

Page 1

TERMOVENTILATORE
FAN HEATER
RADIATEUR SOUFFLANT
HEIZLÜFTER
VENTILATORKACHEL
TERMOVENTILADOR
TERMOVENTILADOR
ΑΕΡΟΘΕΡΜΟ
ТЕПЛОВЕНТИЛЯТОР
TERMOVENTILÁTOR
TEPELNÝ VENTILÁTOR
TERMOWENTYLATOR
TEPELNÝ VENTILÁTOR
VIFTEOVN
VÄRMEFLÄKT
VARMLUFTBLÆSER
TUULETINLÄMMITIN
VENTILACIJSKA GRIJALICA
TERMOVENTILATOR
ТЕРМОВЕНТИЛАТОР
TERMOVENTILATOR
TERMOVANTİLATÖR
HVY
Istruzioni d’uso
instructions
mode d’emploi
Bedienungsanleitung
gebruiksaanwijzingen
instrucciones para el uso
instruções de utilização
οδηγιες χρησης
инструкции по эксплуатации
kezelési utasítás
návod k použití
instrukcja obsługi
návod k použitiu
bruksanvisning
bruksanvisning
brugsvejledning
käyttöohjeet
upute za uporabu
navodila za uporabo
указания за употреба
instrucţiuni de folosire
kullanma talimatlari
10
Page 2
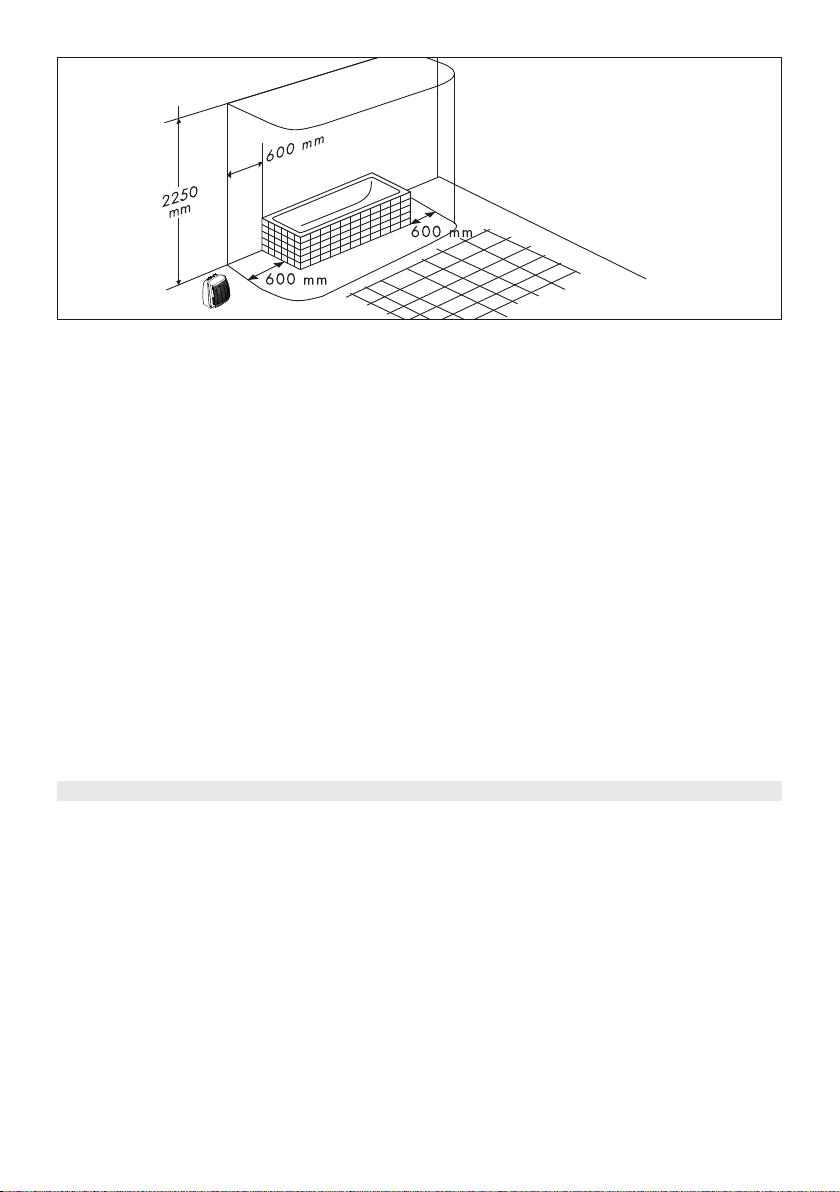
Fig. 1
A) If your appliance comes fitted with a plug, it will incorporate a 13 Amp fuse. If it does not fit your socket, the plug should
be cut off from the mains lead, and an appropriate plug fitted, as below.
WARNING: Very carefully dispose of the cut off plug after removing the fuse: do not insert in a 13 Amp socket elsewhere
in the house as this could cause a shock hazard.
With alternative plugs not incorporating a fuse, the circuit must be re-fitted when changing the fuse using a 13 Amp Asta
approved fuse to BS 1362. In the event of losing the fuse cover, the plug must NOT be used until a replacement fuse cover
can be obtained from your nearest electrical dealer. The colour of the correct replacement fuse cover is that as marked
on the base of the plug.
B) If your appliance is not fitted with a plug, please follow the instructions provided below:
IMPORTANT
The wires in the mains lead are coloured in accordance with the followin code:
Blue: Neutral
Brown: Live
As the colours of the wires in the mains lead of this appliance may not correspond with the coloured markings identifying the
terminals in your plug, proceed as follows:
The wire which is coloured blue must be connected to the terminal which is marked with the letter N or coloured black.
The wire which is coloured brown must be connected to the terminal which si marked with the letter L or coloured red.
ELECTRICAL CONNECTION (U.K. ONLY)
2
Page 3
3
1
1
2
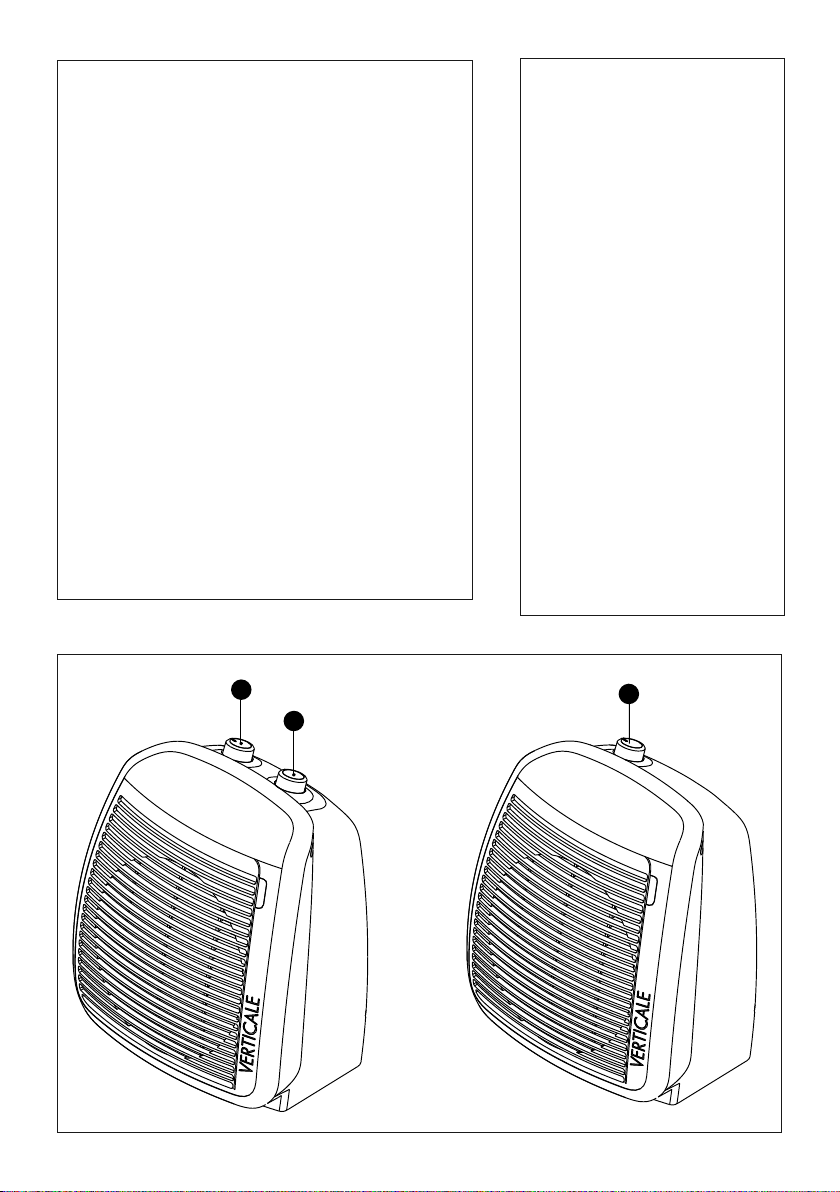
Fig. 2
1- Termostato ambiente
1- Room thermostat
1- Thermostat ambiant
1- Raumthermostat
1- Kamerthermostaat
1- Termostato ambiente
1- Termóstato ambiente
1- Θερµοστάτης χώρου
1- Терморегулятор температуры в помещении
1- Környezeti termosztát
1- Pokojový termostat
1- Termostat pomieszczenia
1- Termostat prostredia
1- Termostat for romtemperatur
1- Rumstermostat
1- Rumtermostat
1- Huoneilman lämmönsäädin
1- Sobni termostat
1- Termostat okolja
1- Термостат за температурата на помещението
1- Termostat mediu ambiant
1- Oda termostatı
2- Selettore di funzioni
2- Function selector
2- Sélecteur de fonctions
2- Funktionswählschalter
2- Functieschakelaar
2- Selector de funciones
2- Selector de funções
2- Ε)ιλογέας λειτουργιών
2- Переключатель функций
2- Funkcióválasztó
2- Volič funkcí
2- Przełącznik funkcji
2- Volič funkcií
2- Funksjonsvelger
2- Funktionsväljare
2- Funktionsvælger
2- Toiminnon valitsin
2- Dugme za odabir funkcija
2- Selektor funkcij
2- Превключвател за избор на
работна функция
2- Selector de funcţiuni
2- Fonksiyon selektörü
Page 4

ELECTRICAL CONNECTION
- BEFORE PLUGGING INTO THE MAINS, MAKE SURE THE VOLTAGE OF YOUR MAINS SUP-
PLY CORRESPONDS TO THE VALUE IN VOLTS (V) INDICATED ON THE APPLIANCE AND
THAT THE SOCKET AND POWER LINE ARE APPROPRIATE FOR THE LOAD REQUIRED.
- THIS APPLIANCE COMPLIES WITH DIRECTIVE 2004/108/EC ON ELECTROMAGNETIC
COMPATIBILITY.
INSTALLATION
The appliance must be used in the portable configuration only. The appliance is designed and produced for domestic use only.
- If the appliance is used in a room with bath or shower, respect the "safety distances" shown
in fig. 1 and always install away from taps, basins, showers, etc. The appliance must not be
placed immediately under a fixed power socket.
FUNCTIONING AND USE
MODELS WITH FUNCTION SELECTOR AND THERMOSTAT
Make sure the appliance is off before plugging into the mains.
1. Plug the appliance into the mains.
2. Turn the thermostat dial to maximum.
3. Summer mode (fan only): turn the function selector to the position (the light comes on).
4. Low power operation: turn the function selector to position 1.
5. Medium power operation: turn the function selector to position 2.
6. High power operation: turn the function selector to position 3.
7. Switching off: turn the function selector to the "0" position and the thermostat dial to
the position, then unplug from the mains socket.
NB: In models with two power levels only, position 2 corresponds to maximum power.
Setting the thermostat:
Position the thermostat on maximum. When the room has reached the required temperature,
turn the thermostat dial slowly anticlockwise until you hear a click (the fan and the light go
off). The thermostat will then keep room temperature at the selected level automatically.
Frost prevention mode
With the function selector in position 3 (position 2 for models with two power levels only) and
the thermostat dial in position , the appliance maintains room temperature at about 5°C,
preventing freezing with minimal energy consumption.
M
ODELS WITH THERMOSTAT ONLY
To switch the appliance on, turn the thermostat dial clockwise to maximum (the light comes
on).
To switch the appliance off completely, turn the knob to the position, then unplug from the
mains.
For the frost prevention function, turn the thermostat dial to the position and leave the appliance plugged into the mains.
MAINTENANCE
- Always unplug from the mains socket before cleaning.
- Clean the air intake and outlet grilles regularly.
- Do not use abrasive products or solvents to clean the appliance.
1
1
1
1
22222
EN
Voltage Wattage See rating plate
6
1
2
1
1
Page 5

IMPORTANT
- Do not use this appliance near showers, baths, swimming pools, etc.
- Always use the heater in an upright position.
- Do not cover the appliance when in operation to avoid the risk of fire.
- Do not use the heater to dry laundry. Never obstruct the intake and outlet grilles (danger of
overheating).
- The appliance is not intended for use by persons (including children) with reduced physical,
sensory or mental capabilities, or lack of experience and knowledge, unless they have been
given supervision or instruction concerning use of the appliance by a person responsible for
their safety. Children must be supervised to ensure they do not play with the appliance.
- The heater must be positioned at least 50 cm from furniture, walls, curtains, or other objects.
- The appliance must not be positioned near walls, furniture, curtains etc.
- The use of extension leads is not recommended. However if they cannot be avoided, follow the
instructions accompanying the extension lead and never exceed the power limit marked on the
extension.
- If the power cable is damaged, it must be replaced by the manufacturer, an authorised service centre or a qualified electrician in order to eliminate all risk.
- Do not use the appliance in rooms measuring less than 4 m².
The heater is fitted with a thermal cutout device which switches the heater off in case of accidental overheating (eg. obstruction of air intake and outlet grilles, motor turning slowly or not
at all).
To reset, unplug the appliance from the mains socket for a few minutes, remove the cause of
overheating then plug in again.
CAUTION: In order to avoid a hazard due to inadvertent resetting of the thermal cutout, this appliance must not be powered through an external switching device such as a timer, or connected
to a circuit that is regularly switched on and off by the power provider.
IMPORTANT: Never under any circumstances cover the appliance during operation as this
would lead to dangerous overheating of the appliance.
Important information for correct disposal of the product in accordance with EC Directive
2002/96/EC.
At the end of its working life, the product must not be disposed of as urban waste. It must
be taken to a special local authority differentiated waste collection centre or to a dealer
providing this service. Disposing of a household appliance separately avoids possible
negative consequences for the environment and health deriving from inappropriate di-
sposal and enables the constituent materials to be recovered to obtain significant savings
in energy and resources.As a reminder of the need to dispose of household appliances separately, the product is marked with a crossed-out wheeled dustbin.
7
Page 6

8
RACCORDEMENT ÉLECTRIQUE
- Avant de brancher l’appareil, vérifiez attentivement si la tension de secteur correspond à la
valeur en Volts (V) indiquée sur l’appareil et si la prise de courant et la ligne d'alimentation
peuvent supporter l’intensité requise.
- CET APPAREIL EST CONFORME À LA DIRECTIVE 2004/108/CE SUR LA COMPATIBILITÉ
ÉLECTROMAGNÉTIQUE
INSTALLATION
L’appareil ne doit être utilisé que dans sa configuration portable.
- Si vous utilisez l’appareil dans la salle de bains, respectez le « volume de protection » (voir
fig. 1) et installez-le loin des robinets, lavabos, douches, etc.
Cet appareil ne doit pas être placé juste au-dessous d’une prise de courant fixe.
FONCTIONNEMENT ET UTILISATION
M
ODELES AVEC SELECTEUR DE FONCTIONS ET THERMOSTAT
Avant de brancher l’appareil, vérifiez s’il est éteint.
1. Branchez l’appareil.
2. Tournez le bouton du thermostat jusqu’à la position max.
3. Utilisation d’été (seulement ventilation) : tournez le sélecteur de fonctions sur (le témoin
s’allume).
4. Fonctionnement à puissance min : tournez le sélecteur de fonctions sur 1.
5. Fonctionnement à puissance moy. : mettez le sélecteur de fonctions sur 2.
6. Fonctionnement à la puissance max. : mettez le sélecteur de fonctions sur 3.
7. Arrêt : mettez le sélecteur de fonctions sur 0 et le bouton du thermostat sur , puis
débranchez l’appareil.
Remarque : Sur les modèles dotés de 2 niveaux de puissance seulement, la position 2 correspond à la puissance maximum.
Réglage du thermostat
Mettez le thermostat sur la position maximum. Une fois que la pièce aura atteint la température désirée, tournez lentement le bouton du thermostat en sens inverse des aiguilles d’une
montre jusqu’au déclic(le ventilateur et le témoin s’éteignent).
La température ainsi fixée sera automatiquement réglée et maintenue constante par le thermostat.
Fonction hors gel
Le sélecteur de fonctions étant sur 3 (ou sur 2 pour les modèles doté de 2 niveaux de puissance seulement) et le bouton du thermostat sur , l’appareil maintient la température de la
pièce à environ 5 °C, évitant le gel et consommant un minimum d’énergie.
MODELES AVEC SEULEMENT LE THERMOSTAT
Pour allumer l’appareil, tournez le bouton du thermostat dans le sens des aiguilles d’une
montre jusqu’à la position maximum (le témoin s’allume).
Pour arrêter complètement l’appareil, tournez le bouton en sens inverse jusqu’à la position 0
et débranchez l’appareil.
Pour la fonction antigel, tournez le bouton du thermostat sur et laissez la fiche branchée
dans la prise de courant.
ENTRETIEN
- Avant toute opération de nettoyage, débranchez toujours l’appareil.
- Nettoyez régulièrement les grilles d’entrée et de sortie de l’air
- N’utilisez jamais de poudres abrasives ni de solvants pour nettoyer l’appareil.
FR
Tension puissance voir plaque signalétique
111
1
22222
111
2
Page 7

9
MISES EN GARDE
- Évitez d’utiliser l’appareil à proximité de douches, baignoires, piscines, etc.
- Utilisez l’appareil exclusivement en position verticale.
- Ne couvrez pas l’appareil en marche, cela pourrait provoquer un incendie.
- Évitez d’utiliser l’appareil pour sécher le linge. Évitez d’obstruer les grilles d’entrée et de
sortie de l’air (risque de surchauffe).
- L’appareil ne doit pas être utilisé par des personnes (y compris les enfants) ayant des capacités psychophysiques sensorielles réduites, une expérience ou des connaissances insuffisantes, sans la surveillance vigilante et les instructions d'un responsable de leur sécurité. Surveillez les enfants et assurez-vous qu’ils ne jouent pas avec l’appareil.
- Évitez de placer l’appareil à moins de 50 cm du mur, des meubles, des rideaux et autres
objets.
- Évitez d’installer l’appareil contre un mur, un meuble, un rideau, etc.
- Les rallonges sont déconseillées, mais si vous en avez vraiment besoin, suivez attentivement
les instructions qui les accompagnent, sans jamais dépasser la puissance maximale indiquée
sur la rallonge.
- Afin de prévenir tous les risques, si le câble d’alimentation est détérioré, faites-le remplacer
par le constructeur ou dans un centre de service, mais toujours par une personne qualifiée.
- N’utilisez pas cet appareil dans une pièce de moins de 4 m².
Un dispositif thermique de sécurité arrête l’appareil en cas de surchauffe accidentelle
(obstruction des grilles d’entrée et de sortie de l’air, moteur qui ne tourne pas ou qui tourne
lentement).
Pour remettre l’appareil en marche, débranchez-le quelques minutes, supprimez la cause de
la surchauffe et rebranchez-le.
ATTENTION : afin d’éviter les risques liés à une remise à zéro accidentelle de l’interrupteur à
relais thermique, cet appareil ne doit pas être alimenté par un dispositif de marche/ arrêt externe (minuterie) ni branché sur un circuit régulièrement allumé et éteint par le fournisseur d'énergie
IMPORTANT : Afin d’éviter les surchauffes, ne couvrez en aucun cas l’appareil quand il
est en marche, cela pourrait provoquer une hausse de la température.
Avertissements pour l'élimination correcte du produit aux termes de la Directive européenne
2002/96/EC.
Au terme de son utilisation, le produit ne doit pas être éliminé avec les déchets
urbains.
Le produit doit être remis à l'un des centres de collecte sélective prévus par l'administration communale ou auprès des revendeurs assurant ce service.
Éliminer séparément un appareil électroménager permet d'éviter les retombées négatives pour l'environnement et la santé dérivant d'une élimination incorrecte, et permet
de récupérer les matériaux qui le composent dans le but d'une économie importante
en termes d'énergie et de ressources. Pour rappeler l'obligation d'éliminer séparé-
ment les appareils électroménagers, le produit porte le symbole d'un caisson à ordures barré.
 Loading...