

Page 1
4
A Filter cap fastening hook
B Anti-odour filter cap
C Lid
D Inspection window (if provided)
E Filter inspection opening
F Basket
G Handle slider
H Basket handle
I Lid opening button
L Handle for lifting appliance
M Minute timer (if supplied)
N Minute timer key (if supplied)
O Pilot lamp
P Sliding thermostat control/OFF switch
Q Drainage tube panel (if provided)
R Drainage tube “easy clean system”
(if provided)
S Cord holder
DESCRIPTION OF THE APPLIANCE
•
This appliance has been designed to fry foods and is
exclusively for domestic use. It must not be used for
other purposes and must not be modified in any way.
• Do not use the appliance if it is damaged (i.e. from
a fall)
•
Before using the deep fryer for the first time, wash the
bowl, basket and cover (remove filters) thoroughly
with hot water and washing up liquid. You should
also run hot water and washing up liquid through the
oil drainage tube (if provided). Dry thoroughly.
• The fryer must only be used (inserting the plug into
the mains socket) after having been filled with oil or
fat. If it is turned on while empty, a safety mechanism will cause it to cut out.
Should this occur, it is
necessary to contact an authorised Dealer for qualified assistance.
• Before use, check that power supply corresponds
to power requirements of appliance (see specification written on rating label).
• Connect appliance only to earthed power outlets
with minimum of 10A current carrying capacity. (If
the socket and the plug on the appliance should
prove incompatible, get a professionally qualified
technician to replace the socket with a more suitable one).
• Should it be necessary to replace the feeder cable,
make sure that it is of the H05VVF 3x1 2mm type.
The replacement cable must conform to the current
norms and be of the same diameter as the original cable.
•When in use, the appliance becomes very hot.
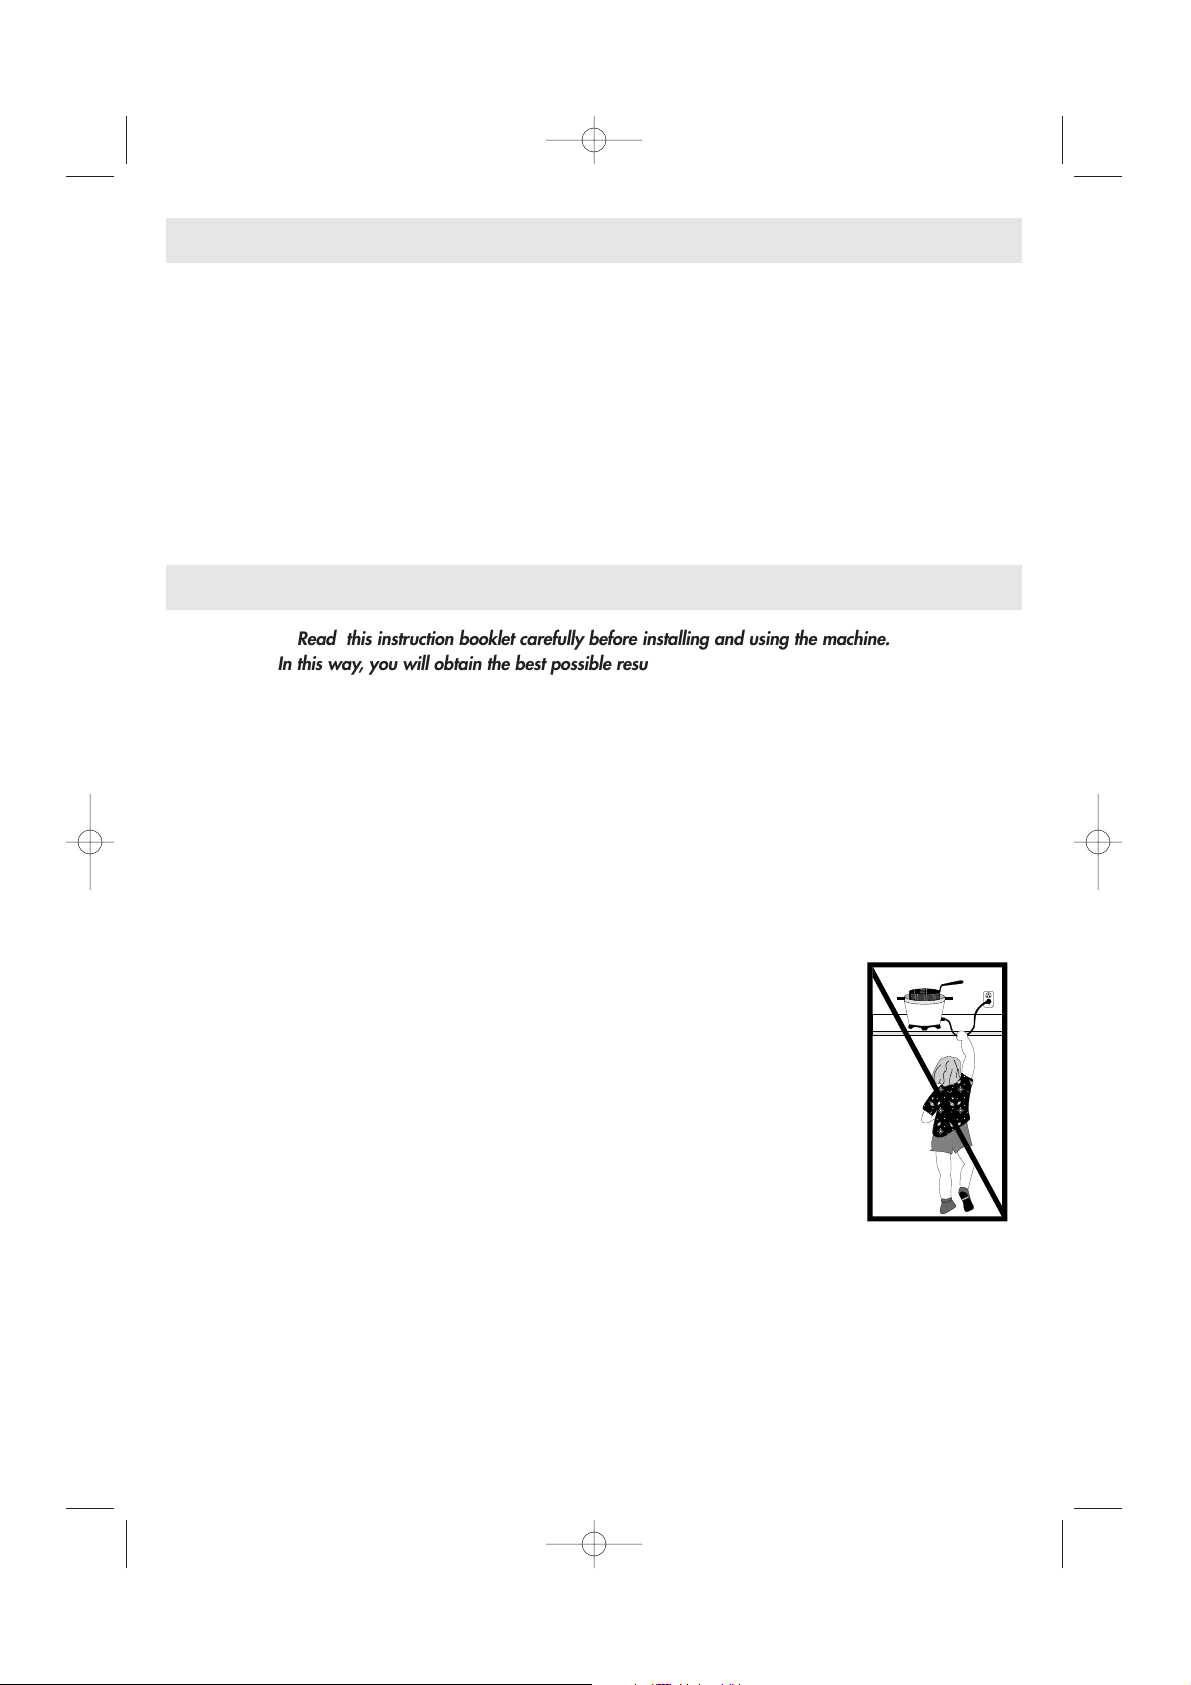
THE APPLIANCE MUST BE INSTALLED OUT OF
THE REACH OF CHILDREN.
• When the appliance is in operation, the drainage
tube (if fitted) must always be closed and positioned in its compartment.
•Always allow the oil to cool before moving the
fryer, as hot oil can cause severe burns.
• Should fryer leak, contact nearest Service Centre or
authorized Dealer for qualified assistance.
• Do not unplug the appliance by pulling on the
electric cable - always use the plug itself.
•
Serious hot-oil burns may result from a deep fat
fryer being pulled off of a countertop. Do not allow
the cord to hang over the edge of the counter where
it may be grabbed by children
or become entagled with the
user. Do not use with an
extension cord.
• The appliance is not intended for use by young children or infirm persons
without supervision.
•Young children should be
supervised to ensure that
they do not play with the
appliance.
•To move the appliance, use
the special lifting handles “
L”. (Never lift by the
basket handle).
• It is totally normal that, on first use, the refrigerator emits a “new appliance” smell. If this
happens, aerate the room.
• The materials and objects likely to come into contact with foodstuffs conform to EEC Directive
89/109.
IMPORTANT
Read this instruction booklet carefully before installing and using the machine.
In this way, you will obtain the best possible results and maximum operating safety.
GB 10-03-2003 9:22 Pagina 4
Page 2

FILLING THE BOWL
• Raise the basket into its upper position by lifting
upwards on the handle (Fig. 1).
• Push on the “
I” button (Fig. 1) and open the lid.
• Remove the basket by pulling it up (Fig. 2).
The cover must ALWAYS be closed whenever the
basket is raised or lowered.
• Pour 2 lt. of oil into the bowl (or approx.1,8
kg./3,6 lb fat).
The level of oil in the bowl must always be between the
minimum and maximum marks.
The maximum level mark should never be exceeded.
For best results use a good peanut seed oil. Olive oil
is optimal due to its slower degradation, but prolonged
use accentuates its flavour. Above all, avoid mixing different oils.
If using blocks of solid fat, cut into small pieces to avoid
fryer heating dry in the first few minutes.
It is also advisable to place thermostat on 150°C
during initial heating-up phase.
Melt solid fat directly in pot. Only when completely
melted, should the basket be lowered.
PRE-HEATING
1. Place the food to be fried in the basket. Do not
overfill the basket (maximum 1 kg of fresh potatoes).
2. Replace the basket in the bowl in the raised position and close lid by lightly pushing down until
catch snaps shut.
3. Set the sliding thermostat control “
P” (fig. 3) to the
desired temperature (see enclosed table). When
the selected temperature is reached, the control
light will switch off.
FRYING
As soon as the pilot lamp switches off, move the
handle slider in the handle “
G” backwards, then move
the handle downwards to lower the basket into the oil.
•
A considerable quantity of steam will escape from
the filter cover, when the basket is lowered into
the oil. This is perfectly normal.
• It is also normal for drops of condensation to fall
from the lid onto the plastic sides and around the
basket handle while in use.
• When basket is lowered into the oil, the inside of
the inspection window (if provided) will immediately become steam up. This steam will disappear
gradually as the food is cooked.
For models with viewing window, grease the glass
door with a little oil before cooking to reduce the
accumulation of condensate and thereby improve
visibility.
IN THE MODELS FITTED WITH THE ELECTRONIC
MINUTE TIMER
1. Set the cooking time by pressing key “N”; display
“
M” will show the minutes set.
2. The figures will begin flashing immediately
afterwards, signifying that the cooking time has
started. The last minute will be visualised in
seconds.
3. In the event of error, the new cooking time can be
set by keeping the button pressed down for more
than 2 seconds. The display will reset itself, then
repeat as for point 1 (above).
4. The minute timer will show the end of the cooking
time with two series of beeps at an interval of about
20 seconds. In order to switch off the audible alarm
you only need press minute timer key “
N”.
WARNING: the minute timer does not switch the
appliance off.
Replacing the minute timer battery (fig.4)
• Remove the minute timer from its compartment by
prying it from the upper side
(see fig. 4A).
•Turn the battery cover (fig. 4B) placed on the back
in an anticlockwise direction until it is released.
•Replace the battery with another of the same type.
END OF FRYING TIME
When the selected frying time is elapsed, raise the basket
and check that food is golden brown as desired. This can
be done without opening the lid in models with window.
When the food is completely cooked, switch the
appliance off by setting the thermostat control to “Off”
until the switch is heard to click off. Leave the contents
to drip for a moment and then open the lid and remove the basket without shaking it too vigorously.
For two-stage frying (e.g. potatoes), lift the basket at the
end of the first stage, wait for the indicator light to go off
and then lower the basket into the oil a second time (see
enclosed table).
5
OPERATING INSTRUCTIONS
GB 10-03-2003 9:22 Pagina 5
Page 3

FILTERING OF OIL OR FAT
It is advisable to filter the oil or fat after frying in order
to remove any food particles, especially if the food is
coated in breadcrumbs or flour. Food particles remaining in the oil tend to burn, which causes the oil to
deteriorate more quickly.
For models without a drainage tube
1. Remove the lid and empty the tank from one of its
sides (left or right side edge of the tank).
2. Use a sponge or a paper kitchen towel to remove
any deposits from the bowl.
3. Hook the basket to the bowl and place the supplied
paper filter in the bottom of the basket. Spare filters
can be obtained from your dealer or from our service centres.
4. Pour the oil very slowly into the basket, ensuring
that it does not overflow from the filter.
Note: After filtering the oil, it can be left in the fryer.
However, should a long period of time pass between
one frying and the next, it is advisable to store the oil
in a closed container, not exposed to direct light in
order to avoid its deterioration. Oil used for frying fish
should be stored separately from oil used for other
foods.
If fat is used for frying, this should not be allowed to cool
too much, otherwise it may solidify.
For models fitted with a drainage tube
Proceed as follows:
1. Raise the lid of the fryer and remove the basket.
Check
that the oil is sufficiently cool
(about 2 hours).
2. Open the panel “
Q” and remove the drainage tube
“
R”as shown in fig. 5.
3. Remove the cap (fig. 6). Take care to pinch the end of
the tube with two fingers so that the oil does not drain
until the tube has been placed in a receptacle.
4. Drain the oil into a suitable receptacle (fig. 6)
5. Use a sponge or a paper kitchen towel to remove
any deposits from the bowl.
6. Replace the drainage tube in its compartment.
Do
not forget to replace the cap.
7. Place the filter supplied with the appliance in the bottom of the basket (fig. 7). Spare filters can be obtained
from your dealer or from our service centres.
8. Pour the oil very slowly into the basket, ensuring
that it does not overflow from the filter (fig. 8).
Note: After filtering the oil, it can be left in the fryer.
However, should a long period of time pass between
one frying and the next, it is advisable to store the oil
in a closed container, not exposed to direct light in
order to avoid its deterioration.
To drain the oil into the receptacle, remove the drainage
tube and proceed as shown in fig. 9.
Oil used for frying fish should be stored separately
from oil used for other foods.
If fat is used for frying, this should not be allowed to
cool too much, otherwise it may solidify.
CHANGING THE ANTI-ODOUR FILTERS
With time the odour-eater filters placed inside the lid
lose their effectiveness. A change of colour in the filter,
visible through hole of fig.10 on the inside cover,
shows that the filter needs to be changed. To replace it,
remove plastic filter cover (fig.11) by pressing hook in
the direction of arrow “
1”, then raise it in the direction
of arrow “
2”. Replace the filters.
Note: The white filter must be inserted first with the black
filter on top. The filter cover must be placed over the
black filter (fig. 12).
CLEANING
Before cleaning, always remove the plug from the
electrical socket.
Never immerse the deep fryer in water or hold it
under the tap. By getting inside the water would
cause short circuiting.
Do not immerse the lid in water without having first
removed the filters.
To clean the boiler pan, proceed as follows:
•
Check that the oil is sufficiently cold (wait about 2
hours),
then empty out the oil or fat as previously
described in the paragraph headed “filtering the
oil or fat”.
• Remove any deposit from the bottom of the bowl
using a sponge or a paper towel.
•Wash the tank with hot water and washing up
liquid, then rinse.
•We advise regular cleaning of the basket, with care
being taken to eliminate any deposits.
• The basket can be washed in a dishwasher.
•After frying, wipe the outside of the fryer with a soft
damp cloth in order to remove any oil smears and
condensation.
• The lid is removable, to take it off, proceed as follows:
push the lid back (see arrow "
1" fig. 10 ) and at the
same time, lift it up (see arrow "
2" fig. 10)
• After washing, dry thoroughly. Remove any water
left in the bottom of the container and, in particular, inside the oil drainage pipe. This avoids dangerous spurts of hot oil during use.)
MODEL WITH NON-STICK BOILER PAN
To clean the boiler pan use a soft cloth with a neutral
detergent never using objects or abrasive detergents.
6
GB 10-03-2003 9:22 Pagina 6
Page 4

Type of food
Max. Quantity (gr.) Time in Minutes
Fried potatoes half portion
porzione intera
500
1000
phase 1 5 - 6
phase 2 2 - 3
phase 1 7 - 9
phase 2 6 - 8
Fish Squid
“Canestrelli”
Scampi
Sardines
Baby cuttlefish
Soles (1)
500
500
500
500
500
400
12 - 13
12 - 13
10 - 11
12 - 13
12 - 13
8 - 9
Meat Beef cutlets (1)
Chicken cutlets (1)
Meatballs (13)
300
300
550
8 - 9
7 - 8
7 - 8
Vegetables Artichokes
Cauliflower
Mushrooms
Aubergines (4 slices)
Courgettes
250
400
400
100
300
11 - 12
9 - 10
9 - 10
7 - 8
11 - 12
190
190
160
160
160
170
170
160
170
170
160
150
160
150
170
160
Temperature °C
7
FRYING NON-FROZEN FOOD
Bear in mind that the cooking times and temperatures are approximate and must regulated according to the
ammount of food which is to be fried and to personale taste.
HOW LONG THE OIL OR FAT LASTS
When oil goes below minimum level mark, add new
oil. It is advisable to remove the oil from time to time
in order to preserve not only the quality of its flavour,
but also the digestibility of the fried food .
The number of times the oil can be used depends on
the type of food you fry. For example, the oil must be
changed more often if food coated in breadcrumbs is
fried frequently.
We advise that the oil be completely changed every
5/8 times or it should be completely changed in the
following circumstances:
• unpleasant odour
• smoke when frying
• becomes dark in colour.
FOR PERFECT FRYING
• The food to be fried should not be lowered into
the oil until the the pilot lamp switches off.
•Do not overfill the basket. Too much food in the basket
lowers the temperature of the oil suddenly, with the
result that the food will be greasy and unevenly-fried.
•When frying small quantities of food, the temperature of the oil must be set lower than the temperature indicated to avoid the oil boiling too violently.
• Check that the food is sliced thinly and evenly.
Thick slices will not be fried throughout, although
they will look very attractive on the outside. If the
food is evenly sliced, each slice will be perfectly
fried at the same time.
•
Be sure to dry the food carefully before frying.
Damp foods - especially potatoes - remains soggy
after frying. Foods with a high water content (e.g.
fish, meat and vegetables) should be dipped in
breadcrumbs or flour. Remember to shake off any
excess flour or breadcrumbs before frying.
COOKING HINTS
GB 10-03-2003 9:22 Pagina 7
Page 5

8
FRYING FROZEN FOODS
1. Due to their extremely low temperature, frozen
foods inevitably lower the temperature of the oil.
For good results each time you fry, we recommend
you don’t exceed the maximum quantities set out in
the following table.
2.
Frozen foods are frequently covered with a coating of ice crystals, which should be removed
before frying.
Lower the basket very slowly into the
oil in order to ensure that the oil does not boil over.
Before lowering the basket into the oil, ensure
that the lid is securely closed.
3. To obtain best results, do not exceed recommended
max. quantity of food.
TROUBLESHOOTING
SolutionCauseAnomaly
Change the filter
Change the oil (or fat)
Use a good-quality peanut oil
Anti-odour filter saturated
The oil or fat has deteriorated
The oil or fat is not suitable
Unpleasant odours
Lower the basket slowly
Reduce quantity of oil in the fryer
Dry the food thoroughly
1 kg (fresh potatoes)
Set a lower temperature
The basket has been lowered too quickly into the oil
Too much oil in the fryer
Food not dried sufficiently before immersing in the
oil
Recommended max. quantity exceeded
You have immersed a small amount of food.
The oil overflows
Contact Service Centre (fuse
change necessary)
Fryer has been previously switched on without oil
in pot causing the thermal cut-out failure.
Oil does not heat
The cooking time shown in this table are approximate, and may vary according to the initial temperature of the
food and to the cooking temperature recommended on the packet.
Food
Max. Quantity (gr.)
Time
(minutes)
Pre-cooked frozen potatoes
Potato croquettes
300(*)
500
phase 1 5 - 6
phase 2 2 - 3
7 - 8
Fish Fish-fingers
Prawns
300
300
6 - 7
6 - 7
Meat Chicken cutlets (2)
200
7 - 8
(*) This is the recommended quantity for excellent results. Naturally a larger quantity of frozen potatoes can be
fried, taking into consideration that they will be a little more greasy due to the sudden drop in the temperature of the oil, upon immersion.
Temperature °C
190
190
190
190
190
GB 10-03-2003 9:22 Pagina 8
 Loading...