

Page 1
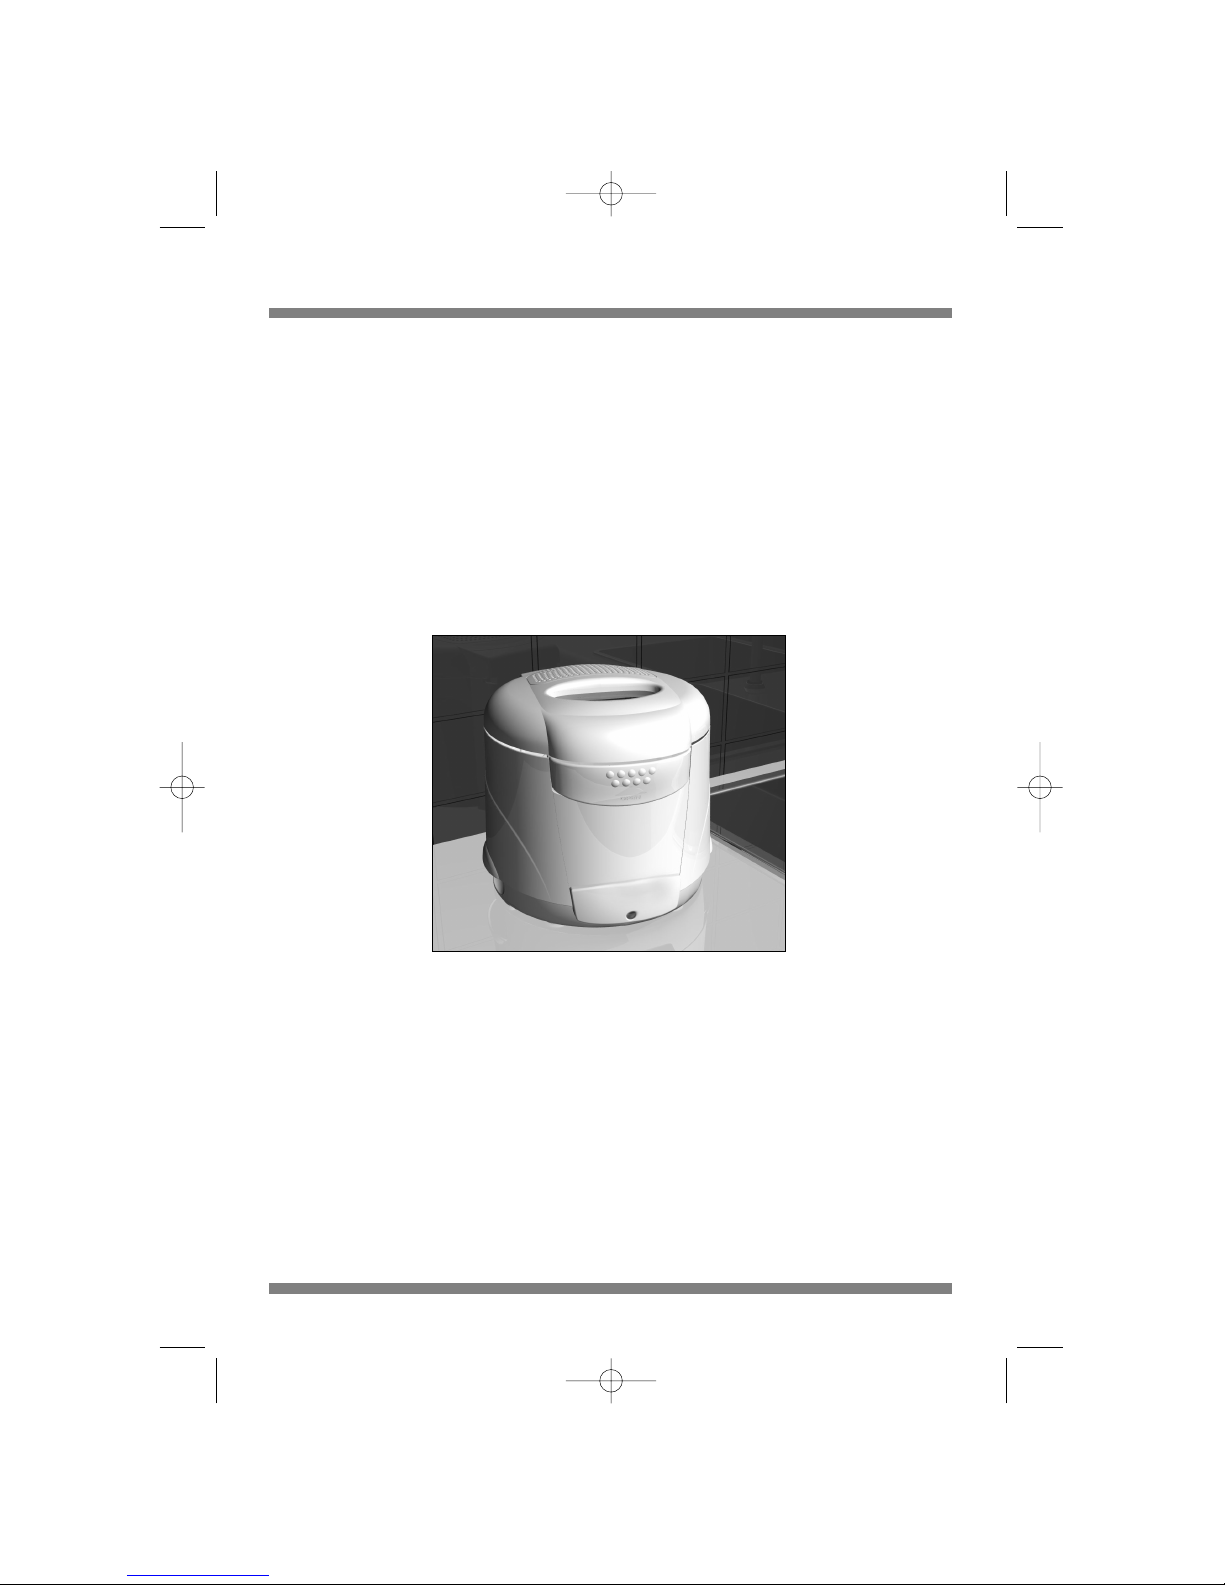
ELECTRIC FRYER
INSTRUCTIONS FOR USE
5725105900 28-04-2003 11:50 Pagina 10
Page 2
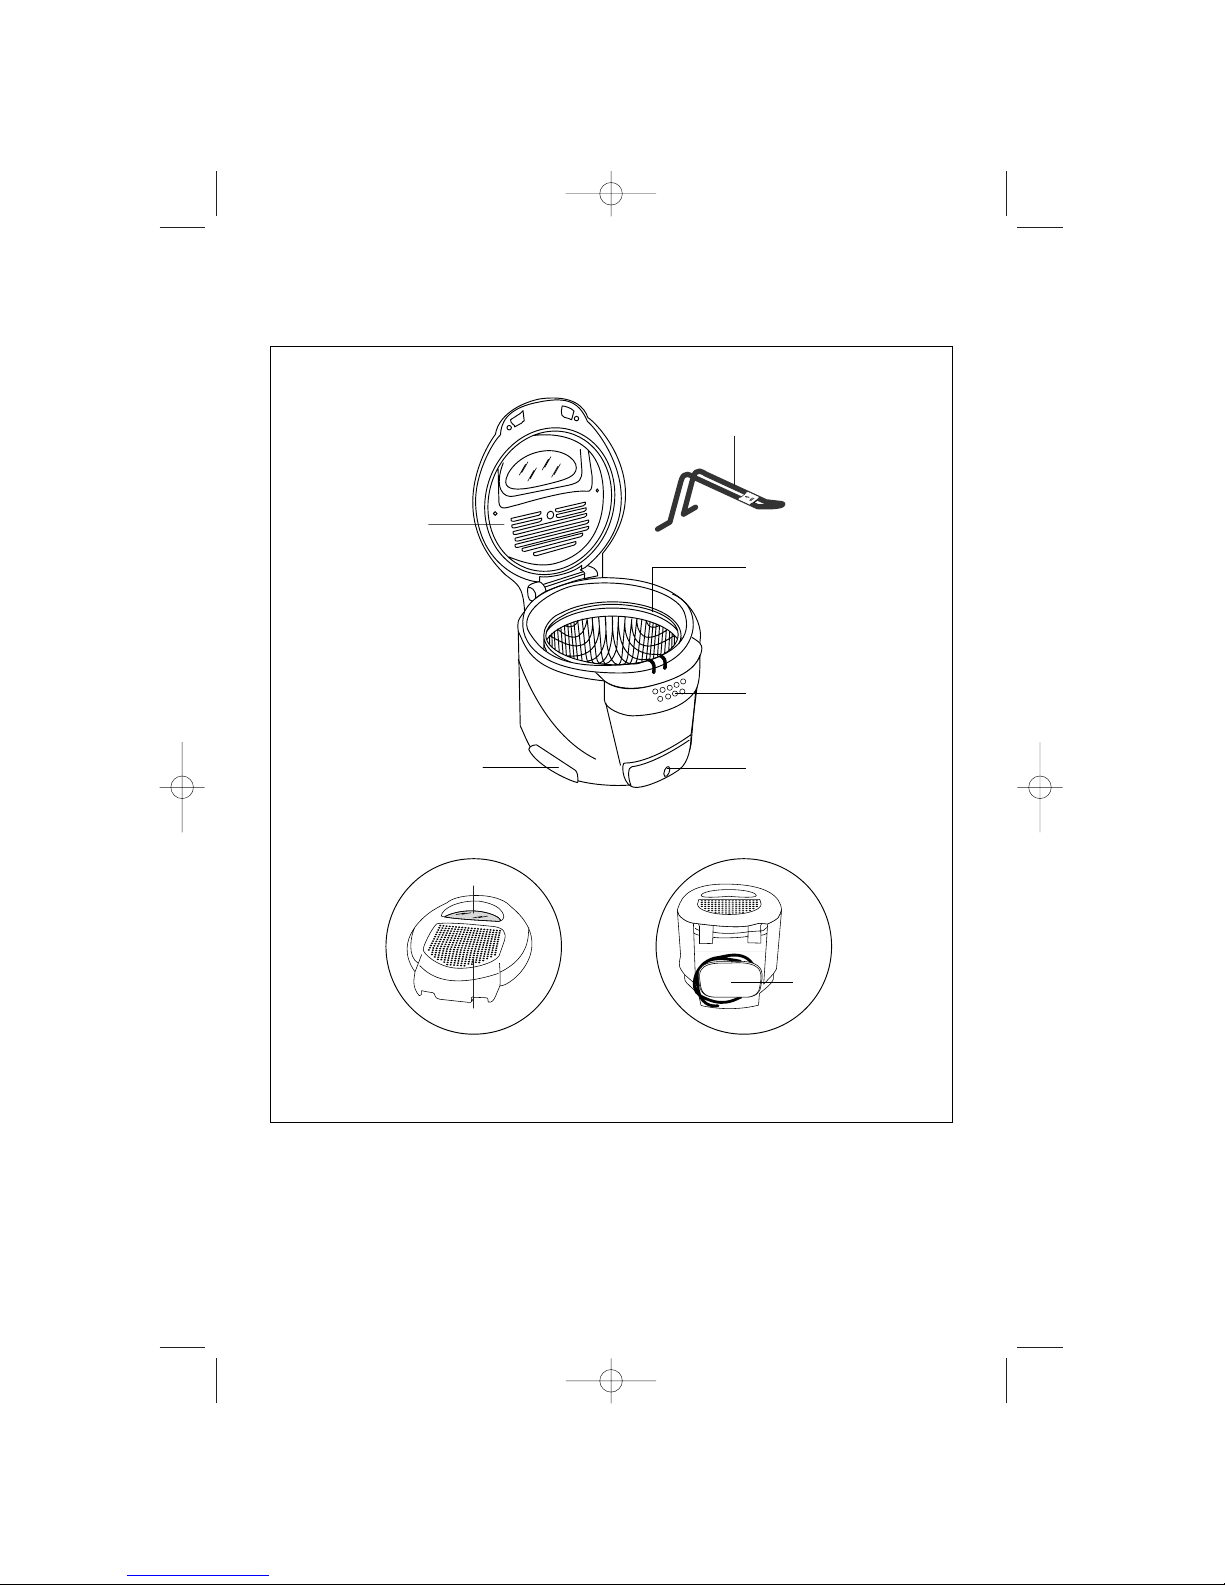
DESCRIPTION OF THE APPLIANCE
A Inner lid
B Basket handle with lock
C Basket
D Lid opening push-button
E Control lamp
F Handle for lifting appliance
G Viewing window (only on some models)
H Filter cover
I Cable holder
A
F
C
B
D
E
G
H
I
5725105900 28-04-2003 11:50 Pagina 1
Page 3
IMPORTANT
• This appliance has been designed to fry
foods and is exclusively for domestic use.
It must not be used for other purposes and
must not be modified in any way.
• Do not use the appliance if it is damaged
(i.e. by being dropped).
• Before using the fryer for the first time,
wash the aluminium bowl and basket
using hot water and a little washing-up liquid; then dry the bowl carefully.
• Before use, check that the mains power
supply corresponds to the power supply
indicated on the appliance.
• Plug the appliance into an earthed power
socket with a capacity of at least 10
ampere. If the plug does not match the
socket, have a qualified electrician replace
the socket.
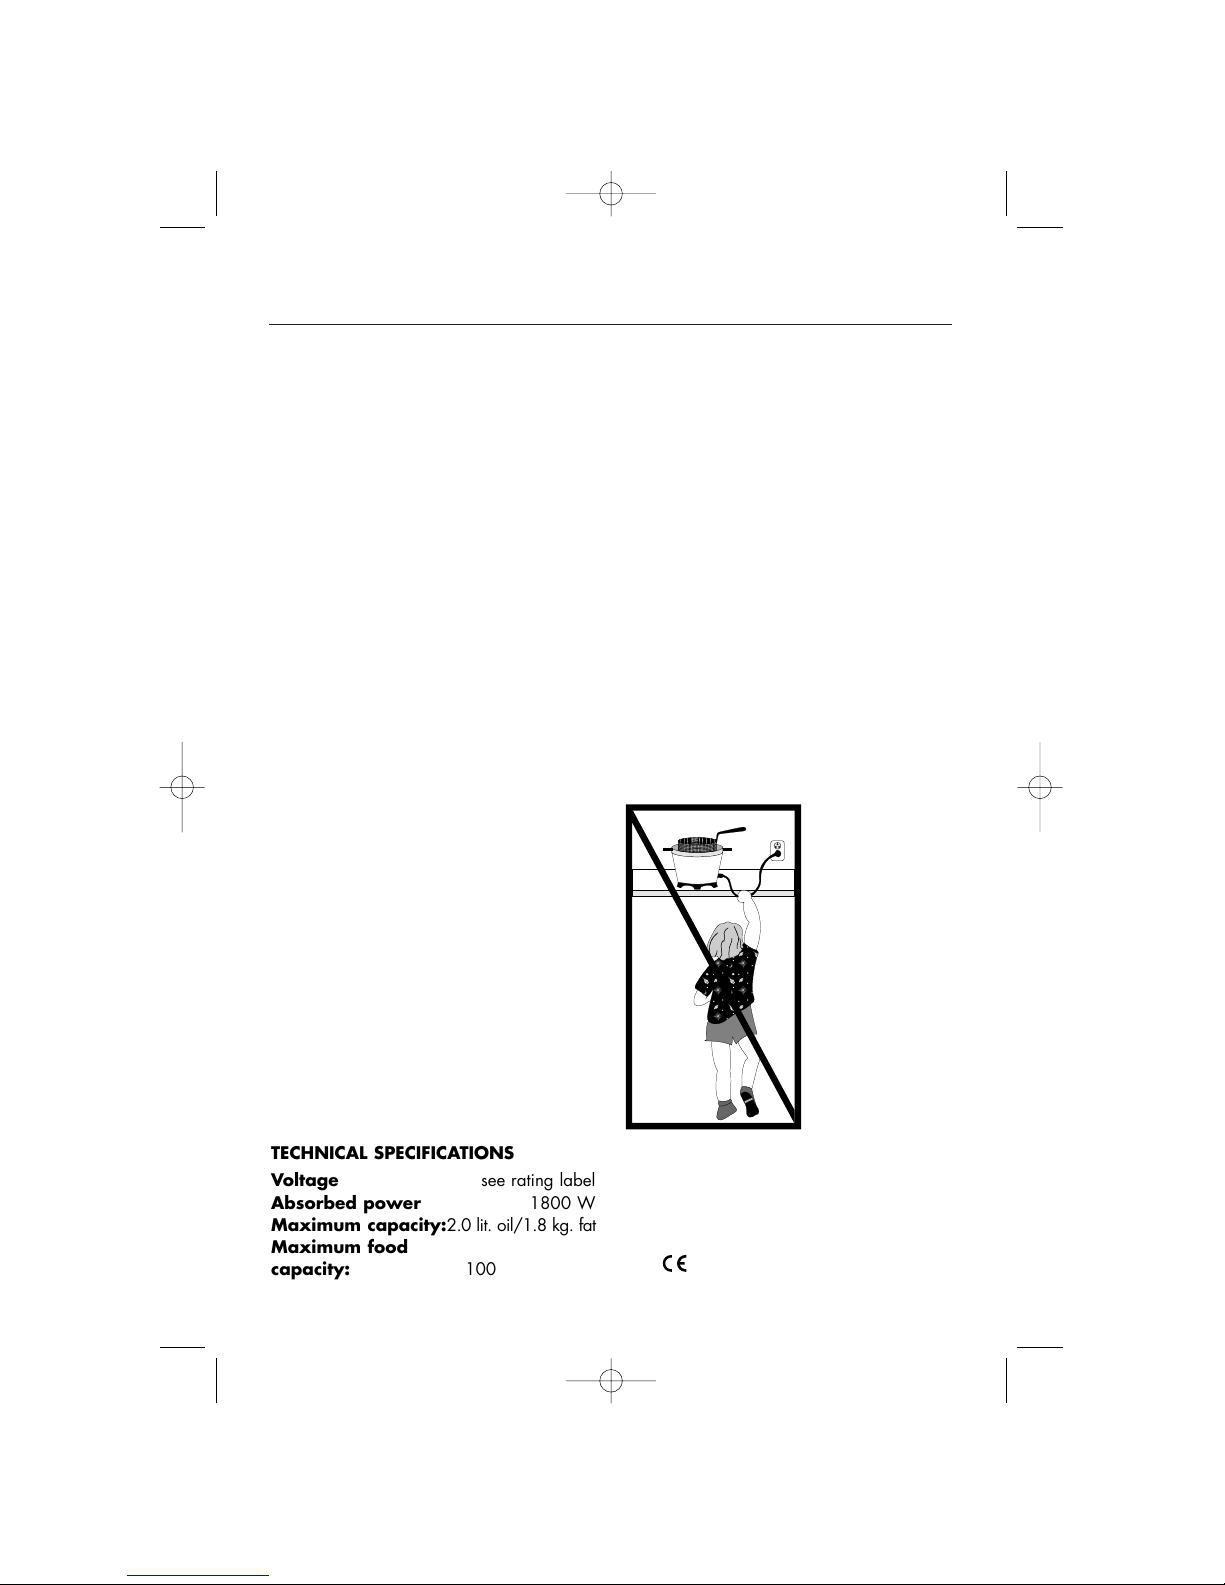
•When in use, the appliance becomes very
hot. THE APPLIANCE MUST BE INSTALLED
OUT OF THE REACH OF CHILDREN.
•Always allow the oil to cool before moving
the fryer, as hot oil can cause severe
burns.
• Never plug in the fryer before
adding oil or fat. If the fryer is
operated without oil or fat, a thermostatically-operated safety
device interrupts the operation of
the appliance.
In this case, it is necessary to contact one
of our authorized service centres before reusing the appliance.
• If it is necessary to replace the power
cable, be sure to use a H05 VVF cable
consisting of three 1mm
2
wires. The
replacement cable must be in compliance
with current safety legislation and must
have the same diameter as the original
cable.
• In case of leaks, contact your nearest service centre or authorized dealer.
• Do not unplug the appliance by pulling on
the electric cable - always use the plug
itself.
• Serious hot-oil burns may result
from a deep fat fryer being pulled
off of a countertop. Do not allow
the cord to hang over the edge of
the counter where it may be
grabbed by children or become
entangled with the user. Do not use
with an extension lead.
•Children or infirm persons should not be
allowed to use this product unsupervised
• Children should not be allowed to play
with this appliance
•Never move the appliance while the oil
is still hot.
•To move the
appliance, use
the special lif
ting handles (F).
(Never lift by
the basket han
dle).
• It is totally nor
mal that, on first
use, the refrige
rator emits a
“new appli
ance” smell. If
this happens,
aerate the
room.
TECHNICAL SPECIFICATIONS
Voltage see rating label
Absorbed power 1800 W
Maximum capacity:2.0 lit. oil/1.8 kg. fat
Maximum food
capacity: 1000 g. potatoes
Materials and articles destined for use in
contacts with food products conform to the
EC directives 89/109.
In addition, this appliance is manufactured
in compliance with applicable EEC directives , including those relative to radio
interference.
5725105900 28-04-2003 11:50 Pagina 2
Page 4

The flexible mains lead is supplied connected to a B.S. 1363 fused plug having a fuse
of 13 amp capacity.
Should this plug not fit the socket outlets in
your home, it should be cut off and replaced
with a suitable plug, following the procedure outlined below.
Note: Such a plug cannot be used for any
other appliance and should therefore be
properly disposed of and not left where children might find it and plug it into a supply
socket - with the obvious consequent danger.
N.B. We recommend the use of good quality plugs and wall sockets that can be
switched off when the machine is not in use.
IMPORTANT: the wires in the mains lead
fitted to this appliance are coloured in
accordance with the following code:
As the colours of the wires in the mains lead
of this appliance may not correspond with
the coloured markings identifying the terminals in your plug, proceed as follows:
The wire which is coloured green and yellow must be connected to the terminal in the
plug which is marked with the letter E or by
the earth symbol or coloured green or
green and yellow.
The wire which is coloured blue must be
connected to the terminal which is marked
with the letter N or coloured black.
The wire which is coloured brown must be
connected to the terminal which is marked
with the letter L or coloured red.
When wiring the plug, ensure that all
strands of wire are securely retained in
each terminal. Do not forget to tighten the
mains lead clamp on the plug. If your electricity supply point has only two pin socket
outlets, or if you are in doubt, consult a
qualified electrician.
Should the mains lead ever require replacement, it is essential that this operation be
carried out by a qualified electrician and
should only be replaced with a mains of the
same size.
After replacement of a fuse in the plug, the fuse
cover must be refitted. If the fuse cover is lost,
the plug must not be used until a replacement
cover is obtained. The colour of the correct
replacement fuse cover is that of the coloured
insert in the base of the fuse recess or elsewhere on the plug. Always state this colour
when ordering a replacement fuse cover.
Only 13amp replacement fuses which are
ASTA approved to B.S. 1362 should be fitted.
This appliance conforms to the Norms EN
55014 regarding the suppression of radio
interference.
Before using this appliance ensure that the voltage indicated on the product
corresponds with the main voltage in your home, if you are in any doubt
about your supply contact your local electricity company.
GREEN AND YELLOW
BLUE
BROWN
EARTH
NEUTRAL
LIVE
WARNING - THIS APPLIANCE MUST BE EARTHED
ELECTRICAL REQUIREMENTS
Green and Yellow to
Earth
Blue to Neu-
tral
13 amp
Fuse
Brown to
Live
Cord Clamp
5725105900 28-04-2003 11:50 Pagina 3
Page 5

OPERATING INSTRUCTIONS
• Before use, check that the mains power supply corresponds to the power supply indicated on the appliance.
• Before use, wash the bowl, the basket and the lid (after
removing the filters) using hot water then dry carefully.
• NEVER plug in the fryer before adding oil or fat. If the fryer
is operated without oil or fat, a thermostatically operated
safety device interrupts the operation of the appliance. In
this case, it is necessary to contact one of our authorized
service centres before re-using the appliance.
Filling with oil or fat
• Open the lid by pushing the button (fig. 1) then take the
accessories out.
• Pour approx. 2 litres of oil into bowl (or 1.8kg fat).
For best results, use good-quality sunflower oil.
AVOID MIXING DIFFERENT TYPES OF OIL.
If using blocks of solid fat, cut into small pieces to avoid
fryer heating dry in the first few minutes. The temperature
must be set to 150°C until the fat has melted completely. The
required temperature can then be set.
Melt solid fat directly in bowl.
Pre-heating
Plug the appliance in and wait until the control lamp switches
off (fig. 1).
Read this instruction booklet carefully before installing and using the machine. In this
way, you will obtain the best possible results and maximum operating safety.
1
2
COOKING SUGGESTIONS
Changing the oil or fat
When oil goes below minimum level mark,
add new oil. It is advisable to change the oil
from time to time to maintain the quality and
taste of your fried food.
The number of times the oil can be used
depends on the type of food you fry. For example, the oil must be changed more often if food
coated in breadcrumbs is fried frequently.
We advise that the oil be completely changed
every 5/8 times or it should be completely
changed in the following circumstances:
• unpleasant odour
•smoke when frying
• oil becomes dark in colour.
For perfect frying
•To ensure crisp results, the food
to be fried should not be lowered
into the oil until the temperature
has been reached (i.e. when the
control lamp switches off).
• When frying small quantities of food, the
temperature of the oil must be set lower
than the temperature indicated to avoid
the oil boiling too violently.
5725105900 28-04-2003 11:50 Pagina 4
Page 6

• Do not overfill the basket. Too much
food in the basket lowers the temperature of the oil suddenly, with the result
that the food will be greasy and unevenly-fried.
• Check that the food is sliced thinly and
evenly. Thick slices will not be fried
throughout, although they may look
cooked on the outside. If the food is
evenly sliced, each slice will be perfectly fried at the same time.
• Be sure to dry the food carefully before
frying. Damp foods - especially potatoes
- remain soggy after frying. Foods with
a high water content (e.g. fish, meat
and vegetables) should be dipped in
breadcrumbs or flour. Remember to
shake off any excess flour or breadcrumbs before frying.
Frying frozen foods
1. Due to their extremely low temperature,
frozen foods inevitably lower the temperature of the oil. For good results each
time you fry, we recommend you don’t
exceed the maximum quantities specified below.
2. Frozen foods are frequently cov-
ered with a coating of ice crystals, which should be removed
before frying. Lower the basket very
slowly into the oil in order to ensure that
the oil does not boil over.
Make certain that the lid is tightly
closed after the basket has been
placed inside the fryer.
3. For best results, do not exceed recommended maximum quantities.
RECOMMENDED FRYING TIMES
Food
CHIPPED POTATOES (fresh) 1000 14-16
FROZEN CHIPS 300 7-9
FISH PIECES 400 6- 7
CHICKEN PIECES (2) 200 4-5
ONION RINGS 400 7-8
MUSHROOMS 400 5-7
Max. quantity (gr) Time (min)
The timings above are a guide and should be varied according to the quantites cooked and
personal taste.
5725105900 28-04-2003 11:50 Pagina 5
Page 7

• It is also normal for drops of condensation to fall from the lid
onto the metal or plastic sides of the appliance while in use.
End of frying time
When the selected frying time has elapsed, attach basket handle
and raise basket to upper position (fig.4). Check that food is
cooked to your taste. If more cooking is needed, lower the basket
and continue frying. You can check on the food during the
cooking process by looking through the viewing window.
When the food is cooked, switch the appliance off by
unplugging it. (fig. 5) Leave the contents to drip for a
moment.
5
1
2
6
8
7
1
2
Frying
1. As soon as the lamp goes off, lower the basket into
the oil by inserting the basket handle in the basket (as
shown in fig. 3) and locking it securely in place. Always
ensure that the handle lock is in place when
lifting the basket in or out of the oil Remove the
handle and close the lid.
• It is normal for a quantity of steam to escape
from the filter cover immediately after lowering
the basket into the hot oil.
3
Filtering of oil or fat
It is advisable to filter the oil or fat after
frying in order to remove any food
particles, especially if the food is coated
in breadcrumbs or flour. Food particles
remaining in the oil tend to burn, which
causes the oil to deteriorate more quickly.
1. Once oil has cooled, remove the
lid (fig. 6) and carefully empty the
bowl from its right or left side (shown
by the arrows impressed on the bowl fig. 7).
2. Attach basket handle and secure in
upper position. Place the supplied
paper filter in the bottom of the basket
(fig. 8). Spare filters can be obtained
from your dealer or from our service
centres.
3. The lid is removable, to take it off,
proceed as follows: push the lid back
(see arrow "1" fig. 6) and at the same
time, lift it up (see arrow "2" fig. 6)
4
5725105900 28-04-2003 11:50 Pagina 6
Page 8

CHANGING THE ANTI-ODOUR FILTERS
After a period of time, the anti-odour filters fitted to the lid tend
to lose their effectiveness. When the filter changes colour, this
indicates that it must be replaced (the filter may be inspected
through the hole in the lid - fig. 10). To replace the filter,
remove the anti-odour filter cover, pushing on the filter cover
fastening hook , as shown by the arrows 1 and 2 (fig. 11).
Insert new filter and replace filter cover.
N.B:The white filter must be inserted first with the black filter
on top of it. The filter cover should be placed on top of
the black filter (fig. 12).
CLEANING
Before cleaning, ensure the appliance is unplugged.
Never immerse the fryer in water or place under a
tap, as water in contact with electrical components
may cause electric shocks.
Always remove the filters before immersing the lid in water.
To clean the bowl:
• Allow the oil to cool for about two hours, then
drain the bowl as described previously.
• Remove any deposit from the bottom of the bowl using a
sponge or a paper towel.
•Wash the bowl with hot water and washing-up liquid.
Rinse, carefully empty the bowl from the side shown by the
arrow (fig. 7) (left or right front edge of the bowl) and dry
carefully.
• Clean the basket regularly, taking care to remove any
particles .
• The basket can be washed in a dishwasher.
• After frying, wipe the outside of the fryer with a soft damp
cloth in order to remove any oil smears and condensation.
MODEL WITH NON-STICK BOILER PAN
To clean the boiler pan use a soft cloth with a neutral detergent never using objects or abrasive detergents.
1
2
11
12
10
Check the colour
of the filter
4. Pour the oil very slowly into the basket, ensuring that it
does not overflow from the filter (fig. 9).
Note: After filtering the oil, it can be left in the fryer.
However, should a long period of time pass between
one frying and the next, it is advisable to store the oil
in a sealed container, not exposed to direct light in
order to avoid its deterioration.
Oil used for frying fish should be stored separately
from oil used for other foods.
If fat is used for frying, this should not be
allowed to cool too much, otherwise it may
solidify.
9
5725105900 28-04-2003 11:50 Pagina 7
Page 9

TROUBLESHOOTING
RemedyCauseProblem
Change the filter
Change the oil (or fat)
Use a good-quality oil
Anti-odour filter saturated
The oil or fat has deteriorated
The oil or fat is not suitable
Unpleasant odours
Remove ice prior to frying
Lower the basket slowly
Reduce the quantity of oil in the
fryer
Dry the food thoroughly
1000 gr of fresh chipped potatoes or 300gr frozen chips
Frozen food covered in ice crystals
The basket has been lowered
too quickly into the oil
Too much oil in the fryer
Food not dried sufficiently
before immersing in the oil
Recommended max. quantity
exceeded
The oil overflows
Contact Service Centre (fuse
change necessary).
Fryer has been previously
switched on without oil in pot
causing the thermal cut-out failure.
Oil does not heat
5725105900 28-04-2003 11:50 Pagina 8
Page 10

5725102900 01/99
5725105900 28-04-2003 11:50 Pagina 9
 Loading...