

Page 1
instructions
Electric Fryer
F600
F600 19-07-2004 10:49 Pagina 1
Page 2
Electric Fryer F600
2
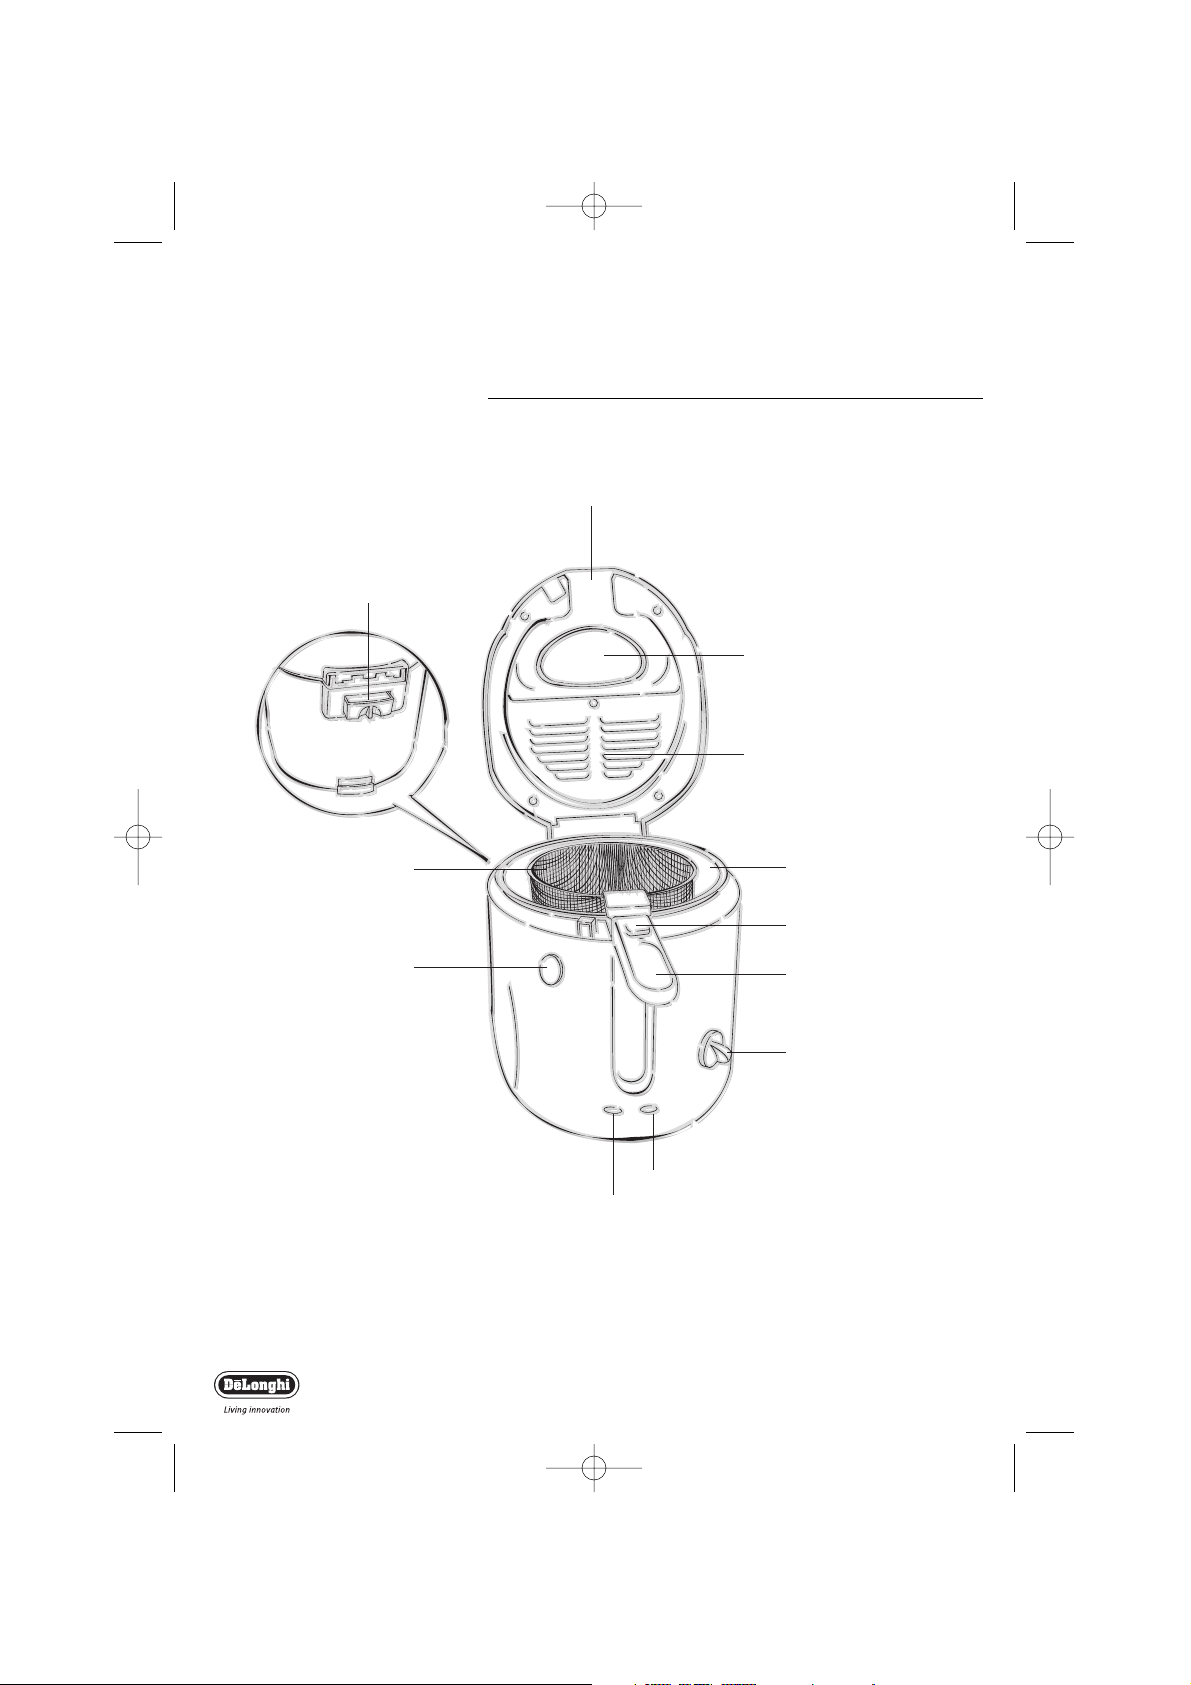
Description of appliance
The following terms are used throughout the instruction manual
Lid release button
Basket handle
Basket
Lid
Viewing window
(not on all models)
Basket handle button
Filters
Thermostat knob
Red light “Power”
Green light “Ready”
Condensation tray
Non-stick bowl
F600 19-07-2004 10:49 Pagina 2
Page 3
Thank you for choosing this electric fryer.To get the best
results from your deep fryer it is advisable to read these
instructions before using the appliance. This is the only way
to ensure optimum results and maximum safety.
Before using for the first time
• Read all the sections of this booklet carefully.
• Remove the fryer from the packaging.
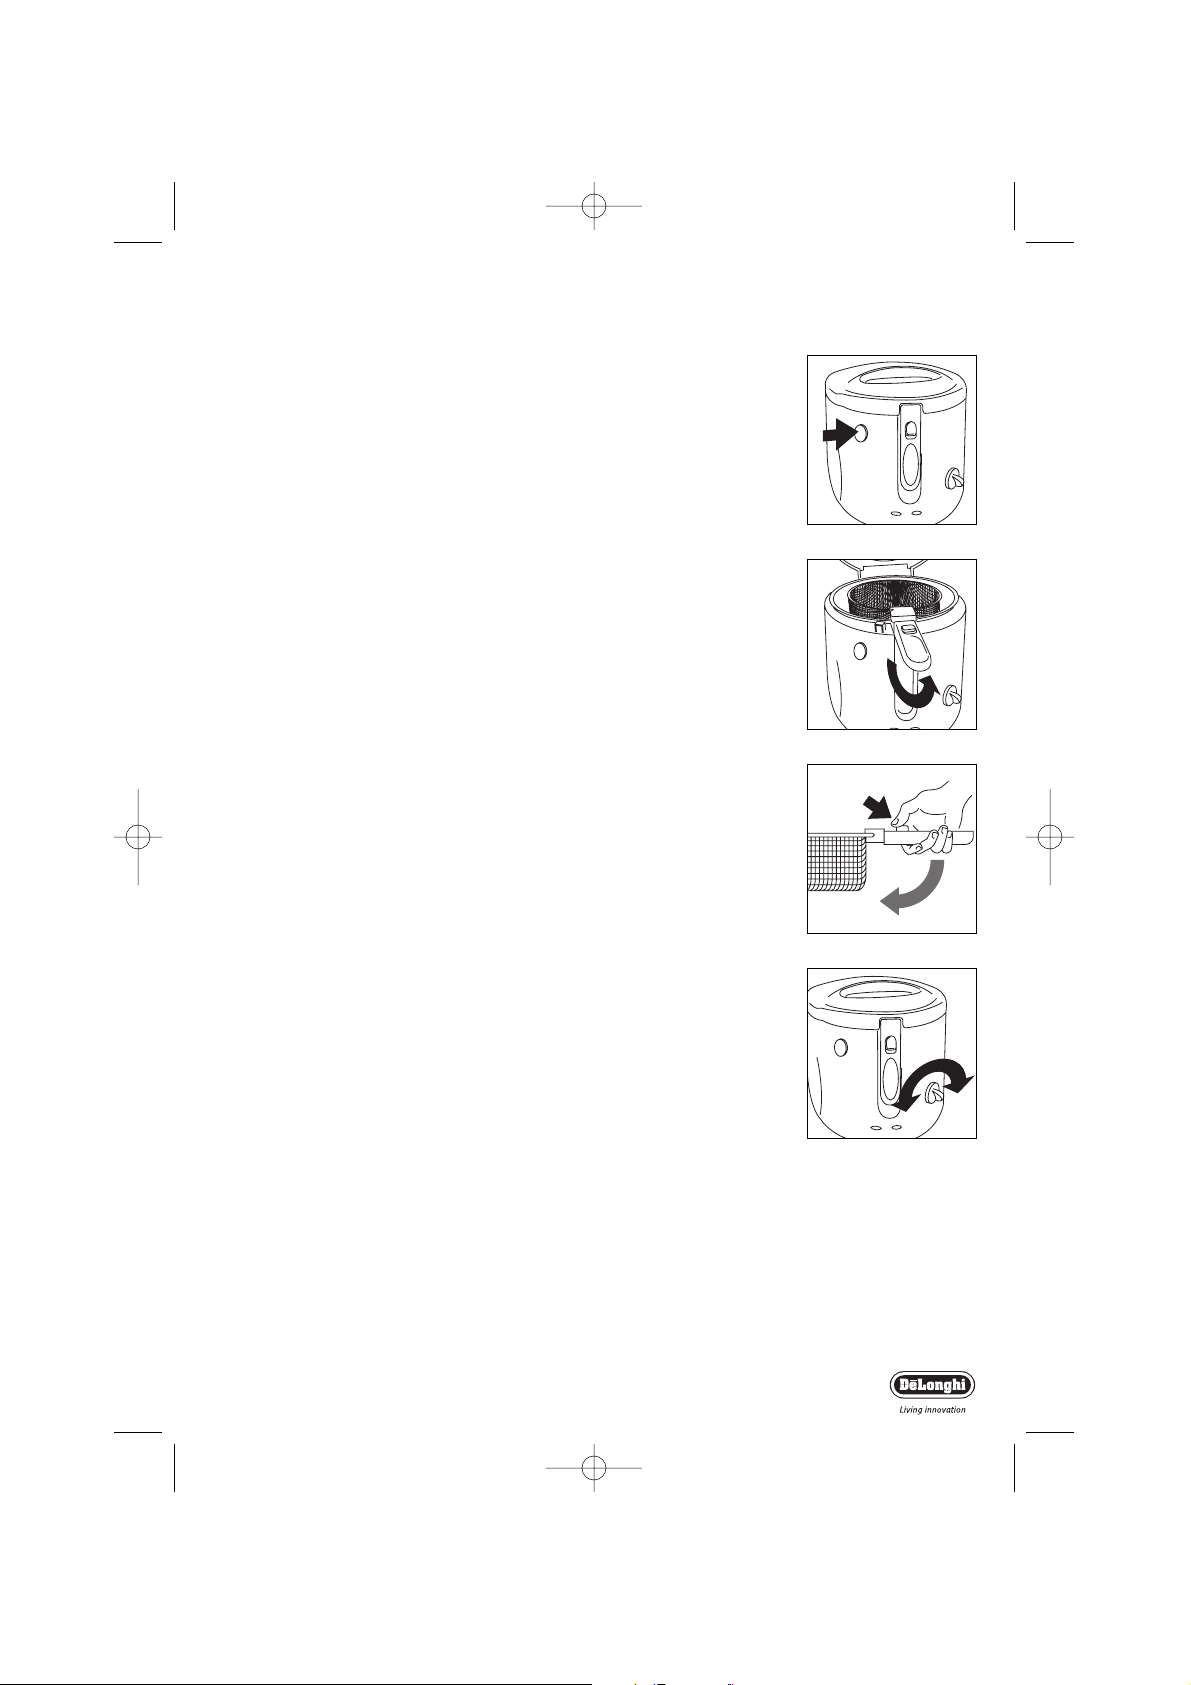
• Open the lid by pressing the automatic lid button (fig. 1).
• Raise the basket handle until it locks horizontally (fig. 2).
• Remove all accessories and printed documents from the basket.
• Clean the bowl (and the frying basket) with hot water, a little
dishwashing liquid and a non-abrasive sponge. Never immerse
the appliance in water. Dry thoroughly.
Operating the basket handle
The frying basket can be controlled from the outside with the lid
closed.To raise the basket, lift the handle upward until it clicks horizontally. You can remove the basket when it is in the locked (fig.
3) position by simply lifting it out.
When the basket is filled, close the lid, lower the basket by pressing the button on the handle and folding down gently.
Pre-heating
WARNING: for your safety, do not use your fryer under wall cupboards and keep away from curtains and similar fittings. Never
leave the appliance unattended while in use.This appliance is not to
be used by children.
Note:
1. The oil level must be maintained between the minimum and
maximum level marks indicated on the inside of the non-stick
bowl. Check the level before each use and add oil if necessary.
2. Do not use the fryer without oil or equivalent substance or
with an insufficient level(below the minimum level).Always
unplug the fryer when not in use.
3. Select the desired temperature by turing the thermostat knob
(fig. 4).The graphics on the fryer and the table attached on
cooking times will help you in determining the ideal frying temperature.
4. Pre-heat 10 minutes.
5. Raise the basket to the “up” position.
6. Open the lid.
7. Fill the basket with food with minimum water or ice content.
DO NOT OVERFILL THE FRYER.
8. Close the lid.
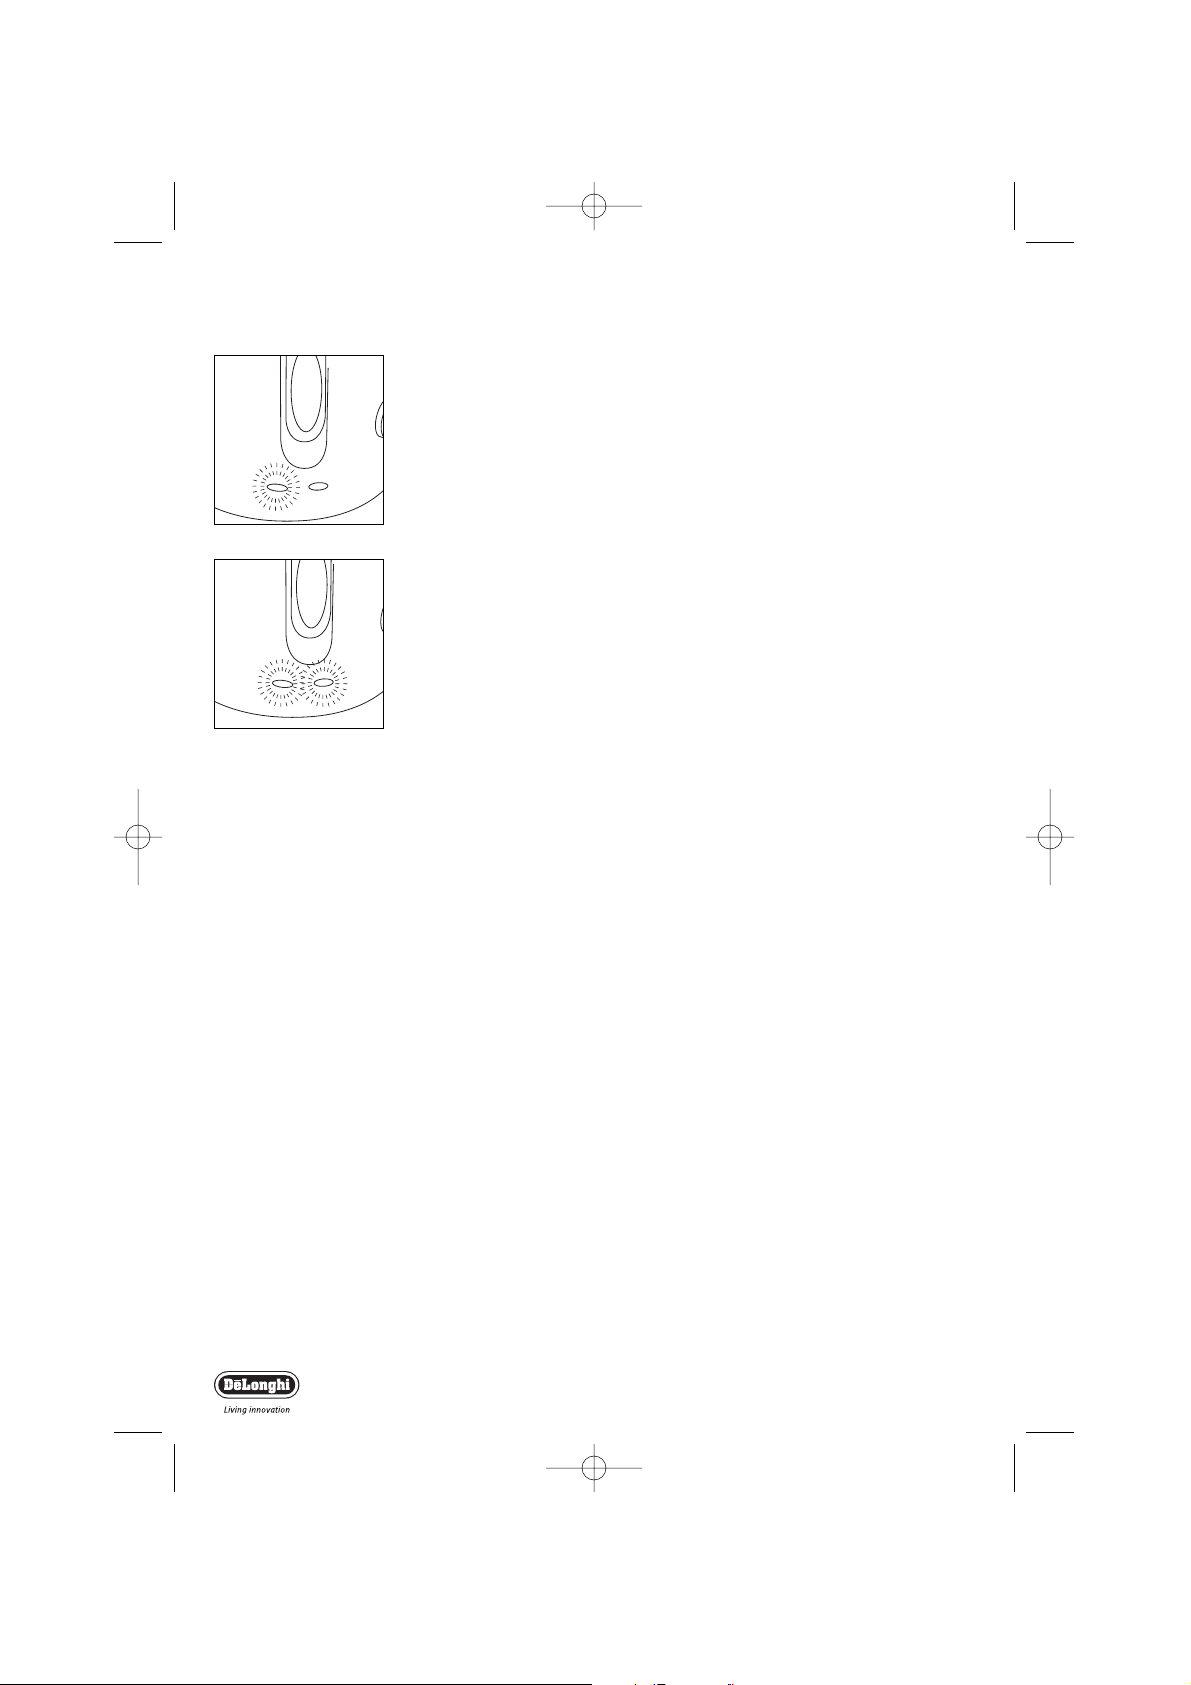
9. Plug in the fryer.The red light “power” will come on indicating
the fryer is heating up (fig. 5).
fig. 1
fig. 2
fig. 3
3
Electric Fryer F600
fig. 4
F600 19-07-2004 10:49 Pagina 3
Page 4
Electric Fryer F600
The green light “ready” will be on when the fryer will reach
the desired temperature (fig. 6).
10. When the oil has reached the correct frying temperature, the
green light will go off.
11. You can now slowly lower the basket into the oil.
Frying foods
1. Do not touch any metal parts of the fryer as they may be hot.
2. When the green temperature light is turned off, slowly lower
the basket into the hot oil by folding down the handle.
Lowering the basket too quickly may result overflowing of the oil.
3. Always use the frying basket to fry foods.Always close the lid
during frying.
4. When frying, viewing window enables you to control your
foods without opening the lid.
5. It is normal for steam to appear on the window during the
first few minutes of use and this will gradually disappear during
cooking.
6. During frying hot steam may escape through the filters in the
lid.This is normal.
At the end of the cooking time
When cooking time is ended:
1. Lift the handle to its horizontal position and open the lid.
2. Let the food drain for a minute, then lift the basket out to
serve, making sure not to press the button on the handle.
3. Always unplug the deep fryer when you have finished frying.
4. Let the fryer cool completely (1 or 2 hours) before storing or
cleaning.
5. Never carry or move the deep fryer with hot oil or fat inside.
6. The deep fryer has a little condensation tray on the back of the
appliance.This needs to be checked and emptied occationally.
Filtering and changing the oil
1. Make sure the fryer is unplugged and the oil has cooled down
before cleaning or storing your fryer.
2. The oil does not need to be changed after each use. On average, oil can be used for 8 to 12 fryings. You will need to change
it more often when frying fish or heavily battered foods.
3. We recommend filtering the oil if you see any food debris left
in the oil or on the bottom of the non-stick bowl.You can do
this as follows:
4. Remove the basket. Carefully pour the oil into another large
pot or saucepan.
5. Clean the frying basket and the non-stick bowl with hot water,
a little dishwashing liquid and a non abrasive pad or sponge.
6. Over time, the non-stick coating of the bowl may become
slightly darker or scratched due to usage.This is normal.
fig. 5
4
fig. 6
F600 19-07-2004 10:49 Pagina 4
Page 5

Electric Fryer F600
Cleaning the non-stick bowl
1. Thanks to the non-stick coating, the bowl will be easy to clean
by hand with hot water and a non-abrasive sponge or soft
cloth.
2. NEVER immerse or pour water into the fryer.
Cleaning the basket lifting system
Brush the metal parts of the lifting system with hot water and
dishwashing liquid as soon as you have finished frying.
Cleaning the fryer body
Clean the outside of the fryer with a damp, soft cloth.
The lid is removable for easy cleaning: Open the lid and pull it
firmly upward until it comes off. Remove the filters and clean the
lid with soapy water. Dry thoroughly and put the filters back into
its compartment.To reattach the lid hold it slightly tilted backwards and press it firmly back down into the rear casing making
sure the spring is fitted into the groove until it clicks into place.
Clean the viewing window with dishwashing liquid. Clean regularly
to maintain good visibility during cooking. (TIP: brushing the inside
of the window with a little lemon juice or vinegar helps preventing
condensation build-up.)
IMPORTANT: never immerse the fryer, cord or plug in water or
any other liquid. Do not wash the lid in a dishwasher. Never use
abrasive cleaners or abrasive scouring pads to clean your fryer.We
recommend cleaning the fryer after each use.
Storing the oil
The sealed lid of your fryer allows you to store the oil inside the
appliance.The fryer must be stored at room temperature.
Changing the filters
The life of the filters depends on the type of food fried.
The mesh filters will absorb unpleasant frying odors for about 15
fryings. Close the lid of the fryer and open the filter cover. Unpack
the filters and insert them in the filter compartment with the thick
white layer underneath.
Close the filter cover by pressing gently until it clicks shut.
Warning: do not use the appliance with over used filters as this
could cause bad odours and obstruct the steam.
5
F600 19-07-2004 10:49 Pagina 5
Page 6

Electric Fryer F600
6
Frying non-frozen food
CHIPS Half portion 350 190 8-10
Whole portion 700 190 10-13
FISH Squid 500 160 12-13
Scampi tails 500 160 9-10
Sardines 500 170 12-13
Sole (2 pieces) 400 160 7-8
MEAT Beef cutlets (2 pieces) 300 170 8-9
Chicken cutlets (2 pieces) 300 180 7-8
Meat balls (13 pieces) 500 170 7-8
VEGETABLES Artichokes 250 150 11-12
Cauliflower 300 160 7-8
Mushrooms 300 160 6-7
Aubergines 100 170 7-8
Courgettes 300 160 11-12
Type of food
Max.
Quantity
(grms)
Temperature
°C
Time in Minutes
Please remember that the cooking times and temperatures are approximate and
must be adapted according to the quantity of food and personal tastes.
F600 19-07-2004 10:49 Pagina 6
Page 7

Electric Fryer F600
7
Frying frozen food
•Due to their extremely low temperature, frozen foods inevitably lower the
temperature of the oil. For good results each time you fry, we recommend you
do not exceed the maximum quantities set out in the following table.
• Frozen foods are frequently covered with a coating of ice crystals
which must be removed before cooking.This can be done by shaking
the basket. Lower the basket very slowly into the oil, to ensure that the oil
does not boil over. Close the fryer lid after the basket has been placed inside
the fryer.
The cooking times are approximate and must be varied according to the initial
temperature of the food which is to be fried and according to the temperature
recommended by the frozen food producer.
CHIPS (*) 350 190 6-9
POTATOES CROQUETTES 500 190 10-11
FISH Cod fingers 300 190 5-6
Shrimps 300 190 5-6
MEAT Chicken cutlets (n. 2) 200 190 7-8
Type of food
Max.
Quantity
(grms)
Temperature
°C
Time in Minutes
WARNING: Before immersing the basket, check that the lid is firmly closed.
(*) This is the recommended quantity for excellent results. Naturally a larger quan-
tity of frozen potatoes can be fried, taking into consideration that they will be a
little more greasy due to the sudden drop in the temperature of the oil upon
immersion.
F600 19-07-2004 10:49 Pagina 7
Page 8

Electric Fryer F600
8
Fault
Unpleasant odours
The oil
overflows
Food does not brown
during cooking
The oil does not heat
up
Cause
The filters are saturated.
The oil has deteriorated.
The cooking liquid is
unsuitable.
The oil has deteriorated
and causes too much
foam.
Food not dried sufficiently before immersing
in the oil.
The basket has been
immersed too quickly.
Recommended max oil
quantity exceeded.
The basket is over
loaded
The oil temperature is
too low.
The basket is over
loaded
Fryer has been previously
switched on without oil in
bowl causing the thermal
cutout to operate.
Remedy
Replace the filters.
Replace the oil or fat.
Use a good quality sunflower or vegetable oil.
Replace the oil or fat.
Dry the food thoroughly
Lower the basket slowly.
Reduce the amount of
oil in the bowl.
Reduce the amount of
food.
Set a higher temperature.
Reduce the amount of
food.
Contact the Service
Centre (thermal safety
device will need to be
replaced).
Problem solving
F600 19-07-2004 10:49 Pagina 8
Page 9

9
Electric Fryer F600
Safety warnings
• As with any electrical appliance, whilst the instructions aim to
cover as many eventualities as possible, caution and common
sense should be applied when operating your fryer, particularly in
the vicinity of young children.
• Before use check that the voltage power supply corresponds to
the one shown on the appliance data plate.
• Only connect the appliance to electrical sockets which have a
minimum load of 10A and which are properly earthed. (If the
socket and the plug on the appliance should prove incompatible,
get a professionally qualified technician to replace the socket with
a more suitable one).
• Do not place the appliance near heat sources.
•Do not immerse the deep fryer in water. The infiltration of water
may cause electric shocks.
• The appliance is hot when it is in use. DO NOT LEAVE IT WITH-
IN THE REACH OF CHILDREN.
• Hot oil can cause serious burns. Do not move the deep fryer
when the oil is hot.
•Never touch the viewing window when frying as it becomes very
hot.
•To move the appliance, use the special lifting handles. (Never lift
by the basket handle).
• The deep fryer must only be switched on after it has been filled
with oil or fat. If it is heated while empty, a thermal safety device
comes into operation which stops it from working. In this case it
is necessary to contact our nearest authorised service centre to
replace the device.
• If the deep fryer leaks oil, contact the technical service centre or
staff authorised by the Company.
•Wash the following carefully with hot water and washing up liq-
uid before using the deep fryer for the first time: the fryer bowl,
the basket and the lid (remove filters).
• The materials and objects likely to come into contact with food-
stuffs conform to EEC Directive.
• Using the appliance for the first time may result in minimal
smoke. This is normal and disappears in few minutes.The room
must be ventilated.
• Children or infirm persons should not be allowed to use this
product unsupervised.
• Children should not be allowed to play with this appliance.
• Do not allow the cord to hang over the edge of the worksurface
where it may be grabbed by children or become entangled with
the user. Do not use with an extension cord.
• If it is necessary to replace the power cable, contact a service
centre approved by the manufacturer.
F600 19-07-2004 10:49 Pagina 9
Page 10

Electric Fryer F600
10
Electrical requirements
Before using this appliance ensure that the voltage indicated on the
product corresponds with the main voltage in your home, if you
are in any doubt about your supply contact your local electricity
company.The flexible mains lead is supplied connected to a B.S.
1363 fused plug having a fuse of 13 amp capacity. Should this plug
not fit the socket outlets in your home, it should be cut off and
replaced with a suitable plug, following the procedure outlined
below.
Note: Such a plug cannot be used for any other appliance and
should therefore be properly disposed of and not left where children might find it and plug it into a supply socket - with the obvious consequent danger.
N.B.We recommend the use of good quality plugs and wall sockets
that can be switched off when the machine is not in use.
important: the wires in the mains lead fitted to this appliance are
coloured in accordance with the following code:
As the colours of the wires in the mains lead of this appliance may
not correspond with the coloured markings identifying the terminals in your plug, proceed as follows:
The wire which is coloured green and yellow must be connected
to the terminal in the plug which is marked with the letter E or by
the earth symbol or coloured green or green and yellow.
The wire which is coloured blue must be connected to the terminal which is marked with the letter N or coloured black.
The wire which is coloured brown must be connected to the terminal which is marked with the letter L or coloured red.
When wiring the plug, ensure that all strands of wire are securely
retained in each terminal. Do not forget to tighten the mains lead
clamp on the plug. If your electricity supply point has only two pin
socket outlets, or if you are in doubt, consult a qualified electrician.
Should the mains lead ever require replacement, it is essential that
this operation be carried out by a qualified electrician and should
only be replaced with a flexible cord of the same size.
After replacement of a fuse in the plug, the fuse cover must be
refitted. If the fuse cover is lost, the plug must not be used until a
replacement cover is obtained. The colour of the correct replacement fuse cover is that of the coloured insert in the base of the
fuse recess or elsewhere on the plug.Always state this colour
when ordering a replacement fuse cover. Only 13amp replacement
fuses which are asta approved to B.S. 1362 should be fitted.
This appliance conforms to the Norms EN 55014 regarding the
suppression of radio interference.
warning - this appliance must be earthed
green and yellow
blue
brown
earth
neutral
live
Green and Yellow to Earth
Blue to
Neutral
13 amp
Fuse
Brown
to Live
Cord Clamp
F600 19-07-2004 10:49 Pagina 10
Page 11

11
Electric Fryer F600
57251/05.04
F600 19-07-2004 10:49 Pagina 11
 Loading...