

Page 1

Proudly distributed by
De’Longhi Australia Pty Limited
P.O. BOX 4540
CASULA MALL NSW 2170
Customer Service Ph: 1800 126 659
Fax: 1800 706932
www.delonghi.com.au
e-mail: info.au@delonghigroup.com
De’Longhi New Zealand Limited
99 Khyber Pass Road
Grafton 1023
Auckland
New Zealand
P.O. Box 58-056 Botany
MANUKAU 2163
Customer Service Ph: 0508 200 300
Fax: 0508 200 301
www.delonghi.co.nz
e-mail: info.nz@delonghigroup.com
De’Longhi Appliances via Seitz, 47 31100 Treviso Italia www.delonghi.com
5712511911_00_0518
Page 2
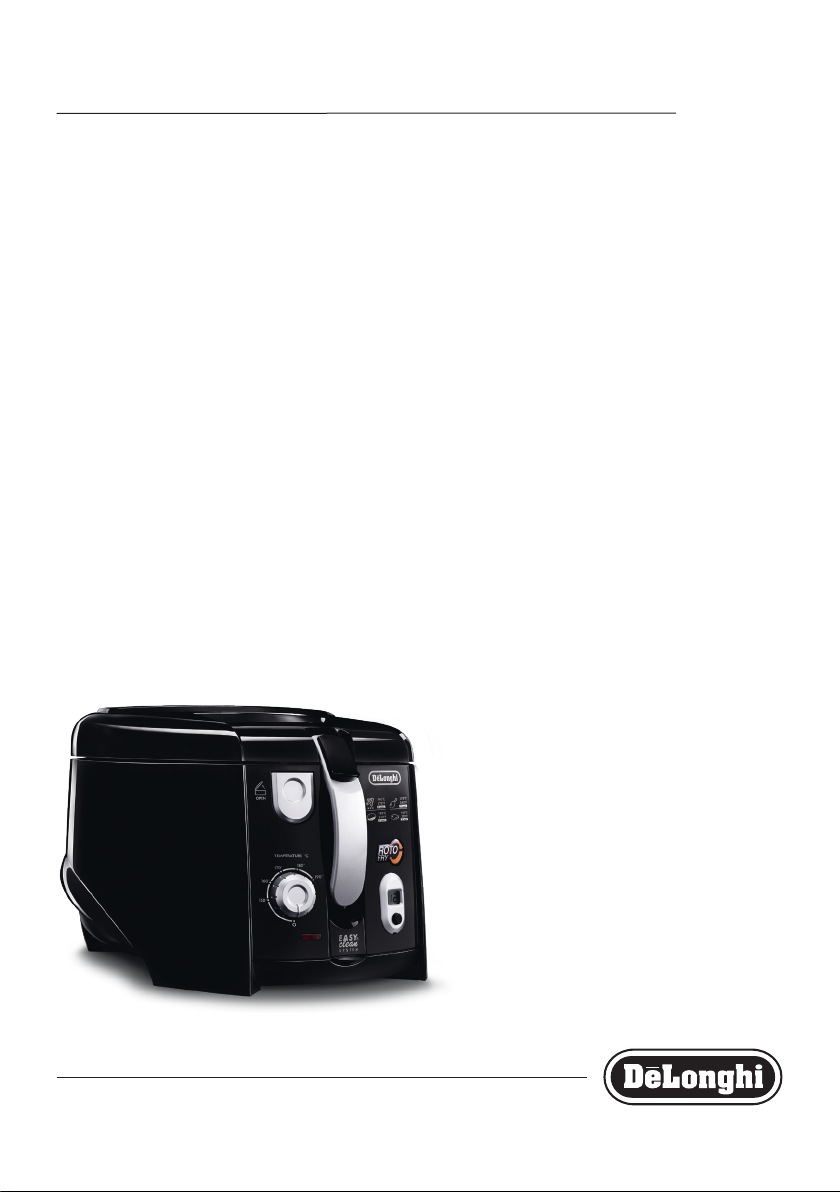
F28313
ELECTRIC DEEP FRYER
Page 3
E
KQ R
G
B
H
F
C
A
D
P
O
N
M
I
L
J
2
Page 4
1
2
3
10
4
7
5
8
6
9
2
1
11
12
3
Page 5

2
1
13
16
14
17
15
18
4
Page 6

Read all the Instruction for Use carefully before using
the appliance. Keep this Instructions for Use.
• If the power cable is damaged, it must
be replaced by the manufacturer or the
manufacturer’s Customer Experience in
order to avoid all risk.
• Never immerse the appliance in water.
• The appliance is not intended for use
by persons (including children) with
reduced physical, sensory or mental
capabilities, or lack of experience and
knowledge, unless they have been given supervision or instruction concerning
use of the appliance by a person responsible for their safety.
Children should be supervised to ensure
that they do not play with the appliance.
• The appliance must not be operated by
a timer or a separate remote control system.
• This is household appliance only.
It is not intended to be used in: sta
kitchen areas in shops, oces and other working environments; farm houses;
by clients in hotels, motels and other
residential type environments; bed and
breakfast type environments.
• Cooking appliances should be positioned
in a stable situation with the handles (if
any) positioned to avoid spillage of the
hot liquids.
Danger!
Failure to observe the warning may result in life threatening
injury by electric shock.
• Before use check that the voltage power supply corresponds to the one shown on the appliance data plate.
• Only connect the appliance to electrical sockets which have
a minimum load of 10A and which are properly earthed.
(If the socket and the plug on the appliance should prove
incompatible, get a professionally qualied technician to
replace the socket with a more suitable one).
Danger of burns!
Failure to observe the warnings could result in scalds or burns.
• The appliance is hot when it is in use. DO NOT LEAVE IT
WITHIN THE REACH OF CHILDREN.
• Do not move the deep fryer when the oil is hot, as there it
could cause serious burns.
• To move the appliance, use the special lifting handles.
(Never lift by the basket handle). Check that the oil is cool
enough (waiting about 2 hours).
• Never leave the power cable hanging from the edge of
the surface the deep fryer is resting on, where it could be
grasped by a child or get in the way of the user.
• When opening the lid, take great care to avoid hot steam
and splashes of boiling oil.
Important!
Failure to observe the warnings may result in life threatening
injury or damage to the appliance.
• Do not place the appliance near heat sources.
• The deep fryer must only be switched on after it has been
lled with oil or fat. If it is heated up while empty, a thermal safety device comes into operation which stops it from
working. In this case it is necessary to contact our nearest
authorised service centre.
• If the deep fryer leaks oil, contact the technical service cen-
tre or sta authorised by the Company.
Please note:
This symbol identies important advice or information for the
user
• Before using the deep fryer for the rst time, wash the
pan, the basket and the lid (removing the lter) carefully
with hot water and washing up liquid. When this has been
done, dry carefully.
After washing, dry thoroughly. Remove any water left in
the bottom of the container. This avoids dangerous spurts
of hot oil during use.
• It is totally normal that, on rst use, the appliance emits a
“new appliance” smell. If this happens, aerate the room.
• Never use homemade or very acid oils.
• If your appliance has a drain hose, make sure it is always
closed and in its compartment while the appliance is in
use.
• The basket ts automatically onto the central pin in the
bowl.
5
Page 7

This appliance conforms to EC Regulation 1935/2004 on
materials and articles intended to come into contact with food.
DISPOSING OF THE APPLIANCE
The appliance must not be disposed of with household waste, but taken to an authorised waste separation and recycling centre.
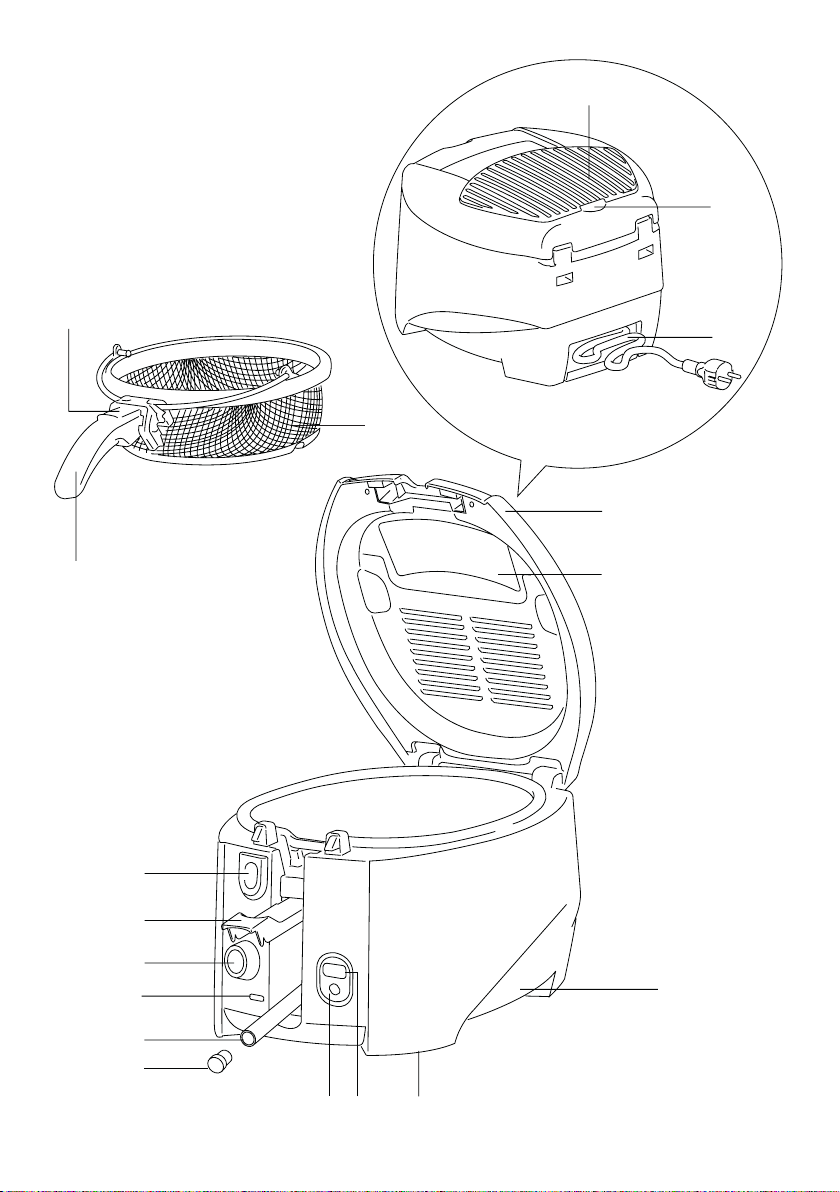
DESCRIPTION OF THE APPLIANCE
A. Basket handle
B. Handle slide
C. Lid
D. Viewing window
E. Filter cover
F. Basket
G. Filter cover catch
H. Cable compartment
I. Handgrip to lift the appliance
J. Drain hose cap (certain models only)
K. Foot
L. Oil drain hose (certain models only)
M. Indicator light
N. Thermostat dial
O. Hose compartment door (certain models only)
P. Release button
Q. Timer button
R. Timer display
TECHNICAL DATA
Net weight 3.5 kg
absorbed power: see rating label
frequency: see rating label
voltage: see rating label
FILLING WITH OIL OR FAT
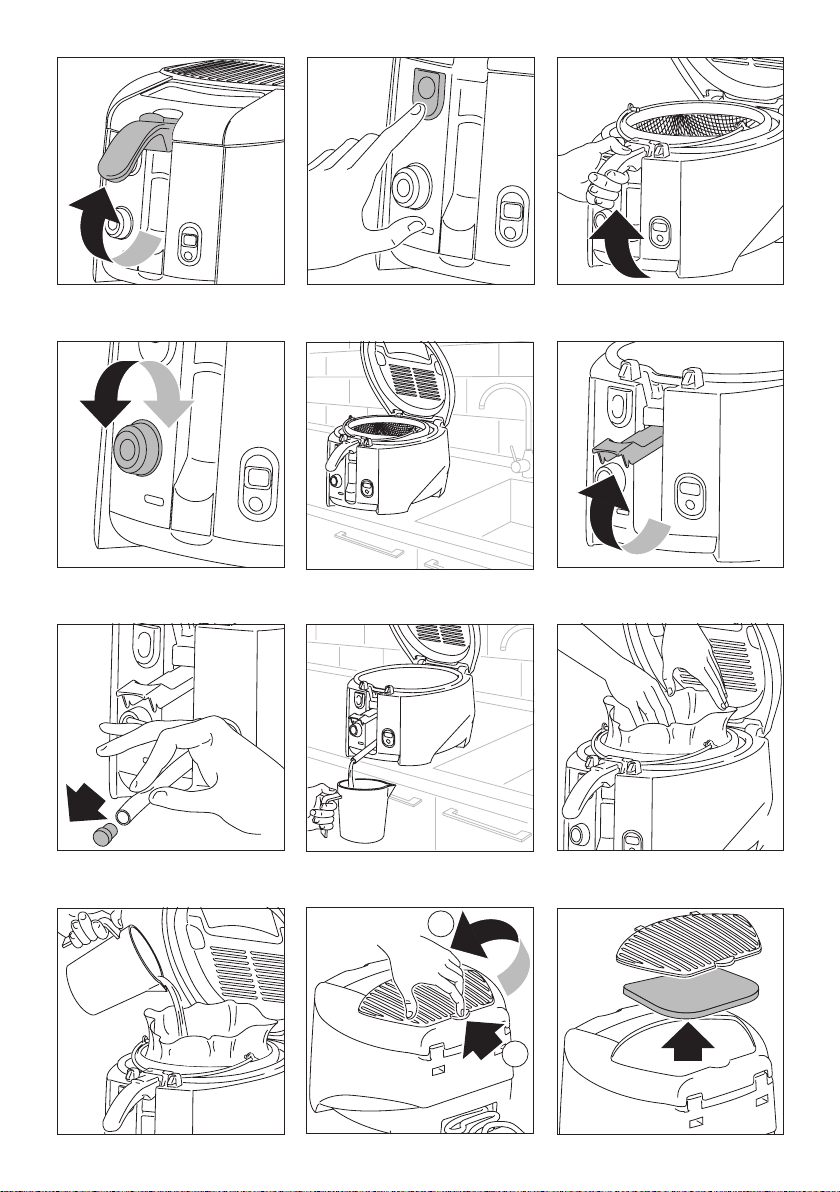
• Raise the basket (F) into the top position by pulling the
handle (A) upwards (g. 1).
ALWAYS raise and lower the basket with the lid closed.
• Open the lid (C) by pressing button (P) (g. 2).
• Remove the basket by pulling upwards (g. 3).
• Pour 1.2 l of oil (or 1 kg of fat) into the container.
Important! The level of oil should always be between
the maximum and minimum marks.
Never use the deep fryer with the oil below the “min” level as
this could cause the thermal cutout to trip. To replace, contact
an authorised service centre.
For best results, use good quality peanut oil.
Never mix dierent oils together.
If you are using solid fat, cut into small pieces to avoid the deep
fryer heating up without liquid for the rst few minutes.
The temperature must be set to 150°C until the fat has melted
completely. You can then set the required temperature.
STARTING FRYING
1. Place the food to be fried in the basket. Never over ll (1 kg
max. of fresh potatoes).
To obtain more even frying you should concentrate the
food around the edge of the basket, with less food at the
centre.
2. Place the basket in the bowl in the raised position (g. 3)
and close the lid, pressing lightly until it clips into place.
To avoid splashes of hot oil, always close the lid before low-
ering the basket.
3. Plug the appliance into the mains socket and turn the thermostat dial (N) to the required temperature (g. 4).
When the set temperature is reached, the indicator light
(M) goes out.
4. As soon as the light has gone out, immerse the basket in
the oil by pushing the slide (B) on the basket handle backwards and slowly lowering the basket itself.
• It is normal for a considerable quantity of very hot steam to
be given o from the lter cover (E) immediately after the
basket has been lowered.
• When cooking begins, immediately after immersing the
food in the oil, the inside surface of the viewing window
(D) (if present) mists up then clears gradually.
• It is normally for drops of condensation to form near the
basket handle while the appliance is in operation.
SET THE ELECTRONIC MINUTE TIMER
1. Set the cooking time by pressing the minute timer button.
The display will show the minutes set.
2. The numbers will begin to ash immediately. This shows
that the cooking time has begun. The nal minute is displayed in seconds.
3. If an error is made, a new cooking time can be set by holding the button down for more than 2 seconds. The display
will reset and the process can then be repeated from point
1.
4. The minute timer will indicate the end of the cooking time
with two series of beeps about 20 seconds apart. To turn
the acoustic signal o, press the minute timer button.
Please note: the minute timer does not automatically
turn the appliance o.
6
Page 8

Replacing the minute timer battery
• Remove the minute timer from its housing by prising it
from the lower side (g. 17).
• Turn the battery cover on the back of the battery anticlockwise (g. 18) until it comes free.
• Replace the battery with another of the same type (L1131).
Please note: When replacing or disposing of the appliance, the battery must be removed and disposed of according to
current legislation as it represents a hazard to the environment.
END OF FRYING
When the set cooking time has elapsed, raise the basket and
check that the food is cooked to the required colour.
You can do this through the viewing window without opening
the lid.
If you decide the food is suciently cooked, turn the appliance
o by rotating the thermostat dial to the “0” position until you
hear the internal switch click.
Drain excess oil by leaving the basket in the raised position inside the deep fryer.
FILTERING THE OIL OR FAT
You are recommended to do this after each frying session as,
particularly if coated in breadcrumbs or our, the particles of
food remaining in the liquid tend to burn, causing the oil or fat
to alter more rapidly.
Make sure the oil is suciently cool (wait about two hours).
Models without drain hose
1. Remove the lid as shown in g. 13.
2. Empty the deep fryer by tilting it as shown in g. 16 and
collecting the contents in a container.
Models with drain hose
Move the front of the deep fryer to the edge of the surface on
which it stands, making sure the feet (K) remain resting on the
surface (g. 5).
1. Open the deep fryer lid and remove the basket (g. 3).
2. Open the door (O) as shown in g. 6.
3. Remove the drain hose (L).
4. Remove the cap (J) and at the same time squeeze the hose
with two ngers to avoid the oil or fat running out until the
hose is placed over a container (g. 7).
5. Run o the oil or fat into a container (g. 8).
6. Remove any deposits left in the bowl using a sponge or
absorbent paper.
7. When you have nished, close the drain hose with the cap
and replace in its housing.
Impor tant! Never empty the deep fryer by tilting it or
turning it upside down. Always use the drain hose.
• Put the basket back in the raised position and place a lter
in the bottom of the basket (g. 9).
Filters are available from your local dealer or one of our
customer service centres.
• Then pour the oil or fat back into the deep fryer very slowly
to avoid it overowing from the lter (g. 10).
• The ltered oil can be kept inside the deep fryer.
However, if you will not be frying again for some time,
you should keep the oil in the dark in a closed container to
avoid it deteriorating.
It is good practice to separate oil used for frying sh and oil
used for frying other food.
If you are using fat, make sure it does not cool down exces-
sively or it will solidify.
MAINTENANCE OF THE ANTIODOUR FILTER
Over time, the anti-odour lter inside the lid loses its eciency.
You are therefore recommended to replace it after every 10/15
frying sessions.
To replace, remove the plastic lter grille (gs. 11/12).
CLEANING
Danger! Before cleaning, always unplug from the mains
socket.
Never immerse the deep fryer in water and never place it under running tap water. If water gets into the appliance, it could
cause electric shock.
Danger of burns! Check the oil is suciently cool (wait
about two hours).
Empty the oil or fat as described above in the section “Filtering
the oil or fat”.
Remove the lid as shown in g. 13.
To remove the lid, proceed as follows: push it backwards (see
arrow “1”, g. 13) and at the same time pull it upwards (see arrow “2”, g. 13).
Please note: Never immerse the lid in water without re-
moving the lter rst.
To clean the bowl, proceed as follows:
• Wash the bowl with hot water and washing up liquid, then
rinse and dry thoroughly.
In models with oil drain hose, always use the drain hose
to empty the water (g. 14), then eliminate any water re-
7
Page 9

maining in the oil drain hose.
• Use the brush provided to clean the inside of the drain hose
(g. 15).
• You should clean the basket regularly, making sure to remove any deposits accumulated in the wheel ring.
• Dry the outside of the deep fryer with a soft damp cloth to
eliminate splashes and drips of oil or condensation.
Model with non-stick bowl
Never use abrasive objects or detergents to clean the bowl.
Clean with a soft cloth and neutral detergent only.
HOW LONG THE OIL OR FAT LASTS
The level of oil or fat must never fall below the minimum.
Every now and then it must be completely changed.
The life of the oil or fat depends on what foods are being fried.
Food coated in breadcrumbs, for example, dirties the oil more
than simple frying. As with any deep fryer, the oil deteriorates
after being heated a number of times!
Even if used and ltered correctly, it should therefore be
changed completely on a regular basis.
Thanks to the rotating basket, the appliance fries with little oil.
This means you save about half the oil used by other deep fryers
on the market.
CORRECT FRYING
• You should always respect the recommend temperature for
the recipe being followed.
If the temperature is too low, the oil will be absorbed.
If the temperature is too high, a crust will form immediate-
ly and the inside of the food will not be cooked.
• The food being fried must not be immersed in the oil until
the oil has reached the correct temperature and the light
has gone o.
• Never over ll the basket.
This could cause a sudden drop in the temperature of the
oil and therefore greasier uneven frying.
• If you fry small quantities of food, the temperature of the
oil must be set lower than that indicated to avoid the oil
boiling ercely.
• Check that the food is sliced into thin, even pieces. If the
slices are too thick, the food will not be well cooked inside,
despite its appearance, while even slices will all be perfectly cooked at the same time.
• Dry the food perfectly before immersing it in the oil or fat
as moist foods will be less crispy after cooking (especially
potatoes). Foods with a high water content (sh, meat,
vegetables) should ideally be coated in breadcrumbs or
our before frying. Make sure to remove excess our or
breadcrumbs before immersing the food in the oil.
8
Page 10

FRYING NONFROZEN FOOD
Bear in mind that cooking times and temperatures are approximate and must be adjusted according to the quantity of food to
be fried and personal tastes.
Food Max. quantity (g) Temperature (°C) Time (minutes)
POTATO CHIPS
FISH
MEAT
VEGETABLES
Recommended quantity for optimum frying
MAX quantity (safety limit) 1000 190 14-16
Squid 500 160 9-10
Waes 500 160 9-10
Scampi tails 600 160 7-10
Sardines 500-600 170 8-10
Cuttlesh 500 160 8-10
Sole (3) 500-600 160 6-7
Beef cutlets (2) 250 170 5-6
Chicken cutlets (3) 300 170 6-7
Meat balls (8-10) 400 160 7-9
Artichokes 250 150 10-12
Cauliower 400 160 8-9
Mushrooms 400 150 9-10
Aubergines 300 170 11-12
Courgettes 200 170 8-10
500 190 7-9
FRYING FROZEN FOOD
Frozen foods are stored at very low temperatures.
They therefore lower the temperature of the oil or fat drastically.
For best results, never exceed the maximum recommended
quantities indicated in the following table.
Frozen foods are often covered with a layer of ice. This should be
removed before cooking by shaking the basket.
Immerse the basket in the oil very slowly to prevent the oil from
boiling over.
Food Max. quantity (g) Temperature (°C) Time (minutes)
Recommended quantity for optimum
POTATO CHIPS
POTATO CROQUETTES 500 190 7-8
FISH
MEAT
(*) Recommended quantity for best frying results. You can, of
course, fry a larger quantity of frozen potato chips, but they
will be greasier as a result of the sudden drop in oil temperature on immersion.
frying
MAX quantity (safety limit) 1000 190 16-18
Fish ngers 300 190 4-6
Shrimps 300 190 4-6
Chicken cutlets (3) 200 180 6-8
Danger of burns! Before immersing the basket, make
sure the lid is tightly closed.
The cooking times are approximate and must be adjusted according to the initial temperature of the food being fried and the
temperatures indicated on the packaging of the food.
180 (*) 190 3-4
9
Page 11

TROUBLESHOOTING
FAU LT CAUSE REMEDY
The anti-odour lter is saturated. Replace the lter.
Unpleasant smells
Oil overows
The oil does not heat upThe deep fryer has been operated without oil in the bowl,
Only half the basket is
fried correctly
The oil has deteriorated. Replace the oil or fat.
The cooking liquid is unsuitable. Use good quality peanut oil.
The oil has deteriorated and produces too much foam. Replace the oil or fat.
You have immersed food which is not suciently dry in
the hot oil.
Basket immersed too rapidly. Immerse slowly.
The oil level in the deep fryer is over the maximum limit. Reduce the quantity of oil inside the bowl.
damaging the thermal cutout.
The basket is not rotating during cooking.
Dry the food well.
Contact customer services (the device must be
replaced).
Clean the bottom of the bowl.
Clean the wheel ring in the basket.
10
 Loading...