

ELECTRIC OIL FILLED RADIATORS
INSTRUCTIONS FOR USE
SAVE THESE INSTRUCTIONS
RADIADORES ELÉCTRICOS DE ACEITE
INSTRUCCIONES PARA EL USO
REPASE Y GUARDE ESTAS INSTRUCCIONES
LEA CUIDADOSAMENTE ESTE INSTRUCTIVO ANTES
DE USAR SU APARATO
RADIATEURS À BAIN D’HUILE
MODE D’EMPLOI
CONSERVEZ CE MODE D’EMPLOI
RADIATORI AD OLIO
ISTRUZIONI PER L'USO
CONSERVARE LE PRESENTI ISTRUZIONI
TYPE/MODELE/MODELO/MODELLO:
EW7707CM
Register this product on-line and receive a free trial issue of Cook's
Illustrated. Visit www.delonghiregistration.com.
Visit www.delonghi.com for a list of service centers near you.
(U.S. Only)
Registre este producto en línea y reciba un ejemplar gratis de
Cook's Illustrated. Visite www.delonghiregistration.com.
Visite www.delonghi.com para ver la lista de centros de servicios
cercanos a usted. (Solamente en los Estados Unidos)
Enregistrez ce produit en ligne et recevez un numéro gratuit de
Cook's Illustrated. Visitez www.delonghiregistration.com.
Visitez www.delonghi.com pour y voir une liste des centres de
réparation proches de chez vous. (É.-U. uniquement)
Registra questo prodotto "on-line" per ricevere una copia omaggio della
rivista Cook's Illustrated. Visita www.delonghiregistration.com.
Visita www.delonghi.com per una lista dei centri di servizio a te
piu vicini. (Solo negli Stati Uniti).
ELECTRONIC CHARACTERISTICS/ CARACTERISTICAS ELECTRICAS
CARACTÉRISTIQUES ÉLECTRONIQUES/CARATTERISTICHE ELETTRICHE
120V~60Hz 1500W

When using electrical appliances, basic precautions should always be followed to reduce
IMPORTANT SAFEGUARDS
risk of fire, electric shock, and injury to persons, including the following:
1. Read all instructions before using this heater.
2. If your radiator is equipped with a polythene tape used as carry handle, remove it before
connecting appliance to the outlet.
3. This heater is hot when in use. To avoid burns, do not let bare skin touch hot surfaces.
Use handle when moving this heater. Keep combustible materials, such as furniture, pillows, bedding, papers, clothes, and curtains at least 3 feet (0,9 m) from the front and top
of the heater and keep them away from the sides and rear.
4. Extreme caution is necessary when any heater is used by or near children and whenever
the heater is left operating and unattended.
5. Always unplug heater when not in use.
6. If the supply cord is damaged, it must be replaced by the manufacturer, its service agent
or similarly qualified persons in order to avoid a hazard.
7. Do not operate any heater with a damaged cord or plug or after the heater malfunctions, has been drop-
ped or damaged in any manner. If heater has leaked any oil, discontinue using the heater and contact
the service center as indicated in the instruction leaflet. Return heater to authorized service facility for examination, electrical or mechanical adjustment, or repair.
8. Do not use outdoors.
9. This heater is not intended for use in bathrooms, laundry areas and similar indoor locations. Never locate heater where it may fall into a bathtub or other water container.
10. Do not run cord under carpeting. Do not cover cord with throw rugs, runners, or the like.
Arrange cord away from traffic area and where it will not be tripped over.
11. To disconnect heater, turn controls to off, then remove plug from outlet.
12. Connect to properly polarized outlets only.
13. Do not insert or allow foreign objects to enter any ventilation or exhaust opening as this
may cause an electric shock, fire, or damage the heater.
14. To prevent a possible fire, do not block air intakes or exhaust in any manner. Do not use
on soft surfaces, like a bed, where openings may become blocked.
15. A heater has hot or arcing or sparking parts inside. Do not use it in areas where
gasoline, paint, or flammable liquids are used or stored.
16. Use this heater only as described in this manual. Any other use not recommended by the
manufacturer may cause fire, electric shock, or injury to persons.
17. To prevent overload and blown fuses, be sure that no other appliance is plugged into the
same outlet (receptacle) or into another outlet (receptacle) wired into the same circuit.
18. It is normal for the heater’s plug and cord to feel warm to the touch. A plug or cord which becomes hot
to the touch or becomes distorted in shape may be a result of a worn electrical outlet. Worn outlets or
receptacles should be replaced prior to further use of the heater. Plugging heater into a worn outlet
/receptacle/ may result in overheating of the power cord or fire.
19. Do not use an extension cord because it may overheat and cause a risk of fire. However, if you have
to use an extension cord, the cord shall be No. 1 4 AWG minimum size and rated not less than
1875 watts, and has to be used only for supplying power to this heater.
20. Be sure that the plug is fully inserted into an appropriate outlet. Please remember that outlets also deteriorate due to aging and continuous use: check periodically if signs overheating or deformations are evidenced by the plug. Do not use the outlet and CALL your electrician.
21. Check that neither the appliance nor the power cable have been damaged in any way
during transportation.
22. Make sure that no pieces of polystyrene or other packaging material have been left
between one element of the appliance and another. It may be necessary to pass over the
appliance with a vacuum cleaner.
23. When switching on the appliance for the first time, allow it to run at full power for about two
hours to get rid of the unpleasant smell Make sure that the room in which the appliance is
located is well ventilated during this operation. It is normal for the appliance to emit small
cracking sounds when you turn it on for the first time.
24. Do not cover the appliance while it is functioning in order to avoid overheating with the
attendant risk of fire
.
SAVE THESE INSTRUCTIONS
2
HOW TO USE YOUR HEATER
FITTING THE WHEELS (“EASY WHEEL”SYSTEM)
Turn the radiator upside-down on a rug or a soft surface in order to prevent damaging
the paint finish. Fully unfold the castors by turning them outwards (Fig. 1).
Turn the radiator back to its upright position.
fig. 1
CAUTION
Always operate the heater in upright position only (wheels on the bottom, controls on
top). Any other position could create hazardous situation!
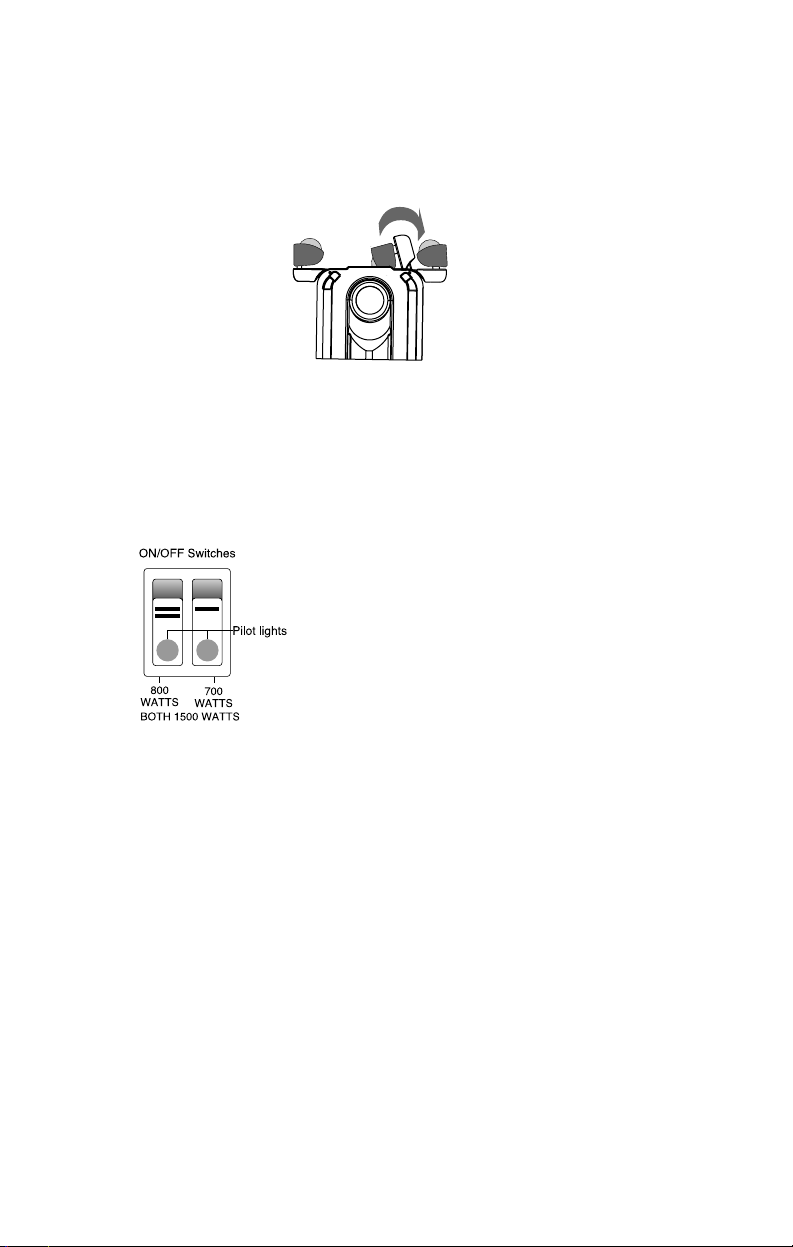
WATTS ECONOMIZER
For more economical use, the two switches may be
used individually, after unit has reached the operating
temperature:
- button in position «l» = minimum power (indi-
cator light on);
- button in position «ll» = intermediate power
(indicator light on);
- both buttons in position «l» «ll» = maximum
power (indicator lights on)
With pilot lights ON, the heater is ON!
3

1. LOCATION
Place heater on the floor beneath the coldest window in the room, or any other location. Your heater will reduce the effect of cold drafts. The heater should not be placed immediately below a
power outlet. Do not use this radiator in rooms with a floor area of less than 43 square feet (4 sq.
m.).
2. CONNECTION
The radiator should be connected to a properly polarized A/C 120 V household outlet in perfect
working conditions. Keep loose clothing or bedding, furniture and flammable material away from
the heater’s wall outlet.
3. TURNING ON
Turn the thermostat clockwise to its maximum position. Push down both switches. The switch lights
stay on independently of the thermostat cycling. When room reaches the desired temperature, turn
the thermostat knob counter-clockwise very slowly and carefully until you hear a click. This should
set your heater to maintain the desired temperature by cycling on and off as required.
4. USE OF THERMOSTAT
The thermostat operates according to room air temperature, rather than radiator temperature.
Turning it counter-clockwise to smaller numbers would decrease the temperature; clockwise to
greater numbers would increase the temperature.
Antifreeze function
Turn the thermostat dial to the position and push the switches on. The appliance will maintain a
minimum room temperature of approximately 42°F (5°C), thus preventing freezing while conserving energy.
REMINDER
To completely shut the heater off, ON/OFF switches must be set in the OFF position.
5. COMFORTEMP FUNCTION
With the two switches and the COMFORTEMP button depressed,
the appliance is automatically set to reach and keep the suggested ideal temperature. When the mode COMFORTEMP is on, the
relevant green pilot light is on. To depress the COMFORTEMP
function and return to manual functioning, depress the COMFORTEMP button once again.
A safety device
A safety device switches the heater off in the event of everhea-
ting. To restart the heater, call the nearest Service center.
6. MAINTENANCE AND SERVICE
Always unplug the heater from the power outlet and allow the
radiator to cool. Wipe radiator with a soft damp cloth; do not use
PILOT
LIGHT
detergents and abrasives. Should the radiator not be in use over
a certain length of time, roll the cable around the holder and store
it in a dry place (see fig. on front page).
This appliance has been built to last for many years of troublefree service. In case of malfunction or doubt, do not try to repair
the heater by yourself: this might increase the risk of fire and electric shock. Call nearest Service Center Visit www.delonghi.com for a
completelist of Service Centers (U.S. Only).
BUTTON
COMFORTEMP
Your product is equipped with a polarized alternating current line plug (a plug having one blade
wider than the other). There is only one way it can be plugged into a power supply. This is a
safety feature. If you are unable to insert the plug fully into the outlet, try again by turning it the
other way. If it would still not go in, it is probably due to an obsolete outlet which should be
replaced. Do not temper with the plug or outlet to defeat the purpose of this safety mechanism.
4

Cuando use aparatos eléctricos, tome siempre las precauciones básicas para reducir el riesgo de
INSTRUCCIONES IMPORTANTES
incendio, electrocución y lesiones a las personas, observando lo siguiente:
1. Lea todas las instrucciones antes de usar el calentador.
2. Si el radiador tiene una cinta de polietileno que se usa como manija para trasladarlo, quítela
antes de conectar el aparato a un tomacorriente.
3. Este calentador se calienta durante el uso. Para evitar quemaduras, procure no tocar superficies
calientes con la piel sin protección. Use la manija para desplazar este calentador. Mantenga el
material combustible, tal como muebles, almohadas, ropa de cama, papeles, prendas y cortinas,
a una distancia de al menos 90 cm. de la parte frontal y superior del aparato, así como de los
costados y de la parte trasera del radiador.
4. Ponga extremo cuidado cuando use cualquier calentador cerca de niños o inválidos y cuando el
calentador se deje funcionando sin vigilancia.
5. Siempre desconecte el calentador cuando no lo esté usando.
6. Si el cable de alimentación está estropeado, el fabricante o su servicio de asistencia técnica, o
en cualquier caso, una persona con una cualificación similar deberá sustituirlo para eliminar
cualquier riesgo.
7. No haga funcionar ningún calentador con el cable o enchufe averiado o si éste funcionara
mal, por haberse caído o averiado en algún modo. Si el calentador pierde aceite, no lo use y
póngase en contacto con el centro de servicio técnico indicado en el folleto de instrucciones.
Lleve el calentador a un centro de servicio de asistencia autorizado para que lo examinen,
para los ajustes eléctricos o mecánicos o para su reparación.
8. No use el aparato a la intemperie.
9. EI calentador no se debe de usar en baños, lavaderos y otros locales similares. Nunca coloque
el calentador en donde se pueda caer en la bañera o en cualquier otro recipiente con agua.
10. No pase el cable por debajo de la alfombra. No cubra el cable con tapetes, alfombras o simi-
lares. Ponga el cable lejos de zonas transitadas y donde no pueda provocar tropezones.
11. Para desconectar el calentador, apague los mandos y luego desenchúfelo.
12. Conecte el aparato solamente en tomacorrientes debidamente polarizados.
13. No introduzca ni permita que entre ningún objeto extraño en la ventilación o salida de aire,
porque esto puede causar una descarga eléctrica, incendio o avería del calentador.
14. Para evitar incendios, no cubra las entradas o salidas de aire de ninguna manera.
No use el calentador sobre superficies blandas, como una cama, en donde las aberturas se
podrían bloquear.
15. Un calentador tiene adentro partes calientes o que causan chispas. No lo use en zonas donde
se use o almacene gasolina, pintura o líquidos inflamables.
16. Use este calentador sólo como se indica en este folleto. Todo otro uso que no sea aquel recomendado por el fabricante puede causar incendios, descarga eléctrica o lesiones a las personas.
17. Para prevenir una sobrecarga de corriente y que se quemen los fusibles, verifique que no haya
otros aparatos conectados en el mismo tomacorriente o en otro tomacorriente conectado en el
mismo circuito.
18. Es normal que el enchufe y el cable de alimentación del aparato se sientan calientes al tacto. Sin
embargo, si el enchufe o el cable están calientes o se deforman, puede ser debido a un tomacorriente gastado. Los tomacorrientes o enchufes gastados se deben sustituir antes de seguir utilizando el radiador. Si se conecta un aparato en un tomacorriente deteriorado, el cable de alimentación podría llegar a provocar un incendio.
19. Este calentador no se debe usar con un cable de extensión, porque podría recalentarse y pro-
vocar un riesgo di incendio. Sin embargo, si fuera necesario usar un cable de extensión, este
tiene que ser tamaño N° 14 AWG como mínimo y debe soportar un mínimo de 1875 vatios
de potencia. Además, tiene que ser usado solo para alimentar este radiador.
20. CControle que el enchufe esté bien conectado y que el tomacorriente sea adecuado. Recuerde
que los tomacorrientes se deterioran con el tiempo y el uso continuo. Controle periódicamente si
el enchufe muestra signos de recalentamiento o deformación. En tal caso, no utilice el tomacorriente y llame inmediatamente a un electricista.
21. Controle que el aparato y el cable de alimentación no hayan sufrido daños durante el transporte.
22. Controle que entre un elemento y otro del aparato no hayan quedado residuos de poliestireno u
otras materiales de embalaje. Podría ser necesario pasar el aspirador sobre el aparato.
23. Al encender el aparato por primera vez, déjelo funcionar durante alrededor de dos horas a la
potencia máxima, para eliminar el olor desagradable. Ventile muy bien el local donde se
encuentra el aparato durante tal operación. Es normal que el radiador produzca ligeros crujidos cuando usted lo encienda por primera vez.
24. IMPORTANTE: no cubrir en ningún caso el aparato durante el funcionamiento, ya que esto
puede provocar recalentamientos peligrosos.
CONSERVE ESTAS INSTRUCCIONE
6

COMO USAR SU CALENTADOR
MONTAJE DE LOS PIES (SISTEMA “EASY WHEEL”)
Vuelque el radiador, apoyándolo sobre una alfombra o sobre otra superficie blanda para
no arruinar la pintura.
Gire hacia afuera los soportes de las ruedas hasta el fin de carrera (fig. 1).
Coloque el radiador en posición vertical.
fig. 1
TENGA PRECAUCIÓN
Operar sólo en posición vertical (las ruedas abajo, los controles arriba).
ECONOMIZADOR DE VATIOS
Para un uso más económico, los interruptores se pueden usar
individualmente, después de que la unidad ha alcanzado la
temperatura de funcionamiento:
- solamente interruptor en posición “l“= potencia mínima
(indicador luminoso encendido)
- solamente interruptor en posición “ll” = potencia intermedia
(indicador luminoso encendido)
- ambos interruptore en pos. “l” “ll” = potencia máxima
(indicadores luminosos encendidos)
Las luces pilotos encendidas indican que el aparato está encendido.
7

1. POSICIÓN
Ponga el calentador en el piso junto a la ventana más fría del cuarto o donde usted guste. Su
calentador reducirá el efecto de corrientes de aire frío. El aparato no debe estar colocado inmediatamente debajo de un tomacorriente.
No utilice este radiador en habitaciones que tengan una superficie menor de 4 m
2
2. CONEXIÓN
EI calentador debe estar conectado a un tomacorriente polarizado de 120 V AC
que funcione perfectamente. Mantenga las telas o ropas de cama, muebles y materiales inflama-
bles a distancia del tomacorriente donde el calentador esté enchufado.
3. ENCENDIDO
Gire el termostato hacia la derecha hasta la posición máxima. Encienda los dos interruptores. Las
luces de los interruptores permanecen encendidas independientemente del ciclo del termostato.
Cuando el cuarto alcance la temperatura deseada, gire el botón del termostato muy lentamente
hacia la izquierda hasta que oiga un chasquido. Así ajustará la unidad automáticamente en el
ciclo de encendido-apagado a la temperatura configurada deseada.
4. USO DEL TERMOSTATO
EI termostato funciona según la temperatura de la habitación y no según la temperatura del radiador. Hacia la derecha - número más bajo, temperatura más baja.
Hacia la izquierda - número más alto, temperatura más alta.
Función anticongelación:
Gire el mando del termostato hacia la posición y presione los interruptores. El aparato mantendrá una temperatura mínima de 5°C así impidiendo la formación de hielo, con un consumo mínimo
de energía.
5. BOTON COMFORTEMP
Con el botón COMFORTEMP y los dos interruptores pulsados a la vez, el aparato es programado automaticamente para que éste fije y mantenga la temperatura ideal del termostato. El modo
de funcionamiento COMFORTEMP enciende la luz piloto de color verde. Para desactivar la funcion COMFORTEMP y volver a la selección manual de temperatura, pulsar otra vez el botón
COMFORTEMP.
Nota
Para apagar completamente la unidad, los interruptores ENCENDIDO / APAGADO (ON /OFF) deben ponerse en la posición de
APAGADO (OFF).
Dispositivo de seguridad
Un dispositivo de seguridad apaga el radiador en caso de reca-
lentamiento. Para encenderlo de nuevo, llame a su Centro de
Asistencia más cercano.
6. MANTENIMIENTO Y SERVICIO
Desconecte el cordón eléctrico y permita que se enfrie el radia-
LUZ
PILOTO
dor. Limpie el radiador con un trapo suave y húmedo, no use
detergentes ni cosas que lo puedan rayar. Si el radiador no se
usa por un período de tiempo manténgalo en un lugar seco. Este
aparato se ha fabricado para brindar muchos años de servicio
sin problemas. En caso de mal funcionamiento ó de duda, no
intente arreglar (reparar) el radiador por si mismo. Dirigirse al
Servicio Post-Venta más cercano (ver la lista de Servicios PostVenta adjunto).
BOTON
COMFORTEMP
Este producto está equipado con un enchufe polarizado para corriente alterna (un enchufe que
tiene una espiga más ancha que las demás). Dicho enchufe se puede introducir en el tomacorriente en una sola posición, lo que constituye una seguridad. Si usted no consigue introducir
completamente el enchufe en el tomacorriente, pruebe a girar el enchufe. Si igualmente no consigue enchufarlo bien, llame a un electricista para sustituir el tomacorriente viejo. Respete la función de seguridad del enchufe polarizado.
8
 Loading...