

Page 1
De’Longhi Appliances via Seitz, 47 31100 Treviso Italia www.delonghi.com
5713200041_00_0221 - Printed in China
Page 2
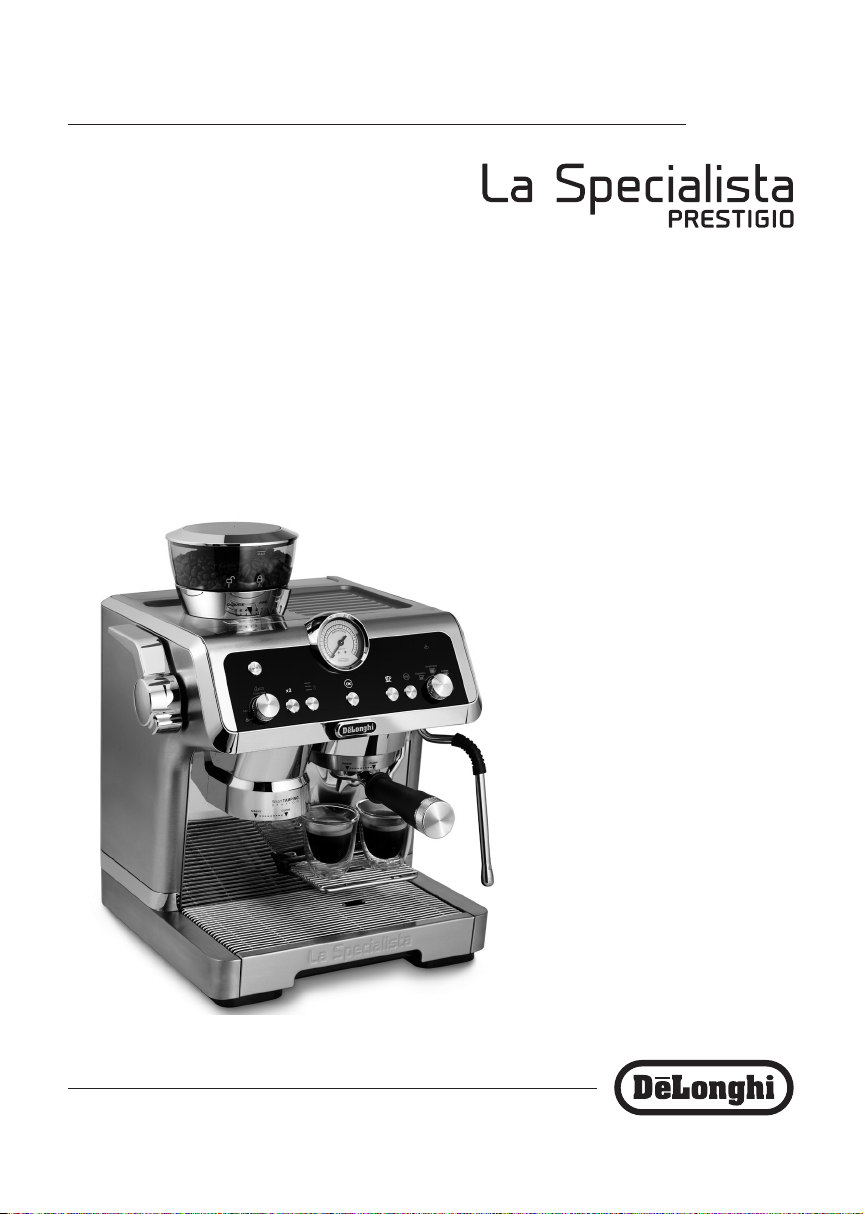
EC935X
COFFEE MAKER
Instructions for use. Keep these instructions
Visit www.delonghi.com
for a list of service centers near you.
ELECTRIC CHARACTERISTICS
120 V~ 60 H z 1450 W
MACHINE À CAFÉ
Mode d’emploi . Conservez cette notice
Visitez www.delonghi.com pour y voir une liste des
centres de réparation proches de chez vous.
CARACTÉRISTIQUES ÉLECTRIQUES
120 V~ 60 H z 1450 W
CAFETERA
Repase y guarde estas instrucciones.
Lea cuidadosamente este instructivo
antes de usar su aparato.
Visite www.delonghi.com para ver la lista de
centros de servicios cercanos a usted.
CARACTERISTICAS ELECTRICAS:
120 V~ 60 H z 1450 W
Page 3
EN
FR
ES
page 4 page 24 pág. 45
B1
B17
B16
B14
B15
B2 B3 B4 B5 B6 B7 B8
C1
C2
C4
C3
C9
C7
C6
C8
B13
B12
B11
C5
C10
Decalcicante per macchine da caè
Descaler for coee machines
Détartrant pour machines à café
Entkalker für Kaeemaschinen
De’Longhi Appliances s.r.l.
Via L. Seitz, 47 31100 Treviso - ITALY
B10
B9
Tel. +39 0422 4131
5413218631/04.15
2
Page 4
A20
A21
A19
A18
A1
A2 A3
A4
A5
A6
A12
A13
A14
A15
A16
A17
A7
A10
A9
A8
A11
3
Page 5

IMPORTANT SAFEGUARDS
When using electrical machines, basic safety precautions should always be followed, including the following:
• Read all instructions.
• Use this machine only as described in this instruction manual.
As with any electrical machine, the instructions aim to cover as many situations as possible. Caution and
common sense should be used when operating and installing this machine.
• To protect against re, electrical shock and personal injury, do not immerse cord, plug or machine in
water or other liquid.
• Never allow the machine to be used by children.
• Unplug from the outlet when not in use and before cleaning. Allow to cool before tting or taking o
parts, and before cleaning the machine.
•
Do not operate with a damaged cord or plug, or after the machine malfunctions, or has been damaged in any
manner. Return the machine to the nearest authorized service facility for examination, repair or adjustment.
• The use of accessory attachments or spare parts not recommended by the machine manufacturer may
result in re, electrical shock or personal injury.
• Do not use outdoors.
• Do not let the cord hang over the edge of the table or counter, or touch hot surfaces.
• Do not place on or near a hot gas or electrical burner, or in a heated oven.
• Plug cord into the wall outlet. To disconnect, turn any control to “o”, then remove plug from wall outlet.
• Do not use the machine for other than the intended use. This machine is to be utilized for domestic use
only. Any other use is to be considered improper and therefore, dangerous.
WARNING: To reduce the risk of re or electric shock, do not remove the exterior of the unit or the cover.
Don’t attempt to repair or modify the machine, doing so will void the warranty. Repair should be done by
authorized service personnel only!
SAVE THESE INSTRUCTIONS
THIS PRODUCT IS FOR HOUSEHOLD USE ONLY
SHORT CORD INSTRUCTIONS
- A short power cord is provided to reduce risks resulting from becoming entangled in or tripping over a
longer cord.
- Longer, detachable power supply cords or extension cords are available and may be used if care is exercised in their use.
- If an extension cord is used, the marked electrical rating should be at least as great as the electrical rating
of the machine. If the machine is provided with 3- wire, grounding type cord, the extension should be a
GROUNDING TYPE 3 - WIRE CORD. The longer cord should be arranged so that it will not drape over the
counter-top or table top where it can be pulled on by children or tripped over.
-
Your product is equipped with a polarized alternating current line plug (a plug having one blade wider
than the other). This plug will t into the power outlet only one way. This is a safety feature. If you are unable to insert the plug fully into the outlet, try reversing the plug. If the plug should still fail to t, contact
your electrician to replace your obsolete outlet. Do not defeat the safety purpose of the polarized plug.
4
Page 6
1. DESCRIPTION
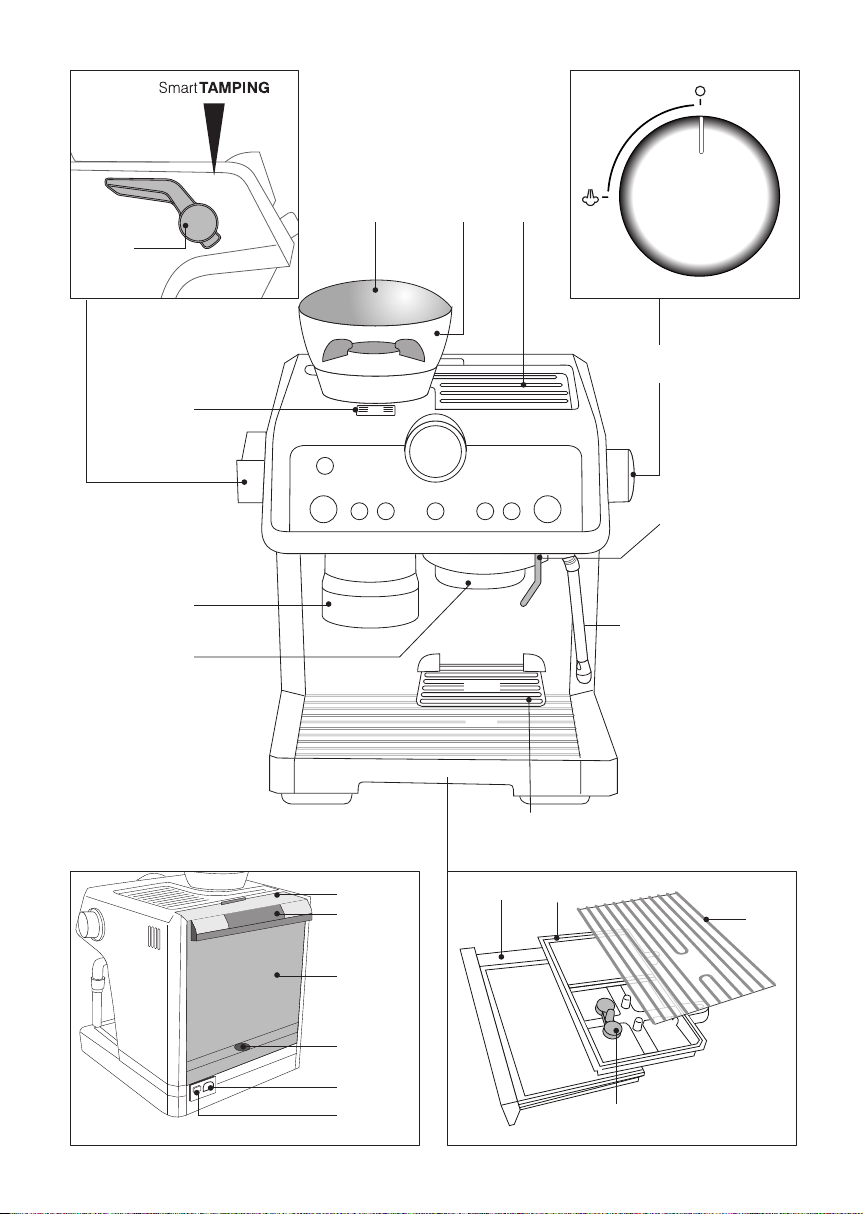
1.1 Description of appliance - A
A1. Beans container lid
A2. Beans container
A3. Cup tray
A4. Steam dial
A5. Hot water outlet
A6. Steam wand and nozzle
A7. Cup grille for espresso
A8. Cup grille for glasses or mugs
A9. Drip tray grille
A10. Drip tray
A11. Drip tray water level indicator
A12. Water tank lid
A13. Water tank extraction handle
A14. Water tank
A15. Water softener lter housing
A16. Power cord connector socket
A17. Main switch (ON/OFF)
A18. Coee outlet
A19. Coee mill outlet (tamping station)
A20. Presser lever
A21. Cover to access the
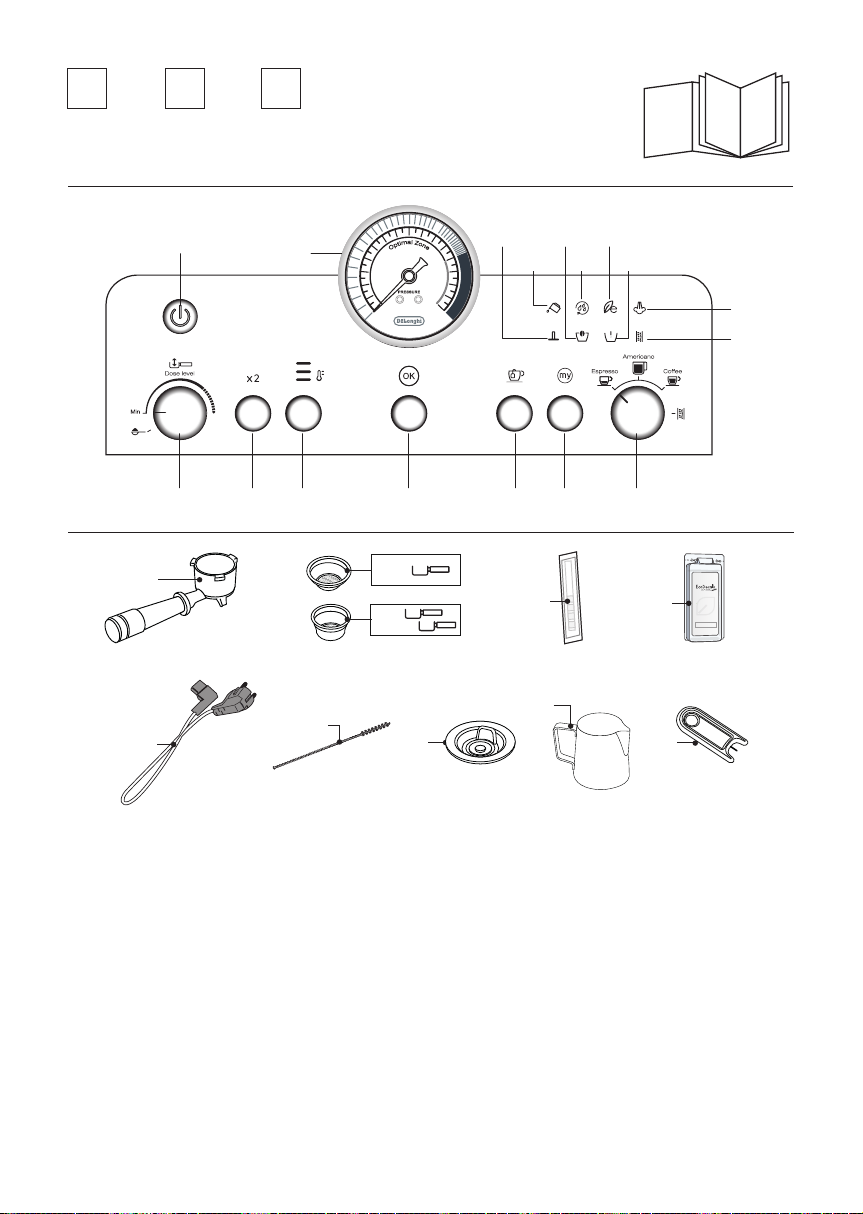
1.2 Description of control panel - B
B1. ON/Standby button
B2. Coee dose dial
B3. “X2” button: to use the 2 coees lter
B4. Coee Temperature button
B5. “OK” button: to deliver the beverage/conrm
B6. Hot water button
B7. “My” button: to customise beverage quantity
B8. Mode selector dial:
• Espresso
• Americano
• Coee
• Descaling
B9. Descale light
B10. Steam ready light
B11. No bean container light
B12. Energy saving light
B13. Cleaning light (see “8.1 Cleaning of the coee outlet”)
B14. Bean container empty
B15. No water light
B16. Tamping light
B17. Pressure gauge
coee mill coee guide
1.3 Description of accessories - C
C1. Portalter
C2. 1-cup coee lter
C3. 2-cups coee lter
C4. “Water hardness test “ indicator paper
C5. Descaler
C6. Power cord
C7. Tube brush
C8. Coee outlet cleaning disk accessory
C9. Milk pitcher
C10. Cleaning needle for steam nozzle
1.4 Recommended optional cleaning accessories
Visit Delonghi.com for more information.
Cleaning tab
(see “8.1 Cleaning of the coee outlet”)
Cleaner
EAN: 8004399333307
5
Page 7
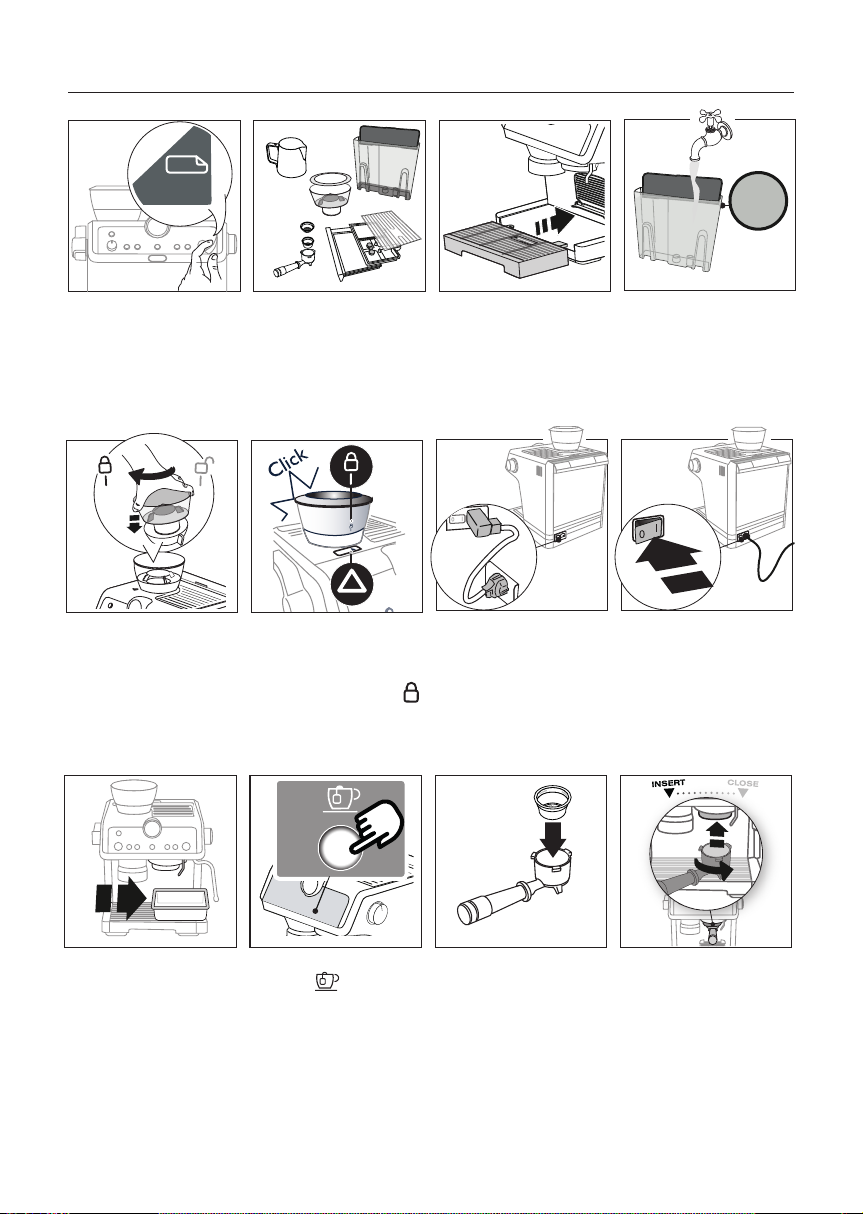
2. PREPARING YOUR MACHINE FOR FIRST USE
REMOVE
PROTECTION FILM
BEFORE USE
REMOVE
PROTECTION FILM
BEFORE USE
MAX
REMOVE
PROTECTION FILM
BEFORE USE
MAX
MAX
1. Remove stickers and packing materials.
5. Insert the Bean container
(A2) in the coee grinder.
1
2. Wash and dry all accessories (including water
tank) with warm water
and washing-up liquid
5
6. The container is correctly
inserted when the arrow
is lined up with the
symbol and you hear a
“click”.
2
3. Insert the drip tray (A10)
complete with cup grill
(A8) and (A9).
.
6
7. Plug the power cord connector (C6) into the socket (A16) at the back of
the machine, then plug
into the mains socket.
3
4. Remove the water tank
(A14) and ll with fresh
clean water, taking care
not to exceed the MAX
level.
7
8. Make sure the main
switch (A17) at the
back of the machine
is pressed and in the I
position.
4
8
9. Place a container with a
minimum capacity of 100
ml under the hot water
spout (A5).
9
10. Press (B6) to rinse.
10
11. Insert coee lter ((C2)
or (C3)) in the portalter
(C1).
6
11
12. Attach the lter holder
lter to the machine. To
attach correctly, align the
lter holder handle with
“INSERT”, then turn the
handle to the right until
it is aligned in the “CLOSE”
position.
12
Page 8
REMOVE
PROTECTION FILM
BEFORE USE
MAX
PREPARING YOUR MACHINE FOR FIRST USE
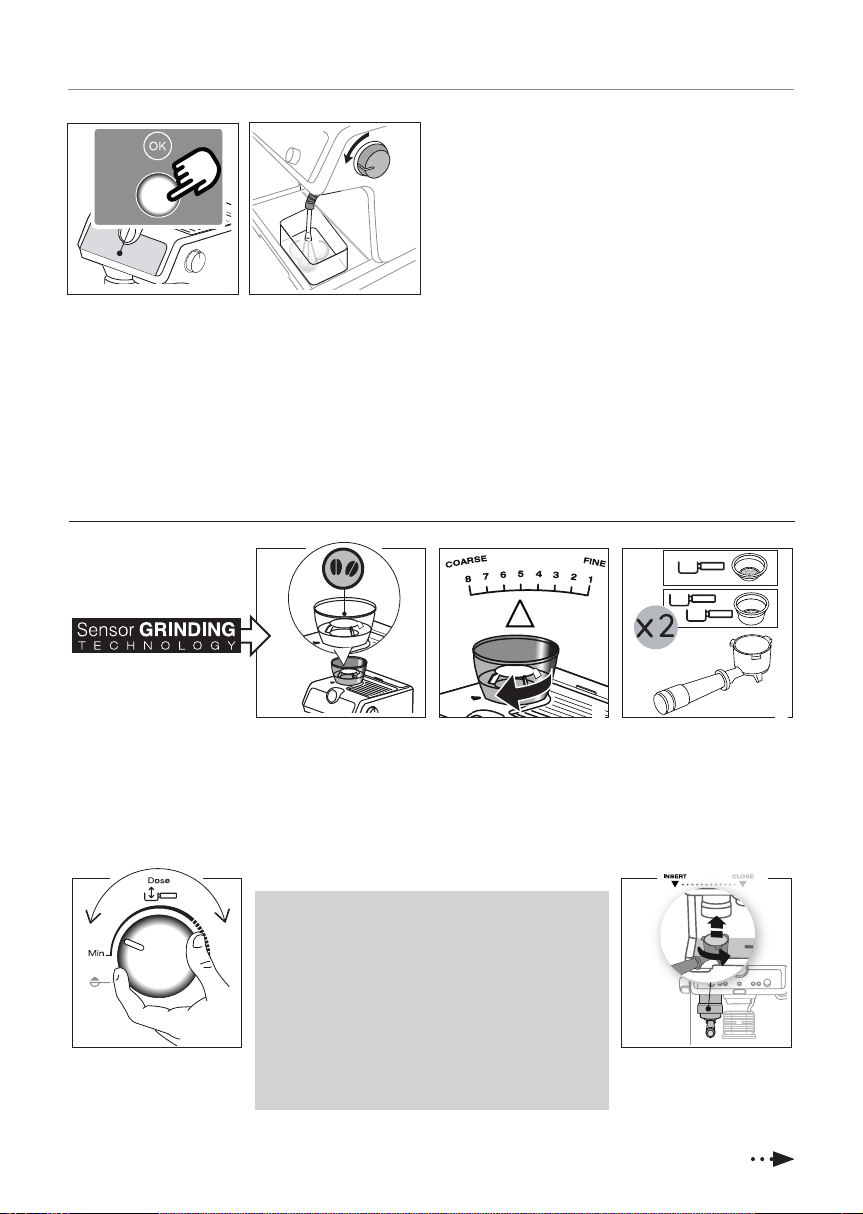
Step 1-grinding
13. Place a container under
the portalter and frothing wand and press OK
(B5). Repeat 2 times to
rinse the coee circuit.
3. COFFEE DELIVERY
Step 1-grinding
14. Open the steam dial for a
few seconds. For optimal
steam performance we
recommend you repeat
this action 3 or 4 times.
This is to purge the steam
circuit before frothing or
steaming your milk.
1 2 3
1. Add beans to hopper
(A2). Fresh is best; ll in
just with the quantity
you need.
2. The factory setting is 5
(medium grinding). If you
are not satised, adjust
the level according to
your personal taste and
the type of coee (do it
while grinding).
3. Select single or double
dose lter and place in
the portalter (C1). If you
are using the double lter,
press the X2 button (this
will double the volume of
the espresso shot as well).
4
4. Set the dose level by
adjusting the dial (B2)
starting from the min.
position.
When using the coee grinder for the rst time, leave the
knob to Min position. At the beginning, it is normal for
a few attempts to be needed before nding the correct
grinding level and quantity. We recommend starting
by using the default values, then if necessary changing
them according to the tips in section “3.1 Adjust dose”.
5
5. Attach portalter.
Once locked into place, grinding will start.
7
Page 9
Step 1-grinding
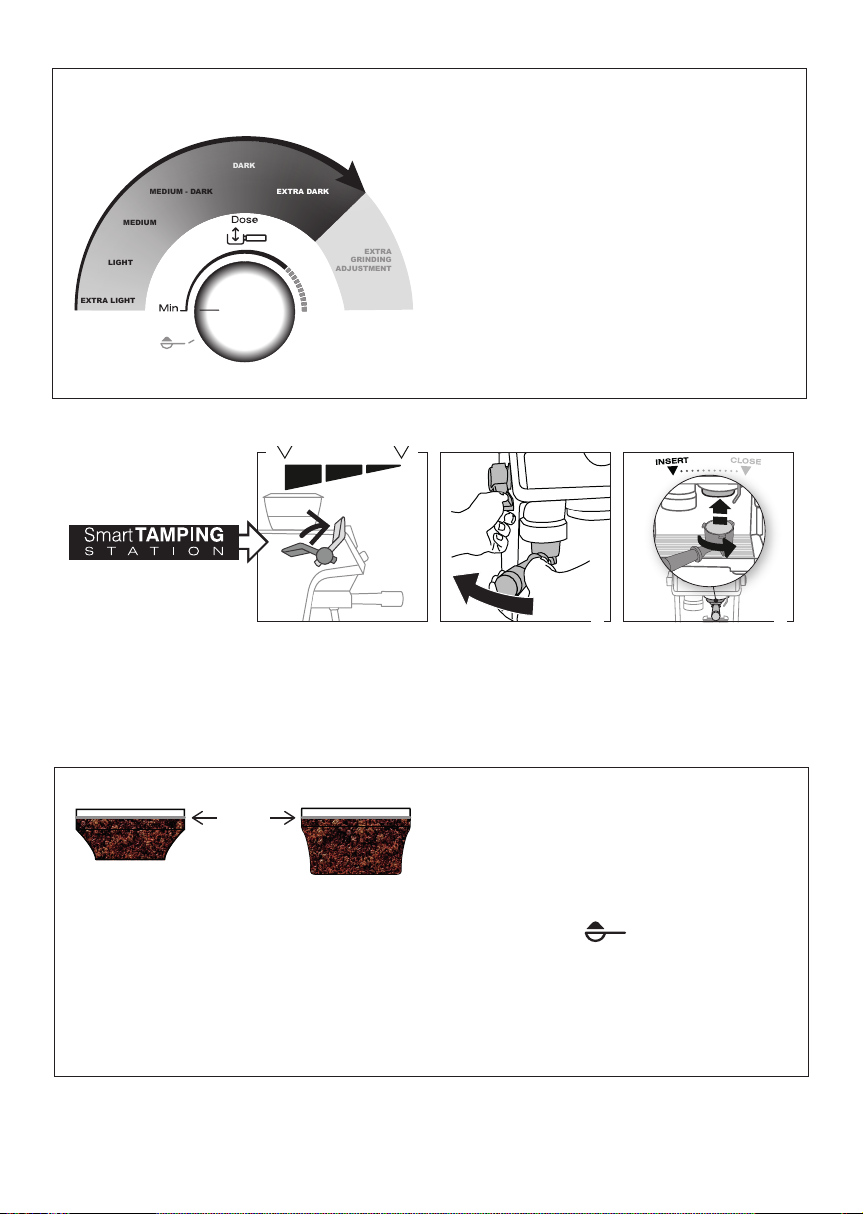
3.1 Adjust dose
MEDIUM - DARK EXTRA DARK
MEDIUM
LIGHT
EXTRA LIGHT
Step 2-tamping
DARK
EXTRA
GRINDING
ADJUSTMENT
Each variety of coee beans can behave dierently during grinding and this is the reason why setting the dose at the beginning
might require extra care.
With this illustration we give you some indications on how to
regulate the dose. Please note these suggested setting ranges,
based on the roasting level, are certainly a good starting point,
but they might slightly vary depending on specic composition
of your coee beans.
1. Set the dose starting from the minimum position.
2. Look at which roasting type your coee is and based on
that, turn the knob slowly, referencing the ranges.
1. After grinding, pull the
lever (A20) down fully
(do not remove portalter). For a perfect result,
you can do it twice.
3.2 The perfect dose
Perfect
dose
• The coee lters have a mark inside to identify the level for
perfect dose.
• Ensure the coee is at the recommended dosage level after
tamping. You may need to adjust the dosage dial more
times before reaching the perfect dose.
• If your coee is over or under extracted and the dose is
within the perfect dose range, adjust the grinder settings
ner or coarser (see Step 1 - grinding).
1 2 3
2. Keep the lever down
while removing the portalter. Once it is done,
place back the lever in its
original position.
3. Check the dose (see “3.2
The perfect dose”) and
attach the portalter
(C1) to the brewing unit
(A18).
Over extracted coee (pouring too slowly) needs coarser
grind
Under extracted coee (pouring too fast) needs ner grind.
• Barista tip: Pull the lter holder out while the tamper is
still down for polished nish of coee.
• Using pre-ground coee:
- add the pre-ground coee in the lter
- turn the dial to ;
- attach the lter holder to the machine;
- pull the lever down.
• Please note: If any residual ground coee remains after
tamping, it will not impact the quality of the extraction.
8
Page 10
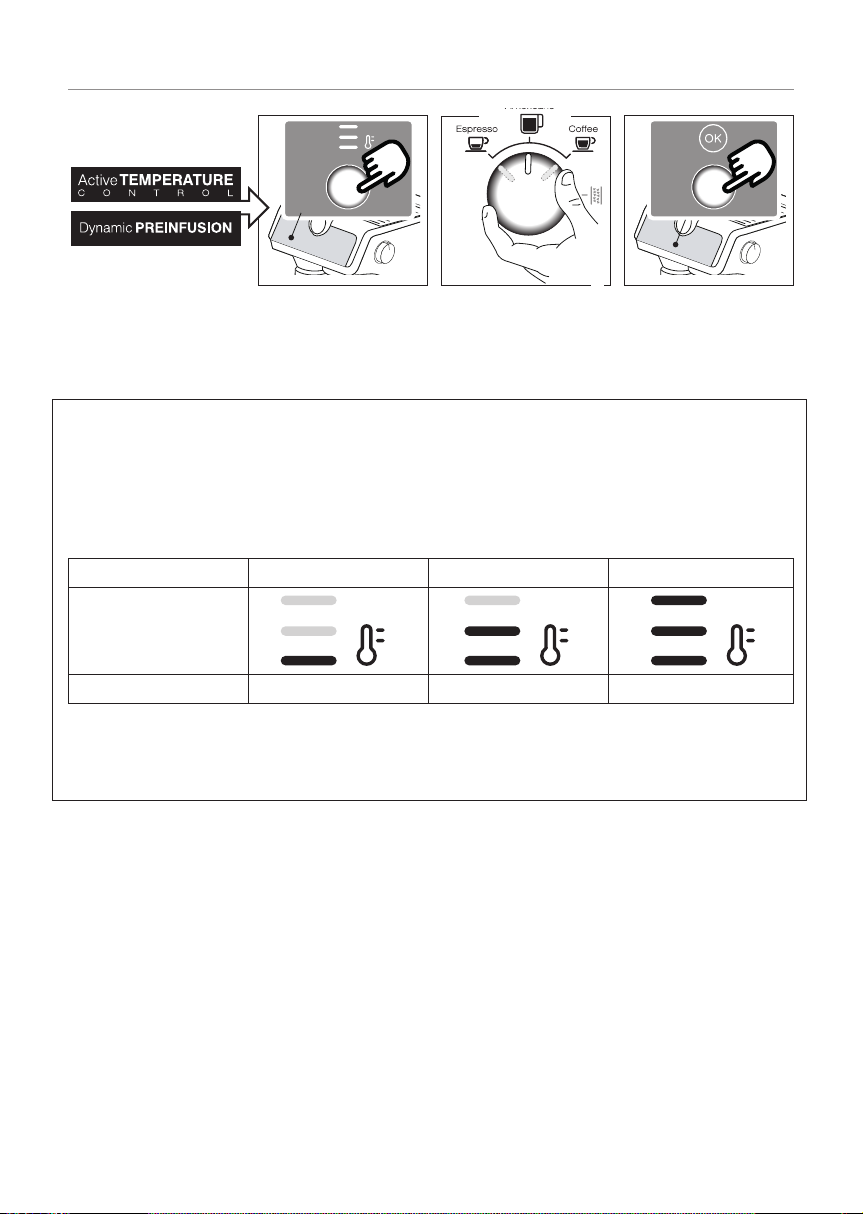
COFFEE DELIVERY
Step 1-grinding
Step 2-tamping
Step 3-brewing
1 2
3. Press OK to start brewing (preinfusion and
infusion). Coee delivery
stops automatically.
1. Select the temperature (see “3.3 Focus on
temperature”).
2. Select your beverage.
3.3 Focus on temperature
The water temperature is precisely controlled throughout the entire brewing process to ensure the ideal temperature stability for the
extraction. La Specialista Prestigio oers up to 3 infusion temperature* proles to select, correspondent to a range of temperatures
between 92°C and 96°C.
Coee bean varieties as well as roasting colours require their own specic temperature setting for the best extraction: Robusta coee
beans prefer lower temperature; Arabica prefers higher temperature. The same is applicable to beans with a darker roasting colour or
to freshly-roasted beans than those degassed over time.
Temperature level MIN MED MAX
Corresponding light
Coee Beans Roasting Range DARK MEDIUM to DARK LIGHT to MEDIUM
* This temperature refers to the water inside the thermoblock. This diers from the temperature of the beverage in the cup or the
temperature measured when the beverage comes out from the portalter spouts.
9
Page 11
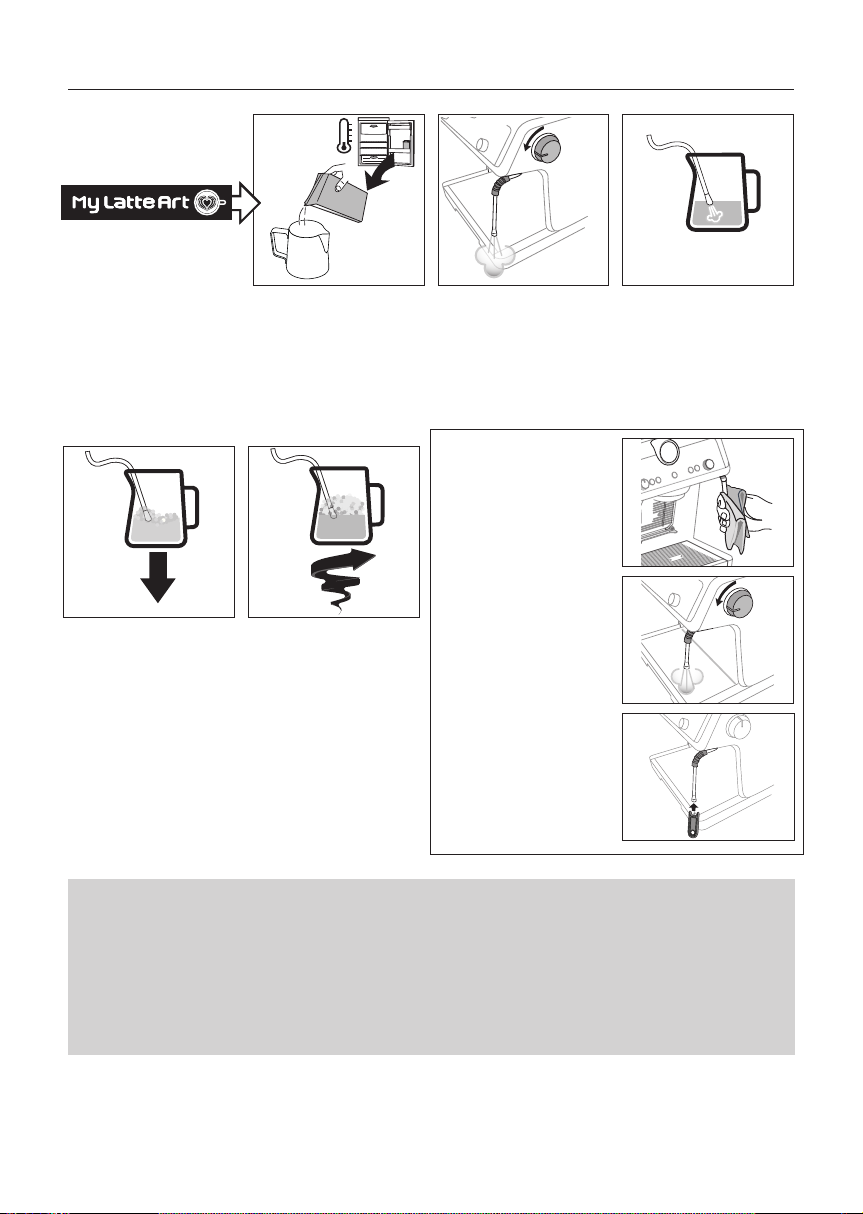
4. MAKING MILK BEVERAGES
5°C
Manual
frothing
Manual
frothing
4. Keep the steam nozzle just
on the surface, careful not
to make big bubbles by
letting too much air in.
5°C
1. Fill the milk pitcher (C9)
with fresh cold milk.
Milk will up to triple in
volume.
4 5
5. Insert the steam nozzle
just under the milk: this
create a vortex. Once the
desired temperature is
reached turn the steam
knob o and wait till
steam stops completely
before removing jug.
1 2 3
2. Turn the steam wand (A6)
on briey to purge condensation. Make sure the
wand is pointing away
from you.
Cleaning the steam wand
1. After every use, remove
with a soft damp cloth
any milk residues from the
steam wand. For perfect
cleaning, we recommend
Eco MultiClean: it ensures
hygiene by removing milk
proteins and fats and can
be used to clean the whole
machine.
2. Use the steam for a deeper
cleaning.
3. Wait that the steam wand
cool down and open the 3
holes of the nozzle with
the Cleaning tool to maintain the better usability of
the steam wand.
3. To make the froth, put the
nozzle on the surface of
the milk and air will catch
by the mixing of milk and
steam.
Barista tips:
• Fresh is best : Be sure to use fresh cold milk every time.
• For best results, store the milk pitcher in the refrigerator.
• Whole milk is recommended for best results. Dairy and Non Dairy alternatives will vary in ease of texturing depending
on type.
• After foaming milk, eliminate unwanted bubbles by swirling the pitcher.
10
Page 12
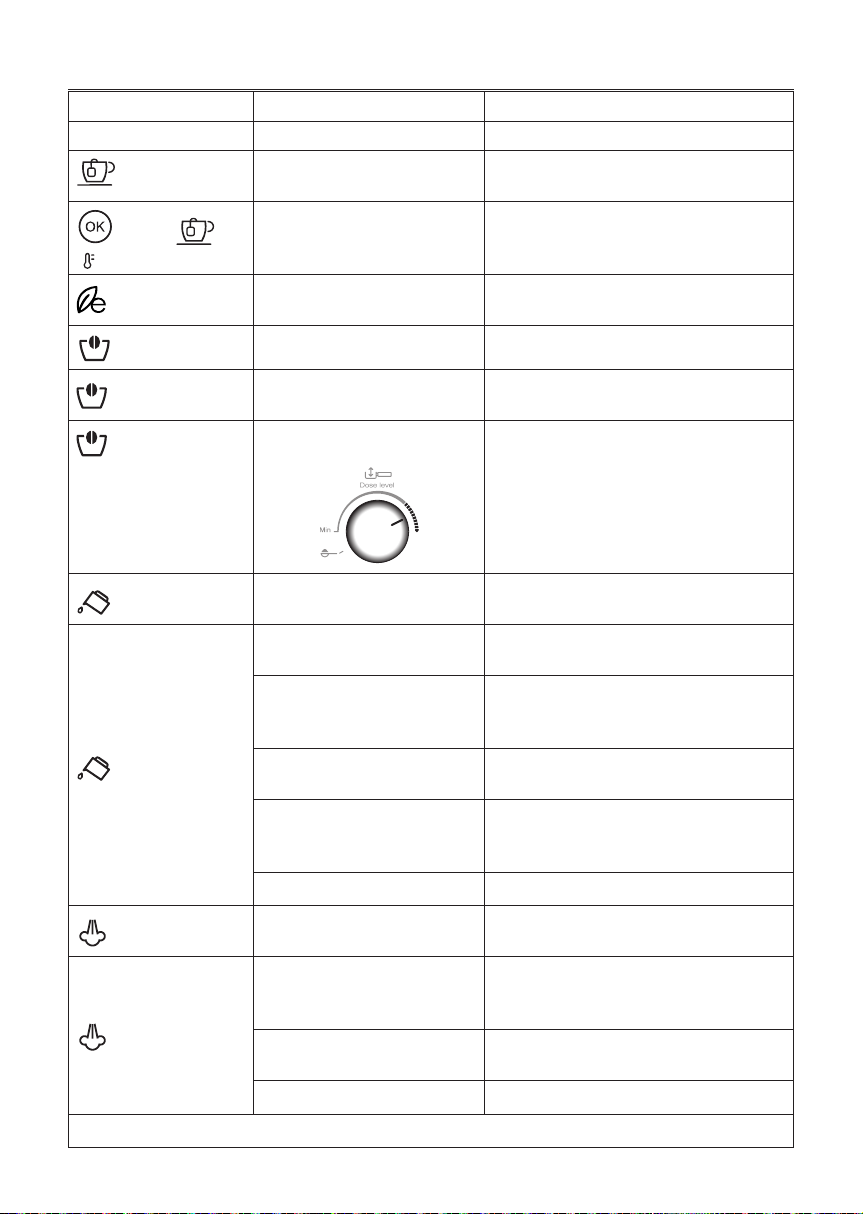
5. EXPLANATION OF LIGHTS
LIGHTS EXPLANATION OF LIGHTS OPERATION
All the lights ash briey Turning the machine on Self-diagnosis
on
(white) +
( selected temperature is on)
on
on
ashing
ashes briey at
regular intervals
on
The appliance is being turned on for the rst
time and the water circuit must be lled
The machine is ready to delivery
Energy saving is enabled If you want to disable the function, see section “6.
The beans container (A2) is empty Fill the beans container
You are trying to grind coee but the
beans container (A2) is empty
The dial (B2) has been turned to the
maximum adjustment possible
Proceed as described in section “2. Preparing your
machine for rst use”.
Prepare the machine and proceed with delivery
Menù settings”
Fill the beans container
When not enough coee is ground to reach the correct quantity, select the new grinding range as described in section “6. Menù settings”.
on
ashing
on
ashing
Insucient water in tank (A14) or
water tank not inserted correctly
You are trying to deliver a beverage but
water tank is empty
The grinding is too ne and the coee is
delivered too slowly or not at all
The lter (C2) or (C3) is blocked Clean as described in section “8. Cleaning and
The tank (A14) has been inserted incorrectly and the valves on the bottom are
not open
Scale in the water circuit Descale as described in section “10. Descaling”
(If Energy saving is not activated) The
appliance is on and ready for use
The appliance is on and energy saving
is enabled. The steam dial (A4) is in the
steam delivery position
The appliance is heating up to be ready
for use
The appliance is delivering steam
11
Fill the tank or extract the tank and put it back
correctly
Fill the tank
Extract the lter holder and repeat the operations to
make the coee, bearing in mind the indications in section “3.1 Adjust dose” and table “3.2 The perfect dose”.
maintenance”.
Press the tank down lightly to open the valves on the
bottom
The appliance is at the right temperature to deliver
steam. To deliver steam, turn the steam dial (A4)
The light ashes to indicate that the appliance is preparing to deliver steam. Delivery begins as soon as
the appliance is at temperature
The appliance is at temperature when the light remains on steadily
…
→
Page 13
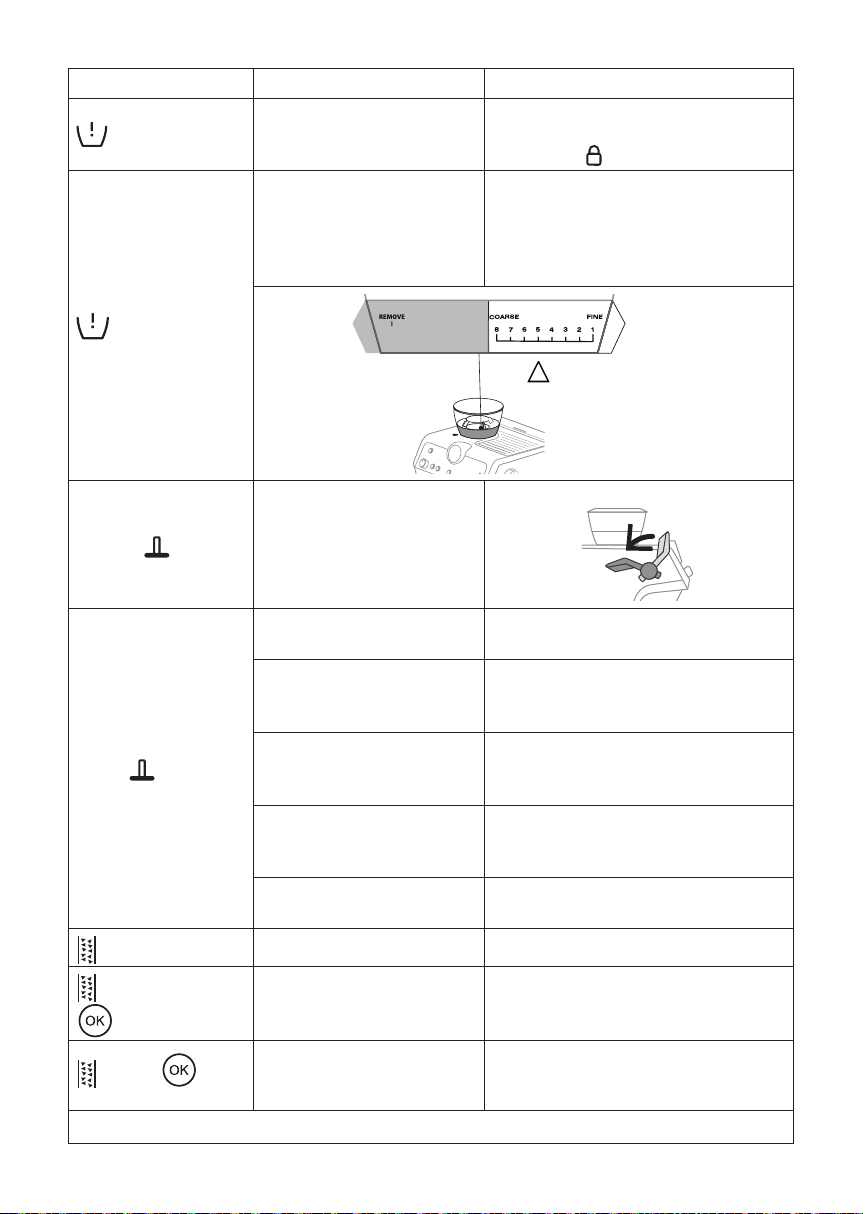
LIGHTS EXPLANATION OF LIGHTS OPERATION
The bean container (A2) is not inserted
on
The ness of the grind regulation is incorrect (or out of correct range)
Insert bean container or check that is completely locked.
The container is correctly inserted when the arrow is
lined up with the symbol and you hear a “click”.
Move the selector within the 8 levels from coarse to
ne, keeping in mind to:
• Always adjust the coee mill during the grinding
• Adjust one grinding level at a time and make at
least 5 coees before adjusting again
ashing
on
ashing
on (red)
ashing (red) +
ashing
(orange)
on (red) + on
(white)
OUT of correct
range
Presser lever (A20) is not in the correct
position
Pressing is needed The coee has just been ground and the lter holder
The portalter (C1) has been detached
from the coee mill without pressing
The portalter has been detached before grinding has ended or pressing has
been performed too quickly
The slide of coee grinder is clogged Clean as described in section “8.5 Cleaning the
The burrs are blocked by foreign matter Remove the foreign matter and clean the burrs as de-
Descaling must be performed
Descaling is underway Complete the operation as described in section “10.
The rinsing cycle of descaling must be
performed
12
Turn the lever back in place.
is attached to the coee mill
Detach the portalter and press the coee as described in section “3.2 The perfect dose” “add the
preground coee in the lter”
Repeat grinding
“Smart tamping station”” and section “11. Troubleshooting” in correspondence to the picture.
scribed in section “8.3 Cleaning the burr”.
Descale the appliance as described in section “10. Descaling”
Descaling”: the light comes white when the rinsing
cycle of descaling is underway
Correct
range
…
→
Page 14
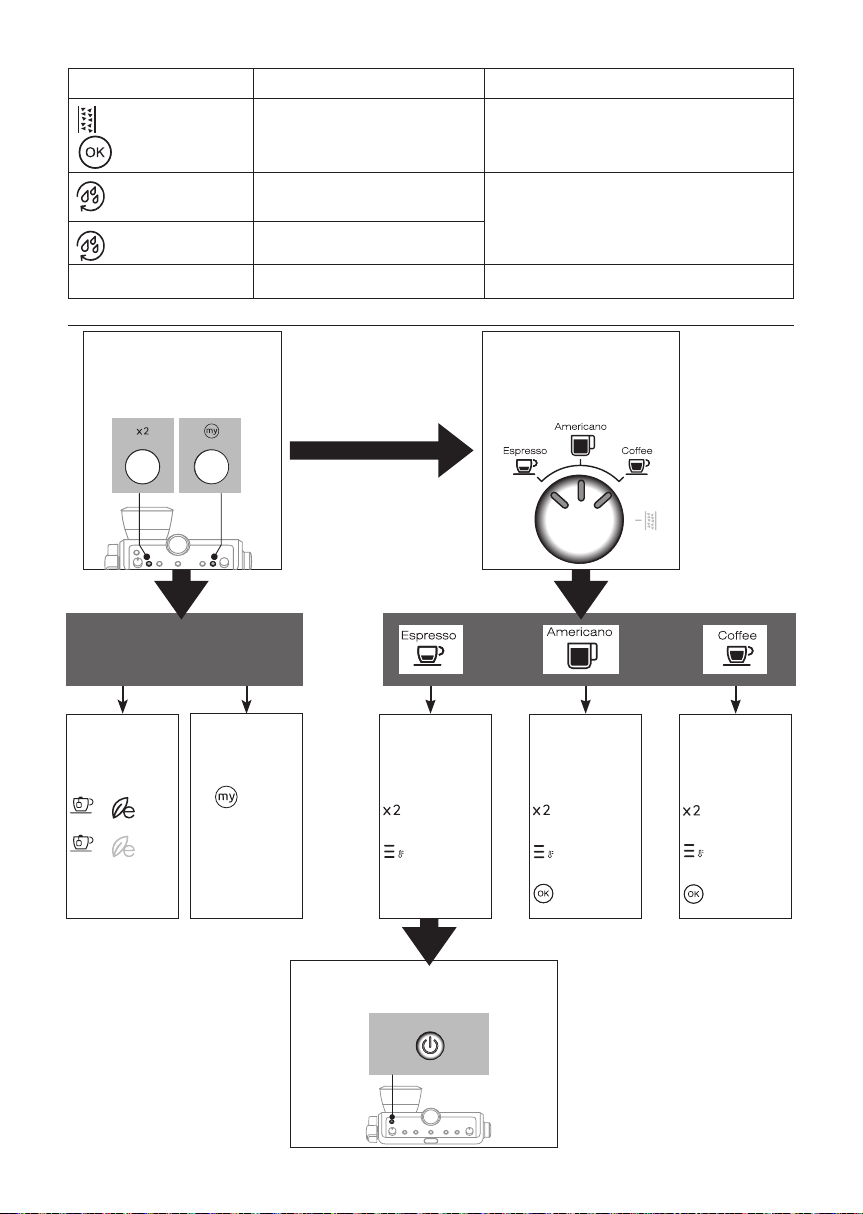
LIGHTS EXPLANATION OF LIGHTS OPERATION
ashing (red) +
ashing (white)
on (orange)
ashing (orange)
All the lights ash
The rinsing cycle of descaling is
underway
Cleaning of the coee outlet must be
performed
Cleaning of the coee outlet is underway
General alarm Contact Customer Services
See section “8.1 Cleaning of the coee outlet”
6. MENÙ SETTINGS
Enter the setting menu
Press both buttons for 5 seconds
to enter setting menu
Select the setting
Energy saving
Press button to set:
➡ ON
➡ OFF
Default values
until the correspon-
ding light starts
Keep pressed
button
for 5 seconds,
ashing
Select the setting
Turn the knob to select the drink
light corresponding to the function to set
Extra grinding
Water hardness
adjustment
Press button to set:
➡1st range
➡ 2nd range
Press button to set:
➡soft
➡
medium
➡
hard
Auto o
Press button to set:
➡9 minutes
➡
1,5 hours
➡
3 hours
Save new settings:
Press the ON/Standby button to conrm.
13
Page 15
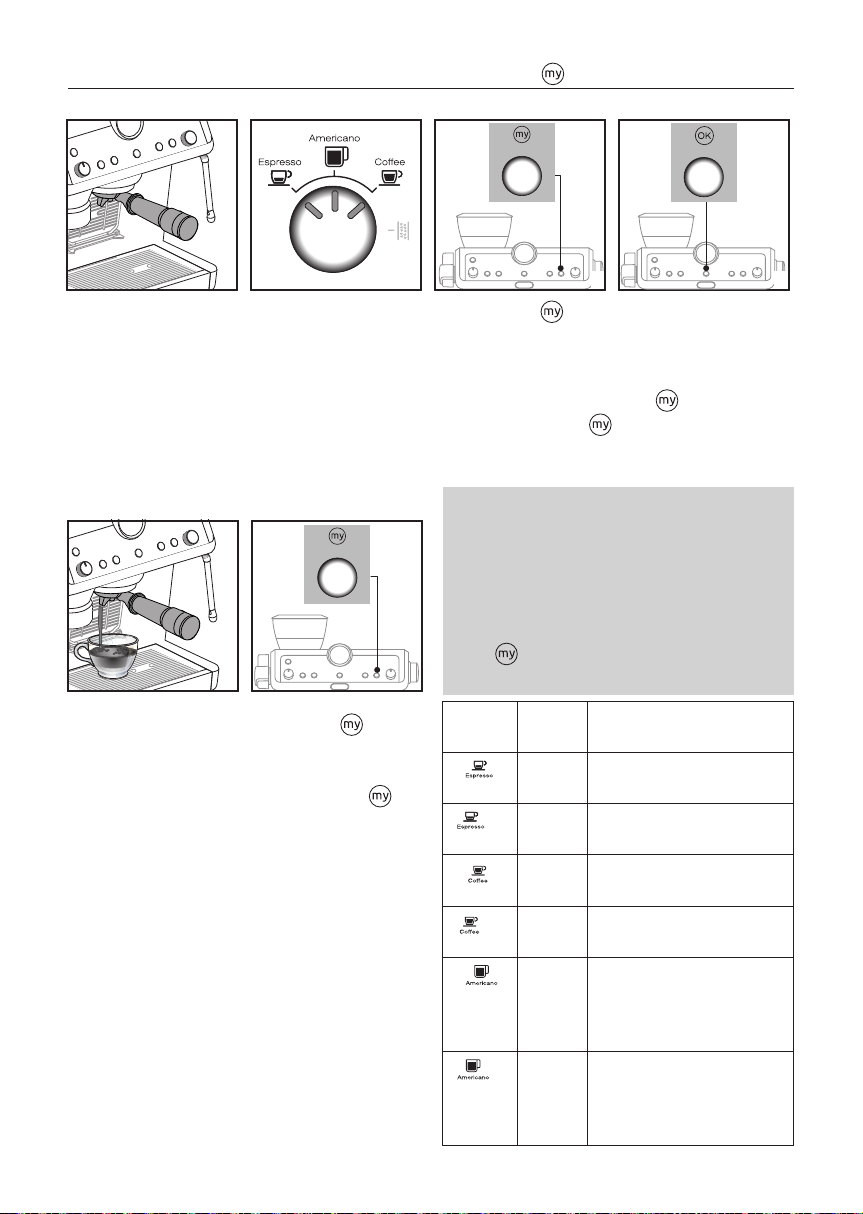
7. CUSTOMISING THE QUANTITY OF COFFEE BEVERAGES WITH THE BUTTON (B7)
1
1. Prepare the appliance to
deliver the beverage you
want to make. Prepare the
coee dose and attach the
portalter to the coee
outlet.
5
5. When you have reached
the desired quantity of
the beverage, press the OK
button again. If the recipe
includes another ingredient, it starts delivery:
when you have reached
the desired quantity, press
the OK button again.
2. Turn the dial (B8) to
select the drink to be
programmed.
6
6. Press the button to
save the new setting. The
appliance is ready for use
again and the button remains on.
If you do not want to save the
new setting, press any other
button.
2
3. Press the button
(B7): the light corresponding to the OK
button (B5) comes on
steadily and the light cor-
responding to the
button ashes.
Please note:
• You can programme coee beverages quantities, but not
steam and hot water as those are manual functions.
• Programming changes the quantity of the beverages, but
not the amount of coee ground.
• “X2” beverages can be programmed separately.
• To reset the default beverage quantities, press and hold
the button until it goes o. The selected beverage is
reset to the default values.
Coee
Recipe
14
X2
X2
X2
Default
quantity
1.83 oz
/ 35 ml
2.37 oz
/ 70 ml
2.70 oz
/ 80 ml
5.41 oz
/ 160 ml
4.06 oz
/ 120 ml
8.12 oz
/ 240 ml
3 4
4. Press the OK button (B5)
to start delivering the
beverage. The lights corresponding to the OK and
buttons ash.
Programmable quantity
from 0.84 to 3.04 oz /
from 25 to 90 ml
from 1.69 to 6.08 oz /
from 50 to 180 ml
from 1.69 to 6.08 oz /
from 50 to 120 cc
from 4.06 to 8.12 oz /
from 120 to 240 ml
• espresso: from 0.84 to 2.02 0z/
from 25 to 60 ml
• water:
from 0.84 to
from 25 to 120 ml
• espresso: from 1.69 to 6.08 oz/
from 50-120 ml
• water: from 1.69 to 8.12 oz/
from 50 to 240 ml
4.06 oz /
Page 16
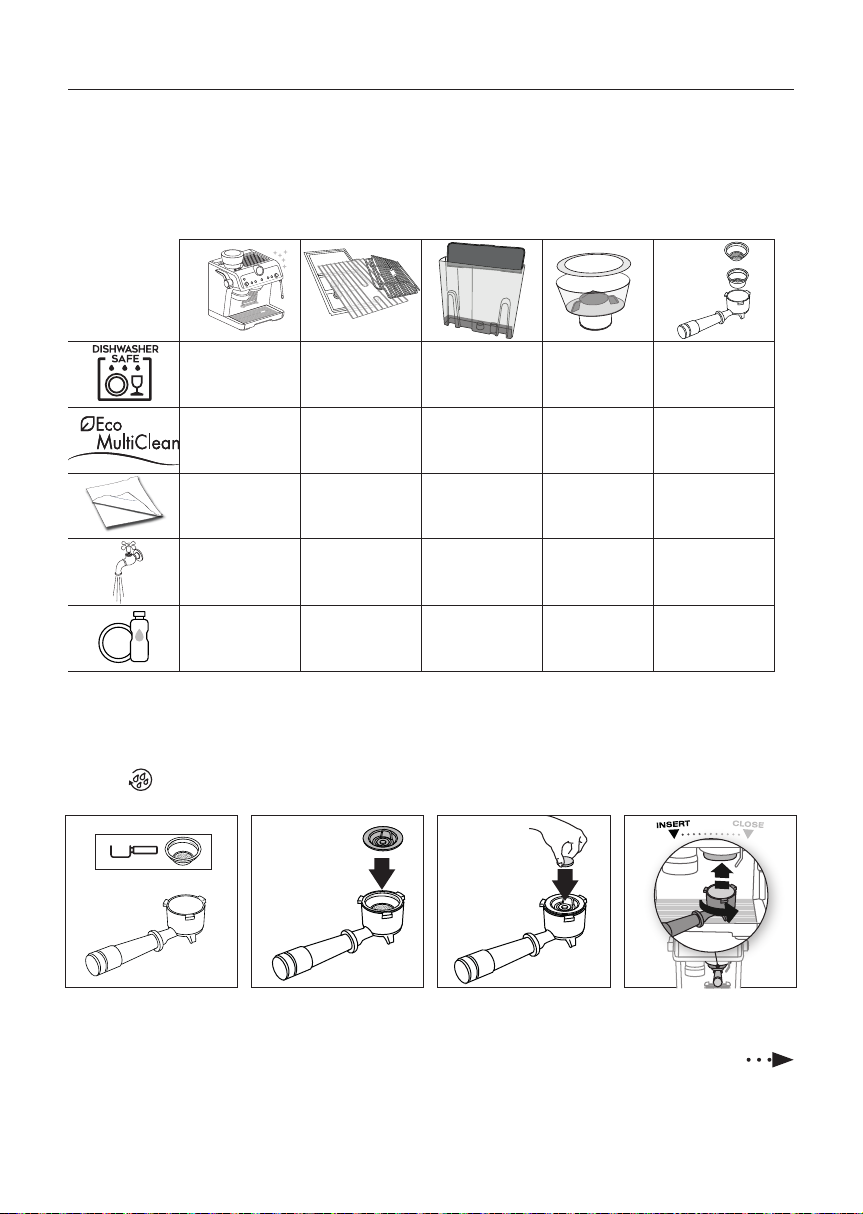
8. CLEANING AND MAINTENANCE
Important!
• Do not use solvents, abrasive detergents or alcohol to clean the coee machine.
• Do not use metal objects to remove encrustations or coee deposits as they could scratch metal or plastic surfaces.
• If the appliance is not used for more than a week, before using it again, we recommend you perform a rinse cycle.
Danger!
• While cleaning, never immerse the coee maker in water. It is an electrical appliance.
• Before cleaning the outside of the appliance, turn it o, unplug from the mains socket and allow to cool.
(A7)+(A8)+ (A9)
✕
✓
✓
✕
✕
8.1 Cleaning of the coee outlet
When the light comes on (orange) (B13), you have to proceed cleaning the coee circuit. To run the cleaning, you have to purchase dedicated cleaning tabs for coee makers. For more info, please visit Delonghi.com.
✓
✕ ✕ ✕ ✕
✕ ✕
✓ ✓ ✓ ✓
✓ ✓
✕ ✕ ✕
✓
✕
✕
✓
1 2 3 4
1. Insert the 1-cup coee
lter (C2) in the portalter (C1);
2. Put on the coee lter
the special disk accessory (C8) and press it to
the bottom;
3. Put on the accessory the
cleaning tab;
15
4. Attach the portalter to
the coee outlet (A18);
Page 17
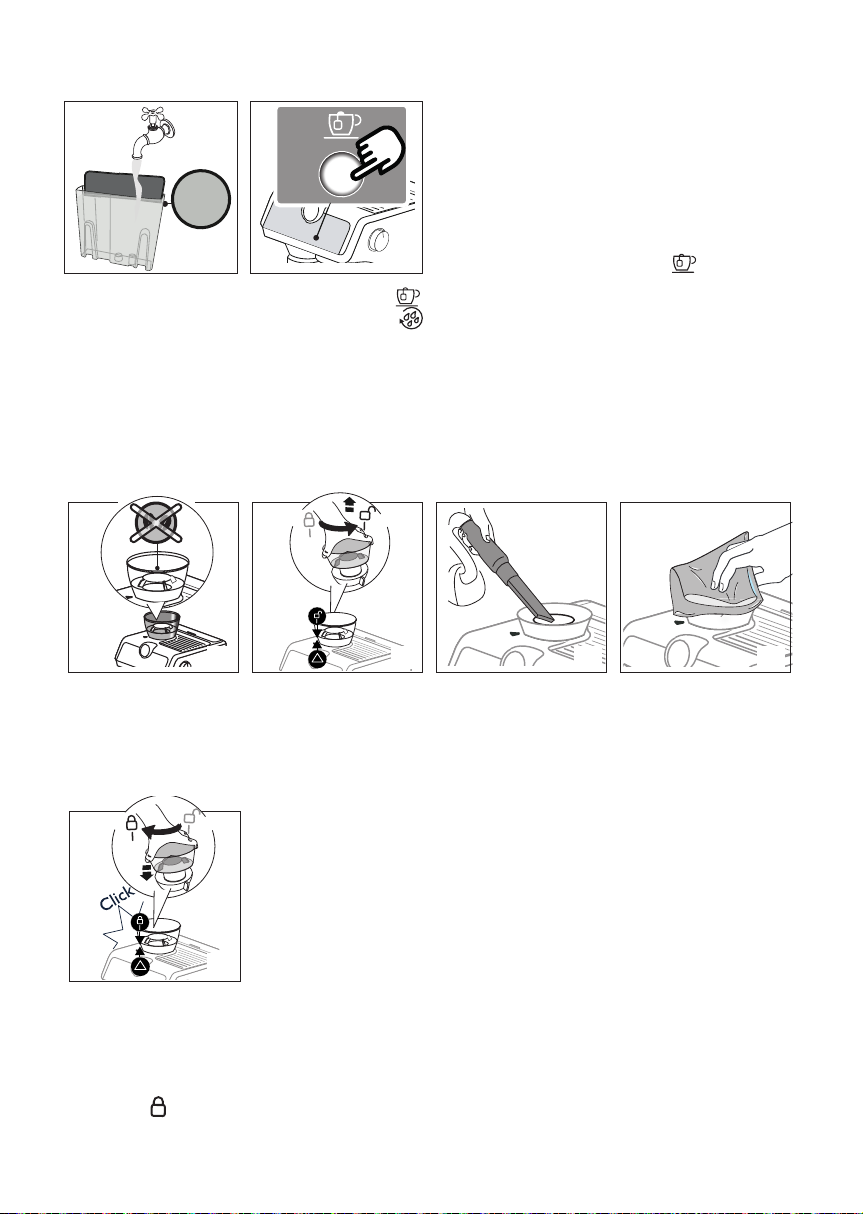
Cleaning of the coee outlet
MAX
1
5. Fill the water tank (A14).
Make sure the drip tray
(A10) is empty.
8.2 Cleaning the beans container housing
6. Keep pressed the
button, until the
light starts blinking
(orange). After few minutes the cleaning stops
automatically;
7. Remove the portalter and the cleaning disk accessory;
8. Wash the portalter and the lter under tap water;
9. Insert the portalter again and make a rinse by pressing
the
OK
button: we suggest to put a container under the
portalter;
10. Remove and empty the drip tray.
Please note:
2
This procedure can start by pressing the button (B6)) for
some seconds. To delete this option, press the same button for
10 seconds.
1
1. Make sure the beans
container (A2) is empty.
If necessary, operate the
coee mill without beans
to empty it:
5
5. Put the container back
inserting it in the coee
mill. The container is
correctly inserted when
the arrow ▲ is lined up
with the symbol and
you hear a “click”.
2. Release the beans container by turning it anticlockwise and extract
from the appliance;
2
3. Remove coee residues
using a vacuum cleaner;
16
3 4
4. Clean the beans container housing with a damp
cloth and dry;
Page 18
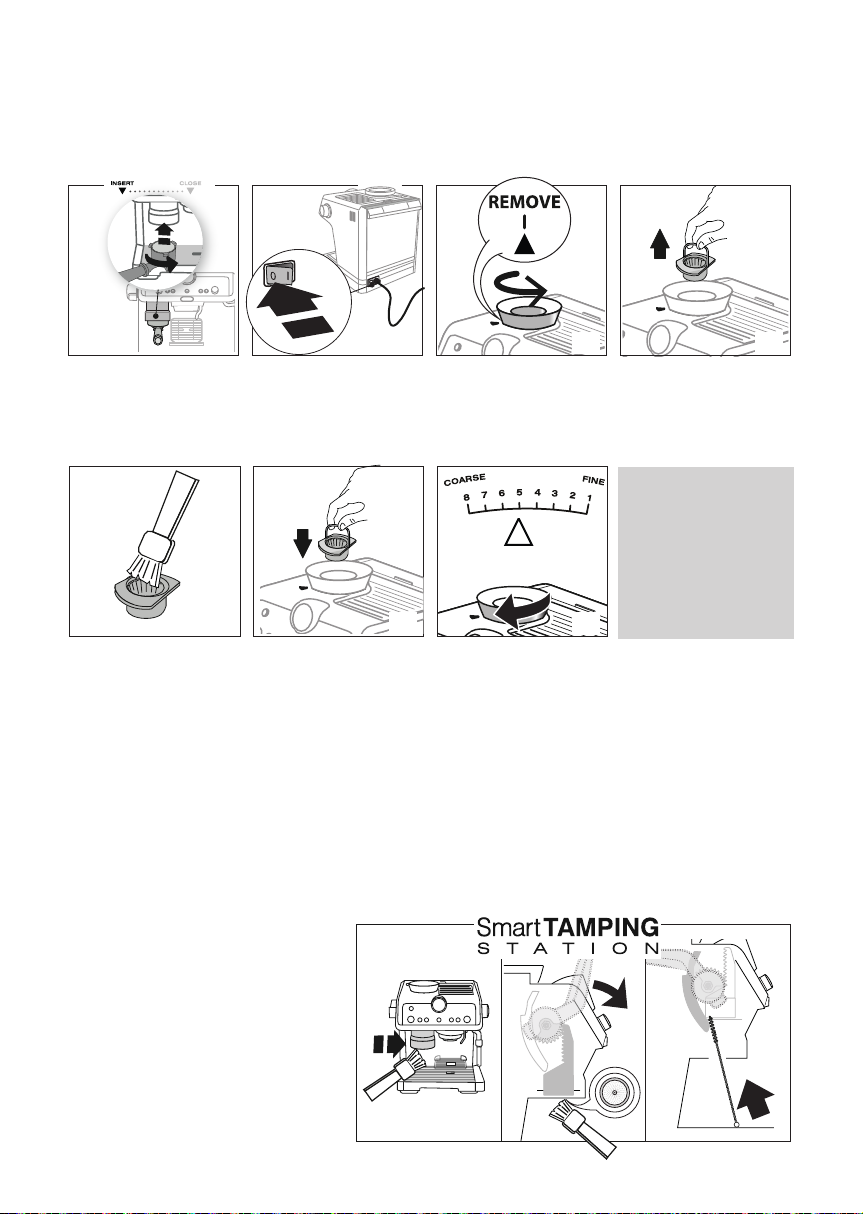
8.3 Cleaning the burr
When cleaning the beans container, clean the container housing and upper burr with a damp cloth. The burr can be removed and replaced
by an authorised customer services centre.
You may also need to remove the burr if it becomes blocked with foreign matter. If this occurs, remove the beans container and clean
as follows:
1
1. Attach the portalter and
operate the mill without
beans to free the coee
guide;
5
5. Clean the burr with a
brush (not included)
and remove the coee
residues using a vacuum
cleaner;
2. Turn the appliance o;
6. Put the upper burr back
in place;
2
3. Turn the grinding selector
anticlockwise as far as it
will go to the “REMOVE”
position;
6
7. Turn the selector to select
the desired grinding level.
3
4. Extract the upper burr,
gripping it by the handle;
Make sure the burr is inserted correctly by pulling it by
the handle. If it is correctly
inserted, it will not move.
7
4
8.4 Replacing the burrs
When the quantity of coee becomes even less, contact a customer services centre to have the burrs replaced, then adjust the mill
again as follows entering the setting menu (“6. Menù settings”) and selecting the rst range of the “Extra grinding adjustment”.
Then turn the ground coee quantity dial (B2) to minimum position and set the dose like a rst use (see “3.2 The perfect dose”).
8.5 Cleaning the “Smart tamping station”
1. Clean the attachment area with a brush;
2. Pull the
lever
(A20) as far as it will go and
clean the presser cylinder with a brush. Then
release the lever.
3. Use the tube brush (C7) to clean the coee
funnel.
1 2 3
17
Page 19
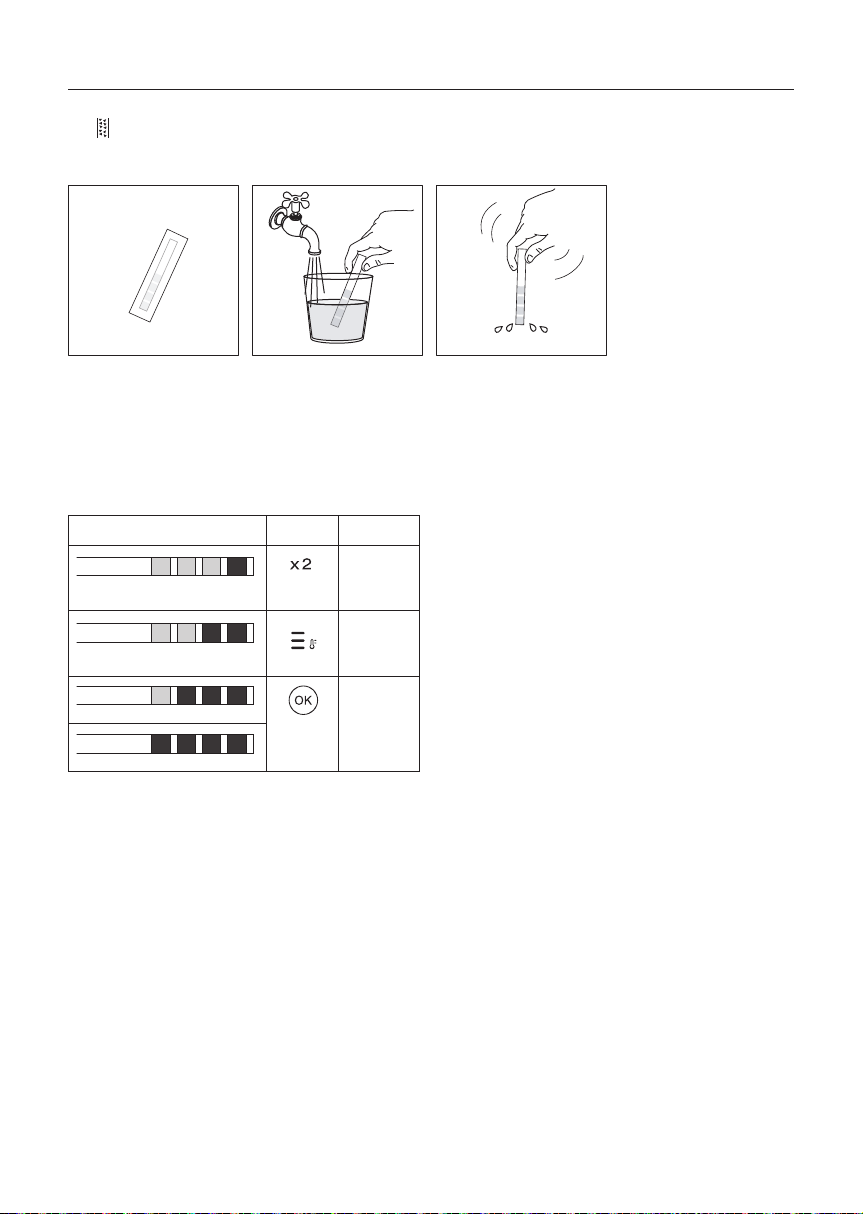
9. WATER HARDNESS
9.1 Water hardness
The descale light (B9) comes on after a period of time established according to water hardness. The machine can also be programmed according to the actual hardness of the water supply in the various regions, in which case descaling may be required less
frequently.
1. Remove the “TOTAL HARDNESS TEST” indicator paper
(C4) from its pack.
After about a minute, 1, 2, 3, or 4 red squares form, depending
on the hardness of the water. Each square corresponds to one
level.
Total Hardness Test result Button Level
2. Immerse the paper completely in a glass of water
for one second.
1
soft water
2
medium
water
3
hard or
very hard
water
3. Remove the paper from the
water and shake lightly.
4. Set the appliance as indicated in section “6. Menù
settings”.
18
Page 20
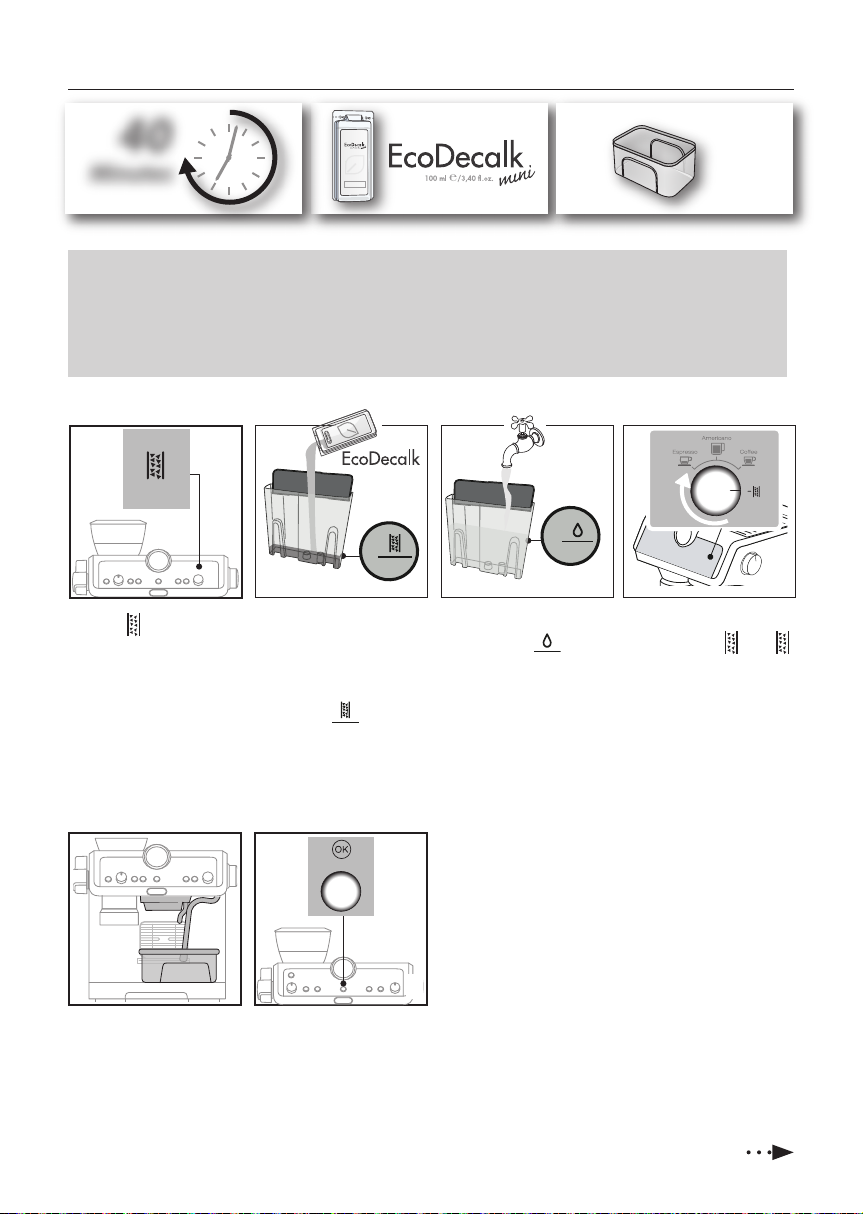
A
B
10. DESCALING
40
Minutes
Decalcificante per macchine da caffè
Descaler for coffee machines
Détartrant pour machines à café
Entkalker für Kaffeemaschinen
De’Longhi Appliances s.r.l.
Via L. Seitz, 47 31100 Treviso - ITALY
Tel. +39 0422 4131
5413218631/04.15
2 L
Please note
• Before use, read the instructions and the labelling on the descaler pack.
• It is important to use De’Longhi descaler only. Using unsuitable descaler and/or performing descaling incorrectly may result
in faults not covered by the manufacturer’s guarantee.
• Descaler could damage delicate surfaces. If the product is accidentally spilt, dry immediately.
RED
B
he level B .
2 3
3. Turn the mode selector
dial (B8) to :
the
light begins to blink:
and
the OK light turns to
orange.
When the light (B9) comes
on, it is time to proceed descaling the machine. The descaling
cycle can be run in any moment.
Please note
• In case you start the descaling
cycle by mistake, you can press
the OK button for 10 seconds; the
rinsing cycle can not be stopped
(from step 9).
A
1
1. IF PRESENT, REMOVE
THE WATER SOFTENER
DEVICE. Pour the descaler into the tank up to
the level A marked
inside the tank (equal to
one 100ml packet).
2. A
dd water (1 liter) up
to t
Then put the water tank back in
the appliance.
4
4. Make sure the portalter is
not attached and position a
recipient under the coee
outlet, hot water spout and
steam wand.
5. Press the OK (B5)
ton: descaling starts.
6. The descale programme starts and the descaler liquid
comes out of the steam wand and coee outlet. The descale programme removes limescale deposits from inside
the appliance by automatically performing a series of
rinses and pauses until the tank is empty.
Delive
5
ry stops and th
e OK
light turns to white. This indicates
that it is necessary to proceed with rinsing: see next page.
but-
19
Page 21
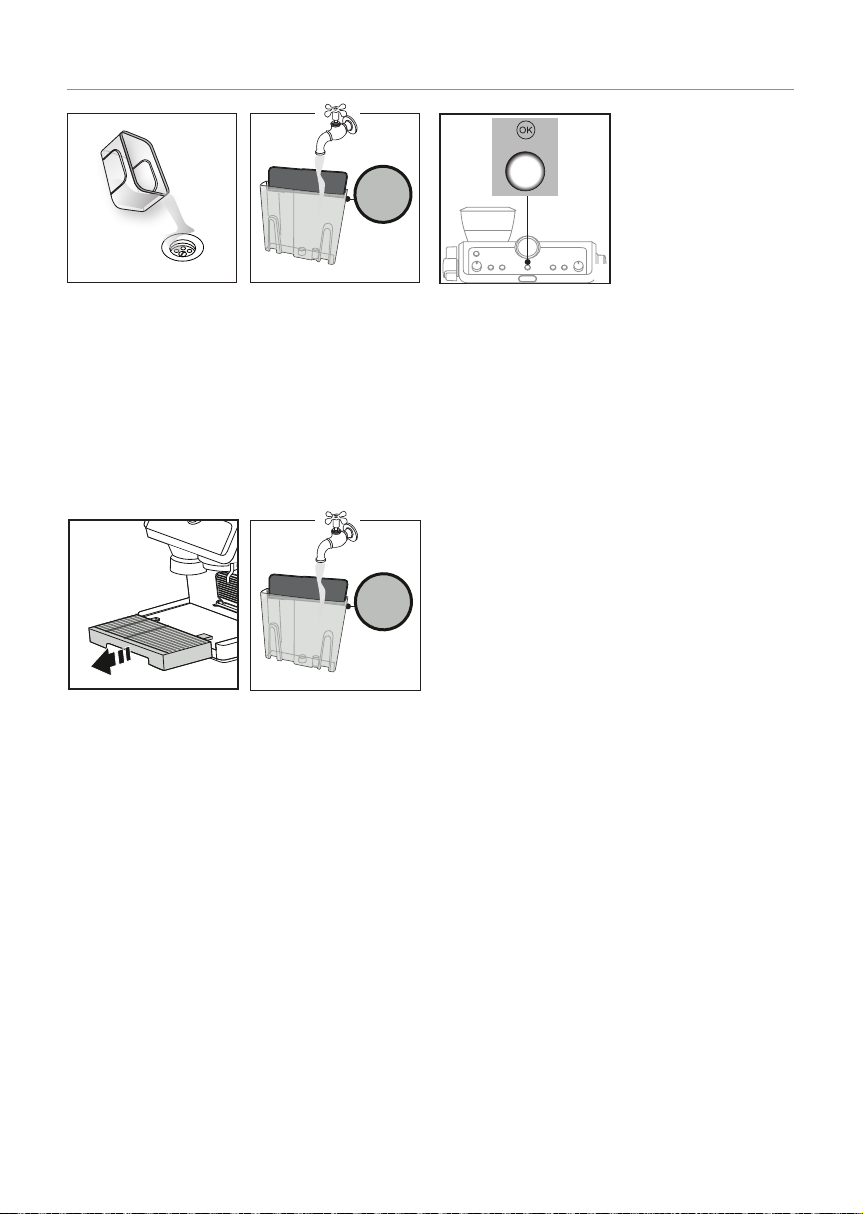
DESCALING
MAX
MAX
10. When rinsing is complete,
delivery stops and the
appliance prepares to be
used again.
11. Empty the recipients used
to collect the rinse water.
7
7. Empty the recipiens used
to collect the descaler
solution and replace it
empty.
12
12. Extract and empty the drip
tray, then put back in the
appliance.
8. Remove the water tank,
empty any residues of
descaler solution, rinse
with running water and
ll with fresh water up
to the MAX level. Put the
tank back in its housing.
MAX
13
13. Empty, rinse, then ll the
water tank with fresh
water and replace it.
8 9
9. Press the
OK button:
rinsing starts.
Now the appliance is ready to use.
20
Page 22
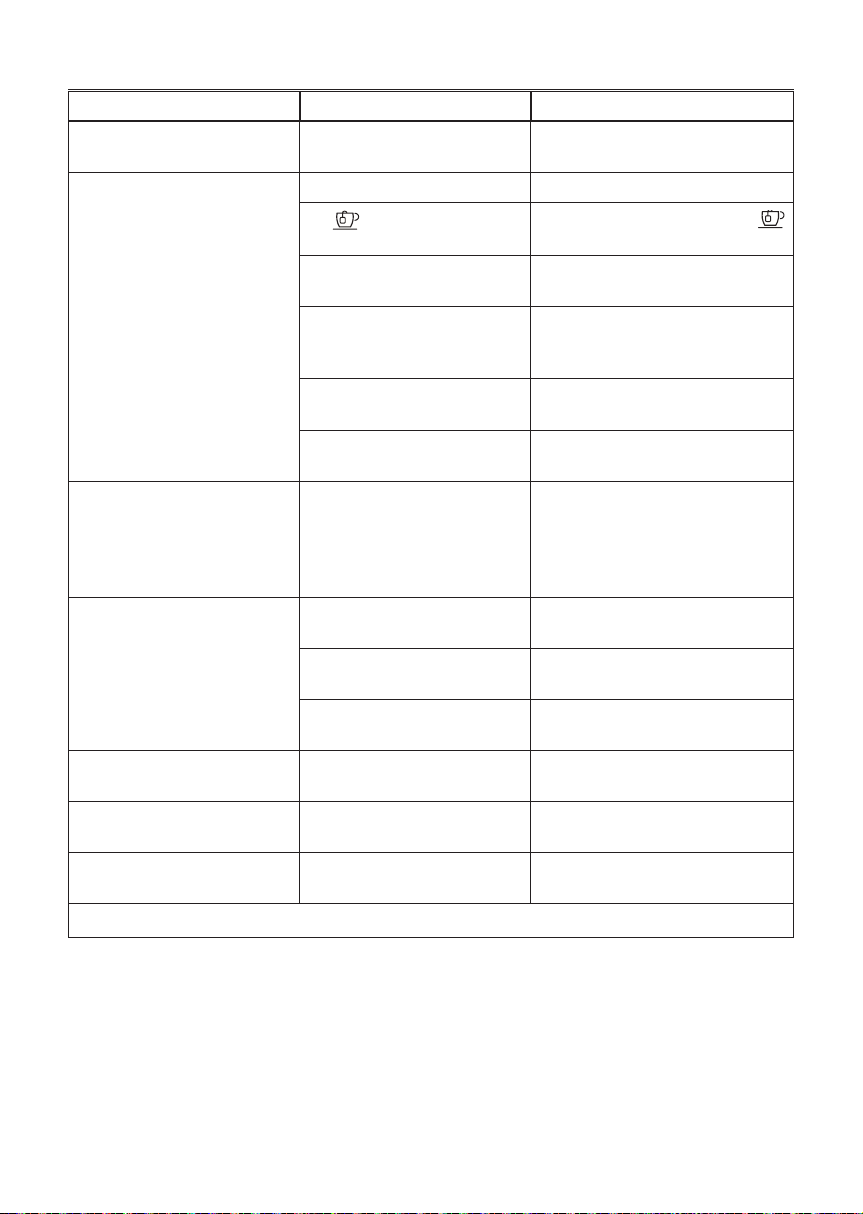
11. TROUBLESHOOTING
PROBLEM CAUSE SOLUTION
There is water in the drip tray (A10) It is normal: due to the internal water
circuits operations
No espresso coee is delivered No water in the tank (A14) Fill the tank
The light is on to indicate that the
coee or steam circuit is empty
The coee lter (C2) or (C3) is blocked Rinse the lters under abundant running
The tank (A14) has been inserted incorrectly and the valves on the bottom are
not open
Scale in the water circuit Descale as described in section “10.
Coee grind too ne or too much coee Adjust coee dose and grinding (refer to
The portalter (C1) cannot be attached
to the appliance
The espresso coee drips from the
edges of the portalter (C1) rather than
the holes
The coee crema is too light (delivered
from the spout too fast)
The coee crema is too dark (delivered
from the spout too slowly)
At the end of descaling, the appliance
requests a further rinse
The ground coee has not been pressed
or is too much
The portalter is inserted incorrectly Attach the portalter correctly and rotate
The espresso boiler gasket has lost elasticity or is dirty
The coee lter is clogged Rinse the lters under abundant running
The appliance settings need reviewing Refer to quick guide for suggestions
The appliance settings need reviewing Refer to quick guide for suggestions
During the rinse cycle, the water tank
has not been lled to the MAX level
Regularly empty and clean the drip tray
Press the button corresponding to the
light to ll the circuit
water.
Press the tank down lightly to open the
valves on the bottom
Descaling”
Quick Guide)
Repeat grinding with new settings. Reduce
the powder quantity: check if the lte r(single or double lter) is the same size as the
selector of grinding quantity (2x button (B3)
selected or not)
rmly as far as it will go
Have the espresso boiler gasket replaced by
Customer Services
water.
Complete the rinse cycle from point (8) of section “10. Descaling”
…
→
21
Page 23
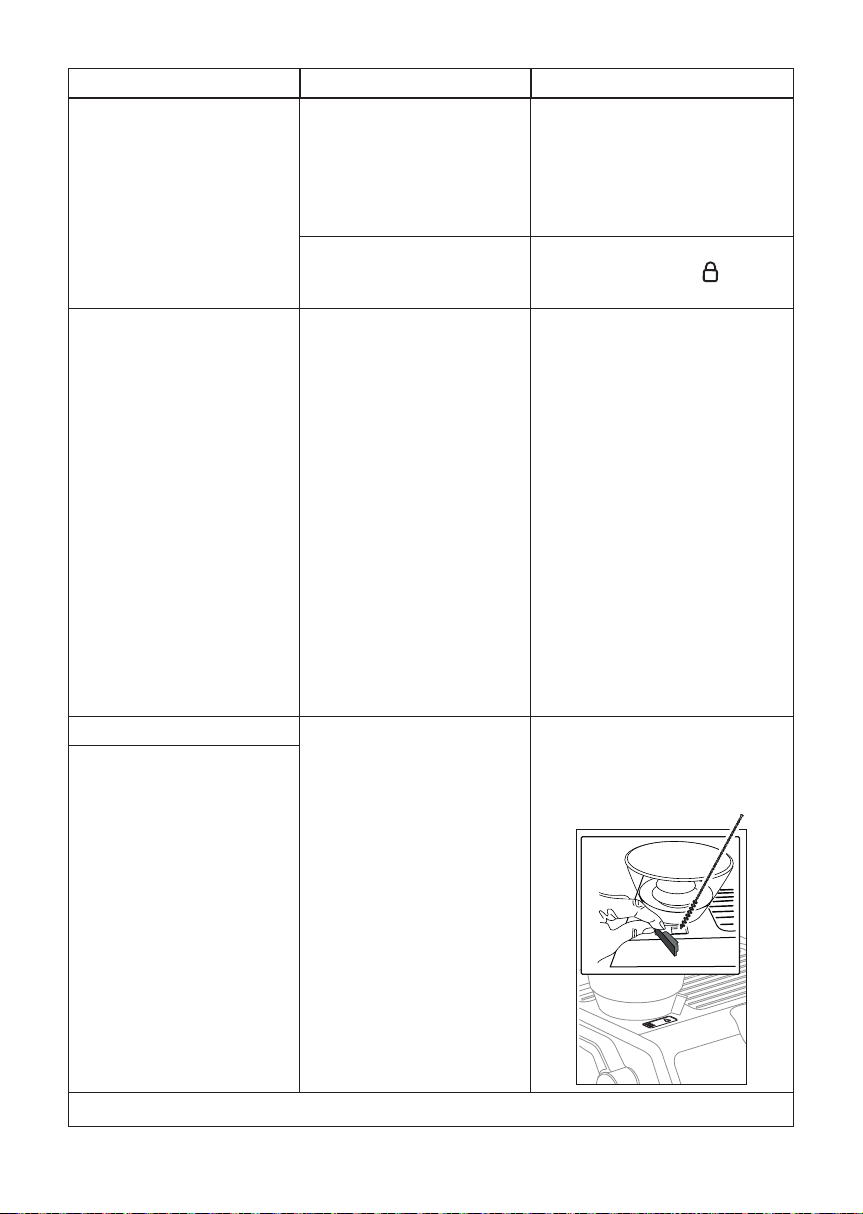
PROBLEM CAUSE SOLUTION
The appliance does not grind the coee There is foreign matter that cannot be
ground in the coee mill
The coee beans container (A2) is not
in the right position
If you want to change the type of coee You must remove all the beans present
in the machine
After grinding, the coee lter is empty The coee grinder coee funnel is
After tamping, there is too much coee
in the lter
clogged
Clean the burrs as described in section “8.3
Cleaning the burr”, making sure you remove
all the beans from the beans container (A2)
before extracting it.
Before putting the burr back, vacuum all residues from the housing.
The container is correctly inserted when the
arrow ▲ is lined up with the symbol and
you hear a “click”.
• Empty the beans container (if necessary, operate the coee mill without
beans or use a vacuum cleaner to remove any remaining beans)
• Attach the lter holder and operate the
coee mill a number of times without
beans to free the grinder. Attach the
lter holder to the outlet of the grinder
(A19), lining it up with "INSERT", then
turning it to the right. Grinding begins
when the lter holder reaches the CLOSE
position and stops automatically. Repeat until the lter is empty
• Place the new coee in the beans
container
• If the amount of coee ground is not
enough to reach the perfect dose, proceed setting the appliance as for the
rst use
Clean as described in section “8.5 Cleaning the
“Smart tamping station””. If the problem persists, access the guide by opening the hatch
and free it using the brush)
…
→
22
Page 24
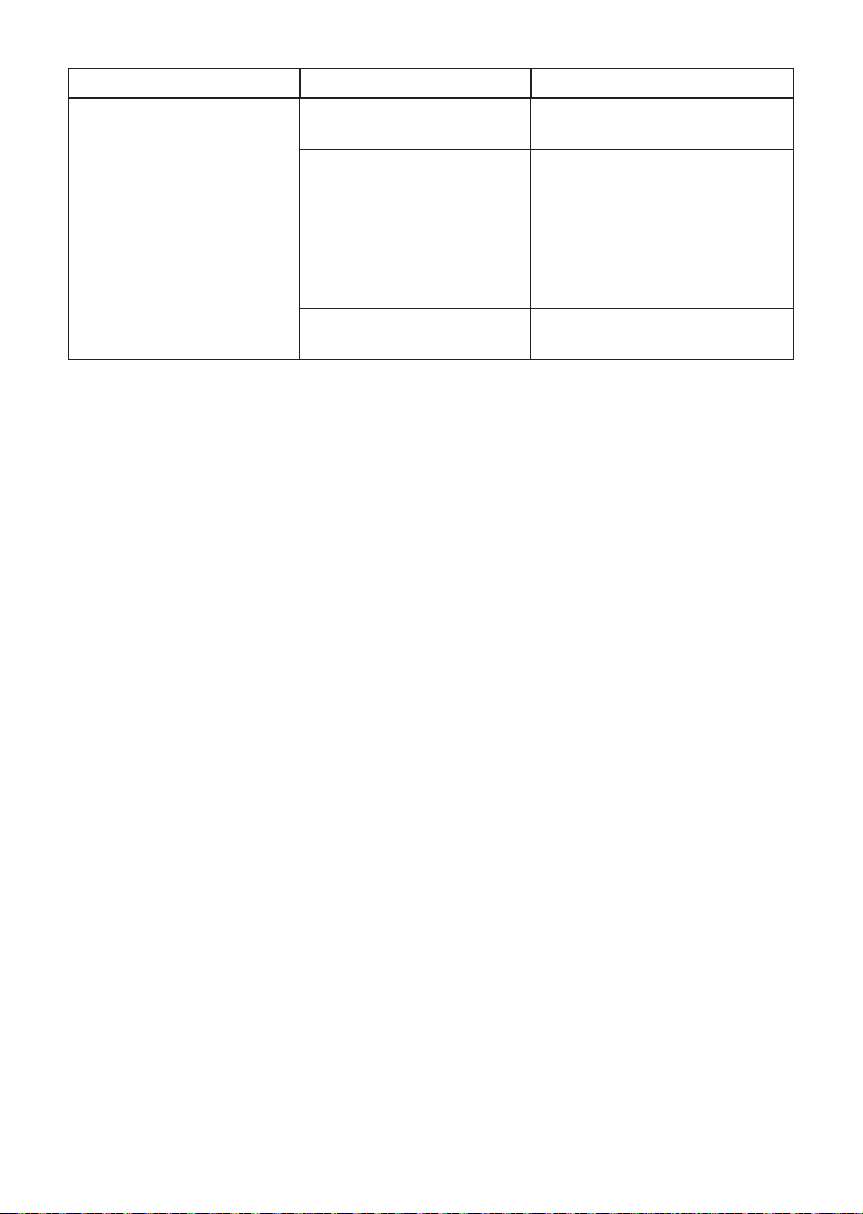
PROBLEM CAUSE SOLUTION
After grinding, the ground coee in the
lter does not reach the “perfect dose”
The "Smart Tamping Station" needs
cleaning
The quantity of ground coee needs
adjusting
Over time the burrs wear down
Clean as described in section “8.5 Cleaning the
“Smart tamping station””, then grind again
Adjust the quantity of coee with the dial
(B2). If the dial is already in the max. position,
select the second range of grinding adjustment (see “6. Menù settings”- “Extra grinding
adjustment”). If the problem persists, replace
the burrs as described in section “8.4 Replacing the burrs”
Replace the burrs as described in section “8.4
Replacing the burrs”
23
 Loading...