

Page 1

INSTALLATION and SERVICE INSTRUCTIONS
USE and CARE INSTRUCTIONS
distributed by
DèLonghi
Pty Ltd
DOUBLE
OVEN
Page 2

2
Dear Customer,
Thank you for having purchased and given your preference
to our product.
The safety precautions and recommendations within this
booklet are for your own safety and that of others. They will
also provide a means by which to make full use of the features
offered by your appliance.
Please preserve this booklet carefully. It may be useful in
future, either to yourself or to others in the event that doubts
should arise relating to its operation.
This appliance must be used only for the task it has explicitly been designed for, that is for cooking foodstuffs. Any
other form of usage is to be considered as inappropriate and
therefore dangerous.
The manufacturer declines all responsibility in the event
of damage caused by improper, incorrect or illogical use of
the appliance.
This oven has been designed and constructed in accordance with the following codes
and specifications:
AS/NZS 60335-1 General Requirements for Domestic electrical appliances
AS/NZS 60335-2-6 Particular Requirements for Domestic electrical cooking appliances
AS/NSZ 1044 Electromagnetic Compatibility Requirements.
Page 3

3
BEFORE USING FOR THE FIRST TIME
■ Read the instructions carefully before installing and using the appliance.
■ After unpacking the appliance, check that it is not damaged. In case of doubt,
do not use the appliance and contact your supplier or a qualified engineer.
■ Remove all the packing materials (i.e. plastic bags, polystyrene foam, etc.) and
do not leave it around within easy reach of children, as these may cause serious
injuries. The packaging materials are recyclable.
■ Do not attempt to modify the technical characteristics of the appliance, as it
may become dangerous to use.
■ The appliance should be installed and all the electrical connections made by a
qualified engineer in compliance with local regulations in force and following the
manufacturer's instructions.
IMPORTANT PRECAUTIONS AND RECOMMENDATIONS FOR
USE OF ELECTRICAL APPLIANCES
Use of any electrical appliance implies the necessity to follow a series of fundamental
rules. In particular:
■ Never touch the appliance with wet hands or feet;
■ Do not operate the appliance barefooted;
■ The appliance is not intended for use by young children or infirm persons without
supervision
■ Young children should be supervised to ensure they do not play with the appli-
ance
The manufacturer cannot be held responsible for any damages caused by improper,
incorrect or illogical use of the appliance.
Page 4

4
IMPORTANT PRECAUTIONS AND RECOMMENDATIONS
After
having unpacked the appliance, check to ensure that it is not damaged.
In case of doubt, do not use it and consult your supplier or a professionally qualified technician.
Packing elements (i.e. plastic bags, polystyrene foam, nails, packing straps, etc.) should not
be left around within easy reach of children, as these may cause serious injuries.
■ Do not attempt to modify the technical characteristics of the appliance as this may become
dangerous to use.
■ Do not carry out cleaning or maintenance operations on the appliance without having pre-
viously disconnected it from the electric power supply.
■ After use, ensure that the controls/knobs are in the off position.
■
The appliance is not intended for use by young children or infirm persons unless they have
been adequately supervised by a responsible person to ensure that they can use the appliance
safely .
■ During and after use of the appliance, certain parts will become very hot. Do not touch
hot parts. Care should be taken to avoid touching heating elements inside the ovens.
■ Keep children away from the appliance when it is in use.
■ Young children should be supervised to ensure that they do not play with the appliance.
■ Some appliances are supplied with a protective film on steel and aluminium parts. This
film must be removed before using the appliance.
■ Make sure that electrical cables connecting other appliances in the proximity of the oven
are not entrapped in the oven doors.
■ Do not line the oven walls with aluminium foil. Do not place baking trays or the drip tray
on the base of the oven chamber.
■ WARNING When correctly installed, your product meets all safety requirements laid down
for this type of product category. However special care should be taken around the rear
or the underneath of the appliance as these areas are not designed or intended to be
touched and may contain sharp or rough edges, that may cause injury.
■ Fire risk!
Do not store flammable material in the ovens.
■ Always use oven gloves when removing the shelves and food trays from the oven whilst
hot.
■ Do not hang towels, dishcloths or other items on the appliance or its handle – as this
could be a fire hazard.
■ Clean the ovens regularly and do not allow fat or oils to build up in the oven base or tray.
Remove spillages as soon as they occur.
■ Do not stand on the open oven door/s.
■ Always stand back from the appliance when opening the oven door/s to allow steam and
hot air to escape before removing the food.
■ This appliance is for domestic use only.
■ Safe food handling: leave food in the oven for as short a time as possible before and after
cooking. This is to avoid contamination by organisms which may cause food poisoning.
Take particular care during warmer weather.
■ The manufacturer declines all liability for injury to persons or damage to property caused
by incorrect or improper use of the appliance.
■ WARNING: Taking care NOT to lift the oven by the door handle/s.
■ IMPORTANT NOTE: This appliance shall not be used as a space heater, espe-
cially if installed in marine craft or caravans.
Page 5

5
CAUTION:
■
This appliance must be installed in accordance with these installation instructions.
■
This appliance shall only be serviced by authorized personnel.
■
This appliance is to be installed only by an authorised person
and in compli-
ance with local safety standards.
■
Incorrect installation, for which the manufacturer accepts no responsibility, may
cause personal injury of damage.
■
Always disconnect the oven from mains power supply before carrying out any
maintenance operations or repairs.
INSTALLATION
11
N.B. • The connection of the appliance to earth is mandatory.
• For connection to the mains, do not use adapters, reducers or
branching devices as they can cause overheating and burning.
If the installation requires alterations to the domestic electrical system call a qualified
electrician. He should also check that the electrical system is suitable for the power
drawn by the appliance.
Appliance power rating: 230 V~ 5600 W (24.3 A)
240 V~ 6100 W (25.4 A)
ELECTRICAL REQUIREMENTS
■ Connection to the mains must be carried out by qualified personnel in accor-
dance with current regulations.
■ The appliance must be connected to the mains checking that the voltage cor-
responds to the value given in the rating plate and that the electrical cable sections can withstand the load specified on the plate.
■ The appliance must be connected directly to the mains placing a two pole switch
with minimum opening between the contacts of 3 mm between the appliance
and the mains.
■ The power supply cable must not touch the hot parts and must be positioned
so that it does not exceed 75°C at any point.
■ Once the appliance has been installed, the switch must always be accessible.
■
If the supply cord is damaged it must be replaced by the manufacturer or its
Service Agent or a similarly qualified person in order to avoid a hazard.
WARNING: This appliance must be earthed. This oven must be connected to supply
using V105 insulated cable.
Page 6
6
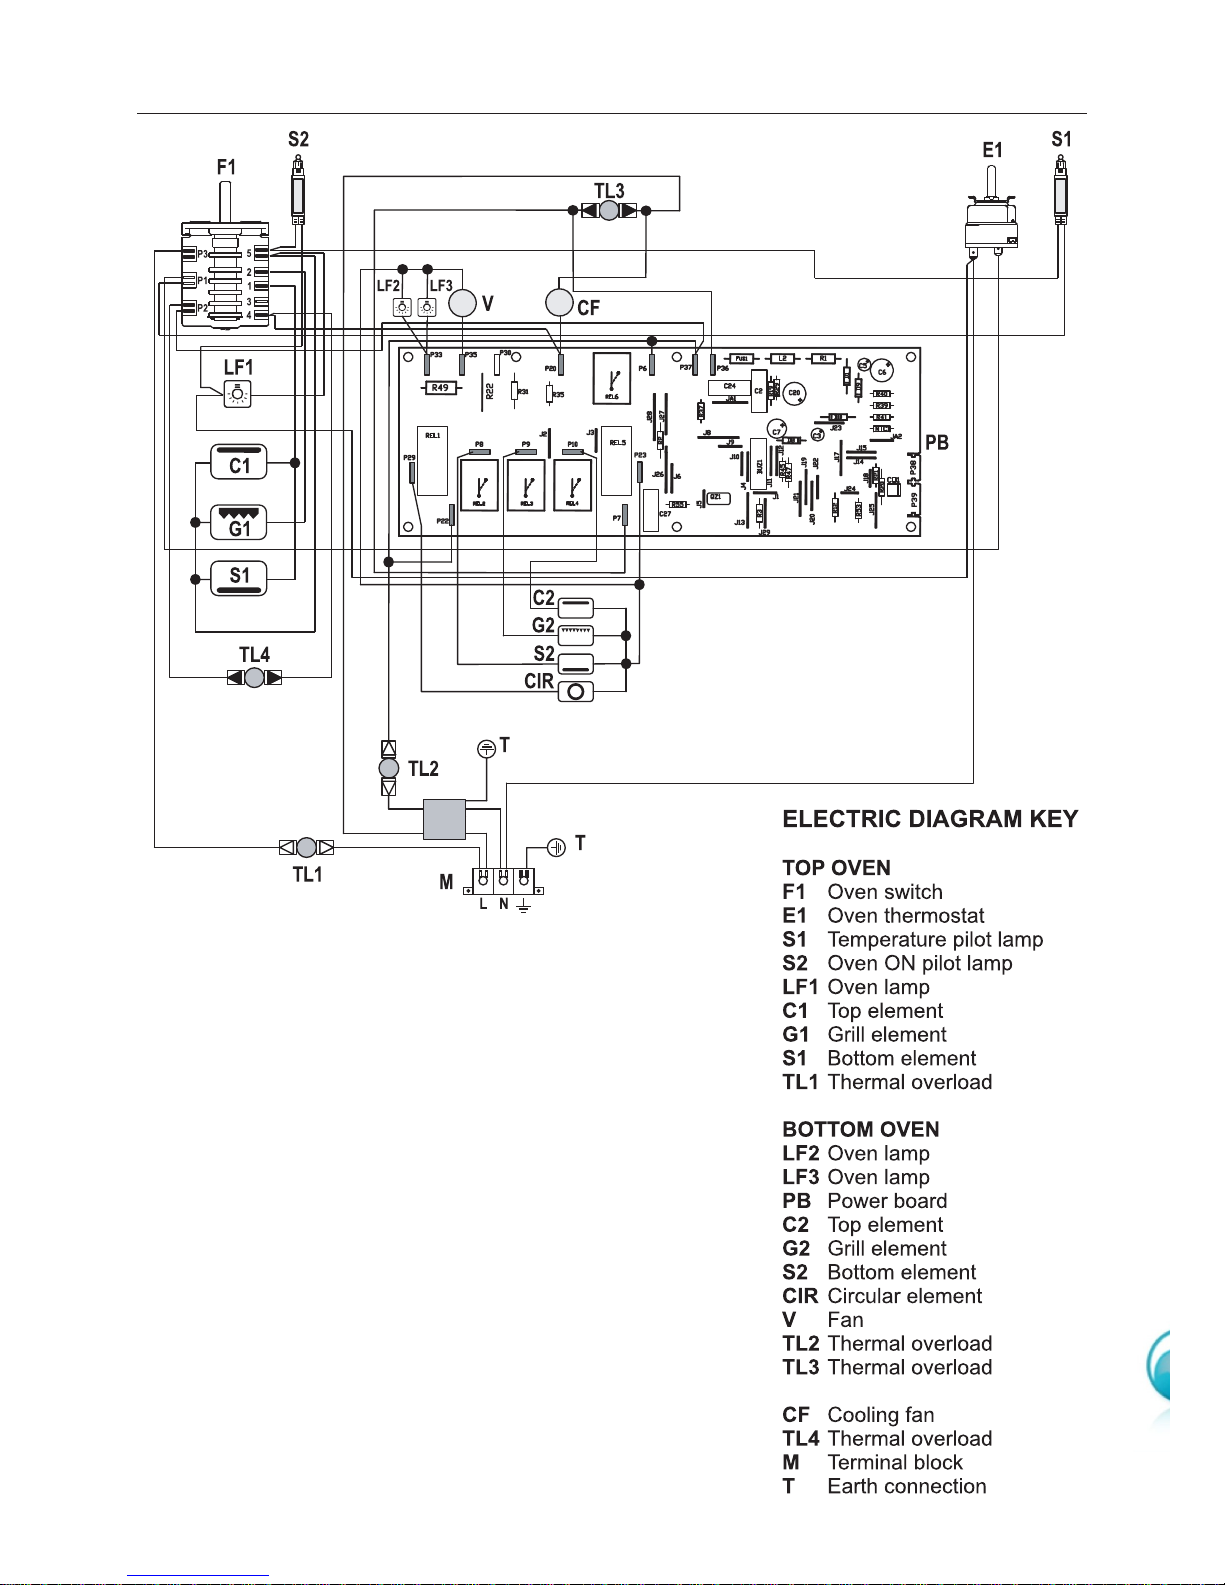
WIRING DIAGRAM
Page 7
7
C
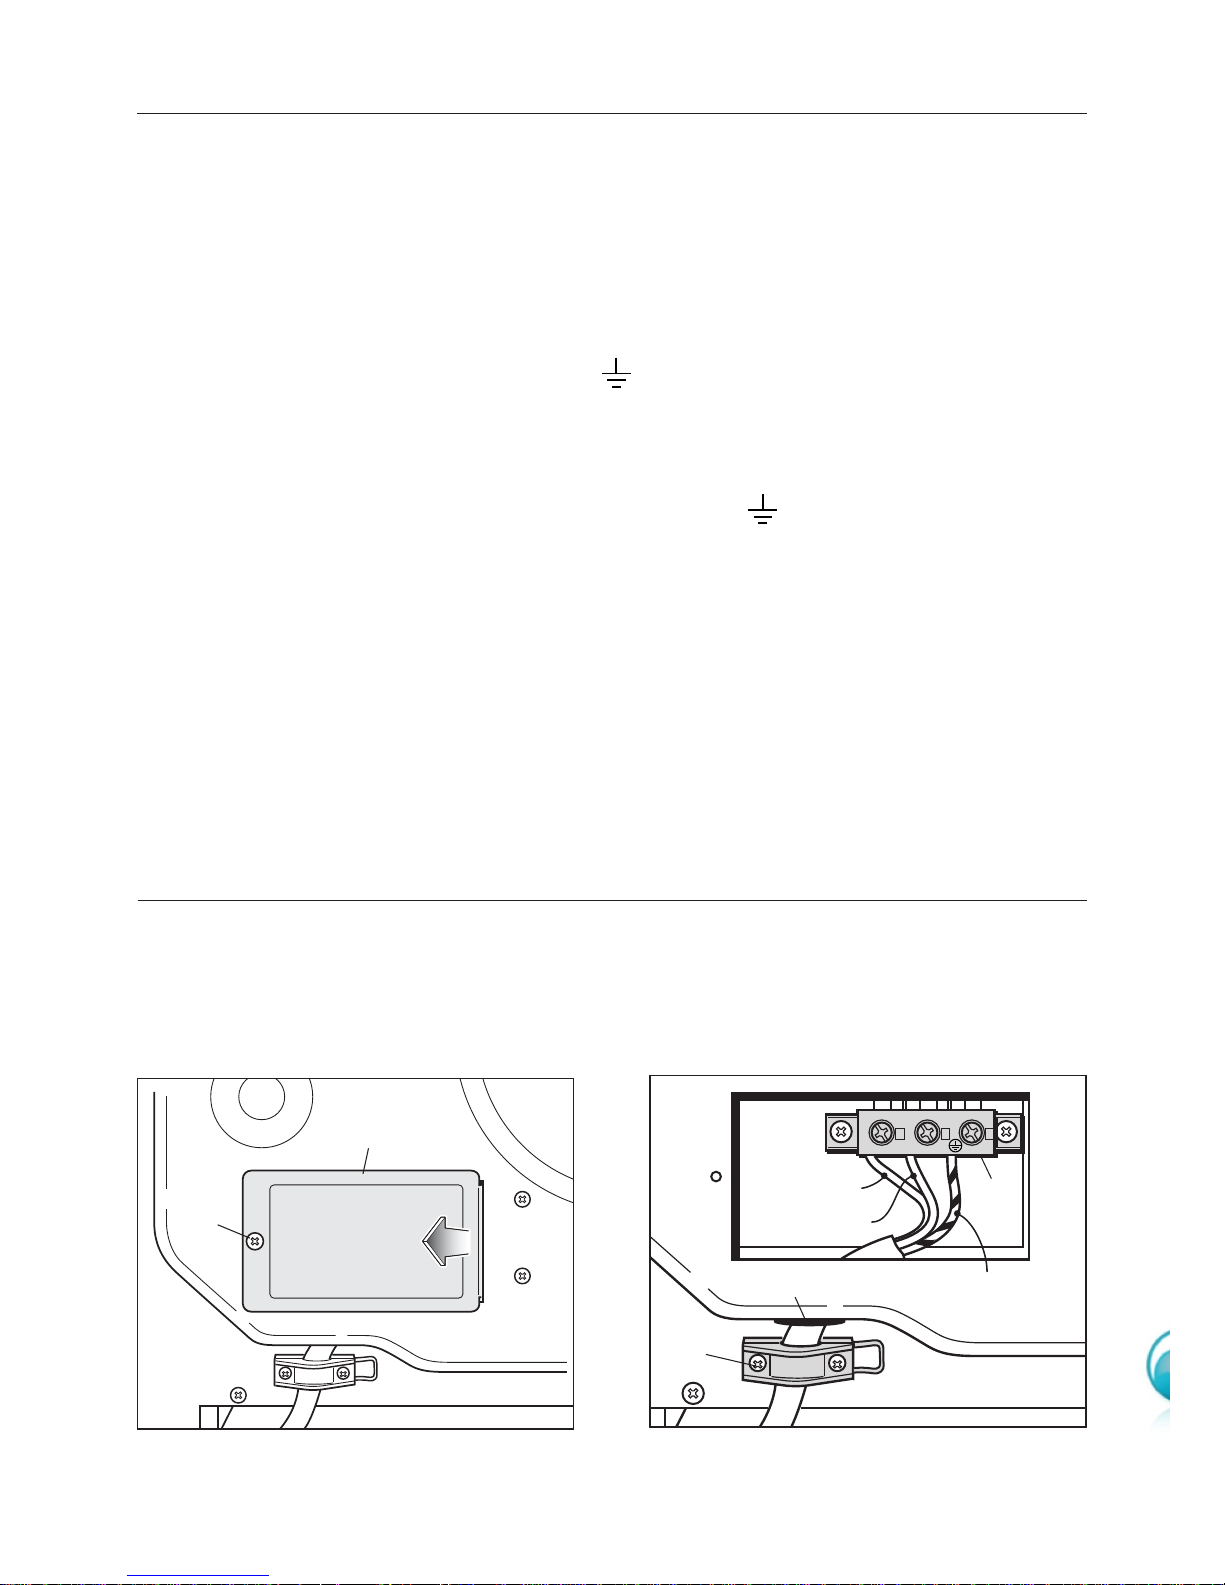
ONNECTING THE FEEDER CABLE
■
Unscrew the screw A securing the cover plate B behind the oven (fig. 1.1).
■
Remove the cover plate B.
■
Remove the screws C from the cable clamp (fig. 1.2).
■
Insert the mains cable (type V105 - 3x2,5 mm2section) into the cable protector P.
■
Connect the phase and earth cables to the mains terminal connection block D.
■ The wires of this appliance must be coloured in accordance with the following
code:
GREEN AND YELLOW - EARTH
BLUE - NEUTRAL “N”
BROWN - LIVE “L”
■ The wire which is coloured GREEN AND YELLOW must be connected to terminal
which is marked with the letter “E” or by the Earth symbol or coloured GREEN
or GREEN AND YELLOW.
■ The wire which is coloured BLUE must be connected to the terminal which is
marked with the letter “N” or coloured BLACK.
■ The wire which is coloured BROWN must be connected to the terminal which is
marked with the letter “L” or coloured RED.
■ Refit the cable clamp so that it clamps the outer sleeving of the cable, and screw
the screws C.
■ Refit the cover plate B and fix it with the screw A.
REPLACING THE POWER SUPPLY CABLE
If the supply cable is damaged, it must be replaced by the manufacturer or its service
agent or a similarly qualified person in order to avoid a hazard.
Green & Yellow
(Earth)
Brown (Live)
Blue (Neutral)
N
L
A
C
P
D
B
WARNING: This appliance must be earthed
Fig. 1.1
Fig. 1.2
Page 8
8
FITTING REQUIREMENTS
WARNING: Taking care NOT to lift the oven by the door handles.
IMPORTANT
The appliance should be installed by a QUALIFIED INSTALLATION TECHNICIAN.
The appliance must be installed in compliance with regulations in force.
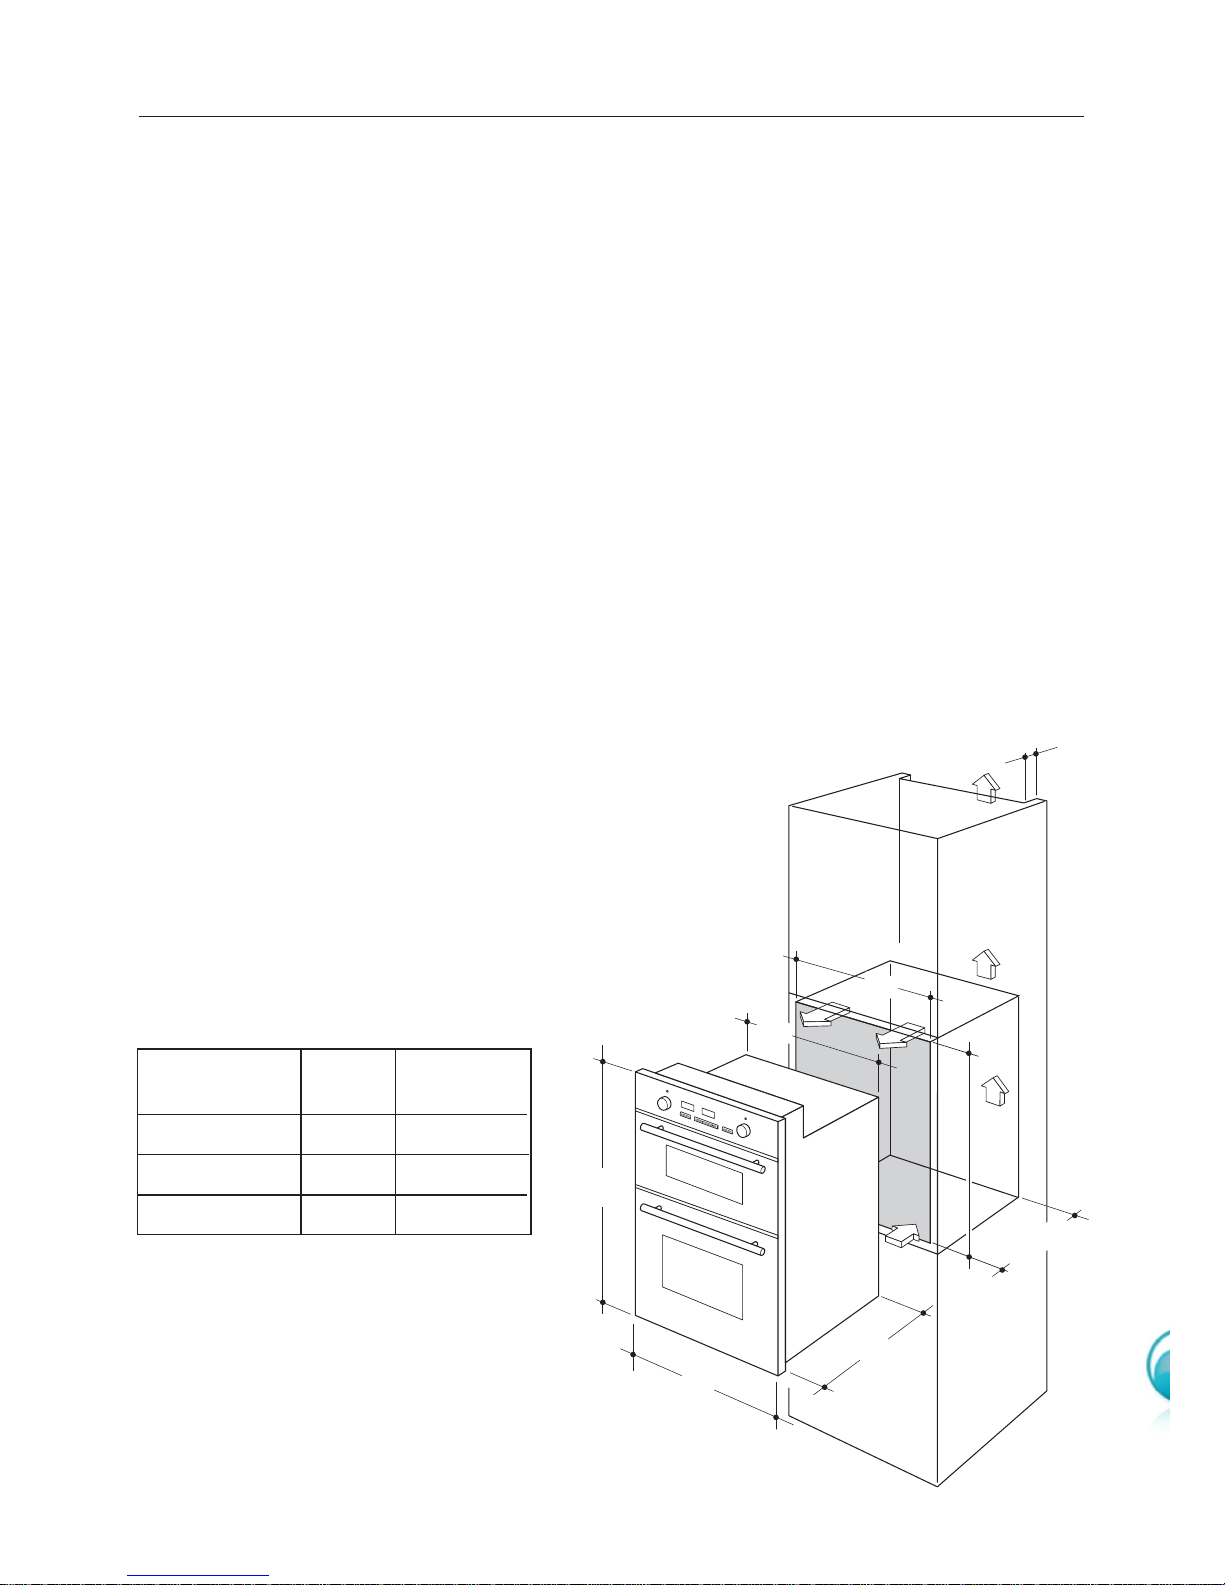
You need the following housing area to fit your oven correctly.
The double oven is designed to fit into a cabinet of 600 mm width.
The double oven can be built in the kitchen units, but you must ensure that it is properly
ventilated.
In the diagram the appliance is ventilated by means of the space in the top of the kitchen
cabinet.
Lift the appliance into position onto the shelf, taking care NOT to lift it by the door handles.
If you open the oven doors, you will see some screw holes.
The oven should then be secured to the housing by fitting screws into these holes.
Remember the housing should not be free standing but be secured to the wall and/or adjacent fittings.
Fig. 1.3
560
50
877
888
min.
555
536
595
564
Dimensions
(mm)
Height
Width
Depth
888
595
564
877
560
555 min.
Housing
Oven
• The appliance must be housed in
heat resistant units.
• The walls of the units must be
capable of resisting temperatures
of 120 °C.
WARNING
When correctly installed, your
product meets all safety requirements laid down for this type of
product category.
However special care should be
taken around the rear or the
underneath of the appliance as
these areas are not designed or
intended to be touched and may
contain sharp or rough edges,
that may cause injury.
Page 9
9
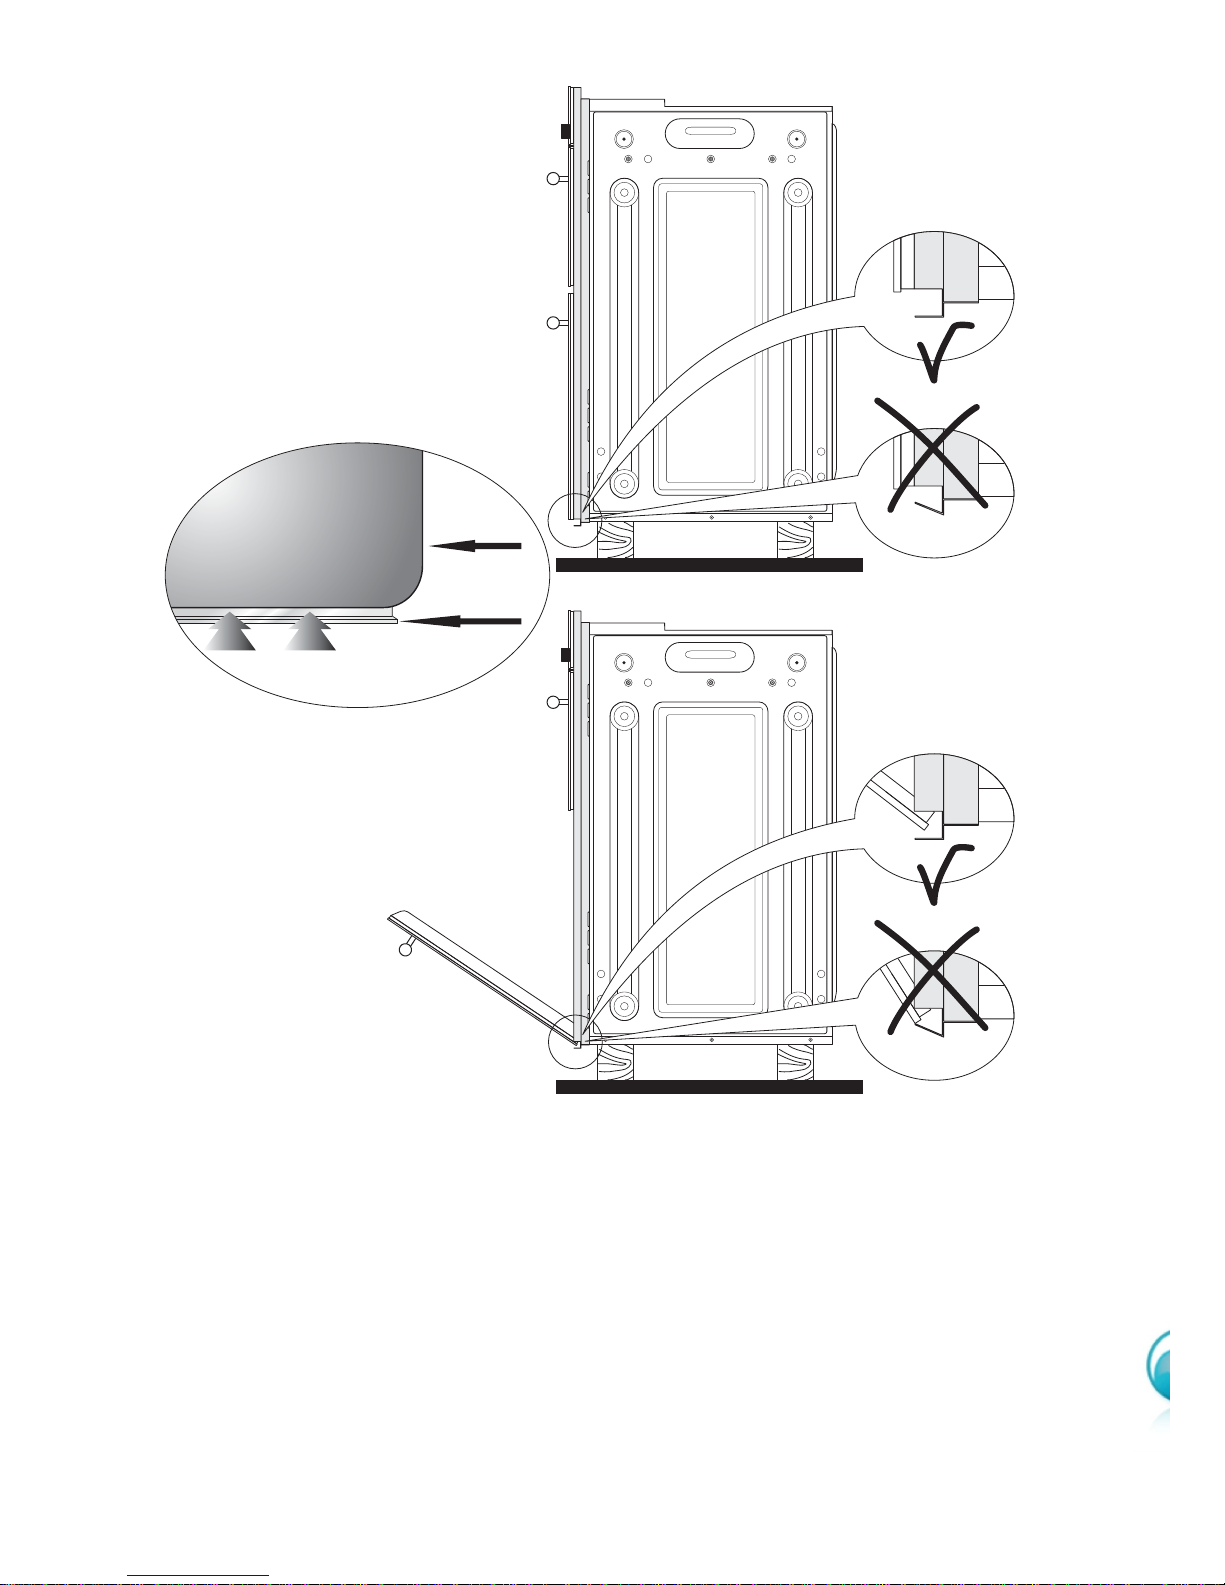
OVEN DOOR
LOWER TRIM
AIR FLOW
IMPORTANT:
To avoid damage to the lower trim please note the following instructions.
The lower trim is designed to allow for good air circulation and the correct opening of the
oven door.
To ensure the trim is not damaged due to the appliance being placed on the floor, the appliance should be suitably supported as in above illustrations.
After installation the appliance door should be slowly opened to ensure no damage has
occurred.
No responsibility for lower trim damage will be accepted if these instructions have not
been followed.
Fig. 1.4
Page 10
10
■ ATTENTION - Most important: During use the appliance becomes hot. Care
should be taken to avoid touching heating elements inside the oven.
■ WARNING: Accessible parts will become hot when in use. To avoid burns and
scalds children should be kept away.
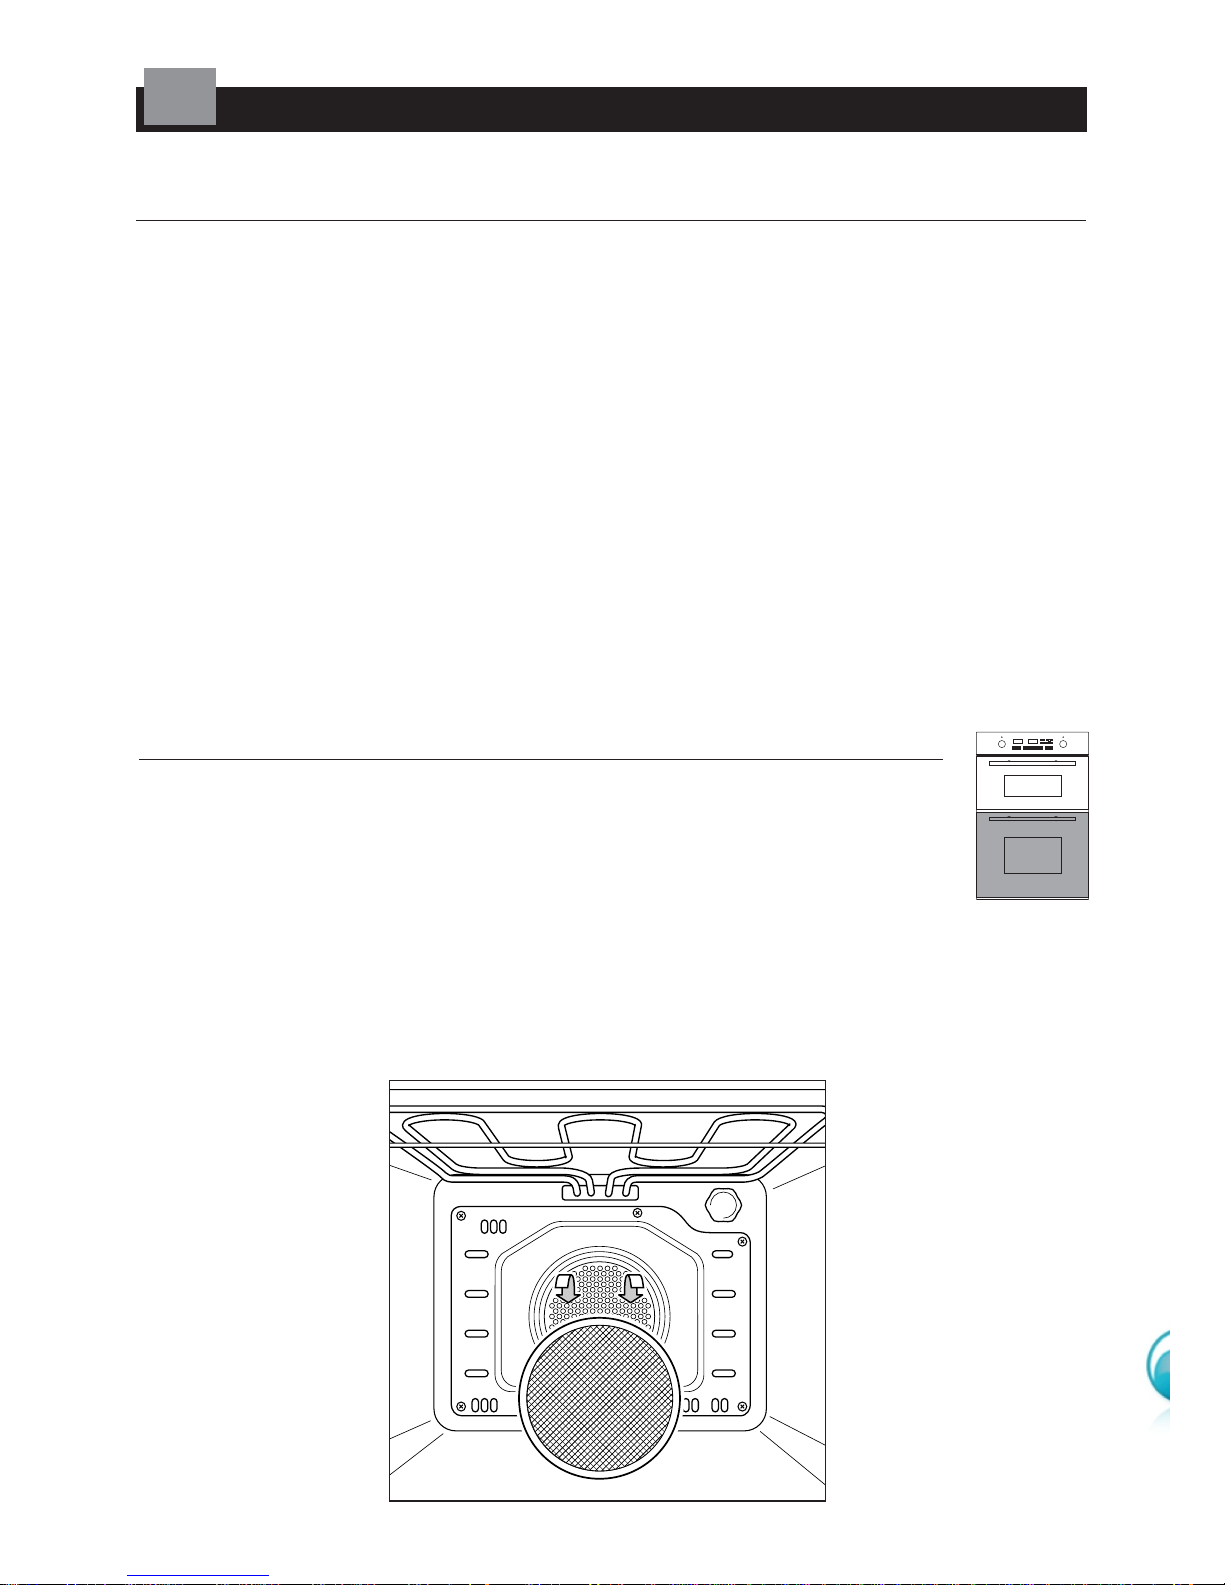
GREASE FILTER (BOTTOM MAIN OVEN ONLY)
■ A special screen is provided at the back of the multifunction main
oven to catch grease particles, mainly when meat is being roasted
(fig. 2.1).
■ When baking pastry etc. this filter should be removed.
■ Always clean the filter after cooking as any solid residues on it might adversely
affect the oven performance.
CAUTION:
■ This appliance must be used only for the task it has explicitly been designed
for, that is for domestic cooking of foodstuffs. Any other form of usage is to be
considered as inappropriate and therefore dangerous.
■ Do NOT place combustible materials or products on this appliance at any time.
USE and CARE
12
Fig. 2.1
Page 11
11
USING THE BOTTOM MAIN OVEN FOR THE FIRST TIME
You are advised to carry out the following operations:
■ Clean the inside of the oven with a cloth soaked in water and neutral
detergent and dry thoroughly.
■
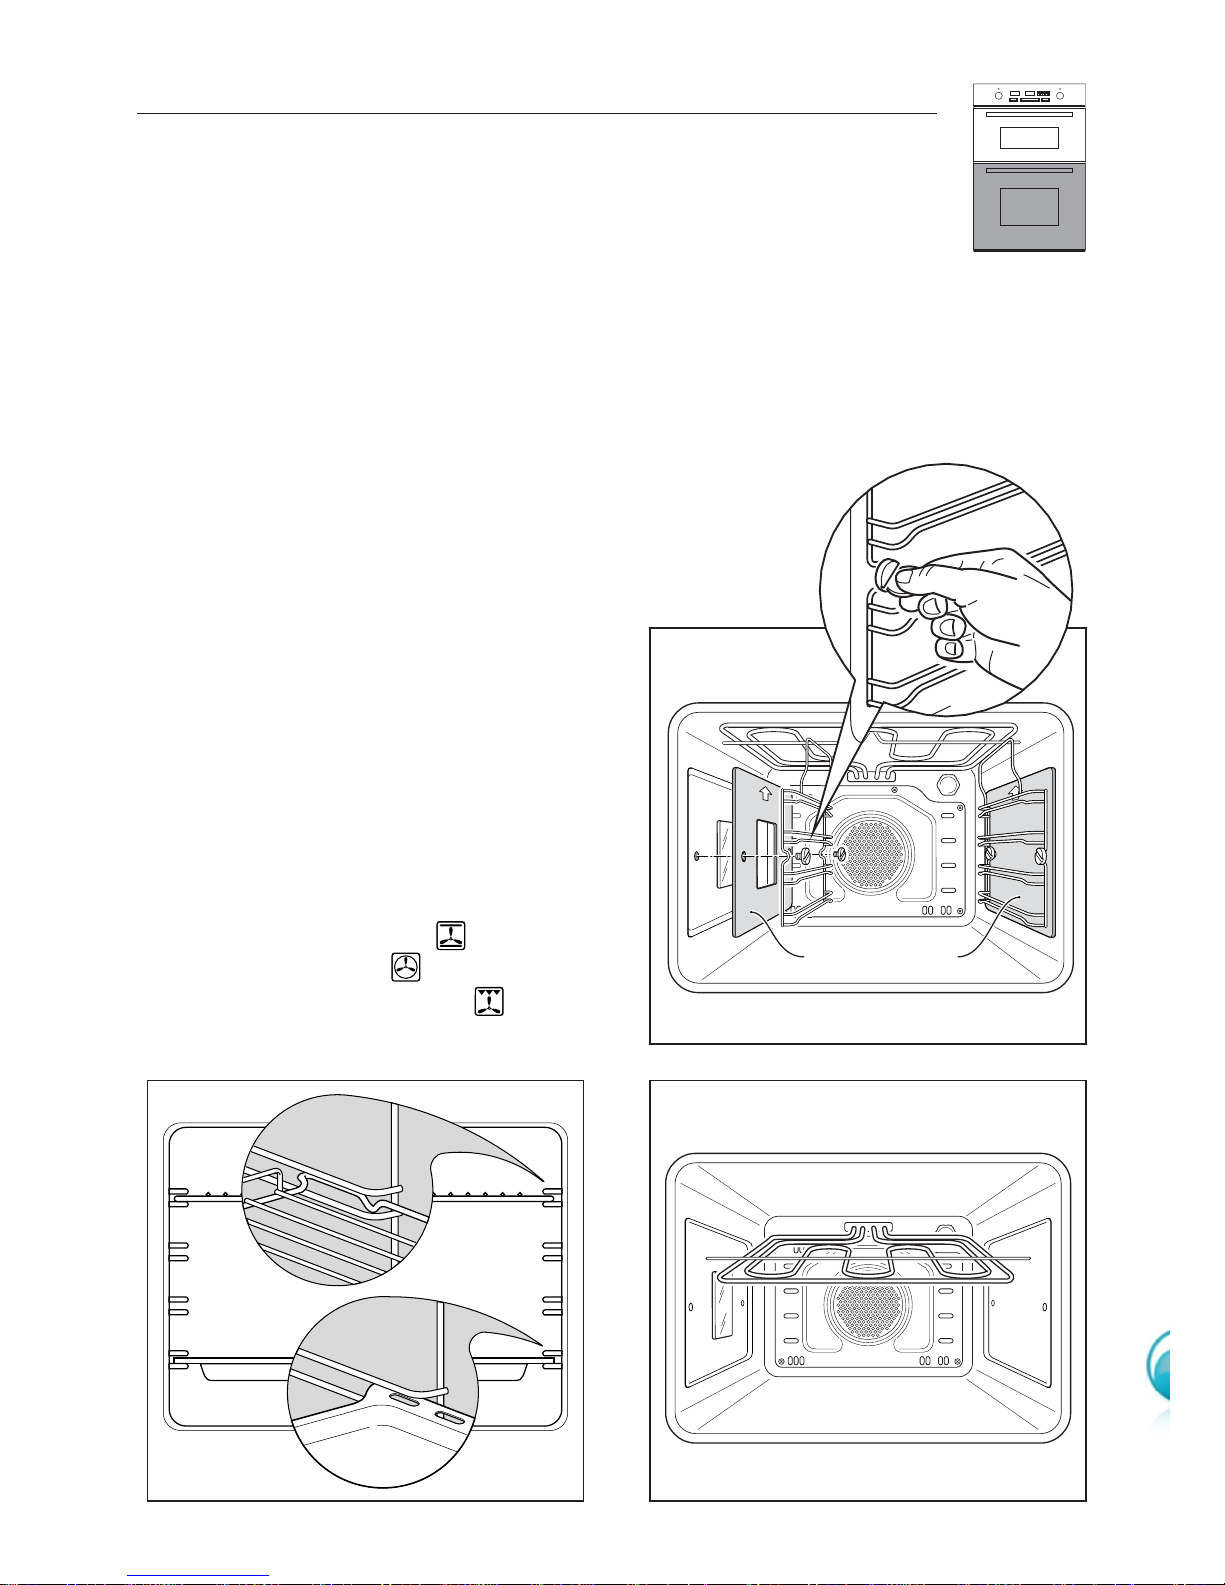
Assemble the wire racks to the oven walls using the 2 screws (Fig. 2.2).
Correctly interpose the catalytic panels in this way:
• The catalytic panel A with the hole for the side oven lamp must be positioned
on the left oven wall with the arrow up (fig. 2.2).
• The catalytic panel B must be positioned on the right oven wall with the arrow up.
• DO NOT POSITION THE CATALYTIC PANEL B ON THE LEFT OVEN WALL.
■ Slide into the guides, the shelf and the tray (fig. 2.3).
The shelf must be fitted so that the safety catch, which stops it
sliding out, faces the inside of the oven.
Fig. 2.3
Fig. 2.4
A
B
To dismantle, as follows:
■ Unscrewing the fixing screws and slide
off the wire racks to the oven wall as
in fig. 2.2.
The grill is secured to the rear wall
of the oven on a hinge system that
allows it to be lowered to allow
proper access when cleaning the
oven ceiling (fig. 2.4).
■
To eliminate traces of grease from the
heating elements, switch on the oven on,
to the maximum temperature in this
ways:
For 60 minutes in the position, for
30 minutes in the position and for
another 15 minutes in the position.
Fig. 2.2
Page 12
12
USING THE TOP OVEN FOR THE FIRST TIME
You are advised to carry out the following operations:
■ Clean the inside of the oven with a cloth soaked in water and
neutral detergent and dry thoroughly.
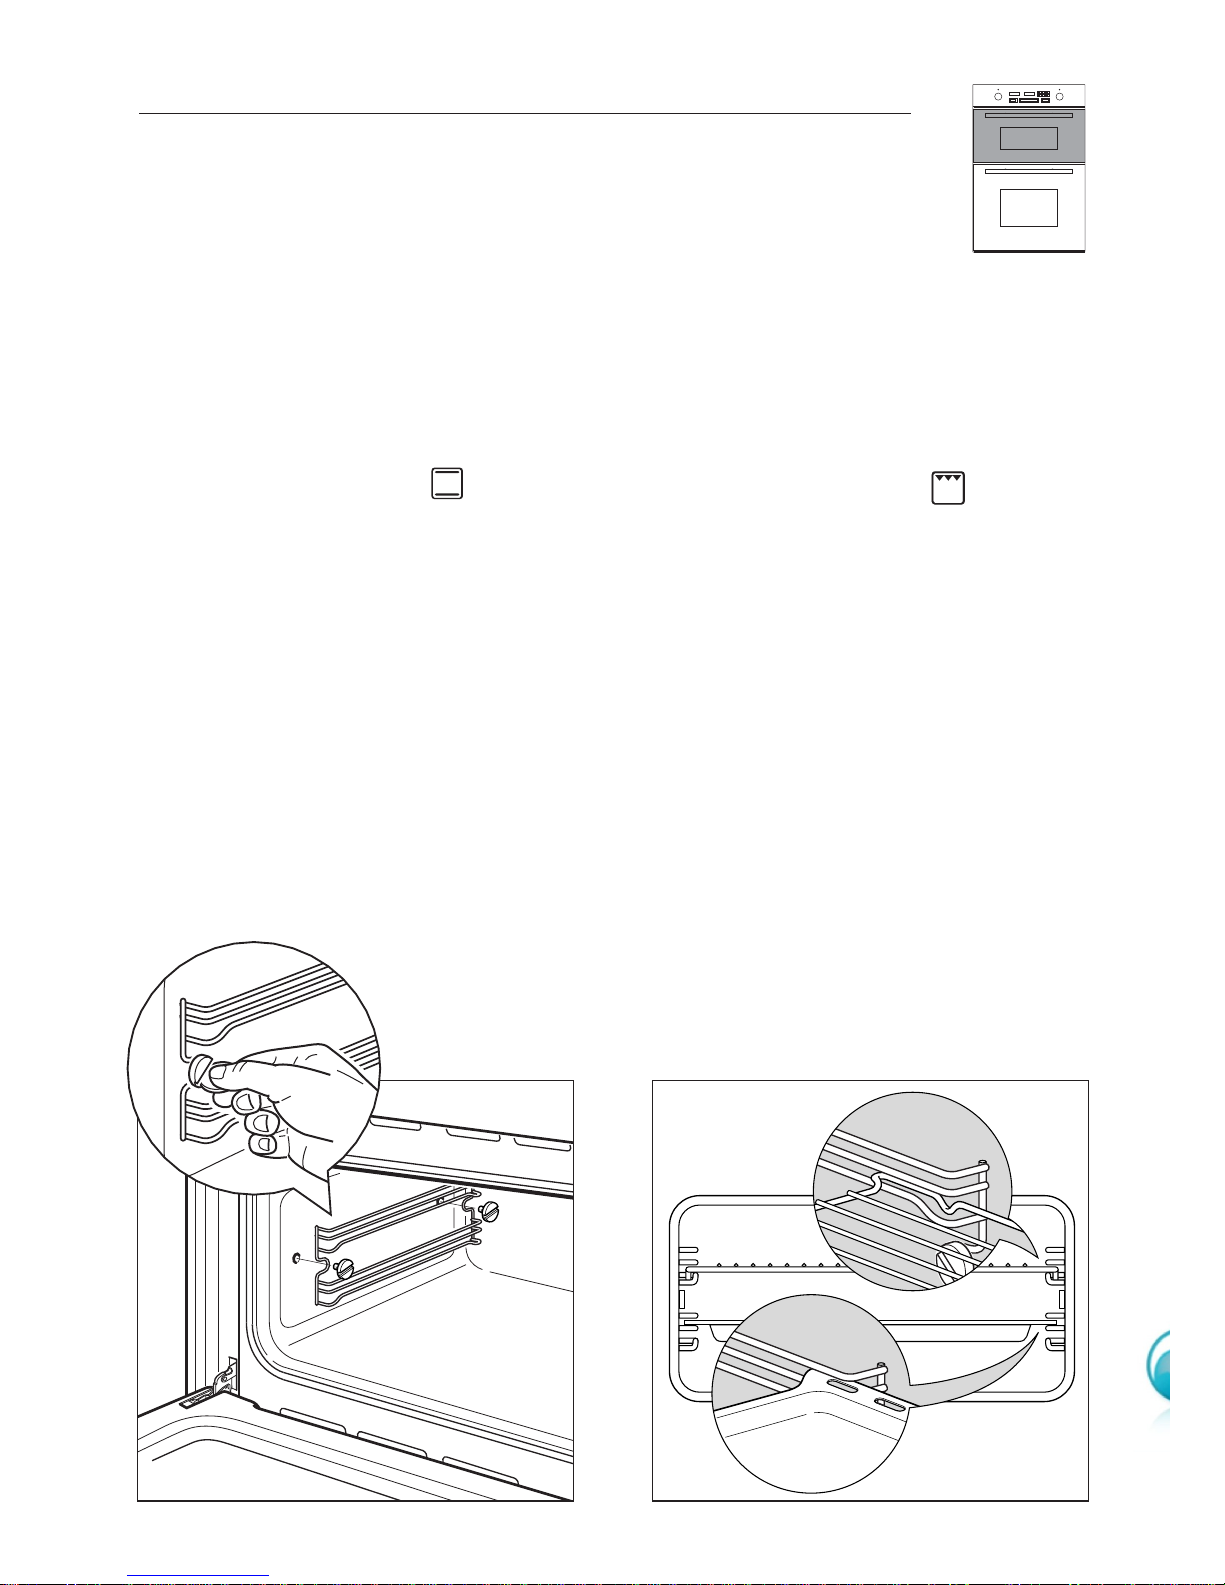
■ Assemble the wire racks to the oven walls using the 2 screws
(Fig. 2.5).
■ Slide into the guides, the shelf and the tray (fig. 2.6).
The shelf must be fitted so that the safety catch, which stops it sliding out, faces
the inside of the oven.
■
To dismantle, operate in reverse order.
■
To eliminate traces of grease from the heating elements, switch on the oven to the
maximum temperature in this ways:
For 60 minutes in the position and for another 15 minutes in the position.
Fig. 2.6
Fig. 2.5
Page 13
13
TELESCOPIC SLIDING SHELF SUPPORTS
The telescopic sliding shelf supports make it safer and easier to insert and remove the
oven shelves and trays. They stop when they are pulled out to the maximum position.
Important! When fitting the sliding shelf supports, make sure that you fit:
■ The slides to the top wire of a rack. They do not fit on the lower wire.
■ The slides so that they run out towards the oven door.
■ Both sides of each pair of shelf slides.
■ Both sides on the same level.
To fix the sliding shelf support onto the side racks:
■ Screw the side rack onto the oven wall (Figs. 2.2 - 2.5).
■ Fit the sliding shelf support onto the top wire of a rack and press (Figs. 2.7 - 2.8).
You will hear a click as the safety locks clip over the wire.
Fig. 2.7
Fig. 2.8
Left
Right
Left
Right
Note: you cannot
fit the sliding shelf
supports to the top
shelf position.
Page 14
14
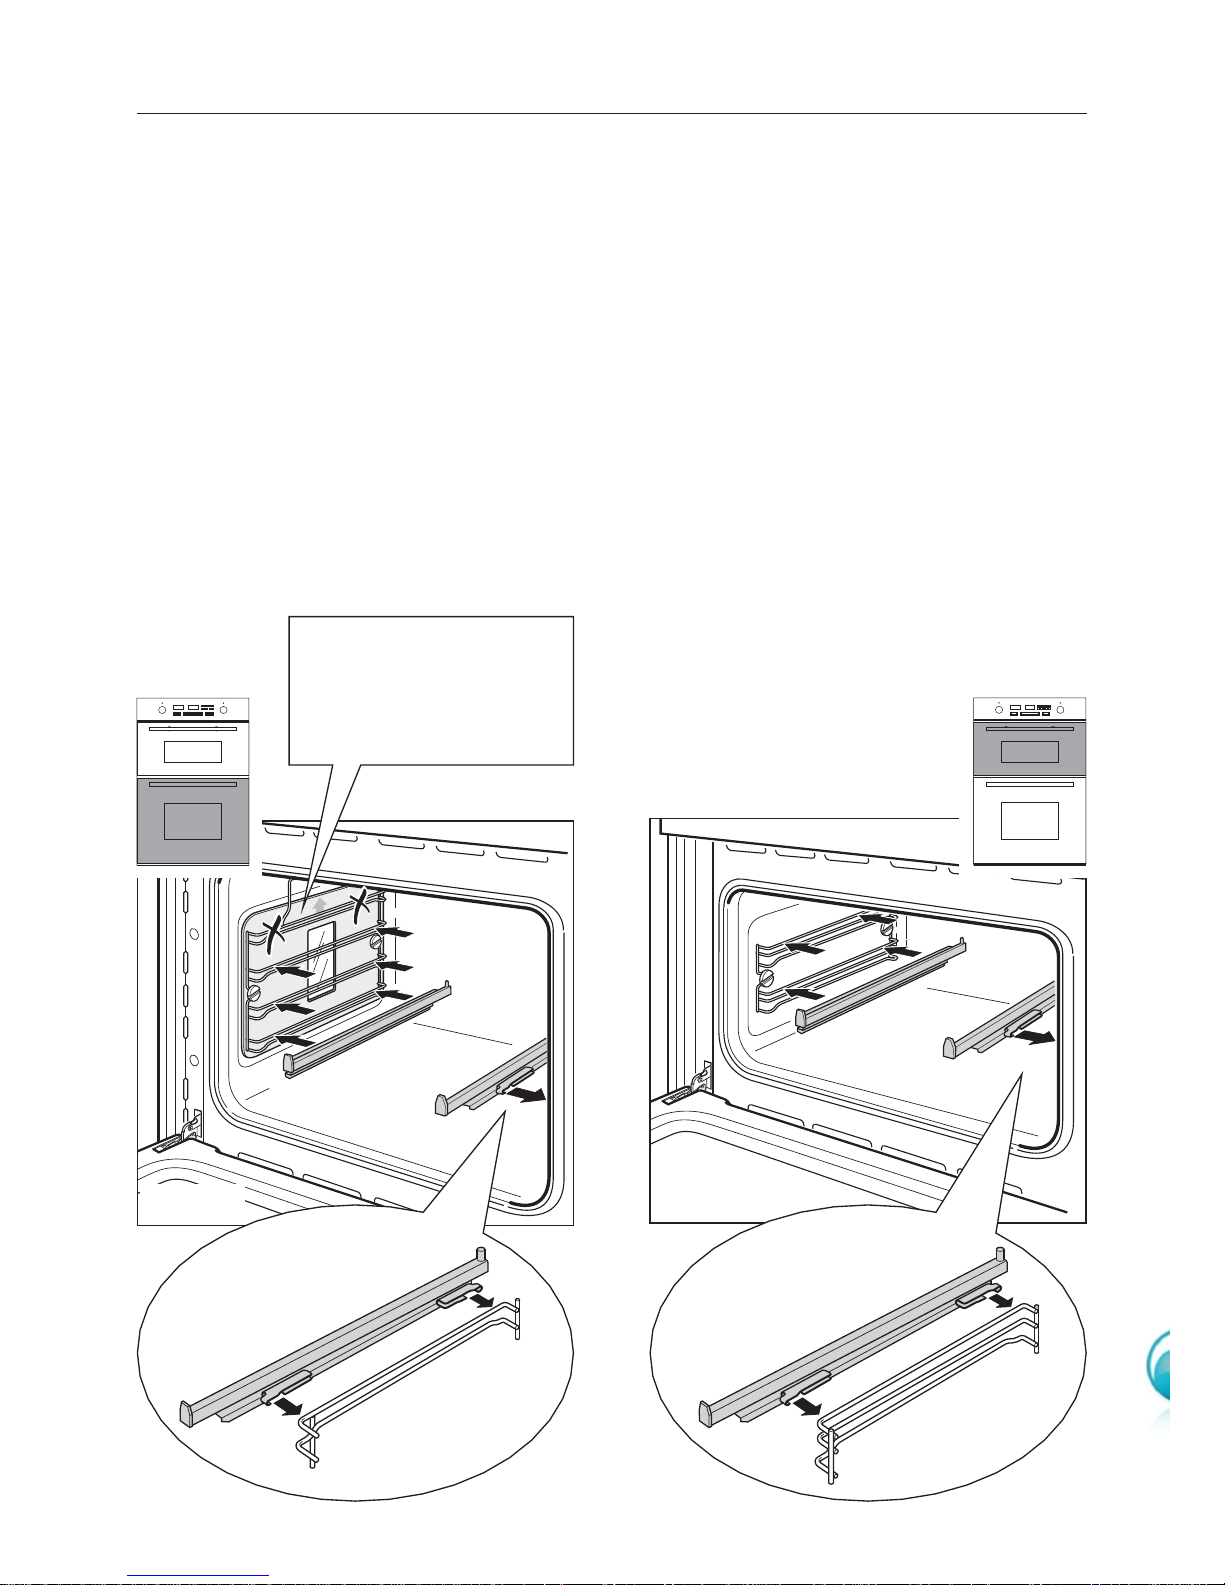
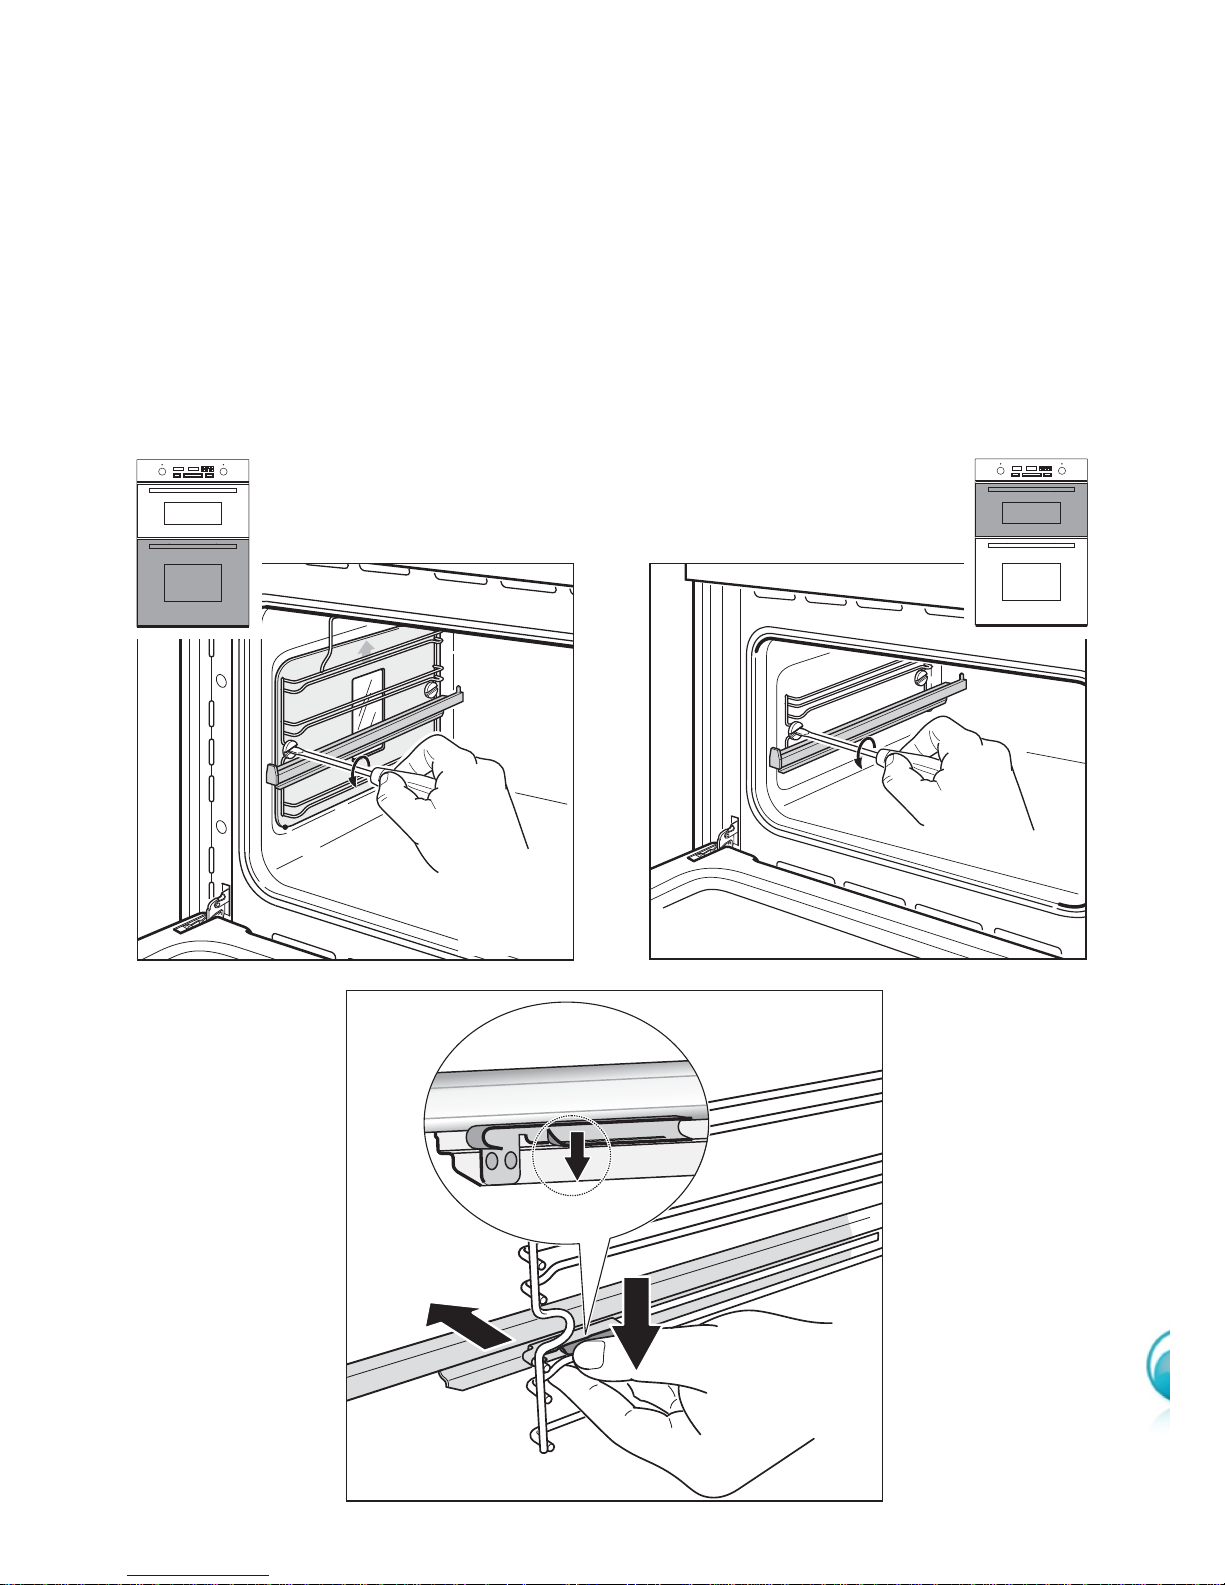
To remove the sliding shelf supports:
■ Remove the side racks by unscrewing the fixing screws (Figs. 2.9 - 2.10).
■ Lay down the sliding shelf support and side racks, with the sliding shelf support
underneath.
■ Find the safety locks. These are the tabs that clip over the wire of the side rack
(arrow 1 in Fig. 2.11).
■ Pull the safety locks away from the wire to release the wire (arrow 2 in Fig. 2.11).
1
2
1
Fig. 2.9
Fig. 2.10
Fig. 2.11
Cleaning the sliding shelf supports
– Wipe the supports with a damp cloth and a mild detergent only.
– Do not wash them in the dishwasher, immerse them in soapy water, or use oven
cleaner on them.
Page 15
15
Fig. 2.12
Fig. 2.13
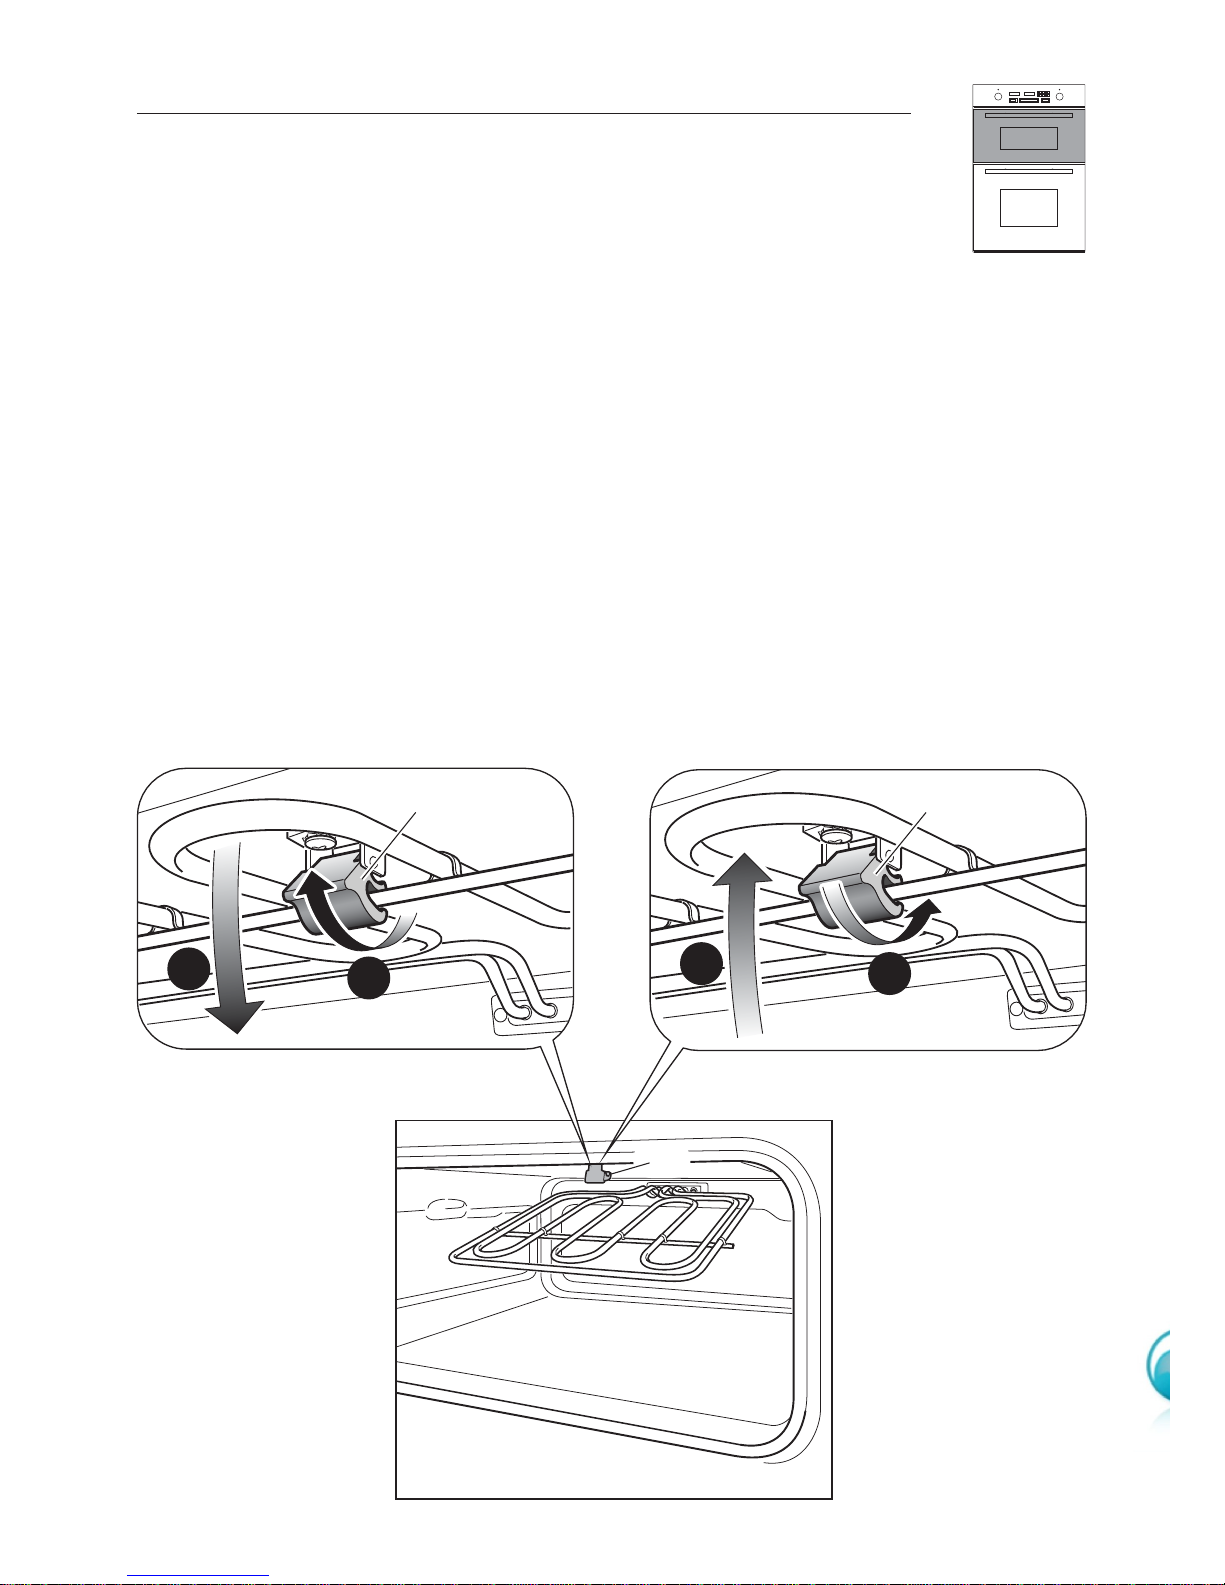
TILTING GRILL OF THE TOP OVEN (fig. 2.14)
■ The grill is secured to the rear wall of the oven on a hinge sys-
tem that allows it to be lowered to allow proper access when
cleaning the oven ceiling (fig. 2.14).
■ In the front the grill is secured to the ceiling by a hook A.
1
2
1
2
Unlocking the tilting grill (fig. 2.12)
1. Open the hook A.
2. Gently pull down the grill as shown
in the figure 2.14.
Locking the tilting grill (fig. 2.13)
1. Gently lift up the grill.
2. Close the hook A on the grill bar.
A A
A
Fig. 2.14
Page 16
16
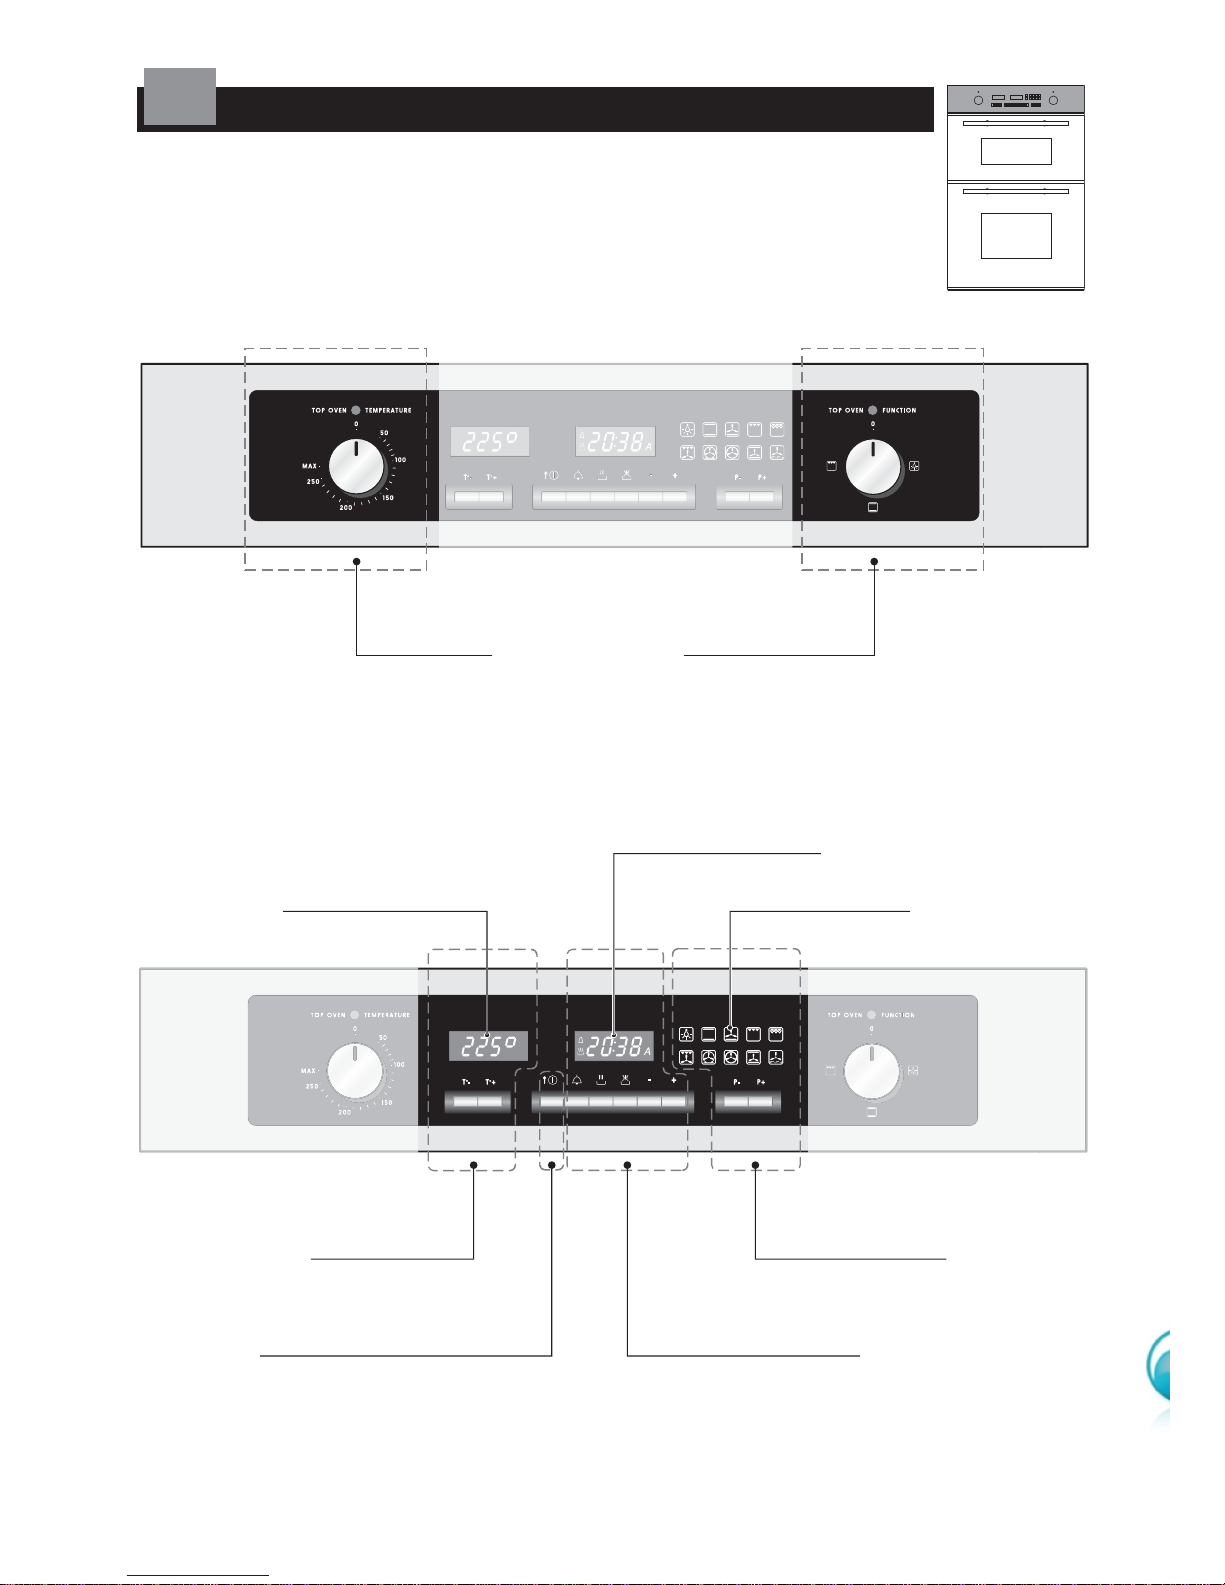
Temperature
knob
Cooking functions
knob
Temperature
operating zone
Cooking functions
operating zone
Electronic programmer
operating zone
On/OFF and "Children Care"
operating zone
Temperature display
Programmer display
Functions display
Fig. 3.1
Fig. 3.2
TOP OVEN CONTROLS
BOTTOM MAIN OVEN CONTROLS
Please note: This appliance incorporates a safety cooling fan which you will hear oper-
ating whenever the oven or grill are in use. This fan is to reduce the external temperature
of the appliance and cool the internal components
.
CONTROL PANEL
13
Page 17
17
NATURAL CONVENTION ELECTRIC OVEN
GENERAL FEATURES
This oven features 2 different thermostatic control functions to satisfy all cooking
requirements, provided by 3 heating elements:
• Upper element, 700 W
• Lower element, 1000 W
• Grill element, 2000 W
NOTE:
When using for the first time, you are advised to operate the oven at maximum temperature (thermostat knob on the maximum position) for approximately one hour in the
mode and for another 15 minutes in the mode in order to eliminate any traces
of grease from the electrical elements.
WARNING:
The door is hot, use the handle.
During use the appliance becomes hot. Care should be taken to avoid touching
heating elements inside the oven.
Attention: The oven door becomes very hot during operation.
Keep children away.
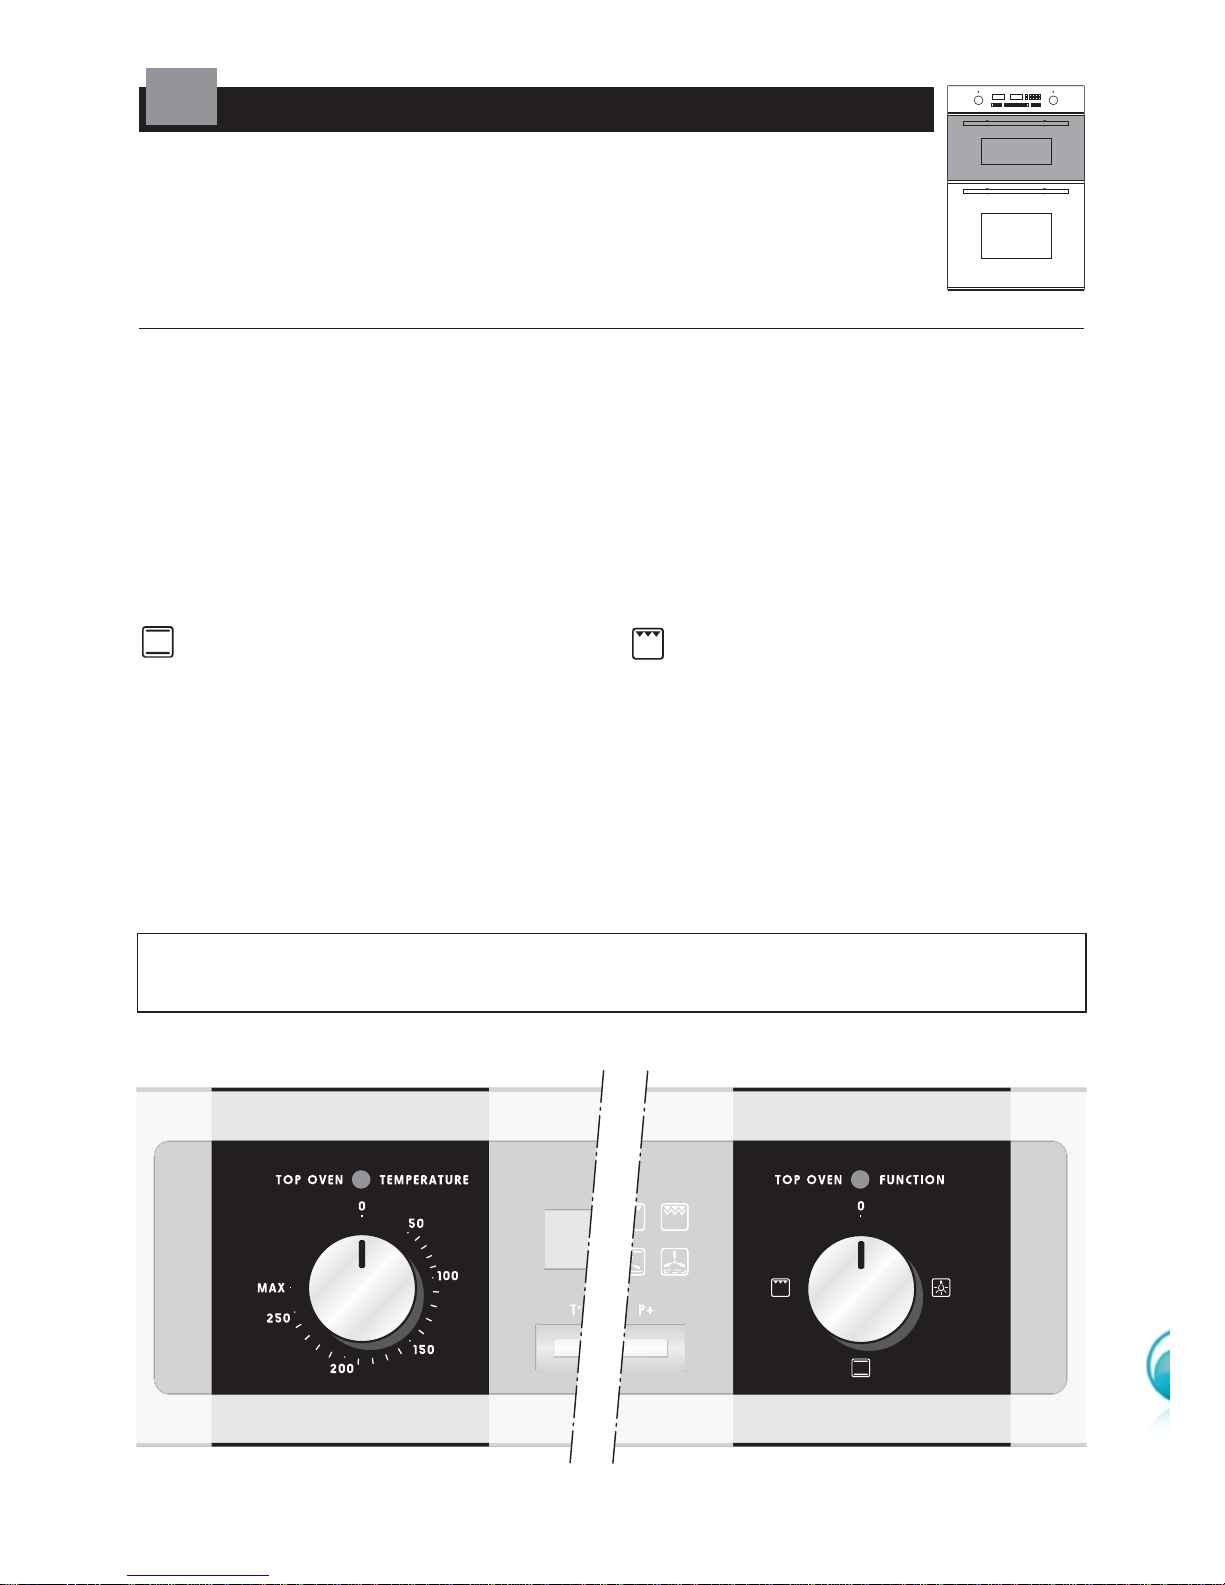
Fig. 4.1 Fig. 4.2
TOP OVEN
14
Page 18

18
FUNCTION SELECTOR KNOB (fig. 4.2)
Rotate the knob clockwise to set the oven to one of the following functions:
OVEN LAMP
By turning the function selector knob to this setting, the oven light will illuminate in the oven
cavity.
The oven light will operate on all selected functions.
THERMOSTAT KNOB (fig. 4.1)
To tur n on the heating elements of the oven, set function selector knob to the required position and the thermostat knob to the desired temperature.
To set the temperature, turn the thermostat control knob indicator mark to the required temperature.
The elements will turn on or off automatically which is determined by the thermostat.
The operation of the heating elements is signalled by a light placed on the control panel.
TRADITIONAL CONVECTION COOKING
The upper and lower heating elements are switched on.
The heat is diffused by natural convection and the temperature must be regulated between
50°C and the maximum position with the thermostat knob.
It is necessary to preheat the oven before introducing the foods to be cooked.
Recommended for:
For foods which require the same cooking temperature both internally and externally, i. e.
roasts, spare ribs, meringue, etc.
OPERATING PRINCIPLES
Heating and cooking in the conventional oven are obtained:
a. by natural convection
The heat is produced by the upper and lower heating elements.
b. by radiation
The heat is radiated by the infrared grill element.
Page 19

19
USE OF THE GRILL
Leave to warm up for approximately 5 minutes with the door closed.
Place the food inside positioning the rack as near as possible to the grill.
Insert the drip pan under the rack to collect the cooking juices.
Always grill with the oven door closed.
Grill with the oven door closed and for no longer than 30 minutes at any one time.
Attention: the oven door becomes very hot during operation.
Keep children away.
OVEN COOKING
Before introducing the food, preheat the oven to the desired temperature.
For a correct preheating operation, it is advisable to remove the tray from the oven and
introduce it together with the food, when the oven has reached the desired temperature.
Check the cooking time and turn off the oven 5 minutes before the theoretical time to recuperate the stored heat.
GRILLING
The infra-red heating element is switched on. The heat is diffused by radiation.
Use with the oven door closed and the thermostat knob must be regulated between
50 °C and 200 °C maximum.
For correct use see chapter “USE OF THE GRILL”.
Recommended for:
Intense grilling, browning, cooking au gratin and toasting etc.
It is recommended that you do not grill for longer than 30 minutes at any one time.
Attention: the oven door becomes very hot during operation.
Keep children away.
Page 20

20
GENERAL FEATURES
This is an oven that presents particular features from an operational point of view. It
is possible to insert 9 different cooking programs to satisfy every cooking need.
The 9 positions, controlled by the electronic programmer and a temperature probe, are
obtained by 4 heating elements which are:
• Lower element 1300 W
• Upper element 1000 W
• Grill element 2000 W
• Circular element 2200 W
NOTE:
Upon first use, it is advisable to operate the oven, at the maximum temperature, for
60 minutes in the position, for 30 minutes in the position and for another 15
minutes in the position.
Repeat the operation for another 15 minutes with the grill element on as explained in
the chapters GRILLING and USE OF THE GRILL.
WARNING:
The door is hot, use the handle.
During use the appliance becomes hot.
Care should be taken to avoid touching heating elements inside the oven.
Attention: the oven door becomes very hot during operation.
Keep children away.
FULL ELECTRONIC MULTIFUNCTION OVEN
BOTTOM MAIN OVEN
15
Page 21

21
OPERATING PRINCIPLES
Heating and cooking in the FULL ELECTRONIC MULTIFUNCTION oven are obtained
in the following ways:
a. by normal convection
The heat is produced by the upper and lower heating elements.
b. by semi-forced convection from the bottom
The heat produced by the lower heating element is distributed throughout the oven
by the fan.
c. by forced convection
A fan sucks in the air contained in the oven, which is circulated it through the circular
heating element and then forced back into the oven by the fan.
Before the hot air is sucked back again by the fan to repeat the described cycle, it
envelops the food in the oven, provoking a complete and rapid cooking. It is possible
to cook several dishes simultaneously.
d. by semi-forced convection from the bottom and back
The heat produced by the lower and circular heating elements is distributed throughout the oven by the fan.
e. by semi-forced convection
The heat produced by the upper and lower heating elements is distributed throughout
the oven by the fan.
f. by radiation
The heat is radiated by the infra red grill element.
g. by large area radiation
The heat is radiated simultaneously by the upper heating element and the infra red
grill element.
h. by radiation and ventilation
The radiated heat from the infra red grill element is distributed throughout the oven
by the fan.
i. by ventilation
The food is defrosted by using the fan and the bottom heating element (“
dEF”
mode). By setting the temperature to higher values(from 40 to 100°C max) it is possible to use this mode as a food warmer.
Page 22

22
SYMBOL
Lit = semi-automatic or automatic
cooking programmed
Flashing = semi-automatic or
automatic cooking completed
SYMBOL
Lit = operation of heating
elements (cooking functions)
Flashing = semi-automatic or
automatic cooking completed
DIGITS
Normally time of the day
SYMBOL
Lit = minute minder in operation
Flashing = countdown completed
by the minute minder
SYMBOL
End cooking time selection
SYMBOL
To decrease the numbers
on the programmer display
SYMBOL
To increase the numbers
on the programmer display
SYMBOL
Minute minder selection
SYMBOL
Cooking time selection
SYMBOL
ON/OFF or
"Children Care" selection
USING THE MAIN OVEN -
E
LECTRONIC PROGRAMMER
Fig. 5.1
Page 23

IMPORTANT NOTE:
The first time the oven is used or after a black-out three zeroes “0:00” will appear on
the programmer display.
Before using the oven set the time of the day.
23
OR
ELECTRONIC PROGRAMMER
FEATURES
The electronic programmer performs the following functions:
• 24 hours clock with illuminated display.
• Timer (up to 23 hours and 59 minutes).
• Program for semi-automatic oven cooking.
• Program for automatic oven cooking.
• Automatic switch off (after 10 hours when
using the oven in manual operation).
• "Children Care" safety selection (deactivation
of the programmer selection).
• Confirmation by three acoustic signals of last
setting performed (excluding oven programmer activation).
WARNING:
After any programmer setting, wait for the three acoustic signals of confirmation
before proceeding with a new selection.
SETTING TIME OF DAY
The programmer is provided with an electronic clock with luminous figures showing
the hour and minutes.
To set the time, press the two buttons simultaneously and with “ :” symbol flashing on the programmer display, press the button or to increase
or decrease the digits.
VERY IMPORTANT NOTE: Setting the clock will zero any programmes in progress
and the setted cooking function starts to operate immediately.
Page 24

24
OVEN PROGRAMMER ACTIVATION / DEACTIVATION (ON / OFF)
To activate the oven programmer:
• Press the button ;
0n appears for 2 seconds on the programmer display and
the oven lamp lights (symbol “ ” illuminated on the functions display). Then the
time of the day appears.
• The oven is ready to be operated.
• If the oven is not operated within 3 minutes the oven programmer is automatically
deactivated ("stand-by" condition); the oven light and “ ” symbol switch off and
“
OFF” appears, for some seconds, on the programmer display. Then the time of the
day appears.
To deactivate the oven programmer:
• Press the button ;
OFF appears, for some seconds, on the display. The oven
is turned off (“stand-by” condition) and appears the time of the day on the programmer display.
W
ARNING - IMPORTANT NOTE
Do not deactivate the oven programmer with an automatic or semi-automatic
cooking programmed: this operation will cancel the programmed cooking.
Only the minute minder operates in the “stand-by” condition.
Page 25

25
5 seconds
5 seconds
"CHILDREN CARE" SAFETY SELECTION
By pressing the button for about 5 seconds it is possible to activate the “Children
Care” option.
The display shows “
n--0”, 0n and then the time appears again.
When the “Children Care” option has been selected it is possible only to turn off the
oven (stand-by mode), operate the minute minder and check the cooking time or the
end of the cooking time.
In this setting it is not possible to change the oven cooking program (cooking function,
temperature) and the time selected for a semi-automatic or automatic cooking: if pressing the relative button “
n--0” appears on central or left temperature display.
To deactivate the “Children Care” option press the button for about 5 seconds.
The display shows “
n--0”, OFF and then the time of the day appears again.
IMPORTANT: If the oven has been switched off (stand-by mode) with the “Children
Care” option selected it is possible to turn on the oven only after having deactivated the “Children Care”.
Page 26

26
OR
UP TO
MINUTE MINDER
The minute minder consists simply of an acoustic signal which can be set for a maximum of 23 hours an 59 minutes.
The minute counter, at the end of countdown, does not stop the operation of the oven
(heating elements stay on). Remember to turn off the oven manually.
• Press button . The “ ” symbol lights and ":" symbol flashes on the programmer display.
• Press button or to set the time required.
• The countdown starts immediately and after about 5 seconds the time of the day
appears again on the display.
• To check the countdown press button ; the time is indicated (for some seconds)
in hours and minutes.
• At the end of the countdown an intermittent acoustic signal sounds and the “ ”
symbol flashes on the programmer display. Press any pushbutton of the programmer
(not ON/OF) to stop the intermittent acoustic signal.
NOTE:
The minute minder operates also if the oven, after selection, is turned OFF (standby). The minute minder can also be set in the "stand-by" condition (OFF).
Page 27

27
MANUAL USE OF THE OVEN
Activate the oven programmer as indicated in the “OVEN PROGRAMMER ACTIVATION/DEACTIVATION (ON/OFF)” chapter.
If “A” symbol is shown on the programmer display (semi-automatic or automatic cooking
selected) the programmed cooking time shall be cancelled as indicated in the “CANCELLING A SET PROGRAMME” chapter.
Operate the oven manually by selecting the oven function and temperature as indicated
in the “USING THE OVEN - COOKING FUNCTIONS” chapter.
After about 4 seconds from the last selection the oven starts to operate.
The “ ” symbol appears on the programmer display.
The “ ° ” (Celsius degrees) symbol appears on the temperature display indicating that
the heating elements are operating. If flashing this indicates that the oven is preheating.
To turn off the oven press the symbol.
IMPORTANT:
The oven operates in the manual use for maximum 10 hours. After 10 hours it
switches off automatically.
CANCELLING A SET PROGRAMME
To cancel a set programme (“A” symbol activated on the programmer display) press
the two buttons simultaneously.
IMPORTANT:
If the oven is on, remember to switch it off manually otherwise it does not stop
operating in the set mode.
IMPORTANT:
A set programme is also cancelled when the oven is switched OFF in the “stand-
by” condition. At the next power up the oven is not programmed.
Page 28

28
1
2
3
4
5
6
7
8
9
10
11
12
1
2
3
OR
1 - Time when the oven is programmed (10:00)
2 - Time necessary to cook the food (2 hours)
3 - Time when cooking will be completed (12:00)
CAUTION: after a black-out three zeroes
"0:00" appear on the display.
The semi-automatic cooking is cancelled.
Example
SEMI-AUTOMATIC COOKING - ONLY END OF COOKING
This automatically switches off the oven after the required cooking time.
Two methods of semi-automatic cooking are available:
1
ST
METHOD: Programming the duration of the cooking
• Set the oven (function and temperature) as indicated in the “USING THE OVEN - COOK-
ING FUNCTIONS” chapter.
•
Set the duration of the cooking (“hh:mm” - hours and minutes) by pressing button
(“ : ” symbol flashes on the programmer display) and then button to move
forward or to move back if you have gone beyond the required time. Set it to ten
minutes less than the time required because the stored heat will complete the cooking.
•“A” letter and “ ” symbol appear on the programmer display; the oven starts to operate
immediately and it will switch off automatically at the end of the cooking time (an intermittent acoustic signal sounds, the “A” letter and “ ” symbol flash on the programmer
display and the oven lamp is lit - press any pushbutton of the programmer [not ON/OFF]
to stop the intermittent acoustic signal).
• During cooking press button (press two times if the oven lamp is not lit - first
press lights only oven lamp) to display the remaining duration of the cooking (countdown).
• During cooking press button (press two times if the oven lamp is not lit - first
press lights only oven lamp) to display the time when cooking will be completed.
• The cooking program can be cancelled at any time as indicated in the "CANCELLING A
SET PROGRAMME" chapter.
Page 29

29
1
2
3
4
5
6
7
8
9
10
11
12
1
3
2
1 - Time when the oven is programme (10:00)
2 - Time when cooking will be completed (12:00)
3 - Duration of the cooking (2 hours).
CAUTION: after a black-out three zeroes
"0:00" appear on the display.
The semi-automatic cooking is cancelled.
Example
OR
2NDMETHOD: Programming the time when cooking will be completed.
• Set the oven (function and temperature) as indicated in the “USING THE OVEN - COOKING
FUNCTIONS” chapter.
• Set the time when cooking will be completed (“hh:mm” - hours and minutes) by pressing
button (“ : ” symbol flashes on the programmer display) and then button to
move forward or to move back if you have gone beyond the required time.
Set it to ten minutes less than the time required because the stored heat will complete the
cooking.
•“A” letter and “ ” symbol appear on the display; the oven starts to operate immediately
and it will switch off automatically at the end of the cooking time (an intermittent acoustic
signal sounds, the “A” letter and “ ” symbol flash on the programmer display and the
oven lamp is lit - press any pushbutton of the programmer [not ON/OFF] to stop the
intermittent acoustic signal).
• During cooking press button (press two times if the oven lamp is not lit - first press
lights only oven lamp) to display the time when cooking will be completed.
• During cooking press button (press two times if the oven lamp is not lit - first press
lights only oven lamp) to display the remaining duration of the cooking (countdown).
• The cooking program can be cancelled at any time as indicated in the "CANCELLING A
SET PROGRAMME" chapter.
Page 30

30
OR
OR
AUTOMATIC COOKING - START AND END OF COOKING
This automatically switches on the oven and switches it off at the required time.
To cook the food in the automatic mode follow these instructions:
1. Set the duration of the cooking
Set it
(“hh:mm” - hours and minutes)
by pressing button
(“ : ” symbol flashes
on the programmer display) and then button to move forward or to
move back if you have gone beyond the required time.
Set it to ten minutes less than the time required because the stored heat will complete
the cooking.
“A”
letter symbol appears on the programmer display.
2. Set the time when cooking has to be completed.
Set it
(“hh:mm” - hours and minutes)
by pressing button
(“ : ” symbol flashes
on the programmer display) and then button to move forward or to
move back if you have gone beyond the required time. Attention: the time when cooking has to be completed cannot be lower than time of the day plus duration of the
cooking.
Page 31

31
1
2
3
4
5
6
7
8
9
10
11
12
1
2
3
4
7:30
CAUTION: after a black-out three zeroes "0:00" appear on the display.
The semi-automatic cooking is cancelled.
1 - Time when the oven is programmed
(07:30)
2 - Time necessary to cook the food (2 hours)
3 - Time when the food to be cooked must
be ready (12:00)
4 - Time when the oven automatically switch-
es on (10:00)
Example
3. Set the cooking temperature and function
Operate as indicated in the "USING THE OVEN - COOKING FUNCTIONS" chapter.
The oven starts to operate for the programmed cooking time considering the time for
which the food has to be cooked.
“A”
letter is lit on the programmer display and
“”
symbol appears on the programmer
display when the oven starts to operate.
At the end of the automatic cooking an intermittent acoustic signal sounds and the
“A”
letter and
“”
symbol flash on the programmer display; press any button of the pro-
grammer [not ON/OFF] to stop the intermittent acoustic signal.
Press button (press two times if the oven lamp is not lit - first press lights only
oven lamp) to display the duration of the cooking programme or the remaining duration
of the cooking if the oven is already operating (countdown).
Press button (press two times if the oven lamp is not lit - first press lights only
oven lamp) to display the time when cooking has to be completed.
The cooking program can be cancelled at any time as indicated in the "CANCELLING
A SET PROGRAMME" chapter.
Page 32

32
END OF A PROGRAMMED SEMI-AUTOMATIC OR
AUTOMATIC COOKING
At the end of the programmed semi-automatic or automatic cooking the oven switches
off automatically the heating elements and the oven lamp.
An intermittent acoustic signal sounds and the
“A”
letter and
“”
symbol flash on
the programmer display; the temperature display is deactivated.
Press any pushbutton of the programmer [not ON/OFF] to stop the intermittent acoustic
signal.
After pressing, the oven lamp lights (light mode) and the oven is ready to be used for
a new manual or programmed cooking otherwise it can be switched off as indicated
in the "OVEN PROGRAMMER ACTIVATION/DEACTIVATION" chapter.
AUDIBLE SIGNAL
You can choose from three variations.
To select press the button.
Page 33

33
SOME ERROR
CODES ON
TEMPERATURE
DISPLAY
SOME ERROR
CODES ON
TEMPERATURE
DISPLAY
ABNORMAL SITUATIONS - ERROR CODES
In case of abnormal situations the oven is automatically switched off: only the cooling fan
motor operates and on the programmer display, an error message code appears.
The oven is stalled.
If this condition disappears the oven returns in the stand-by (
OFF) condition where the
central programmer display is activated and the time is displayed.
If this condition does not disappear try to disconnect the oven from the mains and then
reconnect.
If the abnormal situation persists, disconnect the oven
from the mains and contact the After-Sales Service.
IMPORTANT - “
----
” MESSAGE ON BOTH PROGRAMMER AND TEMPERATURE DISPLAYS
This indicates that the oven cavity is overheated. The oven is stalled and has to be
activated as below:
• Open the oven door and let the cavity to cool.
• Press the two buttons simultaneously.
• Three zeroes “0:00” flash on the display; proceed as per first connection to the mains
by setting the time of the day and then activating the oven programmer.
If this abnormal situation persists disconnect the oven from the mains and contact the
After-Sales Service.
Page 34

34
Set oven temperature button
Decreasing.
Set oven temperature button
Increasing.
" " (Celsius degrees) symbol
When the symbol is flashing the oven is preheating.
When the symbol is permanently lit the oven is at temperature.
Cooking temperature
All cooking functions start to operate with a pre-set temperature
which can be modified, at any time, by pressing the relative buttons
positioned below the temperature display (" T-" and " T+").
Fig. 5.2
U
SING THE
MAIN OVEN -
C
OOKING FUNCTION
OVEN TEMPERATURE SELECTION AND REGULATION
Page 35

35
Oven lamp
When the symbol is activated only
the oven lamp is on.
Oven cooking functions
During selection of a cooking function the
relative symbol is activated.
"P-" setting
"P+" setting
Set oven function button
Decreasing.
Set oven function button
Increasing.
Fig. 5.3
OVEN FUNCTION SELECTION AND REGULATION
Page 36

36
SETTING THE OVEN FUNCTION AND TEMPERATURE
Turn on the oven programmer as indicated in the "OVEN PROGRAMMER ACTIVATION/
DEACTIVATION (ON/OFF)" chapter.
Select the oven function as indicated in the "OVEN FUNCTION SELECTION AND REGULATION" chapter.
Select the oven temperature as indicated in the "OVEN TEMPERATURE SELECTION
AND REGULATION" chapter.
IMPORTANT: the cooking function and temperature can be modified at any time
during the normal, semi-automatic or automatic cooking.
We suggest to set, in presence of children, the "Children Care" selection (see relative chapter).
OVEN LAMP
When the oven is turned on from the "stand-by" (OFF) mode the oven lamp lights up
and the relative symbol is lit in the functions display. The lamp is always on in all the
cooking modes.
If the appliance is not operated within 3 minutes the oven is automatically turned off
in the "stand-by" mode.
During an automatic cooking program the lamp is off before the oven starts to operate.
By pressing any pushbutton of the programmer (not ON/OFF) the lamp is lit for one
minute; by pressing two times button , or the lamp is lit for a few
seconds.
TRADITIONAL CONVECTION COOKING
The upper and lower heating elements switch on.
The heat is diffused by natural convection and the temperature must be set between
50 °C and 250 °C.
This function starts cooking with a pre-heating temperature set at 200°C. To vary the
temperature proceed as indicated in the “OVEN TEMPERATURE SELECTION AND
REGULATION” chapter.
Recommended for:
For foods which require the same cooking temperature both internally and externally,
i.e. roasts, spare ribs, meringue, etc.
FAN LOWER HEAT
The lower heating element and the fan motor switch on.
The heat coming from the bottom is diffused by forced convection and the temperature
must be set between 50 °C and 250 °C.
This function starts cooking with a pre-heating temperature set at 190 °C. To vary the
temperature proceed as indicated in the “OVEN TEMPERATURE SELECTION AND
REGULATION” chapter.
Recommended for:
This mode is particularly suitable to complete cooking of dishes that require higher
temperature at the bottom.
Page 37

37
GRILLING
The infrared heating element switches on.
The heat is diffused by radiation.
The temperature can be set between 50 °C and 225 °C
maximum
.
This function starts cooking with a pre-heating temperature set at 225 °C.
To vary the temperature proceed as indicated in the "OVEN TEMPERATURE SELECTION AND REGULATION" chapter.
Recommended for:
Intense grilling action for cooking with the broiler; browning, crisping, “au gratin”, toasting, etc. For correct use see the “USE OF THE GRILL AND TURBO GRILL” chapter.
The external parts of the oven become hot during operation. Keep children well
out of reach.
TURBO GRILL
In this position the upper heating element and the grill element are on simultaneously
so that also the corner areas are heated. Heat is radiated over the entire surface area
of the grill. The temperature can be set between 50 °C and 225 °C maximum.
This function starts cooking with a pre-heating temperature set at 225 °C.
To vary the temperature proceed as indicated in the "OVEN TEMPERATURE SELECTION AND REGULATION" chapter.
Recommended for:
Intense grilling action for cooking in the entire surface area with the broiler; browning,
crisping, “au gratin”, toasting, etc.
For correct use see the “USE OF THE GRILL AND TURBO GRILL” chapter.
The external parts of the oven become hot during operation. Keep children well
out of reach.
VENTILATED GRILL COOKING
The infrared heating element and the fan switch on. The heat is mainly diffused by
radiation and the fan distributes it in the whole oven.
The temperature can be set between 50 °C and 225 °C
maximum
.
This function starts cooking with a pre-heating temperature set at 175 °C.
To vary the temperature proceed as indicated in the "OVEN TEMPERATURE SELECTION AND REGULATION" chapter.
Recommended for:
For grill cooking when a fast outside browning is necessary to keep the juices in, i. e.
veal steak, steak, hamburger, etc.
For correct use see the GRILLING AND “AU GRATIN” chapter.
The external parts of the oven become hot during operation. Keep children well
out of reach.
Page 38

38
HOT AIR COOKING WITH LOWER HEAT
This mode combines the lower heating element, the circular heating element and the fan.
The food is cooked by forced air circulation with additional heat from the bottom of
the oven. The temperature can be set between 50 °C and 250 °C.
This function starts cooking with a pre-heating temperature set at 210 °C.
To vary the temperature proceed as indicated in the "OVEN TEMPERATURE SELECTION AND REGULATION" chapter.
Recommended for:
This cooking mode is ideal for large joints of meat and large quantities of food that call
for uniform cooking inside and out, e.g. roasts, turkey, chicken, cakes, etc.
HOT AIR COOKING
The circular heating element and the fan switch on. The heat is diffused by forced convection and the temperature can be set between 50 °C and 250 °C.
This function starts cooking with a pre-heating temperature set at 175 °C. To vary the
temperature proceed as indicated in the "OVEN TEMPERATURE SELECTION AND
REGULATION" chapter.
Recommended for:
For foods that must be well done on the outside and tender or rare on the inside, i.
e. lasagna, lamb, roast beef, whole fish, etc.
CONVECTION COOKING WITH FAN
The upper and lower heating elements and the fan switch on. The heat from the top and
the bottom is diffused by fan convection. The temperature can be set between 50 °C
and 250 °C.
This function starts cooking with a pre-heating temperature set at 175 °C. To vary the temperature proceed as indicated in the "OVEN TEMPERATURE SELECTION AND REGULATION" chapter.
Recommended for:
For foods of large volume and quantity which require the same internal and external degree
of cooking; e.g. rolled roasts, turkey, legs, cakes, etc.
DEFROSTING FROZEN FOODS OR FOOD WARMING
The fan and the lower heating element switch on. This function starts to operate in the
defrosting mode (temperature display shows “
dEF”) at about 30 °C.
It is possible to vary the temperature as indicated in the "OVEN TEMPERATURE SELECTION
AND REGULATION" chapter, from 40 °C to maximum 100 °C, and this function operates
as a food warmer.
Recommended for:
To rapidly defrost frozen foods; 1 kilogram requires about one hour. The defrosting times
vary according to the quantity and type of foods to be defrosted.
To keep hot cooked foods at serving temperature
.
Page 39

39
COOKING ADVICE
STERILIZATION
Sterilization of foods to be conserved, in full and hermetically sealed jars, is done in
the following way:
a. Set the function .
b. b. Set the temperature at 185 °C and preheat the oven.
c. Fill the grill pan with hot water.
d. Set the jars into the grill pan making sure they do not touch each other and the
door and set the temperature at 135 °C.
When sterilization has begun, that is, when the contents of the jars start to bubble,
turn off the oven and let cool.
REGENERATION
Set the function and the temperature at 150° C.
Bread becomes fragrant again if wet with a few drops of water and put into the oven
for about 10 minutes.
COOKING DIFFERENT DISHES AT THE SAME TIME
By setting the or functions the ventilated oven allows you to cook different
types of food at the same time.
Fish, cakes and meat can be cooked together without the smells and flavours mixing.
The only precautions required are the following:
• The cooking temperatures must be as close as possible with a maximum difference
of 20° - 25°C between the different foods.
• Different dishes must be placed in the oven at different times according to the cooking
time required for each one. This type of cooking obviously provides a considerable
saving on time and energy.
ROASTING
To obtain classical roasting, it is necessary to remember:
• that it is advisable to maintain a temperature between 180 and 200 °C.
• that the cooking time depends on the quantity and the type of foods.
Page 40

40
USE OF THE GRILL AND TURBO GRILL
Set the or function and set the temperature between 50 °C and 225 °C max.
Leave to warm up for approximately 5 minutes with the door closed.
Introduce the food to be cooked, positioning the grill pan as close to the grill as possible.
Always grill with the oven door closed.
Grilling with the oven door closed and not for longer than 30 minutes at any one
time.
Attention: the oven door becomes very hot during operation. Keep children away.
GRILLING AND “AU GRATIN”
Grilling may be done by selecting the function because the hot air completely
envelops the food that is to be cooked.
Set the temperature between 50 °C and 225 °C max and after having preheated the
oven, simply place the food on the grid.
Close the door and let the oven operate until grilling is done.
Adding a few dabs of butter before the end of the cooking time gives the golden “au
gratin” effect.
Grilling with the oven door closed.
It is recommended that you do not grill for longer than 30 minutes at any one
time.
Attention: the oven door becomes very hot during operation. Keep children away.
Page 41

41
GENERAL ADVICE
■ Before you begin cleaning, you must ensure that the appliance is switched off.
■ It is advisable to clean when the appliance is cold and especially when cleaning
the enamelled parts.
■ Avoid leaving alkaline or acidic substances (lemon juice, vinegar, etc.) on the sur-
faces.
■ Avoid using cleaning products with a chlorine or acidic base.
■ Do not use a steam cleaner because the moisture can get into the appliance
thus make it unsafe.
WARNING
When correctly installed, your product meets all safety requirements laid down
for this type of product category.
However special care should be taken around the rear or the underneath of the
appliance as these areas are not designed or intended to be touched and may
contain sharp or rough edges, that may cause injury.
CLEANING and MAINTENANCE
16
ENAMELLED PARTS
■ All of the enamelled parts must be washed only with a sponge and soapy water
or with non-abrasive products.
■ Dry preferably with a microfibre or soft cloth.
Before any cleaning or maintenance operation, disconnect the oven
from mains power supply.
STAINLESS STEEL SURFACES WITH ANTI-FINGERPRINT
TREATMENT
CAUTION:
■ The stainless steel front surfaces used in this oven are protected with a Special
Lacquer to reduce finger-print marks.
■ To avoid damaging this lacquer, do not clean the stainless steel with abrasive
cleaners or abrasive cloths or scouring pads.
ONLY SOAP/WARM WATER MUST BE USED TO CLEAN THE STAINLESS STEEL
SURFACES.
Page 42

42
INSIDE OF OVEN
■ The oven should always be cleaned after use when it has cooled
down.
The cavity should be cleaned using a mild detergent solution and
warm water. Suitable proprietary chemical cleaners may be used after
first consulting with the manufacturers recommendations and testing
a small sample of the oven cavity. Abrasive cleaning agents or scouring
pads/cloths should not be used on the cavity surface.
■ NOTE: The manufacturers of this appliance will accept no responsibility for dam-
age caused by chemical or abrasive cleaning.
Do not store flammable material in the ovens.
STAINLESS STEEL AND ALUMINIUM PARTS AND SILKSCREEN PRINTED SURFACES
■ Clean using an appropriate product. Always dry thoroughly.
IMPORTANT: these parts must be cleaned very carefully to avoid scratching and
abrasion. You are advised to use a soft cloth and neutral soap.
TILTING GRILL (TOP OVEN AND BOTTOM MAIN OVEN)
■ The grill heating element is self-cleaning and does not require
maintenance. The grill is secured to the rear wall of the oven on a
hinge system that allows it to be lowered to allow proper access
when cleaning the oven ceiling (see pages 11, 15).
GLASS CONTROL PANEL
Clean using an appropriate product. Always dry thoroughly.
Do not use harsh abrasive cleaners or sharp metal scrapers to clean the
control panel since they can scratch the surface, which may result in shattering of the glass.
Page 43

43
GREASE FILTER (BOTTOM MAIN OVEN ONLY)
■ Clean the filter after any cooking! The grease filter can be removed
for cleaning and should be washed regularly in hot soapy water (fig.
6.1).
■ Always dry the filter properly before fitting it back into the oven.
Fig. 6.1
A
DVICE FOR USE AND MAINTENANCE OF CATALYTIC
PANELS
(BOTTOM MAIN OVEN ONLY)
The catalytic panels are covered with special microporous enamel which
absorbs and does away with oil and fat splashes during normal baking over
200 °C.
If, after cooking very fatty foods, the panels remain dirty, operate the oven
“idling” on max temperature for about 30 minutes.
These panels do not require to be cleaned, however it is advised to periodically remove
them from the oven (at least the side panels) and to wash them with tepid soapy water and
then wipe off with a soft cloth.
DO NOT CLEAN OR WASH THEM WITH ABRASIVE PRODUCTS OR WITH PRODUCTS
CONTAINING ACIDS OR ALKALIS.
The side panels are reversible and when the catalytic microporous enamel degrades, they
can be turned to the other side.
Page 44

44
Fig. 6.2
REPLACING THE OVEN LAMPS
WARNING: Ensure the appliance is switched off before replacing the lamp to avoid
the possibility of electric shock.
■
Let the oven oven cavities and the heating elements to cool down;
■
Switch off the electrical supply;
TOP RIGHT LAMP (TOP AND BOTTOM MAIN OVEN):
■
Remove the protective cover C (fig. 6.2);
■
Unscrew and replace the bulb B with a new one suitable for high temperatures (300°C) having the following specifications: 230-240V 50 Hz,
E14
and same power (check watt power as stamped in the bulb
itself) of the replaced bulb.
■
Refit the protective cover;
LEFT LAMP (BOTTOM MAIN OVEN ONLY):
■
Remove the left wire rack and the side catalytic panel by unscrewing
the fixing screws.
■
Press down from the top the protective cover A (fig. 6.2) and remove
it by rotating on the lower side. IMPORTANT: never use screwdrivers
or other utensils to remove the cover A. This could damage the enamel
of the oven or the lampholder. Operate only by hands.
■
Unscrew and replace the bulb B with a new one suitable for high temperatures
(300°C) having the following specifications: 230-240V 50 Hz, E14
and same power
(check watt power as stamped in the bulb itself) of the replaced bulb.
■
Refit the protective cover A operating in reverse order. ATTENTION: the notch in the
inner edge of the cover must be oriented toward the lamp.
■
Assemble the left wire rack and the side catalytic panel with the arrow up.
Note: Oven bulb replacement is not covered by your guarantee.
A
B
B
C
1
2
A
A
Page 45

45
The oven door can easily be
removed as follows:
■ Open the door to the full extent (fig.
6.3a).
■ Open the lever A completely on the
left and right hinges (fig. 6.3b).
■ Hold the door as shown in fig. 6.3.
■ Gently close the door (fig. 6.3c) until
left and right hinge levers A are
hooked to part B of the door (fig.
6.3b)
■ Withdraw the hinge hooks from
their location following arrow C (fig.
6.3d).
■ Rest the door on a soft surface.
■ To replace the door, repeat the
above steps in reverse order.
REMOVING THE
OVEN DOORS
Fig. 6.3a
B
A
C
Fig. 6.3b
Fig. 6.3c
Fig. 6.3d
Fig. 6.3
Page 46

46
CLEANING THE PANES
OF GLASS
Do not use harsh abrasive cleaners or
sharp metal scrapers to clean the oven
door glass since they scratch the surface, which may result in shattering of
the glass.
REMOVING THE INNER PANE OF
GLASS
The oven door has two panes. To clean
these, you need to remove the inner
pane.
1. Lock the door open:
• Fully open the oven door (fig. 6.4).
• Fully open the lever A on the left and
right hinges. (Fig 6.5).
• Gently close the door (Fig. 6.6) until
the left and right hinges are hooked to
part B of the door (Fig. 6.5)
2. Remove the inner pane:
• Remove the seal G by unhooking the
three fixing hooks (Fig. 6.7).
• Gently pull out the inner pane of glass
(Fig. 6.8)
• Clean the glass with an appropriate
cleaner. Dry thoroughly, and place on
a soft surface.
Now you can also clean the inside of the
outer glass.
TOP OVEN DOOR
(WITH TWO PANES OF
GLASS)
B
A
Fig. 6.6
Fig. 6.5
Fig. 6.4
Fig. 6.7
Fig. 6.8
G
Page 47

47
D
Fig. 6.13
Fig. 6.10
Fig. 6.9
E
F
Fig. 6.12
H
Fig. 6.11
A
Fig. 6.14
G
The top oven
door has a
sealed gasket
in the top part.
It is normal the opened gap between the
top edge of the inner glass and the sealed
gasket. This allows the cooling air
circulation.
REPLACING THE INNER PANE OF
GLASS
1. Make sure the door is locked open
(see figs. 6.4, 6.5, 6.6).
2. Replace the inner pane:
• Check that the four rubber pads are
in place (D in Fig. 6.9)
• Check that you are holding the pane
the correct way. You should be able
to read the wording on it as it faces
you.
• Insert the pane in the left E and right
F slide guides (fig. 6.10), and gently
slide it to the retainers H (fig. 6.11).
• Replace the seal G by hooking in the
three fixing hooks (fig. 6.13).
Make sure that you put it in the correct
way. (Fig. 6.12).
• Unlock the oven door by opening it
completely and closing the lever A on
the left and right hinges (Fig. 6.14),
Page 48

48
CLEANING THE PANES OF GLASS
The oven door is fitted with no. 3 panes:
- no. 1 outside;
- no. 1 inner;
- no. 1 in the middle.
To clean all panes on both sides it is necessary to remove the inner and the middle
panes as follows.
Do not use harsh abrasive cleaners or
sharp metal scrapers to clean the oven
door glass since they scratch the surface, which
may result in shattering of
the glass.
REMOVING THE MIDDLE AND
INNER PANES OF GLASS
1. Lock the door open:
• Fully open the oven door (fig. 6.15).
• Fully open the lever A on the left
and right hinges. (fig. 6.16).
• Gently close the door (fig. 6.17) until
the left and right hinges are hooked
to part B of the door (fig. 6.16).
2. Remove the inner pane:
• Gently pull out the inner pane of
glass (fig. 6.18).
• Clean the glass with an appropriate
cleaner. Dry thoroughly, and place
on a soft surface.
BOTTOM OVEN
DOOR
(WITH THREE PANES
OF GLASS)
B
A
A
B
Fig. 6.15
Fig. 6.16
Fig. 6.17
Fig. 6.18
Page 49

49
1
2
3. Remove the middle pane:
•Gently unlock the middle pane of
glass from the bottom clamps by
moving it as in fig. 6.20.
•Gently lift the bottom edge of the
pane (arrow 1 in fig. 6.21) and
remove it by pulling it out from the
top clamps (arrow 2 in fig. 6.21).
• Clean the glass with an appropriate
cleaner. Dry thoroughly, and place
on a soft surface.
Now you can also clean the inside of the
outer glass.
Fig. 6.19
Fig. 6.20
Fig. 6.21
Page 50

50
M
1
2
1
REPLACING THE MIDDLE AND
INNER PANES OF GLASS
1. Make sure the door is locked open
(see fig. 6.17).
2. Replace the middle pane:
• Check that the four rubber pads are
in place (M in fig. 6.22).
• Check that you are holding the pane
the correct way. You should be able
to read the wording on it as it faces
you.
• Gently insert the top edge of the
pane into the top clamps (arrow 1
in fig. 6.23), then lower the pane
and insert the bottom edge into the
bottom clamps (arrow 2 in fig. 6.23);
and then slide the pane into
position (fig. 6.24).
Fig. 6.22
Fig. 6.23
Fig. 6.24
Page 51

51
D
A
E
F
H
3. Replace the inner pane:
• Check that the four rubber pads are
in place (D in fig. 6.25).
• Check that you are holding the pane
the correct way. You should be able
to read the wording on it as it faces
you.
• Insert the pane in the left E and
right F slide guides (fig. 6.26), and
gently slide it to the retainers H (Fig.
6.27).
4. Unlock the oven door by opening it
completely and closing the lever A on
the left and right hinges (fig. 6.28).
The bottom
oven door has
not a sealed
gasket in the
top part.
E
F
D
H
A
Fig. 6.25
Fig. 6.26
Fig. 6.27
Fig. 6.28
Page 52

52
TROUBLESHOOTING:
If you experience a problem with your oven, check the following points before calling
our Customer Service Centre for assistance.
1. The power is switched on.
2. The controls are switched on.
3. None semi-automatic or automatic cooking program has been selected.
4. Both the fuse and the mains fuse are intact.
Should you still require assistance please contact our Customer Service Centre for
your nearest Authorised Delonghi Service Agent.
Page 53

53
Page 54

54
Page 55

55
Descriptions and illustrations in this booklet are given as simply indicative. The manufacturer reserves the right,
considering the characteristics of the models described here, at any time and without notice, to make eventual
necessary modifications for their construction or for commercial needs.
Page 56

Cod. 1103201 - ß2
 Loading...