

Page 1
CONTACT-GRILL
GRILL A CONTACT
TISCHGRILL
GRIGLIA A CONTATTO
KONTAKGRILL
PARILLA A CONTACTO
GRELHADOR DE CONTACTO
TTOOSSTTIIEERRAA
KONTAKGRILL
KONTAKTGRILL
MOINITOIMIPARILA
KONTAKTRENDSZERŰ GRILLSÜTŐ
OPIEKACZ
KONTAKTNÍ GRIL
ÉÉêêààããúú
Instructions for use
Istruzioni per l’uso
Mode d’emploi
Gebrauchsanweisung
Gebruiksaanwijzing
Instrucciones para el uso
Instuções de uso
√¢∏°π∂™ Ã∏™∏™
Bruksveiledning
Bruksanvisning
Käyttöohje
Kezelési utasítás
INSTRUKCJA OBS¸UGI
NÁVOD K POUÎITÍ
ààççëëííêêììääññàààà èèéé ùùääëëèèããììÄÄííÄÄññàààà
INT 26-11-2002 10:23 Pagina 1
Page 2
2
A) If your appliance comes fitted with a plug, it will incorporate
a 13 Amp fuse. If it does not fit your socket, the plug
should be cut off from the mains lead, and an appropriate
plug fitted, as below.
WARNING: Very carefully dispose of the cut off plug after
removing the fuse: do not insert in a 13 Amp socket
elsewhere in the house as this could cause a shock hazard.
With alternative plugs not incorporating a fuse, the circuit
must be protected by a 15 Amp fuse.
If the plug is a moulded-on type, the fuse cover must be
re-fitted when changing the fuse using a 13 Amp Asta
approved fuse to BS 1362. In the event of losing the fuse
cover, the plug must NOT be used until a replacement fuse
cover can be obtained from your nearest electrical dealer.
The colour of the correct replacement fuse cover is that as
marked on the base of the plug.
B) If your appliance is not fitted with a plug, please follow the
instructions provided below:
WARNING - THIS APPLIANCE MUST BE EARTHED
IMPORTANT
The wires in the mains lead are coloured in accordance with
the following code:
Green and yellow: Earth
Blue: Neutral
Brown: Live
As the colours of the wires in the mains lead may not correspond with the coloured markings identifying the terminals in
your plug, proceed as follows:
The green and yellow wire must be connected to the terminal
in the plug marked with the letter E or the earth symbol
or coloured green or green and yellow.
The blue wire must be connected to the terminal marked with
the letter N or coloured black.
The brown wire must be connected to the terminal marked
with the letter L or coloured red.
N
E
L
ELECTRICAL CONNECTION (UK ONLY)
POS. 1
P
OS. 2
INT 26-11-2002 10:23 Pagina 2
M
D
F
F
O
/
N
O
M
E
D
N
I
M
M
A
N
M
ED
IN
ON/OFF
M
READY
L
I
X
Y
D
EA
R
M
AX
A
B
C
E
D
F
G
H
Page 3
3
DESCRIZIONE DELL’APPARECCHIO
A Maniglia
B Gancio di chiusura
C Piastra superiore antiaderente
D Impugnatura
E Portacavo
F Piastra inferiore
G Indicatore grado cottura
H Manopola termostato
I Lampada spia “READY”
L Lampada spia “ON/OFF”
M Drenaggio grassi
N Contenitore raccogli grasso
DESCRIPTION OF APPLIANCE
A Handle
B Grill plate release catch
C Non-stick top grill plate
D Handgrip
E Cable holder
F Non-stick bottom grill plate
G Cooking level indicator
H Thermostat knob
I "READY" indicator light
L "ON/OFF" indicator light
M Fat drainage
N Fat drainage receptacle
BESCHREIBUNG DES GERÄTS
A Thermoisolierter Griff
B Verriegelungshaken
C Obere antihaftbeschichtete Platte
D Griffmulde
E Kabelhalter
F Untere antihaftbeschichtete Platte
G Gar- bzw. Grillstufenanzeige
H Thermostatregler
I Kontrolllampe „READY”
L Kontrolllampe „ON/OFF”
M Fettabfluss
N Fettauffangschale
BESCHRIJVING VAN HET APPARAAT
A Handvat
B Sluithaak
C Bovenste anti-aanbakplaat
D Handgreep
E Snoerhouder
F Onderste anti-aanbakplaat
G Indicator bakgraad
H Thermostaatknop
I Lampje “READY”
L Lampje “ON/OFF”
M Afvoer vet
N Drupbakje vet
DESCRIPCION DEL APARATO
A Asa
B Gancho de cierre
C Plancha superior antiadherente
D Empuñadura
E Portacable
F Plancha inferior antiadherente
G Indicador de grado de cocción
H Mando del termostato
I Lámpara piloto “READY”
L Lámpara piloto “ON/OFF
M Salida grasa
N Recipiente recoge grasa
DESCRIÇÃO DO APARELHO
A Pega
B Fecho de segurança
C Placa superior anti-aderente
D Punho
E Porta-cabo
F Placa inferior anti-aderente
G Indicador do grau de cozedura
H Botão do termóstato
I Lâmpada piloto “READY”
L Lâmpada piloto “ON/OFF”
M Drenagem da gordura
N Recipiente de recolha da gordura
PPEERRIIGGRRAAFFHH TTHHSS SSUUSSKKEEUUHHSS
A §·‚‹
B °¿УЩ˙Ф˜ ОПВИЫ›М·ЩФ˜
C ¶¿Уˆ ·УЩИОФППЛЩИО‹ П¿О·
D §·‚‹
E ™Ù‹ÚÈÁÌ· ηψ‰›Ô˘
F ∫¿Щˆ ·УЩИОФППЛЩИО‹ П¿О·
G ŒÓ‰ÂÈÍË ‚·ıÌÔ‡ „Ë̷ۛÙÔ˜
H £ВЪМФЫЩ¿ЩЛ˜
I ∂У‰ВИОЩИО‹ П˘¯У›· "READY"
L ∂У‰ВИОЩИО‹ П˘¯У›· "ON/OFF"
M ∞ФЫЩЪ¿ББИЫЛ П›Ф˘˜
N ¢Ô¯Â›Ô Û˘ÏÏÔÁ‹˜ Ï›Ô˘˜
DESCRIPTION DE L’APPAREIL
A Poignée
B Clip de verrouillage
C Plaque supérieure anti-adhésive
D Poignées pour manipuler l'appareil
E Range-cordon
F Plaque inférieure anti-adhésive
G Indicateur de cuisson
H Bouton thermostat
I Voyant lumineux "READY"
L Voyant lumineux "ON/OFF"
M Écoulement des graisses
N Bac à graisses
GB
GB
F
F
D
D
I
I
NL
NL
E
E
P
P
GR
GR
INT 26-11-2002 10:23 Pagina 3
Page 4

4
LAITTEEN KUVAUS
A Kahva
B Sulkukoukku
C Ylempi teflon-levy
D Sivukahva
E Johdon pidike
F Alempi teflon-levy
G Tehon osoitin
H Termostaatin nuppi
I “READY”- merkkivalo
L “ON/OFF”- merkkivalo
M Rasvan poistoputki
N Rasvan keruuastia
BESKRIVELSE AF APPARATET
A Håndtag
B Lukkekrog
C Øverste tefal-beklædte plade, aftagelig
D Greb
E Ledningsholder
F Nederste tefal-beklædte plade, aftagelig
G Stegegrad indikator
H Termostatknap
I Kontrollampe “READY”
L Kontrollampe “ON/OFF”
M Fedtafløb
N Fedtopsamlings beholder
BESKRIVELSE AV APPARATET
A Håndtak
B Lukkekrok
C Øvre plate, klebefri
D Håndtak
E Avlukke til ledning
F Nedre plate, klebefri
G Indikator for stekegrad
H Termostatbryter
I Varsellampe "READY"
L Varsellampe "ON/OFF"
M Fettuttømmingsinnretning
N Fettbeholder
A KÉSZÜLÉK LEÍRÁSA
A Felső csuklós pánt
B Kivehető, felső sütőlap tapadásgátló
bevonattal
C Támasztó láb (egyes típusoknál)
D A készülék felső része
E Hőálló fogantyú
F Zsírelvezető mélyedés
G Kivehető, alsó sütőlap tapadásgátló
bevonattal
H Szabályozható termosztát
I Sütőlap rögzítés/kivétel zárókapocs
L Hőmérséklet ellenőrző lámpa
M A készülék alsó része
OPIS URZÑDZENIA
A Uchwyt górny
B Zaczep mocujàcy
C P∏yta górna, teflonowa
D Uchwyt
E Pojemnik na kabel
F P∏yta dolna, teflonowa
G Wskaênik poziomu t∏uszczu
H Pokr´t∏o termostatu
I Lampka kontrolna “READY”
L Lampka kontrolna “ON/OFF”
M Odprowadzenie t∏uszczu
N Zbiorniczek na t∏uszcz
BESKRIVNING AV MASKINEN
A Handtag
B Låshake
C Övre belagd grillplatta
D Lyfthandtag
E Sladdvinda
F Nedre belagd grillplatta
G Grillindikator
H Termostat
I Signallampa “READY”
L Signallampa “ON/OFF”
M Fettuttömning
N Fettuppsamlingsbehållare
DK
DK
S
S
N
N
SF
SF
H
H
PL
PL
POPIS P¤ÍSTROJE
A Horní kloubov˘ závûs
B Vrchní deska grilu s nepfiipékavou
povrchovou úpravou, vyjímatelná
C Rozpûrka (jen u nûkter˘ch modelÛ)
D Vrchní ãást spotfiebiãe
E Odizolovaná rukojeÈ
F Odtok tuku
G Spodní deska grilu s nepfiipékavou
povrchovou úpravou, vyjímatelná
H Nastaviteln˘ termostat
I Háãek upevnûní/vyjmutí grilovacích
desek
L Svûtelná kontrolka
M Spodní ãást spotfiebiãe
ééèèààëëÄÄççààÖÖ èèêêààÅÅééêêÄÄ
A ê͇ۘ
B б‡˘ВОН‡ ‰Оfl Б‡ˆВФОВМЛfl
C ÇÂıÌflfl ÔÓÚË‚ÓÔË„‡Ì‡fl
Ô·ÒÚË̇
D аБУОЛЫ˛˘‡fl Ы˜Н‡
E йЪТВН ‰Оfl ¯МЫ‡
F çËÊÌflfl Ô·ÒÚË̇
G à̉Ë͇ÚÓ ÛÓ‚Ìfl ʇÍË
H ê͇ۘ ÚÂÏÓÒÚ‡Ú‡
I à̉Ë͇ÚÓ̇fl ·ÏÔ‡ "READY"
(ЙйнйЗзйлнъ)
L à̉Ë͇ÚÓ̇fl ·ÏÔ‡ "ON/OFF"
(Çäã/Çõäã)
M ÑÂÌ‡Ê Êˇ
N дУМЪВИМВ ‰Оfl Т·У‡ КЛ‡
CZ
CZ
RUS
RUS
INT 26-11-2002 10:23 Pagina 4
Page 5

5
INSTALLING THE GRILL
- Before using the grill, make sure that
it has not been damaged in any way
during transportation.
- Place the appliance on a flat surface
well out of the reach of children, as
high temperatures are generated
during use.
- Before plugging the appliance into
the mains , check that:
• the supply voltage corresponds
to that indicated on the rating
plate fitted on the appliance;
• the power on the mains socket is
minimum 10A;
• the mains socket is suitable for
the type of plug fitted on the
appliance; if not it should be
changed;
• the mains socket is earthed. The
manufacturer does not accept
any liability for damage caused
as a result of non-compliance
with this requirement.
- Before using the grill for the first
time, switch it on and leave it to heat
up in the barbecue/party grill position
(pos.2) without any food, for at least
5 minutes; open the window in order
to eliminate any unpleasant smell
that tends to be given off when an
appliance is new.
IMPORTANT SAFETY INSTRUCTIONS
- Read the following safety instructions carefully before using the grill, to obtain the
best results and avoid making any errors.
- This appliance is designed to cook food and should not be used for any other purposes, or modified or tampered with in any way.
- Children or infirm persons should not be allowed to use this product unsupervised
- Children should not be allowed to play with this appliance.
- Make sure that the supply cord does not come into contact with any part of the grill
that generates heat when the appliance is being used.
- The temperature of accessible surfaces may be high when the appliance is operating
- Wash the two non-stick grill plates thoroughly before using the grill.
- Grill plates must be perfectly dry before being fitted onto the appliance.
- Make sure that the handle closing-latch (H) is holding the wire racks in place.
- Keep out of the reach of children and never leave the iron unattended when switched on.
- Always disconnect the appliance from the mains:
• before storing away the appliance or removing the grill plates
• before cleaning or maintenance
• after use.
- Always use approved extension cords.
- Do not use outdoors. Do not change the supply cord without expert assistance as special equipment is required. For repairs to the cord, contact your local authorised Service Agents.
- Do not unplug the appliance by pulling the supply cord.
- Only switch the appliance on with the grill plates fitted.
- WARINING: charcoal or similar combustible fuels must not be used with this
appliance.
- Do not immerse the appliance in water.
- Allow the appliance to cool down completely before storing it away.
- Do not use sharp tools on the grill plates as these may damage the non-stick coating.
This appliance conforms to EEC Directive EN 55014 regarding the suppression of radio disturbance.
GB
INT 26-11-2002 10:23 Pagina 5
Page 6

6
USING THE APPLIANCE
- Plug into the mains socket and adjust the thermostat (H) to the required
position. The ON/OFF indicator light
(L) come on. Pre-heat the appliance
with the grill plates closed.
- When the appliance has reached the
required temperature, the "READY"
indicator light (I) come on.
- Place the food to be grilled on the
grill plates.
- Place the fat collection receptacle (N)
under the fat drainage spout.
- To turn the appliance off, turn the
thermostat knob anticlockwise until it
stops and unplug from the mains
socket.
-After cooking, unplug the appliance
and leave to cool.
- The release catch (B) enables the
appliance to be closed (position 1)
for easy transport.
- The appliance has a hinged top plate
to adapt to foods of any thickness.
Never touch the plates with sharp
implements as this could damage
the coating.
CLEANING
- Always unplug the appliance and
allow it to cool before cleaning.
- Clean the appliance after each use to
prevent unpleasant smells or fumes
from being emitted when it is next
used.
- Do not use abrasive tools or cleaning
agents as these may scratch or
damage the non-stick coating.
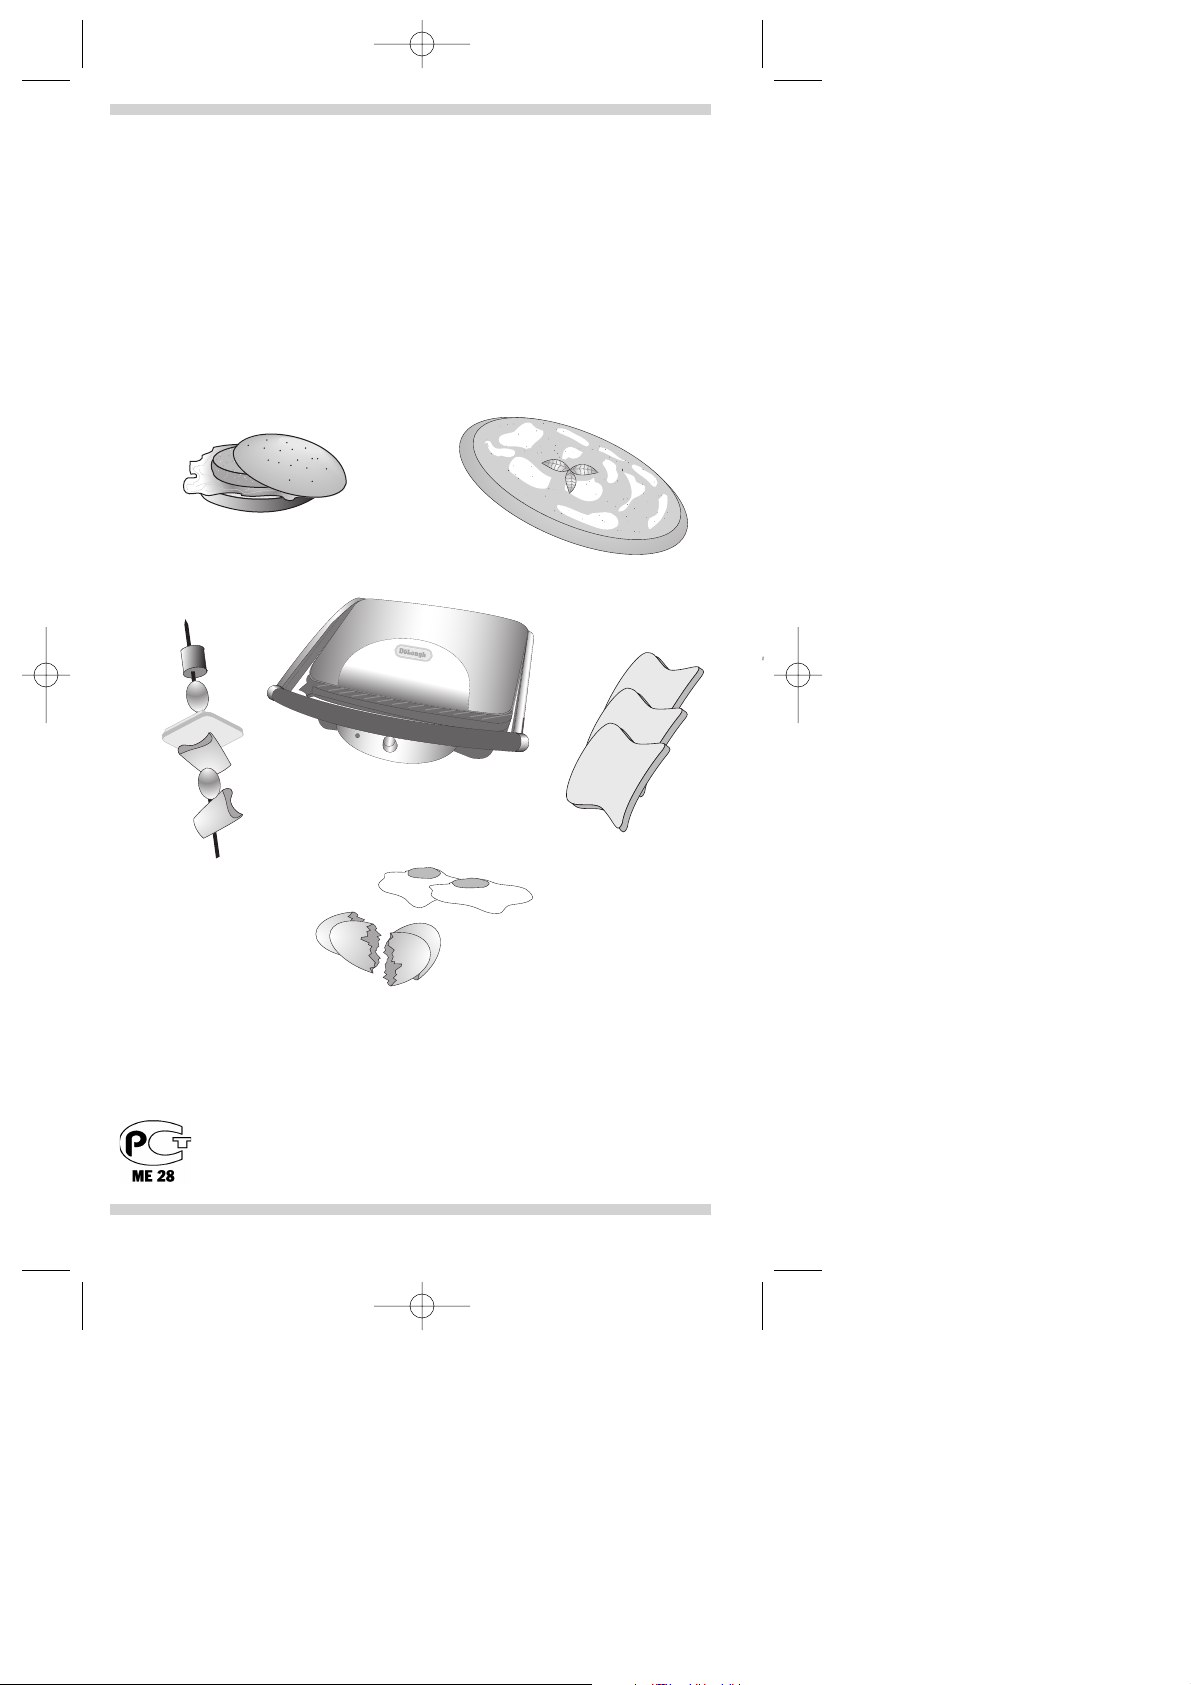
COOKING TIPS
- Thawed and marinaded meat should
be dried thoroughly before being placed on the grill.
- Meat should be seasoned before grilling but salt should be added at time
of serving.
- Food which is to be contact-grilled
should be uniformly thick to ensure
even browning.
- When cooking fish, the bottom plate
(F) must always be oiled.
-A number of recipes suitable for the
grill have been provided.
Please note that the cooking times
given are only approximate.
They may vary, depending on the
characteristics of the food being
cooked (temperature prior to cooking,
water content) and individual preference.
INT 26-11-2002 10:23 Pagina 6
Page 7

7
FOOD
TEMP.
SETTING
GRILL
POSITION
TIME REMARKS & TIPS
Chop (1) max 1 6’-8’
Chops should be of even thickness.
Beefburger (2) max 1 3’-5’
Wait 2-3’ before opening the plate, otherwise
the burgers will break up.
Beef steak (1) med 1 2’-3’
Meat cooked rare in time indicated
Pork steak (1) max 1 2’-3’
Meat cooked rare in time indicated
Spare ribs (3) max 1 15’-18’
Turn ribs after 10’
Liver (2) med 1 2’-3’
Clean liver thoroughly
Kebabs (3) max 1 8’-10’
Turn after 4-5’
Chicken (1 kg) med 1 75’-80’
Cut open in half, do not turn
Sausage (3) max 1 3’-5
Cut in half
Fresh sausage (2) max 1 4’-6’
Cut in half
Salmon trout fillet (1) med 2 16’-20’
Oil the plate and turn halfway through cooking
Salmon steak (1) med 2 16’-20’
Oil the plate and turn halfway through cooking
Sole (1) med 2 18’-22’
Oil the plate and turn halfway through cooking
Aubergines
(6 slices)
med 1 6’-8’
Slice evenly
Courgettes
(7 slices)
med 1 6’-8’
Slice evenly
1 pepper/capsicum (quarters)
med 1 6’-8’
Close the grill plates and press down
Onions (sliced) med 1 6’-8’
Slice evenly
Polenta (slices) med 1 20’-25’
Cut into 1.5 cm. thick slices. Leave to cook with
plates closed for 15’
Filled bread rolls med 1 3’-9’
Use soft rolls
Toasted sandwich med 1 2’-3’
Place only half a cheese slice in each sandwich
as it tends to spill as it melts.
A) If your appliance comes fitted with a plug, it will incorporate
a 13 Amp fuse. If it does not fit your socket, the plug should
be cut off from the mains lead, and an appropriate plug fitted, as below.
WARNING: Very carefully dispose of the cut off plug after
removing the fuse: do not insert in a 13 Amp socket elsewhere in the house as this could cause a shock hazard.
With alternative plugs not incorporating a fuse, the circuit
must be protected by a 15 Amp fuse.
If the plug is a moulded-on type, the fuse cover must be refitted when changing the fuse using a 13 Amp Asta approved fuse to BS 1362. In the event of losing the fuse cover,
the plug must NOT be used until a replacement fuse cover
can be obtained from your nearest electrical dealer. The
colour of the correct replacement fuse cover is that as
marked on the base of the plug.
B) If your appliance is not fitted with a plug, please follow the
instructions provided below:
WARNING - THIS APPLIANCE MUST BE EARTHED
IMPORTANT
The wires in the mains lead are coloured in accordance with
the following code:
Green and yellow: Earth
Blue: Neutral
Brown: Live
As the colours of the wires in the mains lead may not correspond with the coloured markings identifying the terminals in
your plug, proceed as follows:
The green and yellow wire must be connected to the terminal in
the plug marked with the letter E or the earth symbol or
coloured green or green and yellow.
The blue wire must be connected to the terminal marked with
the letter N or coloured black.
The brown wire must be connected to the terminal marked with
the letter L or coloured red.
N
E
L
ELECTRICAL CONNECTION (UK ONLY)
INT 26-11-2002 10:23 Pagina 7
 Loading...