

Page 1
Instructions for use
Käyttöohjeet
Bruksanvisning
Brugervejledning
Bruksanvisning
Instrukcja uýytkowania
Kezelési utasítás
ààÌÌÒÒÚÚÛÛÍ͈ˆËËflfl ÔÔÓÓ ˝˝ÍÍÒÒÔÔÎÎÛÛ‡‡ÚÚ‡‡ˆˆËËËË
NNáávvoodd kk ppoouuÏÏiittíí
COFFEE MACHINE
KAHVINKEITIN
ESPRESSOMASKIN
KAFFEMASKINE
ESPRESSOMASKIN
EKSPRES DO KAWY
KÁVÉFŐZŐGÉP
ääééîîÖÖÇÇÄÄêêääÄÄ
KKÁÁVVOOVVAARR
Page 2

WARNING - THIS APPLIANCE MUST BE EARTHED
IMPORTANT
The wires in the mains lead are coloured in accordance with the
following code:
Green and yellow: Earth
Blue: Neutral
Brown: Live
As the colours of the wires in the mains lead may not correspond with
the coloured markings identifying the terminals in your plug, proceed as
follows:
The green and yellow wire must be connected to the terminal in the plug
marked with the letter E or the earth symbol or coloured green or
green and yellow.
The blue wire must be connected to the terminal marked with the letter N
or coloured black.
The brown wire must be connected to the terminal marked with the letter
L or coloured red.
N
E
L
ELECTRICAL CONNECTION (UK ONLY)
A) If your appliance comes fitted with a plug, it will incorporate a 13
Amp fuse. If it does not fit your socket, the plug should be cut off
from the mains lead, and an appropriate plug fitted, as below.
WARNING: Very carefully dispose of the cut off plug after
removing the fuse: do not insert in a 13 Amp socket elsewhere in
the house as this could cause a shock hazard.
With alternative plugs not incorporating a fuse, the circuit must be
protected by a 15 Amp fuse.
If the plug is a moulded-on type, the fuse cover must be re-fitted when
changing the fuse using a 13 Amp Asta approved fuse to BS 1362.
In the event of losing the fuse cover, the plug must NOT be used
until a replacement fuse cover can be obtained from your nearest
electrical dealer. The colour of the correct replacement fuse cover is
that as marked on the base of the plug.
B) If your appliance is not fitted with a plug, please follow the
instructions provided below:
Page 3
3
17
18
1
4
7
2
21
5
20
19
6
16
8
15
13
14
10
9
12
11
Page 4
1
1
2
2
3
10
4
7
5
8
11
6
9
12
13
14
15
Page 5
5
1
16
19
22
17
A
B
20
23
2
18
B
C
21
Page 6
Thank you for choosing this Delonghi coffee machine.
To get the very best out of your new coffee machine
it is advisable to read these instructions before using
the appliance. This is the only way to ensure
optimum results and maximum safety.
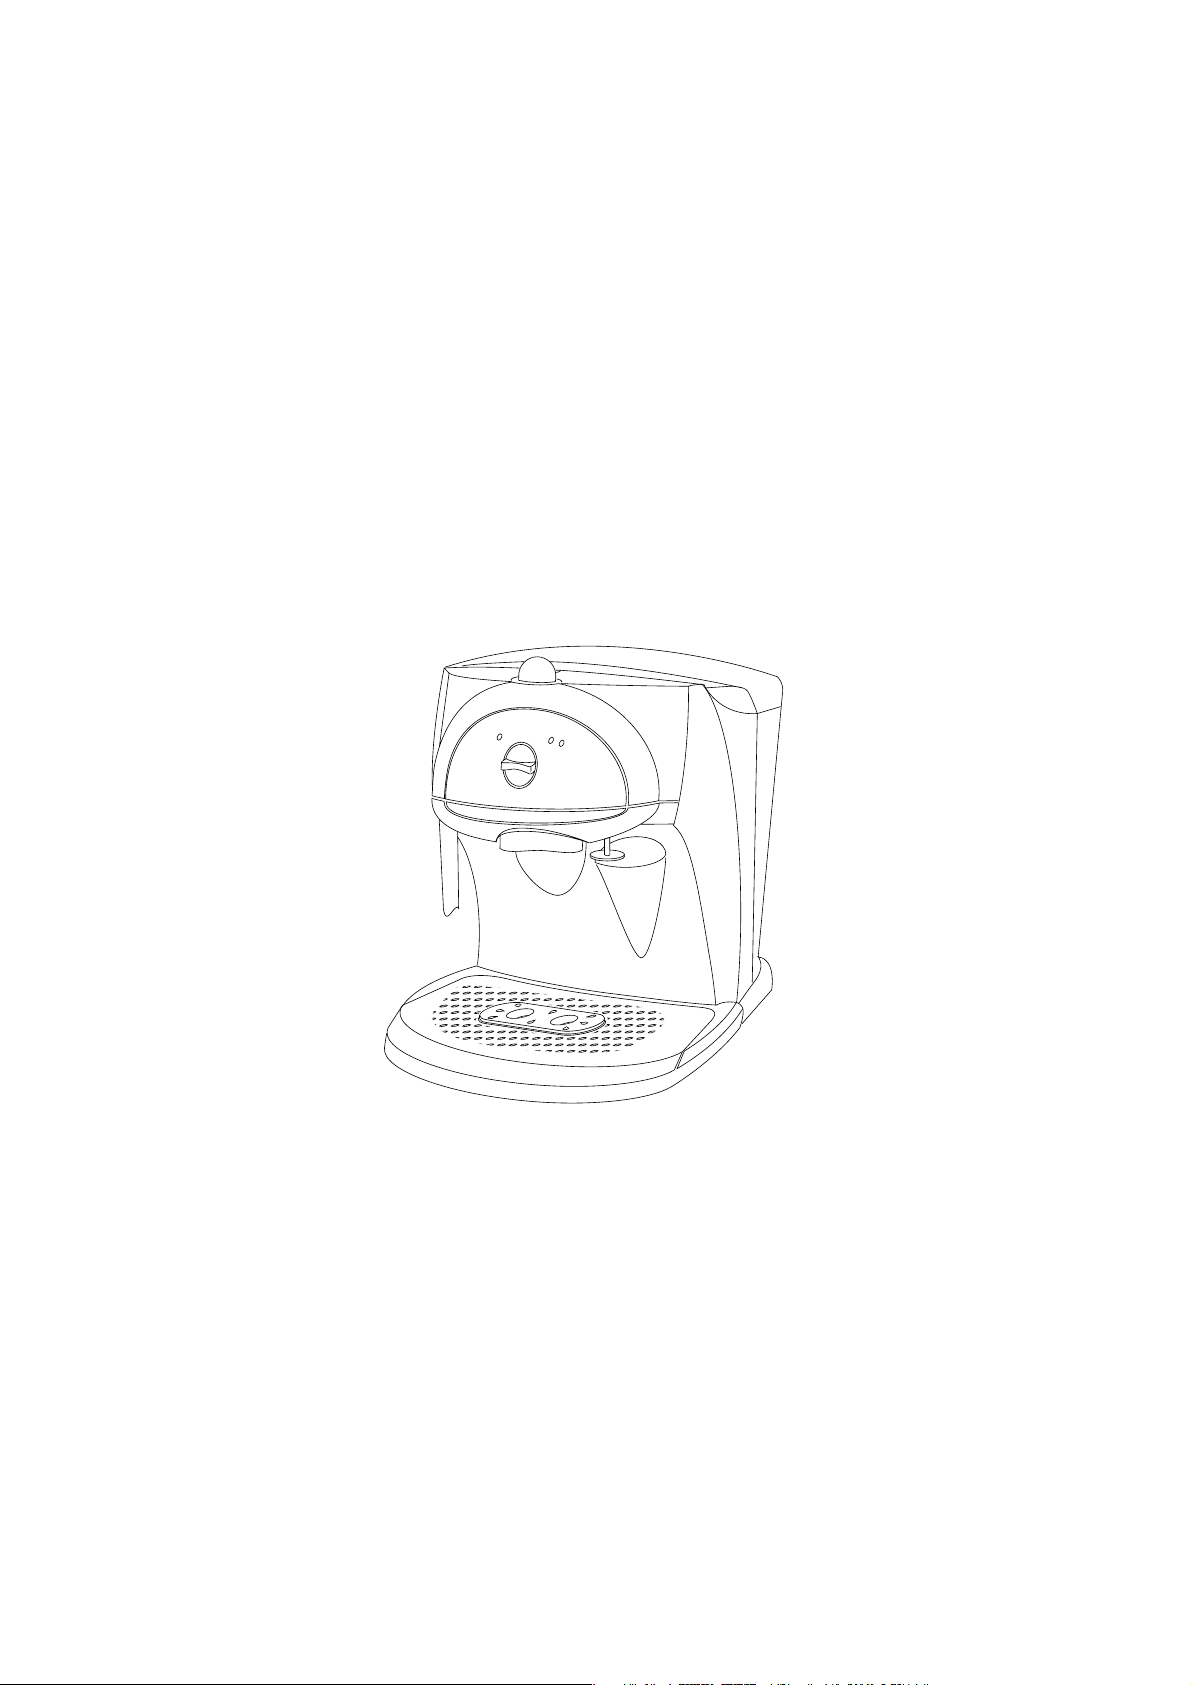
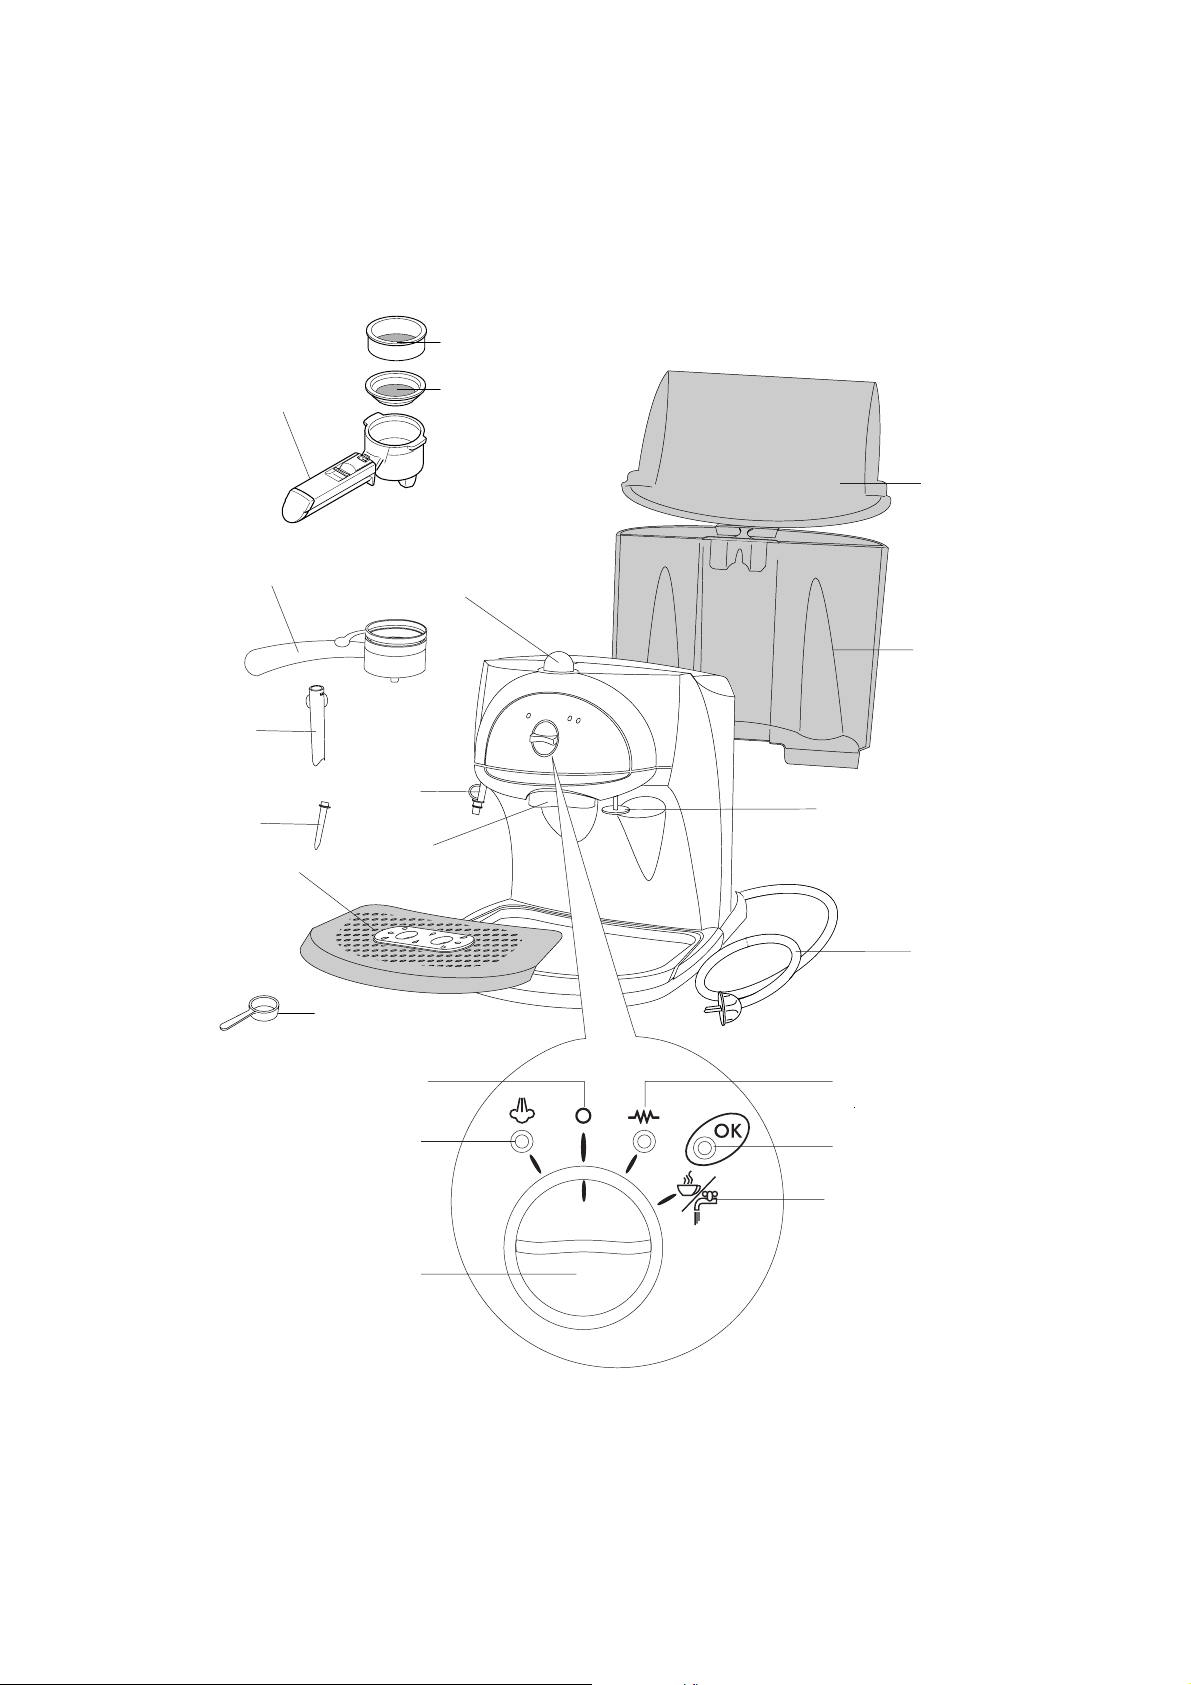
DESCRIPTION OF THE APPLIANCE
The following terms are used throughout the instruction
manual
1 Filter holder for ground coffee
2 1-cup filter
3 2-cup filter
4 Filter holder for pods (if fitted)
5 Steam release knob
6 Coffee tamper
7 Removable drip tray - black area inside for
positioning cups
8 Power supply cable
9 ‘OK’ light
10 Boiler on function
11 Selector knob
12 Espresso function
13 “O”OFF position
14 Cappuccino function (for milk frothing)
15 Coffee measuring spoon
16 Boiler outlet
17 Milk frother
18 Steam nozzle
19 Delivery tube
20 Water tank
21 Lid for water tank
SAFETY WARNINGS
• This machine has been built to “make coffee” and to
“reheat beverages”; please be careful to avoid burns
from the sprays of hot water or steam and avoid any
improper use.
• When the appliance is in use, do not touch any of the
machine’s hot surfaces.
• After unpacking, make sure that the machine is
complete and undamaged. In case of doubt, do not
use the appliance and seek the advice of a qualified
service professional.
• Packaging materials (plastic bags, foam polystyrene,
etc.) should not be left within the reach of children as
this could be a potential source of danger.
• This appliance is to be utilised for domestic use only.
Any other use is to be considered improper and
therefore, dangerous.
• The manufacturer takes no responsibility for damage
derived from improper use.
• Never touch the appliance with wet or damp hands.
• The appliance is not intended for use by young
children or infirm persons without supervision.
• Young children should be supervised to ensure that
they do not play with the appliance.
•In case of breakdown or malfunctioning, turn off the
appliance immediately and do not touch it. For
repairs, please contact a Service Centre authorized
by the manufacturer and request the use of original
replacement parts only. The lack of respect for this
point may compromise the safe use of the appliance.
• The power supply cable of this appliance must never
be replaced by the user, because its replacement
requires the use of special tools. If the cable should
become damaged, or in case it needs to be replaced,
please go to a Service Centre authorized by the
manufacturer.
• When the appliance is not in use, turn off and
disconnect the plug from the socket.
• As with any electrical appliance, whilst the
instructions aim to cover as many eventualities as
possible, caution and common sense should be
applied when operating your appliance, particularly
in the vicinity of young children.
INSTALLATION
• Place the coffee maker on flat work surface at a safe
distance from taps and sinks.
• Check that the voltage corresponds to that indicated
on the appliance rating plate. The appliance must
always be connected to a well-earthed socket rated
at 10 A minimum. The manufacturer is not liable for
damage caused by inadeguate earthing of the
appliance.
• In the event of incompatibility between the plug on
the appliance and the socket, have the plug replaced
with another of the right type by a qualified
professional.
If the cable is damaged or requires replacing,
contact a service centre authorised by the
manufacturer only.
• Never install the machine in an environment that can
reach a temperature less than or equal to 0°C (if the
water in it freezes, the coffee maker may be damaged).
• When the machine is in operation, any additional
cable can be stored in the machine by inserting it
back into the cable supply outlet.
6
GB
Page 7
77
USING YOUR MACHINE FOR THE FIRST
TIME
When you are using the machine for the first time, you
should wash all the accessories i.e. filter holder, steam
nozzle etc in warm soapy water and rinse. To ensure
best tasting coffee the internal circuits must also be
flushed through at least five times. To do this follow the
directions below in “How to prepare espresso coffee”
but use only water and not coffee.
HOW TO PREPARE ESPRESSO COFFEE
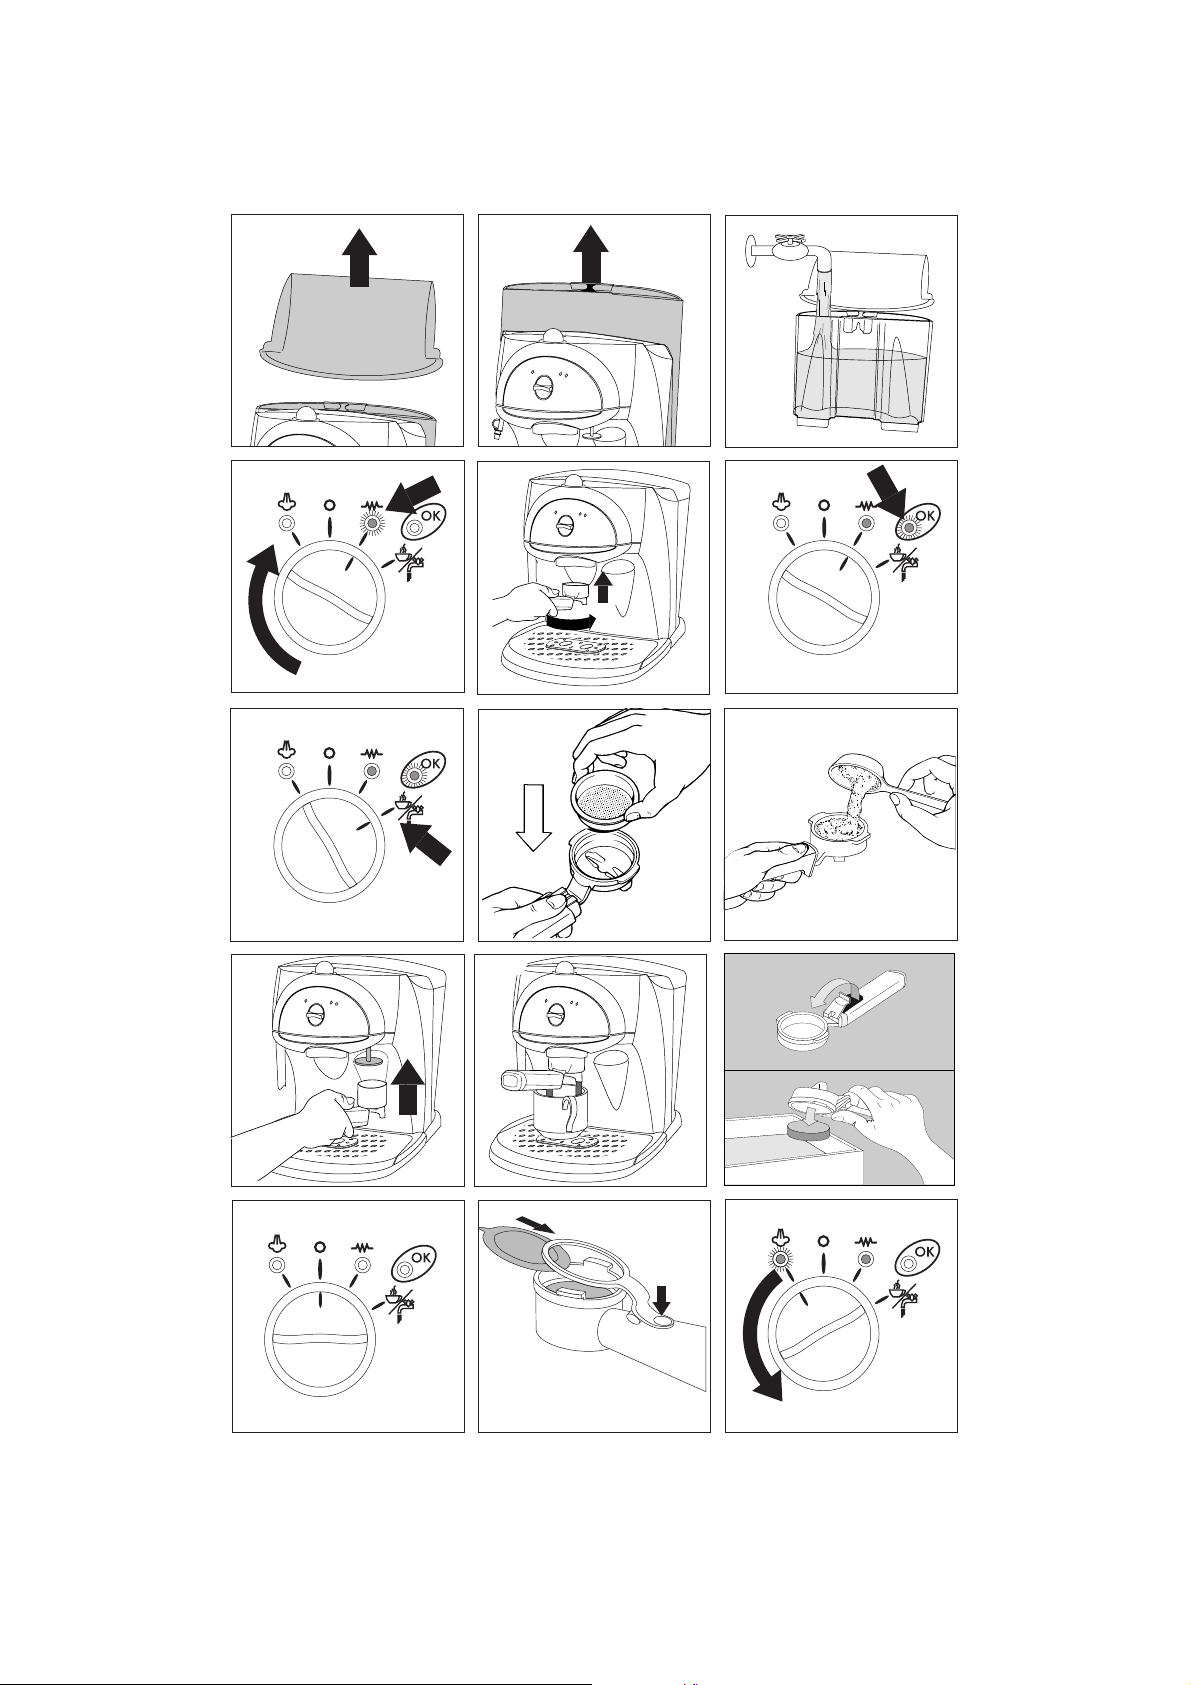
FILLING THE WATER TANK:
To remove the water tank simply pull upwards (fig 2)
and fill the tank at the sink (fig 3). Do not exceed the
MAX level on the water tank. The tank may also be
filled without removing it, simply by pouring water into
it directly from a jug.
Replace the tank by connecting the valve at the bottom
of the tank with the hole in the base on the machine.
Note: Do not operate the appliance without water in
the tank and always remember to fill the tank when the
water level goes below the MIN level.
PREHEATING THE COFFEE MACHINE
To ensure your espresso coffee is dispensed at the right
temperature it is essential that the coffee unit is
preheated.
•Turn the selector knob so that the indented line on
the selector knob points to the boiler on function
. Red light next to will come on (fig 4).
• Attach the empty filter holder (without coffee) to the
machine by positioning it under the boiler outlet
with the handle towards the left (fig 5). Push
upwards and at the same time turn the handle as
far right as possible. It does not matter if the
handle is not centrally aligned with the machine, as
long as the filter holder is firmly attached to the
appliance.
• Position a cup under the filter holder. Use the same
cup that the coffee will be served in, so that it may
be preheated.
•Wait until the orange “OK” light comes on (fig 6)
and turn the selector knob to the espresso function
position (fig 7). Allow water to flow until the
orange “OK” light goes out, then stop the flow of
water by turning the selector knob to the boiler on
function (fig 4)
• Empty the cup, wait until the “OK” pilot light comes
on again and repeat the whole operation one more
time.
• For optimum preheating, the selector knob can be left
in the “boiler on” position for approximately
half an hour before making any coffee.
HOW TO PREPARE ESPRESSO COFFEE:
Hints and Tips:
• It is important to use a high quality ground coffee
with a fine grind in order to avoid the obstruction
of the filter during the brewing.
• It is important to ensure that the filter is clean before
filling with coffee.
•Tamping the coffee gives a better quality espresso.
If you press too hard, the coffee comes out slowly
and the cream is dark in colour. If on the other
hand, the coffee is not pressed enough, it will come
out too quickly and the cream will be light in colour.
•Preheating the machine will ensure your coffee is
dispensed at the correct temperature
•Espresso is a strong dark coffee with a distinctive
caramel coloured froth, known as the “crema”.
Espresso coffee is best served in small “demi-tasse”
cups, with a half cup being the ideal serving
(approx 1
1
/2- 2 fl oz).
1. After carrying out the preheating of the machine as
described in the preceding section, in order to
make just one cup of espresso coffee, insert the 1cup filter (the smaller of the two provided) into the
filter holder (Fig. 8) and fill it with one level
measuring spoon of ground coffee – about 7
grams. If you wish to prepare two cups of espresso
coffee, use the 2-cup filter (the larger of the two
provided) and fill it with two less-than-level
measuring spoons of ground coffee (about 6+6
grams).
2. Distribute the ground coffee uniformly and press it
lightly with the pressing pad (Fig. 10).
3 Remove any excess coffee from the filter holder rim
and attach the filter holder to the machine. To do
this push the filter holder upwards and at the same
time turn the handle as far right as possible. It does
not matter if the handle is not centrally aligned with
the machine, as long as the filter holder is firmly
attached to the appliance (fig 5).
4 Place the cup or cups (cups can be preheated by rinsing
under hot water) on the black part of the removable drip
tray (fig 11). Ensure that the cup or cups line up with
the dispensing holes on the filter holder.
5Wait until the “OK” light comes on (fig 6) then turn
the selector knob to the espresso function (fig
7) until the desired quantity of coffee is obtained
(approx 1
1
/2- 2 fl oz or 1/2“demi-tasse” cup.
6To detach the filter holder, turn the handle from
right to left. To avoid any splashing, do not detach
Page 8

8
the filter holder while the machine is dispensing
coffee.
7. To remove the used coffee, hold the filter locked
with the special lever that is built into the handle
and let the coffee fall out by knocking the
overturned filter holder (Fig. 12).
8To switch off the coffee machine, turn the selector knob
on the appliance to the OFF position “O” (fig 13)
HOW TO PREPARE COFFEE USING THE FILTER
HOLDER FOR PODS (if fitted):
•Preheat the machine as described in the above
preheating section.
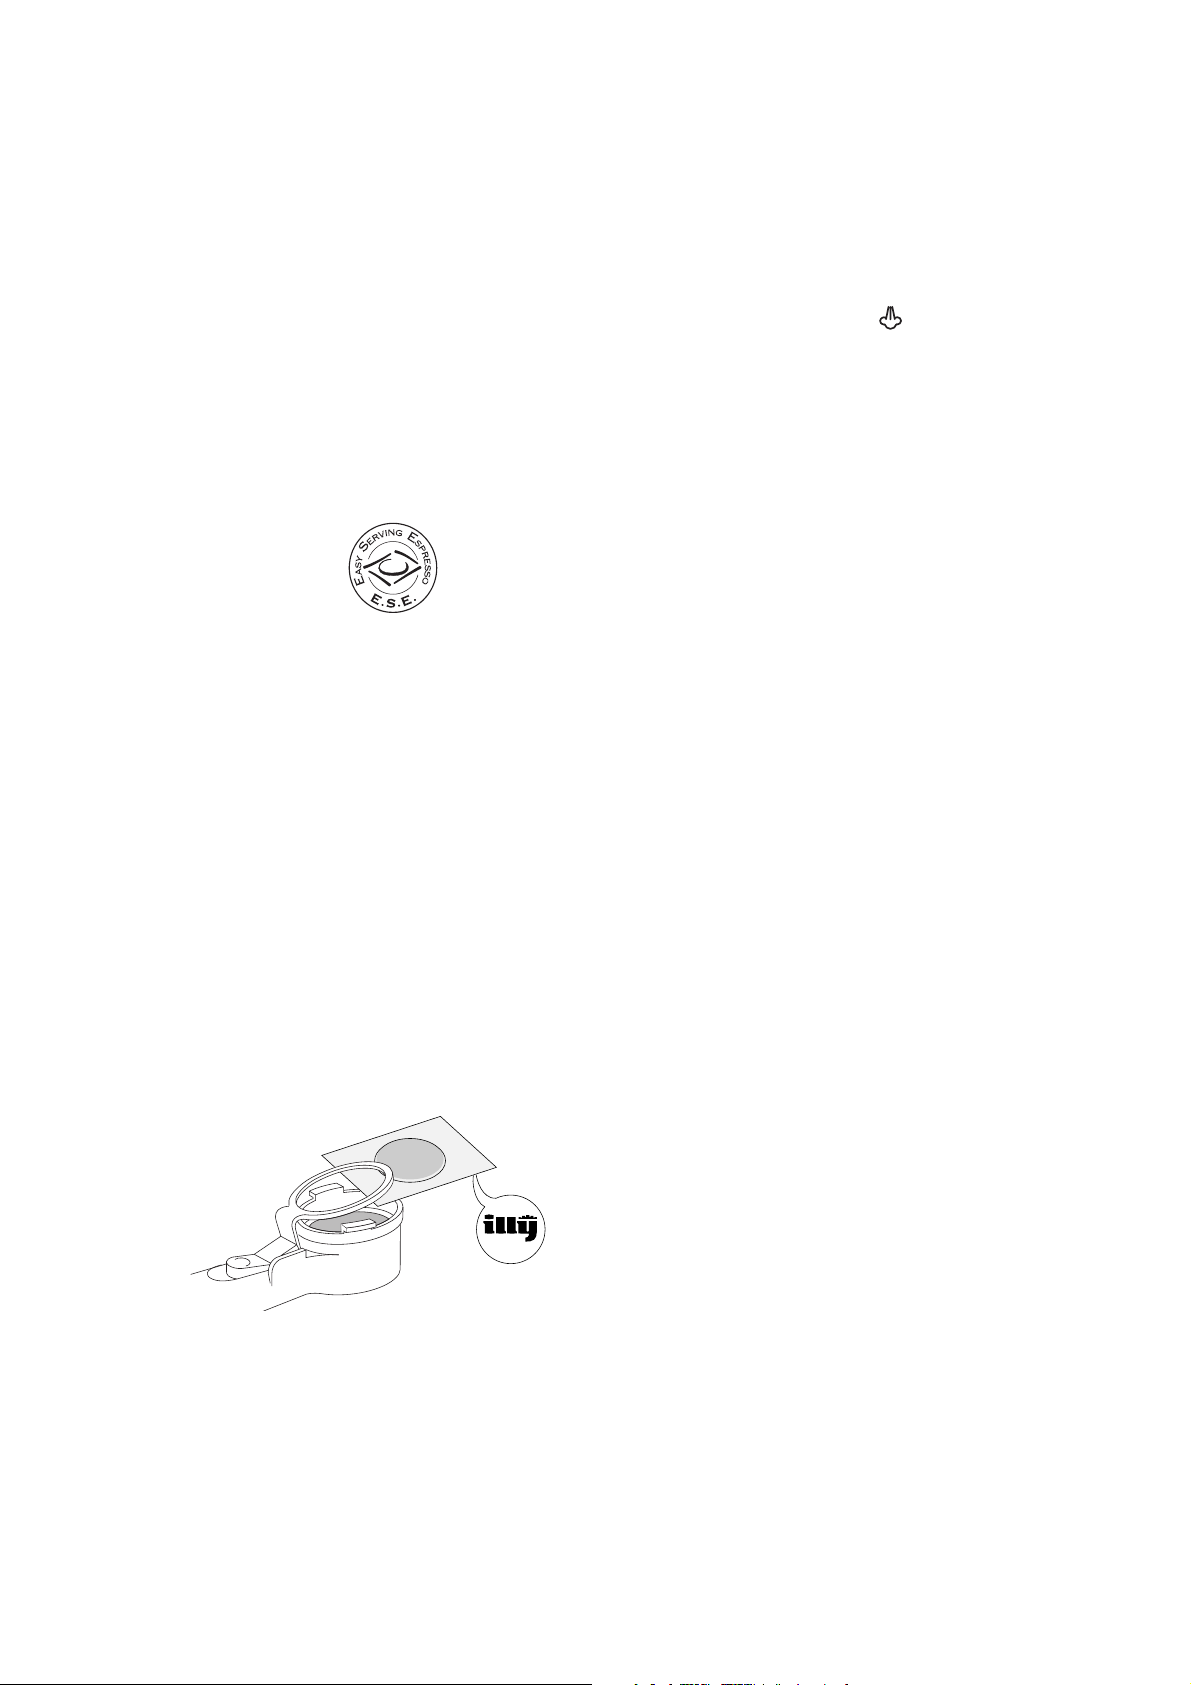
•Press the filter holder button and insert the pod into
the filter (fig 14).
Note: Use pods which conform to the ESE standard:
this will be indicated on the packaging by the following
symbol:
The ESE standard is a system accepted by the leading
coffee pod manufacturers, and allows espresso coffee
to be prepared simply and without any mess.
• Attach the filter holder onto the machine, moving
from left to right (fig 5).
•Proceed as in points 4, 5 and 6 in the previous
section on how to prepare espresso.
•To remove the pod, press the button on the filter
holder and simply lift the pod out
•To turn the coffee machine off, turn the selector knob
on the appliance to the Off position “O” (fig 13). If
you use the “iIIycaffe” coffee pods, use the special
filter holder. Insert the coffee pod ensuring the
name “iIIy” is facing down and the long side of the
pod is parallel to the handle (see illustration).
HOW TO MAKE CAPPUCCINO
1.Prepare espresso coffee, using cups that are large
enough for cappuccinos (see “How to prepare
espresso coffee).
2.Turn the selector knob to the position (fig. 15)
The “cappuccino function” and “boiler on” red lights
will come on. Wait until the orange “OK” light comes
on, to indicate that the boiler has reached the ideal
temperature for producing steam.
3.In the meantime, fill a container with approximately
3 fl. oz of milk for each cappuccino to be prepared.
The milk must be cold from the refrigerator (not
warm!). In choosing the container, bear in mind that
the volume of the milk will increase by 2 or 3 times.
Semi skimmed milk gives best results.
NOTE: We suggest you used semi-skimed milk at
refrigerator temperature.
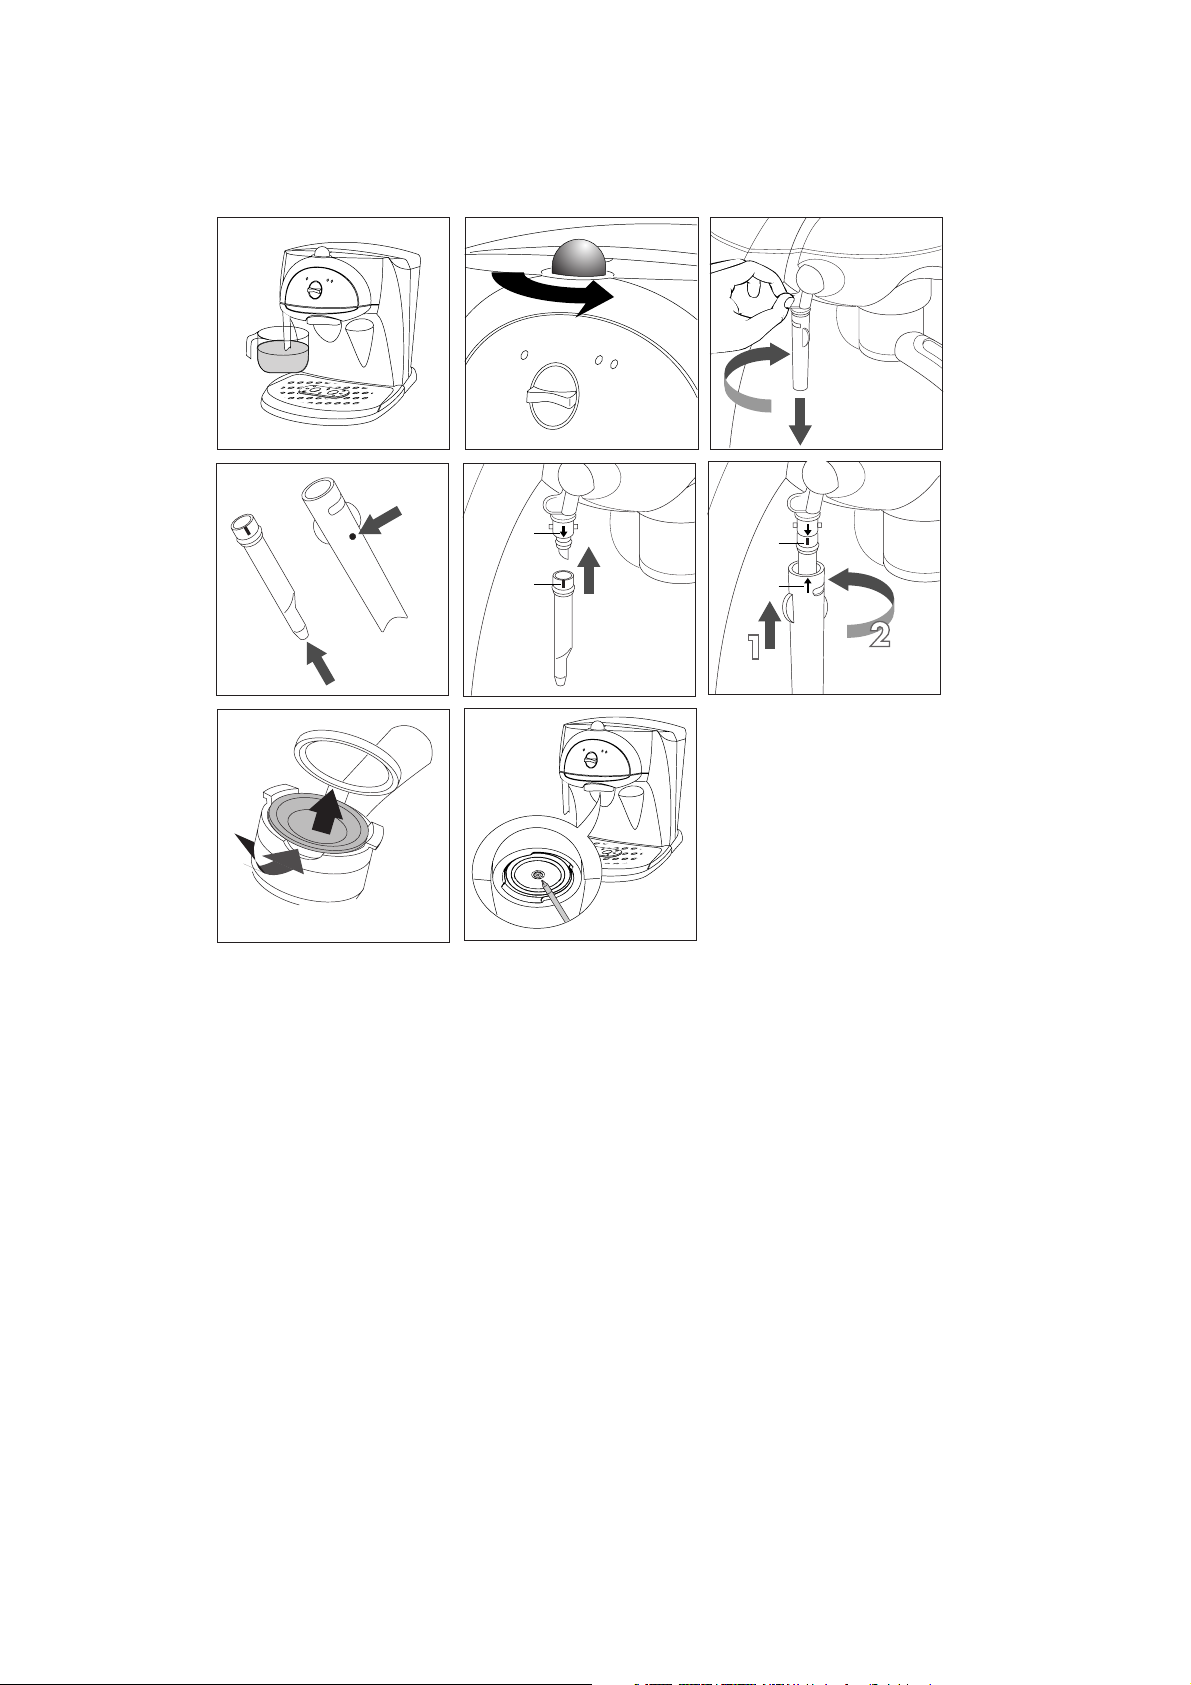
4.Position the container with the milk in it under the
milk frother (fig. 16).
5.Immerse the cappuccino maker nozzle about 2 cm
deep into the milk and turn the steam knob in an
anti-clockwise direction (fig. 17) (by turning the knob
to a greater or lesser extent, it is possible to vary the
quantity of steam that comes out from the cappuccino
maker). At this point, the milk will begin to increase
in volume and to appear frothy.
6.Once the desired temperature has been reached (the
ideal temperature is 60°C), stop the delivery of steam
by turning the steam knob in a clockwise direction
and at the same time positioning the selector knob at
“O” (fig. 13).
7.Pour the frothed milk into the cups containing the
espresso coffee. Your cappuccino is now ready. Add
sugar to taste and, if desired, sprinkle a little
powdered chocolate on top of the froth.
IMPORTANT: always clean the milk frother and steam
nozzle immediately after use. Proceed as follows:
1.By turning the steam knob (fig. 17), allow a little
steam to come out for a few seconds. Then close
firmly by turning clockwise.
2.Hold the upper part tight with one hand and use your
other hand to unscrew the cappuccino maker,
rotating it in a clockwise direction, and remove it
from the nozzle (fig. 18).
3.Remove the steam nozzle by sliding it off the delivery
tube (fig. 19).
4.Wash the cappuccino maker and steam nozzle
thoroughly with tepid water.
5.Check that the two holes shown in fig. 20 are not
blocked. If necessary, clean them with the help of a pin.
Page 9
9
6. Re-attach the steam nozzle by inserting it into the
steam tube and aligning the ‘A’ arrow with the ‘B’
notch, as indicated in figure 20.
7. Re-attach the cappuccino maker by sliding it all the
way into the steam nozzle, aligning the ‘C’ arrow
with the ‘B’ notch, as shown in figure 21, and then
turning it in an anti-clockwise direction.
PRODUCING HOT WATER
1. Turn on the coffee unit by turning the selector knob
to the position (fig. 4).
2. Position a container under the cappuccino maker.
3. When the ‘OK’ pilot light comes on, position the
selector knob at (fig. 7) and at the same time
turn the steam knob in an anti-clockwise direction
(fig. 17); hot water will come out from the
cappuccino maker.
4. To stop the flow of hot water, turn the steam knob in a
clockwise direction and position the selector knob at “O”.
CLEANING AND MAINTENANCE
CLEANING THE FILTER HOLDER FOR GROUND COFFEE
After use, it is necessary to clean the filter holder in the
following manner:
• Turn the bottom of the filter holder in an anticlockwise direction and take it off (fig. 22).
• Rinse with hot water.
• Replace the bottom.
Every so often it is necessary to eliminate the build up
that forms on the metal crown of the filter holder,
immersing it in hot water for about ten minutes and
then activating the cursor several times.
Never wash the filter holder in the dishwasher.
In the event of the coffee maker remaining unused for
a long period, it is not recommended that the filter
holder be left attached, because the gasket of the boiler
could lose its elasticity.
CLEANING THE FILTER HOLDER FOR PODS (IF
SUPPLIED)
Every so often, the filter holder for pods should be
cleaned, as follows:
• press the filter holder button and remove the filter, as
indicated in fig. 23
• check that the pinholes of the filter are not blocked. If
necessary, clean it carefully with hot water, scrubbing
it with an abrasive pad.
• clean the inside of the filter holder and the rubber
gasket;
• replace the filter.
Never wash the filter holder in the dishwasher.
CLEANING THE ESPRESSO BOILER OUTLET
At least once a year, it is necessary to clean the outlet
of the espresso boiler in the following manner:
• check that the coffee machine is not warm and the
plug is detached from the mains;
• using a screwdriver, unscrew the screw that holds the
outlet of the espresso boiler (fig. 23);
• using a moist cloth, clean the area of the boiler
where the outlet was positioned;
• brush the outlet with a little dish-washing liquid until
all the pinholes are clean;
• rinse the outlet under the tap, still scrubbing it;
• replace the outlet of the espresso boiler.
OTHER CLEANING OPERATIONS
1.Do not use solvents or detergents in cleaning the
coffee maker. Use a soft, damp cloth.
2.Remove the drip-trays, empty them and wash them
periodically.
3.Clean the water tank.
ATTENTION: during cleaning, never immerse the unit
in water – it is an electrical appliance.
DESCALING
It is advisable to clean the calcium from the machine
every 200 cups of coffee. It is recommended that
specific (store-bought) products for descaling of
espresso coffee machines be used. If such products are
not available, it is possible to proceed as follows:
1.Fill the tank with water using 1 liter of water;
2.Dissolve 2 spoonfuls (about 30 grams) of citric acid
in the water (available from chemists);
3.Turn the selector knob to the position and wait
until the ‘OK’ light comes on.
4.Check that the filter holder is not attached and place
a container under the outlet of the machine;
5.Turn the selector knob to the position and allow
half of the solution in the tank to flow out. Then stop
the flow by turning the selector to the “O” position.
6.Allow the solution to act for about 15 minutes, then
start up the flow again until the tank is completely
empty;
7.To eliminate the remains of the solution and the
calcium, rinse the tank well, fill it with clean water
and replace.
8.Turn the selector knob to the position and allow
all of the remaining solution in the tank to flow out.
9.Turn the selector knob to the position and repeat
operations 7 and 8 one more time.
Repairs for malfunctioning caused by problems of
calcium build-up are not covered by the guarantee if
the descaling process described above is not carried
out regularly.
Page 10

PROBLEM POSSIBLE CAUSES SOLUTION
Espresso coffee drips from the
edges of the filter holder,
instead of from its holes.
The coffee has an acidic taste.
• Lack of water in the tank.
• The holes in the filter holder spouts
are blocked.
• The outlet of the espresso boiler is
blocked.
• The tank is badly inserted and the
valve at the bottom is not open.
• Fill the water tank.
• Clean the holes in the spouts.
• Clean as indicated in the “Cleaning
the espresso boiler outlet” section.
•Press the tank lightly so as to open
the valve at the bottom.
•
The filter holder is badly inserted.
• The gasket of the espresso boiler has
lost elasticity.
• The holes in the filter holder spouts
are blocked.
• Attach the filter holder on correctly
and turn it all the way.
• Have the espresso boiler gasket
replaced at an Service Centre
• Clean the holes in the spouts.
The espresso coffee is cold.
•
The ‘OK’ pilot light was not on when
the coffee delivery switch was pres
sed.
• The preheating was not carried out.
• The cups were not preheated.
•
Wait until the OK pilot light comes
on.
• Carry out the preheating as indica
ted in the “Preheating the coffee
unit” section.
• Preheat the cups by rinsing them in
hot water.
The pump is too noisy.
• The water tank is empty.
•
The tank is inserted wrongly and the
valve at the bottom is not open.
• Fill the tank.
•
Press the tank lightly so as to open
the valve at the bottom.
The milk does not frothwhen
making a cappuccino.
•
The milk is not cold enough.
• The cappuccino maker is dirty.
• Always use milk at refrigerator tem
perature.
• Carefully clean the pinholes in the
milk frother
The coffee cream is lightcoloured (the coffee comes out
quickly from the spout).
• The ground coffee has not been
pressed enough.
• The quantity of ground coffee is
scarce.
• The coffee is not ground finely
enough.
•Tamper the ground coffee down
more.
•
Increase the quantity of coffee.
• Only use coffee specifically ground
The coffee cream is dark (the
coffee comes out slowly from
the spout).
• The ground coffee is too tightly pres
sed.
• The quantity of ground coffee is too
much.
• The espresso boiler outlet is blocked.
• The coffee is too finely ground.
•Press the coffee less.
• Decrease the quantity of ground cof
fee.
•
Clean the outlet as described in
“Cleaning the espresso boiler outlet”
section.
• Only use coffee specifically ground for
espresso coffee machines.
• The unit was not sufficiently rinsed
after the descaling process
procedure.
• Rinse the unit as described in the
“descaling” section.
10
Espresso coffee no longer
comes out.
Page 11
Lue tämä käyttöohje huolellisesti ennekuin asennat
tai käytät keitintä. Osaamalla keittimen
toimintaperiaatteet saat parhaan mahdollisen kahvin
ja vältyt käyttövirheiltä.
LAITTEEN KUVAUS
Näitä termejä käytetään jatkuvasti seuraavilla sivuilla.
1. Suodatinkuppi jauhetulle kahville
2. Yhden kupin suodatin
3. Kahden kupin suodatin
4. Suodatinkuppi annospusseja varten (mikäli
varusteena)
5. Höyrynuppi
6. Painin
7. Kupin alusta
8. Virtajohto
9. OK- merkkivalo
10.Merkkivalo (kone päällä) kahvitoiminnolla
11.Valitsinnuppi
12.Asento kahvin/veden tiputus
13.Asento “O”, pois päältä
14.Höyryn merkkivalo (kone päällä)
höyrytoiminnolla
15.Kahvin annoslusikka
16.Lämmittimen suutin
17.Cappuccinon sekoitin
18.Höyrysuutin
19.Valutusputki
20.Vesisäiliö
21.Vesisäiliön kansi
TURVAOHJEET
• Tämä laite on suunniteltu kahvin keittoon ja
juomien lämmittämiseen. Varo kuumaa vettä ja
höyryä ja muista käyttää keitintä ohjeiden
mukaisesti.
• Älä koske kuumiin osiin.
•Varmista pakkauksen poistamisen jälkeen, että keitin on
moitteettomassa kunnossa. Älä käytä laitetta, mikäli sen
kunnossa ilmenee puutteita vaan ota yhteys
valtuutettuun ammattilaiseen
• Älä jätä pakkausmateriaalia (muovipussit, styroksit
jne.) lasten ulottuvilla, sillä ne saattavat aiheuttaa
vaaratilanteita leikkikaluina käytettäessä
• Tämä keitin on tarkoitettu ainoastaan kotikäyttöön.
Kaikki muu käyttö katsotaan vääräksi ja vaaralliseksi
käytöksi
•Valmistaja ei vastaa mistään virheellisestä tai
huolimattomasta käytöstä aiheutuneista
vahingoista.
• Älä koske keittimeen, jos kätesi tai jalkasi ovat
märät tai kosteat.
• Älä anna lasten tai vastuuttomien henkilöiden
käyttää keitintä ilman valvontaa
• Sammuta keitin, jos siihen tulee jokin vika tai sen
toiminnassa ilmenee puutteita. Älä yritä korjata sitä
itse. Ota yhteys valmistajan valtuuttamaan
huoltoliikkeeseen mahdollisten korjausten
suorittamista varten. Vaadi aina alkuperäisiä
varaosia. Tämän ohjeen laiminlyöminen voi
vaarantaa laitteen turvallisuuden.
• Käyttäjä ei saa vaihtaa tämän laitteen verkkojohtoa,
sillä tämän toimenpiteen suorittamiseen tarvitaan
erityistyökaluja. Verkkojohdon saavat korjata tai
vaihtaa ainoastaan valmistajan valtuuttamat
huoltoliikkeet, jolloin tapaturmilta vältytään.
ASENNUS
• Aseta laite työtasolle kauaksi vesihanoista tai
tiskialtaista.
• Varmista ennen keittimen käyttöönottoa, että
verkkovirran jännite vastaa keittimen arvokyltissä
ilmoitettua jännitettä. Kytke keitin ainoastaan
riittävästi maadoitettuun pistorasiaan, jonka teho on
vähintään 10 A. Valmistaja ei vastaa mistään
onnettomuuksista tai vahingoista, jotka johtuvat
laitteen maadoittamisen laiminlyönnistä.
• Jos pistotulppa ei sovi pistorasiaan, anna valtuutetun
sähkömiehen suorittaa pistorasian vaihto
sopivampaan pistorasiaan
• Älä asenna kahvinkeitintä koskaan tiloihin, jossa
lämpötila voi pudota 0° tai sen alapuolelle (veden
jäätyessä laite voi vahingoittua).
• Mikäli virtajohto on liian pitkä, voit työntää
ylimääräisen johdon osan virtajohdon
ulostuloaukosta laitteen sisälle.
11
SF
Page 12
ESPRESSO- KAHVINKEITTIMEN KÄYTTÖ
VESISÄILIÖN TÄYTTÄMINEN
Poista vesisäiliön kansi (kuva 1) ja poista säiliö tämän
jälkeen vetämällä sitä ylöspäin (kuva 2).
Täytä säiliö puhtaalla ja raikkaalla vedellä. Varmista,
ettet ylitä kirjoitusta MAX. (kuva 3).
Pane säiliö takaisin työntämällä sitä kevyesti siten, että
säiliön pohjalla oleva venttiili aukeaa.
Voit täyttää säiliön myös helpommin ilman että vedät
sen ulos, jolloin voit kaataa veden säiliöön suoraan
kannusta.
HUOM: Älä käytä laitetta koskaan silloin, kun säiliössä
ei ole vettä ja muista täyttää taso aina silloin kun se
saavuttaa pari senttimetriä pohjasta.
KAHVINKEITINYKSIKÖN ESILÄMMITYS
Oikean lämpöisen espresso- kahvin edellytyksenä on
että kahvinkeitin lämmitetään ensin. Suorita tämä
asettamalla valitsinnuppi asentoon (kuva 4)
vähintään puoli tuntia ennen kahvin valmistusta.
Muista jättää suodatinkuppi kahvinkeittimeen kiinni
(varmista, että höyrynuppi on kiinni). Kiinnitä
suodatinkuppi kahvinkeittimeen asettamalla se
höyrysuuttimen alapuolelle siten, että kahva osoittaa
vasemmalle (katso kuva 5) ja työnnä sitä ylöspäin.
Käännä kahvaa samanaikaisesti oikealle. Käännä aina
loppuun saakka. Voit keittää kahvin puolen tunnin
kuluttua seuraamalla seuraavassa kappaleessa
annettuja ohjeita.
Voit esilämmittää kahvinkeittimen myös nopeammin
seuraavalla tavalla:
1.Pane kahvinkeitin päälle asettamalla valitsinnuppi
asentoon (kuva 4). Kiinnitä suodatinkuppi
koneeseen, mutta älä täytä sitä vielä kahvilla.
2.Pane kuppi suuttimen alle. Käytä samaa kuppia,
johon aiot keittää kahvin, jolloin se lämpenee.
3.Odota, että “OK” merkkivalo syttyy (kuva 6) ja
käännä valitsinnuppi tämän jälkeen asentoon
(kuva 7). Anna veden valua ulos, kunnes “OK”merkkivalo sammuu ja pysäytä tippuminen
kääntämällä valitsinnuppi asentoon (kuva 4).
4.Tyhjennä kuppi ja odota, että ”OK” merkkivalo syttyy
uudelleen ja toista sama toimenpide.
ESPRESSO- KAHVIN VALMISTUS JAUHETULLE
KAHVILLE OLEVAA SUODATINKUPPIA KÄYTTÄMÄLLÄ
1. 1. Suorita kahvinkeittimen esilämmitys edellisessä
kappaleessa kuvatulla tavalla. Mikäli haluat
valmistaa 1 kupin espressoa, aseta yhden kupin
suodatin (pienempi kahdesta toimitetusta)
suodatinkuppiin (kuva 8) ja kaada 1 tasainen
mittalusikallinen jauhettua kahvia, noin 7 grammaa
(kuva 9). Mikäli haluat puolestaan valmistaa kaksi
kuppia espresso- kahvia, käytä kahden kupin
suodatinta (suurempi kahdesta toimitetusta) ja
kaada siihen kaksi vajaata mittalusikallista kahvia
(noin 6+6 grammaa).
2. Levitä jauhettu kahvi tasaisesti ja paina sitä kevyesti
painimella (kuva 10).
HUOM: Jauhetun kahvin painaminen on erittäin
tärkeää parhaan espresso- kahvin keittämiseksi.
Mikäli painat liikaa, kahvi tippuu hiljalleen ja
vaahto on tummaa. Mikäli painat liian vähän,
kahvi tippuu liian nopeasti ja vaahto on väriltään
kirkasta
3.Poista suodatinkupin reunoille mahdollisesti jäänyt
ylimääräinen kahvi ja kiinnitä suodatinkuppi
keittimeen. Käännä se aina loppuun saakka (kuva
5).
4.Aseta kuppi tai kupit suodatinkupin valutussuuttimen
alapuolelle. Jos mahdollista, lämmitä myös kupit
huuhtelemalla ne kuumalla vedellä (kuva 11).
5.Varmista, että “Espresso OK”- merkkivalo (kuva 6)
palaa (mikäli se on sammuneena, odota että se
syttyy). Valitse tämän jälkeen kahvin tiputus (kuva
7), kunnes kahvia on valunut tarpeeksi. Voit
pysäyttää tippumisen asettamalla tämän valitsimen
asentoon (kuva 4).
6.Irrota suodatinkuppi kääntämällä kahvaa oikealta
vasemmalle
HUOMIO: Älä irrota suodatinkuppia koskaan
silloin, kun keittimestä tippuu kahvia. Roiskeiden
vaara.
7.Poista vanhat kahvinporot suodatinkupista pitämällä
suodatinta lukittuna kahvassa olevaa vipua
käyttämällä ja poista kahvi lyömällä ylös alaisin
olevaa suodatinta kevyesti (kuva 12).
8.Sammuta kahvinkeitin kääntämällä valitsinnuppi
asentoon ”O” (kuva 13).
HUOMIO: Laitteen ensimmäisen käyttöönoton
yhteydessä kaikki lisälaitteet sekä sisäiset piirit on
pestävä valmistamalla vähintään viisi kahvikupillista
ilman kahvia.
12
Page 13
ESPRESSO- KAHVIN VALMISTUS ANNOSPUSSEILLE
OLEVAA SUODATINKUPPIA KÄYTTÄMÄLLÄ (MIKÄLI
VARUSTEENA)
1.Esilämmitä kahvinkeitin kappaleessa
"KAHVINKEITINYKSIKÖN ESILÄMMITYS"
annettujen ohjeiden mukaisesti.
2.Paina suodatinkupin painiketta ja aseta annospussi
siten, että se asettuu hyvin suodattimen päälle (kuva
14).
HUOM: Käytä annospusseja, jotka vastaavat ECElaatuvaatimuksia. Tämä on osoitettu pakkauksessa
seuraavalla merkillä
ECE- laatuvaatimus on kaikkien suurimpien
annospussien valmistajien hyväksymä järjestelmä,
jonka avulla espresso- kahvi voidaan valmistaa
helpoimmin ja puhtaimmin.
3.Kiinnitä suodatinkuppi keittimeen ja käännä se aina
loppuun saakka (kuva 5).
4.Toimi edellisessä kappaleessa olevien kohtien 4, 5 ja
6 ohjeiden mukaisesti.
5.Poista annospussi painamalla suodatinkupin
painiketta ja vedä se ulos.
6.Sammuta kahvinkeitin kääntämällä valitsinnuppi
asentoon ”O” (kuva 13).
Mikäli käytät kahvinkeittimessäsi "serving illycaffè"
annospusseja, käytä tarkoitukseen olevaa
suodatinkuppia. Aseta kahvin annospussi paikalleen
siten, että kirjoitus "illy" asettuu alaspäin ja
annospussin pitkä sivu on samansuuntainen kahvan
kanssa ( katso kuvaa).
CAPPUCCINON VALMISTUKSEEN
TARVITTAVAT TOIMENPITEET
1.Käytä riittävän suurta kuppia espresso- kahvia
valmistaessasi.
2.Käännä valitsinnuppi asentoon (kuva 15) ja
odota, että “OK”- merkkivalo syttyy (kuva 6).
Merkkivalon syttyminen osoittaa, että lämmitin on
saavuttanut parhaan mahdollisen lämpötilan höyryn
tuottamiselle.
3.Täytä astia tällä välin noin 100 grammalla maitoa
jokaista valmistamaasi cappuccinoa kohden.
Varmista, että maito on jääkaappikylmää (ei
kuumaa!). Muista astiaa valitessasi, että maidon
tilavuus kasvaa noin 2 tai 3 kertaiseksi cappuccinon
valmistuksen aikana.
HUOM: Suosittelemme jääkaappikylmän kevytmaidon
käyttöä.
4.Aseta maitoa sisältävä astia cappuccinon sekoittimen
alle (kuva 16).
5.Aseta cappuccinon sekoitin maitoon noin 2 cm
matkalta ja käännä höyrynuppia vastapäivään
(kuva 17) (voit säätää cappuccinon sekoittimesta
tulevan höyryn määrää kääntämällä sitä joko
enemmän tai vähemmän). Nyt maidon tilavuus alkaa
kasvamaan ja se muuttuu kermamaiseksi.
6.Keskeytä höyryn tulo kääntämällä höyrynuppia
myötäpäivään sen jälkeen, kun lämpötila on oikea
(paras mahdollinen lämpötila on 60°C) ja aseta
valitsinnuppi samanaikaisesti asentoon “O” (kuva
13).
7.Kaada emulsioitunut maito aiemmin valmistettua
espresso- kahvia sisältäviin kuppeihin. Cappuccino
on nyt valmis. Lisää sokeria maun mukaan ja kaada
kaakaojauhetta maitovaahdon pinnalle..
TÄRKEÄÄ: Puhdista cappuccinon sekoitin aina käytön
jälkeen. Suorita tämä seuraavasti:
1.Käännä höyrynuppia ja anna jonkin verran höyryä
tulla ulos muutaman sekunnin ajan (kuva 17).
2.Pidä toisella kädellä ylempää osaa paikallaan ja
ruuvaa toisella kädellä cappuccinon sekoitin irti
kääntämällä sitä myötäpäivään. Vedä se suuttimesta
(kuva 18).
3.Poista höyrysuutin vetämällä se valutusputkesta.
4.Pese cappuccinon sekoitin ja höyrysuutin huolellisesti
kädenlämpöisellä vedellä.
5.Tarkista, etteivät kaksi kuvassa 19 osoitettua reikää
ole tukossa. Puhdista ne tarvittaessa neulalla.
6.Asenna höyrysuutin paikoilleen asettamalla se
höyryputkeen siten, että kuvassa 20 oleva merkki A
ja merkki B asettuvat kohdalleen.
13
Page 14
7.Asenna cappuccinon sekoitin paikoilleen työntämällä
se loppuun saakka höyrysuuttimeen siten, että
kuvassa 21 osoitetut nuoli C ja merkki B asettuvat
kohdalleen. Käännä sitä tämän jälkeen
vastapäivään.
KUUMAN VEDEN VALMISTAMINEN
1.Käynnistä kahvinkeitin kääntämällä valitsinnuppi
asentoon (kuva 4).
2.Aseta astia cappuccinon sekoittimen alle;
3.“OK”- merkkivalon syttymisen yhteydessä aseta
valitsinnuppi asentoon (kuva 7) ja käännä
höyrynuppia samanaikaisesti vastapäivään (kuva
17). Kuumaa vettä alkaa valumaan cappuccinon
sekoittimesta.
4.Käännä höyrynuppi myötäpäivään, kun haluat
keskeyttää kuuman veden tulon ja aseta valitsinnuppi
asentoon “O”.
PUHDISTUS JA HUOLTO
ANNOSPUSSEILLE TARKOITETUN SUODATINKUPIN
PUHDISTUS (MIKÄLI VARUSTEENA)
Puhdista annospusseille tarkoitettu suodatinkuppi
seuraavasti:
• paina suodatinkupin painiketta ja poista suodatin
kuvassa 22 kuvatulla tavalla.
• tarkista, etteivät pienet suodattimen reiät ole tukossa.
Puhdista ne tarvittaessa huolellisesti kuumalla vedellä
ja hankaa niitä karkealla sienellä.
• Puhdista suodatinkupin sisäosat sekä kuminen
tiiviste;
• Aseta suodatin takaisin paikoilleen;
Älä pese suodatinkuppia koskaan astianpesukoneessa.
ESPRESSON LÄMMITTIMEN SUUTTIMEN PUHDISTUS
Puhdista espresson lämmittimen suutin vähintään
kerran vuodessa seuraavasti:
• Varmista, ettei kahvinkeitin ole kuuma ja että
pistotulppa on irrotettu pistorasiasta;
•Irrota espresson lämmittimen suuttimen kiinnitysruuvit
ruuvimeisseliä käyttämällä (kuva 23);
• Puhdista suuttimen kiinnitysalue kostealla pyyhkeellä;
• Harjaa suutin vedellä ja astianpesuaineella, kunnes
kaikki pienet reiät ovat puhtaat.
• Huuhtele suutin juoksevan veden alla ja hankaa sitä
samalla.
• Asenna espresson lämmittimen suutin takaisin
paikoilleen;
MUUT PUHDISTUKSET
1.Älä käytä liuotinaineita tai hankausaineita keittimen
puhdistukseen. Puhdistukseen riittää kostea ja
pehmeä pyyhe.
2.Poista, tyhjennä ja pese pisaran keruualusta
säännöllisesti.
3.Puhdista espresson vesisäiliö.
HUOMIO: Älä upota keitintä veteen puhdistuksen
aikana, sillä se on sähkökäyttöinen laite
KALKIN POISTO
Suosittelemme keittimen kalkin poiston suorittamista
joka 200 kahvin valmistuksen välein. Suosittelemme
erityisien markkinoilla olevien espressokahvinkeittimen kalkin poistoon tarkoitettujen tuotteiden
käyttöä. Toimi seuraavasti, mikäli et löydä tällaisia
tuotteita:
1.Kaada säiliöön 1 litra vettä;
2.Kaada sekaan 2 lusikallista (noin 30 grammaa)
sitruunahappoa (saatavilla apteekeista tai
ruokatavarakaupoista);
3.Käännä valitsinnuppi asentoon ja odota, että
“OK”- merkkivalo syttyy;
4.Varmista, ettei suodatinkuppi ole paikoillaan ja aseta
keruuastia keittimen suuttimen alle;
5.Käännä valitsinnuppi asentoon ja tyhjennä
puolet säiliöstä. Keskeytä tiputus kääntämällä valitsin
asentoon ”O”.
6.Anna nesteen vaikuttaa noin 15 minuutin ajan ja
jatka valuttamista, kunnes säiliö on tyhjennyt
kokonaan.
7.Poista nesteen ja kalkkikiven jäämät huuhtelemalla
säiliö huolellisesti, täytä se puhtaalla vedellä ja aseta
se takaisin paikoilleen.
8.Käännä valitsinnuppi asentoon ja odota, että
säiliö tyhjenee kokonaan;
9.Paina katkaisinta uudelleen ja toista kohdissa 7
ja 8 mainitut toimenpiteet.
Kalkkikiven aiheuttamista ongelmista johtuvat
korjaukset eivät kuulu takuun piiriin, mikäli yllä
mainittua kalkin poistoa ei ole suoritettu säännöllisesti
14
Page 15

15
ONGELMA
MAHDOLLISET SYYT KORJAUS
Espresso- kahvia ei tipu
• Vesisäiliössä ei ole vettä
• Suodatinkupin valutussuuttimen reiät
ovat tukossa
• Espresson lämmittimen suutin on
tukossa
• Säiliö on asetettu väärin paikoilleen ja
sen pohjalla oleva venttiili ei ole auki.
• Täytä säiliö vedellä
• Puhdista valutussuuttimen reiät
• Suorita puhdistus kappaleessa
"Espresson lämmittimen suuttimen
puhdistus" annettujen ohjeiden mukaisesti.
• Paina säiliötä kevyesti siten, että sen
pohjalla oleva venttiili aukeaa.
Il caffè espresso gocciola dai
bordi del portafiltro anziché
dai fori
• Suodatinkuppi on asetettu väärin
paikoilleen
• Espresson lämmittimen tiiviste on
kovettunut;
• Suodatinkupin valutussuuttimen reiät
ovat tukossa.
• Kiinnitä suodatinkuppi oikein
paikoillaan ja käännä se loppuun
saakka
•Vaihda espresson lämmittimen tiiviste,
jonka saat huoltoliikkeestämme
• Puhdista valutussuuttimen reiät.
Espresso- kahvi on kylmää
• Espresso OK”- merkkivalo ei pala
silloin, kun kahvin tiputuksen
katkaisinta painetaan:
•Esilämmitystä ei ole suoritettu
• Kuppeja ei ole esilämmitetty;
• Odota, että “OK”- merkkivalo syttyy;
• Suorita esilämmitys kappaleessa
"Kahvinkeitinyksikön esilämmitys"
annettujen ohjeiden mukaan;
• Esilämmitä kupit
Pumpun toiminta on
äänekästä
•Vesisäiliö on tyhjä
• Säiliö on asetettu väärin paikoilleen
ja sen pohjalla oleva venttiili ei ole
auki.
• Täytä säiliö
• Paina säiliötä kevyesti siten, että sen
pohjalla oleva venttiili aukeaa.
Kahvin vaahto on kirkasta
(valuu nopeasti
valutussuuttimesta
• Jauhettua kahvia ei ole painettu
tarpeeksi
• Jauhettua kahvia on asetettu liian
vähän
• Kahvi on karkeajauhettua
• Paina jauhettua kahvia enemmän
• Lisää kahvin määrää
• Käytä ainoastaan espressokahvinkeittimille tarkoitettua jauhettua kahvia
Kahvin vaahto on tummaa
(kahvi valuu hitaasti
valutussuuttimesta)
• Jauhettua kahvia on painettu liikaa
• Jauhettua kahvia on asetettu liikaa
• Espresson lämmittimen suutin on
tukossa
• Kahvi on jauhettu liian hienoksi
• Paina kahvia vähemmän
• Vähennä jauhetun kahvin määrää
•
Suorita puhdistus kappaleessa
"Espresson lämmittimen suuttimen
puhdistus" annettujen ohjeiden
mukaisesti
• Käytä ainoastaan espressokahvinkeittimille tarkoitettu jauhettua
kahvia.
Kahvi maistuu happamalta
• Kalkin poiston jälkeistä huuhtelua ei
ole suoritettu riittävän hyvin
• Huuhtele keitin kappaleessa "Kalkin
poisto" annettujen ohjeiden
mukaisesti.
Maito ei vaahdotu
cappuccinon valmistuksen
yhteydessä
• Maito ei ole riittävän kylmää.
• Cappuccinon sekoitin on likainen.
• Käytä aina jääkaappilämpöistä
maitoa.
• Puhdista cappuccinon sekoittimen
pienet reiät huolellisesti. Puhdista
kuvassa 21 merkityt reiät erityisen
huolellisesti.
Page 16

Les denne bruksanvisningen nøye før maskinen
installeres og tas i bruk. Bare på denne måten vil man
oppnå de beste resultater og maksimal
brukersikkerhet
BESKRIVELSE AV MASKINEN
Begrepene nedenfor vil bli brukt gjennomgående på de
følgende sidene.
1. Filterholder for malt kaffe
2. Filter for 1 kopp
3. Filter for 2 kopper
4. Filterholder for kaffeputer (hvis medfølger)
5. Dampbryter
6. Presstempel
7. Rist til å sette koppene på
8. Stømledning
9. Varsellampe OK
10.Varsellampe (maskinen på), kaffefunksjon
11.Bryter for valg av funksjon
12.Posisjon tapping av kaffe/vann
13.”O” posisjon av
14.Varsellampe damp (maskin på), dampfunksjon
15.Måleskje til kaffe
16.Utløp kokeenhet
17.Melkeskummer
18. Dampstrålerør
19.Tapperør
20.Vannbeholder
21.Lokk til vannbeholder
SIKKERHETSREGLER
• Denne maskinen er fremstilt for å “lage
espressokaffe ” og for å “varme opp drikker”. Vær
forsiktig slik at forbrenning fra sprutende varmt
vann eller damp unngås. Unngå feilaktig bruk av
maskinen.
• Unngå kontakt med varme deler av maskinen.
• Etter at emballasjen er fjernet, skal man kontrollere
at maskinen er komplett. I tvilstilfeller skal maskinen
ikke brukes, og man skal henvende seg til kvalifisert
servicepersonell.
• Emballasjen (plastikkposer, polyesteren osv.) må
holdes utenfor barns rekkevidde, da den utgjør en
potensiell fare.
•Denne maskinen er bare til husbruk. Enhver annen
bruk betraktes som feilaktig og dermed farlig.
•Produsenten kan ikke holdes ansvarlig for
eventuelle skader som skyldes uegnet, feilaktig eller
ufornuftig bruk.
•Ta aldri på maskinen med våte eller fuktige hender
eller føtter.
• Pass nøye på at maskinen aldri blir brukt av barn
eller uegnede personer uten oppsyn.
• Dersom maskinen går i stykker eller ikke virker
skikkelig, skal den slås av umiddelbart og ikke
røres.
• For eventuelle reparasjoner, skal man ta kontakt
med et serviceverksted som er godkjent av
produsenten, og be om originale reservedeler. Hvis
dette ikke gjøres, kan maskinsikkerheten settes på
spill.
• Strømledningen til maskinen må aldri byttes ut av
brukeren da dette krever spesielt verktøy. Hvis
ledningen blir skadet eller hvis det er nødvendig å
bytte den ut, skal man ta kontakt med et
serviceverksted som er godkjent av produsenten slik
at enhver risiko unngås.
INSTALLASJON
• Plasser maskinen på en arbeidsbenk i sikker
avstand fra vannkraner og vask.
• Kontroller at strømnettets spenning samsvarer med
spenningen angitt på kaffemaskinens merking.
Maskinen skal bare kobles til et uttak som gir minst
10 A strømstyrke og som er jordet. Produsenten
kan ikke holdes ansvarlig for uhell som oppstår på
grunn av manglende jording av maskinen.
• Dersom veggkontakten og kaffemaskinens støpsel
ikke er kompatible, skal man be en kvalifisert
elektriker om å bytte kontakten.
• Installer aldri maskinen i omgivelser der
temperaturen kan bli lavere enn eller rundt 0°C
(hvis vannet fryser, kan maskinen bli ødelagt).
• Hvis strømledningen er lengre enn avstanden som
er nødvendig for å nå frem til støpselet, kan den
overflødige ledningen plasseres inne i maskinen
ved å skyve ledningen mot åpningen der ledningen
kommer ut av denne.
HVORDAN TILBEREDE ESPRESSOKAFFE
FYLLING AV VANNBEHOLDEREN
Fjern lokket til vannbeholderen (fig. 1), og ta deretter
vannbeholderen ut ved å løfte den oppover (fig. 2).
Fyll beholderen med rent, friskt vann. Vær nøye med
ikke å overskride merket MAX (fig. 3).
Sett beholderen tilbake på plass mens du trykker den
lett ned slik at ventilen i bunnen på vannbeholderen
åpnes.
Vannbeholderen kan fylles på en enklere måte, uten å
ta den ut, ved å helle vann i den direkte fra en mugge.
NB! Bruk aldri kaffemaskinen når det ikke er vann i
beholderen og husk alltid å fylle på vann når det bare
noen få centimeter med vann over bunnen.
16
N
Page 17

FORVARMING AV KAFFEENHETEN
For å oppnå espressokaffe med riktig temperatur, er
det helt nødvendig å forvarme maskinen: Drei bryteren
i posisjon (fig. 4) minst en halv time før du lager
kaffe. I denne tiden er det nødvendig å la filterholderen
stå i maskinen (kontroller alltid at dampbryteren er
stengt). Sett inn filterholderen ved å plassere den, med
håndtaket dreid mot venstre, under kokeenhetens utløp,
se fig. 5, skyv filterholderen oppover og drei samtidig
håndtaket mot høyre. Drei alltid så langt som mulig.
Etter en halv time tilberedes kaffen som beskrevet i
neste avsnitt.
Alternativt kan maskinen forvames raskere på følgende
måte:
1. Skru på maskinen ved å dreie bryteren i posisjon
(fig. 4) og fest filterholderen til maskinen uten
å fylle den med malt kaffe.
2. Sett en kopp under filterholderen. Bruk den samme
koppen som kaffen skal serveres i, slik at den blir
forvarmet.
3. Vent til varsellampen OK tennes (fig. 6), og drei
deretter bryteren til posisjon (fig. 7). La vannet
strømme ut helt til varsellampen OK slukkes, avbryt
deretter tappingen ved å dreie bryteren i posisjon
(fig. 4).
4. Tøm koppen, vent til varsellampen ”OK” tennes igjen og
gjenta operasjonen en gang til.
HVORDAN TILBEREDE ESPRESSO MED
FILTERHOLDEREN FOR MALT KAFFE
1. Forvarm maskinen som beskrevet i avsnittet ovenfor.
Hvis man bare ønsker å lage én kopp espresso, sett inn
filteret for 1 kopp (den minste av de to filtrene som
medfølger) i filterholderen (fig. 8) og fyll filteret med én
strøken måleskje malt kaffe, ca. 7 gram (fig. 9).
Hvis man derimot ønsker å tilberede to kopper
espressokaffe, bruk filteret beregnet for 2 kopper (den
største av de to filtrene som medfølger) og fyll det med
to knappe måleskjeer malt kaffe (ca. 6+6 gram).
2. Fordel kaffen jevnt og press den forsiktig sammen ved
hjelp av presstempelet (fig. 10).
NB! For å oppnå en god espressokaffe er det meget
viktig at den malte kaffen presses sammen. Hvis man
presser for mye, vil kaffen renne langsomt og den vil bli
mørk og meget sterk. Hvis man derimot presser for lite,
vil kaffen renne altfor fort ut og man vil oppnå en tynn
og lys kaffe.
3. Fjern eventuell overflødig kaffe fra kanten på
filterholderen og fest sistnevnte til maskinen. Drei
alltid filterholderen til den står helt fast (fig. 5).
4. Plasser koppen eller koppene (helst forvarmet med
varmt vann), under kranene på filterholderen (fig. 11).
5. Kontroller at varsellampen OK espresso (fig. 6) er
tent (hvis lampen er slukket, vent til den tennes),
drei deretter bryteren i posisjon for tapping av
kaffe (fig. 7) inntil ønsket kvantum er oppnådd.
Tappingen avbrytes ved å bringe bryteren i
posisjon (fig. 4).
6. For å ta av filterholderen, drei håndtaket fra høyre
mot venstre.
ADVARSEL: For å unngå sprut må filterholderen
aldri løsnes mens tapping av kaffe pågår.
7. For å fjerne den brukte kaffen, hold filteret fast med den
dertil bestemte hendelen som er innlemmet i håndtaket
og fjern kaffen ved å dunke filterholderen mens den er
snudd på hodet (fig. 12).
8. For å skru av maskinen, drei bryteren i posisjon
”O” (fig. 13).
ADVARSEL: Første gang maskinen brukes, er det
nødvendig å vaske alt tilbehøret og maskinens indre
deler ved å lage fem kopper kaffe uten å tilsette den
malte kaffen.
HVORDAN TILBEREDE KAFFE MED FILTERHOLDER FOR
KAFFEPUTER (HVIS MEDFØLGER)
1. Forvarm maskinen som beskrevet i avsnittet
”FORVARMING AV KAFFEENHETEN”
2. Trykk på hendelen på filterholderen og sett inn
kaffeputen mest mulig sentrert over filteret (fig. 14).
NB: Bruk bare kaffeputer som tilfredsstiller ESEstandarden; denne angis på pakken med følgende
merking:
ESE-standarden er et system som er godkjent av de
største produsentene av kaffeputer og som gjør det
mulig å lage espressokaffe på en enkel og ren måte.
3. Fest filterholderen til maskinen, ved å dreie det så
langt som mulig (fig. 5).
4. Gjør som i punktene 4, 5 og 6 i forrige avsnitt.
5. For å fjerne kaffeputen, trykk på hendelen på
filterholderen og ta deretter ut kaffeputen.
6. For å skru av kaffemaskinen, drei bryteren i
posisjon ”O” (fig. 13).
Ved bruk av ”serving illycaffè”, skal det dertil bestemte
filteret brukes; sett inn kaffeputen og pass på at merket
”illy” vender nedover og at den lange siden av
kaffeputen er parallell med håndtaket (se figuren).
17
Page 18

HVORDAN TILBEREDE CAPPUCCINO
1.Tilbered espressokaffe i kopper som er store nok til
cappuccino.
2.Drei bryteren i posisjon (fig. 15) og vent til
varsellampen “OK” tennes (fig.6). Når lampen
tennes indikerer dette at kokeenheten har nådd riktig
temperatur for å produsere damp.
3.I mellomtiden, fyll en beholder med ca. 100 gram
melk for hver cappuccino som skal tilberedes.
Melken må være kjøleskapskald (ikke varm!). Når
det gjelder valg av størrelse på beholderen, må det
tas hensyn til at melkens volum vil dobles og kanskje
tredobles.
NB! Det anbefales å bruke lettmelk med
kjøleskapstemperatur.
4.Plasser beholderen med melk under
melkeskummeren (fig. 16).
5. La melkeskummeren stikke ca. 2 cm ned i melken og
drei dampbryteren i retning mot urviserne, fig. 17
(ved å dreie bryteren mer eller mindre kan man
variere mengden damp som kommer ut av
melkeskummeren). Melken begynner nå å øke i
volum og vil begynne å ligne skum.
6.Når ønsket temperatur er nådd (ideell temperatur er
60°C), avbryt tappingen av dampen ved å dreie
dampbryteren i retning med urviserne og sett
samtidig bryteren for valg av funksjon i “O” (fig.
13).
7.Hell melkeskummet i kopper som allerede inneholder
ferdig espressokaffe. Cappuccinoen er nå klar til å
drikkes: Tilsett ønsket sukkermengde, og dryss
eventuelt litt sjokoladepulver over skummet.
VIKTIG: Rengjør alltid melkeskummeren etter bruk.
Gå frem på følgende måte:
1. Drei dampbryteren og la det strømme ut litt damp i
noen sekunder (fig. 17).
2.Hold den øvre delen fast med en hånd, skru løs
melkeskummeren med den andre hånden og trekk
den ut av dampstrålerøret (fig. 18).
3.Fjern dampstrålerøret ved å trekke det ut av
tapperøret.
4.Vask melkeskummeren og dampstrålerøret nøye i
lunkent vann.
5.Kontroller at de to åpningene som er indikert i fig.
19 ikke er tette. Rengjør disse ved hjelp av en nål
hvis nødvendig.
6.Sett dampstrålerøret tilbake på plass ved å føre det
inn i tapperøret slik at pilen A og hakket B faller
sammen som indikert i fig. 20.
7.Sett på melkeskummeren igjen ved å føre det inn i
bunnen av dampstrålerøret slik at pilen C faller
sammen med hakket B som indikert i figur 21 og drei
melkeskummeren i retning mot urviserne.
TILBEREDNING AV VARMT VANN
1.Slå på maskinen ved å dreie bryteren i posisjon
(fig. 4).
2. Plasser en beholder under melkeskummeren.
3.Når varsellampen OK tennes, sett bryteren i posisjon
(Fig. 7) og drei samtidig dampbryteren i retning
mot urviserne (fig. 17): det varme vannet vil strømme
ut av melkeskummeren.
4.For å avbryte tappingen av varmt vann, drei
dampbryteren i retning med urviserne og sett
bryteren for valg av funksjon i posisjon “O”.
RENGJØRING OG VEDLIKEHOLD
RENGJØRING AV FILTERHOLDEREN FOR KAFFEPUTER
(HVIS MEDFØLGER)
Med jevne mellomrom skal filterholderen for kaffeputer
rengjøres på følgende måte:
•Trykk på hendelen på filterholderen og fjern filteret
som vist i figur 22.
• Kontroller at hullene i filteret ikke er tette. Hvis
nødvendig, rengjør filteret nøye med varmt vann og
puss det med en slipesvamp.
• Rengjør innsiden av filterholderen og
gummipakningen;
• Sett filteret tilbake på plass;
Vask aldri filterholderen i oppvaskemaskinen
RENGJØRING AV UTLØPET TIL ESPRESSOKOKEREN
Det er nødvendig å vaske utløpet til espressokokeren
minst en gang i året.
• Kontroller at espressomaskinen ikke er varm og at
støpselet er tatt ut av stikkontakten;
• Løsne skruene som fester utløpet til espressokokeren
ved hjelp av et skrujern (fig. 23);
• Rengjør området der utløpet er festet med en fuktig klut;
• Børst utløpet med litt oppvaskemiddel helt til hullene
er rene.
• Skyll utløpet under rennende vann og gni hele tiden
godt med en klut.
• Sett på utløpet til espressokokeren igjen.
18
Page 19

ANNEN RENGJØRING
1. Bruk aldri løsemidler eller slipende vaskemidler ved
rengjøring av maskinen. Det holder å bruke en myk
og fuktig klut.
2. Fjern dryppekaret, tøm det og vask det
regelmessig.
3. Vask vannbeholderen for espresso.
ADVARSEL: Ved rengjøring må maskinen aldri senkes
i vann: dette er et elektrisk apparat.
AVKALKING
Det anbefales å avkalke maskinen for hver 200. kaffe.
Bruk et av de spesielle produktene for avkalking av
espressomaskiner som finnes i handelen. Hvis du ikke
får tak i slike produkter, kan du gjøre som følger:
1. Fyll vannbeholderen med 1 liter vann.
2. Løs opp 2 spiseskjeer (ca. 30 gram) sitronsyre (fås
på apoteket) i vannet.
3. Drei bryteren i posisjon og vent til varsellampen
OK tennes.
4. Kontroller at filterholderen ikke er festet og sett en
beholder under maskinens utløp.
5. Drei bryteren i posisjon og slipp ut halvparten
av innholdet i beholderen.
6. La blandingen virke i ca. 15 minutter, slipp deretter
ut resten av innholdet i beholderen.
7. For å fjerne rester av sitronsyreblandingen og kalk,
må beholderen skylles godt, fylles opp med rent
vann og settes på plass igjen.
8. Sett bryteren i posisjon og la vannet strømme ut
helt til beholderen er tømt.
9. Sett velgeren i posisjon og gjenta punktene 7
og 8 en gang til.
Garantien dekker ikke reparasjoner av maskinen som
skyldes kalkproblemer dersom ovennevnte prosedyre
ikke følges.
19
Page 20

20
Høy lyd fra pumpen • Fyll opp beholderen
•Trykk lett på beholderen slik at
ventilen på bunnen åpnes
PROBLEM MULIGE ÅRSAKER LØSNING
Det kommer ikke noe
espressokaffe
• Beholderen er tom for vann
• Hullene i filterholderens kraner er
tette.
• Utløpet til espressokokeren er tett.
• Beholderen er satt inn på feil måte
og ventilen i bunnen er stengt.
• Fyll på vann i beholderen
•
Rengjør hullene i kranene
•Foreta rengjøring som beskrevet i
avsnittet “ Rengjøring av utløpet til
espressokokeren”.
•Trykk lett på beholderen for å åpne
ventilen i bunnen.
Det lekker espressokaffe fra
sidene på filterholderen og fra
hullene
• Filterholderen er satt inn på feil
måte;
• Pakningene til espressokokeren har
mistet elastisiteten.
• Hullene i filterholderen er tette.
• Sett inn filterholderen på korrekt
måte og deri den så langt som mulig.
• Skift pakninger på espressokokeren
hos et godkjent serviceverksted.
• Vask hullene i kranene.
•Varsellampen espresso OK er slukket
i det man dreier på bryteren for å
tappe kaffe.
• Maskinen er ikke blitt forvarmet.
• Koppene er ikke blitt forvarmet.
• Vent til OK-lampen lyser.
• Forvarm maskinen som beskrevet i
avsnittet ”Forvarming av kaffeenheten”.
• Forvarm koppene
•Vannbeholderen er tom
•
Vannbeholderen er satt inn på feil
måte og ventilen i bunnen er ikke
åpen.
Espressokaffen er kald
Kaffen er lys (kommer fort ut
av tappekranen):
• Den malte kaffen er for dårlig
presset sammen
• Kaffemengden er for liten
• Kaffen er for grovmalt
• Øk sammenpressingen av den malte
kaffen
• Øk kaffemengden
•Bruk bare malt kaffe for
espressomaskiner
Kaffen er mørk (kaffen
kommer langsomt ut av
tappekranen)
• Den malte kaffen er presset sammen
for hardt
• Mengden malt kaffe er for stor
•
Utløpet til espressokokeren er tett
• Kaffen er for finmalt
• Press kaffen mindre sammen
• Reduser kaffemengden
•
Foreta rengjøring som beskrevet i
avsnittet “Rengjøring av utløpet til
espressokokeren”
•Bruk bare malt kaffe beregnet på
espressomaskiner
Kaffen smaker surt
• Maskinen har ikke blitt skylt godt
nok etter avkalkingen
• Skyll maskinen som beskrevet i
avsnittet ”Avkalking”.
Melken skummer ikke når man
tilbereder cappuccino
•
Melken er ikke kald nok
• Melkeskummeren er skitten
•
Bruk alltid melk med
kjøleskapstemperatur
•Vask hullene i melkeskummeren
nøye, spesielt de som er vises i figur
21
Page 21

21
Læs denne instruktionsbog omhyggeligt, før
apparatet installeres og tages i brug. Kun på denne
måde kan man være sikker på at opnå et godt
resultat og helt forsvarlig anvendelse.
BESKRIVELSE AF APPARATET
Den nedenstående terminologi anvendes konstant på
de næste sider.
1. Filterholder til malet kaffe
2. Filter til 1 kop
3. Filter til 2 kopper
4. Filterholder til færdigpakkede engangsportioner
(såfremt den forefindes)
5. Håndtag til damp
6. Stempel
7. Kopholder
8. El-ledning
9. Kontrollampe OK
10.Kontrollampe (maskinen tændt) på kaffe
funktionen
11.Vælgehåndtag
12.Position til brygning af kaffe/vand
13.“O” position slukket
14.Kontrollampe damp (maskinen tændt) på damp
funktionen
15.Måleske til kaffe
16.Kogerens si
17.Adapter til cappuccino
18.Dyse til damp
19.Brygningsrør
20.Vandbeholder
21.Låg til vandbeholder
SIKKERHEDSANVISNINGER
• Dette apparat er beregnet til at “lave
espressokaffe” samt til at “opvarme drikke”: Pas på
ikke at brænde dig på vandstrålerne eller på
dampen eller på grund af forkert anvendelse.
• Man må under ingen omstændigheder røre ved
ophedede dele.
• Undersøg om apparatet er intakt, så snart man har
fjernet emballagen. I tvivlstilfælde må apparatet
ikke anvendes, og man skal henvende sig til en
fagmand.
• Emballagens materiale (plastikposer,
polystyrenskum osv.) kan være farlig for børn og
skal derfor anbringes udenfor deres rækkevidde.
• Dette apparat er udelukkende beregnet til
husholdningsbrug. Anvendelse til ethvert andet
formål anses for at være uhensigtsmæssig og
derfor farlig.
• Fabrikanten fralægger sig ethvert ansvar for farer,
der opstår som følge af uhensigtsmæssig eller
forkert brug eller anvendelse til urimelige formål.
•Man må under ingen omstændigheder røre ved
apparatet, hvis man har våde eller fugtige hænder
eller fødder.
•Sørg for at apparatet ikke anvendes af børn eller
inhabile personer uden opsyn.
•I tilfælde af defekter eller funktionsforstyrrelser skal
man slukke for apparatet og undlade at manipulere
det.
Skulle der opstå behov for reparationer, skal man
henvende sig til et af fabrikanten autoriseret
Servicecenter og kræve, at der anvendes originale
reservedele. Hvis disse forskrifter tilsidesættes, kan
det være farligt at anvende apparatet.
•Brugeren må under ingen omstændigheder selv
erstatte apparatets el-ledning, da udskiftningen kun
kan foretages med særlige redskaber. Hvis
ledningen er defekt eller skal udskiftes, skal man
henvende sig til et af fabrikanten autoriseret
Servicecenter for at undgå enhver form for risiko.
INSTALLERING
• Anbring apparatet på en arbejdsflade, langt væk fra
vandhaner og vasken.
• Undersøg om elforsyningens spænding svarer til det
der er angivet på apparatets datamærke. Apparatet
skal forbindes med en stikkontakt med en kapacitet
på mindst 10A og en velfungerende jordforbindelse.
Fabrikanten fralægger sig ethvert ansvar for ulykker,
der skyldes, at anlægget ikke er jordet.
• Hvis stikkontakten ikke passer til apparatets stik, skal
man lade en fagmand udskifte stikkontakten med en
egnet type.
• Apparatet må under ingen omstændigheder
anbringes på et sted, hvor temperaturen kan komme
ned på 0°C eller under frysepunktet (hvis vandet
fryser, risikerer man, at apparatet beskadiges).
•Hvis el-ledningen er længere end afstanden der er
nødvendig for at nå til stikkontakten, kan den
overflødige del føres ind i maskinen, ved at skubbe
ledningen ind i selve hullet, hvoraf den kommer ud.
TILBEREDNING AF ESPRESSOKAFFE
FYLDNING AF VANDBEHOLDEREN
Tag låget af vandbeholderen (fig.1), og tag derefter
beholderen ud ved at trække den opad (fig. 2).
Fyld vandbeholderen med koldt, rent vand, vær
opmærksom på at vandet ikke overstiger mærket MAX
(fig. 3).
Sæt beholderen i igen og tryk let på den for at åbne
ventilen der findes på bunden af selve beholderen.
DK
Page 22

Det er også muligt at fylde beholderen ved ganske
enkelt at hælde vand direkte i den med en kande
BEMÆRKNING: apparatet må under ingen
omstændigheder sættes igang uden vand i beholderen,
husk altid på at fylde beholderen når vandstanden er
et par centimeter fra bunden
FORVARMNING AF KAFFEENHEDEN
For at espressokaffen kan få den rigtige temperatur, er
det absulut nødvendigt at forvarme maskinen: drej
vælgehåndtaget i position (fig. 4) mindst en halv
time før kaffen skal laves og vær sikker på at
filterholderen er koblet på maskinen (forsikre sig altid
at damphåndtaget er lukket). For at koble filterholderen
på, anbringes den under kogerens si med håndgrebet
vendt mod venstre, se fig. 5, samtidig med at den
pressen opad drejes håndgrebet til højre; drej den med
bestemthed. Når den halve time er gået, laves kaffen
ifølge den procedure der er beskrevet i det næste
kapitel.
Forvarmningen kan også foretages hurtigere på denne
måde:
1.Tænd for maskinen ved at dreje vælgehåndtaget i
position (fig. 4) og koble filterholderen på
maskinen uden at fylde den med malet kaffe.
2.Placer en kop under filterholderen. Anvend den
samme kop til at lave kaffen så den er forvarmet.
3. Vent til kontrollampen OK (fig. 6) tændes, hvorefter
vælgehåndtaget straks drejes i positionen (fig.
7), lad vandet løbe indtil kontrollampen OK slukkes,
og afbryd derefter brygningen ved at dreje
vælgehåndtaget i position (fig. 4).
4. Tøm koppen, vendt til kontrollampen “OK” tændes
igen og gentag derefter samme procedure.
TILBEREDNING AF ESPRESSO MED FILTERHOLDEREN
TIL MALET KAFFE
1. Efter at have foretaget forvarmningen af maskinen
som beskrevet i foregående afsnit, indsættes, hvis
man kun vil lave 1 kop kaffe, filtret til 1 kop (den
mindste af de to der er vedlagt) i filterholderen (fig.
8), inden den indsættes fyldes den med 1 strøget
måleske malet kaffe, cirka 7 gram (fig. 9).
Hvis man istedet for ønsker at tilberede 2
espressokaffe, anvendes filtret til 2 kopper (den
største af de to vedlagte) denne fyldes med knap to
måleskeer malet kaffe (cirka 6+6 gram).
2. Fordel den malede kaffe regelmæssigt og pres den
let med stemplet (fig. 10).
BEMÆRKNING: presningen af den malede kaffe er
meget vigtig for at få en god espressokaffe. Hvis
der presses for meget løber kaffen langsomt ud og
cremen vil få en mørk farve. Hvis der derimod
presses lidt, vil kaffen løbe for hurtigt ud og der vil
kun dannes meget lidt creme med en lys farve.
3. Fjern den eventuelt overskydende kaffe fra kanten
af filterholderen og fastgør denne til apparatet,
husk at dreje den helt i bund (fig. 5).
4. Placer koppen eller kopperne under filterholderens
haner (fig. 11), det er bedst hvis de forvarmes, ved
at holde dem under varmt vand.
5. Undersøg om kontrollampen OK espresso (fig. 6)
er tændt ( hvis den er slukket, ventes til den
tændes), derefter vælges kaffebrygning (fig. 7)
indtil man opnår den ønskede mængde. For at
afbryde, føres vælgeren i position (fig. 4).
6. For at koble filterholderen af, drejes håndgrebet fra
højre mod venstre
GIV AGT! for at undgå sprøjt, må man under
ingen omstændigheder fjerne filterholderen mens
maskinen brygger.
7. Den brugte kaffe fjernes fra filterholderen ved at
holde filteret fast med låseknappen der findes på
håndgrebet og banke kaffen ud ved at holde
filterholderen på hovedet (fig. 12).
8. Maskinen slukkes ved at dreje vælgehåndtaget i
positionen “O” (fig. 13).
VIGTIGT: den første gang man bruger maskinen, er
det nødvendigt at vaske alt tilbehør samt de indre
dele af, ved at lave mindst 5 kaffe uden at komme
malet kaffe i.
TILBEREDNING AF ESPRESSO MED FILTERHOLDEREN
TIL ENGANGSPORTIONER (SÅFREMT DEN FINDES)
1. Udfør forvarmningen af maskinen som beskrevet i
afsnittet “FORVARMNING AF KAFFEENHEDEN”.
2. Tryk på filterholderens knap og indsæt den
færdigpakkede engangsportion på filtret, så
centralt som muligt (fig. 14).
BEMÆRKNING: man skal anvende færdigpakkede
engangsportioner, som opfylder kravene i ESE
standarden, dette er angivet på pakningerne med
følgende mærke:
ESE standarden er et system, som er godkendt af de
førende producenter af færdigpakkede
engangsportioner og som giver mulighed for at
tilberede espressokaffe på en enkel og hygiejnisk
måde.
22
Page 23

3. Sæt filterholderen på maskinen ved altid at dreje
den helt i bund (fig. 5).
4. Følg proceduren som i punkterne 4,5 og 6 i det
foregående afsnit.
5. Den færdigpakkede engangsportion fjernes ved at
trykke på knappen på filterholderen og tage den
af.
6. Maskinen slukkes ved at dreje vælgehåndtaget i
positionen “O” (fig. 13).
Hvis man bruger “serving illycaffè” til brygning af
espressokaffe, skal man benytte den dertil beregnede
filterholder, anbring den færdigpakkede
engangsportion så påskriften “illy” vender nedad og
engangsportionens lange side ligger parallelt med
håndgrebet (se figuren).
TILBEREDNING AF CAPPUCCINO
1.Tilbered espressokaffe med anvendelse af store
kopper.
2. Drej vælgehåndtaget i positionen (fig. 15) og
vent til kontrollampen “OK” tændes (fig. 6). Når
lampen tændes har kogeren nået den ideelle
temperatur til at producere damp.
3. Fyld imellemtiden cirka 100 gram mælk for, hver
cappuccino man vil lave, i en beholder. Mælken skal
være køleskabskold (ikke varm!). Med hensyn til
beholderens størrelse, husk på at mælkens omfang
forøges 2 – 3 gange.
BEMÆRKNING: det anbefales at anvende letmælk der
har køleskabstemperatur.
4. Placer beholderen med mælken under adapteren til
cappuccino (fig. 16).
5. Sænk adapteren til cappuccino ned i mælken cirka
2 cm og drej damphåndtaget i retning mod uret, fig.
17 (ved at dreje mere eller mindre på håndtaget er
det muligt at variere mængden af damp der kommer
ud af adapteren). På dette punkt begynder mælken
af svulme op og det får et skummet udseende.
6. Når den ønskede temperatur er nået (det ideelle er
60°C), afbrydes dampen ved at dreje håndtaget i
retning med uret og samtidig indstille
vælgehåndtaget på “O” (fig. 13).
7. Hæld mælkeemulsionen i kopperne der indeholder
den espressokaffe der er lavet i forvejen.
Cappuccinoen er klar: kom sukker i efter behag og,
hvis man synes, kan der drysses kakaopulver på
skummet.
VIGTIGT: gør altid adapteren til cappuccino ren efter
brug. Dette gøres på følgende måde:
1.Lad lidt damp komme ud i nogle sekunder ved at
dreje på damphåndtaget (fig. 17).
2.Hold med en hånd den øverste del fast og med den
anden hånd skrues adapteren til cappuccino af ved
at dreje den i retning med uret og tage den af dysen
(fig. 18).
3.Tag dysen til damp af brygningsrøret.
4.Vask omhyggeligt adapteren til cappuccino og dysen
til damp af under varmt vand.
5. Kontroller at de to huller der er vist i fig. 19, ikke er
tilstoppede. Hvis det er nødvendigt rengøres de ved
hjælp af en nål.
6.Genmonter dysen til damp ved at sætte den på røret
så pilen A stemmer overens med hakket B, som vist i
figur 20.
7.Genmonter adapteren til cappucino på dysen til
damp ved at føre den ind, helt i bund, så pilen C
stemmer overens med hakket B, som vist i figur 21,
og derefter dreje den i retning mod uret.
TILBEREDNING AF VARMT VAND
1. Tænd for maskinen ved at dreje vælgehåndtaget i
position (fig. 4)
2. Placer en beholder under adapteren til cappucino.
3. Når kontrollampen OK tændes, sættes
vælgehåndtaget i position (fig. 7) og samtidig
drejes damphåndtaget i retning mod uret (fig. 17):
det varme vand kommer nu ud af adapteren.
4. For at slukke for det varme vands udløb, drejes
damphåndtaget i retning med uret og
vælgehåndtaget sættes i position “O”.
RENGØRING OG VEDLIGEHOLDELSE
RENGØRING AF FILTERHOLDEREN TIL
FÆRDIGPAKKEDE ENGANGSPORTIONER (HVIS DEN
FOREFINDES)
Man skal med jævne mellemrum rense filterholderen til
engangsportioner på følgende måde::
•tryk på filterholderens knap og fjern filtret som vist
i figur 22.
• kontroller at filtrets huller ikke er tilstoppede. Hvis
det er nødvendigt, rengøres den omhyggeligt med
varmt vand og med en slibende hård svamp.
• Rengør filterholderen indvendig og
gummitætningen.
• Sæt filtret i igen.
23
Page 24

24
Filterholderen må under ingen omstændigheder vaskes
i opvaskemaskinen.
RENGØRING AF ESPRESSOKOGERENS SI
Espressokogerens si skal renses på følgende måde
mindst én gang om året:
• Sørg for at kaffemaskinen ikke er varm og at stikket
er trukket ud af stikkontakten.
• Løsn skruen, som holder espressokogerens si, ved
hjælp af en skruetrækker (fig. 23).
• Rens den del af kogeren, hvor sien befandt sig,
med en fugtig klud.
• Rens sien med opvaskemiddel, indtil alle hullerne er
rene.
• Skyl sien under vandhanen og gnub den.
• Sæt espressokogerens si tilbage igen.
ANDEN RENGØRING
1. Man må ikke anvende opløsningsmidler eller
slibende rengøringsmidler til rengøring af
apparatet. Det er tilstrækkeligt at anvende en blød,
fugtig klud.
2. Træk afdrypningskarret ud, tøm det og vask det
med jævne mellemrum.
3. Rengør espresso vandbeholderen.
VIGTIGT: Apparatet må under ingen omstændigheder
sættes ned i vand i forbindelse med rengøringen:
husk på at det er et elektrisk apparat.
AFKALKNING
Det tilrådes at afkalke apparatet for hver 200 kopper
kaffe. Det anbefales at anvende de særlige produkter,
der er beregnet til afkalkning af espressokaffemaskiner,
der findes i handlen. Skulle det være umuligt at
tilvejebringe disse produkter, kan man følge denne
procedure:
1. Hæld 1 liter vand i vandbeholderen.
2. Tilsæt 2 spiseskeer (cirka 30 gram) citronsyre (kan
fåes på apoteket eller i specialbutikker).
3. Drej vælgehåndtaget i positionen og vent til
kontrollampen OK tændes.
4. Sørg for at filterholderen ikke er koblet på og
placer en egnet beholder under maskinens si.
5. Drej vælgehåndtaget i position og lad halvdelen
af opløsningen i beholderen løbe ud.
Afbryd derefter ved at dreje vælgeren i positionen
“O”.
6. Lad opløsningen virke i cirka 15 minutter, og sæt
derefter udstrømningen igang igen indtil
beholderen er helt tom.
7. Skyl beholderen omhyggeligt for at fjerne rester af
opløsningen og kalk, fyld den med rent vand og
sæt den på plads igen.
8. Drej vælgehåndtaget i positionen og lad vandet
løbe igennem til beholderen er helt tom.
9. Drej vælgehåndtaget i position og gentag
proceduren i punkt 7 og 8 en gang til.
Garantien dækker ikke reparationer af maskinen som
følge af forstyrrelser, der skyldes kalkdannelse, hvis den
ikke regelmæssigt er blevet afkalket som beskrevet
ovenfor.
Page 25

25
PROBLEM
MULIGE ÅRSAGER
LØSNING
Espressokaffen løber ikke ud
• Der mangler vand i beholderen
• Hullerne i filterholderens haner er
tilstoppede
• Espressokogerens si er tilstoppet
• Beholderen er ikke sat rigtig i, og
ventilen på dens bund er ikke åben.
• Fyld vandbeholderen
•
Rens hanernes huller
• Foretag en rengøring ifølge
vejledningen i kapitlet “Rengøring af
espressokogerens si”.
•Tryk let på beholderen, således at
ventilen på bunden åbnes.
Espressokaffen siver ud fra
kanten af filterholderen i
stedet for gennem hullerne.
Espressokaffen er kold
•
Filterholderen sidder ikke rigtigt.
• Espressokogerens tætning er ikke
længere elastisk.
• Hullerne i filterholderens haner er
tilstoppede.
• Fastgør filterholderen rigtigt og drej
den helt i bund.
• Lad espressokogerens tætning
udskifte på et Servicecenter.
•
Rengør hullerne i hanerne.
• Kontrollampen OK espresso er ikke
tændt når der trykkes på knappen til
brygning af kaffe.
• Forvarmningen er ikke foretaget.
• Kopperne er ikke forvarmede.
• Vent til kontrollampen OK tændes.
• Foretag forvarmningen ifølge
vejledningen i afsnittet “Forvarmning
af kaffeenheden”.
•
Forvarm kopperne.
Pumpen larmer temmelig
meget
•
Fyld beholderen.
•
Tryk let på beholderen, således at
ventilen på bunden af den åbnes.
Kaffecremen er lys (løber for
hurtigt ud af hanen)
Kaffecremen er mørk (kaffen
løber for langsomt ud af
hanen)
•
Den malede kaffe er presset for
hårdt.
• Der er anvendt for meget malet
kaffe.
•
Espressokogerens si er tilstoppet.
•
Kaffen er for fint malet.
•Vandbeholderen er tom.
• Beholderen er sat forkert i, og
ventilen på bunden af den er ikke
åben.
•
Den malede kaffe er ikke presset
hårdt nok.
•
Der er anvendt for lidt malet kaffe.
• Kaffen er ikke malet fint nok.
•Pres den malede kaffe hårdere.
• Anvend mere kaffe.
•
Anvend udelukkende malet kaffe der er
beregnet til espressokaffemaskiner.
•Pres kaffen mindre.
• Anvend mindre malet kaffe.
•
Foretag rengøringen ifølge
anvisningerne i kapitlet “Rengøring
af espressokogerens si”.
•
Anvend udelukende malet kaffe
beregnet til espressokaffemaskiner.
Der dannes ikke mælkeskum,
når man laver cappuccino.
•
Mælken er ikke kold nok.
•
Adapteren til cappuccino er snavset
•
Anvend altid mælk der har
køleskabstemperatur.
•
Rengør hullerne i adapteren til
cappuccino grundigt, især dem der er
beskrevet i figur 21.
Kaffen har en sur smag
• Man har ikke skyllet apparatet
tilstrækkeligt efter afkalkningen.
• Skyl apparatet som beskrevet i
kapitlet “Afkalkning”.
Page 26

26
Läs denna bruksanvisning noggrant innan maskinen
installeras och används. Endast på så sätt kan du
uppnå optimalt resultat och maximal driftssäkerhet.
BESKRIVNING AV APPARATEN
Följande termer används i bruksanvisningen
1 Filterhållare för malet kaffe
2 Filter för 1 kopp
3 Filter för 2 koppar
4 Filterhållare för portionsförpackat kaffe (om sådan
finns)
5 Reglerknapp för ånga
6Press
7 Galler för koppar
8 Elsladd
9 Signallampa för OK
10 Signallampa (maskin på) i kaffeläge
11 Väljare
12 Läge utmatning kaffe/vatten
13 “O” avstängd
14 Signallampa ånga (maskin på) i ångläge
15 Kaffemått
16 Espressostril
17 Cappuccinorör
18 Ångmunstycke
19 Utmatningsrör
20 Vattenbehållare
21 Lock till vattenbehållare
SÄKERHETSANVISNINGAR
• Denna maskin är konstruerad för ”tillagning av
kaffe” och ”uppvärmning av drycker”. Var försiktig
så att du inte bränner dig på hett vatten eller
ånga eller genom att använda kaffemaskinen på
ett felaktigt sätt.
•Vidrör aldrig heta delar.
• Kontrollera efter att ha tagit bort emballaget att
kaffemaskinen är hel. I tveksamma fall ska
apparaten inte användas. Vänd dig vid behov till
fackman.
• Allt emballagematerial (plastpåsar, expanderad
polystyren etc.) måste hållas utom räckhåll för barn
eftersom det kan ge upphov till skada.
• Denna kaffemaskin får endast användas för
hushållsbruk. All annan användning skall betraktas
som felaktig och därmed farlig.
•Tillverkaren kan inte ställas till ansvar för eventuella
skador som uppstår till följd av felaktig, olämplig
eller oförnuftig användning.
• Rör inte kaffemaskinen om du har våta eller fuktiga
händer eller fötter.
• Låt inte barn eller omyndiga använda den utan
övervakning.
•Om maskinen uppvisar fel eller driftsstörningar ska
du stänga av den och låta bli att mixtra med den.
Kontakta endast av tillverkaren auktoriserad
serviceverkstad för eventuella reparationer och
begär att orginalreservdelar används. I annat fall
kan maskinens säkerhet äventyras.
•Kaffemaskinens sladd får inte bytas ut av
användaren, eftersom detta kräver att man
använder specialverktyg. Vänd dig endast till av
tillverkaren auktoriserad serviceverkstad om
sladden skadas eller behöver bytas ut. På så sätt
undviker du att utsätta dig för risker.
INSTALLATION
• Placera maskinen på en arbetsbänk långt från
vattenkranar och diskhoar.
• Kontrollera att nätspänningen motsvarar den
spänning som anges på maskinens märkplåt.
Apparaten får endast anslutas till eluttag som har
en kapacitet på minst 10A och är ordentligt jordat.
Tillverkaren kan inte ställas till ansvar för eventuella
olyckor som inträffar till följd av att jordning
saknas.
• Överlåt åt en elektriker att byta ut kontakten om
vägguttaget och kaffemaskinens stickpropp inte
skulle passa ihop.
• Installera aldrig maskinen på en plats där
temperaturen kan sjunka ned till eller under 0°C
(om vattnet fryser till is kan maskinen skadas).
• Om elsladden är längre än vad som behövs för att
nå fram till uttaget kan man föra in den överflödiga
delen i maskinen genom att trycka in sladden
genom utgångshålet.
TILLAGNING AV ESPRESSO
ATT FYLLA PÅ VATTEN
Ta bort vattenbehållarens lock (fig. 1) och lossa
behållaren genom att dra den uppåt (fig. 2).
Fyll den med rent och friskt vatten och se till att
vattennivån inte överskrider texten MAX. (fig. 3).
Sätt tillbaka behållaren och tryck ned den lätt så att
ventilen i dess botten öppnas.
Ett enklare sätt är att fylla på behållaren utan att ta loss
den, genom att hälla i vatten från en karaff.
OBS: starta aldrig maskinen utan vatten i behållaren
och kom ihåg att alltid fylla på den när vattennivån har
sjunkit till några centimeter från bottnen.
FÖRUPPVÄRMNING AV KAFFEENHETEN
För att espressokaffet ska få rätt temperatur måste man
värma upp maskinen i förväg: Vrid väljaren till läge
(fig. 4) minst en halvtimme innan kaffet ska tillagas
26
S
Page 27

och se till att filterhållaren sitter i maskinen (kontrollera
alltid att reglerknappen för ånga är stängd).
Filterhållaren sätter man fast genom att hålla den under
espressostrilen med handtaget riktat åt vänster (se fig.
5). Tryck den sedan uppåt och vrid samtidigt handtaget
åt höger. Dra åt den ordentligt. När halvtimmen har
gått kan man laga kaffet genom att följa anvisningarna
i nästa avsnitt.
För att snabba upp föruppvärmningen kan man också
gå till väga enligt följande:
1. Sätt på maskinen genom att vrida väljaren till läge
(fig. 4) och sätt fast filterhållaren utan att fylla
den med kaffe.
2. Placera en kopp under filterhållaren. Använd
samma kopp som ska användas till kaffet, så att
den värms upp.
3. Vänta tillsa signallampan för OK tänds (fig. 6) och
vrid sedan väljaren till läge (fig. 7). Låt vattnet
matas ut tills signallampan för OK släcks och
avbryt då utmatningen genom att vrida väljaren till
läge (fig. 4).
4. Töm koppen, vänta tills signallampan för OK tänds
igen och upprepa samma procedur en gång till.
ATT LAGA ESPRESSO MED FILTERHÅLLARE FÖR MALET
KAFFE
1. Om du efter att ha värmt upp maskinen enligt
beskrivningen ovan vill laga en kopp kaffe sätter du
i filtret för 1 kopp (det minsta av de två filter som
medföljer) i filterhållaren (fig. 8) och fyller det med
1 struket mått malet kaffe, cirka 7 gram (fig.9).
Om du i stället vill laga två koppar espresso
använder du filtret för 2 koppar (det största av de
två som medföljer) och fyller det med knappt två
mått malet kaffe (cirka 6+6 gram).
2. Fördela kaffet jämnt och pressa ihop det lätt med
pressen (fig. 10).
OBS: för att espresson ska bli lyckad är det mycket
viktigt att man pressar kaffepulvret. Om man
trycker för hårt kommer kaffet ut långsamt och
skummet blir mörkt. Om man i stället trycker för löst
kommer kaffet ut för snabbt och man får lite och
ljust skum.
3. Ta bort eventuellt kaffeöverskott från filterhållarens
kant och haka fast den på maskinen. Vrid den
alltid så långt det går (fig. 5).
4. 4. Placera koppen eller kopparna, som du helst ska
värma upp i förväg genom att spola dem med hett
vatten, under filterhållarens munstycken (fig. 11).
5. Kontrollera att signallampan för OK espresso (fig.
6) är tänd (vänta annars tills den tänds) och vrid
sedan väljaren till utmatning av kaffe (fig. 7)
tills du erhåller önskad mängd. För att avbryta
utmatningen vrider du väljaren till läge (fig. 4).
6. För att ta loss filterhållaren vrider du handtaget från
höger till vänster.
OBS! för att undvika stänk bör man aldrig ta loss
filterhållaren medan maskinen matar ut kaffe.
7. För att tömma ut kaffesumpen håller du filtret låst
med spaken på handtaget och tömmer ut sumpen
genom att vända filterhållaren upp och ned och slå
(fig. 12).
8. För att stänga av maskinen vrider du väljaren till
läge “O” (fig. 13).
OBS! innan kaffemaskinen används för första gången
ska alla tillbehör diskas och maskinen rengöras
invändigt genom att man lagar minst fem koppar kaffe
utan att använda kaffepulver.
ATT LAGA ESPRESSO MED FILTERHÅLLARE FÖR
PORTIONSKAFFE (OM SÅDAN FINNS)
1. Värm upp maskinen enligt beskrivningen i avsnittet
“FÖRUPPVÄRMNING AV KAFFEENHETEN”.
2. Tryck på filterhållarens knapp, för in portionskaffet
och centrera det så mycket som möjligt på filtret
(fig. 14).
OBS: använd portionskaffe som överensstämmer med
ESE-standarden: detta markeras med följande symbol
på förpackningen:
ESE-standarden är ett system som accepterats av de
största tillverkarna av portionskaffe och som gör det
möjligt att tillaga en espresso på ett enkelt och rent sätt.
3. Haka fast filterhållaren på maskinen och vrid alltid
så långt det går (fig. 5).
4. Gå tillväga på det sätt som beskrivs under
punkterna 4, 5 och 6 i det föregående avsnittet.
5. Avlägsna portionskaffet genom att trycka på
filterhållarens knapp och ta bort det.
6. Stäng av kaffemaskinen genom att vrida väljaren
till läge “O” (fig. 13).
Om du använder “serving illycaffè” för ditt
espressokaffe ska du använda den särskilda
filterhållaren. Lägg i kaffetärningen och se till att texten
“illy” är vänd nedåt och att tärningens långsida är
parallell med handtaget (se figur).
27
Page 28

TILLAGNING AV CAPPUCCINO
1.Laga espresso i koppar som är tillräckligt stora för att
rymma cappuccino.
2.Vrid väljaren till läge (fig. 15) och vänta tills
signallampan för OK tänds (fig. 6). När lampan
tänds har vattnet i varmvattensbehållaren uppnått
rätt temperatur för att producera ånga.
3.Fyll under tiden en behållare med cirka 100 gram
mjölk för varje cappuccino som ska tillagas. Mjölken
ska vara kylskåpskall (inte varm!). Tänk på att
mjölkens volym kommer att bli 2 eller 3 gånger så
stor när du väljer behållare.
OBS: använd helst lättmjölk som har
kylskåpstemperatur.
4.Placera behållaren med mjölk under
cappuccinoröret (fig. 16).
5.Sänk ner utloppsröret för ångan cirka 2 cm i mjölken
och vrid reglerknappen för ångan motsols, enligt fig.
17. (Mängden ånga kan varieras genom att man
vrider mer eller mindre på reglerknappen). Mjölken
börjar då öka i volym och får ett krämigt utseende.
6.När önskad temperatur har uppnåtts (60°C är
idealiskt) avbryter du utmatningen av ånga genom
att vrida reglerknappen medsols och samtidigt sätta
väljaren på “O” (fig. 13).
7.Häll den skummade mjölken i kopparna med
espresso. Cappuccinon är färdig: sockra efter
behag och strö litet kakaopulver över mjölkskummet
om så önskas.
VIKTIGT: rengör alltid cappuccinoröret efter
användning på följande sätt:
1.Släpp ut lite ånga under några sekunder med hjälp
av reglerknappen för ånga (fig. 17).
2.Håll den övre delen stilla med ena handen och vrid
med den andra loss cappuccinoröret genom att vrida
det medsols och dra av det från munstycket (fig. 18).
3.Ta bort ångmunstycket genom att dra av det från
utmatningsröret.
4.Rengör cappuccinoröret och ångmunstycket
ordentligt med ljummet vatten.
5.Kontrollera att de två hålen i fig. 19 inte är tilltäppta.
Rengör dem om nödvändigt med hjälp av en nål.
6.Montera tillbaka ångmunstycket genom att sätta på
det på ångröret så att pilen A motsvarar märket B
enligt fig. 20.
7.Montera tillbaka cappuccinoröret genom att trycka
in det så långt det går på ångmunstycket och så att
pilen C motsvarar märket B enligt fig. 21. Vrid det
sedan motsols.
SÅ HÄR FÅR DU HETT VATTEN
1.Sätt på maskinen genom att vrida väljaren till läge
(fig. 4).
2.Placera en behållare under cappuccinoröret.
3.Vänta till signallampan för OK tänds och vrid sedan
väljaren till läge (fig. 7) samtidigt som du vrider
reglerknappen för ånga motsols (fig. 17): hett vatten
strömmar då ut genom cappuccinoröret.
4.För att avbryta utmatningen av hett vatten vrider du
reglerknappen för ånga medsols och sätter väljaren
i läge “O”.
RENGÖRING OCH UNDERHÅLL
RENGÖRING AV FILTERHÅLLAREN FÖR
KAFFEPORTIONER (OM SÅDAN FINNS)
Rengör då och då filterhållaren för portionskaffe på
följande sätt:
•tryck på filterhållarens knapp och ta bort filtret
såsom visas i figur 22.
• kontrollera att hålen på filtret inte är tilltäppta.
Rengör filtret noga med varmvatten och genom att
gnida med en styv svamp om så behövs.
•] Rengör insidan av filterhållaren och
gummipackningen.
• Sätt tillbaka filtret.
Diska aldrig filterhållaren i diskmaskin.
RENGÖRING AV ESPRESSOSTRILEN
Minst en gång om året måste man rengöra strilen på
följande sätt:
• Kontrollera att kaffemaskinen inte är varm och att
stickproppen är utdragen.
• Lossa skruven som håller espressostrilen på plats
med en skruvmejsel (fig. 23).
• Rengör den del av varmvattenbehållaren där strilen
satt med en fuktig trasa.
• Borsta strilen med lite diskmedel tills alla hål är
rena.
• Skölj den under vattenkranen samtidigt som du
gnider den.
• Montera tillbaka espressostrilen.
ÖVRIG RENGÖRING
1. Använd inte lösningsmedel eller rengöringsmedel
med slipverkan för rengöring av kaffemaskinen.
Det räcker med en fuktig och mjuk trasa.
2. Ta loss droppskålen, töm den och rengör den
regelbundet.
3. Rengör vattenbehållaren för espresso.
OBS! sänk aldrig ned kaffemaskinen i vatten under
rengöringen: den är en elektrisk maskin.
28
Page 29

29
AVKALKNING
Vi rekommenderar att kaffemaskinen avkalkas efter
cirka var 200:e kopp kaffe. Använd de särskilda
avkalkningsmedel för espressomaskiner och som finns
att köpa i handeln. Om du inte kan få ta på dessa
produkter kan du gå tillväga på följande sätt:
1. Fyll vattenbehållaren med 1 liter vatten.
2. Lös upp 2 matskedar (cirka 30 gram) citronsyra
(finns på apotek eller i livsmedelsaffärer) i vattnet.
3. Vrid väljaren till läge och vänta tills
signallampan för OK tänds.
4. Kontrollera att filterhållaren inte sitter på maskinen
och placera ett kärl under kaffemaskinens stril.
5. Vrid väljaren till läge och mata ut hälften av
den lösning som finns i behållaren.
Avbryt därefter genom att vrida väljaren till läge
“O”.
6. Låt lösningen verka i cirka 15 minuter och mata
sedan ut lösningen på nytt tills behållaren har tömts
helt och hållet.
7. Avlägsna rester av lösningen och kalkrester genom
att skölja behållaren noga, fylla den med rent
vatten och sätta tillbaka den på dess plats.
8. Vrid väljaren till läge och mata ut vatten tills
behållaren är helt tom.
9. Sätt väljaren i läge och upprepa moment 7 och
8 en gång till.
Reparationer av kaffemaskinen till följd av
kalkavlagringsproblem täcks inte av garantin om den
ovan beskrivna avkalkningen inte har utförts
regelbundet.
Page 30

30
PROBLEM
MÖJLIGA ORSAKER LÖSNING
Espresson kommer inte ut
längre
•
Det saknas vatten i behållaren.
• Hålen på filterhållarens munstycken
är tilltäppta.
• Espressostrilen är tilltäppt.
• Behållaren är inte korrekt införd och
ventilen på dess botten är inte
öppen.
• Fyll på vattenbehållaren.
• Rengör hålen på munstyckena.
• Rengör såsom beskrivs i avsnittet
“Rengöring av espressostrilen”.
•Tryck lätt på behållaren så att
ventilen på botten öppnas.
Espresson är kall
Pumpen bullrar för mycket
• Fyll på vattenbehållaren.
•Tryck lätt på behållaren så att
ventilen på botten öppnas.
Kaffeskummet är ljust (kaffet
rinner snabbt ur munstycket)
Kaffeskummet är mörkt
(kaffet rinner långsamt ur
munstycket)
• Kaffepulvret har tryckts samman för
mycket
• För mycket kaffepulver
• Espressostrilen ät tilltäppt.
• Kaffet är för finmalet.
Kaffet smakar beskt
• Maskinen har inte sköljts tillräckligt
efter avkalkningen.
• Skölj kaffemaskinen såsom beskrivs i
avsnittet “Avkalkning”
Det bildas inget mjölkskum
under tillagningen av
cappuccino
• Mjölken är inte tillräckligt kall
• Cappuccinoröret är smutsigt
• Använd alltid kylskåpskall mjölk
• Rengör noga hålen på cappuccinoröret, i
synnerhet de hål som visas i fig. 21
•
Filterhållaren är inte ordentligt påsatt
•
Packningen på espressostrilen har
förlorat sin elasticitet.
•
Hålen på filterhållarens munstycken
är tilltäppta.
• Haka fast filterhållaren ordentligt och
dra åt den så mycket det går.
• Byt ut packningen hos en
serviceverkstad.
• Rengör hålen på munstyckena.
• Signallampan för OK espresso lyste
inte när väljaren sattes i läge för
utmatning av kaffe..
• Föruppvärmningen har inte utförts.
• Kopparna har inte värmts i förväg.
• Vänta tills signallampan för OK
tänds
• Värm upp maskinen såsom beskrivs i
avsnittet “Föruppvärmning av
kaffeenheten”
• Värm kopparna i förväg.
•Vattenbehållaren är tom
• Behållaren är inte korrekt införd och
ventilen på dess botten är inte
öppen.
• Kaffepulvret har tryckts samman för
lite
• För lite kaffepulver
• Kaffet är för grovmalet.
•Pressa kaffepulvret mer.
• Fyll på mer kaffepulver
• Använd endast malet kaffe som är
avsett för espressomaskiner.
•Pressa kaffepulvret mindre
• Minska mängden kaffepulver
• Rengör såsom beskrivs i avsnittet
“Rengöring av espressostrilen”.
• Använd endast malet kaffe som är
avsett för espressomaskiner.
Espresson droppar från
filterhållarens kanter i stället
för från hållen.
Page 31

Prosimy uwa˝nie przeczytaç t´ instrukcj´ przed
zainstalowaniem i u˝yciem urzàdzenia. Tylko w ten
sposób b´dà Paƒstwo mogli uzyskaç najlepsze efekty
oraz zapewniç sobie najbardziej bezpieczne warunki
u˝ytkowania.
OPIS URZÑDZENIA
Poni˝sza terminologia b´dzie stosowana w ca∏ej
instrukcji.
1 Pojemnik z filtrem do kawy mielonej
2 Filtr na 1 fili˝ank´
3 Filtr na 2 fili˝anki
4 Pojemnik z filtrem dla pastylek (jeÊli przewidziany)
5 Pokr´t∏o podgrzewacza pary
6 Wk∏adka dociskowa
7 Podstawka do fili˝anek
8 Kabel zasilajàcy
9 Lampka kontrolna OK
10 Lampka kontrolna (ekspres w∏àczony) w
po∏o˝eniu kawa
11 Prze∏àcznik wybierania po∏o˝enia
12 Po∏o˝enie nalewania kawy / wody
13 “O” po∏o˝enie wy∏àczenia
14 Lampka kontrolna podgrzewacza pary
(urzàdzenie w∏àczone) w po∏o˝eniu pary
15 Dozownik kawy
16 Wylot podgrzewacza
17 Koƒcówka do kawy cappuccino
18 Dysza wylotowa pary
19 Rurka nalewania
20 Zbiornik wody
21 Pokrywa zbiornika wody
OSTRZE˚ENIE
• Urzàdzenie to jest przeznaczone do robienia kawy
“espresso” i podgrzewania napojów. Prosimy o
ostro˝noÊç, aby nie doznaç oparzeƒ od strumienia
goràcej wody lub pary albo w wyniku
niew∏aÊciwego obchodzenia si´ z urzàdzeniem.
• Nigdy nie wolno dotykaç goràcych cz´Êci
urzàdzenia.
• Po rozpakowaniu prosimy upewniç si´, czy
urzàdzenie jest kompletne i nie uszkodzone. W razie
wàtpliwoÊci nie nale˝y go u˝ywaç, lecz zwróciç si´
do fachowego personelu serwisu.
• Elementów opakowania (torby plastikowe, pianka
polistyrenowa, itd.) nie wolno pozostawiaç w
miejscu dost´pnym dla dzieci, gdy˝ stanowià
potencjalne êród∏o zagro˝enia.
• Niniejsze urzàdzenie jest przeznaczone jedynie do
u˝ytku domowego. Wszelkie inne wykorzystanie
urzàdzenia jest niew∏aÊciwe i niebezpieczne.
• Producent nie ponosi odpowiedzialnoÊci za
ewentualne szkody wynikajàce z niew∏aÊciwego,
b∏´dnego lub nieracjonalnego wykorzystania
urzàdzenia.
• Nigdy nie wolno dotykaç urzàdzenia mokrymi lub
wilgotnymi r´kami lub stopami.
• Nigdy nie wolno dopuszczaç do korzystania z
urzàdzenia przez dzieci lub osoby nie
przygotowane bez w∏aÊciwego nadzoru.
W przypadku uszkodzenia lub wadliwego
funkcjonowania urzàdzenie nale˝y go wy∏àczyç i
nie rozbieraç na cz´Êci.
W celu ewentualnej naprawy prosimy zwracaç si´
jedynie do Centrum Pomocy Technicznej
autoryzowanego przez producenta i ˝àdaç monta˝u
oryginalnych cz´Êci zamiennych. Nieprzestrzeganie
powy˝szego mo˝e naraziç u˝ytkownika urzàdzenia
na niebezpieczeƒstwo.
• U˝ytkownik nie powinien nigdy wymieniaç kabla
zasilajàcego urzàdzenia, gdy˝ czynnoÊç ta wymaga
u˝ycia specjalnych narz´dzi. W przypadku
uszkodzenia kabla lub koniecznoÊci jego wymiany
nale˝y zwróciç si´ wy∏àcznie do Centrum Pomocy
Technicznej autoryzowanego przez producenta,
unikajàc w ten sposób wszelkiego ryzyka.
INSTALACJA
• Ustawiç aparat na powierzchni roboczej, z dala od
kranów i zlewozmywaków.
• Sprawdziç, czy napi´cie sieciowe odpowiada
napi´ciu podanemu na tabliczce z danymi
technicznymi ekspresu. Pod∏àczyç urzàdzenie tylko
do gniazda o nat´˝eniu minimalnym 10 A
wyposa˝onego w skuteczne uziemienie. Producent
nie ponosi odpowiedzialnoÊci za ewentualne
wypadki spowodowane brakiem uziemienia
urzàdzenia.
•W przypadku ró˝nic mi´dzy gniazdem a wtyczkà
ekspresu nale˝y dokonaç wymiany gniazda na
w∏aÊciwe przez wykwalifikowanà osob´.
• Nigdy nie wolno instalowaç urzàdzenia w
Êrodowisku, gdzie wyst´pujà spadki temperatury do
0∞C lub ni˝ej (zamarzni´cie wody mo˝e
spowodowaç uszkodzenie urzàdzenia).
• JeÊli kabel zasilajàcy jest d∏u˝szy, ni˝ odleg∏oÊç od
gniazda zasilania, pozostajàcà cz´Êç kabla mo˝na
wsunàç do wn´trza urzàdzenia, wpychajàc kabel do
wn´trza otworu wyjÊciowego.
31
PL
Page 32

JAK POST¢POWAå, ABY ZROBIå KAW¢
“ESPRESSO”
NAPE¸NIANIE ZBIORNIKA WODÑ
Zdjàç pokryw´ zbiornika na wod´ (rys. 1) a nast´pnie
wyjàç zbiornik, ciàgnàc go do góry. (rys. 2).
Nape∏niç zbiornik Êwie˝à czystà wodà, zwracajàc
uwag´, aby nie przekroczyç napisu MAX (rys. 3).
Wstawiç ponownie zbiornik, lekko dociskajàc go w
celu otwarcia zaworu umieszczonego na dnie
zbiornika.
¸atwiej mo˝na nape∏niç zbiornik bez wyjmowania go,
nalewajàc do niego wod´ bezpoÊrednio przy pomocy
karafki.
UWAGA: nigdy nie nale˝y w∏àczaç urzàdzenia bez
wody w zbiorniku i zawsze pami´taç o koniecznoÊci
nape∏nienia go, gdy poziom wody spada do
wysokoÊci paru centymetrów od dna.
ZGRZEWANIE URZÑDZENIA
Aby uzyskaç kaw´ espresso o w∏aÊciwej temperaturze,
absolutnie konieczne jest rozgrzanie urzàdzenia:
przekr´ciç pokr´t∏o prze∏àcznika w po∏o˝enie (rys.
4) co najmniej na pó∏ godziny przed robieniem kawy,
upewniajàc si´, ˝e pojemnik z filtrem do kawy zosta∏
za∏o˝ony na urzàdzenie (a tak˝e, i˝ pokr´t∏o
podgrzewacza pary jest zamkni´te). Aby
przymocowaç pojemnik z filtrem do kawy, nale˝y
umieÊciç go pod wylotem podgrzewacza z uchwytem
skierowanym w lewo (patrz rys. 5); popchnàç
pojemnik z filtrem do góry i jednoczeÊnie przekr´ciç
uchwyt w prawo; przekr´caç uchwyt zdecydowanie.
Po up∏ywie pó∏ godziny mo˝na zrobiç kaw´,
post´pujàc zgodnie z zasadami opisanymi w
nast´pnym rozdziale.
Alternatywnie, aby rozgrzaç urzàdzenie szybciej,
mo˝na postàpiç w inny sposób:
1. W∏àczyç urzàdzenie przekr´cajàc dêwigni´
prze∏àcznika w po∏o˝enie (rys. 4) i zamocowaç
pojemnik z filtrem na urzàdzeniu, nie nape∏niajàc
go zmielonà kawà.
2. UmieÊciç fili˝ank´ pod pojemnikiem z filtrem. U˝yç
tej samej fili˝anki, w której b´dzie podawana
kawa, aby jà równie˝ podgrzaç.
3 Odczekaç do zapalenia si´ lampki kontrolnej OK
(rys. 6) i natychmiast przekr´ciç dêwigni´
prze∏àcznika w po∏o˝enie (rys. 7). Pozostawiç
wyp∏ywajàcà wod´ a˝ do zgaÊni´cia lampki
kontrolnej OK, po czym przerwaç wyp∏yw,
przekr´cajàc pokr´t∏o prze∏àcznika w po∏o˝enie
(rys. 4).
4 Opró˝niç fili˝ank´, odczekaç, a˝ lampka kontrolna OK
zapali si´ ponownie, po czym powtórzyç t´ samà
operacj´ ponownie.
.
JAK PRZYGOTOWAÅ KAW¢ ESPRESSO W
POJEMNIKU Z FILTREM DO KAWY MIELONEJ
1 Po rozgrzaniu urzàdzenia zgodnie z instrukcjà z
poprzedniego rozdzia∏u, jeÊli chcemy przygotowaç
tylko jednà kaw´, nale˝y w∏o˝yç filtr dla 1 fili˝anki
(ten o mniejszej pojemnoÊci z dwu b´dàcych w
wyposa˝eniu) do pojemnika na filtr (rys. 8) i
nape∏niç go 1 p∏askà porcjà dozownika kawy
mielonej, ok. 7 g (rys. 9).
JeÊli natomiast pragniemy przygotowaç dwie
kawy, nale˝y u˝yç filtr na 2 fili˝anki (ten o wi´kszej
pojemnoÊci z dwu b´dàcych w wyposa˝eniu) do
pojemnika na filtr i nape∏niç go dwiema niepe∏nymi
porcjami dozownika kawy mielonej (ok. 6+6 g).
2. Rozprowadziç równomiernie kaw´ mielonà,
przyciskajàc jà lekko wk∏adkà dociskowà (rys. 10).
UWAGA: odpowiednie dociÊni´cie kawy jest
bardzo wa˝ne dla uzyskania dobrej kawy
espresso. Zbyt silne dociÊni´cie spowoduje wolny
wyp∏yw kawy i ciemny kolor pianki. Natomiast jeÊli
dociÊniemy za s∏abo, kawa b´dzie wyp∏ywaç zbyt
szybko i otrzymamy ma∏o pianki o jasnym kolorze.
3. Usunàç ewentualny nadmiar kawy z kraw´dzi
pojemnika z filtrem i za∏o˝yç pojemnik na
urzàdzenie, obracajàc go a˝ do koƒca (rys. 5).
4. Fili˝ank´ lub fili˝anki, lepiej jeÊli podgrzane przez
op∏ukanie ich w ma∏ej iloÊci goràcej wody, nale˝y
umieÊciç pod dziobkami pojemnika z filtrem (rys.
11).
5. Sprawdziç, czy pali si´ lampka kontrolna OK
espresso (rys. 6), (jeÊli nie, nale˝y poczekaç, a˝ si´
zapali), nast´pnie ustawiç prze∏àcznik w po∏o˝eniu
nalewania kawy (rys. 7) a˝ do uzyskania
po˝àdanej iloÊci kawy. Aby przerwaç nalewanie,
nale˝y przestawiç prze∏àcznik w po∏o˝enie ***
(rys. 4).
6. Aby zdjàç pojemnik z filtrem, nale˝y obróciç ràczk´
pojemnika od prawej do lewej strony.
UWAGA: aby uniknàç rozpryskiwania wrzàtku, nigdy
nie nale˝y zdejmowaç pojemnika z filtrem z
urzàdzenia w czasie nalewania kawy.
7. Aby usunàç zu˝ytà kaw´, nale˝y trzymaç filtr
zablokowany przy pomocy odpowiedniej
dêwigienki zamocowanej na ràczce i wysypaç
kaw´, stukajàc w pojemnik z filtrem odwrócony
dnem do góry.
8. Aby wy∏àczyç urzàdzenie, nale˝y przekr´ciç
prze∏àcznik w po∏o˝enie “O” (rys. 13).
UWAGA: Przed pierwszym u˝yciem urzàdzenia
konieczne jest umycie wszystkich akcesoriów i
przep∏ukanie obwodów wewn´trznych, robiàc co
najmniej pi´ç zaparzeƒ bez u˝ywania kawy mielonej.
32
Page 33

JAK PRZYGOTOWAÅ KAW¢ W
POJEMNIKU Z FILTREM DO PASTYLEK (JELI
TAKI JEST W WYPOSA˚ENIU)
1. Rozgrzaç urzàdzenie, jak opisano w rozdziale
“ROZGRZEWANIE URZÑDZENIA DO KAWY”.
2. Wcisnàç przycisk pojemnika z filtrem i umieÊciç
pastylk´ w miar´ dok∏adnie na Êrodku filtra (rys.
14).
UWAGA: Stosowaç pastylki zgodne z normà ESE: jest
to zaznaczone na opakowaniu nast´pujàcym
symbolem:
Norma ESE jest stosowana przez najwi´kszych
producentów pastylek i umo˝liwia przygotowanie
kawy espresso w sposób prosty i czysty.
3. Za∏o˝yç pojemnik z filtrem na urzàdzenie,
obracajàc go zawsze do koƒca (rys. 5).
4. Post´powaç zgodnie z punktem 4, 5 i 6
poprzedniego paragrafu.
5. Aby usunàç pastylk´, nale˝y wcisnàç przycisk
pojemnika z filtrem i wyjàç jà.
6. Aby wy∏àczyç urzàdzenie, nale˝y przekr´ciç
prze∏àcznik w po∏o˝enie „O” (rys. 13).
W przypadku stosowania do kawy espresso
pastylek “serving illycaffã”, nalezy u˝yç
odpowiedni pojemnik z filtrem; w∏o˝yç do niego
pastylk´ kawy, zwracajàc uwag´, aby napis ‘illy’
by∏ od do∏u i d∏u˝szy bok p∏ytki równolegle do
uchwytu (patrz ilustracja).
JAK ZROBIå KAW¢ CAPPUCCINO
1. Przygotowaç kaw´ espresso, stosujàc
wystarczajàco du˝e fili˝anki.
2. Przekr´ciç prze∏àcznik w po∏o˝enie (rys.15) i
poczekaç na zapalenie si´ lampki kontrolnej “OK”
(rys. 6). Zapalenie si´ lampki wskazuje, ˝e
podgrzewacz osiàgnà∏ temperatur´ odpowiednià
do wytwarzania pary.
3. W mi´dzyczasie nape∏niç naczynie iloÊcià ok. 100
gram mleka na ka˝dà kaw´ cappuccino, którà
chcemy przygotowaç. Mleko powinno byç zimne z
lodówki (nie ciep∏e!). Wybierajàc wielkoÊç
naczynia, nale˝y pami´taç, ˝e obj´toÊç mleka
zwi´kszy si´ 2- lub 3-krotnie.
UWAGA: zalecane jest stosowanie mleka
pó∏t∏ustego sch∏odzonego w lodówce.
4. Ustawiç naczynie z mlekiem pod koƒcówkà do
kawy capuccino” (rys. 16).
5. Zanurzyç koƒcówk´ do cappuccino w mleku na
g∏´bokoÊç ok. 2 cm i przekr´ciç prze∏àcznik w
kierunku przeciwnym do wskazówek zegara wg.
rys. 17 (przekr´cajàc prze∏àcznik wi´cej lub mniej,
mo˝na zmieniaç iloÊç pary wychodzàcej z dyszy).
W tym momencie mleko zaczyna zwi´kszaç
obj´toÊç i przybieraç wyglàd Êmietanki.
6. Po osiàgni´ciu ˝àdanej temperatury (wartoÊç
idealna wynosi 60oC) nale˝y przerwaç podawanie
pary, przekr´cajàc wy∏àcznik pary w kierunku
wskazówek zegara i równoczeÊnie ustawiajàc
prze∏àcznik w po∏o˝eniu “O” (rys. 13).
7. Nalaç spienione mleko do fili˝anek zawierajàcych
przygotowanà wczeÊniej kaw´ espresso.
Cappuccino jest gotowe: pos∏odziç do smaku i
wed∏ug ˝yczenia posypaç piank´ sproszkowanà
czekoladà.
WA˚NE: zawsze po u˝yciu nale˝y wyczyÊciç dysz´
do kawy cappuccino. Post´powaç w sposób
nast´pujàcy:
1.Spowodowaç wydzielenie si´ troch´ pary,
przekr´cajàc pokr´t∏o podgrzewacza pary (rys. 17).
2.Jednà r´kà przytrzymaç nieruchomo cz´Êç górnà a
drugà r´kà odkr´ciç koƒcówk´ do kawy cappuccino,
obracajàc jà w kierunku wskazówek zegara i
wyjmujàc jà z dyszy (rys 18).
3.Usunàç dysz´ pary, zdejmujàc jà z rurki wyp∏ywu.
4.Umyç dok∏adnie koƒcówk´ do kawy cappuccino i
dysz´ pary letnià wodà.
5.Sprawdziç, czy dwa otwory wskazane na rysunku
19 nie sà zatkane. JeÊli jest konieczne, nale˝y je
oczyÊciç przy pomocy szpilki.
6.Zamontowaç ponownie dysz´ pary, wprowadzajàc
jà do rury pary tak, aby strza∏ka A i naci´cie B
wskazane na rys. 20 pokry∏y si´.
7.Zamontowaç ponownie koƒcówk´ do kawy
capuccino, wprowadzajàc jà do koƒca w dysz´
pary tak, aby strza∏ka C i naci´cie B wskazane na
rys. 21 pokry∏y si´ i obracajàc jà nast´pnie w
kierunku przeciwnym do wskazówek zegara.
PODGRZEWANIE WODY
1.W∏àczyç urzàdzenie, przekr´cajàc prze∏àcznik w
po∏o˝enie (rys. 4).
2.Ustawiç naczynie pod koƒcówkà do kawy
cappuccino.
3.Kiedy lampka kontrolna OK zapali si´, ustawiç
prze∏àcznik w po∏o˝eniu (rys. 7) i równoczeÊnie
przekr´ciç pokr´t∏o pary w kierunku przeciwnym do
ruchu wskazówek zegara (rys. 17): z koƒcówki do
kawy cappuccino pop∏ynie goràca woda.
4.Aby przerwaç wyp∏yw goràcej wody, nale˝y
przekr´ciç pokr´t∏o pary i ustawiç prze∏àcznik w
po∏o˝eniu "O".
33
Page 34

CZYSZCZENIE I KONSERWACJA
CZYSZCZENIE POJEMNIKA Z FILTREM DLA PASTYLEK
(JELI JEST W WYPOSA˚ENIU)
Od czasu do czasu wyczyÊciç pojemnik z filtrem dla
pastylek w nast´pujàcy sposób:
• Nacisnàç przycisk pojemnika z filtrem i wyjàç filtr,
jak wskazano na rysunku 22.
• Sprawdziç, czy dziurki filtra nie sà zatkane. JeÊli jest
konieczne, oczyÊciç go dok∏adnie goràcà wodà,
przecierajàc gàbkà Êciernà.
•WyczyÊciç wn´trze pojemnika z filtrem i uszczelk´
gumowà.
•W∏o˝yç ponownie filtr.
Nie myç nigdy pojemnika z filtrem w zmywarce do
naczyƒ
CZYSZCZENIE WYLOTU PODGRZEWACZA DO KAWY
ESPRESSO
Co najmniej raz w roku konieczne jest czyszczenie
wylotu podgrzewacza do kawy espresso w
nast´pujàcy sposób:
•Upewniç si´, czy ekspres do kawy ostyg∏ i czy
wtyczka zosta∏a wyj´ta z gniazda;
• Przy pomocy Êrubokr´tu odkr´ciç wkr´t
przytrzymujàcy wylot podgrzewacza do kawy
espresso (rys. 23);
• Wilgotnà Êciereczkà umyç Êcianki podgrzewacza,
gdzie by∏ umieszczony wylot;
• PrzeczyÊciç szczotkà wylot z niewielkà iloÊcià p∏ynu
do naczyƒ, a˝ wszystkie otwory b´dà czyste;
• P∏ukaç wylot pod kranem, ca∏y czas zeskrobujàc
osady;
• Zamontowaç ponownie wylot na podgrzewacz do
kawy espresso.
INNE CZYNNOCI CZYSZCZENIA
1. Do czyszczenia ekspresu do kawy nie u˝ywaç
rozpuszczalników ani Êrodków czyszczàcych.
Wystarczy mi´kka wilgotna szmatka.
2. Okresowo wyjmowaç ociekacz, opró˝niaç go i
myç.
3. Myç zbiornik na wod´ do kawy espresso.
UWAGA: podczas mycia nigdy nie zanurzaç
ekspresu w wodzie: jest to urzàdzenie elektryczne.
ODWAPNIANIE
Zalecane jest odwapnianie urzàdzenia po zrobieniu
oko∏o 200 fili˝anek kawy. Do odwapniania ekspresów
do kawy zaleca si´ stosowanie specjalnych Êrodków
(dost´pnych w sklepach). Je˝eli sà one niedost´pne,
prosimy post´powaç w nast´pujàcy sposób:
1.Do zbiornika wodnego wlaç 1 litr wody:
2.RozpuÊciç w wodzie 2 ∏y˝ki (oko∏o 30 gram) kwasu
cytrynowego (dost´pny w aptece lub drogerii).
3.Przekr´ciç prze∏àcznik w po∏o˝enie i poczekaç
do zapalenia si´ lampki kontrolnej ‘OK’;
4.Upewniç si´, ˝e pojemnik z filtrem nie jest za∏o˝ony
i umieÊciç jakieÊ naczynie pod wylotem urzàdzenia;
5.Przekr´ciç prze∏àcznik w po∏o˝enie i pozwoliç,
aby wyp∏yn´∏a po∏owa wody zawartej w zbiorniku.
Nast´pnie przerwaç wyp∏yw, przekr´cajàc
prze∏àcznik w po∏o˝enie „O”;
6.Pozwoliç, aby roztwór dzia∏a∏ przez oko∏o 15 minut,
nast´pnie kontynuowaç spuszczanie a˝ do
ca∏kowitego opró˝nienia zbiornika.
7.Aby usunàç pozosta∏oÊci roztworu i wapnia,
przep∏ukaç dobrze zbiornik, nape∏niç go czystà
wodà i ponownie umieÊciç w swym po∏o˝eniu.
8.Przekr´ciç prze∏àcznik w po∏o˝enie i spuszczaç
wod´ ze zbiornika a˝ do ca∏kowitego opró˝nienia.
9.Przekr´ciç ponownie prze∏àcznik na pozycj´ i
powtórzyç czynnoÊci 7 i 8 nast´pny raz.
Naprawy uszkodzeƒ urzàdzenia spowodowanych
przez osady wapniowe nie sà obj´te gwarancjà w
przypadku, gdy odwapnianie urzàdzenia opisane
powy˝ej nie by∏o wykonywane regularnie.
34
Page 35

35
PROBLEM MO˚LIWE PRZYCZYNY ROZWIÑZANIE
Kawa espresso sàczy si´ z
kraw´dzi pojemnika z filtrem
zamiast przez otwory.
Kawa ma kwaÊny smak
• Brak wody w zbiorniku.
• Otwory w dziobkach pojemnika z
filtrem sà zatkane.
•Wylot podgrzewacza kawy espresso
jest zatkany.
• Zbiornik jest êle w∏o˝ony i zawór na
jego spodzie nie jest otwarty.
• Nape∏niç zbiornik wodà.
• PrzeczyÊciç otwory w dziobkach.
• Wykonaç czyszczenie zgodnie ze
wskazaniem w rozdziale “Czyszczenie
wylotu podgrzewacza do kawy
espresso”.
• Wcisnàç lekko zbiornik, aby
otworzyç zawór na jego spodzie.
•
Pojemnik z filtrem jest êle w∏o˝ony.
• Uszczelka podgrzewacza do kawy
espresso utraci∏a elastycznoÊç.
• Otwory w dziobkach pojemnika z
filtrem sà zatkane.
•
Za∏o˝yç prawid∏owo pojemnik z
filtrem, dokr´cajàc go do koƒca.
•
Wymieniç uszczelk´ podgrzewacza
do kawy espresso w Centrum Pomocy
Technicznej
•
OczyÊciç otwory w dziobkach.
Kawa espresso jest zimna.
• Lampka kontrolna ‘OK’ espresso nie
pali∏a si´ w momencie, kiedy zosta∏
wciÊni´ty przycisk nalewania kawy.
• Nie wykonano rozgrzania ekspresu.
• Nie zosta∏y ogrzane fili˝anki.
• Odczekaç do zapalenia lampki
kontrolnej OK.
•Rozgrzaç ekspres zgodnie ze
wskazówkami w rozdziale
“Rozgrzewanie urzàdzenia”.
• Ogrzaç fili˝anki.
Nadmierny ha∏as pompy
• Zbiornik na wod´ jest pusty.
•
Zbiornik zosta∏ êle w∏o˝ony i zawór
na jego spodzie nie jest otwarty.
• Nape∏niç zbiornik.
• Wcisnàç lekko zbiornik, aby
otworzyç zawór na jego spodzie.
.
Nie tworzy si´ pianka z mleka
podczas robienia kawy
cappuccino.
•
Mleko nie jest doÊç ch∏odne.
•Przyrzàd do kawy cappuccino jest
brudny.
• Zawsze stosowaç mleko sch∏odzone
z lodówki.
• Dok∏adnie oczyÊciç otworki w
przyrzàdzie do kawy cappuccino,
szczególnie otworki wskazane na
rysunku 21.
Kolor kawy jest zbyt jasny
(kawa wyp∏ywa zbyt
szybko z dziobka).
• Zmielona kawa zosta∏a zbyt s∏abo
dociÊni´ta..
• IloÊç zmielonej kawy jest
niewystarczajàca..
• Kawa nie zosta∏a dobrze zmielona.
• Mocniej docisnàç zmielonà kaw´.
•
Zwi´kszyç iloÊç kawy
• Stosowaç jedynie kaw´ mielonà
specjalnie do ekspresów.
Kolor kawy jest zbyt ciemny
(kawa wyp∏ywa za wolno z
dziobka).
• Kawa zmielona zosta∏a zbyt mocno
dociÊni´ta.
• IloÊç zmielonej kawy jest zbyt du˝a.
• Wylot podgrzewacza kawy jest
zatkany.
• Kawa zosta∏a zbyt drobno zmielona.
•
L˝ej docisnàç kaw´.
•
Zmniejszyç iloÊç zmielonej kawy.
•
OczyÊciç wylot zgodnie ze
wskazówkami w rozdziale “Czyszczenie
wylotu podgrzewacza kawy”.
•
Stosowaç jedynie kaw´ mielonà
specjalnie do ekspresów.
• Urzàdzenie nie zosta∏o dobrze
wyp∏ukane po odwapnieniu.
• Przep∏ukaç urzàdzenie zgodnie z
opisem w rozdziale “Odwapnianie”.
Kawa espresso nie wyp∏ywa z
urzàdzenia
Page 36

36
A készülék beállítása és használata előtt
figyelmesen olvassa el a kezelési utasítást. Csak
így tud biztonságos használat mellett kiváló
eredményeket elérni.
A KÉSZÜLÉK LEÍRÁSA
Az alábbi kifejezéseket fogjuk használni a következő
oldalakon
1 Szűrőtartó daráltkávéhoz
2 Szűrő 1 adaghoz
3 Szűrő 2 adaghoz
4 Szűrőtartó kávétablettához (ha van)
5 Gőztárcsa
6 Préselő
7 Csészetartó
8 Tápvezeték
9 OK fényjelző
10 fényjelző (gép bekapcsolva) kávékészítés
11 Funkcióbeállító
12 fokozat kávé/víz adagolás
13 "O" fokozat kikapcsolva
14 gőz fényjelző (gép bekapcsolva) gőzkészítés
15 Kávéadagoló kanál
16 Vízmelegítő zuhany
17 Habosító
18 Gőzfúvóka
19 Adagolócső
20 Víztartály
21 Víztartály fedele
BIZTONSÁGRA VONATKOZ"
FIGYELMEZTETÉSEK
- Ezt a készüléket "presszókávé készítéséhez" és
"italmelegítéshez" tervezték: vigyázzon, nehogy
a kifolyó víz illetve gőz megégesse, valamint
kerülje a készülék nem előírás szerinti
használatát.
- Soha ne érintse meg a forró részeket.
-A csomagolás levétele után ellenőrizze a
készülék épségét. Kétely esetén ne kapcsolja
be, hanem forduljon szakemberhez.
-A csomagolóanyagok (műanyag tasakok,
polisztirol darabok, stb.) gyermekektől elzárva
tartandók, mert veszélyesek lehetnek.
-A készüléket kizárólag otthoni használatra
tervezték. Minden más felhasználás veszélyes
és tilos.
-A gyártó elhárít minden felelősséget a helytelen
és a nem előírás szerinti használatból származó
esetleges károkért.
- Nedves kézzel vagy lábbal ne érjen a
készülékhez.
- Ne engedje gyerekeknek vagy
csökkentképességű személyeknek a készülék
használatát.
- Hiba vagy helytelen működés esetén kapcsolja
ki és ne próbálja szétszerelni a készüléket.
Az esetleges javítás érdekében forduljon a
gyártó által felhatalmazott szervizhez és kérjen
eredeti alkatrészeket. A fentiek be nem tartása a
készülék biztonságos használatát veszélyezteti.
-A készülék tápvezetékét tilos a felhasználónak
kicserélnie, mert ezt a munkát csak különleges
szerszámokkal lehet elvégezni. A tápvezeték
esetleges sérülése esetén a cserét kizárólag a
gyártó által felhatalmazott szerviz végezheti, így
nem áll fent az áramütés veszélye.
BEÁLLÍTÁS
-A készüléket helyezze vízcsaptól és
mosogatótól távoleső munkafelületre.
-Ellenőrizze, hogy a hálózati feszültség
megegyezik-e a készülék adatlemezén
feltüntetett értékkel. A készüléket min. 10A
erősségű és megfelelő földeléssel rendelkező
foglalathoz csatlakoztassa. A gyártó elhárítja a
felelősséget minden olyan balesetért, mely a
készülék földelés nélküli hálózatra való
csatlakoztatásából ered.
- Amennyiben a foglalat és a villásdugó nem
illenének egymáshoz, akkor egy szakemberrel
cseréltesse ki a foglalatot egy megfelelő
típusúra.
-A készüléket ne állítsa 0˚C, vagy annál
alacsonyabb hőmérsékletű helyiségbe (a
jégképződés kárt okozhat a készülékben):
- Ha a tápvezeték a foglalat eléréséhez túl hosszú
lenne, akkor a felesleges hosszat a kijöveteli
résen keresztül a készülék belsejébe nyomja be.
HOGYAN LEHET PRESSZ"KÁVÉT
KÉSZÍTENI
A VÍZTARTÁLY FELTÖLTÉSE
Vegye le a víztartály fedelét (1. ábra), majd a tartályt
felfelé húzva vegye ki (2. ábra).
A víztartályt töltse fel friss, tiszta vízzel, de ne lépje
túl a MAX. feliratot (3. ábra).
Tegye vissza a tartályt úgy, hogy kicsit lenyomja,
mert ekkor a tartály alján lévő szelep kinyílik.
A tartályt egyszerűbb úgy feltölteni, hogy nem
húzza ki, hanem egy kancsóból vizet önt bele.
MEGJEGYZÉS: a készüléket tilos üres tartállyal
bekapcsolni és ne felejtsen el vizet tölteni bele,
amikor már csak pár centiméternyi víz van az alján.
A KÁVÉEGYSÉG ELŐMELEGÍTÉSE
A megfelelő hőmérsékletű presszókávé
elkészítéséhez feltétlenül szükséges a gép
előmelegítése: forgassa el a funkcióválasztót a
fokozatig (4. ábra) legalább fél órával a kávéfőzés
elkezdése előtt, és ellenőrizze, hogy a szűrőtartó a
gépbe van-e akasztva (győződjön meg arról, hogy a
gőztárca mindig elzárva legyen). A szűrőtartót úgy
akaszthatja be, hogy a tartály vízmelegítő zuhanya
alá teszi a fogóval balra, lásd 5. ábra, majd felfelé
H
Page 37

nyomja és ezzel egyidejűen a fogót jobbra fordítja;
határozott mozdulatta fordítsa el. Fél óra letelte után
kövesse a következő fejezetben leírtakat.
Ha viszont nem tud ennyit várni az előmelegítésre,
akkor az alábbiak szerint járjon el:
1.A funkcióválasztó fokozatra való állításával
kapcsolja be a készüléket (4. ábra) és a még üres
szűrőtartót akassza a gépbe.
2.Tegyen egy csészét a szűrőtartó alá. Azt a
csészét használja, amiből a kávét fogja inni, így
előmelegíti.
3.Várja meg az OK fényjelző kigyulladását (6. ábra)
és azonnal ezután állítsa a funkcióválasztót a
fokozatra (7. ábra), majd addig folyassa ki a vizet,
amíg az OK fényjelző ki nem alszik, ezután állítsa
le a kifolyást a választó visszaállításával (4. ábra).
4.Öntse ki a csészéből a vizet, várjon addig, amíg
az "OK" fényjelző ki nem gyullad megint és
ismételje meg az eljárást.
HOGYAN LEHET PRESSZ"KÁVÉT KÉSZÍTENI A
DARÁLTKÁVÉ SZŰRŐTART"JÁVAL
1. A készülék az előző fejezetben leírt
előmelegítése után 1 csésze presszókávé
készítéséhez az 1 adagos szűrőt (a mellékelt
szűrők közül a kisebb) tegye be a szűrőtartóba
(8. ábra) és tegyen bele egy csapott kanál
daráltkávét, ami kb. 7 grammnak felel meg (9.
ábra).
Amikor két csésze presszókávét kíván készíteni,
akkor használja a kétadagos szűrőt (a
mellékeltek közül a nagyobb), töltsön bele két
csapott adagolókanál kávét (kb. 6 + 6 gramm).
2. Ezután a préselővel könnyedén egyengesse el
és nyomogassa le a kávét (10. ábra).
MEGJEGYZÉS: a presszókávé minősége a
daráltkávé összepréselésének fokától függ. Ha
túlságosan lenyomja, akkor a kávé lassan fog
kifolyni és a krémje sötét lesz. Ha viszont túl
lazán hagyja, akkor a kávé gyorsan fog kifolyni
és a krémje világos lesz
3.Ha túl sok kávét tett a szűrőtartóba, akkor a
felesleget vegye ki, majd akassza a szűrőtartót a
készülékbe és ne felejtse el, hogy mindig teljesen
be kell csavarni (5. ábra).
4.A meleg vizes öblítéssel lehetőleg előmelegített
csészét vagy csészéket helyezze a szűrőtartók
rése alá (11. ábra).
5.Ellenőrizze, hogy az OK fényjelző (6. ábra)
kigyulladt-e (ellenkező esetben várja meg, amíg
kigyullad), majd kezdje el a kávéadagolást
(7.ábra) egész addig, amíg a kért mennyiség ki
nem folyik. A leállításhoz a funkcióválasztót állítsa
vissza fokozatra (4. ábra).
6.A szűrőtartó kiakasztásához a fogót mozgassa el
jobbról balra.
FIGYELEM: elkerülheti a forró víz
kifröccsenését, ha a szűrőtartót csak a
vízkieresztés végeztével akasztja ki.
7.A kávézacc eltávolításához a fogóba épített nyelv
segítségével tartsa a szűrőt rögzítve és a
szűrőtartó megfordításával rázza ki belőle a kávét
(12. ábra).
8.A funkcióválasztó "0"-ra való állításával kapcsolja
ki a készüléket (13. ábra).
FIGYELEM: a készülék legelső használatakor
gondosan meg kell tisztítani a tartozékokat és a
belső csöveket úgy, hogy kávé betétele nélkül
legalább öt kávét főz.
HOGYAN LEHET PRESSZ"KÁVÉT KÉSZÍTENI A
KÁVÉTABLETTA SZŰRŐTART"JÁVAL (HA VAN)
1. A "A KÁVÉEGYSÉG ELŐMELEGÍTÉSE" című
fejezetben leírtak szerint végezze el a készülék
előmelegítését.
2. Nyomja meg a szűrőtartó gombját és a
kávétablettát helyezze a lehető legpontosabban a
szűrő közepére (14. ábra).
MEGJEGYZÉS: az ESE standard szerint készült
kávétablettát használja: ezt a csomagoláson
feltüntetett alábbi márkajel jelzi:
Az ESE standard a legnagyobb kávétabletta gyártók
által elfogadott rendszer és könnyen, piszkolás
nélkül készíthet vele kávét.
3.Akassza a szűrőtartót a gépbe és mindig teljesen
fordítsa el (5. ábra).
4.Az előző fejezet 4., 5. és 6. pontja szerint járjon el.
5.A tabletta kivételéhez nyomja meg a szűrőtartó
gombját.
6.A készülék kikapcsolásához a funkcióválasztót
állítsa a "0" fokozatra. (13. ábra).
Ha a presszókávét "serving illycaffé"-val készíti,
akkor használja a megfelelő szűrőtartót; helyezze
be a kávétablettát úgy, hogy az "illy" felirat lefelé
nézzen, valamint a tabletta hosszú oldala a
fogóval párhuzamosan legyen (lásd ábra).
HOGYAN LEHET KAPUCINERT
KÉSZÍTENI
1.Megfelelő nagyságú csészékben készítsen
presszókávét.
37
Page 38

2. A funkcióválasztót állítsa a fokozatra (15. ábra)
és várja meg,a míg az "OK" fényjelző ki nem
gyullad (6. ábra). A fényjel azt jelenti, hogy a
tartály elérte a gőzkészítéshez szükséges
hőmérsékletet.
3.Ezalatt töltsön minden kapucinerre 100 gr tejet
számítva egy edénybe. A tej hűtőszekrény
hőmérsékletű legyen (nem meleg!). Olyan
nagyságú edényt válasszon, melyből a 2-3szorosára növekedett tej nem fut ki.
MEGJEGYZÉS: tanácsos sovány,
hűtőszekrényből kivett tejet használni.
4. A tejet taartalmazó edényt tegye a habosító alá
(16. ábra).
5. A habosító kb. 2 cm-es részét mártsa a tejbe és
a gőztárcsát forgassa el az óramutató járásával
ellenkező irányba, 17. ábra, (a tárcsa többkevesebb elforgatásával a kieresztett gőz
mennyiségét lehet szabályozni). Ekkor a
tejmennyiség megnő és krémszerűvé válik.
6.A kívánt hőmérséklet elérése után (az ideális érték
60˚C) a tárcsát állítsa vissza az óramutató
járásával megegyező irányba és ugyanakkor a
funkcióválasztót állítsa "0"-ra (13. ábra).
7.A habosított tejet öntse az előzőleg elkészített
kávéra. A kapuciner készen van: kedve szerint
cukrozza, és ha szereti, a tetejére szórjon kakaót.
FONTOS: a habosítót használat után mindig
tisztítsa meg. Az alábbiak szerint járjon el:
1.Pár másodpercig eressze ki a gőzt a gőztárcsa
elfordításával (17. ábra).
2.Az egyik kezével tartsa a felső részt és a másikkal
a habosítót csavarja ki az óramutató járásával
megegyező irányba fordítva, majd húzza ki a
fúvókából (18. ábra).
3.A gőzfúvókát húzza ki az adagolócsőből.
4.A habosítót és a gőz fúvókát meleg vízzel
gondosan tisztítsa meg .
5.Ellenőrizze, hogy a 19. ábrán feltüntetett két rés
nincs-e eldugulva. Szükség esetén egy tűvel
tisztítsa meg őket.
6.A gőzfúvókát szerelje vissza a gőzkieresztő
csőbe, vigyázzon, hogy a 20. ábrán látható "A"
nyíl és a "B" vonal egy szintben legyenek.
7.A habosítót a gőzfúvókába teljesen illessze bele,
a "C" nyíl és a "B" vonal illeszkedjenek
egymáshoz a 21. ábra szerint, majd az óramutató
járásával ellenkezőlen forgassa el.
MELEG VÍZ KÉSZÍTÉSE
1.A készüléket kapcsolja be úgy, hogy a
funkcióválasztót a fokozatra állítja (4. ábra).
2.Tegyen egy edényt a habosító alá;
3.Amikor az OK fényjel kigyullad, a funkcióválasztót
állítsa a fokozatra (7. ábra) és ugyanakkor a
gőztárcsát az óramutató járásával ellenkező
irányba forgassa el (17. ábra): ekkor meleg víz fog
kifolyni a habosítóból;
4.A meleg víz kiáramlását megszakíthatja, ha a
gőztárcsát az óramutató járásával megegyező
irányba elforgatja és a funkcióválasztót a "0"
fokozatra állítja.
TISZTÍTÁS ÉS KARBANTARTÁS
A KÁVÉTABLETTA SZŰRŐTART"JÁNAK
TISZTÍTÁSA (HA VAN)
Időnként a tabletta szűrőtartójának tisztítását el kell
végezni az alábbiak szerint:
- nyomja meg a szűrőtartó gombját és vegye ki a
szűrőt a 22. ábra útmutatása szerint.
- ellenőrizze, hogy a szűrő rései szabadok-e.
Szükség esetén meleg vízzel és dörzsszivacs
segítségével gondosan tisztítsa meg.
- Tisztítsa meg a szűrőtartót és a gumitömítést is;
-Tegye vissza a szűrőt;
A szűrőtartót nem szabad mosogatógéppel
tisztítani.
A PRESSZ"KÁVÉ VÍZMELEGÍTŐ ZUHANYÁNAK
TISZTÍTÁSA
Legalább egyszer egy évben al kell végezni a
vízmelegítő zuhany tisztítását az alábbiak szerint:
- Ellenőrizze, hogy a kávéfőzőgép lehült és a dugó
ki van húzva;
- Egy csavarhúzó segítségével távolítsa el a
presszókávé vízmelegítő zuhanyának csavarját
(23. ábra);
- Egy megnedvesített kendővel tisztítsa meg a
melegítőnek azt a részét, ahol a zuhany van;
-A zuhanyt addig kefélje mosogatószerrel, amíg ki
nem tisztította a lyukakat.
- Állandó dörzsölés mellett a zuhanyt öblítse folyó
víz alatt.
- Szerelje vissza a presszókávé vízmelegítőjének
zuhanyát ;
EGYÉB TISZTÍTÁSI MŰVELETEK
1.A készülék tisztításához ne használjon oldó,
illetve dörzshatású szereket. Ehhez egy
megnedvesített, puha kendő nagyon megfelel.
2.Húzza ki a cseppfelfogó tálat, rendszeresen ürítse
ki és mossa el.
3.Mossa el a presszókávé víztartályát is.
FIGYELEM: Soha ne mártsa a gépet vízbe a
tisztítás alatt: ez elektromos készülék.
VÍZKŐOLDÁS
Tanácsos a vízkőoldást minden 200. csésze kávé
után elvégezni. A kereskedelemben beszerezhető,
presszókávégépekhez ajánlott vízkőoldó szereket
használja. Ha nem sikerül ilyen terméket
beszereznie, az alábbiak szerint járjon el:
1. 1 liter vízzel töltse fel a víztartályt;
2. Oldjon fel benne 2 kanál (kb. 30 gramm)
citromsavat (gyógyszertárban vagy szakboltban
beszerezhető);
38
Page 39

39
3. A funkcióválasztót állítsa a fokozatra és várja
meg az OK fényjelzés kigyulladását.
4. Ellenőrizze, hogy a szűrőtartó ne legyen
beakasztva és tegyen egy edényt a vízmelegítő
zuhany alá;
5. A funkcióválasztót állítsa a fokozatra és ürítse ki
félig a tartályt.
Állítsa a funkcióválasztót a " " fokozatra, így
leáll a víz.
6. Hagyja hatni az oldatot kb. 15 percig, majd
ismét folyassa a vizet egész addig, amíg a
tartály teljesen ki nem ürül.
7. Az oldat és a vízkő tökéletes eltávolítása
érdekében öblítse el alaposan a tartályt, töltse
fel tiszta vízzel és tegye a helyére.
8. Állítsa a funkcióválasztót a " " fokozatra és
várja meg, hogy a tartály kiürüljön;
9. Ismét állítsa a funkcióválasztót a " " fokozatra
és 7 - 8-szor ismételje meg a műveletet.
A vízkő okozta károkért a garancia nem felel, ha a
fenti vízkőoldást nem végezte el rendszeresen.
Page 40

40
PROBLÉMA
LEHETSÉGES OKOK MEGOLDÁS
Nem folyik ki a kávé
-
Nincs víz a tartályban
-
A szűrőtartó nyílásainak lyukai
elzáródtak
-
A vízmelegítő zuhanya elzáródott
-
A tartály nem lett jól betéve és az
alján lévő szelep nem nyílt ki.
-
Töltsön vizet a tartályba
-A nyílások lyukait tisztítsa ki
- "A presszókávé vízmelegítő
zuhanyának tisztítása" fejezetben
leírt módon végezze el a tisztítást.
- Kicsit nyomja le a tartályt, hogy
ezáltal az aljlapon lévő szelep
kinyíljon.
A presszókávé a szűrőtartó
oldalán csöpög és nem a
lyukakból
-A szűrőtartó rosszul lett betéve;
-A vízmelegítő tömítése elvesztette
rugalmasságát
-* A szűrőtartó réseinek lyukai
eltömődtek.
- Akassza be helyesen a szűrőtartót
és teljesen csavarja be
- Egy szervizben kérje a vízmelegítő
tömítésének cseréjét
- Tisztítsa meg a rések lyukait.
A presszókávé hideg
-
Az OK espresso fényjelzője nem
égett, amikor megnyomta a
kávéadagolás kapcsolóját;
-
Nem végezte el a gép
előmelegítését
-
A csészéket nem melegítette elő;
- Várja meg az OK fényjelző
kigyulladását;
- "A kávéegység előmelegítése"
című fejezetben leírtak szerint
végezze el az előmelegítést;
- Melegítse elő a csészéket
A szivattyú nagyon zajos
-
A víztartály üres
-A tartály rosszul lett betéve és az
alján lévő szelep nem nyílt ki.
-
Töltse fel a tartályt
- Kicsit nyomja le a tartályt, hogy az
aljlapon lévő szelep kinyíljon.
A kávé krémje világos
(gyorsan folyik ki a résből)
-
A daráltkávé nincs eléggé
lepréselve
-
Kevés daráltkávét tett be
-
A kávé túl durvára lett darálva
- Nyomja le jobban a daráltkávét
-Tegyen be több kávét
- Csak presszókávégéphez ajánlott
daráltkávét használjon
A kávé krémje sötét ( a kávé
lassan csöpög ki a résből)
-A daráltkávét túlságosan lepréselte
- Túl sok kávét tett be
-A vízmelegítő zuhanya elzáródott
- Túl finomra darált kávét használt
-
A kávét ne nyomja le annyira
-
Tegyen be kevesebb daráltkávét
-
Végezze el a tisztítási műveleteket a
"A presszókávé vízmelegítő
zuhanyának tisztítása" című
fejezetben leírtak szerint
-
Csak presszókávégéphez ajánlott
daráltkávét használjon
A kávé savanyú
-
A tej nem elég hideg.
- Öblítse el a "Vízkőoldás" című
fejezetben leírtak szerint.
A kapuciner készítése alatt
nem képződik tejhab
-A tej nem elég hideg.
-A habosító piszkos
- Kizárólag hűtött tejet használjon.
- Gondosan tisztítsa meg a habosító
réseit, különös tekintettel a 21.
ábrán láthatóakra.
Page 41

ÇÇÌÌËËÏχ‡ÚÚÂÂÎθ¸ÌÌÓÓ ÔÔÓÓ˜˜ËËÚÚ‡‡ÈÈÚÚ ˝˝ÚÚÛÛ ËËÌÌÒÒÚÚÛÛÍ͈ˆË˲˛ ÔÔ‰‰
ÛÛÒÒÚÚ‡‡ÌÌÓÓ‚‚ÍÍÓÓÈÈ ËË ËËÒÒÔÔÓÓÎθ¸ÁÁÓÓ‚‚‡‡ÌÌËËÂÂÏÏ ÍÍÓÓÙÙ‚‚‡‡ÍÍËË..
í퇇ÍÍËËÏÏ ÓÓ··‡‡ÁÁÓÓÏÏ,, ‚‚˚˚ ÒÒÏÏÓÓÊÊÂÂÚÚ ‰‰ÓÓÒÒÚÚËË„„ÌÌÛÛÚÚ¸¸
Ì̇‡ËËÎÎÛÛ˜˜¯¯ËËıı ÂÂÁÁÛÛÎθ¸ÚÚ‡‡ÚÚÓÓ‚‚ ËË Ì̇‡ËË··ÓÓÎθ¸¯¯ÂÂÈÈ
··ÂÂÁÁÓÓÔÔ‡‡ÒÒÌÌÓÓÒÒÚÚËË ‚‚ ˝˝ÍÍÒÒÔÔÎÎÛÛ‡‡ÚÚ‡‡ˆˆËËËË..
ééèèààëëÄÄççààÖÖ èèêêààÅÅééêêÄÄ
щЪЛ ЪВПЛМ˚ ·Ы‰ЫЪ ФУТЪУflММУ ФЛПВМflЪ¸Тfl М‡
ТОВ‰Ы˛˘Лı ТЪ‡МЛˆ‡ı
1 СВК‡ЪВО¸ ЩЛО¸Ъ‡ ‰Оfl ПУОУЪУ„У НУЩВ
2 оЛО¸Ъ М‡ 1 ˜‡¯НЫ
3 оЛО¸Ъ М‡ 2 ˜‡¯НЛ
4 СВК‡ЪВО¸ ЩЛО¸Ъ‡ ‰Оfl Ъ‡·ОВЪУН (ВТОЛ
ФВ‰ЫТП‡ЪЛ‚‡ВЪТfl)
5 кЫ˜Н‡ ФУ‰‡˜Л Ф‡‡
6 иВТЪ
7 иУ‰ТЪ‡‚Н‡ ‰Оfl ˜‡¯ВН
8 лВЪВ‚УИ ¯МЫ
9 г‡ПФУ˜Н‡ OK
10 г‡ПФУ˜Н‡ (‡·УЪ‡ П‡¯ЛМ˚) ‰Оfl
ФЛ„УЪУ‚ОВМЛfl НУЩВ
11 иВВНО˛˜‡ЪВО¸
12 иУОУКВМЛВ ФУ‰‡˜‡ НУЩВ/‚У‰˚
13 “O” ФУОУКВМЛВ ‚˚НО˛˜ВМУ
14 г‡ПФУ˜Н‡ Ф‡ (‡·УЪ‡ П‡¯ЛМ˚) ‰Оfl
ФЛ„УЪУ‚ОВМЛfl Ф‡‡
15 еВН‡ ‰Оfl НУЩВ
16 лВЪН‡ ·УИОВ‡
17 мТЪУИТЪ‚У ‰Оfl ‚Б·Л‚‡МЛfl ПУОУН‡
18 з‡Т‡‰Н‡ ФУ‰‡˜Л Ф‡‡
19 нЫ·У˜Н‡ ФУ‰‡˜Л
20 Е‡Н ‚У‰˚
21 д˚¯Н‡ ·‡Н‡ ‚У‰˚
êêÖÖääééååÖÖççÑÑÄÄññàààà èèéé
ÅÅÖÖááééèèÄÄëëççééëëííàà
- С‡ММ‡fl НУЩВ‚‡Н‡ ФВ‰М‡БМ‡˜ВМ‡ ‰Оfl
ФЛ„УЪУ‚ОВМЛfl НУЩВ Л ФУ‰У„В‚‡ М‡ФЛЪНУ‚:
·Ы‰¸ЪВ ‚МЛП‡ЪВО¸М˚ Л МВ У·УК„ЛЪВТ¸
ТЪЫflПЛ ‚У‰˚ ЛОЛ Ф‡‡ ЛОЛ КВ ФЛ
МВФ‡‚ЛО¸МУП ЛТФУО¸БУ‚‡МЛЛ ФЛ·У‡.
- ç ÔË͇҇ÈÚÂÒ¸ Í „Ófl˜ËÏ ˜‡ÒÚflÏ ÔË·Ó‡.
- иУТОВ ЪУ„У, Н‡Н ‚˚ ‡ТФ‡НУ‚‡ОЛ ФЛ·У,
ФУ‚В¸ЪВ, МВЪ ОЛ М‡ МВП ФУ‚ВК‰ВМЛИ. З
ТОЫ˜‡В ‚УБМЛНМУ‚ВМЛfl ТУПМВМЛИ ‚
ˆВОУТЪМУТЪЛ ФЛ·У‡, МВ ЛТФУО¸БЫИЪВ В„У, ‡
Т‚flКЛЪВТ¸ Т Н‚‡ОЛЩЛˆЛУ‚‡ММ˚П
ТФВˆЛ‡ОЛТЪУП.
- мФ‡НУ‚У˜М˚В П‡ЪВЛ‡О˚ (Ъ‡НЛВ, Н‡Н
ФУОЛ˝ЪЛОВМУ‚˚В Ф‡НВЪ˚, ФВМУФО‡ТЪ Л Ъ.‰.)
ФВ‰ТЪ‡‚Оfl˛Ъ ФУЪВМˆЛ‡О¸МЫ˛ УФ‡ТМУТЪ¸
‰Оfl ‰ВЪВИ. зВ ‰‡‚‡ИЪВ Лı ‰ВЪflП.
- щЪУЪ ФЛ·У ‡Б‡·УЪ‡М ЪУО¸НУ ‰Оfl
‰УП‡¯МВ„У ЛТФУО¸БУ‚‡МЛfl. аТФУО¸БУ‚‡МЛВ
ФЛ·У‡ ‚ ‰Ы„Лı ˆВОflı Т˜ЛЪ‡ВЪТfl
МВФ‡‚ЛО¸М˚П Л, ТОВ‰У‚‡ЪВО¸МУ, УФ‡ТМ˚П.
- иУЛБ‚У‰ЛЪВО¸ МВ ПУКВЪ Т˜ЛЪ‡Ъ¸Тfl
УЪ‚ВЪТЪ‚ВММ˚П Б‡ Ы˘В·, М‡МВТВММ˚И ‚
ВБЫО¸Ъ‡ЪВ МВФ‡‚ЛО¸МУ„У, У¯Л·У˜МУ„У Л
МВ‡БЫПМУ„У ЛТФУО¸БУ‚‡МЛfl.
- ç ‰ÓÚ‡„Ë‚‡ÈÚÂÒ¸ ‰Ó ÔË·Ó‡ ‚·ÊÌ˚ÏË
ËÎË ÏÓÍ˚ÏË Û͇ÏË ËÎË ÌÓ„‡ÏË.
- зВ ФУБ‚УОflИЪВ ‰ВЪflП Л МВ‰ВВТФУТУ·М˚П
О˛‰flП ФУО¸БУ‚‡Ъ¸Тfl ФЛ·УУП ·ВБ
ФЛТПУЪ‡.
- иЛ ФУОУПНВ ЛОЛ МВФУО‡‰Н‡ı ‚ ‡·УЪВ
ФЛ·У‡ ‚˚НО˛˜ЛЪВ В„У Л МВ УЪН˚‚‡ИЪВ.
- СОfl ФУ‚В‰ВМЛfl ВПУМЪ‡ У·‡˘‡ИЪВТ¸
ЪУО¸НУ ‚ ‡‚ЪУЛБУ‚‡ММ˚И ФУЛБ‚У‰ЛЪВОВП
ТВ‚ЛТМ˚И ˆВМЪ, Л ЪВ·ЫИЪВ ЛТФУО¸БУ‚‡МЛfl
Б‡Ф˜‡ТЪВИ ФУЛБ‚У‰ЛЪВОfl. иЛ
МВТУ·О˛‰ВМЛЛ ‚˚¯ВЫН‡Б‡ММ˚ı ЪВ·У‚‡МЛИ
ПУКВЪ ·˚Ъ¸ М‡Ы¯ВМ‡ ·ВБУФ‡ТМУТЪ¸
ФЛ·У‡.
- лВЪВ‚УИ ¯МЫ ‰‡ММУ„У ФЛ·У‡ МВ ‰УОКВМ
Б‡ПВМflЪ¸Тfl ФУО¸БУ‚‡ЪВОВП, Ъ‡Н Н‡Н ‰Оfl
Б‡ПВМ˚ ЪВ·Ы˛ЪТfl ТФВˆЛ‡О¸М˚В
ЛМТЪЫПВМЪ˚. ЗУ ЛБ·ВК‡МЛВ О˛·УИ
УФ‡ТМУТЪЛ, ФЛ ФУ‚ВК‰ВМЛЛ ˝ЪУ„У ¯МЫ‡
ЛОЛ ‰Оfl В„У Б‡ПВМ˚ У·‡˘‡ИЪВТ¸
ЛТНО˛˜ЛЪВО¸МУ ‚ ‡‚ЪУЛБУ‚‡ММ˚И
ФУЛБ‚У‰ЛЪВОВП ТВ‚ЛТМ˚И ˆВМЪ.
ììëëííÄÄççééÇÇääÄÄ
- ìÒÚ‡ÌÓ‚ËÚ ÔË·Ó Ì‡ Ó‚ÌÛ˛ ÔÓ‚ÂıÌÓÒÚ¸
ÔÓ‰‡Î¸¯Â ÓÚ ‡ÍÓ‚ËÌ Ë Í‡ÌÓ‚.
- м·В‰ЛЪВТ¸, ˜ЪУ М‡ФflКВМЛВ ТВЪЛ
ТУУЪ‚ВЪТЪ‚ЫВЪ М‡ФflКВМЛ˛, ЫН‡Б‡ММУПЫ М‡
П‡НЛУ‚У˜МУИ ˝ЪЛНВЪНВ ФЛ·У‡.
дУЩВ‚‡НЫ ТОВ‰ЫВЪ ФУ‰НО˛˜ЛЪ¸ ЪУО¸НУ Н
ЛТФ‡‚МУ Б‡БВПОВММУИ УБВЪНВ,
У·ВТФВ˜Л‚‡˛˘ВИ ФУıУК‰ВМЛВ ЪУН‡ МВ
ПВМВВ 10 Д. иУЛБ‚У‰ЛЪВО¸ ТМЛП‡ВЪ Т ТВ·fl
‚ТflНЫ˛ УЪ‚ВЪТЪ‚ВММУТЪ¸ Б‡ ‚УБПУКМ˚В
ФУ‚ВК‰ВМЛfl, ‚ТОВ‰ТЪ‚ЛВ МВФ‡‚ЛО¸МУ„У
Б‡БВПОВМЛfl ФЛ·У‡.
-Ç ТОЫ˜‡В, ВТОЛ ‚ЛОН‡ ФЛ·У‡ МВ ФУ‰ıУ‰ЛЪ Н
УБВЪНВ, УБВЪН‡ ‰УОКМ‡ ·˚Ъ¸ Б‡ПВМВМ‡
Н‚‡ОЛЩЛˆЛУ‚‡ММ˚П ˝ОВНЪЛНУП.
- зВ ЫТЪ‡М‡‚ОЛ‚‡ИЪВ ФЛ·У ‚ ФУПВ˘ВМЛЛ, „‰В
ЪВПФВ‡ЪЫ‡ ПУКВЪ УФЫТЪЛЪ¸Тfl ‰У 0°C Л
МЛКВ (ВТОЛ ‚У‰‡ Б‡ПВБМВЪ, НУЩВ‚‡Н‡
ПУКВЪ ЛТФУЪЛЪ¸Тfl).
- ЦТОЛ ‰ОЛМ‡ ТВЪВ‚У„У ¯МЫ‡ ФВ‚˚¯‡ВЪ
‡ТТЪУflМЛВ ‰У ˝ОВНЪЛ˜ВТНУИ УБВЪНЛ, ЪУ
ЛБОЛ¯НЛ ¯МЫ‡ ПУКМУ Ы·‡Ъ¸ ‚МЫЪ¸
НУЩВ‚‡НЛ, ‰Оfl ˝ЪУ„У ФУЪУОНМЛЪВ ¯МЫ ‚
УЪ‚ВТЪЛВ, ЛБ НУЪУУ„У УМ ‚˚ıУ‰ЛЪ.
ääÄÄää èèêêààÉÉééííééÇÇààííúú ääééîîÖÖ
ççÄÄèèééããççÖÖççààÖÖ ÅÅÄÄääÄÄ ÑÑããüü ÇÇééÑÑõõ
лМЛПЛЪВ Н˚¯НЫ ·‡Н‡ ‰Оfl ‚У‰˚ (ЛТ. 1), ФУТОВ
˜В„У ЛБ‚ОВНЛЪВ В„У, ФУ‰МЛП‡fl ‚‚Вı (ЛТ. 2).
41
RU
Page 42

з‡ОВИЪВ Т‚ВКЫ˛ Л ˜ЛТЪЫ˛ ‚У‰Ы ‚ ·‡Н, ФЛ ˝ЪУП
У·‡ЪЛЪВ ‚МЛП‡МЛВ М‡ ЪУ, ˜ЪУ·˚ МВ ФВ‚˚ТЛЪ¸
УЪПВЪНЫ MAX (ЛТ. 3).
иУТЪ‡‚¸ЪВ ·‡Н М‡ ПВТЪУ, ТОВ„Н‡ М‡КЛП‡fl М‡ МВ„У
Ъ‡Н, ˜ЪУ·˚ УЪН˚ОТfl НО‡Ф‡М, ‡ТФУОУКВММ˚И М‡
‰МВ ·‡Н‡.
Ц˘В ФУ˘В, ·‡Н ПУКМУ Б‡ФУОМЛЪ¸, МВ ‚˚МЛП‡fl
В„У, ‡ МВФУТВ‰ТЪ‚ВММУ Б‡ОЛ‚‡fl ‚У‰Ы ‚ МВ„У ЛБ
„‡ЩЛМ‡.
икаеЦуДзаЦ: МЛНУ„‰‡ МВ ‚НО˛˜‡ИЪВ
НУЩВ‚‡НЫ, ВТОЛ ‚ ·‡НВ МВЪ ‚У‰˚, Л МВ
Б‡·˚‚‡ИЪВ М‡ФУОМЛЪ¸ В„У, НУ„‰‡ ЫУ‚ВМ¸ ‚У‰˚
УФЫТЪЛОТfl ‰У ‰‚Ыı Т‡МЪЛПВЪУ‚ ‰У ‰М‡.
èèêêÖÖÑÑÇÇÄÄêêààííÖÖããúúççõõââ ççÄÄÉÉêêÖÖÇÇ ììááããÄÄ ÑÑããüü ääééîîÖÖ
СОfl ФУОЫ˜ВМЛfl НУЩВ ФЛ МЫКМУИ ЪВПФВ‡ЪЫВ
ТОВ‰ЫВЪ У·flБ‡ЪВО¸МУ ФВ‰‚‡ЛЪВО¸МУ М‡„ВЪ¸
НУЩВ‚‡НЫ: ФВ‚‰ЛЪВ ФВВНО˛˜‡ЪВО¸ ‚
ФУОУКВМЛВ (ЛТ. 4) МВ ПВМВВ ˜ВП Б‡ ФУО˜‡Т‡
‰У ФЛ„УЪУ‚ОВМЛfl НУЩВ, МВ Б‡·˚‚‡fl УТЪ‡‚ЛЪ¸
‰ВК‡ЪВО¸ ЩЛО¸Ъ‡, ЫТЪ‡МУ‚ОВММ˚И М‡
НУЩВ‚‡НВ (ФЛ ˝ЪУП Ы·В‰ЛЪВТ¸, ˜ЪУ Ы˜Н‡
ФУ‰‡˜Л Ф‡‡ Б‡Н˚Ъ‡). СОfl ФУ‰ТУВ‰ЛМВМЛfl
‰ВК‡ЪВОfl ЩЛО¸Ъ‡ ЫТЪ‡МУ‚ЛЪВ В„У ФУ‰ ТВЪНУИ
·УИОВ‡ ЫНУflЪНУИ ТОВ‚‡, ТПУЪЛ ЛТ. 5,
ЪУОНМЛЪВ ‰ВК‡ЪВО¸ ‚‚Вı Л У‰МУ‚ВПВММУ
ФУ‚ВМЛЪВ В„У М‡Ф‡‚У. нУОН‡ИЪВ ‰У ЫФУ‡. иУ
ЛТЪВ˜ВМЛЛ ФУОЫ˜‡Т‡, ФЛ„УЪУ‚¸ЪВ НУЩВ ФУ
ЛМТЪЫНˆЛflП, ФЛ‚В‰ВММ˚П ‚ ТОВ‰Ы˛˘ВП
‡Б‰ВОВ.
дУПВ ЪУ„У, ˜ЪУ·˚ ·УОВВ ·˚ТЪУ ‚˚ФУОМЛЪ¸
ФВ‰‚‡ЛЪВО¸М˚И М‡„В‚, ПУКМУ ‚˚ФУОМЛЪ¸
ТОВ‰Ы˛˘ВВ:
1.ЗНО˛˜ЛЪВ НУЩВ‚‡НЫ, ФУ‚ВМЫ‚
ФВВНО˛˜‡ЪВО¸ ‚ ФУОУКВМЛВ (ЛТ. 4) Л
ФУ‰ТУВ‰ЛМЛЪВ ‰ВК‡ЪВО¸ ЩЛО¸Ъ‡ Н
НУЩВ‚‡НВ, МУ МВ М‡Т˚Ф‡ИЪВ ‚ МВ„У ПУОУЪУ„У
НУЩВ.
2.иУТЪ‡‚¸ЪВ ˜‡¯НЫ ФУ‰ ‰ВК‡ЪВО¸ ЩЛО¸Ъ‡.
аТФУО¸БЫИЪВ ЪЫ КВ ˜‡¯НЫ, ‚ НУЪУУИ ·Ы‰ВЪВ
„УЪУ‚ЛЪ¸ НУЩВ, ˜ЪУ·˚ ‡БУ„ВЪ¸ ВВ.
3.СУК‰ЛЪВТ¸ ‚НО˛˜ВМЛfl О‡ПФУ˜НЛ OK (ЛТ. 6),
Т‡БЫ ФУТОВ ˝ЪУ„У ФУ‚ВМЛЪВ ФВВНО˛˜‡ЪВО¸ ‚
ФУОУКВМЛВ (ЛТ. 7), ФУБ‚УО¸ЪВ ‚У‰В
‚˚ЪВН‡Ъ¸ ‰У ‚˚НО˛˜ВМЛfl О‡ПФУ˜НЛ OK ,
ФУТОВ ˜В„У УТЪ‡МУ‚ЛЪВ ФУ‰‡˜Ы, ФУ‚У‡˜Л‚‡fl
ФВВНО˛˜‡ЪВО¸ ‚ ФУОУКВМЛВ (ЛТ. 4).
4 З˚ОВИЪВ ТУ‰ВКЛПУВ ˜‡¯НЛ, ‰УК‰ЛЪВТ¸
МУ‚У„У ‚НО˛˜ВМЛfl О‡ПФУ˜НЛ "йд", ФУТОВ ˜В„У
ФУ‚ЪУЛЪВ ТМУ‚‡ ˝ЪЫ КВ УФВ‡ˆЛ˛.
ääÄÄää èèêêààÉÉééííééÇÇààííúú ääééîîÖÖ ëë ÑÑÖÖêêÜÜÄÄííÖÖããÖÖåå
îîààããúúííêêÄÄ ÑÑããüü ååééããééííééÉÉéé ääééîîÖÖ
1. З˚ФУОМЛ‚ ФВ‰‚‡ЛЪВО¸М˚И М‡„В‚
ÍÓÙ‚‡ÍË ‚ ÒÓÓÚ‚ÂÚÒÚ‚ËË Ò ÓÔËÒ‡ÌËÂÏ
Ô‰˚‰Û˘Â„Ó ‡Á‰Â·, ‰Îfl ÔË„ÓÚÓ‚ÎÂÌËfl
ÚÓθÍÓ Ó‰ÌÓÈ ˜‡¯ÍË ÍÓÙ ‚ÒÚ‡‚¸Ú ÙËθÚ
̇ 1 ˜‡¯ÍÛ (̇ËÏÂ̸¯ËÈ ËÁ Ëϲ˘ËıÒfl 2
ÙËθÚÓ‚) ‚ ‰ÂʇÚÂθ ÙËθڇ (ËÒ. 8), Ë
М‡Т˚Ф¸ЪВ ‚ МВ„У 1 М‡ФУОМВММЫ˛ ‰У Н‡В‚
ПВНЫ ПУОУЪУ„У НУЩВ, УНУОУ 7 „‡ППУ‚ (ЛТ.
9).
ЦТОЛ КВ ‚˚ ıУЪЛЪВ ФЛ„УЪУ‚ЛЪ¸ ‰‚В ˜‡¯НЛ
НУЩВ, ЛТФУО¸БЫИЪВ ЩЛО¸Ъ М‡ ‰‚В ˜‡¯НЛ
(М‡Л·УО¸¯ЛИ ЛБ ЛПВ˛˘ЛıТfl 2 ЩЛО¸ЪУ‚), Л
М‡Т˚Ф¸ЪВ ‚ МВ„У ‰‚В МВФУОМ˚В ПВНЛ
ПУОУЪУ„У НУЩВ (УНУОУ 6+6 „‡ППУ‚).
2. ꇂМУПВМУ ‡ТФВ‰ВОЛЪВ НУЩВИМ˚И
ФУУ¯УН Л ТОВ„Н‡ ЫЪ‡П·ЫИЪВ В„У ФВТЪУП
(ЛТ. 10).
икаеЦуДзаЦ: ‰Оfl ФУОЫ˜ВМЛfl ‚НЫТМУ„У
НУЩВ, Ъ‡П·У‚Н‡ ПУОУЪУ‚У„У НУЩВ Л„‡ВЪ
‚‡КМЫ˛ УО¸. ЦТОЛ ФУУ¯УН Ъ‡П·ЫВЪТfl
ТОЛ¯НУП ФОУЪМУ, НУЩВ ‚˚ıУ‰ЛЪ ПВ‰ОВММУ Л
ФУОЫ˜ЛЪТfl ФВМ‡ ЪВПМУ„У ˆ‚ВЪ‡. ЦТОЛ,
М‡У·УУЪ, ФУУ¯УН ТО‡·У Ъ‡П·ЫВЪТfl, НУЩВ
‚˚ıУ‰ЛЪ ТОЛ¯НУП ·˚ТЪУ Л ФУОЫ˜ЛЪТfl П‡ОУ
ФВМ˚ Т‚ВЪОУ„У ˆ‚ВЪ‡.
3.쉇ÎËÚ Î˯ÌËÈ ÍÓÙÂ Ò Í‡Â‚ ‰ÂʇÚÂÎfl
ЩЛО¸Ъ‡, ФЛ М‡ОЛ˜ЛЛ, Л ФУ‰ТУВ‰ЛМЛЪВ В„У Н
НУЩВ‚‡НВ,
ÔÔÓÓ‚‚ÓÓ‡‡˜˜ËË‚‚‡‡flfl „„ÓÓ ‰‰ÓÓ ÛÛÔÔÓÓ‡‡ ((ËËÒÒ.. 55))..
4.мТЪ‡МУ‚ЛЪВ ФУ‰ МУТЛНЛ ‰ВК‡ЪВОfl ЩЛО¸Ъ‡
˜‡¯НЫ ЛОЛ ˜‡¯НЛ, ВНУПВМ‰ЫВЪТfl М‡„В‚‡Ъ¸
Лı, УФУО‡ТНЛ‚‡fl Лı „Уfl˜ВИ ‚У‰УИ (ЛТ. 11).
5.ì·Â‰ËÚÂÒ¸, ˜ÚÓ Î‡ÏÔӘ͇ éä espresso (ËÒ. 6)
„УЛЪ (ВТОЛ УМ‡ ‚˚НО˛˜ВМ‡, ‰УК‰ЛЪВТ¸ ВВ
‚НО˛˜ВМЛfl), ФУТОВ ˜В„У ‚˚·ВЛЪВ ФУ‰‡˜Ы
НУЩВ (ЛТ. 7) ‰У ФУОЫ˜ВМЛfl МВУ·ıУ‰ЛПУ„У
НУОЛ˜ВТЪ‚‡ НУЩВ. СОfl УТЪ‡МУ‚НЛ ФУ‰‡˜Л,
ТМУ‚‡ ЫТЪ‡МУ‚ЛЪВ ФВВНО˛˜‡ЪВО¸ ‚
ФУОУКВМЛВ (ЛТ. 4).
6.СОfl УЪТУВ‰ЛМВМЛfl ‰ВК‡ЪВОfl ЩЛО¸Ъ‡,
ÔÓ‚ÂÌËÚ ÛÍÓflÚÍÛ ÒÔ‡‚‡ ̇΂Ó.
ÇÇççààååÄÄççààÖÖ:: ‚‚ÓÓ ËËÁÁ··ÂÂÊʇ‡ÌÌËË ‡‡ÁÁ··˚˚ÁÁ„„ËË‚‚‡‡ÌÌËËflfl ÌÌËË
‚‚ ÍÍÓÓÂÂÏÏ ÒÒÎÎÛÛ˜˜‡‡Â ÌÌ ÓÓÚÚÒÒÓÓ‰‰ËËÌÌflflÈÈÚÚ ‰‰ÂÂÊʇ‡ÚÚÂÂÎθ¸
ÙÙËËÎθ¸ÚÚ‡‡,, ÍÍÓÓ„„‰‰‡‡ ÍÍÓÓÙÙ‚‚‡‡Í͇‡ ÔÔÓÓ‰‰‡‡ÂÂÚÚ ÍÍÓÓÙÙÂÂ..
7.СОfl ЛБ‚ОВ˜ВМЛfl ЛТФУО¸БУ‚‡ММУ„У НУЩВИМУ„У
ФУУ¯Н‡ Ы‰ВКЛ‚‡ИЪВ ЩЛО¸Ъ М‡ ПВТЪВ
ТФВˆЛ‡О¸М˚П ˚˜‡КНУП, ‚ТЪУВММ˚П ‚ Ы˜НЫ
Л ЛБ‚ОВНЛЪВ НУЩВ, ФУТЪЫНЛ‚‡fl ФВВ‚ВМЫЪ˚П
‰ВК‡ЪВОВП ЩЛО¸Ъ‡ (ЛТ. 12).
8.ÑÎfl ‚˚Íβ˜ÂÌËfl ÍÓÙ‚‡ÍË, Ô‚‰ËÚÂ
ФВВНО˛˜‡ЪВО¸ ‚ ФУОУКВМЛВ "й" (ЛТ. 13).
ÇÇççààååÄÄççààÖÖ:: ÍÍÓÓ„„‰‰‡‡ ‚‚˚˚ ËËÒÒÔÔÓÓÎθ¸ÁÁÛÛÂÂÚÚ ÍÍÓÓÙÙ‚‚‡‡ÍÍÛÛ ‚‚
ÔÔ‚‚˚˚ÈÈ ‡‡ÁÁ,, ÌÌÂÂÓÓ··ııÓÓ‰‰ËËÏÏÓÓ ÔÔÓÓÏÏ˚˚ÚÚ¸¸ ‚‚ÒÒÂÂ
ÔÔËËÌ̇‡‰‰ÎÎÂÂÊÊÌÌÓÓÒÒÚÚËË ËË ‚‚ÌÌÛÛÚÚÂÂÌÌÌÌËË ÍÍÓÓÌÌÚÚÛÛ˚˚,,
ÔÔËË„„ÓÓÚÚÓÓ‚‚ËË‚‚ ÌÌ ÏÏÂÂÌÌ ÔÔflflÚÚËË ˜˜‡‡¯¯ÂÂÍÍ ÍÍÓÓÙÙ ··ÂÂÁÁ
ÍÍÓÓÙÙÂÂÈÈÌÌÓÓ„„ÓÓ ÔÔÓÓÓÓ¯¯Í͇‡..
ääÄÄää èèêêààÉÉééííééÇÇààííúú ääééîîÖÖ ëë ÑÑÖÖêêÜÜÄÄííÖÖããÖÖåå
îîààããúúííêêÄÄ ÑÑããüü ííÄÄÅÅããÖÖííééää ((ÖÖëëããàà
èèêêÖÖÑÑììëëååÄÄííêêààÇÇÄÄÖÖííëëüü))
1.З˚ФУОМЛЪВ ФВ‰‚‡ЛЪВО¸М˚И М‡„В‚
НУЩВ‚‡НЛ ‚ ТУУЪ‚ВЪТЪ‚ЛЛ Т УФЛТ‡МЛВП
‡Б‰ВО‡ "икЦСЗДканЦгъзхв зДЙкЦЗ мбгД
Сгь дйоЦ".
42
Page 43

2.з‡КПЛЪВ НМУФНЫ М‡ ‰ВК‡ЪВОВ ЩЛО¸Ъ‡ Л
ФУПВТЪЛЪВ Ъ‡·ОВЪНЫ, ЫТЪ‡М‡‚ОЛ‚‡fl ВВ Н‡Н
ПУКМУ ·ОЛКВ Н ˆВМЪЫ ЩЛО¸Ъ‡ (ЛТ.14).
икаеЦуДзаЦ: ЛТФУО¸БЫИЪВ Ъ‡·ОВЪНЛ,
ТУУЪ‚ВЪТЪ‚Ы˛˘ЛВ ТЪ‡М‰‡ЪЫ ESE; ˝ЪУ
У·УБМ‡˜‡ВЪТfl М‡ ЫФ‡НУ‚НВ ТОВ‰Ы˛˘ВИ
П‡НЛУ‚НУИ:
лЪ‡М‰‡Ъ ESE - ˝ЪУ ТЛТЪВП‡, ФЛБМ‡ММ‡fl
Т‡П˚ПЛ НЫФМ˚ПЛ ФУЛБ‚У‰ЛЪВОflПЛ НУЩВИМ˚ı
Ъ‡·ОВЪУН, Л ФУБ‚УОflВЪ ФЛ„УЪУ‚ЛЪ¸ НУЩВ ФУТЪУ
Л ˜ЛТЪУ.
3.иУ‰ТУВ‰ЛМЛЪВ ЩЛО¸Ъ Н НУЩВ‚‡НВ,
ФÔÓÓ‚‚ÓÓ‡‡˜˜ËË‚‚‡‡flfl „„ÓÓ ‰‰ÓÓ ÛÛÔÔÓÓ‡‡ ((ËËÒÒ.. 55))..
4.З˚ФУОМЛЪВ УФВ‡ˆЛЛ, УФЛТ‡ММ˚В ‚ ФЫМНЪ‡ı 4,
5 Л 6 ФВ‰˚‰Ы˘В„У ‡Б‰ВО‡.
5.з‡КПЛЪВ НМУФНЫ М‡ ‰ВК‡ЪВОВ ЩЛО¸Ъ‡ ‰Оfl
ЛБ‚ОВ˜ВМЛfl Ъ‡·ОВЪНЛ Л ТМЛПЛЪВ ВВ.
6.СОfl ‚˚НО˛˜ВМЛfl НУЩВ‚‡НЛ, ФУ‚ВМЛЪВ
ФВВНО˛˜‡ЪВО¸ ‚ ФУОУКВМЛВ "й" (ЛТ. 13).
Se per il Vostro caffЛ espresso adoperate “serving
illycaffЛ”, servitevi dell’apposito portafiltro; inserite la
pastiglia di caffЛ facendo attenzione che la scritta
“illy” sia posizionata verso il basso e il lato lungo
della cialda sia parallelo all’impugnatura (vedi
figura). ЦТОЛ ‰Оfl ФЛ„УЪУ‚ОВМЛfl НУЩВ ‚˚
ЛТФУО¸БЫВЪВ "serving illycaffЛ", ЫФУЪВ·ОflИЪВ
ТФВˆЛ‡О¸М˚И ‰ВК‡ЪВО¸ ЩЛО¸Ъ‡. З‚В‰ЛЪВ
Ъ‡·ОВЪНЫ НУЩВ, У·‡˘‡fl ‚МЛП‡МЛВ М‡ ЪУ, ˜ЪУ·˚
М‡‰ФЛТ¸ “illy” М‡ıУ‰ЛО‡Т¸ ‚МЛБЫ, Л ˜ЪУ·˚ ‰ОЛММ‡fl
ТЪУУМ‡ Ъ‡·ОВЪНЛ М‡ıУ‰ЛО‡Т¸ Ф‡‡ООВО¸МУ
ЫНУflЪНВ (ТПУЪЛ ЛТЫМУН).
ääÄÄää èèêêààÉÉééííééÇÇààííúú ääÄÄèèììóóóóààççéé
1.иЛ„УЪУ‚¸ЪВ НУЩВ, ЛТФУО¸БЫfl ФЛ ˝ЪУП
‰УТЪ‡ЪУ˜МУ ‚ПВТЪЛЪВО¸М˚В ˜‡¯НЛ.
2.иУ‚ВМЛЪВ ФВВНО˛˜‡ЪВО¸ ‚ ФУОУКВМЛВ
(ЛТ. 15) Л ‰УК‰ЛЪВТ¸ ‚НО˛˜ВМЛfl О‡ПФУ˜НЛ
"йд" (ЛТ. 6). ЗНО˛˜ВМЛВ О‡ПФУ˜НЛ
У·УБМ‡˜‡ВЪ, ˜ЪУ ·УИОВ ‰УТЪЛ„ Л‰В‡О¸МУИ ‰Оfl
ФЛ„УЪУ‚ОВМЛfl Ф‡‡ ЪВПФВ‡ЪЫ˚.
3.З ˝ЪУ ‚ВПfl М‡ОВИЪВ ‚ ВПНУТЪ¸ УНУОУ 100
„‡ППУ‚ ПУОУН‡ М‡ Н‡К‰˚И
ФЛ„УЪ‡‚ОЛ‚‡ВП˚И Н‡ФЫ˜˜ЛМУ. еУОУНУ
‰УОКМУ ·˚Ъ¸ ФЛ ЪВПФВ‡ЪЫВ ıУОУ‰ЛО¸МЛН‡
(‡ МВ ЪВФОУВ!). иЛ ‚˚·УВ ‡БПВ‡ ВПНУТЪЛ
Ы˜ЪЛЪВ, ˜ЪУ У·˙ВП ПУОУН‡ Ы‚ВОЛ˜ЛЪТfl ‚ 2-3
‡Б‡.
икаеЦуДзаЦ: ВНУПВМ‰ЫВЪТfl ЛТФУО¸БУ‚‡Ъ¸
У·ВБКЛВММУВ ПУОУНУ ФЛ ЪВПФВ‡ЪЫВ
ıУОУ‰ЛО¸МЛН‡.
4.мТЪ‡МУ‚ЛЪВ ВПНУТЪ¸ Т ПУОУНУП ФУ‰
ЫТЪУИТЪ‚У ‰Оfl ‚Б·Л‚‡МЛfl ПУОУН‡ (ЛТ. 16).
5.йФЫТЪЛЪВ ЫТЪУИТЪ‚У ‰Оfl ‚Б·Л‚‡МЛfl ПУОУН‡ ‚
ПУОУНУ ФЛ·ОЛБЛЪВО¸МУ М‡ 2 Т‡МЪЛПВЪ‡ Л
ФУ‚ВМЛЪВ Ы˜НЫ ФУ‰‡˜Л Ф‡‡ ФУЪЛ‚ ˜‡ТУ‚УИ
ТЪВОНЛ, ЛТ. 17 (ФУ‚УУЪУП Ы˜НЛ ПУКМУ
ПВМflЪ¸ НУОЛ˜ВТЪ‚У Ф‡‡, ‚˚ıУ‰fl˘В„У ЛБ
ЫТЪУИТЪ‚‡). иУТОВ ˝ЪУ„У ПУОУНУ М‡˜МВЪ
‚Б·Л‚‡Ъ¸Тfl Л ФВ‚‡ЪЛЪТfl ‚ „ЫТЪЫ˛ ФВМЫ.
6.иЛ ‰УТЪЛКВМЛЛ МВУ·ıУ‰ЛПУИ ЪВПФВ‡ЪЫ˚
(Л‰В‡О¸МУВ БМ‡˜ВМЛВ - 60 °л) ФВ‚ЛЪВ ФУ‰‡˜Ы
Ф‡‡, ФУ‚У‡˜Л‚‡fl Ы˜НЫ ФУ‰‡˜Л Ф‡‡ ФУ
˜‡ТУ‚УИ ТЪВОНВ Л У‰МУ‚ВПВММУ
ЫТЪ‡М‡‚ОЛ‚‡fl ФВВНО˛˜‡ЪВО¸ ‚ ФУОУКВМЛВ
"й" (ЛТ. 13).
7.з‡ОВИЪВ ‚Б·ЛЪУВ ПУОУНУ ‚ ˜‡¯НЛ Т ‡МВВ
ФЛ„УЪУ‚ОВММ˚П НУЩВ. нВФВ¸ Н‡ФЫ˜˜ЛМУ
„УЪУ‚: М‡Т˚Ф¸ЪВ Т‡ı‡ ФУ ‚НЫТЫ Л, ВТОЛ ‚‡П
М‡‚ЛЪТfl, ФУТ˚Ф¸ЪВ ФВМЫ МВ·УО¸¯ЛП
НУОЛ˜ВТЪ‚УП Н‡Н‡У-ФУУ¯Н‡
ÇÇççààååÄÄççààÖÖ:: ÌÌÂÂÓÓ··ııÓÓ‰‰ËËÏÏÓÓ ˜˜ËËÒÒÚÚËËÚÚ¸¸ ÛÛÒÒÚÚÓÓÈÈÒÒÚÚ‚‚ÓÓ
‰‰ÎÎflfl ‚‚ÁÁ··ËË‚‚‡‡ÌÌËËflfl ÏÏÓÓÎÎÓÓÍ͇‡ Í͇‡Êʉ‰˚˚ÈÈ ‡‡ÁÁ ÔÔÓÓÒÒÎÎÂÂ
ËËÒÒÔÔÓÓÎθ¸ÁÁÓÓ‚‚‡‡ÌÌËËflfl.. ÇÇ˚˚ÔÔÓÓÎÎÌÌËËÚÚ ÒÒÎΉ‰ÛÛ˛˛˘˘ËËÂÂ
ÓÓÔÔ‡‡ˆˆËËËË::
1.З˚ФЫТН‡ИЪВ Ф‡ ‚ ЪВ˜ВМЛВ МВТНУО¸НЛı ТВНЫМ‰,
ФУ‚У‡˜Л‚‡fl Ы˜НЫ ФУ‰‡˜Л Ф‡‡ (ЛТ. 17).
2.й‰МУИ ЫНУИ ФЛ‰ВКЛ‚‡ИЪВ ‚ВıМ˛˛ ˜‡ТЪ¸,
‡ ‰Ы„УИ ЫНУИ УЪ‚ЛМЪЛЪВ ЫТЪУИТЪ‚У ‰Оfl
‚Б·Л‚‡МЛfl ПУОУН‡, ФУ‚У‡˜Л‚‡fl В„У ФУ
˜‡ТУ‚УИ ТЪВОНВ, Л ТМЛПЛЪВ В„У Т М‡Т‡‰НЛ
(ЛТ. 18).
3.йЪТУВ‰ЛМЛЪВ Ф‡У‚Ы˛ М‡Т‡‰НЫ, ТМЛП‡fl ВВ Т
ЪЫ·У˜НЛ ФУ‰‡˜Л.
4.н˘‡ЪВО¸МУ ФУПУИЪВ ЫТЪУИТЪ‚У ‰Оfl
‚Б·Л‚‡МЛfl ПУОУН‡ Л Ф‡У‚Ы˛ М‡Т‡‰НЫ ЪВФОУИ
‚У‰УИ.
5.м·В‰ЛЪВТ¸, ˜ЪУ ‰‚‡ УЪ‚ВТЪЛfl, ФУН‡Б‡ММ˚В М‡
ЛТ. 19, МВ Б‡ТУВМ˚. иЛ МВУ·ıУ‰ЛПУТЪЛ
ФУ˜ЛТЪЛЪВ Лı ·ЫО‡‚НУИ.
6.мТЪ‡МУ‚ЛЪВ М‡ ПВТЪУ Ф‡У‚Ы˛ М‡Т‡‰НЫ:
‚ТЪ‡‚¸ЪВ ВВ ‚ ЪЫ·У˜НЫ ФУ‰‡˜Л Ф‡‡ Л
ТУ‚ПВТЪЛЪВ ТЪВОНЫ Д Т УЪПВЪНУИ З, Н‡Н
ФУН‡Б‡МУ М‡ ЛТ. 20.
7.мТЪ‡МУ‚ЛЪВ М‡ ПВТЪУ ЫТЪУИТЪ‚У ‰Оfl
‚Б·Л‚‡МЛfl ПУОУН‡: М‡‰ВМ¸ЪВ В„У ‰У ЫФУ‡ М‡
Ф‡У‚Ы˛ М‡Т‡‰НЫ Л ТУ‚ПВТЪЛЪВ ТЪВОНЫ л Т
УЪПВЪНУИ З, Н‡Н ФУН‡Б‡МУ М‡ ЛТ. 21.
èèêêààÉÉééííééÇÇããÖÖççààÖÖ ÉÉééêêüüóóÖÖââ ÇÇééÑÑõõ
1.ЗНО˛˜ЛЪВ НУЩВ‚‡НЫ, ФУ‚У‡˜Л‚‡fl
ФВВНО˛˜‡ЪВО¸ ‚ ФУОУКВМЛВ (ЛТ. 4).
43
Page 44

2.иУТЪ‡‚¸ЪВ ВПНУТЪ¸ ФУ‰ ЫТЪУИТЪ‚У ‚Б·Л‚‡МЛfl
ПУОУН‡;
3.иЛ ‚НО˛˜ВМЛЛ О‡ПФУ˜НЛ йд ФВ‚‰ЛЪВ
ФВВНО˛˜‡ЪВО¸ ‚ ФУОУКВМЛВ (ЛТ. 7) Л
У‰МУ‚ВПВММУ ФУ‚ВМЛЪВ Ы˜НЫ ФУ‰‡˜Л Ф‡‡
ФУЪЛ‚ ˜‡ТУ‚УИ ТЪВОНЛ (ЛТ. 17): „Уfl˜‡fl
‚У‰‡ ‚˚ıУ‰ЛЪ ЛБ ЫТЪУИТЪ‚‡ ‚Б·Л‚‡МЛfl
ПУОУН‡.
4.СОfl ФВН‡˘ВМЛfl ФУ‰‡˜Л „Уfl˜ВИ ‚У‰˚
ФУ‚ВМЛЪВ ФУ ˜‡ТУ‚УИ ТЪВОНВ Ы˜НЫ ФУ‰‡˜Л
Ф‡‡ Л ЫТЪ‡МУ‚ЛЪВ ФВВНО˛˜‡ЪВО¸ ‚
ФУОУКВМЛВ "й".
óóààëëííääÄÄ àà ììïïééÑÑ
óóààëëííääÄÄ ÑÑÖÖêêÜÜÄÄííÖÖããüü îîààããúúííêêÄÄ ÑÑããüü
ííÄÄÅÅããÖÖííééää ((ÖÖëëããàà ààååÖÖÖÖííëëüü))
ЗВПfl УЪ ‚ВПВМЛ У˜Л˘‡ИЪВ ‰ВК‡ЪВО¸
ЩЛО¸Ъ‡ ‰Оfl Ъ‡·ОВЪУН ТОВ‰Ы˛˘ЛП У·‡БУП:
- з‡КПЛЪВ НМУФНЫ ‰ВК‡ЪВОfl ЩЛО¸Ъ‡ Л
ТМЛПЛЪВ ЩЛО¸Ъ, Н‡Н ФУН‡Б‡МУ М‡ ЛТЫМНВ 22.
- иУ‚В¸ЪВ, ˜ЪУ ‰˚У˜НЛ ЩЛО¸Ъ‡ МВ
Б‡ТУВМ˚. иЛ МВУ·ıУ‰ЛПУТЪЛ Ъ˘‡ЪВО¸МУ
ФУ˜ЛТЪЛЪВ ЩЛО¸Ъ „Уfl˜ВИ ‚У‰УИ, ФУЪЛ‡fl
‡·‡БЛ‚МУИ „Ы·НУИ.
- й˜ЛТЪЛЪВ ‚МЫЪВММ˛˛ ˜‡ТЪ¸ ‰ВК‡ЪВОfl
ЩЛО¸Ъ‡ Л ВБЛМУ‚Ы˛ ФУНО‡‰НЫ.
- мТЪ‡МУ‚ЛЪВ ЩЛО¸Ъ М‡ ПВТЪУ.
зЛ ‚ НУВП ТОЫ˜‡В МВ ПУИЪВ ‰ВК‡ЪВО¸ ЩЛО¸Ъ‡
‚ ФУТЫ‰УПУВ˜МУИ П‡¯ЛМВ.
óóààëëííääÄÄ ëëÖÖííääàà ÅÅééââããÖÖêêÄÄ ÑÑããüü ääééîîÖÖ
зВ ВКВ У‰МУ„У ‡Б‡ ‚ „У‰ МВУ·ıУ‰ЛПУ У˜Л˘‡Ъ¸
ТВЪНЫ ·УИОВ‡ ‰Оfl НУЩВ ТОВ‰Ы˛˘ЛП У·‡БУП:
- м·В‰ЛЪВТ¸, ˜ЪУ НУЩВ‚‡Н‡ МВ „Уfl˜‡fl, Л ˜ЪУ
‚ЛОН‡ УЪТУВ‰ЛМВМ‡ УЪ УБВЪНЛ;
- иЛ ФУПУ˘Л УЪ‚ВЪНЛ УЪ‚ЛМЪЛЪВ ‚ЛМЪ,
НВФfl˘ЛИ ТВЪНЫ ·УИОВ‡ ‰Оfl НУЩВ (ЛТ. 23);
- èÓÚËÚ ‚·ÊÌÓÈ ÚflÔÍÓÈ Û˜‡ÒÚÓÍ ·ÓÈ·,
„‰Â ̇ıӉ˷Ҹ ÒÂÚ͇;
- й˜ЛТЪЛЪВ ТВЪНЫ ˘ВЪНУИ Л ПУ˛˘ЛП ТВ‰ТЪ‚УП
‰Оfl П˚Ъ¸fl ФУТЫ‰˚ ‰У ЪВı ФУ, ФУН‡ ‚ТВ
‰˚У˜НЛ МВ ФУ˜ЛТЪflЪТfl.
лФУОУТМЛЪВ ТВЪНЫ ФУ‰ Н‡МУП Л ‚˚ЪЛЪВ ВВ.
мТЪ‡МУ‚ЛЪВ М‡ ПВТЪУ ТВЪНЫ ·УИОВ‡ ‰Оfl НУЩВ.
ÑÑêêììÉÉààÖÖ ÇÇààÑÑõõ óóààëëííääàà
1.зВ ЛТФУО¸БЫИЪВ ‡ТЪ‚УЛЪВОЛ ЛОЛ
‡·‡БЛ‚М˚В ПУ˛˘ЛВ ТВ‰ТЪ‚‡ ‰Оfl ˜ЛТЪНЛ
НУЩВ‚‡НЛ. СУТЪ‡ЪУ˜МУ Пfl„НУИ ‚О‡КМУИ
ЪflФУ˜НЛ.
2.èÂËӉ˘ÂÒÍË ËÁ‚ÎÂ͇ÈÚ ‚‡ÌÌÓ˜ÍÛ ‰Îfl
Ò·Ó‡ ͇ÔÂθ, ÓÔÓÓÊÌflÈÚÂ Ë Ó˜Ë˘‡ÈÚ ÂÂ.
3.й˜ЛТЪЛЪВ ·‡Н ‚У‰˚ ‰Оfl НУЩВ.
ÇÇççààååÄÄççààÖÖ:: ççËËÍÍÓÓ„„‰‰‡‡ ÌÌ ÔÔÓÓ„„ÛÛÊʇ‡ÈÈÚÚ ÍÍÓÓÙÙ‚‚‡‡ÍÍÛÛ
‚‚ ‚‚ÓÓ‰‰ÛÛ ‚‚ÓÓ ‚‚ÂÂÏÏflfl ÓÓ˜˜ËËÒÒÚÚÍÍËË:: ˝˝ÚÚÓÓ ˝˝ÎÎÂÂÍÍÚÚÓÓÔÔËË··ÓÓ..
ììÑÑÄÄããÖÖççààÖÖ ççÄÄääààèèàà
кВНУПВМ‰ЫВЪТfl Ы‰‡ОflЪ¸ М‡НЛФ¸ ФУТОВ
ФЛ„УЪУ‚ОВМЛfl ФЛ·ОЛБЛЪВО¸МУ 200 ˜‡¯ВН
НУЩВ. кВНУПВМ‰ЫВЪТfl ЛТФУО¸БУ‚‡Ъ¸
ТФВˆЛ‡О¸М˚В ТВ‰ТЪ‚‡ ‰Оfl ˝ОВНЪУНУЩВ‚‡УН,
ЛПВ˛˘ЛВТfl ‚ ФУ‰‡КВ. ЦТОЛ ‚˚ МВ ТПУКВЪВ
М‡ИЪЛ Ъ‡НЛВ ТВ‰ТЪ‚‡, ЪУ ‚˚ФУОМЛЪВ
ТОВ‰Ы˛˘Ы˛ ФУˆВ‰ЫЫ:
1. з‡ОВИЪВ ‚ ·‡Н ‰Оfl ‚У‰˚ 1 ОЛЪ ‚У‰˚.
2. к‡ТЪ‚УЛЪВ ‚ МВИ 2 ТЪУОУ‚˚В ОУКНЛ (УНУОУ
30 „‡ПП) ОЛПУММУИ НЛТОУЪ˚ (ВВ ПУКМУ
М‡ИЪЛ ‚ ‡ФЪВНВ ЛОЛ ‚ ·‡Н‡ОВИМУИ О‡‚НВ);
3. иВ‚‰ЛЪВ ФВВНО˛˜‡ЪВО¸ ‚ ФУОУКВМЛВ
Ë ‰ÓʉËÚÂÒ¸ ‚Íβ˜ÂÌËfl ·ÏÔÓ˜ÍË éä.
4. м·В‰ЛЪВТ¸, ˜ЪУ ‰ВК‡ЪВО¸ ЩЛО¸Ъ‡ МВ
ФУ‰ТУВ‰ЛМВМ Л ЫТЪ‡МУ‚ЛЪВ ВПНУТЪ¸ ФУ‰ ТВЪНЫ
НУЩВ‚‡НЛ;
5. иУ‚ВМЛЪВ ФВВНО˛˜‡ЪВО¸ ‚ ФУОУКВМЛВ Л
‚˚ФЫТЪЛЪВ ФУОУ‚ЛМЫ ‡ТЪ‚У‡, М‡ıУ‰fl˘В„УТfl
‚ ·‡НВ.
иУТОВ ˝ЪУ„У УТЪ‡МУ‚ЛЪВ ФУ‰‡˜Ы Л
ФВ‚‰ЛЪВ ФВВНО˛˜‡ЪВО¸ ‚ ФУОУКВМЛВ
"й".
6. С‡ИЪВ ‡ТЪ‚УЫ ФУВ‡„ЛУ‚‡Ъ¸ ‚ ЪВ˜ВМЛВ 15
ПЛМЫЪ, ФУТОВ ˜В„У ‚УБУ·МУ‚ЛЪВ ФУ‰‡˜Ы ‰У
ФУОМУ„У УФУУКМВМЛfl ·‡Н‡.
7. СОfl Ы‰‡ОВМЛfl УТЪ‡ЪНУ‚ ‡ТЪ‚У‡ Л М‡НЛФЛ
Ъ˘‡ЪВО¸МУ ТФУОУТМЛЪВ ·‡Н, М‡ОВИЪВ ‚ МВ„У
˜ЛТЪЫ˛ ‚У‰Ы Л ‚ТЪ‡‚¸ЪВ ·‡Н ‚ „МВБ‰У.
8. иУ‚ВМЛЪВ ФВВНО˛˜‡ЪВО¸ ‚ ФУОУКВМЛВ
Л ‚НО˛˜ЛЪВ ФУ‰‡˜Ы ‰У ФУОМУ„У
УФУУКМВМЛfl ·‡Н‡.
9. лМУ‚‡ ФУ‚ВМЛЪВ ФВВНО˛˜‡ЪВО¸ Л
ФУ‚ЪУЛЪВ ФЫМНЪ˚ 7 Л 8 В˘В ‡Б.
кВПУМЪ НУЩВ‚‡НЛ, Т‚flБ‡ММ˚И Т М‡НУФОВМЛВП
М‡НЛФЛ, МВ ФУН˚‚‡ВЪТfl „‡‡МЪЛВИ, ВТОЛ
‚˚¯ВУФЛТ‡ММ˚В УФВ‡ˆЛЛ ФУ Ы‰‡ОВМЛ˛ М‡НЛФЛ
МВ ФУ‚У‰ЛОЛТ¸ В„ЫОflМУ.
44
Page 45

45
зЦаликДЗзйлнъ
ЗйбейЬзхЦ икауазх лийлйЕ млнкДзЦзаь
äÓÙ Ì ‚˚ÚÂ͇ÂÚ
- йЪТЫЪТЪ‚ЛВ ‚У‰˚ ‚ ·‡НВ
- йЪ‚ВТЪЛfl МУТЛНУ‚ ‰ВК‡ЪВОfl
ЩЛО¸Ъ‡ Б‡ТУВМ˚
- ëÂÚ͇ ·ÓÈ· ÍÓÙ Á‡ÒÓÂ̇
- Å‡Í ÔÎÓıÓ ‚ÒÚ‡‚ÎÂÌ, ‡ Í·ԇÌ
̇ Â„Ó ‰Ì Ì ÓÚÍ˚Ú
- з‡ФУОМЛЪВ ·‡Н ‚У‰УИ
- й˜ЛТЪЛЪВ УЪ‚ВТЪЛfl МУТЛНУ‚
- З˚ФУОМЛЪВ ˜ЛТЪНЫ, Н‡Н УФЛТ‡МУ
‚ ‡Б‰ВОВ "уЛТЪН‡ ТВЪНЛ ·УИОВ‡
‰Оfl НУЩВ"
- лОВ„Н‡ М‡КПЛЪВ М‡ ·‡Н, ˜ЪУ·˚
УЪН˚Ъ¸ НО‡Ф‡М М‡ ‰МВ
äÓÙ ͇ԇÂÚ ËÁ ͇‚
‰ÂʇÚÂÎfl ÙËθڇ, ‡ ÌÂ
ËÁ ÓÚ‚ÂÒÚËÈ
- ÑÂʇÚÂθ ÙËθڇ
ÌÂÔ‡‚ËθÌÓ ‚ÒÚ‡‚ÎÂÌ
- èÓÍ·‰Í‡ ·‡Í‡ ‰Îfl ÍÓÙÂ
ÔÓÚÂfl· ÛÔÛ„ÓÒÚ¸
- йЪ‚ВТЪЛfl МУТЛНУ‚ ‰ВК‡ЪВОfl
ЩЛО¸Ъ‡ Б‡ТУВМ˚
- иУ‰ТУВ‰ЛМЛЪВ ‰ВК‡ЪВО¸
ЩЛО¸Ъ‡ Ф‡‚ЛО¸МУ Л ФУ‚ВМЛЪВ
В„У ‰У ЫФУ‡
- б‡ПВМЛЪВ ФУНО‡‰НЫ ·УИОВ‡
‰Оfl НУЩВ ‚ ТВ‚ЛТМУП ˆВМЪВ
- й˜ЛТЪЛЪВ УЪ‚ВТЪЛfl МУТЛНУ‚.
èË„ÓÚÓ‚ÎflÂÏ˚È ÍÓÙÂ
ıÓÎÓ‰Ì˚È
- ã‡ÏÔӘ͇ OK espresso Ì „ÓËÚ
ÍÓ„‰‡ ̇ÊËχÂÚÒfl ‚˚Íβ˜‡ÚÂθ
ÔÓ‰‡˜Ë ÍÓÙÂ
- зВ ·˚О ‚˚ФУОМВМ
ФВ‰‚‡ЛЪВО¸М˚И М‡„В‚
- ó‡¯ÍË Ì ·˚ÎË ‡ÁÓ„ÂÚ˚
- ÑÓʉËÚÂÒ¸ ‚Íβ˜ÂÌËfl ·ÏÔÓ˜ÍË
éä
- З˚ФУОМЛЪВ ФВ‰‚‡ЛЪВО¸М˚И М‡„В‚,
Н‡Н ЫН‡Б‡МУ ‚ ‡Б‰ВОВ
"иВ‰‚‡ЛЪВО¸М˚И М‡„В‚ НУЩВ‚‡НЛ"
- к‡БУ„ВИЪВ ˜‡¯НЛНУЩ‚‡НЛ".
к‡БУ„ИЪ ˜‡¯НЛ
èÓ‚˚¯ÂÌÌ˚È ¯ÛÏ Ì‡ÒÓÒ‡
- Å‡Í ‰Îfl ‚Ó‰˚ ÔÛÒÚ
- Å‡Í ÔÎÓıÓ ‚ÒÚ‡‚ÎÂÌ, ‡ Í·ԇÌ
̇ Â„Ó ‰Ì Ì ÓÚÍ˚Ú
- б‡ФУОМЛЪВ ·‡Н
- лОВ„Н‡ М‡КПЛЪВ М‡ ·‡Н, ˜ЪУ·˚
УЪН˚Ъ¸ НО‡Ф‡М М‡ ‰МВ.
л‚ВЪО‡fl НУЩВИМ‡fl
ФВМ‡ (НУЩВ ‚˚ıУ‰ЛЪ
ТОЛ¯НУП ·˚ТЪУ ЛБ
ЪЫ·НЛ)
- еУОУЪ˚И НУЩВ ТО‡·У
ЫЪ‡П·У‚‡М
- зВ‰УТЪ‡ЪУ˜МУВ НУОЛ˜ВТЪ‚У
ПУОУЪУ„У НУЩВ
- иУПУО НУЩВ ТОЛ¯НУП НЫФМ˚И.
- лЛО¸МВВ ЫЪ‡П·ЫИЪВ ПУОУЪ˚И
НУЩВ
- ì‚Â΢ËÚ ÍÓ΢ÂÒÚ‚Ó ÍÓÙÂ
- аТФУО¸БЫИЪВ ЪУО¸НУ ПУОУЪ˚И
НУЩВ ‰Оfl ˝ОВНЪУНУЩВ‚‡УН
нВПМ‡fl НУЩВИМ‡fl ФВМ‡
(НУЩВ ‚˚ıУ‰ЛЪ ТОЛ¯НУП
ПВ‰ОВММУ ЛБ ЪЫ·НЛ)
- еУОУЪ˚И НУЩВ ТОЛ¯НУП ФОУЪМУ
ЫЪ‡П·У‚‡М.
- гЛ¯МВВ НУОЛ˜ВТЪ‚У ПУОУЪУ„У
НУЩВ.
- ëÂÚ͇ ·ÓÈ· ‰Îfl ÍÓÙÂ
Á‡ÒÓÂ̇.
- иУПУО НУЩВ ТОЛ¯НУП ПВОНЛИ
- зВ Ъ‡П·ЫИЪВ ТОЛ¯НУП ФОУЪМУ
ПУОУЪ˚И НУЩВ.
- мПВМ¸¯ЛЪВ НУОЛ˜ВТЪ‚У ПУОУЪУ„У
НУЩВ.
- З˚ФУОМЛЪВ ˜ЛТЪНЫ, Н‡Н ЫН‡Б‡МУ ‚
‡Б‰ВОВ "уЛТЪН‡ ТВЪНЛ ·УИОВ‡ ‰Оfl
НУЩВ"
- аТФУО¸БЫИЪВ ЪУО¸НУ ПУОУЪ˚И
НУЩВ ‰Оfl ˝ОВНЪУНУЩВ‚‡УН
дУЩВ ЛПВВЪ НЛТО˚И
ФЛ‚НЫТ
- зВ‰УТЪ‡ЪУ˜МУВ ФУОУТН‡МЛВ
ФУТОВ Ы‰‡ОВМЛfl М‡НЛФЛ
- лФУОУТМЛЪВ НУЩВ‚‡НЫ ‚
ТУУЪ‚ВЪТЪ‚ЛЛ Т ‡Б‰ВОУП
"쉇ОВМЛВ М‡НЛФЛ".
иЛ ФЛ„УЪУ‚ОВМЛЛ
Н‡ФЫ˜˜ЛМУ МВ У·‡БЫВЪТfl
ПУОУ˜М‡fl ФВМ‡.
- еУОУНУ МВ‰УТЪ‡ЪУ˜МУ ıУОУ‰МУВ.
- мТЪУИТЪ‚У ‰Оfl Т·Л‚‡МЛfl
ПУОУН‡ „flБМУВ.
- н˘‡ЪВО¸МУ У˜ЛТЪЛЪВ УЪ‚ВТЪЛfl
ЫТЪУИТЪ‚‡ ‰Оfl ФЛ„УЪУ‚ОВМЛfl
Н‡ФЫ˜˜ЛМУ, ‚ ˜‡ТЪМУТЪЛ
УЪ‚ВТЪЛfl, ЫН‡Б‡ММ˚В М‡ ЛТЫМНВ
21
Page 46

Pfied instalací a pfied pouÏitím spotfiebiãe si pozornû
pfieãtûte tento návod k pouÏití. Pouze tak dosáhnete
vynikajících v˘sledkÛ a maximální bezpeãnosti pfii
jeho pouÏívání.
POPIS P¤æSTROJE
Tyto v˘razy budou pouÏívány v textu následujících
stránek.
1 DrÏák sítka pro mletou kávu
2 Sítko na 1 ‰álek
3 Sítko na 2 ‰álky
4 DrÏák sítka pro kapsle (je-li souãástí dodávky)
5 Knoflík páry
6 Pûchovadlo
7 Podnos na ‰álky
8 Napájecí ‰ÀÛra
9 Svûtelná kontrolka OK
10 Svûtelná kontrolka (pfiístroj je zapnut˘) na funkci
káva
11 Knoflík pfiepínaãe
12 Poloha v˘dej kávy/vody
13 "O" poloha vypnuto
14 Svûtelná kontrolka páry (pfiístroj je zapnut˘) na
funkci páry
15 Odmûrka na kávu
16 Sprchová v˘pusÈ
17 NapûÀovaã
18 Tryska páry
19 Trubiãka v˘vodu
20 NádrÏ na vodu
21 Víko nádrÏe na vodu
BEZPEÂNOSTNÆ UPOZORNÙNÆ
• Tento spotfiebiã je konstruovan˘ pro "vafiení kávy a
espressa a ohfiívání nápojÛ": dávejte pozor, abyste
se neopafiili proudem vody, párou nebo
nesprávn˘m pouÏíváním pfiístroje.
• Nedot˘kejte se tepl˘ch ãástí spotfiebiãe.
• Po odstranûní obalu se pfiesvûdãte, zda pfiístroj
není po‰kozen. Pokud máte obavy, Ïe pfiístroj je
po‰kozen˘, nepouÏívejte jej a obraÈte se na
odborníka.
• Nenechávejte obalov˘ materiál (sáãky z umûlé
hmoty, polystyrén, atp.) v dosahu dûtí, mÛÏe b˘t
pro nû nebezpeãn˘.
• Tento spotfiebiã musí b˘t pouÏívan˘ pouze v
domácnostech. KaÏdé dal‰í pouÏití je povaÏováno
za nevhodné a tudíÏ nebezpeãné.
• V˘robce není zodpovûdn˘ za pfiípadné ‰kody
zpÛsobené nevhodn˘m, chybn˘m anebo
nerozumn˘m pouÏíváním pfiístroje.
•Nedot˘kejte se pfiístroje pokud máte mokré nebo
vlhké ruce nebo nohy.
•Nedovolte, aby spotfiebiã pouÏívaly nesvéprávné
osoby nebo dûti bez dohledu.
•V pfiípadû, Ïe se spotfiebiã po‰kodí nebo funguje
‰patnû, vypnûte jej a nepokou‰ejte se jej
vlastnoruãnû opravit.
Pfiípadné opravy nechte provést pouze v Servisu,
kter˘ má povûfiení v˘robce a poÏadujte, aby bylo
pouÏito pouze originálních náhradních dílÛ.
NedodrÏením shora uveden˘ch bodÛ se mÛÏe
poru‰it bezpeãnost pfii pouÏívání pfiístroje.
• Pfiívodní ‰ÀÛru tohoto pfiístroje nesmí vymûÀovat
uÏivatel, protoÏe k v˘mûnû je nutné pouÏít speciální
náfiadí. Pokud se ‰ÀÛra po‰kodí, nebo je tfieba ji
vymûnit, obraÈte se v˘hradnû na Servis povûfien˘
v˘robcem, vyhnete se tak pfiípadnému probíjení el.
proudu.
INSTALACE
• Pfiístroj umístûte na pracovní desku, co nejdál od
vodovodních kohoutkÛ a dfiezÛ.
• Ovûfite si, zda napûtí sítû odpovídá poÏadovanému
napûtí uvedenému na popisném ‰títku spotfiebiãe.
Pfiístroj zapojujte pouze do patfiiãnû uzemnûné
zásuvky s minimálním pfiíkonem 10 A.
V˘robce není zodpovûdn˘ za pfiípadné ‰kody
zpÛsobené neodpovídajícím uzemnûním.
•V pfiípadû, Ïe zásuvka a zástrãka spotfiebiãe nejsou
kompatibilní, nechte vymûnit zásuvku za jin˘,
vhodn˘ typ kvalifikovan˘m elektrikáfiem.
• Neinstalujte spotfiebiã v prostfiedí, kde teplota mÛÏe
dosáhnout ãi klesnout pod 0°C (pfii zmrznutí vody
ve spotfiebiãi mÛÏe dojít k po‰kození pfiístroje).
• Pokud je spotfiebiã umístûn˘ blízko zásuvky el.
proudu a pfiívodní ‰ÀÛra je pfiíli‰ dlouhá,
pfieb˘vající ãást ‰ÀÛry se mÛÏe uloÏit do vnitfiku
spotfiebiãe tak, Ïe ji zastrkáte do v˘stupního otvoru.
JAK POSTUPOVAT P¤I P¤æPRAVù KÁVY
ESPRESSO
NAPLNùNæ NÁDRÎE NA VODU
OdstraÀte víko nádrÏe na vodu (obr. 1) a nádrÏ
vyjmûte tahem nahoru (obr. 2).
NádrÏ naplÀte ãistou a ãerstvou vodou pfiiãemÏ dávejte
pozor, abyste dodrÏeli maximální mnoÏství vody
vyznaãené ryskou MAX (obr. 3).
Lehk˘m zatlaãením nasaìte nádrÏ tak, aby se ventil na
dnû nádrÏe tlakem otevfiel.
NádrÏ lze naplnit i jednodu‰eji, bez vyjímání nádrÏe
tak, Ïe vodu nalejete do nádrÏe pfiímo z konvice.
Poznámka: neuvádûjte do provozu spotfiebiã bez vody
v nádrÏi. Doporuãujeme Vám doplÀovat vodu v nádrÏi
kdyÏ je hladina vody zhruba dva centimetry ode dna
nádrÏe.
P¤EDEH¤ÁTæ P¤æSTROJE PRO P¤æPRAVU KÁVY
Abychom obdrÏeli správnû teplou kávu espresso, je
nutné nejdfiíve pfiístroj pfiedehfiát: otoãte knoflíkem
pfiepínaãe do polohy (obr. 4) alespoÀ pÛl hodiny
pfied pfiípravou kávy. NezapomeÀte nasadit drÏák
sítka na pfiístroj (pfiekontrolujte zda je knoflík páry
zavfien˘). Pfii nasazování drÏáku sítka na pfiístroj
podrÏte sítko pod sprchovou v˘pustí ohfiívaãe s
drÏátkem nasmûrovan˘m doleva, viz obr. 5. Potom
46
CZ
Page 47

zatlaãte sítko smûrem nahoru a zároveÀ jím otáãejte
doprava; otáãejte vÏdy aÏ na doraz. Po uplynutí pÛl
hodiny mÛÏete zaãít s pfiípravou kávy podle pokynÛ
popsan˘ch v následující kapitole.
Fázi pfiedehfiívání lze urychlit následujícím zpÛsobem:
1.Otoãením knoflíku pfiepínaãe do polohy (obr. 4)
pfiístroj zapnûte a nasaìte prázdn˘ drÏák sítka (bez
mleté kávy) na spotfiebiã.
2.Pod drÏák sítka umístûte ‰álek na kávu. Tímto
zpÛsobem nahfiejete ‰álek do kterého pfiipravíte
kávu.
3.Poãkejte aÏ se rozsvítí svûtelná kontrolka OK (obr. 6)
a poté ihned otoãte knoflíkem pfiepínaãe do polohy
(obr. 7). Nechte vodu vytékat dokud svûtelná
kontrolka OK nezhasne. Poté otoãením knoflíku
pfiepínaãe do polohy (obr. 4) pfieru‰te dodávku
vody.
4.·álek vyprázdnûte, poãkejte aÏ se znovu rozsvítí
svûtelná kontrolka "OK" a zopakujte je‰tû jednou
popsané úkony.
JAK P¤IPRAVIT ESPRESSO SE SæTKEM NA MLETOU
KÁVU
1. Po pfiedehfiátí pfiístroje podle popisu v pfiede‰lé
kapitole, pokud budete pfiipravovat jeden ‰álek
kávy, nasaìte do drÏáku sítka sítko na 1 ‰álek kávy
(to men‰í ze dvou sítek, které jsou souãástí
dodávky) (obr. 8) a naplÀte jej jednou plnou
odmûrkou mleté kávy, cca 7 gramÛ (obr. 9).
Pokud chcete pfiipravit dva ‰álky kávy espresso,
pouÏijte sítko na 2 ‰álky (to vût‰í ze dvou dodan˘ch
sítek) a nasypte do sítka dvû necelé odmûrky mleté
kávy (cca 6 + 6 gramÛ).
2. Mletou kávu stejnomûrnû rozprostfiete a zlehka
upûchujte pûchovadlem (obr.10).
POZNÁMKA: správné upûchování mleté kávy je
pfii pfiípravû dobré kávy espresso velmi dÛleÏité.
Pokud kávu moc upûchujete, káva protéká pfiíli‰
pomalu a krém na kávû bude tmav˘. Pfii málo
upûchované kávû zase protéká pfiíli‰ rychle a na
kávû se utvofií pfiíli‰ málo svûtlého krému.
3. OdstraÀte pfiípadné zbytky kávy z okrajÛ sítka a
pak jej zaháknûte na pfiístroj, otáãejte vÏdy aÏ na
doraz (obr. 5).
4. Umístûte ‰álek nebo ‰álky pod trysky drÏáku sítka.
Je lep‰í je nejdfiív pfiedehfiát teplou vodou (obr. 11).
5. Pfiesvûdãte se, zda je svûtelná kontrolka OK
espresso (obr. 6) rozsvícená (pokud je zhasnutá,
poãkejte aÏ se rozsvítí), poté nastavte otoãn˘ knoflík
na v˘dej kávy (obr. 7) dokud nevyteãe
poÏadované mnoÏství kávy. V˘dej pfieru‰íte
otoãením knoflíku do polohy (obr. 4).
6. Pfii vyháknutí drÏáku sítka otáãejte rukojetí zprava
doleva.
POZOR: nevyjímejte drÏák sítka bûhem dodávky
kávy, mohli byste se postfiíkat.
7. PouÏit˘ kávov˘ prá‰ek vyndáte ze sítka tak, Ïe podrÏíte
sítko zablokované páãkou v drÏáku sítka a nûkolikrát
klepnete drÏákem sítka obrácen˘m vzhÛru nohama
(obr.12).
8 Otoãením knoflíku pfiepínaãe do polohy "O"
pfiístroj vypnete (obr. 13).
POZOR: pfii prvním pouÏití pfiístroje je nutné um˘t
ve‰keré pfiíslu‰enství a vnitfiní okruh tak, Ïe
necháte spotfiebiã provést pfiípravu alespoÀ pûti
káv, ale naprázdno bez mleté kávy.
JAK P¤æPRAVIT ESPRESSO SE SæTKEM NA KAPSLE
(POKUD JE SOUâÁSTæ DODÁVKY)
1.Proveìte pfiedehfiátí pfiístroje podle pokynÛ v
kapitole "P¤EDEH¤ÁTæ P¤æSTROJE".
2.Stisknûte tlaãítko na drÏáku sítka a poloÏte do sítka
kapsli. SnaÏte se ji umístit do stfiedu sítka (obr. 14).
POZNÁMKA: pouÏívejte kapsle, které odpovídají
standardu ESE: toto oznaãení se nachází na
baleních spolu se symbolem:
Standard ESE je systém schválen˘ nejlep‰ími v˘robci
kávov˘ch kapslí, kter˘ zaruãuje pfiípravu kávy espresso
jednoduch˘m a ãist˘m zpÛsobem.
3. Sítko nasaìte na pfiístroj, otáãejte vÏdy aÏ na doraz
(obr. 5).
4. Postupujte podle bodÛ 4, 5 a 6 pfiedcházející
kapitoly.
5. Pfii vyjímání kapsle stisknûte tlaãítko na drÏáku sítka
a kapsli vyndejte.
6. Otoãením knoflíku pfiepínaãe do polohy "O" (obr.
13), pfiístroj vypnete.
Pokud pfii pfiípravû kávy espressa pouÏíváte "serving
illycaffé", pouÏijte k tomu urãen˘ drÏák sítka; vloÏte do
nûj kávovou kapsli tak, aby nápis "illy" byl otoãen
smûrem dolÛ a dlouhá strana kapsle byla soubûÏná s
drÏákem (viz zobrazení).
JAK POSTUPOVAT P¤I P¤æPRAVù
KAPUâæNA
1.Pfiipravte kávu espresso do dostateãnû velk˘ch ‰álkÛ.
2. Knoflíkem pfiepínaãe otoãte do polohy (obr. 15)
a poãkejte aÏ se rozsvítí kontrolní svûtélko"OK" (obr.
6). Rozvícené kontrolní svûtélko znamená, Ïe se
ohfiívaã zahfiál na správnou teplotu pro pfiípravu
páry.
3.Mezitím nalijte do nádoby 100 gramÛ mléka na
kaÏd˘ ‰álek kapuãína. Mléko musí mít teplotu z
Page 48

chladniãky (nesmí b˘t teplé!). Pfii volbû nádoby na
mléko poãítejte s tím, Ïe objem mléka se 2x nebo 3x
zvût‰í.
Poznámka: doporuãujeme pouÏít polotuãné mléko s
teplotou z chladniãky.
4.Nádobu s mlékem umístûte pod napûÀovaã (obr.16).
5.Trysku napûÀovaãe ponofite asi 2 cm hluboko do
mléka a otoãte knoflíkem páry proti smûru
hodinov˘ch ruãiãek, obr. 17 (otáãením knoflíku
mÛÏete nastavit mnoÏství páry vycházející z
napûÀovaãe). Mléko zaãne nab˘vat na objemu a
jeho vzhled se zmûní na krém.
6.Po dosaÏení poÏadované teploty (ideální teplota je
60°C), pfieru‰te dodávku páry tak, Ïe otoãíte
knoflíkem páry ve smûru hodinov˘ch ruãiãek a
zároveÀ otoãíte knoflíkem pfiepínaãe do polohy "O"
(obr. 13).
7.Nalijte napûnûné mléko do ‰álkÛ s kávou, kterou jste
si pfiipravili pfiedem. A kapuãíno je hotové: ocukrujte
podle libosti, a pokud chcete, mÛÏete mléãnou pûnu
poprá‰it tro‰kou ãokoládového prá‰ku.
DÒLEÎITÉ: po kaÏdém pouÏití je nutné napûÀovaã
mléka vyãistit po kaÏdém pouÏití. Postupujte podle
následujících pokynÛ:
1.Otoãením knoflíku páry nechte vypustit po nûkolik
sekund páru (obr. 17).
2.Jednou rukou pfiidrÏujte horní ãást a druhou
od‰roubujte, otáãením ve smûru hodinov˘ch ruãiãek,
napûÀovaã a vytánûte ho z trysky (obr. 18).
3.VysuÀte trysku páry z trubiãky v˘deje.
4.Umyjte peãlivû napûÀovaã a trysku teplou vodou.
5.Pfiekontrolujte, aby dva otvory vyznaãené na obr.
19, nebyly zane‰ené. Pokud je to nutné vyãistûte je
jehlou.
6.Namontujte znovu trysku páry vsunutím do trubiãky
páry tak, aby ‰ipka A a ryska B znázornûné na
obrázku 20 do sebe zapadaly.
7.Smontujte napûÀovaã tak, Ïe ho nasunete aÏ na
doraz do trysky páry. ·ipka C a ryska B musí do
sebe zapadat podle znázornûní na obrázku 21. Pak
jím otoãte proti smûru hodinov˘ch ruãiãek.
P¤æPRAVA TEPLÉ VODY
1.Zapnûte spotfiebiã otoãením knoflíku pfiepínaãe do
polohy (obr. 4).
2.Pod napûÀovaã umístûte nádobu.
3.V okamÏiku kdy se rozsvítí svûtelná kontrolka "OK",
otoãte knoflíkem pfiepínaãe do polohy (obr. 7) a
zároveÀ otoãte knoflíkem páry proti smûru
hodinov˘ch ruãiãek (obr. 7): z napûÀovaãe bude
vytékat teplá voda.
4.Otoãením knoflíku páry po smûru hodinov˘ch
ruãiãek a nastavením knoflíku pfiepínaãe na "O",
zastavíte dodávku teplé vody.
âI·TùNæ A ÚDRÎBA
âI·TùNæ DRÎÁKU SæTKA PRO KAPSLE (POKUD JE
SOUâÁSTæ DODÁVKY)
Obãas je nutné vyãistit drÏák sítka pro kapsle
následujícím zpÛsobem:
• stisknûte tlaãítko drÏáku sítka a vyjmûte sítko podle
zobrazení na obr. 22.
• zkontrolujte, aby otvory sítka nebyly zane‰ené.
Pokud je to nutné, sítko peãlivû omyjte teplou vodou
a houbiãkou s drsn˘m povrchem.
• Vyãistûte vnitfiek drÏáku sítka a pryÏové tûsnûní.
•Znovu sítko vloÏte.
DrÏák sítka se nesmí m˘t v myãce na nádobí.
âI·TùNæ SPRCHOVÉ V¯PUSTI OH¤æVAâE ESPRESSA
AlespoÀ jednou za rok je nutné vyãistit sprchovou
v˘pusÈ ohfiívaãe espressa následujícím zpÛsobem:
• Pfiesvûdãte se, zda je pfiístroj na pfiípravu kávy
studen˘ a zástrãka vytaÏená ze zásuvky.
• Pomocí ‰roubováku od‰roubujte ‰roubek, kter˘m je
upevnûna sprchová v˘pusÈ ohfiívaãe espressa (obr.
23).
• Vlhk˘m hadfiíkem oãistûte otvor ohfiívaãe ve kterém
byla namontována sprchová v˘pusÈ.
• Sprchovou souãástku oãistûte kartáãkem a vodou s
pfiípravkem na mytí nádobí dokud v‰echny otvory
nejsou ãisté.
• Opláchnûte ji pod tekoucí vodou za nepfietrÏitého
otírání.
• Znovu namontujte sprchovou souãástku na ohfiívaã
espressa.
DAL·æ âI·TùNæ
1.Pfii ãi‰tûní pfiístroje nepouÏívejte fiedidla nebo
prá‰kové ãistící prostfiedky. Staãí vlhk˘ a mûkk˘
hadfiík.
2.Vyjmûte pravidelnû nádobku odkapávaãe,
vyprázdnûte ji a omyjte.
3.Omyjte nádrÏ na vodu pro espresso.
POZOR: Neponofiujte pfiístroj bûhem ãi‰tûní do vody:
jedná se o elektrick˘ spotfiebiã.
ODVÁPNùNæ
Po pfiípravû zhruba 200 káv doporuãujeme provést
odvápnûní pfiístroje. Doporuãujeme pouÏít
odvápÀovací prostfiedky urãené pro espresso kávovary,
které se dají zakoupit v obchodech. Pokud tyto
pfiípravky nejsou k dostání, mÛÏete postupovat
následovnû:
1. NaplÀte nádrÏ 1 litrem vody.
2. Ve vodû rozpusÈte 2 lÏíce (cca 30 gramÛ) kyseliny
citronové (k dostání v lékarnû nebo v drogerii).
3. Otoãte knoflíkem pfiepínaãe do polohy a
poãkejte aÏ se rozsvítí kontrolní svûtélko OK
espresso.
4. Zkontrolujte, aby drÏák sítka nebyl nasazen˘ na
pfiístroji a pod sprchovou v˘pusÈ umístûte prázdnou
nádobu.
48
Page 49

5. Otoãte knoflíkem pfiepínaãe do polohy a nechte
vypustit polovinu nádrÏe.
Poté pfieru‰te dodávku otoãením knoflíku pfiepínaãe
do polohy "O".
6. Nechte roztok pÛsobit po dobu zhruba 15 minut a
potom nechte nádrÏ úplnû vyprázdnit.
7. NádrÏ dobfie opláchnûte, aby se odstranily zbytky
roztoku a vápníku. Znovu ji naplÀte ãistou vodou a
nasaìte do svého uloÏení
8. Otoãte knoflíkem pfiepínaãe do polohy poãkejte
aÏ se nádrÏ vyprázdní.
9. Poté otoãte knoflíkem pfiepínaãe do polohy a
zopakujte úkony bodÛ 7 a 8 je‰tû jednou.
Opravy pfiístroje kávovaru t˘kající se problémÛ
zavinûn˘ch usazeninami vápníku nejsou zahrnuty v
záruce pfiístroje, pokud shora uvedené odvápÀování
nebude provádûno pravidelnû.
49
Page 50

50
PROBLÉM
MOÎNÉ P¤æâINY NÁPRAVA
Káva espresso nevytéká z
pfiístroje
•V nádrÏi chybí voda.
• Otvory trysek drÏáku sítka jsou
zane‰ené.
• Sprchová v˘pusÈ ohfiívaãe espressa
je zane‰ená.
• NádrÏ je ‰patnû umístûná a ventil na
dnû není otevfien˘.
• Naplnit nádrÏ na vodu.
• Vyãistit otvory trysek.
• Provést ãi‰tûní v˘pustû podle pokynÛ
uveden˘ch v kapitole "âi‰tûní sprchové
v˘pustû ohfiívaãe espressa".
• Zatlaãit lehce nádrÏ do uloÏení, aby
se otevfiel ventil na jejím dnû.
Káva espresso stéká z okrajÛ
drÏáku sítka místo z trysek
• DrÏák sítka je ‰patnû nasazen˘.
•Tûsnûní ohfiívaãe espressa není dost
pruÏné.
• Otvory trysek drÏáku sítka jsou
zane‰ené.
• Nasadit drÏák sítka správn˘m
zpÛsobem a otoãit jím aÏ nadoraz.
• Vymûnit tûsnûní ohfiívaãe espressa v
autorizovaném servisu.
• Vyãistit otvory trysek.
Káva espresso je studená
• Svûtelná kontrolka OK espresso
nebyla v okamÏiku stisknutí vypínaãe
v˘deje kávy rozsvícená.
• Nebylo provedeno pfiedehfiátí
pfiístroje.
• ·álky nebyly nahfiáté.
• Poãkat aÏ se rozsvítí svûtelná
kontrolka OK.
• Provést pfiedehfiátí pfiístroje podle
pokynÛ v kapitole "Pfiedehfiátí pfiístroje
pro pfiípravu kávy"
• Nahfiát ‰álky.
Zvuk vydávan˘ ãerpadlem je
silnûj‰í
• NádrÏ na vodu je prázdná.
• NádrÏ je ‰patnû umístûná v uloÏení
a ventil na dnû není otevfien˘.
• Naplnit nádrÏ.
• Zatlaãit lehce nádrÏ do uloÏení, aby
se otevfiel ventil na jejím dnû.
Krém na kávû je svûtl˘
(káva vytéká z trysky
rychle)
• Mletá káva je málo upûchovaná.
• Pfiíli‰ málo mleté kávy.
• Káva je umletá pfiíli‰ na hrubo.
• Káva je umletá pfiíli‰ na jemno.
• Upûchovat ménû mletou kávu.
• SníÏit mnoÏství mleté kávy.
• Provést ãi‰tûní v˘pustû podle pokynÛ
uveden˘ch v kapitole "âi‰tûní sprchové
v˘pustû ohfiívaãe espressa".
• PouÏít pouze mletou kávu urãenou pro
espresso kávovary.
Káva má nakyslou chuÈ • Nebylo provedeno dostateãnû
peãlivû opláchnutí po odvápnûní.
• Provést opláchnutí pfiístroje podle
pokynÛ v kapitole "Odvápnûní".
Pfii pfiípravû kapuãína se
nedafií napûnit mléko.
• Mléko je teplé.
• NapûÀovaã mléka je ‰pinav˘.
• PouÏít vÏdy mléko s teplotou z
chladniãky.
• Vyãistit peãlivû otvory napûÀovaãe
mléka, zvlá‰tní pozornost vûnujte
otvorÛm vyznaãen˘ch na obrázku 21.
 Loading...