

DeLonghi AUTOMATIC BREAD MAKER Instructions For Use Manual

AUTOMATIC BREAD MAKER
Instruction for use
De'Longhi Appliances
via Seitz, 47
31100 Treviso Italia

2
CONTENTS
Using the appliance safely . . . . . . . . . . . . . . . . . . . . . . . . . . . . . . . . . . . . . . . . . . . . . . . . . . . . . . .3
Characteristics of the appliance and accessories . . . . . . . . . . . . . . . . . . . . . . . . . . . . . . . . . . . . . . . .4
Control panel . . . . . . . . . . . . . . . . . . . . . . . . . . . . . . . . . . . . . . . . . . . . . . . . . . . . . . . . . . . . . . . .5
Baking progress indicator . . . . . . . . . . . . . . . . . . . . . . . . . . . . . . . . . . . . . . . . . . . . . . . . . . . . . . . .6
Menu settings . . . . . . . . . . . . . . . . . . . . . . . . . . . . . . . . . . . . . . . . . . . . . . . . . . . . . . . . . . . . . . . . .7
Using the appliance . . . . . . . . . . . . . . . . . . . . . . . . . . . . . . . . . . . . . . . . . . . . . . . . . . . . . . . . . . . .8
Dried fruit and nut distributor (certain models only) . . . . . . . . . . . . . . . . . . . . . . . . . . . . . . . . . . . . . .9
Simple steps to bake with the appliance . . . . . . . . . . . . . . . . . . . . . . . . . . . . . . . . . . . . . . . . . . . . . .9
Baking bread: an art and a science . . . . . . . . . . . . . . . . . . . . . . . . . . . . . . . . . . . . . . . . . . . . . . . .10
Important tips for measuring quantities . . . . . . . . . . . . . . . . . . . . . . . . . . . . . . . . . . . . . . . . . . . . . .11
The baking process . . . . . . . . . . . . . . . . . . . . . . . . . . . . . . . . . . . . . . . . . . . . . . . . . . . . . . . . . . . .11
How to use the Delay Bake function . . . . . . . . . . . . . . . . . . . . . . . . . . . . . . . . . . . . . . . . . . . . . . . .12
Power failure backup . . . . . . . . . . . . . . . . . . . . . . . . . . . . . . . . . . . . . . . . . . . . . . . . . . . . . . . . . .13
Practical tips . . . . . . . . . . . . . . . . . . . . . . . . . . . . . . . . . . . . . . . . . . . . . . . . . . . . . . . . . . . . . . . . .13
Cleaning and maintenance . . . . . . . . . . . . . . . . . . . . . . . . . . . . . . . . . . . . . . . . . . . . . . . . . . . . . .14
Recipes . . . . . . . . . . . . . . . . . . . . . . . . . . . . . . . . . . . . . . . . . . . . . . . . . . . . . . . . . . . . . . . . . . . .15
Information on the display . . . . . . . . . . . . . . . . . . . . . . . . . . . . . . . . . . . . . . . . . . . . . . . . . . . . . . .24
Troubleshooting . . . . . . . . . . . . . . . . . . . . . . . . . . . . . . . . . . . . . . . . . . . . . . . . . . . . . . . . . . . . . .25
FAQs . . . . . . . . . . . . . . . . . . . . . . . . . . . . . . . . . . . . . . . . . . . . . . . . . . . . . . . . . . . . . . . . . . . . . .27
Important information for correct disposal of the product in accordance with EC Directive 2002/96/EC and
Italian Legislative Decree no. 151 of 25 July 2005.
At the end of its working life, the appliance must not be disposed of as urban waste.
It can be taken to a special local authority differentiated waste collection centre or to a dealer
providing this service.
Disposing of a household appliance separately avoids possible negative consequences for the
environment and health deriving from inappropriate disposal and enables the constituent materials to be recovered to obtain significant savings in energy and resources.
As a reminder of the need to dispose of household appliances separately, the product is
marked with a rubbish bin bearing a cross.
Unlawful disposal of the product by the user is punishable by law.

USING THE APPLIANCE SAFELY
1. Read all instructions, warnings and labels carefully. Keep these instructions.
2. Remove all "foreign" material from the bread pan.
3. Clean the bread pan and paddle before use.
4. Remove the plastic film from the control panel and all labels.
5. Always plug the appliance into a 230 AC socket
6. Do not rest anything on the power cable. Do not touch the hot surfaces of the appliance. Do not lay or
leave the power cable across transit points or where someone could trip over it. Do not rest the appliance on the edge of a table or bench.
During use
1. This appliance is cold to the touch, but heats up during operation. Keep hands and face away.
2. Do not open the lid or remove the bread pan while the appliance is operating unless specifically indicated in the instructions.
3. Do not place anything on the lid of the appliance. Do not cover the vents.
4. The appliance has a power failure backup which retains the cooking cycle in the memory in the event of
power failure. Prolonged power failure could cause the programme to be cancelled (see page 13 for
complete details).
5. Do not touch and/or try to block moving parts (e.g. the paddle while in operation).
6. Do not place your hand in the bread pan while the appliance is in operation
Where to use the appliance
1. Use on a stable heat resistant surface.
2. Do not use the appliance in direct sunlight or near heat sources such as heaters or ovens.
3. Do not place the bread maker on top of other appliances.
4. Keep the appliance away from children as it becomes hot. In addition, touching the buttons accidentally
during operation may stop the baking process
5. Place the appliance at least 20 cm from the walls or they may be discoloured by the heat.
After use
1. Always turn the appliance off by placing the ON/OFF switch in the "0" position. Unplug from the mains
after use and before cleaning.
2. Use oven gloves to remove the bread pan after baking.
3. Allow the appliance to cool down before cleaning it or putting it away.
4. Read the instructions before cleaning. Do not immerse the appliance or the plug in water. It could lead
to electric shock or damage to the appliance.
5. Do not use sharp or cutting metal objects to clean the bread pan.
6. If the appliance is kept permanently plugged into the mains sockets after use, put the pan back in the
chamber.
Safety precautions
1. To avoid electric shock or injury, use the accessories recommended by the manufacturer only.
2. Do not use the appliance outdoors, for commercial purposes or for uses other than those for which it was
designed.
3. If the power cable is damaged, it must be replaced by the manufacturer, an authorised service centre or
a qualified electrician in order to eliminate all risk. If the appliance is dropped or damaged in any way
do not use it. Take it to the nearest authorised service centre for checking, repair or mechanical or electrical adjustment.
4. Disconnect the appliance by pulling the plug (not the cable).
5. Extensions: the appliance is supplied with a short power cable to reduce the risk of injury caused by becoming entangled in or tripping over a long cable. If you must use an extension, take the utmost care. It
must not hang from the work surface where children could pull it or trip over it accidentally.
3
4
6. Power supply: if the electrical circuit is overloaded, the appliance may not operate correctly. It should therefore be connected to a separate electrical circuit from other appliances.
7. For safety reasons and to avoid unqualified people from carrying out maintenance, certain appliances
have a tamper-proof seal. These appliances must be taken to the nearest authorised service centre for
adjustment and repairs if necessary.
8. Do not allow the appliance to be used by persons (including children) with psychological, physical or sensory impairments or with inadequate experience or knowledge, unless closely supervised and instructed
by someone responsible for their safety. Always supervise children. Make sure they do not play with the
appliance.
9. IMPORTANT: Incorrect use (wrong recipe, excessively long baking times) could cause the bread to
overheat and produce smoke or flames. If this occurs, do not open the lid. Unplug from the mains power
supply. Leave the appliance to cool down sufficiently before opening the lid.
10.Materials and accessories coming into contact with food conform to EEC regulation 1935/2004.
This appliance is designed for domestic use only.
Maximum admissible quantities of flour/yeast: 700g flour and 4 g yeast.
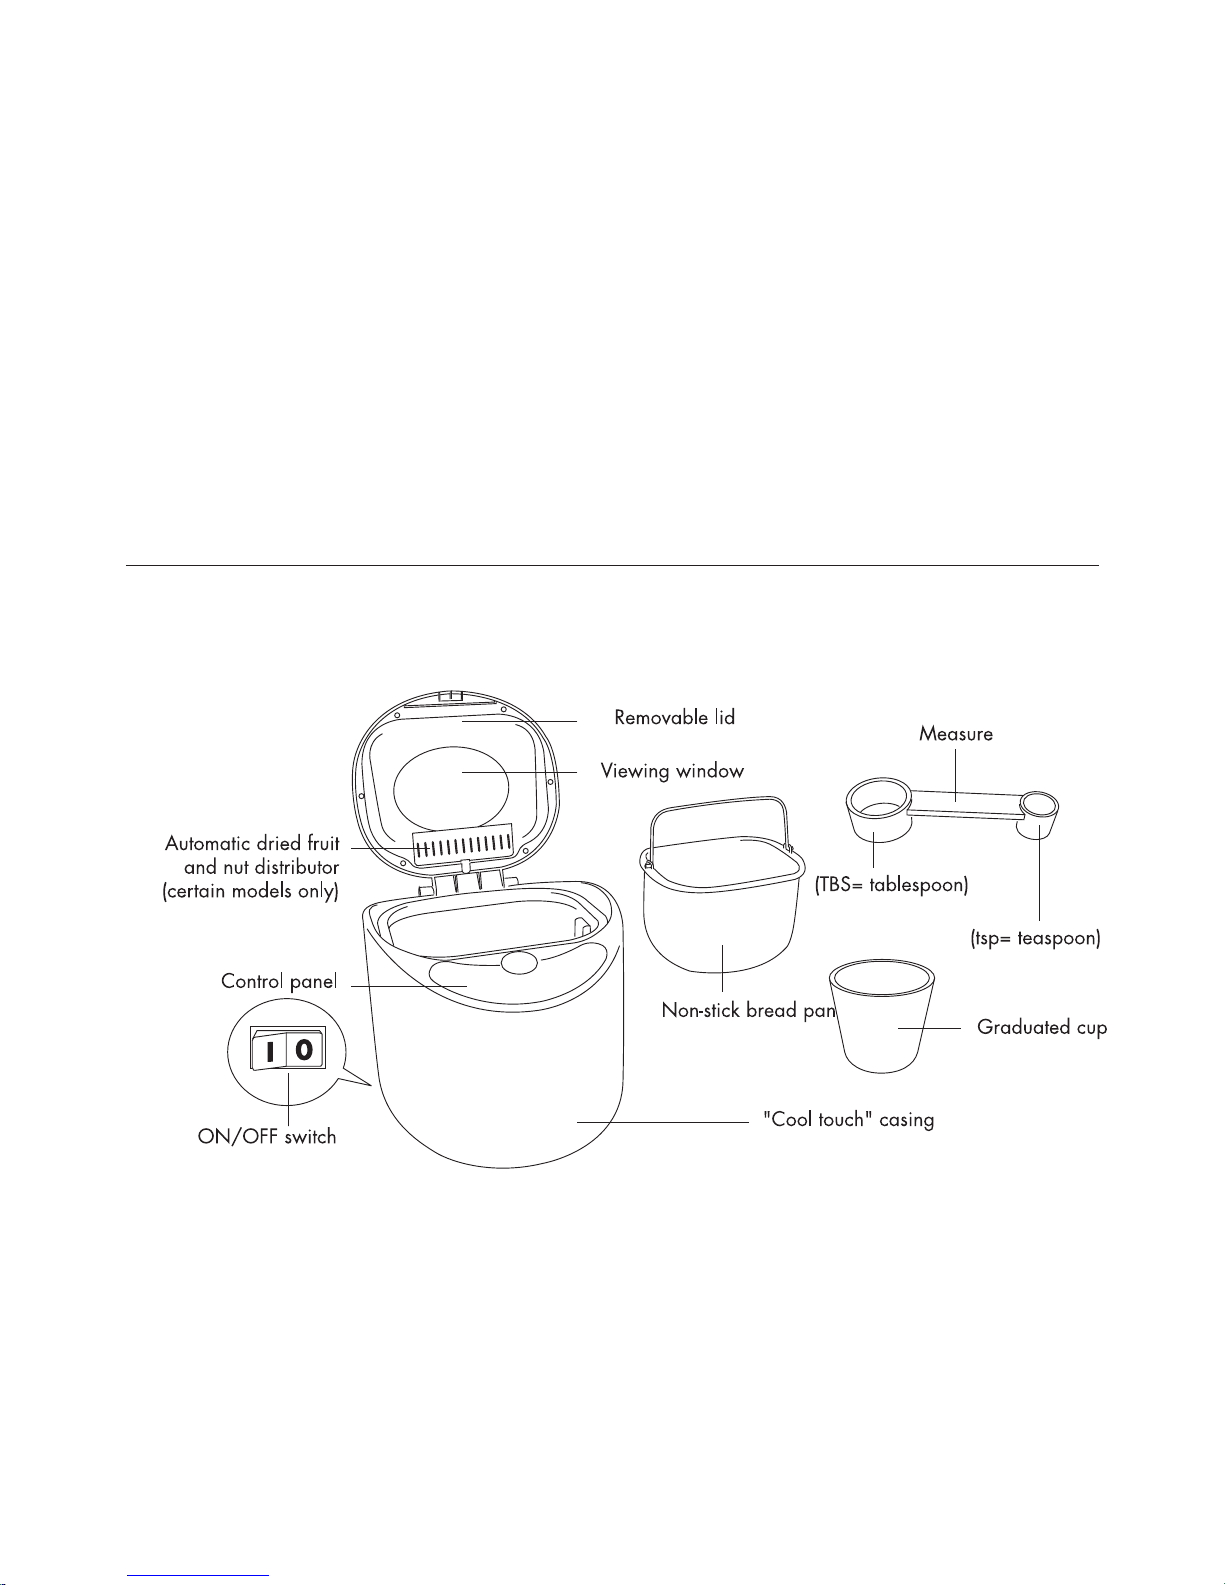
CHARACTERISTICS OF THE APPLIANCE AND ACCESSORIES
The appliance is a fully programmable bread maker enabling fresh bread to be cooked easily in just a few
hours.
It has the following additional characteristics:
64 baking and kneading options
Including CLASSICAL, FRENCH, WHOLEMEAL, SWEET, TURBO, PIZZA DOUGH, PASTA DOUGH, GLUTEN
FREE, JAM, OVEN.

Baking progress indicator
Shows each stage of the bread baking process. See page 6 for further information.
13 hour Delay Bake function
You can wake up in the morning to the smell of hot crusty bread thanks to the 13 hour Delay Bake function.
See page 12 for further information.
Power failure backup
Memorises the programme in the event of power failure or temporary voltage surge.
Once power has been restored, baking will resume from where it was interrupted.
See page 13 for further information.
"Cool touch" casing
Makes the appliance safer during baking, especially in the presence of children.
Viewing window
Enables you to see each stage of the bread baking process.
60 minute keep warm function
Keeps the bread hot for up to an hour after baking.
Automatic dried fruit and nut distributor (certain models only)
Automatically releases the ingredients during the kneading cycle according to the recipes.
See page 9 for further information.
Beep for fruit and nuts (certain models only)
Make your bread making more creative. The appliance emits a beep to tell you when to add fruit and/or
nuts. This avoids them breaking up excessively during kneading.
Removable lid
Can be removed for easy cleaning.
Removable non-stick pan
To remove the bread easily and facilitate cleaning the pan.
CONTROL PANEL
The control panel is designed to make the appliance easy to use. Selection of the required baking programme is simple and the large display makes it easy to read the selected menu and time left to complete the programme.
5
control panel
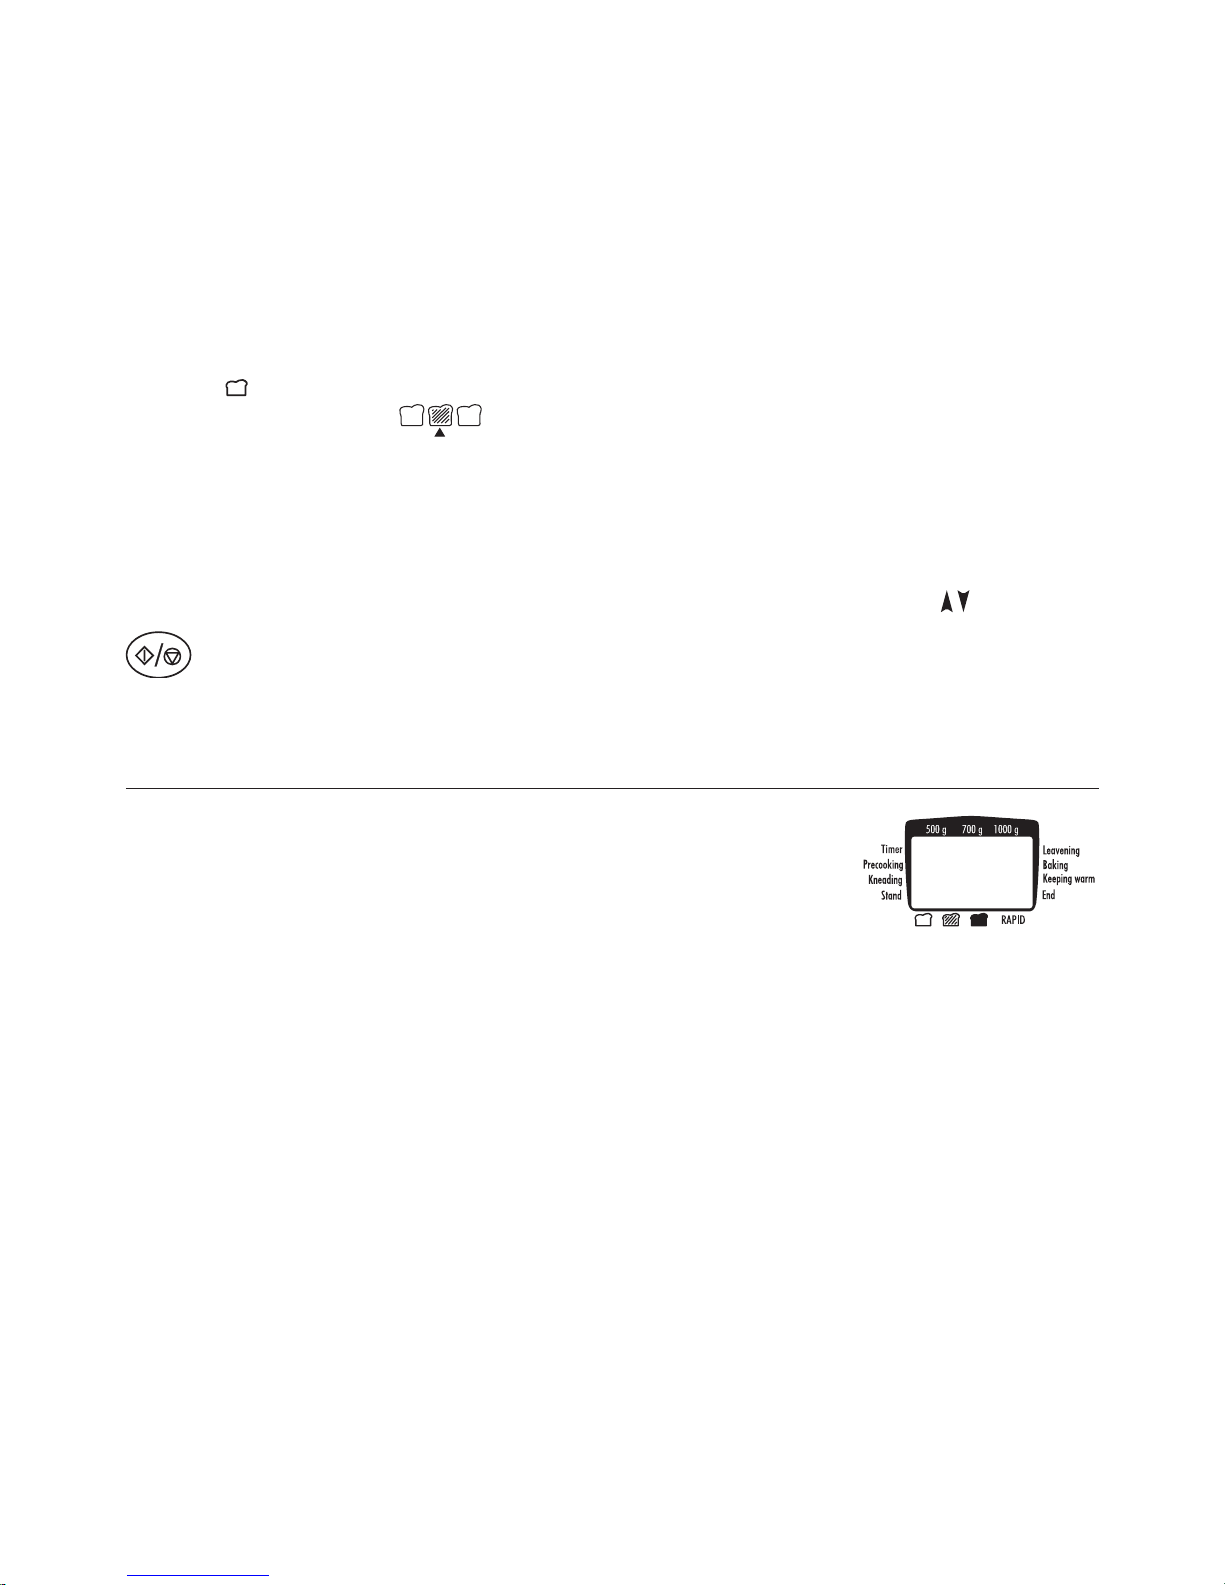
Display
The display shows the programme selected from (1) to (12), the CRUST COLOUR and WEIGHT of the loaf.
The display indicates the number of hours and minutes before the end of the cycle (indicated by 0:00).
Menu button
Press the MENU button to select the automatic baking menus from (1) to (12).
The settings are described on page 7.
When the appliance is turned on, the default menu is CLASSICAL.
Crust colour button
Press the "crust colour" button to select the required crust colour: Light, Medium, Dark.
The default setting is Medium .
Weight 500g 700g 1000g
Press the kg button to select the size of the loaf: 500g, 700g or 1000g.
The default setting is 1200g.
Delay/adjustment
Completion of the chosen programme can be delayed for up to 13 hours by pressing the buttons.
button
Starts the selected recipe or the countdown before the Delay Bake function begins. To stop operation or cancel the timer setting, hold the button down for a few seconds (the appliance emits a beep).
BAKING PROGRESS INDICATOR
The baking progress indicator displays all phases of the baking cycle by means
of an arrow at the side of the display (see figure).
TIMER:
(available for functions 1 to 4 and 8 only). Shows that the Delay Bake function
has been set.
PRECOOKING:
(available for functions 3 and 8 only). The appliance is preheating the ingredients before the initial kneading
phase begins.
KNEADING:
The bread is in one of the two kneading phases, mixing or punching down.
LEAVENING:
The bread is in one of the three leavening phases, encouraged by the low temperature.
BAKING:
The bread is being baked. This is the final stage of the cycle during which a high temperature is required to
bake the bread.
KEEPING WARM:
This process begins when the bread baking cycle is complete. It keeps the bread warm for up to 60 minutes.
END:
The baking cycle has ended.
6

MENU SETTINGS
(1) CLASSICAL
Press the MENU button once,"1" is displayed.
Use this setting to bake traditional white bread.
You can choose three crust colours: Light, Medium or Dark.
The appliance is set by default to make a 1000g loaf with a medium coloured crust.
To select another crust colour, press the "crust colour" button once for darker bread and twice for lighter bread. To make a loaf weighing other than 1000g, press the kg button until you reach the required size.
(2) FRENCH
Use to make crustier French or Italian style bread. Press the MENU button twice,"2" is displayed.
Use this setting to make bread with a low fat and sugar content.
(3) WHOLEMEAL
Wholemeal bread needs a longer leavening time to compensate for the slower rising of the wholemeal flour.
The baking time for wholemeal bread will therefore be longer and the consistency will be denser.
Press the MENU button three times,"3" is displayed. NB: When WHOLEMEAL is selected, the first kneading
phase does not begin at once.
This is due to a 30-minute Preheat phase included in the cycle to guarantee good results.
(4) SWEET
Use to make bread requiring additional ingredients such as sugar, dried fruit, nuts or chocolate to sweeten
it. Press the MENU button four times,"4" is displayed. To avoid the crust being too dark, the Light crust colour
is recommended.
(5 and 6) TURBO
For quicker baking, the TURBO setting speeds up the whole cycle.
A loaf baked using this setting may be smaller and denser given the shorter leavening time.
You are recommended to use the TURBO function to bake Classical, Wholemeal, Sweet, and French bread.
To use the TURBO setting, place the ingredients in the pan and then place the pan in the appliance. Press the
MENU button five or six times, "5 or 6" is displayed.
(7) GLUTEN FREE
The appliance includes a specific recipe to satisfy the needs of the numerous people allergic to gluten.
As the ingredients for gluten free bread are different, before baking you should read the practical tips in the
Gluten Free instructions in the recipe section. This setting can also be used to make unleavened bread.
Read the instructions for unleavened bread in the Recipes section. Press the MENU button eight times,"7" is
displayed.
(8) PASTA DOUGH
Use this setting to make dough for fresh pasta. When the dough is ready, place the pasta in a machine to
make fettuccine, ravioli and lasagne. Read the instructions for Pasta in the Recipes section.
Press the MENU button eight times,"8" is displayed.
(9) PIZZA DOUGH
This setting can be used to create a variety of doughs for croissants, bread rolls and pizza for baking in a
traditional oven. Read the instructions for Dough in the Recipes section.
Press the MENU button nine times,"9" is displayed.
(10) CAKE
This setting can be used to make your favourite cakes or use cake mixes to enjoy hot home baked cake at
any time.
7

8
Press the MENU button ten times,"10" is displayed.
(11) JAM
Use this setting to make sweet, tasty, fresh jam.
Read the instructions for jam in the Recipes section. Press the MENU button eleven times,"11" is displayed.
(12) OVEN
When OVEN is selected, the appliance cooks like a normal electric oven.
This setting remains in operation for one hour and can be controlled manually by pressing the button
to stop the function at any moment.
Use this setting to complete bread baking if there has been a power failure.
In this case, leave the dough to rise in the pan without electricity until it occupies 3/4 of the pan.
Reconnect to the power supply and select (12) OVEN, then press .
This setting can also be used to increase baking times.
If the bread still looks doughy at the end of the baking cycle or you want to bake it more, just select the OVEN
function and continue baking.
NB: you may have to wait for 10-15 minutes for the appliance to cool down before selecting the OVEN programme.
If you try and use the OVEN option before the appliance has cooled down, the error message "E01" is
displayed (see page 24 for further information).
Press the MENU button twelve times,"12" is displayed.
USING THE APPLIANCE
Before using the appliance.
You are recommended to remove the pan (see instructions below) and clean the pan and paddles with a
damp cloth, then dry thoroughly. Do not immerse the pan in water unless strictly necessary. Do not use abrasive cleaning products as they could damage the non-stick surface. Do not wash any accessories in a dishwasher.
Removing the pan
Open the lid of the appliance and remove the pan by holding it by the handle and lifting. It is advisable to
remove the pan before adding the ingredients to avoid them coming in contact with the heating element.
Adding the ingredients
You should add the ingredients to the pan in the specified order. All ingredients must be at room temperature and measured carefully.
Replacing the pan in the chamber
To reposition the pan in the appliance, just place it in the chamber and push downwards until it is correctly
positioned. Leave the handle down towards the side of the pan. Close the lid, plug the appliance into a 230
V AC socket and place the ON/OFF switch on the appliance to "I". NB: when the appliance is plugged in
for the first time, it emits a beep and "menu 1 3:25" is displayed.
Beep for fruit and nuts (certain models only)
Make your bread making more creative. The appliance emits a beep to tell you when to add fruit and/or
nuts. This avoids them breaking up excessively during kneading.

DRIED FRUIT AND NUT DISTRIBUTOR (certain models only)
The appliance has a dried fruit and nut distributor which automatically releases the dry ingredients into the
dough during the kneading cycle.
This occurs about eight minutes before the end of the second kneading phase and guarantees that the dried
fruit and nuts are not broken up, but remain whole and evenly distributed.
The fruit and nut distributor holds one cup of dry ingredients and is available with all menu settings, although its use is recommended only for CLASSICAL (1), FRENCH (2), WHOLEMEAL (3) and SWEET (4).
The fruit and nut distributor is a further feature of the appliance, designed to make it even more convenient
to follow the recipes.
NOTE: do not force the door as this can only be opened automatically by the electronic control.
SIMPLE STEPS TO BAKE WITH THE APPLIANCE
The following instructions are designed to help beginners with every phase of the baking process.
These instructions apply specifically to recipes for bread, dough and pasta (see the Recipes section of these
instructions).
You should weigh all ingredients accurately and use the graduated cup and measure provided.
Phase 1 Add the ingredients
Simply add the ingredients to the pan in the following order:
1. Liquid ingredients
2. Dry ingredients
3. Yeast
For good results, it is important to weigh the ingredients accurately and add them in the correct order.
Phase 2 Select the menu setting
Press the MENU button to make the required selection.
Pressing the MENU button scrolls through the recipes from (1) to (12). The number of the recipe is displayed.
Phase 3 Select crust colour
Press the "crust colour" button to select the required crust colour.
You can choose between Light, Medium or Dark.
If you do not choose a specific crust colour, the appliance will automatically adopt the default of Medium.
Phase 4 Select the weight of the loaf
Press the kg button to select the weight of the loaf: 500g, 700g or 1000g
If you do not choose a specific weight, the appliance will automatically adopt the default of 1000g.
Phase 5 Press
NB: If no selections are made, the appliance will use Menu 1 with a default setting of 1200g and a medium
crust colour.
Press button to start baking with the current settings.
The hours and minutes left before the end of the cycle are displayed.
Phase 6 Hot, fresh, crusty bread
At the end of the baking cycle, the appliance emits a beep and "0:00" is displayed.
The appliance automatically switches to the "Keep Warm" cycle for 60 minutes.
Hot air circulates through the baking chamber, helping reduce condensation.
A red light on the control panel flashes for about 15-20 minutes.
9
 Loading...