


RDM3
WOOD MOISTURE METER
Owner’s Manual
US version - 1.5
For RDM-3 Meters starting with Serial #11925
Delmhorst Instrument Co.
Rev 8
May, 2010
TABLE OF CONTENTS
|
PAGE |
GENERAL DESCRIPTION & SPECIFICATIONS |
3 |
OPERATING INSTRUCTIONS |
4 |
NAVIGATION |
4 |
BATTERY |
4 |
POWER UP |
7 |
METER USE |
7 |
MAIN MENU |
7 |
MOISTURE CONTENT READING |
8 |
MODE – CONTINUOUS /TRIGGERED |
10 |
TEMPERATURE COMPENSATION |
10 |
CREATE/EDIT A JOB |
11 |
SPECIES |
12 |
ALARM |
13 |
APENDING DATA TO A JOB |
14 |
STORAGE MENU |
15 |
VIEW STATISTICS |
16 |
STORED READINGS |
17 |
CLEAR MEMORY |
19 |
RESTORE DEFAULTS |
19 |
IR LINK TO PC |
19 |
SETUP MENU |
22 |
TAKING A READING |
24 |
CARE OF YOUR METER |
25 |
SERVICE FOR YOUR METER |
26 |
WARRANTY |
27 |
SPECIES LIST |
28 |
Copyright ã 2005, Delmhorst Instrument Co.
Page 2 of 28
1.GENERAL DESCRIPTION
Thank you for your purchase of Delmhorst Instrument Co.’s newly designed RDM3 handheld wood moisture meter. The RDM3 follows a long line of “RDM” meters with data acquisition capabilities, and offers the latest in features and functionality. Even with its wide range of functions, the RDM3 is intuitive and easy to operate. We recommend that you read the following pages in detail to take full advantage of all that the RDM3 has to offer.
Outstanding features:
∙MC range 5%-60% (Douglas Fir)
∙Wood species corrections for 69 species
∙Temperature compensation over the range of 0° to 255° F (-18° to 124°C)
∙Operating Temperature of -4°to158°F (-20° to 70°C)
∙Integral contact pins mounted on top of meter - 5/16” penetration
∙Connector for external electrode
∙Date and time stamp for each stored reading
∙Job groupings – up to 98
∙Optional IR linking capability w/ application software
∙Resolution - 0.1% MC
∙Battery - 9V alkaline included
∙Warranty - 1-year
∙Carrying case included
Copyright ã 2005, Delmhorst Instrument Co.
Page 3 of 28
2.Operating Instructions
-User Guide-
This guide provides step-by-step instructions on powering up, using and powering down the meter.
NAVIGATION:
The meter uses an on-screen, menu-driven approach to navigate through the meter features, allowing for an intuitive understanding of keypad functions. Each screen presents the user with a number of selectable options. One of the options is always selected and the user can move (navigate) the selection to any other available option. The keypad is aimed at providing navigational control, and not at accessing specific features. There are four directional keys aligned intuitively around a middle (fifth) key (see Figure 1): Above (UP), below (DOWN), to the right (RIGHT) and to the left (LEFT). The middle key is used to SELECT the option highlighted on the screen.
INSTALLING THE BATTERY:
The battery compartment is located on the underside of the case, at the bottom of the handle.
1.Open the battery compartment by sliding the lid back while pressing on the release indent.
2.Ensure correct polarity, and push the battery in flush with the bottom board until the connectors snap together on both sides.
3.Replace the battery compartment lid.
NOTE: DO NOT REMOVE THE BATTERY WITHOUT TURNING THE METER
OFF FIRST. BATTERY REMOVAL WHILE THE METER IS ON MAY CAUSE LOSS OF STORED READINGS AND MAY CORRUPT THE STORAGE MEMORY. IF THIS OCCURS, CERTAIN FUNCTIONS (SUCH AS STATISTICS, READING RECALL, ETC) WILL FAIL AND LOCK UP THE METER. If the battery is removed by accident while the meter is ON, and if the readings already stored
Copyright ã 2005, Delmhorst Instrument Co.
Page 4 of 28
are important, DO NOT store additional readings. Turn the meter back on and perform a PC download. Beware that any readings stored during the power cycle that included the battery removal WILL NOT be available and CANNOT be recovered. Once the download is complete, perform a meter reset by choosing “RESTORE DEFAULTS” in the Storage Menu. If a download is not necessary, go directly to “RESTORE DEFAULTS”.
LOW BATTERY:
The meter features a battery status monitor, designed to warn the user as well as protect measurement accuracy from impending battery failure conditions. The battery warning is triggered by either continuous or temporary low voltage conditions. Visible (a battery icon on the top right side of the display) and audible (buzzer warble) indicators accompany a battery warning.
Once a permanent low battery condition is detected, all measurement functions are disabled. Enough power remains for other menu functions, including a PC download, although almost any user action at this time causes a low-battery warning to be generated. The battery should be replaced immediately. If the battery reaches critical levels, the meter will refuse to stay on at power-up. This gradual warning system is intended to provide the user advanced battery
status notice and give ample time for replacement before operational limitations occur.
NOTE: Stored readings are not lost during battery replacement or low battery conditions. Current meter settings are maintained as well.
Copyright ã 2005, Delmhorst Instrument Co.
Page 5 of 28

Fig. 1 Keypad Layout
Copyright ã 2005, Delmhorst Instrument Co.
Page 6 of 28

POWERING UP THE METER:
1.Press and hold the center (SELECT) button.
2.The meter switches on and displays the meter name and software version for a couple of seconds. If the button is released during this time the meter will turn off immediately.
3.Following the meter name/software version screen, the meter switches the display to the Main Menu and pre-selects the “MC Read” mode option. Release the SELECT button at any time now and the meter will
remain ON.
NOTE: Once the power-on cycle is complete, the center button returns to its main function of SELECTing the currently highlighted option on the screen.
3. Meter Use
This chapter describes each meter menu in detail, as well as the use of each meter feature.
MAIN MENU:
The RDM3 Main Menu is the default screen at power-up. It provides access to every available meter function, as well as to each feature or feature category.
oMC READ: This menu option selects the contact Moisture Content measurement function
oStorage: This menu option selects Reading Storage and related features. They are: View Statistics, Stored Readings, Clear Memory, Restore
Defaults
o IR Link: This menu option selects the PC download interface feature
Copyright ã 2005, Delmhorst Instrument Co.
Page 7 of 28
oSetup: This menu option selects access to the rest of the meter features: Set Date and Time, Set Power-off Time, Set Backlight and Conversions
oOff: This menu options turns the meter off. It should be noted here that the meter will remember certain configurable parameters through to the next power-up.
Meter functions:
MC READ:
The RDM3 operates on the principle of electrical resistance - it uses wood as the element in a circuit by driving two electrode pins into it. This method is effective because moisture is an excellent conductor of electricity and wood is an effective insulator. Besides the moisture content itself, the factors that affect the accuracy of the readings are the wood temperature and species. To insure reliable results, set the meter to the appropriate temperature and species parameters before taking readings.
The meter is able to store MC measurement results for review, statistical analysis or download to a PC. In order to allow the user to better keep track of stored data, the meter organizes MC readings in groups called JOBS.
oA reading cannot be taken or stored without being part of a job. There are no limitations to a job size, other than those imposed by
storage memory limits.
o The meter supports up to 98 different jobs at any one time.
oThe meter imposes strict boundaries among existing jobs. All operations on stored data can only be performed on the job
selected.
o The meter restricts each job to one species. Only readings taken from the same species can belong to a specific job. More than one job can be defined with the same species.
RDM3 automatically configures MC READ Mode with the following default set of parameters when this feature is first accessed:
Copyright ã 2005, Delmhorst Instrument Co.
Page 8 of 28
o |
Default species: |
Douglas Fir |
o |
Default Temperature : |
70F |
o |
Default Job Number: |
1 |
o |
Default Electrode: |
4P Nonins(ulated) |
o |
Alarm |
Off |
o |
Mode |
Trig |
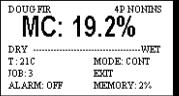
An example of the main MC READ screen is shown below:
This screen provides a complete snapshot of the current meter settings, as well as the current reading. In the upper left corner the meter indicates the current species being measured. The large text in the line below shows the current MC measurement. The Dry-Wet bar below shows where the current reading falls between “DRY” and a user-defined “WET” condition.
NOTE: The “WET” bar limit is directly tied to the Alarm value, when it is used. If the Alarm feature is off, the WET bar limit is reached at a reading of 17% MC Douglas Fir. If other species are used, this value becomes the species-corrected reading for 17% MC Douglas Fir.
Below the Dry-Wet bar is an information area, showing the current temperature compensation, job number, alarm setting, measurement mode and percent storage memory used. The EXIT option allows the user to exit this function. The main MC READ screen has both selectable and non-selectable items.
Non-selectable items:
o SPECIES NAME (top line) o DRY/WET bar
o The MEMORY status (bottom right corner)
Selectable items:
o MC reading (large text)
Copyright ã 2005, Delmhorst Instrument Co.
Page 9 of 28
 Loading...