

Page 1

Wyse Datacenter Appliance XC for VMware
View
Deployment Guide
Dell Wyse Solutions Engineering
November 2014
A Dell Deployment and Configuration Guide
Page 2

Date
Description
November 2014
Initial release
Revisions
Copyright © 2014 Dell Inc. All rights reserved. This product is protected by U.S. and international copyright
and intellectual property laws. Dell™ and the Dell logo are trademarks of Dell Inc. in the United States
and/or other jurisdictions. All other marks and names mentioned herein may be trademarks of their
respective companies.
2014–11
Rev. A00
2 Wyse Datacenter Appliance XC for VMware View
Page 3

Contents
Revisions .................................................................................................................................................................................................................... 2
1 Overview............................................................................................................................................................................................................ 4
1.1 Purpose of this document .............................................................................................................................................................. 4
1.2 Scope ...................................................................................................................................................................................................... 4
2 Configuring Nutanix Storage Pool and Containers .......................................................................................................................... 5
3 Installing vCenter Server Appliance ........................................................................................................................................................ 8
3.1 Appliance Installation ....................................................................................................................................................................... 8
3.2 Adding Hosts to vCenter ...............................................................................................................................................................28
3.3 Setting up vCenter Networking ..................................................................................................................................................34
4 Installing SQL Server .................................................................................................................................................................................. 49
5 Installing VMware View Connection Server ....................................................................................................................................... 51
6 Installing a VMware View Composer Instance .................................................................................................................................63
7 Configuring a VMware View Connection Server ............................................................................................................................ 69
8 Installing Remote Desktop Services Role on Windows Server 2012 R2 ................................................................................. 77
9 Adding RDSH Servers to a VMWare View Farm ............................................................................................................................... 88
10 Deploying Virtual Desktop Master Image ...........................................................................................................................................93
10.1 Creating Template VM ...................................................................................................................................................................93
10.2 Optimizing Desktop OS .................................................................................................................................................................93
3 Wyse Datacenter Appliance XC for VMware View
Page 4

1 Overview
1.1 Purpose of this document
This document describes:
Configuration of Nutanix Storage Pool and Containers.
The tasks to be completed to install VMware vCenter Appliance, VMware View 6.0, and View
Composer 6.0.
Guidance for creating the required SQL Databases.
The tasks to be performed to install the Server 2012 RDSH Roles and add RDSH Session Hosts to a
Farm.
Configure each of the core components.
1.2 Scope
The objectives of this document are:
Provide the specific configuration required for a XC720xd View VDI Solution
Provide the Application and network security recommendations.
Provide installation guidance for a VMware View Solution leveraging the VMware vCenter Appliance
Provide guidance on the setup of VMware View RDS Farms.
4 Wyse Datacenter Appliance XC for VMware View
Page 5
2 Configuring Nutanix Storage Pool and Containers
To use the cluster storage, you must configure a storage pool and containers within the pool. Create only
one pool consisting of all the disks in the cluster. Within the storage pool, we recommend creating
multiple containers for a logical distinction between the compute and management storage layers.
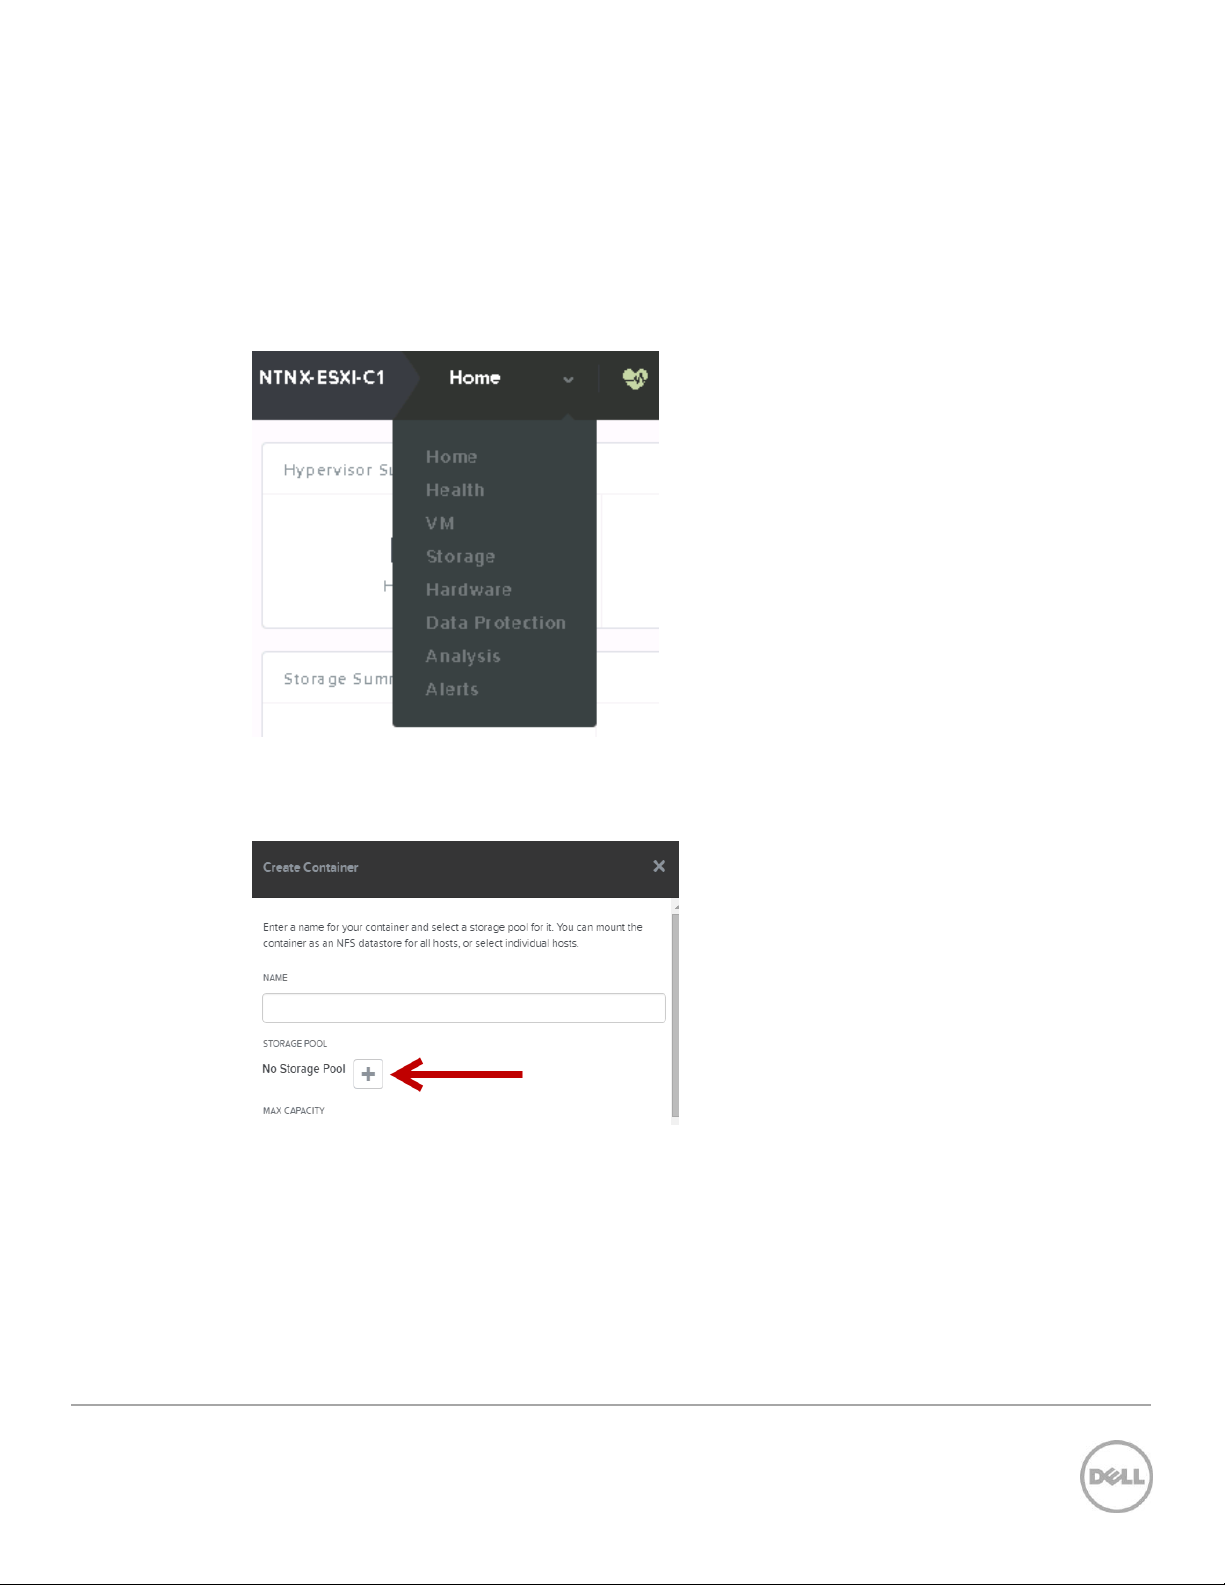
1. To configure the storage pool and containers, log in to the Nutanix Web Console. From the
Home drop-down menu, select Storage.
Figure 1 Nutanix Web Console
2. Click the Create Container link and click the plus symbol (+) under the STORAGE POOL section to
create a pool.
Figure 2 Create Container Wizard
5 Wyse Datacenter Appliance XC for VMware View
Page 6
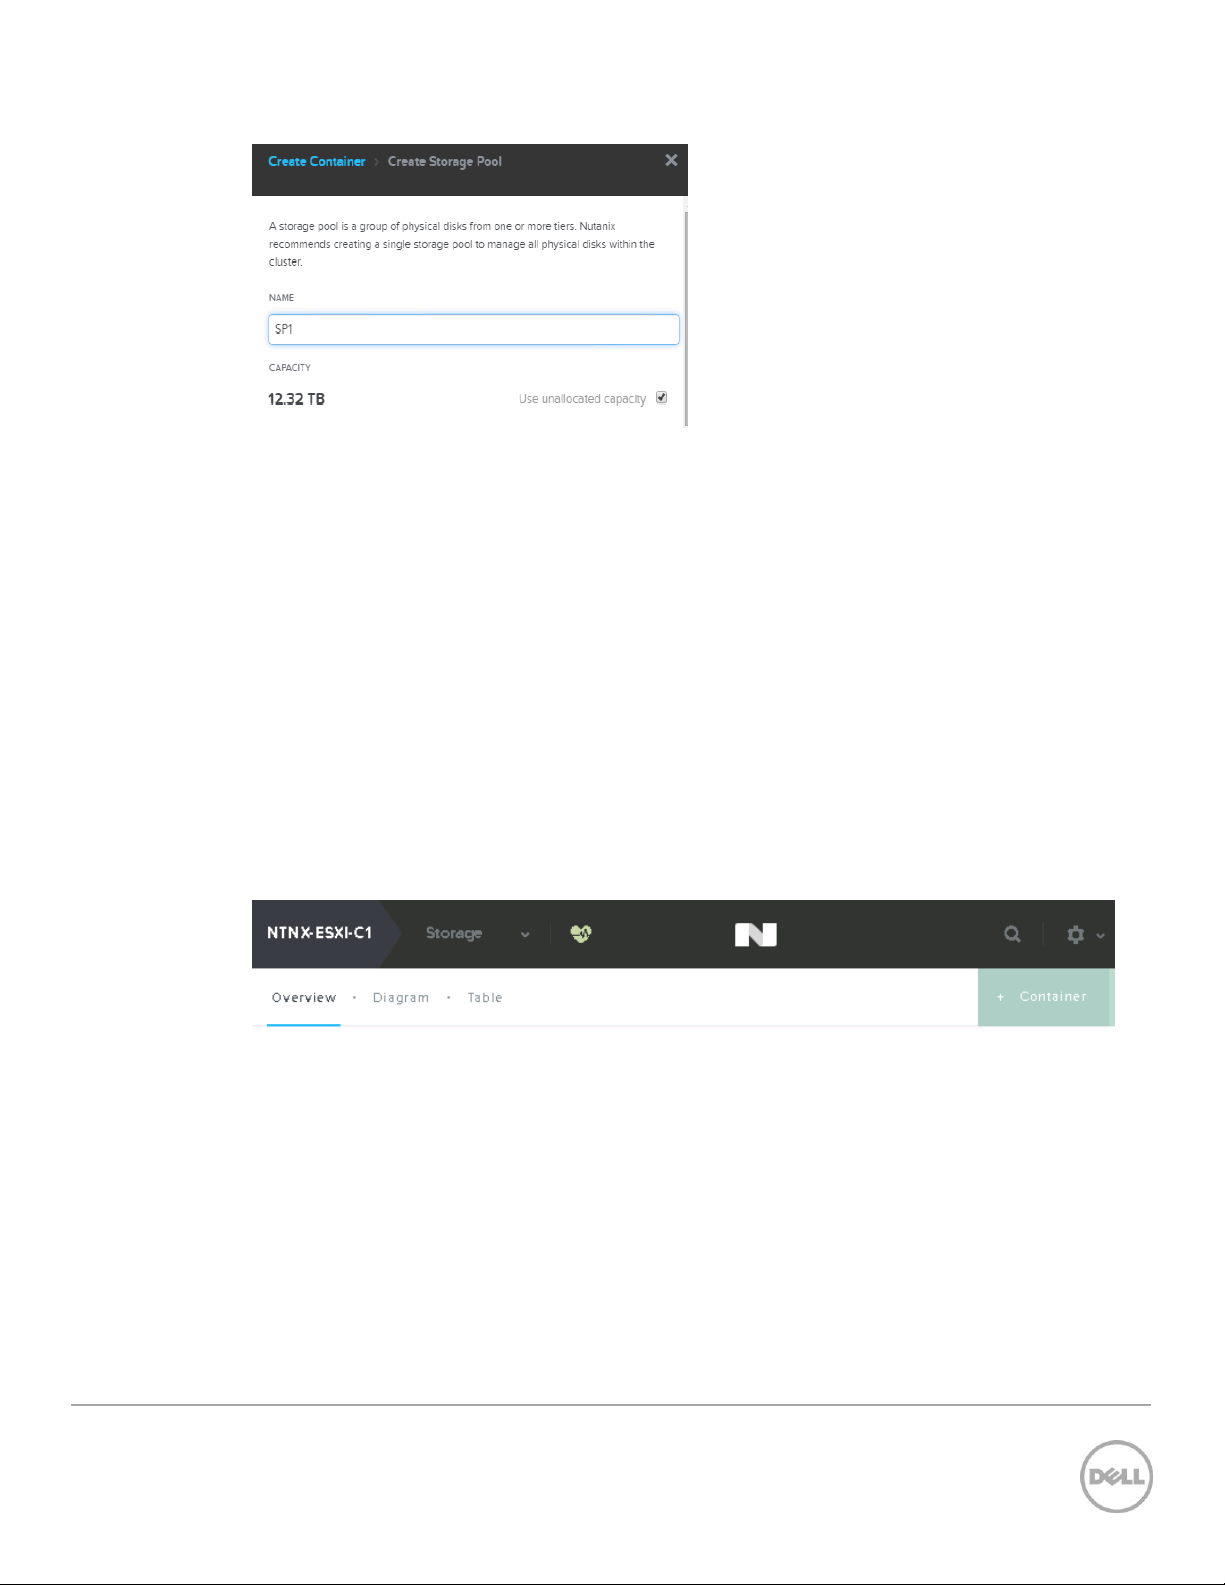
Figure 3 Creating Storage Pool
3. Type a name for the pool (for example, SP1) and use all unallocated disk space. Click Save. On the
Create Container page, to view additional settings, click the Advanced Settings button. The
recommended settings are as follows:
Replication Factor: 2
Reserved Capacity: 4096 GB (only for the “Compute” container that contains the persistent
virtual desktops)
Compression: Disabled
Delay: 0 minutes
Perf Tier Deduplication: On
Capacity Tier Deduplication: On (Post-Process)
4. Type a name for the management container. For example, “ds_mgmt, and click Save. Click +
Container to add another container for the compute or RDSH layer. Use the same advanced settings,
type a name (for example, ds_compute or ds_rdsh) and click Save. If you are using desktops and RDSH
on the same cluster, create an additional container for logical separation.
Figure 4 Overview
6 Wyse Datacenter Appliance XC for VMware View
Page 7
Hyper-V Hypervisor and SMB Shares
SMB shares are used to store the virtual machine disks and settings files. The cluster name is the “host”
portion of the SMB share name. If not created during the Nutanix cluster setup, add a DNS entry for this
name and point it to the cluster IP address. The container names that you created earlier are used as the
share names. The resulting share name will be \\{cluster-name}\{container-name}. For example:
\\cluster\ds_mgmt.
By default, only the cluster hosts have access to the SMB shares. To change this, you must modify the
whitelist on the cluster. At a minimum, the IP address of the System Center VMM host must be added. If
you want all management hosts to be able to access, you can specify the network segment as opposed to
single IP addresses.
NOTE: The shares must be used only for storing VDI -related components.
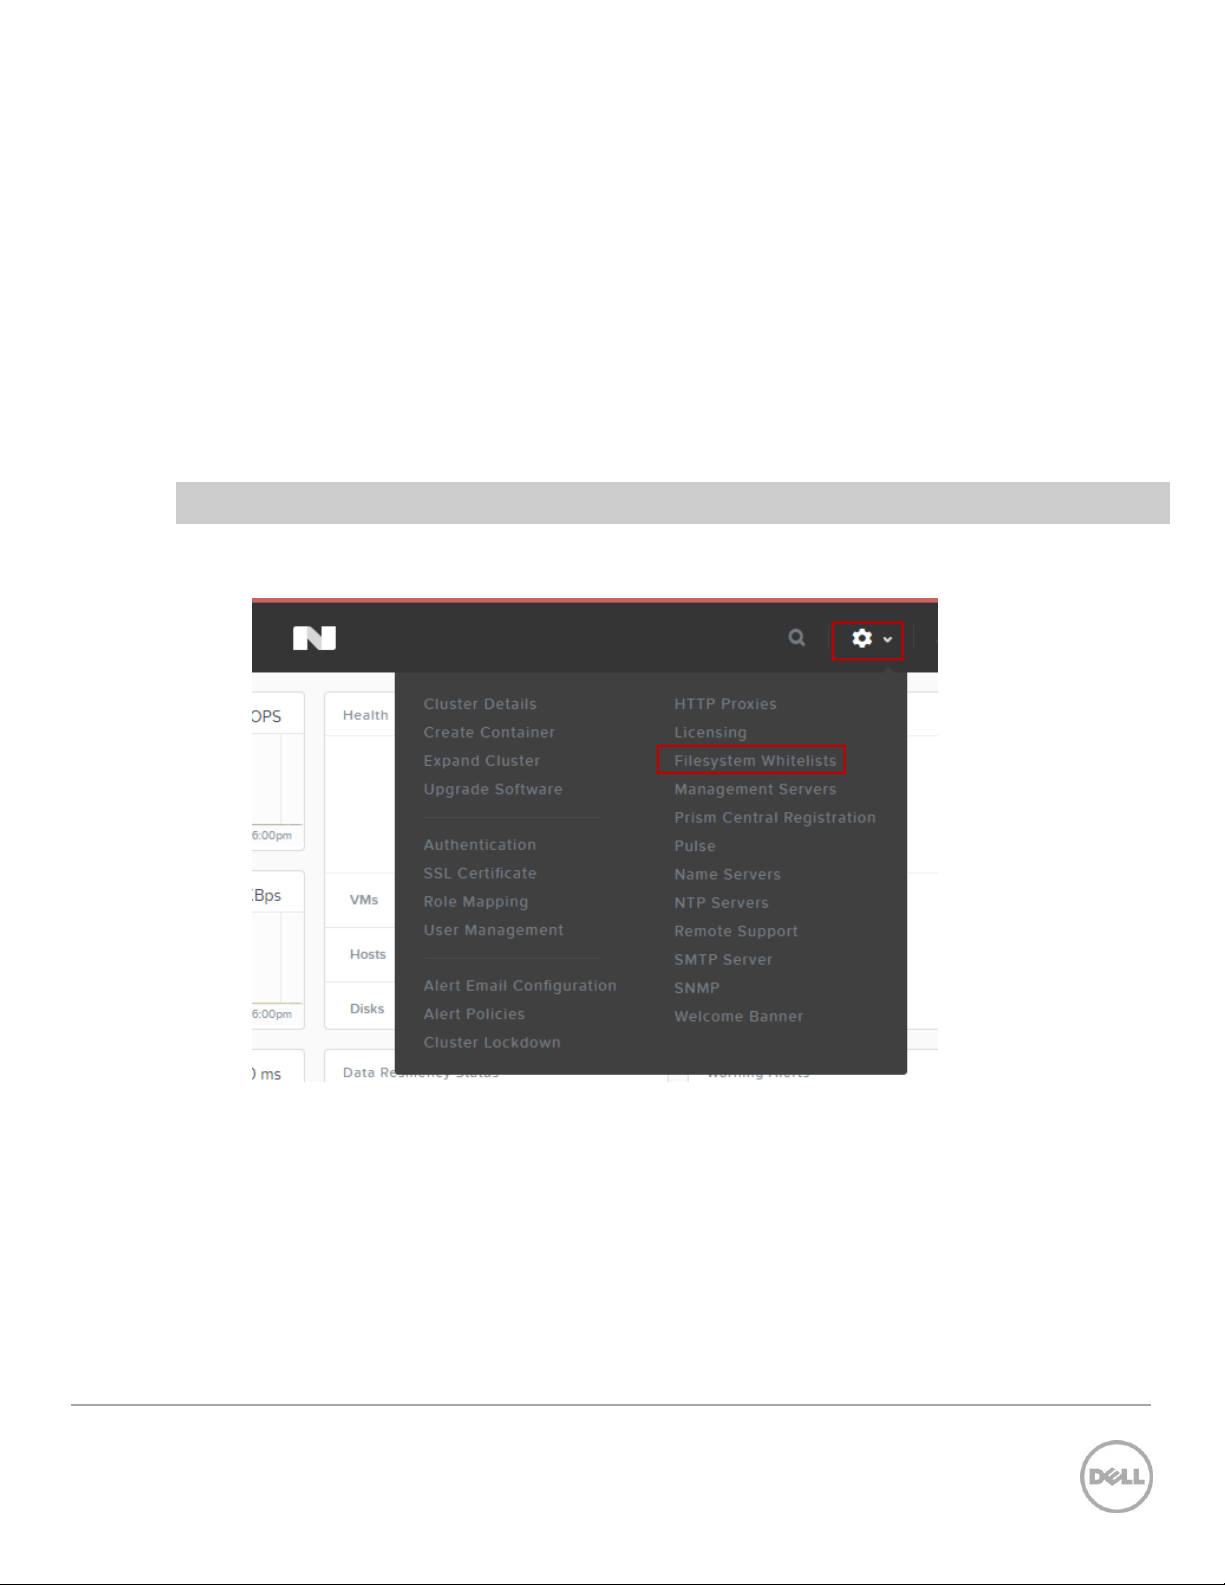
To modify the Whitelist, go to the Nutanix Web Console, click the configuration wheel symbol in the
upper-right corner, and then click Filesystem Whitelists.
Figure 5 Filesystem Whitelists
Type the desired host IP address or network segment and click Add.
7 Wyse Datacenter Appliance XC for VMware View
Page 8
3 Installing vCenter Server Appliance
The deployment of desktop pools within VMware View requires that an install of the following VMware
components is completed successfully: VMware vCenter Server Appliance, VMware View, and VMware
View Composer and an associated SQL server VM. The VMware vCenter VM will be created using the
VMware vCenter Server Appliance. The VMware vCenter Server Appliance is a preconfigured Linux-based
virtual machine that is optimized for running vCenter Server and associated services. Visit the VMware
website for information on downloading version 5.5.0 and licensing.
3.1 Appliance Installation
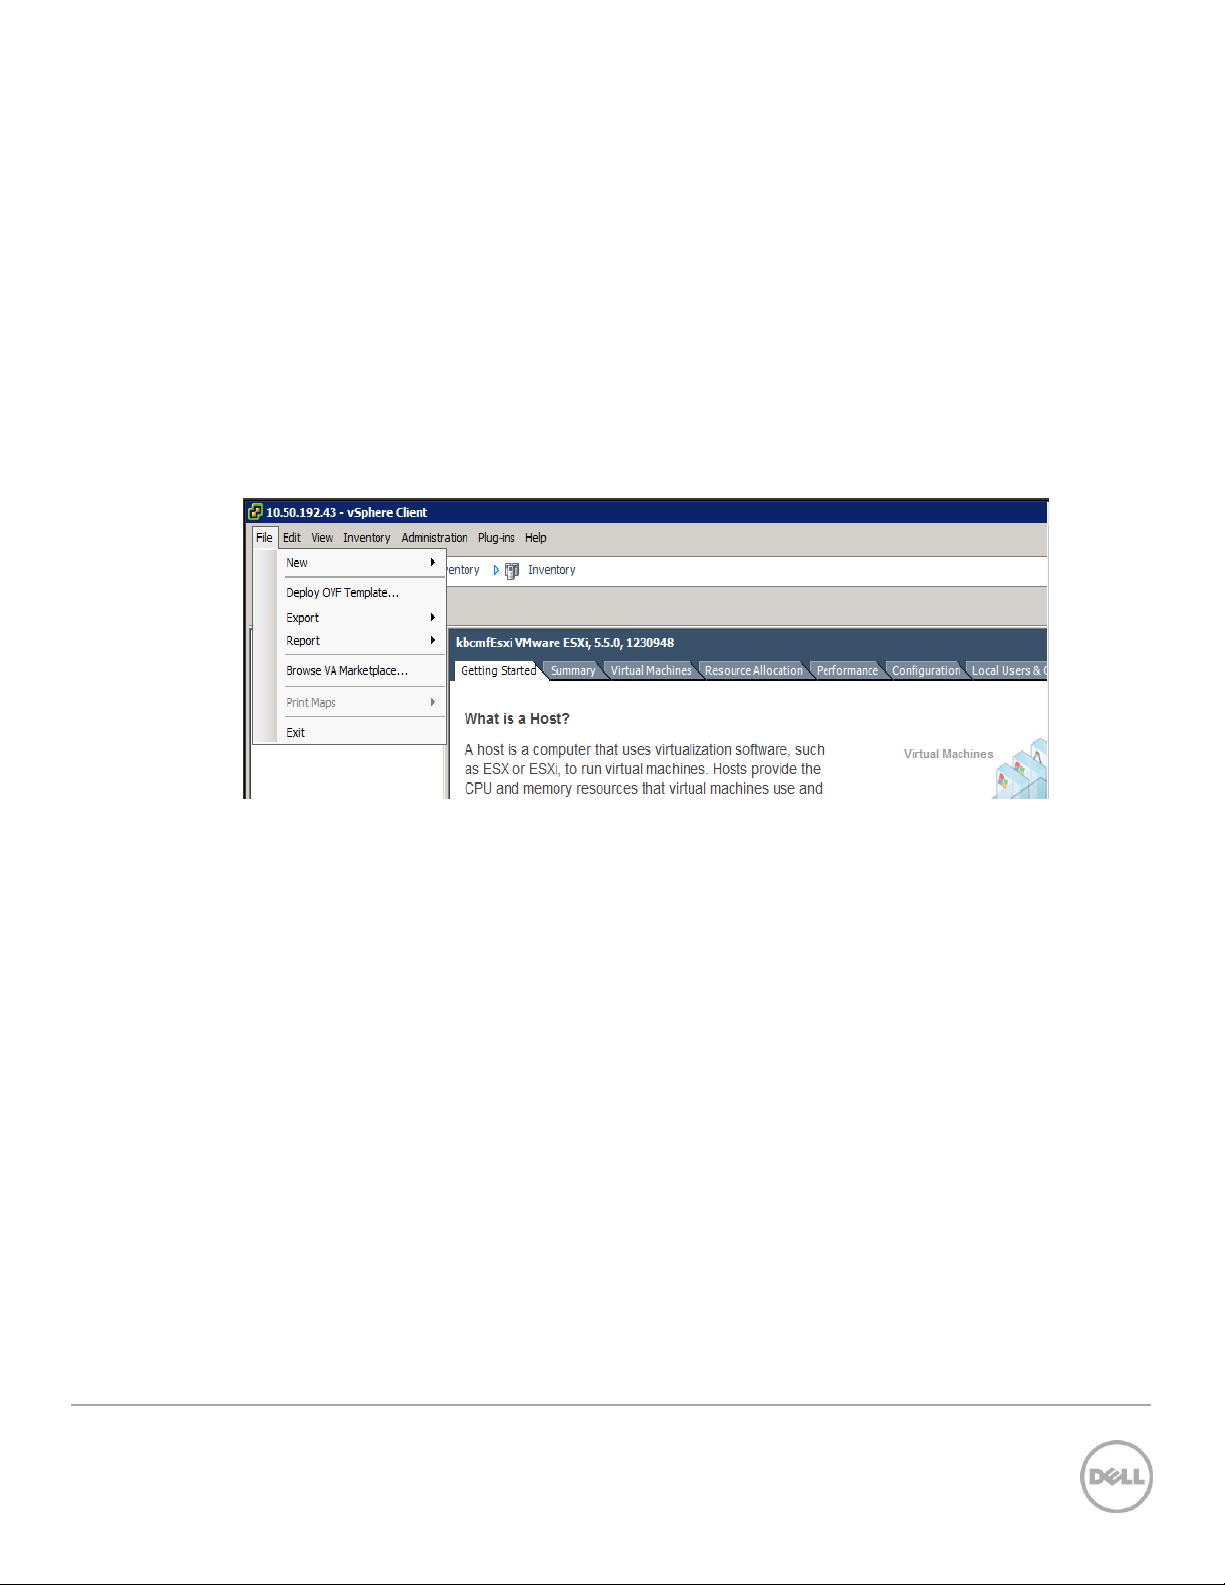
1. Connect to one of the Nutanix configured ESXi hosts using the VMware vSphere client.
2. In the VMware vSphere client select File and Deploy OVF Template.
Figure 6 Deploy OVF Template
8 Wyse Datacenter Appliance XC for VMware View
Page 9
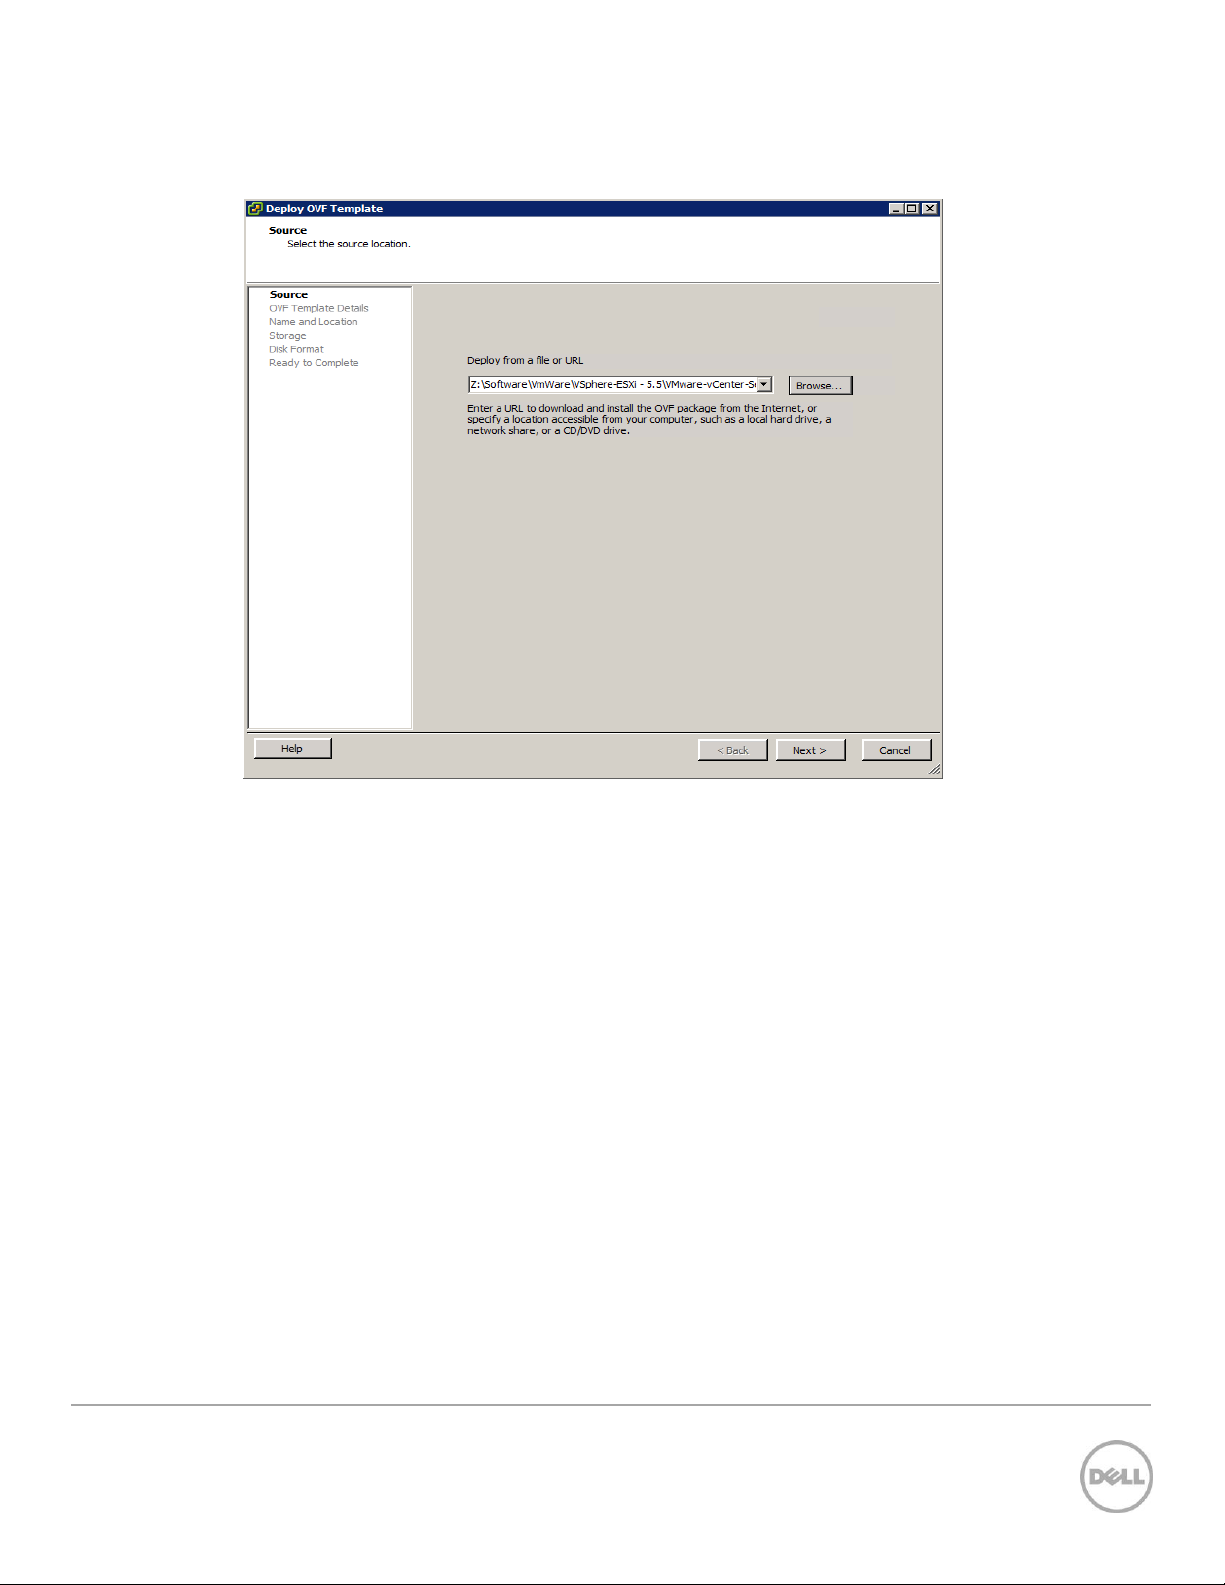
3. In the OVF deployment wizard, click Browse and select the vCenter Appliance OVF template file and
click Next.
Figure 7 Select OVF Template file.
9 Wyse Datacenter Appliance XC for VMware View
Page 10
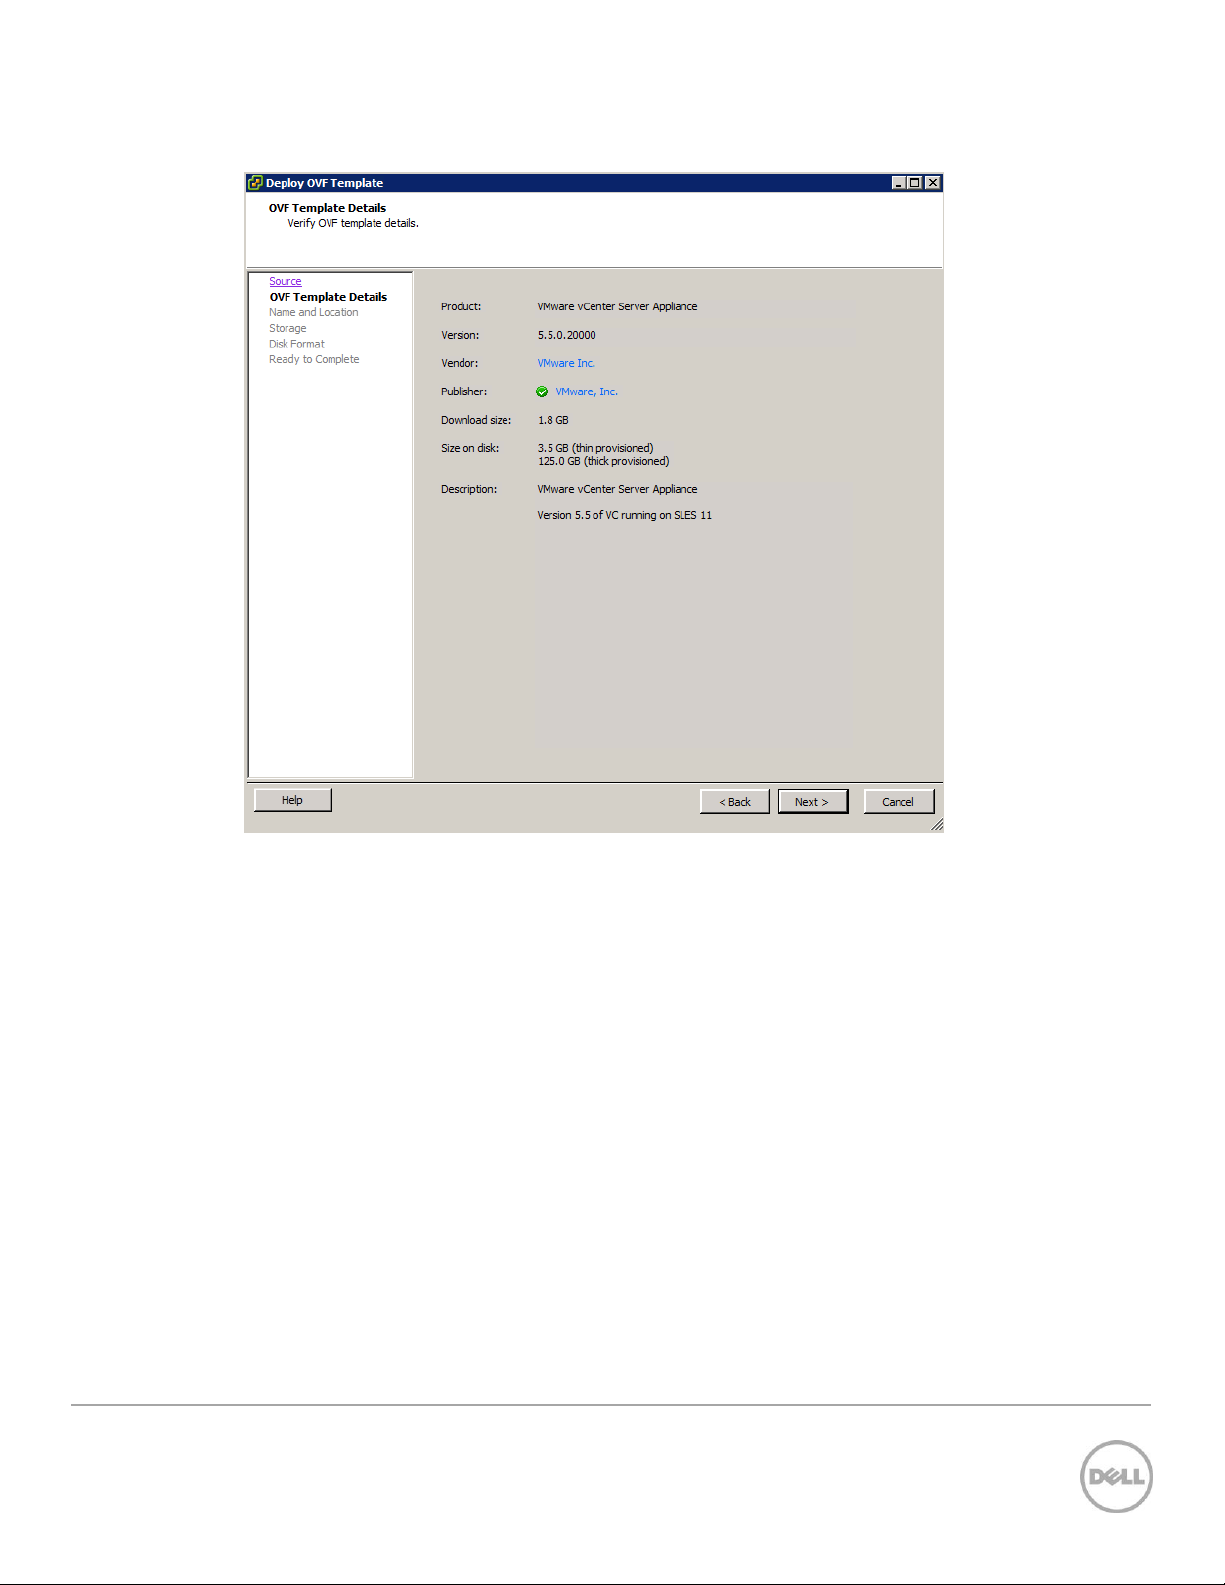
4. Confirm the template details and click Next.
Figure 8 OVF Template Details
10 Wyse Datacenter Appliance XC for VMware View
Page 11
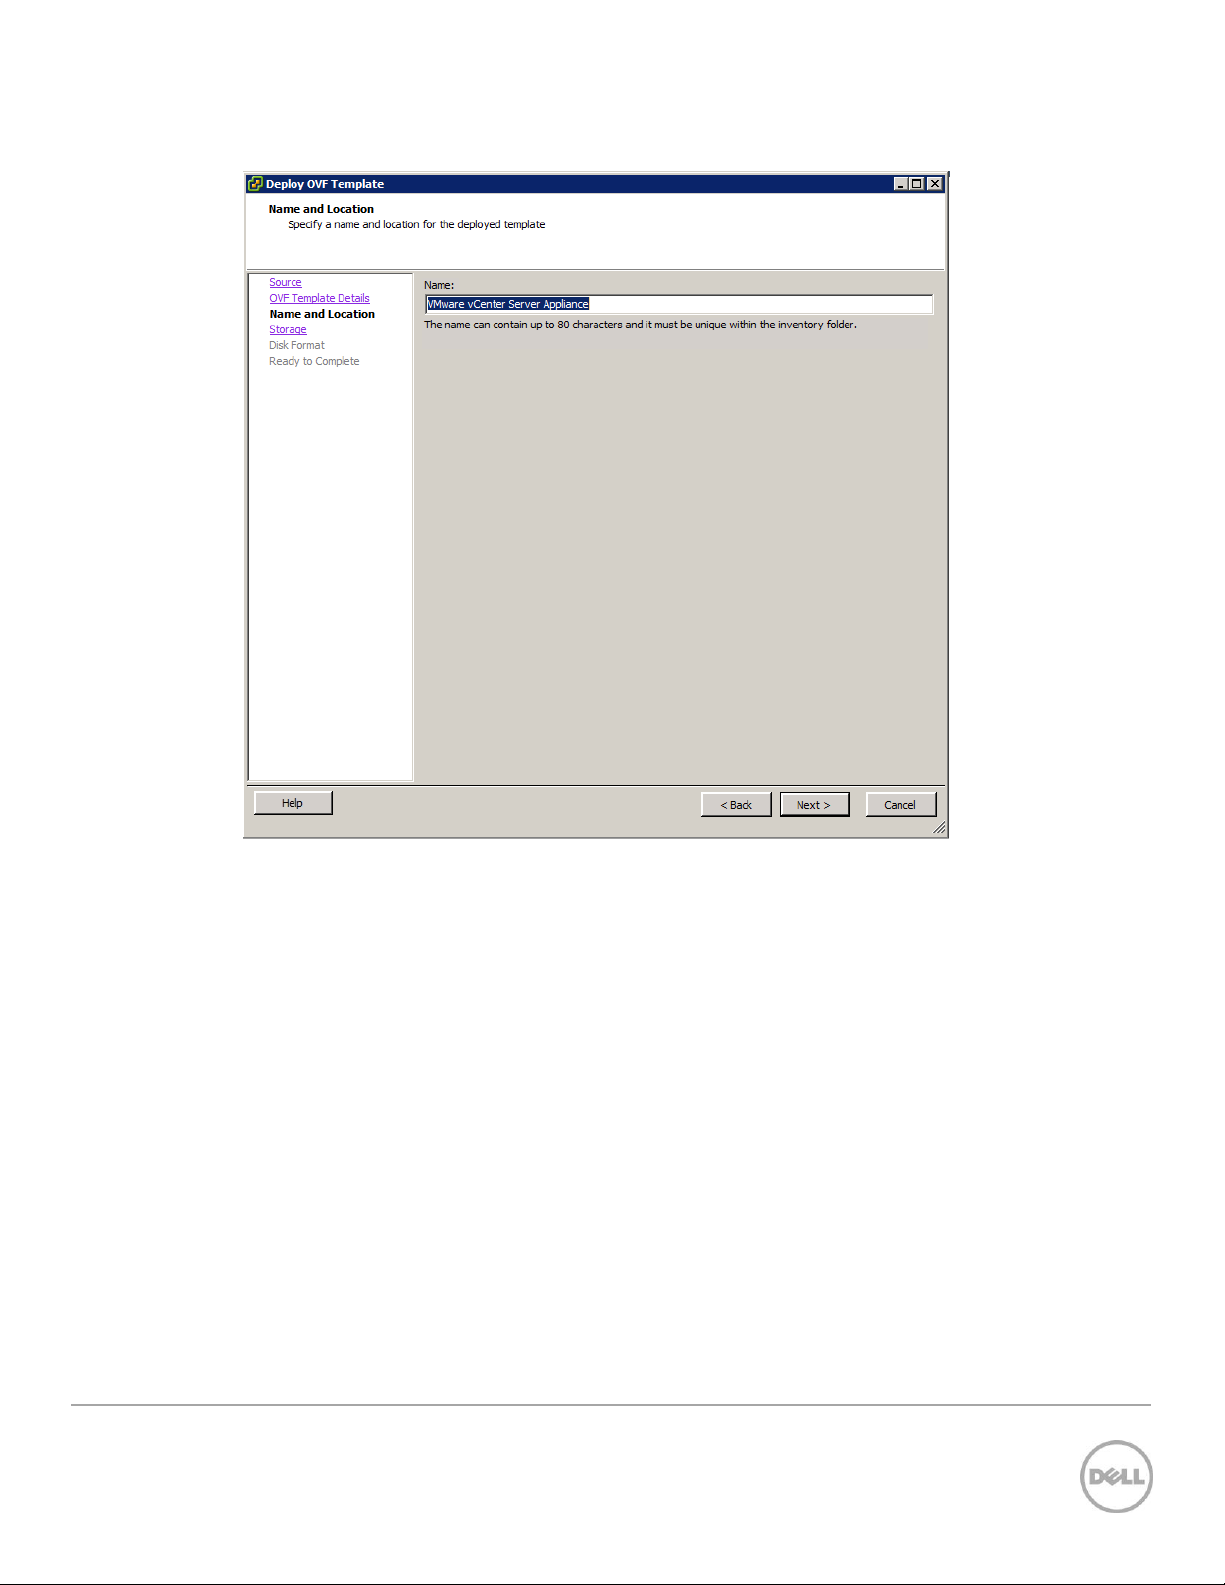
5. Specify a name for the vCenter Server Appliance VM and click Next.
Figure 9 vCenter Appliance Name
11 Wyse Datacenter Appliance XC for VMware View
Page 12
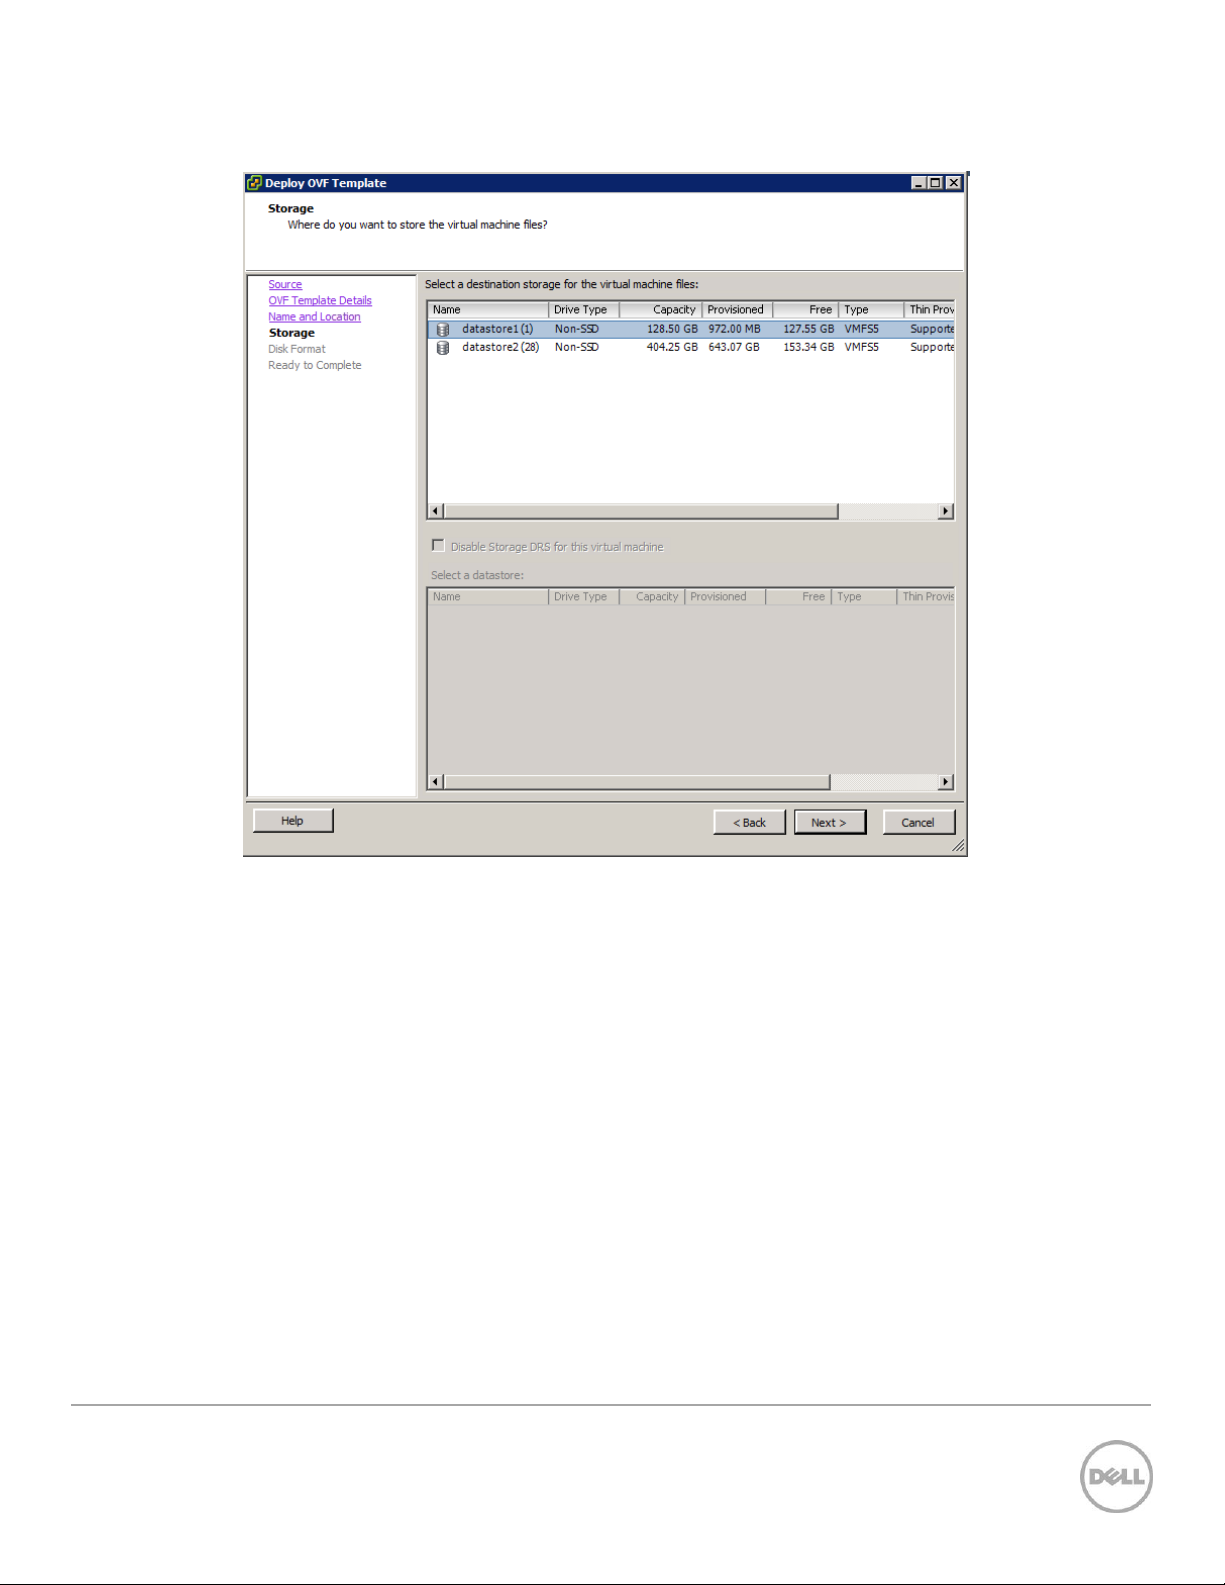
6. Select a storage location and click Next.
Figure 10 Select Storage
12 Wyse Datacenter Appliance XC for VMware View
Page 13
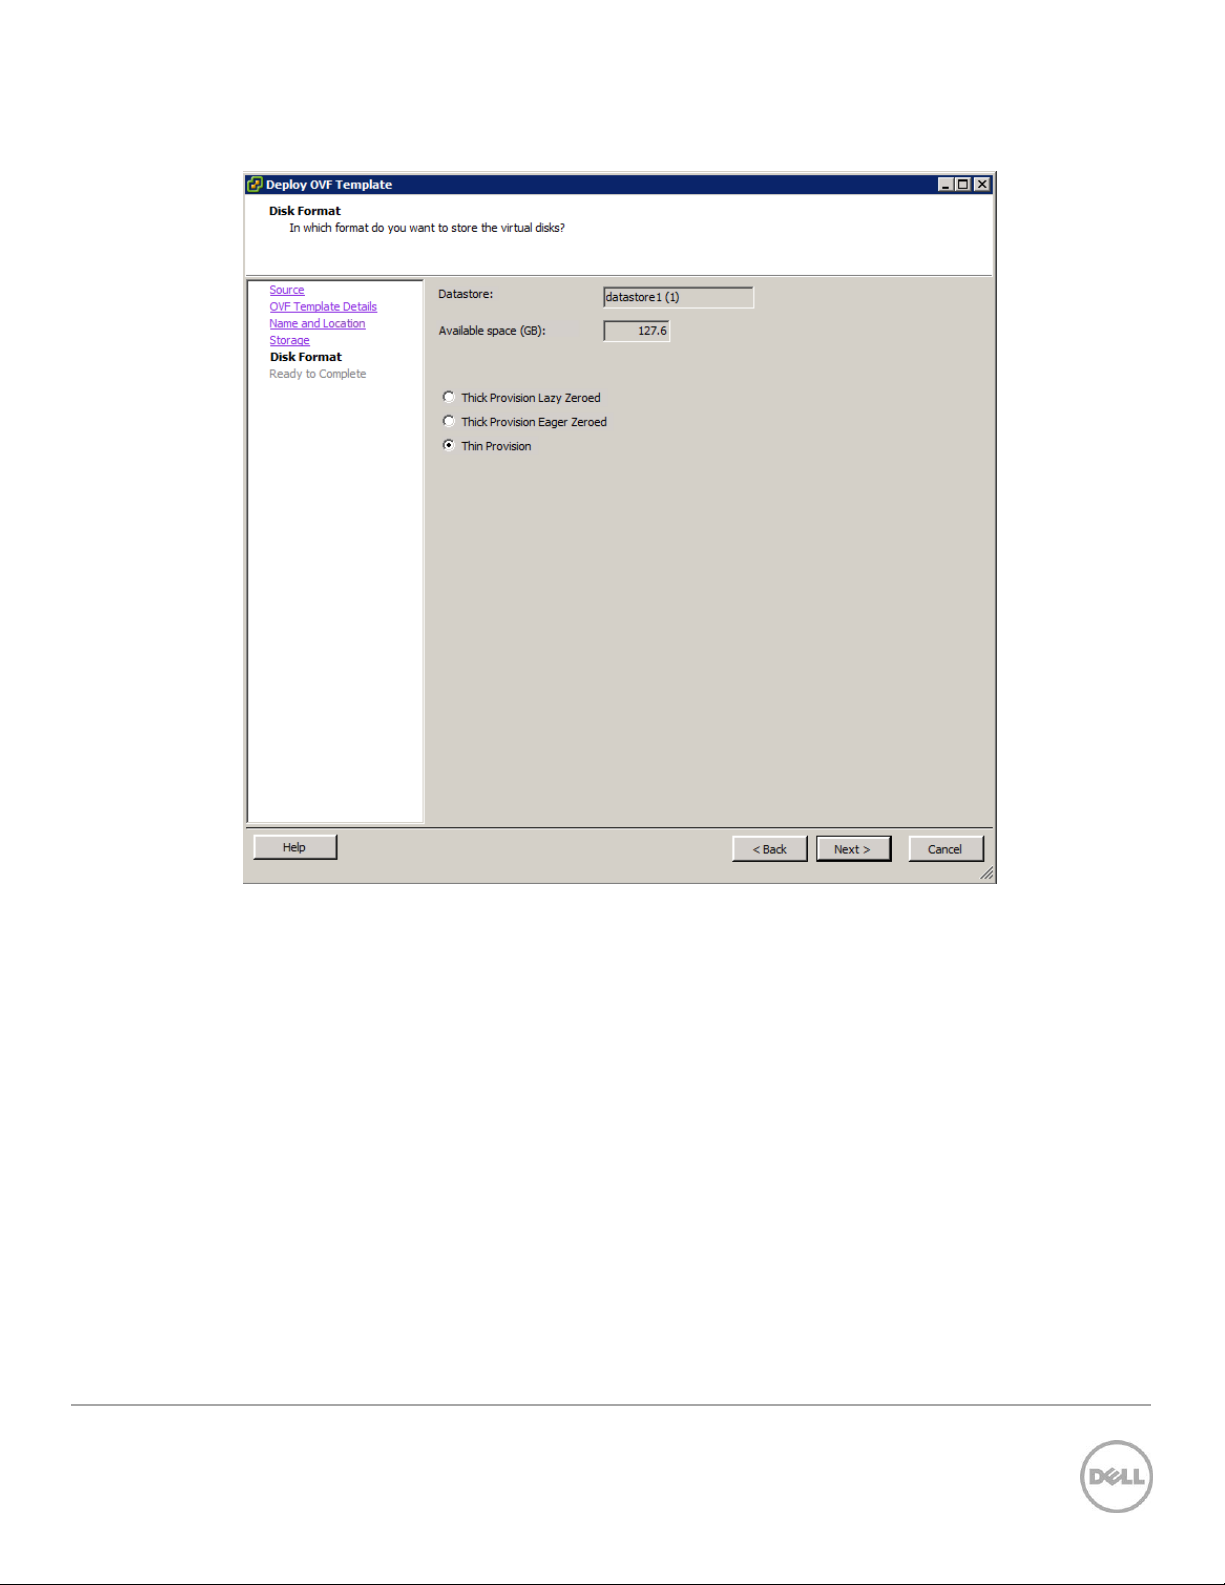
7. Select the required disk format and click Next.
Figure 11 Disk Format
13 Wyse Datacenter Appliance XC for VMware View
Page 14

8. Review the settings and click Finish to deploy.
Figure 12 Finish OVF Deployment Wizard
The vCenter Appliance deployment process will now start.
Figure 13 vCenter Appliance Deployment Progress
14 Wyse Datacenter Appliance XC for VMware View
Page 15

After deployment, the vCenter Appliance VM will appear listed under the ESXi host in the vSphere
Client window.
Figure 14 vCenter Appliance
9. Turn on the vCenter Appliance VM and open the Console tab to view the on-screen Quick Start
Guide.
Figure 15 vCenter Appliance VM Powered On
15 Wyse Datacenter Appliance XC for VMware View
Page 16
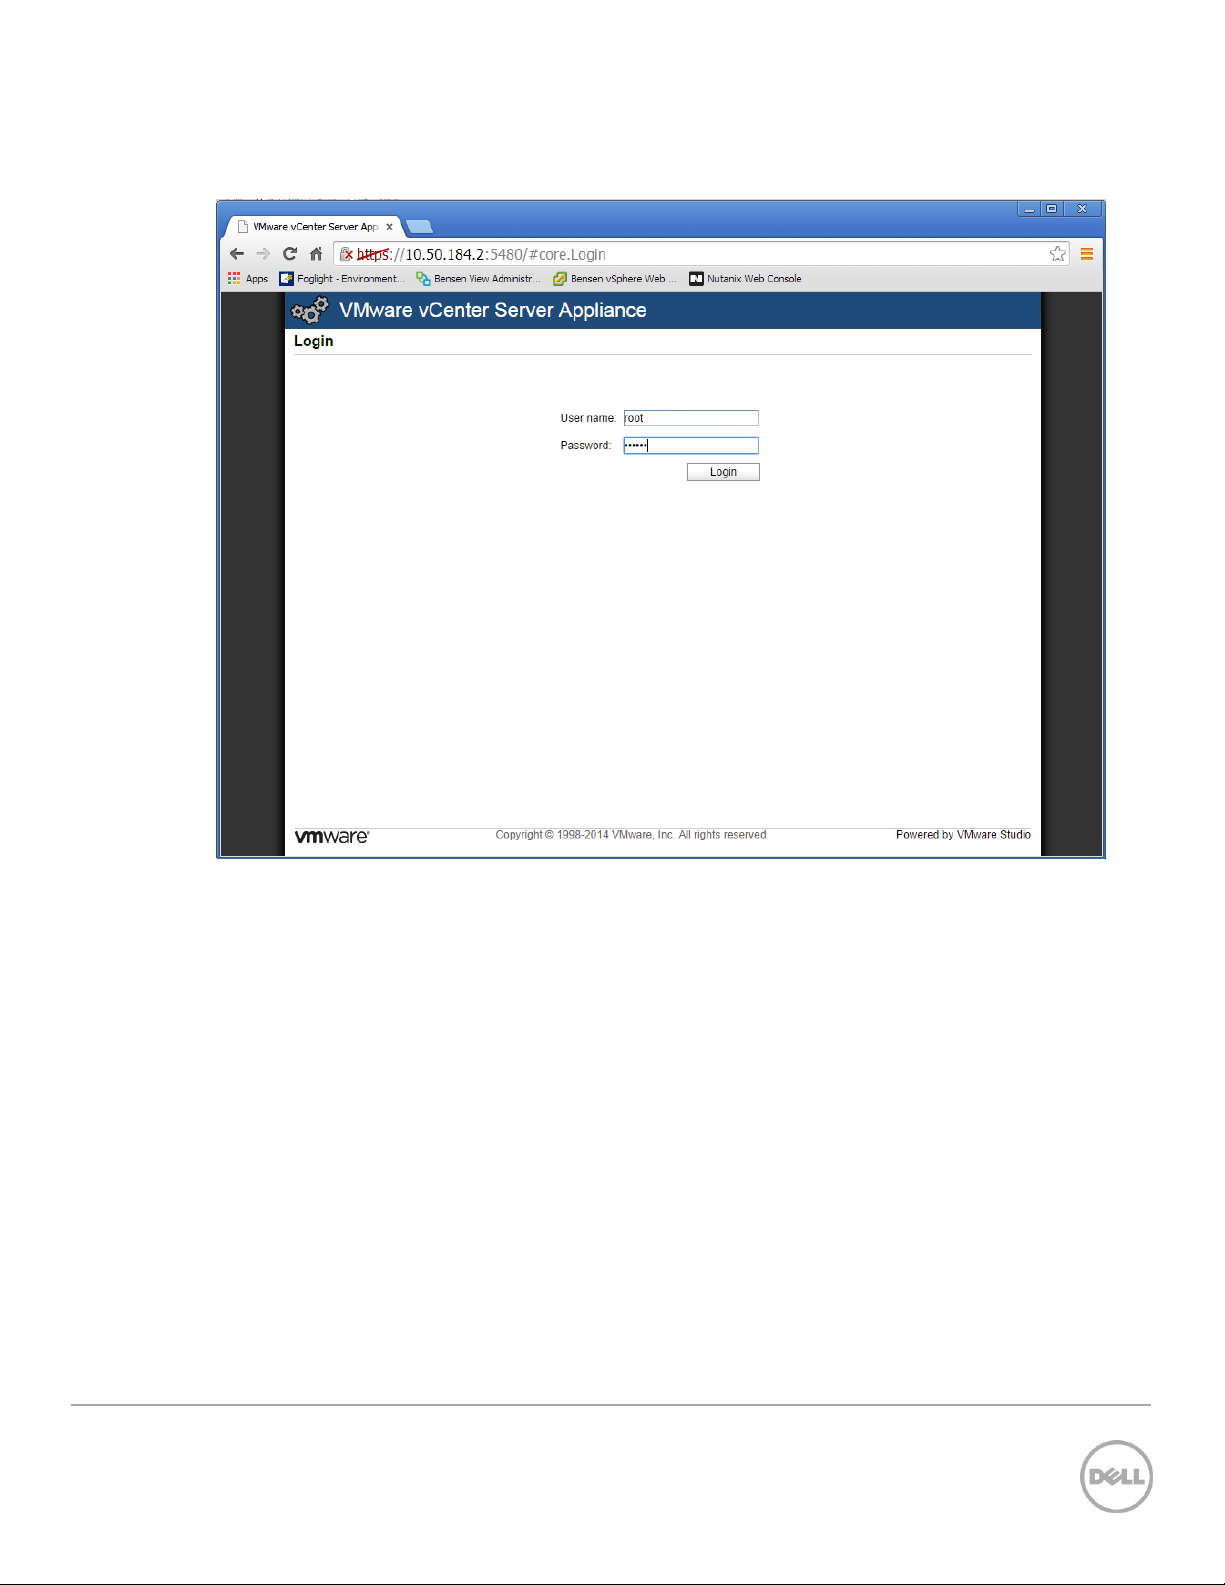
10. Open a web browser window to the URL indicated in the Quick Start Guide and type the user name
root and password vmware, and then click Login.
Figure 16 vCenter Appliance login screen
16 Wyse Datacenter Appliance XC for VMware View
Page 17
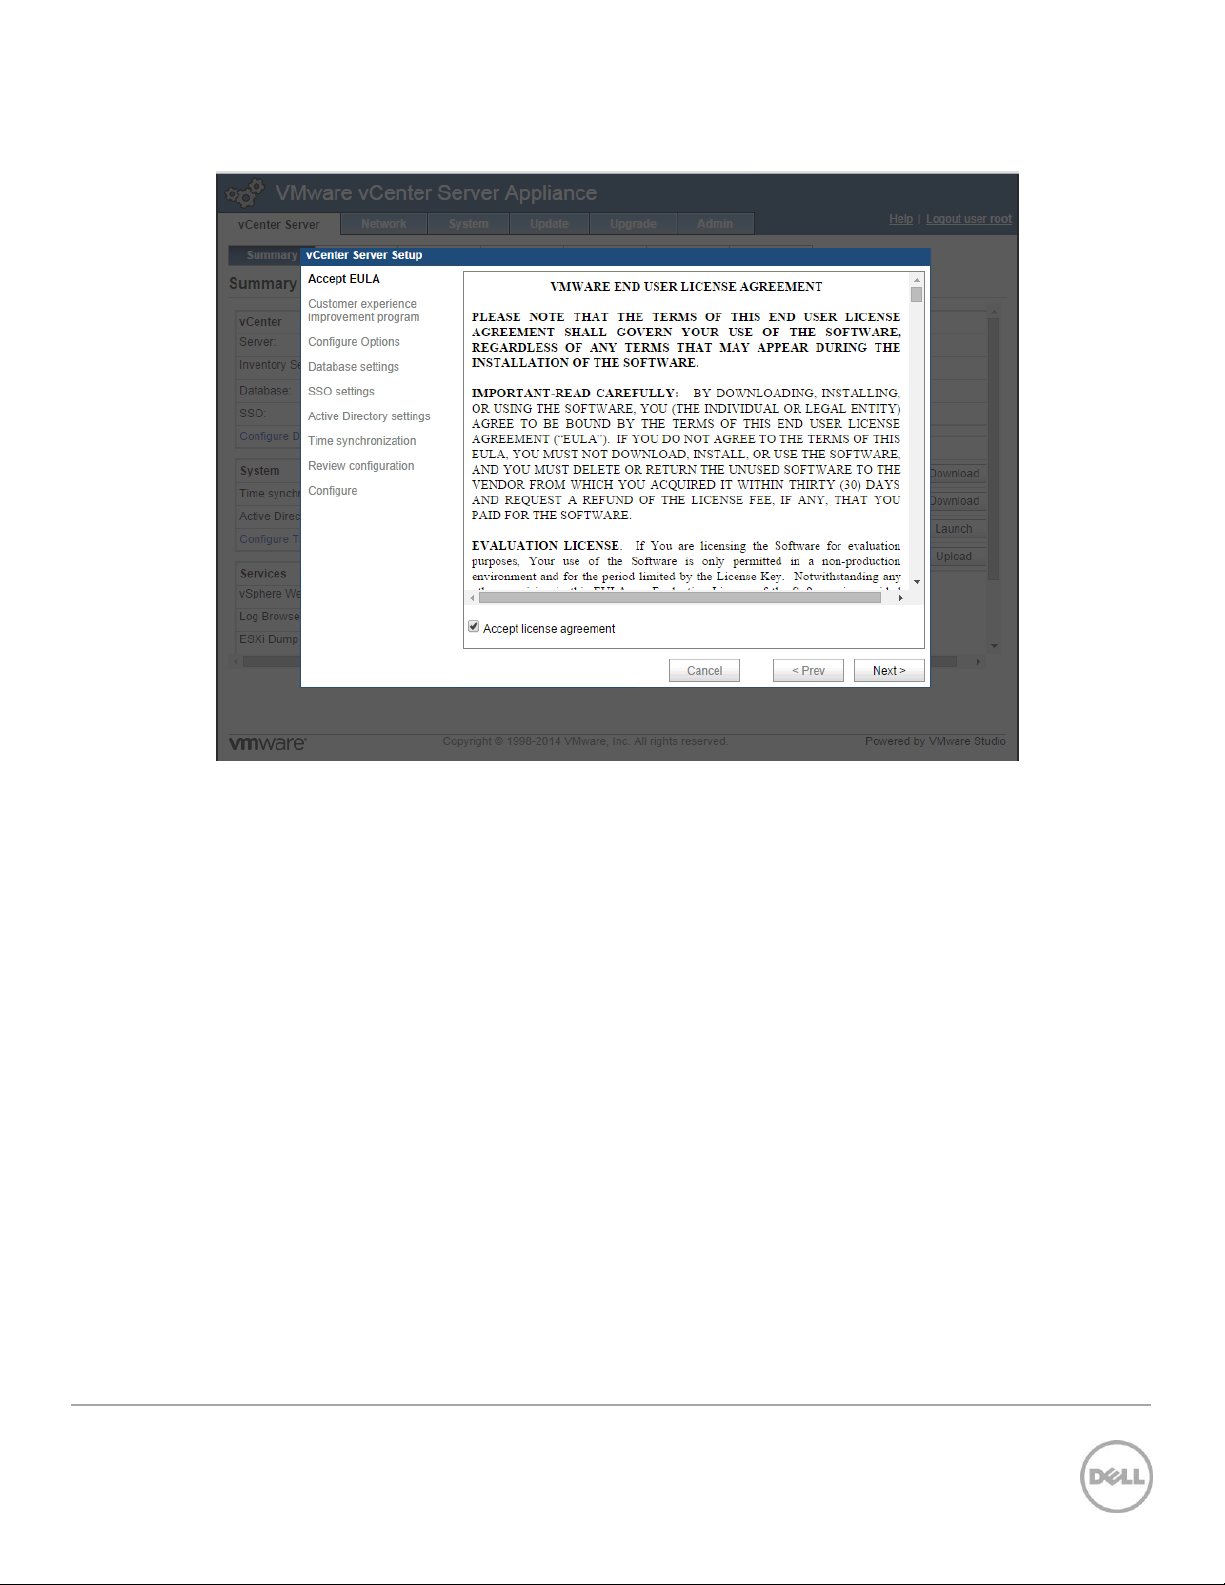
11. Accept the EULA and click Next.
Figure 17 vCenter EULA
17 Wyse Datacenter Appliance XC for VMware View
Page 18
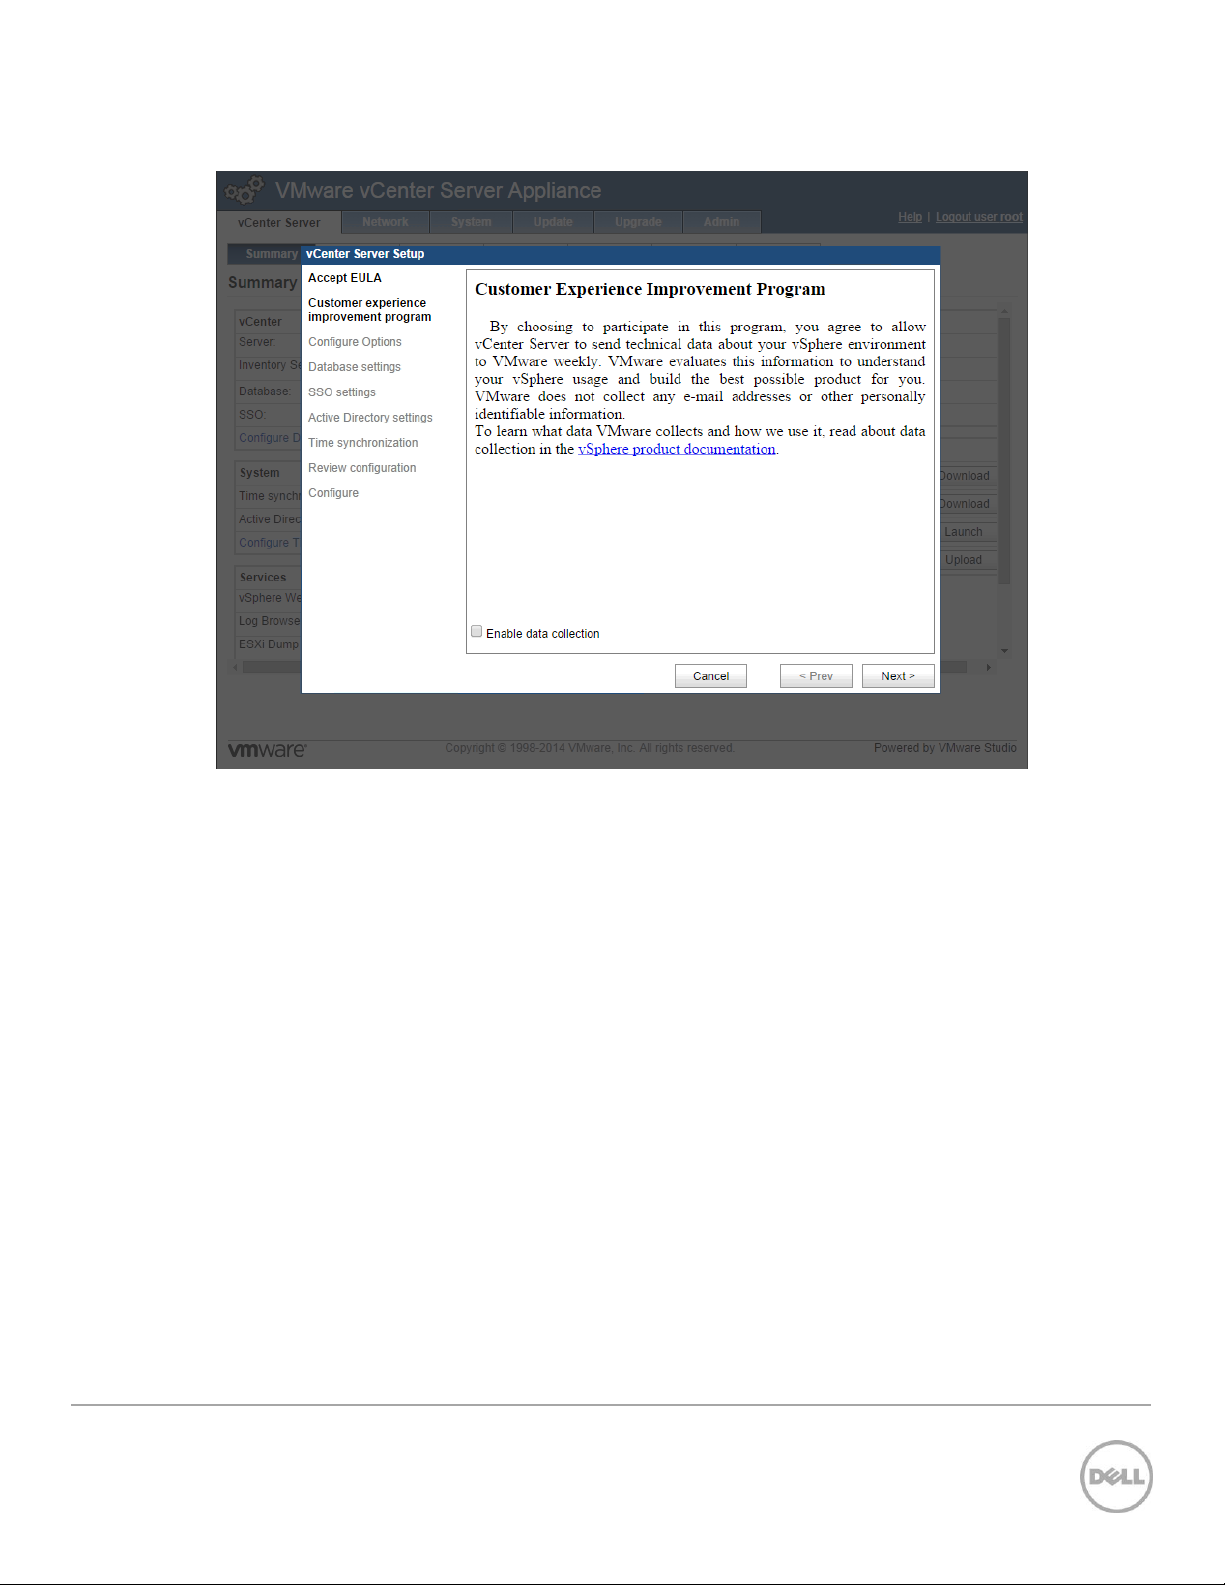
12. Click Next on the Customer Experience Improvement Program screen.
Figure 18 Customer Experience Program
18 Wyse Datacenter Appliance XC for VMware View
Page 19
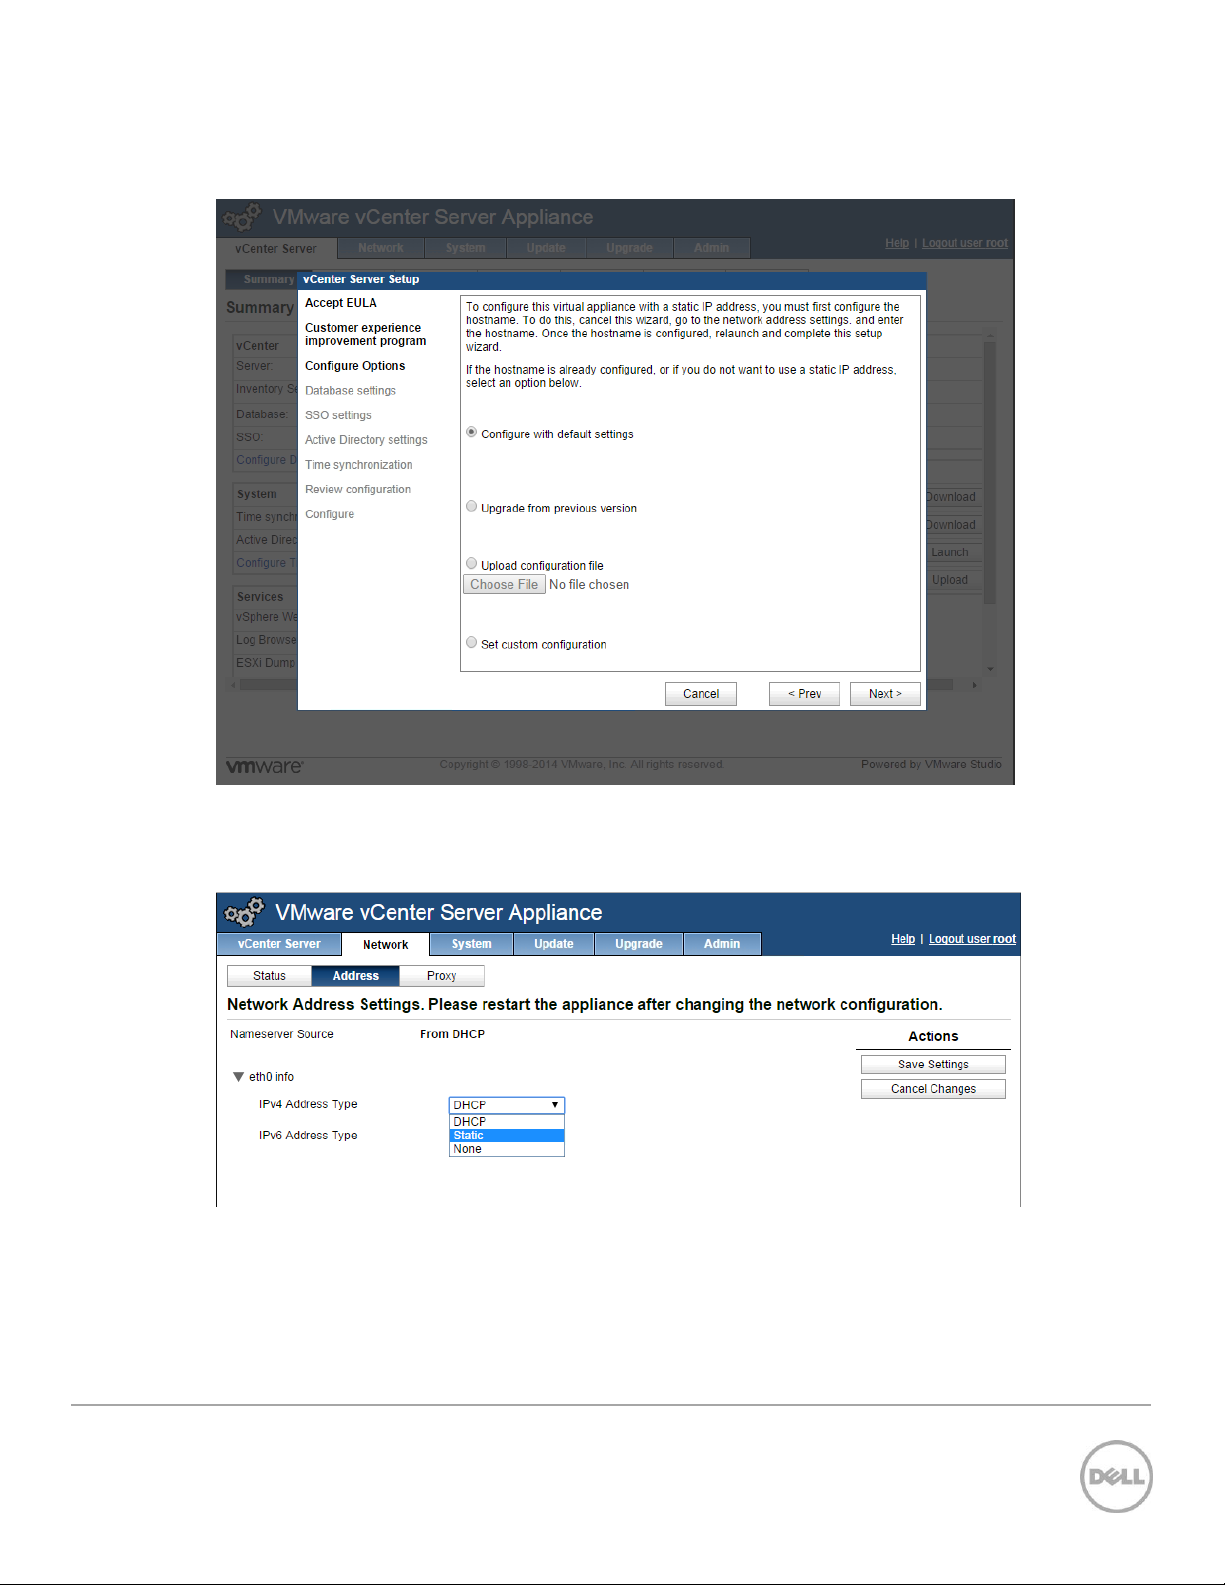
13. If using a static IP address you must close the wizard and set a hostname. In this guide a static IP
Address will be used. Click Cancel to close the wizard.
Figure 19 Cancel Wizard
14. Click the Network tab, and then select Static as the address type from the IPv4 Address Type drop-
down menu.
Figure 20 Static IP Address
19 Wyse Datacenter Appliance XC for VMware View
Page 20
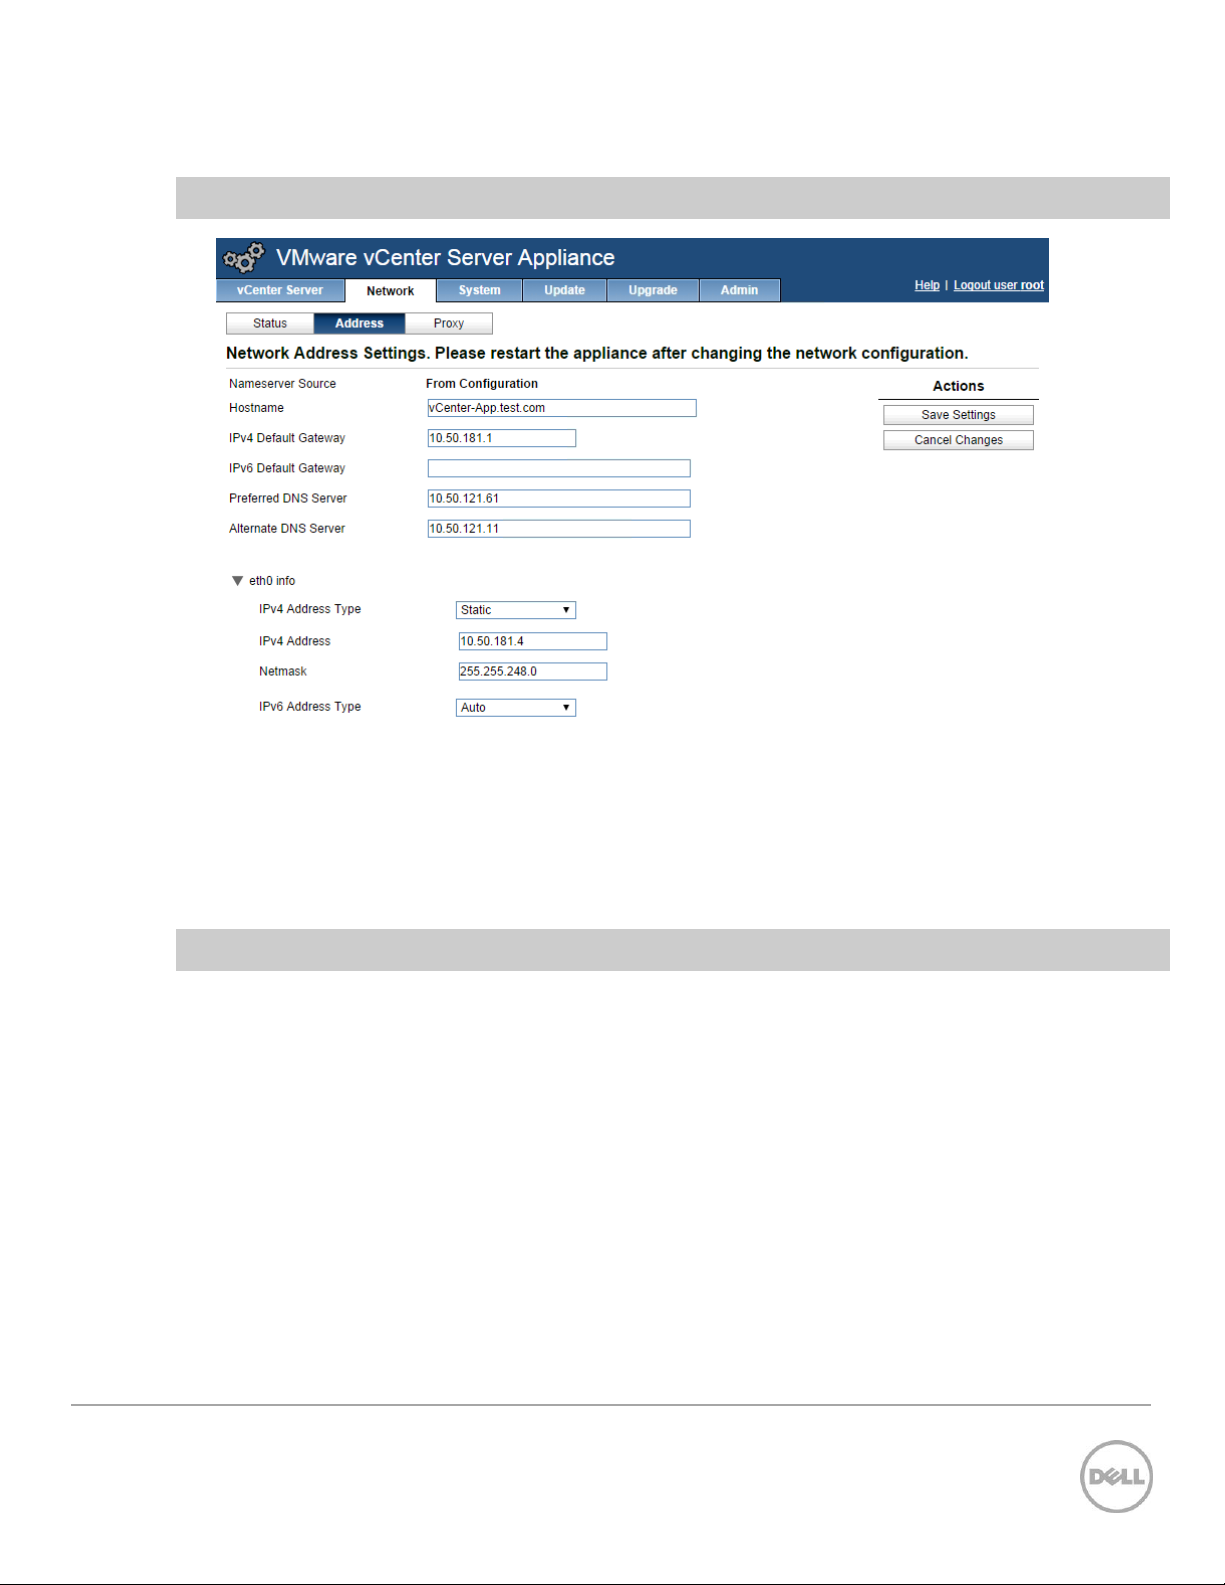
15. Set the Hostname and IPv4 address settings. Click Save Settings.
Note: The fully qualified domain name (FQDN) format must be used for the host name.
Figure 21 Set IPv4 Settings
16. When the network settings have saved, change the URL on the web browser to the static IP address
you just set and log in again by using the login ID ‘root’ and password ‘vmware’, and then click the
Network tab to verify your IPv4 settings.
Note: You may briefly lose connectivity.
20 Wyse Datacenter Appliance XC for VMware View
Page 21
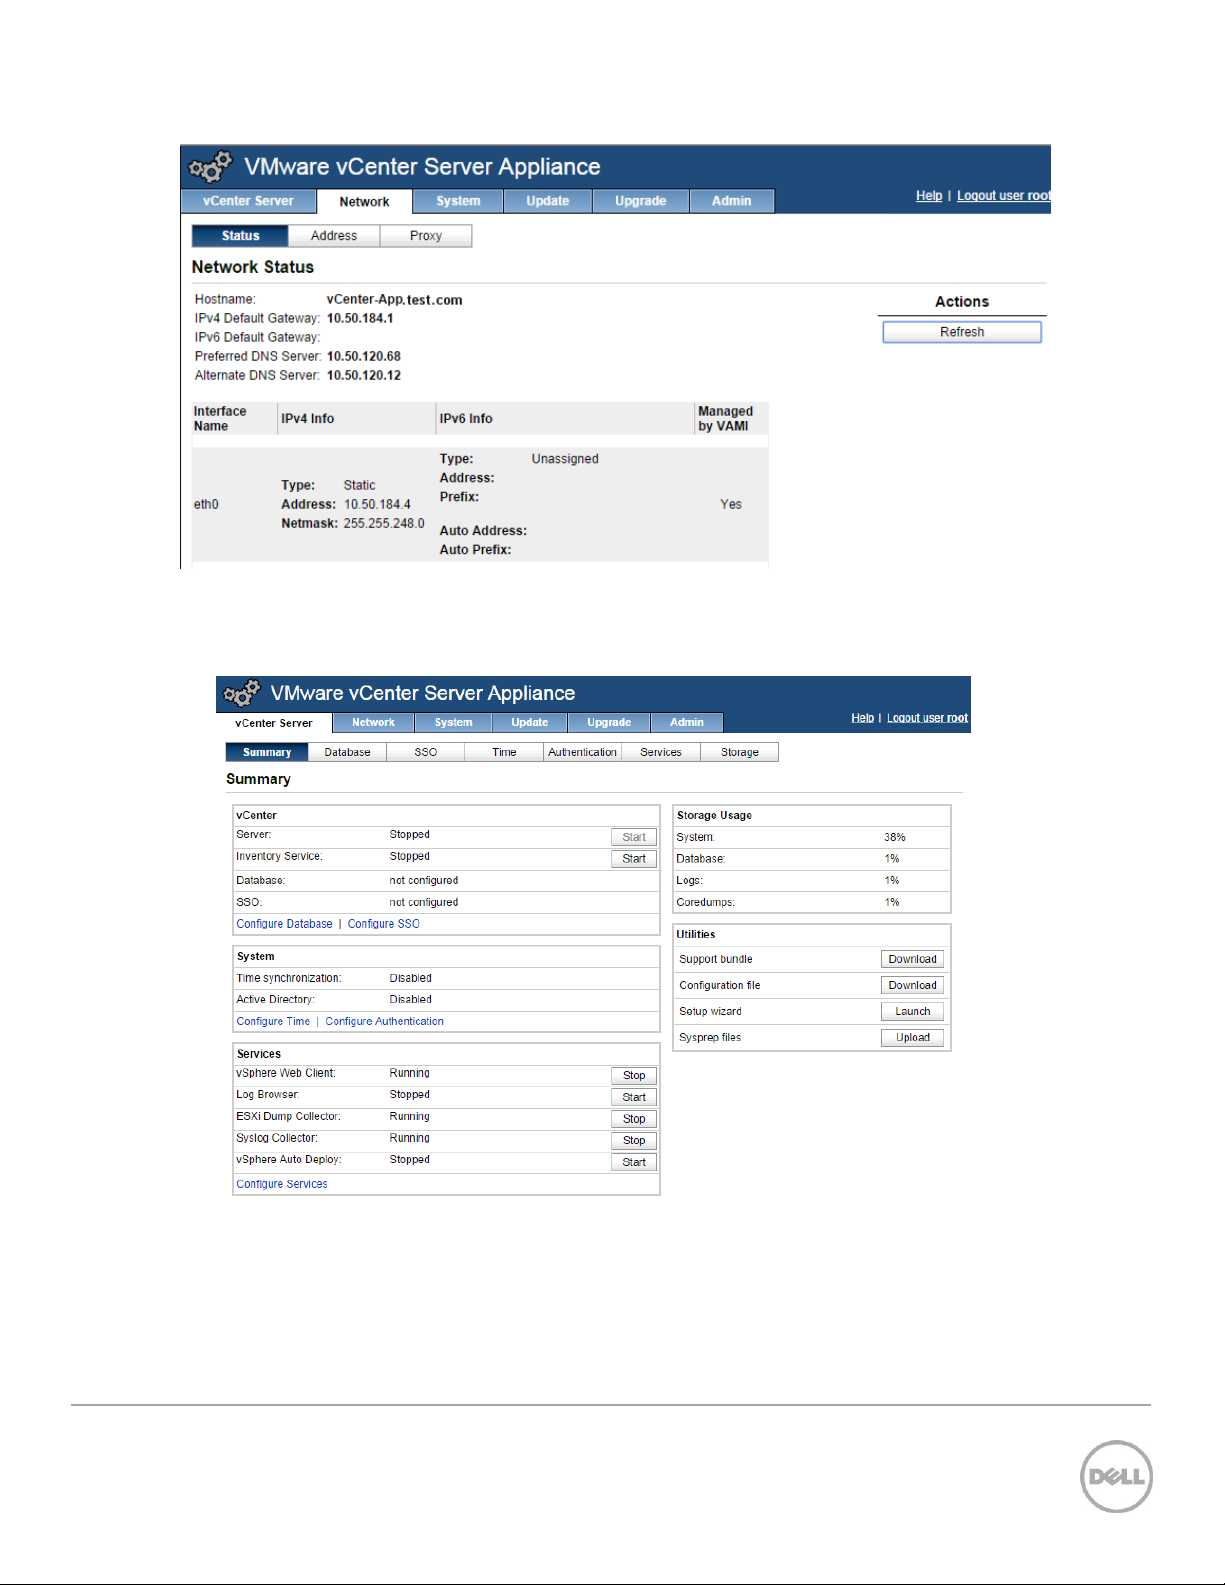
Figure 22 IPv4 Settings
17. Click the vCenter Server tab, and under the Utilities section, click the Setup wizard Launch button to
re-open the Setup Wizard.
Figure 23 Setup wizard re-launch
21 Wyse Datacenter Appliance XC for VMware View
Page 22
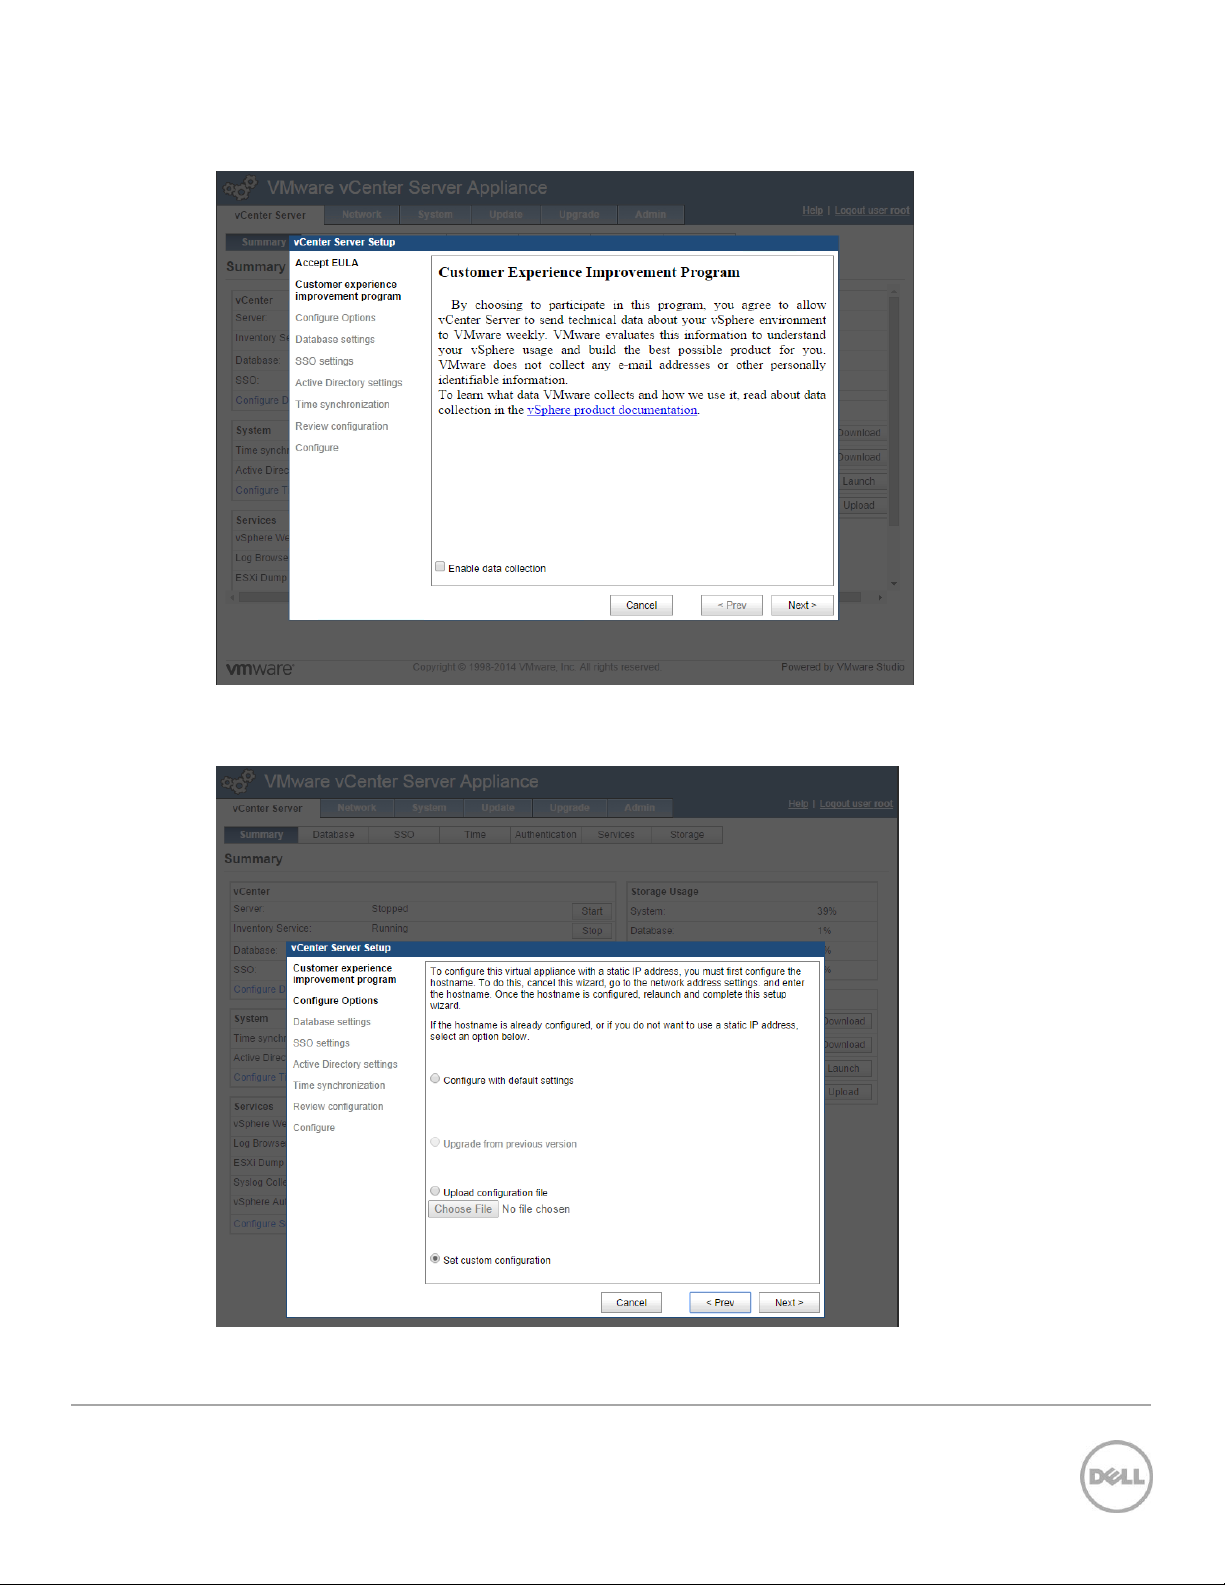
18. On the Customer Experience Improvement Program window, click Next.
Figure 24 Customer Experience Improvement Program
19. Click Set custom configuration and click Next.
Figure 25 Set Custom Configuration
22 Wyse Datacenter Appliance XC for VMware View
Page 23
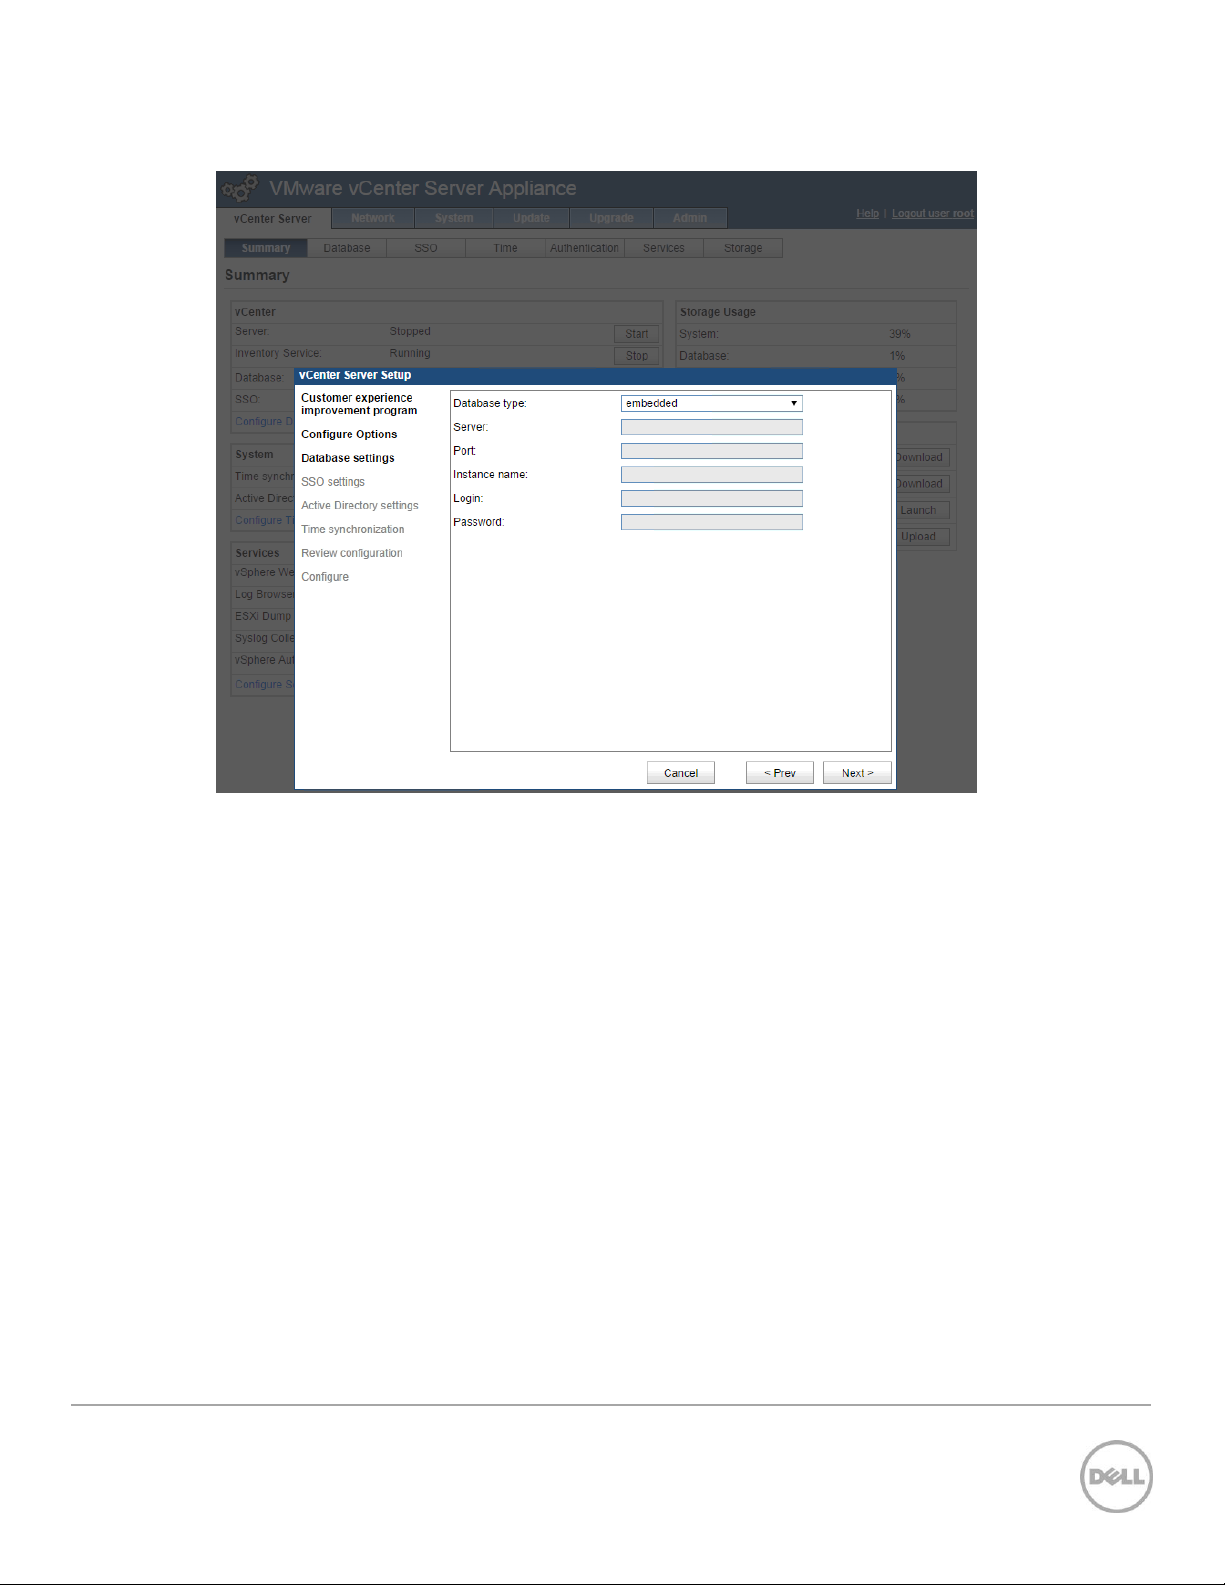
20. Accept the default database settings and click Next.
Figure 26 Database Settings
23 Wyse Datacenter Appliance XC for VMware View
Page 24
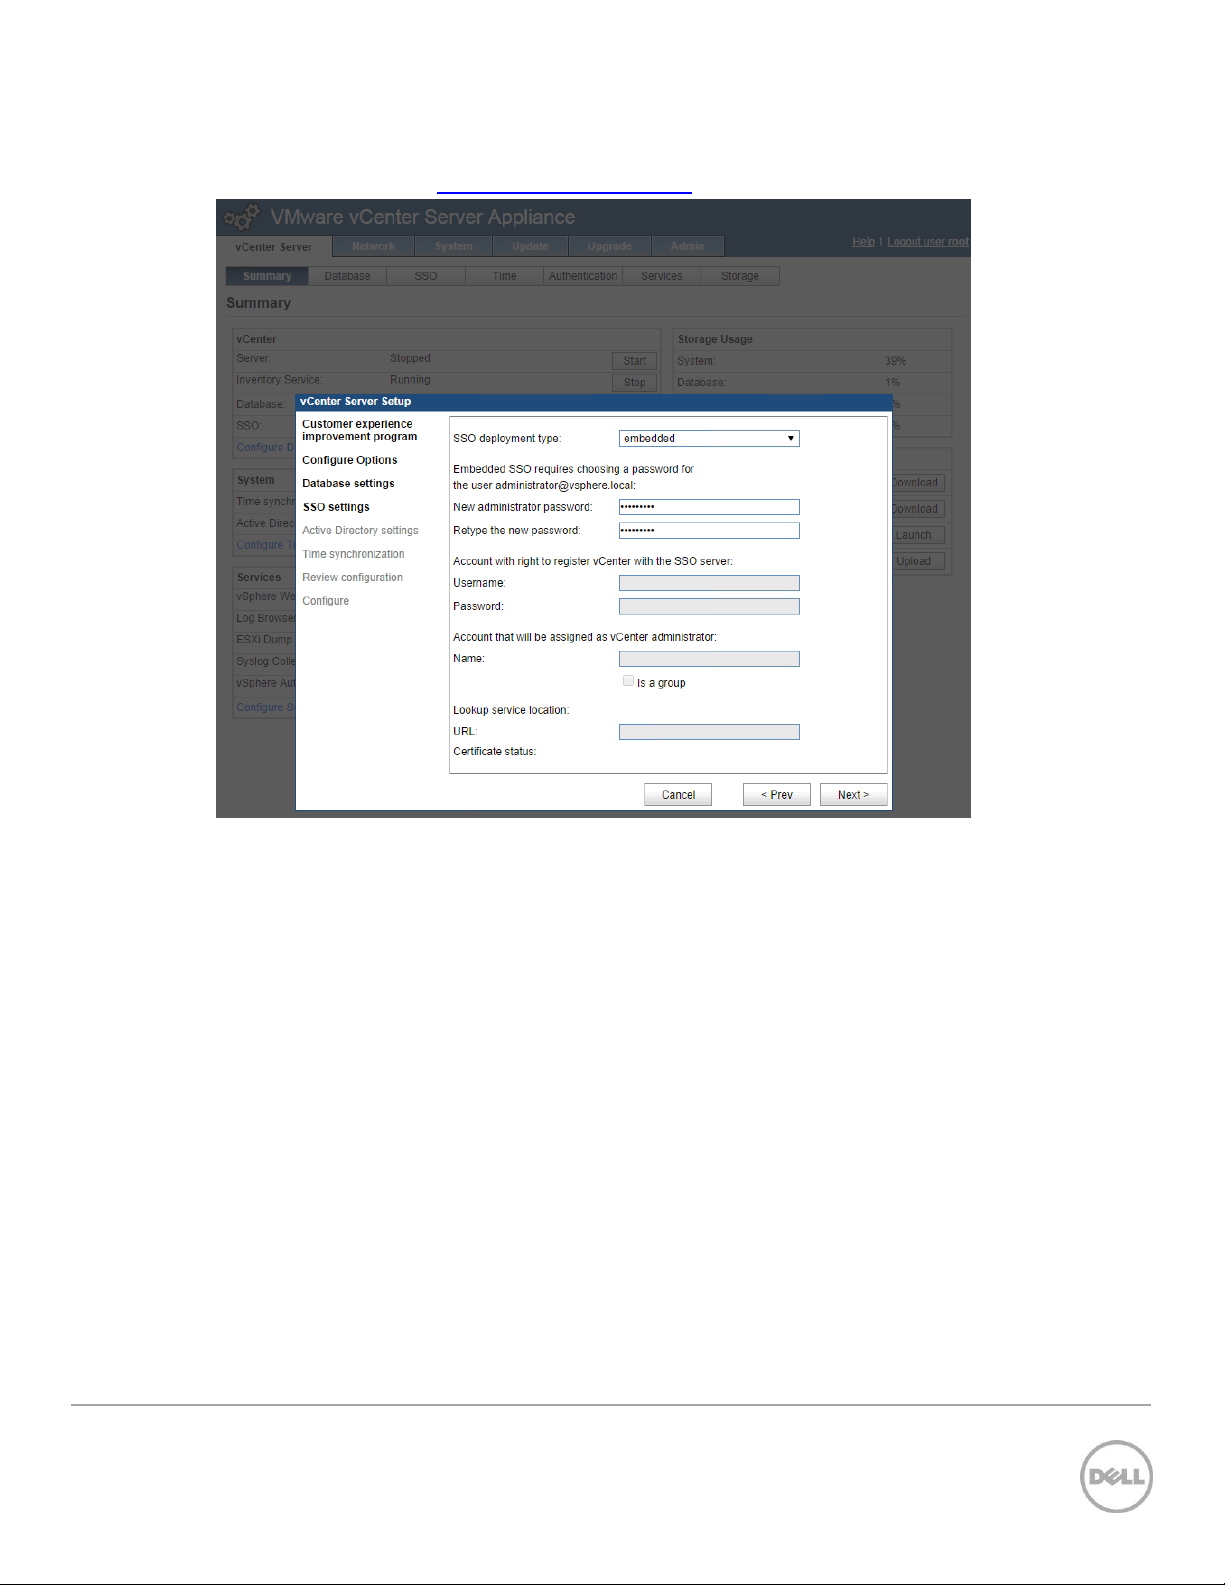
21. From the SSO deployment type drop-down menu, select the embedded SSO deployment type and
type a password for the administrator@vsphere.local user and click Next.
Figure 27 Single Sign On
24 Wyse Datacenter Appliance XC for VMware View
Page 25
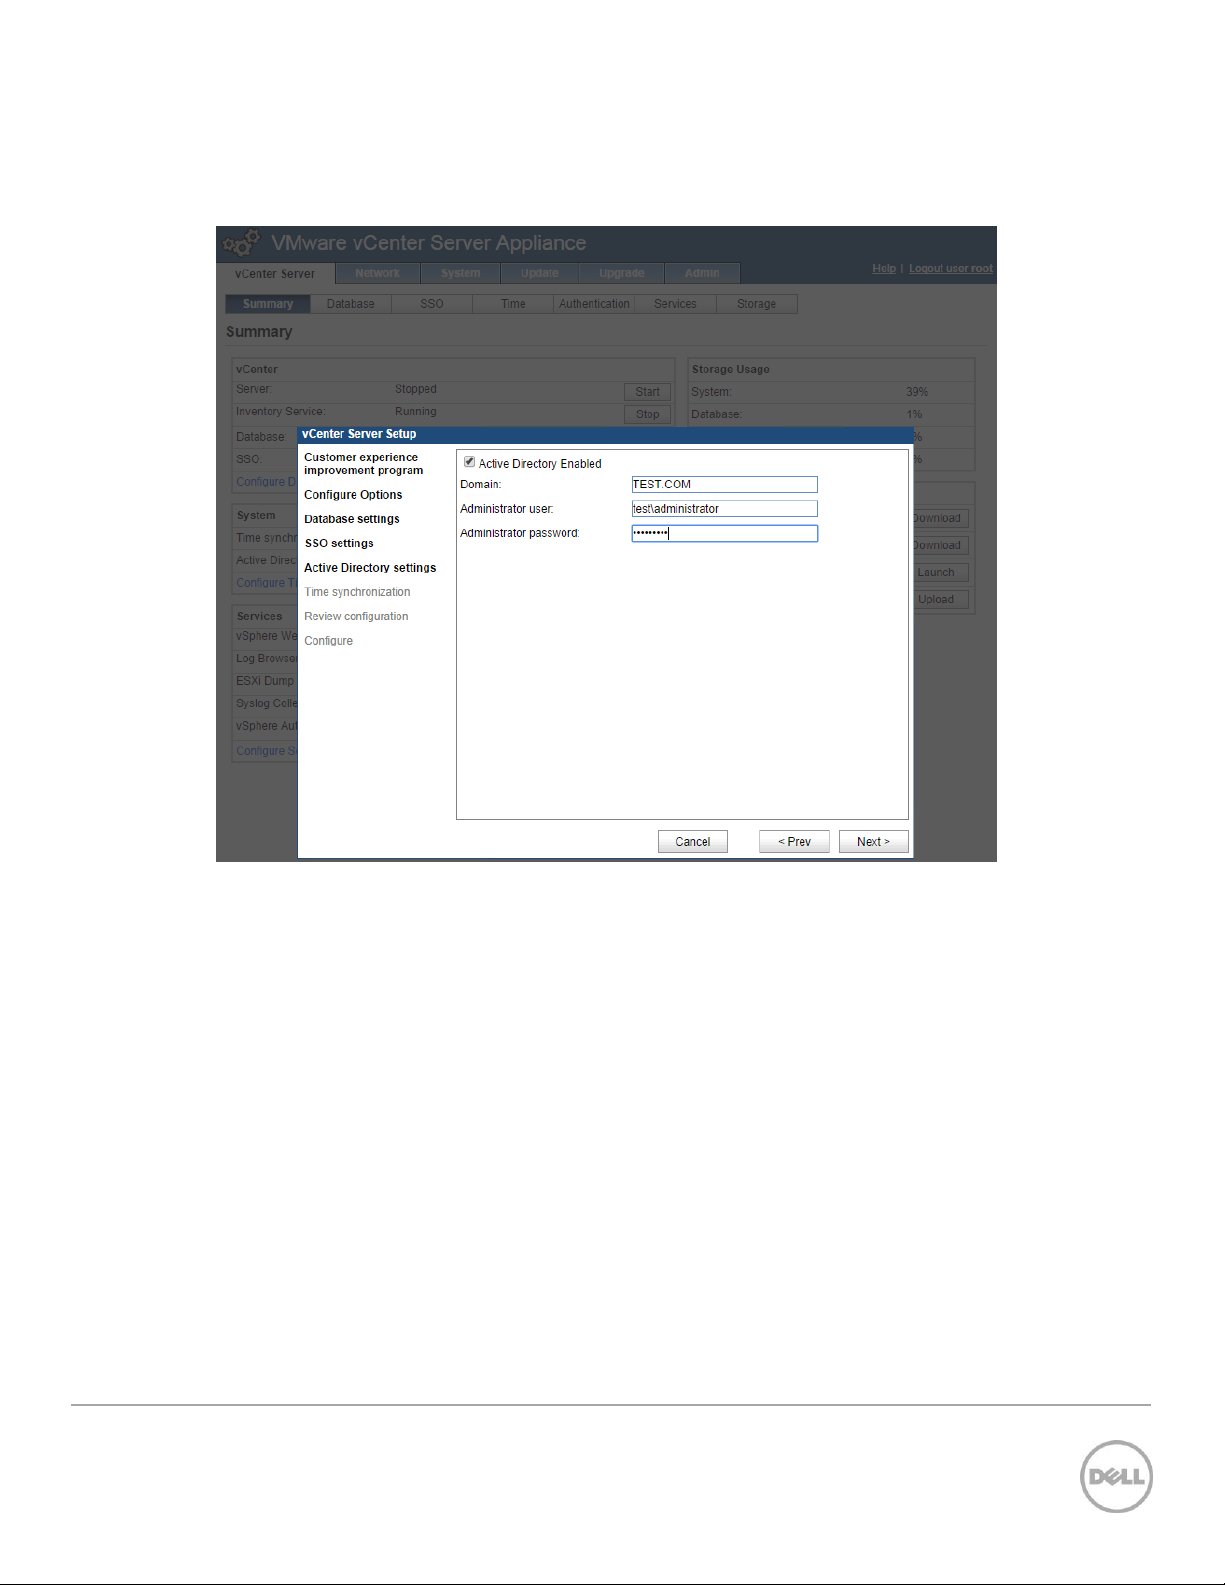
22. To configure Active Directory authentication select the Active Directory Enabled check box and type
the domain name to authenticate to, along with an administrative user login and password for that
domain. Click Next.
Figure 28 Active Directory
25 Wyse Datacenter Appliance XC for VMware View
Page 26
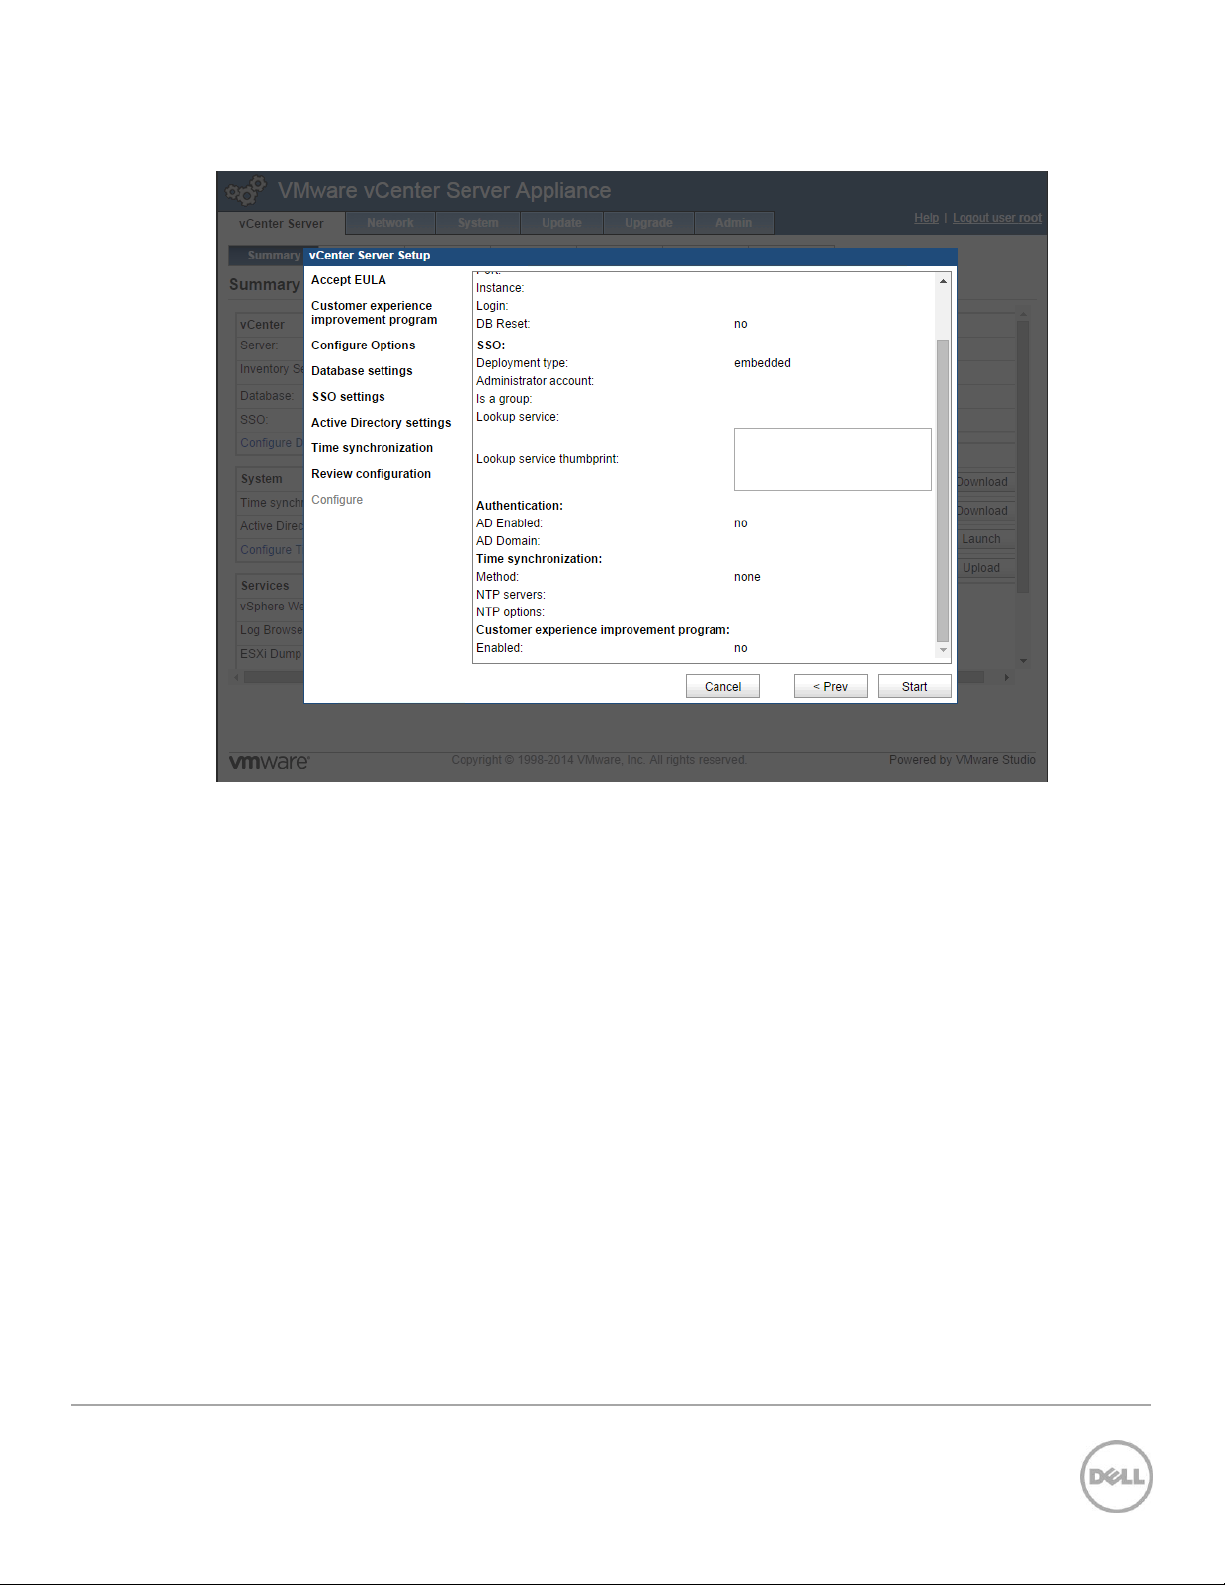
23. Review the configuration settings and click Start.
Figure 29 Complete Startup Wizard
26 Wyse Datacenter Appliance XC for VMware View
Page 27
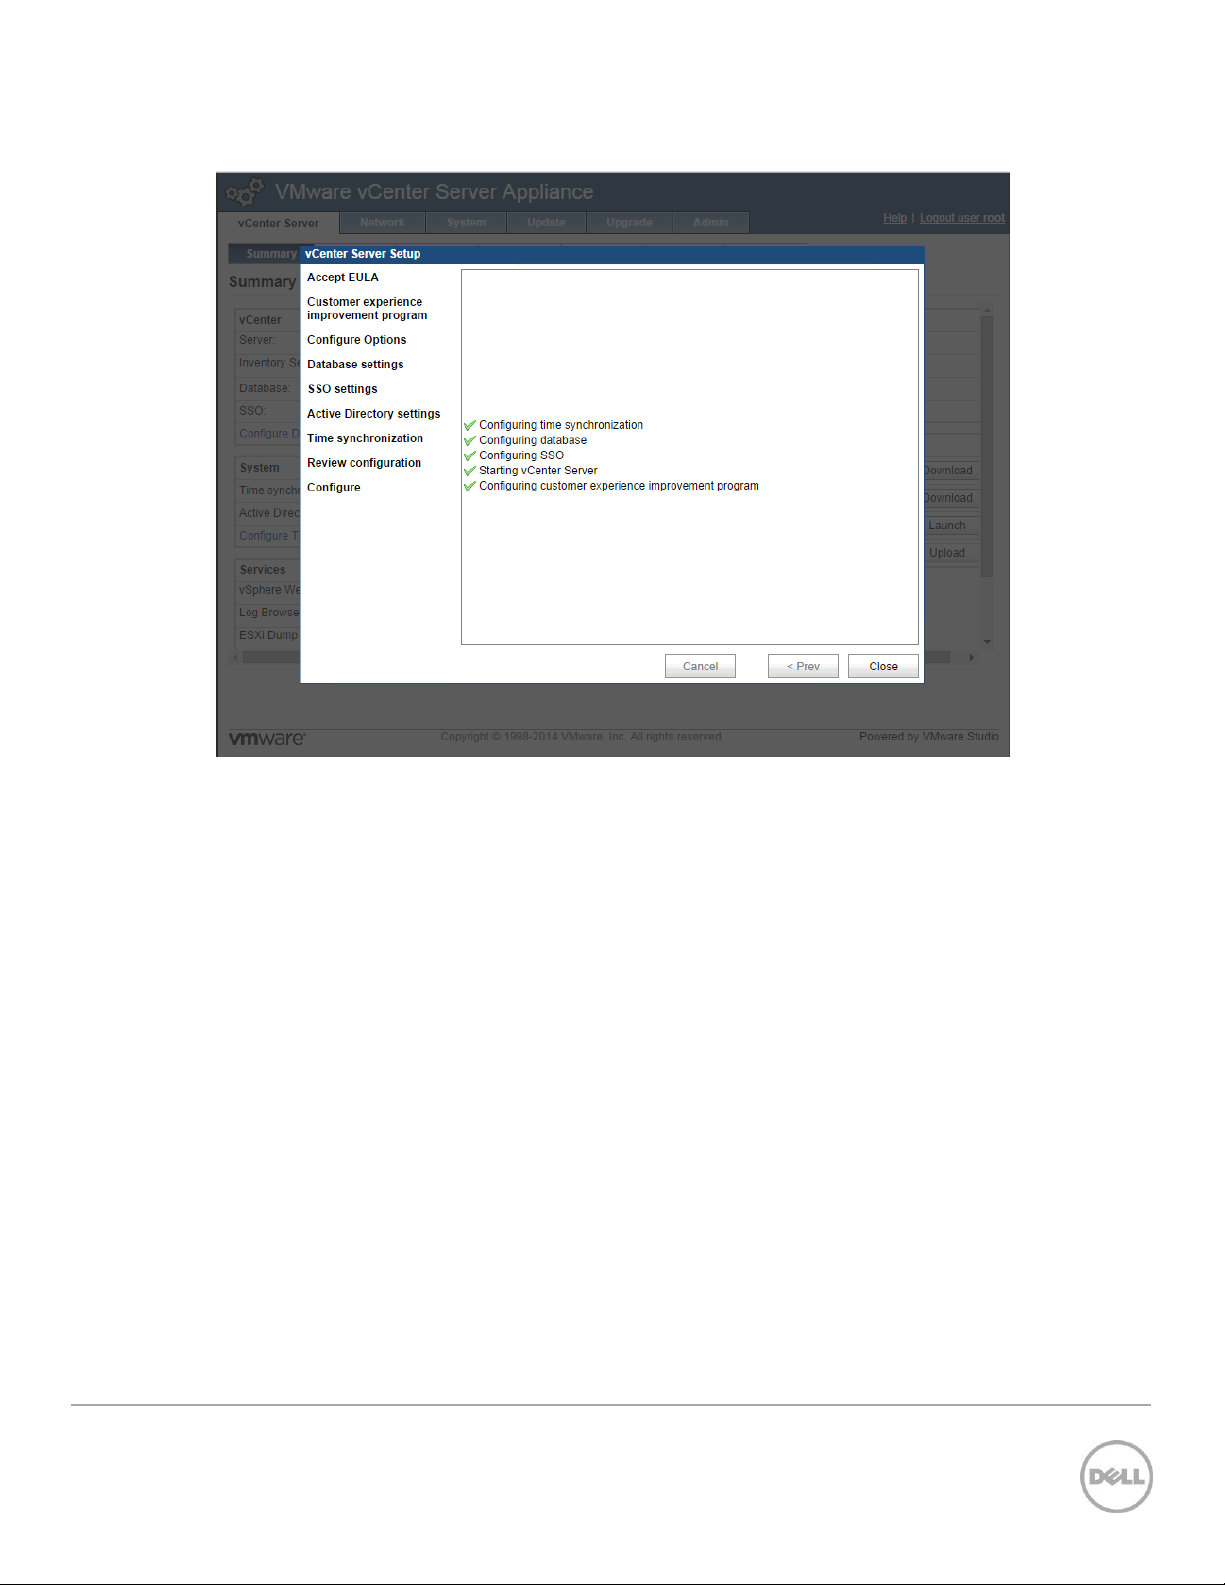
24. When the configuration processes are completed, click Close.
Figure 30 vCenter Setup Complete
27 Wyse Datacenter Appliance XC for VMware View
Page 28
3.2 Adding Hosts to vCenter
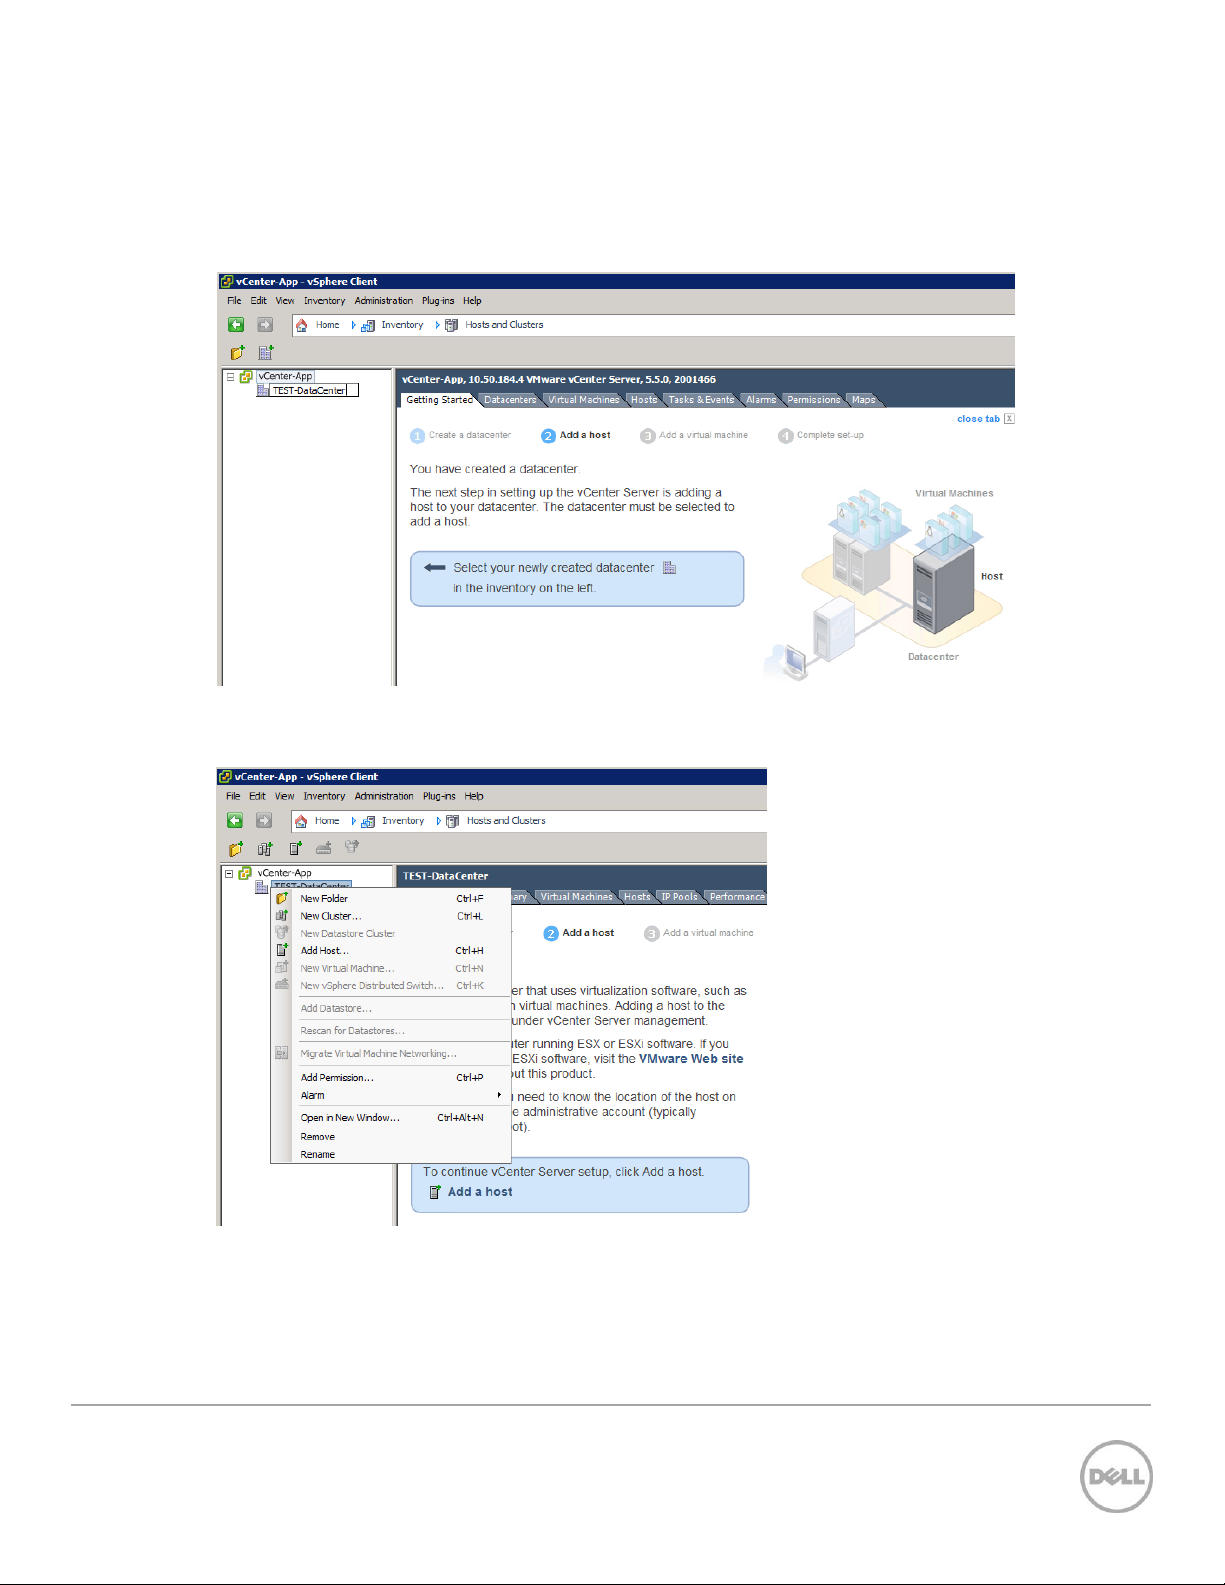
1. To add the Nutanix configured ESXi hosts to be managed by vCenter, open the vSphere Client and
attach to the vCenter Server Appliance, click Create a datacenter to add a datacenter, and then name
the datacenter.
Figure 31 New Datacenter
2. Right-click the datacenter and select New Cluster.
Figure 32 New Cluster
28 Wyse Datacenter Appliance XC for VMware View
Page 29
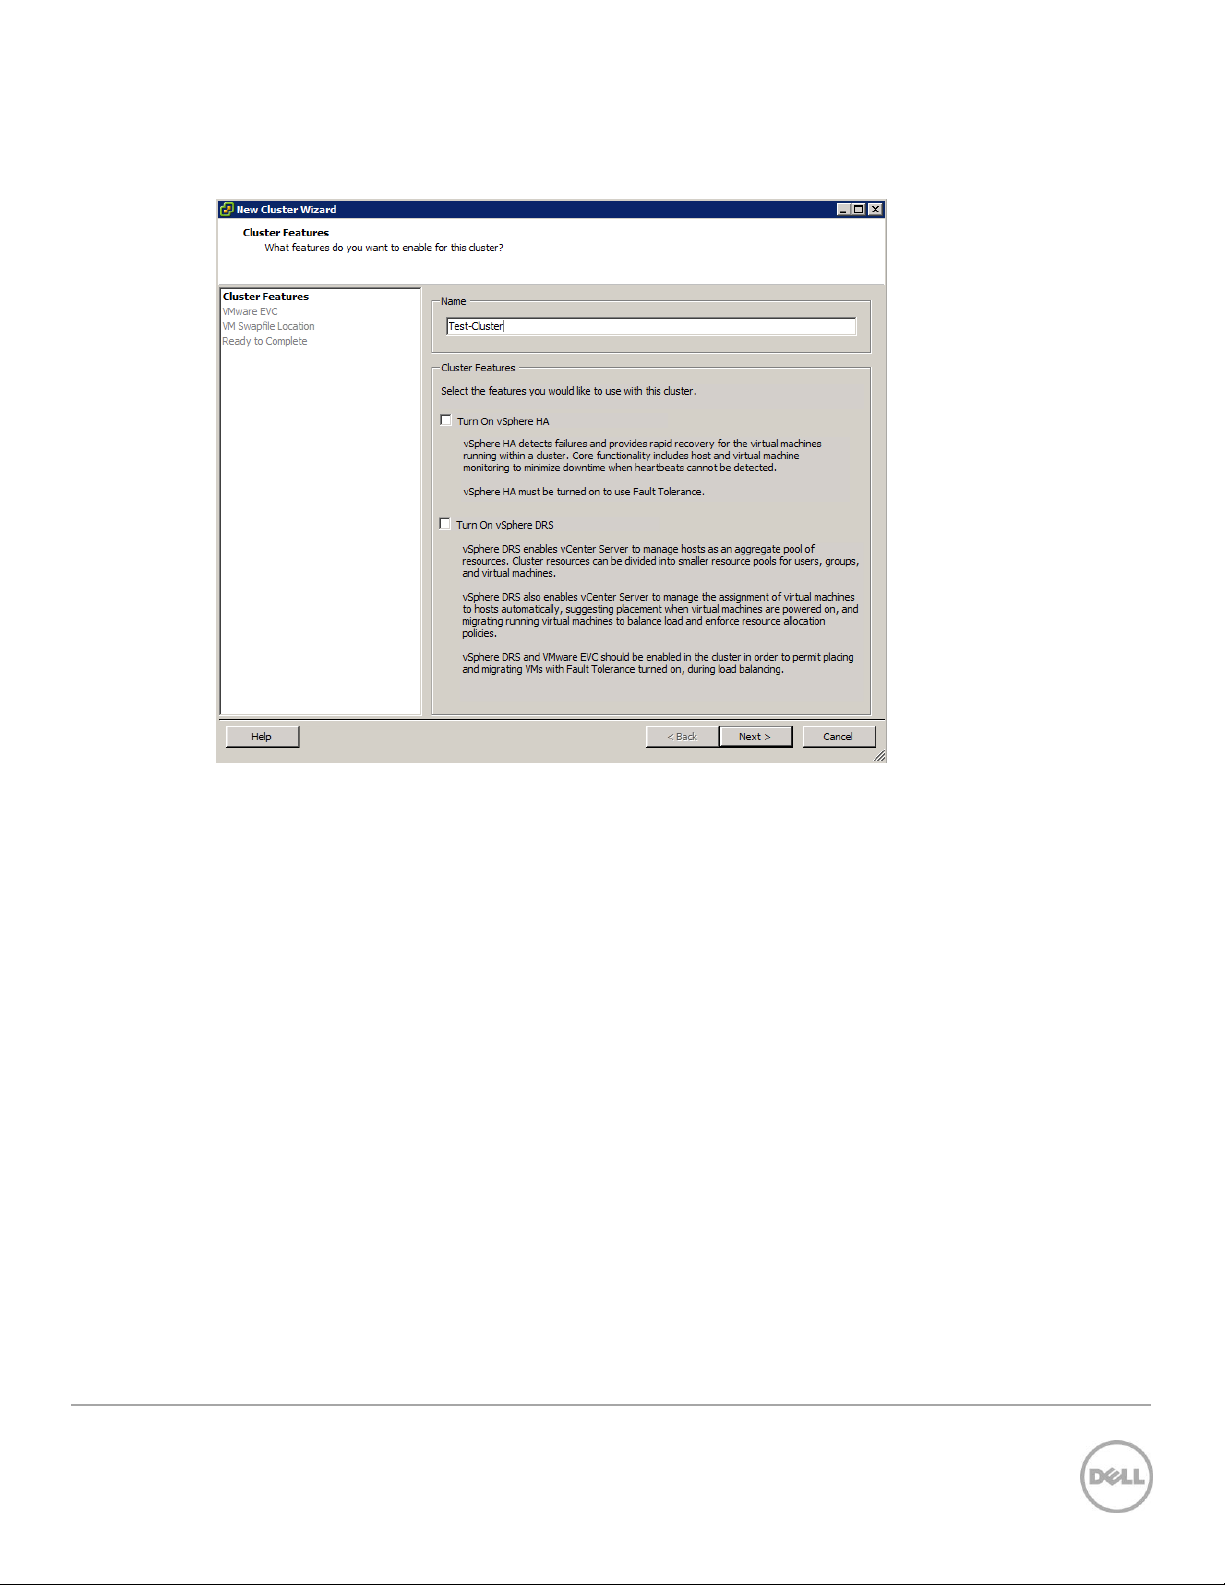
3. In the Name box, type a cluster name. vSphere HA or DRS may be enabled at this point, if required.
Click Next.
Figure 33 New Cluster Wizard
29 Wyse Datacenter Appliance XC for VMware View
Page 30

4. Configure Enhanced vMotion, if required, and then click Next.
Figure 34 Enhanced vMotion
5. Set the VM Swapfile policy, if required, and click Next.
Figure 35 Swapfile Policy
30 Wyse Datacenter Appliance XC for VMware View
Page 31

6. Review and click Finish to complete the cluster setup.
Figure 36 Complete Cluster Setup
7. Click the newly created cluster and click Add a host, enter the ESXi host FQDN or IP address, ESXi host
user name, and password in the wizard, and then click Next.
Figure 37 Add A Host
31 Wyse Datacenter Appliance XC for VMware View
Page 32

8. Review the host summary and click Next.
Figure 38 Host Summary
9. Assign a license key, if required, and then click Next.
Figure 39 License Key
32 Wyse Datacenter Appliance XC for VMware View
Page 33

10. Set the Lockdown mode, if required, and click Next.
Figure 40 Lockdown Mode
11. Click Finish to add the ESXi host to the cluster. Repeat the process of adding the host for all Nutanix
configured ESXi hosts.
Figure 41 Finish Add Host Wizard
33 Wyse Datacenter Appliance XC for VMware View
Page 34

3.3 Setting up vCenter Networking
1. To add networking in vCenter, click one of the host servers, select the Configuration tab, click
Networking, and then click Add Networking. The vSphere Standard Switch view should be selected.
Figure 42 vCenter Network Configuration
2. Select Virtual Machine connection type to create a Virtual Machine Port Group.
Figure 43 Select Virtual Machine Connection Type
34 Wyse Datacenter Appliance XC for VMware View
Page 35

3. Create a Standard vSwitch, select the two 10Gb NICs, and then click Next.
Figure 44 Create vSphere Standard Switch
4. Assign a name for the VDI VLAN that will host user virtual desktops and a VLAN ID and click Next.
Figure 45 Assign Network Label and VLAN ID
35 Wyse Datacenter Appliance XC for VMware View
Page 36

5. Click Finish to complete.
Figure 46 Finish Network Configuration
6. Repeat tasks 1—2 to create a second Virtual Machine Port Group to host the Nutanix CVMs and
vCenter VMs and use the previously created vSwitch.
Figure 47 Create Second Port Group
36 Wyse Datacenter Appliance XC for VMware View
Page 37

7. Assign a name and VLAN ID, and then click Next and click Finish to complete.
Figure 48 Assign Network Label and VLAN ID
37 Wyse Datacenter Appliance XC for VMware View
Page 38

8. Click Add Networking again and create a VMKernel connection type for the vMotion network, and
then click Next.
Figure 49 Create VMKernel
38 Wyse Datacenter Appliance XC for VMware View
Page 39

9. Select the existing vSwitch and click Next.
Figure 50 Select vSwitch
10. Assign a name and VLAN ID and select the Use this port group for vMotion check box and click Next.
Figure 51 Assign port name for vMotion
39 Wyse Datacenter Appliance XC for VMware View
Page 40

11. Assign an IP address and click Next.
Figure 52 Assign IP Address
12. Click Finish to complete.
Figure 53 Finish vSphere Switch Configuration
40 Wyse Datacenter Appliance XC for VMware View
Page 41

13. Repeat tasks 8 and 9 to create another VMkernel Port for the Management network.
14. Assign a name and VLAN ID, select the Use this port for vMotion check box and Use this port group
for management traffic check box, select IP and IPv6 as the Network Type, and then click Next.
Figure 54 VMkernel Connection Settings
41 Wyse Datacenter Appliance XC for VMware View
Page 42

15. Enter an IP address and click Next.
Figure 55 VMkernel IP Settings
16. Select the Obtain IPv6 address automatically through Router Advertisement check box and click
Next.
Figure 56 Automatically Obtain IPv6 Address
42 Wyse Datacenter Appliance XC for VMware View
Page 43

17. Click Finish to complete.
Figure 57 Configuration Complete
18. Click Add Networking to create a second switch for the internal CVM traffic and select the Virtual
Machine connection type, and then click Next.
Note: This internal switch is created automatically during the Nutanix install process but is included here
for reference and in case the switch needs to be re-created.
43 Wyse Datacenter Appliance XC for VMware View
Page 44

Figure 58 Create Second Switch
19. Click Create a vSphere standard switch and deselect any network adapters and click Next.
Figure 59 Create vSphere Standard Switch
44 Wyse Datacenter Appliance XC for VMware View
Page 45

20. Type a network label in the Network Label box and click Next.
Figure 60 Assign Network Label
21. Click Finish to complete.
Figure 61 Completed Adding Switches
45 Wyse Datacenter Appliance XC for VMware View
Page 46

22. Click Add Networking again and select a VMkernel connection type.
Figure 62 Adding VMKernel Connection
23. Select the newly created switch and click Next.
Figure 63 Use Newly Created Switch
46 Wyse Datacenter Appliance XC for VMware View
Page 47

24. Assign a network label and click Next.
Figure 64 Assign Network Label
25. Assign an IP address and click Next.
Figure 65 Assign IP Connection Settings
47 Wyse Datacenter Appliance XC for VMware View
Page 48

26. Click Finish to complete.
Figure 66 Completed Network Configuration
The completed networking topology should look like the one shown in the screen shot here.
Figure 67 Completed Networking Topology
48 Wyse Datacenter Appliance XC for VMware View
Page 49

Role
vCPU
vRAM
(GB)
NIC
OS vDisk
Size
(GB)
Location
Primary
SQL
4 8 1
40 + 200
SDS: ds_mgmt
4 Installing SQL Server
Create a virtual machine using the disk space and CPU settings recommended in the table here for hosting
MSSQL Server and install the Windows Server 2012 R2 operating system.
To install SQL Server:
1. From the SQL VM, access the SQL setup files (go to file share, copy locally, insert DVD,
download, etc.)
2. Run Setup.exe, in the left pane, click Installation, and then select new stand-alone
installation.
3. To continue earlier discovery operation, click OK.
4. On the Language selection page (if displayed), click Next.
5. On the Product Key page, type PID, and then click Next.
6. Accept license terms and click Next.
7. Enable setup to download and use update files and click Next.
8. Note any warnings or issues from the report and click Next.
9. Select SQL Server Feature Installation and click Next.
10. Database Engine Services, Management Tools (basic & completed), and SQL Client Connectivity
SDK features must be installed. Other features can be installed as required. Click Next until you
arrive at the instance configuration.
11. Specify “Default instance” and click Next. On the Disk Usage page, click Next again.
12. Change the SQL service accounts to the desired domain user accounts determined in the
prerequisites. Make sure to specify the domain account and password. Click Next to continue.
Figure 68 Server Configuration
49 Wyse Datacenter Appliance XC for VMware View
Page 50

13. Set to mixed mode authentication, specify a password for the SA account, an d add domain
user(s) or group(s) to be used for SQL administration.
14. On the DataBase Engine Configuration page, click the Data Directories tab. Change the
database, log, and temp locations to the corresponding HDDs configured during the SQL VM
creation. Unless you want to designate specific folders, the existing paths can be retained with
only the drive letter being changed (for example “D:\Program Files\Microsoft SQL
Server\MSSQL11.MSSQLSERVER\MSSQL\Data”). Click Next.
Figure 69 Database Engine Configuration
15. Click Next on Error Reporting and Next again on Installation Configuration Rules. To begin
installation, click Install and after completing the installation process, and then click Close.
50 Wyse Datacenter Appliance XC for VMware View
Page 51

Role
vCPU
vRAM
(GB)
NIC
OS vDisk
Size
(GB)
Location
View
Connection
Server
4 8 1
40
SDS: ds_mgmt
5 Installing VMware View Connection Server
Create a virtual machine using the below recommended memory and CPU settings for hosting View
Connection Server and install Windows Server 2012 R2 operating system.
1. Double-click VMware-viewconnectionserver-x86_64-6.0.0-xxxxxx.exe to start the
installer. The installation wizard is displayed.
Figure 70 VMware Horizon View Connection Server Installer
51 Wyse Datacenter Appliance XC for VMware View
Page 52

2. On the Welcome page, click Next.
Figure 71 VMware Horizon View Connection Server Welcome Page
52 Wyse Datacenter Appliance XC for VMware View
Page 53

3. Read and accept the VMware license agreement, and then click Next.
Figure 72 License Agreement
53 Wyse Datacenter Appliance XC for VMware View
Page 54

4. By default, the path of the folder where VMware View Connection Server is installed is displayed. To
change the location, click Change, and then type the new file folder path. Click Next.
Figure 73 Specifying Destination Folder for Installation
54 Wyse Datacenter Appliance XC for VMware View
Page 55

5. Select View Standard Server as the server installation type and click Next. Alternately, you can select
the Install HTML Access check box to connect to desktop pools using HTML5 by using a Web
browser. This configuration is not required for Dell XC720xd for Desktop Virtualization.
Figure 74 Other Installation Options
55 Wyse Datacenter Appliance XC for VMware View
Page 56

6. Type a password for the data recovery. This is used to recover the View Connection Server AD
LDS (ADAM) database backups. Click Next.
Figure 75 Setting up Data Recovery Password
56 Wyse Datacenter Appliance XC for VMware View
Page 57

7. To configure Windows firewall to allow incoming TCP connections to the View Connection Server,
click Configure Windows Firewall automatically, and then click Next.
Figure 76 Firewall Configuration
57 Wyse Datacenter Appliance XC for VMware View
Page 58

8. To authorize a domain group that will have management access to the View console, click Authorize
a specific domain user or domain group.
Figure 77 Setting up Initial View Administrators
58 Wyse Datacenter Appliance XC for VMware View
Page 59

9. To not participate in the user-experience improvement program, clear the Participate anonymously
in the user experience improvement program check box.
Figure 78 Participating in User Experience Improvement Programs
59 Wyse Datacenter Appliance XC for VMware View
Page 60

10. To start installation of the View Connection Server, click Install.
Figure 79 Start Install of View Connection Server
60 Wyse Datacenter Appliance XC for VMware View
Page 61

11. After the installation process is completed, clear the Show Readme file check box, and then click
Finish.
Figure 80 Finish Install of View Connection Server
61 Wyse Datacenter Appliance XC for VMware View
Page 62

12. The View Connection Server can now be managed by using the Vmware Horizon View Administrator
Web site: https://viewconnectionservername/admin
Figure 81 Horizon View Webpage Login
62 Wyse Datacenter Appliance XC for VMware View
Page 63

Role
vCPU
vRAM
(GB)
NIC
OS vDisk
Size
(GB)
Location
View
Composer
4 8 1
60
SDS: ds_mgmt
6 Installing a VMware View Composer Instance
Create a virtual machine using the below recommended memory and CPU settings for hosting View
Composer and install Windows Server 2012 R2 operating system.
Before installing a composer, you must create a blank database (BD) on your SQL server. For this
installation, a DB was created using all SQL default settings, and “SA” is specified as the owner.
Note: When installing View Composer as part of a VMware vCenter Appliance deployment, it must be
installed on a standalone VM.
1. To start the installation process, double-click VMware-viewcomposer-6.0.0-xxxxxx.exe.
63 Wyse Datacenter Appliance XC for VMware View
Figure 82 VMware Horizon View Composer Welcome Page
Page 64

2. Read and accept the VMware license agreement, and then click Next.
Figure 83 VMware Horizon View Composer License Agreement
64 Wyse Datacenter Appliance XC for VMware View
Page 65

3. By default, the path of the folder where VMware View Composer is installed is displayed. To change
the location, click Change, and then type the new foder path. Click Next.
Figure 84 VMware Horizon View Composer Welcome Installation Folder
65 Wyse Datacenter Appliance XC for VMware View
Page 66

4. Type appropriate information about the database to which VMware Horizon View Composer is
connected, and then click Next.
Figure 85 Connecting VMware Horizon View Composer Welcome to a Database
66 Wyse Datacenter Appliance XC for VMware View
Page 67

5. In the SOAP Port box, type the SOAP port to enable connection to the Composer, and click either:
Create default SSL certificate: To create a new, default, SSL certificate for connection purposes.
Use an existing SSL certificate: To use an existing SSL certificate Click Next.
Figure 86 SOAP Port Settings
67 Wyse Datacenter Appliance XC for VMware View
Page 68

6. Click Install.
7. After the installation is completed, click Finish.
Figure 87 Successful Installation
8. To complete the View Composer installation, restart the server.
Note: Before restarting the server, make sure that it is not in use by you and any other individual.
68 Wyse Datacenter Appliance XC for VMware View
Page 69

7 Configuring a VMware View Connection Server
The events tab of the Dashboard requires a valid Database to be assigned. For this installation a blank
database was created on a MS-SQL server called “ViewEvents” with “SA” as the owner.
1. After you log in to VMware Horizon View Administrator, the Dashboard page is displayed. To configure
access to the Virtual Center, in the left pane, click View Configuration.
Figure 88 VMware View Connection Server Configuration
69 Wyse Datacenter Appliance XC for VMware View
Page 70

2. Select the Server’s menu option and select Add.
Figure 89 Add vCenter Servers
70 Wyse Datacenter Appliance XC for VMware View
Page 71

3. On the Add vCenter Server—vCenter Server Information page, type appropriate data in the boxes,
and then click Next.
Figure 90 vCenter Server Information
Note: It is important to use the FQDN of the vCenter server.
71 Wyse Datacenter Appliance XC for VMware View
Page 72

4. If using a View Composer, on the Add vCenter Server—View Composer page, type or select
appropriate information for installing the Composer. Click Standalone View Composer Server
because a vCenter Appliance was used to manage the ESXi hosts and View desktop farm (Use the
FQDN name of the server you have installed composer on).
Figure 91 View Composer Settings
For more information about composer configuration and installation, see the earlier section for this guide.
5. Click Add and enter the AD Domain name that any linked clone dekstops will reside in and a domain
user with domain administrator rights.
72 Wyse Datacenter Appliance XC for VMware View
Page 73

Figure 92 View Composer Domains
6. Select Storage options, if available, and then click Next.
Figure 93 Storage Options
73 Wyse Datacenter Appliance XC for VMware View
Page 74

7. Click Finish to complete the Wizard.
Figure 94 Complete Wizard
8. To provide your VMware View License, in the left pane, click Product Licensing and Usage, and then
click Edit License in the working pane. Type your license key by following the on-screen instructions.
Figure 95 VMware View Administrator Licensing and Usage
74 Wyse Datacenter Appliance XC for VMware View
Page 75

9. In the left pane, click Global Settings, and then configure the global security settings as per your
security policy requirements.
Figure 96 Global Settings
10. In the left pane, click the Event Configuration tab, and then click Edit. Make sure that you have
created a View Event database on the vSphere SQL VM.
Figure 97 Editing Event Configuration
75 Wyse Datacenter Appliance XC for VMware View
Page 76

11. In the Edit Event Database dialog box, type or select appropriate information about the relevant
database, and then click OK to complete the configuration process.
Figure 98 Configuring Event Database
76 Wyse Datacenter Appliance XC for VMware View
Page 77

8 Installing Remote Desktop Services Role on Windows
Server 2012 R2
RDS hosts are server computers that have Windows Remote Desktop Services and View Agent installed.
These servers host desktop sessions that users can access remotely. Within View, RDS desktop pools
provide users with desktop sessions on RDS hosts. When you create an RDS desktop pool you must
specify a farm. The RDS hosts in the farm provide the desktop sessions.
It is assumed you are familiar with installing Windows Server 2012. The screen shot here shows the last
task in installation where you are prompted for a password. After you type credentials, the host is
connected to the domain.
Figure 99 Logging in to Windows 2012 Server
77 Wyse Datacenter Appliance XC for VMware View
Page 78

1. Log in to the VM as a domain account with permissions to add the required roles. Start the Server
Manager application. Click Add roles and features and click Next.
Figure 100 Configuring local server
78 Wyse Datacenter Appliance XC for VMware View
Page 79

2. Click Next.
Figure 101 Roles and Features Wizard
79 Wyse Datacenter Appliance XC for VMware View
Page 80

3. Click Remote Desktop Services installation selected, and then click Next.
Figure 102 Remote Desktop Services installation
80 Wyse Datacenter Appliance XC for VMware View
Page 81

4. Click Standard Deployment and click Next.
Figure 103 Standard Deployment
81 Wyse Datacenter Appliance XC for VMware View
Page 82

5. Because you have to install a session-based solution, click Session-based desktop deployment,
and then click Next.
Figure 104 Session-Based Desktop Deployment
82 Wyse Datacenter Appliance XC for VMware View
Page 83

6. On the Review role Services page, click Next.
Figure 105 Review Role Services
83 Wyse Datacenter Appliance XC for VMware View
Page 84

7. Click Next.
Figure 106 RD Connection Server
84 Wyse Datacenter Appliance XC for VMware View
Page 85

8. For this deployment, all services are being deployed on a single RDSH host. These roles can be
broken out across multiple servers as this is best practice in an Enterprise environment. Click Next.
Under the Server Pool section, select the local host or a dedicated web access server, and then
click Next.
Figure 107 RD Web Access Server
85 Wyse Datacenter Appliance XC for VMware View
Page 86

9. Select the session host from the available servers and click Next.
Figure 108 RD Session Host Server
86 Wyse Datacenter Appliance XC for VMware View
Page 87

10. Select the Restart the destination server automatically if required check box, and then click Next.
Figure 109 Confirm Selections
11. When the roles are installed and configured, the server is automatically restarted.
Figure 110 RDSH Role Install Progress
87 Wyse Datacenter Appliance XC for VMware View
Page 88

9 Adding RDSH Servers to a VMWare View Farm
Farms simplify the task of managing RDSH hosts, RDS desktops, and applications in an enterprise. RDSH
session host servers must be added to a Farm before they can be used by a desktop pool to provide RDS
desktop sessions to end users.
1. To creare an RDS Farm in VMware Horizon View Administrator, click the Resources menu, click Farms,
and then click Add.
Figure 111 Add a Farm
88 Wyse Datacenter Appliance XC for VMware View
Page 89

2. Type the Farm an ID and description, select an Access Group, and then click Next.
Figure 112 Farm Description
89 Wyse Datacenter Appliance XC for VMware View
Page 90

3. Select the RDS host servers to be included in the Farm and click Next.
Figure 113 Select RDS Hosts
90 Wyse Datacenter Appliance XC for VMware View
Page 91

4. Review the settings and click Finish.
Figure 114 RDS Farm Settings Summary
91 Wyse Datacenter Appliance XC for VMware View
Page 92

5. The newly created Farm will show up in the list of RDS Farms and should be enabled automatically.
Figure 115 RDS Farm
Note: For users to connect to an RDS desktop session, an RDS Desktop Pool must be created using
VMware Horizon View Administrator and an RDS Farm must be specified during the pool creation
process.
92 Wyse Datacenter Appliance XC for VMware View
Page 93

10 Deploying Virtual Desktop Master Image
10.1 Creating Template VM
Suggested on the basis of user types used by Dell.
NOTE: Solution is provided on the basis of using full clones for persistence (Standard provisioning) and
recommended disk format is VMDK. Ensure Master image is placed in the same container as the Desktop
pool for faster deployment
Provision a Gold image by doing the following:
Machine Creation Services - Master Image
1. Create Base VM (specify Disk size, Network, Memory, and so on)
2. Install Windows 8.1.
3. Add VM to the Domain.
4. Activate Windows 8.1.
5. Install VMWare Tools.
6. Install the VMware View 6.0.0 agent using the 32bit or 64bit versions as required.
7. Install any required application software including antivirus software and activate if required.
8. Optimize Windows 8.1 using VMWare Optimization best practices.
9. When all optimization tasks have been completed, open an administrator command prompt and type
ipconfig /release to release the IP address and shut down the VM.
10. If a pool of full virtual machine clones is being created; in the vSphere Client, right-click the VM and
select Template, and then click Convert to Template. A VM must be in template form in order for
VMware View to use the VM to create a pool of full clone desktops.
10.2 Optimizing Desktop OS
Ensure you use the VMWare desktop optimization script which can be downloaded from the VMWare
website which can be used to optimize desktop settings for a VDI environment including disabling
unnecessary services.
Windows 8.x Optimization
A new feature in Win 8.1 is Automatic Windows Maintenance, which is a feature of the dism tool that
checks the system and application for update compatibility and file integrity. By default, the system
scheduled task runs at 1 a.m. everyday, or any time after 10 min of idle time. When the system is
functioning, the tiworker.exe process consumes 100 percent CPU on any recently booted desktop
VMs, possibly overloading servers.
93 Wyse Datacenter Appliance XC for VMware View
Page 94

The administrator accounts cannot change the services because the services (idle time check and
automatic check) run as a SYSTEM. You must get SYSTEM rights to disable services.
You can still run the checks manually even if the services are disabled. You must have psexec.exe
(sysinternals) on the Master Image VM to fix this issue.
The following are the three scheduled tasks that must be disabled on your desktop template.
o psexec \\SERVERNAME -s schtasks /change /tn
"\Microsoft\Windows\TaskScheduler\Maintenance Configurator" /DISABLE
o psexec \\SERVERNAME -s schtasks /change /tn
"\Microsoft\Windows\TaskScheduler\Idle Maintenance" /DISABLE
o psexec \\SERVERNAME -s schtasks /change /tn
"\Microsoft\Windows\TaskScheduler\Regular Maintenance" /DISABLE
Turn off the Master Image and take a snapshot for reference.
94 Wyse Datacenter Appliance XC for VMware View
 Loading...