

Page 1

Dell Wireless Docking Station
WLD15
Page 2

Notes, cautions, and warnings
NOTE: A NOTE indicates important information that helps you make better use of your computer.
CAUTION: A CAUTION indicates either potential damage to hardware or loss of data and tells you
how to avoid the problem.
WARNING: A WARNING indicates a potential for property damage, personal injury, or death.
Copyright © 2015 Dell Inc. All rights reserved. This product is protected by U.S. and international copyright and
intellectual property laws. Dell™ and the Dell logo are trademarks of Dell Inc. in the United States and/or other
jurisdictions. All other marks and names mentioned herein may be trademarks of their respective companies.
2015 - 02
Rev. A00
Page 3

Contents
1 Introduction ..........................................................................................................4
Package Contents ................................................................................................................................ 4
Identifying Parts and Features ..............................................................................................................6
Pairing/Connect/Disconnect button.............................................................................................. 7
Kensington Lock.............................................................................................................................. 7
Reset Button.................................................................................................................................... 8
Hardware Requirements ...................................................................................................................... 8
2 Quick Setup of Hardware ...................................................................................9
3 LED Status Indicators......................................................................................... 10
Power Adapter LED............................................................................................................................. 10
Docking Status Indicator.....................................................................................................................10
Pairing/Connect/Disconnect Button .................................................................................................10
Input/Output (I/O) Connectors on the Dell Wireless Docking Station WLD15 ................................11
Re-setting the Dell Wireless Docking Station WLD15........................................................................12
4 Connecting to the Intel Wireless Dock Manager .........................................14
5 Configuring the Intel HD Graphics Utility......................................................19
If connecting two displays, follow these steps:................................................................................. 19
If connecting three displays, follow these steps:............................................................................... 21
6 Dell Wireless Docking Station Software Update.......................................... 26
7 Troubleshooting the Dell Wireless Docking Station WLD15...................... 31
Symptoms and Solutions.....................................................................................................................31
8 Technical specifications....................................................................................34
Product Specifications ....................................................................................................................... 34
Docking Specifications .................................................................................................................34
Display Resolution Table...............................................................................................................35
3
Page 4
1
Introduction
The Dell Wireless Docking Station WLD15 is a device that links all your electronic devices to your laptop
computer with WiGig interface. When you connect the laptop to the docking station, you can gain access
to all your peripherals such as mouse, keyboard, stereo speakers, external hard drive, and large-screen
displays without having to plug each one into the laptop.
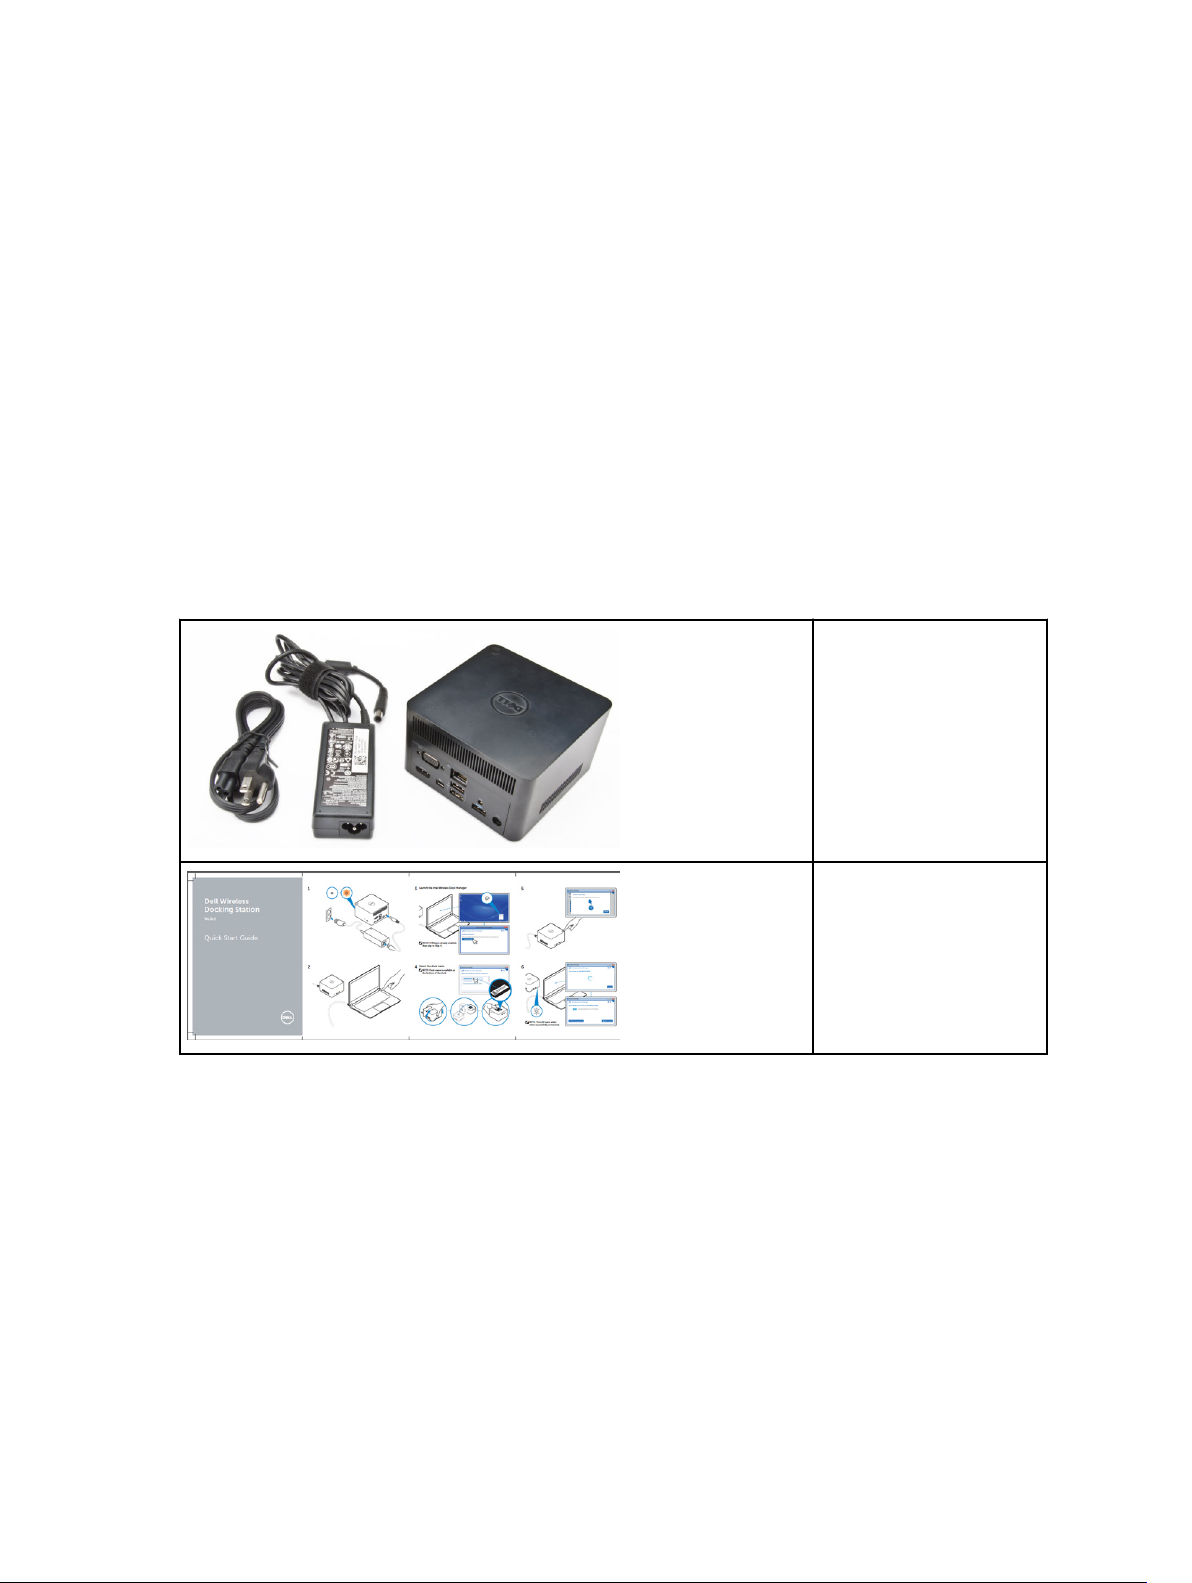
Package Contents
Your docking station ships with the components shown below. Ensure that you have received all the
components and contact Dell (see your invoice for contact information) if something is missing.
Wireless Dock
Power Adapter
Power Cord
Quick Setup Guide (QSG)
4
Page 5

Safety, Environmental, and
Regulatory Information
5
Page 6
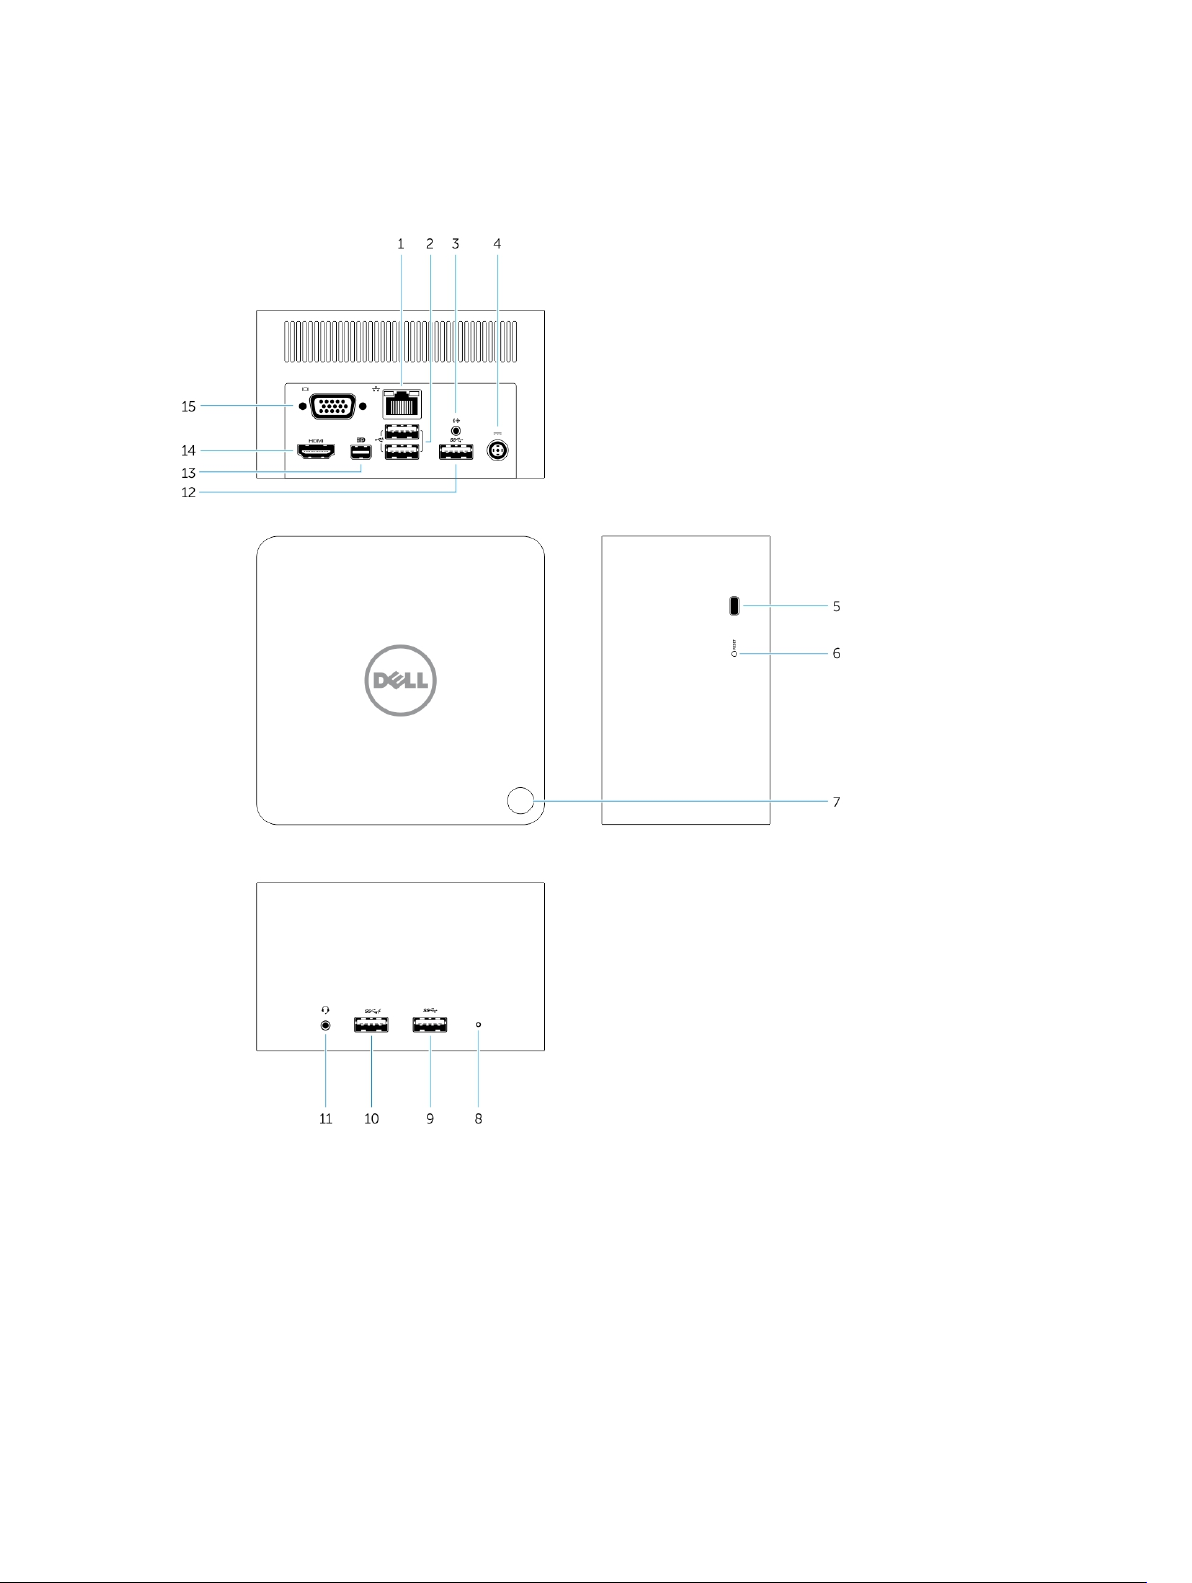
Identifying Parts and Features
Figure 1. Identifying Parts and Features
1. RJ-45 Port
2. USB 2.0 Ports
3. Speaker out
4. DC-in Connector
5. Kensington lock
6. Reset button
6
Page 7
7. Pairing/Connect/Disconnect/Sleep/Wake up button
8. Docking status indicator
9. USB 3.0 connector
10. USB 3.0 connector with PowerShare
11. Headset connector
12. USB 3.0 Port
13. mini Display Port
14. HDMI Port
15. VGA Port
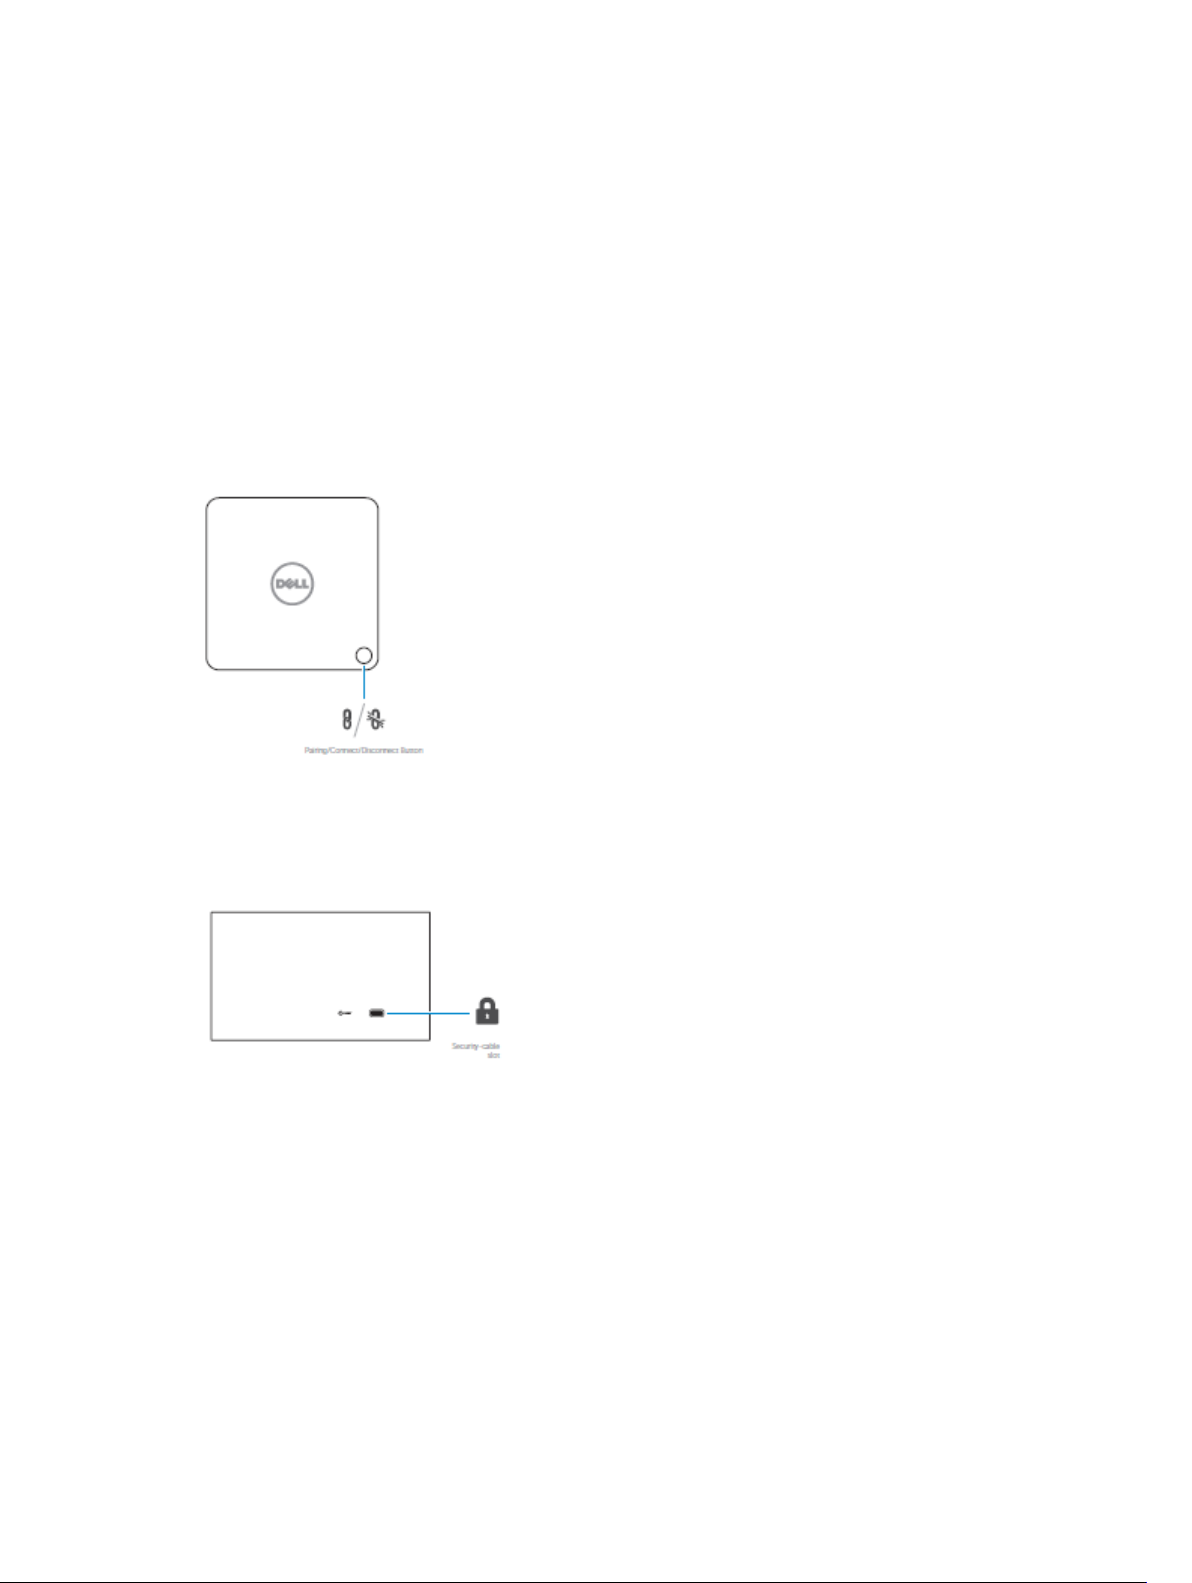
Pairing/Connect/Disconnect button
Figure 2. Pairing/Connect/Disconnect button
Kensington Lock
Figure 3. Kensington Lock
7
Page 8

Reset Button
Figure 4. Reset Button
Hardware Requirements
Before using the docking station, ensure that your notebook or PC has a WiGig module and antenna to
enable one-to-one wireless connection.
8
Page 9
2
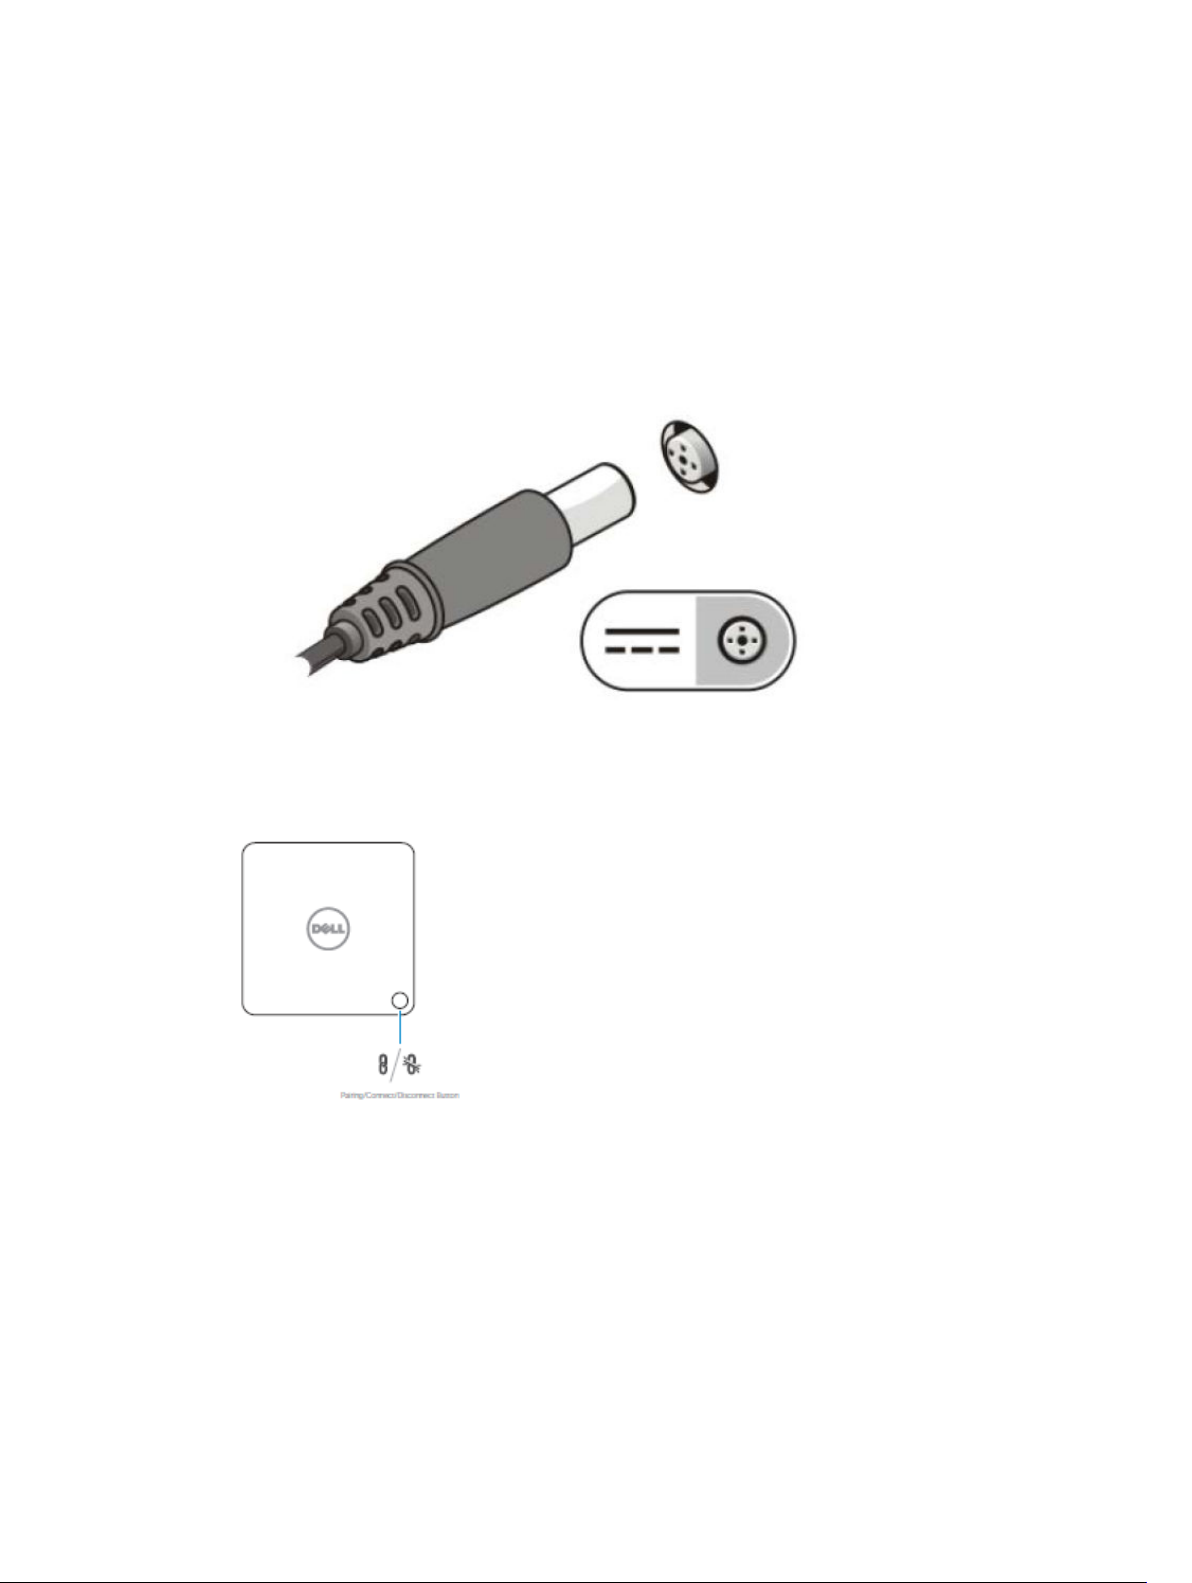
Quick Setup of Hardware
1. Connect the AC adapter to the AC adapter connector on the Dell Wireless Docking Station WLD15
and to the electrical outlet.
Figure 5. AC Adapter
2. Press the Pairing/Connect/Disconnect button.
Figure 6. Press the Pairing/Connect/Disconnect button.
9
Page 10

LED Status Indicators
Power Adapter LED
The LED on the power adapter connector illuminates white when power is supplied.
Docking Status Indicator
Table 1. Docking Station LED Indicators
State LED Behavior
Disconnected Solid Amber
Connected Solid White
Error (hardware failure) Amber/White - alternate blinking between white
and amber.
Pairing/Connecting Amber - rapid blinking.
Firmware Upgrade Blinking white
3
Table 2. RJ-45 LED Indicators
Link Speed Indicators Ethernet Activity Indicator
10 Mb = Green Yellow Flashing
100 Mb = Orange
1 Gb = Green + Orange
Pairing/Connect/Disconnect Button
The Pairing Button is an easy way for the user to pair, connect, and disconnect the docking station to the
laptop. It can also be used to ‘put to sleep’ and ‘wake up’ the laptop.
10
Page 11

Function Docking state Action Effect
Initial pairing Docking station not
connected and not
paired.
Go to sleep Dock connected Short press Puts the laptop in Sleep
Short press Completes pairing and
connection to the
docking station.
mode.
NOTE: The laptop’s
Power Options
should be
configured to
support this
function.
Disconnect (Undock) Dock connected Long press (more than 2
seconds)
Resume from Standby Dock connected Short press Laptop in ‘active/wake’
Monitor wake up No docking station in
range.
Short press Activates the monitor.
Disconnects from
docking station.
NOTE: Docking
station LED will
turn Amber to
indicate successful
disconnection.
mode.
NOTE: There is no
active docking
connection in this
state.
Input/Output (I/O) Connectors on the Dell Wireless Docking Station WLD15
The Dell Wireless Docking Station WLD15 has the below I/O connectors:
11
Page 12

Video Ports
• mini DisplayPort x 1
• HDMI x 1
• VGA x 1
Input/Output Ports
If the wireless link between the laptop and the Dell Wireless Docking Station becomes weak, move the
laptop closer to the Dell Wireless Docking station or rotate the laptop to find a position with a stronger
wireless link. For example, if you find that the wireless signal strength is reduced when the laptop lid is
closed, you can open the laptop lid to find the best reception.
NOTE: The wireless connection works best if your laptop lid (logo side) directly faces the front side
of the docking station and there is a line-of-sight between the laptop and the docking station.
• USB 3.0 x 2
• USB 3.0 PowerShare x 1
• USB 2.0 x 2
• Gigabit Ethernet (RJ–45) x 1
• Headset connector x 1
• Line-out connector x 1
Re-setting the Dell Wireless Docking Station WLD15
To re-set to the default factory settings, first power off the docking station, press the re-set button for
more than 2 seconds, and then power on the docking station.
Figure 7. Reset
The Reset button is intended for recovering from undesired situations. It restores default parameters and
the factory firmware version. The table below describes the reset button functionality:
Function Action Effect
Parameters recovery Long press (>2 sec)
12
Restores all parameters to
factory defaults.
Page 13

Function Action Effect
NOTE: The firmware version
is not changed in this
process.
Factory version recovery and
defaults
Press during docking station
power-up.
Restores factory-saved version.
NOTE: This process will
restore the firmware version,
restore all default
parameters, and delete all
previously defined profiles.
13
Page 14

4
Connecting to the Intel Wireless Dock Manager
The Intel Wireless Dock Manager is an easy-to-use software which allows you to connect to the Dell
Wireless Docking Station WLD15. The Wireless Dock Manager uses WiGig’s WDE/WSE PAL leveraging the
latest technology in transmitting the data wirelessly. Using this software you can enjoy wireless highspeed data, audio, and video transfer between your PC/laptop and the Dell Wireless Docking Station
securely. This software supports WPS security pairing.
Once you establish a connection between your PC/laptop and the Dell Wireless Docking Station, all the
devices like mouse, keyboard, stereo speakers, display devices, external hard drives, etc. attached to the
dock are available to you. You can access them wirelessly using your PC/laptop. The Device Manager on
your PC/laptop shows all the devices attached to the Dell Wireless Docking Station as if they are attached
to your PC/laptop.
The following sections explain in detail how to configure the Intel Wireless Dock Manager software,
connect to the Dell Wireless Docking Station, and use the devices attached to the docking station.
NOTE: The Intel Wireless Dock Manager is pre-installed in your computer.
1. Launch the Intel Wireless Dock Manager.
Figure 8. Launch the Intel Wireless Dock Manager
2. If disabled, please enable WiGig.
14
Page 15

Figure 9. Enable WiGig
3. Click the icon in your task bar as shown to connect to your Wireless Docking Station.
Figure 10. Docks available to connect
4. Select the dock you want to connect to.
Figure 11. Select the dock you want to connect to
15
Page 16

5. Press the connection button on the Wireless Docking Station to confirm.
Figure 12. Confirm and press the connection button
6. You are now successfully connected to the Dell Wireless Docking Station WLD15. You can also enable
Yes to automatically connect to this docking station on subsequent attempts.
Figure 13. Successfully connected
7. If you do not wish to connect automatically on subsequent attempts, you can disable it by sliding the
button to No.
16
Page 17

Figure 14. Choose No to not connect automatically
8. Click the Dock Management tab to configure the Intel Wireless Dock Manager. You can customize the
Dock Access Settings to Individual, Shared, or Public connections. Selecting Individual allows automatic
connections. After the initial pairing, every subsequent connection attempt will use pairing content from
a stored profile.
Figure 15. Dock Management
Selecting Shared will require you to manually select the target docking station from the scan list to
connect. After the initial pairing, every subsequent connection attempt will use the pairing content from
the stored profile.
17
Page 18

Figure 16. Dock Management - shared
Selecting Public always requires the WPS pairing.
Figure 17. Dock Management - Public
You can also set a password to protect the docking station settings.
CAUTION: If you forget your password, then you have to do a roll-back to the full factory-default
settings.
18
Page 19

Configuring the Intel HD Graphics Utility
The Intel HD Graphics Utility allows you to configure multiple displays. You can connect two or more
displays, but can only enable two active external displays simultaneously.
If connecting two displays, follow these steps:
1. Click the icon list on the task bar.
Figure 18. Intel HD Graphics utility
2. Click the Intel HD Graphics utility on your taskbar as shown here
5
Figure 19. Intel HD Graphics utility
3. Click Graphics Properties.
Figure 20. Graphics Properties.
4. Click Display.
19
Page 20

Figure 21. Display
5. Click Display and select Multiple Displays.
Figure 22. Multiple Displays
6. Select your preferred Display Mode.
20
Page 21

Figure 23. Display Mode
If connecting three displays, follow these steps:
1. Click the Intel HD Graphics Utility.
Figure 24. Intel HD icon on taskbar
2. Select DisplayPort Topology.
Figure 25. Select DisplayPort topology
3. Select Port.
Your monitors will be displayed.
4. Click Get Display Names.
21
Page 22

Figure 26. Display names
5. Your monitors model numbers will be displayed.
Figure 27. Names displayed
6. Select any two monitors and click Apply.
22
Page 23

Figure 28. Select your display and click Apply
7. Click Graphics Properties.
Figure 29. Select Intel HD Graphics Properties
8. The Intel HD Graphics Control Panel appears.
Figure 30. Intel HD Control Panel
23
Page 24

9. Select Display.
Figure 31. Select Display
10. Select Multiple Displays.
Figure 32. Select Multiple Displays
11. Select your preferred Display Mode.
24
Page 25

Figure 33. Select Display 3
12. Click Apply.
Figure 34. Apply
NOTE: Go back to General Settings to configure each display’s resolution. The maximum resolution
for two active displays should not be higher than 1920 x 1200 or dependent on the display’s
supportable resolution. Please refer to the Display Resolution table in the Technical Specifications
section of this user’s guide.
25
Page 26

Dell Wireless Docking Station Software Update
1. To update the Dell Wireless Docking Station Software, in the Update Package dialog box, click
INSTALL.
Figure 35. Install or Extract
6
2. The Dell Wireless Docking Software – InstallShield Wizard dialog box is displayed. Click Yes.
Figure 36. Click Yes to install
The Dell Wireless Docking Software - InstallShield Wizard dialog box indicates that the installation is in
progress.
26
Page 27

Figure 37. Preparing the install
3. In the Dell Wireless Docking Software – InstallShield Wizard dialog box, click Next.
Figure 38. Click Yes to continue
4. To enable WiGig, in the Welcome to Intel Wireless Dock Manager dialog box, click Yes.
27
Page 28

Figure 39. Click yes to enable WiGig
5. In the Dell Wireless Docking Software- InstallShield Wizard dialog box, click Finish.
Figure 40. Click Finish
6. A message is displayed indicating that the software is successfully updated. Click CLOSE.
28
Page 29

Figure 41. Successful
7. When you are connecting to the docking station, a message may be displayed asking whether or not
you want to update the docking station firmware. Click Yes.
Figure 42. Click yes to update drivers
The Intel Wireless Dock Manager page indicates that the Dell WLD15 update is in progress.
29
Page 30

Figure 43. Updating in progress
30
Page 31

Troubleshooting the Dell Wireless Docking Station WLD15
Symptoms and Solutions
Symptoms Suggested solutions
1. No video on the monitors attached to the HDMI,
miniDP port, or the VGA port on the wireless
docking station.
• Make sure the laptop is connected with the
docking station to disconnect and reconnect
to the docking station.
• Make sure that the video cable attached to the
panel is tightly secured to the video port in the
docking station and that the monitor’s display
output setting is set to the correct output.
• This may be due to the monitor(s) supporting
higher resolutions than the WiGig connection
is able to support. In the Intel Graphics Control
Panel, under General Settings, ensure that the
resolution is set to 1920 x 1200 or 1920 x 1080
at 59 Hz or 60 Hz for both the monitors.
• If only one monitor is shown, while the other is
not, go to the Intel Graphics Control Panel, and
under Multiple Displays, select the output for
the second monitor.
• If three displays are plugged into the docking
station, then the docking station will only
support a maximum of two external monitors.
Please refer to section in this User Guide which
describes how to select and activate the
desired monitors.
• If your monitor is connected to a docking
station, then the video output on your laptop
may be disabled. Consult your laptop’s user
manual or contact your laptop manufacturer
for assistance on enabling this feature.
7
2. The video on the attached monitor is distorted
or flickering.
• Make sure the video cable attached to the
panel is tightly secured to the video port in the
docking station.
• When the monitor is distorted or flickering,
please reset your monitor to restore it to its
original settings. You can reset the monitor by
pressing the Menu button on the monitor itself,
and selecting Restore Factory Settings. Or
disconnect the monitor from your docking
station and power off and on in order to reset.
31
Page 32

Symptoms Suggested solutions
3. The video on the attached monitor is not
displaying as an extended monitor.
• Make sure the Intel HD Graphics is installed in
the Windows Device Manager.
• Open the Intel HD Graphics Control Panel and
go to Multiple Displays control to set the
display to the extended mode.
4. The audio connector is not functioning or there
is a lag in the audio.
5. The USB ports are not functioning on the
docking station.
6. The HDCP content is not displayed on the
attached monitor.
7. The LAN port is not functioning.
• Ensure the correct playback device is selected
in the laptop.
• The most likely cause of audio output
problems on the docking station is a bad
audio-out connector. First try powering off and
then powering on the docking station. If that
fails, try to re-plug in the audio cable to the
docking station from the external speaker
output.
• Make sure the laptop is stationed closer to the
docking station to avoid audio lag. Also, please
update to the latest audio drivers.
• Make sure the laptop is connected with the
docking station. Try to disconnect and
reconnect again with the docking station.
• Check the USB ports. Try plugging the USB
device into another port.
• Please check if the plugged device is shown in
the Windows Device Manager.
• Wireless docking station does not support
HDCP content
• Make sure the Ethernet cable connections are
secured at the firewall and the hub or
workstation.
• Make sure the Realtek Gigabit Ethernet
controller is installed in the Windows Device
Manager.
• Please re-install the Realtek Ethernet Driver or
Dell Wireless Docking Software from Dell.com/
support.
8. The Wireless Dock Manager is not loading.
32
• Make sure the Intel Wireless Dock Manager is
installed in the laptop or search for Intel
Wireless Dock Manager program.
• Device Manager should show Network
Adapters –
– Intel Tri-Band Wireless-AC 17625
• Device manager should show: Intel Wireless
Gigabit 17625 Drivers -
– Intel Wireless Gigabit 17625 Device Driver
– Intel Wireless Gigabit 17625 User Mode
Driver
• Re-install the Dell Wireless Docking Software
Pack from Dell.com/support.
Page 33

Symptoms Suggested solutions
9. The WiGig connection is not established.
• If docking station is used, other users will not
be able to find it or connect to it
• If dock is not in used by another computer, you
can check following items:
– The docking station LED should display
Amber color.
– Bring the computer closer to the docking
station and ensure nothing is in between
the computer and the docking station.
• The LED color should be white when a WiGig
connection is established.
• Dell Wireless Docking Software and driver pack
may be outdated, download the latest driver
pack from Dell.com/support
10. Poor docking signal performance.
11. No docking connection in pre-OS
environment.
12. Fan noise from docking station in disconnected
mode.
13. Dell Display Manager (DDM) monitor
application not functioning with wireless docking
station
• Make sure there is a clear line-of-sight
between laptop and docking station.
• Bring computer closer to the docking station.
• Make sure there is nothing blocking or is in
between docking station and laptop.
• Docking station does not support pre-OS
environment.
• The docking station is constantly “listening” to
computers who may wish to pair with it. The
fan within the docking station will turn on
occasionally to maintain temperature in the
docking station.
• DDM application is not supported with current
WiGig release solution.
33
Page 34

Technical specifications
Product Specifications
Docking Specifications
8
Standard
Video Ports
IO Ports
Network Port
USB Ports
Buttons
LEDs
• Intel WiGig 1.1
• IEEE 802.11ad
• mini DisplayPort x 1 (supports DP 1.2)
• HDMI x 1 (supports HDMI 1.4)
• VGA Port x 1
• Headset connector x 1
• Speaker out x 1
• 10/100/1000 M LAN Port x 1
• 2 Front USB 3.0 Ports (one with PowerShare)
• 1 Rear USB 3.0 Ports
• 2 Rear USB 2.0 Ports
• Pairing/Connect/Disconnect
• Reset
• Wireless status indicator
– Search/Disconnected Mode - Amber
– Connected Mode - White
• Error: White and Amber
• Pairing: Amber blinking
• Firmware Upgrade: White blinking
34
Page 35

Environmental Characteristics Temperature Operating: 0 °C to 35 °C
Non-operating:
• Storage: -20 °C to 60 °C (-4
°F to 140 °F)
• Shipping: -20 °C to 60 °C (-4
°F to 140 °F)
Humidity Operating: 10% to 80% (non-
condensing)
Non-operating:
• Storage: 5% to 90% (noncondensing)
• Shipping: 5% to 90% (noncondensing)
Power Adapter Input Voltage AC 100~240 V
Power Adapter Output Voltage 19.5 V / 3.34 A
Average Power Consumption 4.384 W
Network Standby Power
Consumption
Dimension 120 mm x 120 mm x 70 mm
Weight 363.42 g
5.8 W
Display Resolution Table
Table 3. Display Resolution Table
No of video ports
connected
Single 2560 x 1600 p60 Not connected Not connected
Single Not connected 2560 x 1600 p60 Not connected
Single Not connected Not connected 2560 x 1600 p60
Dual Display 1920 x 1200 p60 1920 x 1200 p60 Not connected
Dual Display 1920 x 1200 p60 Not connected 1920 x 1200 p60
Dual Display Not connected 1920 x 1200 p60 1920 x 1200 p60
VGA* HDMI MiniDP
35
Page 36

NOTE: If higher resolution monitors are used, the Intel Graphics driver will make a judgement based
on monitor specifications, available WiGig bandwidth, and display configurations. Some resolutions
may not be supported and so will be removed from the Intel Graphics Media Control Panel.
36
 Loading...