

Page 1

Dell™ W2306C LCD TV Display
Owner’s Manual
Model W2306C
www.dell.com | support.dell.com
Page 2
Notes, Notices, and Cautions
NOTE: A NOTE indicates important information that helps you make better use of your LCD TV display.
NOTICE: A NOTICE indicates either potential damage to hardware or loss of data and tells you how to avoid the
problem.
CAUTION: A CAUTION indicates a potential for property damage, personal injury, or death.
____________________
Information in this document is subject to change without notice.
© 2005 Dell Inc. All rights reserved.
Reproduction in any manner whatsoever without the written permission of Dell Inc. is strictly forbidden.
Trademarks used in this text: Dell™, Dimension™, OptiPlex™, Dell Precision™, Latitude™, Inspiron™, DellNet™, PowerApp™,
PowerEdge™. PowerConnect™, PowerVault, EMC
symbol are trademarks of SRS Labs, Inc.
Other trademarks and trade names may be used in this document to refer to either the entities claiming the marks and names or their products.
Dell Inc. disclaims any proprietary interest in trademarks and trade names other than its own.
October 2005 Rev. A00
®
and the DELL logo are trademarks of Dell, Inc.; TruSurround XT, SRS, and
Page 3

Contents
1 About Your LCD TV Display . . . . . . . . . . . . . . . . . . . . . . . . . . . . . .5
Front View. . . . . . . . . . . . . . . . . . . . . . . . . . . . . . . . . 5
Right Side View
Left Side View
Bottom View
Package Contents
. . . . . . . . . . . . . . . . . . . . . . . . . . . . . . 6
. . . . . . . . . . . . . . . . . . . . . . . . . . . . . . . 7
. . . . . . . . . . . . . . . . . . . . . . . . . . . . . . . . 8
. . . . . . . . . . . . . . . . . . . . . . . . . . . . . 9
2 Setting Up Your LCD TV Display . . . . . . . . . . . . . . . . . . . . . . . . .11
Proper Location for Your LCD TV Display . . . . . . . . . . . . . . . . . . 11
Connecting Your LCD TV Display
Connecting Your Computer to the LCD TV Display
. . . . . . . . . . . . . . . . . . . . . . 11
. . . . . . . . . . . . . . 13
3 Your Remote Control . . . . . . . . . . . . . . . . . . . . . . . . . . . . . . . . . . .19
Installing Batteries . . . . . . . . . . . . . . . . . . . . . . . . . . . . 19
Using Your Remote Control
Using Your LCD TV Display With a Universal or Learning Remote Control
. . . . . . . . . . . . . . . . . . . . . . . . . 20
. . . 22
4 Using the TV Menu . . . . . . . . . . . . . . . . . . . . . . . . . . . . . . . . . . . .23
Using Your Remote Control With the TV Menu. . . . . . . . . . . . . . . . 23
Selecting Your TV Menu Language
Input Select Menu
Picture Menu
. . . . . . . . . . . . . . . . . . . . . . . . . . . . . . . . . . . 26
Audio
Size
. . . . . . . . . . . . . . . . . . . . . . . . . . . . . . . . . . . . 26
. . . . . . . . . . . . . . . . . . . . . . . . . . . . . 24
. . . . . . . . . . . . . . . . . . . . . . . . . . . . . . . 25
. . . . . . . . . . . . . . . . . . . . . 24
Contents 3
Page 4

Parental Control . . . . . . . . . . . . . . . . . . . . . . . . . . . . . . 27
TV Menu Setup
Sleep Timer
Closed Caption
. . . . . . . . . . . . . . . . . . . . . . . . . . . . . . 28
. . . . . . . . . . . . . . . . . . . . . . . . . . . . . . . . 29
. . . . . . . . . . . . . . . . . . . . . . . . . . . . . . 29
5 Troubleshooting Your LCD TV Display . . . . . . . . . . . . . . . . . . . . 30
Troubleshooting Tips. . . . . . . . . . . . . . . . . . . . . . . . . . . . 30
General Problems
TV Menu Messages
Remote Control Problems
. . . . . . . . . . . . . . . . . . . . . . . . . . . . . 31
. . . . . . . . . . . . . . . . . . . . . . . . . . . . 35
. . . . . . . . . . . . . . . . . . . . . . . . . 36
Using the Self-Test Feature When Your LCD TV Display is Connected to Your Computer
36
Problems When Using the LCD TV Display as a Monitor
. . . . . . . . . . . 37
6 Specifications for Your LCD TV Display . . . . . . . . . . . . . . . . . . .38
7 Contacting Dell . . . . . . . . . . . . . . . . . . . . . . . . . . . . . . . . . . . . . . .41
Index . . . . . . . . . . . . . . . . . . . . . . . . . . . . . . . . . . . . 59
4 Contents
Page 5

About Your LCD TV Display
Front View
1
2
1
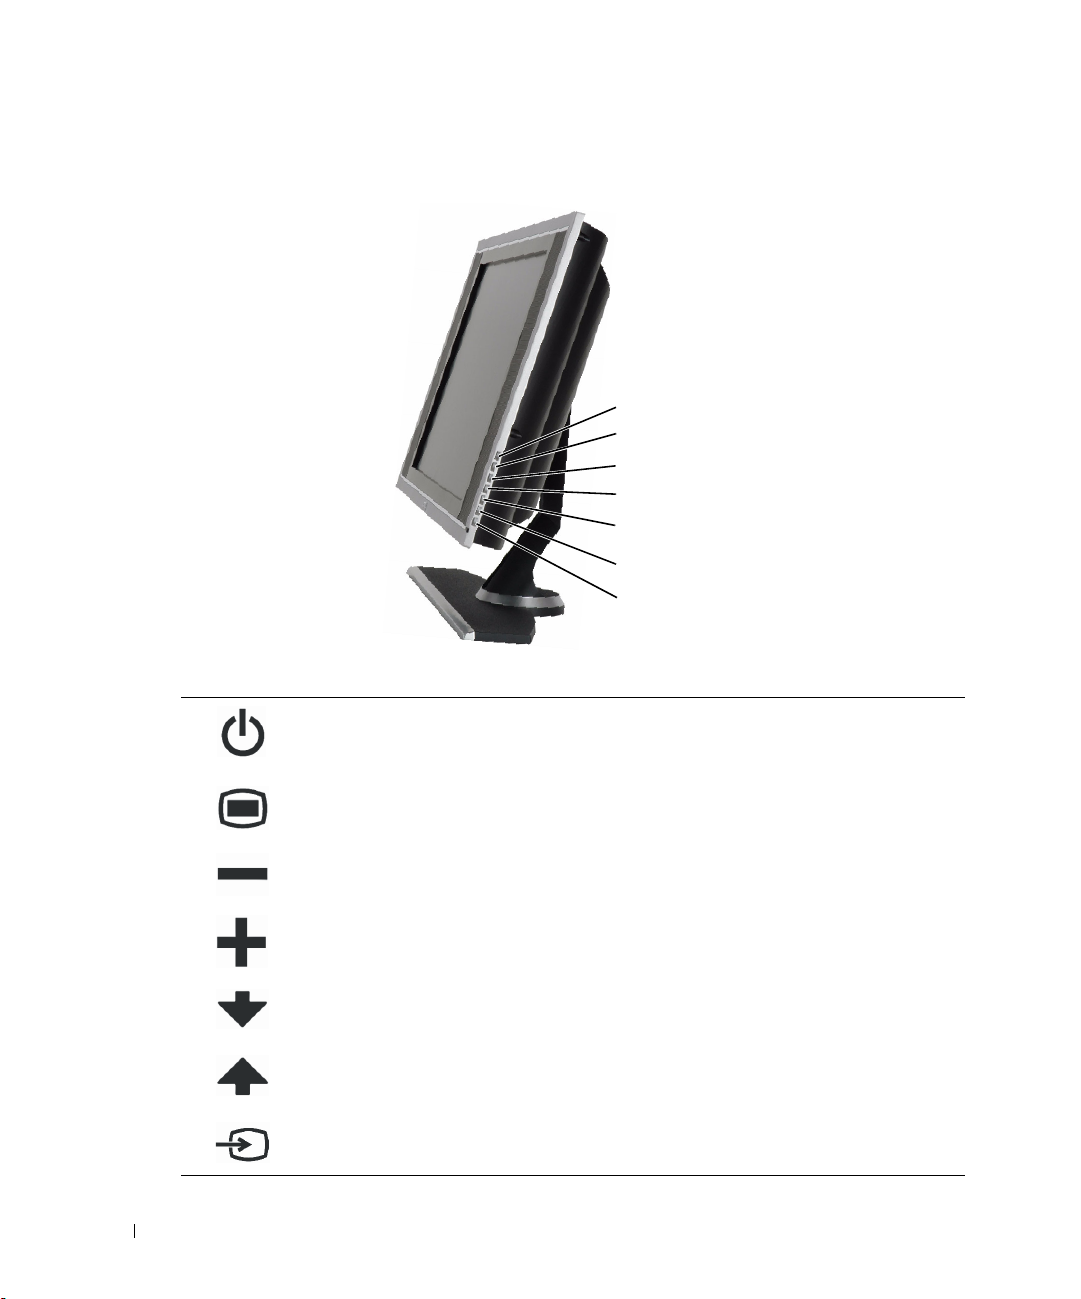
1 IR receiver Senses the signal from the remote control.
2 Power indicator light (LED) The light is blue when the LCD TV display is on and amber
when the LCD TV display is in power save mode.
About Your LCD TV Display 5
Page 6
www.dell.com | support.dell.com
Right Side View
1 Power button
2
TV Menu button Push to enable the TV Menu.
7
6
5
4
3
2
1
Push to turn the LCD TV display on and off. The power button
is blue when it is on and amber when it is in power saving
mode.
3
4 Volume button Push to increase the volume.
5 Channel button
6
7
Volume button Push to decrease the volume.
Channel button
Input Select button Push to display the Input Select menu.
6 About Your LCD TV Display
Push to select the previous channel or navigate through the TV
Menu.
Push to select the next channel or navigate through the TV
Menu.
Page 7
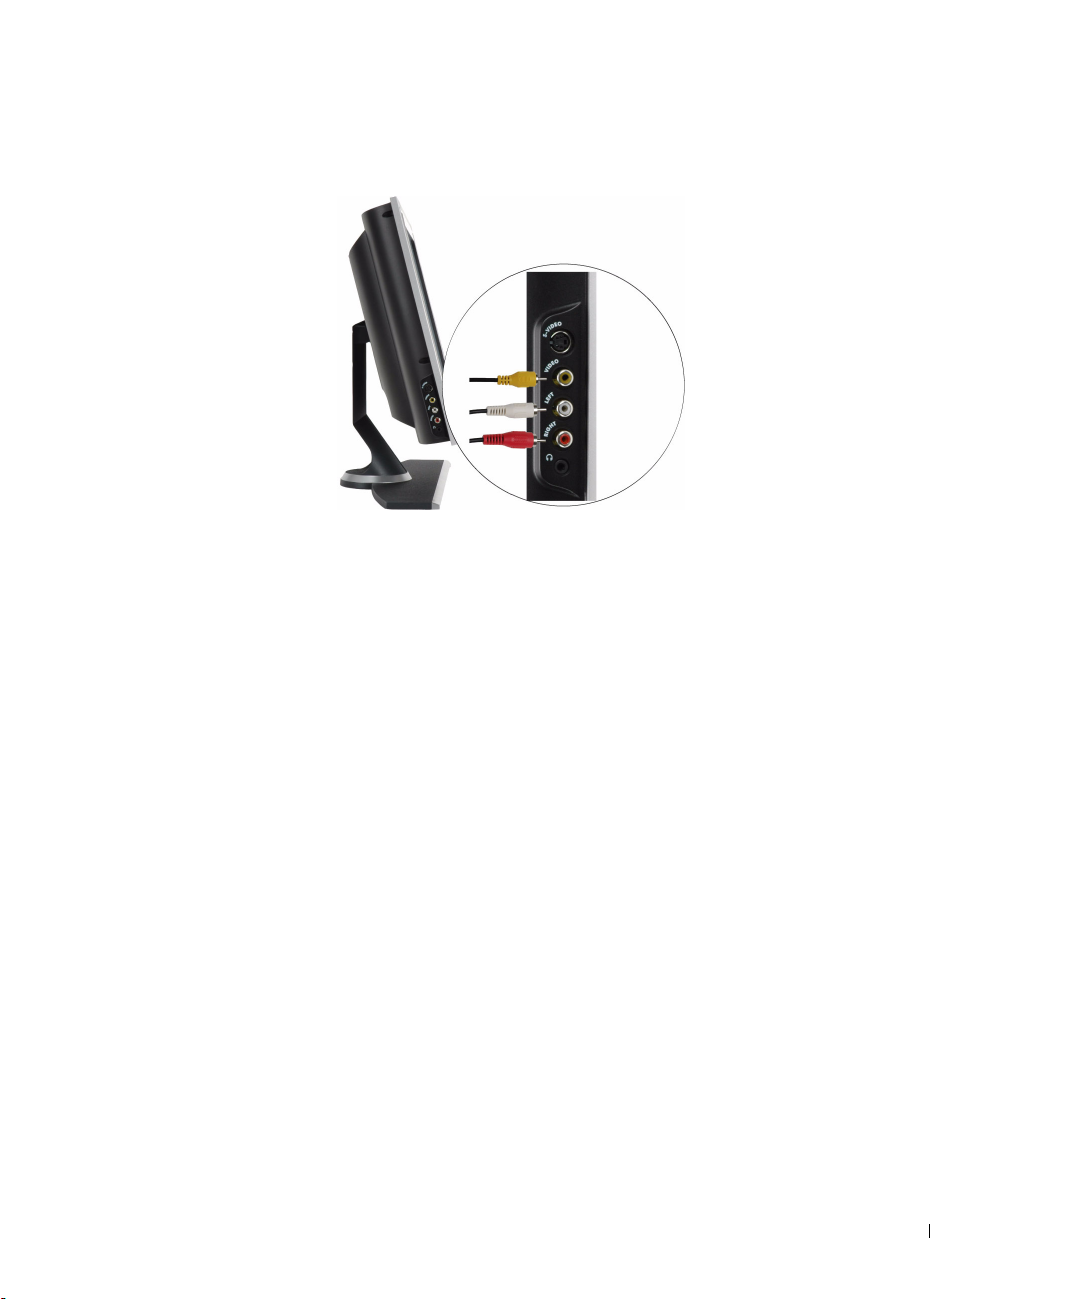
Left Side View
1
2
3
4
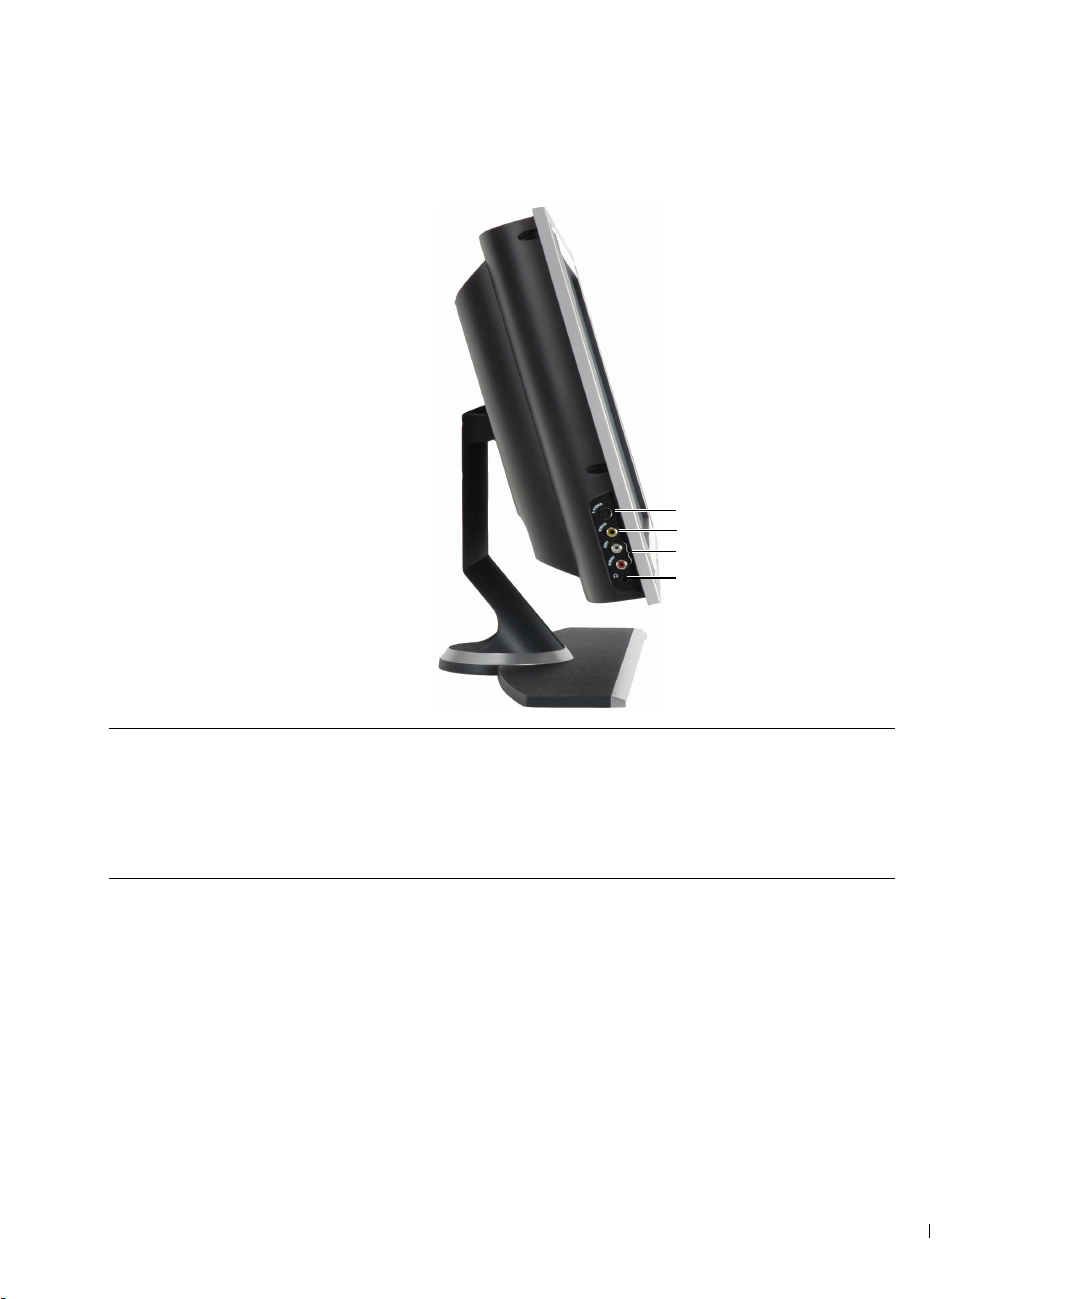
1 AV SIDE (S-Video 1) Connect devices such as a video game system or a VCR.
2 AV SIDE (Composite 1) Connect devices such as a VCR or DVD player.
3 Composite audio connector Use the audio connector if you have connected a device to
connector.
4 Headphone connector Connect headphones.
About Your LCD TV Display 7
Page 8
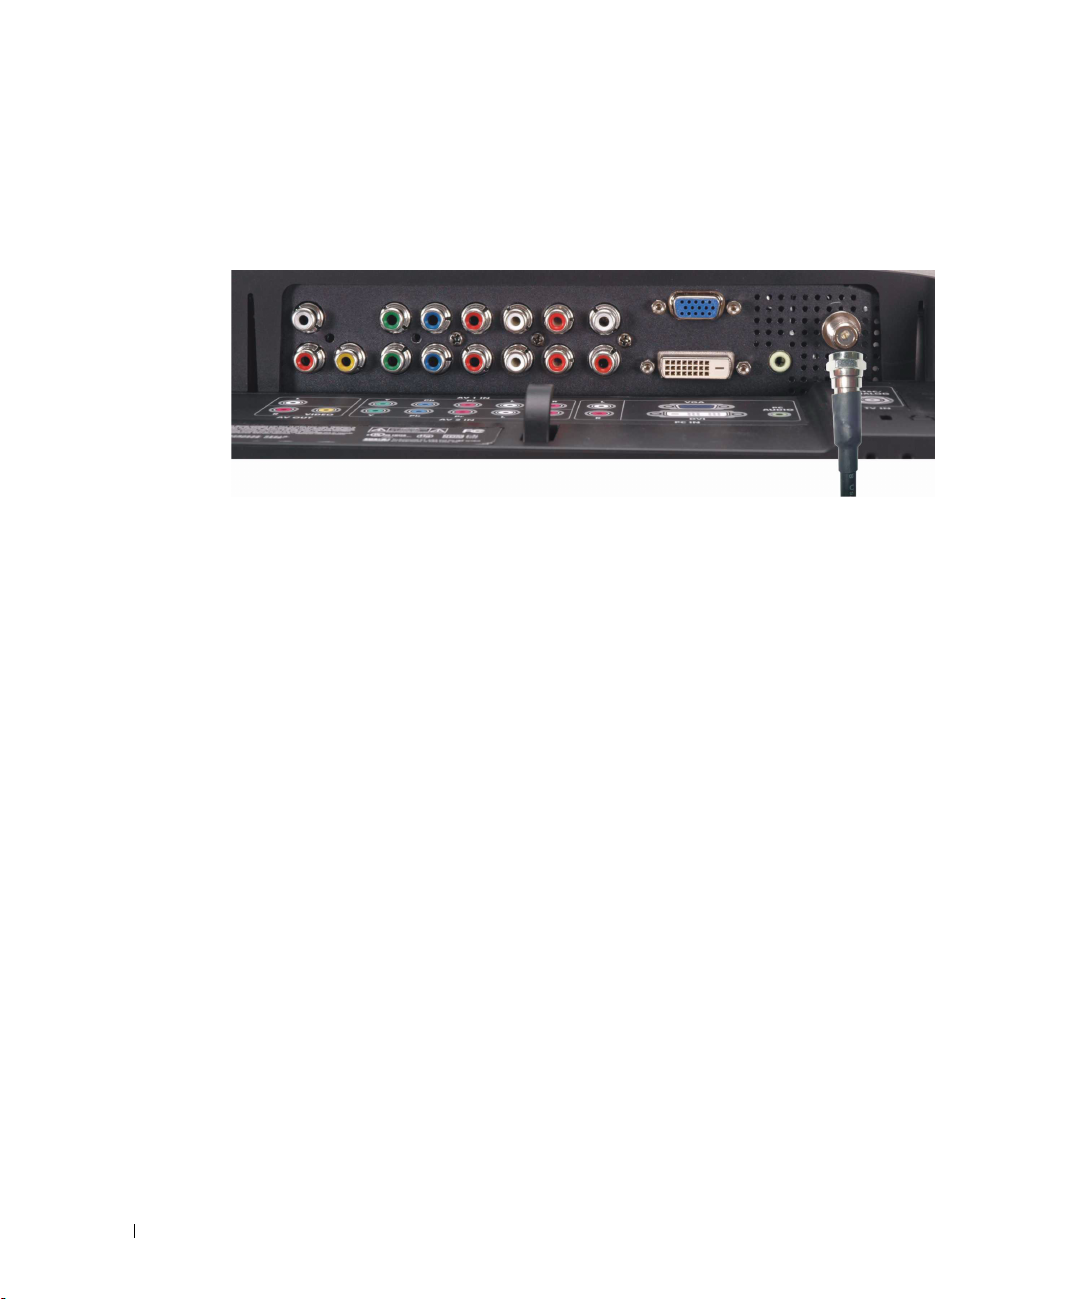
Bottom View
www.dell.com | support.dell.com
1
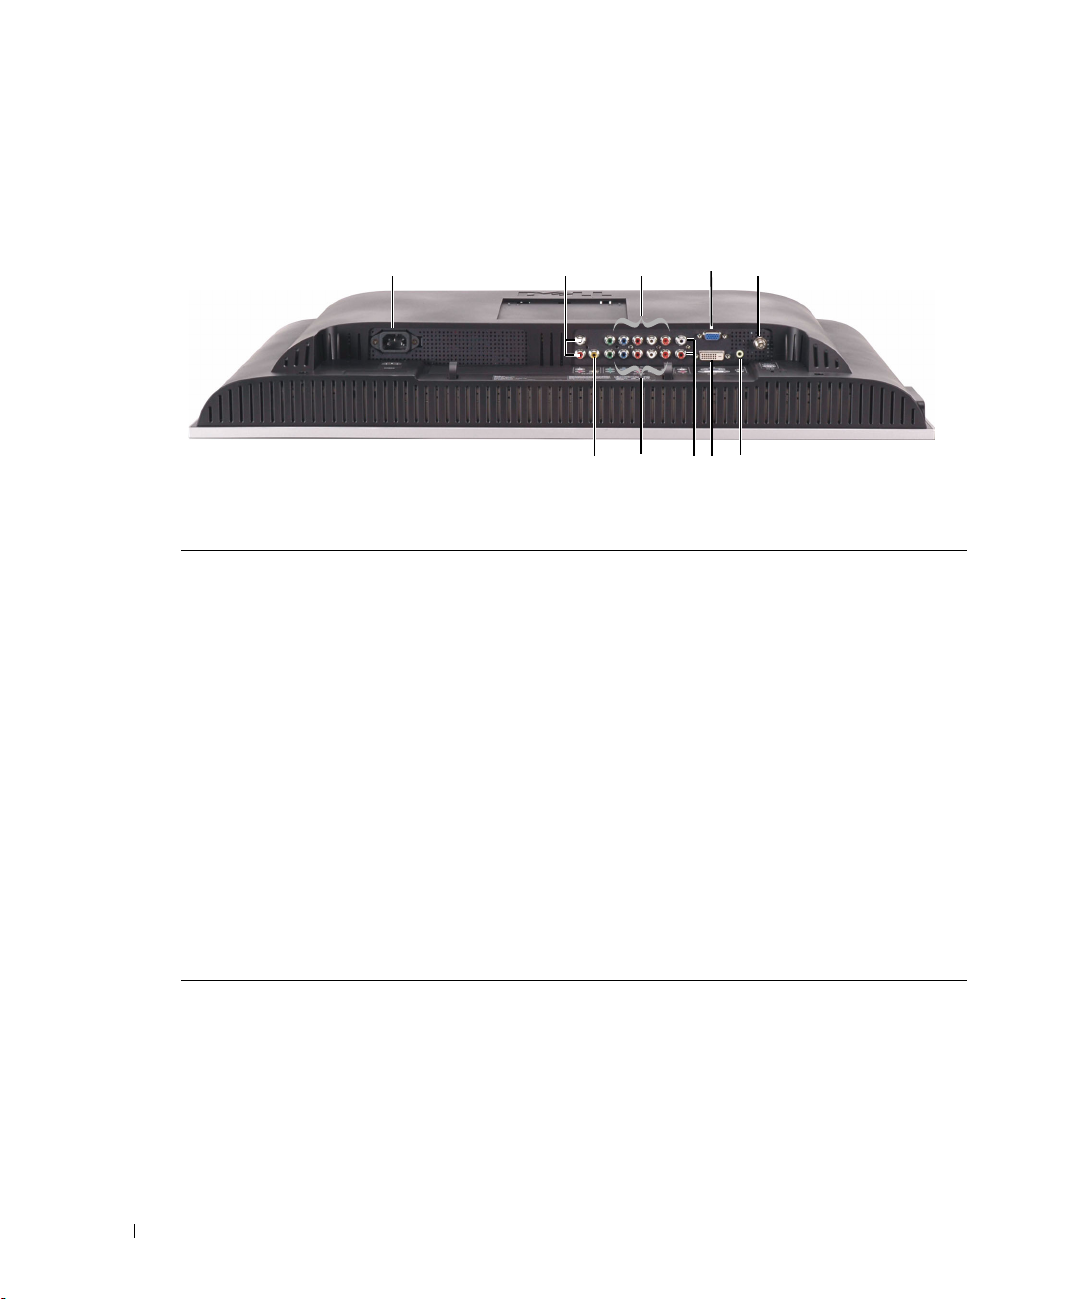
1 Power connector Connect your power cord.
2 Composite out/Audio Out (L/R) Connect a VCR.
3 Composite out/Video Out Connect a VCR.
4 Component video and audio
connectors (AV1)
5 Component video and audio
connectors (AV2)
6 DVI audio connector (L / R) Use the DVI audio connector if you have connected a device
7 VGA Connect your computer.
8 DVI connector Connect your computer or video devices such as a DVD
9 Audio connector for VGA or DVI Connect the audio cable from your computer to the LCD
10 ANT/Cable Connect cable TV box or an antenna.
Connect devices such as a DVD player or cable TV box.
Connect devices such as a DVD player or cable TV box.
such as a DVD player to the DVI connector.
player.
TV Display.
2
4
5
3
7
10
8
6
9
8 About Your LCD TV Display
Page 9
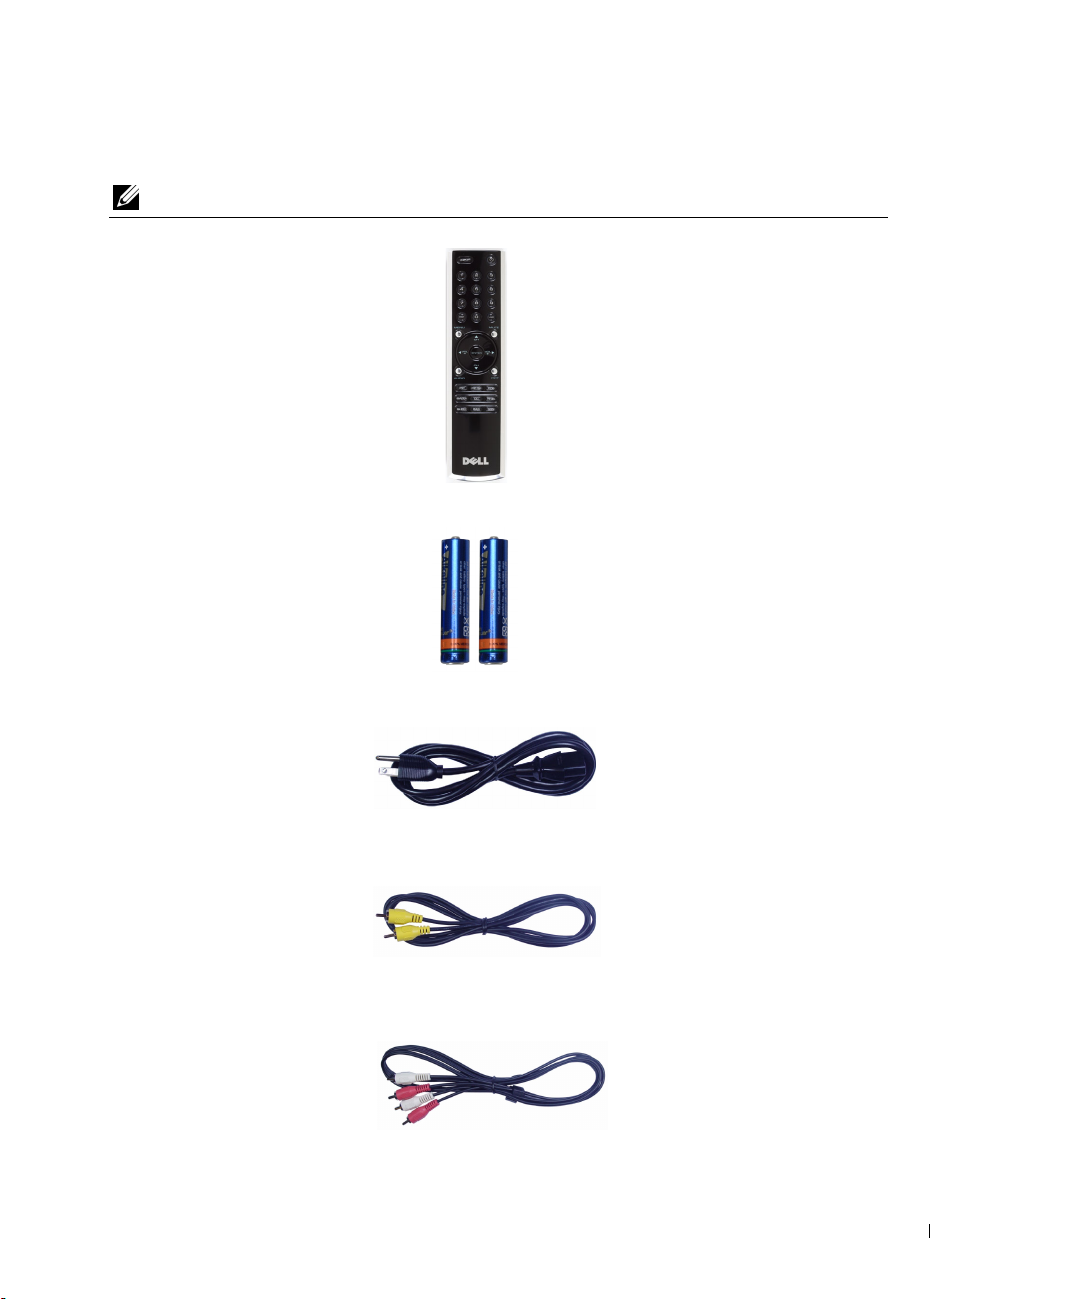
Package Contents
NOTE: If you need additional cables, contact Dell.
Remote control
AAA batteries (2)
Power cord
Composite video cable
Audio cable
About Your LCD TV Display 9
Page 10
www.dell.com | support.dell.com
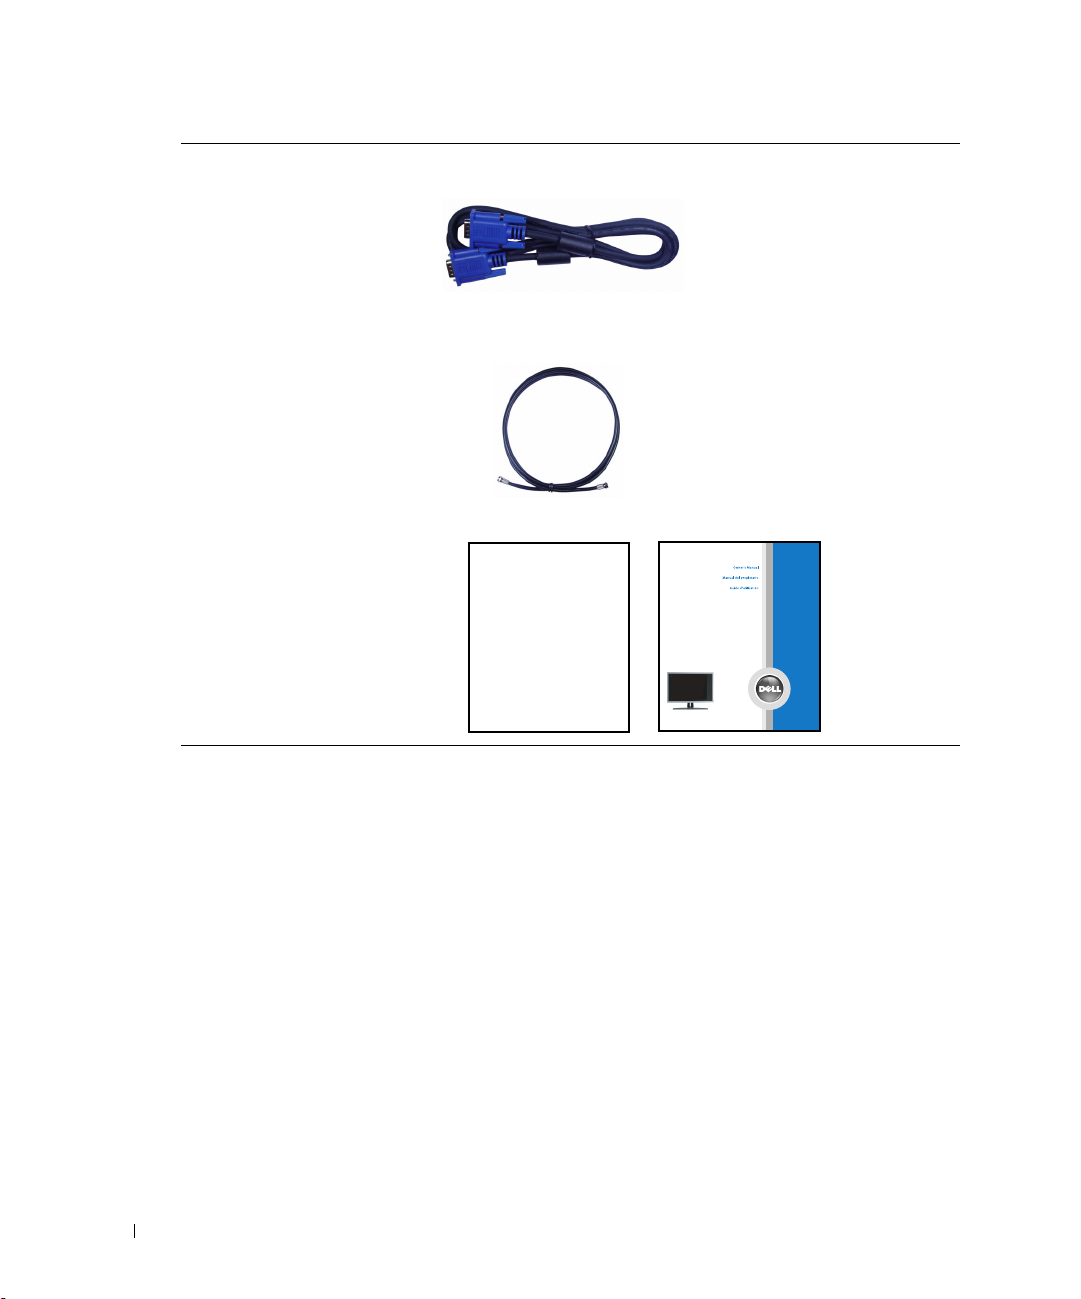
VGA cable
Coaxial cable
Documentation:
Setup Guide
Product Information Guide
Owner's Manual
Dell™ TV
Product Information Guide
Guide d’informations duproduit
Guía de información delproducto
www.dell.com | support.dell.com
TM
Dell W2606C 26" LCD TV Display
Model W2606C
www.dell.com | support.dell.com
Owner 's Manual
TM
10 About Your LCD TV Display
Page 11

Setting Up Your LCD TV Display
CAUTION: Before you begin any of the procedures in this section, follow the safety instructions
located in the
Proper Location for Your LCD TV Display
Consider the following environmental factors when you are deciding where to put your LCD TV
display:
• Do not store or use the LCD TV display in locations that are exposed to high heat, direct
sunlight, or extreme cold.
• Avoid moving the LCD TV display between locations with extreme temperature differences.
For more information, see Specifications on
• Do not subject the LCD TV display to severe vibration or high impact conditions. Do not
place the LCD TV display inside a car trunk.
• Do not store or use the LCD TV display in locations where the LCD TV display would be
exposed to high humidity or dusty environment.
• Do not place the LCD TV display in a location where water or other liquids could spill on or
into the LCD TV display.
Product Information Guide
.
page 38
.
2
Connecting Your LCD TV Display
Your LCD TV display has four standard connectors that can be used to connect devices.
NOTE: Before you connect your LCD TV display, ensure you have all the proper cables. Some cables
may come with the device you are connecting. For a list of cables that came with your LCD TV display,
see Package Contents on page 9. To order additional cables, contact Dell.
Setting Up Your LCD TV Display 11
Page 12
Quality Cable and Connector When to Use
Good Coaxial (RF) carries the video and audio
from one cable. The coaxial connector is
labeled, ANT/Cable on your LCD TV display.
To locate the connector, see page 8.
www.dell.com | support.dell.com
Good Composite carries the video signal through
a single pin. If you are using a composite
video connector you also need to connect
composite audio connectors. To locate the
connector, see page 7.
Better S-Video splits the video signal into two
signals, black-and-white and color. To locate
the connector, see page 7.
12 Setting Up Your LCD TV Display
Page 13
Quality Cable and Connector When to Use
Best Component splits the video signal into three
signals, two color and one black-and-white.
To locate the connector, see page 8.
Connecting Your Computer to the LCD TV Display
Your LCD TV display has two standard connectors that can be used to connect your computer.
NOTE: The type of connector you use depends on the graphics card your computer supports.
For additional information about graphic cards, see your computer documentation.
Quality Cable and Connector When to Use
Good
A standard graphic display system for
computers that uses an analog signal and
can support resolutions up to 1366 x 768.
Better
A digital signal that can support digital
and convert analog to digital. DVI can be
used for high resolution display and can
support resolutions up to 1366 x 768.
Connect the audio cable from your computer
to the LCD TV Display Audio connector for
VGA or DVI
Setting Up Your LCD TV Display 13
Page 14
www.dell.com | support.dell.com
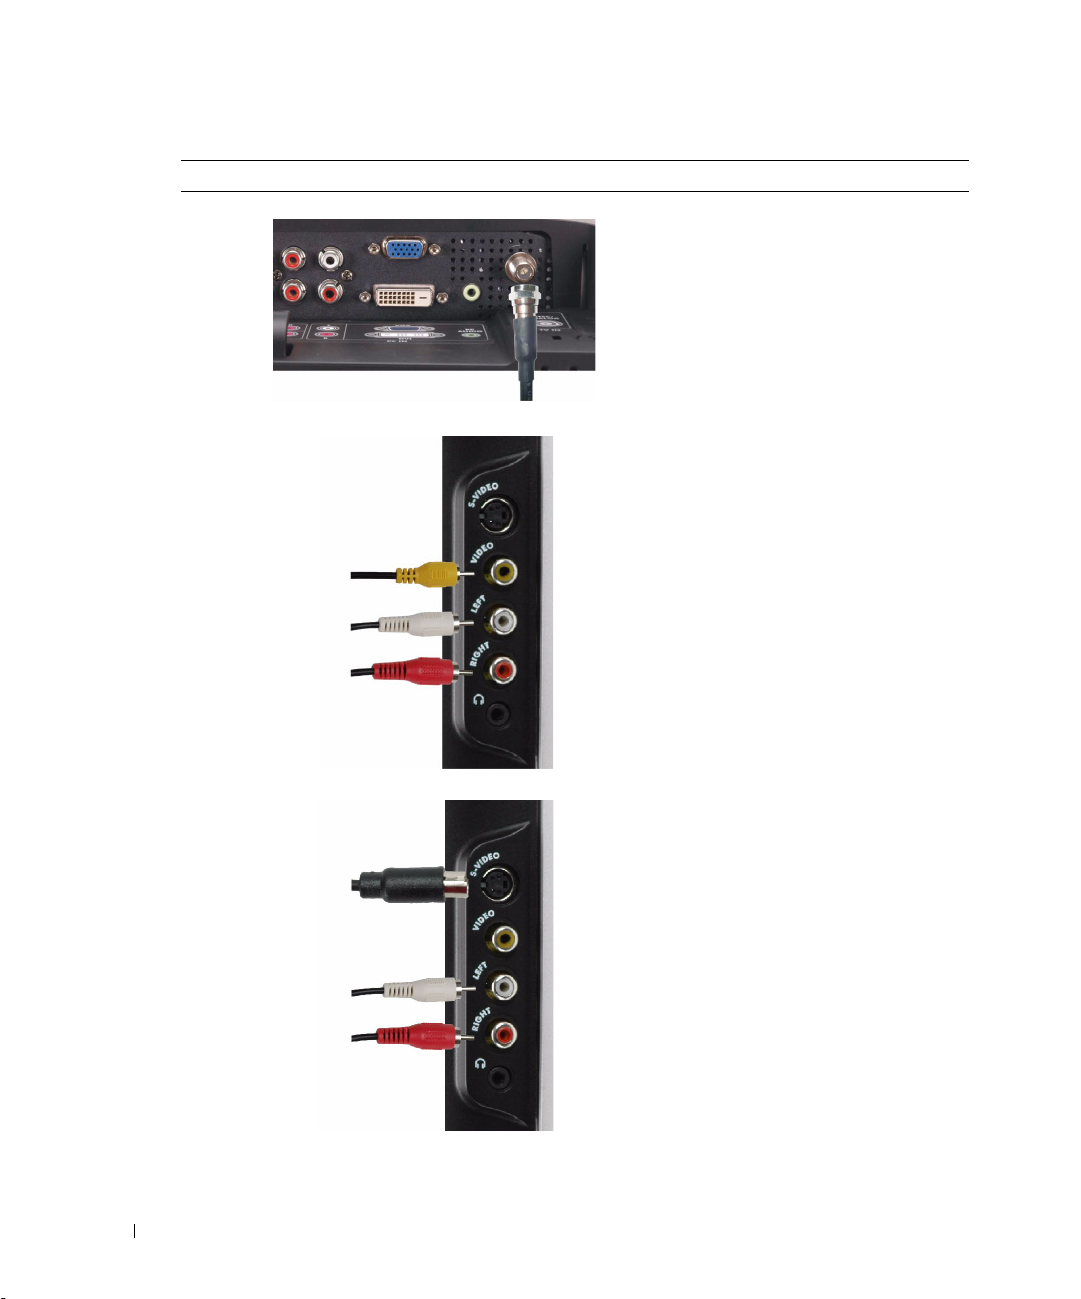
Using the ANT/Cable (Coaxial) Connector
1
Turn off the LCD TV display and unplug the power cord.
2
Connect the coaxial cable to the ANT/Cable connector of the LCD TV display.
3
Plug in the power cord for the LCD TV display and turn on the LCD TV display.
4
Enter the TV Menu and select TV. For additional information about the Input Select menu,
see page 24.
14 Setting Up Your LCD TV Display
Page 15
Using the Composite Connector
1
Turn off the LCD TV display and unplug the power cord.
2
Connect your device including the audio cables.
3
Plug in the power cords for the LCD TV display and device and turn them on.
4
Enter the TV Menu and select the
about the Input Select menu, see page 24.
AV SIDE (Composite 1)
. For additional information
Setting Up Your LCD TV Display 15
Page 16
www.dell.com | support.dell.com
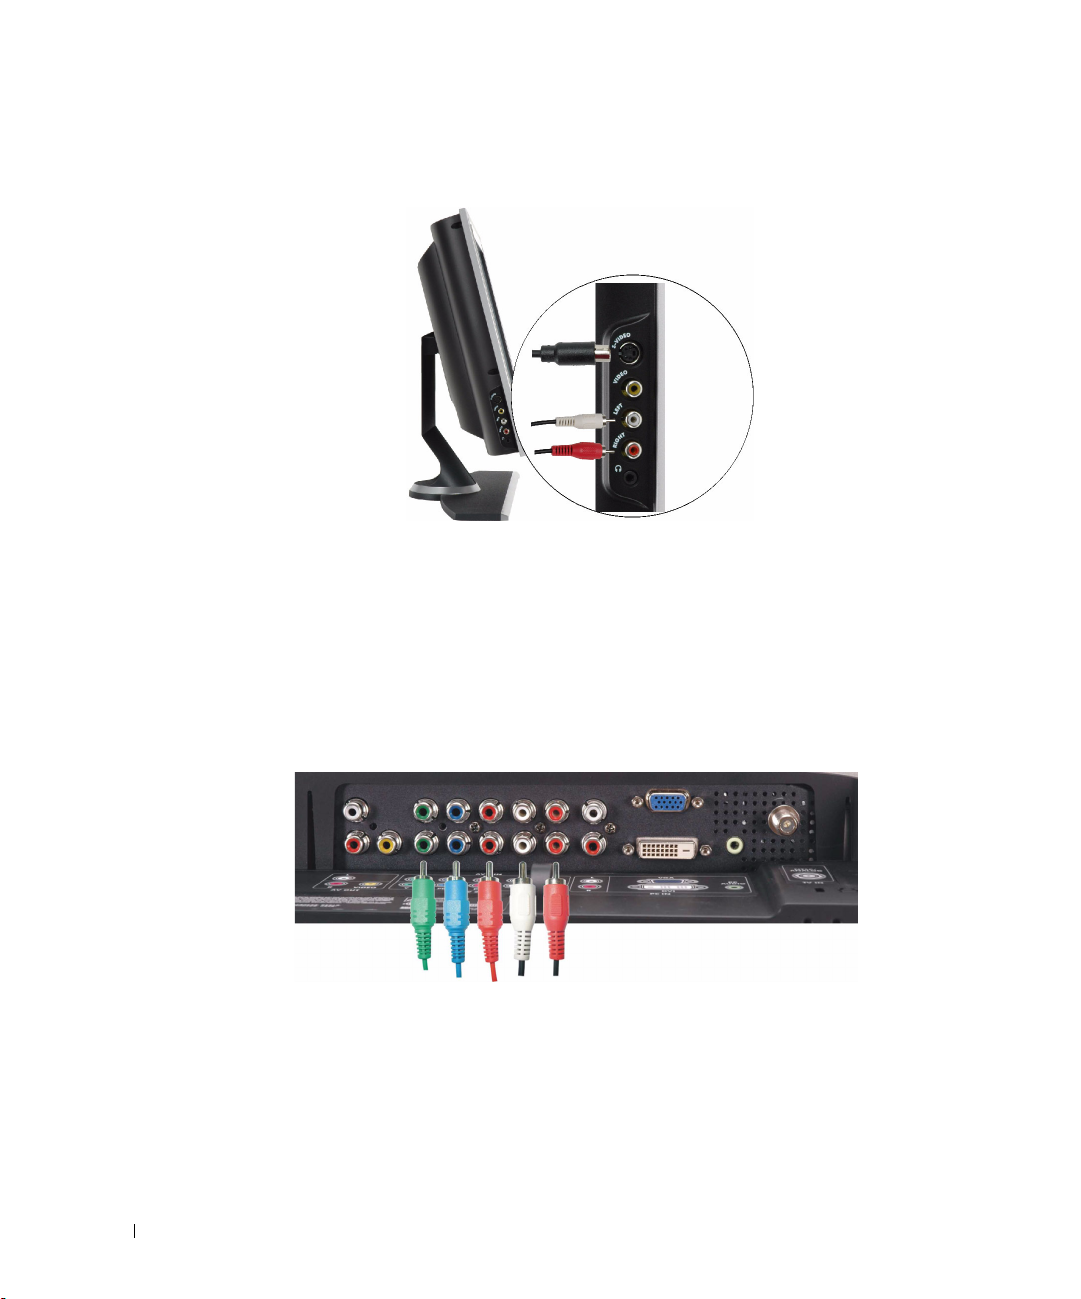
Using the S-Video Connector
1
Turn off the LCD TV display and unplug the power cord.
2
Connect your device including the audio cables.
3
Plug in the power cords for the LCD TV display and device and turn them on.
4
Enter the TV Menu and select the
AV SIDE (S-Video 1)
. For additional information about
the Input Select menu, see page 24.
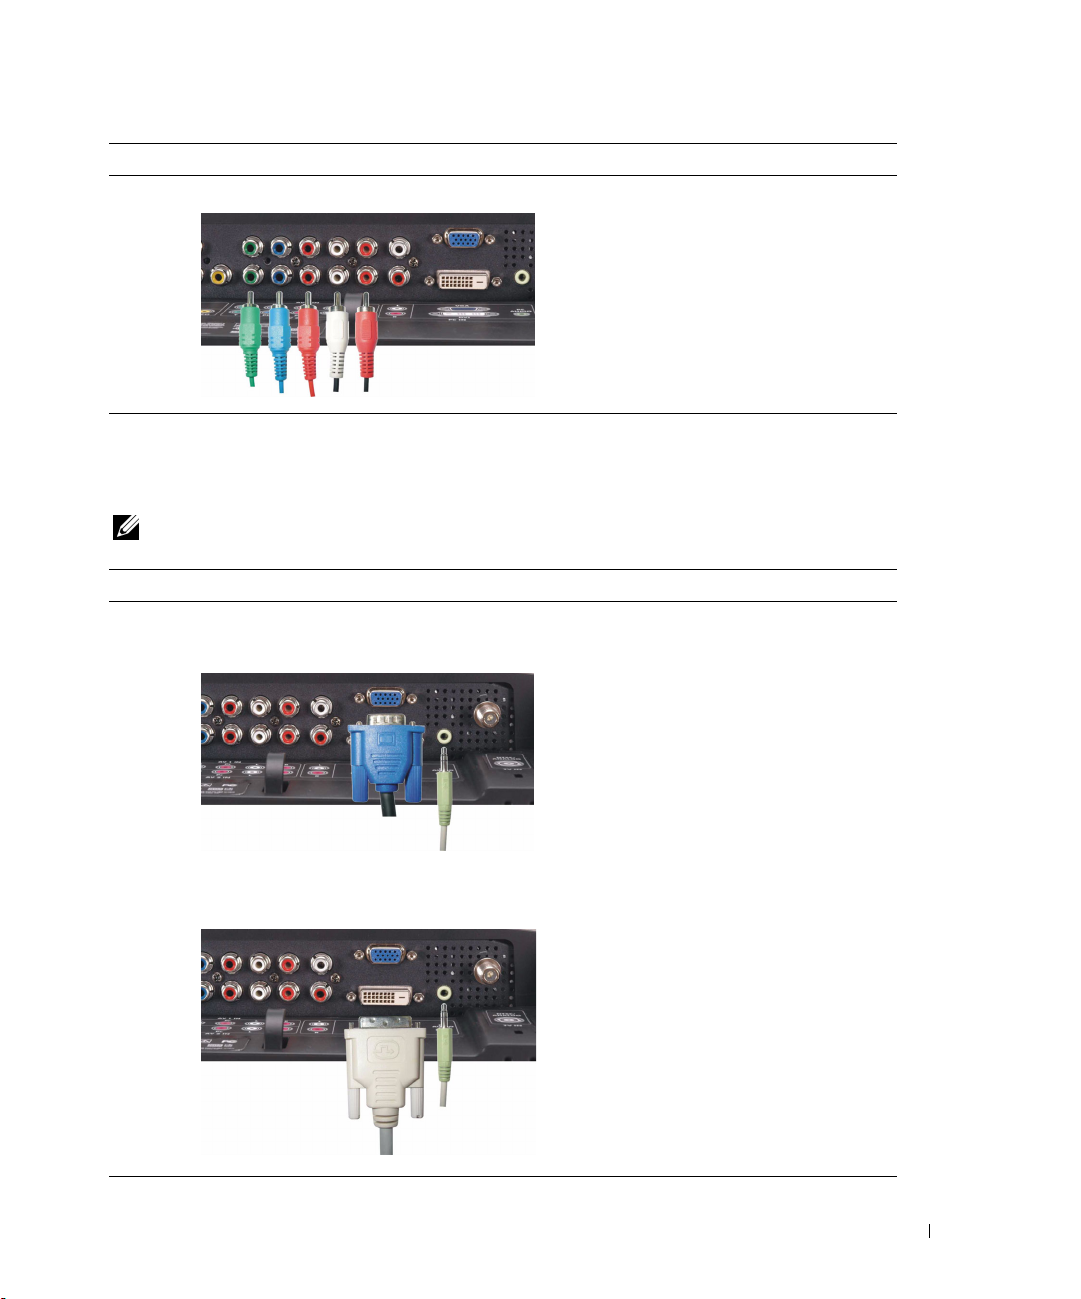
Using the Component Connectors
1
Turn off the LCD TV display and unplug the power cord.
2
Connect your device including the audio cables.
3
Plug in the power cords for the LCD TV display and device and turn them on.
4
Enter the TV Menu and select the
additional information about the Input Select menu, see page 24.
16 Setting Up Your LCD TV Display
AV1 (
Component
1)
or
AV2 (
Component
2)
. For
Page 17
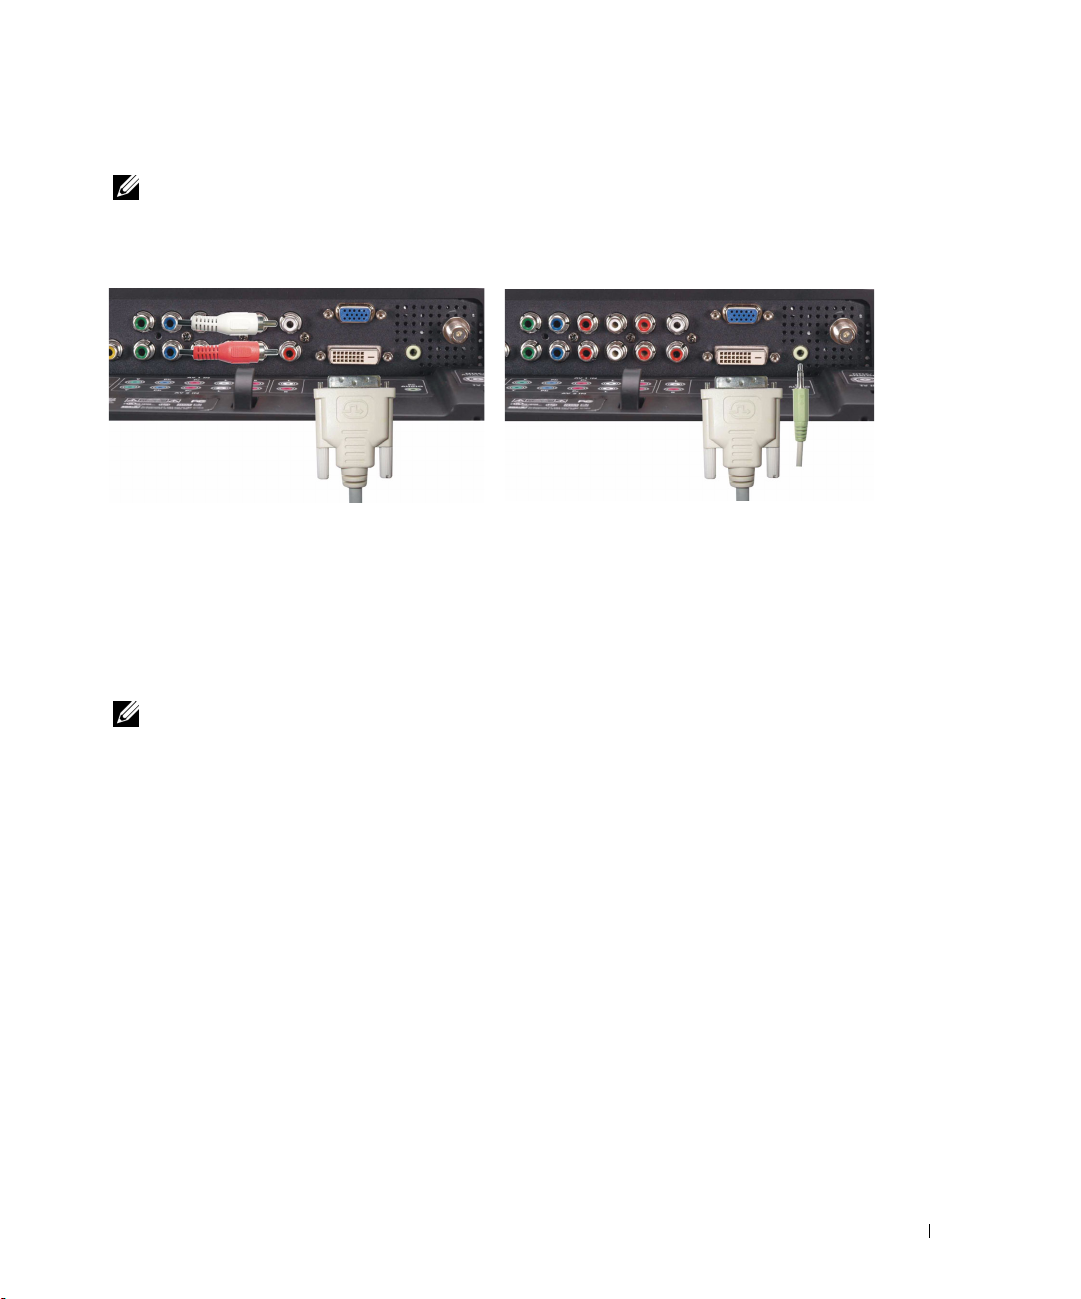
Using the DVI Connector
NOTE: Only one connector can be used for a computer, either VGA or DVI.
Connecting a Video Device Connecting a Computer
1
Turn off the LCD TV display and unplug the power cord.
2
Connect the white DVI cable to your LCD display TV and to the video device or your
computer.
3
Connect the audio cables.
If you are connecting a video device, use the audio connectors (red and white) or if you are
connecting a computer use the stereo connector (green).
NOTE: Some cable TV boxes may have DVI connectors, but do not support using a DVI connection. For
more information, contact your cable TV company.
4
Plug in the power cords for the LCD TV display and device and turn them on.
5
Enter the TV Menu and select the
menu, see page 24.
DVI
. For additional information about the Input Select
Setting Up Your LCD TV Display 17
Page 18
www.dell.com | support.dell.com
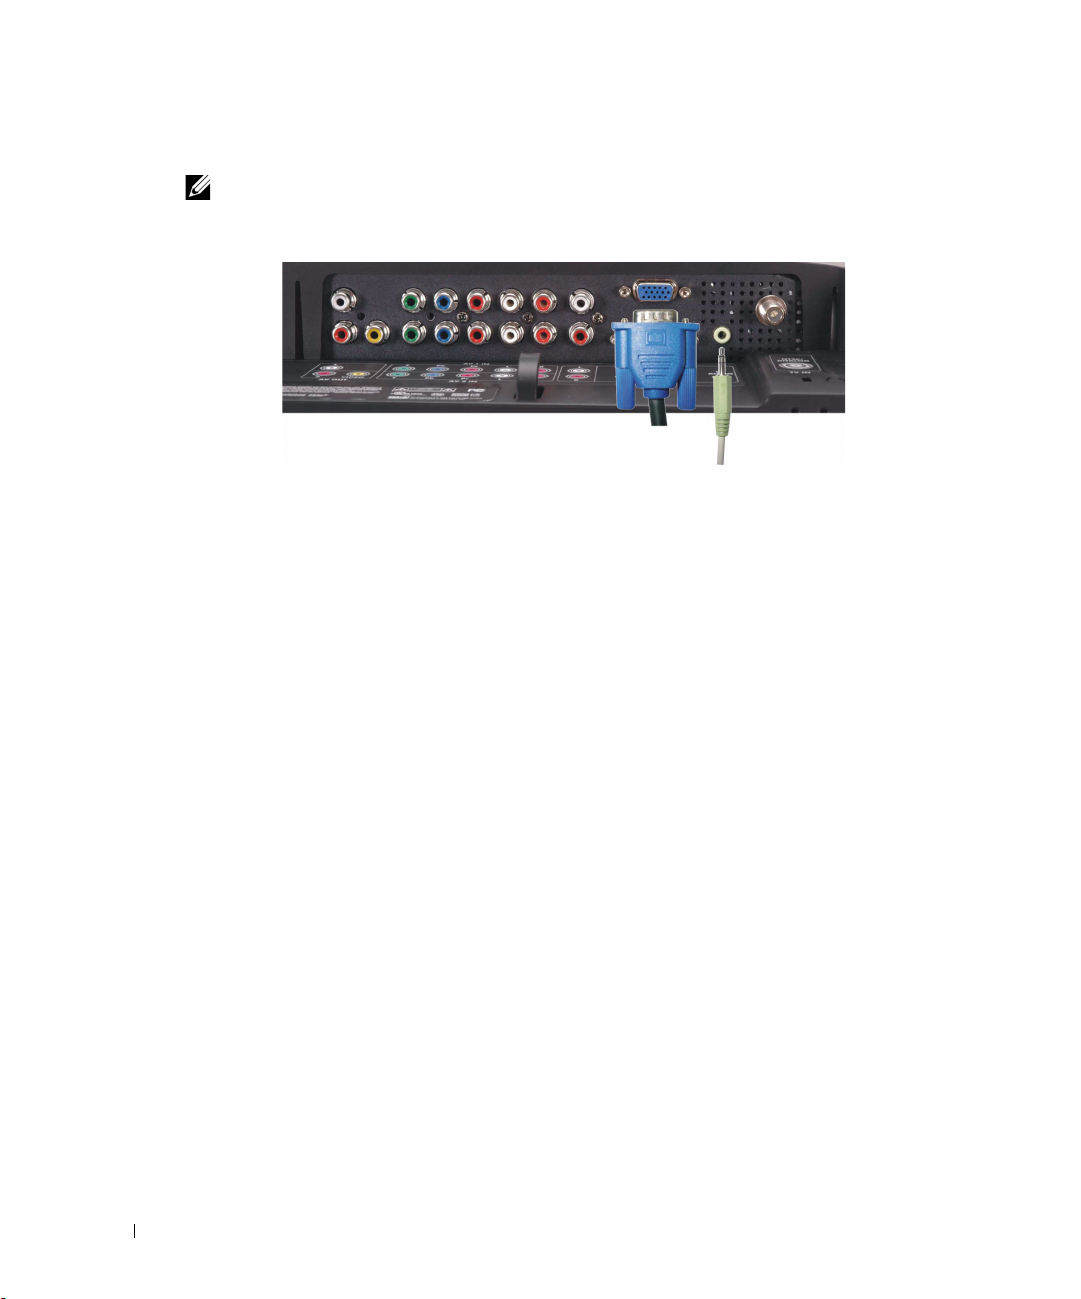
Using the VGA Connector
NOTE: Only one connector can be used for a computer, either VGA or DVI.
1
Turn off the LCD TV display and unplug the power cord.
2
Connect the blue VGA cable to your LCD TV display and to your computer.
3
Connect the green audio cable to the connector on the LCD TV display and to your
computer.
4
Plug in the power cords for the LCD TV display and device and turn them on.
5
Enter the TV Menu and select the
menu, see page 24.
VGA
. For additional information about the Input Select
18 Setting Up Your LCD TV Display
Page 19

Your Remote Control
Installing Batteries
Before you can use your remote control, install two-AAA batteries.
1
Slide open the battery cover.
2
Install the batteries. Make sure that you match the + and - on the batteries with the + and symbols in the battery compartment.
3
Replace the battery cover.
3
Your Remote Control 19
Page 20
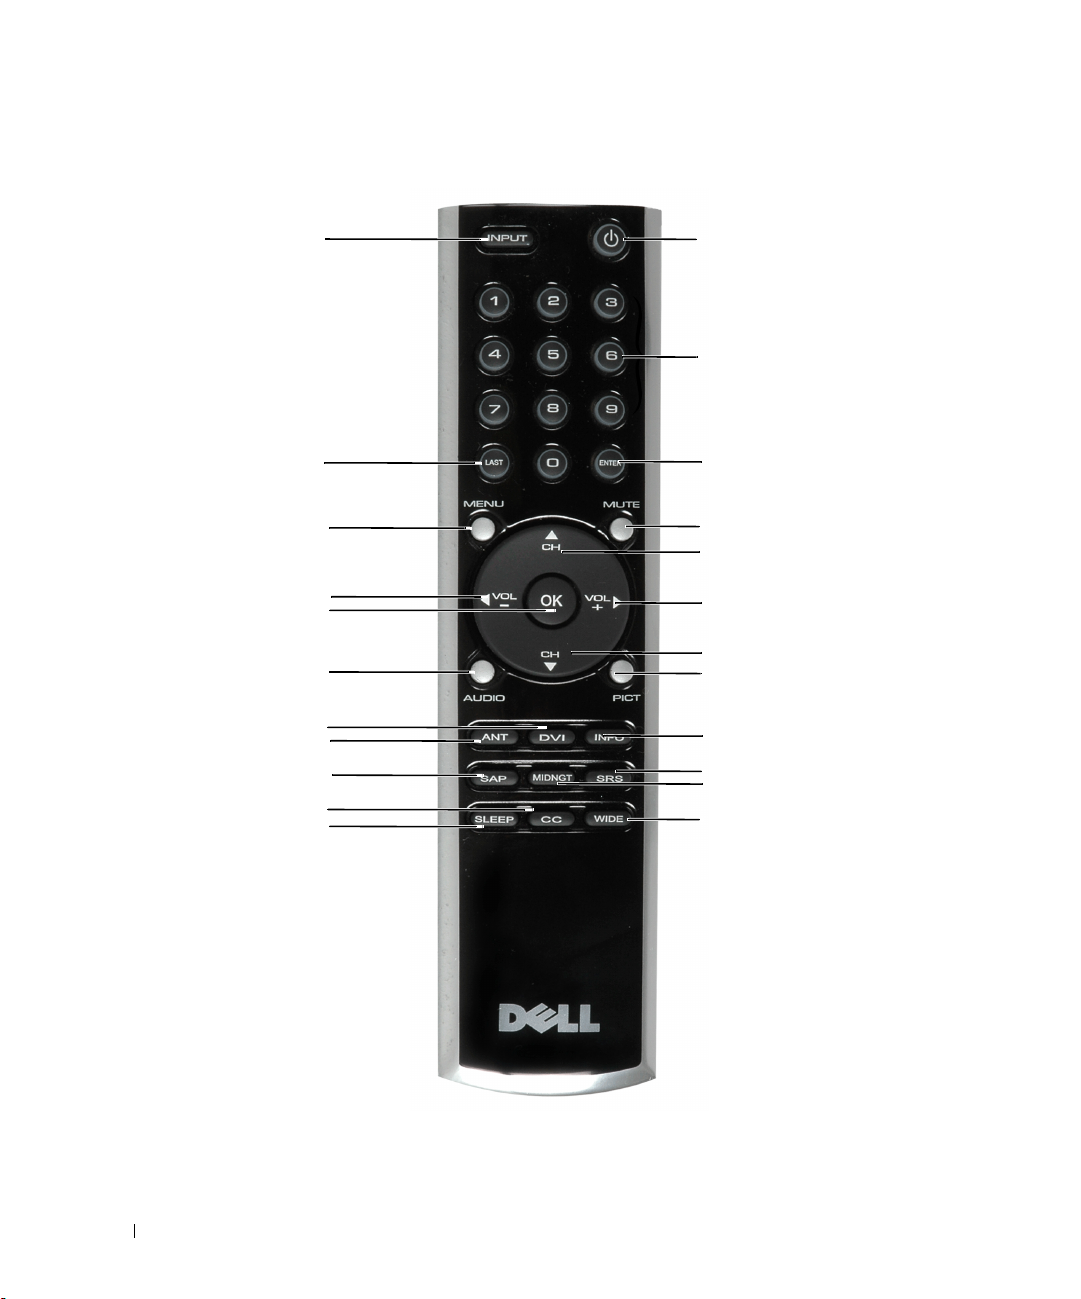
Using Your Remote Control
www.dell.com | support.dell.com
23
22
21
20
19
18
17
16
15
14
13
1
2
3
4
5
6
7
8
9
10
11
12
20 Your Remote Control
Page 21

1 Power Button Turns the LCD TV display on and off
2 Number buttons Press to select a channel
3 Enter Selects an TV Menu option, confirms a channel selection
4 Mute Press to turn the sound on and off
5 CH (up icon) Push to view the next channel
In the TV Menu, use the channel button to navigate through
the menus in the TV Menu
6 Vol + Increases the volume
In the TV Menu, use the volume button to navigate through
the menus.
7 CH (down icon) Push to view the previous channel
In the TV Menu, use the channel button to navigate through
the menus in the TV Menu
8 Pict Cycles through the preset options for the Picture menu
9 INFO Display information about your TV display (for example, in
TV Mode displays the channel you are watching)
10 SRS Toggle SRS surround on and off
11 Midngt Toggle midnight on and off
12 Wide Cycles through the size (aspect ratio) options from the Picture
menu
13 Sleep Turns on the sleep timer
14 CC Cycles through the Closed Caption menu
15 SAP Turns on
16 ANT Selects TV tuner as input source
17 DVI Selects DVI as input source
18 Audio Cycles through the preset Audio options
19 OK Selects an TV Menu option, confirms a channel selection
20 Vol - Decreases the volume
In the TV Menu, use the volume button to navigate through
the menus.
21 Menu Enters and exits the TV Menu main menu
22 Last Returns you to the previously viewed channel
23 Input Enters and exits the Input Select menu
Second Audio Program (SAP)
Your Remote Control 21
Page 22

www.dell.com | support.dell.com
Using Your LCD TV Display With a Universal or Learning
Remote Control
Preprogrammed universal remote controls can be programmed to control the following
functions on your Dell LCD TV display:
•Power
• Channel Up (+)
• Channel Down (-)
• Volume Up (+)
•Volume Down (-)
•Mute
• Input Select
NOTE:
You can program universal remote controls to work with your Dell LCD TV display in the following
ways:
• If the remote control manual lists codes by manufacturer, use the Philips codes.
• If the remote control has a search function, this function may be used to find the
• If the remote control has a learning function, you can program specific buttons on it from
NOTE: For additional information, see the documentation that came with your universal or learning
Future preprogrammed universal remote controls may be able to control more
functions.
correct code.
the Dell remote control, in addition to those buttons listed above.
remote control.
22 Your Remote Control
Page 23
Using the TV Menu
Your LCD TV display has an TV Menu that allows you to select the proper input source, make
adjustments to the image and audio settings and set parental controls.
Using Your Remote Control With the TV Menu
NOTE: You can access and make selections to the TV Menu using the volume and channel buttons on
the side panel of the LCD TV display or you can use the remote control. Except where noted, this section
describes how to use the TV Menu with the remote control.
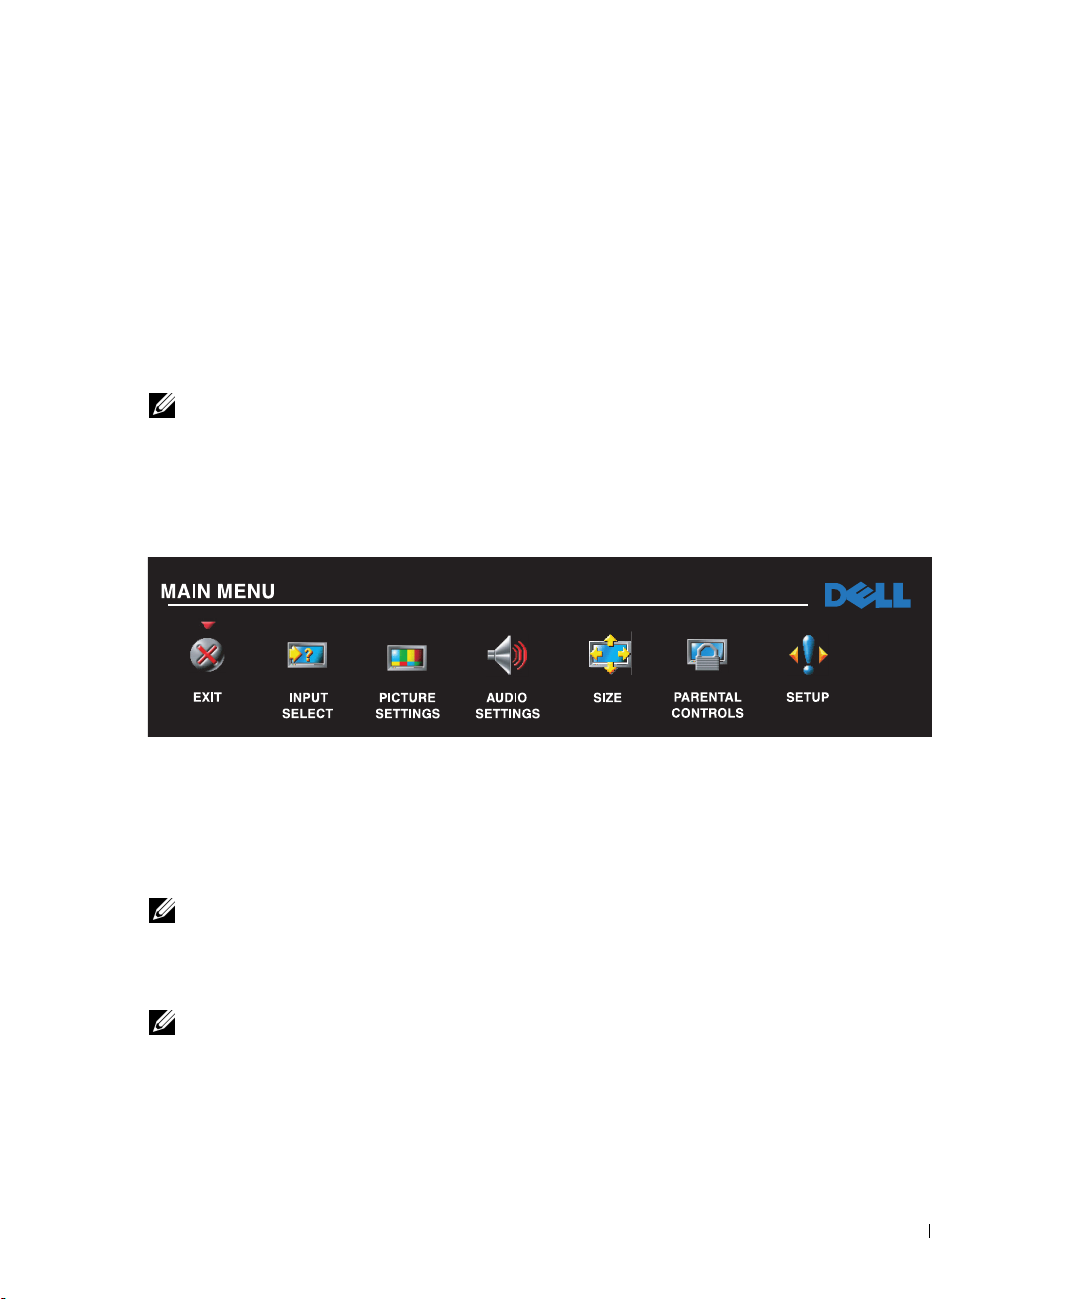
To enter the TV Menu, press the
1
Seven icons appear along the bottom of the screen.
Menu
button.
4
2
Use the left and right buttons (volume buttons) to move between the icons.
The icon appears highlighted as you move through the menu.
3
To select an option, push the OK button when the icon is highlighted.
4
A new menu appears for that selected option. Use the up and down buttons (channel
buttons) to move through the various settings.
NOTE: A red arrow appears next to the setting as you navigate through the options. A check mark
appears next to the option that you have selected.
5
Use the left and right buttons (volume buttons) and the OK button to adjust or select
settings.
NOTE: You can select Exit at any time to return to the main menu.
After you have made your selections,
6
7
To exit the TV Menu, select the
FILE LOCATION: P:\P_TranslateFile\C9\2005\8\C9002566-AOC-DELL W2306C DAO_OM\TR\EN\W2306C_23A0e40.fm
DELL CONFIDENTIAL – PRELIMINARY 9/15/05 – FOR PROOF ONLY
select Exit
Exit
icon and press OK.
to return to the main menu.
Using the TV Menu 23
Page 24
www.dell.com | support.dell.com
FILE LOCATION: P:\P_TranslateFile\C9\2005\8\C9002566-AOC-DELL W2306C DAO_OM\TR\EN\W2306C_23A0e40.fm
Selecting Your TV Menu Language
1
Press
Menu
to enter the TV Menu.
2
Select
Setup
.
3
In the
Setup
menu, select
Language
and select the language that you want the TV Menu to
appear in.
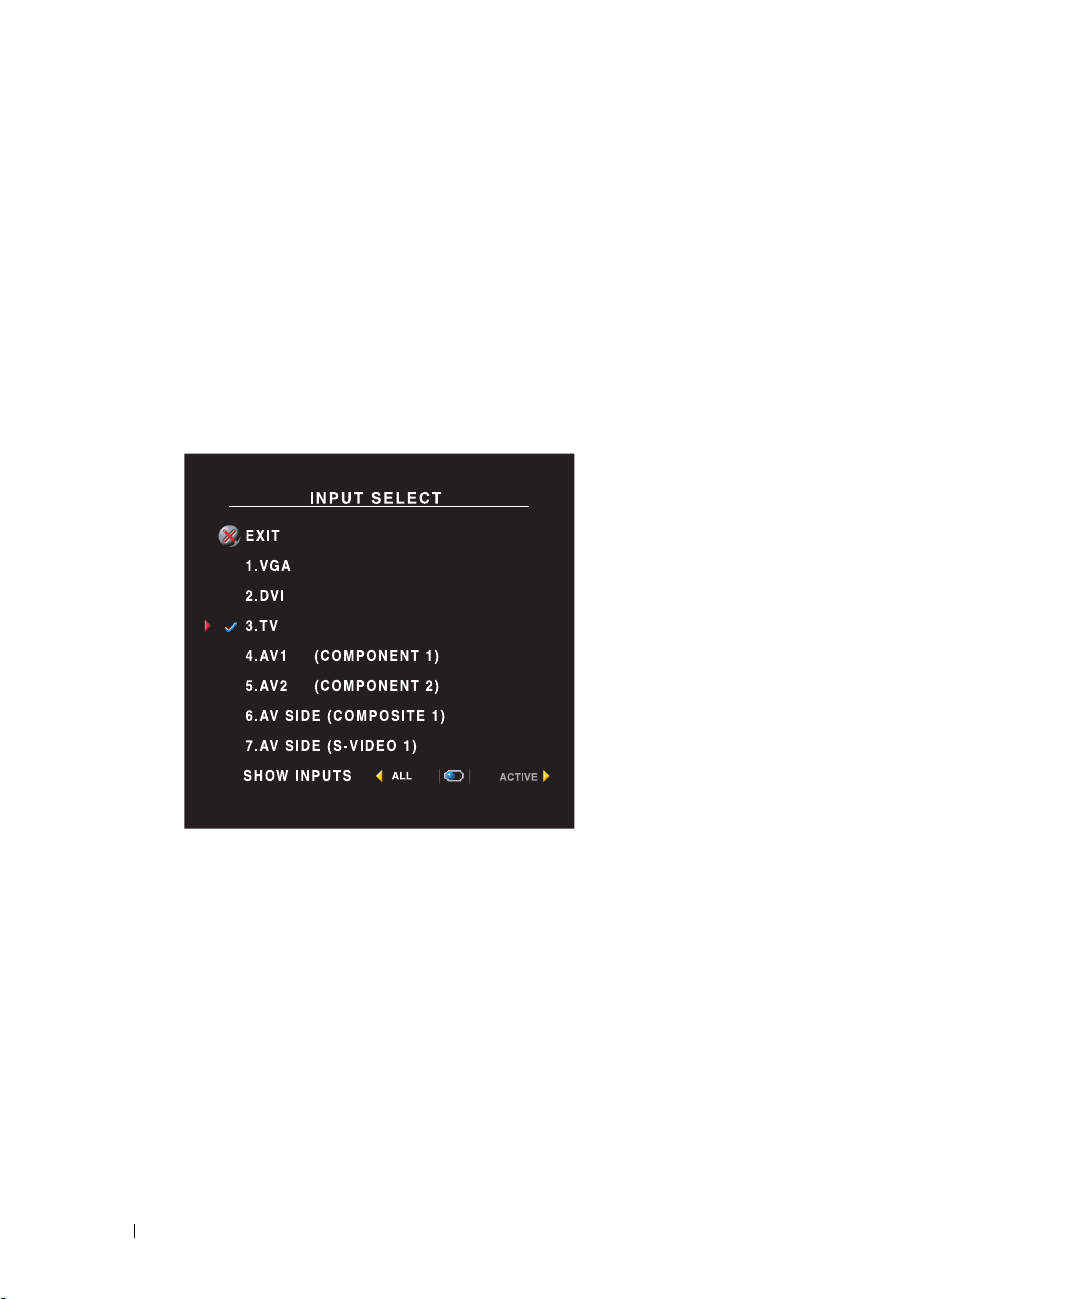
Input Select TV Menu
The
Input Select
TV display and video equipment connected. Press
Select
menu. You can also press
the component connector. See "Bottom View" on page 8 for the location of the component connector.
AV2 (Component 2) — Select when you have a video device, such as a DVD player, connected to the
component connector. See "Bottom View" on page 8 for the location of the component connector.
AV SIDE (Composite 1) — Select when you have a video device, such as a video game system,
connected to the composite connector on the side of the LCD TV display. See "Left Side View" on page 7
for the location of the composite connector.
AV SIDE (S-Video 1) — Select when you have a video device, such as a VCR, connected to the S-Video
connector on the side of the LCD TV display. See "Left Side View" on page 7 for the location of the SVideo connector.
SHOW INPUTS — Show Inputs allows you to select Active or All. Active searches for which connectors
are being used. The available input sources appear in white and input sources that are not available appear
in grey. All shows all the input sources and allows you to select all the input sources even if you do not have
a device connected.
menu allows you to select the proper source based on how you have your LCD
Input
on the remote to go directly to the
Menu
and select
Input Select
VGA — Select when your LCD TV display is
being used as a computer monitor and you have
connected the computer using a VGA cable. See
"Bottom View" on page 8 for the location of the
VGA connector.
DVI — Select when your LCD TV display is being
used as a computer monitor and you have
connected the computer or when you have
connected a device, such as a DVD player using the
DVI cable. See "Bottom View" on page 8 for the
location of the DVI connector.
TV — Select when you have your antenna or cable
TV box connected to the ANT/Cable connector.
See "Bottom View" on page 8 for the location of the
coaxial connector.
AV1 (Component 1) — Select when you have a
video device, such as a DVD player, connected to
from the main menu.
Input
DELL CONFIDENTIAL – PRELIMINARY 9/15/05 – FOR PROOF ONLY
24 Using the TV Menu
Page 25
FILE LOCATION: P:\P_TranslateFile\C9\2005\8\C9002566-AOC-DELL W2306C DAO_OM\TR\EN\W2306C_23A0e40.fm
NOTE: In TV Menu Settings, located in the Setup menu, you can set the Input Select to display the
device that you have attached. For example, AV SIDE (S-VIDEO 1) would say DVD when you view the
Input Select menu.
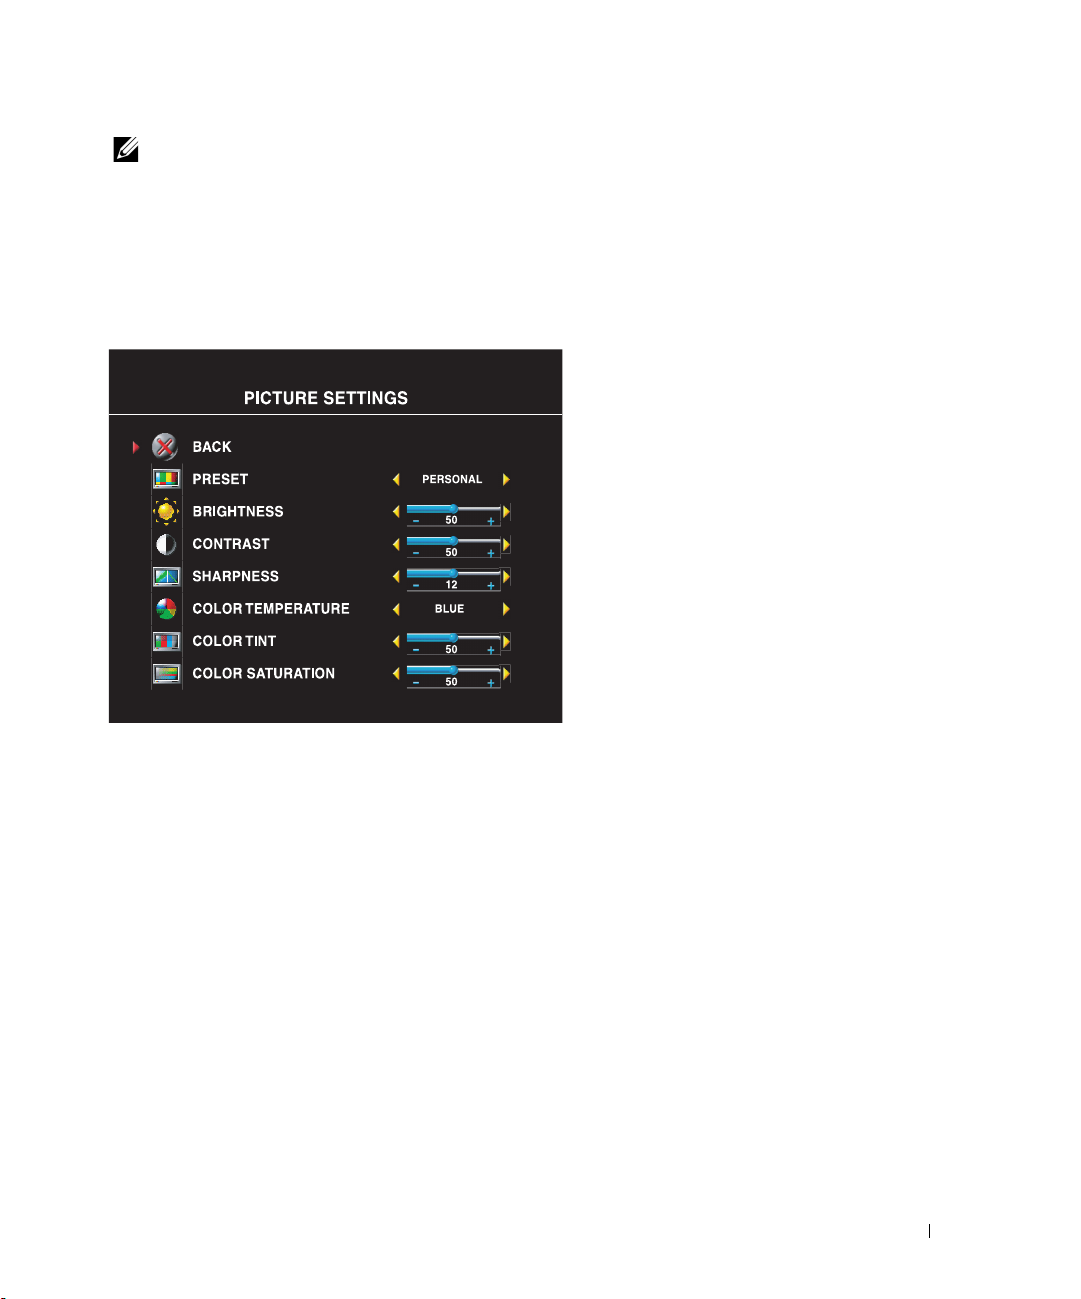
Picture TV Menu
The Picture Menu allows you to adjust the appearance of the image including color and brightness.
If you select one of the following preset
image settings the individual settings
are automatically updated.
•Movies
•Sports
•Weak Signal
•Multimedia
If you select
the individual settings, such as
Brightness
The color temperature presets are:
Natural: 6500K
Normal: the native panel temperature
Blue: 9300K
Red: 5700K
Personal
and
, you can adjust
Color
.
DELL CONFIDENTIAL – PRELIMINARY 9/15/05 – FOR PROOF ONLY
Using the TV Menu 25
Page 26
www.dell.com | support.dell.com
FILE LOCATION: P:\P_TranslateFile\C9\2005\8\C9002566-AOC-DELL W2306C DAO_OM\TR\EN\W2306C_23A0e40.fm
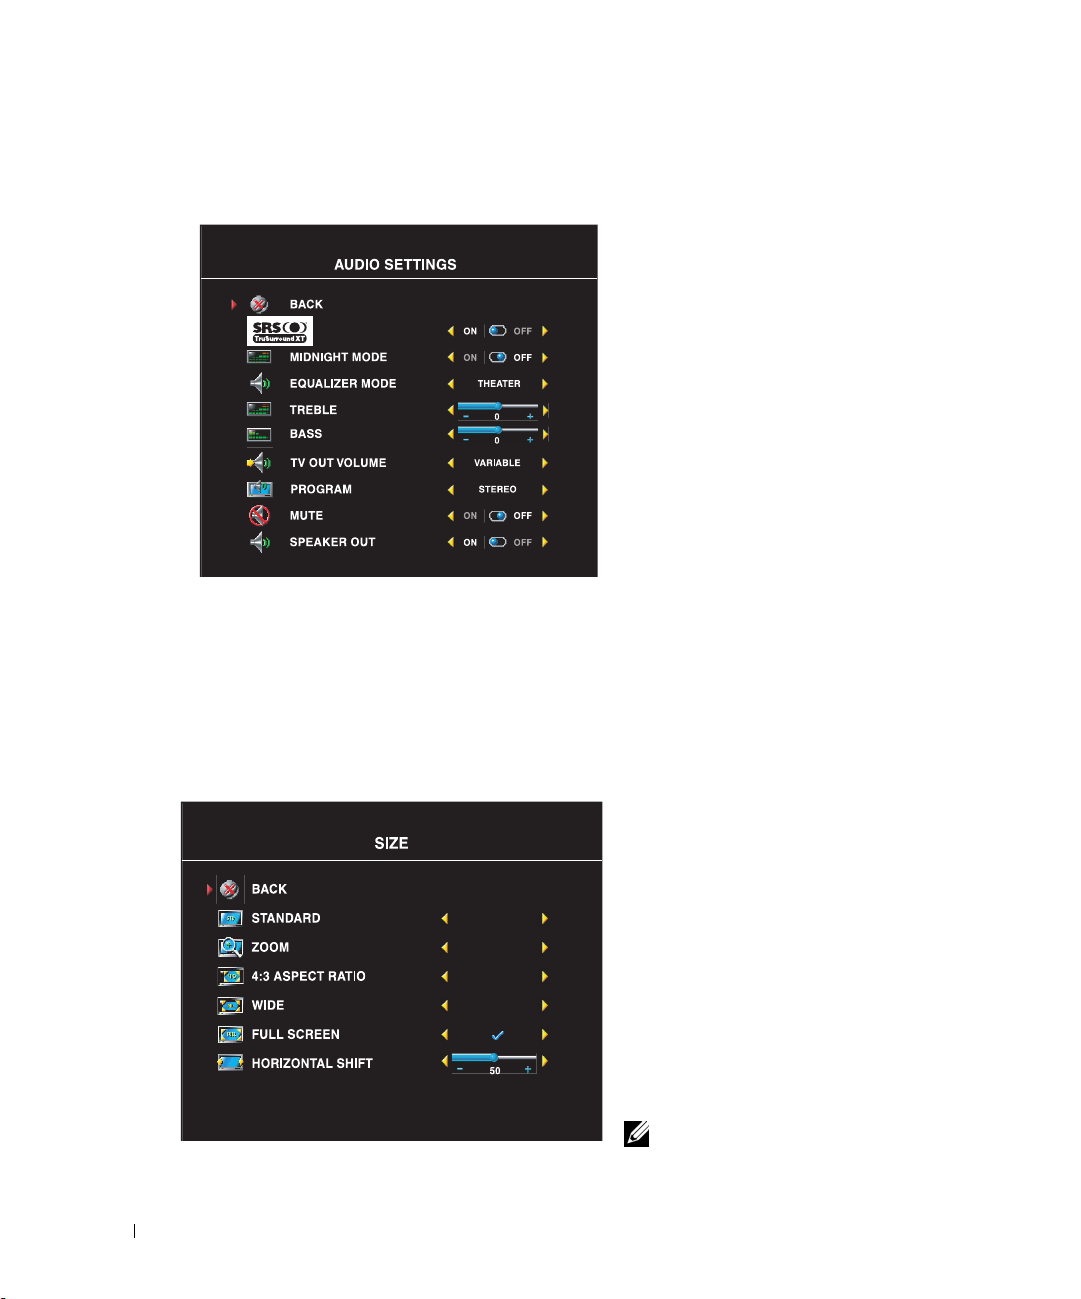
Audio
The Audio Menu allows you to set the audio to best fit the type of show you are watching.
SRS TruSurround XT— Delivers virtual
surround sound over two speakers from any
source, which creates a wider sound with
deep rich bass.
Midnight Mode — Evens out the large
volume variations between voice and action
scenes.
If you select one of the following preset
individual audio levels, such as
Use
Program
to select
Stereo, Mono
Bass
and
, or
Equalizer Mode
audio levels are automatically updated:
•Music
•Theater
•Voice
If you select
Tr eb le
.
SAP
(Second Audio Program).
settings, the individual
Personal
, you can adjust the
Size
Size
allows you to adjust the appearance of the image. Use
horizontal placement of the image.
DELL CONFIDENTIAL – PRELIMINARY 9/15/05 – FOR PROOF ONLY
26 Using the TV Menu
Horizontal Shift
Use the following settings to adjust the
aspect ratio:
Standard
digital HDTV, 16:9 or 22:9 DVD movies.
Zoom
VCR or 4:3 DVD movie.
4:3
4:3 DVD movie.
Wide
HDTV, 16:9 and 22:9 DVD movies.
Full screen
digital HDTV or 16:9 DVD movies.
the supported aspect ratio on the case.
— Best selection for viewing
— Best selection for viewing TV,
— Best selection for viewing TV, VCR or
— Best selection for viewing digital
— Best selection for viewing
NOTE:
Most DVDs have information about
to adjust the
Page 27
FILE LOCATION: P:\P_TranslateFile\C9\2005\8\C9002566-AOC-DELL W2306C DAO_OM\TR\EN\W2306C_23A0e40.fm
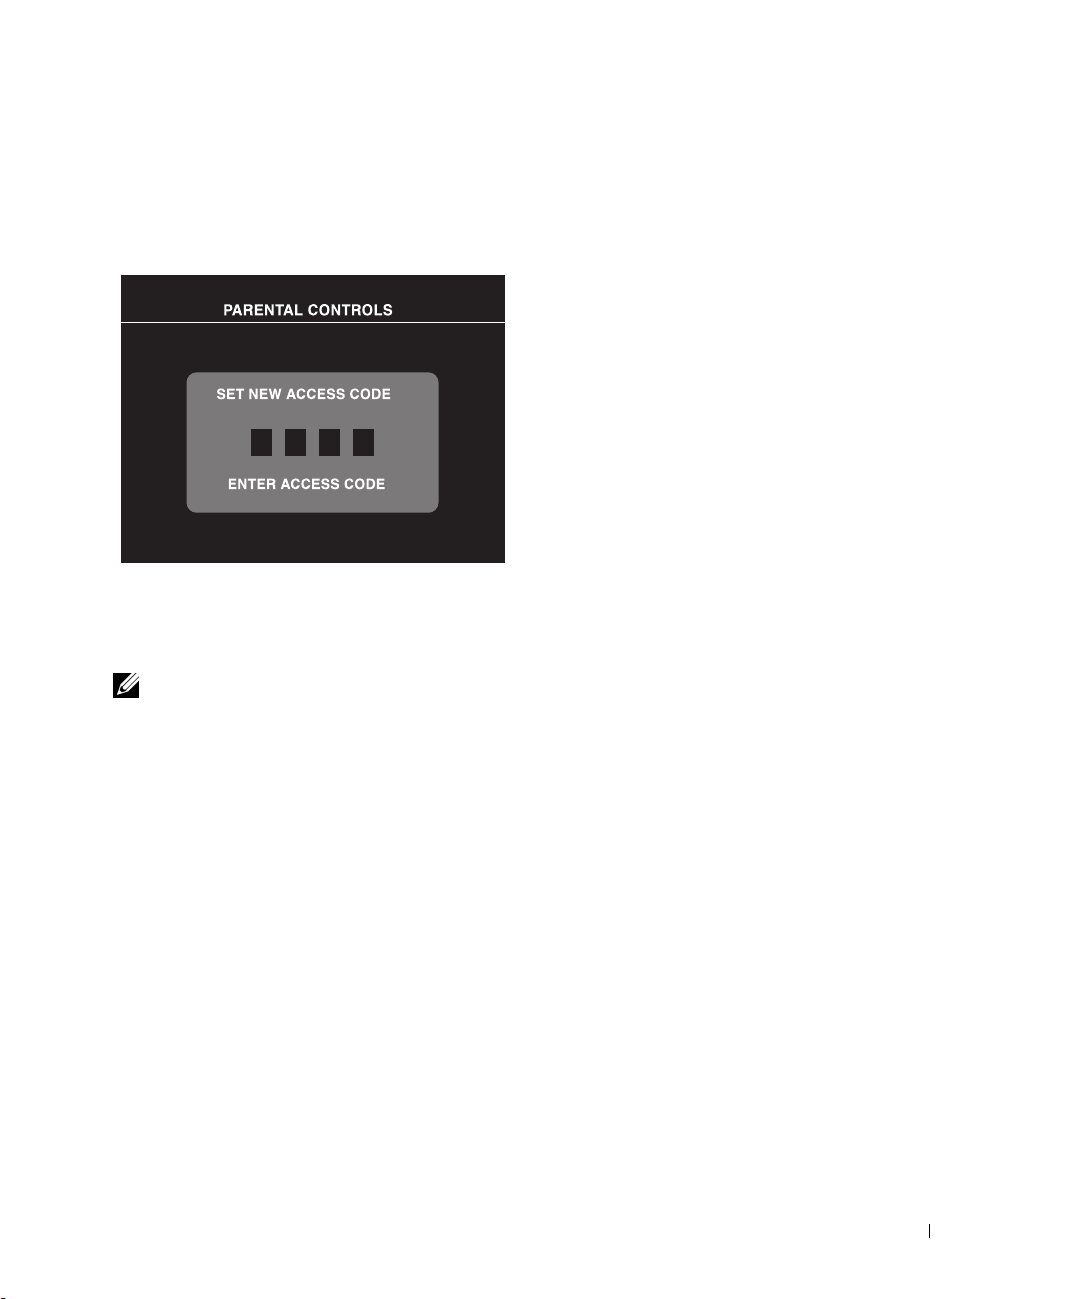
Parental Control
Parental Control allows you to block certain channels or programs so children cannot view
programs that are not age appropriate.
To enter the
an access code. The first time you enter, use
access code
Code" on page 27 for information on creating a
new access code.
You can set the following options to
block content:
•
•
•
•
Parental Control
3355
. See "Setting an Access
Channel Lock
— Blocks selected
menu, you need
channels
Movie Rating
— Blocks movies based
on their rating (G, PG, PG-13, R,
NC-17, and X)
TV Ratings — Blocks TV shows based
on their rating
Block Options — Turns on or off all
your parental control settings
NOTE: You can use Clear All to unblock the channels and programs that you have set.
Setting an Access Code
After you enter the
code. If for any reason you lose or forget your access code, you can use the default code.
1
In the
2
Using the number pad on the remote control, enter a new access code.
3
Select
Parental Contro
Parental Co ntr ol
Exit
.
DELL CONFIDENTIAL – PRELIMINARY 9/15/05 – FOR PROOF ONLY
l menu for the first time, you can set your own four-digit access
menu, select
Change Code
.
Using the TV Menu 27
Page 28
www.dell.com | support.dell.com
FILE LOCATION: P:\P_TranslateFile\C9\2005\8\C9002566-AOC-DELL W2306C DAO_OM\TR\EN\W2306C_23A0e40.fm
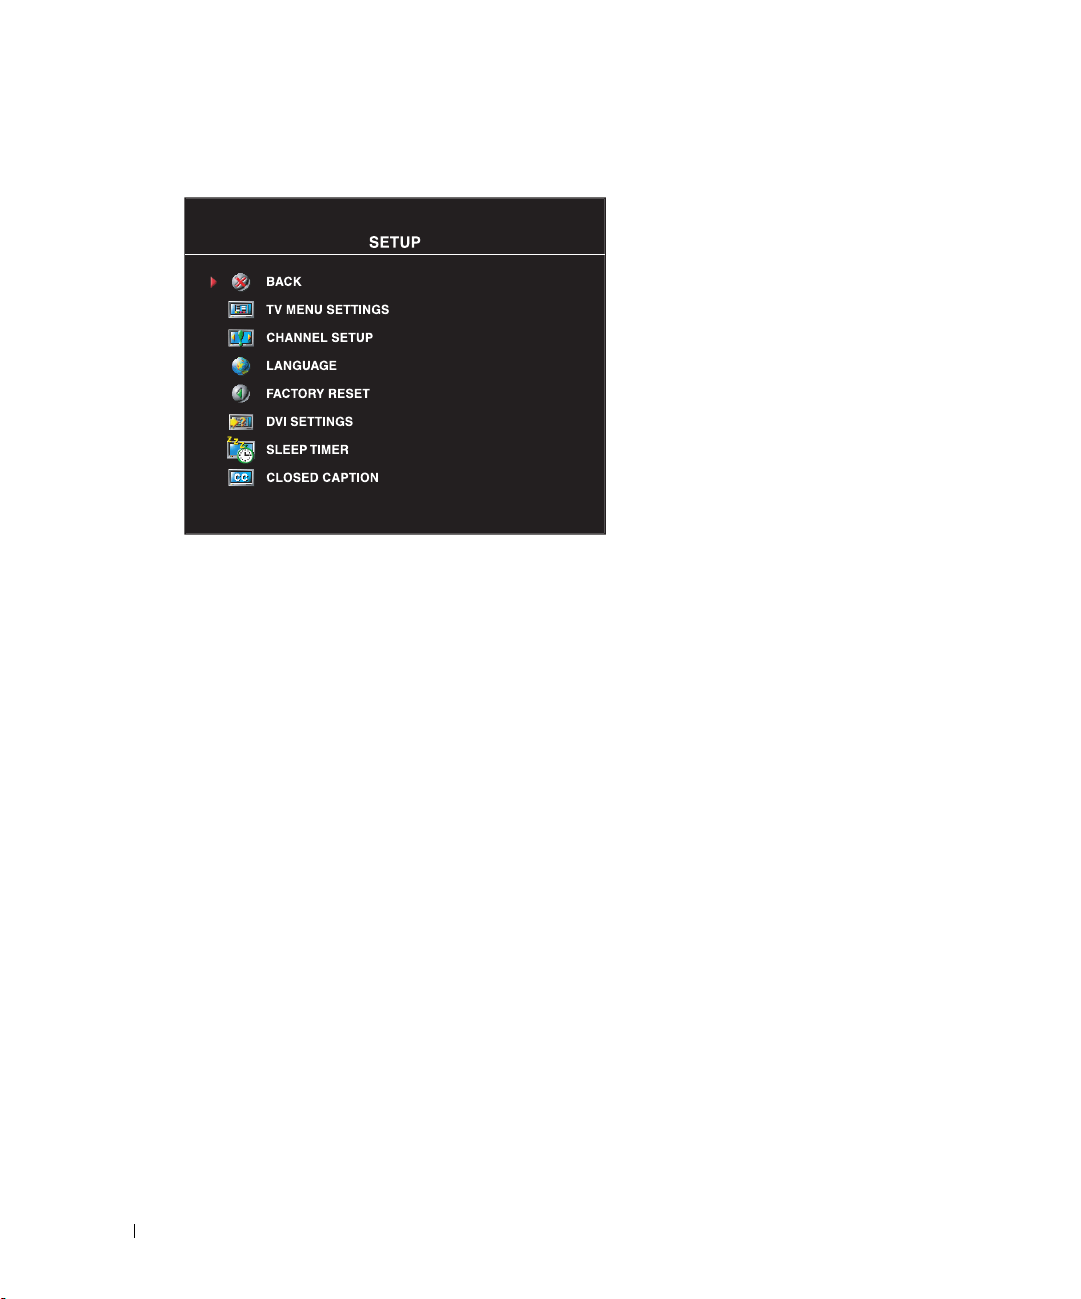
TV Menu Setup
TV Menu setup allows you to adjust the
appearance of the TV Menu, to change the
language of the TV Menu (see "Selecting
Your TV Menu Language" on page 24) and
to restore factory settings.
Use
TV Menu Hold Time
decrease the amount of time the TV Menu
appears. The maximum amount of time is
60 seconds.TV Menu
In the
TV Menu Settings
select
TV Button lock
Menu and the side panel buttons. When
this option is enabled, only the power
button functions. To unlock the TV Menu
and side panel buttons:
1. Press the Menu button on the TV. A message appears stating that the TV is locked
2. While the message is on the TV, press the channel up and volume increase button
simultaneously.
If you are using the DVI connector, you may need to verify the following settings:
Source
— The default setting is Auto. The T V automatically detects if a computer (PC) or video
device is being used. If the image does not display correctly, you can select the source,
Video
, depending on the device you are using.
Color
— The default color space is
the setting to
YUV
.
RGB
. If the colors are not displaying correctly, you can change
to increase or
menu you can
to lock the TV
PC
or
DELL CONFIDENTIAL – PRELIMINARY 9/15/05 – FOR PROOF ONLY
28 Using the TV Menu
Page 29
FILE LOCATION: P:\P_TranslateFile\C9\2005\8\C9002566-AOC-DELL W2306C DAO_OM\TR\EN\W2306C_23A0e40.fm
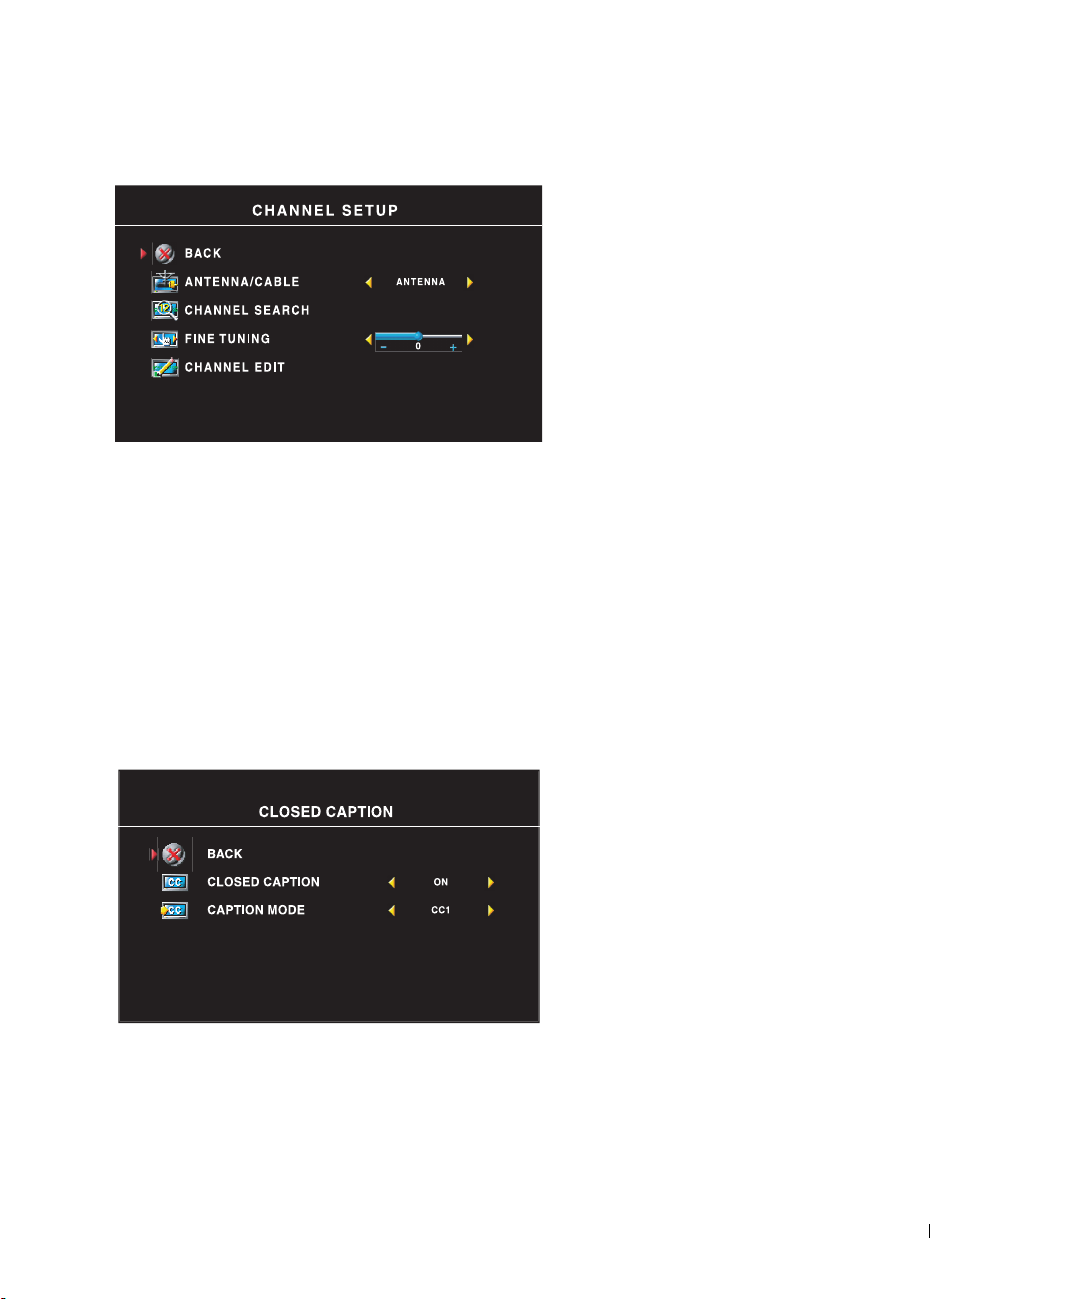
Setting Your Cable Channels
2
Select
Setup
and then select
3
In
Channel Setup
4
If selecting
Channel Setup
, select
Cable
does not resolve the issue, repeat steps 1 through step 3 using each available
option (
Sleep Timer
Channel Setup.
Antenna/Cable
HRC, IRC,
and
Your TV is set to automatically detect
whether you are using an antenna or cable
and then set the available channels. Some
cable providers use an older cable standard
that the TV can not automatically detect.
If you have your TV connected but can
only view channels 5 and 6, complete the
following steps:
1
Press the Menu button the remote
control or TV and enter the TV
Menu.
, and then toggle to
Antenna)
until you can view all channels.
Cable
.
Sleep Timer
automatically. You can select from 10 minutes to 3 hours.
allows you to select an increment of time after which the LCD TV display turns off
Closed Caption
In the
Closed Caption
select On, Off, or Mute. If you select
Mute, CC automatically displays when
you use the Mute button on the remote
control.
You can choose from the following
Caption
•CC1 through CC4 and TXT1 through
TXT4 (CC1, CC2, and CC4 offer
standard C1osed Captioning and CC3
provides closed captioning in a secondary
language.)
• CC Mute (automatically turns CC on when you mute the TV volume)
DELL CONFIDENTIAL – PRELIMINARY 9/15/05 – FOR PROOF ONLY
modes:
menu, you can
Using the TV Menu 29
Page 30

Troubleshooting Your LCD TV Display
CAUTION: If at any time you see smoke or sparks coming from your TV display, unplug the TV display
immediately and contact Dell. Do not try to perform any troubleshooting steps.
5
www.dell.com | support.dell.com
Troubleshooting Tips
NOTE: Some problems may be related to your device. See the documentation for any devices connected
to your LCD TV display.
Most problems with your LCD TV display may be caused by not having the correct input source
selected. Each connector on the LCD TV display is associated with an input source, which are
labeled
You can also select the following input sources:
•
AV1 (
•
AV2 (
•
AV SIDE (
•
AV SIDE (
•
TV
•
VGA
DVI
•
AV SIDE
— ANT/Cable connector on the bottom of the LCD TV display
through
Component 1)— Component connector on the bottom of the LCD TV display
Component 2)— Component connector on the bottom of the LCD TV display
Composite 1)— Composite connector on the side of the LCD TV display
S-Video 1)— S-Video connector on the side of the LCD TV display
— VGA connector on the bottom of the LCD TV display
— DVI connector on the bottom of the LCD TV display
AV2
in the
Input Select
menu.
30 Troubleshooting Your LCD TV Display
Page 31

General Problems
Problem Possible Solution
Poor picture quality while watching TV
and using a device such as a DVD
player or a VCR
• Check the aspect ratio settings in the TV Menu. Press the
button on the remote control and select
Menu" on page 23 For more information on using the TV Menu,
see "Using the TV Menu" on page 23.
• Reconnect the device using the same type of connector. For
example, if you are using the composite connector on the
bottom, try connecting the device to the composite connector
on the side of the LCD TV display. See "About Your LCD TV
Display" on page 5 for the location of the connectors.
After you connect the device, change the input source in the TV
Menu. See "Input Select Menu" on page 24 for more
information.
• Connect the device using a different connector. For example, if
you are experiencing the problem using a composite connector,
try using the component connector.
NOTE: To connect to a different connector, you need the
appropriate cables for that connector. See your device
documentation for a list of supported connections.
After you connect the device, change the input source in the TV
Menu. See "Input Select Menu" on page 24 for more
information.
• Reset the original factory defaults. Press
control, select
• Adjust the color temperature. Press
control, select
NOTE: Some set top boxes offer aspect ratio. See your device
documentation for more information.
Setup
, and then select
Picture
, and then select
Size
. "Using the TV
Menu
on the remote
Factory Reset
Menu
on the remote
Color Temperature
Menu
.
.
Troubleshooting Your LCD TV Display 31
Page 32

www.dell.com | support.dell.com
Problem Possible Solution
Poor picture quality when using a
device connected to the ANT/Cable
(coaxial) connector
1
Ensure LCD TV display is selected as the input source in the
Input Select
more information.
2
Press
Menu
on the remote control, select
Channel Setup
3
Check the aspect ratio settings in the TV Menu. Press the
button on the remote control and select
information on using the TV Menu, see "Using the TV Menu"
on page 23.
4
Reset the original factory defaults. Press
control, select
5
Adjust the color temperature. Press
control, select
6
The problem may be with your device, contact your service
provider.
Nothing appears on my LCD TV
display
1
Ensure the LCD TV display is turned on.
2
Verify that all the cables are properly connected to the LCD TV
display, including the power cable.
3
Check to see if there is a blue or amber light on the lower,
right-hand corner of the LCD TV display. A blue light indicates
the LCD TV display is on. An amber light means the LCD TV
display is in power save mode.
4
Ensure the proper source is selected in the
See "Input Select Menu" on page 24 for more information.
5
Reconnect any devices that are currently connected to the LCD
TV display. If you are using multiple devices, connect and test
one device at a time.
6
Connect another device that you know is working properly.
7
Reset the original factory defaults. Press
control, select
menu. See "Input Select Menu" on page 24 for
Setup
, and then select
. This resets the channels on your remote.
Menu
Size
. For more
Menu
on the remote
Setup
, and then select
Picture
, and then select
Setup
, and then select
Factory Reset
Menu
on the remote
Color Temperature
Input Select
Menu
on the remote
Factory Reset
.
menu.
.
.
32 Troubleshooting Your LCD TV Display
Page 33

Problem Possible Solution
No sound 1
Ensure mute is not turned on. Pressing the
Mute
button on
the remote control turns the mute function on and off.
2
If only certain LCD TV channels do not have sound, then you
need to correct the
Input Select
menu in the TV Menu (see
"Input Select Menu" on page 24).
3
Verify that the audio cables are firmly connected to both the
audio input connectors on your LCD TV display and audio
output connectors on your devices. Ensure that the cable colors
match the connectors colors.
4
Also, ensure that the audio cables are connected to the same
row as the video cables. See "About Your LCD TV Display" on
page 5 for the location of the connectors.
5
Reconnect the device using the same type of connector. For
example, if you are using the composite connector on the
bottom, try connecting the device to the composite connector
on the side of the LCD TV display. See "About Your LCD TV
Display" on page 5 for the location of the connectors.
After you connect the device, change the input source in the TV
Menu. See "Input Select Menu" on page 24 for more
information.
6
Connect the device using a different connector. For example,
if you are experiencing the problem using a composite
connector, try using the component connector.
NOTE: To connect to a different connector, you need the
appropriate cables for that connector. See your device
documentation for a list of supported connections.
After you connect the device, change the input source in the TV
Menu. See "Input Select Menu" on page 24 for more
information.
7
Test the device on a different TV.
Double image or no image with DVD Turn off the progressive scan on the DVD player. Your Dell™
LCD TV display offers built-in deinterlacer that is equal to or
better quality than the deinterlacer on your DVD player. For
more information about progressive scan on your DVD player,
see the documentation for your DVD player
Picture is too dim or too bright
Update the color settings in the TV Menu. Press
remote control and select
The screen is not centered correctly 1
Picture
.
Update the size settings in the TV Menu. Press
Size
remote control and select
2
Reset the original factory defaults. Press
Setup
control, select
, and then select
.
Menu
Menu
Menu
on the remote
Factory Reset
on the
on the
.
Troubleshooting Your LCD TV Display 33
Page 34

www.dell.com | support.dell.com
Problem Possible Solution
Screen has one or more lines 1
Check the aspect ratio settings in the TV Menu. Press the
button on the remote control and select
Size
. For more
Menu
information on using the TV Menu, see "Using the TV Menu"
on page 23.
2
Ensure the proper source is selected in the
Input Select
menu.
See "Input Select Menu" on page 24 for more information.
3
Try connecting a different device. Ensure that you properly
connect the cables and update the input source in the TV
Menu.
4
Update the size settings in the TV Menu. Press
remote control and select
5
Reset the original factory defaults. Press
control, select
Setup
Size
.
, and then select
Factory Reset
Menu
Menu
on the remote
on the
.
The side panel buttons do not work Check the TV Menu to see if the buttons have been locked. Press
Menu on your remote control, select Setup.
Use the side panel buttons to unlock the TV Menu and side
panel buttons:
1
Press the Menu button.
A message appears stating that the TV Menu and buttons are
locked.
2
While the message is on the screen, press the volume decrease
and channel up buttons on the side panel simultaneously.
A message appears stating that the TV Menu and buttons are
unlocked.
The picture is too small 1
Adjust the size settings. Press
Size
select
2
This may be a problem with your device. See the
.
Menu
on the remote control, and
documentation for the device.
34 Troubleshooting Your LCD TV Display
Page 35

TV Menu Messages
While using your LCD TV display, the following messages may appear.
Message Possible Solution
Auto Adjust No action required, the LCD TV display is performing an auto
adjustment.
Out of Range Check the optimal resolution settings.
You may need to download a new video driver. For more
information, go to support.dell.com.
No Video Input 1
TV Button Lock To unlock, press Menu on your remote control, select Setup.
In Power Save Mode
Press any key on keyboard or
move mouse
In Power Save Mode
Please Check Video Signal
Self Test Appears for computer source when there is nothing plugged in.
Check all cables are properly connected.
2
Ensure the proper source is selected in the
See "Input Select Menu" on page 24 for more information.
Use the side panel buttons to unlock the TV Menu and side
panel buttons:
1
Press the Menu button.
A message appears stating that the TV Menu and buttons are
locked.
2
While the message is on the screen, press the volume decrease
and channel up buttons on the side panel simultaneously.
A message appears stating that the TV Menu and buttons are
unlocked.
If you have a computer connected to the LCD TV display and
there is no signal detected, the LCD TV display goes in to sleep
mode. The power light is amber when the LCD TV display in is
sleep mode.
Press any key on the keyboard or move the mouse to wake the
LCD TV display.
If you are using a video device and it has been inactive for
30 minutes the LCD TV display goes in to power save mode. The
power light is amber when the LCD TV display is in power save
mode.
Select VGA or DVI from Input Select menu and nothing is
plugged in. Plug a computer in to the VGA or DVI.
Input Select
menu.
Troubleshooting Your LCD TV Display 35
Page 36

www.dell.com | support.dell.com
Remote Control Problems
Problem Possible Solution
The LCD TV display does not respond
when using the remote control
1
Point the remote control directly at the lower right corner of the
LCD TV display. Be sure that nothing is blocking the front of
the LCD TV display. For the location of the IR, see "Front View"
on page 5.
2
Verify that the batteries are properly installed.
3
If the batteries are old, install new batteries.
NOTE: Bright lights or other infrared devices may interfere with
your remote control and IR on the LCD TV display.
Using the Self-Test Feature When Your LCD TV Display is Connected to Your Computer
When your computer is connected to the LCD TV display through DVI or VGA connector you can
use the self-test feature to check whether your LCD TV display is functioning properly. If your
LCD TV display and computer are properly connected but the LCD TV display screen remains
dark, run the LCD TV display self-test by performing the following steps:
1
Turn off both your computer and the LCD TV display.
2
Unplug the video cable from the back of the computer.
3
Turn on the LCD TV display.
If the LCD TV display cannot sense a video signal and is working correctly, the floating "Dell Self-Test Feature Check" dialog box appears on the screen (against a black background).
While in self-test mode, the power light remains blue and the self-test pattern scrolls through
the screen continually. This box also appears during normal system operation if the video
cable becomes disconnected or damaged.
4
Turn off your LCD TV display and reconnect the video cable; then turn on both your
computer and the LCD TV display. If your LCD TV display screen remains blank, the
problem may be with your computer or graphic card.
See your computer documentation for more information.
36 Troubleshooting Your LCD TV Display
Page 37

Problems When Using the LCD TV Display as a Monitor
NOTE: You can only connect your computer to the LCD TV display using a VGA connector.
Problem Possible Solution
The picture is off-centered or too small 1
No audio 1
No video NOTE: If you see a self-test, it means there is a problem with
Use
Auto Adjust
enter the TV Menu, select
.
Adjust
2
Check the optimal resolution settings.
to check the
Image Settings
Image Settings
, and then select
. Press
Menu
You may need to download a new video driver. For more
information, go to
support.dell.com
.
NOTE: Some older video cards may not support the resolution
settings for the LCD TV display.
Ensure the green audio cable is connected to audio connector
on the LCD TV display and on the computer. For the location
of the connector on the LCD TV display, see "Using the VGA
Connector" on page 18. See your computer documentation for
the location of connectors on your computer.
Do not connect the audio cable to the headphone jack.
2
Ensure the volume on the computer is not muted.
3
Verify that sound on your computer is working by checking the
speakers. See your computer documentation for information on
troubleshooting your computer.
4
Disconnect the LCD TV display from the computer and test to
see if the LCD TV display volume works.
your video card or you are using the wrong input source.
1
Ensure the LCD TV display is turned on.
2
Verify that all the cables are properly connected to the LCD TV
display, including the power cable.
3
Check to see if there is a blue or amber light on the lower,
right-hand corner of the LCD TV display. A blue light indicates
the LCD TV display is on. An amber light, means the LCD TV
display is in power save mode.
4
Ensure
VGA
is selected in the
Select Menu" on page 24 for more information.
5
Reconnect the computer.
6
Connect another device that you know is working properly.
7
Reset the original factory defaults. Press
control, select
Setup
, and then select
Input Select
Menu
Factory Reset
menu. See "Input
on the remote
.
to
Auto
Troubleshooting Your LCD TV Display 37
Page 38

www.dell.com | support.dell.com
Specifications for Your LCD TV Display
General
Model number W2306C LCD TV display
Display type TFT COLOR Premium LCD
Screen size 23 inch panel (23-inch viewable image size)
Viewable area 508.13
Image aspect ratio Wide screen
Brightness (typical) 450 nits (typical)
Contrast Ratio 550:1 (typical)
Response time 16ms (typical)
Video Display Capabilities 480i
Additional Features:
SAP capable
CC capable
Teletext capable
Parental control capable
x
285.70 mm
x
(20.00 inches
16:9 resolution
16:9 aspect ratio
480p
720p
1080i
576i (where available)
576p (where available)
Ye s
Ye s
(where available)
Ye s
Ye s
11.25 inches)
6
38 Specifications for Your LCD TV Display
Page 39

Physical Dimension
Display (with stand) 438 x 722 x 177 mm
17.2" x 28.4" x 7"
Display (no stand) 365 x 722 x 98 mm
With Speakers Non-detachable
Weight (with stand) 10 kg/22.05 lbs (est)
Tilt -5/+20 degrees
Swivel +/- 45 degrees
Native Resolution 1366 x 768 (WXGA)
HDTV Capable Yes
Tuner
Number of Tuners one analog
Viewing Angle
Horizontal +/- 85 degrees
Vertical +/- 85 degrees
Inputs
Video
Composite (CVBS)
S-Video
Component
TV In (coaxial)
Audio (L+R)
DVI (for use with a video device)
Computer
VGA (for use as computer monitor)
DVI (for use as computer monitor)
Audio (PC)
one (side)
one (side)
two (bottom)
one (bottom)
four pairs
one (bottom)
one (bottom)
one (bottom)
one (bottom)
Specifications for Your LCD TV Display 39
Page 40

www.dell.com | support.dell.com
Outputs
Video
Composite (CVBS)
Audio (L+R)
Headphone
one (bottom)
one pair
one (side)
Audio
Effects SRS TruSurround XT
Midnight Mode
Speakers (integrated) 7 watts/channel
7+7 watts total
40 Specifications for Your LCD TV Display
Page 41

Contacting Dell
To contact Dell electronically, you can access the following websites:
• www.dell.com
•
support.dell.com
•
premiersupport.dell.com
medium/large business customers, including Premier, Platinum, and Gold customers)
For specific web addresses for your country, find the appropriate country section in the table below.
NOTE: Toll-free numbers are for use within the country for which they are listed.
NOTE: In certain countries, technical support specific to Dell XPS portable computers is available at a
separate telephone number listed for participating countries. If you do not see a telephone number listed that is
specific for XPS portable computers, you may contact Dell through the technical support number listed and
your call will be routed appropriately.
When you need to contact Dell, use the electronic addresses, telephone numbers, and codes
provided in the following table. If you need assistance in determining which codes to use, contact a
local or an international operator.
(technical support)
(technical support for educational, government, healthcare, and
7
Country (City)
International Access Code
Country Code
City Code
Anguilla General Support
Antigua and Barbuda General Support
Argentina (Buenos Aires)
International Access Code: 00
Country Code: 54
City Code: 11
We bs it e : www.dell.com.ar
E-mail: us_latin_services@dell.com
E-mail for desktop and portable computers:
la-techsupport@dell.com
E-mail for servers and EMC
la_enterprise@dell.com
Customer Care
Tech Support
Tech Support Services
Sales
Department Name or Service Area,
Website and E-Mail Address
®
storage products:
Area Codes,
Local Numbers, and
Toll-Free Numbers
toll-free: 800-335-0031
1-800-805-5924
toll-free: 0-800-444-0730
toll-free: 0-800-444-0733
toll-free: 0-800-444-0724
0-810-444-3355
Contacting Dell 41
Page 42

Country (City)
International Access Code
Country Code
City Code
Aruba General Support
Australia (Sydney)
International Access Code: 0011
Country Code: 61
City Code: 2
E-mail (Australia): au_tech_support@dell.com
E-mail Customer Care (Australia and
New Zealand): apcustserv@dell.com
Home and Small Business
Government and Business
www.dell.com | support.dell.com
Preferred Accounts Division (PAD)
Customer Care (after sales) toll-free 1-333-55(option 3)
Technical Support (portables and desktops)
Technical Support (servers and workstations)
Corporate Sales
Transaction S al e s
Fax
Austria (Vienna)
International Access Code: 900
Country Code: 43
City Code: 1
We bs it e : support.euro.dell.com
E-mail: tech_support_central_europe@dell.com
Home/Small Business Sales
Home/Small Business Fax
Home/Small Business Customer Care
Preferred Accounts/Corporate Customer Care
Technical Support for XPS portable computers only
Home/Small Business Technical Support for all
other Dell computers
Preferred Accounts/Corporate Technical Support
Switchboard
Bahamas General Support
Barbados General Support
Department Name or Service Area,
Website and E-Mail Address
Area Codes,
Local Numbers, and
Toll-Free Numbers
toll-free: 800-1578
1-300-655-533
toll-free: 1-800-633-559
toll-free: 1-800-060-889
toll-free: 1-300-655-533
toll-free: 1-800-733-314
toll-free: 1-800-808-385
toll-free: 1-800-808-312
toll-free: 1-800-818-341
0820 240 530 00
0820 240 530 49
0820 240 530 14
0820 240 530 16
0820 240 530 81
0820 240 530 14
0660 8779
0820 240 530 00
toll-free: 1-866-278-6818
1-800-534-3066
42 Contacting Dell
Page 43

Country (City)
International Access Code
Country Code
City Code
Belgium (Brussels)
International Access Code: 00
Country Code: 32
City Code: 2
Bermuda General Support
Bolivia General Support
Brazil
International Access Code: 00
Country Code: 55
City Code: 51
British Virgin Islands General Support
Brunei
Country Code: 673
Canada (North York, Ontario)
International Access Code: 011
We bs it e : support.euro.dell.com
E-mail for French-speaking Customers:
support.euro.dell.com/be/fr/emaildell/
Technical Support for XPS portable computers only
Technical Support for all other Dell computers
Technical Support Fax
Customer Care
Corporate Sales
Fax
Switchboard
We bs it e : www.dell.com/br
Customer Support, Technical Support
Technical Support Fax
Customer Care Fax
Sales
Customer Technical Support (Penang, Malaysia)
Customer Care (Penang, Malaysia) 604 633 4888
Transaction Sales (Penang, Malaysia)
Online Order Status: www.dell.ca/ostatus
AutoTech (automated technical support)
Customer Care (Home Sales/Small Business)
Customer Care (med./large business, government)
Technical Support (Home Sales/Small Business)
Technical Support (med./large bus., government)
Technical Support (printers, projectors, televisions,
handhelds, digital jukebox, and wireless)
Sales (Home Sales/Small Business)
Sales (med./large bus., government)
Spare Parts Sales & Extended Service Sales
Department Name or Service Area,
Website and E-Mail Address
Area Codes,
Local Numbers, and
Toll-Free Numbers
024819296
024819288
024819295
027131565
024819100
024819299
024819100
1-800-342-0671
toll-free: 800-10-0238
0800 90 3355
51 481 5470
51 481 5480
0800 90 3390
toll-free: 1-866-278-6820
604 633 4966
604 633 4955
toll-free: 1-800-247-9362
toll-free: 1-800-847-4096
toll-free: 1-800-326-9463
toll-free: 1-800-847-4096
toll-free: 1-800-387-5757
1-877-335-5767
toll-free: 1-800-387-5752
toll-free: 1-800-387-5755
1 866 440 3355
Contacting Dell 43
Page 44

Country (City)
International Access Code
Country Code
City Code
Cayman Islands General Support
Chile (Santiago)
Sales, Customer Support, and Technical Support
Country Code: 56
City Code: 2
China (Xiamen)
Country Code: 86
City Code: 592
www.dell.com | support.dell.com
Technical Support website: support.dell.com.cn
Technical Support E-mail: cn_support@dell.com
Customer Care E-mail: customer_cn@dell.com
Technical Support Fax
Technical Support (Dell™ Dimension™ and
Inspiron)
Technical Support (OptiPlex™, Latitude™, and
Dell Precision™)
Technical Support (servers and storage)
Technical Support (projectors, PDAs, switches,
routers, and so on)
Department Name or Service Area,
Website and E-Mail Address
Area Codes,
Local Numbers, and
Toll-Free Numbers
1-800-805-7541
toll-free: 1230-020-4823
592 818 1350
toll-free: 800 858 2969
toll-free: 800 858 0950
toll-free: 800 858 0960
toll-free: 800 858 2920
44 Contacting Dell
Technical Support (printers)
Customer Care
Customer Care Fax
Home and Small Business
Preferred Accounts Division
Large Corporate Accounts GCP
Large Corporate Accounts Key Accounts
Large Corporate Accounts North
Large Corporate Accounts North Government and
Education
Large Corporate Accounts East
Large Corporate Accounts East Government and
Education
Large Corporate Accounts Queue Team
Large Corporate Accounts South
Large Corporate Accounts West
Large Corporate Accounts Spare Parts
toll-free: 800 858 2311
toll-free: 800 858 2060
592 818 1308
toll-free: 800 858 2222
toll-free: 800 858 2557
toll-free: 800 858 2055
toll-free: 800 858 2628
toll-free: 800 858 2999
toll-free: 800 858 2955
toll-free: 800 858 2020
toll-free: 800 858 2669
toll-free: 800 858 2572
toll-free: 800 858 2355
toll-free: 800 858 2811
toll-free: 800 858 2621
Page 45

Country (City)
International Access Code
Country Code
City Code
Colombia General Support
Costa Rica General Support
Czech Republic (Prague)
International Access Code: 00
Country Code: 420
Denmark (Copenhagen)
International Access Code: 00
Country Code: 45
Dominica General Support
Dominican Republic General Support
Ecuador General Support
El Salvador General Support
Finland (Helsinki)
International Access Code: 990
Country Code: 358
City Code: 9
We bs it e : support.euro.dell.com
E-mail: czech_dell@dell.com
Technical Support
Customer Care
Fax
Tech Fax
Switchboard
We bs it e : support.euro.dell.com
E-mail: support.euro.dell.com/dk/da/emaildell/
Technical Support for XPS portable computers only
Technical Support for all other Dell computers
Customer Care (Relational)
Home/Small Business Customer Care
Switchboard (Relational)
Switchboard Fax (Relational)
Switchboard (Home/Small Business)
Switchboard Fax (Home/Small Business)
We bs it e : support.euro.dell.com
E-mail: support.euro.dell.com/fi/fi/emaildell/
Technical Support
Customer Care
Fax
Switchboard
Department Name or Service Area,
Website and E-Mail Address
Area Codes,
Local Numbers, and
Toll-Free Numbers
980-9-15-3978
0800-012-0435
22537 2727
22537 2707
22537 2714
22537 2728
22537 2711
7010 0074
7023 0182
7023 0184
3287 5505
3287 1200
3287 1201
3287 5000
3287 5001
toll-free: 1-866-278-6821
1-800-148-0530
toll-free: 999-119
01-899-753-0777
09 253 313 60
09 253 313 38
09 253 313 99
09 253 313 00
Contacting Dell 45
Page 46

Country (City)
International Access Code
Country Code
City Code
France (Paris) (Montpellier)
International Access Code: 00
Country Code: 33
City Codes: (1) (4)
www.dell.com | support.dell.com
Germany (Langen)
International Access Code: 00
Country Code: 49
City Code: 6103
Department Name or Service Area,
Website and E-Mail Address
We bs it e : support.euro.dell.com
E-mail: support.euro.dell.com/fr/fr/emaildell/
Home and Small Business
Technical Support for XPS portable computers only
Technical Support for all other Dell computers
Customer Care
Switchboard
Switchboard (calls from outside of France)
Sales
Fax
Fax (calls from outside of France)
Corporate
Technical Support
Customer Care
Switchboard
Sales
Fax
We bs it e : support.euro.dell.com
E-mail: tech_support_central_europe@dell.com
Technical Support for XPS portable computers only
Technical Support for all other Dell computers
Home/Small Business Customer Care
Global Segment Customer Care
Preferred Accounts Customer Care
Large Accounts Customer Care
Public Accounts Customer Care
Switchboard
Area Codes,
Local Numbers, and
Toll-Free Numbers
0825 387 129
0825 387 270
0825 823 833
0825 004 700
04 99 75 40 00
0825 004 700
0825 004 701
04 99 75 40 01
0825 004 719
0825 338 339
01 55 94 71 00
01 55 94 71 00
01 55 94 71 01
06103 766-7222
06103 766-7200
0180-5-224400
06103 766-9570
06103 766-9420
06103 766-9560
06103 766-9555
06103 766-7000
46 Contacting Dell
Page 47

Country (City)
International Access Code
Country Code
City Code
Greece
International Access Code: 00
Country Code: 30
Grenada General Support
Guatemala General Support
Guyana General Support
Hong Kong
International Access Code: 001
Country Code: 852
India E-mail: india_support_desktop@dell.com
We bs it e : support.euro.dell.com
E-mail: support.euro.dell.com/gr/en/emaildell/
Technical Support
Gold Service Technical Support
Switchboard
Gold Service Switchboard
Sales
Fax
We bs it e : support.ap.dell.com
Technical Support E-mail: apsupport@dell.com
Technical Support (Dimension and Inspiron)
Technical Support (OptiPlex, Latitude, and Dell
Precision)
Technical Support (PowerApp™, PowerEdge™,
PowerConnect™, and PowerVault™)
Customer Care
Large Corporate Accounts
Global Customer Programs
Medium Business Division
Home and Small Business Division
india_support_notebook@dell.com
india_support_Server@dell.com
Technical Support
Sales (Large Corporate Accounts)
Sales (Home and Small Business)
Department Name or Service Area,
Website and E-Mail Address
Area Codes,
Local Numbers, and
Toll-Free Numbers
00800-44 14 95 18
00800-44 14 00 83
2108129810
2108129811
2108129800
2108129812
toll-free: 1-866-540-3355
1-800-999-0136
toll-free: 1-877-270-4609
2969 3188
2969 3191
2969 3196
3416 0910
3416 0907
3416 0908
3416 0912
2969 3105
1600338045
and 1600448046
1600 33 8044
1600 33 8046
Contacting Dell 47
Page 48

Country (City)
International Access Code
Department Name or Service Area,
Website and E-Mail Address
Country Code
City Code
Ireland (Cherrywood)
International Access Code: 16
Country Code: 353
City Code: 1
We bs it e : support.euro.dell.com
E-mail: dell_direct_support@dell.com
Technical Support for XPS portable computers only
Technical Support for all other Dell computers
U.K. Technical Support (dial within U.K. only)
Home User Customer Care
www.dell.com | support.dell.com
Small Business Customer Care
U.K. Customer Care (dial within U.K. only)
Corporate Customer Care
Corporate Customer Care (dial within U.K. only)
Ireland Sales
U.K. Sales (dial within U.K. only)
Fax/Sales Fax
Switchboard
Italy (Milan)
International Access Code: 00
Country Code: 39
City Code: 02
We bs it e : support.euro.dell.com
E-mail: support.euro.dell.com/it/it/emaildell/
Home and Small Business
Technical Support
Customer Care
Fax
Switchboard
Corporate
Technical Support
Customer Care
Fax
Switchboard
Jamaica General Support (dial from within Jamaica only)
Area Codes,
Local Numbers, and
Toll-Free Numbers
1850 200 722
1850 543 543
0870 908 0800
01 204 4014
01 204 4014
0870 906 0010
1850 200 982
0870 907 4499
01 204 4444
0870 907 4000
01 204 0103
01 204 4444
02 577 826 90
02 696 821 14
02 696 821 13
02 696 821 12
02 577 826 90
02 577 825 55
02 575 035 30
02 577 821
1-800-682-3639
48 Contacting Dell
Page 49

Country (City)
International Access Code
Country Code
City Code
Japan (Kawasaki)
International Access Code: 001
Country Code: 81
City Code: 44
Korea (Seoul)
International Access Code: 001
Country Code: 82
City Code: 2
Department Name or Service Area,
Website and E-Mail Address
We bs it e : support.jp.dell.com
Technical Support (servers)
Technical Support outside of Japan (servers)
Technical Support (Dimension and Inspiron)
Technical Support outside of Japan (Dimension and
Inspiron)
Technical Support (Dell Precision, OptiPlex, and
Latitude)
Technical Support outside of Japan (Dell Precision,
OptiPlex, and Latitude)
Technical Support (PDAs, projectors, printers,
routers)
Technical Support outside of Japan (PDAs,
projectors, printers, routers)
Faxbox Service
24-Hour Automated Order Service
Customer Care
Business Sales Division (up to 400 employees)
Preferred Accounts Division Sales (over 400
employees)
Large Corporate Accounts Sales (over 3500
employees)
Public Sales (government agencies, educational
institutions, and medical institutions)
Global Segment Japan
Individual User
Switchboard
E-mail: krsupport@dell.com
Technical Support
Technical Support (Dimension, PDA, Electronics
and Accessories)
Sales
Fax
Switchboard
Area Codes,
Local Numbers, and
Toll-Free Numbers
toll-free: 0120-198-498
81-44-556-4162
toll-free: 0120-198-226
81-44-520-1435
toll-free:0120-198-433
81-44-556-3894
toll-free: 0120-981-690
81-44-556-3468
044-556-3490
044-556-3801
044-556-4240
044-556-1465
044-556-3433
044-556-3430
044-556-1469
044-556-3469
044-556-1760
044-556-4300
toll-free: 080-200-3800
toll-free: 080-200-3801
toll-free: 080-200-3600
2194-6202
2194-6000
Contacting Dell 49
Page 50

Country (City)
International Access Code
Department Name or Service Area,
Website and E-Mail Address
Country Code
City Code
Latin America Customer Technical Support (Austin, Texas,
U.S.A.)
Customer Service (Austin, Texas, U.S.A.)
Fax (Technical Support and Customer Service)
(Austin, Texas, U.S.A.)
Sales (Austin, Texas, U.S.A.)
SalesFax (Austin, Texas, U.S.A.)
www.dell.com | support.dell.com
Luxembourg
International Access Code: 00
Country Code: 352
We bs it e : support.euro.dell.com
Technical Support
Home/Small Business Sales
Corporate Sales
Customer Care
Fax
Macao
Country Code: 853
Technical Support
Customer Service (Xiamen, China)
Transaction Sales (Xiamen, China)
Malaysia (Penang)
International Access Code: 00
Country Code: 60
City Code: 4
We bs it e : support.ap.dell.com
Technical Support (Dell Precision, OptiPlex, and
Latitude)
Technical Support (Dimension, Inspiron, and
Electronics and Accessories)
Technical Support (PowerApp, PowerEdge,
PowerConnect, and PowerVault)
Customer Care
Transaction S al e s
Corporate Sales
Area Codes,
Local Numbers, and
Toll-Free Numbers
512 728-4093
512 728-3619
512 728-3883
512 728-4397
512 728-4600
or 512 728-3772
342 08 08 075
+32 (0)2 713 15 96
26 25 77 81
+32 (0)2 481 91 19
26 25 77 82
toll-free: 0800 105
34 160 910
29 693 115
toll-free: 1 800 880 193
toll-free: 1 800 881 306
toll-free: 1800 881 386
toll-free:
1800 881 306
(option 6)
toll-free: 1 800 888 202
toll-free: 1 800 888 213
50 Contacting Dell
Page 51

Country (City)
International Access Code
Country Code
City Code
Mexico
International Access Code: 00
Country Code: 52
Montserrat General Support
Netherlands Antilles General Support
Netherlands (Amsterdam)
International Access Code: 00
Country Code: 31
City Code: 20
Customer Technical Support
Sales
Customer Service
Main
We bs it e : support.euro.dell.com
Technical Support for XPS portable computers only
Technical Support for all other Dell computers
Technical Support Fax
Home/Small Business Customer Care
Relational Customer Care
Home/Small Business Sales
Relational Sales
Home/Small Business Sales Fax
Relational Sales Fax
Switchboard
Switchboard Fax
Department Name or Service Area,
Website and E-Mail Address
Area Codes,
Local Numbers, and
Toll-Free Numbers
001-877-384-8979
or 001-877-269-3383
50-81-8800
or 01-800-888-3355
001-877-384-8979
or 001-877-269-3383
50-81-8800
or 01-800-888-3355
toll-free: 1-866-278-6822
001-800-882-1519
020 674 45 94
020 674 45 00
020 674 47 66
020 674 42 00
020 674 4325
020 674 55 00
020 674 50 00
020 674 47 75
020 674 47 50
020 674 50 00
020 674 47 50
Contacting Dell 51
Page 52

Country (City)
International Access Code
Country Code
City Code
New Zealand
International Access Code: 00
Country Code: 64
E-mail (New Zealand): nz_tech_support@dell.com
E-mail Customer Care (Australia and
New Zealand): apcustserv@dell.com
Customer Care toll-free: 0800-289-335
Technical Support (for desktop and portable
computers)
www.dell.com | support.dell.com
Technical Support (for servers and workstations)
Home and Small Business
Government and Business
Sales
Fax
Nicaragua General Support
Norway (Lysaker)
International Access Code: 00
Country Code: 47
We bs it e : support.euro.dell.com
E-mail: support.euro.dell.com/no/no/emaildell/
Technical Support for XPS portable computers only
Technical Support for all other Dell products
Relational Customer Care
Home/Small Business Customer Care
Switchboard
Fax Switchboard
Pana ma General Support
Peru General Support
Poland (Warsaw)
International Access Code: 011
Country Code: 48
City Code: 22
We bs it e : support.euro.dell.com
E-mail: pl_support_tech@dell.com
Customer Service Phone
Customer Care
Sales
Customer Service Fax
Reception Desk Fax
Switchboard
Department Name or Service Area,
Website and E-Mail Address
Area Codes,
Local Numbers, and
Toll-Free Numbers
(option 3)
toll-free:
0800 446 255
toll-free: 0800 443 563
0800 446 255
0800 444 617
0800 441 567
0800 441 566
001-800-220-1006
815 35 043
671 16882
671 17575
23162298
671 16800
671 16865
001-800-507-0962
0800-50-669
57 95 700
57 95 999
57 95 999
57 95 806
57 95 998
57 95 999
52 Contacting Dell
Page 53

Country (City)
International Access Code
Country Code
City Code
Portugal
International Access Code: 00
Country Code: 351
Puerto Rico General Support
St. Kitts and Nevis General Support
St. Lucia General Support
St. Vincent and the Grenadines General Support
Singapore (Singapore)
International Access Code: 005
Country Code: 65
Slovakia (Prague)
International Access Code: 00
Country Code: 421
We bs it e : support.euro.dell.com
E-mail: support.euro.dell.com/pt/en/emaildell/
Technical Support
Customer Care
Sales
Fax
We bs it e : support.ap.dell.com
Technical Support (Dimension, Inspiron, and
Electronics and Accessories)
Technical Support (OptiPlex, Latitude, and Dell
Precision)
Technical Support (PowerApp, PowerEdge,
PowerConnect, and PowerVault)
Customer Care
Transaction S al e s
Corporate Sales
We bs it e : support.euro.dell.com
E-mail: czech_dell@dell.com
Technical Support
Customer Care
Fax
Tech Fax
Switchboard (Sales)
Department Name or Service Area,
Website and E-Mail Address
Area Codes,
Local Numbers, and
Toll-Free Numbers
707200149
800 300 413
800 300 410 or 800 300 411 or
800 300 412 or 21 422 07 10
214240112
1-800-805-7545
toll-free: 1-877-441-4731
1-800-882-1521
toll-free: 1-877-270-4609
toll-free: 1800 394 7430
toll-free: 1800 394 7488
toll-free: 1800 394 7478
toll-free:
toll-free: 1 800 394 7412
toll-free: 1 800 394 7419
1 800 394 7430
(option 6)
02 5441 5727
420 22537 2707
02 5441 8328
02 5441 8328
02 5441 7585
Contacting Dell 53
Page 54

Country (City)
International Access Code
Country Code
City Code
South Africa (Johannesburg)
International Access Code:
09/091
Country Code: 27
City Code: 11
www.dell.com | support.dell.com
Southeast Asian and Pacific
Countries
Spain (Madrid)
International Access Code: 00
Country Code: 34
City Code: 91
Department Name or Service Area,
Website and E-Mail Address
We bs it e : support.euro.dell.com
E-mail: dell_za_support@dell.com
Gold Queue
Technical Support
Customer Care
Sales
Fax
Switchboard
Customer Technical Support, Customer Service,
and Sales (Penang, Malaysia)
We bs it e : support.euro.dell.com
E-mail: support.euro.dell.com/es/es/emaildell/
Home and Small Business
Technical Support
Customer Care
Sales
Switchboard
Fax
Corporate
Technical Support
Customer Care
Switchboard
Fax
Area Codes,
Local Numbers, and
Toll-Free Numbers
011 709 7713
011 709 7710
011 709 7707
011 709 7700
011 706 0495
011 709 7700
604 633 4810
902 100 130
902 118 540
902 118 541
902 118 541
902 118 539
902 100 130
902 115 236
917229200
917229583
54 Contacting Dell
Page 55

Country (City)
International Access Code
Country Code
City Code
Sweden (Upplands Vasby)
International Access Code: 00
Country Code: 46
City Code: 8
Switzerland (Geneva)
International Access Code: 00
Country Code: 41
City Code: 22
Ta i wa n
International Access Code: 002
Country Code: 886
Department Name or Service Area,
Website and E-Mail Address
We bs it e : support.euro.dell.com
E-mail: support.euro.dell.com/se/sv/emaildell/
Technical Support for XPS portable computers only
Technical Support for all other Dell products
Relational Customer Care
Home/Small Business Customer Care
Employee Purchase Program (EPP) Support
Technical Support Fax
Sales
We bs it e : support.euro.dell.com
E-mail: Tech_support_central_Europe@dell.com
E-mail for French-speaking HSB and Corporate
Customers: support.euro.dell.com/ch/fr/emaildell/
Technical Support for XPS portable computers only
Technical Support (Home and Small Business) for
all other Dell products
Technical Support (Corporate)
Customer Care (Home and Small Business)
Customer Care (Corporate)
Fax
Switchboard
We bs it e : support.ap.dell.com
E-mail: ap_support@dell.com
Technical Support (OptiPlex, Latitude, Inspiron,
Dimension, and Electronics and Accessories)
Technical Support (PowerApp, PowerEdge,
PowerConnect, and PowerVault)
Customer Care
Transaction S al e s
Corporate Sales
Area Codes,
Local Numbers, and
Toll-Free Numbers
0771 340 340
08 590 05 199
08 590 05 642
08 587 70 527
201401444
08 590 05 594
08 590 05 185
0848 33 88 57
0844 811 411
0844 822 844
0848 802 202
0848 821 721
022 799 01 90
022 799 01 01
toll-free: 00801 86 1011
toll-free: 00801 60 1256
toll-free:
toll-free: 00801 65 1228
toll-free: 00801 651 227
00801 60 1250
(option 5)
Contacting Dell 55
Page 56

Country (City)
International Access Code
Country Code
City Code
Thailand
International Access Code: 001
Country Code: 66
We bs it e : support.ap.dell.com
Technical Support (OptiPlex, Latitude, and Dell
Precision)
Technical Support (PowerApp, PowerEdge,
PowerConnect, and PowerVault)
Customer Care
www.dell.com | support.dell.com
Corporate Sales
Transaction S al e s
Trinidad/Tobago General Support
Turks and Caicos Islands General Support
U.K. (Bracknell)
International Access Code: 00
Country Code: 44
City Code: 1344
We bs it e : support.euro.dell.com
Customer Care website:
support.euro.dell.com/uk/en/ECare/Form/Home.asp
E-mail: dell_direct_support@dell.com
Technical Support (Corporate/Preferred
Accounts/PAD [1000+ employees])
Technical Support for XPS portable computers only
Technical Support (direct and general) for all other
products
Global Accounts Customer Care
Home and Small Business Customer Care
Corporate Customer Care
Preferred Accounts (500–5000 employees)
Customer Care
Central Government Customer Care
Local Government & Education Customer Care
Health Customer Care
Home and Small Business Sales
Corporate/Public Sector Sales
Home and Small Business Fax
Uruguay General Support
Department Name or Service Area,
Website and E-Mail Address
Area Codes,
Local Numbers, and
Toll-Free Numbers
toll-free: 1800 0060 07
toll-free: 1800 0600 09
toll-free:
1800 006 007
(option 7)
toll-free: 1800 006 009
toll-free: 1800 006 006
1-800-805-8035
toll-free: 1-866-540-3355
0870 908 0500
0870 366 4180
0870 908 0800
01344 373 186
0870 906 0010
01344 373 185
0870 906 0010
01344 373 193
01344 373 199
01344 373 194
0870 907 4000
01344 860 456
0870 907 4006
toll-free: 000-413-598-2521
56 Contacting Dell
Page 57

Country (City)
International Access Code
Country Code
City Code
U.S.A. (Austin, Texas)
International Access Code: 011
Country Code: 1
Automated Order-Status Service
AutoTech (portable and desktop computers)
Technical Support (Dell TV, Printers, and
Projectors
Consumer (Home and Home Office) Technical
Support for all other Dell products
Customer Service
DellNet™ Service and Support
Employee Purchase Program (EPP) Customers
Financial Services website:
www.dellfinancialservices.com
Financial Services (lease/loans)
Financial Services (Dell Preferred Accounts [DPA])
Business
Customer Service and Technical Support
Employee Purchase Program (EPP) Customers
Printers and Projectors Technical Support
Public (government, education, and healthcare)
Customer Service and Technical Support
Employee Purchase Program (EPP) Customers
Dell Sales
Dell Outlet Store (Dell refurbished computers)
Software and Peripherals Sales
Spare Parts Sales
Extended Service and Warranty Sales
Fax
Dell Services for the Deaf, Hard-of-Hearing, or
Speech-Impaired
U.S. Virgin Islands General Support
Vene zu ela General Support
Department Name or Service Area,
Website and E-Mail Address
) for Relationship customers
Area Codes,
Local Numbers, and
Toll-Free Numbers
toll-free: 1-800-433-9014
toll-free: 1-800-247-9362
toll-free 1-877-459-7298
toll-free: 1-800-624-9896
toll-free: 1-800-624-9897
toll-free: 1-877-Dellnet
(1-877-335-5638)
toll-free: 1-800-695-8133
toll-free: 1-877-577-3355
toll-free: 1-800-283-2210
toll-free: 1-800-456-3355
toll-free: 1-800-695-8133
toll-free: 1-877-459-7298
toll-free: 1-800-456-3355
toll-free: 1-800-695-8133
toll-free: 1-800-289-3355
or toll-free: 1-800-879-3355
toll-free: 1-888-798-7561
toll-free: 1-800-671-3355
toll-free: 1-800-357-3355
toll-free: 1-800-247-4618
toll-free: 1-800-727-8320
toll-free: 1-877-DELLTTY
(1-877-335-5889)
1-877-673-3355
8001-3605
Contacting Dell 57
Page 58

www.dell.com | support.dell.com
58 Contacting Dell
Page 59

Index
A
About
side connectors, 5
side panel buttons, 5
TV, 5
Access Code
creating, 27
Adjust, 26
brightness, 25
color, 25
Antenna, 14
aspect ratio, 26
Audio, 26
B
Button
lock, 28
unlock, 28
Buttons
channel up and down, 6
channels, 19
Enter, 19
Input Source, 6
OSD, 6
PIP, 19
power, 6
remote control, 19
Side panel, 6
volume, 6, 19
C
Cables, 9
Channel, 28
blocking, 27
Closed caption, 29
Coaxial, 14
Component, 16
Connecting an Antenna, 14
Connecting Cable TV
coaxial, 14
Connecting devices
Cable TV box, 11
camcorder, 11
computer, 11
DVD player, 11
VCR, 11
Connectors, 7
AV1, 7
AV2, 7
AV3, 8
AV4, 8
coaxial, 8, 11
component, 8, 11, 16
composite, 11
DVI, 8, 11, 17
location of, 8
power, 8
quality, 11
side panel, 7
S-Video, 11, 16
VGA, 8
D
DVI, 17
F
Factory settings
restore, 28
H
headphones, 7
I
Input Select
Input sources, 24
Input Source, 19
rename, 28
IR receiver, 5
M
Midnight Mode, 26
Monitor, 18
O
On-Screen Display, 23
OSD, 19, 23
access code, 27
Index 59
Page 60

appearance of, 28
Audio, 26
closed caption, 29
Input Select, 24
language, 24
Main Menu, 23
messages, 35
Parental Control, 27
Picture, 25
remote control, 23
setup, 28
sleep timer, 29
using, 23
P
Package contents, 9
Parental Control
access code, 27
Power indicator
amber light, 5
blue light, 5
Power light
amber, 5
blue, 5
Problems
remote control, 36
TV, 30
using, 19
S
Self Test, 36
setup, 28
Sleep Timer, 29
Specifications, 38
SRS, 26
S-Video, 16
T
Troubleshooting, 30
computer, 36-37
general problems, 31
monitor, 37
OSD, 35
remote control, 36
self test, 36
TV
connectors, 11
location, 11
set up, 11
U
R
Remote control, 19, 23
batteries, 19
buttons, 19
Learning remote, 22
problems with, 36
60 Index
Universal remote, 22
V
VGA, 18
Page 61

TV LCD Dell™ W2306C
Manual del propietario
Model W2306C
www.dell.com | support.dell.com
Page 62

Notas, avisos y precauciones
NOTA: Una NOTA indica información importante que le ayuda a hacer un mejor uso del televisor.
AVISO: Un AVISO indica un daño potencial para el hardware y ofrece información acerca de cómo evitar el problema.
PRECAUCION: Una PRECAUCIÓN indica posibles daños para el dispositivo, lesiones personales o muerte.
____________________
La información de este documento está sujeta a cambios sin previo aviso.
© 2005 Dell Inc. Todos los derechos reservados.
Queda prohibida la reproducción de este documento sin el consentimiento por escrito de Dell Inc.
Marcas utilizadas en este texto: Dell™, Dimension™, OptiPlex™, Dell Precision™, Latitude™, Inspiron™, DellNet™, PowerApp™,
PowerEdge™. PowerConnect™, PowerVault, EMC
de SRS Labs, Inc.
En este documento pueden utilizarse marcas y nombres de marcas para referirse a las entidades que reclaman las marcas y los nombres o a sus
productos. Dell Inc. niega cualquier interés de propiedad en las marcas y en los nombres de marcas distintos a los suyos.
Octubre 2005 Rev. A00
®
. el logotipo DELL; TruSurround XT, SRS y el símbolo son marcas
Page 63

Tabla de Contenidos
1 Acerca de la pantalla de TV LCD . . . . . . . . . . . . . . . . . . . . . . . . .5
Vista frontal . . . . . . . . . . . . . . . . . . . . . . . . . . . . . . . . 5
Vista del lateral derecho
Vista del lateral izquierdo
Vista inferior
. . . . . . . . . . . . . . . . . . . . . . . . . . . . . . . 8
Contenido del paquete
. . . . . . . . . . . . . . . . . . . . . . . . . . 6
. . . . . . . . . . . . . . . . . . . . . . . . . 7
. . . . . . . . . . . . . . . . . . . . . . . . . . . 9
2 Configuración de la pantalla de TV LCD . . . . . . . . . . . . . . . . . .11
Ubicación adecuada para la pantalla de TV LCD . . . . . . . . . . . . . . 11
Conexión de la pantalla de TV LCD
Conexión de su PC a la pantalla de TV LCD
. . . . . . . . . . . . . . . . . . . . . 11
. . . . . . . . . . . . . . . . . 13
3 El control remoto . . . . . . . . . . . . . . . . . . . . . . . . . . . . . . . . . . . . . .19
Instalación de baterías. . . . . . . . . . . . . . . . . . . . . . . . . . . 19
Utilización del control remoto
Utilización de la pantalla de TV LCD con un Control remoto universal o
programable
. . . . . . . . . . . . . . . . . . . . . . . . . . . . . . . 22
. . . . . . . . . . . . . . . . . . . . . . . 20
4 Utilización del menú TV . . . . . . . . . . . . . . . . . . . . . . . . . . . . . . . .23
Utilización del control remoto con el menú TV . . . . . . . . . . . . . . . 23
Selección del idioma del menú TV
Menú Seleccionar entrada
Menú Imagen
Audio
Tam añ o
. . . . . . . . . . . . . . . . . . . . . . . . . . . . . . . 25
. . . . . . . . . . . . . . . . . . . . . . . . . . . . . . . . . . . 26
. . . . . . . . . . . . . . . . . . . . . . . . . . . . . . . . . . 26
. . . . . . . . . . . . . . . . . . . . . 24
. . . . . . . . . . . . . . . . . . . . . . . . . 24
Tabla de Contenidos 3
Page 64

Control paterno . . . . . . . . . . . . . . . . . . . . . . . . . . . . . . 27
Configuración del menú TV
Temporizador de suspendido
Subtítulos ocultos
. . . . . . . . . . . . . . . . . . . . . . . . . 28
. . . . . . . . . . . . . . . . . . . . . . . . 29
. . . . . . . . . . . . . . . . . . . . . . . . . . . . . 29
5 Solución de problemas de la pantalla de TV LCD . . . . . . . . . .30
Consejos para la solución de problemas . . . . . . . . . . . . . . . . . . 30
Problemas generales
Mensajes del menú TV
Problemas con el control remoto
. . . . . . . . . . . . . . . . . . . . . . . . . . . 31
. . . . . . . . . . . . . . . . . . . . . . . . . . . 35
. . . . . . . . . . . . . . . . . . . . . . 36
Utilización de la función Comprobación automática cuando la pantalla
de TV LCD está conectada al ordenador
Problemas al utilizar la pantalla de TV LCD como un monitor
. . . . . . . . . . . . . . . . . . 36
. . . . . . . . 37
6 Especificaciones de la pantalla de TV LCD . . . . . . . . . . . . . . .38
7 Ponerse en contacto con Dell. . . . . . . . . . . . . . . . . . . . . . . . . . . 41
Index . . . . . . . . . . . . . . . . . . . . . . . . . . . . . . . . . . . . 59
4 Tabla de Contenidos
Page 65

Acerca de la pantalla de TV LCD
Vista frontal
1
2
1
1 Receptor IR Recibe la señal desde el control remoto
2 Luz de indicador de encendido
(LED)
La luz se iluminará en azul cuando la pantalla de TV LCD esté
encendida y ámbar cuando la pantalla esté en el modo de
ahorro de energía.
Acerca de la pantalla de TV LCD 5
Page 66

www.dell.com | support.dell.com
Vista del lateral derecho
1 Botón Encendido
2
Botón de menú TV Púlselo para activar el menú TV
7
6
5
4
3
2
1
Púlselo para encender y apagar la pantalla de TV LCD El botón
de encendido se iluminará en azul cuando esté encendido y en
ámbar cuando se encuentre en modo de ahorro de energía.
3
4 Botones de volumen Púlselo para subir el volumen
5 Botón de canal
6
7
Botones de volumen Púlselo para bajar el volumen
Botón de canal
Botón Seleccionar
entrada
6 Acerca de la pantalla de TV LCD
Púlselo para seleccionar el canal anterior o desplazarse por el
MENÚ TV
Púlselo para seleccionar el canal siguiente o desplazarse por el
MENÚ TV
Púlselo para mostrar el menú Seleccionar entrada
Page 67

Vista del lateral izquierdo
1
2
3
4
1 EXTREMO AV (S-Vídeo 1) Conecte dispositivos como un sistema de videojuegos o un
VCR
2 EXTREMO AV (Compuesto 1) Conecte dispositivos como un VCR o un reproductor de DVD
3 Conector de audio compuesto Utilice los conectores de audio si ha conectado un dispositivo a
un conector
4 Conector de auriculares Conecte los auriculares
Acerca de la pantalla de TV LCD 7
Page 68

Vista inferior
www.dell.com | support.dell.com
1
1 Conexión de alimentación Conecte el cable de alimentación
2 Salida compuesta / Salida de audio
(I/D)
3 Salida compuesta / salida de vídeo Conecte un VCR
4 Conectores de vídeo y audio (AV1) Conecte dispositivos como, por ejemplo, un reproductor de
5 Conectores de vídeo y audio (AV2) Conecte dispositivos como, por ejemplo, un reproductor de
6 Conector de audio DVI (I / D) Utilice el conector de audio DVI si ha conectado un dispositivo
7 VGA Conecte el PC
8 Conector DVI Conecte su PC o dispositivos de vídeo como, por ejemplo un
9 Conector de audio para VGA o DVI Conecte el cable de audio del PC a la Pantalla de TV LCD
10 ANT/Cable Conecte el decodificador de TV por cable o la antena
Conecte un VCR
DVD o un decodificador de TV por cable
DVD o un decodificador de TV por cable
de DVD en la conexión de DVI
reproductor de DVD
2
4
5
3
7
10
8
6
9
8 Acerca de la pantalla de TV LCD
Page 69

Contenido del paquete
NOTA: Si necesita cables adicionales, póngase en contacto con Dell
Control remoto
(2) pilas AAA
Cable de alimentación
Cable de vídeo compuesto
Cable de audio
Acerca de la pantalla de TV LCD 9
Page 70

www.dell.com | support.dell.com
Cable VGA
Cable coaxial
Documentación:
Guía de configuración
Guía de información de
producto
Manual de usuario
Dell™ TV
Product Information Guide
Guide d’informations duproduit
Guía de información delproducto
www.dell.com | support.dell.com
TM
Dell W2606C 26" LCD TV Display
Model W2606C
www.dell.com | support.dell.com
Owner 's Manual
TM
10 Acerca de la pantalla de TV LCD
Page 71

Configuración de la pantalla de TV LCD
PRECAUCIÓN: Antes de comenzar con los procedimientos de esta sección, siga las instrucciones de
seguridad de la
Ubicación adecuada para la pantalla de TV LCD
Tenga en cuenta los siguientes factores ambientales al decidir la posición de la pantalla de TV
LCD:
• No guarde ni utilice la pantalla TV LCD en lugares donde esté expuesta a altas temperaturas,
luz solar directa o frío extremo.
• Evite mover la pantalla de TV LCD entre situaciones con diferencias de temperature
extremas. Para obtener más información, consulte la sección Especificaciones en
• No someta la pantalla de TV LCD a vibraciones severas o golpes fuertes. No coloque la
pantalla de TV LCD en el maletero de un coche.
• No guarde ni utilice la pantalla de TV LCD en lugares donde podría quedar expuesta a
entornos de alta humedad o polvo.
• No coloque la pantalla de TV LCD en un lugar donde podría salpicar agua u otros líquidos
sobre o dentro de la pantalla de TV LCD.
Guía de información de producto
page 38
.
2
Conexión de la pantalla de TV LCD
La pantalla de TV LCD incluye cuatro conectores estándar que se pueden utilizar para conectar
dispositivos.
NOTA: Antes de conectar la pantalla de TV LCD, asegúrese de que dispone de todos los cables
apropiados. Algunos cables pueden suministrarse con el dispositivo que está conectando. Para obtener
una lista de los cables que se suministran con la pantalla de TV LCD, consulte la sección Contenido del
paquete en page 9. Para pedir cables adicionales, póngase en contacto con Dell.
Configuración de la pantalla de TV LCD 11
Page 72

Calidad Cable y conector Cuándo utilizar
Buena el cable coaxial (RF) transporta el video o el
audio en un cable. El conector coaxial está
marcado como ANT/Cable en la pantalla de
TV LCD. Para localizar el conector, consulte
page 8.
www.dell.com | support.dell.com
Buena El cable compuesto transporta la señal de
vídeo mediante un solo contacto. Si está
utiliznado un conector de vídeo compuesto
también necesitará conectar los conectores de
audio. Para localizar el conector, consulte
page 7.
Buena El sistema S-Vídeo separa la señal de vídeo en
dos señales, blanco y negro y color. Para
localizar el conector, consulte page 7.
12 Configuración de la pantalla de TV LCD
Page 73

Calidad Cable y conector Cuándo utilizar
Óptima El sistema componente, separa la señal de
video en tres señales, dos de color y una de
blanco y negro. Para localizar el conector,
consulte page 8.
Conexión de su PC a la pantalla de TV LCD
La pantalla de TV LCD incluye dos conectores estándar que se pueden usar para conectar el PC.
NOTA: El tipo de conector que se utilice depende de la tarjeta gráfica que admita el PC. Para obtener
información adicional acerca de las tarjetas gráficas, consulte la documentación del PC.
Calidad Cable y conector Cuándo utilizar
Buena
Un sistema de visualización de gráficos
para ordenadores que utiliza una señal
analógica y puede admitir resoluciones de
hasta 1366 x 768.
Buena
Una señal digital que puede admitir video
digital y convertir de analógico a digital.
DVI se puede usar en pantallas de alta
resolución y puede admitir resoluciones de
hasta 1366 x 768.
Conecte el cable de audio desde su equipo a
la conexion de audio de la pantalla de
televisión de cristal líquido para VGA o DVI
Configuración de la pantalla de TV LCD 13
.
Page 74

www.dell.com | support.dell.com
Utilización del conector ANT/Cable (Coaxial)
1
Apague la pantalla de TV LCD y desenchufe el cable de alimentación.
2
Conecte el cable coaxial al conector ANT/Cable de la pantalla de TV LCD.
3
Conecte el cable de alimentación de la pantalla de TV LCD y encienda la pantalla.
4
Entre en el menú TV y seleccione TV. Para obtener información adicional acerca del menú
Seleccionar entrada, consulte page 24.
14 Configuración de la pantalla de TV LCD
Page 75

Utilización del conector Compuesto
1
Apague la pantalla de TV LCD y desconecte el cable de alimentación.
2
Conecte el dispositivo incluyendo los cables de audio.
3
Conecte los cables de alimentación de la pantalla de TV LCD y el otro dispositivo y
enciéndalos.
4
Entre en el menú TV y seleccione
adicional acerca del menú Seleccionar entrada, consultepage 24.
EXTREMO AV (compuesto 1)
. Para obtener información
Configuración de la pantalla de TV LCD 15
Page 76

www.dell.com | support.dell.com
Utilización del conector de S Vídeo
1
Apague la pantalla de TV LCD y desconecte el cable de alimentación.
2
Conecte el dispositivo incluyendo los cables de audio.
3
Conecte los cables de alimentación de la pantalla de TV LCD y el otro dispositivo y
enciéndalos.
4
Entre en el menú TV y seleccione
adicional acerca del menú Seleccionar entrada, consulte page 24.
EXTREMO AV (S-Vídeo 1)
. Para obtener información
Utilización de los conectores Componente
1
Apague la pantalla de TV LCD y desconecte el cable de alimentación.
2
Conecte el dispositivo incluyendo los cables de audio.
3
Conecte los cables de alimentación de la pantalla de TV LCD y el otro dispositivo y
enciéndalos.
4
Entre en el menú TV y seleccione
información adicional acerca del menú Seleccionar entrada, consulte page 24.
16 Configuración de la pantalla de TV LCD
AV1 (
Componente
1)
o
AV2 (
Componente
2)
. Para obtener
Page 77

Utilización del conector DVI
NOTA: Para un PC solamente puede utilizarse un equipo, VGA o DVI.
Conexión de un dispositivo de vídeo Conexión de un PC
1
Apague la pantalla de TV LCD y desconecte el cable de alimentación.
2
Conecte el cable DVI blanco a la pantalla de TV LCD y al dispositivo de vídeo o el PC.
3
Conecte los cables de audio.
Si está conectando un dispositivo de vídeo, utilice los conectores de audio (rojo y blanco) o, si
está conectando un PC, utilice el conector estéreo (verde).
NOTA: Algunos decodificadores de TV por cable pueden tener conectores DVI, pero no admiten la
utilización de esta conexión. Para obtener más información, póngase en contacto con su compañía de
TV por cable.
4
Conecte los cables de alimentación de la pantalla de TV LCD y el otro dispositivo y
enciéndalos.
5
Entre en el menú TV y seleccione
Seleccionar entrada, consulte page 24.
DVI
. Para obtener información adicional acerca del menú
Configuración de la pantalla de TV LCD 17
Page 78

www.dell.com | support.dell.com
Utilización del conector VGA
NOTA: Para un PC solamente puede utilizarse un equipo, VGA o DVI.
Apague la pantalla de TV LCD y desconecte el cable de alimentación.
1
2
Conecte el cable VGA azul a la pantalla de TV LCD y al PC.
3
Conecte el cable de audio verde al conector de la pantalla de TV LCD y al PC.
4
Conecte los cables de alimentación de la pantalla de TV LCD y el otro dispositivo y
enciéndalos.
5
Entre en el menú TV y seleccione
Seleccionar entrada, consulte page 24.
VGA
. Para obtener información adicional acerca del menú
18 Configuración de la pantalla de TV LCD
Page 79

El control remoto
Instalación de baterías
Antes de comenzar a utilizar el control remoto, instale dos baterías AAA.
1
Abra la tapa de las baterías.
2
Instale las baterías. Asegúrese de que hace coincidir los símbolos + y – de las baterías con los
símbolos + y – del compartimento de baterías.
3
Vuelva a colocar la tapa de la batería.
3
El control remoto 19
Page 80

Utilización del control remoto
www.dell.com | support.dell.com
23
22
21
20
19
18
17
16
15
14
13
1
2
3
4
5
6
7
8
9
10
11
12
20 El control remoto
Page 81

1 Botón Encendido Enciende y apaga la pantalla de TV LCD
2 Botones numéricos Pulse para seleccionar un canal
3 Intro Selecciona una opción del menú TV, confirma una selección de canal
4 Silencio Pulse para activar o desactivar el sonido
5 C (icono arriba) Púlselo para ver el siguiente canal
En el menú TV, utilice el botón de canal para desplazarse por los menús
6 Vol + Sube el volumen
En el menú TV, utilice el botón de volumen para desplazarse por los
menús.
7 CH (icono abajo) Púlselo para ver el canal anterior
En el menú TV, utilice el botón de canal para desplazarse por los menús
8 Imagen
9 INFORMACIÓN Muestra la información acerca de la pantalla de TV (por ejemplo, en el
10 SRS Activa y desactiva el sonido envolvente SRS
11 Medianoche Activa o desactiva la función de medianoche
12 Panorámica Avanza cíclicamente por las opciones de tamaño (proporción) del
13 Temporizador de
apagado
14 CC Avanza cíclicamente por el menú de Subtítulos ocultos
15 SAP Activa el
16 ANT Selecciona el sintonizadora de TV como la fuente de entrada
17 DVI Selecciona DVI como la fuente de entrada
18 Audio Avanza cíclicamente por las opciones predefinidas de Audio
19 OK (Aceptar) Selecciona una opción del menú TV, confirma una selección de canal
20 Vol - Baja el volumen
21 Menú Entra y sale del menú TV principal
22 Último Regresa al canal que estaba viendo previamente
23 Entrada Entra y sale del menú Seleccionar entrada
Avanza cíclicamente por las opciones predefinidas para el menú
modo de TV, muestra el canal que está viendo)
menú Imágenes
Activa o desactiva el temporizador
Programa de audio secundario (SAP)
En el menú TV, utilice el botón de volumen para desplazarse por los
menús.
Imagen
El control remoto 21
Page 82

www.dell.com | support.dell.com
Utilización de la pantalla de TV LCD con un Control remoto
universal o programable
Los controles remotos universales preprogramados puede programarse para controlar las siguientes
funciones de su pantalla de TV LCD Dell:
•Encendido
• Subir canal (+)
• Bajar canal (-)
• Subir volumen (+)
• Bajar volumen (-)
•Silencio
• Seleccionar entrada
NOTA:
Puede programar los controles remotos universales para funcionar con la pantalla de TV LCD Dell
de las maneras siguientes:
• Si el manual del control remoto incluye los códigos del fabricante, utilice los códigos Philips.
• Si el control remoto dispone de una función de búsqueda, esta función se usará para buscar el
• Si el control remoto tiene una función de programación, puede programar botones específicos
NOTA: Para obtener más información, consulte la documentación que acompaña al control remoto
Los controles remotos preprogramados universales futuros puede que sean capaces de controlar
más funciones.
código correcto.
del control remoto Dell además de los botones de la lista anterior.
universal o programable.
22 El control remoto
Page 83

Utilización del menú TV
La pantalla de TV LCD dispone de un menú de TV que le permite seleccionar la fuente de entrada,
realizar ajustes en la configuración de audio y vídeo y definir los controles de control paterno.
Utilización del control remoto con el menú TV
NOTA: Puede acceder y realizar selecciones en el menú de TV utilizando los botones de volumen y
canal en el lateral de la pantalla de TV LCD o utilizar el control remoto. Excepto cuando se indica, esta
sección describe cómo utilizar el menú TV con el control remoto.
Para entrar en el menú TV, pulse el botón
1
Aparecerán siete iconos a los largo de la parte inferior de la pantalla.
MENÚ PRINCIPAL
Menu (Menú)
.
4
SALIR
2
Utilice los botones izquierda y derecha (botones de volumen) para moverse entre los iconos.
El icono aparecerá resaltado al moverse por los menús.
3
Para seleccionar una opción, pulse el botón
4
Aparecerá un nuevo menú para la opción seleccionada. Utilice los botones Arriba y Abajo (los
botones de canal) para desplazarse por las diferentes opciones de configuración.
NOTA: A medida que se desplaza por las opciones aparecerá una flecha roja junto a las opciones por
las que vaya pasando. Aparecerá una marca de verificación junto a la opción que haya seleccionado.
5
Utilice los botones Izquierda y Derecha (botones de volumen) y el botón
ajustará o seleccionará las opciones de configuración.
NOTA: Puede seleccionar Salir en cualquier momento para regresar al menú principal.
Tras realizar la selección,
6
7
Para salir del menú TV, seleccione el icono
UBICACIÓN DEL ARCHIVO: P:\P_TranslateFile\C9\2005\8\C9002566-AOC-DELL W2306C DAO_OM\TR\SP\W2306C_23A0e40.fm
SELECCIONAR
ENTRADA
CONFIDENCIAL DELL – PRELIMINAR 9/14/05 – SOLAMENTE PARA REVISIÓN
AJUSTES
IMAGEN
seleccione
AJUSTES
SONIDO
Salir
para regresar al menú principal.
TAMAÑO CONTROL
OK (Aceptar)
Salir
y pulse el botón
PATE RNO
cuando se resalte un icono.
CONFIGURACIÓN
OK (Aceptar)
OK (Aceptar)
Utilización del menú TV 23
.
Page 84

UBICACIÓN DEL ARCHIVO: P:\P_TranslateFile\C9\2005\8\C9002566-AOC-DELL W2306C DAO_OM\TR\SP\W2306C_23A0e40.fm
Selección del idioma del menú TV
1
Pulse
2
Seleccione
3
En el menú
Menu (Menú)
Configuración
Configuración
para entrar en el menú TV.
.
, seleccione
Idioma
y seleccione el idioma en el que desea que
aparezca el menú TV.
Menú TV Seleccionar entrada
El menú
conexión de la pantalla de TV LCD y el equipo de vídeo. Pulse
www.dell.com | support.dell.com
remoto para ir directamente al menú
seleccionar
AV1 (Componente 1) — Seleccione esta opción cuando tenga un dispositivo de video, como por
ejemplo, un reproductor de DVD, conectado al conector componente. Consulte "Vista inferior" en la
página 8 para conocer la ubicación del conector Componente.
AV2 (Componente 2) — Seleccione esta opción cuando tenga un dispositivo de video, como por
ejemplo, un reproductor de DVD, conectado al conector componente. Consulte "Vista inferior" en la
página 8 para conocer la ubicación del conector Componente.
EXTREMO AV (Compuesto 1) — Seleccione esta opción cuando se haya conectado un dispositivo de
video, como por ejemplo un sistema de juegos, al conector compuesto del lateral de la pantalla de TV
LCD. Consulte "Vista del lateral izquierdo" en la página 7 para conocer la ubicación del conector
compuesto.
EXTREMO AV (S-Vídeo 1) — Seleccione esta opción cuando tenga un dispositivo de video, como por
ejemplo un reproductor de video, conectado al conector S-Vídeo del lateral de la pantalla de TV LCD.
CONFIDENCIAL DELL – PRELIMINAR 9/14/05 – SOLAMENTE PARA REVISIÓN
24 Utilización del menú TV
Seleccionar entrada
Seleccionar entrada
SELECCIONAR ENTRADA
SALIR
1.VGA
2.DVI
3.TV
4.AV1 (COMPONENTE 1)
5.AV2 (COMPONENTE 2)
6.EXT. AV (COMPUESTO 1)
7.EXT. AV (S-VIDEO 1)
VER ENTRADAS
le permite seleccionar la fuente adecuada basándose en la forma de
en el menú principal.
TODO
Seleccionar entrada
VGA — Seleccione esta opción cuando la pantalla
de TV LCD se vaya a utilizar como un monitor de
ordenador y haya conectado el ordenador usando
un cable VGA. Consulte "Vista inferior" en la
página 8 para conocer la ubicación del conector
VGA.
DVI — Seleccione esta opción cuando la pantalla
de TV LCD se vaya a utilizar como un monitor de
ordenador y se haya conectado el ordenador o un
dispositivo como, por ejemplo, un reproductor DVI,
con el cable DVI. Consulte "Vista inferior" en la
página 8 para conocer la ubicación del conector
DVI.
ACTIVAR
TV — Seleccione esta opción cuando tenga la
antena o el cable del decodificador de TV por cable
conectado al conector ANT/Cable. Consulte "Vista
inferior" en la página 8 para conocer la ubicación
del conector coaxial.
Input (Entrada)
. También puede pulsar
en el control
Menu (Menú)
y
Page 85

UBICACIÓN DEL ARCHIVO: P:\P_TranslateFile\C9\2005\8\C9002566-AOC-DELL W2306C DAO_OM\TR\SP\W2306C_23A0e40.fm
Consulte "Vista del lateral izquierdo" en la página 7 para conocer la ubicación del conector S-Vídeo.
SHOW INPUTS (MOSTRAR ENTRADAS) — La opción Mostrar entradas, le permite seleccionar
Activas o Todas. La opción Activas busca los conectores que se estén utilizando. Las fuentes de vídeo
disponibles aparecerán en blanco y las fuentes no disponibles aparecerán en gris. La opción Todas muestra
todas las fuentes de entrada y le permite seleccionar todas las fuentes incluso si no tiene ningún dispositivo
conectado.
NOTA: En la opción Configuración del menú TV, situado en el menú Configuración, puede definir
Seleccionar entrada para mostrar el dispositivo que desea conectar. Por ejemplo, la opción EXTREMO
AV (S-VÍDEO indicará DVD al ver el menú Seleccionar entrada.
Menú TV Imagen
El menú Imagen le permite ajustar la apariencia de la imagen, incluyendo el color y el brillo.
Si selecciona una de las siguientes
opciones predefinidas de imagen, se
actualizarán automáticamente las
opciones individuales
•Películas
AJUSTES IMAGEN
ATRÁS
PREDEFINIDO
BRILLO
CONTRASTE
NITIDEZ
TEMP. DE COLOR
TINTE DE COLOR
SATURACIÓN DE COLOR
PERSONAL
50
50
12
AZUL
50
50
•Deportes
•Señal débil
•Multimedia
Si selecciona
Personal
, puede ajustar las
opciones de configuración individuales,
como por ejemplo,
Brillo
y
Color
.
Las opciones predefinidas de
temperatura de color son:
Natural: 6500K
Normal: La temperatura nativa del panel
Blue (Azul): 9300K
Red (Rojo): 5700K
CONFIDENCIAL DELL – PRELIMINAR 9/14/05 – SOLAMENTE PARA REVISIÓN
Utilización del menú TV 25
Page 86

UBICACIÓN DEL ARCHIVO: P:\P_TranslateFile\C9\2005\8\C9002566-AOC-DELL W2306C DAO_OM\TR\SP\W2306C_23A0e40.fm
Audio
El menú Audio le permite configurar el audio para adecuarse mejor al tipo de programa que esté viendo.
SRS TruSurround XT: Ofrece un sonido
envolvente virtual en dos altavoces desde
AJUSTES SONIDO
cualquier fuente, lo que crea un sonido más
amplio con unos graves reforzados.
www.dell.com | support.dell.com
ATRÁS
MODO MEDIANOCHE
MODO DE ECUALIZADOR
AGUDOS
GRAVES
VOL. SALIDA TV
PROGRAMA
SILENCIO
SALIDA DE ALTAVOCES
EN
ENEN
TEATRO
VARIABLE
ESTÉREO
ENEN
EN
APAAPA
APA
APA
APAAPA
Modo Medianoche: Nivela las grandes
variaciones entre las escenas de voz y de
acción.
Si selecciona una de las siguientes opciones
predefinidas del
Modo Ecualizador
niveles de audio individuales se
actualizarán automáticamente:
•Música)
•Teatro
•Voz
Si selecciona
Personal
, puede ajustar los
niveles individuales de audio, como por
ejemplo
Utilice la opción
Graves
y
Agudos
Programa
.
para seleccionar
Estéreo, Mono
o
SAP
(Programa de audio secundario).
Tamañ o
La opción
Horizontal Shift (Desplazamiento horizontal)
Size (Tamaño)
ATR ÁS
ESTÁNDAR
ZOOM
4:3 PROPORCIÓN
ANCHO
PANTALLA COMPLETA
DESPL. HORIZONTAL
le permite ajustar la apariencia de la imagen. Utilice la opción
para ajustar la posición horizontal de la imagen.
Utilice las opciones de configuración siguientes
para ajustar la proporción de la imagen:
TAMAÑO
Estándar
: La mejor selección para ver
HDTV digital y películas en DVD 16:9 o
22:9.
Zoom
: La mejor selección para ver TV, VCR
o películas de DVD en 4:3.
4:3
: La mejor selección para ver películas de
TV, VCR o DVD en formato 4:3.
Ancho
: La mejor selección para ver películas
50
de HDTV digital y DVD en formato 16:9 y
22:9.
Pantalla compl eta
: La mejor selección para
ver películas de HDTV digital o DVD en
formato 16:9.
, los
CONFIDENCIAL DELL – PRELIMINAR 9/14/05 – SOLAMENTE PARA REVISIÓN
26 Utilización del menú TV
NOTA:
La mayoría de los DVD incluyen
información acerca de la proporción admitida en
casa caso.
Page 87

UBICACIÓN DEL ARCHIVO: P:\P_TranslateFile\C9\2005\8\C9002566-AOC-DELL W2306C DAO_OM\TR\SP\W2306C_23A0e40.fm
Control paterno
La opción Parental Control (Control paterno) bloquea los programas de ciertos canales para que los
niños no puedan ver programas no adecuados para su edad.
CONTROL PATERNO
CONFIGURACIÓN DE NUEVO
CÓDIGO DE ACCESO
INTRODUZCA CÓDIGO DE ACCESO
Para entrar en el menú
necesario un código de acceso. La primera vez
que entre, utilice el código de acceso
Consulte "Configuración de código de acceso"
en la página 27 para obtener más información
acerca de la creación de un nuevo código de
acceso.
Puede configurar las siguientes opciones para
bloquear contenido:
•
Bloqueo de canal
seleccionados
•
Clasificación de películas
películas basándose en su clasificación
(G, PG, PG-13, R, NC-17, y X)
•
Clasificación de TV : Bloquea los
programas de TV basándose en su
clasificación
•
Opciones de bloqueo : Activa o desactiva
todas las opciones de configuración de
control paterno
Control paterno
, es
3355
: Bloquea los canales
: Bloquea las
.
NOTA: Puede utilizar la opción Borrar todo para desbloquear los canales y programas que se hayan
configurado.
Configuración de código de acceso
Tras entrar en el menú
de cuatro dígitos. Si por alguna razón pierde u olvida su código de acceso, puede utilizar el código
predeterminado.
1
En el menú
2
Utilizando el teclado numérico del control remoto, introduzca un nuevo código de acceso.
3
Seleccione
Control paterno
Control paterno
Salir
.
CONFIDENCIAL DELL – PRELIMINAR 9/14/05 – SOLAMENTE PARA REVISIÓN
por primera vez, puede definir su propio código de acceso
, seleccione
Cambiar código
.
Utilización del menú TV 27
Page 88

UBICACIÓN DEL ARCHIVO: P:\P_TranslateFile\C9\2005\8\C9002566-AOC-DELL W2306C DAO_OM\TR\SP\W2306C_23A0e40.fm
Configuración del menú TV
La configuración del menú TV le permite
ajustar su apariencia, para cambiar el
www.dell.com | support.dell.com
CONFIGURACIÓN
ATR ÁS
CONFIGURACIÓN DE MENÚ TV
CONFIGURACIÓN DE CANAL
IDIOMA
CONFIGURACIÓN DE FÁBRICA
CONFIGURACIÓN DVI
APAGADO AUTOMÁTICO
SUBTÍTULOS OCULTO
de encendido. Para desbloquear el menú TV y los botones del panel lateral:
1. Pulse el botón Menu (Menú) en la TV. Aparecerá un mensaje indicando que la TV está
bloqueada
idioma en el que se mostrará el menú TV
(consulte "Selección del idioma del menú
TV" en la página 24) y restaure la
configuración de fábrica.
Utilice
Tiempo de espera del menú TV
para aumentar o reducir el tiempo durante
el que aparecerá el menú TV. El tiempo
máximo es de 60 segundos. Menú TV
En el menú
Configuración de menú TV
puede seleccionar las opciones
botón TV
para bloquear el menú TV y los
botones del panel lateral. Cuando se activa
esta opción, solamente funcionará el botón
Bloqueo de
2. Mientras el mensaje está en la pantalla de TV, pulse simultáneamente los botones de subir
volumen y subir canal.
Si está utilizando el conector DVI, puede ser necesario verificar las siguientes opciones de
configuración:
Fuente
: La configuración predeterminada es Auto. La TV, por lo general, detecta si se está
utilizando un equipo (PC) o dispositivo de vídeo. Si la imagen no se muestra correctamente, puede
seleccionar la fuente,
Color
: El espacio de color predeterminado es
puede cambiar la configuración a
CONFIDENCIAL DELL – PRELIMINAR 9/14/05 – SOLAMENTE PARA REVISIÓN
28 Utilización del menú TV
PC
o
Vídeo
, dependiendo del dispositivo que se esté utilizando.
RGB
. Si los colores no se muestran correctamente,
YUV
.
Page 89

UBICACIÓN DEL ARCHIVO: P:\P_TranslateFile\C9\2005\8\C9002566-AOC-DELL W2306C DAO_OM\TR\SP\W2306C_23A0e40.fm
Configuración de los canales de TV por cable
La TV está configurada para detectar
CONFIGURACIÓN DE CANAL
automáticamente si se utiliza una antena o
entrada de cable y configurar los canales
ATR ÁS
ANTENA/CABLE
BUSCAR CANAL
SINCRONÍA FINA
EDITAR CANAL
ANTENA
0
disponibles. Algunos proveedores de cable
utilizan un estándar antiguo que no puede
detectar automáticamente la TV. Si tiene la
TV conectada, pero solamente puede ver
los canales 5 y 6, complete los pasos
siguientes:
1
Pulse el botón Menu (Menú) en el
control remoto, o la TV para entrar en
el menú TV.
2
Seleccione
3
En
Configuración de canal
4
Si seleccionar
opciones disponibles de
Configuración
Cable
no soluciona el problema, repita los pasos del 1 al 3 utilizando todas las
Configuración de canal (HRC, IRC, y Antena)
y, a continuación, seleccione
, seleccione
Antena/Cable
y, a continuación, cambie a
Configuración de canal.
hasta que vea todos
Cable
.
los canales.
Temporizador de suspendido
La opción
Temporizador de suspendido
le permite seleccionar un periodo de tiempo tras el que la
pantalla de TV LCD se apagará automáticamente. Puede seleccionar un periodo entre 10 minutos
y 3 horas.
Subtítulos ocultos
En el menú
seleccionar ENCENDER, APAGAR o
SUBTÍTULOS OCULTO
Silencio. Si selecciona Silencio, los
subtítulos ocultos se mostrarán
ATR ÁS
SUBTÍTULOS OCULTO
MODOS DE SUBTÍTULOS
ENCENDER
CC1
automáticamente cuando utilice el botón
Silencio del control remoto.
Puede seleccionar entre los siguientes
modos de
•de CC1 a CC4 y de TXT1 a TXT4 (CC1,
CC2 y CC4 ofrecen subtítulos ocultos
estándar y CC3 proporciona subtítulos
ocultos en un idioma secundario.)
• CC Mute (Silencio SO) (active automáticamente la función de subtítulos ocultos al
desactivar el sonido de la TV)
CONFIDENCIAL DELL – PRELIMINAR 9/14/05 – SOLAMENTE PARA REVISIÓN
Subtítulos ocultos
Subtítulos
:
Utilización del menú TV 29
, puede
Page 90

www.dell.com | support.dell.com
5
Solución de problemas de la pantalla de TV LCD
PRECAUCIÓN: Si, en cualquier momento, ve humo o chispas saliendo de la pantalla de TV,
desenchufe la pantalla de TV inmediatamente y póngase en contacto con Dell. No intente seguir
ninguno de los pasos de resolución de problemas.
Consejos para la solución de problemas
NOTA: Algunos problemas pueden estar relacionados con el dispositivo. Consulte la documentación de
todos los dispositivos conectados a la pantalla de TV LCD.
La mayoría de los problemas de la pantalla e TV LCD pueden estar causados por no seleccionar la
fuente de entrada adecuada. Cada conector de la pantalla de TV LCD está asociado con una fuente
de entrada con la etiqueta desde
•
EXTREMO AV (
LCD
•
EXTREMO AV (
•
AV1 (
Componente 1): Conector componente situado en la parte inferior de la pantalla de TV
LCD
•
AV2 (
Componente 2): Conector componente de la parte inferior de la pantalla de TV LCD
También puede seleccionar las siguientes fuentes de entrada:
•
TV
: Conector ANT/Cable de la parte inferior de la pantalla de TV LCD
TV
: Conector ANT/Cable de la parte inferior de la pantalla de TV LCD
•
•
DVI
: Conector DVI de la parte inferior de la pantalla de TV LCD
Compuesto 1): El conector componente del lateral de la pantalla de TV
S-Vídeo 1): Conector de S-Vídeo del lateral de la pantalla de TV LCD
EXTREMO AV
hasta
AV2
en el menú
Seleccionar entrada
.
30 Solución de problemas de la pantalla de TV LCD
Page 91

Problemas generales
Problema Solución posible
Imagen de mala calidad al ver la TV y
utilizar un dispositivo como, por
ejemplo, un reproductor de DVD o VCR
1
Compruebe la configuración de proporción en el menú TV. Pulse
el botón
"Utilización del menú TV" en la página 23 Para obtener más
información acerca de la utilización del menú TV,
consulte"Utilización del menú TV" en la página 23.
2
Vuelva a conectar el dispositivo utilizando el mismo tipo de
conector. Por ejemplo, si está usando un conector compuesto de
la parte inferior, pruebe utilizando el conector compuesto del
lateral de la pantalla de TV LCD. Consulte "Acerca de la
pantalla de TV LCD" en la página 5 para conocer la ubicación de
los conectores.
Tras conectar el dispositivo, cambie la fuente de entrada en el
menú TV. Consulte "Menú Seleccionar entrada" en la página 24
para obtener más información.
3
Conecte el dispositivo utilizando un conector distinto. Por
ejemplo, si tiene problemas usando un conector compuesto,
inténtelo usando el conector componente.
Menú
NOTA: Para conectar a un conector diferente, necesita los cables
adecuados al nuevo conector. Consulte la documentación del
dispositivo para obtener una lista de conexiones admitidas.
Tras conectar el dispositivo, cambie la fuente de entrada en el
menú TV. Consulte "Menú Seleccionar entrada" en la página 24
para obtener más información.
4
Restaurar los valores predeterminados de fábrica. Pulse
en el control remoto y seleccione
(Menú)
continuación, seleccione
5
Ajuste la temperatura de color. Pulse
control remoto y seleccione
Temper a t u ra de col o r
NOTA: Algunos decodificadores ofrecen un tipo de proporción de
imagen. Consulte la documentación del dispositivo para obtener
más información.
del control remoto y seleccione
Configuración
Reinicio de fábrica
Imagen
.
y, a continuación, seleccione
.
Menu (Menú)
Ta m a ño
en el
.
Menu
y, a
Solución de problemas de la pantalla de TV LCD 31
Page 92

www.dell.com | support.dell.com
Problema Solución posible
Mala calidad de imagen al usar un
dispositivo conectado al conector
ANT/Cable (coaxial)
1
Asegúrese de que la opción TV LCD está seleccionada como la
fuente de entrada en el menú
"Menú Seleccionar entrada" en la página 24 para obtener más
información.
2
Pulse
Menu (Menú)
Configuración
canales
. Esta opción reinicia la configuración de los canales del
control remoto.
3
Compruebe la configuración de proporción en el menú TV. Pulse
el botón
Menú
obtener más información acerca de la utilización del menú TV,
consulte"Utilización del menú TV" en la página 23.
4
Restaurar los valores predeterminados de fábrica. Pulse
(Menú)
en el control remoto y seleccione
continuación, seleccione
5
Ajuste la temperatura de color. Pulse
control remoto y seleccione
Temper a t u ra de col o r
6
El problema puede estar en el dispositivo, póngase en contacto
con el distribuidor correspondiente.
En la pantalla de TV LCD no aparece
nada
1
Asegúrese de que la pantalla de TV LCD está encendida.
2
Verifique que todos los cables están bien conectados a la pantalla
de TV LCD, incluyendo el cable de alimentación.
3
Compruebe si aparece una luz azul o ámbar en la esquina
inferior derecha -de la pantalla de TV LCD. Una luz azul indica
que la pantalla de TV LCD está encendida. Una luz ámbar
indica que la pantalla de TV LCD se encuentra en el modo de
ahorro de energía.
4
Asegúrese de que se ha seleccionado la fuente adecuada en el
Seleccionar entrada
menú
entrada" en la página 24 para obtener más información.
5
Vuelva a conectar los dispositivos conectados a la pantalla de TV
LCD. Si está utilizando varios dispositivos, conéctelos y
pruébelos de uno en uno.
6
Conecte otro dispositivo que esté seguro que funciona
correctamente.
7
Restaurar los valores predeterminados de fábrica. Pulse
(Menú)
en el control remoto y seleccione
continuación, seleccione
Seleccionar entrada
en el control remoto y seleccione
y, a continuación, seleccione
Configuración de
del control remoto y seleccione
Configuración
Reinicio de fábrica
.
Menu (Menú)
Imagen
y, a continuación, seleccione
.
. Consulte "Menú Seleccionar
Configuración
Reinicio de fábrica
.
. Consulte
Ta m a ño
en el
. Para
Menu
y, a
Menu
y, a
32 Solución de problemas de la pantalla de TV LCD
Page 93

Problema Solución posible
Sin sonido 1
Asegúrese de que la función Mute (Silencio) no está activada.
Pulsar el botón
función de silencio.
2
Si solamente son algunos canales TV lo que no tienen sonido, es
necesario corregir el menú
(consulte "Menú Seleccionar entrada" en la página 24).
3
Verifique que los cables de sonido están bien conectados en
ambos extremos de los conectores de entrada de la pantalla de
TV LCD y los de salida de audio de los dispositivos. Asegúrese
de que los colores de los cables coinciden con los de los
conectores.
4
Además, asegúrese de que los cables de audio están conectados
en la misma fila que los cables de vídeo. Consulte "Acerca de la
pantalla de TV LCD" en la página 5 para conocer la ubicación de
los conectores.
5
Vuelva a conectar el dispositivo utilizando el mismo tipo de
conector. Por ejemplo, si está usando un conector compuesto de
la parte inferior, pruebe utilizando el conector compuesto del
lateral de la pantalla de TV LCD. Consulte "Acerca de la
pantalla de TV LCD" en la página 5 para conocer la ubicación de
los conectores.
Tras conectar el dispositivo, cambie la fuente de entrada en el
menú TV. Consulte "Menú Seleccionar entrada" en la página 24
para obtener más información.
6
Conecte el dispositivo utilizando un conector distinto. Por
ejemplo, si tiene problemas usando un conector compuesto,
inténtelo usando el conector componente.
NOTA: Para conectar a un conector diferente, necesita los cables
adecuados al nuevo conector. Consulte la documentación del
dispositivo para obtener una lista de conexiones admitidas.
Tras conectar el dispositivo, cambie la fuente de entrada en el
menú TV. Consulte "Menú Seleccionar entrada" en la página 24
para obtener más información.
7
Pruebe el dispositivo en una TV diferente.
Al utilizar el DVD la imagen aparece
doble o no aparece ninguna imagen
La imagen aparece demasiado borrosa o
brillante
La pantalla no está centrada
correctamente
Desactive la exploración progresiva del reproductor de DVD. La
pantalla de TV LCD Dell™ ofrece una función de desentralazado
integrada igual o mejor que la función de desentrelazado del
reproductor de DVD. Para obtener más información acerca de la
exploración progresiva del reproductor de DVD, consulte la
documentación del reproductor
Actualice la configuración de color del menú TV. Pulse el botón
Menu (Menú)
1
Actualice la configuración de tamaño del menú TV. Pulse
(Menú)
2
Restaurar los valores predeterminados de fábrica. Pulse
(Menú)
del control remoto y seleccione
en el control remoto y seleccione
en el control remoto y seleccione
continuación, seleccione
Silencio
del control remoto activa y desactiva la
Seleccionar entrada
del menú TV
Imagen
.
Menu
Ta m añ o
.
Menu
Configuración
Reinicio de fábrica
.
y, a
Solución de problemas de la pantalla de TV LCD 33
Page 94

www.dell.com | support.dell.com
Problema Solución posible
La pantalla muestra una o más líneas 1
Compruebe la configuración de proporción en el menú TV. Pulse
el botón
Menú
obtener más información acerca de la utilización del menú TV,
consulte"Utilización del menú TV" en la página 23.
2
Asegúrese de que se ha seleccionado la fuente adecuada en el
menú
Seleccionar entrada
entrada" en la página 24 para obtener más información.
3
Pruebe conectando un dispositivo diferente. Asegúrese de haber
conectado los cables correctamente y actualizar la fuente de
entrada del TV.
4
Actualice la configuración de tamaño del menú TV. Pulse
en el control remoto y seleccione
(Menú)
5
Restaurar los valores predeterminados de fábrica. Pulse
en el control remoto y seleccione
(Menú)
continuación, seleccione
Los botones del panel lateral no
funcionan.
Revise el menú TV para ver si están bloqueados. Pulse el botón
Menu (Menú) del control remoto y seleccione Configuración.
Utilice los botones del panel lateral para desbloquear el menú TV
y los botones:
1
Pulse el botón Menu (Menú).
Aparecerá un mensaje indicando que el menú TV y los paneles
laterales están bloqueados.
2
Con el mensaje en la pantalla, pulse simultáneamente el botón
de subir volumen y subir canal del panel lateral.
Aparecerá un mensaje indicando que el menú TV y los paneles
laterales están desbloqueados.
La imagen aparece demasiado pequeña. 1
Ajuste la configuración de tamaño. Pulse
control remoto y seleccione
2
Este puede ser un problema de uno de los dispositivos. Consulte
la documentación del dispositivo.
del control remoto y seleccione
. Consulte "Menú Seleccionar
Ta m añ o
Configuración
Reinicio de fábrica
.
Menu (Menú)
Ta m a ño
.
Ta m a ño
.
. Para
Menu
Menu
y, a
en el
34 Solución de problemas de la pantalla de TV LCD
Page 95

Mensajes del menú TV
Mientras usa la pantalla de TV LCD, pueden aparecer los siguientes mensajes.
Mensaje Solución posible
Botón de ajuste No es necesaria ninguna acción, la pantalla de TV LCD está
realizando un ajuste automático.
Fuera de rango Compruebe la configuración de resolución óptima.
Puede ser necesario descargar un nuevo controlador de vídeo.
Para obtener más información, vaya a support.dell.com.
No hay entrada de vídeo 1
Bloqueo de botones de la TV Para desbloquear los botones, pulse el botón Menu (Menú) del
En el modo de ahorro de energía
Pulse cualquier tecla del teclado o
mueva el ratón
En el modo de ahorro de energía
Compruebe la señal de vídeo
Comprobación automática Aparecerá para la fuente de ordenador cuando no haya nada
Compruebe que todos los cables están bien conectados.
2
Asegúrese de que se ha seleccionado la fuente adecuada en el
menú
Seleccionar entrada
entrada" en la página 24 para obtener más información.
control remoto y seleccione Configuración.
Utilice los botones del panel lateral para desbloquear el menú TV
y los botones:
1
Pulse el botón Menu (Menú).
Aparecerá un mensaje indicando que el menú TV y los paneles
laterales están bloqueados.
2
Con el mensaje en la pantalla, pulse simultáneamente el botón
de subir volumen y subir canal del panel lateral.
Aparecerá un mensaje indicando que el menú TV y los paneles
laterales están desbloqueados.
Si tiene un ordenador conectado a la pantalla de TV LCD y no se
detecta ninguna señal, la pantalla de TV LCD entrará en el
modo suspendido. La luz de encendido se iluminará en ámbar y
la pantalla de TV LCD entrará en el modo suspendido.
Pulse cualquier tecla del teclado o mueva el ratón para activar la
pantalla de TV LCD .
Si está utilizando un dispositivo de vídeo y ha permanecido
inactivo durante 30 minutos la pantalla de TV LCD entrará en el
modo de ahorro de energía. La luz de encendido se iluminará en
ámbar cuando la pantalla de TV LCD entre en el modo de ahorro
de energía.
conectado. Seleccione VGA o DVI en el menú Input Select
(Seleccionar entrada) sin nada conectado y conecte el ordenador
en el conector VGA o DVI.
. Consulte "Menú Seleccionar
Solución de problemas de la pantalla de TV LCD 35
Page 96

www.dell.com | support.dell.com
Problemas con el control remoto
Problema Solución posible
La pantalla de TV LCD no responde al
utilizar el control remoto
1
Apunte con el control remoto directamente a la esquina inferior
derecha de la pantalla de TV LCD. Asegúrese de que no hay
nada bloqueando la parte frontal de la pantalla de TV LCD.
Para conocer la ubicación del sensor de IR, consulte "Vista
frontal" en la página 5.
2
Verifique que las baterías están instaladas correctamente.
3
Si las baterías son antiguas, instale unas nuevas.
NOTA: Las luces potentes y otros dispositivos infrarrojos pueden
interferir con el control remoto y el sensor de IR de la pantalla de
TV LCD.
Utilización de la función Comprobación automática cuando
la pantalla de TV LCD está conectada al ordenador
Cuando el PC está conectado a la pantalla de TV LCD a través de un conector DVI o VGA, puede
utilizar la función de comprobación automática para comprobar si la pantalla de TV LCD funciona
correctamente. Si la pantalla de TV LCD y el PC están conectados correctamente pero la pantalla
permanece oscura, realice la comprobación automática de la pantalla de TV LCD realizando estos
pasos:
1
Apague el PC y la pantalla de TV LCD.
2
Desenchufe el cable de vídeo de la parte trasera del PC.
3
Encienda la pantalla de TV LCD.
Si la pantalla de TV LCD no detecta ninguna señal de video y funciona correctamente,
aparecerá el cuadro de diálogo flotante “Comprobación automática Dell” en la pantalla
(contra un fondo negro).
Mientras se encuentre en el modo de autocomprobación, la luz de encendido permanecerá de
color azul y el patrón de autocomprobación recorrerá continuamente la pantalla. Este cuadro
aparece durante el funcionamiento normal del sistema si el cable de vídeo se desconecta o
está dañado.
4
Apague la pantalla de TV LCD y vuelva a conectar el cable de vídeo; a continuación, encienda
el equipo y la pantalla. Si la pantalla de TV LCD permanece vacía, el problema puede
encontrarse en la tarjeta gráfica del PC.
Consulte la documentación del PC para obtener más información.
36 Solución de problemas de la pantalla de TV LCD
Page 97

Problemas al utilizar la pantalla de TV LCD como un monitor
NOTA: Solamente puede conectar el PC a la pantalla de TV LCD utilizando el conector VGA.
Problema Solución posible
La imagen aparece descentrada
o demasiado pequeña
No hay sonido
No hay vídeo NOTA: Si ve una pantalla de comprobación automática, significa que hay
1
Utilice la función
de imagen
Configuración de imagen
automático
2
Compruebe la configuración de resolución óptima.
Ajuste automático
. Pulse
Menu (Menú)
.
para comprobar la
Configuración
para entrar en el menú TV, seleccione
y, a continuación, seleccione
Ajuste
Puede ser necesario descargar un nuevo controlador de vídeo. Para
obtener más información, vaya a
support.dell.com
.
NOTA: Algunas tarjetas de video antiguas podrían no admitir la
configuración de resolución de la pantalla de TV LCD.
1
Asegúrese de que el cable verde de audio está conectado en un conector
de sonido de la pantalla de TV LCD y al PC. Para conocer la ubicación
del conector de la pantalla de TV LCD, consulte "Utilización del
conector VGA" en la página 18. Consulte la documentación del PC para
conocer la ubicación de los conectores del equipo.
No utilice el cable de audio de los auriculares.
2
Asegúrese de que el sonido del PC no está desactivado.
3
Verfique que el sonido del PC funciona comprobando los altavoces.
Consulte la documentación del PC para obtener información acerca de
la solución de problemas del PC.
4
Desconecte la pantalla de TV LCD del equipo y compruebe que
funciona el volumen de la pantalla.
algún problema con la tarjeta de vídeo o que está utilizando una fuente de
entrada incorrecta.
1
Asegúrese de que la pantalla de TV LCD está encendida.
2
Verifique que todos los cables están bien conectados a la pantalla de TV
LCD, incluyendo el cable de alimentación.
3
Compruebe si aparece una luz azul o ámbar en la esquina inferior
derecha -de la pantalla de TV LCD. Una luz azul indica que la pantalla
de TV LCD está encendida. Una luz ámbar indica que la pantalla de TV
LCD se encuentra en el modo de ahorro de energía.
4
Asegúrese de que se ha seleccionado
Consulte "Menú Seleccionar entrada" en la página 24 para obtener más
información.
5
Vuelva a conectar el PC.
6
Conecte otro dispositivo que esté seguro que funciona correctamente.
7
Restaurar los valores predeterminados de fábrica. Pulse
en el control remoto y seleccione
seleccione
Reinicio de fábrica
VGA
en el menú
Configuración
.
Seleccionar entrada
Menu (Menú)
y, a continuación,
.
Solución de problemas de la pantalla de TV LCD 37
Page 98

www.dell.com | support.dell.com
6
Especificaciones de la pantalla de TV LCD
General
Número de modelo W2306C LCD TV display
Tipo de pantalla LCD TFT COLOR Premium
Tamaño de pantalla Panel de 23 pulgadas (Tamaño de imagen visible
de 23 pulgadas)
Zona visible 508.13
Proporción de imagen Pantalla ancha
Brillo (típico) 450 nits (típico)
Proporción de contraste 550:1 (típica)
Tiempo de respuesta 16ms (típica)
Capacidad de visualización de vídeo 480i
Funciones adicionales:
Capacidad SAP
Capacidad CC
Capacidad de teletexto
Capacidad de control paterno
x
285,70 mm
x
(20,00 pulgadas
Resolución 16:9
Proporción 16:9
480p
720p
1080i
576i (cuando esté disponible)
576p (cuando esté disponible)
Sí
Sí
(donde esté disponible)
Sí
Sí
11,25 pulgadas)
38 Especificaciones de la pantalla de TV LCD
Page 99

Dimensiones físicas
Pantalla (con base) 438 x 722 x 177 mm
17.2" x 28.4" x 7"
Pantalla (sin base) 365 x 722 x 98 mm
Con altavoces No desmontables
Peso (con base) 10 kg/22.05 lbs (est)
Inclinación -5/+20 grados
Rotación +/- 45 grados
Resolución nativa 1366 x 768 (WXGA)
Capacidad HDTV No
Sintonizador
Número de sintonizadores uno analógico
Ángulo de visión
Horizontal +/-85 grados
Vertical +/-85 grados
Entradas
Vídeo
Compuesto (CVBS)
S-Vídeo
Componente
Entrada de TV (coaxial)
Audio (I+D)
DVI (para utilizar con un dispositivo de audio)
Ordenador
VGA (para utilizar como monitor de PC)
DVI (para utilizar como monitor de PC)
Audio (PC)
uno (lateral)
uno (lateral)
dos (parte inferior)
una (parte inferior)
cuatro pares
una (parte inferior)
una (parte inferior)
una (parte inferior)
una (parte inferior)
Especificaciones de la pantalla de TV LCD 39
Page 100

www.dell.com | support.dell.com
Salidas
Vídeo
Compuesto (CVBS)
Audio (I+D)
Auricular
una (parte inferior)
un par
uno (lateral)
Audio
Efectos SRS TruSurround XT
Modo Medianoche
Altavoces (integrados) 7 vatios/canal
7+7 vatios en total
40 Especificaciones de la pantalla de TV LCD
 Loading...