

Page 1

Dell™ W2300 LCD TV User's Guide
Preface
Safety Instructions
Introduction
Setup
Using the LCD TV
Troubleshooting
Specifications
Regulatory Notices
Dell Contact Information
Limited Warranties
Documentation
Information in this document is subject to change without notice.
© 2003 Dell Inc. All rights reserved.
Reproduction in any manner whatsoever without the written permission of Dell Inc. is strictly forbidden.
Trademarks used in this text: Dell and the DELL logo are trademarks of Dell Inc.; Microsoft, Windows, and Windows NT are
registered trademarks of Microsoft Corporation; VESA is a registered trademark of Video Electronics Standards Association; IBM is
a registered trademark of International Business Machines Corporation; Adobe is a trademark of Adobe Systems Incorporated,
which may be registered in certain jurisdictions. As an
ENERGY STAR guidelines for energy efficiency.
the
Other trademarks and trade names may be used in this document to refer to either the entities claiming the marks and names or
their products. Dell Inc. disclaims any proprietary interest in trademarks and trade names other than its own.
Initial release: November, 2003
ENERGY STAR Partner, Dell Inc. has determined that this product meets
Page 2

Back to Contents Page
Preface: Dell™ W2300 LCD TV User's Guide
About This Guide • Notational Conventions
About This Guide
This guide is intended for anyone who uses the Dell™ W2300 LCD TV. It describes the product features, setup, and operation.
The sections are as follows:
Safety Instructions lists safety information.
Introduction gives an overview of the LCD TV's features and provides an orientation to the LCD TV.
Setup describes the initial setup process.
Using the LCD TV gives an overview of how to use the LCD TV.
Troubleshooting provides tips and solutions for common problems.
Specifications lists the technical specifications of the LCD TV.
Regulatory lists regulatory certifications and notices.
Dell Contact Information provides Dell Service support information.
Limited Warranty describes the warranty information for this product.
Documentation provides additional documentation that supports this product.
Notational Conventions
The following subsections describe notational conventions used in this document.
Notes, Notices, and Cautions
Throughout this guide, blocks of text may be accompanied by an icon and printed in bold type or in italic type. These blocks are notes,
notices, and cuations, and they are used as follows:
NOTE: A NOTE indicates important information that helps you make better use of your computer.
NOTICE: A NOTICE indicates either potential damage to hardware or loss of data and tells you how to avoid the problem.
CAUTION: A CAUTION indicates a potential for property damage, personal injury, or death.
Some cautions may appear in alternate formats and may be unaccompanied by an icon. In such cases, the specific presentation of the
warning is mandated by regulatory authority.
Back to Contents Page
Page 3

Safety Instructions: Dell™ W2300 LCD TV User's Guide
Caution: Use of controls, adjustments, or procedures other than those specified in this documentation may result
in exposure to shock, electrical hazards, and/or mechanical hazards.
Read and follow these instructions when connecting and using your LCD TV:
To help avoid damaging your computer, be sure that the voltage selection switch on the power supply for the computer is
set to match the alternating current (AC) power available at your location:
115 volts (V)/60 hertz (Hz) in most of North and South America and some Far Eastern countries such as Japan,
South Korea (also 220 volts (V)/60 hertz (Hz)), and Taiwan.
230 volts (V)/50 hertz (Hz) in most of Europe, the Middle East, and the Far East.
Always be sure that your LCD TV is electrically rated to operate with the AC power available in your location.
Note: This LCD TV does not need or have a voltage selection switch for setting the AC voltage according to the
ranges defined in the Electrical for PC section in the Specifications page.
Never insert anything metallic into the LCD TV openings. Doing so may create the danger of electric shock.
To avoid electric shock, never touch the inside of the LCD TV. Only a qualified technician should open the LCD TV case.
Never use your LCD TV if the power cable has been damaged. Do not allow anything to rest on the power cable. Keep the
power cable away from where people could trip over it.
Be sure to grasp the plug, not the cable, when disconnecting the LCD TV from an electric socket.
Do not defeat the safety purpose of the polarized or grounding- type plug. A polarized plug has two blades with one wider
than the other. A grounding type plug
has two blades and third grounding prong. The wide blade or third prong are provided for your safety. When the provided
plug does not fit into your outlet, consult
an electrician for replacement of the obsolete outlet.
Openings in the LCD TV cabinet are provided for ventilation. To prevent overheating, these openings should not be blocked
or covered. Avoid using the LCD TV on a bed, sofa, rug, or other soft surface, as doing so may block the ventilation
openings in the bottom of the cabinet. If you place the LCD TV in a bookcase or an enclosed space, be sure to provide
adequate ventilation and air flow.
Place your LCD TV in a location with low humidity and minimum dust. Avoid places similar to a damp basement or dusty
hallway.
Do not expose the LCD TV to rain or use it near water (in kitchens, next to swimming pools, etc.). If the LCD TV accidentally
gets wet, unplug it and contact Dell immediately. You can clean the LCD TV with a damp cloth when necessary, being sure
to unplug the LCD TV first.
Place the LCD TV on a solid surface and treat it carefully. The screen is made of glass and can be damaged if dropped or
hit sharply. Use only with a cart, stand, tripod, bracket, or table capable to adequately support your LCD TV. When a cart is
used, use caution when moving the cart/ LCD TV combination to avoid injury from tip- over. Contact Dell for mounting
accessories.
Unplug this apparatus during lightning storms or when unused for long periods of time.
Locate your LCD TV near an easily accessible electric outlet.
If your LCD TV does not operate normally - in particular, if there are any unusual sounds or smells coming from it - unplug it
immediately and contact Dell.
Do not attempt to remove the back cover, as you will be exposed to an electrical shock hazard. The back cover should only
be removed by qualified service personnel.
High temperatures can cause problems. Don't use your LCD TV in direct sunlight, and keep it away from heaters, stoves,
fireplaces, and other sources of heat.
Unplug your LCD TV from the electric outlet before any service is performed.
Damage Requiring Service- The appliance should be serviced by qualified service personnel when:
A. The power supply cord or the plug has been damaged;or
B. Objects have fallen, or liquid has been spilled into the appliance;or
C. The appliance has been exposed to rain;or
D. The appliance does not appear to operate normally or exhibits a marked change in performance;or
E. The appliance has been dropped, or the enclosure damaged. Tilt/Stability-All televisions must comply
with recommended international global safety standards for tilt and stability properties of its cabinets design.
Page 4

Do not compromise these design standards by applying excessive pull force to the front, or top of the cabinet which could
ultimately overturn the product.
Do not place electronic equipment/toys on the top of the set. As such items could unsuspectingly fall from the top of the set
and cause product damage and/or personal injury.
Wall or Ceiling Mounting -The LCD TV should be mounted to a wall or ceiling only as recommended by the manufacturer.
Power Lines-An outdoor antenna should be located away from power lines.
Outdoor Antenna Grounding -If an outside antenna is connected to the receiver, be sure the antenna system is grounded
so as to provide some protection against voltage surges and built up static charges. Section 810 of the National Electric
Code. ANSI/NFPA No.70 -1984, provides information with respect to proper grounding of the mats and supporting structure
grounding of the lead-in wire to and antenna-discharge unit, size of grounding connectors, location of antenna-discharge
unit, connection to grounding electrodes and requirements for the grounding electrode. See Figure below.
Refer to limited warranty section of your user guide for service of your LCD TV. Servicing is required when the LCD TV has
been damaged in any way, such as power -supply cord or plug is damaged, liquid has been spilled or objects have fallen into
LCD TV the LCD TV has been exposed to rain or moisture, does not operate normally, or has been dropped.
Note to the CATV system installer: This reminder is provided to call the CATV system installer's attention to
Article 820 -40 of the NEC that provides guidelines for proper grounding and, in particular, specifies that the cable
ground shall be connected to the grounding system fo the building, as close to the point of cable entry as
practical.
Page 5

Back to Contents Page
Introduction: Dell™ W2300 LCD TV User's Guide
Overview • Graphics
Overview
Thank you for purchasing the Dell W2300 23 -inch wide LCD TV. Utilizing an Active Matrix TFT LCD, the Dell LCD TV display
sharp and brilliant images of text and graphics with a maximum resolution up to 1280 x 768 pixels. This Dell LCD TV was designed
to accommodate a wide variety of uses from a TV entertainment system with capabilities to display TV broadcast standards and
HDTV formats to a performance PC Monitor for use in the home, small office, or large corporate environment. This LCD TV can be
used as a stand alone TV, or as a dual function TV/Monitor with complete TV and PC system capabilities including word
processing, e-mail, spreadsheets, and Internet browsing.
For more details see
Specifications Section.
Graphics
The following links show various views of the LCD TV and its components.
Front View
Back View
Side View
Bottom View
Back to Contents Page
Page 6

Setup: Dell™ W2300 LCD TV User's Guide
LCD TV Height Adjustable Stand (HAS)
Connection to your LCD TV
Proper location of your LCD TV
Maintenance
Page 7

Back to Contents Page
Using the LCD TV: Dell™ W2300 LCD TV User's Guide
Setting the Optimal Resolution
Controls and Indicators
Remote Controls
Back to Contents Page
Page 8
Troubleshooting: Dell™ W2300 LCD TV User's Guide
Troubleshooting PC Display Problems • OSD warning message • Common Problems • TV and Audio Problems • Remote Control Problems • Product Specific
Problems
Troubleshooting PC Display Problems
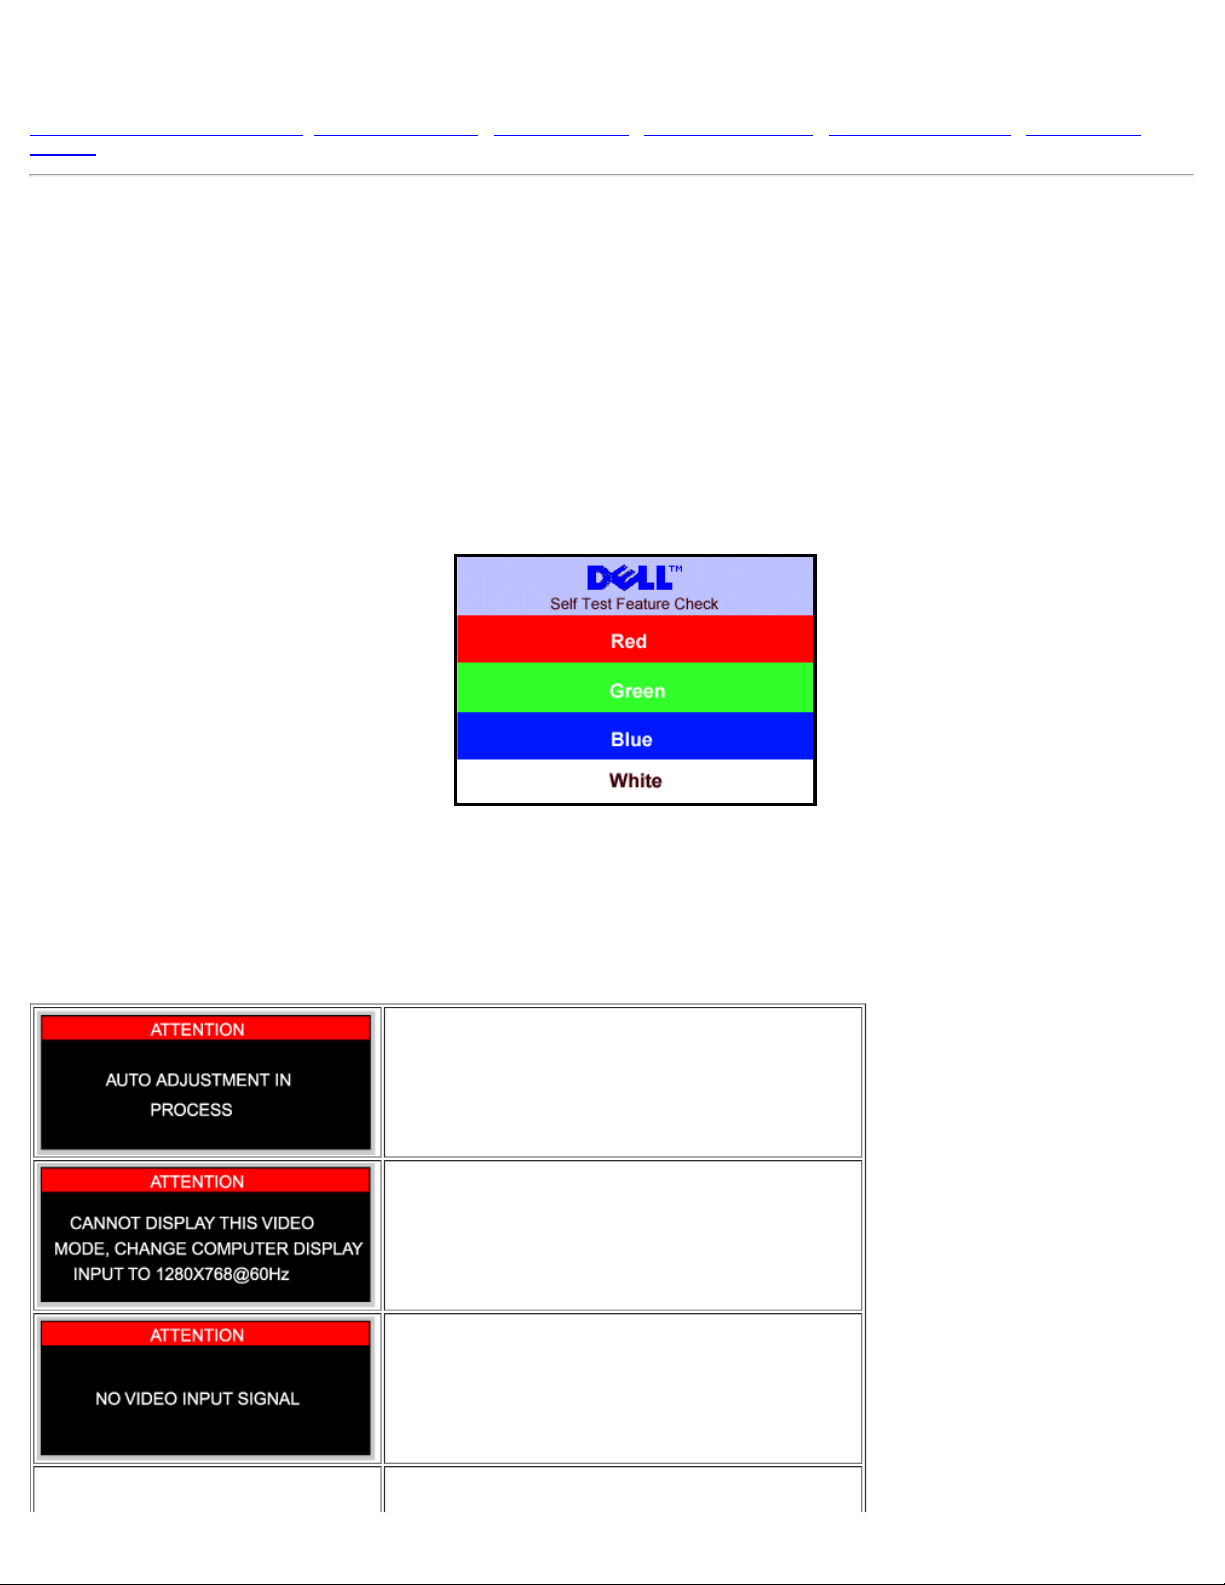
Self-Test Feature Check (STFC)
Your LCD TV when used as a computer display through DVI and/or VGA connection provides a self-test feature that allows you to check whether your LCD TV is
functioning properly. If your LCD TV and computer are properly connected but the LCD TV screen remains dark, run the LCD TV self-test by performing the
following steps:
1. Turn off both your computer and the LCD TV.
2. Unplug the video cable from the back of the computer. To ensure proper Self-Test operation, remove both Digital(white connector) and the Analog(blue
connector) cables from the back of computer.
3. Turn on the LCD TV.
The floating 'Dell - self-test Feature Check' dialog box should appear on-screen (against a black background) if the LCD TV cannot sense a
video signal and is working correctly. While in self- test mode, the power LED remains green and the self- test pattern will scroll through the
screen continually.
This box also appears during normal system operation if the video cable becomes disconnected or damaged.
4. Turn off your LCD TV and reconnect the video cable; then turn on both your computer and the LCD TV.If your LCD TV screen remains blank after you use
the previous procedure, check your video controller and computer system; your LCD TV is functioning properly.
OSD Warning Messages
A warning message may appear on the screen indicating LCD TV current status.
When user see this warning message, it means that the LCD TV
is in adjustment process.
A warning message may appear on the screen indicating that the
LCD TV is out of sync range.
See Specifications for the Horizontal and Vertical frequency
ranges addressable by this LCD TV. Recommended mode is
1280x 768 @ 60Hz.
This message means that there is no video input signal.
Page 9
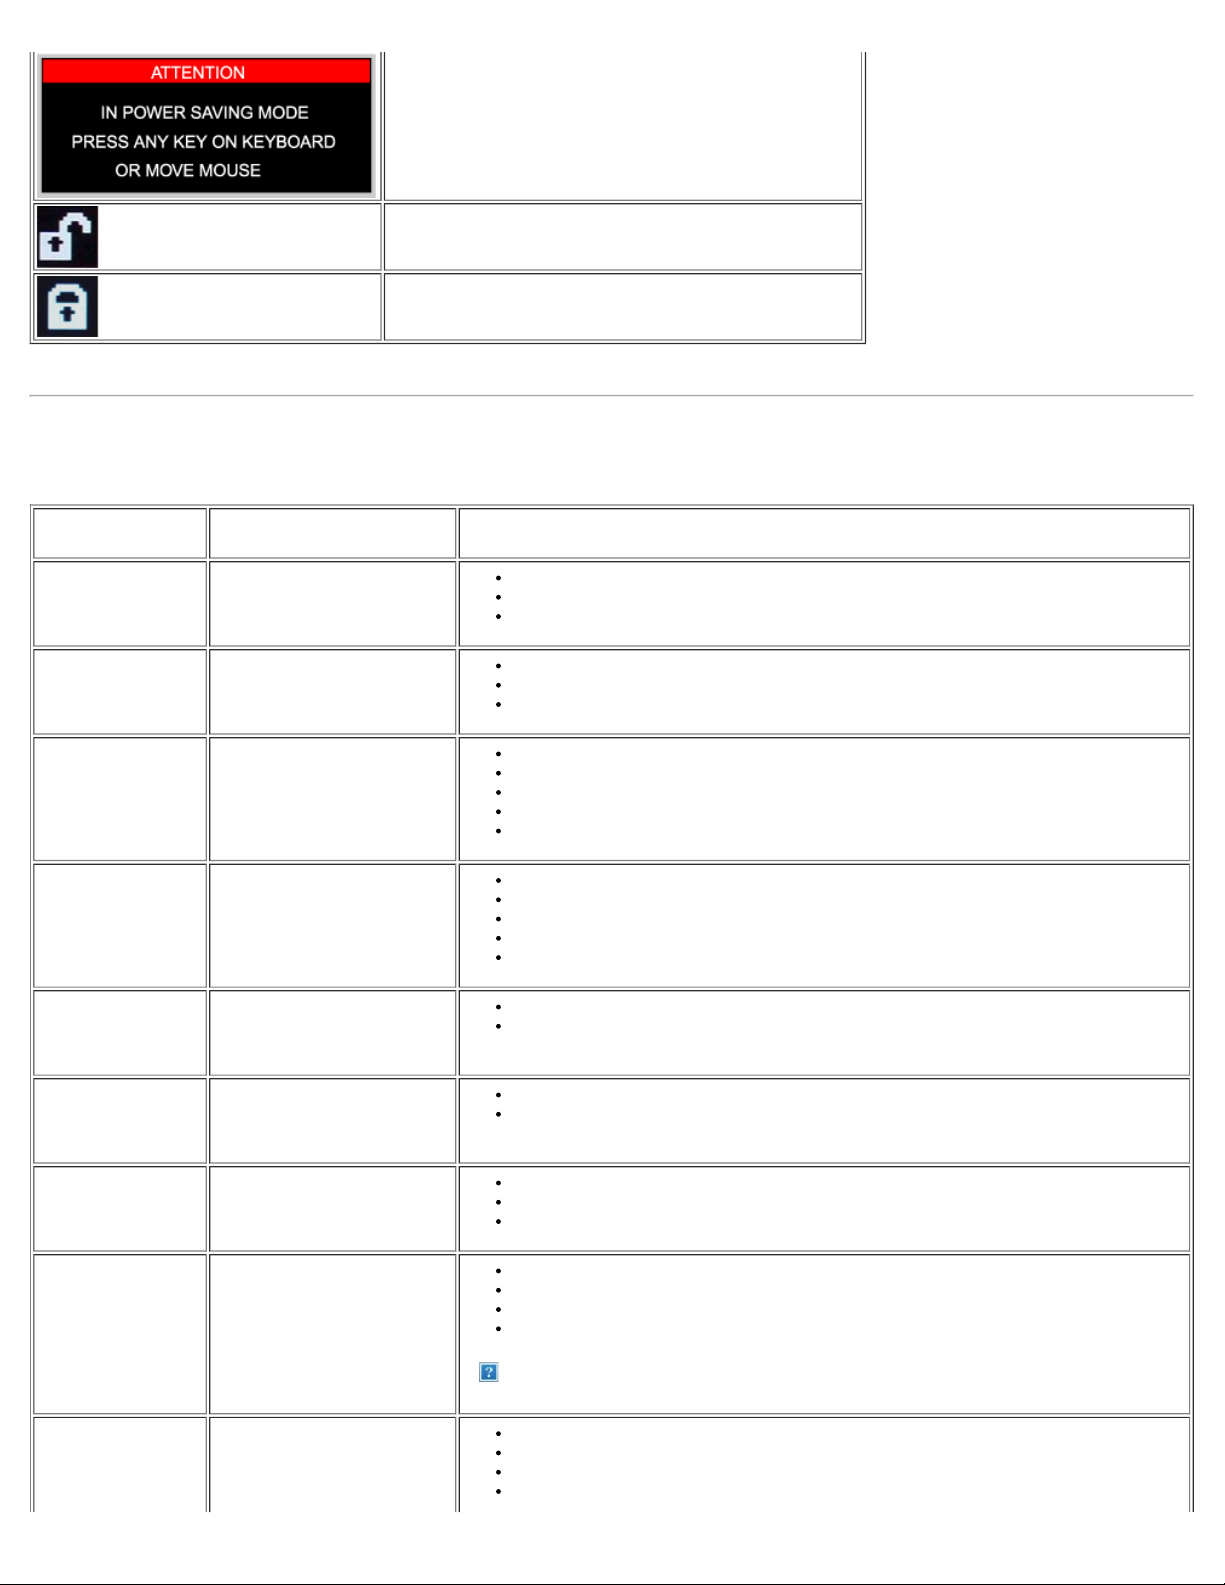
LCD TV is in a power save mode (in PC mode).
The main OSD menu is unlocked.
The main OSD menu is locked.
Common Problems
The following table contains general information about common LCD TV problems you might encounter.
COMMON
SYMPTOMS
No Video/ Power LED
off
No Video/ Power LEDonNo picture or no brightness
Poor Focus Picture is fuzzy, blurry or
Shaky/Jittery Video Wavy picture or fine movement
Missing Pixels LCD screen has spots
Stuck- on Pixels LCD screen has bright spots
WHAT YOU EXPERIENCE POSSIBLE SOLUTIONS
No picture, LCD TV is dead
ghosting
Check connection integrity at both ends of the video cable
Electric outlet verification
Ensure power button depressed fully
Increase brightness & contrast controls
Perform LCD TV self-test feature check
Check for bent or broken pins
Push Auto adjust button
Adjust Phase and Clock controls via OSD
Eliminate video extension cables
Perform LCD TV reset
Lower video resolution or increase font size
Push Auto Adjust button
Adjust Phase and Clock controls via OSD
Perform LCD TV reset
Check environmental factors
Relocate and test in other room
Cycle power on-off
These are pixels that are permanently off and is a natural defect that occurs in LCD
technology
Cycle power on-off
These are pixels that are permanently on and is a natural defect that occurs in LCD
technology
Brightness Problems Picture too dim or too bright
Geometric Distortion Screen not centered correctly
Horizontal/Vertical
Lines
Screen has one or more lines
Perform LCD TV reset
Push Auto Adjust button
Adjust brightness & contrast controls
Perform LCD TV reset on "Position Settings Only"
Push auto-adjust button
Adjust the centering controls
Ensure LCD TV is in proper video mode
Note: When operating in DVI mode, the positioning adjustments are not available.
Perform LCD TV reset
Push Auto Adjust button
Adjust Phase and Clock controls via OSD
Perform LCD TV self-test feature check and determine if these lines are also in self- test mode
Page 10
Check for bent or broken pins
Note: When operating in DVI mode, the Pixel Clock and Phase adjustments are not
available.
Sync Problems Screen is scrambled or appears
torn
LCD Scratched Screen has scratches or
smudges
Safety Related Issues Visible signs of smoke or sparks
Intermittent Problems LCD TV malfunctions on & off
Perform LCD TV reset
Push Auto Adjust button
Adjust Phase and Clock controls via OSD
Perform LCD TV self-test feature check to determine if scrambled screen appears in self -test
mode
Check for bent or broken pins
Boot up in the "safe mode"
Turn LCD TV off and clean the screen
Do not perform any troubleshooting steps
LCD TV needs to be replaced
Ensure LCD TV is in proper video mode
Ensure video cable connection to computer and to the flat panel is secure
Perform LCD TV reset
Perform LCD TV self-test feature check to determine if the intermittent problem occurs in selftest mode
TV and Audio Problems
COMMON SYMPTOMS WHAT YOU EXPERIENCE POSSIBLE SOLUTIONS
The proximity of mountains or high buildings may be responsible for ghost pictures, echoing or
shadows. In this case, try manually adjusting your pictures: see 'fine tuning' or adjust the
Poor TV signal
reception
Abnormal picture seen from the
screen
direction of the outside aerial.
For Asia users in non-NTSC area: Does your antenna enable you to receive broadcasts in
this frequency range (UHF or VHF band)? In the event of difficult reception (snowy pictures)
switch the NR on the PICTURE menu to ON.
Have you connected the aerial socket properly? Have you chosen the right system? Poorly
No TV picture
No sound
No picture when TV input was
selected
No sound output when a
program with sound was playing
connected SCART cables or aerial sockets are often the cause of picture or sound problems
(sometimes the connectors can become half disconnected if the LCD TV set is moved or
turned). Check all connections.
Ensure that the audio cables are firmly connected to both the audio input connectors on your
LCD TV and audio output connectors on your PC or Video player.
If on certain TV channels you receive a picture but no sound, this means that you do not
have the correct TV system. Modify the SYSTEM setting.
Video Problems
COMMON SYMPTOMS WHAT YOU EXPERIENCE POSSIBLE SOLUTIONS
Check Video Input Selection
No Video No signal indicator is displayed.
Low Quality DVD
playback
Picture not crisp and some color
distortion
Composite: Yellow colored RCA jack
S-Video: Typically a round 4 pin jack
Component: Typically 3 RCA jacks of Green, Red and Blue.
Check DVD connection
Composite gives good picture
S-Video gives better picture
Component gives best picture
Check if TV volume is turn off of muted
Page 11
No sound See video but no audio
Connect the audio cable securely
Remote Control Problems
Audio cable is connected incorrectly
Verify that the audio source is selected correctly in the OSD
REMOTE CONTROL
PROBLEMS
Remote control does
not work properly
WHAT YOU EXPERIENCE POSSIBLE SOLUTIONS
No response from LCD TV when
remote is pressed
Product Specific Problems
SPECIFIC
SYMPTOMS
Screen image is too
small
Cannot adjust the LCD
TV with the buttons on
the front panel
WHAT YOU SEE POSSIBLE SOLUTIONS
Image is centered on screen, but
does not fill entire viewing area
OSD does not appear on the
screen
Point the remote control directly at the remote sensor on the LCD TV
Replace both batteries with new ones
Perform LCD TV reset on "All Settings"
Turn the LCD TV off and unplug the power cord and then plug back and power on
Page 12

Back to Contents Page
Specifications: Dell™ W2300 LCD TV User's Guide
General • Flat Panel • Resolution • PC Display Modes • TV Display Modes • HDTV Display Modes • SDTV • Electrical • Physical
Characteristics • Environmental • Power Management Modes • TV and Video Power Management Modes • Pin Assignments • Plug
and Play Capability
General
Model number W2300 LCD TV
Flat Panel
Screen dimensions
Screen type Active matrix - TFT LCD
Screen dimensions 23 inches (23-inch viewable image size)
Preset display area:
Horizontal 501.12± 3 mm (20.04 inches ± 0.12 inches)
Vertical 300.67± 3 mm (12.03 inches ± 0.12 inches)
Pixel pitch 0.3915 mm
Viewing angle +/- 88° (vertical) typ, +/ - 88° (horizontal) typ
Luminance output 450 CD/m ²(typ)
Contrast ratio 400 to 1 (typ)
Faceplate coating Anti-glare
Backlight CCFL (12)
Panel Weight 2.7 Kg/ 5.95lbs
Resolution
Horizontal scan range 30 kHz to 61kHz (automatic)
Vertical scan range 56 Hz to 75 Hz (automatic)
Optimal preset resolution 1280 x 768 at 60 Hz
Highest addressable
resolution
* Addressable means the LCD TV will sync up to this mode.
However, Dell does not guarantee the image will be sized, shaped and centered correctly.
1280 x 768 at 75 Hz
PC Display Modes
Page 13
Display Mode Horizontal
Frequency (kHz)
VGA, 720x 400 31.469 70.087 28.3 -/+
VGA, 640x 480 31.469 59.940 25.2 -/VESA, 640 x 480 37.500 75.000 31.5 -/VESA, 800 x 600 37.879 60.317 40.0 +/+
VESA, 800 x 600 46.875 75.000 49.5 +/+
VESA, 1024 x 768 48.363 60.004 65.0 -/VESA, 1024 x 768 60.023 75.029 78.8 +/+
VESA, 1280 x 768 47.776 59.870 79.5 -/+
VESA, 1280 x 768 60.289 74.893 102.25 -/+
VESA, 1280 x 768 47.396 59.995 68.25 +/-
Vertical Frequency
(Hz)
Pixel Clock
(MHz)
Sync Polarity
(Horizontal/Vertical)
TV Display Modes
Americas model
AIR CH CATV CH
Band Assignment
CH Video Carrier (MHz) CH
VHF LOW 02-06 55.25-83.25 02-15 55.25-127.25
VHF HIGH 07-13 175.25-211.25 16-44 133.25-343.25
UHF 14-69 471.25-801.25 45-125 349.25-799.25
Video Carrier (MHz)
STD
HDTV Display Modes
Display Mode Horizontal
Frequency (kHz)
1920 X 1080i 33.75 60 74.25 Interlace
1280 X 720P 45 60 74.25 Progressive
1920 X 1080i 28.125 50 74.25 Interlace
Vertical Frequency
(Hz)
Pixel Clock
(MHz)
Scan
1280 X 720P 37.5 50 74.25 Progressive
SDTV
Characteristics PAL NTSCM
Page 14
Lines per picture 625 frames 525 frames
Field frequency, nominal value 60 fields/s 59.94 fields/s
Nominal video bandwidth 5HMz 4.2 MHz
Norminal line period 64µs 63.5555µs
Line- blanking interval 12±0.3µs 10.9±0.2µs
Interval between time datum (0 H) and back edge of line-
blanking pulse
Front porch 1.5±0.3µs 1.27 to 2.22µs
Synchronizing pulse 4.7±0.2µs 4.7±0.1µs
Build-up time of the line blacking pulse 0.3±0.1µs =/< 0.48µs
Build-up time of the line synchronizing pulse 0.2±0.1µs =/< 0.25µs
Start of sub-carrier burst 5.6±0.1µs 5.3(4.71 to 5.71)µs
Duration of sub-carrier burst
10.5µs 9.2 to 10.3 µs
2.25±0.23 (10±1
cycles)µs
2.23±3.11 (9±1 cycles)µs
Electrical for PC
Video input signals Analog RGB, 0.7 Volts +/-5%, positive polarity at 75 ohm input impedance
Digital DVI -D TMDS, 600mV for each differential line, positive polarity at 50 ohm
input impedance
Synchronization input
signals
Separate horizontal and vertical synchronizations, polarity-free TTL level,
Composite
AC input voltage /
frequency
90 to 264 VAC / 50 or 60 Hz
+ 2Hz
Physical
Characteristics
Connector type 15-pin D-subminiature, blue connector; DVI-D, white connector
Signal cable type Analog: Detachable, D- sub, 15pin, shipped detached to the LCD TV
Digital: Detachable, DVI-D, Solid pins, shipped detached from the LCD TV
Dimensions: (without
packing)
Height 448.0 mm (17.63 inches)
Width 758.0 mm (29.84 inches)
Depth 265.5 mm (10.45 inches)
Weight (LCD TV only) 13.8 Kg (30.4 lbs)
Weight (with packaging) 18.7 Kg (41.21 lbs)
Page 15
Environmental
Temperature:
ON Active Always On 100W Green
Operating 0°C to 35°C (32°F to 95°F)
Nonoperating Storage: 0 to 60°C (32°F to 140°F)
Shipping: -20 to 60°C( -4°F to 140°F)
Humidity:
Operating 10% to 80% (noncondensing)
Nonoperating Storage: 5% to 90% (noncondensing)
Shipping: 5% to 90%(noncondensing)
Altitude:
Operating 3,657.6m (12,000 ft) max
Nonoperating 12,192 m (40,000 ft) max
Thermal dissipation 239BTU/hour (typical at PC model)
342 BTU/hour (typical at TV model))
Power Management Modes
If you have VESA's DPMS compliance display card or software installed in your PC, the LCD TV can automatically reduce its
power consumption when not in use. This is referred to as 'Power Save Mode'*. If input from keyboard, mouse or other input
devices is detected by the computer, the LCD TV will automatically "wake up". The following table shows the power consumption
and signaling of this automatic power saving feature:
PC display power management mode
Power Management Definition
VESA Modes Video H-sync V-sync Power Used LED color
ON Active Yes Yes 70W (typical) Green
OFF Blanked No No < 3 W Amber
NOTE: In Power Saving Mode, Press Any Key on Keyboard or Move Mouse.
Activate the computer and 'wake up' the LCD TV to gain access to the
OSD.
TV and Video Power Management Modes
Power management Definition
Display Video Power State Power
Used
LED color
Page 16
(typical)
Stand by Blanked Off after 30minutes of no signal < 3W Amber
Power switch off Active/Blanked Off < 1W OFF
This monitor is
* Zero power consumption in OFF mode can only be achieved by disconnecting the main cable from the monitor.
ENERGY STAR® - compliant as well as TCO '99 power management compatible.
ENERGY STAR® is a U.S. registered mark. As an ENERGY STAR® Partner, DELL has determined that this product meets the
ENERGY STAR® guidelines for energy efficiency.
NOTE: This LCD TV automatically returns to normal operation when horizontal and vertical sync return, which occurs when
you move the computer's mouse or press a key on the keyboard.
Pin Assignments
15-pin D-Sub connector:
Pin Number LCD TV Side of the 15 -Pin Side Signal Cable
1 Red
2 Green
3 Blue
4 GND
5 Self test
6 Red GND
7 Green GND
8 Blue GND
9 +5V (supply form PC)
10 Sync GND
11 GND
Page 17
12 Bi -directional data (SDA)
13 H. Sync
14 V. Sync (vclk)
15 Data clock (SCL)
24 pin digital-only DVI cable:
Note: Pin 1 is at the top right.
Pin Signal Assignment Pin Signal Assignment Pin Signal Assignment
1 T.M.D.S. Data 2 - 9 T.M.D.S. Data 1 - 17 T.M.D.S. Data 02 T.M.D.S. Data 2+ 10 T.M.D.S. Data 1+ 18 T.M.D.S. Data 0+
3 T.M.D.S. Data 2 Shield 11 T.M.D.S. Data 1 Shield 19 T.M.D.S. Data 0 Shield
4 No Pin 12 No Pin 20 No Pin
5 No Pin 13 No Pin 21 No Pin
6 DDC Clock 14 +5V Power 22 T.M.D.S. Clock Shield
7 DDC Data 15 Self test 23 T.M.D.S. Clock +
8 No Connect 16 Hot Plug Detect 24 T.M.D.S. Clock -
Plug and Play Capability
You can install the LCD TV in any Plug and Play - compatible system. The LCD TV automatically provides the computer system
with its Extended Display Identification Data (EDID) using Display Data Channel (DDC) protocols so the system can configure itself
and optimize the LCD TV settings.
Back to Contents Page
Page 18

Regulatory: Dell™ W2300 LCD TV User's Guide
Energy Efficiency • Federal Communications Commission (FCC) Notice (U.S. Only) • Canadian Regulatory Information (Canada
Only) • MIC Notice (Republic of Korea Only) • NOM Information (Mexico Only) • Regulatory Listing
Energy Efficiency
The proper operation of the function requires a computer with VESA® DPMS power management capabilities.
When used with a computer equipped with VESA® DPMS, the monitor is
ENERGY STAR® Partner, Dell Computer Corporation has determined that this product meets the
As an
ENERGY STAR® guidelines for energy efficiency.
Federal Communications Commission (FCC) Notice (U.S. Only)
Caution: This equipment has been tested and found to comply with the limits for a Class B digital device, pursuant
to Part 15 of the FCC Rules. These limits are designed to provide reasonable protection against harmful interference in a
residential installation. This equipment generates, uses, and can radiate radio frequency energy and, if not installed and
used in accordance with the instructions, may cause harmful interference to radio communications. However, there is no
guarantee that interference will not occur in a particular installation. If this equipment does cause harmful interference to
radio or television reception, which can be determined by turning the equipment off and on, the user is encouraged to try
to correct the interference by one or more of the following measures:
ENERGY STAR®-compliant.
Reorient or relocate receiving antenna.
Increase the separation between the equipment and receiver.
Connect the equipment into an outlet on a circuit different from that to which the receiver is connected.
Consult the dealer or an experienced radio/TV technician for help.
This device complies with Part 15 of the FCC rules. Operation is subject to the following two conditions:
This device may not cause harmful interference.
This device must accept any interference received including interference that may cause undesired operation.
Instructions to Users: This equipment complies with the requirements of FCC (Federal Communication Commission) equipment
provided that following conditions are met.
1. Power cable: Shielded power cable should be used.
2. Video inputs: The input signal amplitude must not exceed the specified level.
Notice: Changes or modifications not expressly approved by the party responsible for compliance could void the
user's authority to operate the equipment.
Canadian Regulatory Information (Canada Only)
This digital apparatus does not exceed the Class B limits for radio noise emissions from digital apparatus set out in the Radio
Interference Regulations of the Canadian Department of Communications.
Note that Canadian Department of Communications (DOC) regulations provide, that changes or modifications not expressly
approved by Dell Computer Corporation could void your authority to operate this equipment.
This Class B digital apparatus meets all requirements of the Canadian Interference - Causing Equipment Regulations.
Page 19

Cet appareil numérique de la classe B respecte toutes les exigencesdu Règlement sur le matériel brouilleur du Canada.
NOM Information (Mexico Only)
The following information is provided on the device(s) described in this document in compliance with the requirements of the official
Mexican standards (NOM):
Dell Computer Corporation
Exporter:
Importer:
Ship to:
Supply voltage: 90- 264 VAC
Frequency: 50- 60 Hz
Current consumption: 1.6-0.8A
One Dell Way
Round Rock, TX 78682
Dell Computer de México,
S.A. de C.V. Rio Lerma No. 302 - 4º Piso
Col. Cuauhtemoc 16500 México, D.F.
Dell Computer de México,
S.A. de C.V. al Cuidado de Kuehne & Nagel
de México S. de R.I., Avenida Soles No. 55
Col. Peñon de los Baños, 15520 México, D.F.
Información para NOM (únicamente para México)
La información siguiente se proporciona en el dispositivo o en los dispositivos descritos en este documento, en cumplimiento con
los requisitos de la Norma Oficial Mexicana (NOM):
Dell Computer Corporation
Exporter:
Importador:
Embarcar a:
Tensión alimentación: 90- 264 VAC
Frecuencia: 50-60 Hz
Consumo de corriente: 1.6 - 0.8 A
One Dell Way
Round Rock, TX 78682
Dell Computer de México,
S.A. de C.V. Rio Lerma No. 302 - 4º Piso
Col. Cuauhtemoc 16500 México, D.F.
Dell Computer de México,
S.A. de C.V. al Cuidado de Kuehne & Nagel
de México S. de R.I., Avenida Soles No. 55
Col. Peñon de los Baños, 15520 México, D.F.
Regulatory Listing
Safety Certifications:
UL 1950
CSA 950
NOM
Page 20

EMC Certifications:
FCC Part 15 Class B
Energy Consumption and Ergonomics:
ENERGY STAR
®
Page 21

Dell Contact Information: Dell™ W2300 LCD TV User's Guide
Technical Assistance • Automated Order-Status Service • Contacting Dell
Technical Assistance
If you need help with a technical problem, Dell is ready to assist you.
1 Call technical support from a telephone near or at the LCD TV so that technical support can
assist you with any necessary procedures. When calling Dell, use your Express Service Code to
help expedite the routing of your call to the proper support personnel.
The Express Service Code is located on the LCD TV as shown below.
Note: Dell's Express Service Code system may not be available in all countries.
2 In the U.S., Business customers should call 1-877-459-7298, and Consumer (Home and
Home Office) customers should call 1 -800-624 -9896.
If you are calling from a different country or are in a different Service area, see "Contacting
Dell" for your local telephone number.
3 Follow the menu prompts in the automated telephone system to speak with a technical
support representative.
Automated Order-Status Service
To check on the status of any Dell™ products that you have ordered, you can go to
support.dell.com, or you can call the automated order -status service. A recording prompts you for
the information needed to locate and report on your order. See "Contacting Dell" for the telephone
number to call for your region.
Contacting Dell
To contact Dell electronically, you can access the following website:
www.dell.com
support.dell.com (technical support)
Page 22

premiersupport.dell.com (technical support for educational, government, healthcare,
and medium/large business customers, including Premier, Platinum, and Gold customers)
For specific web address for your country, find the appropriate country section in the table
below.
Note: Toll- free numbers are for use within the country for which they are listed.
When you need to contact Dell, use the electronic addresses, telephone numbers, and
codes provided in the following table. If you need assistance in determining which codes
to use, contact a local or an international operator.
Canada (North York, Ontario)
International Access Code: 011 Auto Tech (automated technical support) toll -free: 1-800-247- 9362
TechFax toll- free: 1-800-950 -1329
Customer Care (Home Sales/Small Business) toll- free: 1 - 800 -847-4096
Customer Care (med./large business, government) toll-free: 1 - 800 -326-9463
Technical Support (Home Sales/Small Business) toll -free: 1-800 - 847 -4096
Technical Support (med./large bus.,government) toll-free: 1-800- 387-5757
Sales (Home Sales/Small Business) toll- free: 1-800-387 -5752
Sales (med./large bus., government) toll- free: 1-800-387 -5755
Spare Parts Sales & Extended Service Sales 1 866 440 3355
Mexico Customer Technical Support
International Access Code: 00 Sales
Country Code: 52 Customer Service
Main
Online Order Status:www.dell.ca/ostatus
001-877-384-8979
or 001-877-269 -3383
50-81-8800
or 01 - 800 -888-3355
001-877-384-8979
or 001-877-269 -3383
50-81-8800
or 01 - 800 -888-3355
U.S.A. (Austin, Texas) Automated Order-Status Service toll- free: 1-800-433 -9014
International Access Code: 011 AutoTech (portable and desktop computers) toll- free: 1-800-247 -9362
Country Code: 1 Consumer (Home and Home Office)
Technical Support toll- free: 1-800-624 -9896
Customer Service toll- free: 1-800-624 -9897
DellNet™ Service and Support
Employee Purchase Program (EPP) Customers toll -free: 1-800-695-8133
Financial Services website: www.dellfinancialservices.com
Financial Services (lease/loans) toll- free: 1-877-577 -3355
Financial Services (Dell Preferred Accounts [DPA]) toll- free: 1 - 800 -283-2210
Business
Customer Service and Technical Support toll- free: 1-800-822 -8965
Employee Purchase Program (EPP) Customers toll -free: 1-800-695-8133
Projectors Technical Support toll- free: 1-877-459 -7298
toll- free: 1-877-Dellnet
(1-877-335-5638)
Page 23

Public (government, education, and healthcare)
Customer Service and Technical Support toll- free: 1-800-234 -1490
Employee Purchase Program (EPP) Customers toll -free: 1-800-234-1490
Dell Sales
Dell Outlet Store (Dell refurbished computers) toll- free: 1 - 888 -798-7561
Software and Peripherals Sales toll- free: 1-800-671 -3355
Spare Parts Sales toll-free: 1-800 -357-3355
Extended Service and Warranty Sales toll- free: 1-800-247 -4618
Fax toll- free: 1-800-727 -8320
Dell Services for the Deaf, Hard-of-Hearing, or
Speech-Impaired
toll- free: 1-800-289 -3355
or toll-free: 1-800 -879-3355
toll- free: 1-877-DELLTTY
(1-877-335-5889)
Page 24

Limited Warranties
How long does this limited warranty last?
Limited Warranties for Dell Branded Hardware Products( U.S.Only) •"Total Satisfaction" Return Policy (U.S. Only)• Limited Warranty
Terms for Dell -Branded Hardware Products (Canada Only)• "Total Satisfaction" Return Policy (Canada Only) • Dell Software and
Peripherals (Canada Only)• 1-Year End-User Manufacturer Guarantee (Latin America and the Caribbean Only)
Limited Warranties and Return Policy
Dell- branded hardware products purchased in the U.S. or Canada come with either a 90-day, 1 -year, 2-year, 3-year, or 4 -year
limited warranty. To determine which warranty came with your hardware product(s), see your packing slip or invoice. The following
sections describe the limited warranties and return policy for the U.S., the limited warranties and return policy for Canada, the
manufacturer guarantee for Latin America and the Caribbean, and the Intel® Pentium® and Celeron® warranty for the U.S. and
Canada.
Limited Warranties for Dell Branded Hardware Products (U.S. Only)
What is covered by this limited warranty?
This limited warranty covers defects in materials and workmanship in your—our end-user customer's—Dell-branded hardware
products, including Dell-branded peripheral products.
What is not covered by this limited warranty?
This limited warranty does not cover:
Software, including the operating system and software added to the Dell-branded hardware products through our factoryintegration system, third -party software, or the reloading of software
Non-Dell-branded and Solution Provider Direct products and accessories
Problems that result from:
-External causes such as accident, abuse, misuse, or problems with electrical power
-Servicing not authorized by Dell
-Usage that is not in accordance with product instructions
-Failure to follow the product instructions or failure to perform preventive maintenance
-Problems caused by using accessories, parts, or components not supplied by Dell
Products with missing or altered Service Tags or serial numbers
Products for which Dell has not received payment
THIS WARRANTY GIVES YOU SPECIFIC LEGAL RIGHTS, AND YOU MAY ALSO HAVE OTHER RIGHTS WHICH VARY FROM
STATE TO STATE (OR JURISDICTION TO JURISDICTION). DELL'S RESPONSIBILITY FOR MALFUNCTIONS AND DEFECTS IN
HARDWARE IS LIMITED TO REPAIR AND REPLACEMENT AS SET FORTH IN THIS WARRANTY STATEMENT. ALL EXPRESS
AND IMPLIED WARRANTIES FOR THE PRODUCT, INCLUDING BUT NOT LIMITED TO ANY IMPLIED WARRANTIES AND
CONDITIONS OF MERCHANTABILITY AND FITNESS FOR A PARTICULAR PURPOSE, ARE LIMITED IN TIME TO THE TERM OF
THE LIMITED WARRANTY PERIOD REFLECTED ON YOUR PACKING SLIP OR INVOICE. NO WARRANTIES, WHETHER
EXPRESS OR IMPLIED, WILL APPLY AFTER THE LIMITED WARRANTY PERIOD HAS EXPIRED. SOME STATES DO NOT
ALLOW LIMITATIONS ON HOW LONG AN IMPLIED WARRANTY LASTS, SO THIS LIMITATION MAY NOT APPLY TO YOU.
WE DO NOT ACCEPT LIABILITY BEYOND THE REMEDIES PROVIDED FOR IN THIS LIMITED WARRANTY OR FOR
CONSEQUENTIAL OR INCIDENTAL DAMAGES, INCLUDING, WITHOUT LIMITATION, ANY LIABILITY FOR THIRD-PARTY
CLAIMS AGAINST YOU FOR DAMAGES, FOR PRODUCTS NOT BEING AVAILABLE FOR USE, OR FOR LOST DATA OR LOST
SOFTWARE. OUR LIABILITY WILL BE NO MORE THAN THE AMOUNT YOU PAID FOR THE PRODUCT THAT IS THE SUBJECT
OF A CLAIM. THIS IS THE MAXIMUM AMOUNT FOR WHICH WE ARE RESPONSIBLE.
SOME STATES DO NOT ALLOW THE EXCLUSION OR LIMITATION OF INCIDENTAL OR CONSEQUENTIAL DAMAGES, SO THE
ABOVE LIMITATION OR EXCLUSION MAY NOT APPLY TO YOU.
Page 25

This limited warranty lasts for the time period indicated on your packing slip or invoice, except for the following Dell -branded
hardware:
Portable computer batteries carry a 1-year limited warranty.
Projector lamps carry a 90- day limited warranty.
Memory carries a lifetime limited warranty.
Monitors carry the longer of either a 3- year limited warranty or the remainder of the warranty for the Dell computer to which
the monitor will be connected.
Other add-on hardware carries the longer of either a 1- year limited warranty for new parts and a 90- day limited warranty for
reconditioned parts or, for both new and reconditioned parts, the reminder of the warranty for the Dell computer on which such
parts are installed.
The limited warranty on all Dell-branded products begins on the date of the packing slip or invoice. The warranty period is not
extended if we repair or replace a warranted product or any parts. Dell may change the availability of limited warranties, at its
discretion, but any changes will not be retroactive.
What do I do if I need warranty service?
Before the warranty expires, please call us at the relevant number listed in the following table. Please also have your Dell Service
Tag or order number available.
Individual Home Consumers : U.S. Only
Technical Support 1-800-624-9896
Customer Service 1-800-624-9897
Individual Home Consumers who purchased through an
Employee Purchase Program:
Technical Support and Customer Service 1-800-822-8965
Home and Small Business Commercial Customers:
Technical Support and Customer Service 1-800-456-3355
Medium, Large, or Global Commercial Customers,
Healthcare Customers, and Value-Added Resellers
(VARs):
Technical Support and Customer Service 1-800-822-8965
Government and Education Customers:
Technical Support and Customer Service 1-800-234-1490
Dell- Branded Memory 1-888-363-5150
What will Dell do?
During the 90 days of the 90-day limited warranty and the first year of all other limited warranties: During the 90 days of the 90-day
limited warranty and the first year of all other limited warranties, we will repair any Dell-branded hardware products returned to us that
prove to be defective in materials or workmanship. If we are not able to repair the product, we will replace it with a comparable
product that is new or refurbished.
When you contact us, we will issue a Return Material Authorization Number for you to include with your return. You must return the
products to us in their original or equivalent packaging, prepay shipping charges, and insure the shipment or accept the risk if the
product is lost or damaged in shipment. We will return the repaired or replacement products to you. We will pay to ship the repaired
or replaced products to you if you use an address in Canada. Otherwise, we will ship the product to you freight collect.
If we determine that the problem is not covered under this warranty, we will notify you and inform you of service alternatives that are
available to you on a fee basis.
NOTE: Before you ship the product(s) to us, make sure to back up the data on the hard drive(s) and any other storage
device(s) in the product(s). Remove any confidential, proprietary or personal information, removable media, such as floppy
Page 26

disks, CDs, or PC Cards. We are not responsible for any of your confidential, proprietary or personal information; lost or
corrupted data; or damaged or lost removable media.
During the remaining years following the first year of all limited warranties: We will replace any defective part with new or refurbished
parts, if we agree that it needs to be replaced. When you contact us, we will require a valid credit card number at the time you
request a replacement part, but we will not charge you for the replacement part as long as you return the original part to us within 30
days after we ship the replacement part to you. If we do not receive the original part within 30 days, we will charge to your credit card
the then -current standard price for that part.
We will pay to ship the part to you if you use an address in Canada. Otherwise, we will ship the part freight collect. We will also
include a prepaid shipping container with each replacement part for your use in returning the replaced part to us.
NOTE: Before you replace parts, make sure to back up the data on the hard drive(s) and any other storage device(s) in the
product(s). We are not responsible for lost or corrupted data.
What if I purchased a service contract?
If your service contract is with Dell, service will be provided to you under the terms of the service contract. Please refer to that
contract for details on how to obtain service. Dell's service contracts can be found online at www.dell.ca or by calling Customer Care
at 1 - 800 -847-4096. If you purchased through us a service contract with one of our third-party service providers, please refer to that
contract (mailed to you with your packing slip or invoice) for details on how to obtain service.
How will you fix my product?
We use new and refurbished parts made by various manufacturers in performing warranty repairs and in building replacement parts
and systems. Refurbished parts and systems are parts or systems that have been returned to Dell, some of which were never used
by a customer. All parts and systems are inspected and tested for quality. Replacement parts and systems are covered for the
remaining period of the limited warranty for the product you bought. Dell owns all parts removed from repaired products.
May I transfer the limited warranty?
Limited warranties on systems may be transferred if the current owner transfers ownership of the system and records the transfer with
us. The limited warranty on Dell - branded memory may not be transferred. You may record your transfer by going to Dell’s website:
If you are an Individual Home Consumer, go to www.dell.com/us/en/dhs/topics/sbtopic_015_ccare.htm
www.dell.ca/ca/en/gen/topics/segtopic_ccare_nav_013_ccare.htm
If you are a Home Office, Small, Medium, Large, or Global Commercial Customer, go to
www.dell.com/us/en/biz/topics/sbtopic_ccare_nav_015_ccare.htm
If you are a Government, Education, or Healthcare Customer, or an Individual Home Consumer who purchased through an
Employee Purchase Program, go to www.dell.com/us/en/pub/topics/sbtopic_015_ccare.htm
If you do not have Internet access, call your customer care representative or call 1-800 - 624 -9897.
"Total Satisfaction" Return Policy (U.S. Only)
We value our relationship with you and want to make sure that you're satisfied with your purchases. That's why we offer a "Total
Satisfaction" return policy for most products that you—the end- user customer—purchase directly from Dell. Under this policy, you may
return to Dell products that you purchased directly from Dell for a credit or a refund of the purchase price paid, less shipping and
handling and applicable return fees as follows:
New Hardware Products and Accessories — All new hardware, accessories, parts, and unopened software still in its sealed
package, excluding the products listed below, may be returned within 30 days from the date on the packing slip or invoice. To
return applications software or an operating system that has been installed by Dell, you must return the entire computer. A
different return policy applies to nondefective products purchased through Dell's Software and Peripherals division by customers
of our Small and Medium Business divisions. Those products may be returned within 30 days from the date on the packing slip
or invoice, but a fifteen percent (15%) return fee will be deducted from any refund or credit. The "Total Satisfaction" Return
Policy and Software and Peripherals division return policy are not available for Dell | EMC storage products, EMC - branded
products, Unisys-branded products, PowerVault™ 160T tape libraries, or enterprise software.
Page 27

Reconditioned or Refurbished Dell -Branded Hardware Products and Parts — All reconditioned or refurbished Dell-branded
server and storage products may be returned within 30 days from the date on the packing slip or invoice. All other
reconditioned or refurbished Dell- branded hardware products and parts may be returned within 14 days of the date on the
packing slip or invoice.
To return products, e- mail or call Dell customer service to receive a Credit Return Authorization Number within the return policy
period applicable to the product you want to return. You must obtain a Credit Return Authorization Number in order to return the
product. See "Contacting Dell" or "Getting Help" in your customer documentation (or www.dell.com/us/en/gen/contact.htm) to find the
appropriate contact information for obtaining customer assistance.
You must ship the products to Dell within 5 days of the date that Dell issues the Credit Return Authorization Number. You must also
return the products to Dell in their original packaging, in as-new condition along with any media, documentation, and all other items
that were included in the original shipment, prepay shipping charges, and insure the shipment or accept the risk of loss or damage
during shipment.
Limited Warranty Terms for Dell-Branded Hardware Products (Canada Only)
What is covered by this limited warranty?
This limited warranty covers defects in materials and workmanship in your—our end-user customer's—Dell-branded hardware
products, including Dell-branded peripheral products.
What is not covered by this limited warranty?
This limited warranty does not cover:
Software, including the operating system and software added to the Dell-branded hardware products through our factoryintegration system, or the reloading of the software
Non-Dell branded and Solution Provider Direct products and accessories
Problems that result from:
-External causes such as accident, abuse, misuse, or problems with electrical power
-Servicing not authorized by Dell
-Usage that is not in accordance with product instructions
-Failure to follow the product instructions or failure to perform preventive maintenance
-Problems caused by using accessories, parts, or components not supplied by Dell
Products with missing or altered Service Tags or serial numbers
Products for which Dell has not received payment
THIS WARRANTY GIVES YOU SPECIFIC LEGAL RIGHTS, AND YOU MAY ALSO HAVE OTHER RIGHTS WHICH VARY FROM
PROVINCE TO PROVINCE. DELL'S RESPONSIBILITY FOR MALFUNCTIONS AND DEFECTS IN PRODUCT IS LIMITED TO
REPAIR AND REPLACEMENT AS SET FORTH IN THIS WARRANTY STATEMENT, FOR THE TERM OF THE WARRANTY
PERIOD REFLECTED ON YOUR PACKING SLIP OR INVOICE. EXCEPT FOR THE EXPRESS WARRANTIES CONTAINED IN THIS
WARRANTY STATEMENT, DELL DISCLAIMS ALL OTHER WARRANTIES AND CONDITIONS, EXPRESS OR IMPLIED,
INCLUDING WITHOUT LIMITATION IMPLIED WARRANTIES AND CONDITIONS OF MERCHANTABILITY AND FITNESS FOR A
PARTICULAR PURPOSE, STATUTORY OR OTHERWISE. SOME PROVINCES DO NOT ALLOW THE EXCLUSION OF CERTAIN
IMPLIED WARRANTIES OR CONDITIONS, OR LIMITATIONS ON HOW LONG AN IMPLIED WARRANTY OR CONDITION LASTS.
THEREFORE, THE FOREGOING EXCLUSIONS AND LIMITATIONS MAY NOT APPLY TO YOU.
WE DO NOT ACCEPT LIABILITY BEYOND THE REMEDIES PROVIDED FOR IN THIS WARRANTY STATEMENT OR FOR
SPECIAL, INDIRECT, CONSEQUENTIAL, OR INCIDENTAL DAMAGES, INCLUDING, WITHOUT LIMITATION, ANY LIABILITY FOR
THIRD- PARTY CLAIMS AGAINST YOU FOR DAMAGES, FOR PRODUCTS NOT BEING AVAILABLE FOR USE, OR FOR LOST
DATA OR LOST SOFTWARE. OUR LIABILITY WILL BE NO MORE THAN THE AMOUNT YOU PAID FOR THE PRODUCT THAT IS
THE SUBJECT OF A CLAIM. THIS IS THE MAXIMUM AMOUNT FOR WHICH WE ARE RESPONSIBLE.
SOME PROVINCES DO NOT ALLOW THE EXCLUSION OR LIMITATION OF SPECIAL, INDIRECT, INCIDENTAL, OR
CONSEQUENTIAL DAMAGES, SO THE ABOVE LIMITATION OR EXCLUSION MAY NOT APPLY TO YOU.
How long does this limited warranty last?
Page 28

This limited warranty lasts for the time period indicated on your packing slip or invoice, except that the limited warranty on Dell-
days after we ship the replacement part to you. If we do not receive the original part within 30 days, we will charge to your credit card
branded batteries lasts only 1 year and the limited warranty on the lamps for Dell-branded projectors lasts only 90 days. The limited
warranty begins on the date of the packing slip or invoice. The warranty period is not extended if we repair or replace a warranted
product or any parts. Dell may change the terms and availability of limited warranties, at its discretion, but any changes will not be
retroactive (that is, the warranty terms in place at the time of purchase will apply to your purchase).
What do I do if I need warranty service?
Before the warranty expires, please call us at the relevant number listed in the following table. Please also have your Dell Service
Tag or order number available.
Individual Home Consumers; Home Office and Small Business Customers:
Technical Support and Customer Service
Medium, Large, and Global Commercial Customers; Government, Education, and
Healthcare Customers; and Value-Added Resellers (VARs):
Technical Support 1-800-387-5757
Customer Service
Government or Education Customers, or Individual Home Consumers who
purchased through an Employee Purchase Program:
Technical Support 1-800-387-5757
Customer Service
Dell- Branded Memory 1-888-363-5150
Canada Only
1-800-847-4096
1-800-326-9463
1-800-326-9463
(Extension 8221 for
Individual Consumers)
What will Dell do?
During the 90 days of the 90-day limited warranty and the first year of all other limited warranties: During the 90 days of the 90-day
limited warranty and the first year of all other limited warranties, we will repair any Dell-branded hardware products returned to us that
prove to be defective in materials or workmanship. If we are not able to repair the product, we will replace it with a comparable
product that is new or refurbished.
When you contact us, we will issue a Return Material Authorization Number for you to include with your return. You must return the
products to us in their original or equivalent packaging, prepay shipping charges, and insure the shipment or accept the risk if the
product is lost or damaged in shipment. We will return the repaired or replacement products to you. We will pay to ship the repaired
or replaced products to you if you use an address in Canada. Otherwise, we will ship the product to you freight collect.
If we determine that the problem is not covered under this warranty, we will notify you and inform you of service alternatives that are
available to you on a fee basis.
NOTE: Before you ship the product(s) to us, make sure to back up the data on the hard drive(s) and any other storage
device(s) in the product(s). Remove any confidential, proprietary or personal information, removable media, such as floppy
disks, CDs, or PC Cards. We are not responsible for any of your confidential, proprietary or personal information; lost or
corrupted data; or damaged or lost removable media.
During the remaining years following the first year of all limited warranties: We will replace any defective part with new or refurbished
parts, if we agree that it needs to be replaced. When you contact us, we will require a valid credit card number at the time you
request a replacement part, but we will not charge you for the replacement part as long as you return the original part to us within 30
Page 29

the then -current standard price for that part.
We will pay to ship the part to you if you use an address in Canada. Otherwise, we will ship the part freight collect. We will also
include a prepaid shipping container with each replacement part for your use in returning the replaced part to us.
NOTE: Before you replace parts, make sure to back up the data on the hard drive(s) and any other storage device(s) in the
product(s). We are not responsible for lost or corrupted data.
What if I purchased a service contract?
If your service contract is with Dell, service will be provided to you under the terms of the service contract. Please refer to that
contract for details on how to obtain service. Dell's service contracts can be found online at www.dell.ca or by calling Customer Care
at 1 - 800 -847-4096. If you purchased through us a service contract with one of our third-party service providers, please refer to that
contract (mailed to you with your packing slip or invoice) for details on how to obtain service.
How will you fix my product?
We use new and refurbished parts made by various manufacturers in performing warranty repairs and in building replacement parts
and systems. Refurbished parts and systems are parts or systems that have been returned to Dell, some of which were never used
by a customer. All parts and systems are inspected and tested for quality. Replacement parts and systems are covered for the
remaining period of the limited warranty for the product you bought. Dell owns all parts removed from repaired products.
May I transfer the limited warranty?
Limited warranties on systems may be transferred if the current owner transfers ownership of the system and records the transfer with
us. The limited warranty on Dell - branded memory may not be transferred. You may record your transfer by going to Dell’s website:
For Canada - purchased computers (in -country transfers) and to transfer from one customer to another, go to
www.dell.ca/ca/en/gen/topics/segtopic_ccare_nav_013_ccare.htm
For out-of-country transfers (outside of the original country of purchase), go to
www.dell.com/us/en/biz/topics/sbtopic_ccare_nav_016_ccare.htm
If you do not have Internet access, call Dell at 1-800 -847-4096 (Home Consumer customers) or 1- 800 -326-9463 (Corporate
Commercial or Government customers).
"Total Satisfaction" Return Policy (Canada Only)
If you are an end -user customer who bought new products directly from Dell, you may return them to Dell up to 30 days after you
receive them for a refund or credit of the product purchase price. If you are an end-user customer who bought reconditioned or
refurbished products from Dell, you may return them to Dell within 14 days after the date on the packing slip or invoice for a refund or
credit of the product purchase price. In either case, the refund or credit will not include any shipping and handling charges shown on
your packing slip or invoice and will be subject to a fifteen percent (15%) restocking fee, unless otherwise prohibited by law. If you are
an organization that bought the products under a written agreement with Dell, the agreement may contain different terms for the
return of products than specified by this policy.
To return products, you must call Dell Customer Service at 1-800 - 847 -4096 to receive a Credit Return Authorization Number. To
expedite the process of your refund or credit, Dell expects you to return the products to Dell in their original packaging within 5 days
of the date that Dell issues the Credit Return Authorization Number. You must also prepay shipping charges and insure the shipment
or accept the risk of loss or damage during shipment. You may return software for a refund or credit only if the sealed package
containing the floppy disk(s) or CD(s) is unopened. Returned products must be in as -new condition, and all of the manuals, floppy
disk(s), CD(s), power cables, and other items included with a product must be returned with it. For customers who want to return, for
refund or credit only, either application or operating system software that has been installed by Dell, the whole system must be
returned, along with any media and documentation that may have been included in the original shipment.
The "Total Satisfaction" Return Policy does not apply to Dell | EMC storage products. It also does not apply to products purchased
through Dell's Software and Peripherals division. For those products, please instead refer to Dell's Software and Peripheral's thencurrent return policy (see the following section, "Dell Software and Peripherals [Canada Only]").
Page 30

Dell Software and Peripherals (Canada Only)
Third-Party Software and Peripherals Products
Similar to other resellers of software and peripherals, Dell does not warrant third -party products. Third-party software and peripheral
products are covered by the warranties provided by the original manufacturer or publisher only. Third -party manufacturer warranties
vary from product to product. Consult your product documentation for specific warranty information. More information may also be
available from the manufacturer or publisher.
While Dell offers a wide selection of software and peripheral products, we do not specifically test or guarantee that all of the products
we offer work with any or all of the various models of Dell computers, nor do we test or guarantee all of the products we sell on the
hundreds of different brands of computers available today. If you have questions about compatibility, we recommend and encourage
you to contact the third-party software and peripheral product manufacturer or publisher directly.
Dell-Branded Peripheral Products
Dell does provide a limited warranty for new Dell-branded peripheral products (products for which Dell is listed as the manufacturer)
such as monitors, batteries, memory, docking stations, and projectors. To determine which limited warranty applies to the product you
purchased, see the Dell packing slip or invoice and/or the product documentation that accompanied your product. Descriptions of
Dell's limited warranties are described in preceding sections.
Return Policy
If you are an end -user customer who bought Dell Software and Peripherals products directly from a Dell company, you may return
Dell Software and Peripherals products that are in as-new condition to Dell up to 30 days from the date on the packing slip or invoice
for a refund of the product purchase price if already paid. This refund will not include any shipping and handling charges shown on
your packing slip or invoice; you are responsible for those.
To return products, you must call Dell Customer Service at 1-800 - 387 -5759 to receive a Credit Return Authorization Number. You
must ship the Dell Software and Peripherals products back to Dell in their original manufacturer's packaging (which must be in as-new
condition), prepay shipping charges, and insure the shipment or accept the risk of loss or damage during shipment.
To qualify for refund or replacement, returned products must be in as -new condition, software products must be unopened, and all of
the manuals, floppy disk(s), CD(s), power cables, and other items included with a product must be returned with it.
1-Year End-User Manufacturer Guarantee (Latin America and the Caribbean Only)
Guarantee
Dell Computer Corporation ("Dell") warrants to the end user in accordance with the following provisions that its branded hardware
products, purchased by the end user from a Dell company or an authorized Dell distributor in Latin America or the Caribbean, will be
free from defects in materials, workmanship, and design affecting normal use, for a period of 1 year from the original purchase date.
Products for which proper claims are made will, at Dell’s option, be repaired or replaced at Dell’s expense. Dell owns all parts
removed from repaired products. Dell uses new and reconditioned parts made by various manufacturers in performing repairs and
building replacement products.
Exclusions
This Guarantee does not apply to defects resulting from: improper or inadequate installation, use, or maintenance; actions or
modifications by unauthorized third parties or the end user; accidental or willful damage; or normal wear and tear.
Making a Claim
Claims must be made in Latin America or the Caribbean by contacting the Dell point of sale within the guarantee period. The end
user must always supply proof of purchase, indicating name and address of the seller, date of purchase, model and serial number,
name and address of the customer, and details of symptoms and configuration at the time of malfunction, including peripherals and
software used. Otherwise, Dell may refuse the guarantee claim. Upon diagnosis of a warranted defect, Dell will make arrangements
Page 31

and pay for ground freight and insurance to and from Dell’s repair/replacement center. The end user must ensure that the defective
product is available for collection properly packed in original or equally protective packaging together with the details listed above and
the return number provided to the end user by Dell.
Limitation and Statutory Rights
Dell makes no other warranty, guarantee or like statement other than as explicitly stated above, and this Guarantee is given in place
of all other guarantees whatsoever, to the fullest extent permitted by law. In the absence of applicable legislation, this Guarantee will
be the end user’s sole and exclusive remedy against Dell or any of its affiliates, and neither Dell nor any of its affiliates shall be liable
for loss of profit or contracts, or any other indirect or consequential loss arising from negligence, breach of contract, or howsoever.
This Guarantee does not impair or affect mandatory statutory rights of the end user against and/or any rights resulting from other
contracts concluded by the end user with Dell and/or any other seller.
Dell World Trade LP
One Dell Way, Round Rock, TX 78682, USA
Dell Computadores do Brasil Ltda (CNPJ No. 72.381.189/0001-10)
Avenida Industrial Belgraf, 400
92990-000 - Eldorado do Sul – RS - Brasil
Dell Computer de Chile Ltda
Coyancura 2283, Piso 3- Of.302,
Providencia, Santiago - Chile
Dell Computer de Colombia Corporation
Carrera 7 #115-33 Oficina 603
Bogota, Colombia
Dell Computer de Mexico SA de CV
Paseo de la Reforma 2620 - 11° Piso
Col. Lomas Altas
11950 México, D.F.
Page 32

Documentation: Dell™ W2300 LCD TV User's Guide
You must right-click the link for a portable document format (PDF) file and save the file to your hard-disk drive.
Attempting to link directly to large PDF files causes your system to freeze.
To save PDF files (files with an extension of .pdf) to your hard- disk drive, right-click the document title, click Save Target As in
Microsoft® Internet Explorer or Save Link As in Netscape Navigator, and specify a location on your hard - disk drive.
Right-click only the following link:
"Quick Set-up"(.pdf)
To view a PDF file, launch Adobe™ Acrobat Reader. Click File —> Open and select the PDF file.
NOTE: PDF files require Adobe Acrobat Reader, which can be downloaded from the Adobe World Wide Web site.
Page 33

Front View: Dell™ W2300 LCD TV User's Guide
1 Power switch On/Off
2 Power LED
3 Menu Enable OSD menu (enter key for PC).
4 + Volume Increase / Selection
5 _ Volume Decrease/ Selection
6
7
8 Input select
9 IR receiver Sense the signal from remote control handset.
Normal operation: Green.
Sleeping mode: Amber.
Next channel / Up
Previous channel / Down
Input source select key;PC Analog, PC Digital, TV Tuner, Composite,
S- Video, Component.
Page 34

Back View: Dell™ W2300 LCD TV User's Guide
1 Bass-Port
2 Security cable lock
3 Base release button
4 Cable Clip
5 Lock down button
6 Headphone
7-8 PVR-- Audio Out (TV Tuner)
9 PVR-- Video Out (TV Tuner)
Page 35

Side View: Dell™ W2300 LCD TV Monitor User's Guide
1 TV Antenna or Cable In
S- Video In
2
(paired with composite audio in
and video in)
3 Composite Audio In
4 Composite Video In
Audio In
5
(paired with component video in)
6 Earphone In /Line out
7 Component Video In
8 Base Release Button
Page 36

Back to Contents Page
Bottom View: Dell™ W2300 LCD TV User's Guide
Americas Bottom View
1 AC Inlet (AC in)
2 D- SUB (Analog in)
3 PC Audio in
4 DVI-D ( Digital in)
Back to Contents Page
Page 37

Height-Adjustable Stand (HAS): Dell™ W2300 LCD TV User's Guide
Attaching HAS • Cable Management • Tilt_Swivel • Vertical Adjustment • Removing HAS
Attaching HAS
Lay LCD TV on a flat, soft, and clean surface or use the foam cushion shipped with your LCD TV. Attach stand to LCD TV by
aligning tabs on stand to the LCD TV.
Cable Management
Run all cables through the provided cable sleeve and then run the sleeve (with cables) through the cable clip in the back of HAS.
Tilt/Swivel
With the attached pedestal, you can tilt and/or swivel the LCD TV for the most comfortable viewing angle.
Page 38

Vertical Adjustment
Press the Lock Down button at the bottom of the HAS to make any vertical adjustment. HAS travels vertically.
Removing HAS
Lay LCD TV on a flat, soft, and clean surface or use the foam cushion shipped with your LCD TV. Press the release button, and
pull up the base.
Page 39

Page 40

Attaching the Cables: Dell™ W2300 LCD TV User's Guide
Connecting Your PC • Connecting as a TV • Connecting your DVD/VCD/VCR/CATV Box • Connecting A/V outputs
Connecting your PC
CAUTION: Before performing any of the setup procedures listed below, read and follow the safety instructions.
Connect the power cord to an electrical outlet.
A. Connection through blue VGA & lime green audio cable
1. Connect one end of the blue VGA cable to the VGA plug on W2300, and connect the other end to the VGA
plug on your PC.
2. Connect one end of the lime green audio cable to the audio jack by the D- sub plug on W2300, and connect
the other end to the Audio jack on your PC.
OR
B. Connection through white DVI cable & lime green audio cable
1. Connect one end of the white DVI cable to the DVI plug on W2300, and connect the other end to the DVI
plug on your PC.
2. Connect one end of the lime green audio cable to the audio jack by the DVI plug on W2300, and connect the
Page 41

other end to the audio jack on your PC.
Connecting as a TV
Cable TV • Antenna • TV to VCR
Cable TV
1. If your Cable TV signal is a single, round cable (75 ohm), then you're ready to connect to the TV.
Connect the TV cable to the ANTENNA/CABLE plug on the TV.
2. If you have a cable converter box, connect the cable TV signal to the IN (put) plug on the converter,
connect the OUT(put) plug from the converter to the 75
3. Verify that the On Screen Display (OSD) is set to Cable.
Note: The connecting cable for the converter is supplied by the Cable TV company.
(ohm) plug on the TV.
Page 42

Antenna
1. If your antenna has a round cable (75 ohm) on the end, then you're ready to connect it to the TV.
If your antenna has flat, twin-lead wire (300 ohm), you first need to attach the antenna wires to the screws
on a 300 -to 75- ohm adapter.
2. Push the round end of the adapter (or antenna) onto the 75
If the round end of the antenna wire is threaded, screw it down finger tight.
3. Verify that the On Screen Display (OSD) is set to Antenna.
(ohm) plug on the back of the TV.
Note: If your home has separate UHF and VHF antennas, you will need a combiner to connect to the TV.
TV to VCR
Follow the steps below to connect a basic antenna or Cable TV signal to a VCR, and then
Page 43

the VCR to the TV. For information on other hookups (possible when cable/ descrambler
boxes are included), refer to the owner's manuals for the VCR and the cable converter.
1. Connect your antenna or Cable TV signal to the IN FROM ANT (enna) plug on the
VCR.
2. Connect the OUT TO TV plug on the VCR to the 75 ohm plug on the TV (connecting
cable supplied with the VCR).
3. Refer to the owner's manual included with your VCR for other possible connections
and TV/VCR operating details.
Connecting to DVD/VCD/VCR/CATV BOX
Connect devices with cables provided. Select Composite or S-Video input from On Screen
Display (OSD) Menu. Refer to the Controls and Indicators section in this document for more
information on the OSD. S-Video Source generally yields better video performance than
composite.
Connect device with cables provided. Select Component input from OSD Menu. For optimal
performance use YPbPr for HDTV formats.
Page 44

Connecting A/V Outputs
1. The Composite output jacks on W2300 back cover provides the function to record your
favorite program through broadcast or cable TV.
2. Connect devices (VCR, Camcorder...) with cables provided. Select TV input from OSD
Menu.
Page 45

Proper location: Dell™ W2300 LCD TV User's Guide
Consider the following environmental factors when you are deciding how to position the LCD TV:
Do not store or use the LCD TV in locations exposed to heat, direct sunlight, or extreme cold.
Avoid moving the LCD TV between locations with large temperature differences. Please refer to the Specifications section.
Do not subject the LCD TV to severe vibration or high impact conditions. Do not place the LCD TV inside a car trunk.
Do not store or use the LCD TV in locations exposed to high humidity or dusty environment. Also do not allow water or
other liquids to spill on or into the LCD TV.
Keep flat panel monitor in room temperature conditions. Excessive cold or hot conditions can have an adverse effect on the
liquid crystal of the display.
Page 46

Maintenance: Dell™ W2300 LCD TV User's Guide
Caution: To avoid risk of electric shock, do not disassemble the LCD TV cabinet. Users cannot service the LCD TV. User maintenance is
restricted to cleaning.
NOTE: Before cleaning the LCD TV, unplug it from the electrical outlet.
To clean the surface of the panel, lightly dampen a soft, clean cloth with water. Do not use ketone type materials (ex. Acetone) and no chemicals should be
used.
To clean the LCD TV cabinet, use a cloth lightly dampened with a mild detergent.
Do not use benzene, thinner, ammonia, abrasive cleaners, or compressed air.
Page 47

Setting the Optimal Resolution: Dell™ W2300 LCD TV User's Guide
For optimal LCD TV performance while using the Microsoft® Windows® operating systems, set the display resolution to 1280 x 768
pixels by performing the following steps:
1. Click the Start button, point to Settings, and click Control Panel.
2. Double-click the Display icon in the Control Panel window, and then click the Settings tab.
3. In the Desktop area, move the slidebar to 1280 by 768 pixels. Then click OK.
4. Recommended frequency is 60Hz.
Note: Please prevent prolonged static video images and use screen savers to avoid degradation to the LCD TV
screen
Driver Installation
Use the LCD TV CD to install the appropriate LCD TV driver for your operating system.
Windows XP · Windows 2000
Microsoft® Windows® XP Operating System
To manually install or update the driver, perform the following steps:
1. Insert the LCD TV CD into the CD-ROM drive.
2. Click Start -->Control Panel -->Appearance & Themes and then click the Display icon.
3. In the Display Properties window, click the Settings tab, and then click Advanced.
4. Click the Monitor tab, and then click Properties - ->Driver tab -->Update Driver.
5. When the Hardware Update Wizard dialog box appears, choose "Install the software automatically," and click Next> and
then Finish to complete the installation.
6. Close the Display Properties window.
Microsoft® Windows® 2000 Operating System
To manually install or update the driver, perform the following steps:
1. Click Start -->Settings -->Control Panel and then double - click Display.
2. In the Display Properties window, click the Settings tab, and then click Advanced.
3. Click the Monitor tab, and then click Properties - ->Driver -->Update Driver .
4. When the Update Device Driver Wizard dialog box appears, choose "Search for a suitable driver for my device," and click
Next>.
5. Insert the LCD TV CD into the CD-ROM drive, type d:\ (change the drive letter to match your CD-ROM drive if it is not drive
D) in the Copy manufacturer's files from: box, and click Next> and then Finish to complete the installation.
6. Close the Display Properties window.
Page 48

Back to Contents Page
Controls and Indicators: Dell™ W2300 LCD TV User's Guide
Front Panel • On Screen Display Controls • Remote Controls • Setting Optimal Resolution
1 Power switch On/Off
2 Power LED
3 Menu Enable OSD menu
4 + Volume Increase / Selection
5 _ Volume Decrease/ Selection
6
7
8 Input select
9 IR receiver Sense the signal from remote control handset.
Below is an overall view of the structure of the On-Screen Display. You can use this as a reference when you want to work your
Normal operation: Green.
Sleeping mode: Amber.
Next channel / Up
Previous channel / Down
Input source select key;PC Analog, PC Digital, TV Tuner, Composite,
S- Video, Component.
On Screen Display Controls
way around the different adjustments later on.
There are three different modes of OSD:
PC Mode
Composite / Component / S-Video Mode
TV Mode
Americas OSD Guide
PC Mode
Page 49

A Main Menu B Sub-Menu name C Menu icon
1. With the menu off, push the MENU button on the remote or in font of the LCD TV to enter OSD system and display the main
menu.
2. Push the
highlighted.
3. Push the MENU button once to activate the highlighted function; Push -/+ to select the preferred parameter, push menu to
enter the selected bar ,then use the - and + buttons making your changes.
4. Push the Menu button to return the main menu or select another function.
Icon Menu Name and
and buttons to move between the function icons. As you move from one icon to another, the selection is
.
Description
Sub-menus
EXIT This is used to exit out of the Main menu
INPUT SELECT: Select video source for main display:
PC ANALOG: PC VGA input
PC DIGITAL: PC DIGITAL input
Page 50

TV TUNER: Antenna or cable TV input
COMPOSITE: Composite video input
S-VIDEO: S- video input
COMPONENT: Component video input
BRIGHTNESS/
CONTRAST :
AUDIO:
The Brightness function :
Push the + button to increase luminance;
push the - button to decrease luminance (min 0 ~ max. 100).
The Contrast function :
Push the + button to increase the contrast;
push the - button to decrease the contrast (min 0 ~ max. 100).
Select your preferred function.
EXIT: Exit this menu
TREBLE: Adjustable from 0 to 100
BASS: Adjustable from 0 to 100
BALANCE: Adjustable from 0 to 100
VOLUME: Adjustable from 0 to 100
SURROUND: ON/OFF
MUTE: ON/OFF
AUDIO SOURCE: Only in PC/TV/Video
mode
POWER SAVING:ON/OFF
Page 51

SIZE&POSITION:
Positioning moves the viewing area around on the monitor screen.
EXIT: Exit this menu
H.POSITION /V.POSITION: When making changes to either the 'Horizontal' or 'Vertical' settings,
the image will simply be shifted in response to your selection/change.
Minimum is '0' (-). Maximum is '100' (+).
4:3 ASPECT RATI O: Select 4:3 image display
FULL SCREEN: Select full screen (16:9) image display
IMAGING
SETTING:
Note: When operating 1280*768 in DVI mode, the positioning adjustments are not
available.
To adjust the image settings.
EXIT: Exit this menu
AUTO ADJUST :Press to select automatic adjustment .
PHASE :Use the - and + buttons to adjust from 0 to 100.
PIXEL CLOCK :Use the - and + buttons to adjust from 0 to 100.
Page 52

Note: Operating in DVI mode, the Pixel Clock and Phase
adjustments are not available.
COLOR
SETTING:
Color Settings adjusts the color temperature.
EXIT: Exit this menu
NATURE COLOR: Equivalent to original panel color.
NORMAL COLOR: 6500K (Same as SRGB) default from FACTORY
BLUE PRESET: Equivalent to 9300K
RED PRESET: Equivalent to 5700K
USER PRESET: Adjust red, green, blue three colors from 0 to 100.
OSD SETTINGS: Each time the OSD opens, it displays in the same location on the screen. 'OSD Settings'
Page 53

(horizontal/vertical) provides control over this location.
EXIT: Exit this menu
HORIZONTAL: Adjustable from 0 to 100.
VERTICAL: Adjustable from 0 to 100.
OSD HOLD TIME: The OSD stays active for as long as it is in use. The range of time setting is
from 5 to 60 seconds.
OSD LOCK: Controls user access to adjustments. Show key icon after selecting lock.
Note: When the OSD is locked, pressing the menu button again and it will take user to
OSD LOCK menu. Press (+) to unlock and allow user access to all applicable settings.
Language: Language sets the OSD to display in one of three languages (English, Spanish, French)
FACTORY
Reset the settings to the factory default values.
RESET:
EXIT: Exit this menu
POSITION SETTINGS ONLY: Resume position setting to factory default.
COLOR SETTINGS ONLY: Resume color setting to factory default.
All SETTINGS: Load all factory default settings.
Page 54

PICTURE IN
PICTURE:
Adjust picture in picture preferences.
SIZE: Turn off and set the size of PIP. Users can chose your preferred size.
OFF
SMALL
MEDIUM
LARGE
H POSITION: Adjust the Horizontal position of PIP.
V POSITION: Adjust the Vertical position of PIP.
VIDEO SOURCE: Select video source of PIP:
EXIT
TV TUNER
COMPOSITE VIDEO
S-VIDEO
COMPONENT VIDEO
Page 55

Composite / Component / S-Video Mode
EXIT Exit from this menu
INPUT SELECT Use up and down arrow button to highlight the "INPUT SELECT".
Select video source for main display:
PC ANALOG: PC VGA input
PC DIGITAL: PC DIGITAL input
TV TUNER: Antenna or cable TV input
COMPOSITE: Composite video input
S-VIDEO: S- video input
COMPONENT: Component video input
PICTURE Adjust picture characteristics to suit personal preference.
EXIT: Exit from this menu
BRIGHTNESS: Adjustable from 0 to 100
CONTRAST: Adjustable from 0 to 100
COLOR: Adjustable from 0 to 100
SHARPNESS: Adjustable from 0 to 100
TINT: Not available in component input.
Adjustable from 0 to 100
HOR SHIFT: Only available in component input.
Adjustable from 0 to 100
COLOR TEMP: Select from Normal, Cool or Warm
by "-" and "+" buttons.
Page 56

Note: "TINT " is not available in component input. "HOR SHIFT" only function in component input.
AUDIO Adjust audio characteristics to suit personal preference.
EXIT: Exit from this menu.
TREBLE: Adjustable from 0 to 100
BASS: Adjustable from 0 to 100
BALANCE: Adjustable from 0 to 100
VOLUME: Adjustable from 0 to 100
SURROUND: Switch Surround Sound On/ Off
MUTE: Switch Mute On/ Off
LANGUAGE Set language for OSD.
There are three languages of OSD display.
ENGLISH
SPANISH
FRENCH
SPECIAL
Activate special control features:
FEATURES
EXIT: Exit from this menu.
CLOSED CAPTION: To turn on or off. (For
Composite video only )
SLEEP TIMER: Slide bar off .
OSD LOCK: Show key icon after selecting lock.
VIDEO MODE: Set the screen scaling mode to suit
personal preference:
STANDARD MODE
4:3 ASPECT RATIO
Page 57

PARENTAL
CONTROL
FULL SCREEN
NONLINEAR SCALING
Note: "CLOSED CAPTION" is available for composite video only.
1) When users first enter the PARENTAL
CONTROL, the screen will show the window
asking user key in the code.
2) Users will see the window" Access code" when
they enter this function.
EXIT
LOCK
CHANGE CODE
CLEAR ALL
CLOSED
CAPTION
3) Enter Master code "3355" (read "DELL" on
telephone keypad) twice.
EXIT: Exit from this menu.
CLOSED CAPTION: ON/ OFF
CAPTION MODE:
CC1
CC2
CC3
CC4
CC MUTE
TXT1
Page 58

TXT2
TXT3
TXT4
Note: "CLOSED CAPTION" is available for composite video only.
FACTORY
Reset the setting to default values.
RESET
NO: Keep the setting as current.
YES: Load factory setting
EXIT Exit from this menu
TV Mode
INPUT SELECT Select video source for main display:
PC ANALOG: PC VGA input
PC DIGITAL: PC DIGITAL input
TV TUNER: Antenna or cable TV input
COMPOSITE: Composite video input
S-VIDEO: S- video input
COMPONENT: Component video input
Page 59

PICTURE Adjust picture characteristics to suit personal preference.
EXIT: Exit from this menu
BRIGHTNESS: Adjustable from 0 to 100
CONTRAST: Adjustable from 0 to 100
COLOR: Adjustable from 0 to 100
SHARPNESS: Adjustable from 0 to 100
TINT: Not available in component input.
Adjustable from 0 to 100
COLOR TEMP: Select from Normal, Cool or Warm
by "-" and "+" buttons.
AUDIO Adjust audio characteristics to suit personal preference.
EXIT: Exit from this menu.
TREBLE: Adjustable from 0 to 100
BASS: Adjustable from 0 to 100
BALANCE: Adjustable from 0 to 100
VOLUME: Adjustable from 0 to 100
SURROUND: Switch Surround Sound On/ Off
MUTE: Switch Mute On/ Off
LANGUAGE Set language for OSD.
There are three languages of OSD display.
ENGLISH
SPANISH
FRENCH
SPECIAL
Activate special control features:
FEATURES
EXIT: Exit from this menu.
SLEEP TIMER: Slide bar off .
OSD LOCK: Show key icon after selecting lock.
VIDEO MODE: Set the screen scaling mode to suit
personal preference:
Page 60

STANDARD MODE
4:3 ASPECT RATIO
FULL SCREEN
NONLINEAR SCALING
PARENTAL
CONTROL
1) When users first enter the PARENTAL
CONTROL, the screen will show the window
asking user key in the code.
2) Users will see the window" Access code" when
they enter this function.
EXIT
LOCK
CHANGE CODE
CLEAR ALL
3) Enter Master code "3355" (read "DELL" on
telephone keypad) twice.
CLOSED
CAPTION
EXIT: Exit from this menu.
CLOSED CAPTION: ON/ OFF
CAPTION MODE:
CC1
CC2
CC3
CC4
CC MUTE
TXT1
TXT2
Page 61

TXT3
TXT4
SETUP
EXIT: Exit from this menu.
TUNER MODE:
ANTENNA
CABLE
AUTO
CHANNEL SEARCH:
PLEASE WAIT
PROG.FOUND
CHANNEL
MANUAL ADJUST: FINETUNE
CHANNEL EDIT:
CHANNEL (UP/DOWN)
SKIPPED ( - / + BUTTON)
FACTORY RESET Reset the setting to default values.
NO: Keep the setting as current.
YES: Load factory setting
RETURN TO TOP OF THE PAGE
Page 62

Back to Contents Page
TV Controls: Dell™ W2300 LCD TV User's Guide
Using your Remote Control
When Programming universal remotes, please use Philips/Magnavox TV codes.
Americas
Remote Control Diagram
Power On/Off The remote power button turns the LCD TV ON and OFF.
Picture in Picture (PIP): Turns PIP On/Off and select PIP size.
PIP On/Off and size:
INPUT selection
PIP POSITION
PIP can only be displayed with PC (Digital or Analog) as Main
input source.
Change the input selection from PC Digital, PC Analog,
Composite, S- video and Component inputs.
Changes the PIP Position to four different corners of the
display.
Page 63

Digit 0- 9
Manual entry for direct access to Channel programs for a 2 digit
channel number.
SMART sound
SOUND selection
MUTE Controls sound to mute sound or restore sound setting.
PC/TV switch PC/TV function swaps between last PC and Video input viewed.
SMART picture
DISPLAY status
CHANNEL up/down Adjusts the TV channel up/down.
Volume +/- To increase and decrease volume level.
OSD main MENU select Displays the main On-Screen Display (OSD) menu.
SLEEP timer
Selects excellent preset audio for voice, music, theatre, and
personal settings.
TV sound mode selection, to access MONO, STEREO and
SAP.
Selects excellent preset picture controls for multi- media,
personal, movies, sports, and weak signal programs.
To display the state of video input, aspect ratio, program
number, sound selection, timer for 5 second.
Selects the length of time to automatically turn off the LCD TV
(off, 15 -180) .
Screen Size
LAST channel Selects the previous TV channel viewed.
Closed Caption
Back to Contents Page
Selects different screen sizes; standard mode, 4:3, full screen,
and non-linear scaling.
Selects Close caption feature. (Japanese model without this
button)
RETURN TO TOP OF THE PAGE
 Loading...