

Dell Venue 3845 Pro User Manual

Venue 8 Pro
3000 Series
User’s Manual
Tablet model: Venue 8 Pro 3845
Regulatory model: T01D
Regulatory type: T01D002

Notes, Cautions, and Warnings
NOTE: A NOTE indicates important information that helps you
make better use of your tablet PC.
CAUTION: A CAUTION indicates potential damage to hardware
or loss of data if instructions are not followed.
WARNING: A WARNING indicates a potential for property
damage, personal injury, or death.
_______________________
Copyright © 2014 Dell Inc. All rights reserved.
This product is protected by U.S. and international copyright and intellectual property
laws.
Dell™ and the Dell logo are trademarks of Dell Inc. in the United States and/or other
jurisdictions. All other marks and names mentioned herein may be trademarks of their
respective companies.
September 2014 Rev. A00

Contents
Features ........................................................................... 5
Accessories ..................................................................... 8
Setting Up Your Tablet ................................................. 9
Charging the Tablet .................................................................... 9
TurningOnYourTablet ............................................................. 11
TurningOffYourTablet .............................................................12
Turning Off the Screen .............................................................12
Inserting a MicroSD card ..........................................................13
Removing the MicroSD card ...................................................14
Using Headphones ....................................................................15
Using Your Tablet ........................................................ 16
Wi‑FiSetting ................................................................................16
BluetoothSetting .......................................................................16
Gestures ....................................................................................... 17
Screen Orientation ...................................................................20
Windows 8.1 Start Screen .......................................................20
Synchronizing Your Tablet ...................................................... 23
Refreshing Your Tablet ............................................................. 24
ResettingYourTablet ............................................................... 25
Cleaning Your Tablet ................................................................ 26
Troubleshooting .......................................................... 27
Contacting Dell ........................................................... 31
Locating Your Service Tag and
ExpressServiceCode ................................................. 32
Contents | 3

Specifications ............................................................... 33
Glossary ........................................................................ 35
Index ............................................................................. 38
4 | Contents

Features
2
31
1513 14
12
11
10
9
8
7
6
4
Feature Functionality
1 Ambient‑light sensor Automatically adjusts the brightness
2 Front camera • Captures pictures or records videos.
5
of the display’s backlight based on the
surrounding light intensity.
• Use while making video calls.
Features | 5

Feature Functionality
3 Camera‑status light • Illuminates to indicate when either the
front or rear camera is activated.
• Flashes when the tablet is powering on
or shutting down.
4 Service Tag label Provides the Service Tag and Express
Service Code needed for contacting Dell
for customer service or technical support.
5 Speaker Provides audio output.
6 Regulatory label Provides the tablet’s regulatory type and
model.
7 MicroSD‑card slot
8 Microphone • Records sound.
9 Volume buttons (2) Press to increase or decrease volume.
10 Windows button • Press to open the Windows Start
11 Battery‑charging status light Indicates the battery‑charge status.
12 Micro‑USB port • Connect the supplied power adapter to
Insert a microSD card to expand the
tablet’s storage capacity. Your tablet
supports a microSD card with capacity up
to 128 GB.
• Provides sound input while making
calls.
screen.
• Press for quick access to the most
recently used app or most recently
viewed screen.
provide power to the tablet and charge
the battery.
• Connect USB devices for transferring
data, music, photos, videos, and so on.
• Connect both the supplied
power adapter and USB devices
simultaneously using an optional USB
On‑The‑Go (OTG) dongle.
6 | Features

Feature Functionality
13 Power button • Press and hold to turn the tablet on
or off.
• Press to turn the display on or off.
14 Headset port Connect a headset, headphones,
microphone, or other audio equipment
to listen to stereo sound, record audio, or
make calls.
15 Rear camera Captures pictures or records videos.
NOTE: The front camera does not support zoom, face tracking,
or the touch‑to‑focus feature.
NOTE: The rear camera supports continuous auto‑focus and
touch‑to‑focus, but does not support zoom or the face tracking
feature.
NOTE: The micro‑USB port does not support connecting to a
computer.
NOTE: Your tablet connects to the internet only via a Wi‑Fi
network. For information on using Wi‑Fi network, see
“Wi‑FiSetting”.
Features | 7
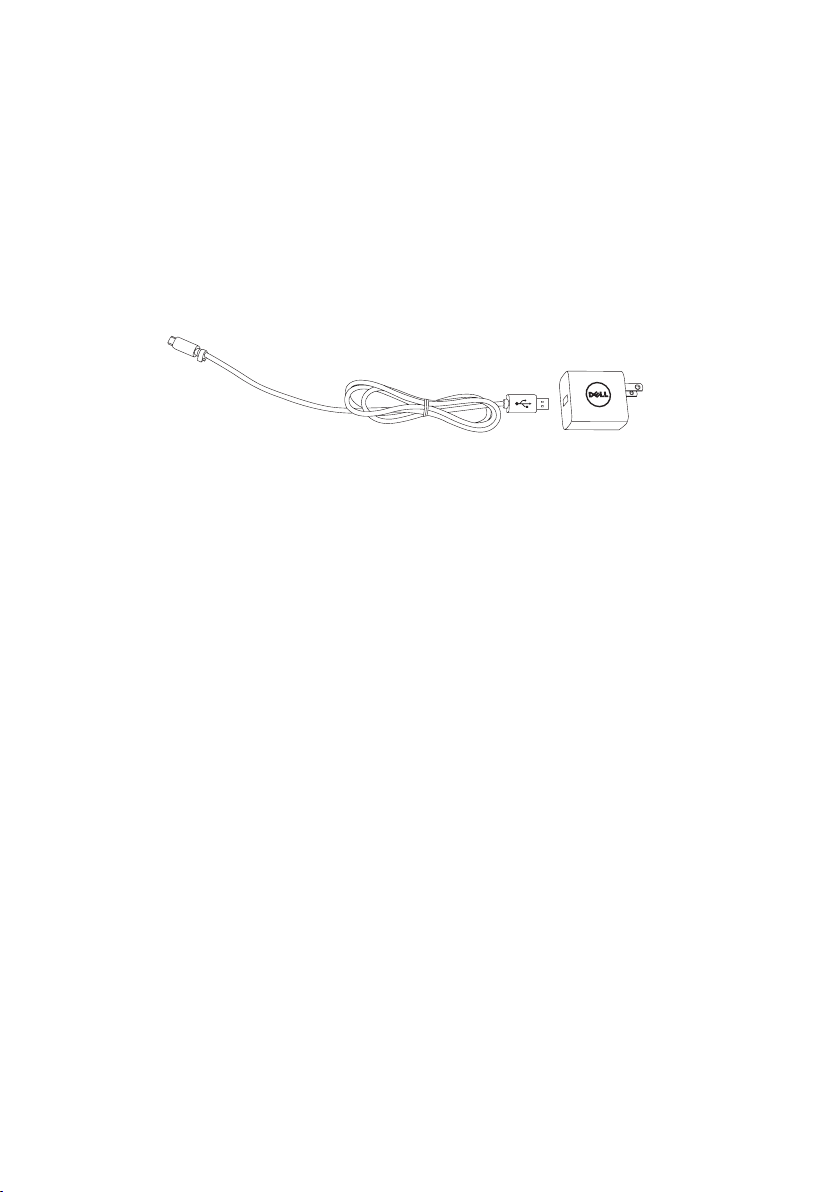
Accessories
Your tablet supports the following accessories:
10 W power adapter and micro-USB cable
Provides power to your tablet and charges the battery.
8 | Accessories

Setting Up Your Tablet
WARNING: Before you begin any of the procedures in this
section, read the safety information that shipped with your
tablet. For additional best practices information, go to
dell.com/regulatory_compliance.
Charging the Tablet
CAUTION: Charge the battery in an ambient temperature of
0°C to 35°C (32°F to 95°F).
CAUTION: Use only the supplied power adapter to charge
your tablet. Using unauthorized power adapters or micro-USB
cables may severely damage your tablet.
NOTE: The battery is not fully charged when you unpack your
tablet.
1 Connect the power cable into the power adapter.
2 Connect the micro‑USB cable to the micro‑USB port on the tablet.
3 Connect the power adapter to an electrical outlet and charge the
tablet until the battery is fully charged.
NOTE: A fully discharged battery takes about 4 to 5 hours to fully
charge.
Setting Up Your Tablet | 9
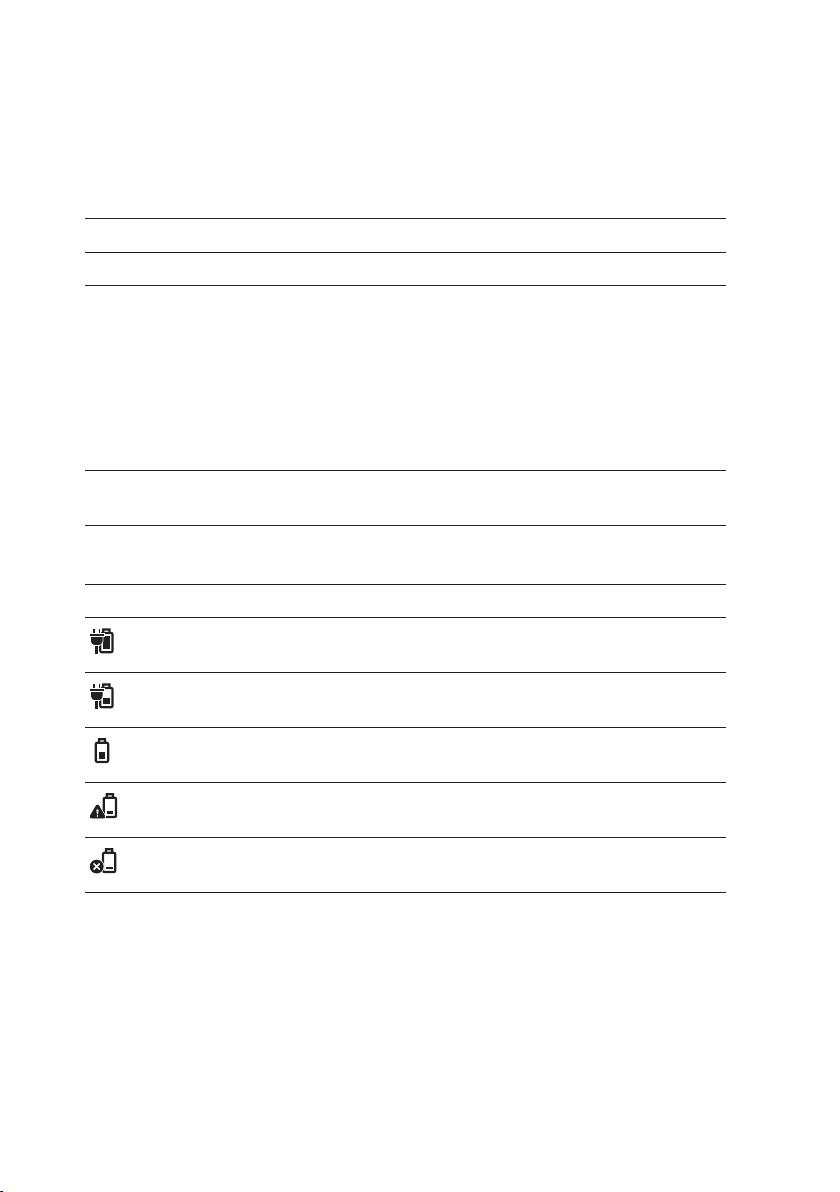
You can check the tablet battery charge status from the battery‑
charging status light or the battery icon displayed at the bottom of the
screen:
LED behavior Description
Solid white Battery is getting charged.
Solid amber Battery charge is critically low and the tablet is off.
NOTE: If you try turning on the tablet when the
battery charge is critically low and the battery
is insufficiently charged, the Dell logo flashes
on the screen, the battery‑charging status light
illuminates for 2 seconds, and then the tablet
turns off.
Off Battery is not getting charged or battery is fully
charged.
Battery icon Description
Tablet is connected to a power supply and the
battery is fully charged.
Tablet is connected to a power supply and the
battery is getting charged.
Tablet is running on the battery power and the
battery is discharging.
Tablet is running on the battery power and the
battery charge is low.
Tablet is running on the battery power and the
battery charge is critically low.
10 | Setting Up Your Tablet

TurningOnYourTablet
When you turn on the tablet for the first time, you must finish
Windows setup to start using your tablet. For more information, see
the
Quick Start Guide
1 Press and hold the power button for 2 seconds to turn on your
tablet. The lock screen appears.
2 Swipe up your finger from the bottom of the display to switch to
the login screen, and then enter password to log in to Windows.
NOTE: If the login screen is not enabled, the Start screen
appears after the lock screen.
that shipped with your tablet.
The tablet is ready for use when the Windows Start screen is displayed.
Setting Up Your Tablet | 11

TurningOYourTablet
Using the power button:
1 Press and hold the power button for at least 4seconds.
2 Swipe down the shutdown confirmation screen to the bottom‑
edge of the display to turn off the tablet.
Using the charms:
1 Swipe in from the right‑edge of the display to access the charms.
2 Touch Settings → Power → Shut down to turn off the tablet.
Using the power button on the Start screen:
1 Touch the power button at the top‑right corner of the Start
screen.
2 Touch Shut down to turn off the tablet.
Turning O the Screen
Using the power button:
Press the power button to turn off the screen.
Using the charms:
1 Swipe in from the right‑edge of the display to access the charms.
2 Touch Settings → Power → Sleep to turn off the screen.
NOTE: If your tablet is in a standby state (tablet is on, but screen
is off), press the power button or Windows button once to turn
on the screen.
12 | Setting Up Your Tablet
 Loading...