

Page 1

Dell Precision™ Workstation
370 Systems
Quick Reference Guide
Models DHM and WHM
www.dell.com | support.dell.com
Page 2

Notes, Notices, and Cautions
NOTE: A NOTE indicates important information that helps you make better use of your computer.
NOTICE: A NOTICE indicates either potential damage to hardware or loss of data and tells you how to avoid
the problem.
CAUTION: A CAUTION indicates a potential for property damage, personal injury, or death.
Abbreviations and Acronyms
For a complete list of abbreviations and acronyms, see the Glossary in your
If you purchased a Dell™ n Series computer, any references in this document to Microsoft
User’s Guide
.
®
Windows®
operating systems are not applicable.
____________________
Information in this document is subject to change without notice.
© 2004 Dell Inc. All rights reserved.
Reproduction in any manner whatsoever without the written permission of Dell Inc. is strictly forbidden.
Trademarks used in this text: Dell, the DELL logo, and Dell Precision are trademarks of Dell Inc.;
Microsoft and Windows are registered trademarks of Microsoft Corporation.
Other trademarks and trade names may be used in this document to refer to either the entities claiming the marks and names
or their products. Dell Inc. disclaims any proprietary interest in trademarks and trade names other than its own.
Models DHM and WHM
April 2004 P/N U3525 Rev. A00
Page 3

Contents
Finding Information and Assistance . . . . . . . . . . . . . . . . . . . . 5
Setting Up Your Mini-Tower Computer
Setting Up Your Desktop Computer
Locating Your User’s Guide
. . . . . . . . . . . . . . . . . . . . . . . . . 19
Opening Your Mini-Tower Computer
The Card Cooling Fan
. . . . . . . . . . . . . . . . . . . . . . . . . . . 22
Opening Your Desktop Computer
Caring for Your Computer
Solving Problems
Troubleshooting Tips
. . . . . . . . . . . . . . . . . . . . . . . . . . 24
. . . . . . . . . . . . . . . . . . . . . . . . . . . . . 25
. . . . . . . . . . . . . . . . . . . . . . . . . 25
. . . . . . . . . . . . . . . . . . . 9
. . . . . . . . . . . . . . . . . . . . . 14
. . . . . . . . . . . . . . . . . . . . 20
. . . . . . . . . . . . . . . . . . . . . . 23
Resolving Software and Hardware Incompatibilities
Using Microsoft Windows XP System Restore
Using Last Known Good Configuration
Dell Diagnostics
Before You Start Testing
Beep Codes
Error Messages
Diagnostic Lights
Frequently Asked Questions
. . . . . . . . . . . . . . . . . . . . . . . . . . . . 28
. . . . . . . . . . . . . . . . . . . . . . . . 30
. . . . . . . . . . . . . . . . . . . . . . . . . . . . . . . . 30
. . . . . . . . . . . . . . . . . . . . . . . . . . . . 31
. . . . . . . . . . . . . . . . . . . . . . . . . . . . . 31
. . . . . . . . . . . . . . . . . . . . . . . . 36
. . . . . . . . . . . . . . . . . 28
. . . . . . . . . . 25
. . . . . . . . . . . . . 26
Index . . . . . . . . . . . . . . . . . . . . . . . . . . . . . . . . . . . . 39
Contents 3
Page 4

4 Contents
Page 5
Finding Information and Assistance
What Are You Looking For? Find it Here
• A diagnostic program for my computer
• Drivers for my computer
• My device documentation
• System board connectors
• Location of system board components
Drivers and Utilities CD (also known as the ResourceCD)
Documentation and drivers are already installed on your
computer. You can use the CD to reinstall drivers, run the
Dell Diagnostics (see page 28), or access your device
documentation.
NOTE: The latest drivers and documentation updates
can be found at support.dell.com.
System Information Label
Located on the inside cover of your computer.
Readme files may be
included on your CD
to provide last-minute
updates about technical
changes to your
computer or advanced
technical-reference
material for technicians
or experienced users.
Quick Reference Guide 5
Page 6
What Are You Looking For? Find it Here
• Warranty information
Dell™ Product Information Guide
• Safety instructions
• Regulatory information
• Ergonomics information
• End User License Agreement
www.dell.com | support.dell.com
• How to remove and replace parts
• Technical specifications
• How to configure system settings
• How to troubleshoot and solve problems
• Service Tag and Express Service Code
• Microsoft Windows License Label
Dell Precision User’s Guide
Microsoft
1
2
Service Tag and Microsoft Windows License
These labels are located on your computer.
• Use the Service Tag
• Enter the Express
®
Windows® XP Help and Support Center
Click the
Click
Start
button and click
User’s and system guides
Help and Support.
and click
User’s guides
to identify your
computer when you
support.dell.com
use
or contact technical
support.
Service Code to direct your call when contacting
technical support. The Express Service Code is not
available in all countries.
.
6 Quick Reference Guide
Page 7

What Are You Looking For? Find it Here
• Latest drivers for my computer
• Answers to technical service and support questions
• Online discussions with other users and technical
support
• Documentation for my computer
Dell Support Website — support.dell.com
NOTE: Select your region to view the appropriate support
site.
The Dell Support website provides several online tools,
including:
• Solutions — Troubleshooting hints and tips, articles
from technicians, and online courses
• Community — Online discussion with other Dell
customers
• Upgrades — Upgrade information for components, such
as memory, the hard drive, and the operating system
• Customer Care — Contact information, order status,
warranty, and repair information
• Downloads — Drivers, patches, and software updates
• Reference — Computer documentation, product
specifications, and white papers
• Service call status and support history
• Top technical issues for my computer
• Frequently asked questions
• File downloads
Dell Premier Support Website — premiersupport.dell.com
The Dell Premier Support website is customized for
corporate, government, and education customers. This
website may not be available in all regions.
• Details on my computer configuration
• Service contract for my computer
• How to use Windows XP
• Documentation for my computer
• Documentation for devices (such as a modem)
Windows Help and Support Center
1
Click the
2
Type a word or phrase that describes your problem
and click the arrow icon.
3
Click the topic that describes your problem.
4
Follow the instructions on the screen.
• How to use Linux
• E-mail discussions with Dell Precision and Linux users
• Additional information regarding Linux and my Dell
Precision computer
Dell Supported Linux Sites
• http://linux.dell.com
• http://lists.us.dell.com/mailman/listinfo/linuxprecision
• http://docs.us.dell.com/docs/software/oslinux/
• http://docs.us.dell.com/docs/software/OSRHEL3/
Start
button and click
Help and Support
.
Quick Reference Guide 7
Page 8

What Are You Looking For? Find it Here
• How to reinstall my operating system
www.dell.com | support.dell.com
Operating System CD
The operating system is already installed on your
computer. To reinstall your operating system, use the
Operating System CD. See your Precision User’s Guide
for instructions.
NOTE: The color of your CD varies based on the operating
system you ordered.
After you reinstall your
operating system, use the
Drivers and Utilities CD
to reinstall drivers for the
devices that came with
your computer.
Your operating system
product key label is
located on your
computer.
8 Quick Reference Guide
Page 9
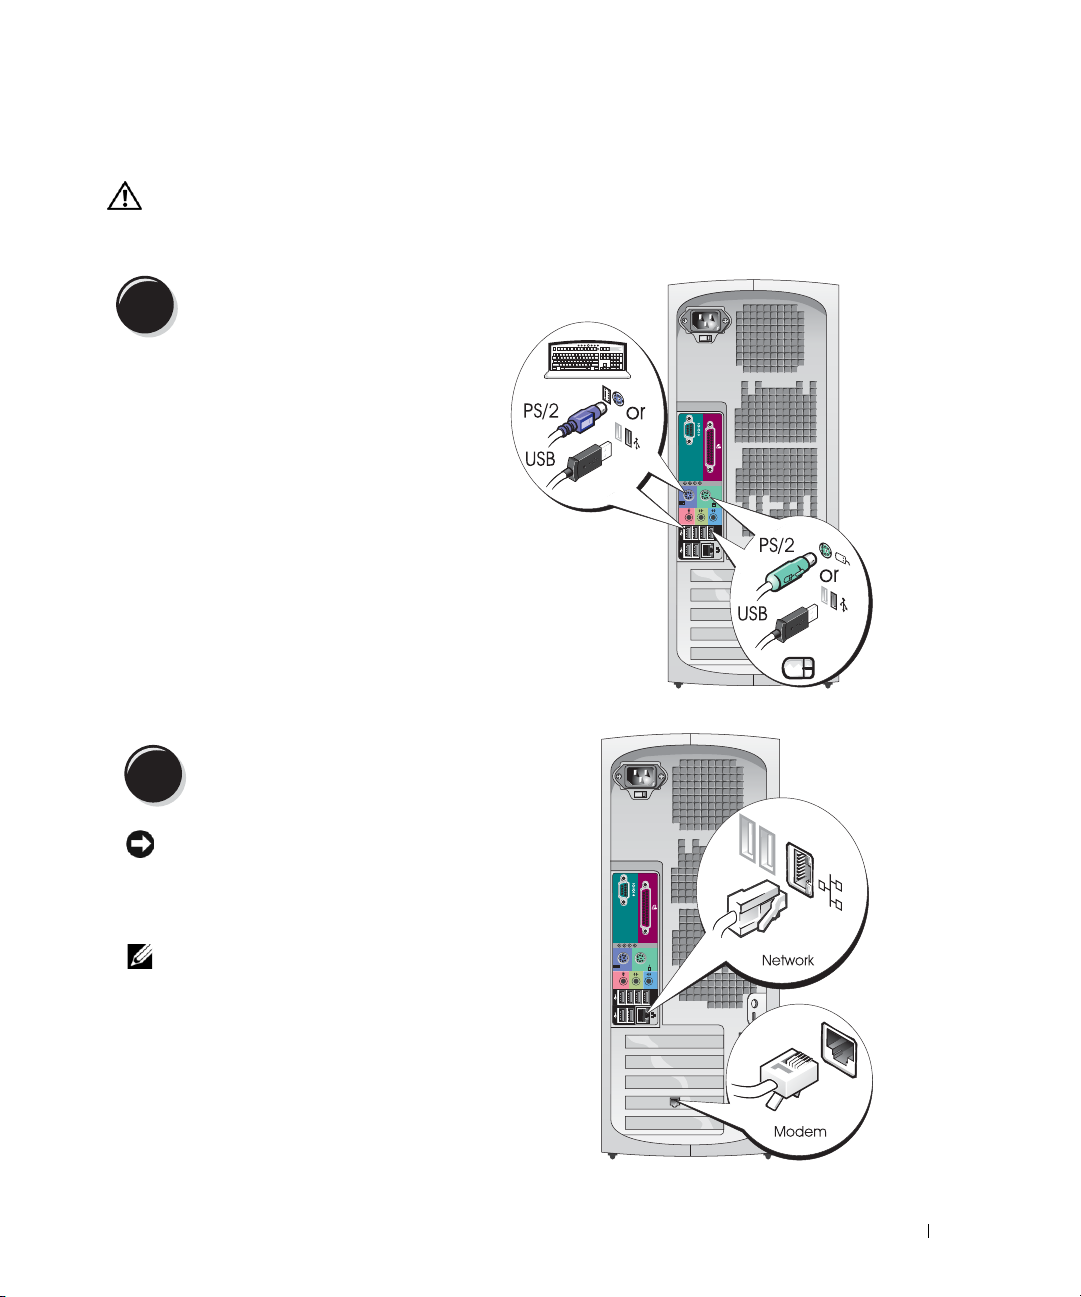
Setting Up Your Mini-Tower Computer
CAUTION: Before you begin any of the procedures in this section, follow the safety instructions
located in the Product Information Guide.
You must complete all steps to properly set up your computer.
Connect the keyboard and the mouse.
1
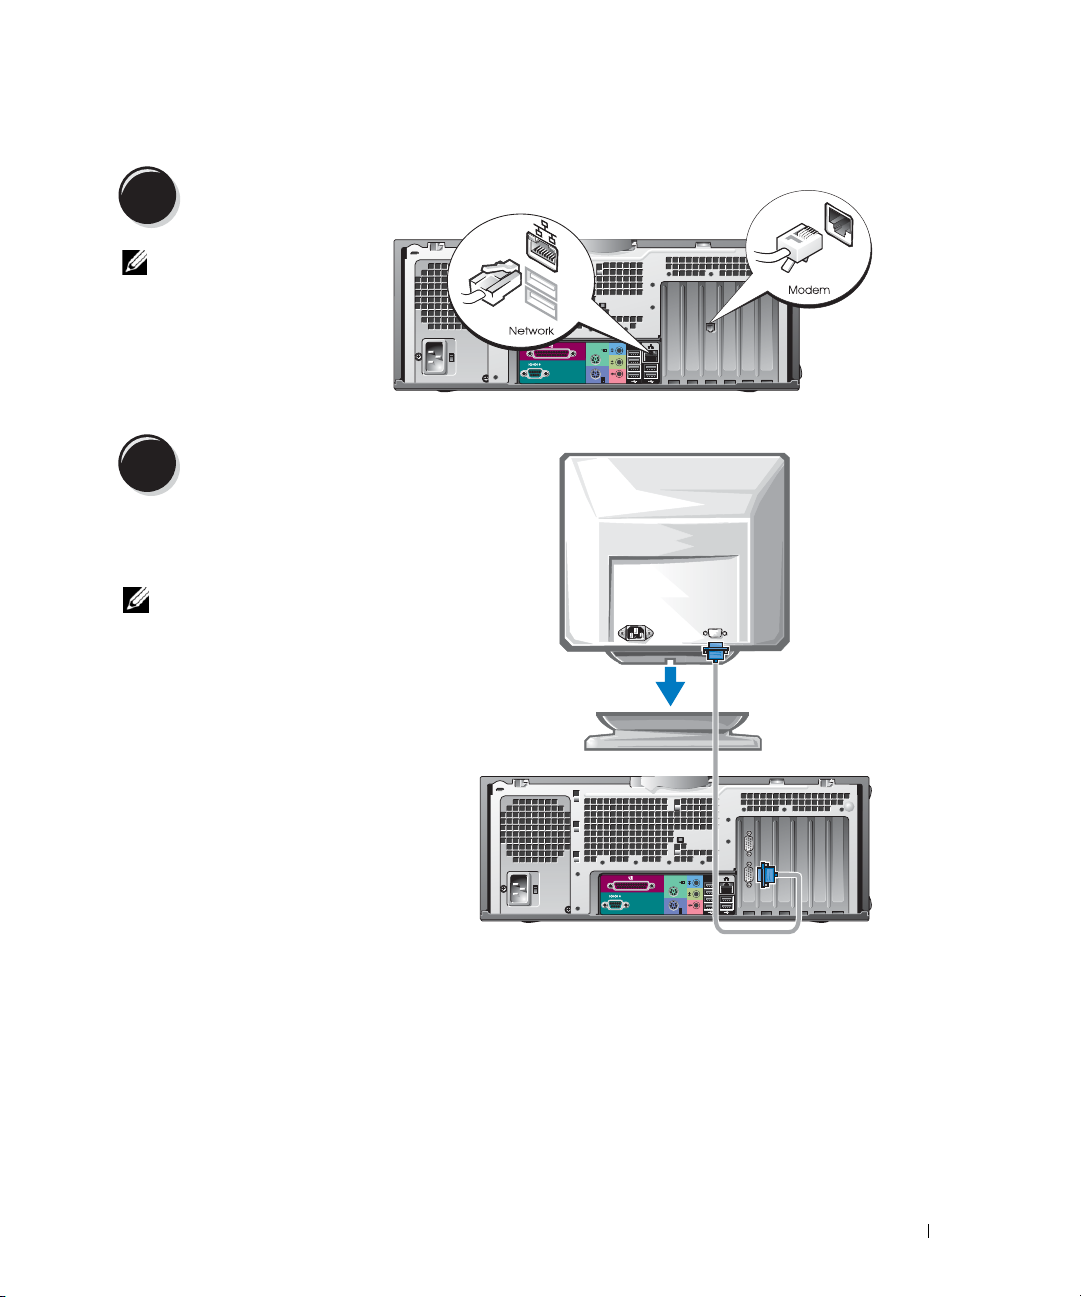
Connect the modem or the network cable.
2
NOTICE: Do not connect a modem cable to the
network adapter. Voltage from telephone
communications can damage the network adapter.
NOTE: If your computer has a network card installed,
connect the network cable to the card.
Quick Reference Guide 9
Page 10

Connect the monitor.
3
Depending on your graphics
card, you can connect your
monitor in various ways.
NOTE: You may need to use
the provided adapter or
www.dell.com | support.dell.com
cable to connect your
monitor to the computer.
10 Quick Reference Guide
Page 11
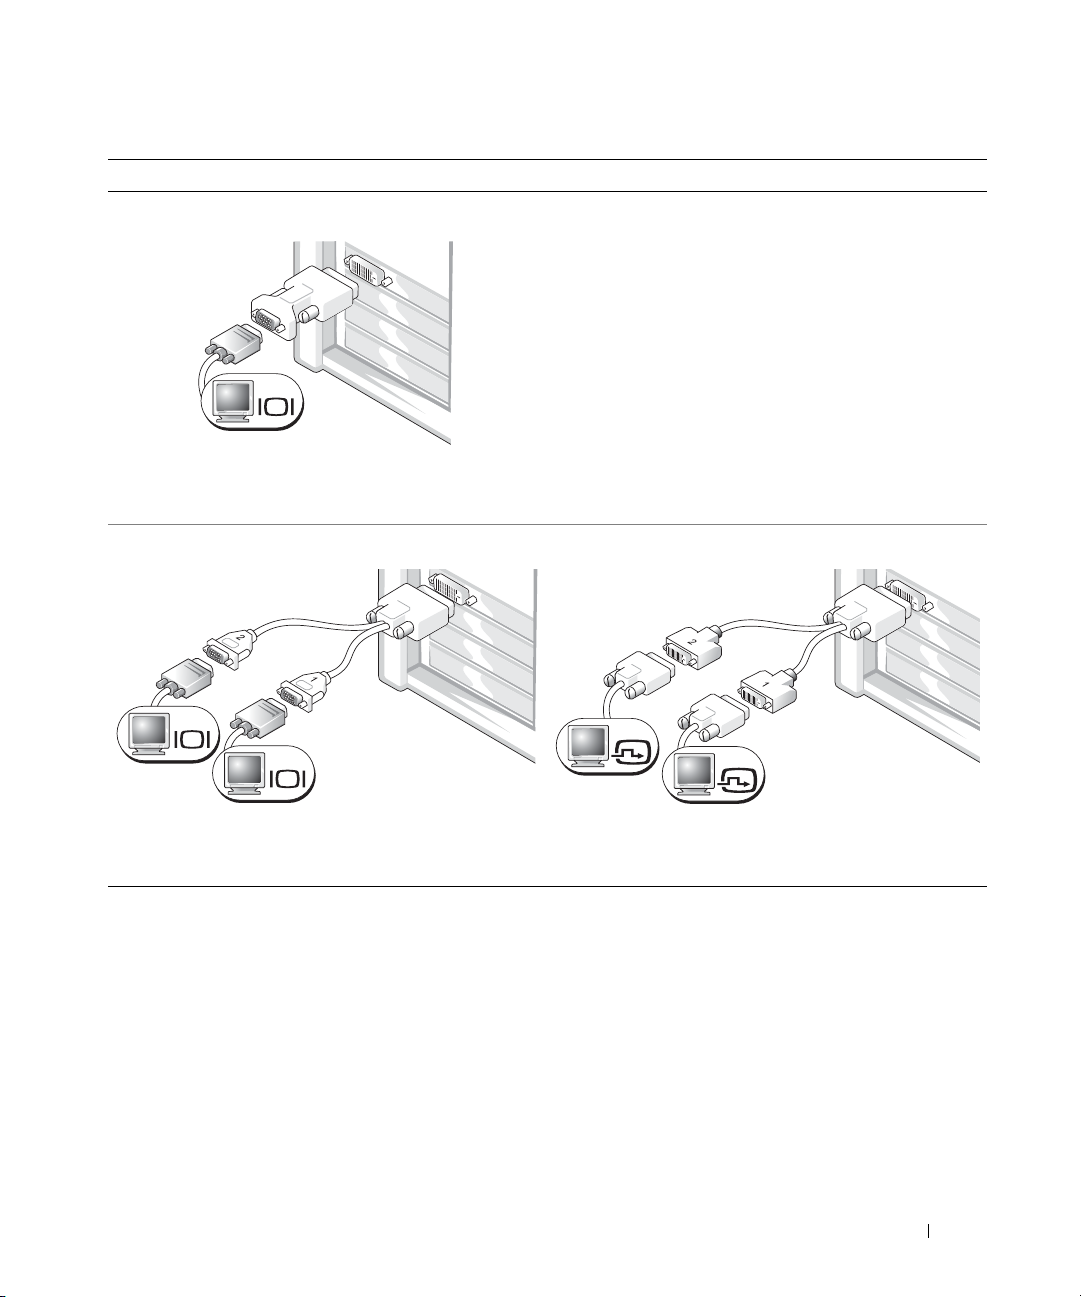
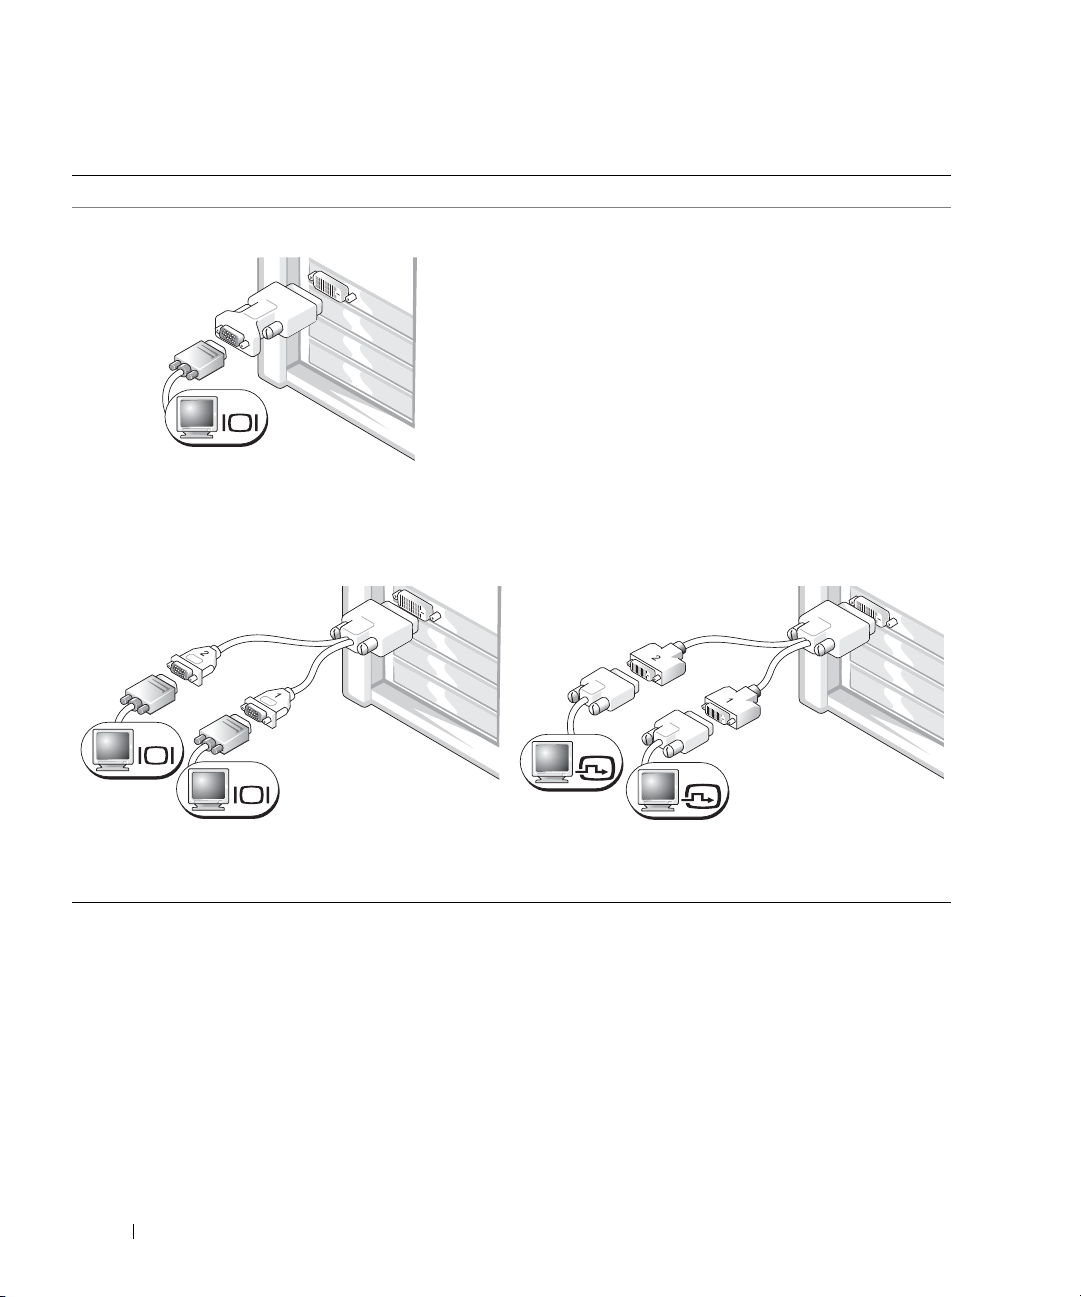
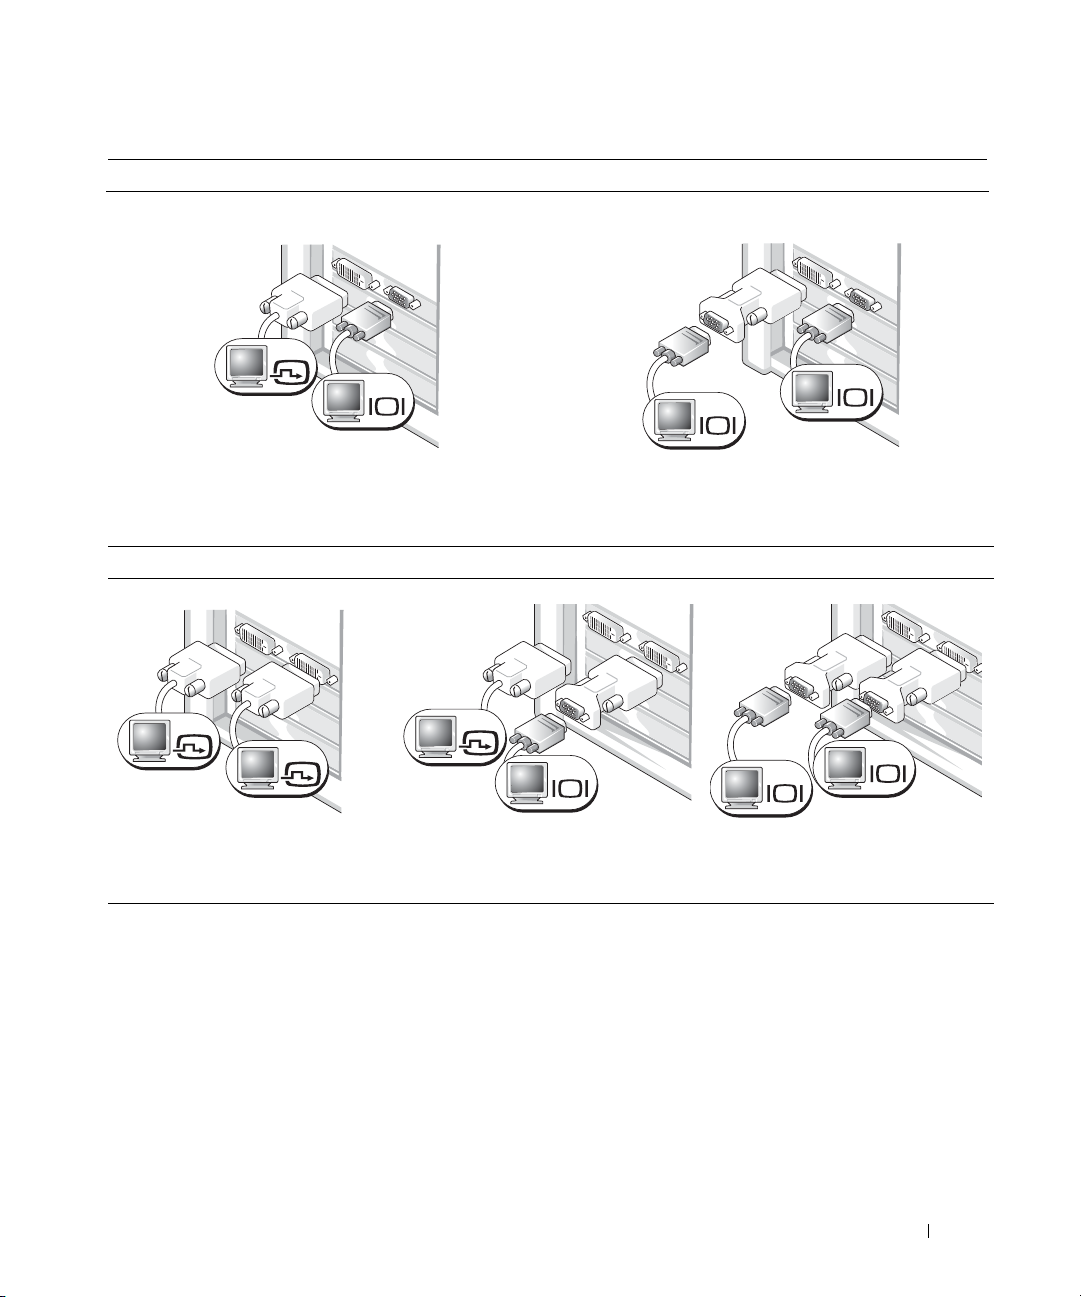
For single- and dual-monitor capable cards with a single connector
VGA Adapter
VGA
Use the VGA adapter when you have a single monitor
graphics card and you want to connect your computer
to a VGA monitor.
Dual VGA Y Cable Adapter
Dual DVI Y Cable Adapter
VGA
VGA
Use the appropriate Y cable when your graphics card has a
single connector and you want to connect your computer
to one or two VGA monitors.
Use the appropriate Y cable when your graphics card has a
single connector and you want to connect your computer
to one or two DVI monitors.
DVI
DVI
The dual-monitor cable is color coded; the blue connector is for the primary monitor, and the black
connector is for the secondary monitor. To enable dual-monitor support, both monitors must be
attached to the computer when it starts.
Quick Reference Guide 11
Page 12
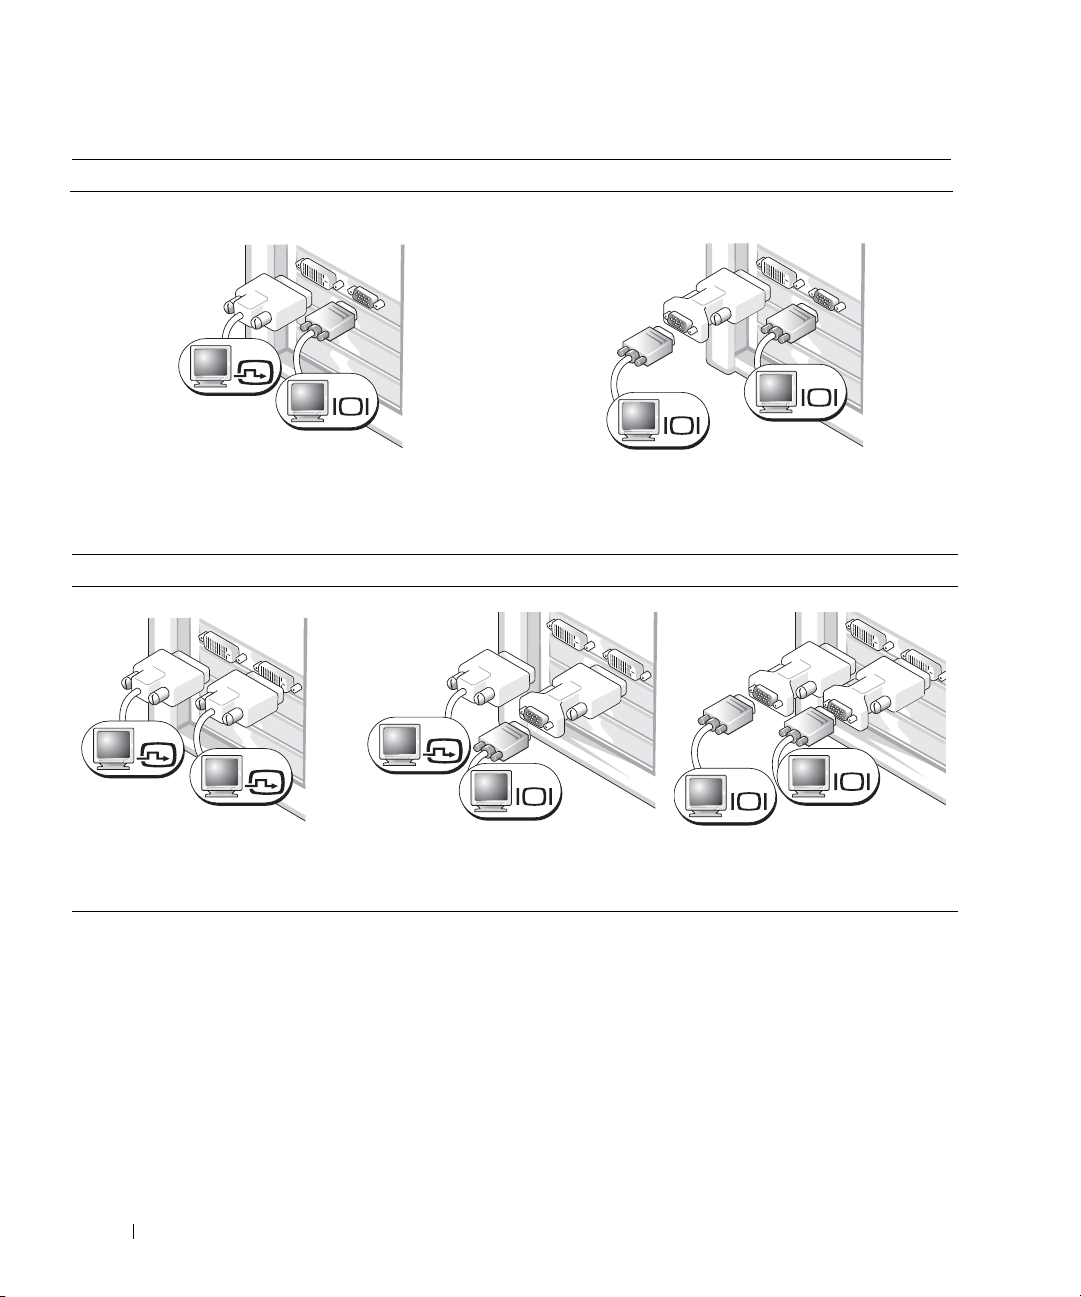
For dual-monitor capable cards with 1 DVI and 1 VGA connector
Single DVI/Single VGA
DVI
VGA
www.dell.com | support.dell.com
Use the appropriate connector(s) when you want
to connect your computer to one or two monitors.
For dual-monitor capable cards with 2 DVI connectors
Dual DVI
Dual DVI With One VGA Adapter
Dual VGA With VGA Adapter
VGA
VGA
Use the VGA adapter when you want to connect
your computer to two VGA monitors.
Dual DVI With Two VGA Adapters
DVI
DVI
Use the DVI connectors to connect
your computer to one or two DVI
monitors.
12 Quick Reference Guide
DVI
VGA
Use the VGA adapter to connect a
VGA monitor to one of the DVI
connector.s on your computer
VGA
VGA
Use two VGA adapters to connect two
VGA monitors to the DVI connectors
on your computer.
Page 13
Connect the
4
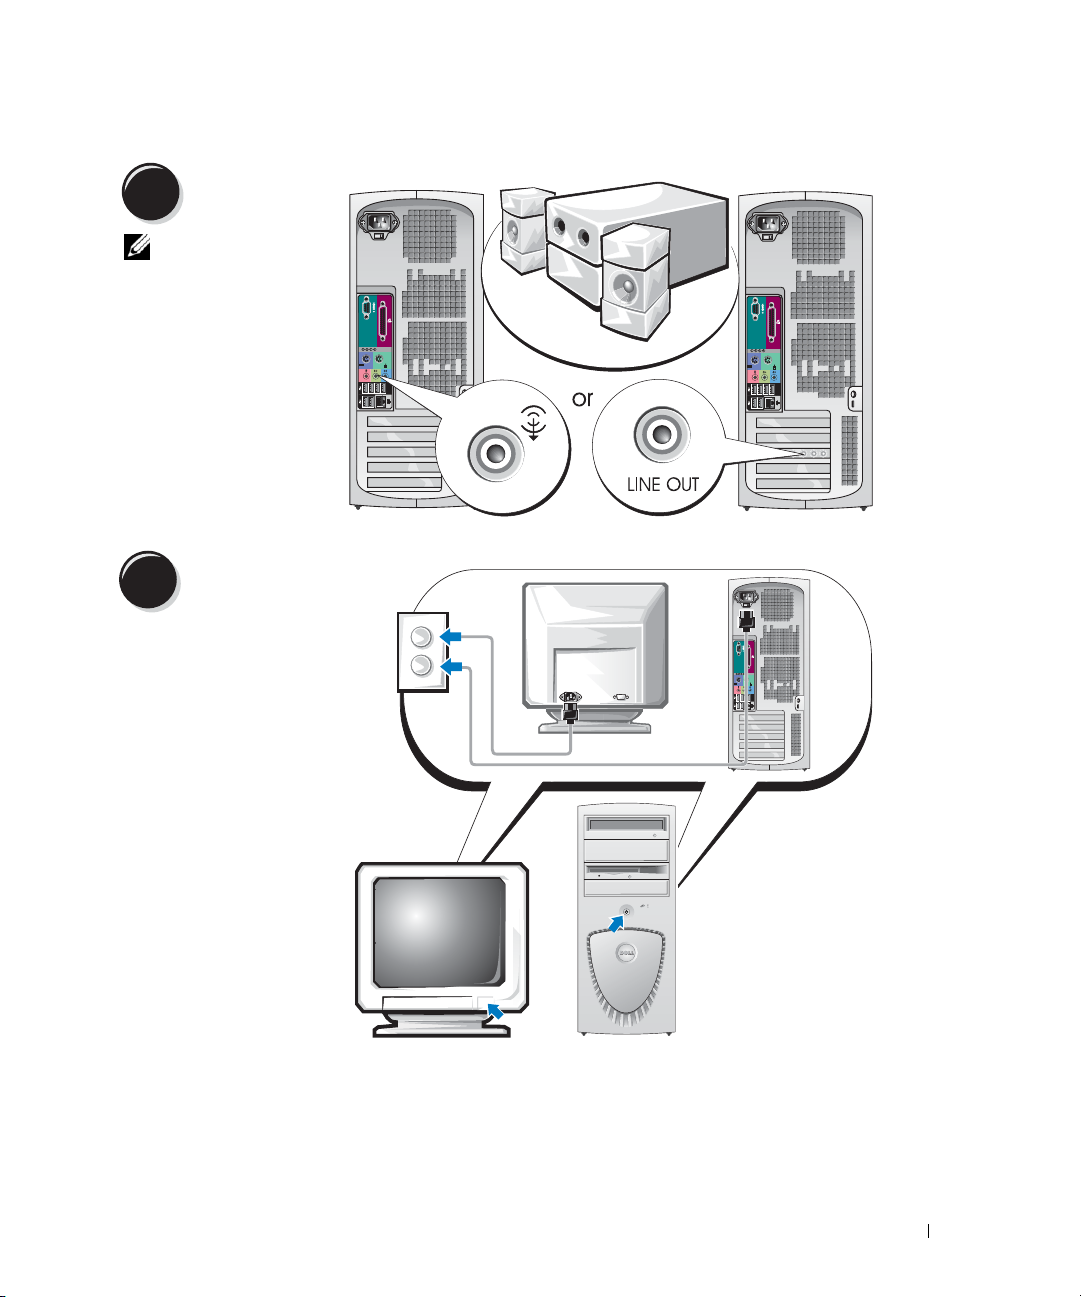
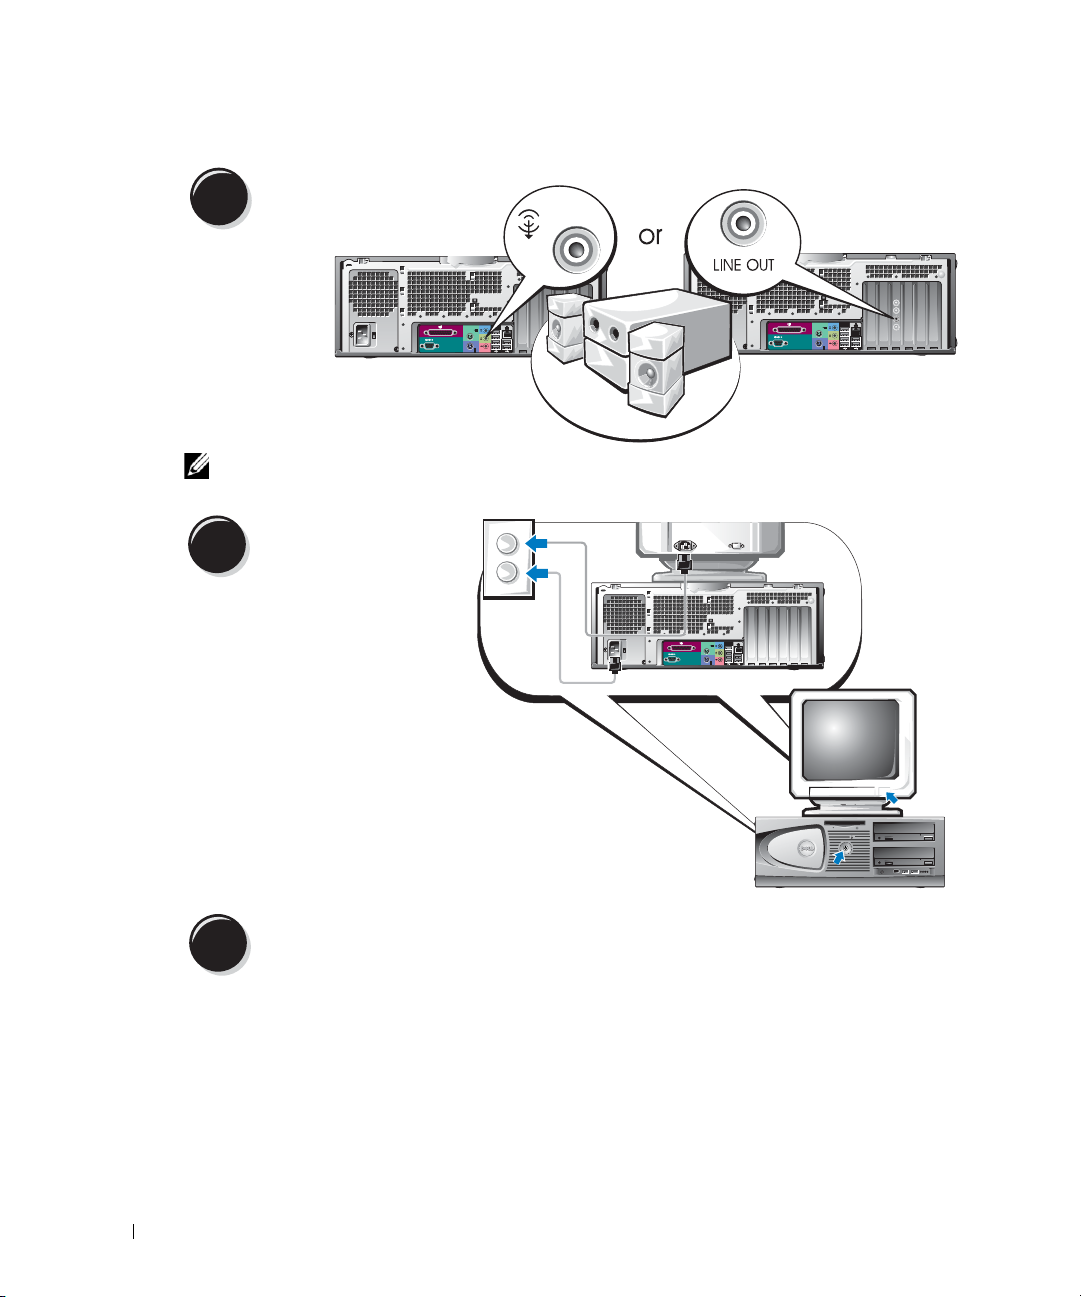
speakers.
NOTE: If your
computer has an audio
card installed, connect
the speakers to the
card.
Connect the power
5
cables and turn on
the computer and
monitor.
Quick Reference Guide 13
Page 14

Install additional software or devices.
6
Before you install any devices or software that did not come with your computer, read the
documentation that came with the software or device or contact the vendor to verify that
the software or device is compatible with your computer and operating system.
Congratulations! You have completed the setup for your mini-tower computer.
Setting Up Your Desktop Computer
www.dell.com | support.dell.com
CAUTION: Before you begin any of the procedures in this section, follow the safety instructions
located in the Product Information Guide.
You must complete all steps to properly set up your computer.
Connect the keyboard and the mouse.
1
NOTICE: Do not connect a
modem cable to the network
adapter. Voltage from
telephone communications
can damage the network
adapter.
14 Quick Reference Guide
Page 15
Connect the modem
2
or the network cable.
NOTE: If your computer
has a network card
installed, connect the
network cable to the card.
Connect the monitor.
3
Depending on your graphics card, you
can connect your monitor in various
ways.
NOTE: You may need to use the
provided adapter or cable to connect
your monitor to the computer.
Quick Reference Guide 15
Page 16
For single- and dual-monitor capable cards with a single connector
VGA Adapter
VGA
www.dell.com | support.dell.com
Use the VGA adapter when you have a single monitor
graphics card and you want to connect your computer
to a VGA monitor.
Dual VGA Y Cable Adapter
Dual DVI Y Cable Adapter
VGA
VGA
Use the appropriate Y cable when your graphics card has a
single connector and you want to connect your computer
to one or two VGA monitors.
The dual-monitor cable is color coded; the blue connector is for the primary monitor, and the black
connector is for the secondary monitor. To enable dual-monitor support, both monitors must be
attached to the computer when it starts.
16 Quick Reference Guide
DVI
DVI
Use the appropriate Y cable when your graphics card has a
single connector and you want to connect your computer
to one or two DVI monitors.
Page 17
For dual-monitor capable cards with 1 DVI and 1 VGA connector
Single DVI/Single VGA
DVI
VGA
Dual VGA With VGA Adapter
VGA
VGA
Use the appropriate connector(s) when you want
to connect your computer to one or two monitors.
For dual-monitor capable cards with 2 DVI connectors
Dual DVI
DVI
DVI
Use the DVI connector(s) to connect
your computer to one or two DVI
monitors.
Dual DVI With One VGA Adapter
DVI
Use the VGA adapter to connect
a VGA monitor to one of the DVI
connectors on your computer.
Use the VGA adapter when you want to connect
your computer to two VGA monitors.
Dual DVI With Two VGA Adapters
VGA
VGA
VGA
Use two VGA adapters to connect
two VGA monitors to the DVI
connectors on your computer.
Quick Reference Guide 17
Page 18
Connect the speakers.
4
www.dell.com | support.dell.com
NOTE: If your computer has an audio card installed, connect the speakers to the card.
Connect the power cables
and turn on the computer
5
and monitor.
Your desktop computer has an
optional front IEEE 1394
connector. This connector is only
available if you purchased an addin IEEE 1394 card. To purchase a
card, contact Dell. For more
information on the add-in card,
see your
User’s Guide
.
Install additional software or devices.
6
Before you install any devices or software that did not come with your computer, read the
documentation that came with the software or device or contact the vendor to verify that
the software or device is compatible with your computer and operating system.
Congratulations! You have completed the setup for your desktop computer.
18 Quick Reference Guide
Page 19

Locating Your User’s Guide
Your
Dell Precision™ Workstation 370 User’s Guide
your computer such as:
• Technical specifications
• Front and back views of your computer, including all of the available connectors
• Inside views of your computer, including a detailed graphic of the system board
and the connectors
• Instructions for cleaning your computer
• Information on software features, such as LegacySelect Technology control, using a password,
and system setup options
• Tips and information for using the Microsoft Windows XP operating system
• Instructions for removing and installing parts, including memory, cards, drives,
the microprocessor, and the battery
• Information for troubleshooting various computer problems
• Instructions for using the Dell Diagnostics and reinstalling drivers
• Information on how to contact Dell
You can access the
support.dell.com
at
To access the User’s Guide from your hard drive:
Click the
Start
User’s Guide
.
button and click
from your hard drive or the Dell Support website
Help and Support
contains additional information about
.
To access your User’s Guide from the Dell Support Site:
1
Go to
support.dell.com
2
Follow the prompts on the website that ask you for information specific to your computer.
3
At the Dell Support website home page, click
and then select your Dell Precision computer.
.
Reference
, click
User’s Guides
Quick Reference Guide 19
, click
Systems
,
Page 20

Opening Your Mini-Tower Computer
CAUTION: Before you begin any of the procedures in this section, follow the safety instructions
located in the Product Information Guide.
CAUTION: To guard against electrical shock, always unplug your computer from the electrical outlet
before opening the cover.
NOTICE: To avoid losing data, save and close any open files and exit any open programs before you turn
off your computer.
Shut down the operating system:
1
a
Save and close any open files, exit any open programs, click the
www.dell.com | support.dell.com
2
3
4
5
6
then click
b
In the
The computer turns off after the operating system shutdown process finishes.
Ensure that the computer and any attached devices are turned off. If your computer and
attached devices did not automatically turn off when you shut down your operating system,
turn them off now.
If you have installed a padlock through the padlock ring on the back panel, remove the
padlock.
NOTICE: Ensure that sufficient space exists to support the open cover—at least 30 cm (1 ft) of desk top
space.
Lay the computer on its side as shown in the following illustration.
Open the cover:
a
Facing the back of the computer, press the release button on the right side of the
computer with one hand while pulling up on the top of the cover with the other hand.
b
Press the release button on the left side of the computer with one hand while pulling up
on the top of the cover with the other hand.
Hold the bottom of the computer with one hand, and then pull open the cover with the other
hand.
Turn Off Computer
Turn off computer
.
window, click
Turn off
Start
button, and
.
20 Quick Reference Guide
Page 21
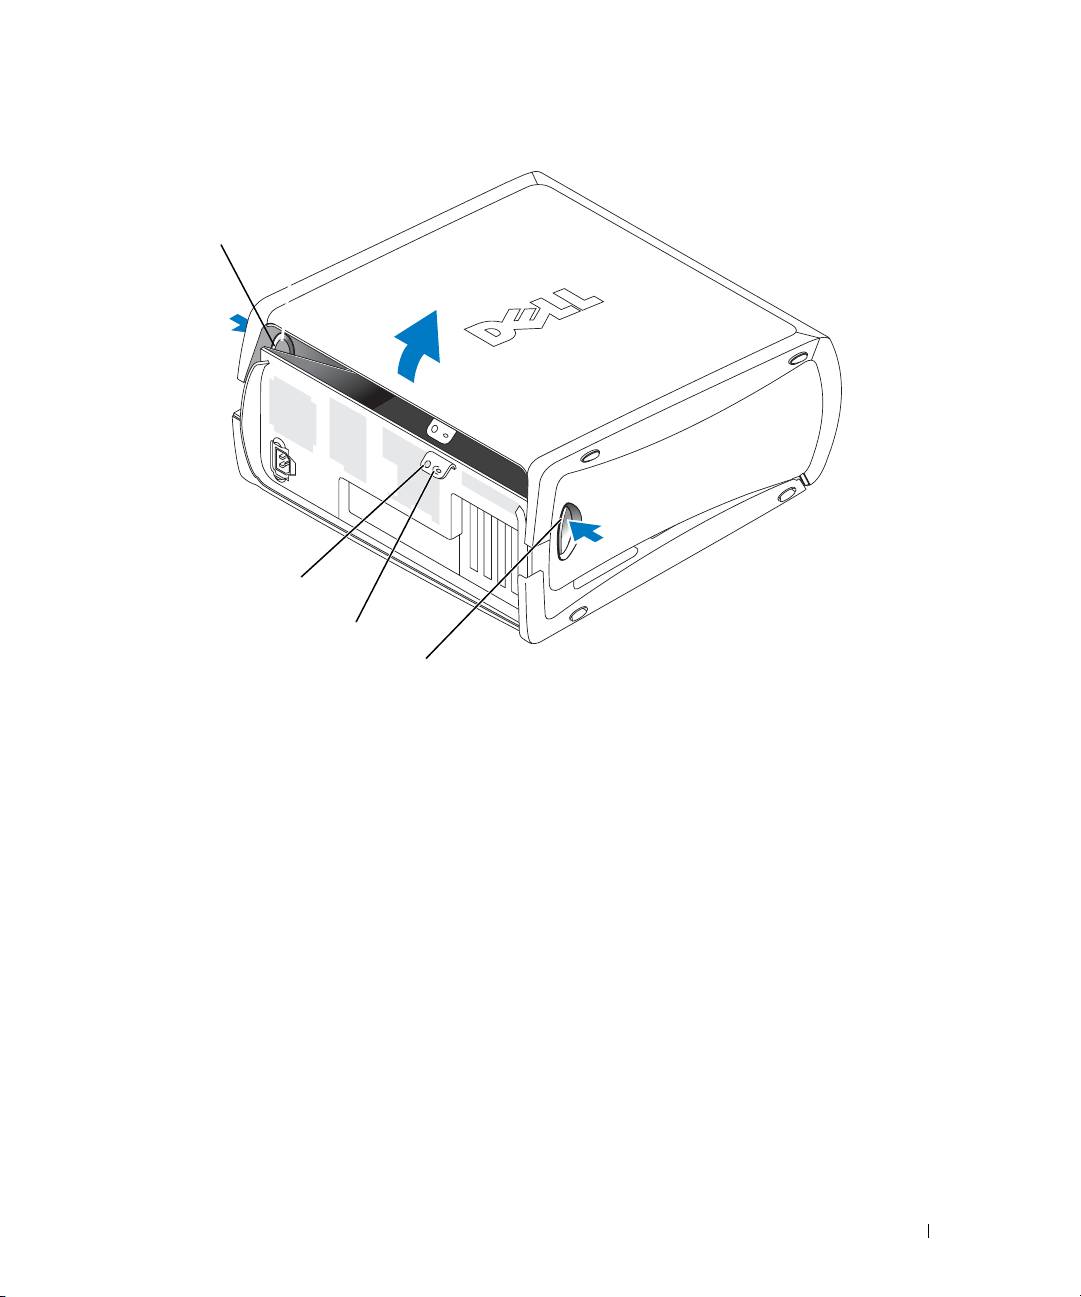
release button
security cable slot
padlock ring
release button
Quick Reference Guide 21
Page 22
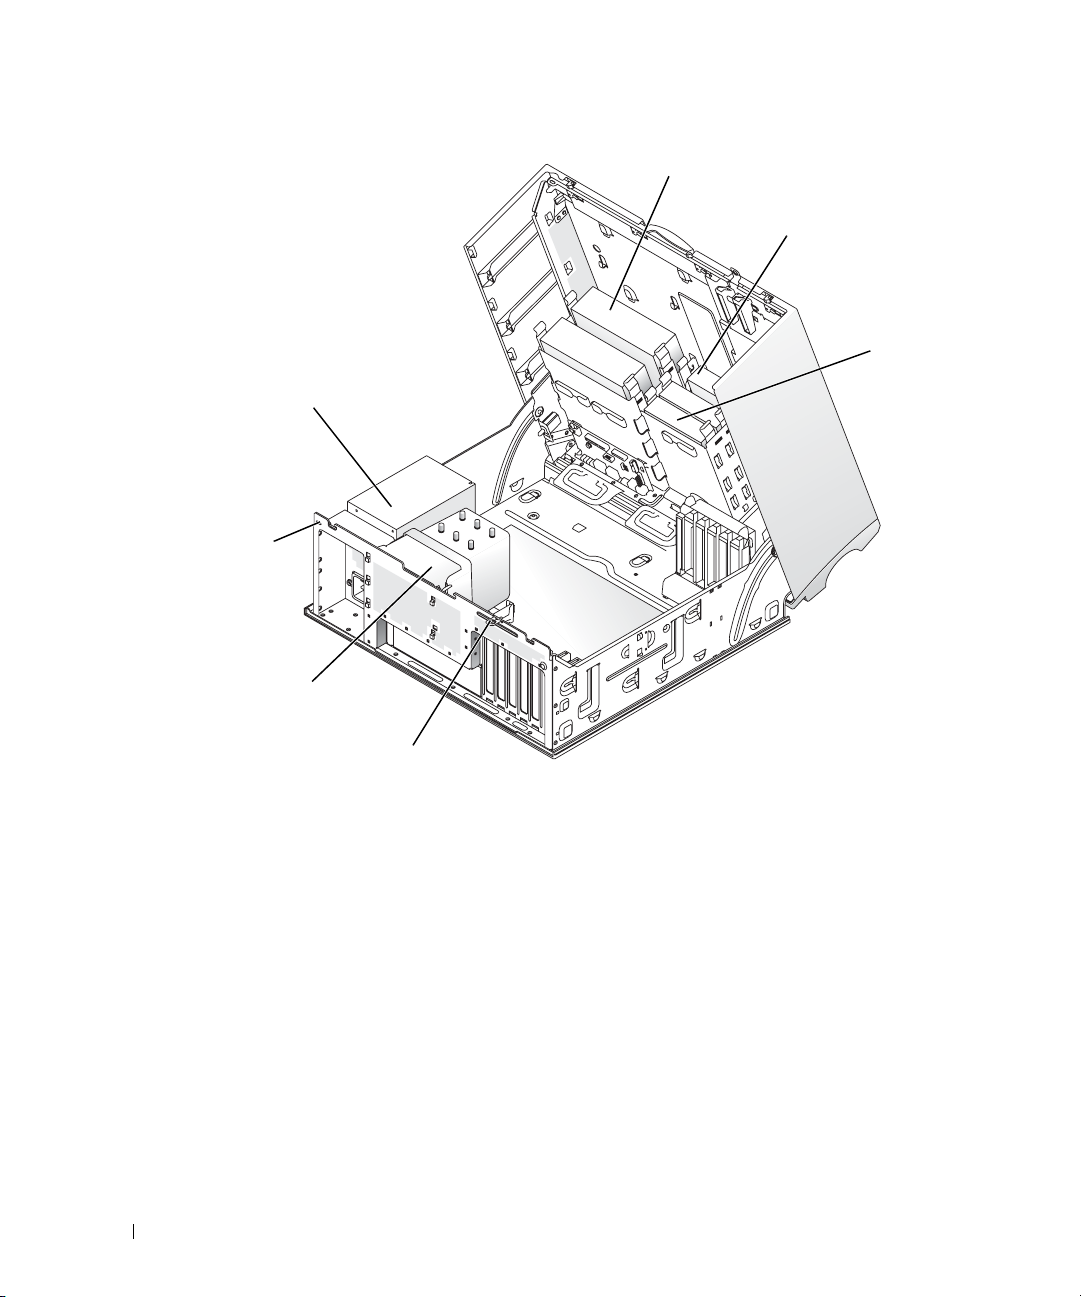
CD/DVD drive
card fan
power supply
www.dell.com | support.dell.com
processor
airflow shroud
and fan
security cable slot
The Card Cooling Fan
NOTICE: PCI Express graphics cards that run higher than 75 watts (W) require an additional cooling fan
installed. Otherwise, your card could overheat and damage your computer.
If you ordered your computer with a graphics card that requires the fan, the fan is included. If a
card fan is not present in your computer and you are installing a graphics card that runs higher than
75 W, contact Dell to purchase a card fan.
If the computer detects that you have installed a card that requires a fan, an error message appears.
For Dell contact information, see your
Contact Us
.
padlock ring
floppy drive
(optional)
User's Guide
or go to
system board
support.dell.com
hard drive
and click
22 Quick Reference Guide
Page 23

Opening Your Desktop Computer
CAUTION: Before you begin any of the procedures in this section, follow the safety instructions
located in the Product Information Guide.
CAUTION: To prevent static damage to components inside your computer, discharge static electricity
from your body before you touch any of your computer’s electronic components. You can do so by
touching an unpainted metal surface on the computer.
NOTICE: To avoid losing data, save and close any open files and exit any open programs before you turn
off your computer.
Shut down the operating system:
1
a
Save and close any open files, exit any open programs, click the
click
b
Turn Off Computer
In the
Turn off computer
.
window, click
Turn off
.
The computer turns off after the operating system shutdown process finishes.
2
Ensure that the computer and any attached devices are turned off. If your computer and
attached devices did not automatically turn off when you shut down your operating system,
turn them off now.
3
Slide the cover release latch to the left.
4
Raise the cover, and pivot it toward the front of the computer.
Start
button, and then
cover latch release
security
cable slot
padlock ring
Quick Reference Guide 23
Page 24
power supply
s
www.dell.com | support.dell.com
ecurity
cable slot
processor airflow
shroud and fan
CD/DVD drive
floppy drive (optional)
hard drive
padlock ring
Caring for Your Computer
To help maintain your computer, follow these suggestions:
• To avoid losing or corrupting data, never turn off your computer when the hard drive light is
on.
• Schedule regular virus scans using virus software.
24 Quick Reference Guide
• Manage hard drive space by periodically deleting unnecessary files and defragmenting
the drive.
• Back up files on a regular basis.
• Periodically clean your monitor screen, mouse, and keyboard (see your
User’s Guide
for more
information).
Page 25

Solving Problems
Troubleshooting Tips
Follow the following tips when you troubleshoot your computer:
• If you added or removed a part before the problem started, review the installation procedures
and ensure that the part is correctly installed.
• If a peripheral device does not work, ensure that the device is properly connected.
• If an error message appears on the screen, write down the exact message. The message may
help technical support personnel diagnose and fix the problem(s).
• If an error message occurs in a program, see the program’s documentation.
• If the recommended action in the troubleshooting section is to see a section in your
Guide
, go to
support.dell.com (on another computer if necessary) to access your
Guide.
Resolving Software and Hardware Incompatibilities
If a device is either not detected during the operating system setup or is detected but incorrectly
configured, you can use the Hardware Troubleshooter to resolve the incompatibility. In the
Microsoft
incompatibilities.
Windows XP
To resolve incompatibilities using the Hardware Troubleshooter:
1
2
3
4
®
Windows® 2000 operating system, you can also use Device Manager to resolve
Click the
Ty p e
Start
button and click
Help and Support
hardware troubleshooter
in the
.
Search
field and click the arrow to start
the search.
Click
Hardware Troubleshooter
In the
Hardware Troubleshooter
on my computer
, and click
Next
in the
Search Results
list, click
.
list.
I need to resolve a hardware conflict
User’s
User’s
Windows 2000
To resolve incompatibilities using Device Manager:
1
Click the
2
In the
3
Click the
4
Click
5
Click
Start
button, point to
Control Panel
Hardware
tab.
Device Manager
View
and click
Resources by connection
Settings
, and then click
window, double-click
.
System
Control Panel
.
.
.
Quick Reference Guide 25
Page 26

6
Double-click
Incorrectly configured devices are indicated by a yellow exclamation point (
the device has been disabled.
7
Double-click any device marked with an exclamation point to display the
The
Device status
reconfigured.
8
Reconfigure the devices or remove the devices from the Device Manager. See the
documentation that came with the device for information on configuring the device.
To resolve incompatibilities using the Hardware Troubleshooter:
1
www.dell.com | support.dell.com
Click the
2
Click
Troubleshooting and Maintenance
troubleshooters
3
In the
Hardware Troubleshooter
computer
Using Microsoft Windows XP System Restore
The Microsoft Windows XP operating system provides System Restore to allow you to return
your computer to an earlier operating state (without affecting data files) if changes to the
hardware, software, or other system settings have left the computer in an undesirable operating
state. See the Windows Help and Support Center (see "Finding Information and Assistance"
on page 5) for information about using System Restore.
Interrupt request (IRQ)
area in the
Start
button and click
, and then click
and click
Next
.
.
Properties
Help
.
Hardware
list, click
!
) or a red X if
Properties
window.
window reports the cards or devices that need to be
on the
Contents
tab, click
Windows 2000
.
I need to resolve a hardware conflict on my
NOTICE: Make regular backups of your data files. System Restore does not monitor your data files
or recover them.
Creating a Restore Point
1
Click the
2
Click
3
Follow the instructions on the screen.
Restoring the Computer to an Earlier Operating State
NOTICE: Before you restore the computer to an earlier operating state, save and close any open files
and exit any open programs. Do not alter, open, or delete any files or programs until the system
restoration is complete.
Click the
1
Start
System Restore
Start
System Restore
2
Ensure that
26 Quick Reference Guide
button and click
Help and Support
.
.
button, point to
All Programs→
Accessories→
.
Restore my computer to an earlier time
System Tools
is selected and click
, and then click
Next
.
Page 27

3
Click a calendar date to which you want to restore your computer.
The
Select a Restore Point
screen provides a calendar that allows you to see and select restore
points. All calendar dates with available restore points appear in boldface type.
4
Select a restore point and click
Next
.
If a calendar date has only one restore point, then that restore point is automatically selected.
If two or more restore points are available, click the restore point that you prefer.
5
Click
Next
.
Restoration Complete
The
screen appears after System Restore finishes collecting data and
then the computer restarts.
6
After the computer restarts, click OK.
To change the restore point, you can either repeat the steps using a different restore point, or you
can undo the restoration.
Undoing the Last System Restore
NOTICE: Before you undo the last system restore, save and close all open files and exit any open
programs. Do not alter, open, or delete any files or programs until the system restoration is complete.
Click the
1
System Restore
2
Click
3
Click
The
Start
button, point to
.
Undo my last restoration
Next
.
System Restore
screen appears and the computer restarts.
All Programs→ Accessories→ System Tools
and click
Next
.
, and then click
4
After the computer restarts, click OK.
Enabling System Restore
If you reinstall Windows XP with less than 200 MB of free hard-disk space available,
System Restore is automatically disabled. To see if System Restore is enabled:
1
Click the
2
Click
3
Click
4
Click the
5
Ensure that
Start
button and click
Control Panel
Performance and Maintenance
System
.
System Restore
tab.
Turn off System Restore
.
.
is unchecked.
Quick Reference Guide 27
Page 28

Using Last Known Good Configuration
1
Restart your computer and press <F8> when the message Please select the
operating system to start
2
Highlight Last Known Good Setting, press <Enter>, press <l>, and then select
your operating system when prompted.
Other Options to Help Resolve Additional Device or Software Conflicts
NOTICE: The following processes erase all of the information on your hard drive.
• Reinstall your operating system using the operating system installation guide and operating
system CD.
www.dell.com | support.dell.com
During the operating system reinstallation, you can select to delete the existing partitions
and reformat your hard drive.
• Reinstall all drivers, beginning with the chipset, using the
Dell Diagnostics
CAUTION: Before you begin any of the procedures in this section, follow the safety instructions
located in the Product Information Guide.
When to Use the Dell Diagnostics
If you experience a problem with your computer, perform the checks in "Solving Problems"
on page 25 and run the Dell Diagnostics before you contact Dell for technical assistance.
It is recommended that you print these procedures before you begin.
appears.
Drivers and Utilities
CD
.
NOTICE: The Dell Diagnostics works only on Dell™ computers. Using this program with other computers
can cause incorrect computer responses or result in error messages.
The Dell Diagnostics allow you to:
• Perform quick checks or extensive tests on one or all devices
• Choose how many times a test is run
• Display or print test results or save them in a file
• Suspend testing if an error is detected or terminate testing if a certain number of errors occur
• Access online
• Read status messages that tell you whether tests completed successfully
• Receive error messages if problems are detected
28 Quick Reference Guide
Help
screens that describe the tests and how to run them
Page 29

Starting the Dell Diagnostics From Your Hard Drive
1
Turn on (or restart) your computer.
2
When the DELL™ logo appears, press <F12> immediately.
NOTE: If you see a message stating that no diagnostics utility partition has been found,
see "Starting the Dell Diagnostics From the Drivers and Utilities CD" on page 29.
If you wait too long and the operating system logo appears, continue to wait until you see
the Microsoft Windows desktop. Then shut down your computer and try again. For more
information on shutting down your computer, see your
3
When the boot device list appears, highlight
4
When the Dell Diagnostics
information on the tests, see your
Starting the Dell Diagnostics From the Drivers and Utilities CD
1
Insert the
2
Shut down and restart the computer. For more information on shutting down your computer,
see your
3
When the DELL logo appears, press <F12> immediately.
Drivers and Utilities
User’s Guide.
Main Menu
User’s Guide.
CD.
Boot to Utility Partition
appears, select the test you want to run. For more
User’s Guide.
and press <Enter>.
If you wait too long and the Windows logo appears, continue to wait until you see the
Windows desktop. Then shut down your computer and try again. For more information
on shutting down your computer, see your
NOTE: The next steps change the boot sequence for one time only. On the next start-up, the computer
boots according to the devices specified in system setup.
When the boot device list appears, highlight
4
5
Select the
6
Select the
7
Ty p e 1 to start the ResourceCD menu.
8
Ty p e 2 to start the Dell Diagnostics.
9
Select
IDE CD-ROM Device
Boot from CD-ROM
option from the CD boot menu.
option from the menu that appears.
Run the 32 Bit Dell Diagnostics
User’s Guide.
IDE CD-ROM Device
and press <Enter>.
from the numbered list. If multiple versions are listed,
select the version appropriate for your computer.
10
When the Dell Diagnostics
information on the tests, see your
Main Menu
User’s Guide.
appears, select the test you want to run. For more
Quick Reference Guide 29
Page 30

Before You Start Testing
CAUTION: Before you begin any of the procedures in this section, follow the safety instructions
in the Product Information Guide.
• Turn on your printer if one is attached.
• Enter system setup, review your computer’s configuration information, and enable all of your
computer’s components and devices, such as connectors.
Beep Codes
Your computer might emit a series of beeps that can identify a problem. One possible series
www.dell.com | support.dell.com
(code 1-3-1) consists of one beep, a burst of three beeps, and then one beep. This series tell you
that the computer encountered a memory problem.
If a beep code is emitted, write it down and look it up in the following table.
Code Cause
1-1-2 Microprocessor register failure
1-1-3 NVRAM read/write failure
1-1-4 ROM BIOS checksum failure
1-2-1 Programmable interval timer failure
1-2-2 DMA initialization failure
1-2-3 DMA page register read/write failure
1-3 Video Memory Test failure
1-3-1 through 2-4-4 Memory not being properly identified or used
3-1-1 Slave DMA register failure
3-1-2 Master DMA register failure
3-1-3 Master interrupt mask register failure
3-1-4 Slave interrupt mask register failure
3-2-2 Interrupt vector loading failure
3-2-4 Keyboard Controller Test failure
3-3-1 NVRAM power loss
3-3-2 Invalid NVRAM configuration
3-3-4 Video Memory Test failure
3-4-1 Screen initialization failure
3-4-2 Screen retrace failure
3-4-3 Search for video ROM failure
30 Quick Reference Guide
Page 31

Code Cause
4-2-1 No timer tick
4-2-2 Shutdown failure
4-2-3 Gate A20 failure
4-2-4 Unexpected interrupt in protected mode
4-3-1 Memory failure above address 0FFFFh
4-3-3 Timer-chip counter 2 failure
4-3-4 Time-of-day clock stopped
4-4-1 Serial or parallel port test failure
4-4-2 Failure to decompress code to shadowed memory
4-4-3 Math-coprocessor test failure
4-4-4 Cache test failure
Error Messages
NOTE: If the message is not listed, see the documentation for either the operating system or the program
that was running when the message appeared.
If an error occurs during start-up, a message may be displayed on the monitor identifying the
problem. See "Error Messages" in the
User’s Guide
for suggestions on resolving any problems.
Diagnostic Lights
CAUTION: Before you begin any of the procedures in this section, follow the safety instructions
located in the Product Information Guide.
To help you troubleshoot a problem, your computer has four lights labeled "A," "B," "C," and "D" on
the front or back panel. The lights can be yellow or green. When the computer starts normally, the
lights flash. After the computer starts, all four lights display solid green. If the computer
malfunctions, the color and sequence of the lights identify the problem.
Quick Reference Guide 31
Page 32

Light Pattern Problem Description Suggested Resolution
ABCD
ABCD
www.dell.com | support.dell.com
ABCD
A possible BIOS failure has occurred; the
computer is in the recovery mode.
Run the BIOS Recovery utility, wait for
recovery completion, and then restart
the computer.
A possible processor failure has occurred. Reinstall the processor and restart the
computer. For more information on
reinstalling the processor, see your
User’s Guide.
Memory modules are detected, but
a memory failure has occurred.
1
Reseat the memory modules.
2
Restart the computer.
3
Run the Dell Diagnostics.
4
If the problem persists, contact Dell.
ABCD
= yellow
= green
= off
A possible expansion card failure has
occurred.
1
Determine if a conflict exists by
removing a card (not the graphics
card) and then restarting the
computer. For more information
on removing a card, see your
.
Guide
2
If the problem persists, reinstall the
User’s
card that you removed, remove a
different card, and then restart the
computer.
3
Repeat this process for each card.
If the computer starts normally,
troubleshoot the last card you
removed for resource conflicts (see
"Resolving Software and Hardware
Incompatibilities").
4
If the problem persists, contact Dell.
For more information on contacting
Dell, see your
User’s Guide
.
32 Quick Reference Guide
Page 33

Light Pattern Problem Description Suggested Resolution
A possible graphics card failure has
occurred.
ABCD
A possible floppy or hard drive failure
has occurred.
• If the computer has a graphics card,
remove the card, reinstall it, and then
restart the computer. For more
information on reinstalling the
graphics card, see your
• If the problem still exists, install a
graphics card that you know works and
restart the computer.
• If the problem persists or the
computer has integrated graphics,
contact Dell. For more information on
contacting Dell, see your
Reseat all power and data cables and
restart the computer.
ABCD
A possible USB failure has occurred. Reinstall all USB devices, check cable
connections, and then restart the
computer.
ABCD
User’s Guide
User’s Guide
.
.
= yellow
= green
= off
Quick Reference Guide 33
Page 34

Light Pattern Problem Description Suggested Resolution
ABCD
www.dell.com | support.dell.com
ABCD
No memory modules are detected.
System board failure has occurred.
• If you have one memory module
installed, reinstall it and restart the
computer. For more information on
memory modules, see your
.
Guide
• If you have two or more memory
modules installed, remove the
modules, reinstall one module, and
then restart the computer. If the
computer starts normally, reinstall an
additional module. Continue until
you have identified a faulty module or
reinstalled all modules without error.
For more information on memory
modules, see your
• If available, install properly working
memory of the same type into your
computer. For more information on
memory modules, see your
.
Guide
• If the problem persists, contact Dell.
For more information on contacting
Dell, see your
Contact Dell
For more information on contacting
Dell, see your User’s Guide.
for technical assistance.
User’s Guide
User’s Guide
User’s
.
User’s
.
ABCD
= yellow
= green
= off
34 Quick Reference Guide
Memory modules are detected, but a
memory configuration or compatibility
error exists.
• Ensure that no special memory
module/memory connector placement
requirements exist.
• Verify that the memory modules that
you are installing are compatible with
your computer.
• Reinstall the memory modules and
restart the computer.
• If the problem persists, contact Dell.
For more information on contacting
Dell, see your
User’s Guide
.
Page 35

Light Pattern Problem Description Suggested Resolution
A possible system board resource and/or
hardware failure has occurred.
ABCD
A possible expansion card failure has
occurred.
ABCD
Another failure has occurred.
ABCD
The computer is in a normal operating
condition after POST.
Perform the procedures in
Software and Hardware
Incompatibilities"
If the problem persists,
more information on contacting Dell,
see your User’s Guide.
1
Determine if a conflict exists by
removing a card (not a graphics card)
and restarting the computer. For more
information on removing a card, see
ser’s Guide
your U
2
If the problem persists, reinstall
the card that you removed, remove
a different card, and then restart
the computer.
3
Repeat this process for each card.
If the computer starts normally,
troubleshoot the last card removed
from the computer for resource
conflicts (see "Resolving Software
and Hardware Incompatibilities" on
page 25).
4
If the problem persists, contact Dell.
For more information on contacting
Dell, see your
• Ensure that the cables are properly
connected to the system board from
the hard drive, CD drive, and DVD
drive.
• If the problem persists, contact Dell.
For more information on contacting
Dell, see your
None.
(see
User’s Guide
User’s Guide
"Resolving
page 25).
contact Dell
.
. For
.
.
ABCD
= yellow
= green
= off
Quick Reference Guide 35
Page 36

Frequently Asked Questions
How Do I... Solution Where to Find Additional Information
Set up my computer to use
two monitors?
www.dell.com | support.dell.com
Connect my monitor when the
monitor cable connector doesn’t
seem to fit the connector on the
back of my computer?
Install a card fan? If you have installed a new graphics
Connect my speakers? If you have a sound card installed,
If your computer has the required
graphics card to support dualmonitor setup, then look in your box
for a Y-cable. The Y-cable has a single
connector on one end (plug this
connector into the back panel) and
branches into two connectors (plug
these connectors into the monitor
cables). For the mini-tower
computer, see "Connect the monitor"
on page 10 and for the desktop
computer, see "Connect the monitor"
on page 15.
If your graphics card has a DVI
connector but your monitor has a
VGA connector, then you need to use
an adapter. An adapter should be
included in the box.
card that runs higher than 75 W, you
need to install a card cooling fan. To
order a card cooling fan, contact
Dell. Contact information is located
in your User's Guide and at
support.dell.com.
connect the speakers to the
connectors on the card. For the minitower computer, see "Connect the
speakers" on page 13 and for the
desktop computer, see "Connect the
speakers" on page 18.
To locate additional information
about using dual monitors, see the
graphics card documentation on the
Drivers and Utilities CD.
Contact Dell for more information.
For information on installing a card
fan or a card, see your User's Guide.
See the documentation that came
with your speakers for more
information.
36 Quick Reference Guide
Page 37

How Do I... Solution Where to Find Additional Information
Find the right connectors for my
USB or IEEE 1394 devices?
Locate information about the
hardware and other technical
specifications for my computer?
Find documentation
for my computer?
Your mini-tower computer has
eight USB connectors (two on
the front and six on the back).
Your Desktop computer has eight
USB connectors (two on the front
and six on the back) and an optional
front IEEE 1394 connector. This
connector is only available if you
purchased an add-in IEEE 1394 card.
To purchase a card, contact Dell. For
more information on the add-in card,
see your User’s Guide.
Yo u r User’s Guide has a
specifications table that provides
more detailed information about
your computer and the hardware.
To locate your User’s Guide,
see "Finding Information and
Assistance" on page 5.
The following documentation is
available for your computer:
• User’s Guide
• Product Information Guide
• System Information Label
To locate these documents,
see "Finding Information and
Assistance" on page 5.
See the front and back view graphics
of your computer in your User’s
Guide. For help locating your User’s
Guide, see "Finding Information and
Assistance" on page 5.
Go to the Dell Support website at
support.dell.com and use one of the
following support tools: read white
papers on the latest technology or
communicate with other Dell users
at the Dell forum chat room.
If you lose your documentation, it is
available on the Dell Support website
at support.dell.com.
Quick Reference Guide 37
Page 38

www.dell.com | support.dell.com
38 Quick Reference Guide
Page 39

Index
C
computer
restore to previous state, 26
conflicts
software and hardware
incompatibilities, 25
D
Dell
premier support website, 7
support site, 7
Dell Diagnostics, 28
Dell Premier Support
website, 6-7
Device Manager, 25
diagnostic lights, 31
diagnostics
Dell, 28
Drivers and Utilities CD, 5
lights, 31
documentation, 14
device, 5
online, 7
Product Information Guide, 6
ResourceCD, 5
User’s Guide, 6
drivers
ResourceCD, 5
Drivers and Utilities CD, 5
E
error messages
diagnostic lights, 31
F
finding information, 5
H
hardware
conflicts, 25
Dell Diagnostics, 28
Hardware Troubleshooter, 25
Help and Support Center, 7
I
installing parts
turning off your
computer, 20, 23
IRQ conflicts, 25
L
labels
Microsoft Windows, 6
Service Tag, 6
lights
back of computer, 31
diagnostic, 31
M
Microsoft Windows label, 6
O
Operating System CD, 8
P
problems
conflicts, 25
Dell Diagnostics, 28
diagnostic lights, 31
restore to previous state, 26
R
reinstalling
Drivers and Utilities CD, 5
ResourceCD, 5
ResourceCD
Dell Diagnostics, 28
Index 39
Page 40

S
U
safety instructions, 6
Service Tag, 6
software
conflicts, 25
system board, 5
system information label, 5
System Restore, 26
T
troubleshooting
conflicts, 25
Dell Diagnostics, 28
diagnostic lights, 31
Hardware Troubleshooter, 25
Help and Support Center, 7
restore to previous state, 26
User’s Guide, 6
W
warranty, 6
Windows 2000
Device Manager, 25
Hardware Troubleshooter, 25
Windows XP
Hardware Troubleshooter, 25
Help and Support Center, 7
System Restore, 26
40 Index
Page 41

Station de travail Dell
Precision™ 370
Guide de référence rapide
Modèles DHM et WHM
www.dell.com | support.dell.com
Page 42

Remarques et avertissements
REMARQUE : une REMARQUE indique des informations importantes qui vous permettent de mieux utiliser
votre ordinateur.
AVIS : un AVIS vous avertit d'un dommage ou d'une perte de données potentiels et vous indique comment éviter
ce problème.
ATT ENTION : le message ATTENTION indique une situation potentiellement dangereuse qui, si elle n'est pas évitée,
peut provoquer une détérioration du matériel ou des blessures pouvant entraîner la mort.
Abréviations et sigles
Pour obtenir une liste complète des abréviations et des acronymes, reportez-vous au glossaire
du
Manuel de l'utilisateur
.
Si vous avez acheté un ordinateur Dell™ série n, aucune des références faites dans ce document aux systèmes
d'exploitation Microsoft
®
Windows® n'est applicable.
____________________
Les informations contenues dans ce document peuvent être modifiées sans préavis.
© 2004 Dell Inc. Tous droits réservés.
La reproduction de ce document de quelque manière que ce soit sans l'autorisation écrite de Dell Inc. est strictement interdite.
Marques utilisées dans ce document : Dell, le logo DELL et Dell Precision sont des marques de Dell Inc. ;
Microsoft et Windows sont des marques déposées de Microsoft Corporation.
Tous les autres noms de marques et marques commerciales utilisés dans ce document se rapportent aux sociétés propriétaires des marques
et des noms de ces produits. Dell Inc. décline tout intérêt dans l'utilisation des marques déposées et des noms de marques ne lui appartenant pas.
Modèles DHM et WHM
Avril 2004 P/N U3525 Rev. A00
Page 43

Sommaire
Obtention d'informations et d'assistance . . . . . . . . . . . . . . . . . . 5
Installation de votre ordinateur mini-tour
Installation de votre ordinateur de bureau
Comment consulter le Manuel de l'utilisateur
Ouverture de l'ordinateur mini-tour
Ventilateur de la carte
. . . . . . . . . . . . . . . . . . . . . . . . . . . 22
Ouverture de l'ordinateur de bureau
Précautions à prendre avec votre ordinateur
Résolution des problèmes
Conseils de dépannage
. . . . . . . . . . . . . . . . . . . . . . . . . 25
. . . . . . . . . . . . . . . . . . . . . . . . 25
. . . . . . . . . . . . . . . . . . 9
. . . . . . . . . . . . . . . . . 14
. . . . . . . . . . . . . . . . 19
. . . . . . . . . . . . . . . . . . . . . 20
. . . . . . . . . . . . . . . . . . . . 23
. . . . . . . . . . . . . . . . 24
Résolution des problèmes d'incompatibilité logicielle et matérielle
Utilisation de la fonction Restauration du système
de Microsoft Windows XP
Utilisation de la dernière configuration valide
Diagnostics Dell
. . . . . . . . . . . . . . . . . . . . . . . . . . . . 28
Avant de commencer un test
Codes sonores
. . . . . . . . . . . . . . . . . . . . . . . . . . . . . . . 30
Messages d'erreur
Voyants de diagnostic
. . . . . . . . . . . . . . . . . . . . . . . . . . . 32
. . . . . . . . . . . . . . . . . . . . . . . 26
. . . . . . . . . . . . . . 28
. . . . . . . . . . . . . . . . . . . . . 30
. . . . . . . . . . . . . . . . . . . . . . . . . . 31
. . . . 25
Questions fréquemment posées
. . . . . . . . . . . . . . . . . . . . . . 37
Index . . . . . . . . . . . . . . . . . . . . . . . . . . . . . . . . . . . . 39
Sommaire 3
Page 44

4 Sommaire
Page 45

Obtention d'informations et d'assistance
Que recherchez-vous ? Reportez-vous aux éléments suivants.
• Un programme de diagnostic pour mon ordinateur
• Des pilotes pour mon ordinateur
• La documentation concernant mes périphériques
• Les connecteurs de la carte système
• L'emplacement des composants
de la carte système
CD Pilotes et utilitaires, également appelé ResourceCD
La documentation et les pilotes sont déjà installés
sur votre ordinateur. Vous pouvez utiliser le CD pour
réinstaller des pilotes, exécuter les diagnostic Dell
(voir la page 28) ou accéder à la documentation.
Des fichiers “readme”
(lisez-moi) peuvent être
inclus sur votre CD
afin de fournir des mises
à jour de dernière minute
concernant
des modifications
techniques apportées
à votre système
ou des informations
de référence destinées
aux techniciens ou aux utilisateurs expérimentés.
REMARQUE : les dernières mises à jour des pilotes ou de
la documentation se trouvent sur le site support.dell.com
Étiquette des informations sur le système
(Sur la paroi interne du capot de l'ordinateur.)
Guide de référence rapide 5
Page 46

Que recherchez-vous ? Reportez-vous aux éléments suivants.
• Des informations sur la garantie
Guide d'informations sur le produit Dell™
• Des consignes de sécurité
• Des informations sur la réglementation
• Des informations sur l'ergonomie
• Le contrat de licence utilisateur final
www.dell.com | support.dell.com
• Comment retirer et remettre en place des composants
• Les spécifications techniques
• Comment configurer les paramètres système
• Comment identifier et résoudre les problèmes
Manuel de l'utilisateur Dell Precision
Centre d'aide et de support Microsoft
1
Cliquez sur le bouton
Démarrer
et support.
2
Cliquez sur
User's and system guides
(Guides de l'utilisateur et du système) puis
• Le numéro de service et le code de service express
• L'étiquette de licence Microsoft Windows
User's guides
sur
Numéro de service et licence Microsoft Windows
Ces étiquettes sont situées sur votre ordinateur.
(Guides de l'utilisateur).
• Utilisez le numéro de
service pour identifier
l'ordinateur lorsque
vous visitez le site
support.dell.com
ou
que vous contactez le
support technique.
• Entrez le code de service express pour faciliter
l'acheminement de votre appel lorsque vous contactez
le support technique. Ce code n'est pas disponible
dans tous les pays.
®
Windows® XP
, puis sur
Aide
6 Guide de référence rapide
Page 47

Que recherchez-vous ? Reportez-vous aux éléments suivants.
• Les pilotes les plus récents pour mon ordinateur
• Des réponses à des questions d'assistance technique
et de support clientèle
• Des discussions en ligne avec d'autres utilisateurs
et le personnel de l'assistance clientèle
• La documentation concernant mon ordinateur
Site Web du support Dell — support.dell.com
REMARQUE : sélectionnez votre région pour accéder
au site de support approprié.
Le site Web du support Dell comporte plusieurs outils
en ligne, notamment :
• Solutions — Conseils et astuces de dépannage,
articles de techniciens et cours en ligne
• Forum clients — Discussion en ligne avec d'autres
clients Dell
• Mises à niveau — Informations de mise à niveau
pour les composants tels que la mémoire, le disque
dur et le système d'exploitation
• Service clientèle — Coordonnées, statut des
commandes, garantie et informations sur les réparations
• Téléchargements — Pilotes, correctifs et mises
à jour logicielles
• Référence — Documentation sur l'ordinateur,
caractéristiques produit et livres blancs
• L'état des appels au service clients et l'historique
du support
• Les problèmes techniques les plus importants
concernant mon ordinateur
• Les questions fréquemment posées
• Des fichiers à télécharger
Site Web de support technique de Dell Premier —
premiersupport.dell.com
Le site Web Dell Premier Support est personnalisé pour
les clients représentant des entreprises, des institutions
gouvernementales ou des institutions d'enseignement.
Il n'est pas disponible partout.
• Des détails sur la configuration de mon ordinateur
• Le contrat de service de mon ordinateur
• Comment utiliser Windows XP
• La documentation concernant mon ordinateur
• La documentation concernant mes périphériques
(mon modem, par exemple)
Centre d'aide et de support Windows
1
Cliquez sur le bouton
et support
2
Tapez un mot ou une phrase décrivant votre problème
.
Démarrer
, puis sur
et cliquez sur l'icône en forme de flèche.
3
Cliquez sur la rubrique qui décrit le problème.
4
Suivez les instructions à l'écran.
• Comment utiliser Linux
• Des discussions par e-mail avec d'autres utilisateurs
d'ordinateurs Precision et de Linux
• Des informations supplémentaires sur Linux et mon
Dell Precision
Sites Dell d'informations sur Linux
• http://linux.dell.com
• http://lists.us.dell.com/mailman/listinfo/
linux-precision
• http://docs.us.dell.com/docs/software/oslinux/
• http://docs.us.dell.com/docs/software/OSRHEL3/
Aide
Guide de référence rapide 7
Page 48

Que recherchez-vous ? Reportez-vous aux éléments suivants.
• Comment réinstaller mon système d'exploitation
www.dell.com | support.dell.com
CD du système d'exploitation
Le système d'exploitation est déjà installé sur votre
ordinateur. Pour le réinstaller, utilisez le CD du système
d'exploitation. Consultez le Manuel de l'utilisateur
Precision pour obtenir des instructions.
REMARQUE : la couleur du CD varie en fonction
du système d'exploitation commandé.
Une fois que vous avez
réinstallé votre système
d'exploitation, utilisez
le CD Pilotes et utilitaires
pour réinstaller les pilotes
des périphériques fournis
avec votre ordinateur.
L'étiquette de la clé
du produit de votre
système d'exploitation
se trouve sur votre
ordinateur.
8 Guide de référence rapide
Page 49

Installation de votre ordinateur mini-tour
AT TE NTION : avant de commencer les procédures de cette section, lisez les consignes de sécurité
fournies dans le Guide d'informations sur le produit et veillez à les respecter scrupuleusement.
Vous devez effectuer toutes les étapes pour configurer correctement votre ordinateur.
Connectez le clavier et la souris.
1
Connectez le modem ou le câble réseau.
2
AVIS : ne raccordez pas de câble de modem à la carte
réseau. Les tensions provenant des communications
téléphoniques peuvent endommager la carte réseau.
REMARQUE : si votre ordinateur est équipé d'une
carte réseau, reliez le câble réseau à cette carte.
Guide de référence rapide 9
Page 50

Connectez le moniteur.
3
En fonction de votre carte
graphique, vous pouvez
brancher votre écran
de différentes façons.
REMARQUE : vous
www.dell.com | support.dell.com
devrez peut-être utiliser
l'adaptateur ou le câble
fourni pour connecter
le moniteur à l'ordinateur.
10 Guide de référence rapide
Page 51

Cartes à un seul connecteur et pouvant gérer un ou deux écrans
Adaptateur VGA
VGA
Utilisez l'adaptateur VGA si vous ne disposez
que d'une seule carte graphique et que vous souhaitez
connecter un moniteur VGA à l'ordinateur.
Câble en Y pour la connexion de deux moniteurs VGA
Câble en Y pour la connexion de deux moniteurs DVI
VGA
VGA
Utilisez le câble en Y approprié si votre carte graphique
dispose d'un seul connecteur et que vous souhaitez
brancher un ou deux écrans VGA.
Utilisez le câble en Y approprié si votre carte graphique
dispose d'un seul connecteur et que vous souhaitez
brancher un ou deux écrans DVI.
DVI
DVI
Le câble pour deux moniteurs est codé par couleur : le connecteur bleu est destiné au moniteur
principal, alors que le connecteur noir est destiné au connecteur secondaire. Pour que le système
puisse prendre en charge deux moniteurs, ceux-ci doivent déjà être connectés quand l'ordinateur
démarre.
Guide de référence rapide 11
Page 52

Cartes possédant 1 connecteur DVI + 1 connecteur VGA et pouvant gérer deux écrans
Un DVI/Un VGA
DVI
VGA
www.dell.com | support.dell.com
Utilisez le ou les connecteurs appropriés
pour connecter l'ordinateur à deux moniteurs.
Deux moniteurs VGA avec l'adaptateur VGA
Utilisez l'adaptateur VGA pour connecter
deux moniteurs VGA.
Cartes possédant 2 connecteurs DVI et pouvant gérer deux moniteurs
Deux connecteurs DVI Deux connecteurs DVI
avec un adaptateur VGA
VGA
VGA
Deux connecteurs DVI
avec deux adaptateurs VGA
DVI
DVI
Utilisez les connecteurs DVI
pour connecter l'ordinateur
à un ou deux moniteurs DVI.
12 Guide de référence rapide
DVI
VGA
Utilisez l'adaptateur VGA
pour brancher un moniteur VGA
sur l'un des connecteurs DVI
de l'ordinateur.
VGA
VGA
Utilisez deux adaptateurs VGA
pour brancher deux moniteurs
VGA sur les connecteurs DVI
de l'ordinateur.
Page 53

Connectez les
4
hauts-parleurs.
REMARQUE : si votre
ordinateur est équipé
d'une carte audio,
connectez les hautparleurs à cette carte.
Branchez les câbles
5
d'alimentation,
puis allumez
l'ordinateur
et le moniteur.
Guide de référence rapide 13
Page 54

Installez les logiciels ou périphériques supplémentaires.
6
Avant d'installer un périphérique ou un logiciel qui n'a pas été fourni avec votre ordinateur,
lisez attentivement sa documentation d'accompagnement ou contactez son fournisseur
pour vous assurer que ce périphérique ou programme est compatible avec votre ordinateur
et votre système d'exploitation.
Félicitations ! Vous avez terminé l'installation de votre ordinateur mini-tour.
www.dell.com | support.dell.com
Installation de votre ordinateur de bureau
ATTENTION : avant de commencer les procédures de cette section, lisez les consignes de sécurité
fournies dans le Guide d'informations sur le produit et veillez à les respecter scrupuleusement.
Vous devez effectuer toutes les étapes pour configurer correctement votre ordinateur.
Connectez le clavier et la souris.
1
AVIS : ne raccordez
pas de câble de modem
à la carte réseau.
Les tensions provenant
des communications
téléphoniques peuvent
endommager la carte réseau.
14 Guide de référence rapide
Page 55

Connectez le modem
2
ou le câble réseau.
REMARQUE : si votre
ordinateur est équipé
d'une carte réseau,
reliez le câble réseau
à cette carte.
Connectez le moniteur.
3
En fonction de votre carte graphique,
vous pouvez brancher votre écran
de différentes façons.
REMARQUE : vous devrez peut-être
utiliser l'adaptateur ou le câble
fourni pour connecter le moniteur
à l'ordinateur.
Guide de référence rapide 15
Page 56

Cartes à un seul connecteur et pouvant gérer un ou deux écrans
Adaptateur VGA
VGA
www.dell.com | support.dell.com
Utilisez l'adaptateur VGA si vous ne disposez que
d'une seule carte graphique et que vous souhaitez
connecter un moniteur VGA à l'ordinateur.
Câble en Y pour la connexion de deux moniteurs VGA
Câble en Y pour la connexion de deux moniteurs DVI
VGA
VGA
Utilisez le câble en Y approprié si votre carte graphique
dispose d'un seul connecteur et que vous souhaitez
brancher un ou deux écrans VGA.
Le câble pour deux moniteurs est codé par couleur : le connecteur bleu est destiné au moniteur
principal, alors que le connecteur noir est destiné au connecteur secondaire. Pour que le système
puisse prendre en charge deux moniteurs, ceux-ci doivent déjà être connectés quand l'ordinateur
démarre.
16 Guide de référence rapide
DVI
DVI
Utilisez le câble en Y approprié si votre carte graphique
dispose d'un seul connecteur et que vous souhaitez
brancher un ou deux écrans DVI.
Page 57

Cartes possédant 1 connecteur DVI + 1 connecteur VGA et pouvant gérer deux écrans
Un DVI/Un VGA
DVI
VGA
Deux moniteurs VGA avec l'adaptateur VGA
VGA
VGA
Utilisez le ou les connecteurs appropriés
pour connecter l'ordinateur à deux moniteurs.
Utilisez l'adaptateur VGA pour connecter
deux moniteurs VGA.
Cartes possédant 2 connecteurs DVI et pouvant gérer deux moniteurs
Deux connecteurs DVI Deux connecteurs DVI
avec un adaptateur VGA
DVI
DVI
Utilisez le ou les connecteurs
DVI pour connecter un ou
deux moniteurs DVI.
Utilisez l'adaptateur VGA
pour brancher un moniteur VGA
sur l'un des connecteurs DVI
DVI
VGA
de l'ordinateur.
Deux connecteurs DVI
avec deux adaptateurs VGA
VGA
VGA
Utilisez deux adaptateurs VGA
pour brancher deux moniteurs
VGA sur les connecteurs DVI
de l'ordinateur.
Guide de référence rapide 17
Page 58

Connectez les hauts-parleurs.
4
www.dell.com | support.dell.com
REMARQUE : si votre ordinateur est équipé d'une carte audio, connectez les haut-parleurs
à cette carte.
Branchez les câbles
d'alimentation, puis allumez
5
l'ordinateur et le moniteur.
Votre ordinateur de bureau
est équipé d'un connecteur
frontal IEEE 1394 en option.
Ce connecteur n'est disponible
que si vous avez acheté une carte
optionnelle IEEE 1394.
Pour vous en procurer une,
contactez DELL. Pour plus
d'informations, consultez
votre
Manuel de l'utilisateur
.
Installez les logiciels ou périphériques supplémentaires.
6
Avant d'installer un périphérique ou un logiciel qui n'a pas été fourni avec votre ordinateur,
lisez attentivement sa documentation d'accompagnement ou contactez son fournisseur
pour vous assurer que ce périphérique ou programme est compatible avec votre ordinateur
et votre système d'exploitation.
Félicitations ! Vous avez terminé l'installation de votre ordinateur de bureau.
18 Guide de référence rapide
Page 59

Comment consulter le Manuel de l'utilisateur
Le
Manuel de l'utilisateur de la station de travail Dell Precision™ 370
complémentaires concernant votre ordinateur, par exemple :
• Spécifications techniques
• Vues de face et arrière de votre ordinateur, y compris tous les connecteurs disponibles
• Vues internes de votre ordinateur comprenant un schéma détaillé de la carte système
et des connecteurs
• Instructions relatives au nettoyage de votre ordinateur
• Informations sur les caractéristiques logicielles telles que le contrôle par technologie
LegacySelect, l'utilisation d'un mot de passe et les options de configuration du système
• Conseils et informations sur l'utilisation de Microsoft Windows XP
• Instructions sur le retrait et l'installation de composants : mémoire, cartes, lecteurs,
microprocesseur et batterie
• Informations relatives à la résolution de divers problèmes informatiques
• Instructions relatives à l'utilisation des Diagnostics Dell et à la réinstallation de pilotes
• Informations pour contacter Dell
Vous pouvez accéder au
Pour accéder au Manuel de l'utilisateur sur votre disque dur :
Cliquez sur le bouton
Manuel de l'utilisateur
Démarrer
, puis sur
Aide et support
à partir du disque dur ou du site
.
contient des informations
support.dell.com
.
Pour accéder au Manuel de l'utilisateur à partir du site de support technique Dell :
1
Rendez-vous sur le site
2
Suivez les invites du site Web et fournissez les informations relatives à votre ordinateur.
3
Sur la page d'accueil du site Dell de support technique, cliquez sur
et cliquez sur
et sélectionnez votre ordinateur Dell Precision.
User's Guides
support.dell.com
(Guides d'utilisation), cliquez sur
.
Reference
Systems
(Systèmes)
Guide de référence rapide 19
(Référence)
Page 60

Ouverture de l'ordinateur mini-tour
ATTENTION : avant de commencer les procédures de cette section, lisez les consignes de sécurité
fournies dans le Guide d'informations sur le produit et veillez à les respecter scrupuleusement.
ATTENTION : pour prévenir tout risque de choc électrique, débranchez toujours votre ordinateur
de la prise électrique avant d'ouvrir le capot.
AVIS : pour éviter de perdre des données, sauvegardez tous les fichiers ouverts,
fermez-les et quittez toutes les applications avant de procéder à l'arrêt du système.
Arrêtez le système d'exploitation :
1
a
Enregistrez et fermez tous les fichiers ouverts, quittez toutes les applications puis cliquez
www.dell.com | support.dell.com
2
3
4
5
6
sur
b
Dans la fenêtre
L'ordinateur s'éteint une fois le système d'exploitation arrêté.
Vérifiez que l'ordinateur et tous les périphériques reliés sont éteints. Si votre ordinateur
et les périphériques connectés ne se sont pas éteints automatiquement lorsque
vous avez arrêté le système d'exploitation, éteignez-les maintenant.
Si vous avez installé un cadenas dans l'anneau de sécurité situé sur le panneau arrière, retirez-le.
AVIS : vérifiez qu'il y a assez de place sur le bureau (au moins 30 cm, soit 1 pied) pour déposer le capot
quand il est ouvert.
Placez l'ordinateur sur le côté comme indiqué dans l'illustration suivante.
Ouvrez le capot.
a
En faisant face à l'arrière de l'ordinateur, appuyez d'une main sur le bouton
de déverrouillage sur le côté droit de l'ordinateur tout en relevant le haut du capot
de l'autre main.
b
Appuyez d'une main sur le bouton de déverrouillage sur le côté gauche de l'ordinateur
tout en relevant le haut du capot de l'autre main.
Saisissez le bas de l'ordinateur d'une main, puis ouvrez le capot en tirant de l'autre main.
Démarrer
et sur
Arrêter l'ordinateur
Arrêter l'ordinateur
.
, cliquez sur
Arrêter
.
20 Guide de référence rapide
Page 61

Bouton de
déverrouillage
Emplacement
pour câble
de sécurité
Anneau pour cadenas
Bouton de déverrouillage
Guide de référence rapide 21
Page 62

Lecteur
de CD/DVD
Ventilateur de la carte
Module
d'alimentation
www.dell.com | support.dell.com
Ventilateur
et carénage
de refroidissement
du processeur
Emplacement pour
câble de sécurité
Anneau pour cadenas
Ventilateur de la carte
AVIS : les cartes graphiques PCI Express fonctionnant à plus de 75 watts nécessitent l'installation
d'un ventilateur de refroidissement supplémentaire. Sinon, la carte risque de surchauffer
et d'endommager l'ordinateur.
Si vous avez commandé votre ordinateur avec une carte graphique nécessitant l'utilisation
du ventilateur, celui-ci est déjà installé. Si votre ordinateur ne contient pas de ventilateur
de carte et que vous installez une carte graphique fonctionnant à plus de 75 W, contactez
Dell pour vous procurer un ventilateur de carte.
Si le système détecte l'installation d'une carte pour laquelle un ventilateur est nécessaire,
un message d'erreur s'affiche.
Pour savoir comment contacter Dell, consultez le
sur le site
support.dell.com
Lecteur
de disquette
(en option)
et cliquez sur
Manuel de l'utilisateur
Contact Us
Disque dur
Carte système
ou rendez-vous
.
22 Guide de référence rapide
Page 63

Ouverture de l'ordinateur de bureau
ATTENTION : avant de commencer les procédures de cette section, lisez les consignes de sécurité
fournies dans le Guide d'informations sur le produit et veillez à les respecter scrupuleusement.
ATTENTION : pour prévenir les dommages causés par les décharges électrostatiques aux composants
de votre ordinateur, déchargez votre corps de son électricité statique avant de manipuler
les composants électroniques du système. Pour ce faire, vous pouvez toucher une surface métallique
non peinte de l'ordinateur.
AVIS : pour éviter de perdre des données, sauvegardez tous les fichiers ouverts, fermez-les
et quittez toutes les applications avant de procéder à l'arrêt du système.
1
Arrêtez le système d'exploitation :
a
Enregistrez et fermez tous les fichiers ouverts, quittez toutes les applications
puis cliquez sur
b
Dans la fenêtre
L'ordinateur s'éteint une fois le système d'exploitation arrêté.
2
Vérifiez que l'ordinateur et tous les périphériques reliés sont éteints. Si votre ordinateur
et les périphériques connectés ne se sont pas éteints automatiquement lorsque vous avez
arrêté le système d'exploitation, éteignez-les maintenant.
3
Poussez le taquet de déblocage vers la gauche.
4
Soulevez le capot et faites-le pivoter vers l'avant de l'ordinateur.
Démarrer
et sur
Arrêter l'ordinateur
Arrêter l'ordinateur
, cliquez sur
.
Arrêter
.
Taquet
de déblocage
du capot
Emplacement pour
câble de
sécurité
Anneau pour cadenas
Guide de référence rapide 23
Page 64

Module
d'alimentation
www.dell.com | support.dell.com
Emplacement
pour câble
de sécurité
Ventilateur
et carénage
de refroidissement
du processeur
Lecteur
de CD/DVD
Lecteur de disquette
(en option)
Disque dur
Anneau pour cadenas
Précautions à prendre avec votre ordinateur
Pour la maintenance de votre ordinateur, suivez ces suggestions :
• Pour éviter toute perte ou corruption des données, n'éteignez jamais votre ordinateur
lorsque le voyant du disque dur est allumé.
• Programmez des recherches régulières de virus à l'aide d'un logiciel anti-virus.
• Gérez l'espace du disque dur en supprimant régulièrement les fichiers inutiles
et en défragmentant le lecteur.
• Sauvegardez régulièrement les fichiers.
• Nettoyez régulièrement l'écran du moniteur, la souris et le clavier.
Consultez le
24 Guide de référence rapide
Manuel de l'utilisateur
pour plus d'informations.
Page 65

Résolution des problèmes
Conseils de dépannage
Lorsque vous dépannez votre ordinateur, suivez les conseils ci-dessous :
• Si vous avez ajouté ou supprimé une pièce avant que le problème n'apparaisse,
revoyez les procédures d'installation et assurez-vous que la pièce est correctement installée.
• Si un périphérique ne fonctionne pas, vérifiez qu'il est correctement connecté.
• Si un message d'erreur apparaît à l'écran, écrivez le message exact. Ce message peut aider
le support technique à diagnostiquer et à résoudre le(s) problème(s).
• Si un message d'erreur apparaît dans un programme, consultez la documentation
du programme.
• Si l'instruction fournie dans la section consacrée au dépannage vous renvoie
au
Manuel de l'utilisateur
(si nécessaire à partir d'un autre ordinateur) pour consulter ce guide.
Résolution des problèmes d'incompatibilité logicielle et matérielle
Si un périphérique n'est pas détecté lors de la configuration du système d'exploitation
ou s'il est détecté mais pas correctement configuré, vous pouvez utiliser l'utilitaire
de résolution de problèmes matériels pour résoudre cette incompatibilité. Si vous utilisez
Microsoft
pour la résolution des incompatibilités.
®
Windows® 2000, vous pouvez aussi faire appel au Gestionnaire de périphériques
, rendez-vous sur le site
support.dell.com
Windows XP
Pour résoudre les incompatibilités à l'aide de l'utilitaire de résolution de problèmes matériels :
1
Cliquez sur le bouton
2
Ta p e z
utilitaire de résolution de problèmes matériels
Rechercher
3
Cliquez sur
Résultats de la recherche
4
Dans la liste
un conflit matériel sur mon ordinateur
puis cliquez sur la flèche pour lancer la recherche.
Utilitaire de résolution de problèmes matériels
Utilitaire de résolution des problèmes matériels
Démarrer
.
, puis sur
, puis sur
Aide et support
Suivant
.
dans la liste
, cliquez sur
.
dans le champ
Je dois résoudre
Guide de référence rapide 25
Page 66

Windows 2000
Pour résoudre les incompatibilités avec le Gestionnaire de périphériques :
1
Cliquez sur le bouton
Panneau de configuration
sur
2
Dans le
3
Cliquez sur l'onglet
4
Cliquez sur
5
Cliquez sur
6
Double-cliquez sur
www.dell.com | support.dell.com
Les périphériques incorrectement configurés sont indiqués par un point d'exclamation
jaune (
!
7
Double-cliquez sur un périphérique suivi d'un point d'exclamation pour afficher
la fenêtre
La zone
devant être reconfigurés.
8
Reconfigurez les périphériques ou supprimez-les du Gestionnaire de périphériques.
Pour plus d'informations sur la configuration du périphérique, consultez la documentation
qui l'accompagne.
Pour résoudre les incompatibilités à l'aide de l'utilitaire de résolution de problèmes matériels :
1
Cliquez sur le bouton
2
Cliquez sur
de résolution de problèmes de Windows 2000
3
Dans la liste
un problème matériel sur mon ordinateur
Démarrer
, pointez sur
Paramètres
, puis cliquez
.
Panneau de configuration
Matériel
Gestionnaire de périphériques
Affichage
puis sur
Requête d'interruption (IRQ)
, double-cliquez sur
.
.
Ressources par connexion
.
Système
.
), ou par un X rouge si le périphérique a été désactivé.
Propriétés
État du périphérique
Dépannage et maintenance
.
Démarrer
de la fenêtre
, puis sur
Aide
sous l'onglet
Propriétés
.
, puis sur
indique les cartes et les périphériques
Sommaire
Matériel
Utilitaire de résolution de problèmes matériels
, puis sur
Suivant
.
.
, cliquez sur
.
, cliquez sur
Utilitaires
Je dois résoudre
Utilisation de la fonction Restauration du système de Microsoft Windows XP
Le système d'exploitation Microsoft Windows XP fournit une fonctionnalité de Restauration
du système qui vous permet de rétablir l'ordinateur à un état de fonctionnement préalable
(sans affecter les fichiers de données) si des modifications apportées aux logiciels ou au matériel
ou à d'autres paramètres du système ont mis l'ordinateur dans un état de fonctionnement
non souhaité. Reportez-vous au Centre d'aide et de support technique de Windows
pou rplus d'informations sur la fonction Restauration du système (consultez la section
“Obtention d'informations et d'assistance” à la page 5).
AVIS : effectuez des sauvegardes régulières de vos fichiers de données. La fonction Restauration
du système ne gère pas et ne récupère pas vos fichiers de données.
26 Guide de référence rapide
Page 67

Création d'un point de restauration
1
Cliquez sur le bouton
2
Cliquez sur
3
Suivez les instructions à l'écran.
Restauration de l'ordinateur à un état antérieur
AVIS : avant de restaurer l'ordinateur à un état antérieur, enregistrez et fermez tous les fichiers ouverts
et quittez tous les programmes en cours d'exécution. Ne modifiez, n'ouvrez ou ne supprimez en aucun
cas des fichiers ou des programmes tant que la restauration du système n'est pas terminée.
Cliquez sur le bouton
1
système
2
Vérifiez que l'option
et cliquez sur
3
Cliquez sur la date à laquelle vous souhaitez restaurer l'ordinateur.
L'écran
Restauration du système
, puis cliquez sur
Suivant
Sélectionner un point de restauration
Démarrer
, puis sur
Aide et support
.
.
Démarrer
, pointez sur
Tous les programmes→
Restauration du système
.
Restaurer mon ordinateur à une heure antérieure
.
inclut un calendrier vous permettant
Accessoires→
est activée
de visualiser et de sélectionner les points de restauration. Toutes les dates du calendrier
comportant des points de restauration apparaissent en gras.
4
Sélectionnez un point de restauration et cliquez sur
Suivant
.
Si une date du calendrier contient un seul point de restauration, ce dernier est sélectionné
automatiquement. Si plusieurs points de restauration sont disponibles, cliquez sur celui
que vous souhaitez utiliser.
5
Cliquez sur
Suivant
.
Une fois que la fonction Restauration du système termine la collecte des données,
Restauration terminée
l'écran
apparaît et l'ordinateur redémarre automatiquement.
Outils
6
Une fois l'ordinateur redémarré, cliquez sur OK.
Pour changer de point de restauration, répétez les étapes précédentes un utilisant un autre point
de restauration ou annulez la restauration.
Annulation de la dernière restauration du système
AVIS : avant d'annuler la dernière restauration du système, enregistrez et fermez tous les fichiers
ouverts et quittez tous les programmes en cours d'exécution. Ne modifiez, n'ouvrez ou ne supprimez
en aucun cas des fichiers ou des programmes tant que la restauration du système n'est pas terminée.
Cliquez sur le bouton
1
système
2
Cliquez sur
3
Cliquez sur
L'écran
4
Une fois l'ordinateur redémarré, cliquez sur OK.
, puis cliquez sur
Annuler ma dernière restauration
Suivant
Restauration du système
Démarrer
, pointez sur
Restauration du système
.
s'affiche et l'ordinateur redémarre.
Tous les programmes→Accessoires→
.
puis sur
Suivant
.
Guide de référence rapide 27
Outils
Page 68

Activation de la fonctionnalité Restauration du système
Si vous réinstallez Windows XP avec moins de 200 Mo d'espace disponible sur le disque dur,
la fonction Restauration du système est automatiquement désactivée. Pour vérifier si la fonction
Restauration du système est activée :
1
Cliquez sur le bouton
2
Cliquez sur
3
Cliquez sur
4
Cliquez sur l'onglet
5
Assurez-vous que l'option
Performances et maintenance
Système
Démarrer
, puis sur
Panneau de configuration
.
.
Restauration du système
.
Désactiver la Restauration du système
.
est bien désactivée.
www.dell.com | support.dell.com
Utilisation de la dernière configuration valide
1
Redémarrez votre ordinateur et appuyez sur <F8> lorsque le message Please select
the operating system to start
2
Mettez en évidence l'option “Last Known Good Configuration” (Dernière configuration
valide connue), appuyez sur <Entrée>, appuyez sur <l> et sélectionnez votre système
d'exploitation lorsque vous y êtes invité.
Autres options permettant de résoudre des conflits logiciels ou matériels
AVIS : les procédures suivantes effacent toutes les informations sur votre disque dur.
• Réinstallez votre système d'exploitation en vous servant du guide et du CD d'installation
appropriés.
Lors de la réinstallation du système d'exploitation, vous pouvez choisir de supprimer
les partitions existantes et reformater votre disque dur.
• Réinstallez tous les pilotes en commençant par celui du chipset, à l'aide du CD
Pilotes et utilitaires
Diagnostics Dell
ATTENTION : avant de commencer les procédures de cette section, lisez les consignes de sécurité
fournies dans le Guide d'informations sur le produit et veillez à les respecter scrupuleusement.
Quand utiliser les diagnostics Dell
Si vous rencontrez des difficultés avec votre ordinateur, procédez aux vérifications décrites
dans la section “Résolution des problèmes” à la page 25 et exécutez les diagnostics Dell
avant de contacter Dell pour obtenir une assistance technique.
Il est recommandé d'imprimer ces procédures avant de commencer.
(Sélectionnez le système d'exploitation) apparaît.
.
AVIS : les diagnostics Dell fonctionnent uniquement sur les ordinateurs Dell™. L'emploi
de ce programme avec d'autres ordinateurs peut provoquer des réponses inexactes de leur part
ou générer des messages d'erreur.
28 Guide de référence rapide
Page 69

Les diagnostics Dell vous permettent :
• de réaliser des vérifications rapides ou des tests étendus sur un ou sur tous les périphériques
• d'indiquer combien de fois le test doit être exécuté
• d'afficher ou d'imprimer les résultats des tests ou de les enregistrer dans un fichier
• d'interrompre le test si une erreur est détectée ou de mettre fin au test si un certain
nombre d'erreurs se produisent
aide
• d'accéder à des écrans d'
en ligne détaillés décrivant les tests et leur méthode d'exécution
• de lire les messages d'état qui vous indiquent si les tests ont réussi
• de recevoir des messages d'erreur si des problèmes sont détectés
Démarrage des diagnostics Dell à partir de votre disque dur
1
Mettez votre ordinateur sous tension (ou redémarrez-le).
2
Lorsque le logo DELL™ apparaît, appuyez immédiatement sur <F12>.
REMARQUE : si un message indique qu'aucune partition de diagnostics Dell n'a été trouvée, consultez
la section “Lancement des diagnostics Dell à partir du CD Pilotes et utilitaires” à la page 29.
Si vous n'avez pas appuyé sur la touche assez vite, le logo du système d'exploitation apparaît.
Attendez jusqu'à ce que le bureau Microsoft Windows s'affiche. Puis arrêtez votre ordinateur
et faites une nouvelle tentative. Pour plus d'informations sur l'arrêt de l'ordinateur, consultez
le
Manuel de l'utilisateur
3
Lorsque la liste des périphériques d'amorçage s'affiche, sélectionnez
.
Boot to Utility Partition
(Démarrer sur la partition de l'utilitaire) et appuyez sur <Entrée>.
4
Lorsque l'écran
le test à effectuer. Pour plus d'informations sur les tests, consultez le
Main Menu
(Menu principal) des diagnostics Dell s'affiche, sélectionnez
Manuel de l'utilisateur
.
Lancement des diagnostics Dell à partir du CD Pilotes et utilitaires
1
Insérez le CD
2
Arrêtez et redémarrez l'ordinateur. Pour plus d'informations sur l'arrêt de l'ordinateur,
consultez le
3
Lorsque le logo Dell apparaît, appuyez immédiatement sur <F12>.
Pilotes et utilitaires
Manuel de l'utilisateur
dans le lecteur.
.
Si vous attendez trop longtemps et que le logo Windows s'affiche, attendez encore
jusqu'à ce que le Bureau Windows s'affiche. Éteignez alors votre ordinateur et faites
une nouvelle tentative. Pour plus d'informations sur l'arrêt de l'ordinateur, consultez
le
Manuel de l'utilisateur
REMARQUE : cette fonctionnalité ne modifie la séquence d'amorçage qu'une seule fois. Au démarrage
suivant, l'ordinateur s'initialisera de nouveau en fonction des périphériques spécifiés dans le programme
de configuration du système.
.
Guide de référence rapide 29
Page 70

4
Lorsque la liste des périphériques d'initialisation s'affiche, mettez en surbrillance l'option
IDE CD-ROM Device
5
Sélectionnez l'option
dans le menu d'initialisation du CD.
6
Sélectionnez l'option
dans le menu qui s'affiche.
7
Ta p e z 1 pour lancer le menu du ResourceCD.
8
Ta p e z 2 pour démarrer les diagnostics Dell.
9
Sélectionnez
dans la liste numérotée. Si plusieurs versions sont répertoriées, sélectionnez la version
www.dell.com | support.dell.com
appropriée pour votre ordinateur.
10
Lorsque l'écran
le test à effectuer. Pour plus d'informations sur les tests, consultez le
Avant de commencer un test
ATTENTION : avant de commencer les procédures de cette section, suivez les consignes de sécurité
du Guide d'informations sur le produit.
• Allumez l'imprimante, le cas échéant.
• Ouvrez le programme de configuration du système, vérifiez les informations relatives
à la configuration actuelle de l'ordinateur et activez tous les composants et périphériques
(les connecteurs par exemple).
(Périphérique CD-ROM IDE) et appuyez sur <Entrée>.
IDE CD-ROM Device
Boot from CD-ROM
Run Dell 32-bit Diagnostics
Main Menu
(Menu principal) des diagnostics Dell s'affiche, sélectionnez
(Périphérique CD-ROM IDE)
(Démarrer à partir du CD-ROM)
(Exécuter les diagnostics Dell 32 bits)
Manuel de l'utilisateur
.
Codes sonores
Votre ordinateur peut émettre une série de signaux sonores permettant d'identifier un problème.
Par exemple, un des codes sonores possibles (code 1-3-1) est composé d'un signal, d'une série
de trois signaux, puis d'un autre signal. Cette série vous indique que l'ordinateur a rencontré
un problème de mémoire.
Si le système émet un code sonore, notez-le et recherchez-le dans le tableau suivant.
Code Cause
1-1-2 Échec du registre du microprocesseur
1-1-3 Erreur de lecture/écriture en NVRAM
1-1-4 Erreur de total de contrôle du BIOS en mémoire ROM.
1-2-1 Erreur du cadenceur d'intervalle programmable
1-2-2 Erreur d'initialisation des DMA
1-2-3 Erreur de lecture/écriture du registre de page DMA
30 Guide de référence rapide
Page 71

Code Cause
1-3 Échec du test de la mémoire vidéo
1-3-1 à 2-4-4 La mémoire n'est pas correctement identifiée ou utilisée
3-1-1 Échec du registre DMA esclave
3-1-2 Échec du registre DMA maître
3-1-3 Échec du registre de masque d'interruption maître
3-1-4 Échec du registre de masque d'interruption esclave
3-2-2 Échec du chargement du vecteur d'interruption
3-2-4 Échec du test du contrôleur du clavier
3-3-1 Panne d'alimentation NVRAM
3-3-2 Configuration incorrecte de la NVRAM
3-3-4 Échec du test de la mémoire vidéo
3-4-1 Erreur d'initialisation de l'écran
3-4-2 Échec du retraçage d'écran
3-4-3 Échec de la recherche de mémoire vidéo
4-2-1 Pas de cycle d'horloge.
4-2-2 Échec de l'arrêt
4-2-3 Échec Gate A20
4-2-4 Interruption inattendue en mode protégé
4-3-1 Échec de mémoire au-dessus de l'adresse 0FFFFh
4-3-3 Échec du compteur 2 de puce d'horloge
4-3-4 Arrêt de l'horloge système
4-4-1 Échec du test du port série ou parallèle
4-4-2 Échec de décompression du code vers la mémoire de doublage
4-4-3 Échec du test du coprocesseur mathématique
4-4-4 Échec du test de la mémoire cache
Messages d'erreur
REMARQUE : si le message n'est pas répertorié, consultez la documentation du système d'exploitation
ou celle du programme que vous utilisiez quand le message est apparu.
Si une erreur survient lors du démarrage, un message identifiant le problème peut s'afficher
à l'écran. Pour obtenir une aide sur la résolution d'un problème, consultez la section
“Messages d'erreur” du
Manuel de l'utilisateur
.
Guide de référence rapide 31
Page 72

Voyants de diagnostic
ATTENTION : avant de commencer les procédures de cette section, lisez les consignes de sécurité
fournies dans le Guide d'informations sur le produit et veillez à les respecter scrupuleusement.
Afin de vous aider à résoudre les incidents, votre ordinateur est muni de quatre voyants
sur le panneau arrière ou avant, marqués “A”, “B”, “C” et “D”. Ces voyants peuvent être jaunes
ou verts. Lorsque l'ordinateur démarre normalement, les voyants clignotent. Une fois
que l'ordinateur a démarré, les quatre voyants sont vert fixe. Si l'ordinateur ne fonctionne
pas correctement, la couleur et le comportement des voyants permettent d'identifier le problème.
Comportement
www.dell.com | support.dell.com
des voyants
ABCD
ABCD
ABCD
= jaune
= vert
= éteint
Description du problème Solution proposée
Échec éventuel du BIOS ;
l'ordinateur est en mode Récupération.
Défaillance possible du processeur. Réinstallez le processeur et redémarrez
Des modules de mémoire sont détectés
mais une panne de mémoire
s'est produite.
Exécutez l'utilitaire de sauvegarde
du BIOS, attendez que la récupération
soit terminée et redémarrez l'ordinateur.
l'ordinateur. Pour plus d'informations
sur la réinstallation du processeur,
consultez le Manuel de l'utilisateur.
1
Remettez en place les modules
de mémoire.
2
Redémarrez l'ordinateur.
3
Exécutez les diagnostics Dell.
4
Si le problème persiste,
contactez Dell.
32 Guide de référence rapide
Page 73

Comportement
des voyants
ABCD
ABCD
Description du problème Solution proposée
Une carte d'extension est peut-être
en panne.
Une défaillance de la carte graphique
semble s'être produite.
1
Déterminez s'il existe un conflit
en retirant une carte (autre que la
carte graphique) puis en redémarrant
l'ordinateur. Pour plus d'informations
sur le retrait d'une carte, consultez
Manuel de l'utilisateur
votre
2
Si le problème persiste, réinstallez
la carte retirée, retirez une autre
carte puis redémarrez l'ordinateur.
3
Répétez ce processus pour chaque
carte. Si l'ordinateur démarre
normalement, lancez le processus de
dépannage approprié sur la dernière
carte retirée pour savoir si celle-ci
provoque des conflits de ressource
(consultez la section “Résolution des
problèmes d'incompatibilité logicielle
et matérielle”).
4
Si le problème persiste, contactez
Dell. Pour savoir comment contacter
Dell, consultez le
l'utilisateur
• Si l'ordinateur contient une carte
graphique, retirez-la, réinstallez-la,
puis redémarrez l'ordinateur.
Pour plus d'informations sur la
réinstallation de la carte graphique,
consultez le
• Si le problème persiste, installez
une carte graphique qui fonctionne
et redémarrez l'ordinateur.
• Si le problème persiste ou que votre
ordinateur dispose de fonctionnalités
vidéo intégrées, contactez Dell.
Pour savoir comment contacter Dell,
consultez le
.
Manuel de l'utilisateur
Manuel de l'utilisateur
.
Manuel de
.
.
= jaune
= vert
= éteint
Guide de référence rapide 33
Page 74

Comportement
des voyants
ABCD
ABCD
www.dell.com | support.dell.com
Description du problème Solution proposée
Une défaillance de l'unité de disque
dur ou du lecteur de disquette
semble s'être produite.
Défaillance possible de l'USB. Réinstallez tous les périphériques USB,
Remettez en place tous les câbles
d'alimentation et de données
et redémarrez l'ordinateur.
vérifiez les connexions des câbles
et redémarrez l'ordinateur.
ABCD
Aucun module de mémoire
n'est détecté.
• Si un seul module de mémoire est
installé, réinstallez-le et redémarrez
l'ordinateur. Pour plus d'informations
sur les modules de mémoire,
consultez le
• Si au moins deux modules de
mémoire sont installés, retirez-les,
réinstallez-en un, puis redémarrez
l'ordinateur. Si l'ordinateur démarre
normalement, réinstallez le module
supplémentaire. Poursuivez jusqu'à
ce que vous puissiez identifier le
module défectueux ou réinstallez
tous les modules sans erreur.
Pour plus d'informations
sur les modules de mémoire,
consultez le
• Si possible, installez des modules
de mémoire de même type. Pour
plus d'informations sur les modules
de mémoire, consultez
le
Manuel de l'utilisateur
• Si le problème persiste, contactez
Dell. Pour savoir comment
contacter Dell, consultez
Manuel de l'utilisateur
le
Manuel de l'utilisateur
Manuel de l'utilisateur
.
.
.
.
= jaune
= vert
= éteint
34 Guide de référence rapide
Page 75

Comportement
des voyants
ABCD
Description du problème Solution proposée
Une défaillance de la carte système
s'est produite.
Contactez Dell
assistance technique. Pour savoir
comment contacter Dell,
consultez le Manuel de l'utilisateur.
pour obtenir une
ABCD
ABCD
= jaune
= vert
= éteint
Des modules de mémoire sont détectés
mais il existe une erreur de compatibilité
ou de configuration de mémoire.
Problème possible de ressource
de la carte système et/ou de matériel.
• Vérifiez qu'aucune contrainte
particulière ne doit être respectée
pour l'installation des modules
dans les connecteurs de mémoire.
• Vérifiez que les modules de mémoire
que vous installez sont compatibles
avec votre ordinateur.
• Réinstallez les modules de mémoire
et redémarrez l'ordinateur.
• Si le problème persiste, contactez
Dell. Pour savoir comment
contacter Dell, consultez le
Manuel de l'utilisateur
Suivez les procédures de la section
“Résolution des incompatibilités
logicielles et matérielles
Si le problème persiste,
Pour savoir comment contacter Dell,
consultez le Manuel de l'utilisateur.
.
” (voir
page 25).
contactez Dell
.
Guide de référence rapide 35
Page 76

Comportement
des voyants
ABCD
www.dell.com | support.dell.com
ABCD
Description du problème Solution proposée
Une carte d'extension est peut-être
en panne.
Une autre panne s'est produite.
L'ordinateur fonctionne normalement
après le POST.
1
Détectez les conflits éventuels
en retirant une carte (autre que la
carte graphique) puis en redémarrant
l'ordinateur. Pour plus d'informations
sur le retrait d'une carte, consultez
Manuel de l'utilisateur
votre
2
Si le problème persiste, réinstallez
la carte retirée, retirez une autre
carte puis redémarrez l'ordinateur.
3
Répétez ce processus pour chaque
carte. Si l'ordinateur démarre
normalement, lancez le processus
de dépannage approprié sur la
dernière carte retirée pour savoir
si celle-ci provoque des conflits
de ressources (consultez la section
“Résolution des incompatibilités
logicielles et matérielles” à la page 25).
4
Si le problème persiste, contactez
Dell. Pour savoir comment
contacter Dell, consultez
Manuel de l'utilisateur
le
• Vérifiez que les câbles reliant la carte
système au disque dur, au lecteur
de CD et au lecteur de DVD
sont correctement connectés.
• Si le problème persiste,
contactez Dell. Pour savoir comment
contacter Dell, consultez le
de l'utilisateur
Aucune
.
.
Manuel
.
ABCD
= jaune
= vert
= éteint
36 Guide de référence rapide
Page 77

Questions fréquemment posées
Comment faire pour... Solution Où trouver des informations
supplémentaires ?
Configurer mon ordinateur
pour utiliser deux écrans ?
Connecter mon écran lorsque
le connecteur du câble de l'écran
ne semble pas correspondre à celui
situé à l'arrière de mon ordinateur ?
Installer un ventilateur
pour la carte ?
Brancher mes haut-parleurs ? Si vous avez installé une seconde
Si votre ordinateur est équipé d'une
carte graphique permettant d'utiliser
deux écrans, un câble en Y doit vous
avoir été fourni. L'une des extrémités
de ce câble est dotée d'un connecteur
qui se branche sur le panneau arrière
de l'ordinateur. Les deux autres
extrémités permettent de connecter
les câbles des moniteurs. Pour
l'ordinateur mini-tour, consultez
la section “Connectez le moniteur”
à la page 10. Pour l'ordinateur
de bureau, consultez la page 15.
Si votre carte graphique possède
un connecteur DVI mais que celui
de votre écran est de type VGA,
vous devez utiliser un adaptateur,
que vous devriez retrouver
dans l’emballage.
Si vous avez installé une carte
graphique fonctionnant à plus
de 75 W, vous devez installer
un ventilateur. Contactez Dell
pour en commander un.
Les coordonnées de Dell se trouvent
dans le Manuel de l'utilisateur
et sur le site support.dell.com.
carte son, branchez les haut-parleurs
sur les connecteurs de celle-ci.
Pour l'ordinateur mini-tour,
consultez la section “Connectez
les haut-parleurs”, à la page 13.
Pour l'ordinateur de bureau,
voir la page 18.
Pour trouver des informations
supplémentaires relatives à
l'utilisation de deux écrans,
consultez la documentation
de la carte graphique sur
le CD Pilotes et utilitaires.
Contactez Dell pour
plus d'informations.
Pour obtenir les instructions
relatives à l'installation d'une carte
ou d'un ventilateur de carte,
consultez le Manuel de l'utilisateur.
Consultez la documentation fournie
avec les haut-parleurs pour plus
d'informations.
Guide de référence rapide 37
Page 78

Comment faire pour... Solution Où trouver des informations
supplémentaires ?
Trouver les bons connecteurs
pour mes périphériques USB
ou IEEE 1394 ?
www.dell.com | support.dell.com
Trouver des informations sur le
matériel et autres caractéristiques
techniques de mon ordinateur ?
Trouver de la documentation
pour mon ordinateur ?
L'ordinateur mini-tour possède
8 connecteurs USB
(deux à l'avant et six à l'arrière).
L'ordinateur de bureau possède
les mêmes connecteurs, ainsi
qu'un connecteur frontal IEEE 1394
en option. Ce connecteur n'est
disponible que si vous avez acheté
une carte optionnelle IEEE 1394.
Pour vous en procurer une,
contactez DELL. Pour plus
d'informations, consultez
votre Manuel de l'utilisateur.
Vo tre Manuel de l'utilisateur contient
un tableau de spécifications dont
le but est de fournir des informations
plus détaillées sur votre ordinateur
et sur le matériel. Pour savoir
comment accéder au Manuel
de l'utilisateur, consultez la section
“Obtention d'informations et
d'assistance” à la page 5.
La documentation suivante est
disponible pour votre ordinateur :
• Manuel de l'utilisateur
• Guide d'informations sur le produit
• Étiquette des informations
sur le système
Pour savoir où trouver ces
documents, consultez la section
“Obtention d'informations et
d'assistance” à la page 5.
Consultez les graphiques
représentant les vues avant et arrière
de votre ordinateur dans le Manuel
de l'utilisateur. Pour savoir comment
accéder au Manuel de l'utilisateur,
consultez la section “Obtention
d'informations et d'assistance”
àlapage5.
Visitez le site Web Dell Support
à l'adresse support.dell.com
et utilisez l'un des outils d'aide
suivants : lisez les livres blancs
relatifs aux dernières technologies
en date ou communiquez
avec d'autres utilisateurs Dell
sur le salon de discussion.
En cas de perte de votre
documentation,
vous pourrez la retrouver
surlesitesupport.dell.com.
38 Guide de référence rapide
Page 79

Index
C
Carte système, 5
CD du Système
d'exploitation, 8
CD Pilotes et utilitaires, 5
Centre d'aide et de support, 7
Conflits
IRQ, 25
logiciels ou matériels, 25
Consignes de sécurité, 6
D
Dell
site de support, 7
site Web Dell Premier
Support, 7
Dépannage
centre d'aide et de support, 7
conflits, 25
diagnostics Dell, 28
résolution des problèmes
matériels, 25
restauration à l'état
précédent, 26
voyants de diagnostic, 32
Diagnostics
CD Pilotes et utilitaires, 5
Dell, 28
voyants, 32
Documentation, 14
en ligne, 7
Guide d'informations
sur le produit, 6
Manuel de l'utilisateur, 6
périphériques, 5
ResourceCD, 5
E
Étiquette des informations
sur le système, 5
Étiquettes
Microsoft Windows, 6
numéro de série, 6
G
Garantie, 6
Gestionnaire de
périphériques, 26
I
Installation de composants
mise hors tension de
l'ordinateur, 20, 22-23
L
Logiciels
conflits, 25
M
Manuel de l'utilisateur, 6
Matériel
conflits, 25
diagnostics Dell, 28
Messages d’erreur
voyants de diagnostic, 32
Microsoft Windows,
étiquette, 6
N
Numéro de série, 6
O
Obtention d'informations, 5
Ordinateur
restauration à l'état
précédent, 26
P
Pilotes
ResourceCD, 5
Problèmes
conflits, 25
diagnostics Dell, 28
restauration à l'état
précédent, 26
voyants de diagnostic, 32
Index 39
Page 80

R
W
Réinstallation
CD Pilotes et utilitaires, 5
ResourceCD, 5
Résolution des problèmes
matériels, 25
ResourceCD
diagnostics Dell, 28
Restauration du système, 26
S
Site Web Dell Premier
Support, 6-7
V
Voya nts
arrière de l’ordinateur, 32
diagnostic, 32
Windows 2000
gestionnaire de
périphériques, 26
utilitaire de résolution des
problèmes matériel, 26
Windows XP
centre d'aide et de support, 7
résolution des problèmes
matériels, 25
restauration du système, 26
utilitaire de résolution des
problèmes matériel, 25
40 Index
Page 81

Dell Precision™ Workstation
370 Systeme
Schnellreferenzhandbuch
Modelle DHM und WHM
www.dell.com | support.euro.dell.com
Page 82

Anmerkungen, Hinweise und Vorsichtsmaßnahmen
ANMERKUNG: Eine ANMERKUNG enthält wichtige Informationen, mit deren Hilfe Sie Ihren
Computer besser nutzen können.
HINWEIS: Mit einem HINWEIS wird auf eine mögliche Beschädigung von Hardware oder den Verlust
von Daten hingewiesen und erläutert, wie dieses Problem vermieden werden kann.
VORSICHT: VORSICHT weist darauf hin, dass Gefahr eines Sach- oder Personenschadens oder Lebensgefahr besteht.
Abkürzungen und Akronyme
Eine vollständige Liste von Abkürzungen und Akronymen finden Sie im Glossar Ihres
Wenn Sie einen Dell™-Computer der N-Serie besitzen, haben die Hinweise auf Microsoft
Benutzerhandbuchs
®
Windows®-
.
Betriebssysteme in der vorliegenden Dokumentation keine Gültigkeit für Ihr System.
____________________
Irrtümer und technische Änderungen vorbehalten.
© 2004 Dell Inc. Alle Rechte vorbehalten.
Nachdrucke jeglicher Art ohne vorherige schriftliche Genehmigung von Dell Inc. sind strengstens untersagt.
Marken in diesem Text: Dell, das DELL-Logo und Dell Precision sind Marken der Dell Inc.;
Microsoft und Windows sind eingetragene Marken der Microsoft Corporation.
Andere in diesem Dokument möglicherweise verwendete Marken und Handelsbezeichnungen sind unter Umständen Marken und Namen
der entsprechenden Firmen oder ihrer Produkte. Dell Inc. erhebt keinen Anspruch auf Marken und Handelsbezeichnungen mit Ausnahme
der eigenen.
Modelle DHM und WHM
April 2004 P/N U3525 Rev. A00
Page 83

Inhalt
Dokumentation und Support . . . . . . . . . . . . . . . . . . . . . . . . 5
Den Minitower-Computer einrichten
Den Desktop-Computer einrichten
Das Benutzerhandbuch aufrufen
Den Minitower-Computer öffnen
Der Kartenlüfter
. . . . . . . . . . . . . . . . . . . . . . . . . . . . . . 22
Den Desktop-Computer öffnen
Pflege des Computers
Probleme lösen
. . . . . . . . . . . . . . . . . . . . . . . . . . . 24
. . . . . . . . . . . . . . . . . . . . . . . . . . . . . . 25
Tipps für die Fehlersuche
. . . . . . . . . . . . . . . . . . . . 9
. . . . . . . . . . . . . . . . . . . . . 14
. . . . . . . . . . . . . . . . . . . . . . 19
. . . . . . . . . . . . . . . . . . . . . . 20
. . . . . . . . . . . . . . . . . . . . . . . 23
. . . . . . . . . . . . . . . . . . . . . . . 25
Inkompatibilitäten von Software und Hardware beheben
Verwenden der Systemwiederherstellung
unter Microsoft Windows XP
. . . . . . . . . . . . . . . . . . . . . 26
Letzte als funktionierend bekannte Konfiguration verwenden
Dell Diagnose
Vor Testbeginn
Signaltoncodes
Fehlermeldungen
Diagnoseanzeigen
. . . . . . . . . . . . . . . . . . . . . . . . . . . . . 28
. . . . . . . . . . . . . . . . . . . . . . . . . . . . 30
. . . . . . . . . . . . . . . . . . . . . . . . . . . . . . 30
. . . . . . . . . . . . . . . . . . . . . . . . . . . 31
. . . . . . . . . . . . . . . . . . . . . . . . . . . . . 32
. . . . . . . . 25
. . . . . . 28
Häufig gestellte Fragen
. . . . . . . . . . . . . . . . . . . . . . . . . . 38
Index . . . . . . . . . . . . . . . . . . . . . . . . . . . . . . . . . . . . 41
Inhalt 3
Page 84

4 Inhalt
Page 85

Dokumentation und Support
Wonach suchen Sie? Hier finden Sie es
• Ein Diagnoseprogramm für meinen Computer
• Treiber für meinen Computer
• Die Dokumentation für meine Geräte
• Systemplatinenanschlüsse
• Anordnung der Komponenten
der Systemplatine
Drivers and Utilities CD (Treiber und Dienstprogramme;
wird auch als ResourceCD bezeichnet)
Dokumentation und Treiber sind bereits auf dem
Computer installiert. Mit Hilfe der CD können
Sie Treiber neu installieren, das Programm
„Dell Diagnose“ (siehe Seite 28) ausführen
oder auf die Gerätedokumentation zugreifen.
ANMERKUNG: Die neuesten Treiber und
Dokumentationsaktualisierungen können Sie
von support.euro.dell.com herunterladen.
Etikett mit den Systeminformationen
Befindet sich auf der Innenseite der Computerabdeckung.
Möglicherweise finden
Sie auf der CD
Readme (Info)-Dateien.
Diese Dateien enthalten
Angaben zu den
neuesten technischen
Änderungen bzw.
Detailinformationen
zu technischen Fragen
für erfahrene Benutzer
oder Techniker.
Schnellreferenzhandbuch 5
Page 86

Wonach suchen Sie? Hier finden Sie es
• Garantieinformationen
Dell™-Produktinformationshandbuch
• Sicherheitshinweise
• Zulassungsbestimmungen
• Informationen zur Ergonomie
• Endbenutzer-Lizenzvertrag
www.dell.com | support.dell.com
• Wie Teile entfernt und ersetzt werden
• Technische Daten
• Informationen zum Konfigurieren
von Systemeinstellungen
• Informationen zur Fehlerbeseitigung
und Problemlösung
• Service-Tag-Nummer und Express-Servicecode
• Microsoft Windows-Lizenzetikett
Dell PrecisionBenutzerhandbuch
Microsoft
1
Klicken Sie auf die Schaltfläche
und anschließend auf
2
Klicken Sie auf
(Benutzer- und Systemhandbücher) und anschließend
User's guides
auf
Service-Tag-Nummer und Microsoft Windows-Lizenz
Diese Aufkleber sind am Computer angebracht.
• Geben Sie die
Service-Tag-Nummer
auf der Website
support.euro.dell.co
oder während des
m
Telefongesprächs mit
dem Technischen
Support an, damit Ihr
Computer identifiziert werden kann.
• Geben Sie während des Gesprächsmit dem Technischen
Support den Express-Servicecode an, um zum
geeigneten Ansprechpartner weitergeleitet zu werden.
Das Express-Servicecodesystem ist möglicherweise nicht
in allen Ländern verfügbar.
®
Windows® XP Hilfe- und Supportcenter
Start
Hilfe und Support
.
User's and system guides
(Benutzerhandbücher).
6 Schnellreferenzhandbuch
Page 87

Wonach suchen Sie? Hier finden Sie es
• Aktuelle Treiber für den Computer
• Antworten auf Fragen zum technischen Support
und Kundendienst
• Online-Diskussionen mit anderen Benutzern
und Mitarbeitern des technischen Supports
• Dokumentation zum Computer
Dell-Support-Website – support.euro.dell.com
ANMERKUNG: Wählen Sie Ihre Region aus, um
auf die entsprechende Support-Website zuzugreifen.
Die Website Dell | Support bietet verschiedene
Online-Werkzeuge, unter anderem:
• Lösungen – Hinweise und Tipps zur
Problembehandlung, Artikel von Technikern
und Onlinekurse
• Community – Online-Diskussion mit anderen
Dell-Kunden
• Upgrades – Aktualisierungsinformationen
zu Komponenten wie Speicher, Festplatte
und Betriebssystem
• Kundenbetreuung – Kontaktinformationen
und Informationen zu Bestellstatus, Garantie
und Reparaturen
• Downloads – Treiber, Patches und Softwareaktualisierungen
• Referenzmaterial – Computerdokumentation,
technische Daten und White Papers
• Serviceanfragen-Status und Supportverlauf
• Wichtige technische Hinweise
für meinen Computer
• Häufig gestellte Fragen
• Dateidownloads
• Ausführliche Informationen
Dell Premier Support-Website –
premiersupport.euro.dell.com
Die Dell Premier Support-Website ist für Firmen,
staatliche Einrichtungen und Kunden aus
dem Bildungswesen konzipiert. Diese Website ist
möglicherweise nicht in allen Ländern verfügbar.
zur Konfiguration des Computers
• Servicevertrag für meinen Computer
• Anleitung zum Arbeiten mit Windows XP
• Dokumentation zum Computer
• Dokumentation für Peripheriegeräte
(z.B. Modems)
Windows Hilfe- und Supportcenter
1
Klicken Sie auf die Schaltfläche
Hilfe und Support
auf
2
Geben Sie ein Stichwort oder einen Ausdruck
zur Beschreibung Ihres Problems ein und klicken
Sie anschließend auf das Pfeilsymbol.
3
Klicken Sie auf das Thema, das Ihr Problem beschreibt.
4
Befolgen Sie die Anweisungen auf dem Bildschirm.
Start
und anschließend
.
Schnellreferenzhandbuch 7
Page 88

Wonach suchen Sie? Hier finden Sie es
• Anleitung zum Arbeiten mit Linux
• Email-Diskussionen mit
Dell Precision- und Linux-Anwendern
• Zusätzliche Informationen zu Linux
und Dell Precision-Computern.
• Informationen zum Neuinstallieren
des Betriebssystems
www.dell.com | support.dell.com
Linux-Webseiten von Dell
• http://linux.dell.com
• http://lists.us.dell.com/mailman/listinfo/
linux-precision
• http://docs.us.dell.com/docs/software/oslinux/
• http://docs.us.dell.com/docs/software/OSRHEL3/
Betriebssystem-CD
Das Betriebssystem ist bereits auf dem Computer
installiert. Verwenden Sie die Betriebssystem-CD,
um das Betriebssystem neu zu installieren. Anleitungen
dazu finden Sie im Precision-Benutzerhandbuch.
ANMERKUNG: Die Farbe der CD hängt vom Betriebs-
system ab, das Sie bestellt haben.
Verwenden Sie die
Drivers and Utilities-CD,
um neuere Treiber für
die mit Ihrem Computer
ausgelieferten Geräte
zu installieren, wenn
Sie das Betriebssystem
Ihres Computers neu
installiert haben.
Das Etikett mit
dem Produktcode
des Betriebssystems
finden Sie am Computer.
8 Schnellreferenzhandbuch
Page 89

Den Minitower-Computer einrichten
VORSICHT: Bevor Sie die in diesem Abschnitt beschriebenen Anweisungen ausführen,
befolgen Sie zunächst die Sicherheitshinweise im Produktinformationshandbuch.
Um den Computer korrekt einzurichten, müssen Sie alle Schritte wie angegeben ausführen.
Schließen Sie Tastatur und Maus an.
1
Schließen Sie das Modem oder Netzwerkkabel an.
2
HINWEIS: Achten Sie darauf, das Modemkabel
nicht versehentlich mit dem Anschluss des
Netzwerkadapters zu verbinden. Die Spannung
auf der Telefonleitung kann den Netzwerkadapter
beschädigen.
ANMERKUNG: Wenn Ihr Computer mit einer
Netzwerkkarte ausgerüstet ist, schließen
Sie das Netzwerkkabel an dieser Karte an.
Schnellreferenzhandbuch 9
Page 90

Schließen Sie
3
den Monitor an.
Abhängig von der Grafikkarte
Ihres Computers gibt
es unterschiedliche
Möglichkeiten zum
Anschließen Ihres Monitors.
www.dell.com | support.dell.com
ANMERKUNG: Unter
Umständen müssen
Sie den Monitor mit
Hilfe des mitgelieferten
Adapters/Kabels
anschließen.
10 Schnellreferenzhandbuch
Page 91

Einzel- und Dual-Monitor-fähige Karten mit einem einzelnen Anschluss
VGA-Adapter
VGA
Wenn eine einzelne Grafikkarte verwendet wird
und ein VGA-Bildschirm angeschlossen werden soll,
verwenden Sie den VGA-Adapter.
Dual-VGA-Y-Kabeladapter
Dual-DVI-Y-Kabeladapter
VGA
VGA
Wenn eine Grafikkarte mit einem einzigen Anschluss
verwendet wird und ein oder zwei VGA-Bildschirme
angeschlossen werden sollen, verwenden Sie einen
geeigneten Y-Kabeladapter.
Wenn eine Grafikkarte mit einem einzigen Anschluss
verwendet wird und ein oder zwei DVI-Bildschirme
angeschlossen werden sollen, verwenden Sie einen
geeigneten Y-Kabeladapter.
DVI
DVI
Das Dual-Bildschirm-Kabel verfügt über eine Farbkodierung; der blaue Anschluss ist für den
primären und der schwarze Anschluss für den sekundären Monitor bestimmt. Um die DualBildschirm-Unterstützung zu aktivieren, müssen beide Bildschirme beim Starten des Computers
angeschlossen sein.
Schnellreferenzhandbuch 11
Page 92

Für Dual-Monitor-fähige Karten mit einem DVI- und einem VGA-Anschluss
Einzel-DVI/Einzel-VGA
DVI
VGA
www.dell.com | support.dell.com
Um einen bzw. zwei Monitore an Ihren Computer
anzuschließen, verwenden Sie die geeigneten
Dual-VGA mit VGA-Adapter
Um zwei VGA-Monitore an Ihren Computer
anzuschließen, verwenden Sie den VGA-Adapter.
Anschlüsse.
Dual-Monitor-fähige Karten mit zwei DVI-Anschlüssen
Dual-DVI
Dual-DVI mit einem VGA-Adapter
VGA
VGA
Dual-DVI mit zwei VGA-Adaptern
DVI
DVI
Um einen oder zwei DVI-Monitore
an Ihren Computer anzuschließen,
verwenden Sie die DVI-Anschlüsse.
12 Schnellreferenzhandbuch
DVI
VGA
Um einen VGA-Monitor mit einem
der DVI-Anschlüsse Ihres Computers
zu verbinden, verwenden Sie den
VGA-Adapter.
VGA
VGA
Um zwei VGA-Monitore mit den
DVI-Anschlüssen Ihres Computers
zu verbinden, verwenden Sie
zwei VGA-Adapter.
Page 93

Schließen Sie die
4
Lautsprecher an.
ANMERKUNG:
Wenn Ihr Computer
mit einer Soundkarte
ausgerüstet ist,
schließen Sie die
Lautsprecher
an dieser Karte an.
Schließen Sie
5
die Netzkabel
an und schalten
Sie Computer
und Monitor ein.
Schnellreferenzhandbuch 13
Page 94

Installieren Sie nun ggf. weitere Software oder Geräte.
6
Bevor Sie Geräte oder Software installieren, die nicht mit Ihrem Computer ausgeliefert wurden,
sollten Sie die mit der Software oder dem Gerät gelieferte Dokumentation lesen oder sich an
den Händler wenden, um sicherzustellen, dass die Software bzw. das Gerät mit Ihrem Computer
und Betriebssystem kompatibel sind.
Herzlichen Glückwunsch! Sie haben Ihren Minitower-Computer
nun vollständig eingerichtet.
www.dell.com | support.dell.com
Den Desktop-Computer einrichten
VORSICHT: Bevor Sie die in diesem Abschnitt beschriebenen Anweisungen ausführen,
befolgen Sie zunächst die Sicherheitshinweise im Produktinformationshandbuch.
Um den Computer korrekt einzurichten, müssen Sie alle Schritte wie angegeben ausführen.
Schließen Sie Tastatur und Maus an.
1
HINWEIS: Achten Sie darauf,
das Modemkabel nicht
versehentlich mit
dem Anschluss des
Netzwerkadapters zu
verbinden. Die Spannung
auf der Telefonleitung
kann den Netzwerkadapter
beschädigen.
14 Schnellreferenzhandbuch
Page 95

Schließen Sie das Modem
2
oder Netzwerkkabel an.
ANMERKUNG:
Wenn Ihr Computer
mit einer Netzwerkkarte
ausgerüstet ist, schließen
Sie das Netzwerkkabel
an dieser Karte an.
Schließen Sie den Monitor an.
3
Abhängig von der Grafikkarte Ihres
Computers gibt es unterschiedliche
Möglichkeiten zum Anschließen
Ihres Monitors.
ANMERKUNG: Unter Umständen
müssen Sie den Monitor mit Hilfe
des mitgelieferten Adapters/Kabels
anschließen.
Schnellreferenzhandbuch 15
Page 96

Einzel- und Dual-Monitor-fähige Karten mit einem einzelnen Anschluss
VGA-Adapter
VGA
www.dell.com | support.dell.com
Wenn eine einzelne Grafikkarte verwendet wird
und ein VGA-Bildschirm angeschlossen werden soll,
verwenden Sie den VGA-Adapter.
Dual-VGA-Y-Kabeladapter
Dual-DVI-Y-Kabeladapter
VGA
VGA
Wenn eine Grafikkarte mit einem einzigen Anschluss
verwendet wird und ein oder zwei VGA-Bildschirme
angeschlossen werden sollen, verwenden Sie
einen geeigneten Y-Kabeladapter.
Das Dual-Bildschirm-Kabel verfügt über eine Farbkodierung; der blaue Anschluss ist
für den primären und der schwarze Anschluss für den sekundären Monitor bestimmt.
Um die Dual-Bildschirm-Unterstützung zu aktivieren, müssen beide Bildschirme beim
Starten des Computers angeschlossen sein.
16 Schnellreferenzhandbuch
DVI
DVI
Wenn eine Grafikkarte mit einem einzigen Anschluss
verwendet wird und ein oder zwei DVI-Bildschirme
angeschlossen werden sollen, verwenden Sie
einen geeigneten Y-Kabeladapter.
Page 97

Für Dual-Monitor-fähige Karten mit einem DVI- und einem VGA-Anschluss
Einzel-DVI/Einzel-VGA
DVI
VGA
Dual-VGA mit VGA-Adapter
VGA
VGA
Um einen bzw. zwei Monitore an Ihren Computer
anzuschließen, verwenden Sie die geeigneten
Anschlüsse.
Dual-Monitor-fähige Karten mit zwei DVI-Anschlüssen
Dual-DVI
DVI
DVI
Um einen oder zwei DVI-Monitore
an Ihren Computer anzuschließen,
verwenden Sie die DVI-Anschlüsse.
Dual-DVI mit einem VGA-Adapter
DVI
Um einen VGA-Monitor mit
einem der DVI-Anschlüsse
Ihres Computers zu verbinden,
verwenden Sie den VGA-Adapter.
Um zwei VGA-Monitore an Ihren Computer
anzuschließen, verwenden Sie den VGA-Adapter.
Dual-DVI mit zwei VGA-Adaptern
VGA
VGA
VGA
Um zwei VGA-Monitore mit den
DVI-Anschlüssen Ihres Computers
zu verbinden, verwenden Sie
zwei VGA-Adapter.
Schnellreferenzhandbuch 17
Page 98

Schließen Sie die
4
Lautsprecher an.
www.dell.com | support.dell.com
ANMERKUNG: Wenn Ihr Computer mit einer Soundkarte ausgerüstet ist, schließen Sie
die Lautsprecher an dieser Karte an.
Schließen Sie die Netzkabel
an und schalten Sie
5
Computer und Monitor ein.
Ihr Desktop-Computer
ist mit einem optionalen
IEEE 1394-Anschluss an
der Vorderseite ausgestattet.
Dieser Anschluss kann
nur mit einer IEEE 1394Erweiterungskarte genutzt
werden. Wenden Sie sich an Dell,
um eine Karte zu erwerben.
Informationen zu der
Erweiterungskarte finden Sie in
Ihrem
Benutzerhandbuch
.
Installieren Sie nun ggf. weitere Software oder Geräte.
6
Bevor Sie Geräte oder Software installieren, die nicht mit Ihrem Computer ausgeliefert wurden,
sollten Sie die mit der Software oder dem Gerät gelieferte Dokumentation lesen oder sich an
den Händler wenden, um sicherzustellen, dass die Software bzw. das Gerät mit Ihrem Computer
und Betriebssystem kompatibel sind.
Herzlichen Glückwunsch! Sie haben Ihren Desktop-Computer
nun vollständig eingerichtet.
18 Schnellreferenzhandbuch
Page 99

Das Benutzerhandbuch aufrufen
Das
Benutzerhandbuch
Informationen zu Ihrem Computer:
• Technische Daten
• Abbildungen der Vorder- und Rückseite des Computers, einschließlich
der verfügbaren Anschlüsse
• Abbildungen der internen Komponenten des Computers, einschließlich
detaillierter Grafiken der Systemplatine und der Anschlüsse
• Anweisungen zum Reinigen Ihres Computers
• Informationen zu Softwaremerkmalen wie der LegacySelect Technologiesteuerung,
der Verwendung eines Passworts und den System-Setup-Optionen
• Hinweise und Informationen zur Verwendung des Betriebssystems Microsoft Windows XP
• Anweisungen zum Entfernen und Installieren von Komponenten wie Speicherelementen,
Karten, Laufwerken, Mikroprozessor und Batterie
• Informationen zum Beheben verschiedener Probleme
• Anleitungen zur Verwendung der Dell Diagnose und zur Neuinstallation von Treibern
• Informationen zur Kontaktaufnahme mit Dell
Sie können das
der Dell Support-Website unter der Webadresse
So rufen Sie das Benutzerhandbuch von Ihrer Festplatte aus auf:
Klicken Sie auf die Schaltfläche
zu Ihrer
Benutzerhandbuch
Dell Precision™ Workstation 370
Start
enthält ausführliche
entweder von Ihrem Festplattenlaufwerk oder von
support.euro.dell.com
und anschließend auf
Hilfe und Support
aufrufen.
.
So rufen Sie das Bennutzerhandbuch über die Dell Support-Site auf:
1
Besuchen Sie die Webadresse
2
Geben Sie entsprechend den Aufforderungen auf der Website die spezifischen
Informationen zu Ihrem Computer ein.
3
Klicken Sie auf der Startseite der Dell Support-Website auf
und anschließend nacheinander auf
auf
Systems
(Systeme). Wählen Sie nun Ihren Dell Precision Computer aus.
support.euro.dell.com
User’s Guides
.
Reference
(Benutzerhandbücher) und
(Referenzmaterial)
Schnellreferenzhandbuch 19
Page 100

Den Minitower-Computer öffnen
VORSICHT: Bevor Sie die in diesem Abschnitt beschriebenen Anweisungen ausführen,
befolgen Sie zunächst die Sicherheitshinweise im Produktinformationshandbuch.
VORSICHT: Schützen Sie sich vor elektrischen Schlägen, indem Sie das Netzkabel des Computers
stets aus der Steckdose ziehen, bevor Sie die Abdeckung öffnen.
HINWEIS: Um Datenverlust zu vermeiden, speichern und schließen Sie alle geöffneten
Dateien und beenden Sie alle aktiven Programme, bevor Sie den Computer ausschalten.
Fahren Sie das Betriebssystem herunter:
1
a
Speichern und schließen sie alle geöffneten Dateien und beenden Sie alle aktiven
www.dell.com | support.dell.com
2
3
4
5
6
Programme. Klicken Sie auf die Schaltfläche
b
Klicken Sie im Fenster
Nachdem das Betriebssystem heruntergefahren wurde, schaltet sich der Computer
automatisch ab.
Stellen Sie sicher, dass der Computer und alle angeschlossenen Geräte ausgeschaltet sind.
Wenn der Computer und die angeschlossenen Geräte beim Herunterfahren
des Computers nicht automatisch ausgeschaltet wurden, schalten Sie diese jetzt aus.
Wenn an der Rückseite ein Vorhängeschloss durch den Ring geschoben wurde,
entfernen Sie das Schloss.
HINWEIS: Stellen Sie sicher, dass auf der Arbeitsfläche genügend Platz für die geöffnete
Computerabdeckung verfügbar ist (mindestens 30 cm).
Legen Sie den Computer auf die Seite, wie in der folgenden Abbildung gezeigt.
Öffnen Sie die Abdeckung:
a
Drücken Sie von der Rückseite des Computers aus gesehen die Freigabetaste auf der
rechten Seite des Computers mit einer Hand. Ziehen Sie gleichzeitig mit der anderen
Hand die Oberseite der Abdeckung nach oben.
b
Drücken Sie die Freigabetaste auf der linken Seite des Computers mit einer Hand und
ziehen Sie gleichzeitig mit der anderen Hand die Oberseite der Abdeckung nach oben.
Halten Sie die Unterseite des Computers mit einer Hand fest und ziehen Sie die Abdeckung
mit der anderen Hand auf.
Computer ausschalten
Start
und anschließend auf
auf
Ausschalten
Ausschalten
.
.
20 Schnellreferenzhandbuch
 Loading...