


Dell Display Manager 2.1
for Windows
User’s Guide

NOTE: A NOTE indicates important information that helps you make better
use of your computer.
Copyright © 2022 Del l Inc. or its subsidiaries. All rights reserved. Dell, EMC, and other trademarks
are trademarks of Del l Inc. or its subsidiaries. Other trademarks may be trademarks of their respective
owners.
2022 - 12
Rev. A01

Contents
Overview . . . . . . . . . . . . . . . . . . . . . . . . . . . . . . . . . . 5
System Requirements . . . . . . . . . . . . . . . . . . . . . . . . . . . . 5
Downloading and setting up the DDM 2.1 . . . . . . . . . 6
Downloading the DDM 2.1 . . . . . . . . . . . . . . . . . . . . . . . . . 6
Connecting the monitor to your computer. . . . . . . . . . . . . 6
Before launching the DDM 2.1. . . . . . . . . . . . . . . . . . 7
Launching DDM 2.1 . . . . . . . . . . . . . . . . . . . . . . . . . . 8
Menu Launcher. . . . . . . . . . . . . . . . . . . . . . . . . . . . . . . . . . 8
Main Menu . . . . . . . . . . . . . . . . . . . . . . . . . . . . . . . 14
Adjusting the brightness and contrast . . . . . . . . . . 16
Managing multiple video inputs . . . . . . . . . . . . . . . .17
Configuring the Picture-in-Picture/Picture-by-Picture
(PIP/PBP) mode . . . . . . . . . . . . . . . . . . . . . . . . . . . . . . . 18
Assigning shortcut keys . . . . . . . . . . . . . . . . . . . . . . . . . . 20
Setting the monitor display mode . . . . . . . . . . . . . 22
Auto change color preset when using specific
application . . . . . . . . . . . . . . . . . . . . . . . . . . . . . . . . . . . . 23
Organizing windows with Easy Arrange . . . . . . . . . 25
Layout. . . . . . . . . . . . . . . . . . . . . . . . . . . . . . . . . . . . . . . . 25
Easy Memory . . . . . . . . . . . . . . . . . . . . . . . . . . . . . . . . . . 27
Settings . . . . . . . . . . . . . . . . . . . . . . . . . . . . . . . . . . . . . . 30
Using the Application Window Snap. . . . . . . . . . . . 31
Configuring the Gaming Settings . . . . . . . . . . . . . . 32
Setting up the KVM. . . . . . . . . . . . . . . . . . . . . . . . . 34
│ 3

Changing KVM configuration . . . . . . . . . . . . . . . . . . . . . . 37
Personalize settings . . . . . . . . . . . . . . . . . . . . . . . . 40
Changing Menu Launcher configuration . . . . . . . . . . . . . 40
Changing Launch DDM Hotkey configuration . . . . . . . . . 41
Applying energy conservation features . . . . . . . . . 42
Color Management. . . . . . . . . . . . . . . . . . . . . . . . . 43
Automatically adjust the default color profile in Windows
when the color preset in monitor is changed . . . . . . . . . . 43
Automatically change the color preset based on the
change in the ICC profile . . . . . . . . . . . . . . . . . . . . . . . . . 43
Changing the ICC profile in Windows. . . . . . . . . . . . . . . . 44
Resetting monitor settings. . . . . . . . . . . . . . . . . . . 44
Import/Export application settings . . . . . . . . . . . . 45
Additional settings of DDM 2.1 . . . . . . . . . . . . . . . . 48
Help . . . . . . . . . . . . . . . . . . . . . . . . . . . . . . . . . . . . 49
Troubleshooting . . . . . . . . . . . . . . . . . . . . . . . . . . . . 51
Understand the different states of DDM 2.1. . . . . . . . . . . 51
Dell monitors not supported by DDM 2.1 . . . . . . . . . . . . . 52
Unable to detect supported Dell monitor. . . . . . . . . . . . . 52
Compatibility between DDM 1.x and DDM 2.1 . . . . . . . . . 52
Getting more information on troubleshooting . . . . . . . . . 53
Application Windows Snap . . . . . . . . . . . . . . . . . . . . . . . . 54
Improve DDM 2.1. . . . . . . . . . . . . . . . . . . . . . . . . . . 55
Updating DDM 2.1 software and monitor
firmware . . . . . . . . . . . . . . . . . . . . . . . . . . . . . . . . . 56
Updating the monitor firmware . . . . . . . . . . . . . . . . . . . . 56
4 │
Overview
Dell Display Manager 2.1 (DDM 2.1) is a Windows application used to manage a
monitor or a group of monitors.
DDM 2.1 allows you to configure the monitor settings, control power settings,
organiz
Dell monitors.
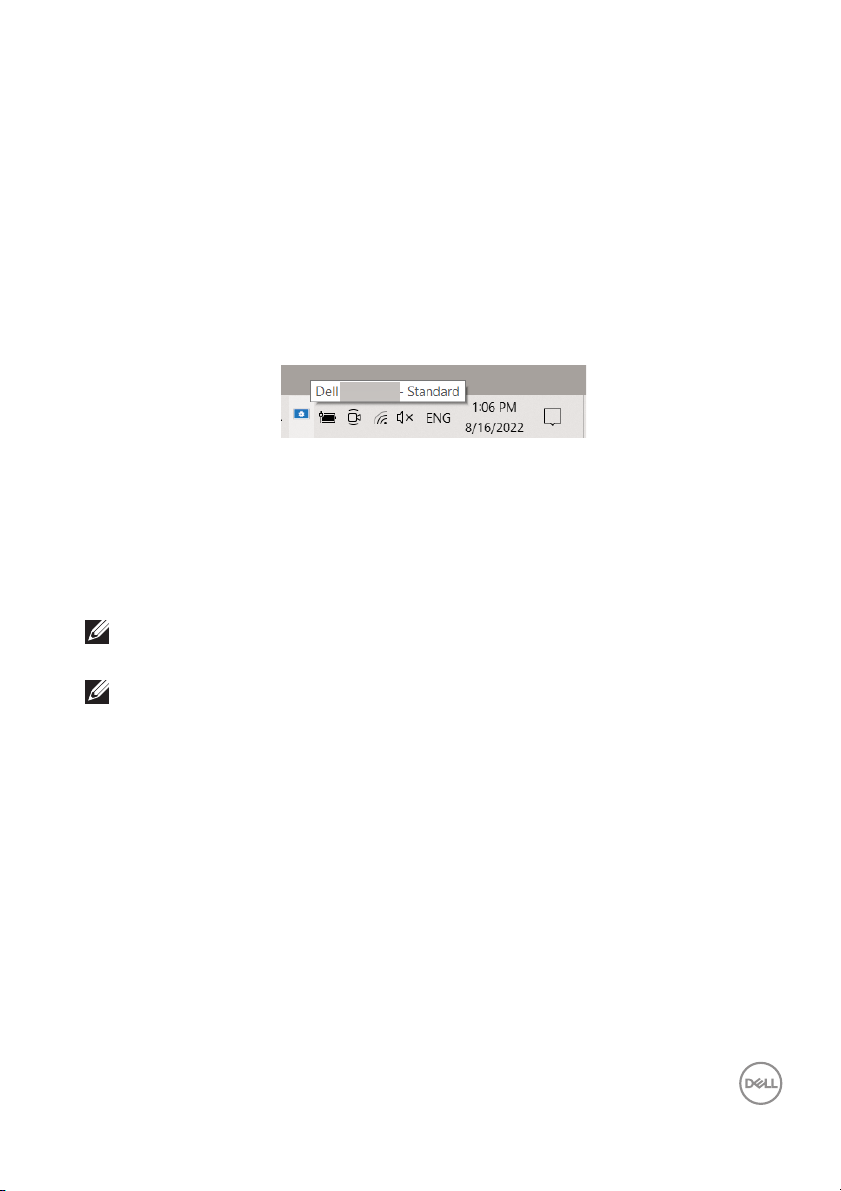
After installing DDM 2.1, it runs each time you restart your computer. A quick access
ic
available when you hover your cursor over the DDM icon.
System Requirements
DDM 2.1 supports the following x86-based Windows:
e applications in different screen layouts, and other functions on supported
on is available in the system taskbar, with information about connected monitors
• Windows 10 build 17763 and above
•Windows 11
NOTE: Certain functions are hardware dependent. Refer to your monitor
user guide for information about the functions that are available.
NOTE: Screenshots in this document are for illustrative purposes only.
Some functions may not be supported by your monitor.
Overview │ 5
Downloading and setting up the DDM 2.1
Downloading the DDM 2.1
1. Browse for your monitor model name, or type it in at https://
www.dell.com/support.
wnload the DDM 2.1 for Windows from the list of downloads, and instal l it
2. Do
on your computer.
You can also visit https://www.dell.com/support/ddm and download the
software from the site. The Del l support website detects the OS of the device,
Del l Display Manager 2.1 download link wil l appear if you are browsing
and
from a Windows OS device. Alternatively, Windows OS can be selected from
the Operating System drop-down list.
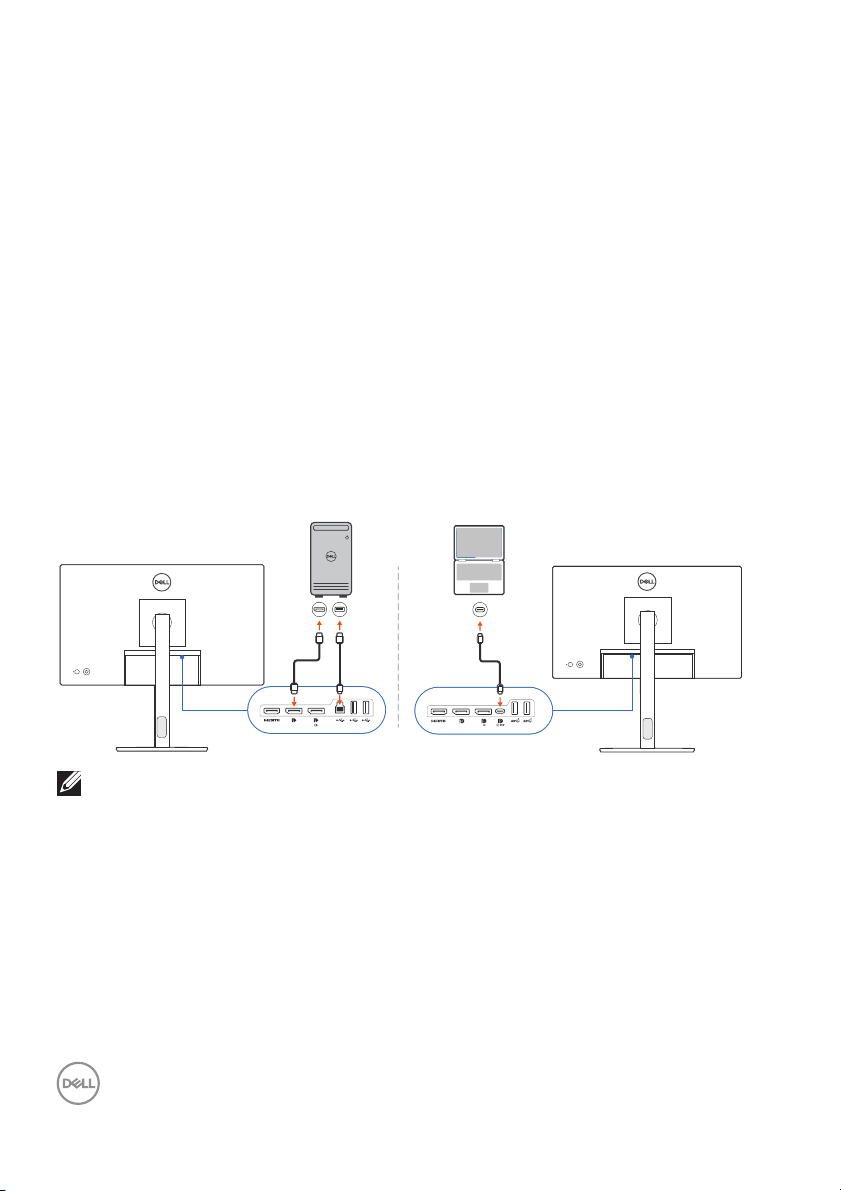
Connecting the monitor to your computer
1. Connect the monitor to your computer by following the steps that are
specified in the monitor user guide.
NOTE: The connectivity diagrams are for il lustrative purposes only. Refer to
your monitor user guide for the complete information.
6 │ Downloading and setting up the DDM 2.1

Before launching the DDM 2.1
Before launching the DDM 2.1, select Others on the monitor’s On-screen Display
(OSD), and ensure that the DDC/CI function is set as On.
NOTE: Only Easy Arrange is enabled if DDC/CI function is set as Off.
Before launching the DDM 2.1 │ 7

Launching DDM 2.1
Menu Launcher
Click the DDM 2.1 icon on the system taskbar to open the Menu Launcher box.
When multiple Dell monitors are connected to the computer, you can select any
monitor from the drop-down list to control the settings of the monitor.
Alternatively, you can open the menu launcher from the program menu.
The Menu Launcher box provides quick access to the following commonly used
functions:
• Disp
• Br
• Co
• Eas
• KVM (
• Gaming (
Display
The following image shows a shortcut link to access the display settings of
computer, and allows you to configure your screen resolution, scale, and layout.
lay
ightness/Contrast
lor
y Arrange
optional)
optional)
your
8 │ Launching DDM 2.1

Brightness/Contrast
Adjust the brightness and contrast (or luminance) level of the selected model. If you
have multiple monitors, select the monitor from the drop-down list or move the
dialog to the monitor you want to adjust.
NOTE: The minimum value of contrast setting is set to 25% to maintain the
visibility on the screen.
Launching DDM 2.1 │ 9

Color
Change color preset to suit user preferences on the screen. Click More for more
settings.
NOTE: For more information, refer to Auto change color preset when
using specific application.
10 │ Launching DDM 2.1
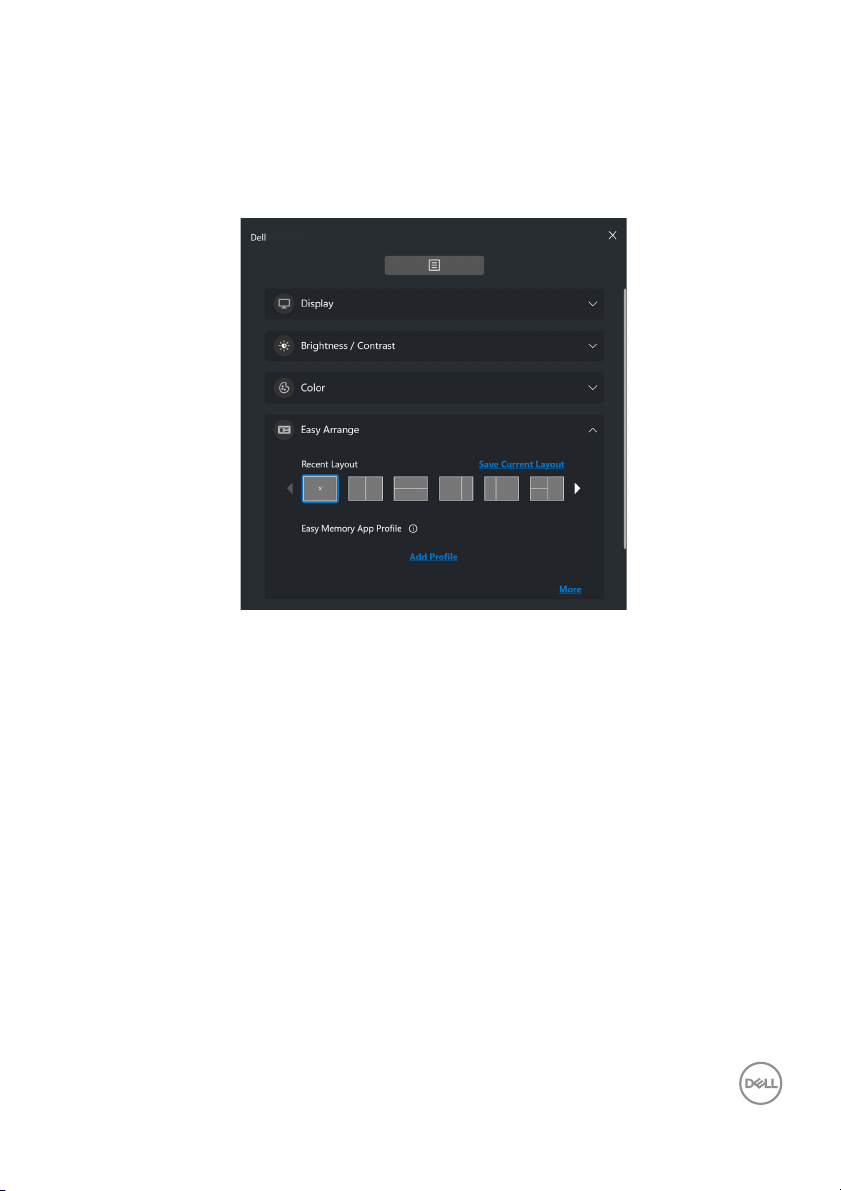
Easy Arrange
A list of the recommended or recently used layouts and easy memory profiles are
displayed for quick selection, as shown in the following image. The Save Current
Layout function allows you to save the current window arrangement on screen as a
custom layout.
Launching DDM 2.1 │ 11

KVM
After setting up the KVM, you can switch keyboard and mouse between
computers. Refer to the section Setting up the KVM to use the Set
Gaming
For the monitors that support
Engine modes from the Gaming function.
vision engine, you can select and switch the Vision
up wizard.
12 │ Launching DDM 2.1

Feature Function Description
Quick
A
ccess to
DDM
Shortcut key
to launch the
Menu
Launcher
box
Select the
or when
monit
multiple
monitors are
connected or
drag the UI to
the monitor
you want to
control
• Configure your preferred hotkey (for example,
t+M) to launch the Menu Launcher.
Al
• To customize your preferred hotkey, select
rsonalize.
Pe
• If you have more than one monitor connected,
ou can select the monitor from the drop-down
y
list or simp l y drag the UI to the monitor you want
to control.
• When the monitor is selected, the monitor icon
the model name appears on the respective
with
monitor screen to indicate the selected monitor.
• Press Al
the monitor where the mouse pointer is placed.
• If you have more than one monitor connected,
ess the configured hotkey for a selected
pr
monitor where the mouse pointer is positioned.
t+M to bring up the Menu Launcher of
Launching DDM 2.1 │ 13

Main Menu
Launch DDM 2.1 by one of the following methods:
• On the system taskbar, right-click the DDM icon,
Display Manager....
• Click the DDM icon from the Menu Launcher box.
and select Open Dell
14 │ Main Menu

The menu system provides a set of menu and submenus to adjust the DDM 2.1
functions.
Main Menu │ 15

Adjusting the brightness and contrast
On the DDM 2.1 menu, select Brightness/Contrast to change the brightness and
contrast levels.
Feature Function Description
Brightness/
Co
ntrast
NOTE: The Enable Display matrix control option is available only when
Brightness /
Contrast
Enable
Disp
lay matrix
control
multiple monitors of the same model are connected
• Adjust the brightness and contrast of the
monitor.
• Enable this function to apply the brightness,
contrast, and color preset control to the
connected monitors of the same model.
.
NOTE: The minimum value of contrast setting is set to 25% to maintain the
visibility on the screen.
16 │ Adjusting the brightness and contrast

Managing multiple video inputs
The Input Source menu allows you to manage multiple video inputs that are
connected to your Dell monitor. This makes it easy to switch between inputs while
you work on multiple computers.
Under Gener
You can assign each input a name and an USB upstream port.
NOTE: For more information, refer to your monitor user guide for the
al, all of the video input ports available on your monitor are displayed.
availab le inputs.
Managing multiple video inputs │ 17

Configuring the Picture-in-Picture/Picture-by-Picture (PIP/ PBP) mode
1. Click the PIP/PBP mode to enable the split screen function on the supported
models.
ick Toggle between positions to change the PIP position.
2. Cl
3. Fr
om the Input 1 drop-down list, select the main input, fol lowed by selecting
the sub-input from the Input 2 drop-down list to change the main or sub
inputs.
ick USB Switch to switch the USB upstream port that is associated with
4. Cl
active input sources.
18 │ Managing multiple video inputs

5. Click Video Swap to swap input sources.
NOTE: For more information, refer to your monitor user guide for the
available PIP/PBP functions.
Managing multiple video inputs │ 19

Assigning shortcut keys
You can assign shortcut keys for quick access to the Input Source functions.
Feature Function Description
Hotkeys Toggle current
in
put source
Favorite Hotkey
uts
Inp
Hotkey to switch
be
tween two
input sources
Swap two inputs
f PIP/PBP
o
windows
• Configure your preferred hotkey (for
example, Alt+C) to toggle the input
sources. You can al so change to your
preferred hotkey.
• Configure your preferred hotkey to toggle to
your favorite input source. You can also
change to your preferred hotkey.
• Configure your preferred hotkey (for
example, Alt+I) to toggle between the two
frequently used input sources. You can also
change to your preferred hotkey.
• Configure your preferred hotkey (for
example, Alt+W) to swap the PIP/PBP
main and sub-input. You can also change to
your preferred hotkey.
20 │ Managing mul tiple video inputs

Feature Function Description
Hotkeys Zoom In/Out
PBP 4 windows
Change PIP
position
UnderScan • Configure your preferred hotkey (for
NOTE: For more information, refer to your monitor user guide for the
available PIP/PBP functions.
NOTE: If there are mul tiple monitors connected, the configured hotkeys will
be synchronized across the monitors for ease of use. To trigger the
function for the selected monitor, move the mouse to the monitor
and press the hotkey.
• Configure your preferred hotkey (for
example, Alt+Z) to zoom in/out the PBP
window. You can also change to your
preferred hotkey.
• Configure your preferred hotkey (for
example, Alt+Q) to change the position of
PIP. You can also change to your preferred
hotkey.
example, Alt+A) to enable or disable
underscan. You can also change to your
preferred hotkey.
NOTE: The underscan function is supported only
on the following models:
• Del l U4320Q
• Del l U4323QE
Managing multiple video inputs │ 21

Setting the monitor display mode
The Color menu allows you to associate color preset mode with an application.
When you select the Auto Mode, the DDM 2.1 automatically switches to the
corresponding color preset mode whenever the associated application is activated.
The color preset mode assigned to a particular application may be the same on each
connected monitor, or it can vary from one monitor to another.
To add a new application to the assignment list, click Ad
applications or drag it from the Windows Programs/Desktop and drop to the
current list. Select the color preset mode from the drop-down list for each
application to associate preset to the applications.
d Application to select
Feature Function Description
Color Manual • Select the color preset mode manually from
the user in
Auto • Enable this function to activate the color
pr
eset mode automatically when the
associated application is selected as the active
window.
• Click the drop-down list to assign a preset
mode
Night light • Change the night light setting.
22 │ Setting the monitor display mode
terface.
to an application.

Auto change color preset when using specific application
1. Select Auto.
2. Cl
ick Add application.
3. Se
lect desired applications and click OK.
Setting the monitor display mode │ 23

4. Select desired color preset when using the application.
NOTE: The color preset mode assignments for batch files, scripts,
shortcuts, and non-executable files, such as zip archives or packed
files, are not supported.
24 │ Setting the monitor display mode

Organizing windows with Easy Arrange
The Easy Arrange menu simplifies the way applications are displayed on windows
on your monitor.
Layout
Perform the following steps to organize the windows:
1. Se
lect any of the predefined layouts to virtually divide the screen into multiple
zones.
ag the application to your selected zone to position it in the zone. The
2. Dr
application snaps to the selected zone.
Landscape mode of the Easy Arrange layouts
Organizing windows with Easy Arrange │ 25

Portrait mode of the Easy Arrange layouts are displayed when you rotate the monitor
Perform the following steps to customize an existing layout:
1. Hover the mouse pointer over the layout to be customized, and click the pen
icon.
lick and drag the partition line until the layout is customized to your
2. C
preference.
the save dialog, choose one layout to replace and input the name of the
3. On
new layout.
ick Save to complete customization.
4. Cl
26 │ Organizing windows with Easy Arrange
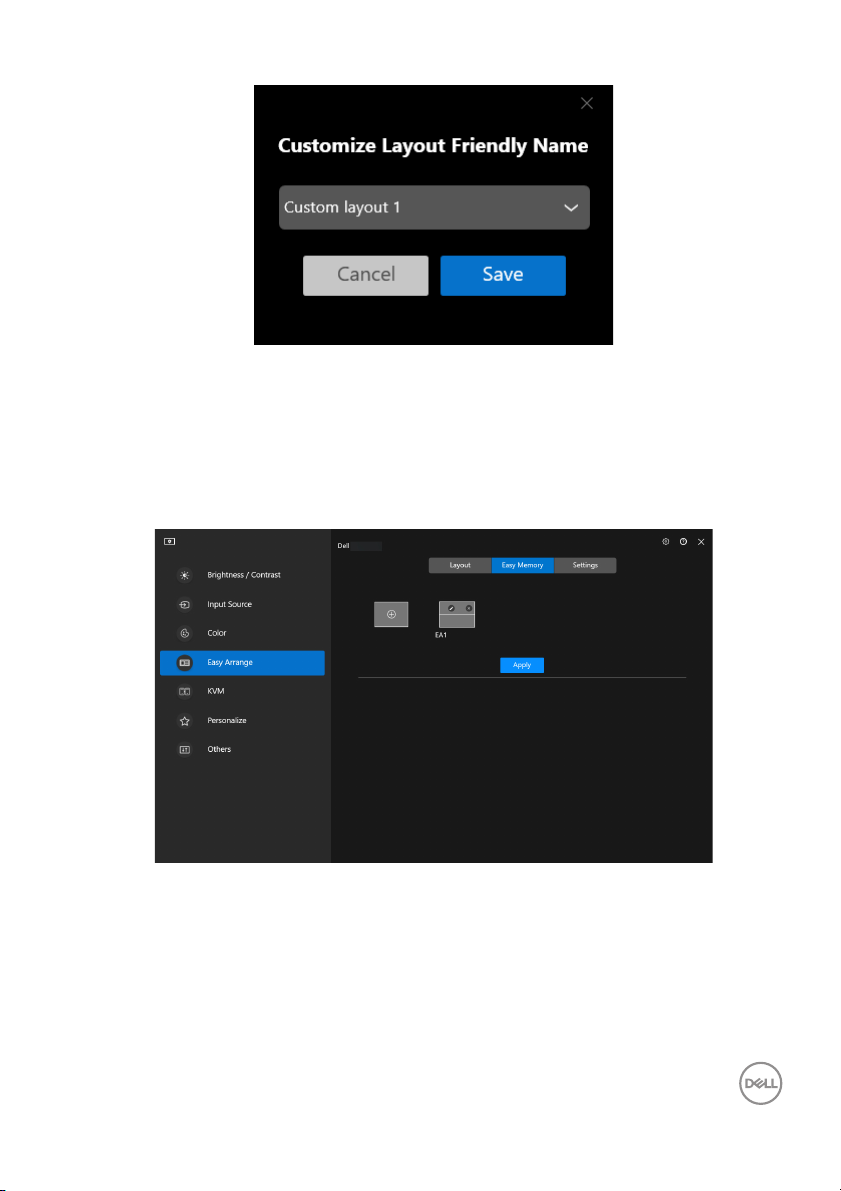
Easy Memory
Easy Memory allows user to save application or files in their respective partition
into different profiles and restore them manually, by scheduled time or at system
start-up. Perform the following steps to create profile and launch it:
ick + to create a new profile.
1. Cl
Organizing windows with Easy Arrange │ 27
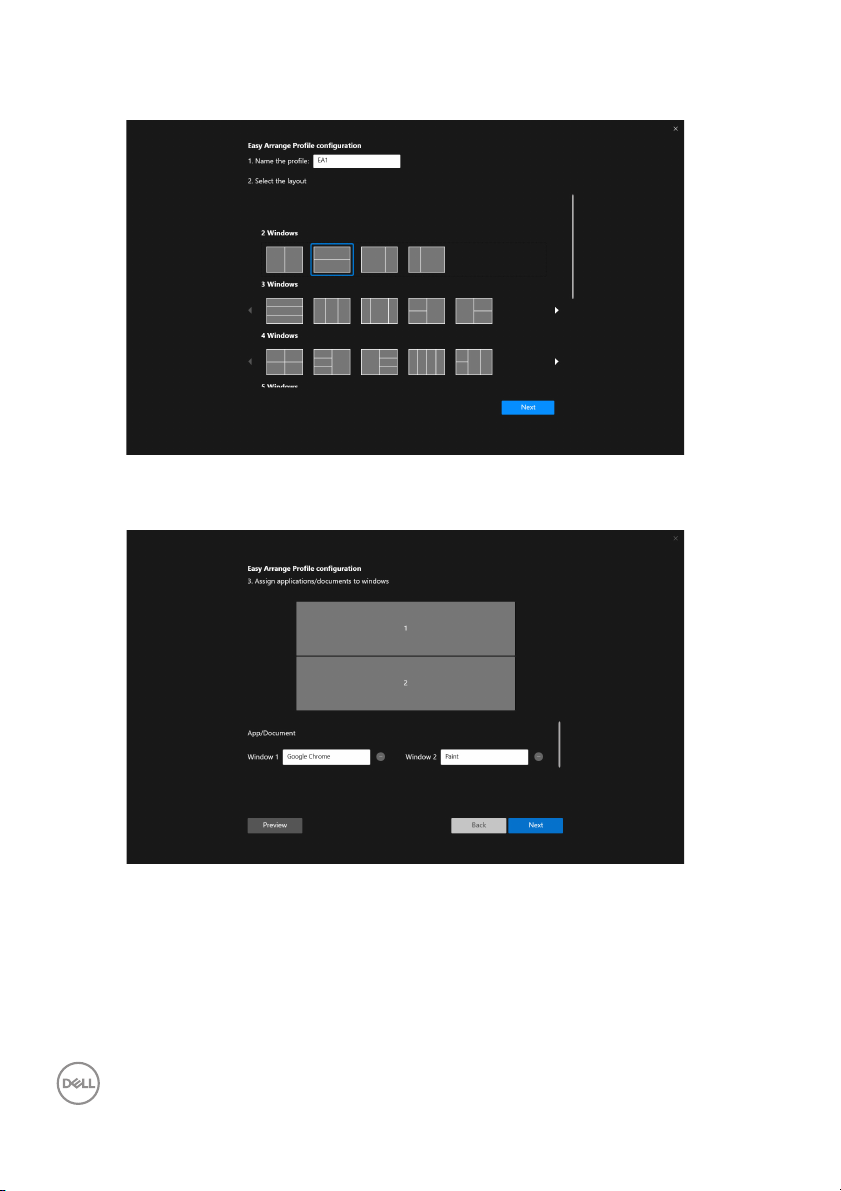
2. Input the profile name and select a layout. Click Next.
3. Assign application or file to be shown in each partition by clicking + or by
dragging the file into partition. Click Next.
28 │ Organizing windows with Easy Arrange

4. Configure the time to launch the profile and click Finish.
Easy Arrange Memory usability may vary according to application type and launch
behavior. Easy Memory works with general productivity apps such as Microsoft
Office, Adobe, Web browsers and more.
Easy Memory might not be
the following takes place:
• App displays a pop-up dialog box upon launch (i.e., login screen, error dialog,
ved files)
or unsa
• App is launched in full screen mode
• Files are opened as individual tabs within the app
• Overlapping Easy Arrange layouts
able to perform a window partition at launch if any of
Organizing windows with Easy Arrange │ 29

Settings
Configure the personal preferences.
Feature Function Description
Easy
Arr
ange
Hotkey: Recent Configure a hotkey (for example, Alt+R) to
select recently used layouts. You can also
change to your preferred hotkey here.
Al low application
t
o split side by
side without gap
Allow only zone
positioning when
SHIFT k
pressed
Span across
mu
Application
Windo
ey is
ltiple monitors
w Snap
Enable this function to allow application snap
side-by-side without gap.
Enables the Eas
the Shift key.
If you are using multiple monitors in an array or
matrix, the Easy Arrange layout can be applied
across all the monitors as one desktop. You need
to align your monitors properly to make it
effective.
Snap any application into a split screen layout
easily by dragging into the partition.
y Arrange menu by pressing
30 │ Organizing windows with Easy Arrange

NOTE: If an application window cannot fit in the zone defined by Easy
Arrange, the application may not display properly.
NOTE: The Span across multiple monitors can be enabled only for all
connected monitors that have the same physical size, resolution,
scaling settings, and are placed side-by-side.
Using the Application Window Snap
On the system taskbar, right-click the DDM icon, select Application Window
Snap and check to turn on the function. When this function is enabled in DDM 2.1,
drag the application to trigger a floating menu that contains the recently used Easy
Arrange layouts. Drop the application on any of the listed layouts to perform
window placement.
When this function is turn
can snap their application conveniently to the respective monitor and zone in the
latest four recently used Easy Arrange layout.
You many turn this function off from the Eas
use Span across multiple monitors.
ed on, it replaces the Easy Arrange option such that user
y Arrange menu when you want to
Using the Application Window Snap │ 31

Configuring the Gaming Settings
You can configure the Gaming menu that is available only on Alienware and Dell
Gaming monitors.
32 │ Configuring the Gaming Settings

Feature Function Description
General Game
enhance
mode
Response
time
Dark
Sta
bilizer
Dark
Sta
bilizer
To g g l e
Color preset • Click Co
Vision
Engine
NOTE: The Gaming menu functions and available options vary depending on
Vision
Engine
Switch
Vis
ion
Engine
the model of the monitor.
• Select the game enhance mode from the dropdo
wn list.
• Select the response time from the drop-down
li
st.
• Select the dark stabilizer from the drop-down
list.
• Configure your preferred hotkey (for example,
Alt+S) to toggle the dark stabilizer levels. You
can also change to your preferred hotkey.
lor Preset for more color options.
• Select one or more vision engines that you can
use when
• Configure your preferred hotkey (for example,
Alt+T) to toggle the Vision Engine. You can
also change to your preferred hotkey.
playing games.
Configuring the Gaming Settings │ 33

Setting up the KVM
For monitors that support the KVM function, follow the on-screen instructions to
set up the devices that are connected to the monitor.
lect the number of sources your monitor is connected to.
1. Se
2. Pair the input sources with their connectors and assign preferred names.
34 │ Setting up the KVM
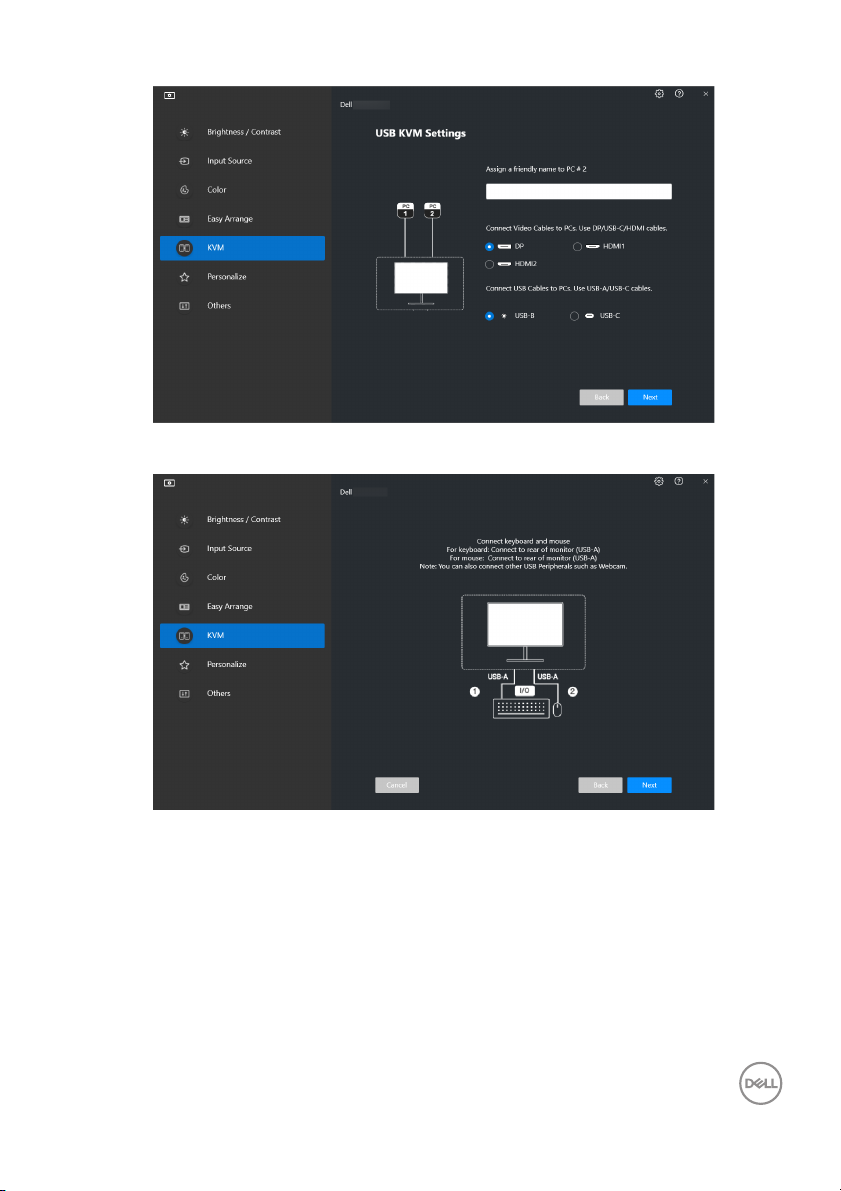
3. Connect keyboard and mouse to the monitor.
Setting up the KVM │ 35

4. Select a preferred layout.
5. Click Download to download Dell Display Manager (Windows) or Dell
Display and Peripheral Manager (Mac) for other computers you wish to
connect. Finally, click Next to save and exit KVM setup.
NOTE: DDM 2.1 communicates with your monitor even when the monitor is
displaying video from another computer. You can install Dell Display
Manager (Windows) or Dell Display and Peripheral Manager (Mac)
on the computer you frequently use, and control input switch from it.
You can also instal l Dell Display Manager (Windows) or Dell Display
and Peripheral Manager (Mac) on other computers connected to the
monitor.
36 │ Setting up the KVM

Changing KVM configuration
You can change the KVM configuration after completing the KVM setup either by
running the setup instructions again or changing the screen configuration by
clicking Configure Screen.
Setting up the KVM │ 37

Feature Function Description
Single
Di
splay
PIP/PBP Video Swap Swap video input of main/sub by clicking arrow or
1. Click KVM Configure Screen to change the screen layout.
Change video
input
USB Switch Click button or press ho
Change current video input by clicking the desktop
computer icon or press hotkey.
pr
ess hotkey (only available in PIP or PBP side by side
layout).
port of active input sources.
tkey to toggle USB upstream
38 │ Setting up the KVM
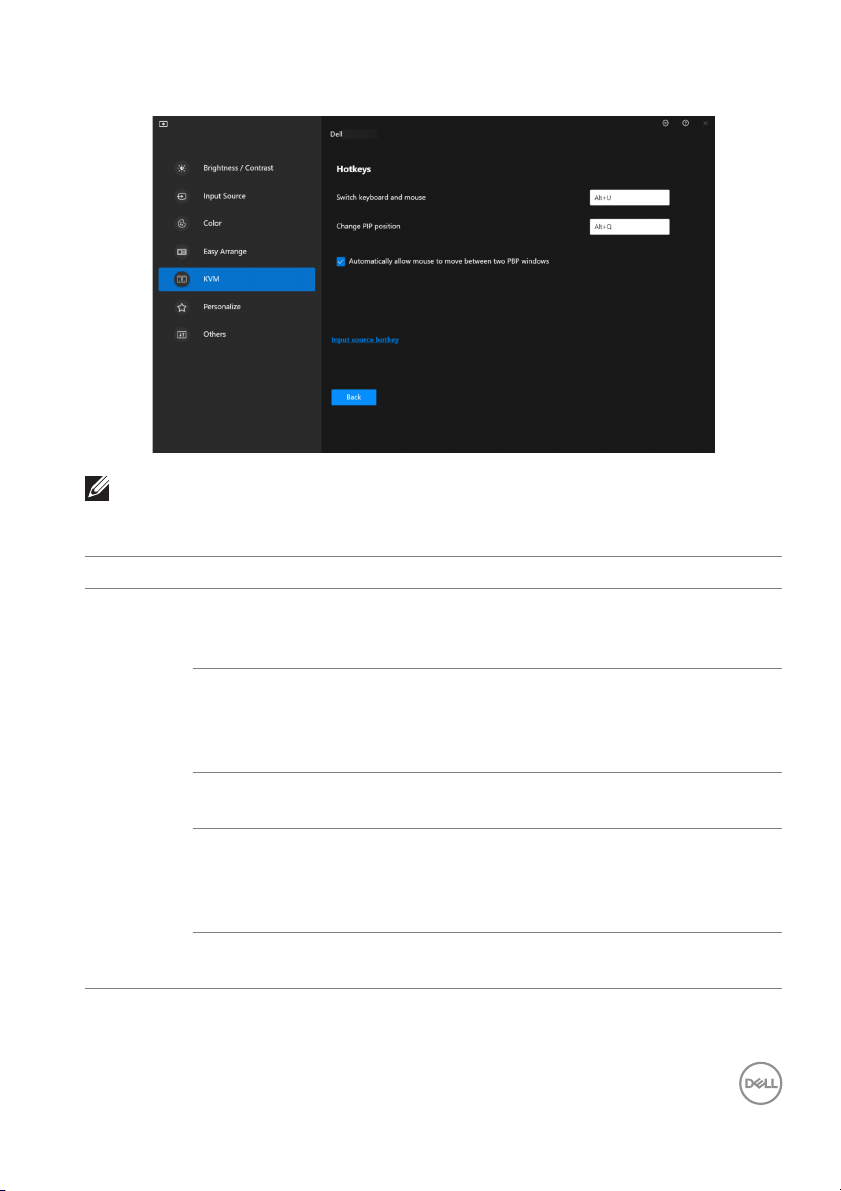
2. Click Hotkeys to configure KVM hotkeys.
NOTE: Only relevant hotkeys in accordance with your screen configuration
will be displayed.
Feature Function Description
Hotkeys Switch between
comput
Switch keyboard and
mouse
Change PIP position Configure your preferred hotkey (for
Automatical ly al low
mouse t
between two PBP
windows
Input source hotkey Click Input sou
ers
o move
Configure your preferred hotkey (for
example, ALT+P) to switch between the
computers in single display mode.
Configure your preferred hotkey (for
ex
ample, ALT+U) to switch keyboard and
mouse between computers in PBP or PIP
mode.
ample, Alt+Q) to change the PIP position.
ex
Check to enable the keyboard and mouse
witching from one computer to another
s
computer by sliding across the edge when
PBP mode is turned on
rce hotkey for more hotkey
configuration.
Setting up the KVM │ 39

Personalize settings
Changing Menu Launcher configuration
1. Click Configure to change the quick access function on Menu Launcher.
2. Select function from the drop-down list. Click Add Function to add more
functions to the Menu Launcher.
40 │ Personalize settings

3. Click Reset Al l to reset the functions of Menu Launcher.
NOTE: The available functions may differ depending on the configuration of
your monitor.
Changing Launch DDM Hotkey configuration
Personalize settings │ 41

Feature Function Description
Personalize Launch Menu
L
auncher
Launch Main Menu Configure a hotkey (for example, AL
Configure a hotkey (for example, ALT+M)
to bring up the Menu Launcher box of the
monitor where the mouse pointer is
currently located.
T+D)
to bring up the Main Menu of the monitor
where the mouse pointer is currently
located.
Applying energy conservation features
On the supported Dell models, PowerNap energy conservation options are
available under Others menu. You can choose to set the brightness of the monitor
to the minimum level, or to put the monitor to sleep when the screen saver is
activated.
NOTE: PowerNap option is disabled in PBP or PIP to prevent disruption of
the normal activities.
42 │ Applying energy conservation features
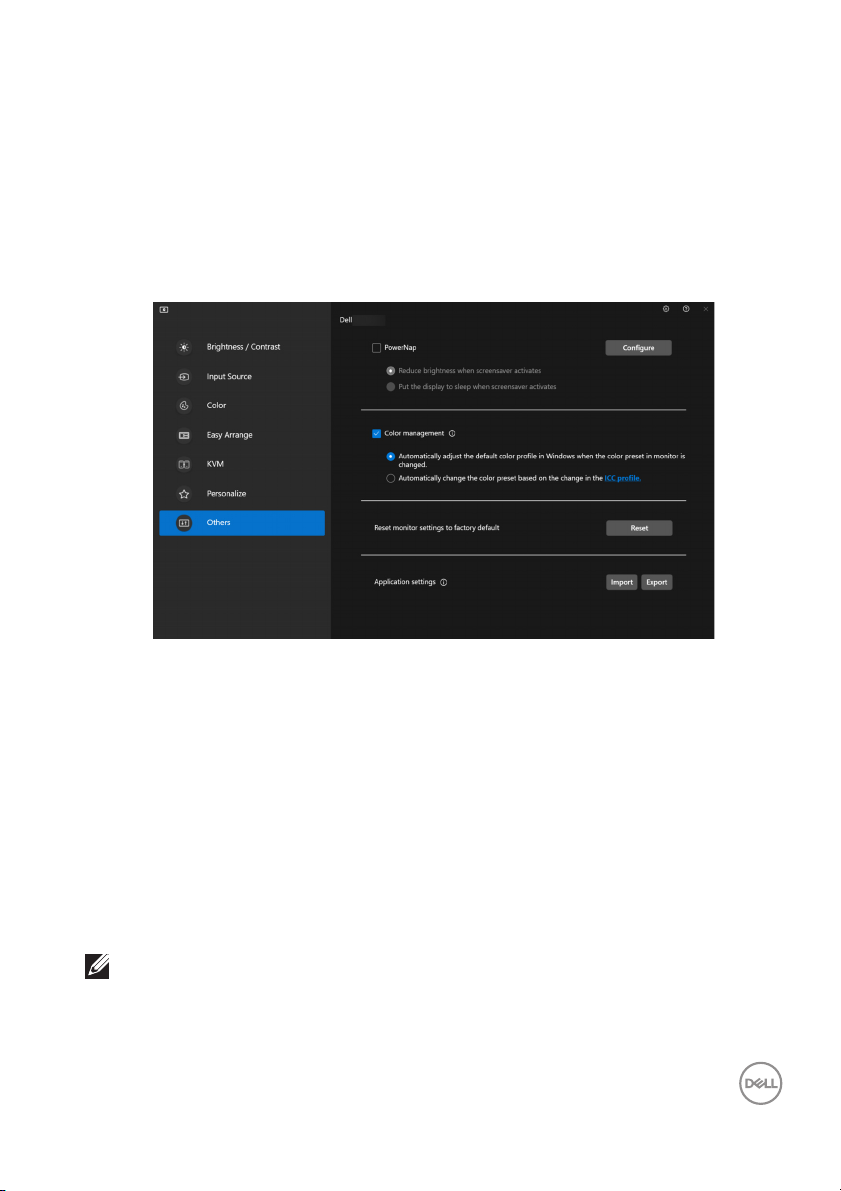
Color Management
This feature provides the optimum color experience by matching the color space of
the monitor with the International Color Consortium (ICC) profile.
On the supported Dell models, C
Others menu. You can choose Automaticall y adjust the default color profile
in Windows when the color preset in monitor is changed or Automatical l y
change the color preset based on the change in the ICC profile.
Automatically adjust the default color profile in Windows when the color preset in monitor is changed
olor Management options are available under
The corresponding color profile will set to default in Windows when you change the
color preset from the monitor OSD menu.
Automatically change the color preset based on the change in the ICC profile
The corresponding color preset will be set in the monitor when you change the ICC
profile in Windows. You can click on the ICC profile link to add the color profile
installed for the monitor.
NOTE: Currently, this function is not supported when display is set to show
only on external monitor.
Color Management │ 43
Changing the ICC profile in Windows
Select a color profile from drop-down list of Color Profile in Display settings.
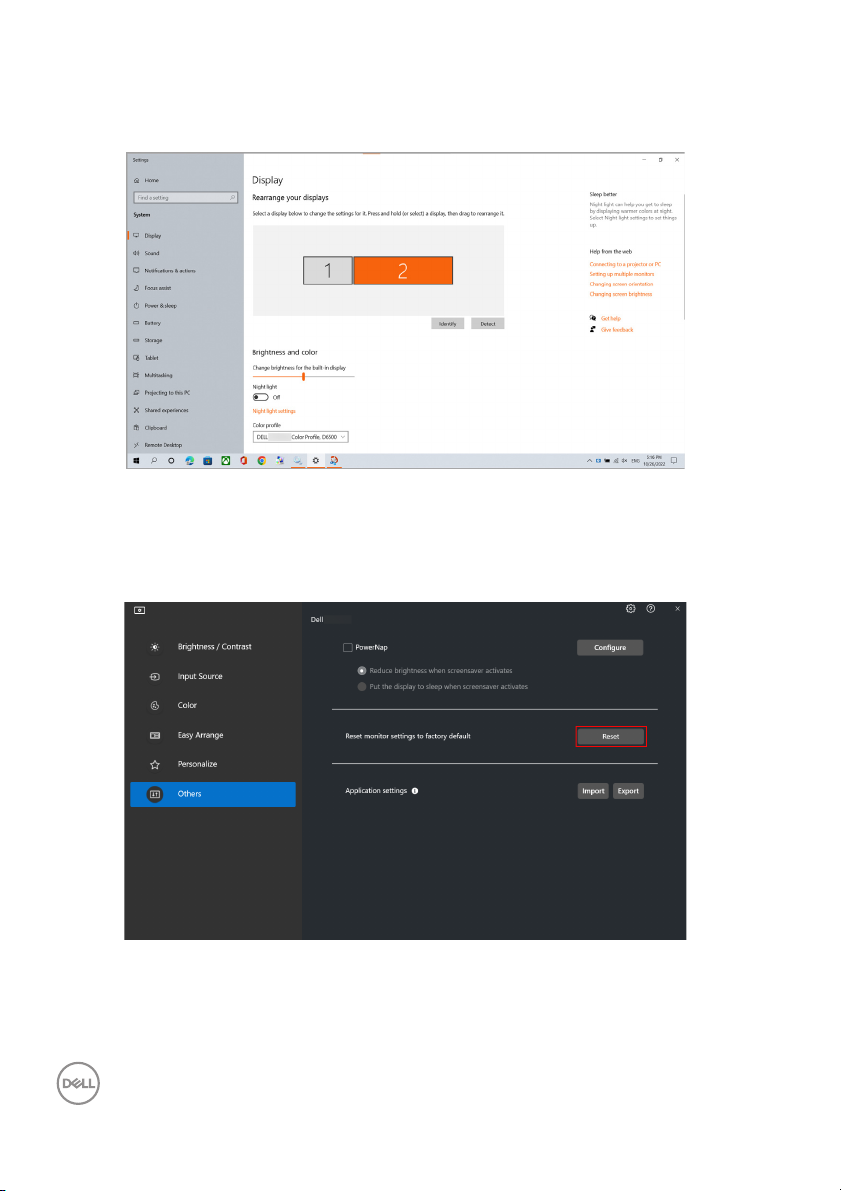
Resetting monitor settings
Click Reset to reset all monitor settings under Others menu.
44 │ Resetting monitor settings
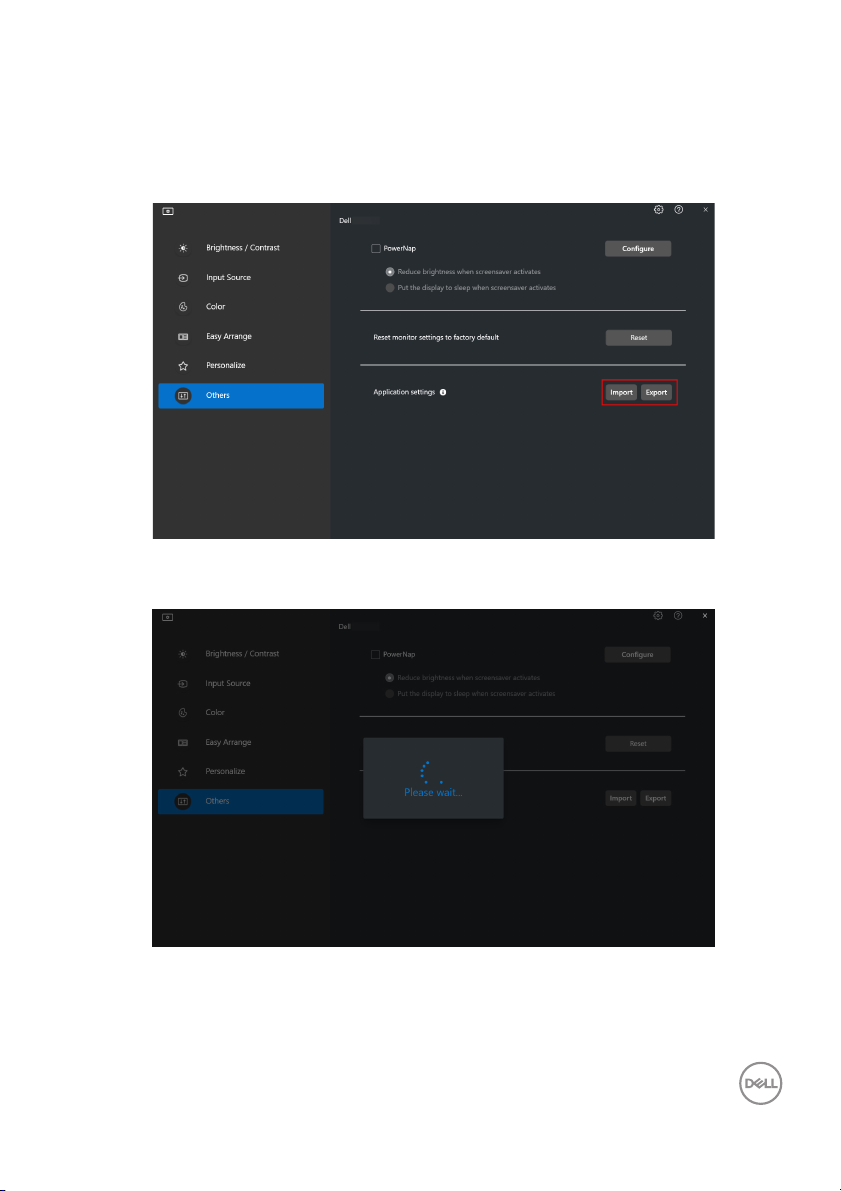
Import/Export application settings
You can use this function to export the monitor settings from one monitor and
import into another monitor of the same model.
1. Click Export to store a copy of the application and monitor settings of
selected monitor to a file and click OK when export is successful.
Import/Export application settings │ 45

2. To import the settings from a previously exported file, click Import and select
the file. The monitor settings wil l be applied to all of the connected displays of
the same model.
46 │ Import/Export application settings

3. DDM 2.1 will restart after the file is imported.
Import/Export application settings │ 47

Additional settings of DDM 2.1
There are additional DDM 2.1 settings available under Settings. Click Settings icon
to make setting adjustments.
Feature Function Description
Settings Change application
la
nguage
Auto-Load at startup Launch DDM 2.1 when the computer starts
Enable on screen
no
tification
Apply preferred language to DDM 2.1. The
default preferred language is the first
language on the preferred language list,
which follows the Windows language
configuration.
.
up
Allow DDM 2.1 to show notification message.
48 │ Additional settings of DDM 2.1

Help
There are additional software and monitor information available in Help. Click the
“?” icon to access the Help screen.
Help │ 49

You can obtain software information by clicking here. You can also obtain model
name, service tag, manufactured date, and firmware information of the monitor.
Click Close to exit the Help screen.
50 │ Help

Troubleshooting
Understand the different states of DDM 2.1
Feature Function Description
DDM Icon Searching
Searching for the supported monitors.
Connected
Unable to connect
If DDM 2.1 does not work on your monitor, y
message in the status menu.
NOTE: DDM 2.1 works onl y on selected Del l-branded monitors and is not
supported on the monitors from other manufacturers.
The supported monitors are connected.
NOTE: Y
supported monitor is not listed in the DDM 2.1
drop-down menu.
Either there are no supported monitors
connected or there is communication error in
connecting your monitor.
See reasons for unable to detect monitor in
the sec
ou can right click to refresh if your
tion below.
ou will see the following icon and
Tro ub l es hoot in g │ 51

Del l monitors not supported by DDM 2.1
DDM 2.1 may not work with the following monitors:
• Del l monitor models not included in DDM 2.1 for Windows supported list. For
more information, see
• Monitors not listed in DDM 2.1 for Windows support list. Virtual and wireless
monitors do not support DDC/CI
https://www.dell.com/support/ddm
Unable to detect supported Dell monitor
In the following scenarios, Dell Display Manager might not be able to communicate
with the monitor.
1. The primary monitor has turned on Multi-Monitor Sync (MMS).
2. The monitor is busy with color calibration.
3. The monitor has Screen Partition turned on.
4. DDC/CI is turned off.
If DDM 2.1 is unable to detect and/or communicate with a supported Dell monitor,
take the following actions to troubleshoot:
1. Make sure the video cable or USB upstream cable is properly connected to
your monitor and your computer. Ensure all the connectors are correctly
connected to the ports.
2. Check the monitor OSD to ensure DDC/CI is enabled.
Compatibility between DDM 1.x and DDM 2.1
Both software can be installed on a computer if you have older monitors not
supported by DDM 2.1. It is highly recommended to uninstall DDM 1.x if all your
monitors are supported by DDM 2.1.
52 │ Tro ub l e sh o ot i ng

Getting more information on troubleshooting
You can Save Diagnostic Report or Save Monitor Asset Report to provide
more information to Dell service center for troubleshooting.
Save Diagnostic Report
Right click on DDM 2.1 icon and select Sa
Diagnostic Report button from Settings. The report contains system and
monitor related information along with DDM 2.1 runtime logs.
Save Monitor Asset Report
Right click on DDM 2.1 icon and select Sa
Save Monitor Asset Report button from Settings. The report contains monitor
Extended Display Identification Data (EDID) information for all connected monitors.
ve Diagnostic Report or click the Save
ve Monitor Asset Report or click the
Tro u bl es hoot in g │ 53

Application Windows Snap
This option is checked by default. When this function is turned on, it replaced the
Easy Arrange option such that user can snap their application conveniently to the
respective monitor and zone in the latest four recently used Easy Arrange layout.
NOTE: You may turn this function off when you want to use Span across
multiple monitors.
54 │ Tro u bl es hoot in g

Improve DDM 2.1
Check the Help Del l improve its product and services automatically if you
consent to provide diagnostic and usage data to Dell server automatically. This data
will help to improve Dell products and services.
Improve DDM 2.1 │ 55

Updating DDM 2.1 software and monitor firmware
If your computer is connected to the Internet, you will be prompted to upgrade to a
newer version of DDM 2.1 or monitor firmware when the updated version is
available. It is recommended to download and install the latest DDM 2.1 application
and monitor firmware.
Click Upda
You can also check for new version by clickin
te in Settings to update the DDM 2.1 software or monitor firmware.
g on Check for Updates in Settings.
Updating the monitor firmware
1. Click Update to update monitor firmware. The download progress bar will
appear once the process begins.
56 │ Updating DDM 2.1 software and monitor firmware

2. After download is complete, a dialog box appears to prompt for confirmation.
Follow the on-screen instruction to disconnect all other monitors before
clicking Yes.
3. The DDM 2.1 will close, and Monitor Firmware Updater Utility will appear
after you confirm to update firmware. Click Update to start firmware update.
Updating DDM 2.1 software and monitor firmware │ 57

4. After the update is complete, cl ick Close to exit Monitor Firmware Updater
Utility and reboot the monitor.
NOTE: You can obtain more information on monitor firmware update by
clicking on the “?” icon in the Monitor Firmware Updater Utility.
NOTE: Restart DDM 2.1 manual ly after monitor firmware update is
complete.
58 │ Updating DDM 2.1 software and monitor firmware
 Loading...