

Dell U2417HWI User Manual

Dell UltraSharp U2417HWi Monitor
User’s Guide
Model: U2417HWi
Regulatory model: U2417HWib

Notes, cautions, and warnings
NOTE: A NOTE indicates important information that helps you make better
use of your computer.
CAUTION: A CAUTION
indicates potential damage to hardware or loss of
data if instructions are not followed.
WARNING: A WARNING indicates a potential for property damage,
personal injury, or death.
____________________
Copyright © 2016 Dell Inc. All rights reserved.
This product is protected by U.S. and international copyright and intellectual property laws.
TM
Dell
and the Dell logo are trademarks of Dell Inc. in the United States and/or other
jurisdictions. Android, Google, Google Play and other marks are trademarks of Google Inc. All
other marks and names mentioned herein may be trademarks of their respective companies.
2016 - 04 Rev. A00

Contents
About Your Monitor . . . . . . . . . . . . . . . . . . . . . . . . . . . . . . . . . . . . 5
Introduction . . . . . . . . . . . . . . . . . . . . . . . . . . . . . . . . . . . . . . . . . . . . . . . . . .5
Package Contents . . . . . . . . . . . . . . . . . . . . . . . . . . . . . . . . . . . . . . . . . . . . .5
Product Features . . . . . . . . . . . . . . . . . . . . . . . . . . . . . . . . . . . . . . . . . . . . . .7
Identifying Parts and Controls . . . . . . . . . . . . . . . . . . . . . . . . . . . . . . . . . .8
Monitor Specifications . . . . . . . . . . . . . . . . . . . . . . . . . . . . . . . . . . . . . . . . 11
Plug and Play Capability . . . . . . . . . . . . . . . . . . . . . . . . . . . . . . . . . . . . . . .17
Universal Serial Bus (USB) Interface. . . . . . . . . . . . . . . . . . . . . . . . . . . . .17
LCD Monitor Quality and Pixel Policy . . . . . . . . . . . . . . . . . . . . . . . . . . 18
Maintenance Guidelines. . . . . . . . . . . . . . . . . . . . . . . . . . . . . . . . . . . . . . 19
Setting Up the Monitor . . . . . . . . . . . . . . . . . . . . . . . . . . . . . . . . 20
Attaching the Stand. . . . . . . . . . . . . . . . . . . . . . . . . . . . . . . . . . . . . . . . . . 20
Connecting Your Monitor . . . . . . . . . . . . . . . . . . . . . . . . . . . . . . . . . . . . .21
Organizing Your Cables . . . . . . . . . . . . . . . . . . . . . . . . . . . . . . . . . . . . . . 22
Attaching the Cable Cover. . . . . . . . . . . . . . . . . . . . . . . . . . . . . . . . . . . . 23
Removing the Monitor Stand . . . . . . . . . . . . . . . . . . . . . . . . . . . . . . . . . 23
Removing the Cable Cover . . . . . . . . . . . . . . . . . . . . . . . . . . . . . . . . . . . 24
Wall Mounting (Optional). . . . . . . . . . . . . . . . . . . . . . . . . . . . . . . . . . . . . 24
Operating the Monitor. . . . . . . . . . . . . . . . . . . . . . . . . . . . . . . . . 26
Power On the Monitor . . . . . . . . . . . . . . . . . . . . . . . . . . . . . . . . . . . . . . . 26
Contents | 3

Power Off the Monitor . . . . . . . . . . . . . . . . . . . . . . . . . . . . . . . . . . . . . . . 26
Using the Front Panel Controls . . . . . . . . . . . . . . . . . . . . . . . . . . . . . . . 27
Using the On-Screen Display (OSD) Menu. . . . . . . . . . . . . . . . . . . . . . 29
Setting the Maximum Resolution. . . . . . . . . . . . . . . . . . . . . . . . . . . . . . 42
Using the Tilt, Swivel, and Vertical Extension . . . . . . . . . . . . . . . . . . . 43
Rotating the Monitor. . . . . . . . . . . . . . . . . . . . . . . . . . . . . . . . . . . . . . . . . 44
Adjusting the Rotation Display Settings of Your System . . . . . . . . . 47
Mirroring Your Device's Screen on the Monitor . . . . . . . . . . 48
Setting Up Wireless Connection. . . . . . . . . . . . . . . . . . . . . . . . . . . . . . . 48
Connecting the Monitor via Screencast or Screen Mirror . . . . . . . . 50
Troubleshooting . . . . . . . . . . . . . . . . . . . . . . . . . . . . . . . . . . . . . . 69
Self-Test . . . . . . . . . . . . . . . . . . . . . . . . . . . . . . . . . . . . . . . . . . . . . . . . . . . . 69
Built-in Diagnostics . . . . . . . . . . . . . . . . . . . . . . . . . . . . . . . . . . . . . . . . . . 70
Common Problems . . . . . . . . . . . . . . . . . . . . . . . . . . . . . . . . . . . . . . . . . . .71
Product Specific Problems . . . . . . . . . . . . . . . . . . . . . . . . . . . . . . . . . . . 73
Universal Serial Bus (USB) Specific Problems . . . . . . . . . . . . . . . . . . . 73
Wireless Connection Problems . . . . . . . . . . . . . . . . . . . . . . . . . . . . . . . 74
Appendix . . . . . . . . . . . . . . . . . . . . . . . . . . . . . . . . . . . . . . . . . . . . . 75
FCC Notices (U.S. Only) and Other Regulatory Information . . . . . . .75
Contact Dell. . . . . . . . . . . . . . . . . . . . . . . . . . . . . . . . . . . . . . . . . . . . . . . . . .75
4 | Contents
About Your Monitor
Introduction
The Dell Wireless Monitor enables your laptop computer, Tablet & Mobile Phone devices
to display your screen image via WiFi Direct interface. When you connect the Laptop,
Tablet & Mobile Phone to the Dell Wireless Monitor, you can access the mouse &
keyboard connected to the Monitor to control the Computer device (Laptop, Tablet or
Mobile Phone).
Dell Wireless Monitor also enables your Laptop & Mobile Phone to be connected
simultaneo
Mobile Phone is displayed as an overlay (PiP) image.
Package Contents
Your monitor ships with the components shown below. Ensure that you have received all
the components and
usly via WiFi Direct interface. The Laptop is displayed in full screen and the
NOTE: The mon
recommend that you keep a safe distance of 20 cm at least between the monitor
and you.
NOTE: Some items may be op
features or media may not be available in certain countries.
NOTE: To
guide f
or setup instructions.
itor is equi
Contact Dell
set up with any other stand, please refer to the respective stand setup
pped with an antenna of the radio transmitter, so we
if something is missing.
tional and may not ship with your monitor. Some
Monitor
About Your Monitor | 5
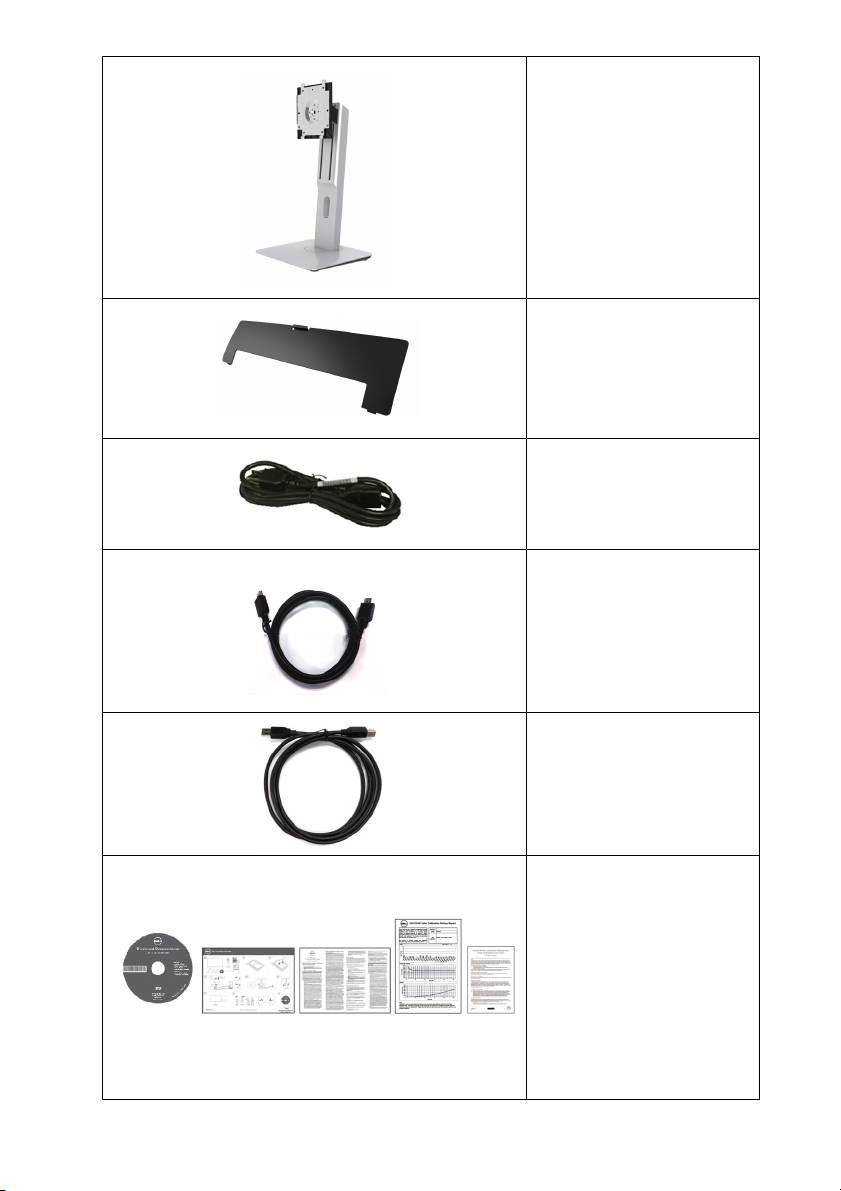
Stand
Cable Cover
Power Cable (Varies by
Countries)
HDMI Cable
6 | About Your Monitor
USB 3.0 Upstream Cable
(Enables the USB Ports on
the Monitor)
• Drivers and
Documentation Media
• Quick Setup Guide
• Safety
• Fa
• Wire
, Environmental,
and Regulatory
Information
ctory Calibration
Report
less Safety and
Regulatory Information

Product Features
The Dell U2417HWi flat panel display has an active matrix, Thin-Film Transistor (TFT),
Liquid Crystal Display (LCD) and LED backlight. The monitor features include:
• U2417HWi: 60.47 cm (23.8-inch) viewable area display (measured diagonally).
1920 x 1080 resolution, plus full-screen support for lower resolutions.
• Wireless connectivity via IEEE 802.11 ac, bluetooth, and Screencast.
• Wide viewing angle to allow viewing from a sitt
moving from side-to-side.
• Tilt, swivel, vertical extension and rotate adjustment capabilities.
• Ultra-thin
set up with an elegant viewing experience.
• Removable stand and Video Electronics Standards Association (VESA™) 100 mm
mounting holes for flexible mounting solutions.
• Extensive all digital connectivity with HDMI, USB 3.0 and MicroUSB 2.0 (for repair
center only) helps future proof your monitor.
• Plug and play
• Color gamut of 96% sRGB (CIE1931) with an average Delta E of <4.
• On-Screen Display (OSD) adjustments for ease of set-up
• Software and documentation media includes an In
Matching File (ICM), and product documentation.
• Dell Display Manager Software included (comes in the CD shipped with the
monitor).
• Energy Saver feature for Energy Star compliance.
• Screenovate drivers/app to support additional/e
be included for Windows® 7/8.x/10.
• Security lock slot.
• Stand lock.
• Capability
the image quality.
• EPEAT Gold Rating.
• U2417HWi monitor is BFR/PVC-free (Halogen-free) excluding external cables.
• TCO-Certified Displays.
• Meets NFP
• Arsenic-
• High Dynamic Contrast Ratio (2,000,000:1).
• 3 W standby power when in the W
• Energy Gauge shows the energy level being consumed by th
bezel minimizes the bezel gap in multi-monitor usage, enabling easier
capability if supported by your system.
switch from wide aspect to standard aspect ratio while maintaining
to
A 99 leakage current requirements.
Free glass and Mercury-Free for the panel only.
ireless Standby mode.
ing or standing position, or while
and screen optimization.
formation File (INF), Image Color
nhanced HID sharing features will
e monitor in real time.
About Your Monitor | 7
Identifying Parts and Controls
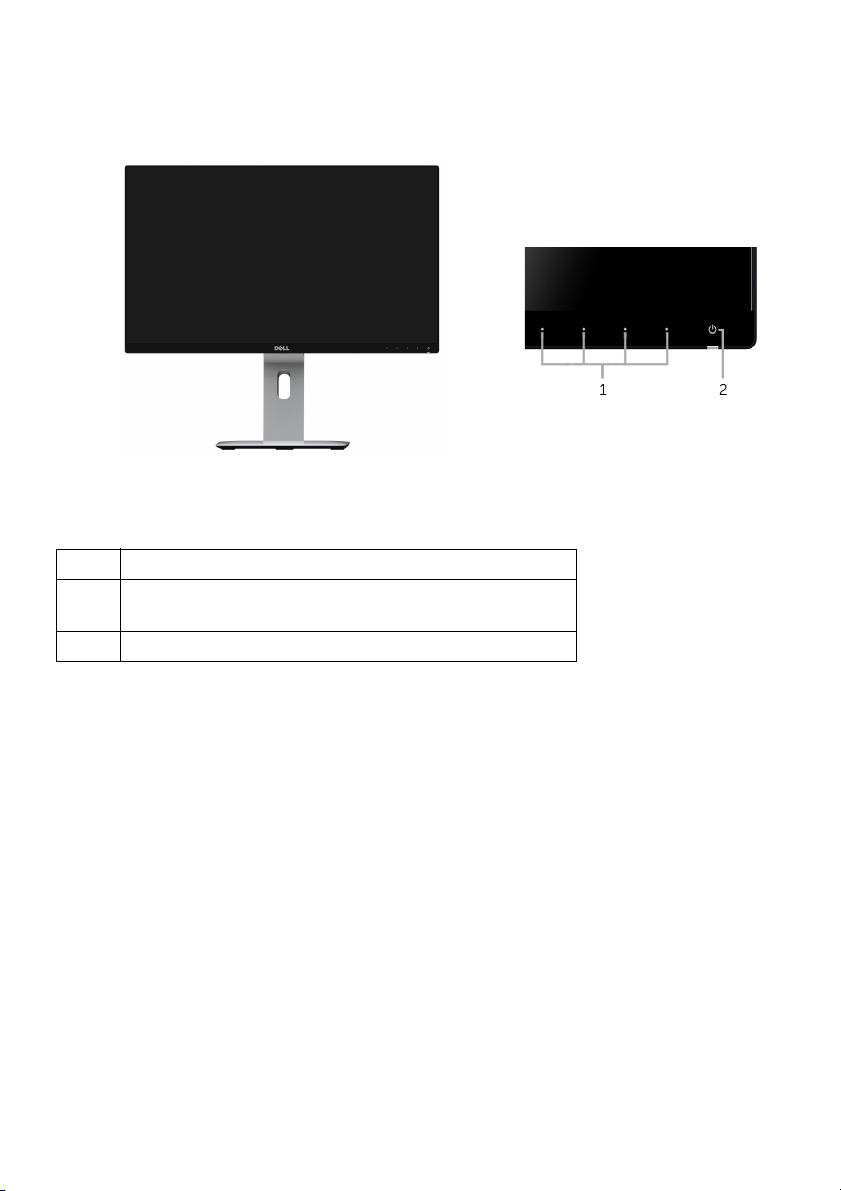
Front View
Front panel controls
Label
1 Function buttons (For more information, see
Operating the Monitor
2 Power On/Off button (with LED indicator)
Description
)
8 | About Your Monitor
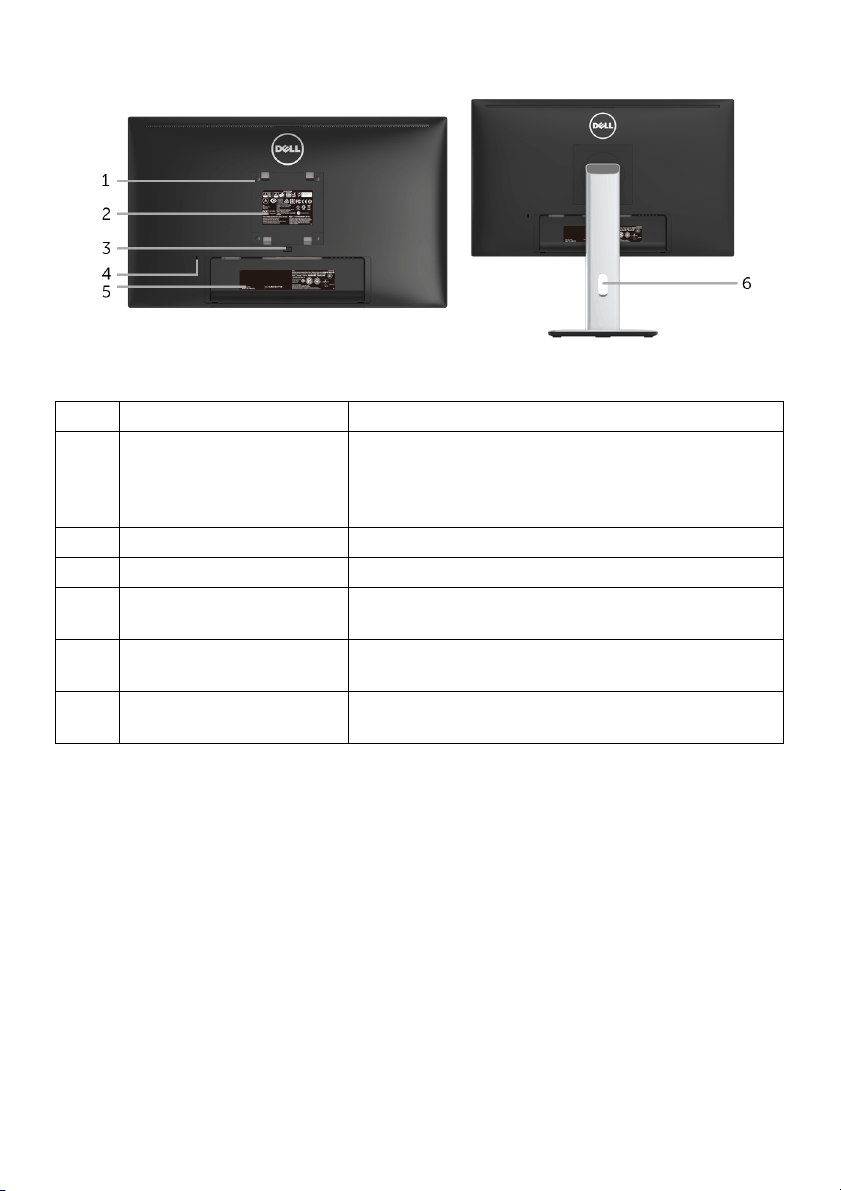
Back View
Back view with monitor stand
Label
1 VESA mounting holes
2 Regulatory label Lists the regulatory approvals.
3 Stand release button Releases stand from monitor.
4 Security lock slot Secures monitor with security lock (security lock
5 Barcode se
6 Cable management slot Use to organize cables by placing them through
Description Use
Wall mount monitor using VESA-compatible wall
(100 mm
behind attached VESA
Cover)
label
x 100 mm -
rial number
mount kit (100 mm x 100 mm).
not included).
Refer to
technical support.
the slot.
this label if you need to contact Dell for
About Your Monitor | 9
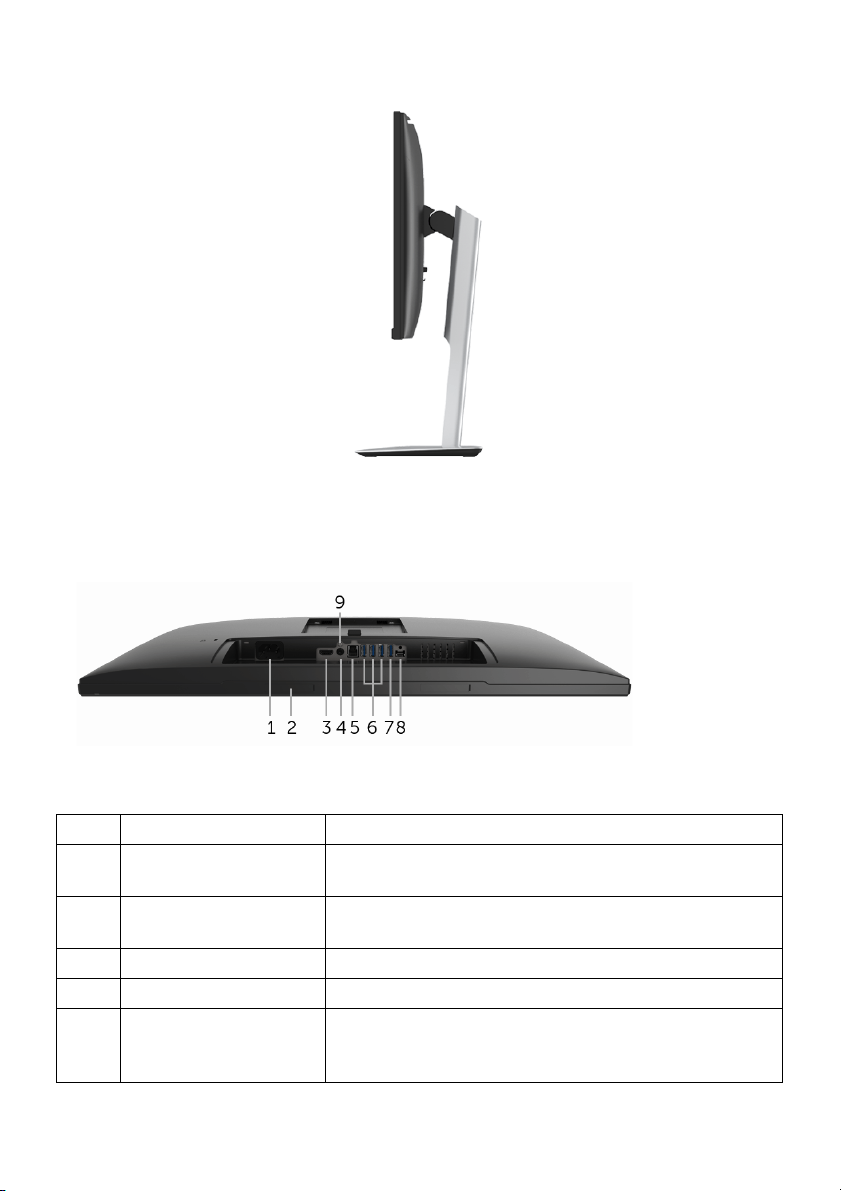
Side View
Bottom View
Bottom view without monitor stand
Label Description Use
1 AC power cord
connector
2 Dell Soundbar
moun
ting slots
3 HDMI port connector Connect your computer with HDMI cable.
4 Audio-Line out Connect your speakers*.
5 USB upstream port Connect the USB cable that came with your monitor
Connect the
Attach the optional Dell Soundbar. (Concealed below
removable plastic sheets)
to the computer
can use the USB connectors on the monitor.
power cable.
. Once this cable is connected, you
10 | About Your Monitor
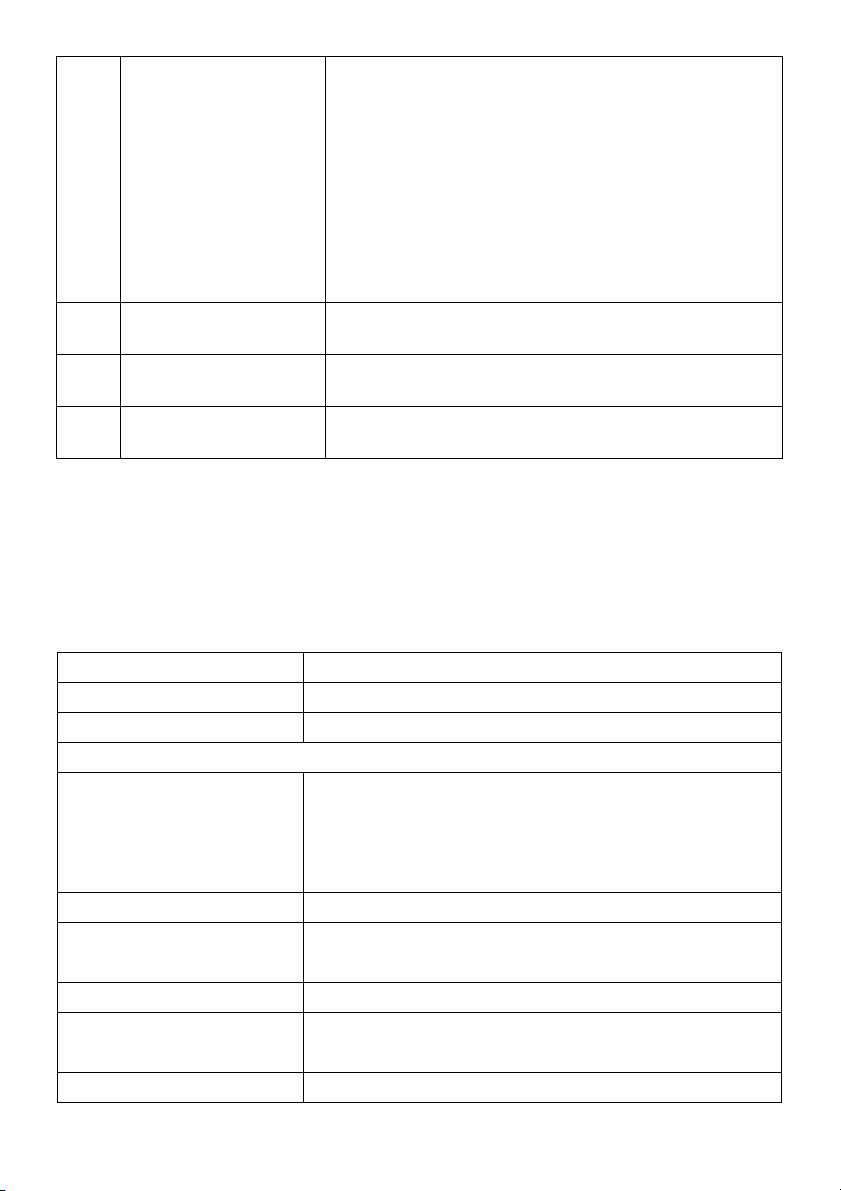
6 USB downstream port HDMI source
Connect your USB device. You can only use this
connector af
the computer and USB upstream connector on the
monitor.
Wireless source
Connect your keyboard and mouse. Other USB
vices are restricted to USB Ethernet, USB
de
Thumbdrive or USB 2.0 Hubs.
7 USB downstream port
Ch
with Power
8 Micro-B port This port is for service or debugging only. (NOT for
9 Stand lock feature To lock the stand to the monitor using a M3 x 6 mm
* Headphone usage is not supported for the audio line out connector.
arging
Connect to charge your device.
end-user)
crew (screw not included).
s
ter you have connected the USB cable to
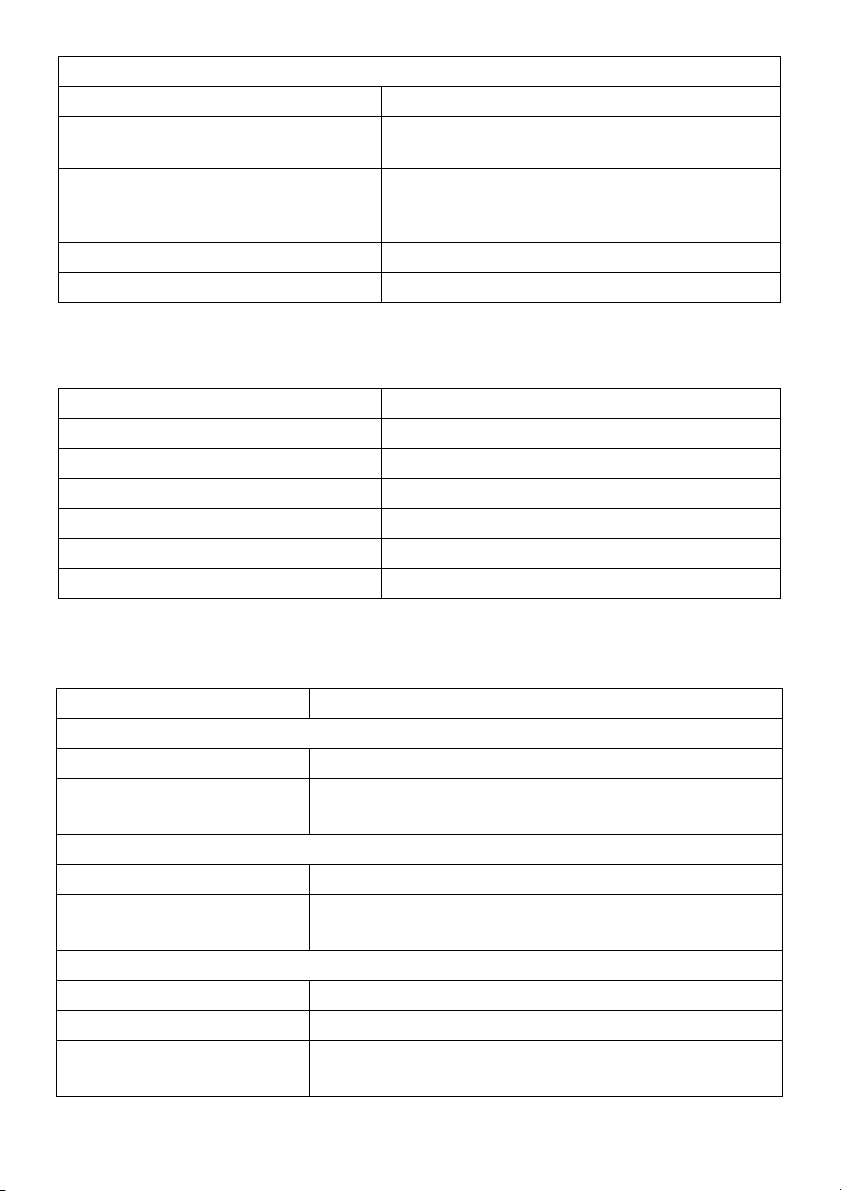
Monitor Specifications
Flat Panel Specifications
Model U2417HWi
Screen type Active matrix - TFT LCD
Panel technology In-Plane Switching Type
Viewable image
Diagonal
Horizontal, Active Area
Vertical, Active Area
Area
Pixel pitch 0.2745 mm
Viewing angle 178° (vertical) typical
Luminance output 250 cd/m² (typical)
Contrast ratio 1000 to 1 (typical)
Faceplate coating Anti-Glare with 3H hardness
604.70 mm (23.8 inches)
527.04 mm (20.75 inches)
296.46 mm (11.67 inches)
2
156246.28 mm
178° (horizontal) typical
2M to 1 (typical Dynamic Contrast On)
(242.18 inch2)
About Your Monitor | 11
Backlight LED edgelight system
Response time 14 ms gray to gray (typical)
8 ms with Overdrive (typical)
Color depth 16.77 million colors
Color gamut CIE1976 (85%), CIE 1931* (72%)
* [U2417HWi] color gamut (typical) is based on CIE1976 (85%) and CIE1931 (72%) test
standards. sRGB coverage is 96%.
Resolution Specifications
Model U2417HWi
Horizontal scan range 30 kHz to 83 kHz (automatic)
Vertical scan range 56 Hz to 76 Hz (automatic)
Maximum preset resolution 1920 x 1080 at 60 Hz
Supported Video Modes
Model U2417HWi
Video display capabilities
(HDMI playback)
480p, 480i, 576p, 576i, 720p, 1080i, 1080p
Preset Display Modes
Display Mode Horizontal
uency (kHz)
eq
Fr
Vertical
Frequency
(Hz)
VESA, 720 x 400 31.5 70.1 28.3 -/+
VESA, 640 x 480 31.5 60.0 25.2 -/-
VESA, 640 x 480 37.5 75.0 31.5 -/-
VESA, 800 x 600 37.9 60.3 40.0 +/+
VESA, 800 x 600 46.9 75.0 49.5 +/+
VESA, 1024 x 768 48.4 60.0 65.0 -/-
VESA, 1024 x 768 60.0 75.0 78.8 +/+
VESA, 1152 x 864 67.5 75.0 108.0 +/+
VESA, 1280 x 1024 64.0 60.0 108.0 +/+
VESA, 1280 x 1024 80.0 75.0 135.0 +/+
12 | About Your Monitor
Pixel Clock
(MHz)
Sync Polarity
(Horizontal/
Vertical)
VESA, 1600 x 1200 75.0 60.0 162.0 +/+
VESA, 1920 x 1080 67.5 60.0 148.5 +/+
Electrical Specifications
Model U2417HWi
Video input signals HDMI 1.4*, 600mV for each differential line, 100 ohm
input impedance per differential pair
Inrush current • 12
AC
input voltage/frequency/
current
* Not Support HDMI 1.4 optional specification, include HDMI Ethernet Channel (HEC),
Audio Return Channel (ARC), standard for 3D format and resolutions, standard for 2K and
4K digital cinema resolution.
0 V: 30 A (Max.) at 0 °C (cold start)
• 240 V: 60 A (Max.) at 0 °C (cold start)
100 VAC to 240 VAC / 50 Hz or 60 Hz
(typical)
+ 3 Hz / 1.5 A
Physical Characteristics
Model U2417HWi
Connector type HDMI; USB 3.0
Signal cable type • Digital:
• Universal Serial Bus: USB, 9 pins
Dimensions (with stand)
Hei
ght (extended) 485.8 mm (19.12 inches)
Height (compressed) 355.8 mm (14.00 inches)
Width 539.1 mm (21.23 inches)
Depth 185.0 mm (7.28 inches)
Dimensions (without stand)
Height 321.1 mm (12.64 inches)
Width 539.1 mm (21.23 inches)
Depth 45.6 mm (1.80 inches)
Stand dimensions
Height (extended) 399.8 mm (15.74 inches)
Height (compressed) 353.9 mm (13.93 inches)
Width 225.0 mm (8.86 inches)
Depth 185.0 mm (7.28 inches)
HDMI, 19 pins
About Your Monitor | 13
i
ght
We
Weight with packaging 7.66 kg (16.88 lb)
5
Weight with stand assembly and
les
cab
Weight without stand assembly (For
wall mount or VESA mount
considerations - no
Weight of stand assembly 1.84 kg (4.06 lb)
Front frame gloss Black Frame - 5.0 gloss unit (max.)
cables)
.42 kg (11.95 lb)
3.28 kg (7.23 lb)
Wireless Specifications
Model U2417HWi
Processor Qualcomm Octa-core
Standard 802.11 ac
Frequency Band 2.4GHz, 5GHz - Concurrent
Connectivity WiFi Direct, Screencast
Security WPA, WPA2
Content DRM HDCP 2.2
Environmental Characteristics
Model U2417HWi
mp
era tu re
Te
Operating 0 °C to 40 °C (32 °F to 104 °F)
Non-operating • Storage: -20 °C to 60 °C (-4
• Shipping: -20 °C to 60 °C (-4 °F to 140 °F)
Humidity
Operating 10% to 80% (non-condensing)
Non-operating • Storage: 5% to 90% (non-condensing)
• Shipping: 5% to 90% (non-condensing)
Altitude
Operating 5,
Non-operating 12,192 m (40,000 ft) (maximum)
Thermal dissipation
000 m (16,404 ft) (maximum)
• 115.94 BTU/hour (maximum)
• 78.43 BTU/hour (typical)
°F to 140 °F)
14 | About Your Monitor
Power Management Modes
If you have VESA's DPM™ compliance display card or software installed in your PC, the
monitor can automatically reduce its power consumption when not in use. The following
table shows the power consumption and signaling of this automatic power saving
feature.
VESA Modes Horizontal
Sync
Normal
operation
Wireless
ta
ndby mode
S
Switch off - - - Off Less than 0.3 W
Active Active Active White 60 W (maximum)**
Inactive Inactive Blanked White (Breathing) Less than 3 W
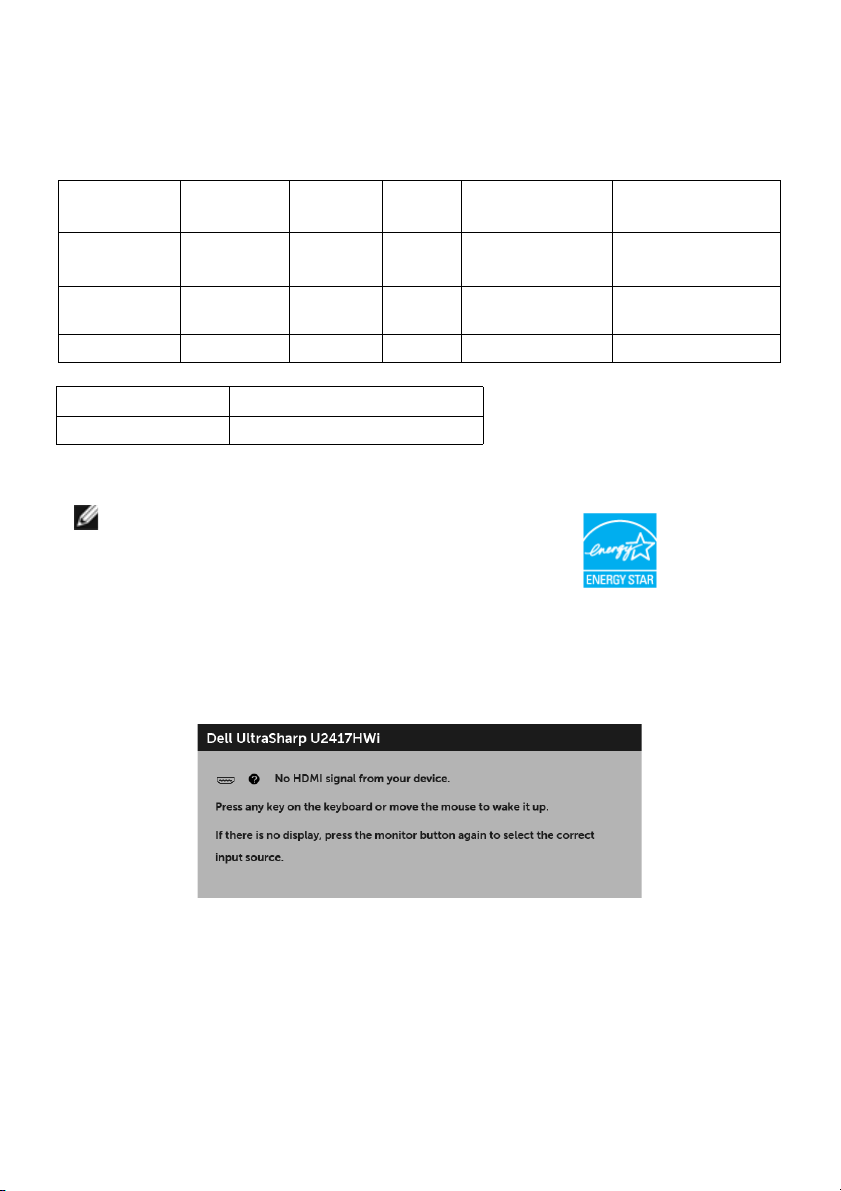
Energy Star Power Consumption
On Mode 18 W***
NOTE: This monitor is ENERGY STAR®-compliant.
The OSD functions only in the normal operation mode. When any button is pressed
under HDMI mode (with Auto Select function turned Off), the following message will be
displayed:
Vertical
Sync
Video Power
Indicator
Power
Consumption
25 W (typical)
(Network Standby)
Activate the computer and the monitor to gain access to the OSD.
* Zero power consumption in OFF mode can only be achiev
ed by disconnecting the
main cable from the monitor.
** Maximum power consumption with max luminance.
*** Energy consumption (On Mode) is tested at 230 Volts / 50 Hz.
This document is informational only and reflects laboratory performance. Your product
may perform differently, depending on the software, components and peripherals you
ordered and shall have no obligation to update such information. Accordingly, the
About Your Monitor | 15

customer should not rely upon this information in making decisions about electrical
tole
rances or otherwise. No warranty as to accuracy or completeness is expressed or
implied.
Pin Assignments
HDMI Connector
Pin
Number
1
2
3
4
5
6
7
8
9
10
11
12
13
14
15
16
17
18
19
19-pin Side of the
Connected Signal Cable
TMDS DATA 2+
TMDS DATA 2 SHIELD
TMDS DATA 2-
TMDS DATA 1+
TMDS DATA 1 SHIELD
TMDS DATA 1-
TMDS DATA 0+
TMDS DATA 0 SHIELD
TMDS DATA 0-
TMDS CLOCK+
TMDS CLOCK SHIELD
TMDS CLOCK-
CEC
Reserved (N.C. on device)
DDC CLOCK (SCL)
DDC DATA (SDA)
DDC/CEC Ground
+5V POWER
HOT PLUG DETECT
16 | About Your Monitor
Plug and Play Capability
You can install the monitor in any Plug and Play-compatible system. The monitor
automatically provides the computer system with its Extended Display Identification Data
(EDID) using Display Data Channel (DDC) protocols so the system can configure itself
and optimize the monitor settings. Most monitor installations are automatic; you can
select different settings if desired. For more information about changing the monitor
settings, see
Operating the Monitor
.
Universal Serial Bus (USB) Interface
This section gives you information about the USB ports that are available on the monitor.
NOTE: This monitor is High-Speed USB 3.0 compatible.
Transfer Speed Data Rate Power Consumption*
Super-speed 5 Gbps 4.5 W (Max, each port)
High speed 480 Mbps 4.5 W (Max, each port)
Full speed 12 Mbps 4.5 W (Max, each port)
* Up to 2A on USB downstream port (port with
compliance devices or normal USB devices.
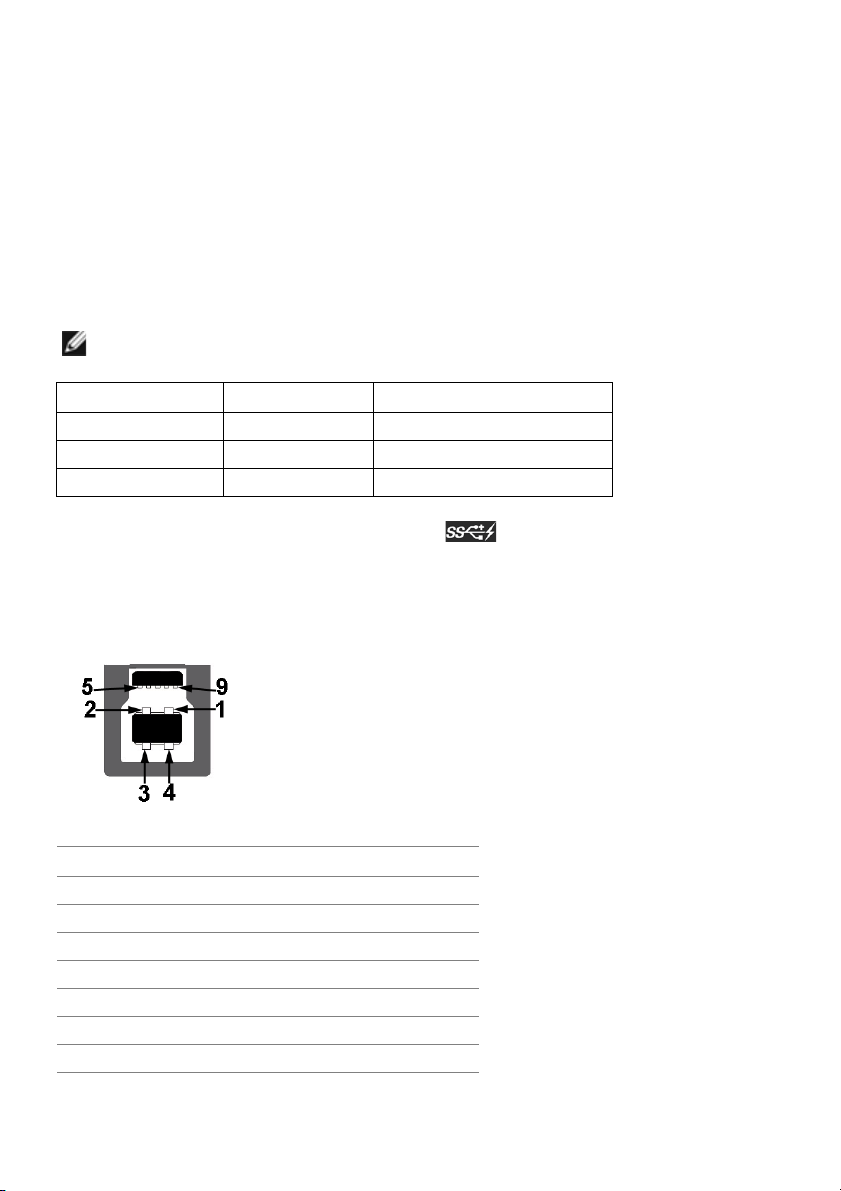
USB Upstream Connector
Pin Number 4-pin Side of the Connector
1 VCC
2 D-
3 D+
4 GND
5 SSTX-
6 SSTX+
7 GND
lightning icon) with BC1.2
About Your Monitor | 17
8 SSRX-
9 SSRX+
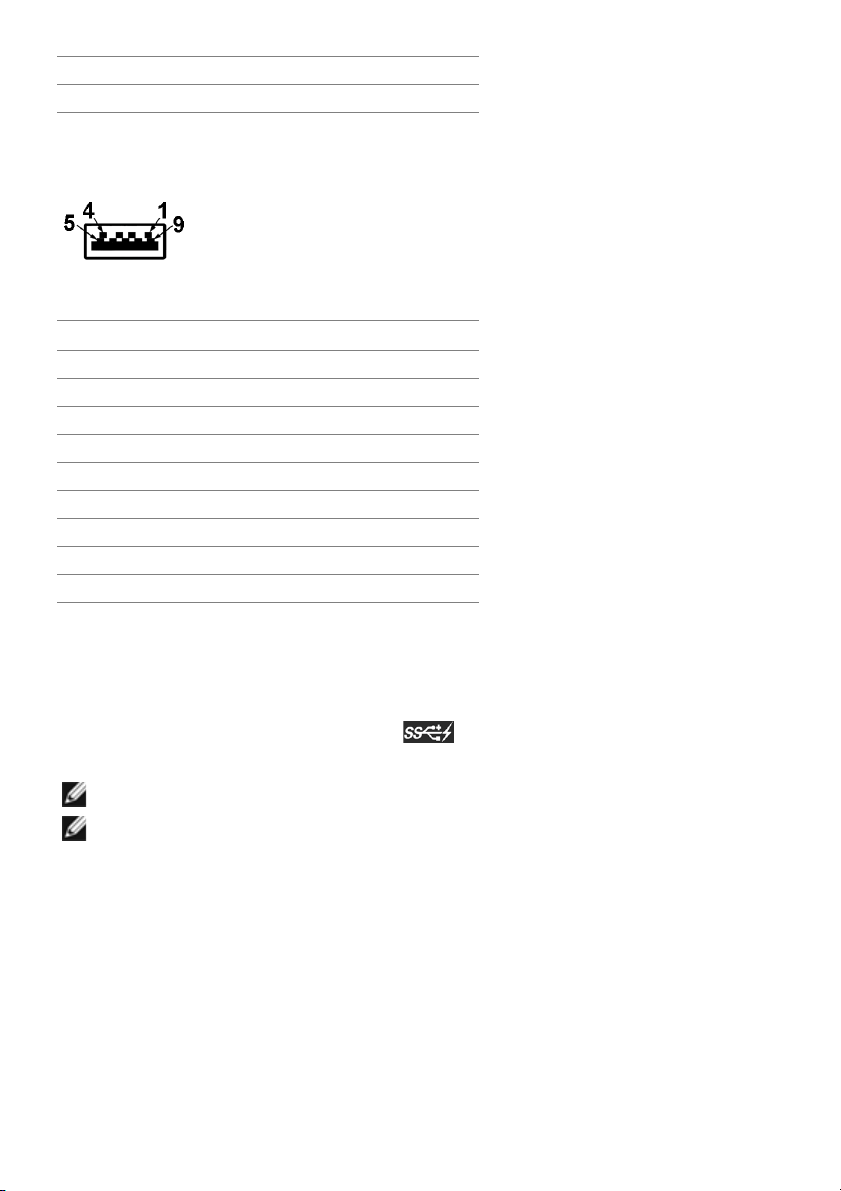
USB Downstream Connector
Pin Number 4-pin Side of the Connector
1 VCC
2 D-
3 D+
4 GND
5 SSRX-
6 SSRX+
7 GND
8 SSTX-
9 SSTX+
USB Ports
• 1 upstream - back
• 4 downstream - back
• Power Charging Port- the
charging capability if the device is BC1.2 compatible.
NOTE: USB 3.0 functio
port with lightning icon; supports fast current
nality requires a USB 3.0-capable computer.
NOTE: The monitor's USB interface works
power save mode. If you turn Off the monitor and then turn it On, the attached
peripherals may take a few seconds to resume normal functionality.
only when the monitor is On or in the
LCD Monitor Quality and Pixel Policy
During the LCD Monitor manufacturing process, it is not uncommon for one or more
pixels to become fixed in an unchanging state which are hard to see and do not affect
the display quality or usability. For more information on Dell Monitor Quality and Pixel
Policy, see Dell Support site at: http://www.dell.com/support/monitors.
18 | About Your Monitor

Maintenance Guidelines
Cleaning Your Monitor
CAUTION: Read and follow the
WARNING: Before cleaning the monitor, unplug the monitor power cable from
the electrical outlet.
For best practices, follow the instructions in the list below while
handling your monitor:
• To clean your anti-static screen, lightly dampen a soft, clean cloth with water. If
possible, use a special screen-cleaning tissue or solution suitable for the antistatic coating. Do not use benzene, thinner, ammonia, abrasive cleaners, or
compressed air.
• Use a lightly-dampened, warm cloth to clean the monitor. Avoid using
detergent of any kind as some detergents leave a milky film on the monitor.
• If you notice white powder when you unpack your monitor, wipe it off with a
cloth.
• Handle your monitor with care as a darker-colored monitor may get scratched
and show white scuff marks more than a lighter-colored monitor.
• To help maintain the best image quality on your monitor, use a dynamically
changing screen saver and turn Off your monitor when not in use.
Safety Instructions
before cleaning the monitor.
unpacking, cleaning, or
About Your Monitor | 19
Setting Up the Monitor
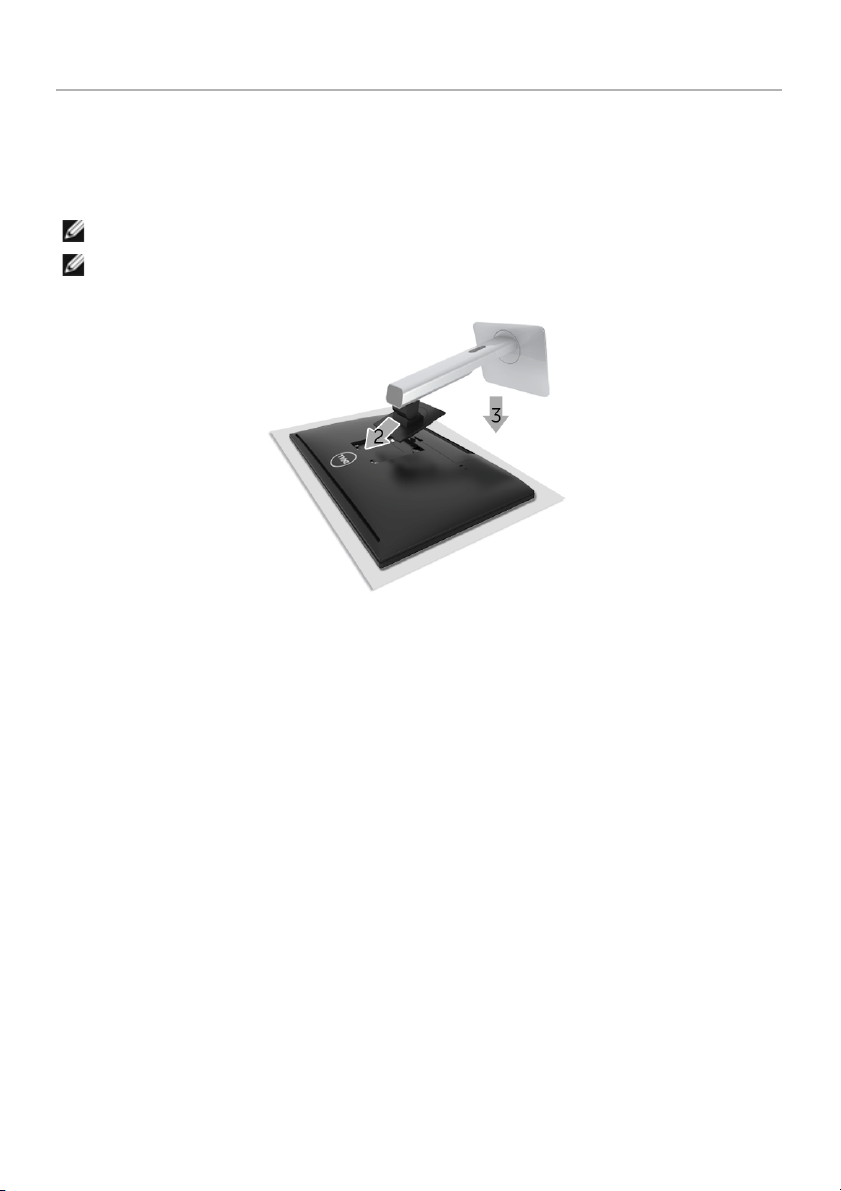
Attaching the Stand
NOTE: The stand is detached when the monitor is shipped from the factory.
NOTE: This is applicable for a monitor with a stand. When any
bought, please refer to the respective stand setup guide for the set up instructions.
To attach the monitor stand:
1 Remove the cover and place
2 Fit the two tabs on the upper part of the stand to the groove on the back of the
monito
r.
3 Press the stand till it snaps into place.
the monitor on it.
other stand is
20 | Setting Up the Monitor
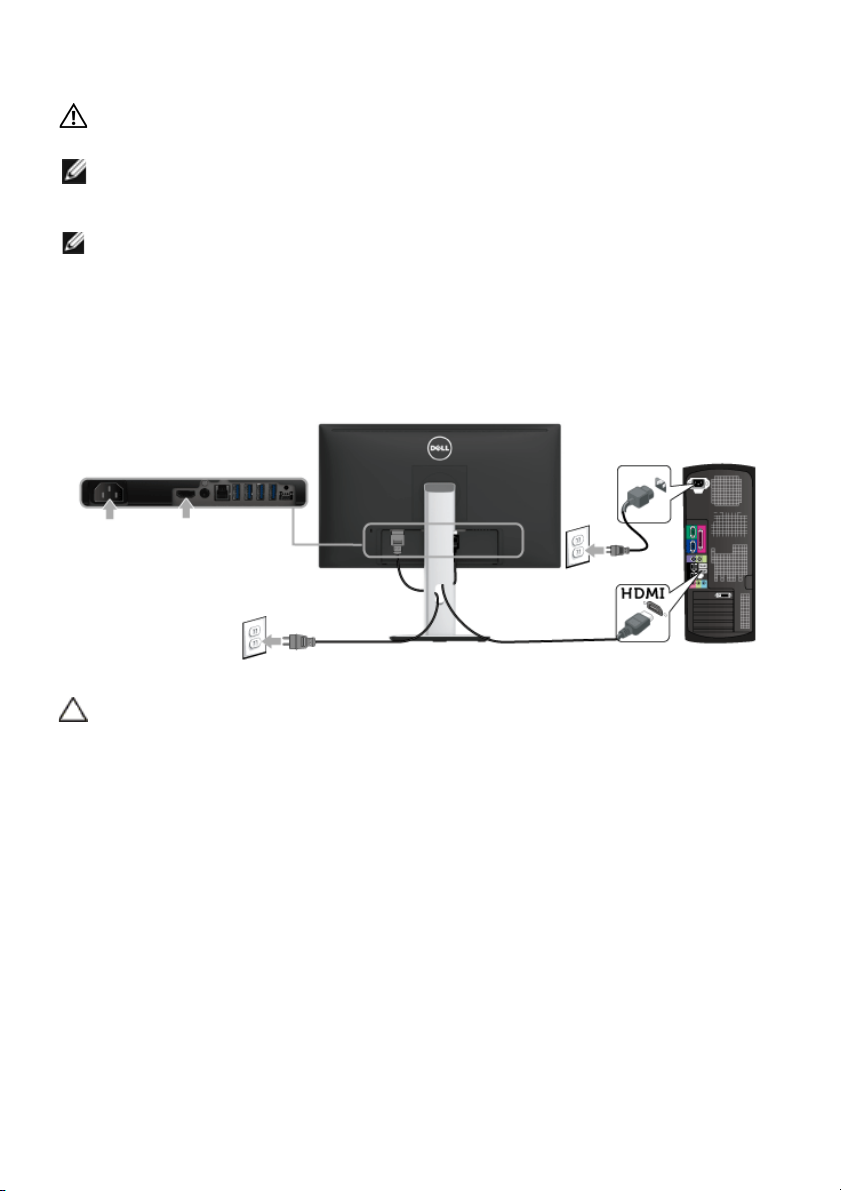
Connecting Your Monitor
WARNING: Before you begin any of the procedures in this section, follow the
Safety Instructions
NOTE: The monitor is equi
recommend that you keep a safe distance of 20 cm at least between the monitor
and you.
NOTE: Do not connect
To connect your monitor to the computer:
1 Turn Off your computer and disconnect th
2 Connect the HDMI to HDMI
Connecting the HDMI cable
.
pped with an antenna of the radio transmitter, so we
all
cables to the computer at the same time.
e power cable.
cable from your monitor to the computer.
CAUTION: The graphics are used for the purpose of illustration only. Appearance
of the computer may vary.
Setting Up the Monitor | 21
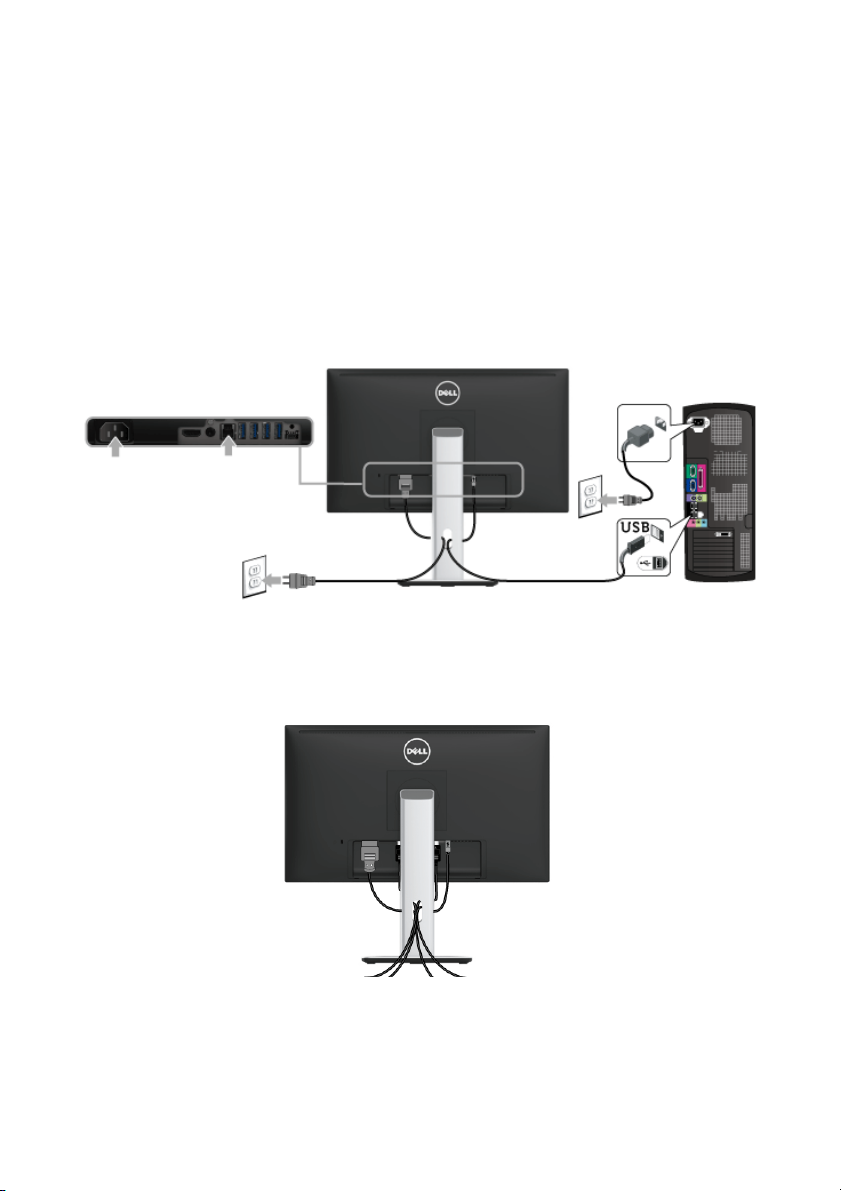
Connecting the USB 3.0 cable
After you have completed connecting the HDMI cable, follow the procedures below to
connect the USB 3.0 cable to the computer and complete your monitor setup:
1 Connect the upstream USB 3.0 port (cable supplied) to an appropriate USB 3.0 port
on your computer. (See
2 Connect the
3 Plug the power cables for your computer and monitor
4 Turn On the monitor and the computer.
If your monitor displays an image, installation is complete. If it does not display an
image, see
5 Use the cable slot on the monitor stand to organize the cables.
USB 3.0 peripherals to the downstream USB 3.0 ports on the monitor.
Universal Serial Bus (USB) Specific Problems
Bottom View
for details.)
into a nearby outlet.
.
Organizing Your Cables
After attaching all necessary cables to your monitor and computer, (See
Monitor
22 | Setting Up the Monitor
for cable attachment,) organize all cables as shown above.
Connecting Your
Attaching the Cable Cover
NOTE: The cable cover is detached when the monitor is shipped from the factory.
1 Fit the two tabs on the bottom part of the cable cover to the groove on the back of
the monitor
2 Press the cable cover till it snaps into place.
.
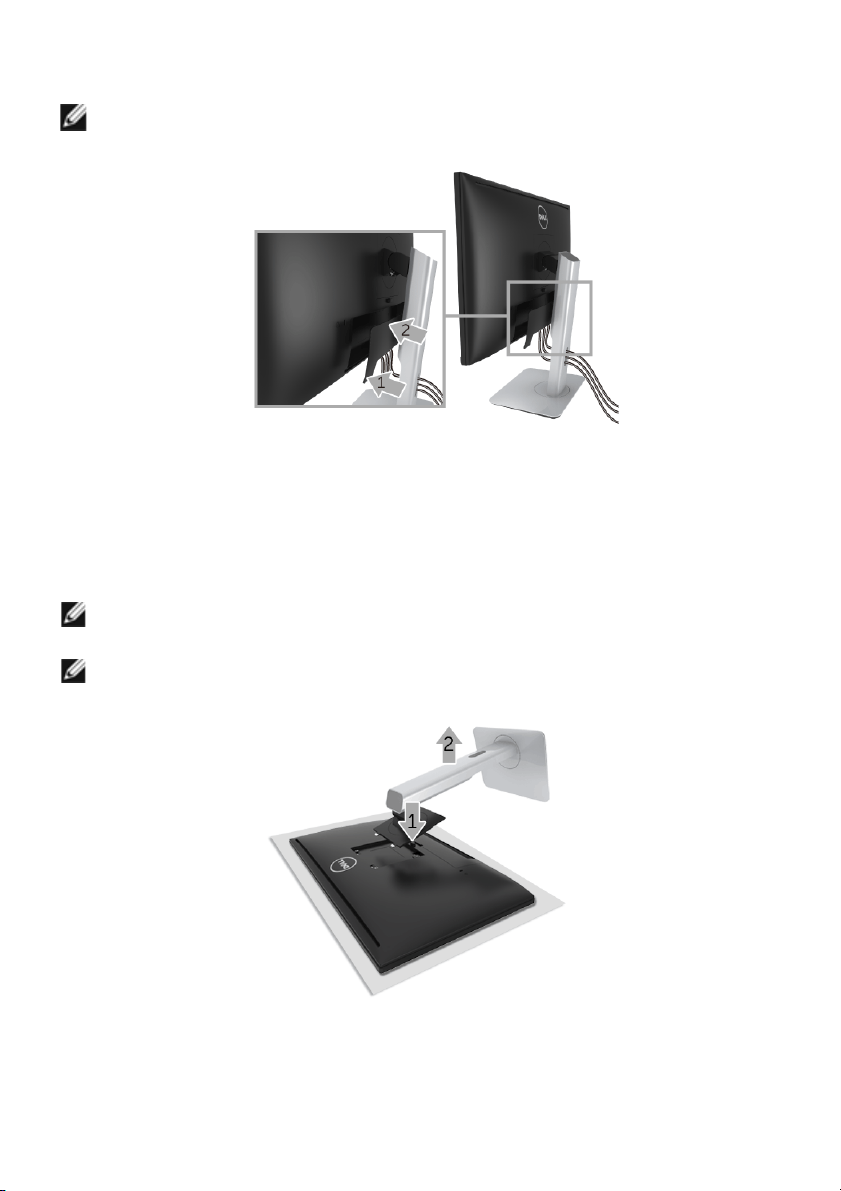
Removing the Monitor Stand
NOTE: To prevent scratches on the LCD screen while removing the stand, ensure
that the monitor is placed on a soft, clean surface.
NOTE: This is applicable for a moni
bought, please refer to the respective stand setup guide for the set-up instructions
tor with a stand. When any
other stand is
To remove the stand:
1 Place the monitor on a
2 Press and hold the stand release button.
soft cloth or cushion.
Setting Up the Monitor | 23
 Loading...