

Page 1

Dell™ Systems Build and Update Utility 1.2
User’s Guide
www.dell.com | support.dell.com
Page 2

Notes
NOTE: A NOTE indicates important information that helps you make better use of
your computer.
___________________
Information in this document is subject to change without notice.
© 2009 Dell Inc. All rights reserved.
Reproduction of these materials in any manner whatsoever without the written permission of Dell Inc.
is strictly forbidden.
Trademarks used in this text: Dell, the DELL logo, PowerEdge, and OpenManage are trademarks of
Dell Inc.; Microsoft, Windows, and Windows Server, are either trademarks or registered trademarks of
Microsoft Corporation in the United States and/or other countries; VMware is a registered trademark
and ESX Server is a registered trademark of VMware, Inc. in the United States and/or other
jurisdictions; SUSE is a registered trademark of Novell, Inc. in the United States and other countries;
Red Hat and Red Hat Enterprise Linux are registered trademarks of Red Hat, Inc. in the U.S. and other
countries.
Other trademarks and trade names may be used in this document to refer to either the entities claiming
the marks and names or their products. Dell Inc. disclaims any proprietary interest in trademarks and
trade names other than its own.
March 2009
Page 3

Contents
1 About This Document . . . . . . . . . . . . . . . . 7
Who Should Read This Document? . . . . . . . . . . . . 7
How Will This Document Help Me?
How Do I Use This Document?
. . . . . . . . . . . . . . 7
2 Dell Systems Build and
Update Utility Overview
What is the Systems Build and
Update Utility?
What’s New in This Release
Overview of Functionalities
. . . . . . . . . . . . . . . . . . . . . . 11
. . . . . . . . . . . . . 11
. . . . . . . . . . . . . . 11
. . . . . . . . . . . . . . . 12
3 Before You Begin Using the
Systems Build and Update Utility
Prerequisites and Requirements . . . . . . . . . . . . 15
Supported Operating Systems
Supported Systems
. . . . . . . . . . . . . . . . . . . 17
. . . . . . . . . . . . . . 17
. . . . . . . . . . . 7
. . . . . . 15
Are There Other Dell Documents I Might Need?
How Do I Get Technical Assistance?
. . . . . . . . . . 19
. . . . 18
Contents 3
Page 4

4 Launching the Systems Build
and Update Utility
. . . . . . . . . . . . . . . . . . 21
5 Using the Systems Build
and Update Utility
Flexibility That the Systems Build
and Update Utility Offers
Using the Systems Build and
Update Utility in Different Scenarios
Updating Your System Firmware
Configuring Your System Hardware
Installing the Operating System
Deploying Your Current ("Bare-Metal")
Dell System
Deploying More Than One System
With the Same Configuration
Deploying More Than One System
With Slightly Different Configurations
Deploying Multiple Systems of
Different Models
Deploying Multiple Systems
With the Same Configuration for
Different Operating Systems
Reusing Configuration Files
. . . . . . . . . . . . . . . . . . 25
. . . . . . . . . . . . . . . . 25
. . . . . . . . . . . . . . . . . . . . . 33
. . . . . . . . . . . . 36
. . . . . . . . . . . . . . . . . . 38
. . . . . . . . . . . . 39
. . . . . . . . . . . . 41
. . . . . . . . . . 26
. . . . . . . . . . 27
. . . . . . . . 28
. . . . . . . . . . 30
. . . . . . . 38
4 Contents
Page 5

6 Important Information and
Frequently Asked Questions
Firmware Update . . . . . . . . . . . . . . . . . . . . 45
Important Information
Frequently Asked Questions
. . . . . . . . . . . . . . . 45
. . . . . . . . . . 45
. . . . . . . . . . . . 45
Hardware Configuration
Server Operating System Installation
Important Information
Frequently Asked Questions
. . . . . . . . . . . . . . . . 46
. . . . . . . . . . 50
. . . . . . . . . . . . . . . 50
. . . . . . . . . . . . 50
Glossary . . . . . . . . . . . . . . . . . . . . . . . . . . . . . 53
Index
. . . . . . . . . . . . . . . . . . . . . . . . . . . . . . . 55
Contents 5
Page 6

6 Contents
Page 7

About This Document
It is strongly recommended that you read the current chapter, the "Dell
Systems Build and Update Utility Overview" chapter, and the "Before You
Begin Using the Systems Build and Update Utility" chapter before proceeding.
Who Should Read This Document?
This document is for system administrators who are responsible for deploying
and updating Dell™ PowerEdge™ systems in their organizations.
How Will This Document Help Me?
This document introduces you to the Dell Systems Build and Update Utility,
and includes best practices on how to make the product effective in helping
you streamline your deployment and update procedures for Dell systems.
• If you are a first-time user of this product, this document will help you set
up your systems prior to, while, and after using the Systems Build and
Update Utility.
• If you are an existing user of the Systems Build and Update Utility, this
document will help you understand how to leverage the utility modules in
an interlinked manner to create a customized deployment media.
How Do I Use This Document?
This document helps you set up your Dell systems to use the Systems Build
and Update Utility effectively and efficiently and provides an overview of the
various modules of the Systems Build and Update Utility and the possible
scenarios in which you might use them. However, it does not cover all
scenarios and possibilities. For specific information on Dell products whose
functionalities are now provided by the Systems Build and Update Utility,
see "Are There Other Dell Documents I Might Need?"
Depending on the Dell systems you want to deploy, redeploy or update, it is
recommended that you use the document as follows.
About This Document 7
Page 8

Table 1-1. Organization of Information in This Guide
Topics For Dell systems For Dell PowerEdge SC
systems
Information on this
document, its intended
audience, purpose, and
organization
Overview of the Systems
Build and Update Utility
and what functionalities
it offers
What you need before
proceeding to use the
Systems Build and Update
Utility and where to get
other information that you
may need while using this
utility
Important information
about launching the
Systems Build and
Update Utility and pointers
to user scenarios
Possible scenarios in which
you can use the Systems
Build and Update Utility
"About This Document" "About This Document"
"Dell Systems Build and
Update Utility Overview"
"Before You Begin Using
the Systems Build and
Update Utility"
"Launching the Systems
Build and Update Utility"
"Using the Systems Build
and Update Utility"
"Dell Systems Build and
Update Utility Overview"
"Before You Begin Using
the Systems Build and
Update Utility"
"Launching the Systems
Build and Update Utility"
"Using the Systems Build
and Update Utility"
(as applicable)
Important information and
frequently asked questions
(FAQs) about the Firmware
Update module
"Firmware Update" Not applicable
8 About This Document
Page 9

Table 1-1. Organization of Information in This Guide (continued)
Topics For Dell systems For Dell PowerEdge SC
systems
Important information
and FAQs about the
Hardware Configuration
module
Important information
and FAQs about the
Server Operating System
Installation module
"Hardware Configuration" Not applicable
"Server Operating System
Installation"
"Important Information
and Frequently Asked
Questions"
Now that you have an idea of what this document is about and how to use it
to easily access the information you want, see "Dell Systems Build and
Update Utility Overview" to get an overview of the Systems Build and Update
Utility and the functionalities it offers.
About This Document 9
Page 10

10 About This Document
Page 11

Dell Systems Build and Update Utility Overview
This chapter provides an overview of the Systems Build and Update Utility.
This chapter helps you understand the functionalities that the Systems Build
and Update Utility provides to update and deploy your Dell systems.
What is the Systems Build and Update Utility?
The Systems Build Update and Utility is an integrated tool for deployment
and update of your Dell systems. It has modules such as Server OS
Installation, Firmware Update, and Hardware Configuration. These
modules enable you to update BIOS and firmware in the pre-operating
system environment, apply these settings on the current system or on
multiple systems, and install the operating system.
For example, if you have bought a new Dell system, you can use the Systems
Build Update and Utility to update the system firmware, configure your
system hardware, and install a supported operating system. If you have an
existing Dell system, you can use the Systems Build Update and Utility to
update to the latest firmware, modify the hardware configuration, and install
a new operating system. You can perform these operations on your existing
system (one-to-one) or create bootable media for multiple systems of
different models of your choice.
What’s New in This Release
The key new features of the Systems Build and Update Utility in this release
are:
• The three main modules—
and Hardware Configuration
configure all the three modules at the same time and apply the
configuration as required.
• You can apply
the same session.
Hardware Configuration
Server OS Installation, Firmware Update,
—are now interlinked such that you can
settings to your current system in
Dell Systems Build and Update Utility Overview 11
Page 12

• You can create customized bootable media to deploy multiple systems
(different platforms) of your choice.
• You can deploy your newly purchased Dell systems for which you had
already created a bootable media. This is possible with a multi-system
configuration file (
.csv
file) that you create and save in a centralized
network location. For more information about the configuration file,
see "Generic Prerequisites and Requirements."
• You can use the
Apply/Export Configuration
feature of the Systems Build
and Update Utility to export your system configuration for future use.
You can use this configuration file, with minor modifications, to deploy
similar systems by using the import feature. Importing such a
configuration file also pre-populates all the graphical user interface (GUI)
fields with values that you saved and exported for future use.
Overview of Functionalities
Table 2-1 lists the functionalities of the Systems Build and Update Utility to
deploy and update your Dell systems.
Table 2-1. Dell Systems Build and Update Utility Functionalities
You Want To Go To For
Update your system firmware
(Baseboard Management
Controller [BMC], Dell Remote
Access Controller [DRAC],
Redundant Array of
Independent Disks [RAID]) and
BIOS in a pre-operating system
environment.
Configure your system
hardware.
"Updating Your System
Firmware"
"Configuring Your
System Hardware"
Dell systems (excluding
PowerEdge SC systems)
Dell systems (excluding
PowerEdge SC systems)
12 Dell Systems Build and Update Utility Overview
Page 13

Table 2-1. Dell Systems Build and Update Utility Functionalities (continued)
You Want To Go To For
Install an operating system on
your system.
Create customized bootable
media to deploy multiple
systems (different platforms) of
your choice
"Installing the Operating
System"
"Using the Systems Build
and Update Utility in
Different Scenarios"
Dell systems
Dell systems
Now that you have an overview of the Systems Build and Update Utility and
what functionalities it offers, read "Before You Begin Using the Systems Build
and Update Utility" to see what you should have before you begin using the
Systems Build and Update Utility in your environment.
Dell Systems Build and Update Utility Overview 13
Page 14

14 Dell Systems Build and Update Utility Overview
Page 15

Before You Begin Using the Systems Build and Update Utility
This chapter lists the prerequisites for using the Systems Build and Update
Utility and where to get other information that you may need while using
this utility.
Prerequisites and Requirements
You should have a Dell system with:
• Minimum memory of 512 MB
• DVD drive
Table 3-1 lists the prerequisites and requirements for the Systems Build and
Update Utility.
Before You Begin Using the Systems Build and Update Utility 15
Page 16

Table 3-1. Prerequisites and Requirements
Module Prerequisites and Requirements
Generic Prerequisites and
Requirements
• To make effective use of the Systems Build and
Update Utility, you will need at least two Network
File System (NFS) or Samba multiple network shares.
If you do not have network connectivity for the
system you are deploying, ensure that you have
multiple USB keys.
• If you are planning to deploy multiple systems using
the Systems Build and Update Utility,
Dell recommends that you create a multi-system
.csv
configuration file (
about all your systems on your network. Information
includes the service tag, host name, IP addresses,
subnet mask, operating system(s) ISO file name(s),
product keys, DRAC IP address, and Domain Name
System (DNS) IP addresses. Save this file on a
common network share or a USB key.
The Systems Build and Update Utility does not
validate the file but uses it during actual deployment.
When you want to apply your customized bootable
media on a group of similar systems, the Systems
Build and Update Utility prompts you to browse and
locate the multi-system configuration file.
• A common network share or a USB key to export your
configuration for later use.
Similarly, if you want to import your previously saved
configuration, the files exported in the earlier session
must be available on a network share or on a USB key.
• A common network share or a USB key to save your
customized bootable image.
• A common network share to save logs for each
system on your network share. These logs can be a
useful reference if you want to troubleshoot any
problem your systems might have encountered
during deployment.
file) that contains information
16 Before You Begin Using the Systems Build and Update Utility
Page 17

Table 3-1. Prerequisites and Requirements (continued)
Module Prerequisites and Requirements
Server Operating System
Installation
Firmware Update Either of the following:
Hardware Configuration
• Operating system media or a network share or a
USB key on which to save the operating system
ISO image.
Dell Systems Management Tools and Documentation
•
™
DVD (if you want to install Dell OpenManage
System Administrator). This is not applicable for
™
Dell PowerEdge
• Basic knowledge of Redundant Array of Independent
Disks (RAID)
• DVD drive and
• A network share with the Server Update Utility
content and knowledge of setting up the Network File
System (NFS) or Microsoft
• Basic knowledge of BIOS,
Management Controller (BMC), and Dell Remote
Access Controller (DRAC).
SC systems.
Dell Server Updates
®
Windows® share.
RAID, Baseboard
DVD
Supported Operating Systems
For the list of operating systems that the Systems Build and Update Utility
supports, see the readme.txt file in the root folder or the
Support Matrix
on the Dell Support website at support.dell.com or the Dell
Systems Management Tools and Documentation DVD.
Dell Systems Software
Supported Systems
For the list of Dell systems supported for this version of the Systems Build
and Update Utility, see the readme.txt file in the root folder or the
Dell Systems Software Support Matrix
support.dell.com or the Dell Systems Management Tools and
Documentation DVD.
Before You Begin Using the Systems Build and Update Utility 17
on the Dell Support website at
Page 18

Are There Other Dell Documents I Might Need?
In addition to this guide and the Systems Build and Update Utility online
help, you might need to refer to the following documents to get details on
specific Systems Build and Update Utility modules and Dell OpenManage
products. These documents are available on the Dell Support website at
support.dell.com and the Dell Systems Management Tools and
Documentation DVD.
•The
•The
•The
•The
•The
•The
•The
•The
•The
Dell OpenManage Installation and Security User's Guide
additional information about performing an unattended installation of
Server Administrator on systems running supported Windows,
Enterprise Linux
operating systems.
Dell Remote Access Controller 4 User's Guide
information about using the
a DRAC 4.
Dell Remote Access Controller 5 Firmware User's Guide
comprehensive information about using the
utility to configure a DRAC 5.
Dell Chassis Management Controller User’s Guide
comprehensive information about using the controller that manages all
modules in the chassis containing your Dell system.
Integrated Dell Remote Access Controller User’s Guide
information about installation, configuration, and maintenance of the
Integrated Dell Remote Access Controller
managed systems.
Dell Remote Access Controller/Modular Chassis User's Guide
information about installation, configuration, and maintenance of the
Dell Remote Access Controller/Modular Chassis (DRAC/MC).
Dell Remote Access Controller Racadm User's Guide
comprehensive information about using the
Dell Baseboard Management Controller Utilities User's Guide
information about configuring a managed system to use the BMC
Management Utility to manage your system through its BMC.
Dell Update Packages User's Guide
and using Dell Update Packages as part of your system update strategy.
®
Server, and SUSE® Linux Enterprise Server
provides comprehensive
RACADM
command line utility to configure
RACADM
(
iDRAC) on management and
RACADM
provides information about obtaining
command line utility.
provides
Red Hat®
provides
command line
provides
provides
provides
provides
provides
18 Before You Begin Using the Systems Build and Update Utility
Page 19

• The
• The
• The
• The
• The
Dell OpenManage Deployment Toolkit User's Guide
information on how to run Linux DUP in the Dell-provided or your
customized Embedded Linux (ELI) environment considering the
dependencies.
Dell OpenManage Deployment Toolkit Command Line Interface
Reference Guide
the Deployment Toolkit (DTK), which is a set of command line tools for
configuring and deploying Dell PowerEdge™ systems.
Server Update Utility User's Guide
identify and apply updates to your system.
Dell Systems Software Support Matrix
various Dell systems, the operating systems supported by these systems,
and the Dell OpenManage components that can be installed on
these systems.
Dell OpenManage Server Administrator Compatibility Guide
compatibility information about Server Administrator installation and
operation on various hardware platforms (or systems) running supported
Windows, Red Hat Enterprise Linux Server, and SUSE Linux Enterprise
Server operating systems.
provides general, best practice procedures on how to run
provides information on how to
provides information about the
provides
provides
How Do I Get Technical Assistance?
If at any time you do not understand a procedure described in this guide or if
your product does not perform as expected, help tools are available to assist
you. For more information about these help tools, see "Getting Help" in your
system's Hardware Owner's Manual.
Additionally, Dell Enterprise Training and Certification is available. See
www.dell.com/training for more information. This service may not be offered
in all locations.
Before You Begin Using the Systems Build and Update Utility 19
Page 20

20 Before You Begin Using the Systems Build and Update Utility
Page 21

Launching the Systems Build and Update Utility
To launch the Systems Build and Update Utility locally:
1
Insert the Dell Systems Management Tools and Documentation
your system drive.
2
Reboot your system.
The boot menu screen appears.
To launch the Systems Build and Update Utility on a remote system:
1
In the Dell Remote Access Controller (DRAC) 4 or DRAC 5 UI, click the
Media
tab.
The
Virtual Media
NOTE: If the Virtual Media Active X Control is not installed on the system,
you are prompted to install it before you proceed.
2
Ensure that the attribute for
3
Specify the location of the
To access the location of the
media or the ISO image of the
Documentation
identify the
screen appears.
Attach/Detach Status
ISO Image File
Systems Build and Update Utility
Dell Systems Management Tools and
DVD, select your system drive location or browse to
ISO Image File
, as appropriate.
.
is
Attached
DVD in
.
bootable
4
Click
Connect
The
Virtual Media Status
Management Tools and Documentation
host system.
5
Click
Power Management
.
screen appears indicating that the
.
Launching the Systems Build and Update Utility 21
Dell Systems
media is now connected to your
Page 22

6
To boot the host system with the Systems Build and Update media, select
Power Cycle System
7
Click
Console
The
Console Redirection
8
Click
Connect
under
Power Control Operations
, and click
.
screen appears.
.
You can now access the boot menu screen on your host system from your
client system and proceed to use the Systems Build and Update Utility
remotely.
Figure 4-1. Boot Menu Screen
Apply
.
22 Launching the Systems Build and Update Utility
Page 23

Table 4-1 lists the options and their descriptions available on this screen.
Table 4-1. Boot Menu Options
Boot Menu Option Does This for You
Dell Systems Build and
Update Utility
Optical Media
(CD/DVD) Check
Skip Optical Media
(CD/DVD) Boot - Boot
to Hard Drive
DTK Command Line
Interface (Linux)
Takes you to the Dell Systems Build and Update Utility
Home screen.
Checks if the Dell Systems Management Tools and
Documentation DVD you inserted has any errors.
Enables you to boot from your system hard drive.
Takes you to the Deployment Tool Kit (DTK) Command Line
Interface (only on systems running Linux).
NOTE: This option is not available on Dell PowerEdge™ SC
systems.
F1 Help Takes you to the navigation help.
F2 Language Enables you to choose the language.
F3 Advanced Options Activates the DTK Command Line Interface (Linux) option.
NOTE: This option is not available on Dell PowerEdge SC
systems.
You may want to use the Systems Build and Update Utility in any of the
following possible scenarios:
• Updating Your System Firmware
• Configuring Your System Hardware
• Installing the Operating System
• Deploying Your Current ("Bare-Metal") Dell System
• Deploying More Than One System With the Same Configuration
• Deploying More Than One System With Slightly Different Configurations
• Deploying Multiple Systems of Different Models
• Deploying Multiple Systems With the Same Configuration for Different
Operating Systems
• Reusing Configuration Files
Launching the Systems Build and Update Utility 23
Page 24

24 Launching the Systems Build and Update Utility
Page 25

Using the Systems Build and Update Utility
This chapter describes the flexibility that the Systems Build and Update
Utility offers to deploy and update your systems and also the various scenarios
in which you can use the Systems Build and Update Utility.
Flexibility That the Systems Build and Update Utility Offers
•
Choice of configuration:
requirement, you can configure all the three modules (
Hardware Configuration
any one of the modules, or a combination of the modules.
•
Choice of when to apply the configuration:
configuration of your choice immediately or save it by using the
Apply/Export Configuration
•
Choice of configuring systems:
in the Systems Build and Update Utility allows you to deploy and update
your current system and/or multiple systems or multiple systems of
different models.
– You can perform the following deployment/update operations on your
current system:
• apply firmware updates
• configure hardware (BIOS, DRAC, RAID, and so on)
• install an operating system
• launch post-operating system install scripts
Depending on your deployment and update
Firmware Update
, and
Server Operating System Installation
You can either apply the
feature.
The
Apply/Export Configuration
),
feature
,
Using the Systems Build and Update Utility 25
Page 26

– You can perform the following deployment or update operations for
multiple systems:
• export the configuration scripts (for all three modules or a
combination of your choice) for future use.
• generate a bootable image that contains, among others, the
update packages for specific generation(s) of system(s), applicable
hardware configuration scripts (BIOS, DRAC, RAID, and so on),
operating system installation details and link to the source
CD/DVDs on the network, and launch points to install the
operating system.
•
Choice of creating bootable media:
set of systems you select and then use the same media to boot each system
in the set. If you select the USB drive as the destination for the image, the
Systems Build and Update Utility gives you the option to make the
USB device bootable and directly boot the system with the device.
•
Unattended update and deployment:
the bootable media (CD/DVD/USB drive), the scripts on the bootable
media you created apply the firmware updates, apply the hardware
configuration, and finally install the operating system, as applicable.
All through this update and deployment process, you are not prompted for
any information, making this an unattended update and deployment of
your system.
NOTE: Content Manager is no longer available on the Dell Systems Management
Tools and Documentation DVD. To access Content Manager, use version 5.5 of the
Dell Systems Management Tools and Documentation DVD.
You can create bootable media for a
When you boot your system using
Using the Systems Build and Update Utility in Different Scenarios
This section describes some of the possible scenarios in which you can use the
Systems Build and Update Utility. These scenarios are meant to give you an
idea on how to effectively use the Systems Build and Update Utility. They are
not necessarily the only ways to use this tool nor are they the only scenarios in
which you can use this tool.
Dell recommends that at any point during your update and deployment
process, you see the online help for details about a particular screen.
26 Using the Systems Build and Update Utility
Page 27

Updating Your System Firmware
If you have purchased a newly released Dell PowerEdge™ system, it is likely to
have the latest firmware. However, if more than a quarter has passed since the
release of your system, you may have to update the firmware.
1
On the
Configure
left pane.
The
2
Specify the location where your update files repository resides. For details,
see "Firmware Update."
If you want to compare your system component status with a different
version of the Server Update Utility, provide the location of the Server
Update Utility on the
Click
3
The
comparison report on the
This screen displays a comparison of the currently installed version of each
component on the existing system with the repository component version
for the same system. It also indicates the components that you need to
upgrade and those that you can downgrade.
4
Select any components that you might want to upgrade and click
Build and Update Utility Home
Dell Systems Build and Update Utility Home
against
Repository Selection
Firmware Update
screen of the
or click
Firmware Update
Firmware Updat
screen, click
on the
e module appears.
Repository Selection screen.
Continue
Firmware Update
NOTE: You can selectively upgrade components depending on your
requirement. However, you cannot perform selective downgrades.
.
inventories your system and generates a
Comparison Report
screen.
.
Systems
NOTE: The Systems Build and Update Utility saves all the information about
the repository and the selections you made on the Comparison Report screen.
These updates will be applied during the actual deployment.
Using the Systems Build and Update Utility 27
Page 28

5
To update your current system, click
Systems Build and Update Utility Home
Configure Apply /Export Options
The
6
Select the
Apply/Export
Apply Configuration to Current System
.
Apply/Export Configuration
screen.
screen appears.
option and click
on the
The progress bar appears after which your system reboots with the firmware
updates configured.
NOTE: For more information on the specific Firmware Update screens and what
you can do on each screen, see the Systems Build and Update Utility online help.
Configuring Your System Hardware
On Your Current System
1
On the
against
left pane.
The
2
To configure the components (RAID, DRAC, BIOS, and so on), click the
individual component buttons.
Component screens appear, on which you can configure various
components.
Systems Build and Update Utility Home
Hardware Configuration
Configuration Status Summary
or click
Hardware Configuration
screen appears.
screen, click
Configure
on the
NOTE: If you configure RAID manually and use the Systems Build and Update
Utility to install an operating system on a master system, you need to manually
configure RAID on the target system as well.
3
After you configure fields on each component screen and before you
navigate away from the screen, click
to Configuration Summary
4
On the
Back to Home Page
Configuration Status Summary
.
.
Save Settings
screen, click
and then click
Save Settings and Go
28 Using the Systems Build and Update Utility
Go Back
Page 29

5
On the
click
The
Configuration to Current System
Systems Build and Update Utility Home
Apply/Export Configuration
Configure Apply/Export Options
.
screen appears with the
option selected, by default.
screen,
Apply
You can export the hardware configuration for later use by selecting
Export Configuration
6
Click
Apply/Export
.
.
A progress bar appears indicating that the configuration changes you saved in
step 3 are being applied to your system. After the changes are applied, your
system reboots automatically and is ready for use with the updated
configuration.
For Multiple Systems
1
On the
against
The
2
Select the system(s) on which you want to deploy the hardware
Systems Build and Update Utility Home
System(s) Selection
Select System(s)
on the left pane.
screen appears.
screen, click
Change
configuration you specify.
NOTE: To generate a bootable ISO image to deploy a hardware configuration
to multiple systems, you must select all the required systems on the Select
System(s) screen even if they are of the same model as your current system
on which you are running the Systems Build and Update Utility.
3
Click
Save Settings
The
Systems Build and Update Utility Home
selected systems under
.
System(s) Selection
screen reappears listing the
.
4
Click
Configure
Configuration
The
Configuration Status Summary
5
To configure the components (RAID, DRAC, BIOS, and so on), click the
against
Hardware Configuration
on the left pane.
or
screen appears.
Hardware
individual component buttons.
Component screens appear on which you can configure various components.
6
After you configure fields on each component screen, click
and then click
Go Back to Configuration Summary
Using the Systems Build and Update Utility 29
.
Save Settings
Page 30

7
On the
Go Back to Home Page
8
On the
click
The
Auto-Deployment Bootable Image
You can export the hardware configuration for later use by selecting
Export Configuration
9
Click
bootable ISO image.
The
10
Specify the location and click
11
Click
The ISO image is generated and saved in the location you specified in the
preceding step. If the destination you specified is not a bootable USB key,
burn the ISO image using any CD/DVD burning software application on
to a CD or a DVD.
12
Boot the selected systems with the bootable media you created.
The deployment starts automatically and you will not be prompted for any
inputs. The system reboots as and when required until the selected systems
are ready with the updated configuration.
Configuration Status Summary
.
Systems Build and Update Utility Home
Apply/Export Configuration
Configure Apply/Export Options
.
Destination
ISO Save Location
Apply/Export
to provide the location where you want to save the
screen appears.
Continue
.
screen, click
.
screen appears with the
option selected, by default.
.
Save Settings and
screen,
Create
Installing the Operating System
1
On the
against
left pane.
The
2
Make the required changes and click
The
30 Using the Systems Build and Update Utility
Systems Build and Update Utility Home
Server OS Installation
Set the Date and Time
Select an Operating System to Install
or click
screen appears.
Server OS Installation
Continue
screen, click
.
screen appears.
Configure
on the
Page 31

3
Select the appropriate operating system, choose whether you want to
create a utility partition, and click
NOTE: The utility partition does not have DOS-based RAID tools.
Continue
.
For this procedure, let us assume that you select the Microsoft Windows
2003 Server Service Pack 2 operating system and choose to create a
utility partition.
The
Select RAID Configuration
4
Indicate whether you want to apply the RAID configuration that you
specified while configuring your system hardware in the
Configuration
system and click
The
Configure the Disk Partition for Microsoft Windows 2003 Server
Service Pack 2
5
Select the file system for boot partition, enter the size of the virtual disk
available, and click
The
Network Adapter(s) Configuration
6
Enter the appropriate information about the network adapters on your
system. Click
Enter Configuration Information for Microsoft Windows 2003
The
Server Service Pack 2
module or retain the existing RAID configuration on your
Continue
screen appears.
Continue
Continue
.
screen appears.
screen appears.
Hardware
.
.
screen appears.
7
Fill in the appropriate fields and click
The
Operating System Installation Summary
8
You can change your configuration settings until this point by
clicking
Back
.
Continue
screen appears.
.
You can also save your configuration and export it for later use by clicking
Go Back to Home Page
. In this case, continue the current procedure from
step 9.
To apply the configuration on your system immediately, click
Apply Now
In this case, continue the current procedure from step 11.
NOTE: The Apply Now option is enabled only if you have not selected any
system on the Select System (s) screen.
Using the Systems Build and Update Utility 31
.
Page 32

9
In the
Systems Build and Update Utility Home
click
Apply/Export Configuration
Configure Apply/Export Options
The
Configuration to Current System
option selected, by default. You can
.
screen appears with the
screen that appears,
Apply
export the operating system installation configuration for later use by
10
selecting
Click
The
Export Configuration
Apply/Export
.
Script Generation Progress
.
screen appears indicating that the
configuration is being saved.
11
If you selected the option to install the Dell OpenManage Server
Administrator on the
Windows 2003 Server Service Pack 2
the Server Administrator CD or the Server Administrator
Enter Configuration Information for Microsoft
screen, specify the location of either
.exe
file on
your system.
12
Insert the operating system CD/DVD when prompted.
The Systems Build and Update Utility copies the operating system files to
your system and launches the operating system installer. Your system may
reboot multiple times.
The operating system is installed and is ready to install Server Administrator.
The files to install Server Administrator are saved on the system and the
Install Server Administrator icon is saved on the desktop.
32 Using the Systems Build and Update Utility
Page 33

Deploying Your Current ("Bare-Metal") Dell System
In this scenario, you can see how to update and deploy your current system.
Bare Metal
System
Firmware
Update
Yes Yes Yes
Save
Config
Config to be
applied later
H/W
Config
Save
Config
Config to be
applied later
SOI
Save
Config
Config to be
applied later
NoNoNo
Updates
Reboots
H/W Config
Reboots
Installs OS
Export
Config
No
Apply
Apply
System
System
applies
System
System
Yes
Specify
Path
Multisystem
Config files
applied
Using the Systems Build and Update Utility 33
Page 34

1
Update your system firmware, if required.
For
details on the
Firmware Update
, see "Firmware Update." For details on
how to use the Firmware Update module, see step 1 through step 4 under
"Updating Your System Firmware."
2
Configure your system hardware and make sure you click
Save Settings
before you navigate away from a component screen.
For details on the Hardware Configuration module, see "Hardware
Configuration." For details on how to use the Hardware Configuration
module, see "Configuring Your System Hardware."
NOTE: Ensure that you configure RAID to proceed beyond the Configure RAID
screen in the Configure Server Operating System Installation module.
3
Click
Configure
Update Utility Home
against
or click
Server OS Installation
Server OS Installation
on the
Systems Build and
on the left pane to
proceed with configuring your system operating system installation.
For details on the Server OS Installation, see "Important Information and
Frequently Asked Questions". For details on how to use the Server OS
Installation module, see "Installing the Operating System."
4
When you have completed configuring the three modules, you can view,
edit, or reset the configuration for the modules by clicking the
or
Reset
options, respectively.
View, Edit
,
34 Using the Systems Build and Update Utility
Page 35

5
On the
Configuration
The
6
Provide your inputs as required and click
Systems Build and Update Utility Home,
click
Apply/Export
.
Configure Apply/Export Options
NOTE: You can choose to configure the multi-system configuration file so
that system settings are taken from this file. See Table 3-1 for details on the
multi-system configuration file.
NOTE: You can check the Exit on Failure option so that the Systems Build and
Update Utility exits when a failure occurs. If this option is not selected, in case
of any failure during actual deployment, the Systems Build and Update Utility
proceeds to the next module operation. However, this may cause your system
to become unstable. Clear the Exit on Failure option only if you are sure that
the failure is known and will not adversely affect your system.
NOTE: For more information on the specific fields on the Select Options
screen, see the Dell Systems Build and Update Utility online help.
screen appears.
Continue
.
The progress screen appears, after which the unattended update or
deployment begins.
If you have provided inputs to update your system firmware, the firmware
update begins, using the configuration you saved. If any of the firmware
updates requires a system reboot, your system reboots automatically.
Then, the Systems Build and Update Utility continues with hardware
configuration and operating system installation, as per your configuration.
This completes your current system update and deployment. Your system is
ready with all the required settings, configurations, and updates and the
operating system installed.
Using the Systems Build and Update Utility 35
Page 36

Deploying More Than One System With the Same Configuration
In this scenario, you can see how to deploy more than one supported system
with the same configuration (that is, having the same cards, controllers, hard
drive, memory, and so on), for example, 50 Dell PowerEdge™ R710 systems.
36 Using the Systems Build and Update Utility
Page 37

1
2
On the
against
The
Select
Systems Build and Update Utility Home
System(s) Selection
Select System(s)
NOTE: Ensure that you click Select Systems so that the option to save the
ISO image (Create Auto-deployment Bootable Image) is enabled on the
Select Options screen.
PowerEdge R710
on the left pane.
screen appears.
(for this example) from the Supported Systems
screen, click
Change
list and click the right arrow.
3
Click
Save Settings
screen.
Home
4
To configure the Systems Build and Update Utility modules, follow step 1
and return to the
Systems Build and Update Utility
through step 4 in "Deploying Your Current ("Bare-Metal") Dell System."
5
On the
click
The
6
Select the
Destination
Systems Build and Update Utility Home
Apply/Export Configuration
Configure Apply/Export Options
.
screen appears.
Create Auto-deployment Bootable Image
to specify the location where you want to save the ISO image.
screen,
option and click
You can also export the configuration you saved in the preceding steps to a
location of your choice.
7
On the
save the ISO image and click
ISO Save Location
screen, specify the location where you want to
Continue
.
If you choose USB as the location, you can also make the USB key
bootable. See the online help for details.
8
Configure Apply/Export Options
The
Click
Apply/Export
.
screen appears.
The ISO image is created.
You can create a bootable media (CD/DVD) or use the bootable USB key to
boot the systems that you want to update or deploy.
Using the Systems Build and Update Utility 37
Page 38

Deploying More Than One System With Slightly Different Configurations
In this scenario, you can see how to deploy more than one supported system
with slightly different configurations. For example, you can configure
50 PowerEdge R710 systems but the systems may have different cards,
controllers, hard drives, memory, and so on. However, for the update and
deployment to work as in the preceding scenario, the following conditions
must be met:
• the same type of controller that is configured must be present, whether the
controller is onboard or in the slot. For controllers in slot, the controller
must be on the same slot as configured.
• the configured RAID level must be supported by the existing controller.
Serial Attached SCSI (SAS) 5 and SAS 6 controllers require a minimum of
2 disks.
• the configured RAID policy must be supported by the current controller.
• the number of disks must be the same or more.
• the disk sizes are the same or more.
• the available disks must be of the same type. For example, a mix of SAS,
small computer system interface (SCSI), and Solid State Disk (SSD) will
not be supported.
Once the above criteria are satisfied, you can follow step 1 through step 8 in
"Deploying More Than One System With the Same Configuration" to update
and deploy more than one system with slightly different configurations.
Deploying Multiple Systems of Different Models
In this scenario, you can see how to deploy multiple systems of different
models; for example, you can deploy 25 PowerEdge R710 systems,
50 PowerEdge R610 systems, and 25 PowerEdge T610 systems.
38 Using the Systems Build and Update Utility
Page 39

Important!
•
Ensure that you select multiple systems that you want to deploy on the
Select System(s)
•The
Firmware Update
screen.
module displays all the update packages for the
systems you selected. Depending on the system model, you must select the
components that need to be updated.
•
The
Hardware Configuration
module displays all the configuration options
under different tabs. Ensure that you select all relevant options for all the
systems you selected.
• The list of operating systems displayed in the
Installation (SOI)
module is a subset of supported operating systems that can
Server Operating System
be installed across the selected systems. This implies that if you select
systems that have no supported operating systems in common, the
SOI
module will not display any operating system and you will not be able to
proceed with the deployment process.
To deploy multiple systems of different models, follow step 1 through step 8
in "Deploying More Than One System With the Same Configuration."
Deploying Multiple Systems With the Same Configuration for Different Operating Systems
In this scenario, you can see how to update and deploy multiple systems
with the same configuration for different operating systems. For example,
you have 100 PowerEdge R710 systems and you want to deploy 25 systems
with the Microsoft
with the Red Hat
with the Windows Server
®
Windows Server® 2003 operating system, 50 systems
®
Enterprise Linux® 5.3 operating system, and 25 systems
®
2008 operating system.
Using the Systems Build and Update Utility 39
Page 40

Select
Systems
Yes
Firmware
Save
Yes
Save
Yes
Save
No
Generate
If Configuring
in Current
Session
Go to
SBUU
Home
RHEL 5.3)
Update
H/W
Config
SOI
Set to
W2K3
Export
ISO 1
Edit SOI
(Set to
No
No
No
Yes
Export
Generate
ISO 2
SBUU
Home
SBUU
Home
Required if
Reconfiguring in
Future
Configuring in
Current
Session
Go to
SBUU
Home
Import
Import
Edit SOI
(Set to
RHEL 5.3)
Edit SOI
(Set to
W2K8)
Edit SOI
(Set to
W2K8)
Generate
ISO
Generate
ISO
Generate
ISO 3
40 Using the Systems Build and Update Utility
Page 41

1
Follow step 1 through step 8 in "Deploying More Than One System With
Slightly Different Configurations" to create a bootable image to deploy an
operating system, for example, Windows Server 2003 operating system.
On the
On the
Server 2003.
If you also choose to export the configuration, you can import this
configuration later (in another session) by clicking
Configuration
2
On the
select another operating system, for example,
Linux 5.3, export the configuration for this operating system,
and generate an ISO image.
3
Similarly, configure and generate an ISO image for a third operating
system, for example, Windows Server 2008.
You now have three ISO images for the three operating systems you want
to install on multiple systems.
4
Create three different bootable media for the three ISO images,
respectively.
5
Boot the corresponding number of systems with the corresponding
bootable media to install the required operating systems.
Systems Build and Update Utility Home
Select an Operating System to Install
on the
Systems Build and Update Utility Home
Systems Build and Update Utility Home
screen, select Windows
Red Hat Enterprise
screen, click
Import Saved
screen, click
SOI
screen.
SOI
.
and
Reusing Configuration Files
In this scenario, you can import and reuse a configuration file that you
created and exported in an earlier session. You can use this configuration file
and create multiple ISO images with slightly different configuration.
This configuration can be for the current system or for multiple systems.
However, you need to create separate ISO images for every variation of the
multiple systems deployment. For the current system, you can directly apply
the configuration you imported, with slight modifications, if required.
Using the Systems Build and Update Utility 41
Page 42
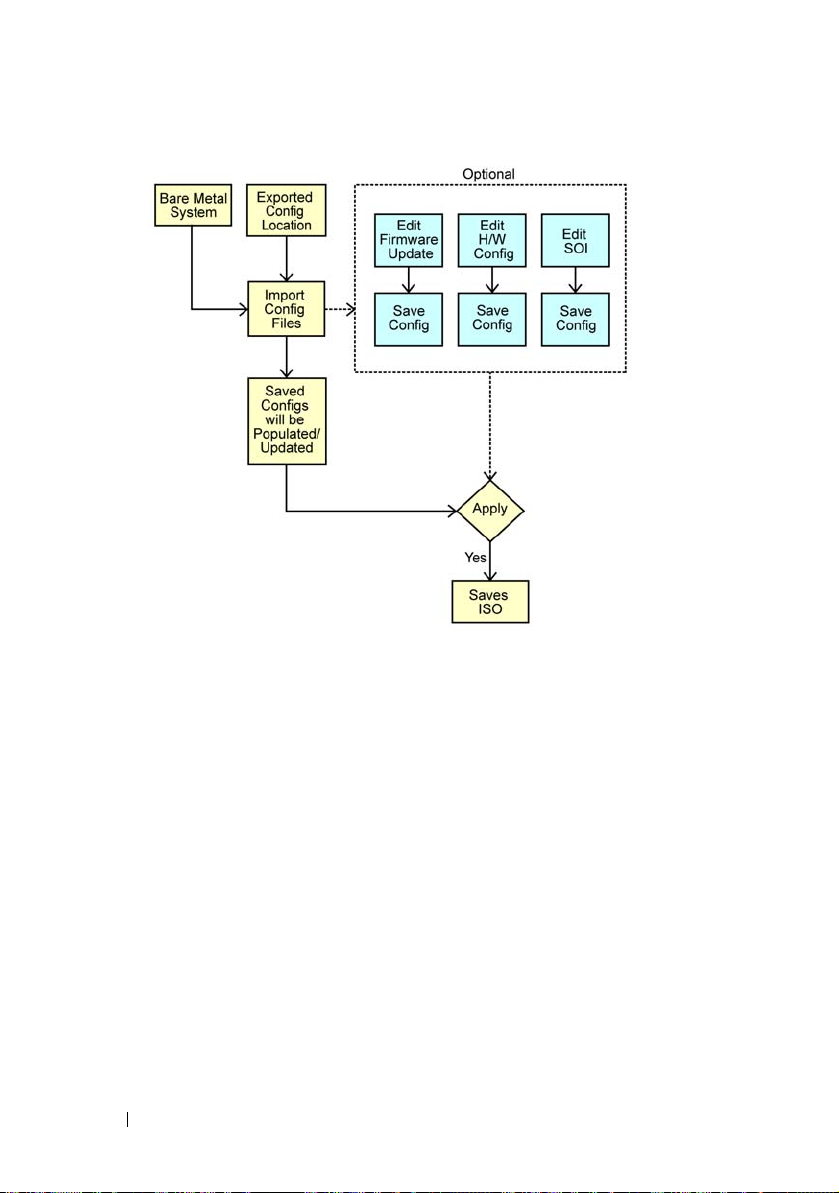
Important!
• When you import the configuration file, all the GUI fields are populated.
• You can edit the Firmware Update Configuration, Hardware Configuration,
and Configure SOI modules, as required. However, ensure that you do not
make any changes on the System(s) Selection screen; if you do so, all existing
configuration for the three modules will be reset.
1
On the
Saved Configuration
The
2
Specify the location from where you want to import the configuration file
and click
The progress screen appears, followed by the
Details
Systems Build and Update Utility Home
.
Import Configuration
Continue
.
screen appears.
screen.
screen, click
Import
Imported Configuration File
42 Using the Systems Build and Update Utility
Page 43

3
Click
Systems Build and Update Utility Home
4
Edit the existing configuration for the
, and
SOI
Configuration
5
Create the ISO image for this configuration by following step 4 through
modules, if required.
Firmware Update, Hardware
.
step 8 in "Deploying More Than One System With the Same
Configuration."
Using the Systems Build and Update Utility 43
Page 44

44 Using the Systems Build and Update Utility
Page 45

Important Information and Frequently Asked Questions
This chapter contains important information about the different modules in
the Systems Build and Update Utility, including answers to some frequently
asked questions.
Firmware Update
Important Information
The Firmware Update module in the Systems Build and Update Utility
enables you to update the BIOS and firmware versions of your Dell systems in
a pre-operating system environment. This module:
• inventories your system (BIOS, firmware, and drivers)
• enables you to select your own repository
• generates a comparison report (comparison of the currently installed
version of each component on the existing system with the repository
component version for the same system.)
• enables you to upgrade the system components
Frequently Asked Questions
Q: What is the repository?
A: The repository contains the updated BIOS, firmware, and driver
components for Dell systems.
The repository includes the Dell Server Updates DVD contents.
Q: What should I do if I face any prerequisite failure during the update process?
A: If you face any prerequisite failure during the update process, see the
Server Update Utility User's Guide on how to rectify this.
Q: I want to use my custom repository for firmware updates using the
Systems Build and Update Utility.
Important Information and Frequently Asked Questions 45
Page 46

A: If you want to use your custom repository for firmware updates using the
Systems Build and Update Utility, you will need a Linux repository. Also, you
must ensure that the repository contains updates for the system on which you
want to run firmware updates.
Q: What should I do if I want to downgrade the firmware?
A: If you want to downgrade the firmware, you will not be able to do it using
the Firmware Update module. Use the Dell Server Updates DVD to
downgrade the firmware on your system.
Q: What should I do if some of the updates fail?
A: If some of the updates fail, reboot your system and try using the latest
repository to update the firmware. Also, see the Server Update Utility User's
Guide for more information.
Q: I want to use a USB key as my source repository.
A: If you are using a USB key as your source repository, insert the USB key
when you are prompted.
NOTE: It is recommended that you do not boot your system to the Systems
Build and Update Utility with the USB key inserted in your system. This is
because the Systems Build and Update Utility may not detect a USB key that
is inserted before you boot the system.
Hardware Configuration
Important Information
The Hardware Configuration module in the Systems Build and Update
Utility enables you to configure your system’s Baseboard Management
Controller (BMC), Dell Remote Access Controller (DRAC), Redundant
Array of Independent Disks (RAID), and BIOS.
Once you save the configuration settings for your system’s BMC, DRAC,
RAID, and BIOS, you can use the tool to generate the .ini file, and apply
these configuration settings across multiple systems.
Frequently Asked Questions
Q: How do I access the command line interface?
A: To access the command line interface, from the boot menu, select DTK
Command Line Interface (Linux).
46 Important Information and Frequently Asked Questions
Page 47

Q: How do I know which components to configure?
A: Table 6-1 lists the components you can configure depending on your
Dell system.
NOTE: This list is not exhaustive and is only meant for quick reference.
Table 6-1. Dell Systems and Configurable Components
For Dell Systems Click the Tabs To Configure
xx1x
•RAID
•
BMC/DRAC 5/iDRAC6 → Common
•
BMC/DRAC 5/iDRAC6 → iDRAC6
•
BMC/DRAC 5/iDRAC6→ Alert
•
BMC/DRAC 5/iDRAC6 → Filter
•
BMC/DRAC 5/iDRAC6 → User
•
BIOS → Common
•
BIOS → xx1x
•
BIOS → Boot Sequence and Security
Q: Where do I get more information on RAID controllers?
A: For details on read, write, and cache policies and supported stripe sizes,
see the
Dell OpenManage Deployment Toolkit Command Line Interface Reference
Guide.
Q: How do I know which BIOS setup options are available on my system?
A: To see which BIOS setup options are available on your system, go to
the boot menu screen and select DTK Command Line Interface (Linux).
Use the SYSCFG tool to see the list of options available on your system.
Important Information and Frequently Asked Questions 47
Page 48

Q: When setting the boot sequence for devices, what happens if I choose a
device that is not on my system?
A: The configuration utility selects the boot devices in the sequence that you
specify for boot order. However, if you choose a device that is not present on
your system, the utility ignores the device, selects the remaining boot devices,
and lists them based on the specified order.
Q: What happens if I create a virtual disk by specifying the size?
A: If you create a virtual disk by specifying the size (instead of using the
Maximum possible size option), subsequent virtual disks that you create will
be bound to the controller and the array disk that you selected. This
condition is valid until you exhaust all the available space on that array disk.
Q: What happens if I want to delete a virtual disk that is one of the virtual
disks that was created using a particular array disk?
A: When you select a virtual disk to delete, and that virtual disk is just one of
the virtual disks that was created using a particular array disk, all the virtual
disks created on that array disk will be selected for deletion.
Q: What should I do if I am not able to configure RAID using the Systems
Build and Update Utility?
A: Ensure that the Fast Initialization parameter of the RAID controller is set
to ON and try again. This setting is the factory default for all RAID
controllers.
Q: Using the Systems Build and Update Utility, can I configure RAID on a
system with a SATA 2s controller connected to a hard drive?
A: The Systems Build and Update Utility does not support RAID
configuration on any system with a SATA 2s controller connected to a hard
drive. To configure RAID on such a system, use the Ctrl+A option or set the
hard drive configuration to Native mode through BIOS.
Q: I have multiple SCSI and RAID controllers on my system. How can I set
the order in which the Systems Build and Update Utility looks for controllers?
A: The Systems Build and Update Utility uses the controller listed first in the
BIOS boot order list. If you want to use another controller for the operating
system, go to the BIOS setup (by pressing F2 as the system starts) and set the
controller as the first boot device.
48 Important Information and Frequently Asked Questions
Page 49

Q: What should I do if I find that one or more virtual disks are in a failed or
degraded state?
A: If any virtual disk is in a failed or degraded state, do not start the server
setup program. Use the RAID controller's firmware utility (by using Ctrl+A,
Ctrl+M, or Ctrl+C while booting) to reset the RAID controller's state.
Q: How can I configure RAID for disks that appear in Legacy mode?
A: On CERC ATA or CERC SATA RAID controller cards, disks that appear
in Legacy mode will not be available for RAID configuration in the Systems
Build and Update Utility. If you want to use Legacy mode disks as part of a
RAID container, use the RAID controller firmware utility to initialize the
disks. However, if all disks are in Legacy mode, the Systems Build and Update
Utility may fail to configure RAID on the controller.
Q: Why does the Systems Build and Update Utility fail during RAID
configuration?
A: On systems with less than 256 MB of memory and more than one RAID
controller, the Systems Build and Update Utility may fail during RAID
configuration. Install the operating system on one adapter and then install
additional adapters.
Q: On SAS 5/IR and 6/IR controller cards, disks that appear in Foreign state
are not available for operating system installation in non-RAID mode.
How can I use such disks for operating system installation?
A: On SAS 5/IR and 6/IR controller cards, if you want to use any disk that is in
Foreign state for operating system installation, clear the physical disks by
using the Erase All Physical Disks option in the System Tools section. If all
disks are in Foreign state, the Systems Build and Update Utility may fail to
install the operating system on the controller in non-RAID mode.
Q: Does the Systems Build and Update Utility support RAID configuration
on systems with SAS 5/IR controller cards?
A: On systems with SAS 5/IR controller cards connected to more than
two disks, the Systems Build and Update Utility supports only advanced
RAID configuration. In Advanced mode, you must select a disk with the
lowest drive ID for RAID configuration.
Important Information and Frequently Asked Questions 49
Page 50

Q: Why does the Novell® SUSE Linux Enterprise Server (SLES) version 10
operating system installation sometimes fail on systems equipped with
multiple RAID and SCSI controllers?
A: When two or more RAID or SCSI controllers are present, install Novell
SLES I0 with only one configured RAID or SCSI controller. Configure the
other controllers after you install the Novell 10 operating system.
Server Operating System Installation
Important Information
The Server Operating System Installation (SOI) module in the Systems
Build and Update Utility enables you to install Dell-supported operating
systems on your Dell
to install to your
interface to configure Dell-supported storage controllers.
You can use SOI to:
• deploy an operating system on your "bare-metal" Dell system (that is,
when your system does not have an operating system installed on it).
• "repurpose" your system (that is, your system already has an operating
system installed on it, and you want to install a different operating system).
• extract drivers and save them on a directory on your system.
systems
system and installs the requisite drivers. It also has a simple
. SOI also maps the operating system you want
Frequently Asked Questions
Q: What happens if I install a new operating system on my system that
already has an operating system?
A: If you already have an operating system on your system (that is, if you are
"repurposing" your system), and you use the SOI to install a different
operating system, the existing operating system is removed and data is
deleted from your system.
Q: Can I install Microsoft
Server™ operating systems?
A: Yes, you can. However, for operating systems such as Windows Server 2008
and VMware ESX Server, the native Graphical User Installation tool provided
by the operating system installation media is used.
50 Important Information and Frequently Asked Questions
®
Windows Server® 2008 and VMware® ESX
Page 51

Q: What happens if I disconnect the network connection while I am copying
the operating system image from a Server Message Block (SMB) share?
A: If you disconnect the network connection while the operating system
image is copying, an error message appears indicating that the network is
being disconnected. A Reboot button is also enabled. However, the operating
system installation process does not resume after you reconnect the network
cable. You need to reboot your system.
Q: What happens if I use the SOI to configure
Redundant Array of
Independent Disks (RAID) controllers on my system that has virtual disks
configured on the controller?
A: If you have virtual disks configured on your controller and you use the
SOI to configure RAID controllers on your system, the existing virtual disks
are deleted.
Q: Where will I get information about support for operating systems and
RAID controllers?
A: Some operating systems are not supported with some RAID controllers.
See the readme.text file in the root folder for details.
Q: Where will I get information on support for storage controllers and
operating systems?
A: Depending on the storage controllers on your system, some operating
systems may not be supported. See readme.txt in the root folder of the
Dell Systems Management Tools and Documentation DVD or the online help
for details.
Important Information and Frequently Asked Questions 51
Page 52

52 Important Information and Frequently Asked Questions
Page 53

Glossary
BIOS
Acronym for basic input/output system. Your system's BIOS contains programs
stored on a flash memory chip. The BIOS controls the following:
• Communications between the microprocessor and peripheral devices, such as
the keyboard and the video adapter
• Miscellaneous functions, such as system messages
BMC
Abbreviation for baseboard management controller, which is the controller
interface between the DRAC and the managed system’s embedded systems
management (ESM).
DRAC
The Dell™ Remote Access Controller (DRAC) is a systems management tool
that enables users to remotely access, monitor, troubleshoot, repair, and upgrade
their systems, independent of the operating system status.
DTK
The Dell OpenManage Deployment Toolkit (DTK) is a set of utilities for
configuring and deploying Dell PowerEdge™ systems. The DTK is designed for
customers who need to build scripted installations to deploy large numbers of
systems in a reliable fashion without having to dramatically change their current
deployment processes.
ESM
Abbreviation for embedded systems management. A set of instruction coding in
system software and firmware that notifies a user about potential hardware
problems on a system.
Inventory
Inventory is a list of components, such as the BIOS versions, firmware, and drivers
installed on your system.
NIC
Abbreviation for the network interface card. The NIC is an adapter circuit board
installed in a computer to provide a physical connection to a network.
Glossary 53
Page 54

USB
Abbreviation for Universal Serial Bus. A USB connector provides a single
connection point for multiple USB-compliant devices, such as mice, keyboards,
printers, and computer speakers. USB devices can also be connected and
disconnected while the system is running.
utility partition
A bootable partition on the hard drive that provides utilities and diagnostics for
your hardware and software. When activated, the partition boots and provides an
executable environment for the partition's utilities.
Windows Preinstallation Environment (Windows PE)
The Microsoft® Windows® Preinstallation Environment (Windows PE) is a
minimal Win32 subsystem with limited services, based on the Windows kernel
running in a protected mode. It contains the minimal functionality that you need
to run Windows Setup, install an operating system from a network share,
automate basic processes, and perform hardware validation.
54 Glossary
Page 55

Index
B
Boot Menu
accessing, 21
options, 23
C
Configuring System Hardware
current system, 28
multiple systems, 29
D
Deploying Current System, 33
Deploying More Than One
System With Same
Configuration, 36
Deploying More Than One
System With Slightly
Different Configuration, 38
Deploying Multiple Systems of
Different Models, 38
Deploying Multiple Systems
With The Same
Configuration For Different
Operating Systems, 39
F
Firmware Update
FAQ s, 4 5
Functionalities in brief, 12
H
Hardware Configuration
FAQ s, 4 6
what BIOS options on your
system?, 47
which components to configure
for which Dell system, 47
I
Installing Operating System, 30
M
Multi-system Configuration
File, 16
Index 55
Page 56

P
Prerequisites
Firmware Update, 17
Generic, 16
Hardware Configuration, 17
Server Operating System
Installation, 17
Product overview
functionalities, 12
R
Reusing Configuration Files, 41
S
Server Operating System
Installation (SOI)
FAQ s, 5 0
uses, 50
Systems Build and Update
Utility
flexibility, advantages, 25
functionalities overview, 12
key features, 11
usage in different scenarios, 26
what is, 11
U
Updating Your System
Firmware, 27
56 Index
 Loading...