

Page 1

Dell SupportAssist
Version 1.1 User's Guide
Page 2

Notes, Cautions, and Warnings
NOTE: A NOTE indicates important information that helps you make better use of your computer.
CAUTION: A CAUTION indicates either potential damage to hardware or loss of data and tells you how to avoid the
problem.
WARNING: A WARNING indicates a potential for property damage, personal injury, or death.
© 2012 Dell Inc.
Trademarks used in this text: Dell™, the Dell logo, Dell Boomi™, Dell Precision™ , OptiPlex™, Latitude™, PowerEdge™, PowerVault™,
PowerConnect™, OpenManage™, EqualLogic™, Compellent™, KACE™, FlexAddress™, Force10™ and Vostro™ are trademarks of Dell
Inc. Intel®, Pentium®, Xeon®, Core® and Celeron® are registered trademarks of Intel Corporation in the U.S. and other countries. AMD
is a registered trademark and AMD Opteron™, AMD Phenom™ and AMD Sempron™ are trademarks of Advanced Micro Devices, Inc.
Microsoft®, Windows®, Windows Server®, Internet Explorer®, MS-DOS®, Windows Vista® and Active Directory® are either trademarks
or registered trademarks of Microsoft Corporation in the United States and/or other countries. Red Hat® and Red Hat
Enterprise Linux® are registered trademarks of Red Hat, Inc. in the United States and/or other countries. Novell® and SUSE® are
registered trademarks of Novell Inc. in the United States and other countries. Oracle® is a registered trademark of Oracle Corporation
and/or its affiliates. Citrix®, Xen®, XenServer® and XenMotion® are either registered trademarks or trademarks of Citrix Systems, Inc. in
the United States and/or other countries. VMware
trademarks of VMware, Inc. in the United States or other countries.
Corporation.
2012 - 10
®
,
Virtual SMP
®
®
,
vMotion
®
is a registered trademark of International Business Machines
IBM
,
vCenter
®
and
vSphere
®
are registered trademarks or
®
®
Rev. A00
Page 3

Contents
Notes, Cautions, and Warnings...................................................................................................2
1 Overview.......................................................................................................................................5
Key Features.............................................................................................................................................................5
Features Supported With Dell Service Contracts.....................................................................................................5
Case Data Handling..................................................................................................................................................6
Event Handling..........................................................................................................................................................6
Data Collected .........................................................................................................................................................6
What's New In This Release....................................................................................................................................7
Other Documents You May Need.............................................................................................................................7
Contacting Dell.........................................................................................................................................................7
2 Installing, Upgrading, And Uninstalling Dell SupportAssist.................................................9
Prerequisites.............................................................................................................................................................9
Minimum Requirements............................................................................................................................................9
Software.............................................................................................................................................................9
Hardware..........................................................................................................................................................10
Network............................................................................................................................................................10
Downloading The Installation Package..................................................................................................................10
Installing Dell SupportAssist...................................................................................................................................10
Installing Dell SupportAssist Using The Dell SupportAssist Installation Package..........................................11
Installing Dell SupportAssist Using The OpenManage Essentials Installation Package.................................13
Verifying The Installation........................................................................................................................................14
Upgrading Dell SupportAssist.................................................................................................................................14
Uninstalling Dell SupportAssist..............................................................................................................................15
3 Using Dell SupportAssist.........................................................................................................17
Launching Dell SupportAssist.................................................................................................................................17
Case List Report......................................................................................................................................................17
Viewing The Case List Report..........................................................................................................................18
Customizing The Case List Display Data..........................................................................................................19
Device Inventory Report.........................................................................................................................................20
Viewing The Device Inventory Report..............................................................................................................20
Customizing The Device Inventory Display Data.............................................................................................20
Refreshing The Case List Or Device Inventory Display Data..................................................................................21
Configuring E-Mail Notification Preferences.........................................................................................................22
Configuring Proxy Server Settings..........................................................................................................................22
Page 4

Confirming Connectivity Through The Proxy Server...............................................................................................23
Confirming E-Mail Connectivity..............................................................................................................................23
Viewing Troubleshooting Features.........................................................................................................................24
Configuring Troubleshooting Credentials...............................................................................................................24
Enabling Report Filtering.........................................................................................................................................25
Setting Dell SupportAssist To Maintenance Mode................................................................................................26
Using The Update Available Link............................................................................................................................26
Identifying The User Name.....................................................................................................................................27
Viewing And Updating The Profile Information......................................................................................................27
Accessing And Viewing The Logs..........................................................................................................................27
Accessing And Viewing The Troubleshooting Data...............................................................................................28
Viewing Dell SupportAssist Product Information...................................................................................................28
Viewing Support Information..................................................................................................................................28
4 Troubleshooting.........................................................................................................................31
Installing Dell SupportAssist...................................................................................................................................31
Launching Dell SupportAssist.................................................................................................................................31
Service Tag Warnings............................................................................................................................................32
Finding The Service Tag Locally......................................................................................................................32
Finding The Service Tag Remotely...................................................................................................................32
Service Contract.....................................................................................................................................................32
Service Contract Warning................................................................................................................................32
Service Contract Type Is Unknown..................................................................................................................33
Services..................................................................................................................................................................33
Security...................................................................................................................................................................34
Page 5

1
Overview
Dell SupportAssist collects information about your computer hardware and software, and automatically creates support
cases when issues arise. This helps Dell to provide you an enhanced, personalized, and efficient support experience.
Dell uses this data to help solve common problems and design and market the products and services features you use
most.
SupportAssist integrates with Dell OpenManage Essentials to provide support capabilities for the following Dell
enterprise server and storage solutions, using the existing environment data:
• Dell PowerEdge servers running:
– Microsoft Windows 2008 Standard, Enterprise, or R2
– Red Hat Enterprise Linux 5.5
– SUSE Enterprise Linux 10 or 11
– VMware ESX or ESXi 3.5, 4.x, or 5.0
• Dell PowerVault MD storage arrays
• Dell PowerConnect Ethernet switches
NOTE: SupportAssist does not support CloudEdge or PowerEdge-C servers.
SupportAssist also provides rich device, support case, and service contract reporting.
You can access information about the OpenManage Essentials-managed Dell devices and related support cases from
the Device Inventory and Case List reports in the SupportAssist dashboard.
Equipping your OpenManage Essentials server with SupportAssist is voluntary, and results in improved support,
products, and services designed to meet your needs.
Key Features
The key features of Dell SupportAssist include:
• Remote monitoring — Monitors your hardware to inform you of critical alerts.
• Automated log and configuration collection — Information required for troubleshooting the issue is
automatically collected and sent to Dell.
• Automatic support case creation — When a critical alert is received from your hardware by OpenManage
Essentials, the alert information is sent to Dell and a service request is automatically created. A Dell technical
support agent contacts you about the alert and helps you resolve the issue.
NOTE: Support cases opened prior to SupportAssist installation, do not appear in the SupportAssist
dashboard.
• Proactive parts dispatch — Based on examination of the troubleshooting data, if the Dell technical support
agent determines that a part needs to be replaced in your environment, a replacement part is dispatched to you
with your consent.
Features Supported With Dell Service Contracts
The features supported on your environment may vary based on your Dell service contract.
5
Page 6
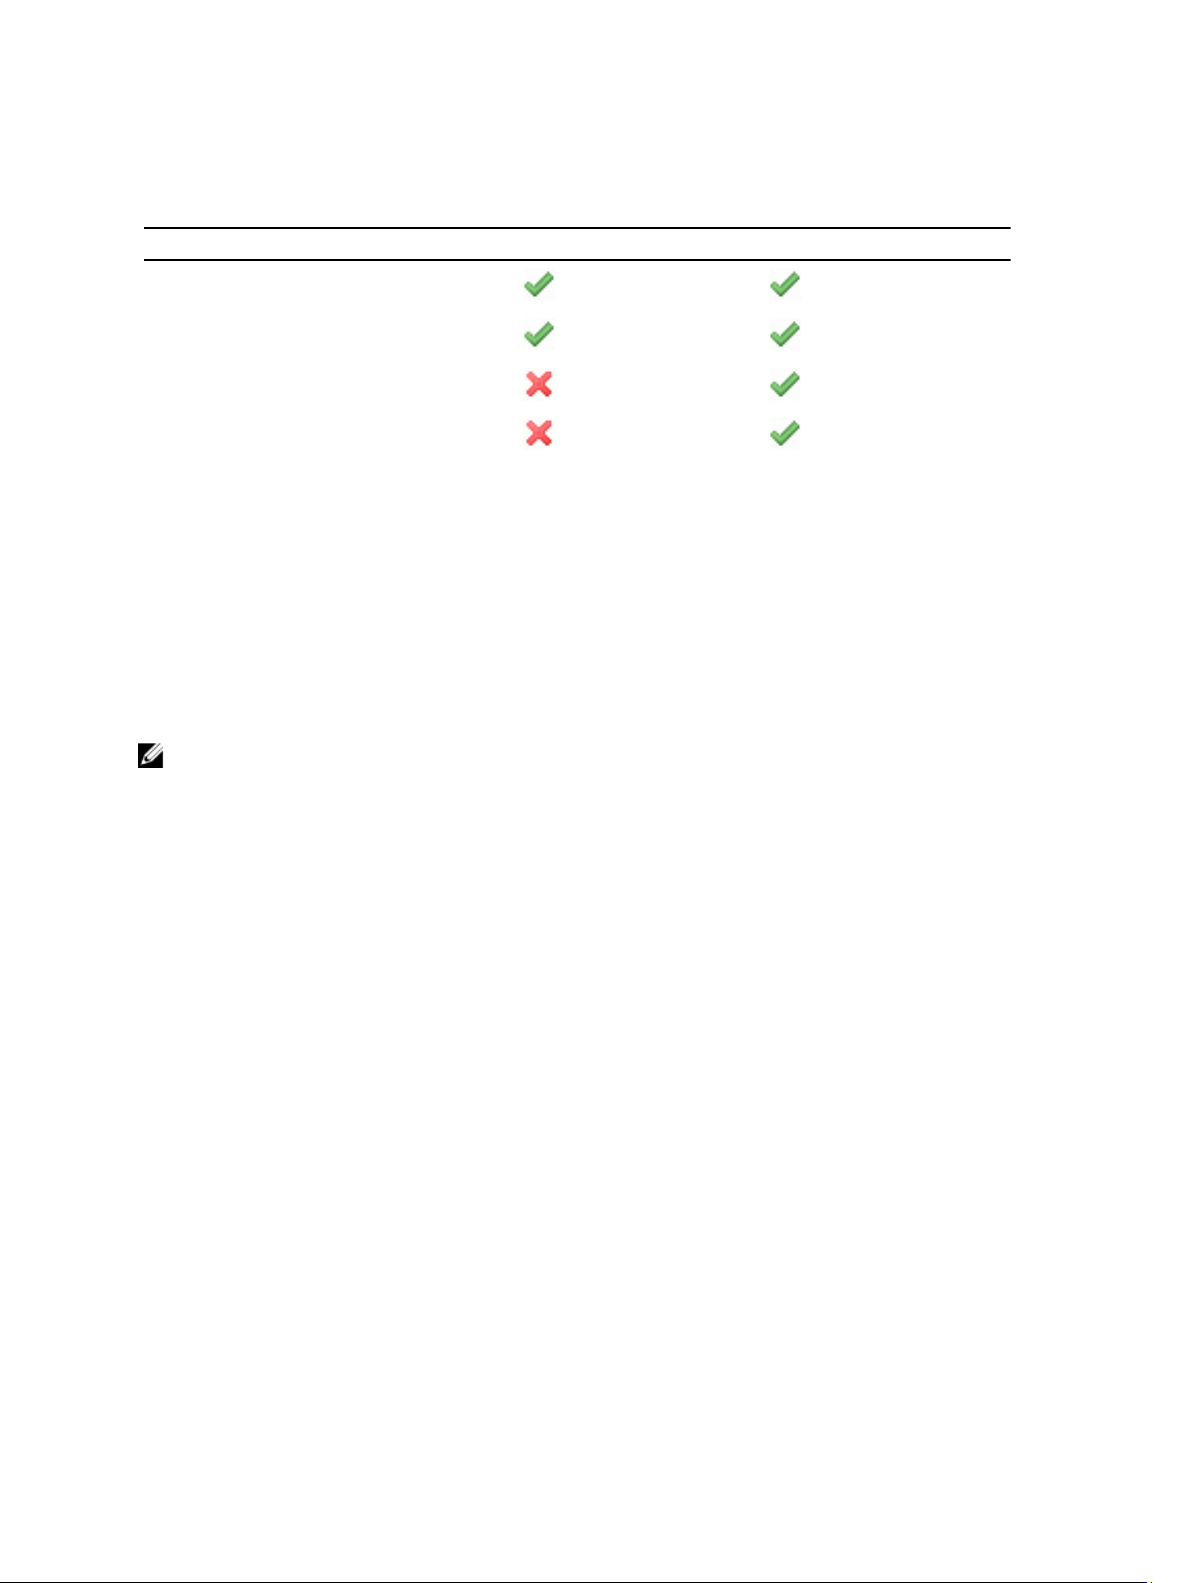
The following table provides a comparison of the features available with the Dell Basic Hardware and Dell ProSupport
service contracts.
Table 1. Feature Comparison
Feature Basic Hardware ProSupport
Remote monitoring
Automated log and configuration collection
Automatic support case creation
Proactive parts dispatch
Case Data Handling
For increased performance, Dell SupportAssist case data is cached prior to display in the dashboard, and is not
displayed in real time. When SupportAssist launched, it:
• Queries Dell once every three minutes for cases in the Submitted state to determine if it needs to update the
case status.
• Determines the last time the case data was updated for a submitted case. It then queries those cases whose
cached status information has expired in the last three minutes.
• Queries Dell once every 15 minutes for cases in all status other than Submitted.
NOTE: If the data for a particular case is older than 15 minutes by the next poll time, SupportAssist queries for that
data in the current poll. Therefore, SupportAssist may only poll for cases that are in the Open state for case data
every 12 minutes.
Event Handling
Dell SupportAssist intelligently handles event storm conditions, allowing up to nine separate alerts from your
OpenManage Essentials-managed environment in a 60-minute time span. However, if it receives 10 or more separate
alerts it automatically enters Maintenance Mode.
Maintenance Mode suspends any further processing of alerts, enabling you to make infrastructure changes without
generating unnecessary alerts. After 30 minutes in Maintenance Mode, SupportAssist automatically exits Maintenance
Mode and resumes normal alert processing.
Data Collected
Dell SupportAssist continually monitors the system configuration data and usage information of your OpenManage
Essentials-managed Dell computer hardware and software. While Dell does not anticipate accessing or collecting
personal information, such as your personal files, web browsing history, or cookies, in connection with this program, any
personal data inadvertently collected or viewed will be treated in accordance with the Dell Privacy Policy.
The information encrypted in the data log file sent back to Dell includes the following categories of data, among others:
• User Information — Computer name, domain, IP address, and Dell Service Tag.
• Hardware Configuration — Installed devices, processor(s), memory, network devices, and usage.
• Software Configuration — Operating system, installed applications, and application usage.
6
Page 7

For more information about the collected troubleshooting information, see Accessing And Viewing The Troubleshooting
Data.
What's New In This Release
• Proxy server support — Enables you to configure your proxy server settings in Dell SupportAssist. See
Configuring Proxy Server Settings.
• Role-based security — Restricts access to configure SupportAssist and test e-mail connectivity. Only members
of the OpenManageEssentials Administrator or Power Users group can configure SupportAssist and test e-mail
connectivity.
• Link and launch — Launch SupportAssist from the Extensions tab of the OpenManage Essentials graphical user
interface (GUI). See Launching Dell SupportAssist.
• Report filtering — Enables you to configure SupportAssist to prevent personally identifiable information (PII)
from being sent to Dell. See Enabling Report Filtering.
• E-mail notification for Basic Hardware service contract — Notifies potential hardware issues reported by
devices covered under Basic Hardware service contract through e-mail.
• User name notification — Displays the user name of the current user at the top-right of the dashboard in the
Signed in as field.
• Update available notification — Indicates if an updated version of SupportAssist is available. See Using The
Update Available Link.
• Support for Integrated Dell Remote Access Controller (iDRAC7) and Dell PowerConnect Ethernet switches —
Monitors alerts from iDRAC7 and PowerConnect Ethernet switches.
Other Documents You May Need
In addition to this guide, you can access the following guides available at support.dell.com/manuals. On the Manuals
page, click Software and then click Systems Management or Serviceability Tools. Click the appropriate product link on
the right-side to access the documents.
• The
Dell OpenManage Essentials User’s Guide
OpenManage Essentials.
• The
Dell SupportAssist Version 1.1 Verifying the Installation
components and configurations that you can verify to ensure that SupportAssist works as expected.
• The
Dell SupportAssist Readme
• The
Dell System E-Support Tool User’s Guide
Support Tool (DSET) to generate reports.
• The
Dell Lasso User's Guide
methods to generate reports.
• The
Glossary
provides information about the terms used in this document.
provides the known issues and resolutions for SupportAssist.
provides an overview of the Lasso tool, the installation details, and the various
provides information about installing, configuring, and using
document provides information about the
provides details about installing and using the Dell System E-
Contacting Dell
NOTE: If you do not have an active Internet connection, you can find contact information on your purchase invoice,
packing slip, bill, or Dell product catalog.
Dell provides several online and telephone-based support and service options. Availability varies by country and
product, and some services may not be available in your area. To contact Dell for sales, technical support, or customer
service issues:
1. Visit support.dell.com.
2. Select your support category.
7
Page 8

3. If you are not a U.S. customer, select your country code at the bottom of the support.dell.com page, or select All to
see more choices.
4. Select the appropriate service or support link based on your need.
8
Page 9

Installing, Upgrading, And Uninstalling Dell SupportAssist
This chapter provides information about installing, upgrading, and uninstalling Dell SupportAssist.
Prerequisites
The following are the prerequisites:
• Dell PowerEdge servers running Dell OpenManage Essentials version 1.0.1 or higher
• Familiarity with OpenManage Essentials installation, configuration, and operation
2
For more information about installing, configuring, and using OpenManage Essentials, see the latest
Essentials User’s Guide
CAUTION: Dell does not support, and strongly suggests that you do not attempt, installing or operating Dell
SupportAssist and OpenManage Essentials on the same server that runs Dell Proactive Systems Management
Enterprise (PSME). Doing so may cause duplicate cases or other unintended results. In addition, the OpenManage
Essentials and PSME trap receivers are incompatible, which can cause SNMP traps issues.
and
Dell OpenManage Essentials Release Notes
at support.dell.com/manuals.
Dell OpenManage
Minimum Requirements
This section provides the minimum requirements for Dell SupportAssist to provide proactive support for Dell PowerEdge
(9th Generation and above), PowerVault MD arrays and storage solutions, iDRAC7, and Dell PowerConnect Ethernet
switches.
NOTE: For information about the SNMP configuration, firewall settings, web services, supported ports and
protocols specific to your environment, see the
and
Dell OpenManage Essentials User’s Guide
Software
The following are the minimum required software configurations:
• Dell OpenManage Essentials 1.0.1 or later.
• Optional: Dell OpenManage Server Administrator (OMSA) installed and operational on all managed PowerEdge
devices.
• SNMP agent enabled on all managed PowerEdge, PowerVault, iDRAC7, and PowerConnect devices for
OpenManage Essentials discovery.
• All managed PowerEdge, PowerVault, iDRAC7, and PowerConnect devices configured to send SNMP traps to
the OpenManage Essentials server.
• All managed PowerEdge, PowerVault, iDRAC7, and PowerConnect devices discovered, categorized, and
inventoried by the OpenManage Essentials server.
• PowerVault Modular Disk Storage Manager (MDSM) installed on the OpenManage Essentials server, in order to
support PowerVault MD Series arrays.
• A trust relationship must exist between the domains of the management station and the managed nodes.
Dell SupportAssist Version 1.1 Verifying the Installation
at support.dell.com/manuals.
document
9
Page 10

• Microsoft .Net Framework 4.0
• Microsoft ASP.Net
• IIS 7.x
• Web browser – Internet Explorer 8, 9, or 10 (32–bit) and Mozilla Firefox 11 or 12 (32–bit); supported only on
Windows-based operating systems.
.
Hardware
The following are the minimum recommended hardware configurations:
Table 2. Minimum Hardware Configurations
Hardware Medium Deployments Large Deployments
Number of managed systems Up to 500 500 to 2000
Processor 6 cores (1.8 GHz minimum) 10 cores (1.8 GHz minimum)
Memory 8 GB 10 GB
Hard drive 6 GB 10 GB
Network
The following are the minimum network requirements:
• Internet connection – standard Gbe network.
• Port 443 must be open on the OpenManage Essentials management server.
• The OpenManage Essentials management server on which the Dell SupportAssist client is installed must be
able to communicate with the Dell SupportAssist server hosted by Dell over the HTTPS protocol.
Downloading The Installation Package
You can install Dell SupportAssist using one of the following:
• Dell SupportAssist installation package
• Dell OpenManage Essentials (version 1.1 or later) installation package
To download the installation package you want to use:
1. Visit support.dell.com and locate the SupportAssist installation package or the OpenManage Essentials installation
package.
2. Download the appropriate installation package to your OpenManage Essentials management server.
Installing Dell SupportAssist
By installing Dell SupportAssist, you agree to the Dell End User License Agreement, available for review at dell.com/
softwarelicenseagreement; and the Dell Privacy Policy available for review at dell.com/privacy. Your use of
SupportAssist is also subject to the terms of your Service Agreement and Terms and Conditions of Sale.
You can install SupportAssist using one of the following:
10
Page 11

• Dell SupportAssist installation package. See Installing Dell SupportAssist Using The Dell SupportAssist
Installation Package.
• OpenManage Essentials installation package. See Installing Dell SupportAssist Using The Dell OpenManage
Essentials Installation Package.
Installing Dell SupportAssist Using The Dell SupportAssist Installation Package
To install:
1. On the Dell OpenManage Essentials management server, right-click the SupportAssist installer package, then
Run as administrator.
select
NOTE: Microsoft User Access Control (UAC) requires that the installation be performed with elevated
privileges that are obtained only through the Run as administrator option. If you are logged on to the
OpenManage Essentials server as an administrator-level user, you can double-click the installer package to
install SupportAssist, but UAC displays the Open File - Security Warning dialog box that you must
acknowledge to proceed.
NOTE: SupportAssist installation requires that you allow Dell to save certain Personally Identifiable
Information (PII) such as your contact information, local administrator credentials, and so on. SupportAssist
installation cannot proceed unless you allow Dell to save your PII.
The Dell SupportAssist - InstallShield Wizard (installation language selection) dialog box is displayed.
2. From the Select the language for the installation from the choices below list, select a language and click OK.
NOTE: If you want to change the installation language after installing SupportAssist, you must uninstall and
then reinstall SupportAssist. Changing the web browser’s default language has no effect on the SupportAssist
dashboard display.
The Preparing to Install dialog box is briefly displayed and then the Welcome to Dell SupportAssist dialog box is
displayed.
3. Read the terms, and then click I Agree.
The License Agreement dialog box is displayed.
4. Read the software license agreement, select I accept the terms in the license agreement, and then click Next.
The Registration dialog box is displayed.
5. Provide the following information:
– Company Name — The company name must contain one or more printable characters, and must not
exceed 256 characters.
– From the Country/Territory: list, select your country or territory.
6. Click Next.
The Primary Contact Information dialog box is displayed.
7. Provide the following information for the primary person to whom Dell must send alert notifications, case status
notifications, and so on:
– First Name — The first name can contain letters, quotation marks [ ’ ], periods [ . ], spaces, and must not
exceed 50 characters.
– Last Name — The last name can contain letters, quotation marks [ ’ ], periods [ . ], spaces, and must not
exceed 50 characters.
– Phone Number — In 123-456-7890 format, or in 123-456-7890 x 123 format (to include an extension). It must
contain a minimum of 10 characters and not exceed 50 characters.
– Alternate Phone Number — Optional, with the same format and character requirements as the Phone
Number.
11
Page 12

– Preferred Email Language — From the list, select the desired language for SupportAssist e-mail
notifications.
– Email Address — Provide the e-mail address in the name@company.com format. It must contain a
minimum of five characters and not exceed 50 characters.
– Receive case information via email upon alert generation — Select the check box to receive e-mail when
SupportAssist creates a support case.
8. Click Next.
The Secondary Contact Information (Optional) dialog box is displayed.
9. Provide the following information for the secondary person to whom Dell must send alert notifications, case status
notifications, and so on:
NOTE: Although the secondary contact information is not required, it is recommended that you enter a
secondary contact. If your primary contact becomes unavailable, Dell can contact your company through the
secondary contact. If both the primary and secondary contacts are configured with valid e-mail addresses,
both receive SupportAssist e-mails.
– First Name — The first name can contain letters, quotation marks [ ’ ], periods [ . ], spaces, and must not
exceed 50 characters.
– Last Name — The last name can contain letters, quotation marks [ ’ ], periods [ . ], spaces, and must not
exceed 50 characters.
– Phone Number — In 123-456-7890 format, or in 123-456-7890 x 123 format (to include an extension). It must
contain a minimum of 10 characters, and not exceed 50 characters.
– Alternate Phone Number — Optional, with the same format and character requirements as the Phone
Number.
– Email Address — Provide the e-mail address in the name@company.com format. It must contain minimum
of five characters, and not exceed 50 characters.
10. Click Next.
The Administrator User Credentials dialog box is displayed.
11. Provide the following information in the corresponding fields:
– Windows Domain — The Windows domain to which the OpenManage Essentials server belongs. You can
also use a period [ . ] for the local domain. It must contain one or more printable characters, and not exceed
255 characters.
– Username — The user name must contain one or more printable characters, and not exceed 104
characters.
– Password — The user password must contain one or more printable characters, and not exceed 127
characters.
– Confirm Password — Repeat the user password. The password should match with one provided in the
Password field.
12. Click Next.
The Troubleshooting Tools dialog box is displayed.
13. Select Allow Dell to gather system details to aid troubleshooting (user credentials required) and then select one of
the following options under
– Windows
– Linux
– ESX/ESXi
NOTE: You can provide credentials for Dell PowerConnect Ethernet switches and iDRAC7 after installing
SupportAssist. To provide the credentials, click the Profile link at the top-right of the SupportAssist dashboard
and then click Troubleshooting Features. For more information, see Configuring Troubleshooting Credentials.
14. Click Next.
12
Credential Type:
Page 13

The Remote System User Credentials (troubleshooting credentials) dialog box is displayed. Troubleshooting
credentials are required for SupportAssist to obtain troubleshooting information about your managed systems for
Dell technical support. This troubleshooting information enables Dell technical support personnel to investigate,
diagnose, and resolve the issues reported by SupportAssist. They are encrypted, and stored locally.
15. Type the following information in the corresponding fields:
NOTE: If you selected Linux or ESX/ESXi credentials instead of Windows credentials in the Administrator User
Credentials dialog box, the fields in the Remote System User Credentials dialog box appear blank.
– Username — The user name must contain one or more printable characters, and not exceed 255
characters.
NOTE: Windows credentials must be entered in the domain\username format. You can also use a
period [ . ] to indicate the local Windows domain.
– Password — The user password must contain one or more printable characters, and not exceed 127
characters.
– Confirm Password — Repeat the user password. The password should match with the one provided in the
Password field.
16. Click Next.
The Ready to Install the Program dialog box is displayed.
17. Click Install to install SupportAssist and its troubleshooting tools. By default, SupportAssist is installed at: C:
\Program Files (x86)\Dell\Dell Integrated Support\ in 64-bit operating systems and at C:\Program Files\Dell\Dell
Integrated Support\ in 32-bit operating systems.
As the SupportAssist application installs, the following Dell troubleshooting tools install in the background:
– Dell System E-Support Tool (DSET) — Diagnostic tool for Dell PowerEdge and iDRAC7 devices
– Lasso — Diagnostic tool for Dell PowerVault and Dell PowerConnect devices
DSET and Lasso gather troubleshooting information from your OpenManage Essentials-managed Dell devices, then
compress and upload it for use by Dell technical support when they diagnose issues.
For more information about the gathered troubleshooting information, see Accessing and Viewing The
Troubleshooting Data.
NOTE: SupportAssist requires both DSET and Lasso in order to install and operate. If you cancel either DSET
or Lasso installation, SupportAssist installation will exit. Your system will not be changed, and SupportAssist
will not be installed.
The Install Wizard Completed dialog box is displayed.
18. Click Finish.
The SupportAssist client opens in a web browser and the Getting Started dialog box is displayed.
The SupportAssist client installed on your system registers with the SupportAssist server hosted by Dell, and sends
you a registration confirmation e-mail.
NOTE: If there is an issue with registering the SupportAssist client with the SupportAssist server and the user
credentials you provided for the Windows service is different from the proxy server credentials, ensure that
you provide the proxy server credentials in SupportAssist. See Configuring Proxy Server Settings.
Installing Dell SupportAssist Using The OpenManage Essentials Installation Package
To install:
1. On the Dell OpenManage Essentials management server, right-click the OpenManage Essentials installer package,
then select Run as administrator.
13
Page 14

NOTE: Microsoft User Access Control (UAC) requires that the installation be performed with elevated
privileges. If you are logged in to the OpenManage Essentials server as an administrator-level user, you can
double-click the installer package to install SupportAssist, but UAC displays the Open File - Security Warning
dialog box that you must acknowledge in order to proceed.
NOTE: SupportAssist installation requires that you allow Dell to save certain Personally Identifiable
Information (PII) such as your contact information, local administrator credentials, and so on. SupportAssist
installation cannot proceed unless you allow Dell to save your PII.
The Dell OpenManage Install dialog box is displayed.
2. In Available Options, select Dell SupportAssist, and then click Install.
The Dell SupportAssist - InstallShield Wizard (installation language selection) dialog box is displayed.
3. Follow the instructions from step 2 to step 18 in Installing Dell SupportAssist Using The Dell SupportAssist
Installation Package.
Verifying The Installation
To verify if the software, hardware, and network components required for Dell SupportAssist to provide proactive
support are configured correctly, see the
manuals.
Dell SupportAssist Verifying the Installation
document at support.dell.com/
Upgrading Dell SupportAssist
If an earlier version of Dell SupportAssist is installed on your system, you can upgrade to SupportAssist version 1.1.
To upgrade:
1. On the Dell OpenManage Essentials management server, right-click the installer package, then select Run as
administrator.
NOTE: Microsoft User Access Control (UAC) requires that the installation be performed with elevated
privileges that are obtained only through the Run as administrator option. If you are logged on to the
OpenManage Essentials server as an administrator-level user, you can double-click the installer package to
install SupportAssist, but UAC displays the Open File - Security Warning dialog box that you must
acknowledge to proceed.
The Dell SupportAssist - InstallShield Wizard (installation language selection) dialog box is displayed.
2. From the Select the language for the installation from the choices below list, select a language and click OK.
The Preparing to Install dialog box is briefly displayed and then the Administrator User Credentials dialog box is
displayed.
3. Provide the following information in the corresponding fields:
– Windows Domain — The Windows domain to which the OpenManage Essentials server belongs. You can
also use a period [ . ] for the local domain. It must contain one or more printable characters, and not exceed
255 characters.
– Username — The user name must contain one or more printable characters, and not exceed 104
characters.
– Password — The user password must contain one or more printable characters, and not exceed 127
characters.
– Confirm Password — Repeat the user password. The password should match with one provided in the
Password field.
4. Click Next.
The Ready to Install the Program dialog box is displayed.
14
Page 15

CAUTION: Once you click Install, the Cancel button is disabled and the installation cannot be rolled back.
5. Click Install.
The Install Wizard Completed dialog box is displayed.
6. Click Finish.
SupportAssist opens in a web browser and displays the Getting Started dialog box that informs you to configure the
proxy server settings and user credentials, if required.
NOTE: The Service Contract column in the SupportAssist dashboard displays unknown for all support cases
created prior to the SupportAssist upgrade. Once an alert is received from the device, the
is updated with the appropriate service contract type.
Service Contract column
Uninstalling Dell SupportAssist
To uninstall:
1. On the OpenManage Essentials management server, click Start → Control Panel → Programs and Features.
The Programs and Features window is displayed.
2. Select Dell SupportAssist, and then click Uninstall.
3. If the Programs and Features dialog box is displayed, prompting you to confirm the uninstallation, click Yes.
SupportAssist and its troubleshooting tools are now uninstalled from your OpenManage Essentials server.
NOTE: All device, case, service contract, and user-entered information are removed when you uninstall
SupportAssist. If you reinstall SupportAssist, it registers with the SupportAssist server as a new client. The support
case information that was generated prior to uninstalling SupportAssist is not displayed.
15
Page 16

16
Page 17

3
Using Dell SupportAssist
This chapter provides information about using Dell SupportAssist.
Launching Dell SupportAssist
To launch SupportAssist:
1. On the OpenManage Essentials management server, do one of the following:
– Double-click the Dell SupportAssist desktop icon.
– Click Start→ All Programs→ Dell OpenManage Applications→ Dell SupportAssist→ Dell SupportAssist.
– In OpenManage Essentials dashboard, click the Extensions tab, and then click the SupportAssist Launch
link.
The Windows Security dialog box may be displayed.
2. If the Windows Security dialog box is displayed, type the User name and Password, and then click OK.
The SupportAssist dashboard opens in a web browser, and may display the Getting Started dialog box that informs you
to configure the proxy server settings and user credentials, if required.
Case List Report
The Case List report is the default Dell SupportAssist dashboard view.
The following table describes the automatically-generated support case information for your supported Dell devices, as
displayed in the Case List report.
Table 3. Case List Report Contents
Column Description
Case Status
Case Number
Case Title
The current state of the support case. The status of a case may be:
• Open — Dell technical support has opened the submitted case.
• In Progress — The case is currently being worked by Dell technical support.
• Customer Deferred — Dell technical support has deferred the case at the customer’s
request.
• Submitted — SupportAssist has submitted the case.
• No Case — No case exists for this device.
• Reopened — The case was previously closed, and has been reopened.
The numeric identifier assigned to the support case.
The case name, which identifies:
• Case generation method
• Device model
• Device operating system
17
Page 18

Column Description
• Alert ID, if available
• Alert description, if available
Progress
Service Contract
The current support case progress status. The progress status may be:
• Case Access Error — SupportAssist cannot currently access the case information.
• Case Service Unavailable — Dell’s support case service is currently unavailable.
• Troubleshooting Tool Not Supported — This device does not support SupportAssist’s
troubleshooting tools.
• Troubleshooting Opted Out — Customer has opted out of SupportAssist’s
troubleshooting capabilities.
• Troubleshooting Scheduled — Troubleshooting tool is scheduled to be run on this
device.
• Troubleshooting Tool Started — Troubleshooting tool has been invoked on this
device.
• Troubleshooting Tool Failed to Start — Troubleshooting tool failed to start on this
device.
• Troubleshooting Ran Successfully — Troubleshooting tool ran successfully on this
device.
• Troubleshooting Tool Failed to Run — Troubleshooting tool started but failed to run on
this device.
• Troubleshooting Information Uploaded — Troubleshooting information has been
uploaded to Dell technical support.
• Troubleshooting Information Failed to Upload — Troubleshooting information was not
successfully uploaded to Dell technical support.
The Dell service contract level under which the device is covered. The service contract
column may display:
• Unknown — SupportAssist cannot determine the service contract.
• Invalid Service Tag — The service tag of the device is invalid.
• No Service Contract — This device is not covered under a Dell service contract.
• Expired Service Contract — The service contract of the device has expired.
• Basic Support — This device is covered under a Dell Basic Hardware service
contract.
• ProSupport — This device is covered under a Dell ProSupport service contract.
Device Type
Service Tag
Date Opened
Indicates the type of device as discovered by OpenManage Essentials:
• Storage — The device is a PowerVault storage array.
• Server — The device is a PowerEdge server.
• PowerConnect — The device is a PowerConnect Ethernet switch.
A unique, alphanumeric identifier which enables Dell to individually recognize each Dell
device.
The date and time when the support case was opened.
Viewing The Case List Report
To view the Case List report, click the Cases tab on the Dell SupportAssist dashboard.
18
Page 19

A progress indicator may appear at the bottom of the report to inform that SupportAssist is in the process of updating its
cache of open support cases.
NOTE: By default, the Case List is sorted by Date Opened, in descending order. See Customizing The Case List
Display Data for more sorting options
NOTE: Pre-existing support cases (opened prior to SupportAssist installation), and cases opened by means other
than SupportAssist, do not appear in the Case List report.
NOTE: The Service Contract column in the SupportAssist dashboard displays unknown for all support cases
created prior to the SupportAssist upgrade. Once an alert is received from the device, the Service Contract column
is updated with the appropriate service contract type.
Support case information is automatically available, for Dell OpenManage Essentials-managed Dell PowerEdge, Dell
PowerVault, iDRAC7, and Dell PowerConnect devices with valid service tags, when SupportAssist connects to the Dell
support case and service contract databases over the Internet.
NOTE: If you do not have Internet access, no case information is populated. It is downloaded and displayed when
you next connect to the Internet and open the Case List report.
Once SupportAssist has completed its open support cases update, the Case List displays the current cases.
Customizing The Case List Display Data
The displayed Case List data can be customized by:
• Sorting The Case List Data By Column Name
• Filtering The Case List Data By Column Name And Keyword
• Returning The Case List Data To The Default Sorting
• Setting The Number Of Cases Displayed Per Page
Sorting The Case List Data By Column Name
To sort the case list display data by column name, click any column header.
The report refreshes to display the data in an ascending or descending order of the column header you clicked.
Filtering The Case List Data By Column Name And Keyword
To filter the case list display data by column name and keyword:
1. Select the column name from the Filter By: list.
2. If you are searching for Case Status, Progress, Device Type, or Service Contract, select the search criteria from the
search list.
3. If you are searching for Case Number, Date Opened, Case Title, or Service Tag, type the search keyword in the
search text field.
4. Click Apply Filters.
The report refreshes to display the data according to your criteria. If there are no matches, the following message
is displayed:
No support cases found. Please review your search criteria and try again.
5. To clear the search criteria and try again, click Clear Filters.
The report refreshes to display the default content.
6. Repeat step 2 through step 3.
The report refreshes to display the data according to your criteria.
19
Page 20

Returning The Case List Data To The Default Sorting
To return to the default Case List view (Date Opened, in descending order), click the Cases tab.
The report refreshes to the default sorting criteria. Any new cases or updates to the current cases appear in the report.
Cases that are closed since the last refresh no longer appear.
Setting The Number Of Cases Displayed Per Page
To change the total number of rows displayed in one page, select the number of cases to display from the Display Cases:
list. You can choose from:
• 10 per page
• 20 per page
• 30 per page
Device Inventory Report
The Device Inventory report displays the supported OpenManage Essentials-discovered devices.
The following table describes the automatically-generated inventory information for your supported Dell devices, as
displayed in the Device Inventory report
Table 4. Device Inventory Report
Column Description
Device Type Indicates the type of device as discovered by OpenManage Essentials:
• Storage — The device is a Dell PowerVault storage array.
• Server — The device is a Dell PowerEdge server.
• PowerConnect — The device is a Dell PowerConnect Ethernet switch.
Service Tag A unique, alphanumeric identifier which enables Dell to individually recognize each Dell
device.
Device Name Indicates the NetBIOS name of the device as discovered by OpenManage Essentials.
OS Name Indicates the name of the operating system on the device as discovered by OpenManage
Essentials.
OS Revision Indicates the version of the operating system on the device as discovered by OpenManage
Essentials.
Viewing The Device Inventory Report
To view the Device Inventory report, click the Devices tab on the Dell SupportAssist dashboard.
NOTE: By default, the Device Inventory is sorted by Device Name, in ascending order. See Customizing The Device
Inventory Display Data for more sorting options.
Customizing The Device Inventory Display Data
The displayed Device Inventory data can be customized by:
• Sorting The Device Inventory Data By Column Name
• Filtering The Device Inventory Data By Column Name And Keyword
20
Page 21

• Returning The Device Inventory Data To The Default Sorting
• Setting The Number Of Devices Displayed Per Page
.
Sorting The Device Inventory Data By Column Name
To sort the device inventory display data by column name, click any column header.
The report refreshes to display the data in an ascending or descending order of the column header you clicked.
Filtering The Device Inventory Data By Column Name And Keyword
To filter the device inventory display data by column name and keyword:
1. Select the column name from the Filter By: list.
2. If you are searching for Device Type, select the search criteria from the search list.
3. If you are searching for Device Name, Service Tag, OS Name, or OS Revision, type the search keyword in the
search text field.
4. Click Apply Filters.
The report refreshes to display the data according to your criteria. If there are no matches, the following message
is displayed:
No support cases found. Please review your search criteria and try again.
5. To clear the search criteria and try again, click Clear Filters.
The report refreshes to display the default content.
6. Repeat step 2 through step 3.
The report refreshes to display the data according to your criteria.
Returning The Device Inventory Data To The Default Sorting
To return to the default Device Inventory view (Device Name, in descending order), click the Devices tab.
The report refreshes to the default sorting criteria. Any newly-discovered devices appear in the report. Devices that
have been removed since the last refresh no longer appear.
Setting The Number Of Devices Displayed Per Page
To change the total number of rows displayed in one page, select the number of cases to display from the Display
Devices: list. You can choose from:
• 10 per page
• 20 per page
• 30 per page
Refreshing The Case List Or Device Inventory Display Data
The Case List or Device Inventory display data can be refreshed in two ways:
• Click the Refresh link that appears at the top-right corner of the Case List or Device Inventory list to update
displayed data using currently selected filters. This is handy for displaying updated information between poll
cycles.
21
Page 22

• Click the Refresh button on the web browser to regenerate the last sort operation. The web browser may display
a dialog box with the following message:
To display the webpage again, the web browser needs to resend the
information you’ve previously submitted.
If you were making a purchase, you should click Cancel to avoid a
duplicate translation. Otherwise, click Retry to display the webpage
again.
In the dialog box that is displayed, click the Retry button to continue.
Configuring E-Mail Notification Preferences
E-mail notification preferences may need to be configured based on your:
• Geographic location
• Preference to receive e-mail notifications from Dell SupportAssist.
To view and/or update e-mail notification preferences:
NOTE: Ensure that you are logged on as a member of the OpenManage Essentials Administrators
(OmeAdministrators) or Power Users (OmePowerUsers) group. If you are not logged on as a member of the
OpenManage Essentials Administrators or Power Users group, the Profile and Connectivity Test links are disabled.
1. Click the Profile link at the top-right corner of the SupportAssist dashboard.
The Contact Information page is displayed.
2. Click the Preferences tab.
The Preferences and Email Notification page is displayed.
3. Under Preferences, from the Preferred Email Language list, select a language.
4. Under Email Notification, select your desired e-mail notification option. You can select from:
– Enable — Receive notifications
– Disable — Do not receive notifications
NOTE: Disabling support case e-mail notifications also disables e-mail connectivity test e-mails.
5. Click Save.
Configuring Proxy Server Settings
If your system connects to the Internet through a firewall or proxy server, the proxy settings can be configured in Dell
SupportAssist.
To configure the proxy server settings:
NOTE: Ensure that you are logged on as a member of the OpenManage Essentials Administrators
(OmeAdministrators) or Power Users (OmePowerUsers) group. If you are not logged on as a member of the
OpenManage Essentials Administrators or Power Users group, the Profile and Connectivity Test links are disabled.
1. Click the Profile link at the top-right corner of the SupportAssist dashboard.
The Contact Information page is displayed.
2. Click the Proxy Settings tab.
The Proxy Settings page is displayed.
3. Select Use Proxy Settings.
22
Page 23

NOTE: SupportAssist provides support for Windows NT LAN Manager (NTLM) authentication protocol only.
4. Type the Proxy Server Address or Name: and Proxy Port Number: in the appropriate fields.
NOTE: If the proxy credentials are not provided, SupportAssist connects to the proxy server as an anonymous
user.
5. If the proxy server requires authentication, select Proxy requires authentication, and then provide the following
information in the corresponding fields:
– Username — The user name must contain one or more printable characters, and not exceed 104
characters.
– Password — The user password must contain one or more printable characters, and not exceed 127
characters.
– Confirm Password — Repeat the user password. The password should match with the one provided in the
Password field.
6. Click Apply.
SupportAssist tests the proxy server settings, and the result of the test is displayed in a dialog box.
You can verify if the proxy settings has been configured correctly by testing the connection through the proxy server.
See Confirming Connectivity Through The Proxy Server.
Confirming Connectivity Through The Proxy Server
To test if Dell SupportAssist can connect to the Internet through the proxy server:
NOTE: Ensure that you are logged on as a member of the OpenManage Essentials Administrators
(OmeAdministrators) or Power Users (OmePowerUsers) group. If you are not logged on as a member of the
OpenManage Essentials Administrators or Power Users group, the Profile and Connectivity Test links are disabled.
1. Click the Profile link at the top-right corner of the SupportAssist dashboard.
The Contact Information page is displayed.
2. Click the Proxy Settings tab.
The Proxy Settings page is displayed.
3. Ensure that the proxy settings has been configured correctly. See Configuring Proxy Server Settings.
4. Click Apply.
A dialog box appears to inform the status of the connection through the proxy server.
Confirming E-Mail Connectivity
You can test the Dell SupportAssist e-mail connectivity status, in order to ensure that you can receive the most current
case and device updates.
For example, you may want to check the e-mail connectivity status following a network outage, a router or firewall
configuration change made to the e-mail address of the primary user.
To test the SupportAssist e-mail connectivity status:
NOTE: Ensure that you are logged on as a member of the OpenManage Essentials Administrators
(OmeAdministrators) or Power Users (OmePowerUsers) group. If you are not logged on as a member of the
OpenManage Essentials Administrators or Power Users group, the Profile and Connectivity Test links are disabled.
1. Click the Connectivity Test link at the top-right corner of the SupportAssist dashboard.
The Connectivity Test page is displayed.
2. Click Send.
23
Page 24

SupportAssist initiates an e-mail connectivity test.
3. If the test is successful, a confirmation e-mail message is sent to you. The message provides the connectivity
status and a reminder to configure your devices for monitoring. The SupportAssist dashboard displays the following
success message:
A connectivity test has been successfully sent to Dell SupportAssist.
When you receive the connectivity confirmation e-mail from SupportAssist, ensure that your supported Dell
devices are properly configured for monitoring, as described in the
support.dell.com/manuals.
If the connectivity test fails, the following error message is displayed:
Error: Connectivity test failed. Please check your network settings. If
your network settings are correct, please contact Dell Technical Support
for further instructions
If SupportAssist displays an error message, ensure that your network settings are correct, and then click Retry.
a) If the error persists, and you are certain that your network settings are correct, click the Dell Technical Support
link that appears below the error message to engage Dell technical support for troubleshooting assistance.
b) Once the error is resolved, repeat step 1 to step 3.
Dell OpenManage Essentials User’s Guide
Viewing Troubleshooting Features
To view and/or update troubleshooting features:
NOTE: Ensure that you are logged on as a member of the OpenManage Essentials Administrators
(OmeAdministrators) or Power Users (OmePowerUsers) group. If you are not logged on as a member of the
OpenManage Essentials Administrators or Power Users group, the Profile and Connectivity Test links are disabled.
at
1. Click the Profile link at the top-right corner of the Dell SupportAssist dashboard.
The Contact Information page is displayed.
2. Click the Troubleshooting Features tab.
The Troubleshooting Credentials and Maintenance Mode page is displayed.
Configuring Troubleshooting Credentials
Dell SupportAssist gathers troubleshooting information from supported Windows, Linux, and VMware ESX/ESXi based
managed Dell server and storage devices, iDRAC7, and Dell PowerConnect Ethernet switches. To gather
troubleshooting information from your OpenManage Essentials-managed Dell systems, the user credentials must be
configured in SupportAssist.
To configure the credentials required for gathering troubleshooting information:
NOTE: Ensure that you are logged on as a member of the OpenManage Essentials Administrators
(OmeAdministrators) or Power Users (OmePowerUsers) group. If you are not logged on as a member of the
OpenManage Essentials Administrators or Power Users group, the Profile and Connectivity Test links are disabled.
1. Click the Profile link at the top-right corner of the SupportAssist dashboard.
The Contact Information page is displayed.
2. Click the Troubleshooting Features tab.
The Troubleshooting Credentials and Maintenance Mode tab is displayed.
3. Under Troubleshooting Credentials, select the Credential Type from the list. You can select from:
– Windows
24
Page 25

– Linux
– ESX/ESXi
– PowerConnect
– iDRAC7
4. Type the following troubleshooting credentials in the corresponding fields:
NOTE: For PowerConnect Ethernet switches, the Username, Password, and Enable Password fields are
optional. However, information must be provided for these fields if the PowerConnect Ethernet switch is
configured with these details.
– Username — The user name must contain one or more printable characters, and not exceed 104
characters.
NOTE: Windows user names must be of the form [Domain\Username]. You can also use a period [ . ] to
indicate the local domain. This rule does not apply to Linux or ESX/ESXi credentials.
NOTE: For PowerConnect Ethernet switches the domain name need not be specified.
Examples of Windows user names: .\Administrator; MyDomain\MyUsername
Example of Linux, ESX/ESXi user name: Username
– Password — The user password must contain one or more printable characters, and not exceed 127
characters.
– Confirm Password — Repeat the user password. The password should match with one provided in the
Password field.
– Enable Password — For PowerConnect Ethernet switches only. The enable password must contain one or
more printable characters, and not exceed 127 characters.
NOTE: Your user credentials are encrypted and saved locally.
5. If you want to allow SupportAssist to automatically run diagnostic tools when there is a problem with a device,
select the Automatically run diagnostic tools when needed (user credentials required) option. The diagnostic tools
gather troubleshooting information from your OME-managed Dell devices, then compress and upload it for use by
Dell Technical Support to diagnose the issues.
6. If you do not want to send the personally identifiable information (PII) to Dell, select the Enable report filtering for
network identification data option. PII collected and sent by the diagnostic tools include complete configuration
snapshot of storage systems, hosts, and network devices which can contain host identification and network
configuration data.
NOTE: When report filtering is enabled, some of the data about your network is not transmitted to Dell.
Enabling report filtering may prevent Dell technical support from resolving your issue.
7. Click Save.
Enabling Report Filtering
Dell SupportAssist collects personally identifiable information (PII) such as the complete configuration snapshot of
storage systems, hosts, and network devices which can contain host identification and network configuration data.
In most cases, part or all of this data is required to properly diagnose issues. Your company’s security policies may
restrict sending this data outside of your network. You can chose not to send this data to Dell by enabling report filtering.
NOTE: When report filtering is enabled, some of the data about your network is not transmitted to Dell. Enabling
report filtering may impede Dell technical support from resolving your issue.
To enable report filtering:
25
Page 26

NOTE: Ensure that you are logged on as a member of the OpenManage Essentials Administrators
(OmeAdministrators) or Power Users (OmePowerUsers) group. If you are not logged on as a member of the
OpenManage Essentials Administrators or Power Users group, the Profile and Connectivity Test links are disabled.
1. Click the Profile link at the top-right corner of the SupportAssist dashboard.
The Contact Information page is displayed.
2. Click the Troubleshooting Features tab.
The Troubleshooting Credentials and Maintenance Mode tab is displayed.
3. In the Troubleshooting Credentials section, select the Enable report filtering for network identification data option.
4. Click Save.
Setting Dell SupportAssist To Maintenance Mode
SupportAssist can also be set into or out of Maintenance Mode. Maintenance Mode disables automatic case generation
activity, and enables you to make infrastructure changes without generating unnecessary alerts.
To set SupportAssist in or out of maintenance mode:
NOTE: Ensure that you are logged on as a member of the OpenManage Essentials Administrators
OmeAdministrators) or Power Users (OmePowerUsers) group. If you are not logged on as a member of the
(
OpenManage Essentials Administrators or Power Users group, the Profile and Connectivity Test links are disabled.
1. Click the Profile link at the top-right corner of the SupportAssist dashboard.
The Contact Information page is displayed.
2. Click the Troubleshooting Features tab.
The Troubleshooting Credentials and Maintenance Mode tab is displayed.
3. Under Maintenance Mode, select the Temporarily suspend case generation activity (for example, for purposes of
downtime, external troubleshooting, etc.) check box to toggle SupportAssist’s Maintenance Mode status.
– If you select the check box, SupportAssist is placed in maintenance mode.
– If you clear the check box, SupportAssist is taken out of maintenance mode.
4. Click Save.
A banner appears along the top of the SupportAssist dashboard displaying Maintenance Mode.
Once manually placed in Maintenance Mode, SupportAssist remains in that state indefinitely unless you clear the
status check box as in step 3.
NOTE: This procedure differs from how SupportAssist’s maintenance mode feature handles event storms. See
Event Handling for more information.
Using The Update Available Link
The Update available link is displayed at the top-right of the Dell SupportAssist if a newer version of SupportAssist is
available.
Click the Update available link to navigate to the location on the Dell support site from where you can download a newer
version of the SupportAssist.
NOTE: The Update Available link can also be accessed through the About dialog box.
26
Page 27

Identifying The User Name
The Signed in as: notification at the top-right corner of the Dell SupportAssist dashboard enables you to identify your
user name.
Viewing And Updating The Profile Information
To view and update user profile information:
NOTE: Ensure that you are logged on as a member of the OpenManage Essentials Administrators
(OmeAdministrators) or Power Users (OmePowerUsers) group. If you are not logged on as a member of the
OpenManage Essentials Administrators or Power Users group, the Profile and Connectivity Test links are disabled.
1. Click the Profile link at the top-right corner of the Dell SupportAssist dashboard.
The Contact Information page is displayed.
2. Type the company name in the Company Name: field. The company name must contain one or more printable
characters, and not exceed 256 characters.
3. Select the user for whom the contact information must be changed. You can select from:
– Primary
– Secondary
4. Make the required changes to any of the following fields:
– First Name — The first name can contain letters, quotation marks [ ’ ], periods [ . ], spaces, and not exceed
50 characters.
– Last Name — The last name can contain letters, quotation marks [ ’ ], periods [ . ], spaces, and not exceed
50 characters.
– Phone Number — In 123-456-7890 format, or in 123-456-7890 x 123 format (to include an extension). It must
contain a minimum of 10 characters, and not exceed 50 characters.
– Alternate Phone Number — Optional, with the same format and character requirements as the Phone
Number.
– Email Address — Provide the e-mail address in the name@company.com format. It must contain a
minimum of five characters, and not exceed 50 characters.
5. Click Save.
Accessing And Viewing The Logs
The Dell SupportAssist dashboard stores Windows events and log messages in two locations:
• The Windows Event Log
• The dashboard installation logs directory (typically, C:\Program Files (x86)\Dell\Dell Integrated Support\logs in
64-bit operating systems and at C:\Program Files\Dell\Dell Integrated Support\logs in 32-bit operating systems)
A new log is created daily at 11:59 PM as per the time zone configured in the system, and is stored in the logs directory
with the date appended to the file extension. This enables you to identify the exact log file stored for a given date when
alerts occur. For example, log files similar to the following can be seen:
• log-file.txt
• log-file.txt
• log-file.txt
20120226
20120227
20120228
27
Page 28

Log files are purged from storage after 45 days.
To view the Windows Event Log, invoke the Event Viewer application and then expand Applications and Services Logs.
The DellIntegratedSupport log file contains entries from the dashboard service. The dashboard logs messages here that
correspond to value of the Windows Registry key, WindowsEventLogLevel, or higher.
In the dashboard installation directory, you can view one log file per day. The current log file is named log-file.txt, and
contains log messages that correspond to the following values (or higher) in the Windows Registry key LogFileLevel:
FATAL, ERROR, WARN, INFO, and DEBUG, with special values of OFF and ALL. A registry value of ERROR results in logs
messages of FATAL, and ERROR, since FATAL is a higher level than ERROR.
The LogFileLevel Windows Registry key can be located at HKEY_LOCAL_MACHINE\SOFTWARE\Wow6432Node\Dell\Dell
Integrated Support in 64-bit operating systems and at HKEY_LOCAL_MACHINE\SOFTWARE\Dell\Dell Integrated Support
in 32-bit operating systems.
Accessing And Viewing The Troubleshooting Data
When a support case is automatically generated by Dell SupportAssist, data required to troubleshoot the issue is
collected and sent to Dell technical support. The collected troubleshooting information is also compressed and stored
on your OpenManage Essentials server in the reports directory (typically, C:\Program Files (x86)\Dell\Dell Integrated
Support\reports in 64-bit operating systems and at C:\Program Files\Dell\Dell Integrated Support\reports in 32-bit
operating systems).
The filename includes the device’s IP address, Dell service tag, and the date/time when the file was created. For
example:
• DSET_Report_for[
• Lasso_Report_for[
• Lasso_Report_for[
The report file is encrypted with the password, dell (all lowercase). The report information can then be viewed by
opening the dsetreport.hta file in your web browser.
NOTE: You should open the reports only when asked to do so by Dell technical support. Your report will not be
reviewed unless you have an open support case.
192.168.1.254_SvcTag_AL12G26_2012-03-07T132648
10.94.216.76_SvcTag_897672S_2012-08-21T094147
10.94.216.76_SvcTag_897672S_2012-08-21T094147
].zip
].zip.gpg (without PII)
].xml.gpg (with PII)
Viewing Dell SupportAssist Product Information
The About dialog box displays the SupportAssist product version, copyright information, and detailed SupportAssist
feature descriptions.
To view general and detailed SupportAssist product information:
1. Click the About link at the top-right corner of the SupportAssist dashboard.
The About dialog box is displayed, where you can view the general and detailed product information and also the
copyright information.
2. Click Close to return to the SupportAssist dashboard.
Viewing Support Information
The Help screen displays Dell SupportAssist product version and copyright information, and provides access to Dell
Technical Support and Dell OpenManage Essentials information.
To view the support information for SupportAssist:
1. Click the Help link at the top-right corner of the SupportAssist dashboard.
28
Page 29

The Help dialog box is displayed.
2. In the Help dialog box :
– Read the General product and copyright information.
– Click the links under Dell SupportAssist Additional Information & Updates to view:
* Dell Technical Support launch points, community forums, blogs, and much more
* Dell product manuals for hardware and software products
– Click the link under Dell OpenManage Essentials (OME) Additional Information & Updates to view Dell
OpenManage Essentials Frequently Asked Questions, updates, videos, and much more
3. Click Close to return to the SupportAssist dashboard.
29
Page 30

30
Page 31

4
Troubleshooting
This chapter describes procedures you can use to troubleshoot Dell SupportAssist issues
Installing Dell SupportAssist
SupportAssist installation requires elevated Microsoft User Authentication (UAC) privileges, and may fail if you attempt
to install by double-clicking on the installer executable. If this occurs, install SupportAssist as follows:
1. Right-click the installer executable.
2. Select Run as administrator.
NOTE: SupportAssist installation requires that you allow Dell to save certain Personally Identifiable
Information (PII) such as your contact information and local administrator credentials, and so on.
SupportAssist installation cannot proceed unless you allow Dell to save your PII.
Launching Dell SupportAssist
If you see a Problem starting the Dell SupportAssist Service error upon launching SupportAssist:
• The local administrator password may have been changed recently. If so, ensure that the SupportAssist
Windows service is configured with the new password:
1. Click Start → Run.
The Run dialog box is displayed.
2. Type services.msc, and then click OK.
The Services Microsoft Management Console (MMC) is displayed.
3. Right-click the Dell SupportAssist service, and then click Properties.
The Dell SupportAssist Service Properties dialog box is displayed.
4. Click the Log On tab, and ensure that the This account option is selected.
5. In the Password: field, type the new local administrator password.
6. In the Confirm Password: field, repeat the local administrator password. The password should match with one
provided in the Password: field.
7. Click Apply.
8. Launch SupportAssist.
• There may be a Windows registry configuration problem with the SupportAssist Windows service. To resolve
this issue, uninstall and then reinstall SupportAssist.
The SupportAssist dashboard requires some DLLs that are installed in OpenManage Essentials version 1.0.1. The
SupportAssist installer checks that OpenManage Essentials is installed, and then checks the OpenManage Essentials
version. If the DLLs are manually removed, the following error appears during installation:
Error 1920. Service Dell SupportAssist Service (PhomePluginWindowsService)
failed to start.
31
Page 32

If this occurs:
• Verify that you have sufficient privileges to start system services.
• Check the log-file.txt file in the logs directory (typically, C:\Program Files (x86)\Dell\Dell Integrated Support\logs
in 64-bit operating systems and at C:\Program Files\Dell\Dell Integrated Support\logs in 32-bit operating systems)
to see which component failed to load.
Service Tag Warnings
On rare occasions some cases may display an invalid Dell service tag warning. If you presume that the warning is
incorrect, you can use the Windows Management Instrumentation CLI command (wmic) to find the correct Dell service
tags for Windows devices.
To resolve service tag warnings:
1. Identify the service tag for your device. See Finding The Service Tag Locally and Finding The Service Tag Remotely.
2. Contact Dell technical support. See Contacting Dell.
Finding The Service Tag Locally
To find the Dell service tag on the local device, type the following at a Windows command prompt:
wmic csproduct get vendor,name,identifyingnumber
A message similar to the following is displayed:
IdentifyingNumber Name Name
ABCDEF0 PowerEdge R510 Dell Inc.
Finding The Service Tag Remotely
To find the Dell service tag on a remote device:
1. On the local device, at the command prompt, type:
wmic /user:<domain>\<user> /node:<nodename> bios get serialnumber
The device prompts for the user password.
2. Type the remote user password.
A message similar to the following is displayed:
SerialNumber
ABCDEF0
Service Contract
The Service Contract column on the Case List report, may display a warning icon or Unknown. See the following
sections for more information about these messages.
Service Contract Warning
A warning icon may appear in the Service Contract column of some cases if the associated device is not covered under
a Dell service contract or the service contract has expired.
32
Page 33

If any cases display a warning icon in the Service Contract column:
1. Move the pointer over the warning icon to display a tooltip.
2. Click the Dell Support link displayed in the tooltip to open the service contract information page.
You can obtain current service contract information for your Dell devices, obtain new service contracts, and so on.
Service Contract Type Is Unknown
The Service Contract column on Case List report displays unknown for all existing support cases.
This is occurs when you upgrade Dell SupportAssist. Once an alert is received from the device, the Service Contract
column is updated with the appropriate service contract type.
Services
• Dell SupportAssist may not initially connect to the SupportAssist server if your network requires passing web
browser traffic through a proxy server. If this occurs:
– A dialog box may be displayed prompting you to configure your proxy settings. Provide the information
required in the appropriate fields to connect to the SupportAssist server through your proxy server.
– Configure the proxy server settings in SupportAssist. See Configuring Proxy Server Settings.
– After configuring the proxy server settings, verify if the SupportAssist dashboard can connect to the
SupportAssist server through the proxy server by performing the e-mail connectivity test. See
Confirming Connectivity Through The Proxy Server.
• If the SupportAssist dashboard does not seem to connect to the SupportAssist server or behave appropriately,
ensure that the SupportAssist Windows service is running:
1. Click Start → Run.
The Run dialog box is displayed.
2. Type services.msc, and then click OK.
The Services Microsoft Management Console (MMC) is displayed
3. Check if the Dell SupportAssist Service displays the status as Running.
4. If the service is not running, start the service by right-clicking Dell SupportAssist Service → Start .
5. If the service cannot or does not start, open the most recent log file (log-file.txt), and then search for text with a
timestamp of when you tried to start the service. The log file may contain a message indicating any dashboard
startup errors and a possible problem diagnosis.
6. To verify that the SupportAssist dashboard can connect to the SupportAssist server, perform the e-mail
connectivity test. See Confirming E-Mail Connectivity.
– If the server is responding a success message is displayed in the dashboard. If not, the server may be
down. If this occurs, look through the log-file.txt file, typically located in C:\Program Files (x86)\Dell\Dell
Integrated Support\logs in 64-bit operating systems and at C:\Program Files \Dell\Dell Integrated Support
\logs in 32-bit operating systems, to find details. If there are no discernible details in the log file, and the
server is not reachable, call Dell technical support.
– If communication is successful, but no data updates occur, the dashboard may be identifying itself with an
ID that is unknown to the server. If this occurs, look through the log-file.txt log file, typically located in C:
\Program Files (x86)\Dell\Dell Integrated Support\logs in 64-bit operating systems and at C:\Program Files
\Dell\Dell Integrated Support\logs in 32-bit operating systems to find details. The log file may contain a
message stating that the dashboard was not recognized. If the dashboard is not recognized by the
SupportAssist server, uninstall and reinstall SupportAssist.
The SupportAssist dashboard registers as a new client, enabling the SupportAssist server to recognize it.
33
Page 34

Security
The Profile and Connectivity Test links at the top-right corner of the Dell SupportAssist dashboard are disabled.
If this occurs, ensure that you are logged on as a member of either the OpenManage Essentials Administrators
(OmeAdministrators) or Power Users (OmePowerUsers) group.
34
 Loading...