

Dell SE2417HGR User Manual

User’s Guide
Dell SE2417HG/SE2417HGR
Model No.: SE2417HG/SE2417HGR
Regulatory model: SE2417HGc

Notes, Cautions, and Warnings
NOTE: A NOTE indicates important information that helps you make better
use of your computer.
CAUTION: A CAUTION indicates potential damage to hardware or loss of
data if instructions are not followed.
WARNING: A WARNING indicates a potential for property damage, personal
injury or death.
Copyright © 2015–2019 Dell Inc. or its subsidiaries. All rights reserved. Dell, EMC, and
other trademarks are trademarks of Dell Inc. or its subsidiaries. Other trademarks may be
trademarks of their respective owners.
2019 – 8 Rev. A07

Contents
About your monitor ................................................................ 5
Package contents ....................................................................................... 5
Product features ......................................................................................... 6
Identifying parts and controls .................................................................. 7
Plug and play capability ..........................................................................10
LCD monitor quality and pixel policy ...................................................10
Maintenance guidelines ..........................................................................10
Setting up the monitor ......................................................... 11
Connecting the stand .............................................................................. 11
Connecting your monitor ......................................................................12
Organizing cables ....................................................................................13
Disconnecting the monitor stand ......................................................... 14
Operating your monitor ....................................................... 15
Power on the monitor .............................................................................15
Using the front panel controls ..............................................................15
Using the on-screen display (OSD) menu .......................................... 17
Setting up your monitor ..........................................................................29
Using tilt .................................................................................................... 30
Contents | 3

Troubleshooting .................................................................... 31
Self-test ...................................................................................................... 31
Built-in diagnostics ..................................................................................32
Common problems .................................................................................33
Product-specific problems ....................................................................35
Appendix ....................................................................................................36
FCC notices (U.S. Only) and other regulatory information .............36
Contacting Dell .........................................................................................36
Monitor specifications .......................................................... 37
Flat panel specifications .......................................................................... 37
Resolution specifications ........................................................................ 37
Supported video modes..........................................................................38
Preset display modes ...............................................................................38
Electrical specifications ...........................................................................38
Physical characteristics ...........................................................................39
Environmental characteristics .............................................................. 40
Power management modes ................................................................. 40
Pin assignments ........................................................................................42
4 | Contents
About your monitor
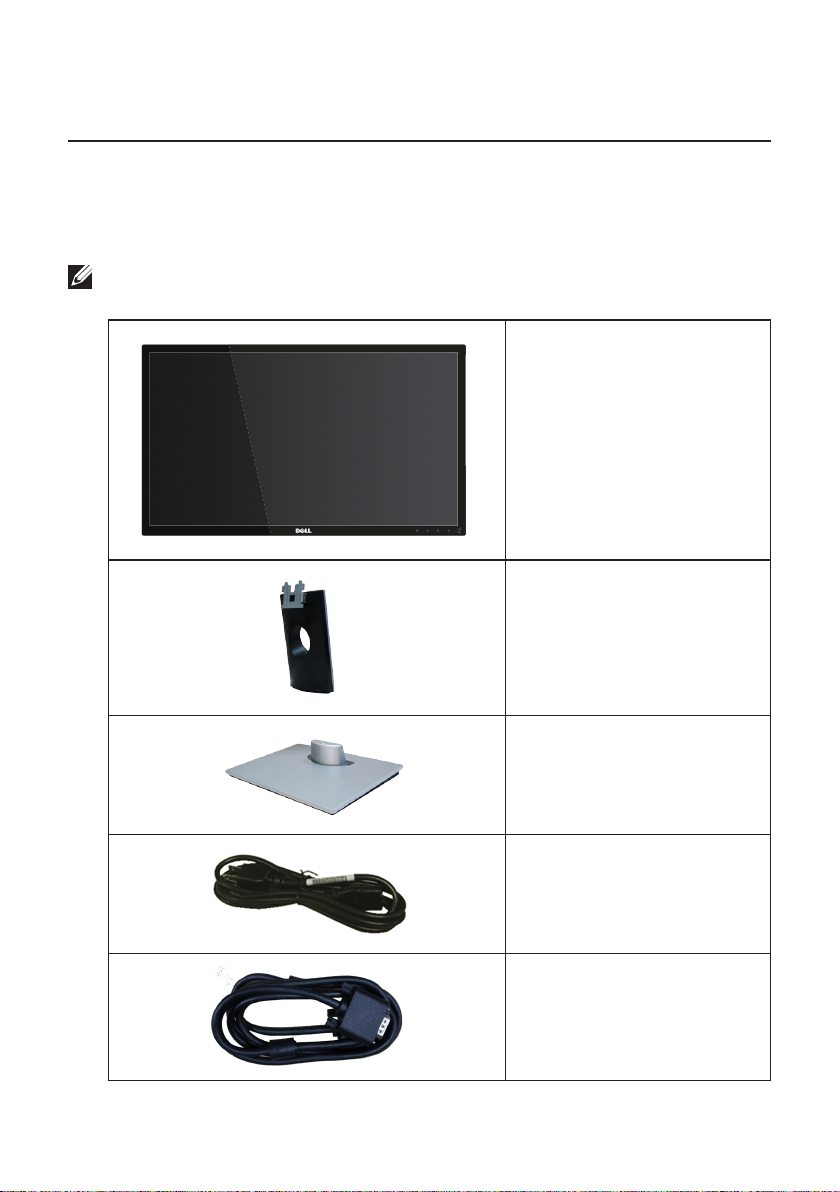
Package contents
Your monitor ships with the components shown below. Ensure that you have
received all the components and Contacting Dell if something is missing.
NOTE: Some items may be optional and may not ship with your monitor. Some
features or media may not be available in certain countries.
Monitor
Stand riser
Stand base
Power cable (varies by
country)
VGA cable
About your monitor | 5

Quick Setup Guide
∞
Safety and Regulatory
∞
Information
Product features
The Dell SE2417HG/SE2417HGR flat panel display has an active matrix, Thin-Film
Transistor (TFT), Liquid Crystal Display (LCD), and LED backlight. The monitor features
include:
59.9 cm (23.6 inch) viewable area display (measured diagonally). 1920 x 1080
∞
resolution, plus full-screen support for lower resolutions.
Plug and play capability if supported by your system.
∞
VGA and dual HDMI connectivity.
∞
Fast 2ms panel response time.
∞
On-Screen Display (OSD) adjustments for ease of set-up and screen
∞
optimization.
Security-cable slot.
∞
Capability to switch from wide aspect to standard aspect ratio while maintaining
∞
image quality.
BFR/PVC- Reduced.
∞
High dynamic-contrast ratio (8,000,000:1).
∞
0.3 W power consumption when in the sleep mode.
∞
Energy Gauge shows the energy level being consumed by the monitor in real
∞
time.
6 | About your monitor

Identifying parts and controls
Front View
1
Front panel controls
Label Description
1 Function buttons (For more information, see Operating your monitor)
2 Power on/off button (with LED indicator)
NOTE: For displays with glossy bezels the user should consider the placement of
the display as the bezel may cause disturbing reflections from surrounding light
and bright surfaces.
2
About your monitor | 7

Back View
1
2
3
Back View without monitor stand
Label Description Use
1 Stand release button Releases stand from monitor.
2 Security-cable slot Secures monitor with security lock
3 Barcode serial number label Refer to this label if you need to
4 Cable management slot Uses to organize cables by placing
Back View with monitor stand
(security lock not included).
contact Dell for technical support.
them through the slot.
4
8 | About your monitor
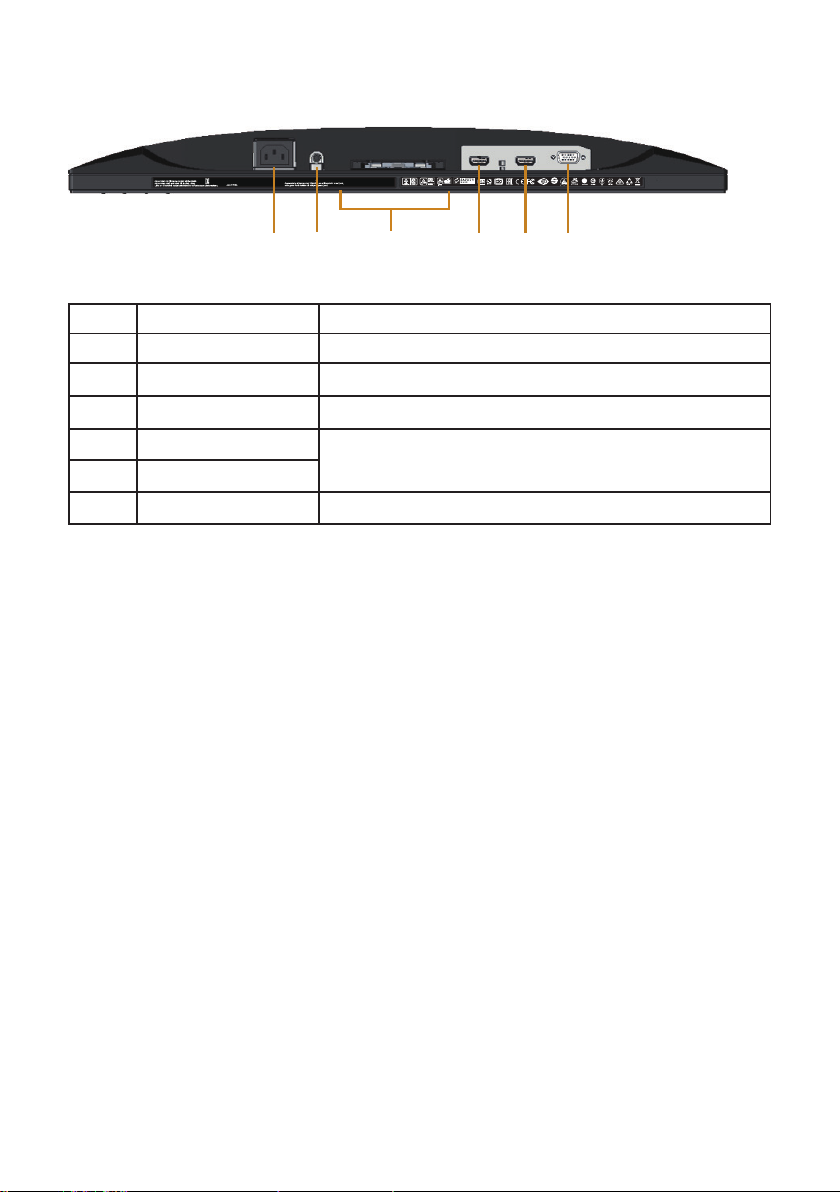
Bottom View
CAN ICES-3 (B)/NMB-3(B)
㐔㷡㢬ڕTOP VICTORY ELECTRONICS (FUJIAN) CO., LTD.
XXXXXXX-XXXXX
㥐㦤㣄ڕTPV Electronics (Fujian) Co., Ltd.
MSIP-REM-TPV-SE2416Hc
Consumo de energía: XX.X Wh
Consumo de energía en modo de espera: X.XX Wh
080-200-3800
1
Удельная мощность рабочего режима - X.XXX Вт/см²
Потребляемая мощность изделием в режиме ожидания - X.XX Вт
Потребляемая мощность изделием в выключенном режиме - X.XX Вт
The equipment must be connected to an earthed mains socket-outlet.
L'appareil doit être branché sur une prise de courant munie d'une mise à la terre.
XXXXXX-XX
䊂
XXXXXX
6
5
423
Bottom view without monitor stand
Label Description Use
1 Power port Connect the power cable.
2 Line-out port* Connect external speakers (sold separately).
3 Regulatory label Lists the regulatory approvals.
4 HDMI1 port
5 HDMI2 port
Connect your computer with HDMI cable.
6 VGA port Connect your computer with VGA cable.
* Headphone usage is not supported for the audio line out port.
About your monitor | 9
Plug and play capability
You can install the monitor in any Plug and Play-compatible system. The monitor
automatically provides the computer system with its Extended Display Identification
Data (EDID) using Display Data Channel (DDC) protocols so the system can configure
itself and optimize the monitor settings. Most monitor installations are automatic,
you can select different settings if desired. For more information about changing the
monitor settings, see Operating your monitor.
LCD monitor quality and pixel policy
During the LCD Monitor manufacturing process, it is not uncommon for one or more
pixels to become fixed in an unchanging state which are hard to see and do not affect
the display quality or usability. For more information on Dell Monitor Quality and Pixel
Policy, see Dell Support site at: www.dell.com/support/monitors.
Maintenance guidelines
Cleaning your monitor
WARNING: Before cleaning the monitor, unplug the monitor power cable from
the electrical outlet.
CAUTION: Read and follow the Safety instructions before cleaning the monitor.
For best practices, follow the instructions in the list below while unpacking, cleaning
or handling your monitor:
To clean your anti-static screen, lightly dampen a soft, clean cloth with water.
∞
If possible, use a special screen-cleaning tissue or solution suitable for the antistatic coating. Do not use benzene, thinner, ammonia, abrasive cleaners or
compressed air.
Use a lightly-dampened, warm cloth to clean the monitor. Avoid using
∞
detergent of any kind as some detergents leave a milky film on the monitor.
If you notice white powder when you unpack your monitor, wipe it off with a
∞
cloth.
Handle your monitor with care as a darker-colored monitor may get scratched
∞
and show white scuff marks more than a lighter-colored monitor.
To help maintain the best image quality on your monitor, use a dynamically
∞
changing screen saver and turn off your monitor when not in use.
10 | About your monitor

Setting up the monitor
Connecting the stand
NOTE: The stand is detached when the monitor is shipped from the factory.
NOTE: The following steps are applicable for connecting the stand that shipped
with your monitor. For setting up any other stand, see the documentation that
shipped with it.
To attach the monitor stand:
1.
Place the monitor on a soft cloth or cushion.
2.
Insert the tabs on the upper part of the stand in to the grooves on the back of
the monitor.
3.
Press down the stand till it snaps into place.
2
3
Setting up the monitor | 11
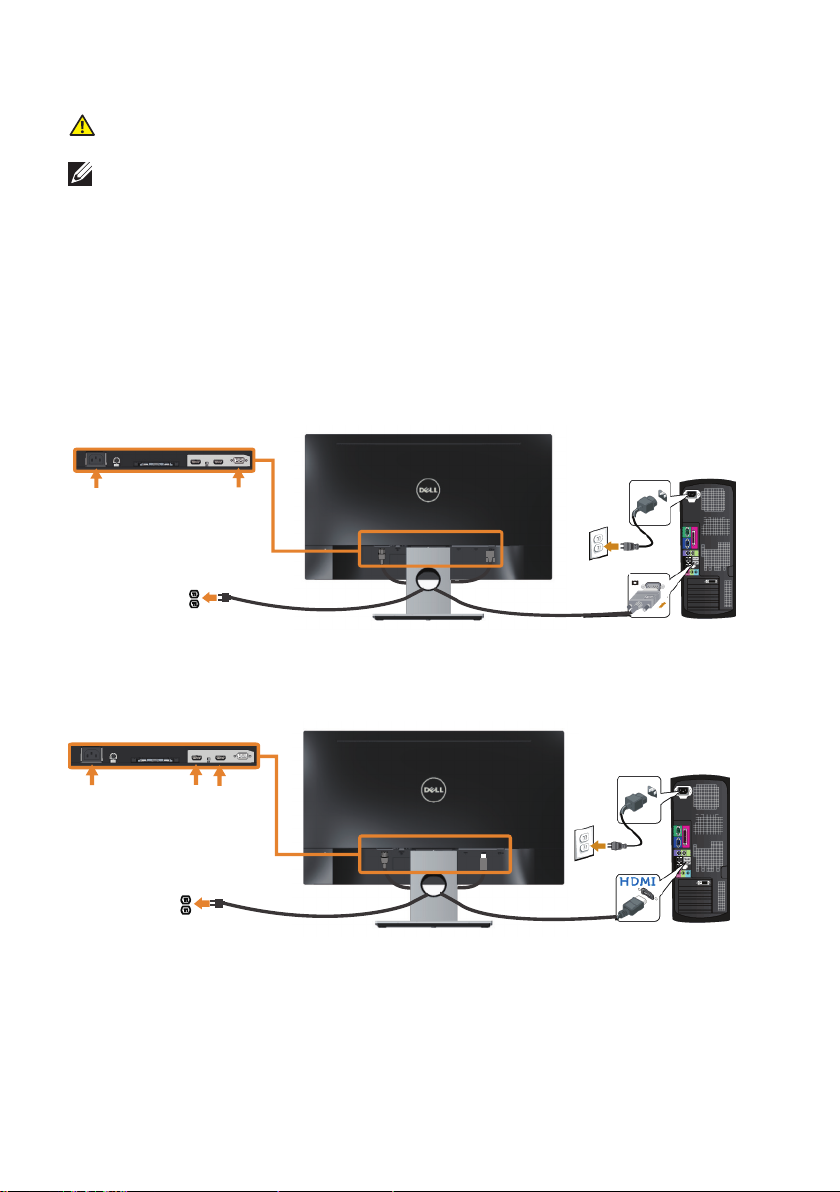
Connecting your monitor
WARNING: Before you perform any of the procedures in this section, follow
the Safety instructions.
NOTE: Do not connect all cables to the computer at the same time. It is
recommend to route the cables through the cable-management slot before you
connect them to the monitor.
To connect your monitor to the computer:
1.
Turn off your computer and disconnect the power cable.
2.
Connect the VGA/HDMI cable from your monitor to the computer.
Connecting the VGA cable
Connecting the HDMI cable (sold separately)
12 | Setting up the monitor

Organizing cables
Use the cable-management slot to organize the cables connected to your monitor.
Setting up the monitor | 13
 Loading...