

Page 1

Dell™ Serial-Attached SCSI 6/iR
Integrated and Adapter
User’s Guide
www.dell.com | support.dell.com
Page 2

Notes, Notices, and Cautions
NOTE: A NOTE indicates important information that helps you make better use of your computer.
NOTICE: A NOTICE indicates either potential damage to hardware or loss of data and tells you how to avoid the problem.
CAUTION: A CAUTION indicates a potential for property damage, personal injury, or death.
____________________
Information in this document is subject to change without notice.
© 2007 Dell Inc. All rights reserved.
Reproduction in any manner whatsoever without the written permission of Dell Inc. is strictly forbidden.
Trademarks used in this text: Dell, the DELL logo, Dell Pr ecision, PowerEdge, and OpenManage are trademarks of Dell Inc.; Intel is a re gistered
trademark of Intel Corporation; Microsoft, Windows, Windows Server, and Windows Vista are either trademarks or registered trademarks of
Microsoft Corporation in the United States and/or other countries; Novell, NetWare, and SUSE are registered trademarks of Novell, Inc. in the
United States and other countries; Red Hat Linux and Red Hat Enterprise Linux are registered trademarks of Red Hat, Inc.; LSI Logic,
Fusion-MPT, Integrated Mirroring, and Integrated Striping are trademarks or registered trademarks of LSI Logic Corporation; DR-DOS is a
registered trademark of DRDOS, Inc.
Other trademarks and trade names may be used in this document to refer to either the entities claiming the marks and names or their products.
Dell Inc. disclaims any proprietary interest in trademarks and trade names other than its own.
Model UCS-61
August 2007 P/N JM360 Rev. A00
Page 3

Contents
CAUTION: Safety Instructions. . . . . . . . . . . . . . . . . . . . . 7
SAFETY: General . . . . . . . . . . . . . . . . . . . . . . . . . . . . . . . . . . 7
SAFETY: When Working Inside Your System
SAFETY: Protecting Against Electrostatic Discharge
. . . . . . . . . . . . . . . . . . . 7
. . . . . . . . . . . . . . . 8
1 Overview . . . . . . . . . . . . . . . . . . . . . . . . . . . . . . . . . . . 9
About RAID . . . . . . . . . . . . . . . . . . . . . . . . . . . . . . . . . . . . 10
RAID Levels
RAID Terminology
Integrated Striping
Integrated Mirroring
. . . . . . . . . . . . . . . . . . . . . . . . . . . . . . . . . 10
. . . . . . . . . . . . . . . . . . . . . . . . . . . . . . . . 10
. . . . . . . . . . . . . . . . . . . . . . . . . . . . . 10
. . . . . . . . . . . . . . . . . . . . . . . . . . . . 11
2 SAS 6/iR Features . . . . . . . . . . . . . . . . . . . . . . . . . . . . . 13
3 Hardware Installation
Installing the SAS 6/iR Adapter . . . . . . . . . . . . . . . . . . . . . . . . . 15
. . . . . . . . . . . . . . . . . . . . . . . . . . 15
4 Driver Installation . . . . . . . . . . . . . . . . . . . . . . . . . . . . . 19
Creating a Driver Diskette . . . . . . . . . . . . . . . . . . . . . . . . . . . . 19
Installing the Driver During Windows Operating System Installation
Installing a Windows Driver for a New SAS 6/iR Controller
Updating an Existing Windows Driver
Installing From the Dell Operating System Media
. . . . . . . . . . . . . . . . . . . . . 21
. . . . . . . . . . . . . . . 22
. . . . . . . . . . 20
. . . . . 20
Contents 3
Page 4

Installing the Red Hat Linux Driver . . . . . . . . . . . . . . . . . . . . . . . 22
Creating a Driver Diskette
Installing the Driver
Installing the Driver Using an Update RPM
. . . . . . . . . . . . . . . . . . . . . . . . . 22
. . . . . . . . . . . . . . . . . . . . . . . . . . . . . 23
. . . . . . . . . . . . . . . . . 23
Installing the SUSE Linux Enterprise Server Driver
Installing the Driver Using an Update RPM
. . . . . . . . . . . . . . . 24
. . . . . . . . . . . . . . . . . 24
Installing SUSE Linux Enterprise Server Using
the Driver Update Diskette
Upgrading the Kernel
. . . . . . . . . . . . . . . . . . . . . . . . . . . . . . 26
. . . . . . . . . . . . . . . . . . . . . . . . . 25
5 SAS 6/iR BIOS . . . . . . . . . . . . . . . . . . . . . . . . . . . . . . . . 27
POST Messages . . . . . . . . . . . . . . . . . . . . . . . . . . . . . . . . . 27
BIOS Fault Code Messages
Configuration Utility
. . . . . . . . . . . . . . . . . . . . . . . . . . . . . . . 28
Starting the Configuration Utility
Functions Performed
Navigating the Configuration Utility
Integrated RAID Configuration and Management Screens
Select New Array Type
Create New Array
View Array
Manage Array
Exit Screen
. . . . . . . . . . . . . . . . . . . . . . . . . . . . . . 29
. . . . . . . . . . . . . . . . . . . . . . . . . . . . . . . . . 31
. . . . . . . . . . . . . . . . . . . . . . . . . . . . . . . . 31
. . . . . . . . . . . . . . . . . . . . . . . . . . . . . . . . . 31
. . . . . . . . . . . . . . . . . . . . . . . . . 27
. . . . . . . . . . . . . . . . . . . . . . 28
. . . . . . . . . . . . . . . . . . . . . . . . . . . . 28
. . . . . . . . . . . . . . . . . . . . 29
. . . . . . . . . . . 29
. . . . . . . . . . . . . . . . . . . . . . . . . . . 29
4 Contents
Performing Configuration Tasks
. . . . . . . . . . . . . . . . . . . . . . . . . 32
Creating an Integrated Striping Virtual Disk
Creating a Integrated Mirroring Virtual Disk
Viewing Virtual Disk Properties
Synchronizing a Virtual Disk
Activating a Virtual Disk
Deleting a Virtual Disk
Hot Spare Failover
. . . . . . . . . . . . . . . . . . . . . . . . . . . . . 35
. . . . . . . . . . . . . . . . . . . . . . . 34
. . . . . . . . . . . . . . . . . . . . . . . . 34
. . . . . . . . . . . . . . . . . . . . . . . . . . 34
. . . . . . . . . . . . . . . . . . . . . . . . . . . 35
Replacing and Rebuilding a Degraded Virtual Disk
. . . . . . . . . . . . . . . . 32
. . . . . . . . . . . . . . . . 33
. . . . . . . . . . . . 35
Page 5

6 Troubleshooting . . . . . . . . . . . . . . . . . . . . . . . . . . . . . . 37
BIOS Boot Order . . . . . . . . . . . . . . . . . . . . . . . . . . . . . . . . . 37
General Problems
Physical Disk Related Issues
Configuration Utility Error Messages
BIOS Error Messages
. . . . . . . . . . . . . . . . . . . . . . . . . . . . . . . . 37
. . . . . . . . . . . . . . . . . . . . . . . . . . 38
. . . . . . . . . . . . . . . . . . . . . . 39
. . . . . . . . . . . . . . . . . . . . . . . . . . . . . . 40
A Updating the Firmware. . . . . . . . . . . . . . . . . . . . . . . . . . 43
Firmware Update Utility . . . . . . . . . . . . . . . . . . . . . . . . . . . . . 43
B Getting Help . . . . . . . . . . . . . . . . . . . . . . . . . . . . . . . . . 45
Obtaining Assistance . . . . . . . . . . . . . . . . . . . . . . . . . . . . . . 45
Technical Support and Customer Service
Online Services
. . . . . . . . . . . . . . . . . . . . . . . . . . . . . . . 46
Automated Order-Status Service
Dell Enterprise Training
Problems With Your Order
Product Information
. . . . . . . . . . . . . . . . . . . . . . . . . . . . . 47
. . . . . . . . . . . . . . . . . . . . . . . . . . . . 47
. . . . . . . . . . . . . . . . . . . . . . . . . . . . . . . 47
Returning Items for Warranty Repair or Credit
. . . . . . . . . . . . . . . . . 45
. . . . . . . . . . . . . . . . . . . . . . 46
. . . . . . . . . . . . . . . . . 47
Before You Call
. . . . . . . . . . . . . . . . . . . . . . . . . . . . . . . . . . 48
C Regulatory Notices . . . . . . . . . . . . . . . . . . . . . . . . . . . . 49
D Corporate Contact Details (Taiwan Only)
Glossary
Index
. . . . . . . . . . . . . . . . . . . . . . . . . . . . . . . . . . . . . . 55
. . . . . . . . . . . . . . . . . . . . . . . . . . . . . . . . . . . . . . . . . 61
. . . . . . . . . . . . . 53
Contents 5
Page 6

6 Contents
Page 7
CAUTION: Safety Instructions
Use the following safety guidelines to help ensure your own personal safety and to help protect your system and working
environment from potential damage.
NOTE: See the caution and safety statements in your Dell™ PowerEdge™ system or Dell Precision™ workstation.
SAFETY: General
• Observe and follow service markings. Do not service any product except as explained in your user documentation. Opening
or removing covers that are marked with the triangular symbol with a lightning bolt may expose you to electrical shock.
Components inside these compartments should be serviced only by a trained service technician.
• If any of the following conditions occur, unplug the product from the electrical outlet and replace the part or contact your
trained service provider:
– The power cable, extension cable, or plug is damaged.
– An object has fallen into the product.
– The product has been exposed to water.
– The product has been dropped or damaged.
– The product does not operate correctly when you follow the operating instructions.
• Use the product only with approved equipment.
• Operate the product only from the type of external power source indicated on the electrical ratings label. If you are not sure
of the type of power source required, consult your service provider or local power company.
• Handle batteries carefully. Do not disassemble, crush, puncture, short external contacts, dispose of in fire or water, or expose
batteries to temperatures higher than 60 degrees Celsius (140 degrees Fahrenheit). Do not attempt to open or service
batteries; replace batteries only with batteries designated for the product.
SAFETY: When Working Inside Your System
Before you remove the system covers, perform the following steps in the sequence indicated.
CAUTION: Except as expressly otherwise instructed in Dell documentation, only trained service technicians are authorized
to remove the system cover and access any of the components inside the system.
NOTICE: To help avoid possible damage to the system board, wait 5 seconds after turning off the system before removing a
component from the system board or disconnecting a peripheral device.
1
Turn off the system and any devices.
2
Ground yourself by touching an unpainted metal surface on the chassis before touching anything inside the system.
3
While you work, periodically touch an unpainted metal surface on the chassis to dissipate any static electricity that might harm
internal components.
4
Disconnect your system and devices from their power sources. To reduce the potential of personal injury or shock, disconnect
any telecommunication lines from the system.
Safety Instructions 7
Page 8

In addition, take note of these safety guidelines when appropriate:
• When you disconnect a cable, pull on its connector or on its strain-relief loop, not on the cable itself. Some cables have a
connector with locking tabs; if you are disconnecting this type of cable, press in on the locking tabs before disconnecting the
cable. As you pull connectors apart, keep them evenly aligned to avoid bending any connector pins. Also, before you connect
a cable, make sure that both connectors are correctly oriented and aligned.
• Handle components and cards with care. Do not touch the components or contacts on a card. Hold a card by its edges or by
its metal mounting bracket. Hold a component such as a microprocessor chip by its edges, not by its pins.
SAFETY: Protecting Against Electrostatic Discharge
Electrostatic discharge (ESD) events can harm electronic components inside your computer. Under certain conditions, ESD may
build up on your body or an object, such as a peripheral, and then discharge into another object, such as your computer. To prevent
ESD damage, you should discharge static electricity from your body before you interact with any of your computer’s internal
electronic components, such as a memory module. You can protect against ESD by touching a metal grounded object (such as an
unpainted metal surface on your computer’s I/O panel) before you interact with anything electronic. When connecting a
peripheral (including handheld digital assistants) to your computer, you should always ground both yourself and the peripheral
before connecting it to the computer. In addition, as you work inside the computer, periodically touch an I/O connector to remove
any static charge your body may have accumulated.
You can also take the following steps to prevent damage from electrostatic discharge:
• When unpacking a static-sensitive component from its shipping carton, do not remove the component from the antistatic
packing material until you are ready to install the component. Just before unwrapping the antistatic package, be sure to
discharge static electricity from your body.
• When transporting a sensitive component, first place it in an antistatic container or packaging.
• Handle all electrostatic sensitive components in a static-safe area. If possible, use antistatic floor pads and work bench pads.
8 Safety Instructions
Page 9
Overview
The Dell™ Serial-Attached SCSI (SAS) 6/iR controller is Dell’s next generation controller with
integrated redundant array of independent disks (RAID) capabilities. SAS technology is not
backward compatible with the previous generation of SAS or SCSI devices. The SAS 6/iR Adapter is
a half-length, standard-height PCI-E card, while the SAS 6/iR Integrated is embedded in the
platform hardware. The SAS 6/iR Adapter is supported on platforms with PCI-E x8 or x16 connectors.
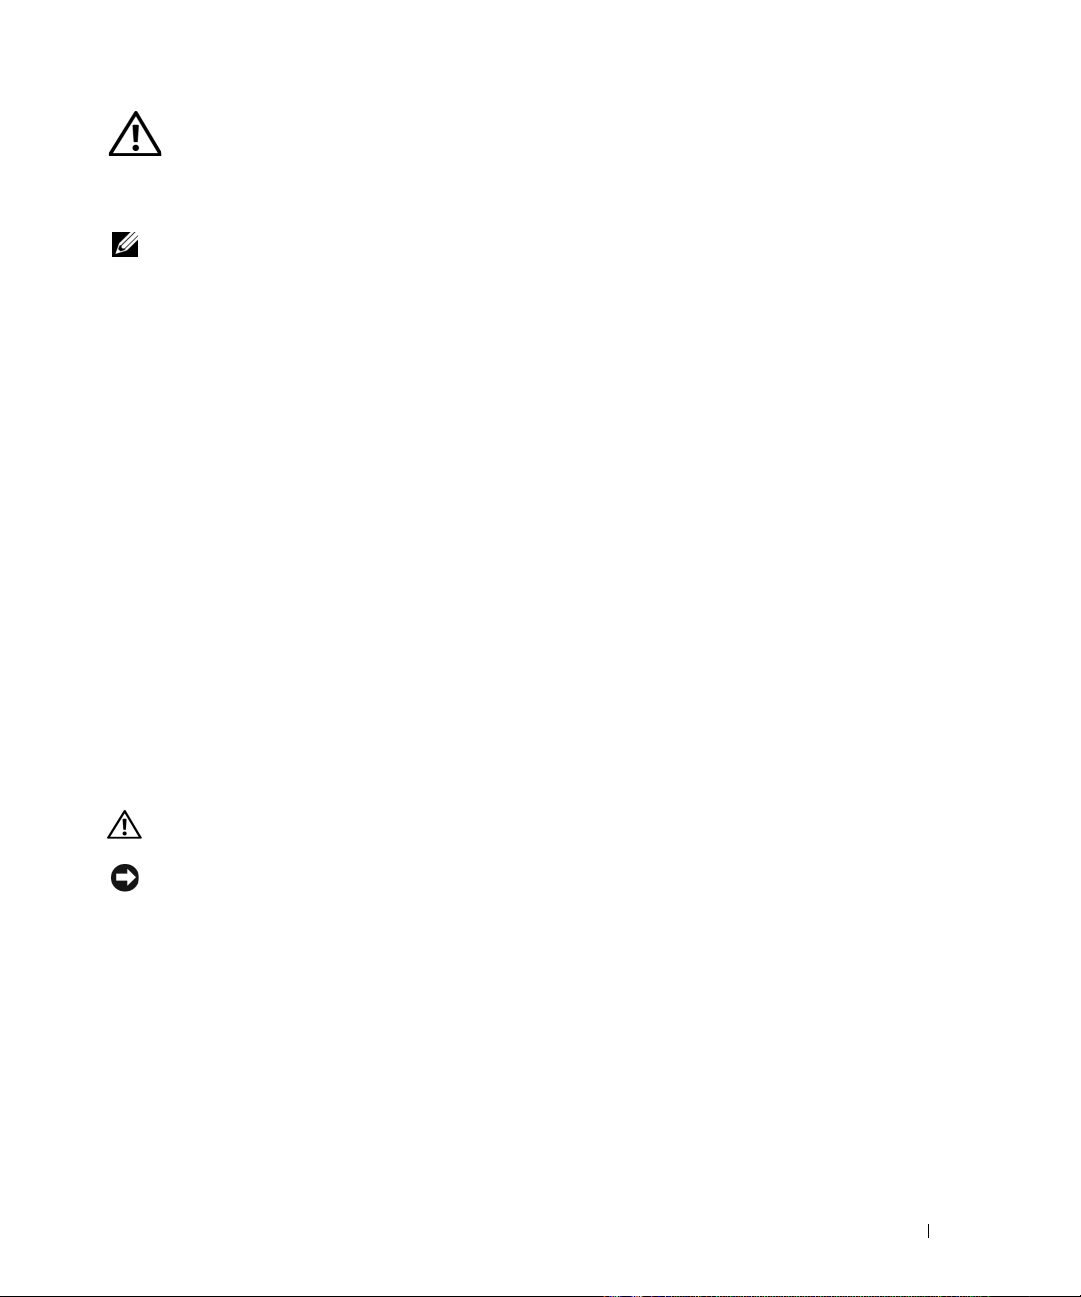
Figure 1-1. SAS 6/iR Adapter Hardware Architecture
1
2
1 SAS x4 internal connector 2 PCI-E connector
Overview 9
Page 10
About RAID
RAID is a group of multiple independent physical disks that provide high performance by increasing the
number of drives used for saving and accessing data. A RAID disk subsystem improves I/O performance
and data availability. The physical disk group appears to the host system as a single storage unit or as
multiple logical units. Data throughput improves because multiple disks can be accessed simultaneously.
RAID systems also improve data storage availability and fault tolerance.
RAID Levels
Integrated Striping or RAID 0 uses disk striping to provide high data throughput, especially for large files
in an environment that requires no data redundancy.
Integrated Mirroring or RAID 1 uses disk mirroring so that data written to one physical disk is
simultaneously written to another physical disk. This is good for small databases or other applications
that require small capacity, but complete data redundancy.
NOTICE: Lost data on an Integrated Striping virtual disk cannot be recovered in the event of a physical disk failure.
RAID Terminology
Integrated Striping
Integrated Striping (RAID 0) allows you to write data across multiple physical disks instead of just one
physical disk. Integrated Striping involves partitioning each physical disk storage space into 64 KB stripes.
These stripes are interleaved in a repeated sequential manner. The part of the stripe on a single physical
disk is called a stripe element.
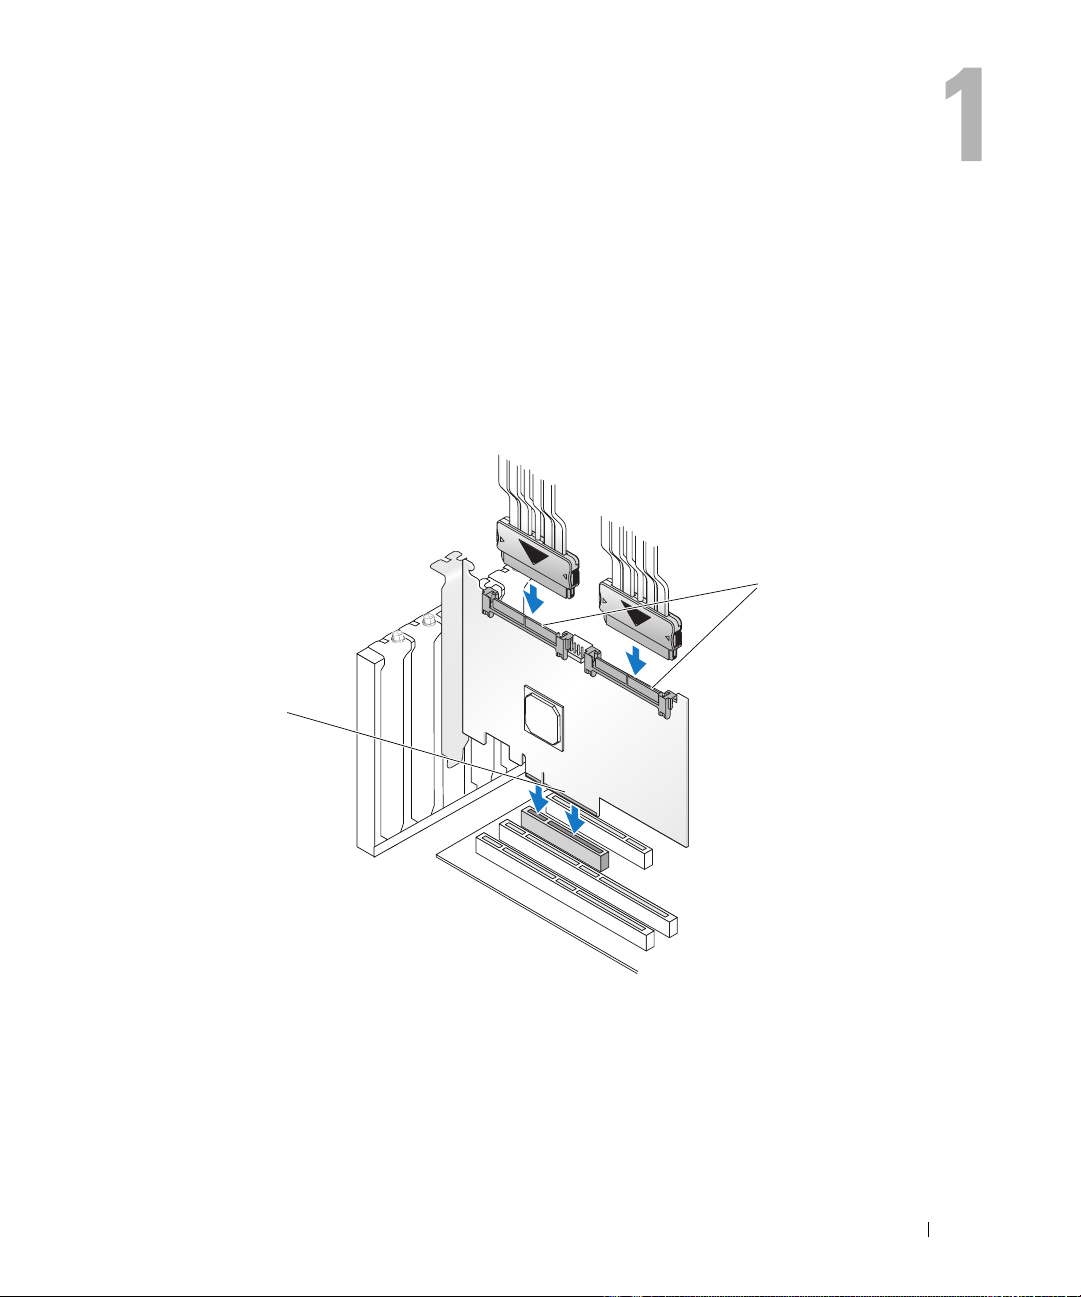
For example, in a four-disk system using only Integrated Striping, segment 1 is written to disk 1, segment 2
is written to disk 2, and so on. Integrated Striping enhances performance because multiple physical disks
are accessed simultaneously, but Integrated Striping does not provide data redundancy. Figure 1-2 shows
an example of Integrated Striping.
Figure 1-2. Example of Integrated Striping (RAID 0)
Stripe element 1
Stripe element 5
Stripe element 9
Stripe element 2
Stripe element 6
Stripe element 10
10 Overview
Stripe element 3
Stripe element 7
Stripe element 11
Stripe element 4
Stripe element 8
Stripe element 12
Page 11
Integrated Mirroring
With Integrated Mirroring (RAID 1), data written to one disk is simultaneously written to another disk.
If one disk fails, the contents of the other disk can be used to run the system and rebuild the failed
physical disk. The primary advantage of Integrated Mirroring is that it provides 100 percent data
redundancy. Because the contents of the disk are completely written to a second disk, it does not matter
if one of the disks fails. Both disks contain the same data at all times. Either physical disk can act as the
operational physical disk.
NOTE: Mirrored physical disks improve read performance by read load balance.
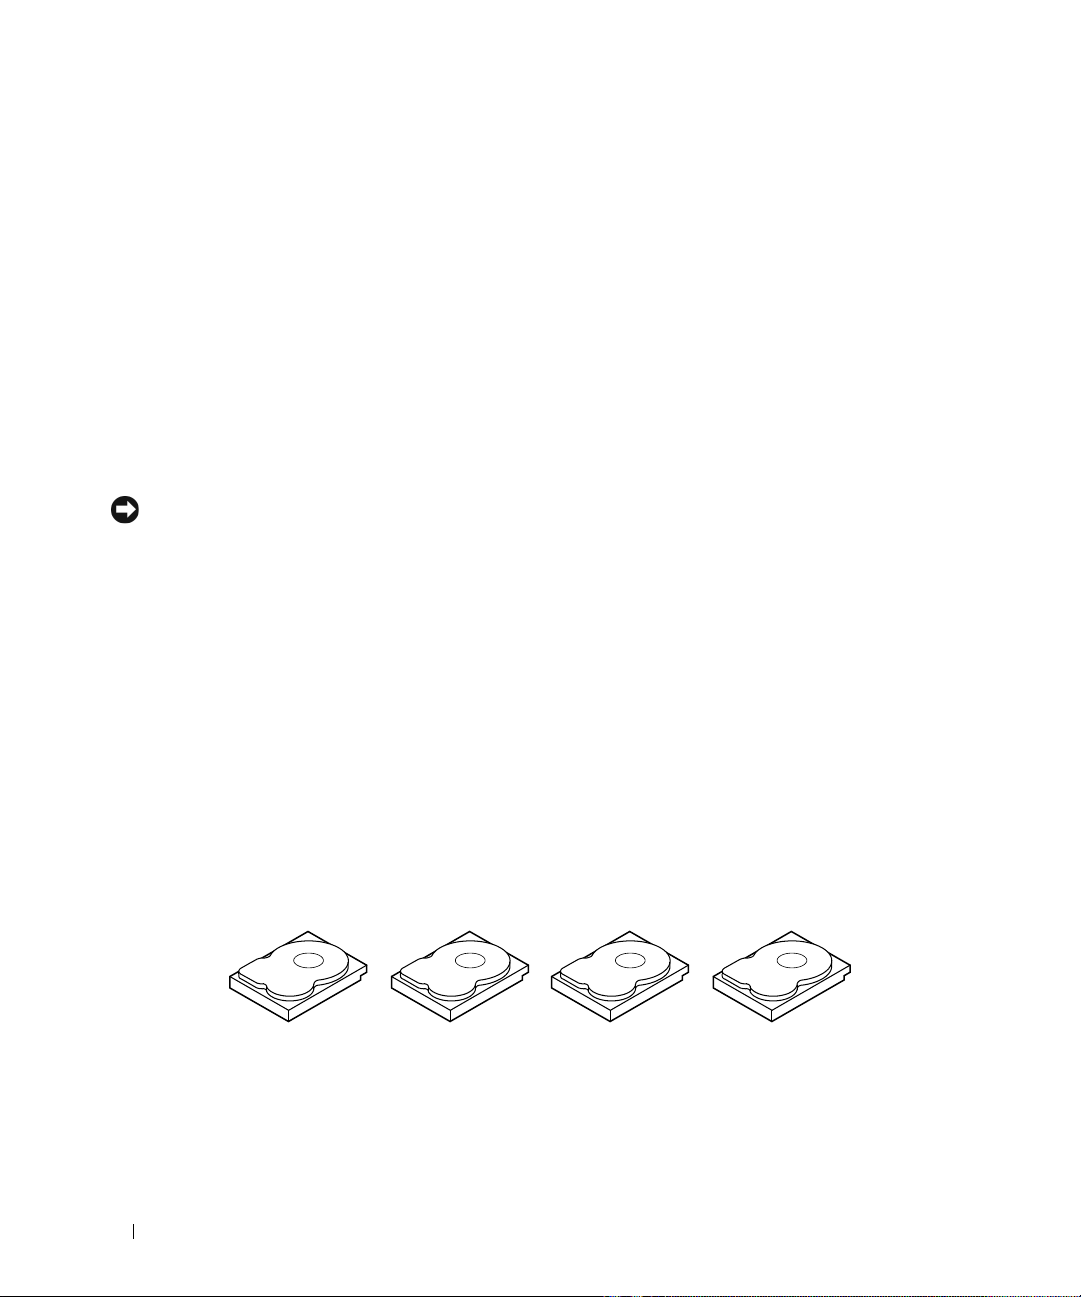
Figure 1-3. Example of Integrated Mirroring (RAID 1)
Stripe element 1
Stripe element 2
Stripe element 3
Stripe element 4 Stripe element 4 Duplicated
Stripe element 1 Duplicated
Stripe element 2 Duplicated
Stripe element 3 Duplicated
Overview 11
Page 12

12 Overview
Page 13

SAS 6/iR Features
This section provides the specifications of Dell™ Serial-Attached SCSI (SAS) 6/iR controller. The
following table compares the specifications of the SAS 6/iR Adapter and SAS 6/iR Integrated.
Table 2-1. Specifications of SAS 6/iR
Specification SAS 6/iR Adapter SAS 6/iR Integrated
SAS technology Yes Yes
Support for x4, x8, or x16 PCI
Express Host Interface
Form Fa ctor
I/O controller (IOC)
Operating voltage requirements +12V, +3.3V, +3.3Vaux +12V, +3.3V, +3.3Vaux
Communication to the system PCI-E lanes System dependent
Communication to end devices SAS Links SAS Links
SAS Connectors 2 x4 Internal System dependent
Lead Free Yes Yes
Supported operating systems
Windows Miniport Interface Storport, SCSIport (Windows XP
Supported drivers for Linux Yes Yes
Dell-compliant SAS and SATA
compatibility
Dell supported direct connected
end devices
Ye s Ye s
Standard-Height, Half-Length PCI
Adapter
LSI SAS 1068e LSI SAS 1068e
Core Speed: 255 MHz Core Speed: 255 MHz
Microsoft
Family, Windows
Vista™ Business 32BIT and Business
64BIT, Red Hat
Versions 4 and 5, SUSE
Enterprise Server Version 10.
32-bit only)
Ye s Ye s
Dell-compliant physical disks Dell-compliant physical disks
®
Windows Server® 2003
®
XP, Windows
®
Enterprise Linux®
®
Linux
System dependent
Microsoft Windows Server
Family, Windows XP,
Windows Vista Business 32BIT
and Business 64BIT, Red Hat
Enterprise Linux Versions 4 and 5,
SUSE Linux Enterprise Server
Version 10.
Storport, SCSIport (Windows XP
32-bit only)
2003
SAS 6/iR Features 13
Page 14

Table 2-1. Specifications of SAS 6/iR (continued)
Specification SAS 6/iR Adapter SAS 6/iR Integrated
Hot add / Hot remove of end devices Yes System dependent
SMART error support through
management applications
Backplane supported systems Yes Yes
Hardware-based RAID RAID 0, RAID 1 RAID 0, RAID 1
Maximum number of virtual disks 2 2
Storage management software
Support for internal tape drive No No
Support for Hotspare Yes Yes
Maximum number of Hotspares 2 2
Ye s Ye s
OpenManage™ Storage Services,
SAS RAID Storage Manager
OpenManage Storage Services,
SAS RAID Storage Manager
14 SAS 6/iR Features
Page 15
Hardware Installation
This chapter describes how to install the Dell™ Serial-Attached SCSI (SAS) 6/iR Adapter.
NOTE: The SAS 6/iR Integrated is embedded on the system motherboard and does not require any installation.
See your system’s Hardware Owner’s Manual or the User’s Guide for instructions.
Installing the SAS 6/iR Adapter
CAUTION: For some systems, only trained service technicians are authorized to remove the system cover
and access any of the components inside the system. Before performing any procedure, see your
Product Information Guide for complete information about safety precautions, working inside the computer,
and protecting against electrostatic discharge.
1
Unpack the SAS 6/iR Adapter and check for damage.
NOTE: Contact Dell if the controller is damaged.
2
Turn off the system and attached peripherals, and disconnect the system from the electrical
outlet. See your system’s
on power supplies.
3
Disconnect the system from the network and remove the cover of the system. See your system’s
Hardware Owner’s Manual
4
Select an appropriate
aligned with the PCI-E slot you have selected.
NOTE: For more information about your system’s PCI-E slots, see your system’s Hardware Owner’s
Manual.
5
Align the SAS 6/iR Adapter to the P
6
Insert the controller gently, but firmly, until the controller is firmly seated in the PCI-E slot.
See Figure 3-1.
Hardware Owner’s Manual
or the
User’s Guide
PCI-E slot. Remove the blank filler bracket on the back of the system
CI-E
slot you have selected.
or the
User’s Guide
for more information on opening the system.
for more information
Hardware Installation 15
Page 16
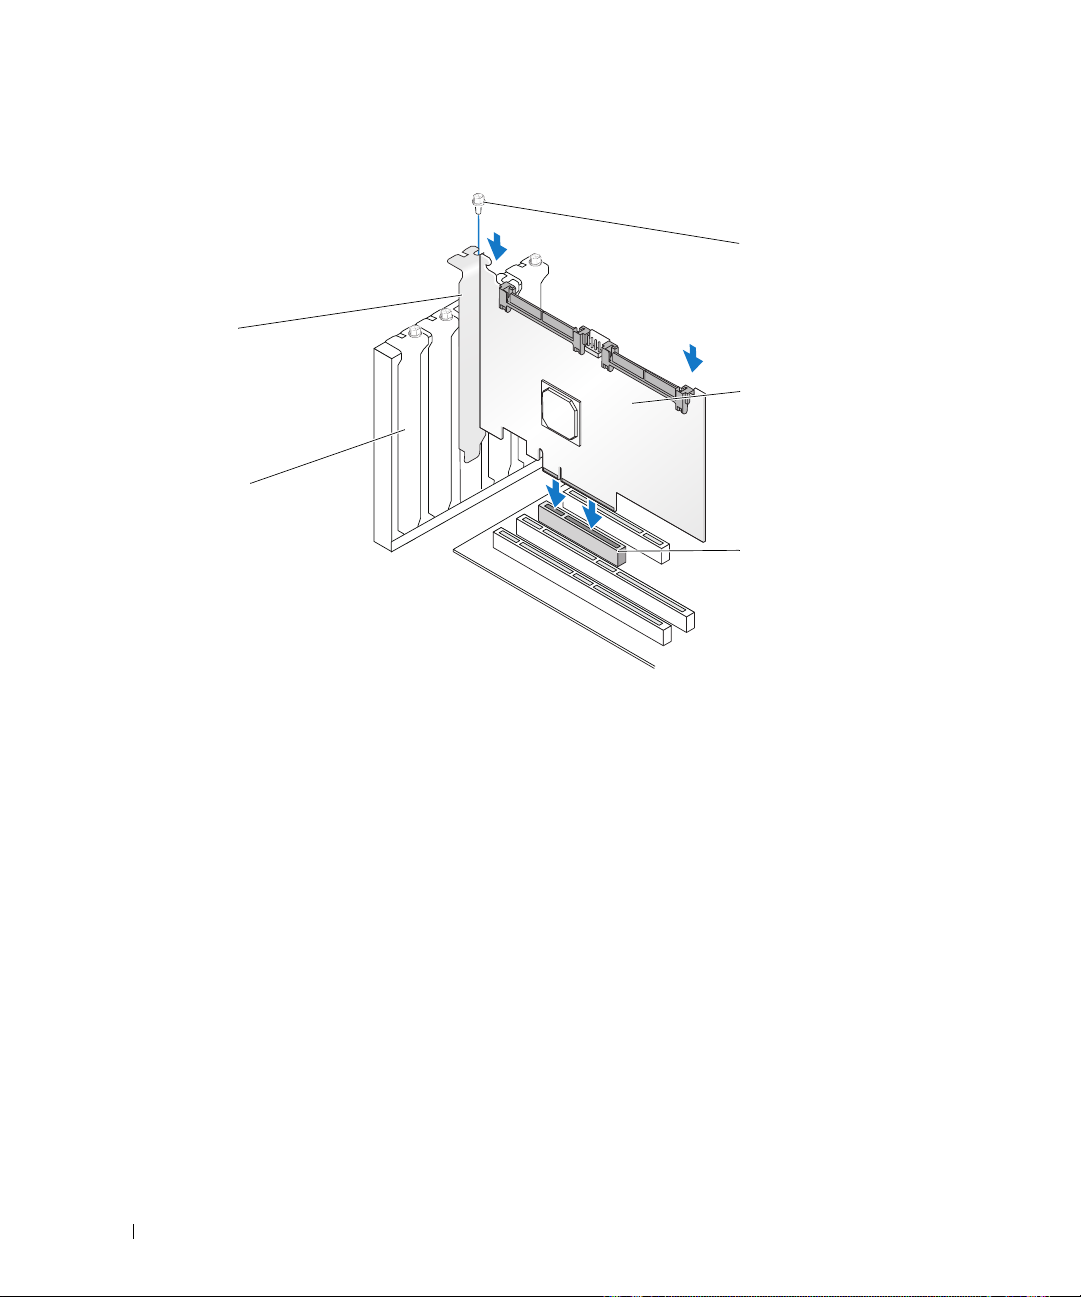
Figure 3-1. Installing a SAS 6/iR Adapter
4
5
1 bracket screw 2 SAS 6/iR Adapter 3 PCI-E slot
4 PCI bracket 5 filler bracket
1
2
3
7
Tighten the bracket screw, if any, or use the system’s retention clips to secure the controller to the
system’s chassis.
8
Connect the cables from the end devices or the backplane of the system to the controller.
See Figure 3-2.
16 Hardware Installation
Page 17
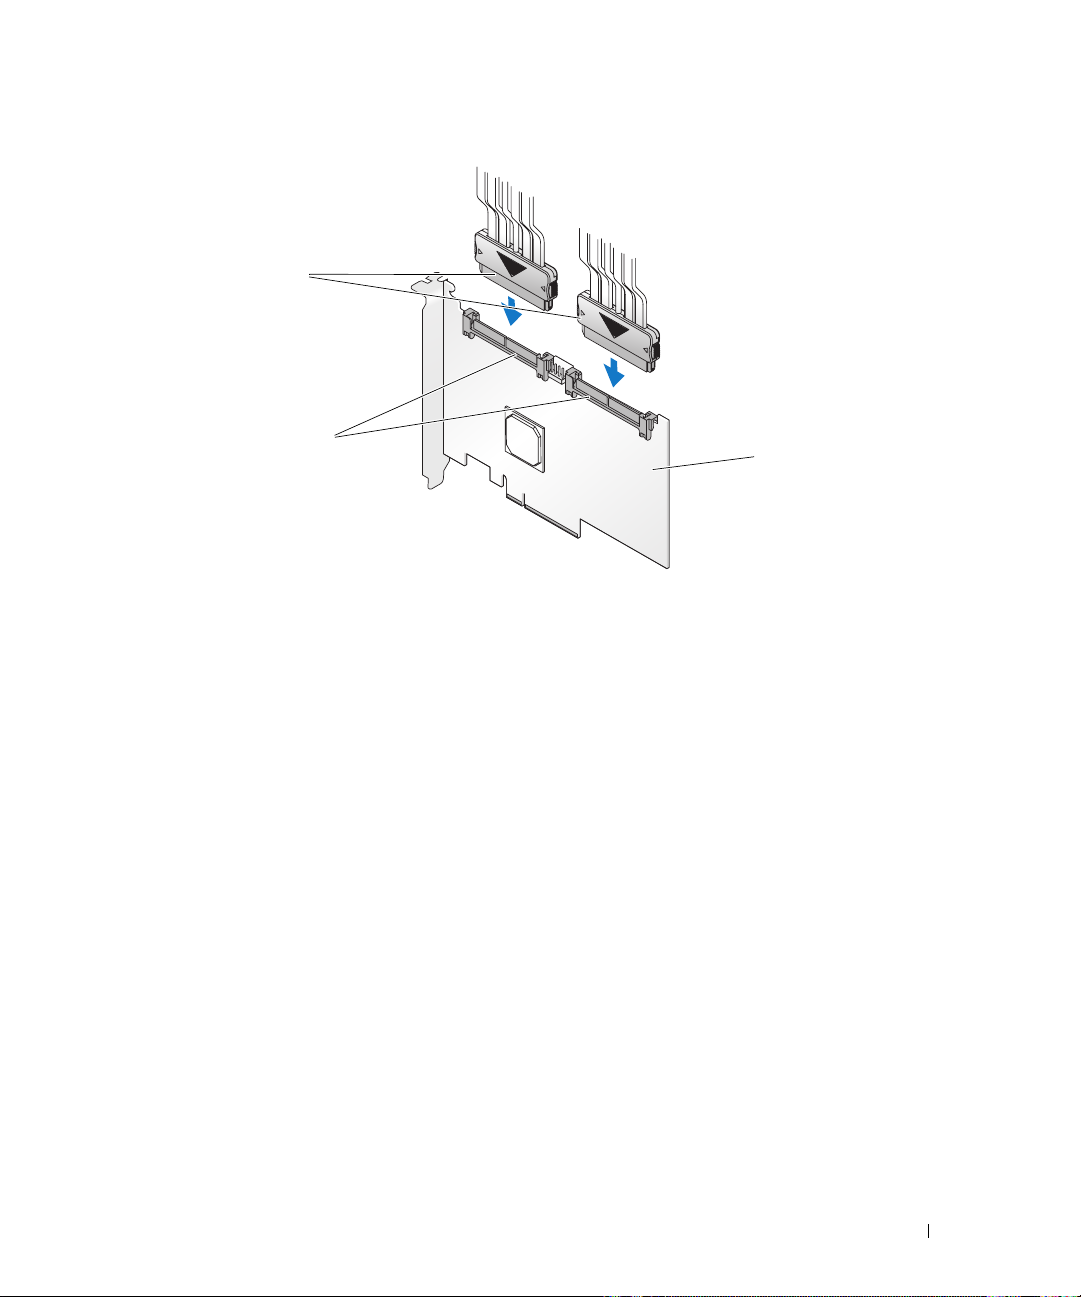
Figure 3-2. Connecting the Cable
3
2
1 SAS 6/iR Adapter 2 SAS x4 internal connector 3 cable
9
Replace the cover of the system. See your system’s
Hardware Owner’s Manual
more information on closing the system.
10
Reconnect the power cable(s) and network cables, and then turn on the system.
1
or the
User’s Guide
for
Hardware Installation 17
Page 18

18 Hardware Installation
Page 19
Driver Installation
The
Dell™ Serial-Attached SCSI (SAS) 6/iR controller
Microsoft
This chapter contains the procedures for installing the drivers for the following operating systems:
• Microsoft Windows Server
• Microsoft Windows XP.
• Red Hat Linux Versions 4 and 5.
• SUSE Linux Enterprise Server Version 10.
• Windows Vista™.
The four methods for installing a driver that are discussed in this chapter are:
• During operating system installation.
• After adding a new SAS 6/iR controller on an existing operating system.
• Updating existing drivers.
• Installing from a
®
Windows®, Red Hat® Linux®, and SUSE® Linux operating systems.
®
2003 Server family.
Dell Precision™ Workstation Operating System
the drivers.
NOTE: Operating system installation on an Integrated Mirroring or Integrated Striping virtual disk is
supported only when the virtual disk is in an optimal state.
NOTE: Device drivers are frequently updated. To ensure you have the latest version of any driver mentioned
in this section, check the Dell Support website at support.dell.com. If a newer version exists, you can
download the driver to your system.
requires software drivers to operate with
CD or DVD. This media includes
Creating a Driver Diskette
NOTE: Driver diskette is not needed if you are installing from a Dell Precision™ Workstation Operating System
CD or DVD.
1
Browse to the download section of the system on the Dell Support website at
2
Locate and download the latest SAS 6/iR driver for the system. The drivers are packaged on the
Dell Support website such that they can be written onto a diskette.
3
Follow the instructions on the support site for extracting the driver to the diskette.
support.dell.com
Driver Installation 19
.
Page 20

Installing the Driver During Windows Operating System
Installation
NOTE: You do not need to provide a driver to install the Windows Vista operating system as the driver is native to
this operating system.
To install the driver during Windows operating system installation:
Boot the system using the
1
2
When the message
RAID driver
Within a few minutes, a screen appears that asks for additional controllers in the system.
NOTE: This step is not required for systems running Windows Vista.
3
Press <S>.
The system prompts for the driver diskette to be inserted.
4
Insert the driver diskette in the diskette drive and press <Enter>.
A list of SAS 6/iR drivers appears.
5
Select the appropriate driver and press <Enter> to load the driver.
NOTE: For some Windows operating systems, a message may appear that states that the driver you provided
is older/newer than the Windows driver. Press <S> to use the driver that is on the floppy diskette.
6
Press <Enter> again to continue the installation.
appears, press <F6> immediately.
Microsoft® Windows Installation
Press F6 if you need to install a third party SCSI or
CD.
Installing a Windows Driver for a New SAS 6/iR Controller
NOTE: You do not need to provide a driver to install the Windows Vista operating system as the driver is native to
this operating system.
To configure the driver when you add the SAS 6/iR controller to a system that already has Windows
installed:
1
Turn off the system.
2
Install the new SAS 6/iR controller in the system.
See "Hardware Installation" on page 15 for detailed instructions on installing and cabling the
SAS 6/iR controller.
3
Turn on the system.
The Windows operating system should detect the new controller and display a message to inform the user.
NOTE: For systems with Windows Vista, the new controller is configured using the native driver. To ensure
you have the latest version of this driver, check the Dell Support website at support.dell.com. If a newer
version exists, you can download the driver to your system.
20 Driver Installation
Page 21

4
The
Found New Hardware
NOTE: In some Windows operating systems, the initial Found New Hardware screen may request to connect
to the Internet in order to find the appropriate driver for the found device. Select No, not at this time.
5
Click
Next
.
6
On the
7
Provide the appropriate driver package (from your driver diskette) on the
8
Click
9
The wizard detects and installs the appropriate device drivers for the new SAS 6/iR controller.
10
Click
11
Restart the system.
Locate device driver
Next
.
Finish
to complete the installation.
wizard appears and displays the detected hardware device.
screen, select
Search for a suitable driver for my device
Locate Driver Files
and click
Updating an Existing Windows Driver
To update the Windows driver for the SAS 6/iR controller already installed on your system:
NOTE: It is important that you close all applications on your system before you update the driver.
1
Click
Start→ Control Panel
The
System Properties
→ System
screen appears.
.
Next
screen.
.
NOTE: In some Windows operating systems, click Start→ Settings
2
Click on the
3
Click
The
Device Manager
4
Double-click on
5
Double-click the SAS 6/iR controller for which you want to update the driver.
6
Click the
The
Update Device Driver
7
Insert the appropriate driver diskette.
8
Select
9
Click
10
Follow the steps in the wizard to search the diskette for the driver.
11
Select the name of the driver file from the diskette.
12
Click
13
Click
NOTE: Restart is not required for systems installed with Windows Server 2003 x64.
Hardware
Device Manager
Driver
Install from a list or specific location
Next.
Next
and continue the installation steps in the wizard.
Finish
to exit the wizard and restart the system for the changes to take place.
tab.
.
screen appears.
SCSI and RAID Controllers (Storage Controller
tab and click on
Update Driver
wizard appears.
.
.
→
Control Panel→ System.
in Windows Vista).
Driver Installation 21
Page 22

Installing From the Dell Operating System Media
Use the Operating System media CD or DVD that came with your Dell workstation to install the driver
during the operating system installation.
1
Boot to the
2
Continue your operating system installation using the instructions provided in the CD or DVD.
The driver loads automatically.
Dell Precision™ Workstation Operating System
CD or DVD.
Installing the Red Hat Linux Driver
Use the procedures in this section to install the driver for Red Hat Linux (versions 4 and 5).
NOTE: The device driver for Red Hat Linux Version 5 is native. To ensure you have the latest version of this driver,
check the Dell Support website at support.dell.com. If a newer version exists, you can download the driver to
your system.
Creating a Driver Diskette
Before beginning the installation, copy the drivers from the Dell™ PowerEdge™ Service and Diagnostic
Utilities CD that shipped with your system or download the driver appropriate for Red Hat Linux
(versions 4 and 5) from the Dell Support website at support.dell.com to your temporary directory. This
file includes a Red Hat Package Managers (RPMs), driver update disk files, and the Dynamic Kernel
Module Support (DKMS) Red Hat Package Manager file.
The package is a gzipped tar file. After downloading the package to a Linux system:
1
Execute gunzip driver_package.tgz to unzip the files.
2
Execute tar -xvf on the package to extract the driver files from the tar package.
NOTE: The package contains a DKMS RPM, the driver RPM (DKMS enabled), Driver Update Diskette (DUD)
images, release notes, and source code.
3
Use the dd command to create a driver update disk. Use the appropriate DUD image for this purpose.
"dd if=<name of the dd image file> of=/dev/fd0"
4
Use the diskette for operating system installation as described later in this section.
NOTE: The SAS 6i/R driver is native on the Red Hat Enterprise Linux 5.0 operating system and later versions.
It is recommended that you install these operating systems with the native driver. After installation, use the
DUD image to update the driver.
22 Driver Installation
Page 23

Creating a Driver Update Diskette
The following files are needed before you create the DUD.
NOTE: The SAS 6/iR driver package installs these files. You do not need to do anything at this point.
• The directory
/usr/src/mptlinux-<driver_version>
contains the driver source code,
dkms.conf
specifications file for the driver.
• The subdirectory
disk_info, modinfo, modules.dep
redhat_driver_disk
, and
contains the files needed to create the DUD. The files needed are
pcitable
.
• To create the DUD image for pre-Red Hat Linux (version 4), the kernel source package must be
installed to compile the driver. For Red Hat Linux 4 distribution, the kernel source is not needed.
Perform the following steps to create the DUD using the DKMS tool:
1
Install the DKMS-enabled SAS 6/iR driver rpm package on a system running Red Hat Linux
operating system.
2
Type the following command in any directory:
dkms mkdriverdisk -d redhat -m mptlinux -v <driver version>
-k <kernel version>
If you want to build the DUD image for multiple kernel versions, use the following command:
3
dkms mkdriverdisk -d redhat -m mptlinux -v <driver version>
-k <kernel_version_1> -k <kernel_version_2>...
4
After the DUD image has been built, you can find it in the DKMS tree for the SAS 6/iR driver.
NOTE: The DKMS package supports both Red Hat Linux and SUSE Linux.
, and
Installing the Driver
To install Red Hat Linux (versions 4 and 5) and the appropriate driver:
1
Boot normally from the Red Hat Linux installation CD.
2
At the command prompt, type:
When the install prompts for a driver diskette, insert the diskette and press <Enter>.
3
Linux expert dd
See "Creating a Driver Diskette" on page 19 for information on creating a driver diskette.
4
Complete the driver installation as directed by the program.
Installing the Driver Using an Update RPM
The following steps explain the installation procedure for the Red Hat Linux (versions 4 and 5) operating
systems and the appropriate RAID driver using an update RPM:
Driver Installation 23
Page 24

Installing the RPM Package with DKMS Support
1
Uncompress the zipped file of the DKMS-enabled driver package.
2
Install the DKMS package using the command:
NOTE: The switch -Uvh is intended for the rpm update only. When installing the rmp package for the first
time, use -Ivh.
3
Install the driver package using the command:
4
Restart the system to load the new driver.
rpm -Uvh <DKMS package name>
rpm -Uvh <Driver package name>
.
.
Installing the SUSE Linux Enterprise Server Driver
Use the procedures in this section to install the driver for SUSE Linux Enterprise Server Version 10.
NOTE: The device driver for SUSE Linux Enterprise Server Version 10 is native. To ensure you have the latest
version of this driver, check the Dell Support website at support.dell.com. If a newer version exists, you can
download the driver to your system.
Installing the Driver Using an Update RPM
The following process explains the installation procedure for the SUSE Linux Enterprise Server Version 10.
operating system and the appropriate RAID driver using an update RPM.
Installing the RPM Package with DKMS Support
1
Uncompress the zipped file of the DKMS-enabled driver package.
2
Install the DKMS package using the command:
rpm -Uvh <DKMS package name>
.
NOTE: The switch -Uvh is intended for the rpm update only. When installing the rmp package for the first
time, use -Ivh.
3
Install the driver package using the command:
4
Restart the system to load the new driver.
Creating the Driver Update Diskette
rpm -Uvh <Driver package name>
The following files are needed before you create the DUD:
NOTE: The SAS 6/iR driver package installs these files. You do not need to do anything at this point.
• The directory
/usr/src/mptlinux -<driver_version>
contains the driver source code,
specifications file for the driver.
• The subdirectory
disk_info, modinfo, modules.dep
redhat_driver_disk
, and
contains the files needed to create the DUD. The files needed are
pcitable
.
24 Driver Installation
.
dkms.conf
, and
Page 25

To create the DUD using the DKMS tool:
1
Install the DKMS-enabled SAS 6/iR driver rpm package on a system running a SUSE Linux
operating system.
2
Type the following command in any directory:
dkms mkdriverdisk -d redhat -m mptlinux -v <driver version>
-k <kernel version>
This starts the process to create the SAS 6/iR DUD image.
3
If you want to build the DUD image for multiple kernel versions, use the following command:
dkms mkdriverdisk -d redhat -m mptlinux -v <driver version>
-k <kernel_version_1> -k <kernel_version_2>...
4
After the DUD image has been built, you can find it in the DKMS tree for the SAS 6/iR driver.
NOTE: The DKMS package supports both Red Hat Linux and SUSE Linux Enterprise Server.
Installing SUSE Linux Enterprise Server Using the Driver Update Diskette
NOTE: See "Creating a Driver Diskette" on page 19 for information on creating a driver diskette.
NOTE: The SAS 6i/R driver is native on the SUSE Linux Enterprise Server Version 10 operating system and later
versions. It is recommended that you install these operating systems with the native driver. After installation, use
the DUD image to update the driver.
1
Insert the appropriate
and boot.
2
Press <F5> for the driver update option and then select
3
Select
INSTALLATION
4
Press <Enter> to load the Linux kernel.
5
Insert the driver update floppy/CD.
6
At the prompt
The system selects the driver from the diskette and installs it.
SUSE Linux Enterprise Server Version 10 Service Pack (SP)
Yes
.
from the menu options.
Please insert the driver update floppy/CDROM
CD in the system
, click OK.
7
If you do not need to provide any other drivers, click OK.
After the system completes loading all the new drivers, normal installation completes.
Back
If you want to install additional drivers, click
click
OK
.
. Select the location of the additional driver(s) and
After the system completes loading all the new drivers, normal installation completes.
Driver Installation 25
Page 26

Upgrading the Kernel
If you run the up2date utility to upgrade the kernel, the DKMS enabled driver packages must be
reinstalled. To do so, type the following in the same order in a terminal window.:
dkms build -m <module_name> -v <module version> -k <kernel version>
dkms install -m <module_name> -v <module version> -k <kernel version>
Check whether the driver is successfully installed in the new kernel by typing:
dkms status
You must see a message similar to the following one on the screen:
<driver name>, <driver version>, <new kernel version>: installed
26 Driver Installation
Page 27

SAS 6/iR BIOS
The BIOS of the Dell™ Serial-Attached SCSI (SAS) 6/iR controller offers the following features:
• Support for multiple SAS adapters
• POST Memory Management (PMM) support
• Redundant Array of Independent Disks (RAID) configuration tool
• Read-only memory (ROM) BIOS recovery image
• POST status error messaging
• Compatibility with Console Redirection
• POST accessible, text-based configuration utility (CTRL-C)
POST Messages
During POST, the BIOS displays messages that provide the status and identification information of
the SAS 6/iR controller, and also displays errors detected during the POST process.
The BIOS POST identification banner prints the BIOS identification, copyright information, and
the controller version. It displays the list of controllers and devices detected at initialization in a
hierarchical order. The BIOS also prompts you to start the Configuration Utility during the
POST process.
BIOS Fault Code Messages
If an error is encountered in the BIOS during POST, an error message appears by default and the
POST process continues. The BIOS Configuration Utility forces the user to acknowledge BIOS
errors during POST by halting the POST process after the error display and forcing the user to press
any key to continue.
The BIOS offers two options:
• The boot process can be stopped if an error is encountered.
• The boot process can continue even if there is an error.
SAS 6/iR BIOS 27
Page 28

Configuration Utility
Starting the Configuration Utility
1
Boot the system.
2
Press <Ctrl+C> during POST when prompted.
If you wait too long and the operating system logo appears, continue to wait until the operating system
completes bootup. Then restart your system and try again.
The Configuration Utility menu screen displays.
Functions Performed
NOTE: The screens are organized in a hierarchical fashion and navigation hints are displayed at the bottom of
each screen. See the online help for additional information about the utility.
Table 5-1. Functions Performed by the Configuration Utility
Function Description
Adapter List Lists all the SAS 6/iR controllers in the system.
Global Properties Lists static and modifiable properties applicable to all SAS 6/iR controllers in
the system.
Adapter Properties Main screen for the selected controller. Lists the static and modifiable
properties for the selected SAS 6/iR controller. Provides a menu for additional
screens.
Select New Array Type Provides the option to view existing arrays or create new arrays.
Create New Array Provides the ability to add devices to the specified new array.
View Array Displays the properties for the existing array and the option to enter the
Mange Array screen.
Manage Array Provides options for managing the current array.
Manage Hot Spares Provides the ability to add or remove global hot spares.
SAS Topology Lists the physical topology for the selected controller.
Device Properties Lists the properties of physical devices attached to the selected controller.
Advanced Adapter Properties Lists the advanced properties for the selected controller.
Advanced Device Properties Lists static and modifiable advanced properties for all devices attached to the
selected controller.
PHY Properties Lists the properties for the PHYs for the selected controller.
28 SAS 6/iR BIOS
Page 29

Navigating the Configuration Utility
The navigation hints are displayed at the bottom of each screen. Online help is also available in the
utility. The screens are organized in a hierarchical fashion.
Integrated RAID Configuration and Management Screens
Integrated RAID (IR) configuration and management involves many screens, all of which are accessed by
selecting RAID Properties on the Adapter Properties screen.
• If no RAID arrays are currently configured, you are prompted to create a RAID array.
• If at least one RAID array is currently configured, select
select the appropriate create option to configure a new array.
The screens in the RAID configuration and management properties area are:
• Select New Array Type
• Create New Array
• View Array
• Manage Array
Select New Array Type
The two options for creating a new array are Create IM Volume and Create IS Volume.
Additional information about the disk type options appear on the screen.
View Existing Array
to manage the array(s), or
Create New Array
The Create New Array screen allows you to select disks for a new array.
1
Press <C> to create the array once the array is configured.
2
Save the changes when prompted to do so.
3
Press <F3> to confirm the changes.
After the array is created, the utility returns to the Adapter Properties screen. See the table below for the
array properties description.
NOTE: It is recommended that you back up your data prior to adding or updating configurations.
Table 5-2. Array Field Descriptions
Field Description
Array Number Number of current array out of total arrays configured.
Array Identifier Identifier text for the current array.
Array Type Type of array (IM or IS).
Array Scan Order Scan order for the current array.
SAS 6/iR BIOS 29
Page 30

Table 5-2. Array Field Descriptions (continued)
Field Description
Array Size (MB) Size of the array
NOTE: In order to facilitate coercion on new larger disk drives, the disk size must be coerced
down to the next lower gigabyte. Additionally, for compliance with the latest Disk Data Format
standard, 512 MB of space must be reserved for RAID metadata on the drive. This may result
in greater than 1 GB of space being removed from the usable size of an array when it is
created.
Array Status Status of the current array.
Device Slot Number Slot number in which the specified device sits.
Device Identifier Identifier text for the specified device.
RAID Disk Specifies whether or not the disk is part of a RAID array (Yes or No). This field is grayed
out under the following conditions:
• The disk does not meet the minimum requirements for use in a RAID array.
• The disk is not large enough to mirror existing data on the primary physical disk.
• The disk is a part of another array.
Hotspare Specifies whether or not the disk is a hotspare.
Drive Status Ok - Disk is online and fully functional.
Missing - Diskette is not detected.
Failed - Disk is not accessible or has reported a failure.
Initing - Disk is initializing.
CfgOffln - Disk is offline at host's request.
UserFail - Disk is marked failed at host's request.
Offline - Disk is offline for some other reason.
Inactive - Disk has been set to inactive.
Not Syncd - Data on disk is not synchronized with the rest of the array.
Primary - Disk is the primary disk for a 2 disk mirror and is OK.
Secondary - Disk is the secondary disk for a 2 disk mirror and is OK.
Wrg Type - Device is not compatible for use as part of a RAID array.
Too Small - Disk is too small to mirror existing data.
Max Dsks - Maximum # of disks allowed for this type of array reached Maximum # of
total IR disks on a controller reached.
No SMART - Disk doesn't support SMART and can't be used in a RAID array.
Wrg Intfc - Device interface (SAS/SATA) differs from existing IR disks.
Predicted Failure Indicates whether device SMART is predicting device failure.
Size (MB) Actual physical size of the selected disk in the array.
30 SAS 6/iR BIOS
Page 31

View Array
The View Array screen allows you to view the current array configuration.
Press <Alt+N> to view the next array. See the table above to view descriptions of each
virtual disk property.
Manage Array
The Manage Array screen is used to manage the current array. The options are Manage Hotspares,
Synchronize Mirror, Activate Array, and Delete Array. A confirmation is requested for each action.
Table 5-3. Manage Array Field Descriptions
Field Description
Identifier The identifier of the array.
Type The RAID type of the array.
Scan Order The scan order of the array.
Size (MB) The coerced size of the array.
NOTE: In order to facilitate coercion on new larger disk drives, the disk size must
be coerced down to the next lower Gigabyte. Additionally, for compliance with the
latest Disk Data Format standard, 512 MB of space must be reserved for RAID
Metadata on the drive. This may result in greater than 1 Gigabyte of space being
removed from the usable size of an array when it is created.
Status The status of the array.
Manage Hotspares This option is used to create or delete global hot spares. Using this option you
can also:
• Assign a hot spare, (Integrated Mirror Raid 1 configurations only).
• Display each drive’s type, size and hot spare status.
Synchronize Mirror This option is used to synchronize the IM array.
This option is not accessible under the following conditions:
• The array is inactive.
• The array does not need to be resynchronized.
• IS array is used.
Activate Array This option is used to activate an inactive (foreign) array. The option is grayed
out if there are no inactive arrays.
Delete Array This option is used to delete the currently displayed array.
Exit Screen
It is important to exit the SAS BIOS Configuration Utility properly, because some changes take effect
only when you exit. From the Adapter List, press <Esc> to exit. In addition, a similar exit screen
appears when you exit most other screens, and it can be used to save settings.
SAS 6/iR BIOS 31
Page 32

Performing Configuration Tasks
Creating an Integrated Striping Virtual Disk
An Integrated Striping (IS) virtual disk, also referred to as RAID 0, offers the ability to stripe data across
multiple physical disks. IS volumes offer increased capacity by combining multiple physical disks into a
single virtual disk. IS volumes also offer increased performance by striping disk access across multiple
physical disks. Follow these steps to create an IS virtual disk on a SAS 6/iR controller that does not
currently have a virtual disk configured.
1
Select a controller from the
2
Select the
3
Select
The next screen shows a list of disks that can be added to a virtual disk.
4
Move the cursor to the
pressing the <+>, <->, or space bar. As disks are added, the
the size of the new virtual disk.
NOTICE: All data will be lost upon creation of the virtual disk.
There are several limitations when creating an IS virtual disk:
• All disks must be either Dell-compliant SAS or SATA physical disks.
• SAS and SATA physical disks cannot be used in the same virtual disk.
• Disks must have 512 byte blocks and must not be removable media (e.g., floppy drive,
• There must be at least 2 physical disks in a virtual disk.
• No more than 10 physical disks are allowed in a virtual disk.
5
Press <C> and then select
6
Press <F3> to confirm that existing data will be lost with the creation of the virtual disk. The
Configuration Utility will pause while the virtual disk is being created.
RAID Properties
Create IS Volume
USB key, etc.).
Adapter List
option.
when you are prompted to create either an IS virtual disk or an IM virtual disk.
RAID Disk
Save changes
in the Configuration Utility.
column. To add a disk to the virtual disk, change “No” to “Yes” by
Virtual Disk Size
when the virtual disk has been fully configured.
field changes to reflect
NOTICE: IS does not provide any data protection in the event of disk failure. It is primarily used to increase
performance.
NOTE: Once the number of disks in a RAID virtual disk is set, it cannot be changed.
NOTE: The maximum size of the virtual disk that contains the bootable operating system is 2 Terabytes. This is due
to operating system restrictions.The maximum array size (non-bootable) is 16 Terabytes.
32 SAS 6/iR BIOS
Page 33

Creating a Integrated Mirroring Virtual Disk
An Integrated Mirroring (IM) virtual disk, also referred to as RAID 1, offers the ability to mirror data
from one physical disk onto another one. IM volumes offer increased reliability by combining two
physical disks into a single virtual disk such that each disk contains a mirrored copy of the other’s data.
Follow these steps to create an IM virtual disk on a SAS 6/iR controller that does not currently have a
virtual disk configured.
1
Select a controller from the
2
Select the
3
Select
RAID Properties
Create IM Volume
The next screen shows a list of disks that can be added to a virtual disk.
4
Move the cursor to the
pressing the <+>, <->, or space bar.
NOTICE: Data on both disks will be lost. It is recommended that you back up all data before performing
these steps.
5
As disks are added, the
There are several limitations when creating an IM virtual disk:
• All disks must be either Dell-compliant SAS or SATA physical disks.
• SAS and SATA physical disks cannot be used in the same virtual disk.
• Disks must have 512-byte blocks and must not have removable media.
• There must be 2 physical disks in an IM virtual disk.
6
Press <C> and then select
Adapter List
in the Configuration Utility.
option.
when you are prompted to create either an IS virtual disk or an IM virtual disk.
RAID Disk
Virtual Disk Size
column. To add a disk to the virtual disk, change “No” to “Yes” by
field will change to reflect the size of the new virtual disk.
Save changes
when the virtual disk has been fully configured.
NOTE: There is an option to create a hot spare for an IM virtual disk. The Create Integrated Mirror screen
allows the option to assign a hot spare. Only drives that are compatible with the new virtual disk configuration
can be selected. The maximum number of hot spares allowed is two.
7
Press <F3> to confirm that existing data will be lost with the creation of the virtual disk. The
Configuration Utility will pause while the virtual disk is being created.
NOTE: IM provides protection against the failure of a single physical disk. When a disk fails, the physical disk can
be replaced and the data re-mirrored to the physical disk, maintaining data integrity.
NOTE: The maximum size of the virtual disk that contains the bootable operating system is 2 Terabytes. This is due
to operating system restrictions.The maximum array size (non-bootable) is 16 Terabytes.
SAS 6/iR BIOS 33
Page 34

Viewing Virtual Disk Properties
Follow these steps to view the properties of IS and IM virtual disks:
Select a controller from the
1
2
Select the
RAID Properties
Adapter List
option.
in the Configuration Utility.
• If there are no existing virtual disks, you will be prompted to create an IM or an IS virtual disk.
• If there is one existing virtual disk, select
View Existing Array
.
• If there are two existing virtual disks, press <Alt+N> to view the next virtual disk.
• If a compatible global hot spare exists it displays with the members of the virtual disk.
3
Press <Enter> when the
Manage Array
item is selected to manage the current virtual disk.
Synchronizing a Virtual Disk
Synchronizing a virtual disk means that the firmware synchronizes the data on the secondary disk(s) with the
data on the primary disk of the mirror. Follow these steps to start synchronization for an IM virtual disk:
1
Select
Synchronize Mirror
2
Press Y to start the synchronization or N to cancel it.
.
Activating a Virtual Disk
A virtual disk can become inactive if, for example, it is removed from one SAS 6/iR controller and moved to
another one. The Activate Mirror option allows you to reactivate an inactive virtual disk that has been
added to a system. This option is only available when the selected virtual disk is currently inactive.
NOTE: Do not migrate a volume or hotspares to a different system unless that system does not currently have the
maximum number of virtual disks and hotspares. The maximum number of virtual disks is two and the maximum
number of hotspares is two. Exceeding this number may result in undesirable behavior.
1
Select
Activate Mirror
2
Press Y to proceed with the activation or press N to abandon it.
.
After a pause, the virtual disk will become active.
NOTE: Activation of migrated virtual disks is only supported when the migrated virtual disk(s) is in an optimal state
and contains all the physical disks.
NOTE: If a virtual disk with defined hot spare drives is migrated to a SAS6/iR controller that has a native virtual disk
with defined hot spares already configured, and the total number of hot spares is greater than the maximum
supported number of hot spares (2) then the migrated hot spare drive(s) will be deleted. After a reboot, those drives
are displayed as basic drives on the system. You can then create the desired virtual disk and hot spare drive
configuration using CTRL-C or the RAID management application.
34 SAS 6/iR BIOS
Page 35

Deleting a Virtual Disk
NOTICE: Before deleting a virtual disk, be sure to back up all data on the virtual disk that you want to keep.
Follow these steps to delete a selected virtual disk:
Select
1
2
3
NOTICE: If the physical disks of a virtual disk are removed and the virtual disk’s configuration is subsequently
Delete Virtual Disk
Press Y to delete the virtual disk or press N to abandon the deletion.
Press <F3> to confirm deletion of the virtual disk. After a pause, the firmware deletes the virtual disk.
deleted from the SAS 6/iR controller, the physical disks show up only as simple disks with no RAID association if
they are placed back onto the same SAS 6/iR controller. Once the virtual disk is removed from a SAS 6/iR controller
using the BIOS Configuration Utility (regardless whether the physical disks members are present), the virtual disk
cannot be restored.
.
Hot Spare Failover
If an Integrated Mirror (RAID 1) enters a degraded state, a compatible hot spare automatically begins
rebuilding the degraded virtual disk. The "missing" or "failed" member of the degraded virtual disk
displays as a ‘missing’ global hot spare. The "missing" or "failed" drive must be replaced with a drive
compatible with an existing virtual disk(s).
Replacing and Rebuilding a Degraded Virtual Disk
In the event of a physical disk failure in an IM virtual disk, you will need to replace the disk and
resynchronize the virtual disk. Synchronization occurs automatically on replacing the physical disk using
the following steps.
1
Replace the failed physical disk with a blank disk of the same type and capacity.
2
Check your management application or the BIOS Configuration Utility (Ctrl-C) to ensure
synchronization started automatically.
NOTE: The Dell SAS 6/iR controller only supports migration of consistent virtual disks and does not support hot
migration of virtual disks.
NOTE: During the rebuilding of a volume the synchronization will be restarted from the beginning if a HDD is added
or removed from the system. Wait until any synchronization processes have been completed before adding or
removing HDDs.
NOTE: Always remove any configuration information from HDDs if they are to be removed from a system. This can
be completed by deleting the RAID configuration through the BIOS configuration utility or an operating system
unless you are migrating these HDDs to a different system level application. SAS 6/iR hotspare functionality
requires that the slots in which HDDs are inserted be associated with the virtual disks they are a part of. Do not
insert HDDs with foreign or old (out of date) configuration information stored on those HDDs into slots that are
associated with existing virtual disks.
NOTE: If the system is rebooted while the rebuild is in progress, the rebuild will be restarted from the beginning.
The rebuild time for a volume varies depending on the size of the member disks and any additional system activity.
A system with no additional activity executes a rebuild at approximately 30 MB per second.
SAS 6/iR BIOS 35
Page 36

36 SAS 6/iR BIOS
Page 37

Troubleshooting
To get help with problems with your Dell™ Serial-Attached SCSI (SAS) 6/iR controller, you can
Contact Dell or access the Dell Support website at support.dell.com.
BIOS Boot Order
If you intend to boot to the controller, ensure it is set appropriately in the system's BIOS boot order.
See your system documentation for more information.
General Problems
NOTE: For additional troubleshooting information, see the SAS RAID Storage Manager User’s Guide and the
OpenManage Storage Services User’s Guide.
Table 6-1. General Problems
Problem Suggested Solution
No Physical Disks Found message appears
during a CD installation of Microsoft
®
2003, or Windows®XP.
Server
®
Windows
The message appears due to one of the following
reasons:
• The driver is not supported on the operating system.
• The controller BIOS is disabled.
• Physical disks are not connected or seated properly.
The corresponding solutions to the three causes of the
message are:
• Press <F6> to install the Device Driver
during installation.
• Enter the BIOS Configuration Utility to enable
the BIOS. See "SAS 6/iR BIOS" on page 27.
• Verify if the physical disks are connected or
seated properly.
Troubleshooting 37
Page 38

Physical Disk Related Issues
Table 6-2. Physical Disk Issues
Problem Suggested Solution
The system does not boot from the SAS 6/iR
controller.
Physical disk is not enumerated during POST.
One of the physical disks in the array shows the
status as "Failed".
Integrated Mirroring (IM) virtual disk does
not rebuild.
Ensure that the boot disk is attached to the controller at the
lowest ID and check the controller and the physical disk boot
order in the system BIOS.
NOTE: See your system documentation for information about
boot device selection.
• Go to the Configuration Utility and ensure that the physical
disk is not enumerated in the SAS topology.
• Verify the cable connection.
• Reseat the physical disk.
• Check and reseat the cable.
• Check the SAS cables.
• Reseat the physical disk.
• Check the enclosure or the backplane for damage.
• Contact Dell if the problem persists.
• Enter the Configuration Utility and ensure the physical disk
is enumerated in the SAS topology.
• Ensure the new disk is of the same drive type as the other
disk in the virtual disk (SAS/SATA).
• Ensure the new disk is of equal or greater capacity as the
other disk in the virtual disk.
• Ensure the new disk is not detected as an inactive virtual
disk under the RAID Properties menu. Delete the newly
inserted inactive disk.
• Ensure the inserted disk has the same ID as the disk it is
replacing. Assign the correct ID to the disk or use the
Manage Secondary Disk
• Ensure the new disk is a Dell supported SAS or SATA disk.
feature in the M
anage Array
menu.
38 Troubleshooting
Page 39

Configuration Utility Error Messages
NOTE: These error messages are displayed inside the Configuration Utility. Restart your system and retry if you
encounter any of these.
Table 6-3. Configuration Utility Error Messages
Message Meaning and Suggested Solution
An error occurred while reading
non-volatile settings.
An error occurred while reading
current controller settings.
Advanced Device Properties settings
not found.
Error obtaining PHY properties
configuration information.
Configuration Utility Options Image
checksum error.
Can't load default Configuration
Utility options.
An error occurred while writing
non-volatile settings.
An error reading any one of a number of settings from the
firmware. Reseat the controller and reboot.
Controller setup and initialization has failed. Reboot the
system.
Failed to read vital configuration page from firmware. Reflash
the firmware and reboot.
Failed to read vital configuration page from firmware.Reflash
the firmware and reboot.
Failed to properly read Configuration Utility options from
flash. Restart and retry. If the issue persists, reflash the
firmware on the controller.
Failed to allocate memory for Configuration Utility options
structure.
An error occurred while writing one or more settings to the
firmware.
Troubleshooting 39
Page 40

BIOS Error Messages
Table 6-4. BIOS Error Messages
Message Meaning
Press <Ctrl+C> to Enable BIOS When the BIOS is disabled, you are given the option to
enable it by entering the configuration utility. You can
change the setting to Enabled in the configuration utility.
Adapter at Baseport xxxx is not
responding where xxxx is the
baseport of the controller
Following SAS targets are not
responding...
Adapter configuration may have
changed, reconfiguration is
recommended!
Press CTRL-C to run Dell SAS 6
Configuration Utility…
Initializing... Displays while the BIOS is waiting to initialize.
SAS discovery error Indicates that there was a discovery error reported by the
Integrated RAID exception detected: The BIOS detected an exception with one or more RAID
Volume (xx:yy:zzz) is currently in
state “STATE”
If the controller does not respond for any reason but is
detected by the BIOS, it displays this warning and continues.
Shut down the system and try to reseat the controller. If this
message appears again, Contact Dell.
When the BIOS determines that previously configured
physical disks are not connected to the controller, the BIOS
displays this warning and continues to boot. The system
continues to boot. See "Physical Disk Related Issues" on
page 38 for troubleshooting tips.
Start the Configuration Utility and confirm the configuration
of the SAS 6/iR controller.
firmware and may be accompanied by more such messages.
Enter the Configuration Utility to investigate.
virtual disk. For additional troubleshooting information, see
the error message "Volume (xx:yy:zzz) is
currently in state “STATE”.
Lists the current state of the specified virtual disk when it is
not optimal. The state may include:
• INACTIVE: The virtual disk is inactive, possibly foreign, or
could be in any one of the states mentioned below.
• DEGRADED: The virtual disk is in a degraded state and has
lost redundancy.
• RESYNCING: The virtual disk is degraded and currently
rebuilding.
• FAILED: The virtual disk has an error and is in a failed state.
• MISSING: The virtual disk is no longer present though a
record of it remains.
40 Troubleshooting
Page 41

Table 6-4. BIOS Error Messages (continued)
Message Meaning
Device not available at Device may not be ready at this time. The device will be
retried. If the problem persists, restart your system.
Spinning up the device! The device currently being scanned is being spun up.
ERROR! Device is not responding to
Read Capacity
Failed to add device, too many
devices!
ERROR! Adapter Malfunctioning! The adapter did not initialize properly. There may be a
MPT firmware fault The LSI Logic MPT firmware faulted. Contact Dell.
Adapter removed from boot order! An controller that was previously in the boot order was not
Updating Adapter List! A new adapter was found for which there is no record.
Adapter(s) disabled by user An adapter was found, but it has been disabled in the
Adapter configuration may have
changed, reconfiguration is
suggested!
Memory allocation failed The controller could not allocate enough memory to load the
Invalid or corrupt image One of the images for the Configuration Utility, its strings
Image upload failed Could not upload the image for the Configuration Utility, its
The device did not respond to a read capacity command.
Contact Dell.
Could not allocate resources for additional devices.
problem with the adapter configuration. Reload the BIOS
configuration. Invoke the configuration utility again and see
if the issue persists.
found. It has either been removed from the system or moved
to a different slot.
A record will be created for it.
Configuration Utility and will not be used by the BIOS.
A controller has been moved or reinstalled in the system. Add
it to the boot order using the available resources.
Configuration Utility, its strings file, or its options file.
Reboot the system.
file, or its options file is corrupt. Reload the BIOS. Reflash the
firmware.
strings file, or its options file. Reload the BIOS.Reflash the
firmware.
Troubleshooting 41
Page 42

Table 6-4. BIOS Error Messages (continued)
Message Meaning
Image not found Could not locate the image for the Configuration Utility, its
strings file, or its options file.
Unable to load LSI Configuration
Utility
Unable to load LSI Logic Corp MPT
BIOS
MRT BIOS Fault 02h encountered at
adapter PCI (XXh, XXh,XXh)
Fusion-MPT Firmware fault code 0706h
Could not load the Configuration Utility. This error usually
follows one of the four previous messages.
The controller was downgraded from the current firmware
revision to an earlier revision which cannot support the
current configuration information and cannot be initialized.
Contact Dell support for assistance.
42 Troubleshooting
Page 43

Updating the Firmware
Updating the Dell™ Serial-Attached SCSI (SAS) 6/iR controller firmware is achieved by flashing the
firmware. The firmware can be flashed while the controller is in use. The system must be restarted
for the changes to the firmware to take effect. If there is a failure while flashing the firmware (such
as a power outage) the controller reverts back to the earlier version of the firmware.
NOTE: If you flash the firmware while using the controller, you may notice temporary degradation in the
controller's performance.
Firmware Update Utility
Firmware update utility can be run from a variety of operating systems. Firmware flash is automated
and no user intervention is required. You can obtain firmware flash utility from the Dell™
PowerEdge™ Service and Diagnostic Utilities CD that shipped with your system.
Running the firmware update utility from the operating system is not supported on Dell
workstations. You have to perform a manual update. In the event of new firmware release, check the
Dell Support website at support.dell.com for the latest firmware updates and the firmware
update procedure.
NOTICE: The SAS6/iR Firmware includes non-volatile configuration information (NVDATA). Do not attempt to
downgrade the firmware to a revision with an NVDATA major version earlier than the currently installed major
version. Doing so will put the controller in a non-functional state. The currently installed NVDATA version can
be found in the Adapter Properties in the BIOS Configuration Utility (CTRL-C.) Contact Dell support for
assistance.
Updating the Firmware 43
Page 44

44 Updating the Firmware
Page 45

Getting Help
Obtaining Assistance
CAUTION: If you need to remove the computer cover, first disconnect the computer power and modem
cables from all electrical outlets.
If you need assistance with a technical problem, perform the following steps:
1
Complete the procedures in the section "Troubleshooting Your System" of your system’s
Hardware Owner’s Manual
2
Run the system diagnostics and record any information provided.
3
Use Dell's extensive suite of online services available at Dell Support at
with installation and troubleshooting procedures.
For more information, see "Online Services" on page 46.
4
If the preceding steps have not resolved the problem, call Dell for technical assistance.
NOTE: Call the support service from a phone near or at the system so that the support staff can assist you
with any necessary procedures.
NOTE: Dell’s Express Service Code system may not be available in all countries.
When prompted by Dell's automated telephone system, enter your Express Service Code to route the
call directly to the proper support personnel. If you do not have an Express Service Code, open the
Dell Accessories
For instructions on using the technical support service, see "Dell Enterprise Training" on page 47 and
"Before You Call" on page 48.
folder, double-click the
.
Express Service Code
support.dell.com
icon, and follow the directions.
for help
NOTE: Some of the following services are not always available in all locations outside the continental
U.S. Call your local Dell representative for information on availability.
Technical Support and Customer Service
Dell's support service is available to answer your questions about Dell™ hardware. Our support staff use
computer-based diagnostics to provide fast, accurate answers.
To contact Dell's support service, see "Before You Call" on page 48, and then see the contact
information for your region or go to
support.dell.com
.
Getting Help 45
Page 46

Online Services
You can access Dell Support at support.dell.com. Select your region on the WELCOME TO DELL
SUPPORT page, and fill in the requested details to access help tools and information.
You can learn about Dell products and services on the following websites:
www.dell.com
www.dell.com/ap
www.dell.com/jp
www.euro.dell.com
www.dell.com/la
www.dell.ca
You can access Dell Support through the following websites and e-mail addresses:
• Dell Support websites
support.dell.com
support.jp.dell.com
support.euro.dell.com
• Dell Support e-mail addresses
mobile_support@us.dell.com
support@us.dell.com
la-techsupport@dell.com (Latin America and Caribbean countries only)
apsupport@dell.com
• Dell Marketing and Sales e-mail addresses
apmarketing@dell.com
(Asian/Pacific countries only)
(Japan only)
(Europe only)
(Latin American and Caribbean countries)
(Canada only)
(Japan only)
(Europe only)
(Asian/Pacific countries only)
(Asian/Pacific countries only)
sales_canada@dell.com (Canada only)
• Anonymous file transfer protocol (FTP)
ftp.dell.com/
Log in as user:
anonymous
, and use your e-mail address as your password.
Automated Order-Status Service
To check on the status of any Dell products that you have ordered, you can go to
can call the automated order-status service. A recording prompts you for the information needed to locate
and report on your order. See the contact information for your region.
46 Getting Help
support.dell.com
, or you
Page 47

Dell Enterprise Training
Dell Enterprise training is available; see
be offered in all locations.
www.dell.com/training
for more information. This service may not
Problems With Your Order
If you have a problem with your order, such as missing parts, wrong parts, or incorrect billing, contact
Dell for customer assistance. Have your invoice or packing slip available when you call. See the contact
information for your region.
Product Information
If you need information about additional products available from Dell, or if you would like to place an order,
visit the Dell website at
the contact information for your region.
www.dell.com
. For the telephone number to call to speak to a sales specialist, see
Returning Items for Warranty Repair or Credit
Prepare all items being returned, whether for repair or credit, as follows:
1
Call Dell to obtain a Return Material Authorization Number, and write it clearly and prominently on
the outside of the box.
For the telephone number to call, see the contact information for your region.
2
Include a copy of the invoice and a letter describing the reason for the return.
3
Include a copy of any diagnostic information indicating the tests you have run and any error messages
reported by the system diagnostics.
4
Include any accessories that belong with the item(s) being returned (such as power cables, media such
as CDs and diskettes, and guides) if the return is for credit.
5
Pack the equipment to be returned in the original (or equivalent) packing materials.
You are responsible for paying shipping expenses. You are also responsible for insuring any product
returned, and you assume the risk of loss during shipment to Dell. Collect-on-delivery (C.O.D.)
packages are not accepted.
Returns that are missing any of the preceding requirements will be refused at our receiving dock and
returned to you.
Getting Help 47
Page 48

Before You Call
NOTE: Have your Express Service Code ready when you call. The code helps Dell's automated-support telephone
system direct your call more efficiently.
NOTE: See your system’s Hardware Owner’s Manual for the telephone numbers and codes provided to contact
Dell Support.
If possible, turn on your system before you call Dell for technical assistance and call from a telephone at or
near the system. You may be asked to type some commands at the keyboard, relay detailed information
during operations, or try other troubleshooting steps possible only at the system itself. Ensure that the
system documentation is available.
CAUTION: Before servicing any components inside your system, see your Product Information Guide for
important safety information.
48 Getting Help
Page 49

Regulatory Notices
For additional regulatory information, please go to the Regulatory Compliance Homepage on
www.dell.com at the following location:
www.dell.com/regulatory_compliance
.
Regulatory Notices 49
Page 50

50 Regulatory Notices
Page 51

Regulatory Notice 51
Page 52

52 Regulatory Notices
Page 53

Corporate Contact Details (Taiwan Only)
Pursuant to Article 11 of the Commodity Inspection Act, Dell provides the following corporate contact details for the
certified entity in Taiwan for the products addressed by this document:
Dell B.V. Taiwan Branch
20/F, No. 218, Sec. 2, Tung Hwa S. Road,
Taipei, Taiwan
Regulatory Notices 53
Page 54

54 Regulatory Notices
Page 55

Glossary
This section defines or identifies technical terms,
abbreviations, and acronyms used in this document.
A
Adapter
An adapter enables the computer system to access
peripheral devices by converting the protocol of one
bus or interface to another. An adapter may also
provide specialized function. Adapters may reside
on the system board or be an add-in card. Other
examples of adapters include network and
SCSI adapters.
B
BIOS
(Basic Input/Output System) The part of the
operating system in a system that provides the lowest
level interface to peripheral devices. BIOS also refers
to the Basic Input/Input Output System of other
“intelligent” devices, such as RAID controllers.
BIOS Configuration Utility
The BIOS Configuration Utility configures and
maintains user configurable controller parameters.
The utility resides in the controller BIOS and its
operation is independent of the operating systems on
your system. The BIOS Configuration Utility, also
known as Ctrl-C, is built on elements called controls.
Each control performs a function.
C
Coercion
Coercion is the process of rounding down the
number of Logical blocks used for the physical
members of a virtual disk to a common number.
This allows drives with different absolute capacities,
which can vary between drive manufacturers and
drive families, to share a common stripe size and
count as members of the virtual disk. Coercion
necessarily results in a smaller capacity than was
available on the un-coerced basic physical drive.
Controller
A chip that controls the transfer of data between
the microprocessor and memory or between the
microprocessor and a peripheral device such as a
physical disk or the keyboard. In Storage
Management, the hardware or logic that interacts
with storage devices to write and retrieve data and
perform storage management. RAID controllers
perform RAID functions such as striping and
mirroring to provide data protection.
D
Disk
A non-volatile, randomly addressable, rewriteable
mass storage device, including both rotating magnetic
and optical storage devices and solid-state storage
devices, or non-volatile electronic storage elements.
Glossary 55
Page 56

DKMS
DKMS stands for Dynamic Kernel Module Support.
It is designed to create a framework where kernel
dependent module source can reside so that it is very
easy to rebuild modules as you upgrade kernels. This
will allow Linux vendors to provide driver drops
without having to wait for new kernel releases while
also taking out the guesswork for customers
attempting to recompile modules for new kernels.
Driver
A device driver, often called a driver for short, is a
program that allows the operating system or some other
program to interface correctly with a peripheral device
such as a printer or network PC card. Some device
drivers, such as network drivers must be loaded from
the config.sys file (with a device= statement) or as
memory-resident programs (usually, from the
autoexec.bat file). Others such as video drivers must
load when you start the program for which they were
designed.
DUD (Driver Update Diskette)
Acronym for driver update diskette. A DUD is an image
of a diskette stored as a regular file. To use it, you have
to create a real diskette from this file. The steps used to
create the diskette depend on how the image is
supplied.
Flash Memory
Sometimes referred as simply "flash", is a compact,
solid-state, rewriteable, non-volatile memory device that
retains its data when the power is turned off. It offers fast
access time, low power consumption, and relative
immunity to severe shock or vibration. It is a special type
of EEPROM that can be erased and reprogrammed in
blocks instead of one byte at a time. Many modern PCs
have their BIOS stored on a flash memory chip so that it
can easily be updated if necessary. Such a BIOS is
sometimes called a flash BIOS.
H
Hardware
The mechanical, magnetic, electronic, and electrical
components making up a computer system
constitutes its hardware.
Hot Add/Remove
It is the addition/removal of a component while the
system is running and operating normally.
L
Link
A connection between any two PCI Express devices is
known as a link.
F
Firmware
Software stored in read-only memory (ROM) or
Programmable ROM (PROM). Firmware is often
responsible for the behavior of a system when it is first
turned on. A typical example would be a monitor
program in a system that loads the full operating
system from disk or from a network and then passes
control to the operating system.
56 Glossary
M
MHz
Megahertz or one million cycles per second is a unit
of frequency commonly used to measure the
operating speed of a computer processor or any other
electronic component.
Page 57

Mirroring
The process of providing complete redundancy using
two physical disks, by maintaining an exact copy of
one physical disk’s data on the second physical disk.
If one physical disk fails, the contents of the other
physical disk can be used to maintain the integrity of
the system and to rebuild the failed physical disk.
N
NVDATA
This refers to non-volatile data. It is the
configuration information that is part of and is used
by the controller firmware and is stored in the flash
memory on the controller.
O
Operating System
The software that runs a computer, including
scheduling tasks, managing storage, and handling
communication with peripherals and performs basic
input/output functions, such as recognizing input
from the keyboard, sending output to the display
screen, etc. is called an operating system.
P
PCI Express (PCI-E)
PCI Express (PCI-E) is an evolutionary upgrade to
the existing Peripheral Component Interconnect
(PCI) bus. PCI-E is a serial connection that operates
more like a network than a bus. Instead of one bus
that handles data from multiple sources, PCI-E has a
switch that controls several point-to-point serial
connections. These connections fan out from the
switch, leading directly to the devices where the data
needs to go. Every device has its own dedicated
connection, so devices no longer share bandwidth like
they do on a normal bus.
PHY
The interface required to transmit and receive data
packets transferred across the serial bus. Each PHY
can form one side of the physical link in a connection
with a PHY on a different Dell-qualified SATA
device. The physical link contains four wires that form
two differential signal pairs. One differential pair
transmits signals, while the other differential pair
receives signals. Both differential pairs operate
simultaneously and allow concurrent data transmission
in both the receive and the transmit directions.
Physical Disk
A physical disk (also known as hard disk drive)
consists of one or more rigid magnetic discs rotating
about a central axle, with associated read/write heads
and electronics. A physical disk is used to store
information, (data), in a non-volatile and randomly
accessible memory space.
Glossary 57
Page 58

POST
POST, short for Power-On Self-Test is a process
performed before the operating system loads when
the computer is turned on. The POST tests various
system components, such as RAM, the physical disks,
and the keyboard.
R
RAID
Acronym for Redundant Array of Independent Disks
(originally Redundant Array of Inexpensive Disks). It
is an array of multiple independent physical disks
managed together to yield higher reliability and/or
performance exceeding that of a single physical disk.
The virtual disk appears to the operating system as a
single storage unit. I/O is expedited because several
disks can be accessed simultaneously. Redundant
RAID levels provide data protection.
ROM
Read-only memory (ROM), also known as firmware,
is an integrated circuit programmed with specific data
when it is manufactured. ROM chips are used not
only in computers, but in most other electronic items
as well. Data stored in these chips is nonvolatile i.e., it
is not lost when the power is turned off. Data stored
in these chips is either unchangeable or requires a
special operation such as flashing to change.
S
SAS
Serial-Attached SCSI, SAS, is a serial, point-to-point,
enterprise-level device interface that leverages the
proven SCSI protocol set. The SAS interface provides
improved performance, simplified cabling, smaller
connectors, lower pin count, and lower power
requirements when compared to parallel SCSI.
SATA
Serial Advanced Technology Attachment, a physical
storage interface standard, is a serial link that provides
point-to-point connections between devices. The
thinner serial cables allow for better airflow within the
system and permit smaller chassis designs.
SCSI
SCSI stands for "Small Computer System Interface,"
a processor-independent standard interface for
system-level interfacing between a computer and
intelligent devices including hard-drives, floppy disks,
CD-ROM, printer, scanners and many more.
SCSIport
SCSIport driver is a Microsoft® driver for Windows®
storage architecture, delivering SCSI commands to
the storage targets. The SCSIport driver works well
with storage using parallel SCSI.
RPM
RPM, short for "Red Hat Package Manager" is a
package management system primarily intended for
Linux. RPM installs, updates, uninstalls, verifies and
queries software. RPM is the baseline package format
of the Linux Standard Base. Originally developed by
Red Hat for Red Hat Linux, RPM is now used by many
Linux distributions. It has also been ported to some
other operating systems such as NetWare by Novell.
58 Glossary
Serial Architecture
Serial architectures have emerged to deliver higher
performance by allowing more bandwidth per device
pathway than their parallel counterparts. Serial
architecture connections consist of a single pair of
transmission signals that contain an embedded clock
for self-clocking, enabling clock speed to be easily
scaled. Serial bus architectures also support a network
of dedicated point-to-point device connections,
versus the multi-drop architectures of parallel buses,
Page 59

to deliver full bandwidth to each device, eliminate the
need for bus arbitration, reduce latency, and greatly
simplify hot-plug and hot-swap system
implementations.
Serial Technology
Serial storage technology, specifically Serial ATA,
Serial-Attached SCSI and PCI Express, address the
architectural limitations of their parallel counterparts
to deliver highly scalable performance. The
technology draws its name from the way it transmits
signals - in a single stream, or serially, compared to
multiple streams for parallel. The main advantage of
serial technology is that while it moves data in a single
stream, it wraps data bits into individual packets that
are transferred up to 30 times faster than parallel
technology data.
SMART
Acronym for Self-Monitoring Analysis and Reporting
Technology. The self-monitoring analysis and
reporting technology (SMART) feature monitors the
internal performance of all motors, heads, and drive
electronics to detect predictable drive failures. This
feature helps monitor drive performance and
reliability, and protects the data on the drive. When
problems are detected on a drive, you can replace
or repair the drive without losing any data.
SMART-compliant disks have attributes for which
data (values) can be monitored to identify changes in
values and determine whether the values are within
threshold limits. Many mechanical failures and some
electrical failures display some degradation in
performance before failure.
Storport
The Storport driver has been designed to replace
SCSIport and work with Windows 2003 and beyond.
In addition, it offers better performance for storage
controllers, providing higher I/O throughput rates,
improved manageability, and an upgraded miniport
interface.
Stripe Element
A stripe element is the portion of a stripe that resides
on a single physical disk.
Striping
Disk striping writes data across all physical disks in a
virtual disk. Each stripe consists of consecutive virtual
disk data addresses that are mapped in fixed-size
units to each physical disk in the virtual disk using a
sequential pattern. For example, if the virtual disk
includes five physical disks, the stripe writes data to
physical disks one through five without repeating any
of the physical disks. The amount of space consumed
by a stripe is the same on each physical disk. The
portion of a stripe that resides on a physical disk is a
stripe element. Striping by itself does not provide
data redundancy. Striping in combination with parity
does provide data redundancy.
W
Windows
Microsoft Windows is a range of commercial
operating environments for computers. It provides a
graphical user interface (GUI) to access programs and
data on the computer.
Glossary 59
Page 60

X
XP
XP is a Microsoft Windows operating system.
Released in 2001, it is built on the Windows 2000
kernel, making it more stable and reliable than
previous versions of Windows. It includes an
improved user interface and more mobility features,
such as plug and play features used to connect to
wireless networks.
60 Glossary
Page 61

Index
B
BIOS, 27
Configuration Utility, 28
fault code messages, 27
POST messages, 27
C
Configuration Utility
functions performed, 28
navigating, 29
overview, 28
starting, 28
D
drivers
creating diskette, 19
installation, 19
Red Hat Enterprise Linux, 22
SUSE Linux Enterprise
Server, 24
E
electrostatic discharge. See
ESD
ESD, 8
F
firmware
update utility, 43
updating, 43
I
installation
driver, 19
SAS 6/iR Adapter, 15
Windows driver, 20
Integrated RAID
configuration, 29, 32
create new virtual disk, 29
creating IM, 33
creating IS, 32
Integrated Mirroring, 11
Integrated Striping, 10
manage array, 31
new virtual disk, 29
rebuilding virtual disk, 35
replacing virtual disk, 35
view virtual disk, 31
virtual disk activation, 34
virtual disk deletion, 35
virtual disk properties, 34
virtual disk
synchronization, 34
M
P
PCI-E connector, 9
R
RAID, 9-10
RAID 0, 10
RAID 1, 10
Red Hat Enterprise Linux, 19
creating a driver diskette, 22
Red Hat Linux
installing the driver, 23
S
safety instructions
for preventing ESD, 8
SAS 6/iR
BIOS, 27
features, 13
overview, 9
SAS 6/iR Adapter, 9
SAS 6/iR Adapter
installation, 15
SAS 6/iR Integrated, 9
specifications, 13
troubleshooting, 37
SCSI
controller, 9
Manage Array, 31
Index 61
Page 62

T
troubleshooting, 37
BIOS boot order, 37
BIOS error messages, 40
Configuration Utility error
messages, 39
physical disk issues, 38
W
Windows, 19
drivers, 19
updating drivers, 21
62 Index
 Loading...