

Page 1

Dell™ PowerEdge™
R905 Systems
Getting Started
With Your System
系统使用入门
はじめに
시스템시작하기
Page 2

Page 3

Dell™ PowerEdge™
R905 Systems
Getting Started
With Your System
Page 4

Notes, Notices, and Cautions
NOTE: A NOTE indicates important information that helps you make better use
of your computer.
NOTICE: A NOTICE indicates either potential damage to hardware or loss of data
and tells you how to avoid the problem.
CAUTION: A CAUTION indicates a potential for property damage, personal injury,
or death.
____________________
Information in this document is subject to change without notice.
© 2007 Dell Inc. All rights reserved.
Reproduction in any manner whatsoever without the written permission of Dell Inc. is strictly
forbidden.
Trademarks used in this text: Dell, the DELL logo and PowerEdge are trademarks of Dell Inc.; AMD,
AMD Opteron and combinations thereof are trademarks of Advanced Micro Devices, Inc.; Microsoft,
Windows and Windows Server are either trademarks or registered trademarks of Microsoft Corporation
in the United States and/or other countries; Red Hat and Enterprise Linux are registered trademarks
of Red Hat, Inc.; SUSE is a registered trademark of Novell, Inc. in the United States and other countries.
Other trademarks and trade names may be used in this document to refer to either the entities claiming
the marks and names or their products. Dell Inc. disclaims any proprietary interest in trademarks and
trade names other than its own.
Model EMMA
December 2007 P/N HX556 Rev. A00
Page 5

System Features
This section describes the major hardware and software features of your
system. It also provides information about other documents you may
need when setting up your system and how to obtain technical assistance.
• Two or four dual-core or quad-core AMD Opteron™ 8000 Series
processors.
• A minimum of 2 GB (dual-processor systems) or 4 GB (four-processor
systems) of 667-MHz DDR2 memory modules. Memory is upgradable
to a maximum of 128 GB (256 GB when 8-GB memory modules are
available) by installing combinations of 512-MB, 1-GB, 2-GB, 4-GB,
or 8-GB (when available) memory modules in the 32 memory module
sockets (8 per processor) on the system board and Processor Expansion
Module (PEM).
• 800-MHZ DDR2 memory modules are supported in restricted
configurations.
• An optional slim-line SATA DVD-ROM drive, slim-line SATA DVD-RW
drive, or a combination CD-RW/DVD drive (when available).
NOTE: DVD devices are data only.
• Support for up to five 3.5-inch hot-plug SAS hard drives or up to eight
2.5-inch hot-plug SAS hard drives.
• An optional external USB diskette drive.
• An optional external USB optical drive.
• Two hot-pluggable, 1100W high efficiency power supplies in a 1 + 1
redundant configuration. The power supplies support an input voltage
range from 100 V to 240 V.
• Four hot-pluggable system cooling fans.
The system board provides the following features:
• The baseboard has CPU 1 and CPU 2 sockets with 16 DIMM slots.
• CPU 3 and CPU 4 and their 16 DIMM slots are on a separate PEM.
• Dedicated PCIe slot for a SAS controller.
Getting Started With Your System 3
Page 6

• Two x8 lane-width PCI-Express (PCIe) expansion slots and five x4 lanewidth PCIe slots.
• Four integrated Gb Ethernet NICs, capable of supporting 10-Mbps,
100-Mbps, and 1000-Mbps data rates. Each NIC also supports TCP/IP
offload engine (TOE) and iSCSI boot functionality. Two of the integrated
NICs are on a daughter card that can be upgraded to 10Gb Ethernet.
• An integrated Trusted Platform Module (TPM) version 1.2 used for
security applications, capable of generating and storing keys and storing
passwords and digital certificates. (Not available in China.)
• Four external USB 2.0-compliant ports, capable of supporting a diskette
drive, an optical drive, a keyboard, a mouse, or a USB flash drive.
• One internal USB 2.0-compliant connector.
• One internal connector for an optional flash memory card.
• Systems management circuitry that monitors operation of the system
fans as well as critical system voltages and temperatures. The systems
management circuitry works in conjunction with the systems management
software.
• Standard Baseboard Management Controller (BMC) with serial access.
• An optional remote access controller (RAC) card for remote systems
management.
•
An integrated VGA-compatible video subsystem based on an integrated
ATI RN50 33-MHz PCI
video controller. The video subsystem includes
16 MB of graphics memory and supports various 2D graphics video
modes. Maximum resolution is 1600x1280 with 65,536 colors.
(
When the optional RAC is installed, the integrated video subsystem
is disabled and the video controller on the RAC is used instead.)
• Front-panel support for a video connector, two USB connectors,
and a 1x5 LCD panel for system ID and error messaging.
• Back-panel connectors including one serial, one video, two USB,
and four NIC connectors.
• System ID button on the front and back panels.
For more information about specific features, see “Technical Specifications”
on page 10.
4 Getting Started With Your System
Page 7
Supported Operating Systems
Your system supports the following operating systems:
• Microsoft® Windows Server® 2003 R2 Standard and Enterprise Editions
(SP1 and later)
• Microsoft Windows Server 2003 R2 Standard and Enterprise x64 Editions
(SP1 and later)
•Red Hat
• Red Hat Enterprise Linux Server 5 AP (x86_64)
• Red Hat Enterprise Linux Server AS (Version 4.5) (x86)
• Red Hat Enterprise Linux Server AS (Version 4.5) (x86_64)
•SUSE
• VMware ESX Server 3 (including embedded versions)
®
Enterprise® Linux Server 5 AP (x86)
®
Linux Enterprise Server 10 (x86_64)
NOTE: For the latest information on supported operating systems,
see www.dell.com.
Other Information You May Need
CAUTION: The Product Information Guide provides important safety and
regulatory information. Warranty information may be included within this
document or as a separate document.
• The
• The
• CDs included with your system provide documentation and tools
Rack Installation Guide
with your rack solution describes how to install your system into a rack.
Hardware Owner’s Manual
features and describes how to troubleshoot the system and install or
replace system components. This document may be found on the CDs
that came with your system or at
for configuring and managing your system.
or
Rack Installation Instructions
provides information about system
support.dell.com
.
included
Getting Started With Your System 5
Page 8

• Updates are sometimes included with the system to describe changes
to the system, software, and/or documentation.
NOTE: Always check for updates on support.dell.com and read the updates
first because they often supersede information in other documents.
• Release notes or readme files may be included to provide last-minute
updates to the system or documentation or advanced technical reference
material intended for experienced users or technicians.
Obtaining Technical Assistance
If you do not understand a procedure in this guide or if the system
does not perform as expected, see your Hardware Owner’s Manual.
Dell Enterprise Training and Certification is available; see
www.dell.com/training for more information. This service may not
be offered in all locations.
Installation and Configuration
CAUTION: Before performing the following procedure, read and follow the safety
instructions and important regulatory information in your Product Information
Guide.
This section describes the steps to set up your system for the first time.
Unpacking the System
Unpack your system and identify each item.(Your system may not include
the optional rack kit and bezel shown here.)
Keep all shipping materials in case you need them later.
6 Getting Started With Your System
Page 9
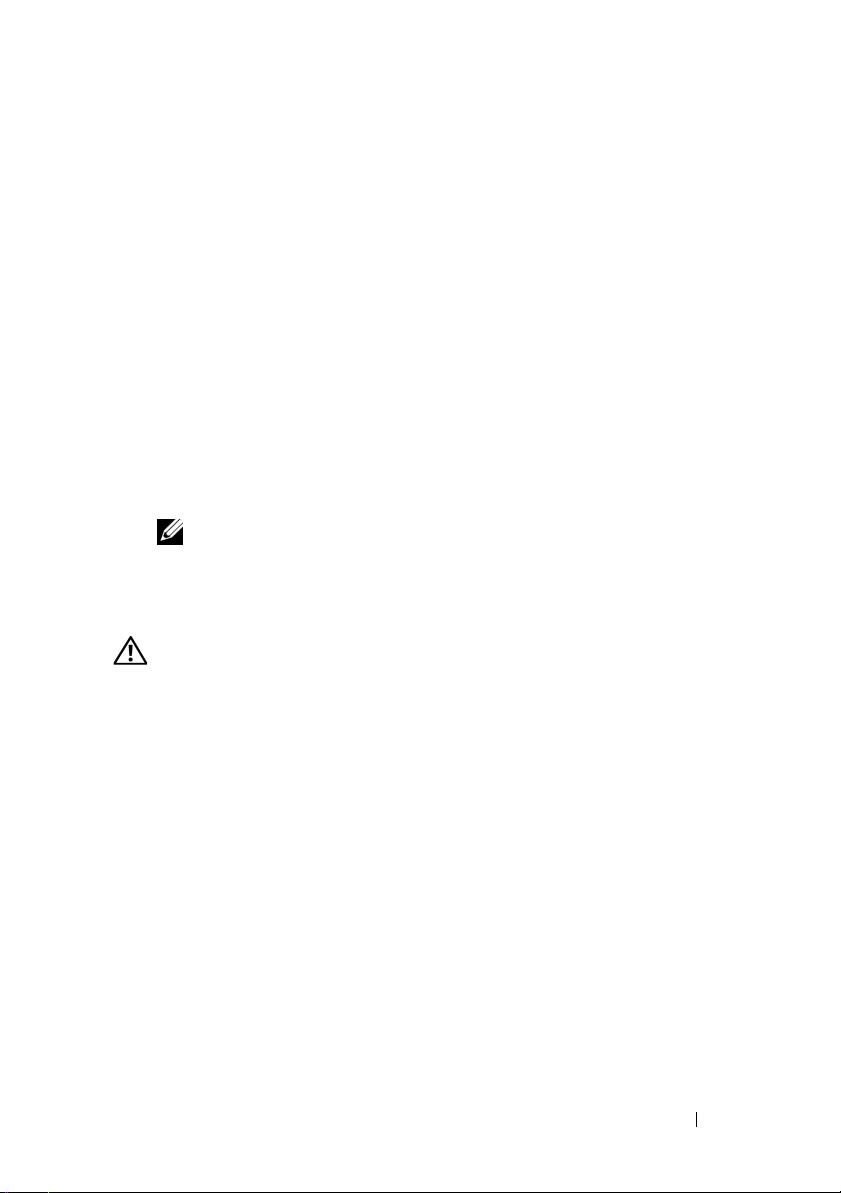
Installing the System in a Rack
Install the system in the rack once you have read the “Safety Instructions”
located in the rack installation documentation for your system.
See your rack installation documentation for instructions on installing
your system in a rack.
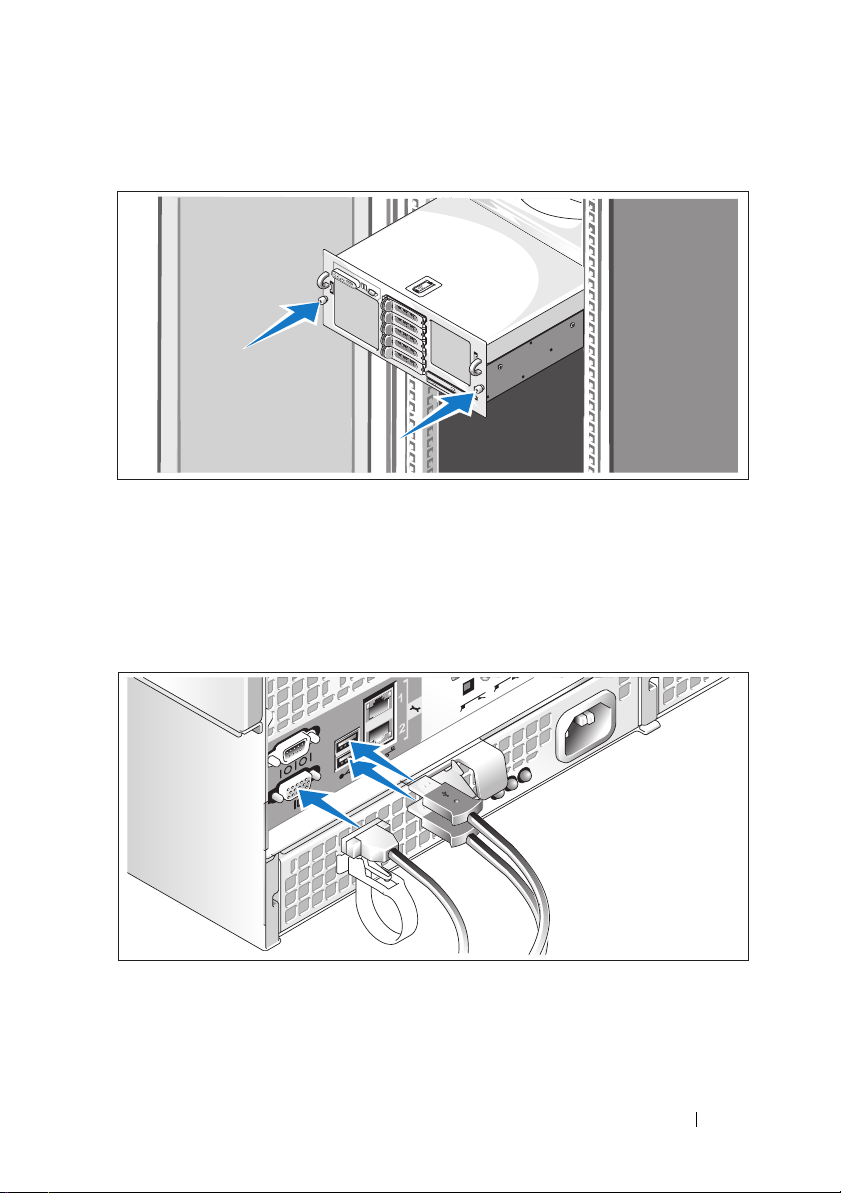
Connecting the Keyboard, Mouse, and Monitor
Connect the keyboard, mouse, and monitor (optional).
Getting Started With Your System 7
Page 10
The connectors on the back of your system have icons indicating which cable
to plug into each connector. Be sure to tighten the screws (if any) on the
monitor's cable connector.
NOTE: If you simultaneously connect two monitors to the system, using the front
and back video connections, the video will default to the front since only one
display can operate at a time.
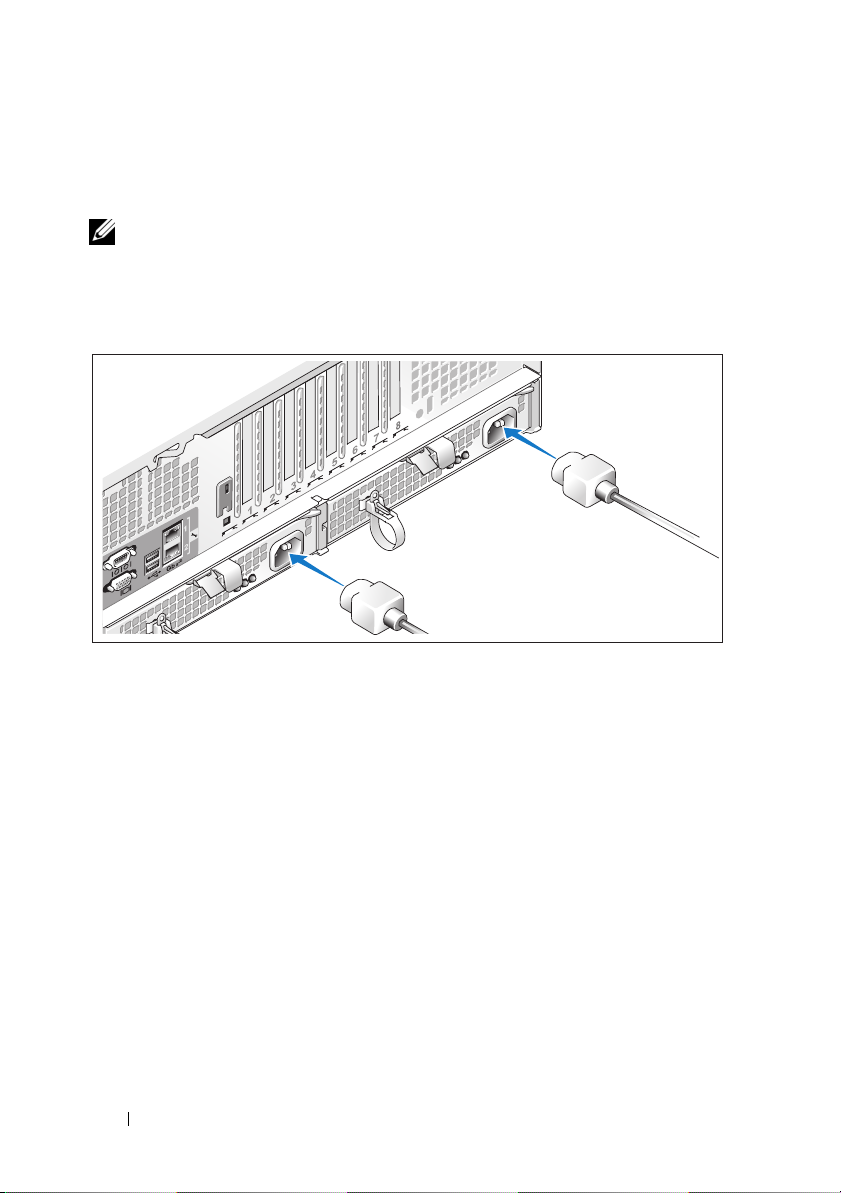
Connecting the System and Monitor Power Cables
Connect the monitor's power cable to the monitor (optional). Connect the
system’s power cables to the system.
Plug the other end of the power cables into a grounded electrical outlet or
a separate power source such as an uninterrupted power supply (UPS) or a
power distribution unit (PDU). If possible, connect the power supplies to two
different 110V power sources or two different 220V power sources, depending
on the power sources used.
8 Getting Started With Your System
Page 11
Turning on the System and Monitor
NOTE: The system may take a few minutes to display on the screen due to
processor and memory initialization that is performed before the video initialization.
The delay is proportional to the amount of memory that is installed.
Press the power button on the system and the monitor (optional). The power
indicators should light. Adjust the monitor's controls until the displayed
image is satisfactory.
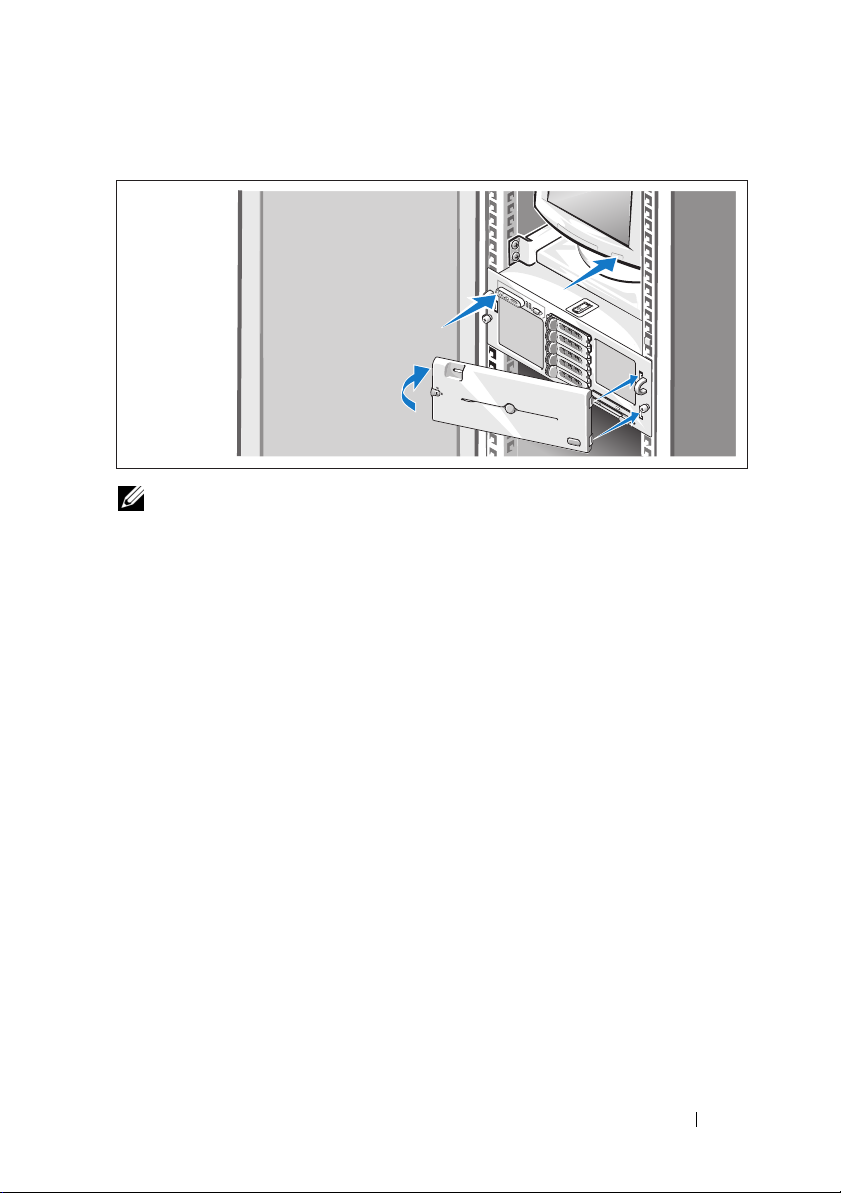
If you have purchased the optional system bezel, install it after turning on
the system.
Complete the 0perating System Setup
If you purchased a preinstalled operating system, see the operating system
documentation that ships with your system. To install an operating system
for the first time, see the Quick Installation Guide. Be sure the operating
system is installed before installing hardware or software not purchased
with the system.
Getting Started With Your System 9
Page 12

Technical Specifications
Processor
Processor type Either two or four dual- or quad-core
AMD Opteron™ 8000 Series processors
Expansion Bus
Bus type PCIe
Expansion slots Two half-length x8 lane-width
half-length x4 lane-width
(An additional x4 slot is reserved for use by
the SAS controller card)
Memory
Architecture 667-MHz registered DDR2 memory modules
800-MHz registered DDR2 memory modules
(limited configurations)
Memory module sockets Thirty-two 240-pin. 16 on the baseboard, 16
on the Processor Expansion Module
Memory module capacities 667-MHz DDR2: 512 MB, 1 GB, 2 GB, 4 GB,
or 8 GB (when available)
800-MHZ DDR2: 2 GB
Minimum RAM 2 GB (two processors) or
4 GB (four processors)
Maximum RAM Two processors: 64 GB
Four processors: 128 GB (256 GB when 8 GB
memory modules are available)
slots
slots and
five
10 Getting Started With Your System
Page 13

Drives
Hard drives Up to five 3.5-inch hot-plug SAS drives or
up to eight 2.5-inch hot-plug SAS drives
Optical drive One optional slim-line DVD-RW,
DVD-ROM/CD-RW combination,
or DVD-ROM
NOTE: DVD devices are data only.
Connectors
Back Panel
NIC
Serial
USB
Video
Front Panel
Video
USB
Video
Video type ATI RN50 video controller; VGA connector
Video memory 16 MB
Resolution Maximum 2D graphics resolution:
Four RJ-45 10/100/1000 Gb
9-pin, DTE, 16550-compatible
Two 4-pin, USB 2.0-compliant
15-pin VGA
15-pin VGA
Two 4-pin, USB 2.0 compliant
1600 x 1280, 65,536 colors
Getting Started With Your System 11
Page 14

Power
AC power supply (per power supply)
Wa t ta g e
Vo lt ag e
Heat dissipation
Maximum inrush current
Batteries
System battery
Physical
Height 17.3 cm (6.8 in)
Width 44.7 cm (17.6 in)
Depth 70.1 cm (27.6 in)
Weight (maximum configuration) 40 kg (88 lb)
90-264VAC input: Output +12V/90.8A,
3.3Vsb/5A Maximum 1100W
Input 100-240VAC, 12-8A, 47-63Hz
4255 BTU/hr (maximum)
Under typical line conditions and over
the entire system ambient operating range,
the inrush current may reach 55A per power
supply for 10 ms or less and 35A per power
supply for up to 150 ms.
CR 2032 3.0-V lithium coin cell
12 Getting Started With Your System
Page 15

Environmental
NOTE: For additional information about environmental measurements for specific
system configurations, see www.dell.com/environmental_datasheets.
Temperature
Operating
Storage
Relative humidity
Operating
Storage
Maximum vibration
Operating
Storage
Maximum shock
Operating
Storage
Altitude
Operating
Storage
Airborne Contaminant Level
Class
10° to 35°C (50° to 95°F)
–40° to 65°C (–40° to 149°F)
20% to 80% (noncondensing) with a
maximum humidity gradation of 10%
per hour
5% to 95% (noncondensing)
0.26 Grms (10 to 350 Hz)
1.54 Grms (10 to 250 Hz)
One shock pulse in the positive z axis
(one pulse on each side of the system)
of 41 G for up to 2 ms
Six consecutively executed shock pulses
in the positive and negative x, y, and z axes
(one pulse on each side of the system)
of 71 G for up to 2 ms
–16 to 3048 m (–50 to 10,000 ft)
–16 to 10,600 m (–50 to 35,000 ft)
G2 or lower as defined by ISA-S71.04-1985
Getting Started With Your System 13
Page 16

14 Getting Started With Your System
Page 17

Dell™ PowerEdge™
R905
系统
系统使用入门
Page 18

注、注意和警告
注: “注”表示可以帮助您更好地使用计算机的重要信息。
注意:“注意”表示可能会损坏硬件或导致数据丢失,并告诉您如何避免此类
问题。
警告:“警告”表示可能会导致财产损失、人身伤害甚至死亡。
____________________
本说明文件中的信息如有更改,恕不另行通知。
© 2007 Dell Inc.
未经
Dell Inc.
本文中使用的商标:
及其组合是
Opteron
Server 是 Microsoft Corporation
Enterprise Linux 是 Red Hat, Inc.
地区的注册商标。
本说明文件中述及的其它商标和产品名称是指拥有相应商标和产品名称的公司或其制造的产
品。
Dell Inc.
型号
EMMA
2007 年 12
版权所有,翻印必究。
书面许可,严禁以任何形式进行复制。
Dell、DELL
Advanced Micro Devices, Inc.
对本公司的商标和产品名称之外的其它商标和产品名称不拥有任何专有权。
月
P/N HX556 Rev.A00
徽标和
PowerEdge 是 Dell Inc.
在美国和/或其它国家/地区的商标或注册商标;
的注册商标;
的商标;
SUSE 是 Novell, Inc.
的商标;
Microsoft、Windows 和 Windows
AMD、AMD
在美国和/或其它国家
Red Hat 和
/
Page 19

系统功能
本节介绍系统的主要硬件和软件功能。此外,还将介绍有关在安装系统时
可能需要的其它说明文件的信息,以及如何获得技术帮助的信息。
•
两个或四个双核或四核
•
最小
内存模块。通过在系统板和处理器扩充模块
槽(每个处理器
(如果可用)内存模块,可将内存最大升级至
模块可用,则为
•
受限配置中支持
•
一个可选的细长型
驱动器或组合
•
最多支持
SAS
•
一个可选的外部
•
一个可选的外部
•
两个
的输入电压范围为
•
四个热插拔系统冷却风扇。
系统板提供以下配置:
•
底板包含
•
CPU 3
•
专用于
•
两个
PCIe
•
四个集成吉位以太网
据速率。每个
两个集成
(双处理器系统)或
2 GB
8
256 GB
CD-RW/DVD
注:
硬盘驱动器。
1100W
、
x8
插槽。
设备仅用于数据。
DVD
5 个 3.5
高性能热插拔电源设备(
CPU 1 和 CPU 2
CPU 4 及其 16 个 DIMM
控制器的
SAS
信道宽度的
NIC
位于可升级至
NIC
AMD Opteron™ 8000
4 GB
个)中组合安装
)。
800 MHZ DDR2
SATA DVD-ROM
驱动器(如果可用)。
英寸热插拨
软盘驱动器。
USB
光盘驱动器。
USB
100 V 至 240 V
PCIe
PCI Express (PCIe)
NIC
还支持
SAS
槽,带
插槽。
,可 支 持
TCP/IP
10Gb
512 MB、1 GB、2 GB、4 GB 或 8 GB
内存模块。
。
16 个 DIMM
插槽位于单独的
减负引擎
(四处理器系统)的
驱动器、细长型
硬盘驱动器或
1 + 1
10 Mbps、100 Mbps 和 1000 Mbps
以太网的子卡上。
系列处理器。
667 MHz DDR2
(PEM) 的 32
128 GB
8 个 2.5
冗余配置)。电源设备支持
插槽。
PEM
扩充槽和五个
(TOE) 和 iSCSI
个内存模块插
(如果
8 GB
SATA DVD-RW
英寸热插拨
上。
信道宽度的
x4
引导功能。
内存
数
系统使用入门 17
Page 20

•
一个集成的受信任的平台模板
(TPM)(1.2
版),用作安全应用程序,可
生成并存储密钥以及存储密码和数字证书。(中国不可用。)
•
四个外部
鼠标或
一个内部
•
•
一个用于可选闪存卡的内部连接器。
•
系统管理电路,可监测系统风扇的运行以及系统临界电压和温度。系统
USB 2.0
USB
USB 2.0
兼容端口,可支持软盘驱动器、光盘驱动器、键盘、
闪存盘驱动器。
兼容连接器。
管理电路需要与系统管理软件配合工作。
•
标准底板管理控制器
•
一个可选的远程访问控制器
•
兼容集成视频子系统
VGA
制器。视频子系统包含
视频模式。最大分辨率为
选的
后,集成视频子系统将被禁用,转而使用
RAC
(BMC)
,支持串行访问。
,用于远程系统管理。
(RAC)
,带有集成的
16 MB
的图形内存,支持各种类型的二维图形
1600x1280(65,536
ATI RN50 33 MHz PCI
色)。(
安装可
上的视频控制
RAC
器。)
•
前面板支持一个视频连接器和两个
显示系统
•
背面板连接器包括一个串行连接器、一个视频连接器、两个
器和四个
•
系统
ID
和错误信息。
ID
连接器。
NIC
按钮,位于前面板和背面板上。
有关特定配置的详细信息,请参阅第
连接器;
USB
页的“技术规格”。
24
1x5 LCD
视频控
面板则用于
连接
USB
18 系统使用入门
Page 21

支持的操作系统
您的系统支持以下操作系统:
•
Microsoft
(
SP1
•
Microsoft Windows Server 2003 R2 Standard
(
SP1
•
Red Hat
•
Red Hat Enterprise Linux Server 5 AP (x86_64)
•
Red Hat Enterprise Linux Server AS
•
Red Hat Enterprise Linux Server AS
•
SUSE
•
VMware ESX Server 3
®
Windows Server® 2003 R2 Standard 和 Enterprise Edition
及更高版本)
和
Enterprise x64 Edition
及更高版本)
®
Enterprise® Linux Server 5 AP (x86)
(
版)
4.5
(
4.5
®
Linux Enterprise Server 10 (x86_64)
版)
(x86)
(x86_64)
(包括嵌入版本)
注:有关支持的操作系统的最新信息,请访问
www.dell.com
可能需要的其它信息
警告:产品信息指南提供了重要的安全信息和管制信息。保修信息可能包
括在该说明文件中,也可能作为单独的说明文件提供。
•
您的机架解决方案附带的机架安装指南或机架安装说明介绍了如何将
系统安装到机架中。
•
硬件用户手册提供了有关系统功能的信息,并说明了如何排除系统故障
以及安装或更换系统组件。此说明文件可在随系统提供的
或通过
support.dell.com
•
系统附带的
•
系统有时附带更新,用于说明对系统、软件和/或说明文件所作的
提供了配置和管理系统时可使用的说明文件和工具。
CD
获得。
更改。
注:请经常访问
因为它们通常用于替代其它说明文件中的信息。
•
可能还会提供版本注释或自述文件以说明对系统、说明文件或针对高级
support.dell.com
以获得更新,并首先阅读这些更新,
用户或技术人员的高级技术参考资料的最新更新。
CD
。
中找到,
系统使用入门 19
Page 22

获得技术帮助
如果您对本指南中的步骤有疑问,或系统运行无法达到预期效果,请参阅
硬盘用户手册。
可以提供企业培训与认证;有关详情,请访问
Dell
www.dell.com/training
。并非在所有国家和地区均可提供此服务。
安装和配置
警告:在执行以下过程之前,请阅读并遵循产品信息指南中的安全说明和
重要的管制信息。
本节介绍初次安装系统时的步骤。
打开系统包装
打开系统包装并识别每项物品。(您的系统中可能不包含此处显示的可选
机架套件和挡板。)
妥善保管所有运输包装材料,以备将来使用。
20 系统使用入门
Page 23

在机架中安装系统
先仔细阅读系统机架安装说明文件中的“安全说明”,然后在机架中安装
系统。
有关在机架中安装系统的说明,请参阅机架安装说明文件。
连接键盘、鼠标和显示器
连接键盘、鼠标和显示器(可选)。
系统使用入门 21
Page 24

系统背面的连接器附有图标,这些图标指示要插入每个连接器的电缆。确
保拧紧显示器的电缆连接器上的螺钉(如果有)。
注: 如果使用前面板和背面板视频连接器,同时在系统上连接两台显
示器,视频将默认显示在前视频连接器上,因为一次仅可使用一台显示器。
连接系统和显示器的电源电缆
将显示器的电源电缆连接到显示器上(可选)。将系统的电源电缆连接到
系统上。
将电源电缆的另一端插入接地的电源插座或单独的电源,如不间断电源设
备
(UPS)
110V 或 220V
或配电装置
(PDU)
。如果可能,将电源设备连接至两个不同的
电源,取决于使用的电源。
22 系统使用入门
Page 25

打开系统和显示器
注: 在初始化视频之前,需要先对处理器和内存进行初始化,因此,可能
需要几分钟才能在屏幕上显示系统。延迟时间与安装的内存容量成正比。
按下系统和显示器(可选)上的电源按钮。电源指示灯将会亮起。调节显
示器的控制按钮直至获得满意的显示图像。
如果您购买了可选的系统挡板,请在打开系统后安装。
完成操作系统安装
如果购买了预安装的操作系统,请参阅随系统提供的操作系统说明文件。
如果是初次安装操作系统,请参阅快速安装指南。请确保先安装操作系
统,然后再安装未预装的硬件或软件。
系统使用入门 23
Page 26

技术规格
处理器
处理器类型 两个或四个双核或四核
系列处理器
8000
扩充总线
总线类型
扩充槽 两个半长
内存
体系结构
内存模块插槽
内存模块容量
最小
RAM 2 GB
最大
RAM
PCIe
信道宽度的
x8
信道宽度的
(需要留出一个
使用)
667 MHz
800 MHz
(有限配置)
32 个 240 针, 16
处理器扩充模块上
667 MHz DDR2:512 MB、1 GB、2 GB
4GB 或 8 GB
800 MHZ DDR2:2 GB
(四个处理器)
两个处理器:
四个处理器:
可用,则为
插槽
插槽,供
x4
带寄存器的
带寄存器的
(如果可用)
(两个处理器)或
256 GB
DDR2
DDR2
个位于底板上,
64 GB
(如果
128 GB
)
4 GB
AMD Opteron
插槽和
五个半长
控制器卡
SAS
内存模块
内存模块
8 GB
™
x4
个位于
16
、
内存模块
24 系统使用入门
Page 27

驱动器
硬盘驱动器
光盘驱动器 一个可选的细长型
连接器
背面板
NIC
串行
USB
视频
前面板
视频
USB
视频
视频类型
视频内存
解决方法 最大二维图形分辨率:
最多
5 个 3.5
英寸热插拨
2.5
ROM/CD-RW
注:
四个
RJ-45 10/100/1000 Gb
9 针、DTE、16550
两个
4 针、USB 2.0
15 针 VGA
15 针 VGA
两个
4 针、USB 2.0
ATI RN50
16 MB
色)
英寸热插拨
SAS
组合或
设备仅用于数据。
DVD
连接器
连接器
视频控制器;
驱动器
DVD-RW、DVD-
兼容连接器
兼容连接器
兼容连接器
驱动器或
SAS
DVD-ROM
连接器
VGA
1600 x 1280(65,536
8 个
电源
交流电源设备(每个电源设备)
功率
电压 输入
散热
90-264VAC
3.3Vsb/5A 最大 1100W
4255 BTU/
输入:输出
100-240VAC,12-8A,47-63Hz
小时(最大)
+12V/90.8A
系统使用入门 25
,
Page 28

电源
(续)
最大涌入电流 在典型的线路条件下和整个系统运行范围
内,每个电源设备在
电池
系统电池
物理规格
高度
宽度
厚度
重量(最大配置)
环境参数
涌入电流可达
电流可达
CR 2032 3.0V
17.3 cm (6.8 in)
44.7 cm (17.6 in)
70.1 cm (27.6 in)
40 kg (88 lb)
35 A
,在最多
55 A
。
锂离子电池
注:有关特定系统配置的环境参数规格的其它信息,请参阅
www.dell.com/environmental_datasheets
温度
运行时
存储时 –40° 至
相对湿度
运行时
存储时
最大振动
运行时
存储时
最大撞击
运行时
。
10° 至 35°C(50° 至 95°F
65°C(–40° 至 149°F
20% 至 80%
度为每小时
5% 至 95%
0.26 G(10 至 350 Hz
1.54 G(10 至 250 Hz
轴正方向上可承受一个
z
(系统每一面承受一个脉冲),最多可持
续
2
(非冷凝),最大湿度变化梯
10%
(非冷凝)
毫秒
或更短时间内的
10 ms
150 ms
)
)
41 G
)
的撞击脉冲
内涌入
)
26 系统使用入门
Page 29

环境参数
海拔高度
气载污染物级别
存储时
运行时
存储时
分类
(续)
x、y 和 z
G
冲),最多可持续
-16 至 3048 m(-50 至 10,000 ft
-16 至 10,600 m(-50 至 35,000 ft
G2
标准)
轴正负方向上可承受连续六个
的撞击脉冲(系统每一面承受一个脉
毫秒
2
)
或更低(根据
ISA-S71.04-1985
71
)
定义的
系统使用入门 27
Page 30

28 系统使用入门
Page 31

Dell™ PowerEdge™ R905
システム
はじめに
Page 32

メモ、注意、警告
メモ:コンピュータを使いやすくするための重要な情報を説明してい
ます。
注意:ハードウェアの損傷やデータの損失の可能性を示し、その危険を
回避するための方法を説明しています。
警告:物的損害、けが、または死亡の原因となる可能性があることを示
しています。
____________________
本書の内容は予告なく変更されることがあります。
© 2007 すべての著作権は Dell Inc. にあります。
Dell Inc. の書面による許可のない複製は、いかなる形態においても厳重に禁じられてい
ます。
は
本書に使用されている商標:Dell、DELL ロゴ、および PowerEdge
です。AMD、AMD Opteron、およびこれらの組み合わせは、Advanced
の商標です。Microsoft、Windows および Windows Server は米国その他の国における
Microsoft Corporation の商標または登録商標です。Red Hat および Enterprise Linux は Red
Hat, Inc. の登録商標です。SUSE は米国その他の国における Novell, Inc. の登録商標です。
本書では、必要に応じて上記以外の商標や会社名が使用されている場合がありますが、
それらの商標や会社名は、一切 Dell Inc. に帰属するものではありません。
Dell Inc. の商標
Micro Devices, Inc.
モデル EMMA
2007 年 12 月 P/N HX556 Rev.A00
Page 33

システムの機能
本項では、お使いのシステムのハードウェアとソフトウェアの主要な機能
について説明します。また、システムをセットアップする際に必要なその
他のマニュアルの情報や、テクニカルサポートへの連絡方法についても説
明します。
•
デュアルコアまたはクアッドコア
2
ロセッサ
•
デュアルプロセッサシステムの場合は
テムの場合は
システム基板とプロセッサ拡張モジュール(
モジュールソケット(プロセッサごとに
2 GB、4 GB
合わせを取り付けることで、最大
が利用可能な場合は
•
800 MHZ DDR2
ています。
•
オプションのスリムライン
ン
SATA DVD-RW
(利用可能時)
メモ: DVD デバイスはデータ専用。
•
ホットプラグ対応の
または、ホットプラグ対応の
までサポート。
•
オプションの外付け
•
オプションの外付け
•
1 + 1
ット
2
ポートしています。
•
ホットプラグ対応システム冷却ファン
個または 4個。
4 GB
以上の
667 MHz DDR2
、または
冗長構成のホットプラグ対応
台。電源ユニットは、
8 GB
(利用可能時)のメモリモジュールの組み
256 GB
メモリモジュールは、限られた構成でサポートされ
ドライブ、または
1
台。
3.5
インチ
USB
ディスケットドライブ
USB
オプティカルドライブ
AMD Opteron® 8000
2 GB
以上、4 プロセッサシス
メモリモジュールが
PEM)の 32
8
個)に
128 GB(8 GB
)までアップグレードできます。
SATA DVD-ROM
CD-RW/DVD
SAS
ハードドライブを
2.5
インチ
1100 W
100 V ~ 240 V
4
ドライブ、スリムライ
SAS
ハードドライブを
1
1
高性能電源ユニ
の入力電圧範囲をサ
台。
シリーズのプ
個のメモリ
512 MB、1 GB
のメモリモジュール
コンボドライブ
5
台まで、
台。
台。
1
8
枚。
、
台
システム基板には、次の機能が搭載されています。
•
ベースボードには、
スロットがあります。
CPU
ソケット1 と
2
および
16 個の DIMM
はじめに 31
Page 34

•
CPU
ソケット
PEM
上にあります。
•
SAS
コントローラ専用の
•
x8
レーン幅
レーン幅
•
10 Mbps、100 Mbps
トする内蔵ギガビットイーサネット
(
TCP/IP
ポートしています。
蔵
NIC
•
キーの生成と保存、パスワードとデジタル証明書の保存ができる、
セキュリティアプリケーション用の内蔵
(
TPM
)(信頼済みプラットフォームモジュール)バージョン
(中国では利用できません)。
•
ディスクドライブ、オプティカルドライブ、キーボード、マウス、
USB
または
ポート
4 個。
•
USB 2.0
•
オプションのフラッシュメモリカード用の内部コネクタ
•
システムの重大な電圧と温度の変化に加え、システムファンの動作
も監視するシステム管理回路。システム管理回路は、システム管理
ソフトウェアと連動して機能します。
•
シリアルアクセスが可能な標準ベースボード管理コントローラ
(
BMC
)。
•
リモートシステム管理用のオプションのリモートアクセスコント
ローラ(
•
内蔵 ATI RN50 33 MHz PCI ビデオコントローラによる VGA 互換
内蔵ビデオサブシステム。このビデオサブシステムには 16 MB の
グラフィックメモリが装備されており、さまざまな 2D グラフィッ
クビデオモードをサポートします。最大解像度は 1600 x 1280
(65,536 色)です。オプションの RAC を取り付けるとオンボード
ビデオサブシステムは無効になり、RAC 上のビデオコントローラ
が代わりに使用されます。
3 と 4
PCI-Express(PCIe
PCIe
スロット
オフロードエンジン)機能および
のうち
2
フラッシュドライブをサポートする
対応の内部コネクタ
RAC
)カード。
およびその
PCIe
5
、および
10Gb
イーサネットにアップグレード可能な 内
枚が、ドーターカード上にあります。
DIMM
スロット。
)拡張スロット
個。
1000 Mbps
1
個。
NIC が 4
スロット
のデータ転送速度をサポー
Trusted Platform Module
16
2
枚。各
iSCSI
起動の機能もサ
USB 2.0
個は、別の
個、および
NIC は TOE
対応の外部
1
個。
1.2
x4
。
32 はじめに
Page 35

•
前面パネルには、ビデオコネクタ
システム
があります。
•
背面パネルには、シリアル(1 個)、ビデオ(1 個)、
および
•
前面パネルおよび背面パネルにはシステム
それぞれの機能の詳細については、
ください。
ID
とエラーメッセージを表示するための
NIC(4
個)の各コネクタがあります。
1 個、USB
10
ページの「仕様
サポートされている OS
コネクタ
ID
ボタンがあります。
2
個、および
1x5 LCD
USB(2
<?>
」を参照して
パネル
個)、
お使いのシステムでは、次の
•
Microsoft® Windows Server® 2003 R2 Standard/Enterprise Edition
(
SP1
以降)
•
Microsoft Windows Server 2003 R2 Standard Edition
Enterprise x64
•
Red Hat® Enterprise® Linux Server 5 AP(x86
•
Red Hat Enterprise Linux Server 5 AP(x86_64
•
Red Hat Enterprise Linux Server AS
•
Red Hat Enterprise Linux Server AS
•
SUSE® Linux Enterprise Server 10(x86_64
•
VMware ESX Server 3
メモ: サポートされている OS の最新情報については、www.dell.com
を参照してください。
Edition(SP1
OS
をサポートしています。
以降)
)
)
(バージョン
(バージョン
)
(内蔵バージョンを含む)
および
4.5)(x86
4.5)(x86_64
その他の情報
警告: 『製品情報ガイド』には、安全および認可機関に関する情報が記
載されています。保証情報に関しては、『サービス & サポートのご案内』
を参照してください。
•
システムをラックに取り付ける方法については、ラックに付属の
『ラック取り付けガイド』に説明があります。
)
)
はじめに 33
Page 36

•
『ハードウェアオーナーズマニュアル』では、システムの機能、
トラブルシューティング方法、およびコンポーネントの取り付けや
交換の方法について説明しています。このマニュアルはシステムに
付属の
CD
に収録されているか、または
きます。
•
システムに付属の
ニュアルやツールが収録されています。
•
システム、ソフトウェア、またはマニュアルの変更に関して記載さ
れたアップデート情報がシステムに付属していることがあります。
メモ: アップデートには他の文書の内容を差し替える情報が含まれ
ている場合がよくありますので、support.dell.com でアップデートがな
いかどうかを常に確認し、初めにお読みください。
•
リリースノートまたは
ニュアルの最新のアップデート情報や、専門知識をお持ちのユー
ザーや技術者のための高度な技術情報が記載されています。
CD
には、システムの設定と管理に使用するマ
readme
ファイルには、システムまたはマ
support.dell.com
で入手で
テクニカルサポートの利用法
このガイドの手順が理解できない場合やシステムが思ったとおりに動作し
ない場合は、『ハードウェアオーナーズマニュアル』を参照してください。
デルでは、企業向けのトレーニングと資格認証を実施しています。詳細に
ついては、
は、ご利用いただけない地域があります。
www.dell.com/training
を参照してください。このサービス
取り付けと設定
警告: 次の手順を実行する前に、『製品情報ガイド』の安全にお使いい
ただくための注意と認可機関に関する情報をよく読み、指示に従ってく
ださい。
本項では、システムを初めてセットアップする際の手順について説明し
ます。
34 はじめに
Page 37

システムの開梱
システムを箱から取り出し、同梱品がすべて揃っていることを確認し
ます。お客様のシステムには、オプションのラックキットとベゼル
(上図)が含まれていない場合があります。
後で必要になる場合があるので、梱包材と箱は保管しておいてください。
ラックへのシステムの取り付け
お使いのシステムのラック取り付けガイドに記載されている「安全にお
使いいただくための注意」を読まれたら、ラックにシステムを取り付け
ます。
システムをラックに取り付ける手順については、ラック取り付けガイドを
参照してください。
はじめに 35
Page 38

キーボード、マウス、モニターの接続
キーボード、マウス、モニター(オプション)を接続します。
システム背面のコネクタには、どのケーブルを各コネクタに接続するか
を示すアイコンがあります。モニターのケーブルコネクタにネジがある場
合は、必ず締めてください。
メモ:前面と背面のビデオ接続を使用してシステムに 2 台のモニター
を同時に接続した場合、ディスプレイは一度に 1 台のみ動作するため、
デフォルトで前面のビデオが使用されます。
36 はじめに
Page 39

システムとモニターの電源ケーブルの接続
モニターの電源ケーブルをモニター(オプション)に接続します。システ
ムに電源コードを接続します。
電源ケーブルのもう一方の端をアースされた電源コンセントまたは
(無停電電源装置)や配電装置(
あれば、使用する電源ユニットに応じて、電源ユニットを
コンセント、または
110 V
PDU
2
つの異なる
)などの電源に接続します。可能で
2
220 V
コンセントに接続します。
UPS
つの異なる
システムとモニターの電源投入
メモ:ビデオの初期化前に行われるプロセッサとメモリの初期化のた
めに、システムの画面が表示されるまでに数分かかることがあります。
この時間は、搭載されているメモリの容量に比例します。
はじめに 37
Page 40

システムとモニター(オプション)の電源ボタンを押します。電源イ
ンジケータが点灯します。表示されたイメージが最適の状態になるまで、
モニターのコントロールを調節します。
オプションのシステムベゼルを購入された場合は、システムの電源を入れ
た後で取り付けます。
OS のセットアップの完了
システムに
OS
のマニュアルを参照してください。
合は、『クイックインストールガイド』を参照してください。システムと
は別途に購入したハードウェアやソフトウェアのインストールは、
インストール済みであることを確認してから行ってください。
OS
がプリインストールされている場合は、システムに同梱の
OS
を初めてインストールする場
OS
が
38 はじめに
Page 41

仕様
プロセッサ
プロセッサの種類 デュアルコアまたはクアッドコア
Opteron
個または 4個。
拡張バス
バスの種類
拡張スロット ハーフレングス
メモリ
アーキテクチャ
メモリモジュールソケット
メモリモジュールの容量
RAM 2 GB
最小
最大
RAM
PCIe
およびハーフレングス
5
ト
(別の
ラカード用に予約)
667 MHz
ジュール。
800 MHz
ル(限られた構成のみ)。
240
16
に
個。
16
667 MHz DDR2: 512 MB、1 GB、2 GB
4 GB
800 MHZ DDR2: 2 GB
4 GB
プロセッサ
プロセッサ
のメモリモジュールが利用できる場合は
256 GB
®
8000
シリーズのプロセッサ
x8
レーン幅スロット
x4
レーン幅スロッ
個。
x4
スロット
レジスタ
レジスタ
ピンソケット
個、プロセッサ拡張モジュール上に
、または
(プロセッサ
(プロセッサ
)。
8 GB
2
個の場合
4
個の場合
1 個は SAS
DDR2
DDR2
32
個。ベースボード上
(利用可能時)。
。
2
個の場合)または
4
個の場合)。
コントロー
メモリモ
メモリモジュー
: 64 GB
。
: 128 GB(8 GB
AMD
2
2
個、
、
はじめに 39
Page 42

ドライブ
ハードドライブ
オプティカルドライブ オプションのスリムライン
ホットプラグ対応の
5
ドライブを
グ対応の
台まで。
8
DVD-ROM/CD-RW
または
台まで、または、ホットプラ
2.5
インチ
DVD-ROM 1
3.5
インチ
SAS
ハードドライブを
コンボドライブ、
台。
メモ: DVD デバイスはデータ専用。
コネクタ
背面パネル
NIC
シリアル
USB
ビデオ
前面パネル
ビデオ
USB
ビデオ
ビデオの種類
ビデオメモリ
解像度
RJ-45 10/100/1000 Gb
16550 互換 9 ピン DTE
ピン
USB 2.0
4
15 ピン VGA
15 ピン VGA
ピン
USB 2.0 対応 2
4
ATI RN50
クタ
16 MB
2D
1600 x 1280(65,536
ビデオコントローラ、
グラフィックス最大解像度:
コネクタ
対応コネクタ
個
色)
SAS
DVD-RW
4
個
2
個
VGA
ハード
、
コネ
電源
AC
電源ユニット(各電源ユニットにつき)
ワット数 入力電圧
+12V/90.8A
電圧 入力
47 ~ 63 Hz
40 はじめに
AC 90 ~ 264 V
、
3.3 Vsb/5A 最大 1100 W
AC 100 ~ 240 V、12 ~ 8A
:出力
、
Page 43

電源 (続き)
熱消費
最大流入電流 通常のラインコンディションのもと、シス
バッテリー
システムバッテリー
サイズと重量
縦幅
横幅
奥行
重量(最大構成)
環境
4255 BTU/
テムの動作環境全範囲で、電源ユニット
150
55 A
することがあります。
3.0 V
17.3 cm
44.7 cm
70.1 cm
40 kg
時(最大)
台当たりの入電量は
に、また
コイン型リチウム電池
150
ミリ秒以下で
10
ミリ秒以下で
CR 2032
35 A
メモ: 特定のシステム構成でのその他の環境条件の詳細については、
www.dell.com/environmental_datasheets を参照してください。
温度
動作時
保管時
相対湿度
動作時
保管時
最大耐久震度
動作時
保管時
最大耐久衝撃
10 ~ 35°C
–40 ~ 65°C
1
時間当たり最大
20 ~ 80
で
5 ~ 95
0.26 Grms(10 ~ 350 Hz
1.54 Grms(10 ~ 250 Hz
パーセント(結露しないこと)
10
パーセントの湿度変化
パーセント(結露しないこと)
)
)
に達
はじめに 41
Page 44

環境 (続き)
動作時
保管時
高度
動作時
保管時
空気汚染物質レベル
クラス
z
軸の正方向に
衝撃パルス(システムの各面に対して
ルス)
x、y、z
撃パルス(システムの各面に対して
パルス)、2 ミリ秒以下で
-16 ~ 3,048 m
-16 ~ 10,600 m
G2
またはそれ未満(
義による)
2
ミリ秒以下で
軸の正および負方向に
71 G
ISA-S71.04-1985
41 G の 1
6
連続衝
1
1
の定
パ
42 はじめに
Page 45

Dell™ PowerEdge™
R905 시스템
시스템 시작 안내서
Page 46

주, 주의사항 및 주의
주: 주는 컴퓨터의 활용도를 높이는 데 도움이 되는 중요한 정보입니다.
주의사항: "주의사항"은 하드웨어의 손상 또는 데이터 유실 위험을 설명하며
, 이러한 문제를 방지할 수 있는 방법을 알려줍니다.
주의: 주의는 위험한 상황, 심각한 부상 또는 사망할 우려가 있음을 알려
줍니다.
____________________
이 문서의 정보는 사전 통보없이 변경될 수 있습니다.
© 2007 Dell Inc. 저작권 본사 소유.
Dell Inc.의 서면 승인 없이 어떠한 경우에도 무단 복제하는 것을 엄격히 금합니다.
본 설명서에 사용된 상표인 Dell, DELL 로고 및 PowerEdge는 Dell Inc.의 상표이며, AMD, AMD
Opteron 및 조합은 Advanced Micro Devices, Inc.의 상표입니다. Microsoft, Windows 및 Windows
Server는 미국 및/또는 기타 국가에서 Microsoft Corporation의 상표
Hat 및 Enterprise Linux는 Red Hat, Inc.의 등록 상표입니다. SUSE는 미국 및 기타 국가에서
Novell, Inc.의 등록 상표입니다.
본 설명서에서 특정 회사의 표시나 제품 이름을 지칭하기 위해 기타 상표나 상호를 사용할 수
도 있습니다. Dell Inc.는 자사가 소유하고 있는 것 이외에 기타 모든 등록 상표 및 상표명에 대
한 어떠한 소유권도
없습니다.
또는 등록 상표이며, Red
모델 EMMA
2007년 12월 P/N HX556 Rev. A00
Page 47

시스템 특징
이 절에서는 컴퓨터의 주요 하드웨어 및 소프트웨어의 특징을 설명합니
다. 시스템 설정 시 필요한 기타 설명서 정보 및 기술 지원을 얻는 방법도
기술되어 있습니다.
•2개 또는 4개의 듀얼 또는 쿼드
세서
.
최소
•
• 800-MHZ DDR2
•
•3.5
•
•
•1 + 1
•
다음은 시스템 보드에 내장되어 있는 특징입니다.
•
•CPU 3
•SAS
•2
2 GB(듀얼
의
667-MHz DDR2
Expansion Module)
512 MB, 1 GB, 2 GB, 4 GB
을
조합
설치하여 메모리를 최대
있을 경우
슬림형
SATA DVD-ROM
이브
또는
주 : DVD 장치는 데이터 전용입니다 .
인치 단축 연결
하드 드라이브 최대 8개까지 지원
SAS
외장형
USB
외장형
USB
중복 구성 단축 연결 가능
전원 공급 장치는
단축 연결형 시스템 냉각팬 4개
베이스보드에는
있습니다
과
CPU 4 및 16 DIMM
컨트롤러 전용
개의
x8 레인 폭 PCIe(PCI-Express)
폭
PCIe
슬롯
프로세서 시스템) 또는
메모리 모듈. 시스템 보드 및
의 메모리 모듈 소켓(프로세서당 8개
256 GB)까지
CD-RW/DVD 콤보
디스켓 드라이브 옵션 1개
광학 드라이브 옵션 1개
16 DIMM
.
.
업그레이드할 수 있습니다
메모리 모듈은 제한된 구성에서 지원됩니다
SAS 하드
100 V - 240 V의
PCIe 슬롯.
코어
AMD Opteron™ 8000
4 GB(4개의
또는
8 GB(사용
128 GB(8 GB
드라이브 옵션, 슬림형
드라이브(사용 가능한 경우
드라이브 최대 5개 또는
, 1100W의
입력 전압 범위를 지원합니다
.
슬롯이 있는
슬롯은 별도의
가능한 경우)의 메모리 모듈
메모리 모듈을 사용할 수
.
.
.
고효율 전원 공급 장치 2개
CPU 1 및 CPU 2
PEM에
확장 슬롯 및 5개의
시리즈 프로
프로세서 시스템
PEM(Processor
) 32개에
.
.
SATA DVD-RW
).
2.5인치 단축 연결
소켓이
있습니다
x4
.
레인
드라
.
)
시스템 시작 안내서 45
Page 48

• 10Mbps, 100Mbps, 1000Mbps
Ethernet NIC 4
부팅 기능을 지원합니다
레이드할
보안 응용프로그램에 사용되며 키 생성 및 저장, 암호 및 디지털 인증서
•
저장이 가능한 내장형
에서는
사용
•
디스켓 드라이브, 광학 드라이브, 키보드, 마우스 또는
이브를
내장형
•
•
플래쉬 메모리 카드 옵션용 내장형 커넥터 1개
시스템 팬, 임계 시스템 전압 및 온도 등의 작동을 모니터링하는 시스템
•
관리 회로. 시스템 관리 회로는 시스템 관리 소프트웨어와 연계하여 작
동합니다
직렬 액세스를 사용하는
•
•
원격 시스템 관리용
내장형 ATI RN50, 33MHz PCI 비디오 컨트롤러를 기반으로 한 내장
•
형
래픽 메모리가 포함되어 있으며 다양한 2D 그래픽 비디오 모드를 지
원합니다. 최대 해상도는 65,536 색상의 1600 x 1280입니다. (
션을
상의 비디오 컨트롤러가 대신 사용됩니다
비디오 커넥터 1개
•
및 오류 메시지를 지원하는 전면 패널
직렬 커넥터 1개, 비디오 커넥터 1개
•
개가 포함된 후면 패널 커넥터
•
전면 및 후면 패널의 시스템
특정 기능에 관한 자세한 내용은 "52페이지의 기술 사양"을 참조하십시오.
지원할 수 있는 외장형
USB 2.0 호환
VGA 호환
설치한 경우 내장형 비디오 서브시스템을 사용할 수 없으며
개 각
NIC는 또한 TOE(TCP/IP offload engine) 및 iSCSI
수
있는 도터 카드에 있습니다
TPM(Trusted Platform Module) version 1.2. (
불가
)
커넥터 1개
.
RAC(Remote Access Controller)
비디오 서브시스템. 비디오 서브시스템에는 16 MB의 그
, USB
데이터 전송률을 지원하는 내장형
. 2개의
BMC(Baseboard Management Controller).
커넥터 2개 및 시스템
내장형
NIC는 10Gb Ethernet
.
USB 2.0 호환 포트 4개.
.
.
.)
ID용 1x5 LCD
.
, USB
커넥터 2개 및
ID
단추
.
USB
카드 옵션
NIC
Gb
으로 업그
플래쉬 드라
.
RAC
패널 1개
커넥터
중국
옵
RAC
4
46 시스템 시작 안내서
Page 49

지원되는 운영 체제
본 시스템에는 다음과 같은 운영 체제가 지원됩니다.
• Microsoft® Windows Server® 2003 R2 Standard 및 Enterprise
이상
Edition (SP1
• Microsoft Windows Server 2003 R2 Standard
(SP1 이상)
®
•Red Hat
• Red Hat Enterprise Linux Server 5 AP (x86_64)
• Red Hat Enterprise Linux Server AS (Version 4.5) (x86)
• Red Hat Enterprise Linux Server AS (Version 4.5) (x86_64)
•SUSE
Enterprise® Linux Server 5 AP (x86)
®
Linux Enterprise Server 10 (x86_64)
)
및
Enterprise x64 Editions
• VMware ESX Server 3(
주 : 지원되는 운영 체제에 대한 자세한 내용은 www.dell.com 을 참조하
십시오 .
내장된 버전 포함
)
기타 필요한 정보
주의: 제품 정보 안내는 중요한 안전 지침 및 규제 관련 정보를 제공합니다. 보
증 정보는 본 설명서에 포함되어 있거나 별도의 문서로 제공됩니다.
•
랙 솔루션과 함께 제공되는 랙 설치 안내서 또는 랙 설치 안내 지침에는
시스템을 랙에 설치하는 방법이 기술되어 있습니다
•
하드웨어 소유자 설명서에서는 시스템 기능에 대한 정보를 제공하고
시스템 문제 해결 방법 및 시스템 구성부품 설치 또는 교체 방법을 설명
. 이
합니다
support.dell.com
시스템에 포함된
•
들어있습니다
시스템, 소프트웨어 또는 설명서의 변경 사항이 포함된 업데이트가 시
•
스템과
주 : support.dell.com 에서 새로운 갱신본이 없는지 항상 확인하십시오 .
설명서는 시스템과 함께 제공되는
에서 다운로드할 수 있습니다
CD에는
.
함께 제공되기도 합니다
갱신본에는 최신 정보가 수록되어 있으므로 다른 설명서를 읽기 전에 반
드시 먼저 참조하시기 바랍니다 .
시스템 구성 및 관리에 대한 설명서 및 도구가
.
.
CD에
수록되어 있거나
.
시스템 시작 안내서 47
Page 50

•
발행 정보나
전문가 또는 기술자를 위한 고급 기술 참조 자료가 포함되어 있을 수 있
습니다
.
readme
파일에는 시스템에 대한 최신 업데이트 사항이나
기술 지원 얻기
본 설명서의 절차가 이해되지 않거나 시스템이 제대로 작동하지 않을 경우
에는 하드웨어 소유자 설명서를 참조하십시오.
이제 Dell Enterprise Training and Certification을 사용할 수 있습니다. 자세
한 내용은 www.dell.com/training을 참조하십시오. 지역에 따라 이 서비스
가 제공되지 않을 수도 있습니다.
설치 및 구성
주의: 아래에 설명된 절차를 수행하기 전에 제품 정보 안내의 안전 지침 및 중
요한 규제 관련 정보를 읽고 준수하십시오.
이 절에서는 처음 시스템을 설정하는 절차를 설명합니다.
시스템 포장 풀기
시스템의 포장을 풀고 각 항목을 확인하십시오. 시스템에 랙 키트 옵션 및
베젤이 포함되어 있지 않을 수도 있습니다.
모든 운송 포장재는 나중에 필요할 수 있으므로 보관하십시오.
48 시스템 시작 안내서
Page 51

랙에 시스템 설치
시스템의 랙 설치 안내서에 나와 있는 "안전 지침"을 읽은 후에 시스템을
랙에 설치합니다.
랙에 시스템을 설치하는 자세한 지침은 랙 설치 안내서를 참조하십시오.
키보드, 마우스 및 모니터 연결
키보드, 마우스 및 모니터(옵션)를 연결합니다.
시스템 시작 안내서 49
Page 52

시스템 후면에 있는 커넥터에는 각 커넥터에 연결될 케이블이 표시된 아이
콘이 있습니다. 모니터의 케이블 커넥터에 있는 나사(해당하는 경우)를 단
단히 고정하십시오.
주: 전면 및 후면 비디오 연결을 통해 두 대의 모니터를 동시에 시스템에 연결
하는 경우 한번에 하나의 디스플레이만 작동할 수 있으므로 전면 비디오 연결
이 기본 비디오가 됩니다.
시스템 및 모니터 전원 케이블 연결
모니터의 전원 케이블을 모니터(옵션)에 연결합니다. 시스템의 전원 케이
블을 시스템에 연결합니다.
케이블의 반대쪽 끝을 접지된 전원이나 UPS(Uninterruptible Power
Supply) 또는 PDU(Power Distribution Unit)와 같은 별도의 전원에 연결합
니다. 가능한 경우 사용되는 전원 소스에 따라 2개의 다른 110V 전원 소스
또는 2개의 다른 220V 전원 소스에 전원 공급 장치를 연결하십시오.
50 시스템 시작 안내서
Page 53

시스템 및 모니터 전원 켜기
주: 비디오를 초기화하기 전에 수행되는 프로세서 및 메모리 초기화로 인해
화면에 표시하기 까지 몇 분이 걸릴 수 있습니다. 지연되는 시간은 설치된 메
모리 양에 비례합니다.
시스템 및 모니터(옵션)의 전원 단추를 누릅니다. 그러면 전원 표시등이
켜집니다. 화면 상태가 만족스러울 때까지 모니터의 컨트롤을 조정합
니다.
시스템 베젤 옵션을 구입한 경우 시스템을 켠 후에 설치하십시오.
운영 체제 설치 완료
시스템 구입시 운영 체제가 미리 설치되어 있는 경우에는 시스템과 함께
제공되는 운영 체제 설명서를 참조하십시오. 운영 체제를 처음으로 설치
하려면 빠른 설치 안내서를 참조하십시오. 시스템과 함께 구입하지 않은
하드웨어 또는 소프트웨어를 설치하기 전에 운영 체제가 설치되어 있는지
확인하십시오.
시스템 시작 안내서 51
Page 54

기술 사양
프로세서
프로세서 유형 2 개 또는 4 개의 듀얼 또는 쿼드 코어
AMD Opteron ™ 8000 시리즈 프로세서
확장 버스
버스 유형
확장 슬롯 2 개의 절반 길이 x8 레인 폭
메모리
아키텍처 667-MHz 등록 DDR2 메모리 모듈
메모리 모듈 소켓 240 핀 32 개 . 베이스보드에 16 개 , 프로세
메모리 모듈 용량
PCIe
슬롯 및 5 개의
절반 길이 x4 레인 폭
(추가 x4
용하도록
800-MHz 등록 DDR2 메모리 모듈 ( 제한된
구성 )
서 확장 모듈에 16 개
667-MHz DDR2: 512 MB, 1 GB, 2 GB, 4 GB
또는 8 GB( 사용 가능한 경우 )
800-MHZ DDR2: 2 GB
슬롯은
예약되어 있습니다
슬롯
SAS
컨트롤러 카드에서 사
.)
최소 RAM 2 GB(2 개의 프로세서 ) 또는 4 GB(4 개의
프로세서 )
최대 RAM 2 개의 프로세서 : 64 GB
4 개의 프로세서 : 128 GB(8 GB 의 모듈을
사용할 수 있을 경우 256 GB)
52 시스템 시작 안내서
Page 55

드라이브
하드 드라이브 3.5 인치 단축 연결 SAS 드라이브 최대 5 개
또는 2.5 인치 단축 연결 SAS 드라이브 최대
8 개
광학 드라이브 슬림형 DVD-RW, DVD-ROM/CD-RW 콤보
또는 DVD-ROM 옵션 1 개
주: DVD 장치는 데이터 전용입니다.
커넥터
후면 패널
NIC
직렬
USB
비디오
전면 패널
비디오
USB
비디오
비디오 유형 ATI RN50 비디오 컨트롤러 ; VGA 커넥터
비디오 메모리
해결 방법 최대 2D 그래픽 솔루션: 1600 x 1280, 65,536
RJ-45 10/100/1000 Gb 4 개
9 핀 , DTE, 16550 호환
4 핀 2 개 , USB 2.0 호환
15 핀 VGA
15 핀 VGA
4 핀 USB 2.0 호환 2 개
16 MB
색상
전원
AC 전원 공급 장치 ( 전원 공급 장치마다 )
와트
전압
열 손실
90-264VAC 입력 : 출력 +12V/90.8A,
3.3Vsb/5A 최대 1100W
입력 100-240VAC, 12-8A, 47-63Hz
최대 4255 BTU/hr
시스템 시작 안내서 53
Page 56

전원 ( 계속 )
최대 유입 전류
전지
시스템 전지
규격
높이 17.3cm(6.8 인치 )
너비 44.7 cm(17.6 인치 )
깊이 70.1cm(27.6 인치 )
무게 ( 최대 구성시 )
환경
일반적인 라인 상태와 전체 시스템의 작동
범위에서는 유입 전류가 10ms 동안 각 전력
공급 장치당 55A 까지 , 150ms 동안 각 전원
공급 장치당 35A 까지 도달할 수 있습니다 .
CR2032 3.0V 리튬 코인 셀
40kg(88lb)
주: 특정 시스템 구성을 위한 환경 측정에 대한 추가 정보는
www.dell.com/environmental_datasheets를 참조하십시오.
온도
작동
보관
상대 습도
작동
보관
최대 진동
작동
보관
최대 충격
작동
10° ~ 35°C(50° ~ 95°F)
–40° ~ 65°C(–40° ~ 149°F)
20% ~ 80%( 비응축 ), 시간당 10% 의 최고
습도 변화시
5% ~ 95%( 비응축 )
0.26 Grms(10 ~ 350 Hz)
1.54 Grms(10 ~ 250 Hz)
최대 2ms 동안 (+) z 축으로 41G 의 충격 펄
스 ( 시스템 각 면에 1 회의 펄스 ) 1 회
54 시스템 시작 안내서
Page 57

환경 ( 계속 )
보관
고도
작동
보관
공기 중 오염 물질 수준
등급
최대 2ms 동안 (+/-) x, y, z 축으로 71G 의 연
속 충격 펄스 ( 시스템 각 면에 1 회의 펄스 )
6 회
–16 ~ 3048 m(–50 ~ 10,000 ft)
–16 ~ 10,600 m(–50 ~ 35,000 ft)
ISA-S71.04-1985 에서 정의한 G2 이하
시스템 시작 안내서 55
Page 58

56 시스템 시작 안내서
 Loading...