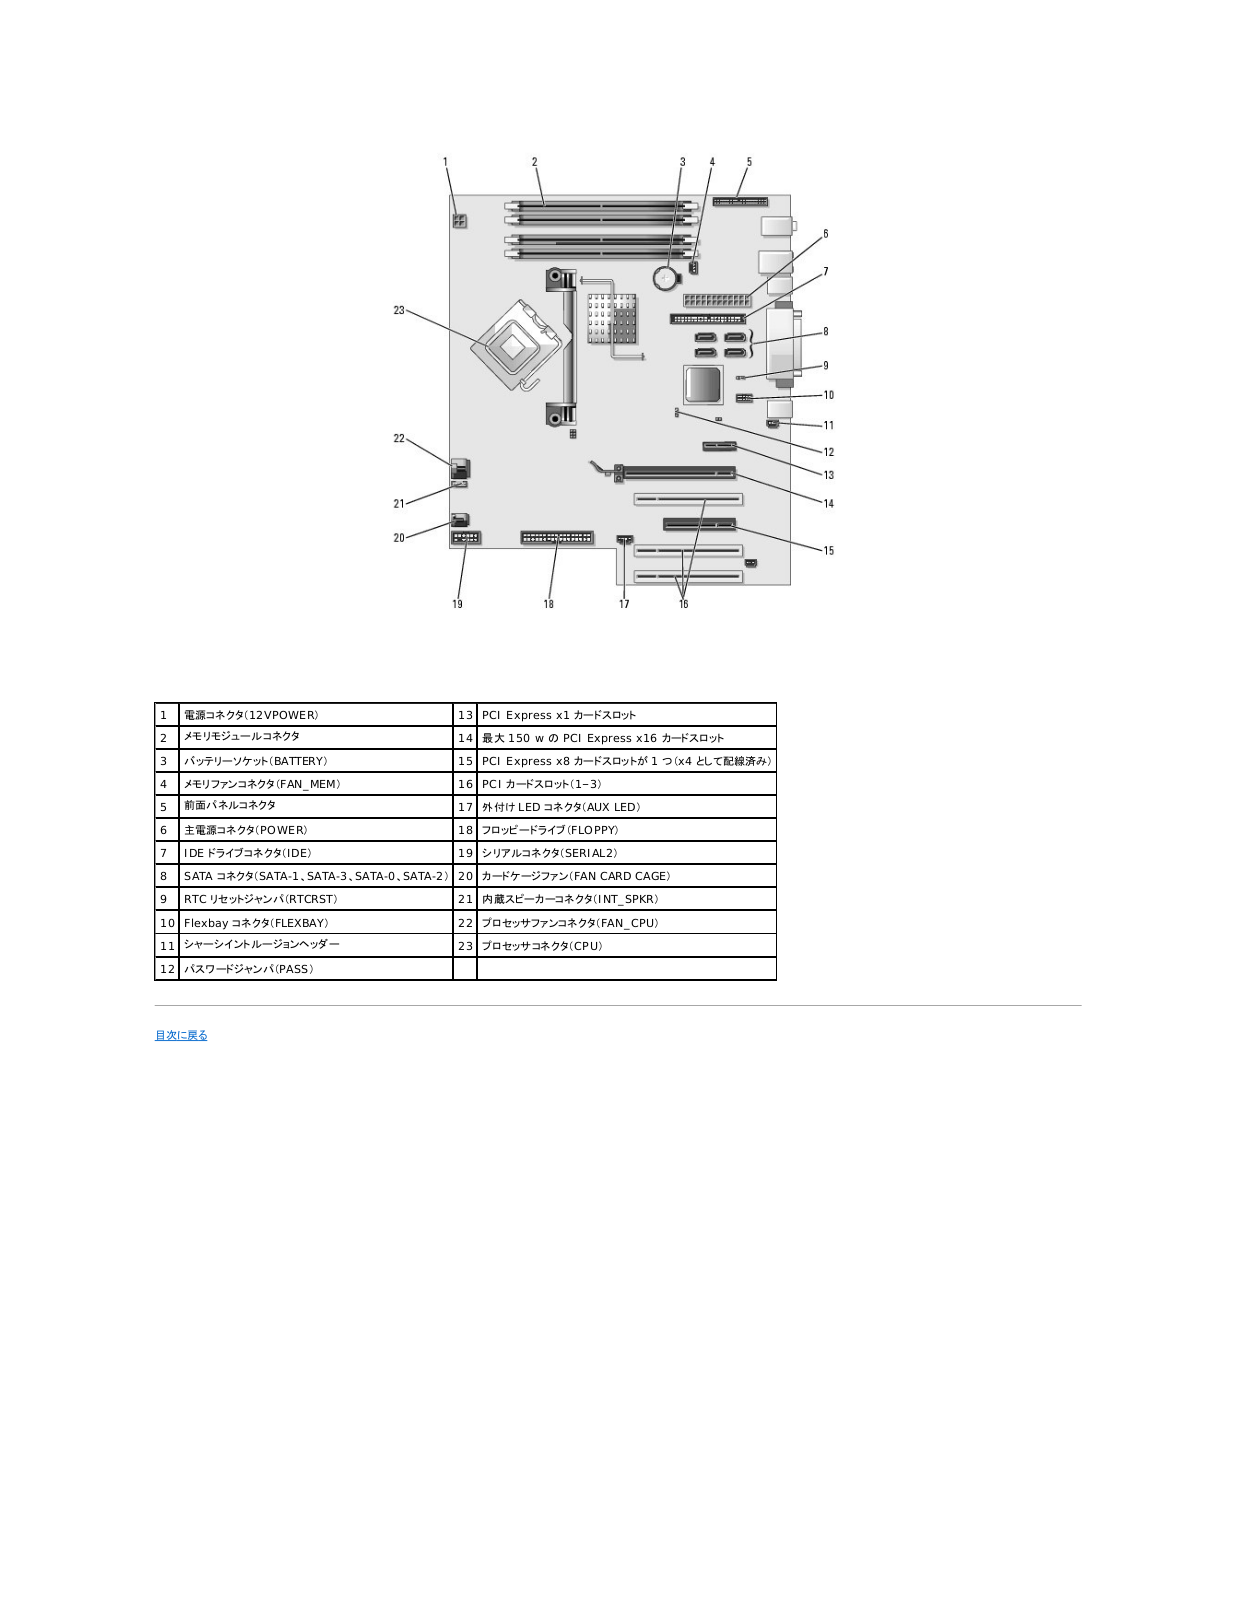
Dell Precision 380 User Manual [ja]

Dell Precision™ Workstation 380

CD DVD

I/O

Microsoft® Windows® XP

Dell™ n Microsoft® Windows®

DCTA

2006 8 P/N M8582 Rev. A04

Dell Precision™ Workstation 380

15.25 CD/DVD

2

5.25

CD/DVD 3


3

3.5

4 ATA


4

3.5


5


CD


6

IEEE 1394

IEEE 1394


7

USB 2.0 2

USB USB USB


USB


8

Dell™

Dell


9


10


Dell Precision 380 User Manual


11


12


13

4


14


10 Mbps 100 Mbps 1000 Mbps 1 Gbps


1


2


3


USB


4


PCI PCI Express


5


15.25 CD/DVD

25.25 CD/DVD 3 ATA SCSI


3

3.5


4


CD


5

IEEE 1394

IEEE 1394


6

USB 2.0 2

USB USB USB


USB


7


8


9

4


10


11


12


10 Mbps 100 Mbps 1000 Mbps 1 Gbps


1


PCI PCI Express


2


3


4


USB


1


USB


USB


Microsoft® Windows® XP


2


USB USB


3


― 10 Mbps


― 100 Mbps


― 1000 Mbps 1 Gbps


4


/


5 3 10 Mbps


5


6


CD VCR /


7


8


9

USB 2.0

USB


2


USB USB


10

USB 2.0

USB


3


USB USB


11


1 COM1 2


COM2


12


USB USB


:

1


7


2


8

3.5


3


9

3.5


4


10

5.25


5


11

5.25


6


12


CD/DVD


1

12VPOWER

13

PCI Express x1


2


14

150 w PCI Express x16


3

BATTERY

15

PCI Express x8 1 x4


4

FAN_MEM

16

PCI 1–3


5


17

LED AUX LED


6

POWER

18

FLOPPY


7

IDE IDE

19

SERIAL2


8

SATA SATA-1 SATA-3 SATA-0 SATA-2

20

FAN CARD CAGE


9

RTC RTCRST

21

INT_SPKR


10

Flexbay FLEXBAY

22

FAN_CPU


11


23

CPU


12

PASS


Dell Precision™ Workstation 380

LegacySelect

CMOS


IEEE 1394


U320 SCSI


RAID


LegacySelect

LegacySelect Dell OpenManage™ IT Assistant CFI

LegacySelect / USB PCI PS/2

ASF Alert Standard Format

ASF DMTF

ASF

ASF


BIOS: Corrupt BIOS/Corrupt BIOS Cleared

BIOS BIOS


Boot: Failure to Boot to BIOS

BIOS


Password: System Password Violation

3


CPU: CPU DOA Alert/CPU DOA Alert Cleared


Heartbeats: Entity Presence


Temperature Generic Critical Temperature Problem/Generic Critical Temperature


Problem Cleared


Cooling Device: Generic Critical Fan Failure/Generic Critical Fan Failure Cleared

rpm rpm


Connectivity: Ethernet Connectivity Enabled/

Ethernet Ethernet

Ethernet Connectivity Disabled


ASF support.jp.dell.com ASF ASF

Dell OpenManage™ IT Assistant

IT Assistant IT AssistantSNMP DMI CIM

DMI CIM Dell OpenManage Client Instrumentation IT Assistant support.jp.dell.com Dell OpenManage IT Assistant

Dell OpenManage Client Instrumentation

Dell OpenManage Client Instrumentation IT Assistant

BIOS

IT Assistant Dell OpenManage Client Instrumentation Dell

OpenManage Client Instrumentation support.jp.dell.com Dell OpenManage Client Instrumentation

2.System Security

3.<Enter>

Enabled Detected

Alert! Cover was previously removed. !

Detected Chassis Intrusion Reset Enabled EnabledSilent Disabled

Enabled-Silent Detected

1

化プログラムなどの保護機能をご自身でご用意ください。

System Password

す。その結果、ハードドライブ内のデータへのアクセスが誰にでも可能になります。

2

Disabled ―

Set

Not Enabled

<Tab> <Shift><Tab> 5 <Esc>

1.Password Status Unlocked

2.System Password <Enter>

Enter Password 32

32 <Backspace>

*

4.<Enter>

32 * Confirm Password 32

5.<Enter>Set

1

Password Status Unlocked

Type in the password and - press

<ENTER> to leave password security enabled.

- press <CTRL><ENTER> to disable password security.

Enter password:

<ENTER> <CTRL><ENTER>

Password Status Locked

Type the system password and press <Enter>.

Enter password: <ENTER>

** Incorrect password. **

3

** Incorrect password. **

Number of unsuccessful password attempts: 3

System halted! Must power down. 3

System Password Admin Password Password Status

2.System Password <Enter>

4.<Enter> 2 Not Set

Admin Password

Set

Not Set

Disabled

使用することはできません。

1.Admin Password Not Enabled

2.Admin Password

Admin Password Enabled

Admin Password

Admin Password

Setup Password Password Status

3.<Enter> 2 Not Set

2.DELL™ <F2>

Microsoft® Windows®

3

Options List

Option Field


Option Field


<Enter>


Key Functions Option Field


Info

System Info

BIOS BIOS Asset Tag


CPU Info

IA-32e CPU L2


Memory Info


Date/Time


Boot Sequence


Drives


Diskette Drive

Off Internal


USB USB USB USB


Read Only


Drive 0 Drive n


Error Reporting

0 6

Onboard Devices


Audio Controller


NIC Controller

NIC On Off On w/ PXE


LPT Port Mode

Off AT IBM AT PS/2 IBM PS/2


EPP EPP ECP ECP


LPT Port Mode LPT ECP LPT Port DMA LPT DMA


LPT Port Address


LPT Port DMA

ECP Off DMA DMA 1 DMA 1 DMA 3


DMA 3


Serial Port #1

[Serial Port #1 1 ]


Auto COM1 COM3


USB

USB / All On All Off


Front On Front Off


Performance


Hyper-Threading

1 2


On Off

HDD Acoustic Mode Quiet

Performance

Bypass

Suggested

SpeedStep

Intel SpeedStep®


Security


Admin Password


System Password


Drive 0 Password


through Drive n


Password

RAID RAID


Password Status


<Ctrl><ENTER>

Chassis Intrusion


TPM Security

TPM Trusted Platform Module


Power Management


AC Power Recovery

AC


Auto Power On


24


Disabled


Auto Power Time

Off


Low Power Mode

Low Power Mode Hibernate Off


Remote Wake-Up

Network Interface Controller Remote Wakeup


On On w/ Boot to NIC


Power Management Low


Power Mode Suspend


Suspend Mode

S1


S3


Maintenance


Event Log


CMOS Defaults


Video


Primary Video

2 PEG PCI Express


POST Behavior


Fastboot

On


Numlock Key

On


Off


Keyboard Errors

Report POST BIOS <F1>


<F2> Do Not Report POST


BIOS


POST Hotkeys

Setup and Boot


Menu F2=Setup and F12=Boot Menu Setup F2=Setup Boot Menu


F12=Boot Menu None


Boot Sequence

Onboard or USB Floppy Drive

Onboard Hard Drive

Onboard or USB CD Drive – CD CD CD

USB Device – USB F12 = Boot Menu <F12> BIOSUSB

USB

Drivers and Utilities CD Dell Diagnostics CD Dell DiagnosticsUSB

USB Off

1.USB USB USB

3.F2=Setup,F12=Boot Menu <F12>

Microsoft Windows

Boot Device Menu

USB USB Flash Device USB <Enter>

USB

2.BootSequence <Enter>

5.( ) ( )

1.


PSWD


RTCRST

CMOS

CMOS

3.3 PSWD 2 3

1 2

6.Microsoft® Windows®

10.3 1 2

Not Set

CMOS

3.CMOS

a.CMOS RTCRST

b.1 2

c.2 3 5

d.1 2

5.

Standby ―

Hibernate ―

Shutdown ― Auto Power OnRemote Wake Up


Windows XP


USB


Intel® 1 2

Windows XP Microsoft® Windows® XP SP1

3.2

IEEE 1394

IEEE 1394 IEEE 1394

4 IEEE 1394

IEEE 1394 IEEE 1394

U320 SCSI

U320 SCSI PCI U320 320 MBps LVD U160 160 MBps

Ultra2 80 MBps Ultra 40 MBps

SE single-ended LVD U320 U160 Ultra2 SCSI SE Ultra 40 MBps

SCSI SCSI ID

RAID

RAID RAIDDell Precision RAID 0 RAID 1 RAID 5 RAID 10 RAID 0 RAID10

Intel® RAID 2 3 RAID 0 3 4 Intel

RAID RAID 0 RAID 1

RAID RAID 10 RAID 0

RAID

RAID RAID

RAID 0

RAID 0

1

RAID 0 1 120 GB 2 240 GB

RAID 0 1 RAID 0

RAID 1

RAID 1 RAID 1

/ 2 120 GB RAID 1 120 GB

RAID 5

RAID 5 3RAID 1 RAID 5RAID 5 RAID 0 RAID 1

/ 4 120 GB RAID 1 360 GB

RAID 10

RAID 10 4RAID 1 RAID 10RAID 10 RAID 0 RAID 1

/ 4 120 GB RAID 1 240 GB

RAID

RAID RAID RAID 2

2

RAID 2 1 Intel RAID Option ROM2 Intel Matrix Storage Manager Intel Matrix Storage Console Intel Matrix Storage Console RAID RAID

RAID

2.Drvies <Enter>

3.SATA Operation SATA <Enter>

4.RAID On RAID <Enter> <Esc>

RAID

5. Save/Exit / <Enter>

Intel® RAID Option ROM RAID

Intel RAID Option ROM RAID RAID

0 2 RAID 1 2

RAID 0

RAID

RAID 0

1.RAID

2.Intel RAID Option ROM <Ctrl><i>

3.Create RAID Volume RAID <Enter>

4.RAID <Enter>

5.RAID0 (Stripe) RAID0 <Enter>

6.2 3 <Enter>

RAID 128 KB

7.<Enter>

8.<Enter>

9.<Enter>

10.<y> RAID

11.Intel RAID Option ROM

12.Exit <Enter>

RAID 1

1.RAID

2.Intel RAID Option ROM <Ctrl><i>

3.Create RAID Volume RAID <Enter>

4.RAID <Enter>

5.RAID1 (Mirror) RAID1 <Enter>

6.2 <Enter>

7.<Enter>

8.<Enter>

9.<y> RAID

10.Intel RAID Option ROM

11.Exit <Enter>

RAID 5

1.RAID

2.Intel RAID Option ROM <Ctrl><i>

3.Create RAID Volume RAID <Enter>

4.RAID <Enter>

5.RAID5 (Mirror) RAID5 <Enter>

6.3 4 <Enter>

7.<Enter>

8.<Enter>

9.<y> RAID

10.Intel RAID Option ROM

11.Exit <Enter>

RAID 10

1.RAID

2.Intel RAID Option ROM <Ctrl><i>

3.Create RAID Volume RAID <Enter>

4.RAID <Enter>

5.RAID10 (Mirror) RAID10 <Enter>

6.4 <Enter>

7.<Enter>

8.<Enter>

9.<y> RAID

10.Intel RAID Option ROM

11.Exit <Enter>

RAID

RAID

RAID Intel RAID Option ROM RAID

1.Intel RAID Option ROM <Ctrl><i>

2.Delete RAID Volume RAID <Enter>

3.RAID <Delete>

4.<y> RAID

5.<Esc> Intel RAID Option ROM

Intel Matrix Storage Manager RAID

2

RAID RAID 0 RAID 1 RAID 0 RAID 1

1 2 1 2 RAID

2 2 RAID

RAID 0

RAID

1.RAID

2.Intel(R) Matrix Storage ManagerIntel Matrix Storage Console Intel Storage

RAID

3.RAID RAID RAID

4.RAID 0 1

5.2 RAID 0 3 3 3

RAID 1

RAID

1.RAID

2.Intel(R) Matrix Storage Manager Intel Matrix Storage Console Intel® Storage

RAID

3.RAID RAID

5.RAID RAID 1

6.RAID 1 1 22

9.Microsoft Windows RAID

RAID 5

RAID

1.RAID

2.Intel(R) Matrix Storage Manager Intel Matrix Storage Console Intel® Storage

RAID

3.RAID RAID

5.RAID RAID 5

6.RAID 5 1 2 33 4

9.Microsoft Windows RAID

RAID 10

RAID

1.RAID

2.Intel(R) Matrix Storage Manager Intel Matrix Storage Console Intel® Storage

RAID

3.RAID RAID

5.RAID RAID 10

6.RAID 10 1 34

9.Microsoft Windows RAID

RAID

RAID 1 RAID 1 2 RAIDRAID 0

1.Intel(R) Matrix Storage Manager Intel Matrix Storage Console Intel® Storage

2.RAID

3.RAID

4.RAID Available RAID

RAID 0

1.RAID

2.Intel(R) Matrix Storage ManagerIntel Matrix Storage Console Intel Storage

RAID

3.RAID

5.RAID

6.RAID RAID 0

RAID 128 KB

RAID

11

11.

RAID 1

1.RAID

2.Intel(R) Matrix Storage ManagerIntel Matrix Storage Console Intel Storage

RAID

3.RAID

5.RAID

6.RAID RAID 1

RAID

10

10.

RAID 5

1.RAID

2.Intel(R) Matrix Storage ManagerIntel Matrix Storage Console Intel Storage

RAID

3.RAID

5.RAID

6.RAID RAID 5

RAID

8.2 3

10

10.

RAID 10

1.RAID

2.Intel(R) Matrix Storage ManagerIntel Matrix Storage Console Intel Storage

RAID

3.RAID

5.RAID

6.RAID RAID 10

RAID

8.3

10

10.

RAID 1 Disk Manager Intel RAID Option ROM

Utility RAID 1

1.Intel(R) Matrix Storage ManagerIntel Matrix Storage Console Intel® Storage

3.Mark as Spare

2.Reset Hard Drive to Non-RAID RAID

RAID 1

RAID 1

1.Intel(R) Matrix Storage ManagerIntel Matrix Storage Console Intel® Storage

2.RAID 1 Rebuild to this Disk

3.RAID 1

Dell Precision™ Workstation 380

触れることにより、身体の静電気を除去することができます。

Time-of-day not set - please run SETUP program

Invalid configuration information -

please run SETUP program ―

Strike the F1 key to continue, F2 to run the setup utility

F1 F2

2 3

ら、バッテリーを外します。それを怠ると、バッテリーソケットが外れたり、システム基板の回路を切断するなど、システム基板に損傷を与える恐れがあります。

Dell Precision™ Workstation 380

Dell™

BIOS CD

2.

タイプのケーブルを外す場合は、ロックタブを押し込んでからケーブルを抜いてください。コネクタを抜く際は、コネクタのピンを曲げないようにまっすぐに引き抜いてください。また、ケーブルを接 続する際は、両方のコネクタの向きが合っていることを確認してください。

3.

Loading...
+ 107 hidden pages