


Precision 3240 Compact
Accessories Installation Guide
Reg ula tor y M ode l: D16 S
Reg ula tor y T ype : D 16S 001
Nov emb er 202 0
Rev . A 01

Notes, cautions, and warnings
NOTE: A NOTE indicates important information that helps you make better use of your product.
CAUTION: A CAUTION indicates either potential damage to hardware or loss of data and tells you how to avoid
the problem.
WARNING: A WARNING indicates a potential for property damage, personal injury, or death.
© 2020 Dell Inc. or its subsidiaries. All rights reserved. Dell, EM C, and other trademarks are trademarks of Dell Inc. or its subsidiaries. Oth er
trademarks may be trademarks of their respective owners.

Contents
Chapter 1: Before you begin ......................................................................................................... 4
Chapter 2: Precision Compact VESA sleeve mount........................................................................ 5
Chapter 3: Precision Compact Dual VESA sleeve mount.................................................................7
Chapter 4: Dell monitor stand VESA mount.................................................................................. 12
Chapter 5: Dell A/C adapter sleeve mount................................................................................... 16
Under the desk................................................................................................................................................................... 16
On the monitor stand........................................................................................................................................................ 18
Chapter 6: Precision Compact Dust Filter ...................................................................................22
Chapter 7: Precision Compact Cable Cover..................................................................................24
Chapter 8: After installing the accessory..................................................................................... 27
Chapter 9: Getting help and contacting Dell................................................................................ 28
Appendix A: Screw size list..........................................................................................................30
Appendix B: Recommended tools................................................................................................. 31
Contents 3

Before you begin
1. Save and close all open files and exit all open applications.
2. Shut down your system: Click Start >
NOTE: If you are using a Linux operating system, see the documentation of your operating system for shut-down
instructions.
3. Disconnect your system and all attached devices from their electrical outlets.
4. Disconnect all attached network devices and peripherals, such as keyboard, mouse, and monitor from your system.
CAUTION: To disconnect a network cable, first unplug the cable from your system and then unplug the cable
from the network device.
5. If the system unit or the adapter is being installed on the monitor:
a. Disconnect the power and all the display cables from the monitor.
b. Remove the stand from the monitor and place the monitor on a clean and soft surface.
Power > Shut down .
1
4 Before you begin

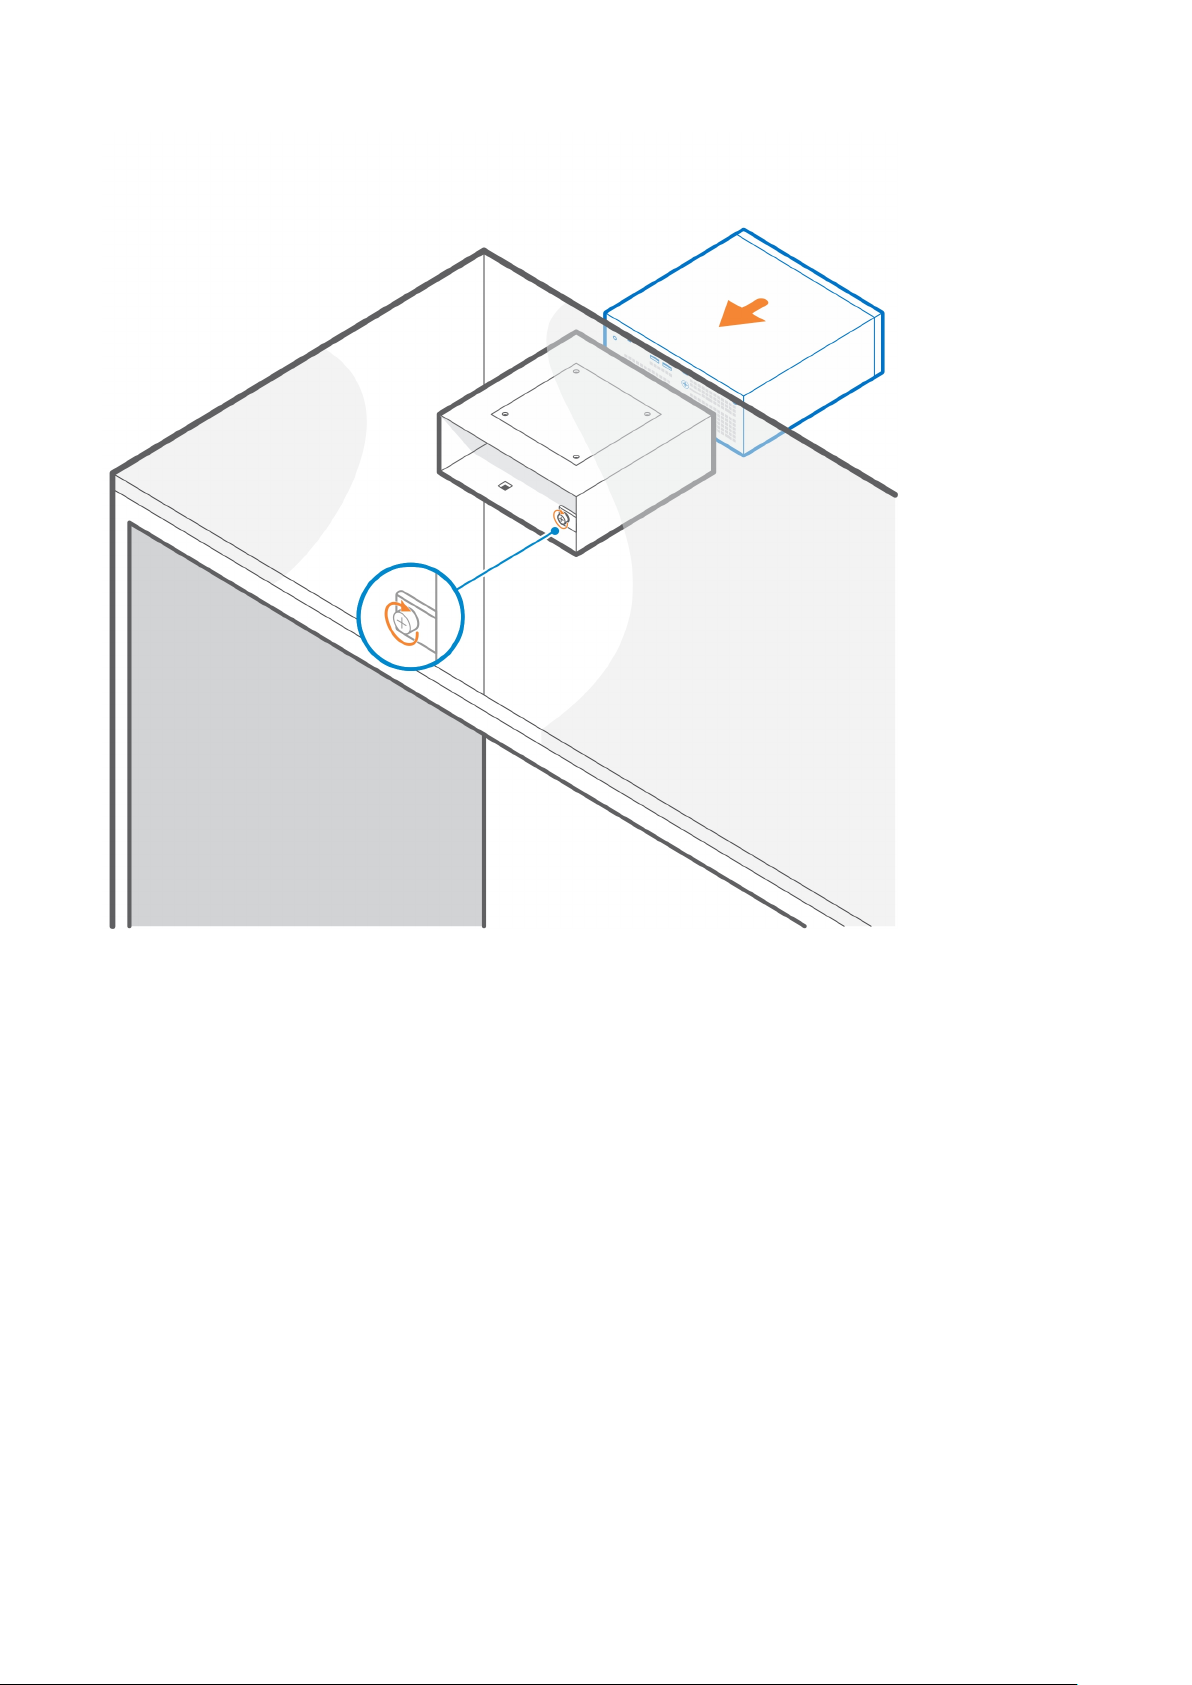
Precision Compact VESA sleeve mount
To avoid clutter on your desk, you can use the Precision Compact VESA sleeve mount to secure the Precision 3240 compact
system under the desk.
1. Follow the instructions in Before you begin.
2.
3. Use the four M4x10 self-tapping screws to secure the VESA sleeve mount under the desk.
NOTE: Precision Compact VESA sleeve mount has holes for the screw mounts 100 mmx100 mm apart.
Install the VESA sleeve mount under the desk with the captive thumbscrew facing inside the desk.
NOTE: Insert the screw driver through the square holes on the VESA sleeve mount to fix the self-tapping screws to the
underside of the desk.
2
4. Slide the system into the VESA sleeve mount .
Ensure that the Dell logo on the system faces the same direction as the ∆ (triangle icon) on the VESA sleeve
NOTE:
mount.
5. Tighten the thumbscrew to secure the system to the VESA sleeve mount.
Precision Compact VESA sleeve mount 5
6. Follow the instructions in After installing the accessory.
Related-links:
● Precision Compact Dust Filter on page 22
● Precision Compact Cable Cover on page 24
● Dell A/C adapter sleeve mount on page 16
6
Precision Compact VESA sleeve mount

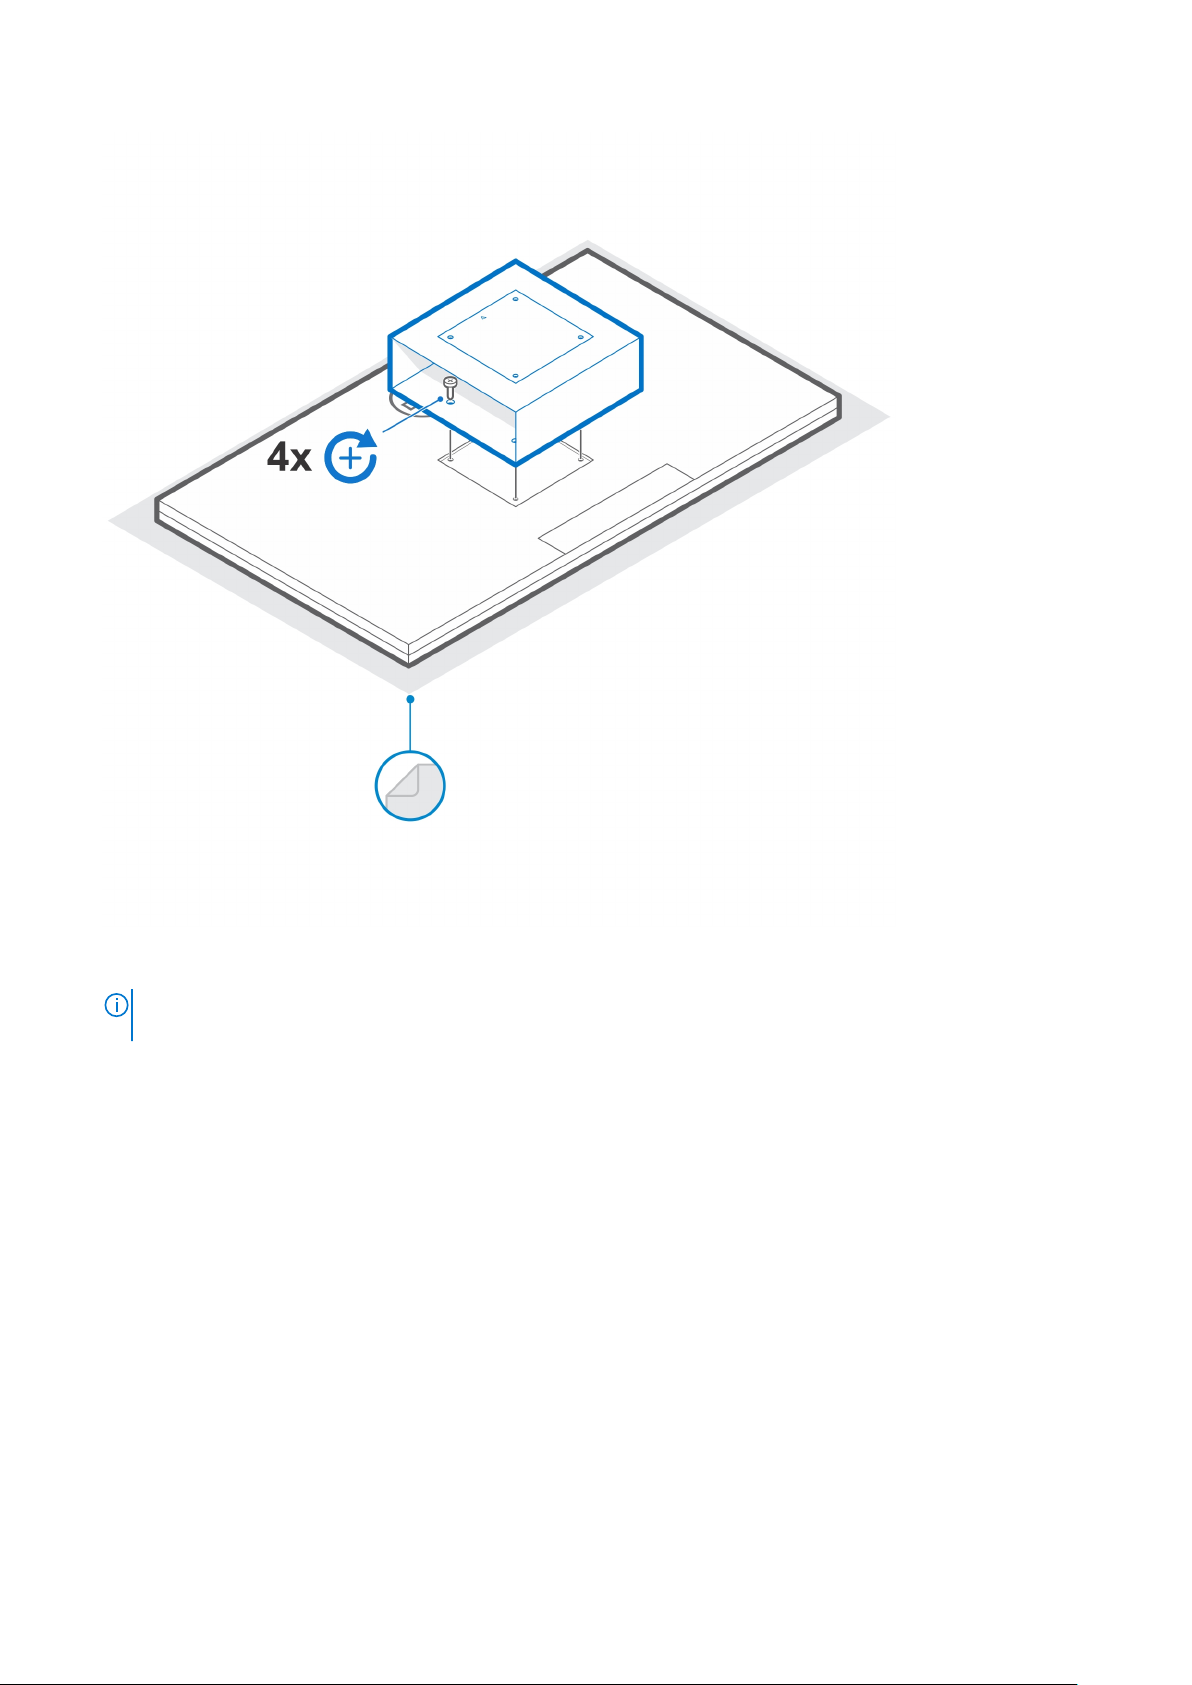
Precision Compact Dual VESA sleeve mount
For flexible installation, you can use the Precision Compact Dual VESA sleeve mount to secure the Precision 3240 Compact
system on a VESA compatible single or dual monitor arms.
Precision compact dual VESA Sleeve mount supports the following monitor arms:
● Dell Dual Monitor Arm - MDA20
● Dell Single Monitor Arm - MSA20
NOTE: The Precision Compact dual VESA sleeve mount supports up to 68.58 cm (27 in.) monitor.
NOTE: To avoid monitor tilt down, user can tighten the hinge screw of arm to keep monitor stand in comfortable angle.
1. Follow the instructions in Before you begin.
2.
3. Place the VESA sleeve mount on the back of the monitor.
CAUTION: To avoid any damage to the monitor, ensure that you place the monitor on a protective sheet.
Place the monitor on a soft cloth or cushion near the edge of desk so the base of the stand extends past the edge of the
desk.
NOTE: Ensure that the side with the ∆ (triangle icon) on the mount is facing up.
3
4. Use the four M4x10 screws to secure the VESA sleeve mount to the back of the monitor.
NOTE:
Insert the screw driver through the square holes on the VESA sleeve mount to fix the screws behind the
monitor.
Precision Compact Dual VESA sleeve mount 7
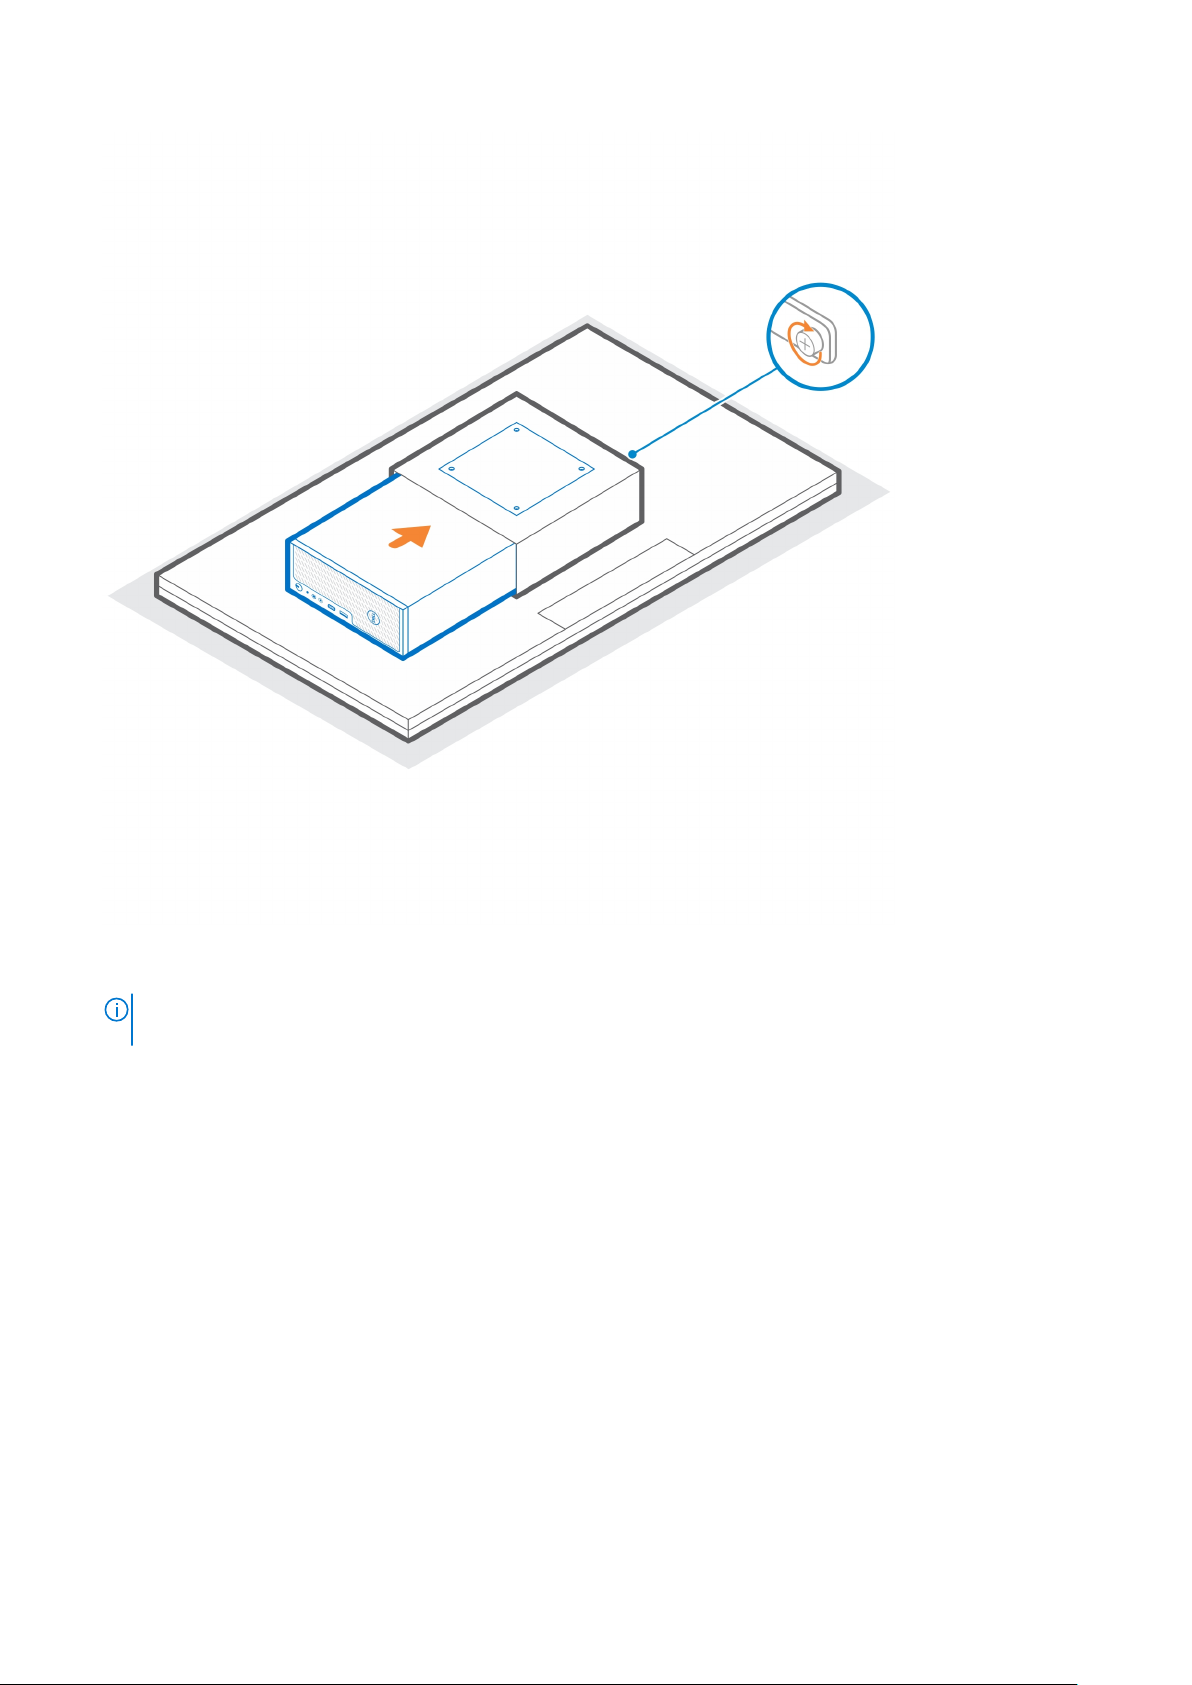
5. Slide the system into the VESA sleeve mount aligning the screw holes on the VESA sleeve mount with the screw holes on
the system.
NOTE:
Ensure that the Dell logo on the system faces the same direction as the ∆ (triangle icon) on the VESA sleeve
mount.
6. Tighten the thumbscrew to secure the system to the VESA sleeve mount.
8
Precision Compact Dual VESA sleeve mount
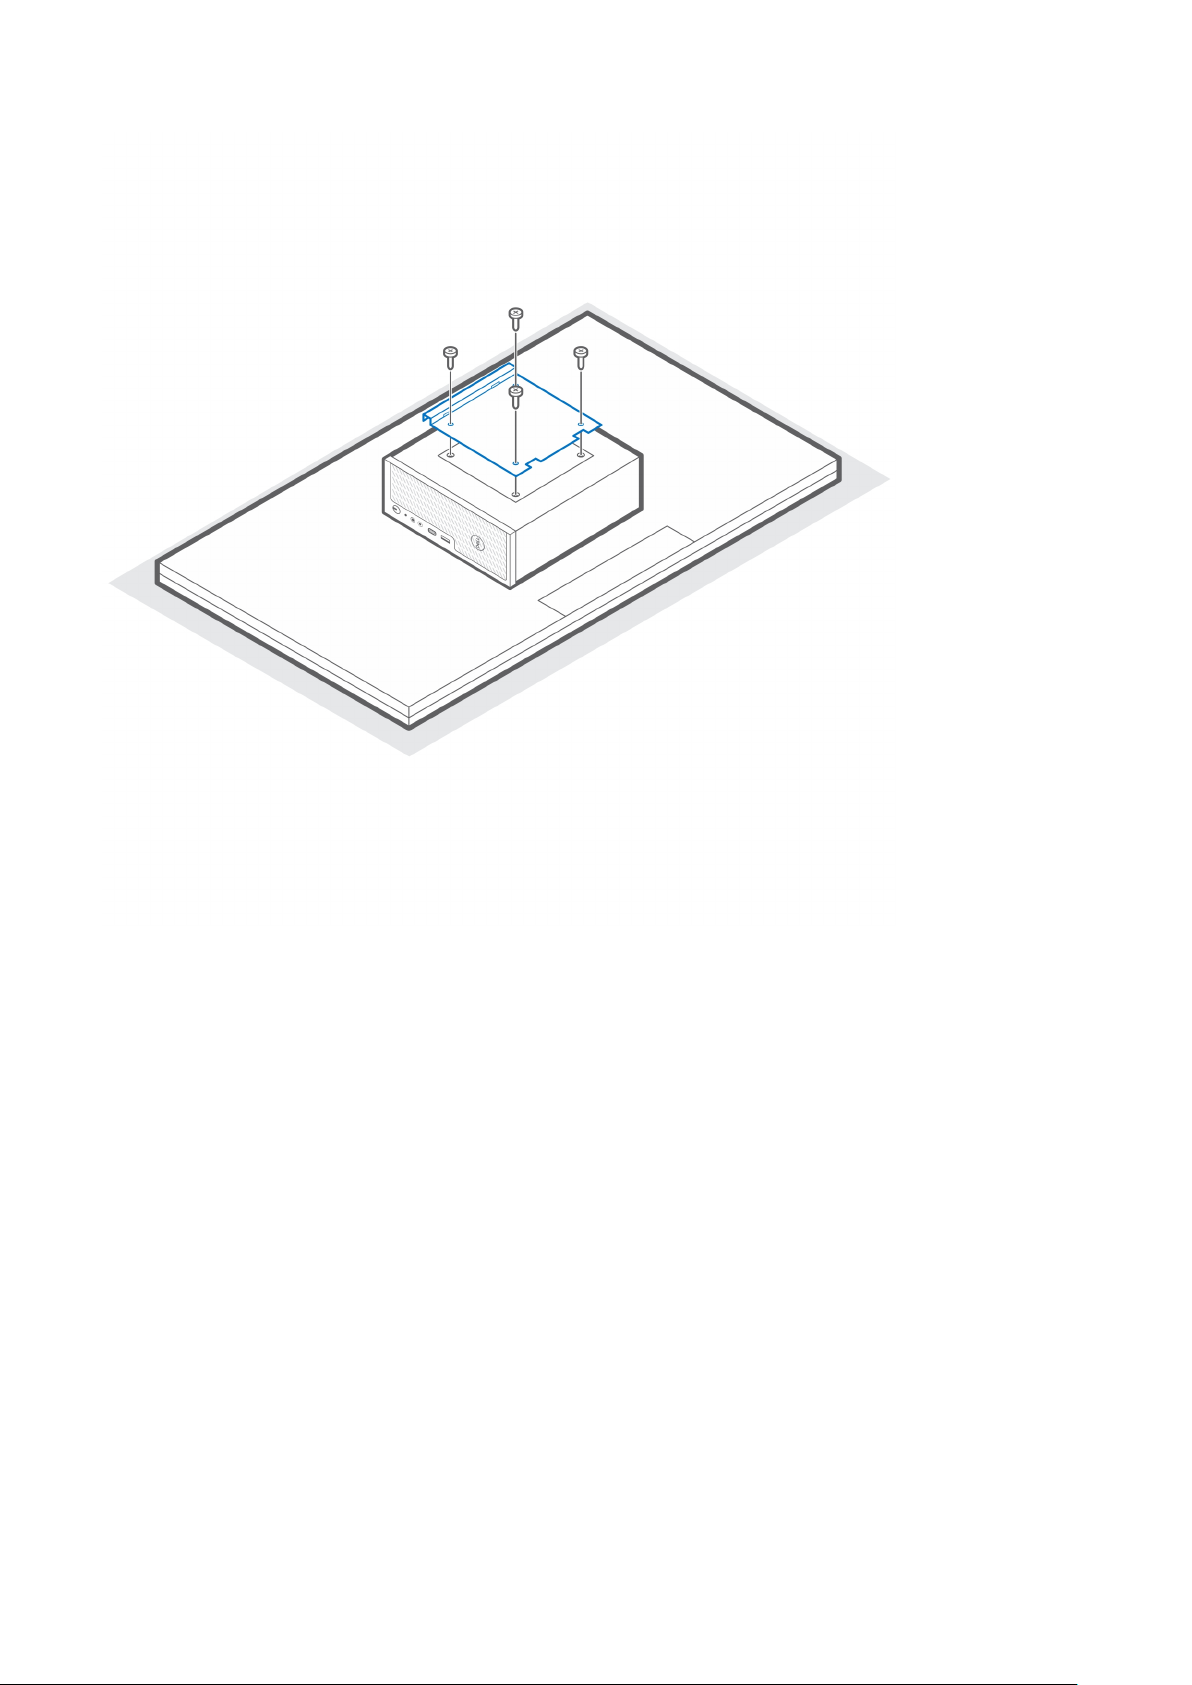
7. Align the screw holes on the VESA adapter plate with the screw holes on the VESA sleeve mount.
8. Use the four M4x10 screws to secure the VESA adapter plate to the VESA sleeve mount.
NOTE:
Ensure the ∆ (triangle icon) the VESA adapter plate and the ∆ (triangle icon) on the VESA sleeve mount are
aligned.
Precision Compact Dual VESA sleeve mount 9
9. Lift the monitor and insert the slots on the VESA bracket into the hooks on the monitor arm until you hear a click.
10. Tighten the single M4x10 screw on the monitor arm to secure the dual VESA sleeve mount to the monitor arm.
10
Precision Compact Dual VESA sleeve mount

11. Follow the instructions in After installing the accessory.
Related-links:
● Precision Compact Dust Filter on page 22
● Precision Compact Cable Cover on page 24
Precision Compact Dual VESA sleeve mount
11

Dell monitor stand VESA mount
For flexible installation, you can use the Dell monitor stand VESA mount to secure the Precision 3240 Compact system on the
Dell VESA monitor stand.
1. Follow the instructions in Before you begin.
2. Place the monitor stand base extender on the base of the monitor stand.
3. Use the four M4x6 screws to secure the monitor stand base extender under the monitor stand.
4
4. Place the Dell monitor stand VESA mount on the system.
Ensure that the ∆ (triangle icon) on the Dell monitor stand VESA mount is aligned in same direction as the Dell
NOTE:
logo on the system.
5. Use the four M4x6 screws to secure the Dell monitor stand VESA mount to the system.
12 Dell monitor stand VESA mount

6. Align the slot on the Dell monitor stand VESA mount with the cable management slot on the Dell monitor stand.
Dell monitor stand VESA mount
13

7. Install the socket [1] from the monitor side into the cable management slot.
8. Use the plug [2] from the system side and turn the plug knob to secure the Dell monitor stand VESA mount to the monitor
stand.
14
Dell monitor stand VESA mount

9. Lift the stand and attach the monitor to the stand.
10. Follow the instructions in After installing the accessory.
Related-links:
● Precision Compact Dust Filter on page 22
● Precision Compact Cable Cover on page 24
● Dell A/C adapter sleeve mount on page 16
Dell monitor stand VESA mount
15

Dell A/C adapter sleeve mount
To avoid clutter on your desk and for flexible installation, you can use the Dell A/C adapter sleeve mount to secure the A/C
adapter behind the monitor (on Dell monitor stand base extender) or under the desk.
Under the desk
1. Follow the instructions in Before you begin.
2. Place the A/C adapter on the A/C adapter sleeve mount.
5
3. Wrap the sleeve around the A/C adapter and insert the retaining tabs into the holes at an appropriate level.
16 Dell A/C adapter sleeve mount

4.
NOTE: The screw holes on the A/C adapter sleeve mount are 70 mm (2.756 in.) apart.
Use the two M3x6 screws to secure the A/C adapter sleeve mount under the desk.
Dell A/C adapter sleeve mount
17

5. Follow the instructions in After installing the accessory.
Related-links:
● Precision Compact VESA sleeve mount on page 5
● Precision Compact Dual VESA sleeve mount on page 7
● Precision Compact Dust Filter on page 22
● Precision Compact Cable Cover on page 24
● Dell monitor stand VESA mount on page 12
On the monitor stand
1. Follow the instructions in Before you begin.
2. Turn over the monitor stand and place the A/C adapter sleeve mount on the Dell monitor stand base extender.
3. Install the two M3x6 screws to secure the Dell A/C adapter sleeve mount to the base extender.
18
Dell A/C adapter sleeve mount

4. Place the A/C adapter in the A/C adapter sleeve mount.
Dell A/C adapter sleeve mount
19

5. Wrap the sleeve around the A/C adapter and insert the retaining tabs into the holes at an appropriate level.
20
Dell A/C adapter sleeve mount

6. Follow the instructions in After installing the accessory.
Related-links:
● Precision Compact VESA sleeve mount on page 5
● Dell monitor stand VESA mount on page 12
● Precision Compact Dust Filter on page 22
● Precision Compact Cable Cover on page 24
Dell A/C adapter sleeve mount
21

6
Precision Compact Dust Filter
The dust filter for the Dell Precision 3240 Compact helps protect the system from fine dust particles. After installation, you can
set a pre-boot reminder in the BIOS to clean or replace the dust filter at customized time interval using the interval setting in
the BIOS.
1. Follow the instructions in Before you begin.
2. Align the top edge of the dust filter with the top edge of the system.
3. Press the lower edge of the dust filter to close over the system.
4. Gently press down to ensure that the filter fits snugly onto the system.
5. Follow the instructions in After installing the accessory.
6. Restart the system and press F2 at the Dell splash screen to enter the BIOS Setup menu.
7. In the BIOS Setup menu, go to System Configuration > Dust Filter Maintenance and select from any of the following
intervals: 15, 30, 60, 90, 120, 150, or 180 days.
NOTE: Default setting: Disabled.
NOTE: Alerts are generated only during a system reboot and not during normal operating system operation.
22 Precision Compact Dust Filter

NOTE: To clean the dust filter, brush or gently vacuum and then wipe down the external surfaces with a moist cloth.
Related-links:
● Precision Compact VESA sleeve mount on page 5
● Precision Compact Dual VESA sleeve mount on page 7
● Dell monitor stand VESA mount on page 12
● Dell A/C adapter sleeve mount on page 16
● Precision Compact Cable Cover on page 24
Precision Compact Dust Filter 23

Precision Compact Cable Cover
The cable cover for the Dell Precision 3240 Compact system protects the ports and organize cables that are connected to the
system unit.
1. Follow the instructions in Before you begin.
2.
NOTE: Images that are shown below may vary depending on your system configuration.
Remove the thumbscrew and the cable clip from the rear of the system unit.
7
3. Align the rear bracket along with the cable clip to the back of the system.
4. Use the thumbscrew to secure the rear bracket along with cable clip to the back of the system.
24 Precision Compact Cable Cover

5. Route the cables through the slot on the cable cover and connect the cables to their respective ports.
6. Turn the antenna outwards to pass through the antenna slot at the top of the cable cover.
7. Align the cable cover retaining hooks into the slots on the Dell Precision 3240 Compact chassis.
CAUTION: Take care not to bend or break the delicate plastic hooks.
8. Gently press down on the cable cover until it clicks into place.
9. Slide the latch to lock the cable cover in place.
Precision Compact Cable Cover
25

NOTE: For added security, use the Kensington cable lock to secure the system unit.
Related-links:
● Precision Compact VESA sleeve mount on page 5
● Precision Compact Dual VESA sleeve mount on page 7
● Dell monitor stand VESA mount on page 12
● Dell A/C adapter sleeve mount on page 16
● Precision Compact Cable Cover on page 24
26
Precision Compact Cable Cover

After installing the accessory
1. Replace all screws and ensure that no stray screws remain.
2. Connect any external devices, peripherals, or cables you removed before working on your system.
3. Connect your system and all attached devices to their electrical outlets.
4. Turn on your system.
8
After installing the accessory 27

Getting help and contacting Dell
Self-help resources
You can get information and help on Dell products and services using these self-help resources:
Table 1. Self-help resources
Self-help resources Resource location
Information about Dell products and services https://www.dell.com/
Dell Support
Tips
Contact Support In Windows search, type Contact Support, and press
Enter.
9
Online help for operating system
Troubleshooting information, user manuals, set up
instructions, product specifications, technical help blogs,
drivers, software updates, and so on.
Dell knowledge base articles for various of system concerns:
Learn and get more information about your product:
● Product specifications
● Operating system
● Setting up and using your product
● Data backup
● Troubleshooting and diagnostics
● Factory and system restore
● BIOS information
● Windows: https://www.dell.com/support/windows
● Linux: https://www.dell.com/support/linux
https://www.dell.com/support/home/
1. Go to https://www.dell.com/support/home/?
app=knowledgebase.
2. Type the subject or keyword in the Search box.
3. Click Search to retrieve the related articles.
Dell provides several online and telephone-based support and
service options. If you do not have an active Internet
connection, you can find contact information about your
purchase invoice, packing slip, bill, or Dell product catalog.
● Select Detect Product.
● Locate your product through the drop-down menu under
View Products.
● Enter the Service Tag number or Product ID in the
search bar.
● Once on product support page, scroll down to Manuals and
Documents section to preview all the Manuals, documents,
and other information for your product.
28 Getting help and contacting Dell

Contacting Dell
Dell provides several online and telephone-based support and service options. If you do not have an active Internet connection,
you can find contact information about your purchase invoice, packing slip, bill, or Dell product catalog. Availability varies by
country/region and product, and some services may not be available in your area. To contact Dell for sales, technical support, or
customer service issues:
1. Go to https://www.dell.com/support/.
2. Select your country/region from the drop-down menu on the lower right corner of the page.
3. For customized support:
a. Enter your system Service Tag in the Enter your Service Tag field.
b. Click submit.
● The support page that lists the various support categories is displayed.
4. For general support:
a. Select your product category.
b. Select your product segment.
c. Select your product.
● The support page that lists the various support categories is displayed.
5. For contact details of Dell Global Technical Support, see https://www.dell.com/contactdell.
NOTE: The Contact Technical Support page is displayed with details to call, chat, or email the Dell Global Technical
Support team.
NOTE: Availability varies by country/region and product, and some services may not be available in your area.
Getting help and contacting Dell 29

Screw size list
This section shows the different types of screws used with the Dell Precision 3240 accessories.
Table 2. Screw size list and location
Location
M4x10 M4x6 M3x6
A
Precision Compact
VESA Sleeve Mount
Precision Compact Dual
VESA Sleeve Mount
Dell Monitor Stand
VESA Mount
Dell Monitor Stand
Base Extender
Dell A/C adapter sleeve
mount
4
4
4
4
2
30 Screw size list

B
Recommended tools
This section lists the different tools that may be required to deploy the Dell Precision 3240 Compact system with its supported
accessories.
The procedures in this document require the following tools:
● Phillips #1 screwdriver
● Small flat blade screwdriver
Recommended tools 31
 Loading...