

Page 1
Online Method to Upgrade Your Dell
expansion
enclosures
(2)
PowerVault MD Storage Arrays From
Simplex to Duplex Mode
NOTE: Information in this document applies to Dell PowerVault MD3200, MD3220,
MD3200i, MD3220i, MD3600i, MD3620i, MD3600f, and MD3620f systems.
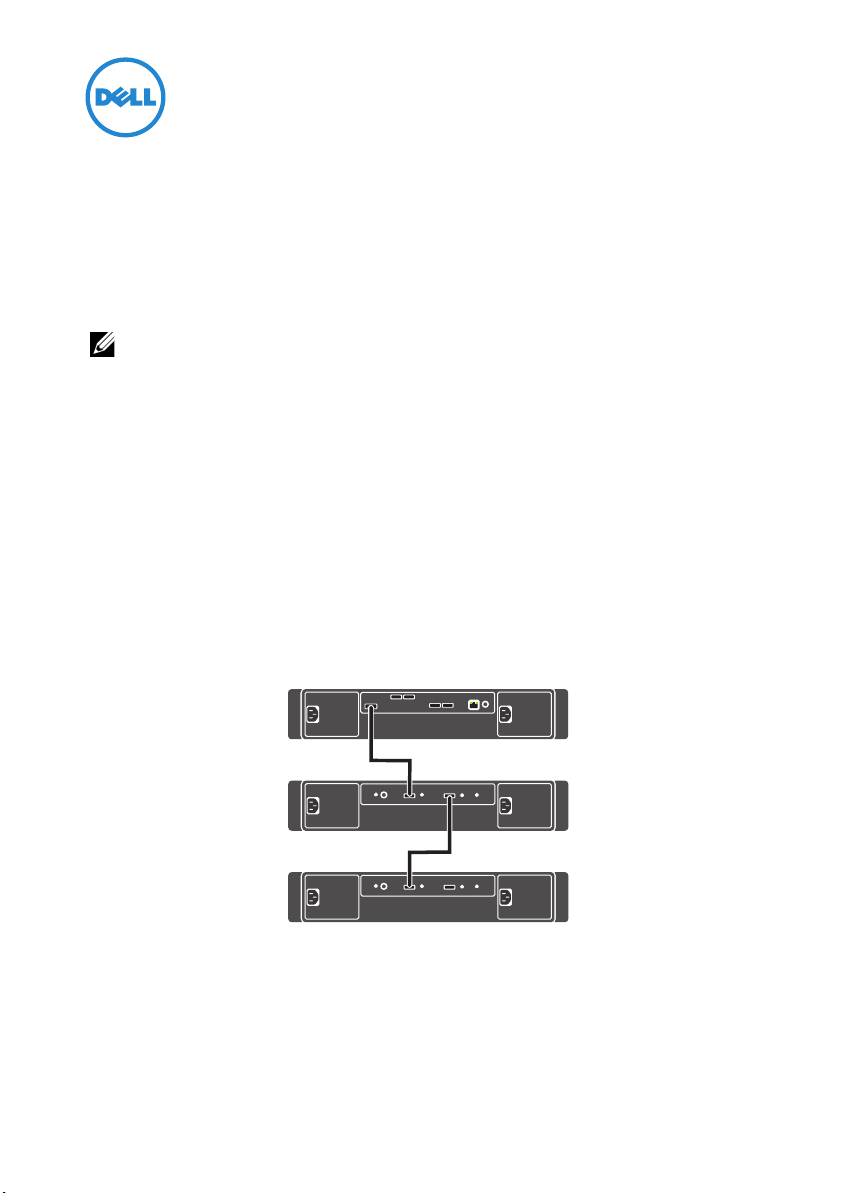
The Dell PowerVault Modular Disk (MD) RAID storage arrays support both
duplex (dual-controller) and simplex (single-controller) configurations. You can
upgrade your existing storage array from a simplex configuration to a duplex
configuration without taking the existing storage array offline.
A duplex configuration allows for full redundancy between RAID controller
modules, non-I/O components, virtual disk paths, and physical disk paths. A
simplex configuration contains only one RAID controller module and does not
support full RAID controller module redundancy, virtual disk path, and physical
disk channel redundancy.
Figure 1. Simplex MD Storage Array (With Expansion)
2012 - 03
Page 2
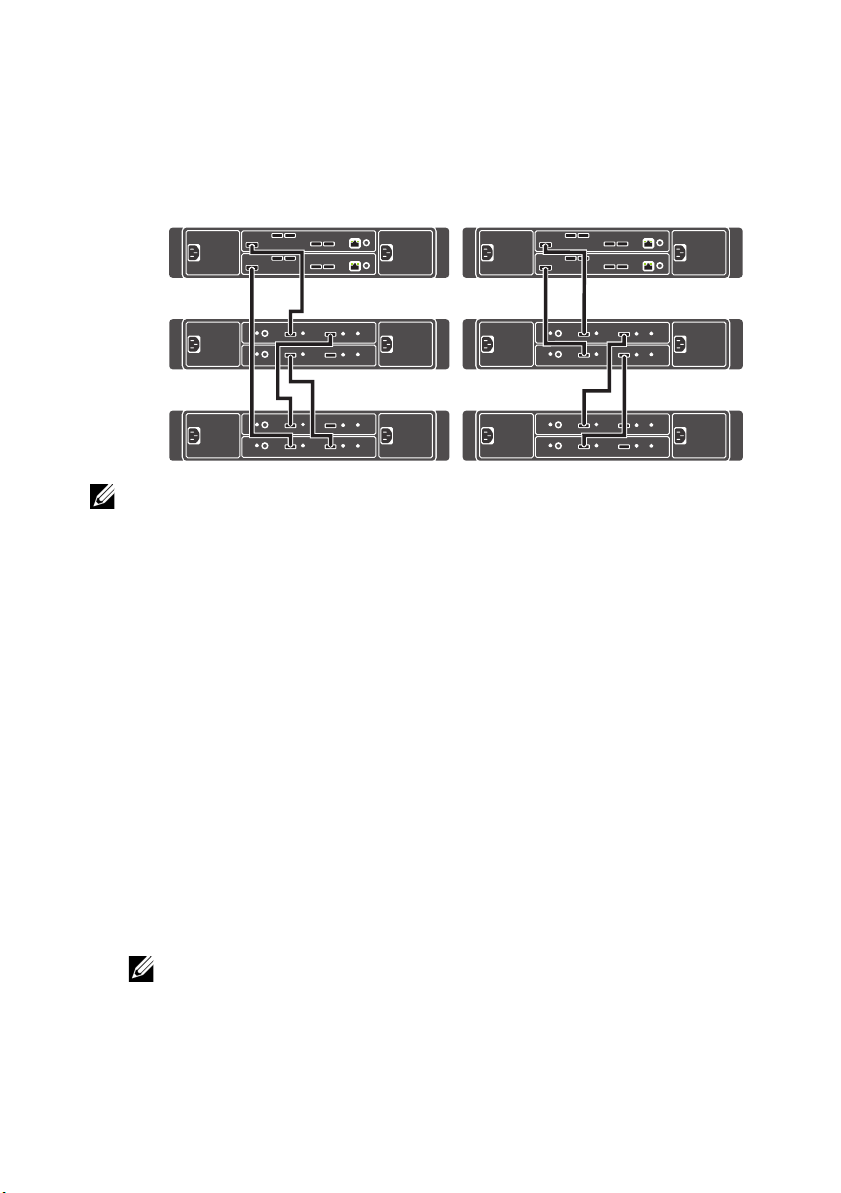
Figure 2. Newly Upgraded Duplex MD Storage Array (With Expansion)
Asymmetric Cabling (Recommended) Symmetric Cabling
expansion
enclosures
(2)
NOTE: See the
dell.com/pvresources.
MD Family Disk Expansion SAS Quick Cabling Guide
at
Adding a RAID Controller Module to a Simplex Configuration
To upgrade your existing storage array from a simplex configuration to a duplex
configuration without taking the existing storage array offline:
1
Start
MD Storage Manager
The
Enterprise Management Window
2
Select and right-click the storage array you are upgrading and select
Script
.
The
Script Editor Window
3
In the
Script Editor Window
set storageArray redundancyMode=duplex;
4
Select
Tools
NOTE: When the command completes, the array status changes to Needs
Attention and the enclosure status LED lights amber. Disregard these indicators
and proceed with the next step.
Verify and Execute
.
is displayed.
Execute
is displayed.
, run the command:
.
Page 3

5
Insert the second (new or replacement) controller module in the empty slot
(slot 1) of the enclosure.
For insertion procedures and slot labeling, see the
Hardware Owner’s Manual
for your MD storage array.
6
Connect the expansion enclosures (if present) to the controller module you
added in slot 1.
NOTE: Wait for the enclosure status LED to turn blue before proceeding to the
next step.
7
In
MD Storage Manager
The
Array Management Window
8
If not using DHCP or default IPv6 address, you may be required to manually
, double-click the storage array you are upgrading.
(AMW) is displayed.
specify the IP configuration. To manually specify the IP configuration:
a
b
c
d
e
9
In the
Storage Arrays
10
In the
The
Select the
Select
select
Select
Modify the configuration to match
Click OK.
Enterprise Management Window
Select Addition Method
Add New Storage Array – Manual
Setup
tab.
Configure Ethernet Management Ports
RAID Controller Module 1, Port 0
Specify configuration
.
.
RAID Controller Module 0
, select the
.
window, select
Manual
window is displayed.
and from
Setup
tab, and click
and click OK.
Ethernet port
,
.
Add
11
Select
12
Out-of-band management
In the
RAID Controller Module (DNS/Network name, IPv4 address or IPv6
address)
fields, enter the IP addresses of both the RAID controllers installed in
.
the storage enclosure.
13
Click
Add
.
14
A message prompts you if you want to add another storage array, click No.
NOTE: The Devices tab in the Enterprise Management Window displays both
management port IP addresses for the newly upgraded duplex storage array.
15
Adjust the virtual disk caching options:
Page 4

a
Open the
b
Right-click on any virtual disk in the list.
c
Select
d
Select all virtual disks in the list.
e
Select the following options:
AMW
and select the
Logical
ChangeCache Settings...
tab.
•Enable read caching
• Enable write caching
• Enable write caching with mirroring
• Enable dynamic cache read prefetch
NOTE: Enable dynamic cache read prefetch must be disabled if the virtual disk is
used for database applications or applications with a large percentage of random
reads.
16
Rebalance the virtual disk ownership across both controllers for optimal
performance. To rebalance virtual disk ownership:
a
In the
AMW
, select the
b
Right click on every alternate virtual disk and select
Ownership/Preferred Path
c
Select
Yes
.
NOTE: Step 16 can be completed using Script Editor or CLI commands when you
have a large number of virtual disks. In script editor, run the following command
as described in Step 3:
Logical
tab.
Change
RAID Controller Module in Slot 1…
set virtualDisks [“virtualDiskName1”,
“virtualDiskName3”,…, “virtualDiskNameN”] owner=
1;
For more information on using the CLI, see the CLI Guide, at
support.dell.com/manuals.
This ensures that virtual disk ownership is evenly distributed across both
controllers.
Page 5

___________________
Information in this publication is subject to change without notice.
© 2012 Dell Inc. All rights reserved.
Reproduction of these materials in any manner whatsoever without the written permission of Dell Inc. is
strictly forbidden.
Trademarks used in this text: Dell™, the DELL logo, Dell Precision™, OptiPlex™, Latitude™,
PowerEdge™, PowerVault™, PowerConnect™, OpenManage™, EqualLogic™, KACE™,
FlexAddress™ and Vostro™ are trademarks of Dell Inc. Intel
are registered trademarks of Intel Corporation in the U.S. and other countries. AMD
trademark and AMD Opteron™, AMD Phenom™, and AMD Sempron™ are trademarks of Advanced
Micro Devices, Inc. Microsoft
trademarks or registered trademarks of Microsoft Corporation in the United States and/or other countries.
Red Hat Enterprise Linux
States and/or other countries. Novell
in the United States and other countries. Oracle
its affiliates. Citrix
of Citrix Systems, Inc. in the United States and/or other countries. VMware
®
vCenter
®
, Xen®, XenServer® and XenMotion® are either registered trademarks or trademarks
, and vSphere® are registered trademarks or trademarks of VMWare, Inc. in the United States or
®
, Windows®, Windows Server®, MS-DOS® and Windows Vista® are either
®
and Enterprise Linux® are registered trademarks of Red Hat, Inc. in the United
®
is a registered trademark and SUSE ™ is a trademark of Novell Inc.
®
is a registered trademark of Oracle Corporation and/or
other countries.
Other trademarks and trade names may be used in this publication to refer to either the entities claiming
the marks and names or their products. Dell Inc. disclaims any proprietary interest in trademarks and trade
names other than its own.
®
, Pentium®, Xeon®, Core™ and Celeron®
®
is a registered
®
, Virtual SMP®, vMotion®,
Page 6

 Loading...