


Dell PowerVault MD3600i and
MD3620i Storage Arrays
Getting Started With
Your System
系统使用入门
Memulai Pengaktifan dengan
Sistem Anda
はじめに
시스템 시작 안내서


Dell PowerVault MD3600i and
MD3620i Storage Arrays
Getting Started With
Your System
Regulatory Model Series E03J and E04J

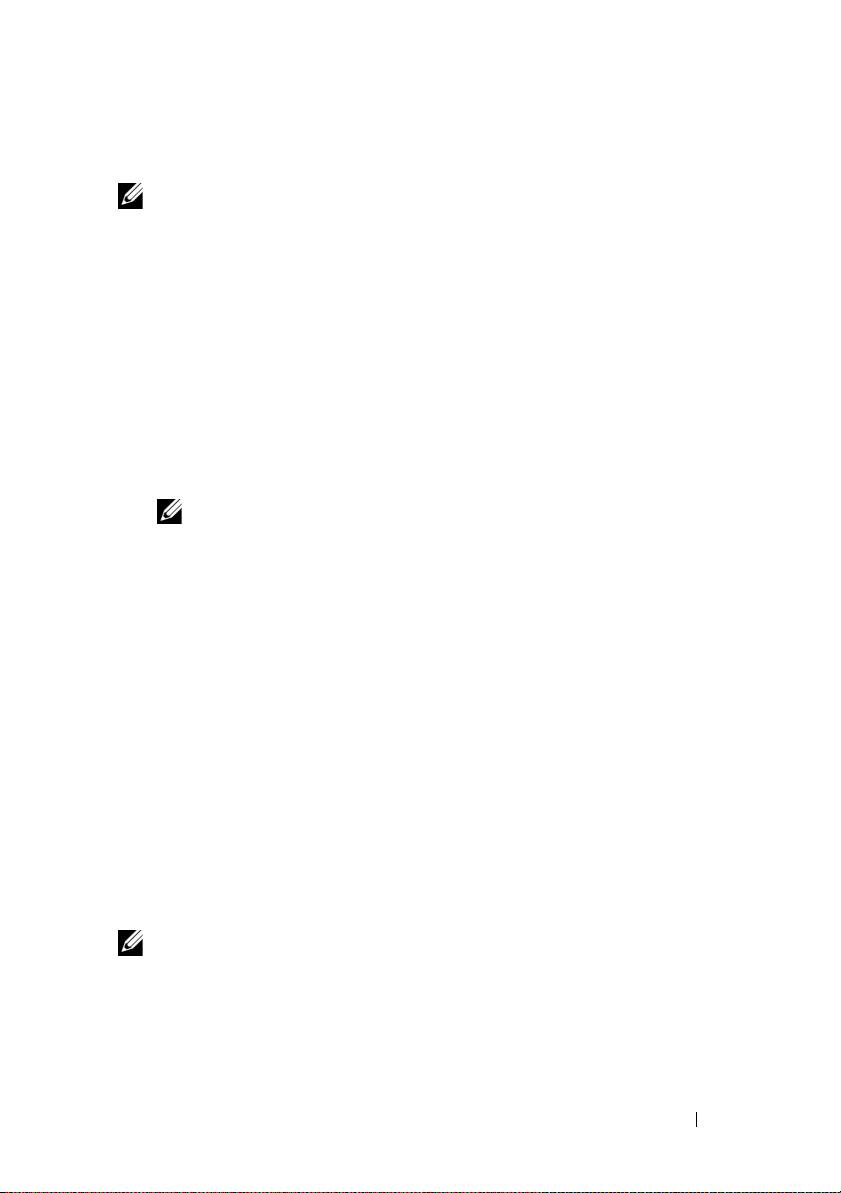
Notes, Cautions, and Warnings
NOTE:
A NOTE indicates important information that helps you make better use of
your computer.
CAUTION:
A CAUTION indicates potential damage to hardware or loss of data
if instructions are not followed.
WARNING:
A WARNING indicates a potential for property damage, personal
injury, or death.
____________________
Information in this publication is subject to change without notice.
© 2011 Dell Inc. All rights reserved.
Reproduction of these materials in any manner whatsoever without the written permission of Dell Inc.
is strictly forbidden.
Trademarks used in this text: Dell™, the DELL logo, and PowerVault™ are trademarks of Dell Inc.
Microsoft
Corporation in the United States and/or other countries Red Hat
registered trademarks of Red Hat, Inc. in the United States and other countries. SUSE
trademark of Novell, Inc. in the United States and other countries. VMware
of VMware, Inc. in the United States and/or other jurisdictions.
Other trademarks and trade names may be used in this publication to refer to either the entities claiming
the marks and names or their products. Dell Inc. disclaims any proprietary interest in trademarks and
trade names other than its own.
®
and Windows Server® are either trademarks or registered trademarks of Microsoft
®
and Red Hat Enterprise Linux® are
®
®
is a registered trademark
is a registered
Regulatory Model Series E03J and E04J
2011 - 08 P/N 22P7F Rev. A02

Before You Begin
NOTE:
Throughout the document, Dell PowerVault MD3600i series storage
array refers to both Dell PowerVault MD3600i and Dell PowerVault MD3620i.
Dell PowerVault MD1200 series expansion enclosure refers to both
Dell PowerVault MD1200 and Dell PowerVault MD1220.
Before setting up your Dell PowerVault MD3600i series storage array,
you must consider certain best practices to ensure that your storage array
operates at maximum efficiency and offers full redundancy (if required).
• The PowerVault MD3600i series storage array is a 10GBase-T product that
requires a 10GBase-T capable infrastructure that consists of Category 6 or
higher cables, 10GBase-T capable patch panels, and switches.
• Existing 1GBase-T infrastructures can be used either through a 10GBase-T
switch, that interconnects the 10GBase-T network, or by manually
configuring the iSCSI ports to run at 1GBase-T speeds. You can also
use the Modular Disk Configuration Utility (MDCU) to configure
the port speeds. For more information about MDCU, see "Installing the
MD Storage Software" on page 14.
NOTE:
Auto-negotiation is not supported and the operation speed must be
configured manually.
• Throughout the network, always use a Category 6 (or higher) Ethernet cable.
• It is recommended that you use a dedicated IP SAN for iSCSI data
transmission. Management traffic can be isolated on a separate
management network.
• Complete the iSCSI configuration worksheet before configuring iSCSI.
See "Completing the iSCSI Worksheet" on page 5. This worksheet gathers
physical network information in a single source.
• After completing the iSCSI worksheet, draw the configuration before
setting up the solution.
• Always configure redundant iSCSI data paths to provide alternate paths
to and from the host server should one of the data paths become disabled.
Getting Started With Your System
3

• If multiple NICs are installed on a host, it is recommeded that you use
different subnets for management and iSCSI data links.
• Before connecting any cables between the host server and storage array,
physically label each port and connector.
• Always follow proper power-up and power-down procedures when cycling
power across the network. You must also ensure that critical network
components are on separate power circuits.
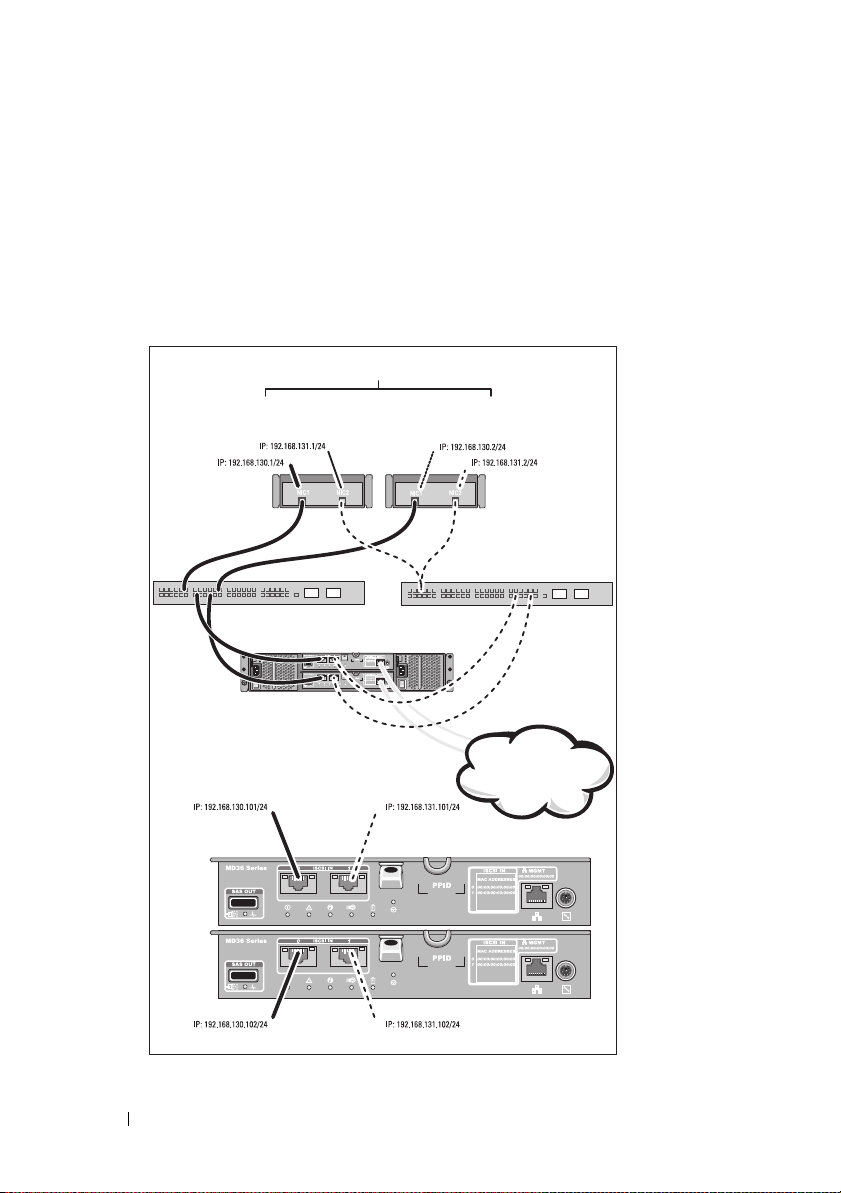
NOTE:
The illustrations in this document show cabling for only one PowerVault
MD3600i series storage array in a SAN environment. The illustrations also show only
the default IP addresses for the PowerVault MD3600i series storage array. To cable more
than one PowerVault MD3600i series storage array in a SAN environment,
see the Deployment Guide.
4
Getting Started With Your System
Completing the iSCSI Worksheet
Mutual
CHAP Secret
Ta rg et
CHAP Secret
A
B
host server
PowerVault MD3600i
series storage array
192.168.130.101 (In 0 default)
192.168.131.101 (In 1 default)
192.168.128.101 (management network port)
192.168.130.102 (In 0 default)
192.168.131.102 (In 1 default)
192.168.128.102 (management network port)
If you need additional space for more than one host server, use an additional sheet.
iSCSI port 0
iSCSI port 1
Management port
Subnet mask
Default gateway
A
___ . ___ . ___ . ___
___ . ___ . ___ . ___
___ . ___ . ___ . ___
___ . ___ . ___ . ___
___ . ___ . ___ . ___
___ . ___ . ___ . ___
___ . ___ . ___ . ___
___ . ___ . ___ . ___
___ . ___ . ___ . ___
Static IP address (storage array)
Subnet mask
Default gateway
B
___ . ___ . ___ . ___
___ . ___ . ___ . ___
___ . ___ . ___ . ___
___ . ___ . ___ . ___
___ . ___ . ___ . ___
___ . ___ . ___ . ___
iSCSI controller 0, In 0
iSCSI controller 0, In 1
Management port cntrl 0
iSCSI controller 1, In 0
iSCSI controller 1, In 1
Management port cntrl 1
___ . ___ . ___ . ___
___ . ___ . ___ . ___
___ . ___ . ___ . ___
___ . ___ . ___ . ___
___ . ___ . ___ . ___
___ . ___ . ___ . ___
___ . ___ . ___ . ___
___ . ___ . ___ . ___
___ . ___ . ___ . ___
___ . ___ . ___ . ___
___ . ___ . ___ . ___
___ . ___ . ___ . ___
Static IP address (host server)
NOTE:
Challenge Handshake Authentication Protocol (CHAP) is an optional iSCSI authentication
method where the storage array (target) authenticates iSCSI initiators on the host server. For more
information, see “Understanding CHAP Authentication” in the Deployment Guide.
IPv4 Settings
Getting Started With Your System
5
NOTE:
For information about the IPv6 worksheet, see the Deployment Guide.
Other Documentation and Media You May Need
WARNING:
your system. Warranty information may be included within this document or
as a separate document.
NOTE:
support.dell.com/manuals.
• The rack documentation included with your rack solution describes how
to install your system into a rack.
•The
describes how to troubleshoot the system and install or replace system
components.
•The
configuring the software and hardware.
•The
interface (CLI) to configure and manage your storage array.
•The
installing the SMI-S provider.
• Any media that ships with your system that provides documentation
and tools for configuring and managing your system, including those
pertaining to the operating system, system management software,
system updates, and system components that you purchased
with your system.
See the safety and regulatory information that shipped with
All PowerVault MD3600i series storage array documents are available at
Owner’s Manual
Deployment Guide
CLI Guide
SMI-S Provider Installation Guide
provides information about system features and
provides information about installing and
provides information about using the command line
provides information about
NOTE:
Always check for updates on support.dell.com/manuals and read the
updates first because they often supersede information in other documents.
6
Getting Started With Your System

Preparing the Host Server
Supported Operating Systems
• Microsoft Windows Server
• Red Hat Enterprise Linux
• SUSE Linux Enterprise Server
•VMware
NOTE:
For the latest information on all supported operating system versions,
see the Support Matrix at support.dell.com/manuals.
Additional NICs for iSCSI
When installing additional NICs, it is recommended that:
• You use dedicated redundant storage networks for iSCSI traffic.
If a dedicated network is not feasible, isolate the iSCSI traffic from
general network traffic using virtual local area networks (VLAN).
• You use additional NICs dedicated for iSCSI traffic.
• The NICs must be added in pairs for redundancy.
NOTE:
A single NIC is also supported.
NIC Configuration
In a SAN environment, depending on the number of switches, it is
recommended that you use two unique subnets for iSCSI traffic.
For direct-attached storage environments, each NIC directly connected to
the PowerVault MD36xxi must be on a separate subnet. All host IP addresses
must be configured before installing the MD storage software.
Getting Started With Your System
7
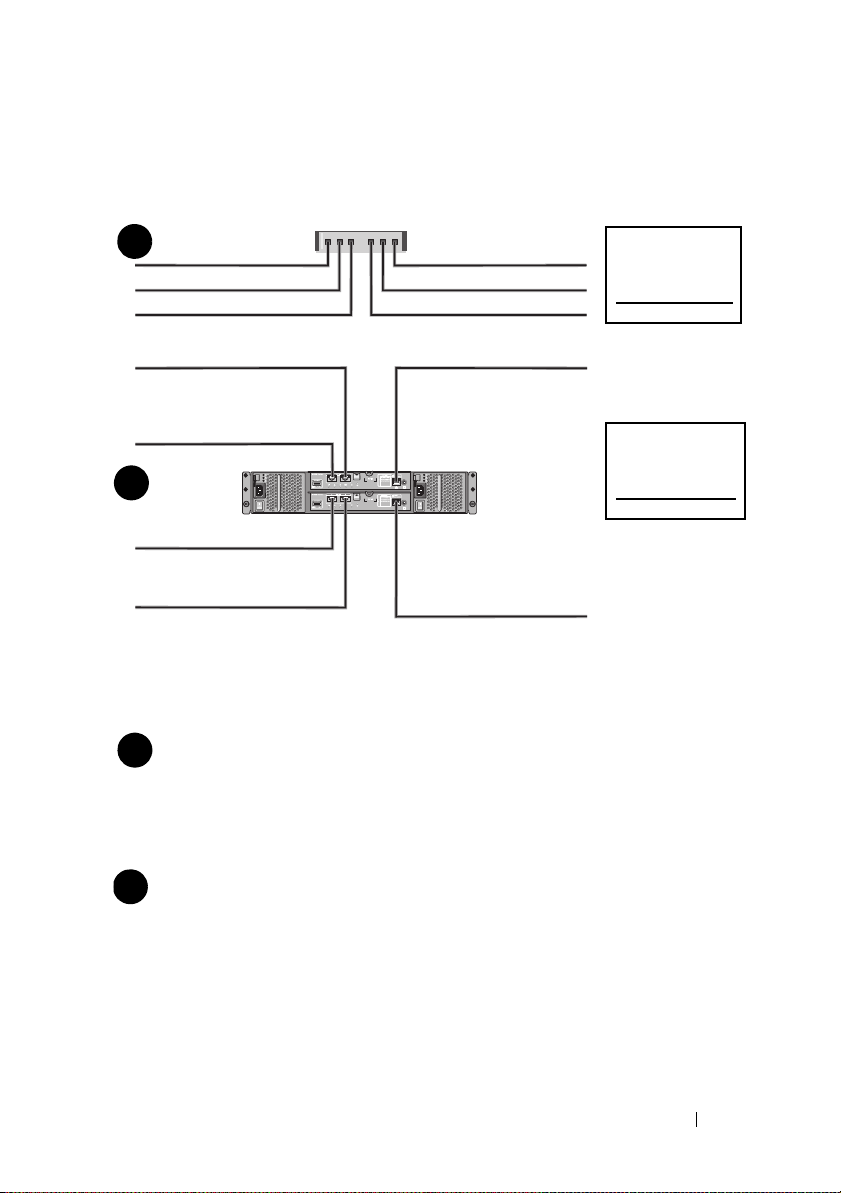
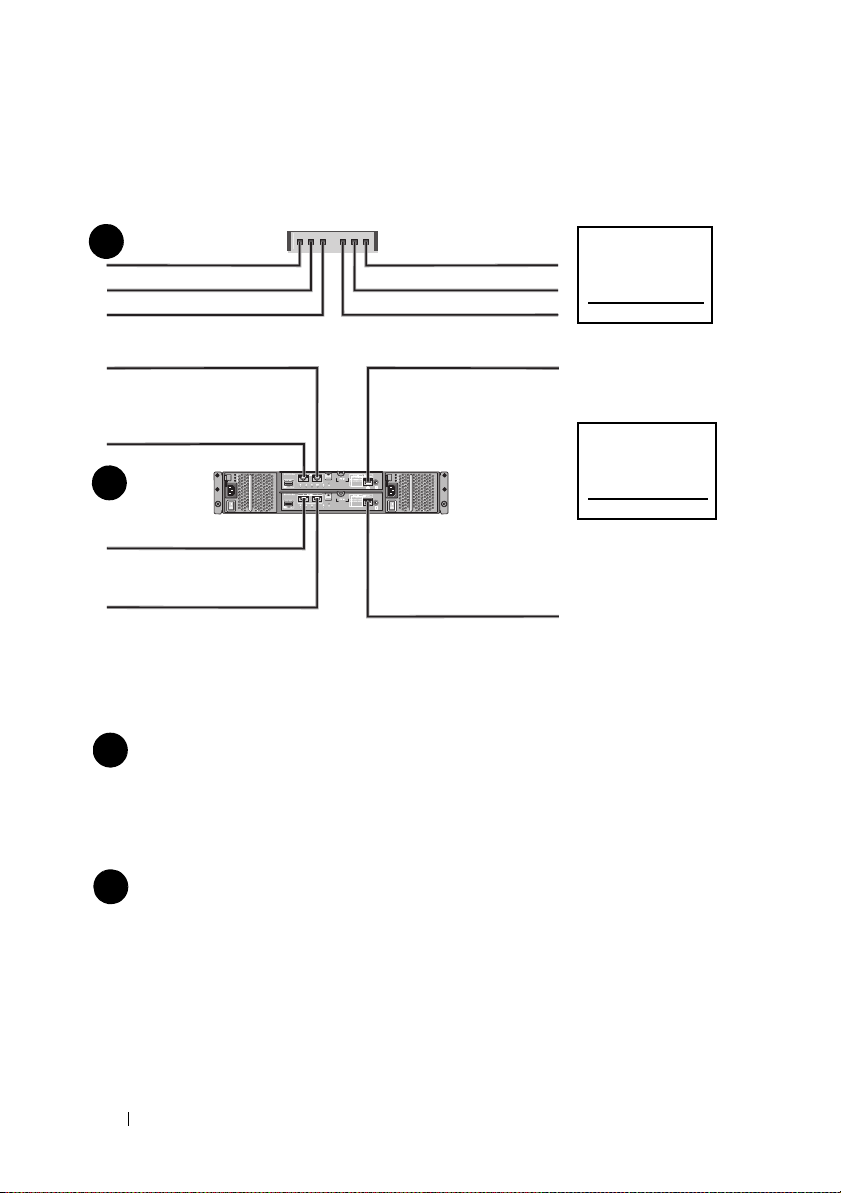
Common Configurations
Up to 64 hosts
Server 1
Server 2
Storage array
Corporate, public,
or private network
Switch 1
Switch 2
Cabling Your SAN-Attached Hosts
Connect all cables between the servers, switches, and storage arrays as shown
in the following illustration. For more examples of cabling the storage arrays,
see the Deployment Guide at support.dell.com/manuals.
8
Getting Started With Your System
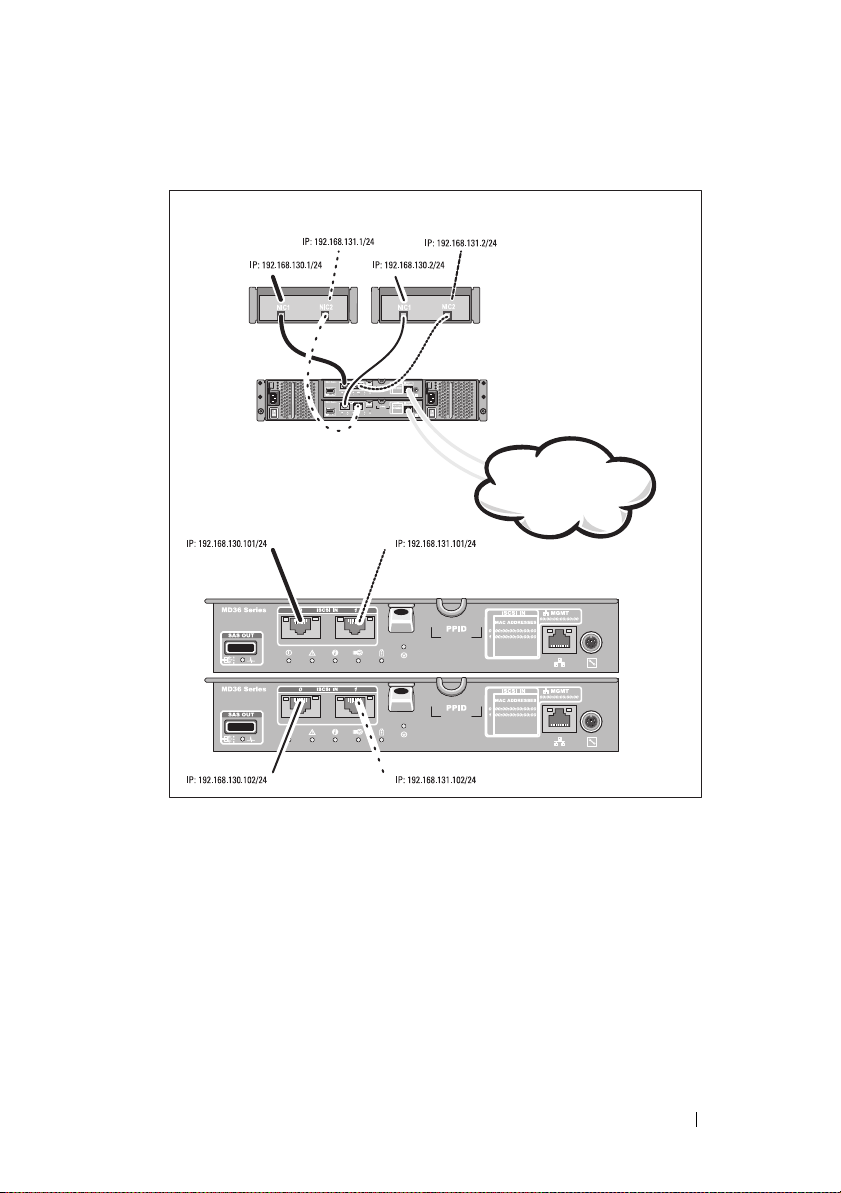
Cabling Your Direct-Attached Hosts
Server 1
Server 2
Storage array
Corporate, public,
or private network
Getting Started With Your System
9
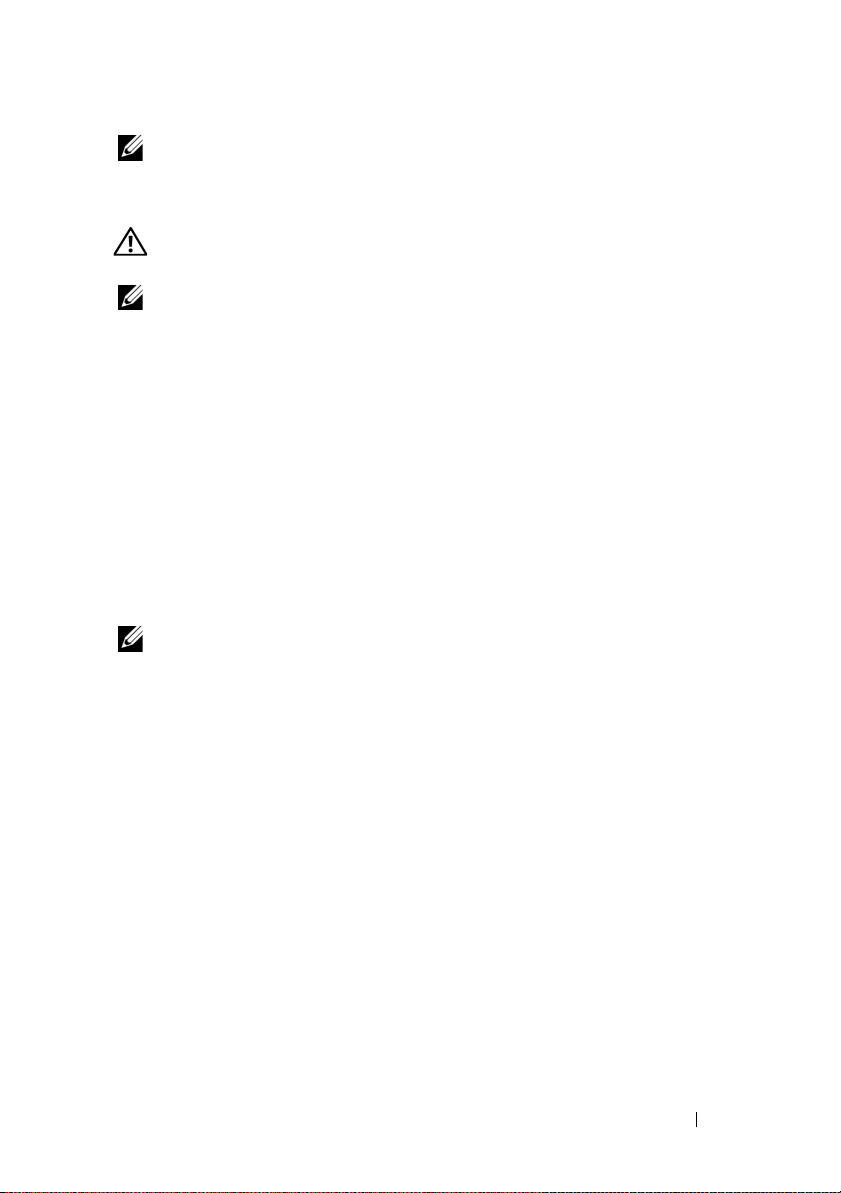
Installation and Configuration
WARNING:
instructions that came with the system.
Unpacking the System
Unpack your system and identify each item with the packing list that shipped
with your system.
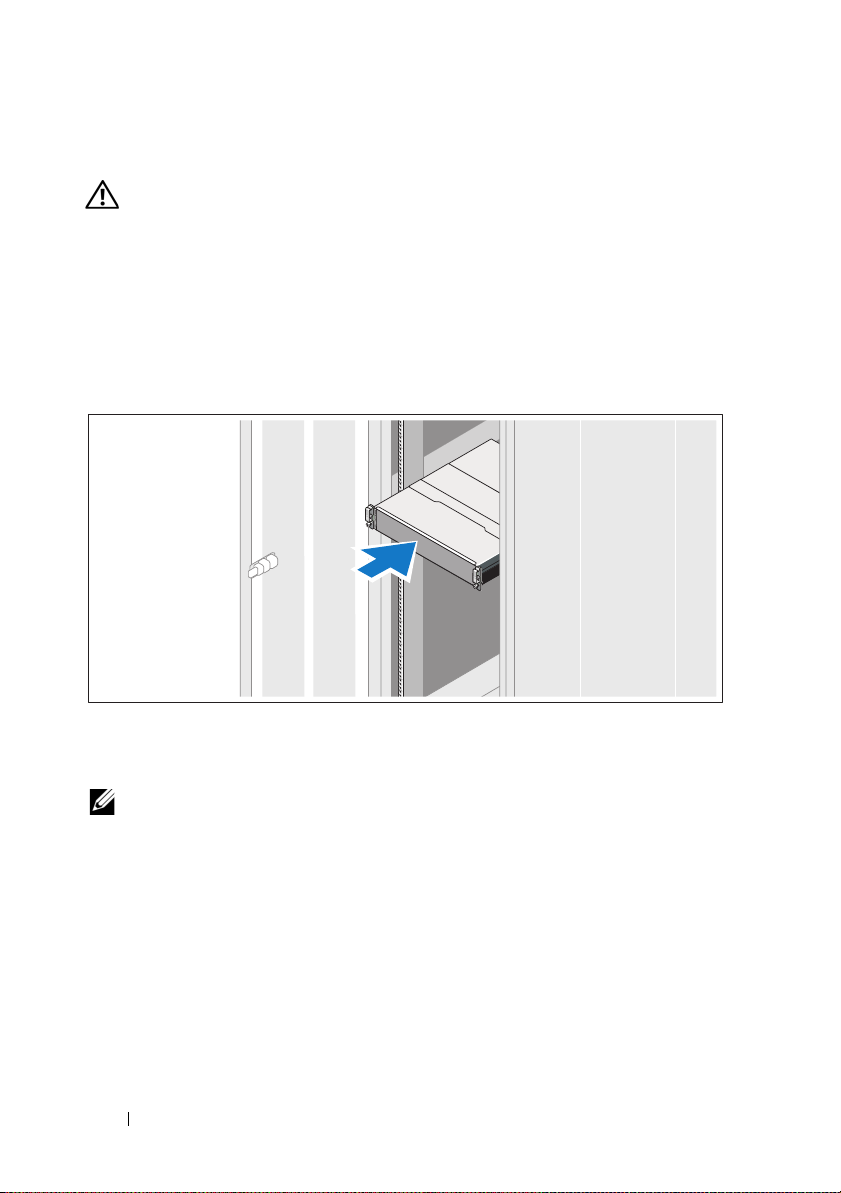
Installing the Rails and System in a Rack
Before performing the following procedure, review the safety
Assemble the rails and install the system in the rack following the safety
instructions and the rack installation instructions provided with your system.
NOTE:
To balance the weight load, it is recommended that you install the
PowerVault MD3600i series storage arrays at the bottom of the rack and the
PowerVault MD1200 series expansion enclosures above it.
10
Getting Started With Your System
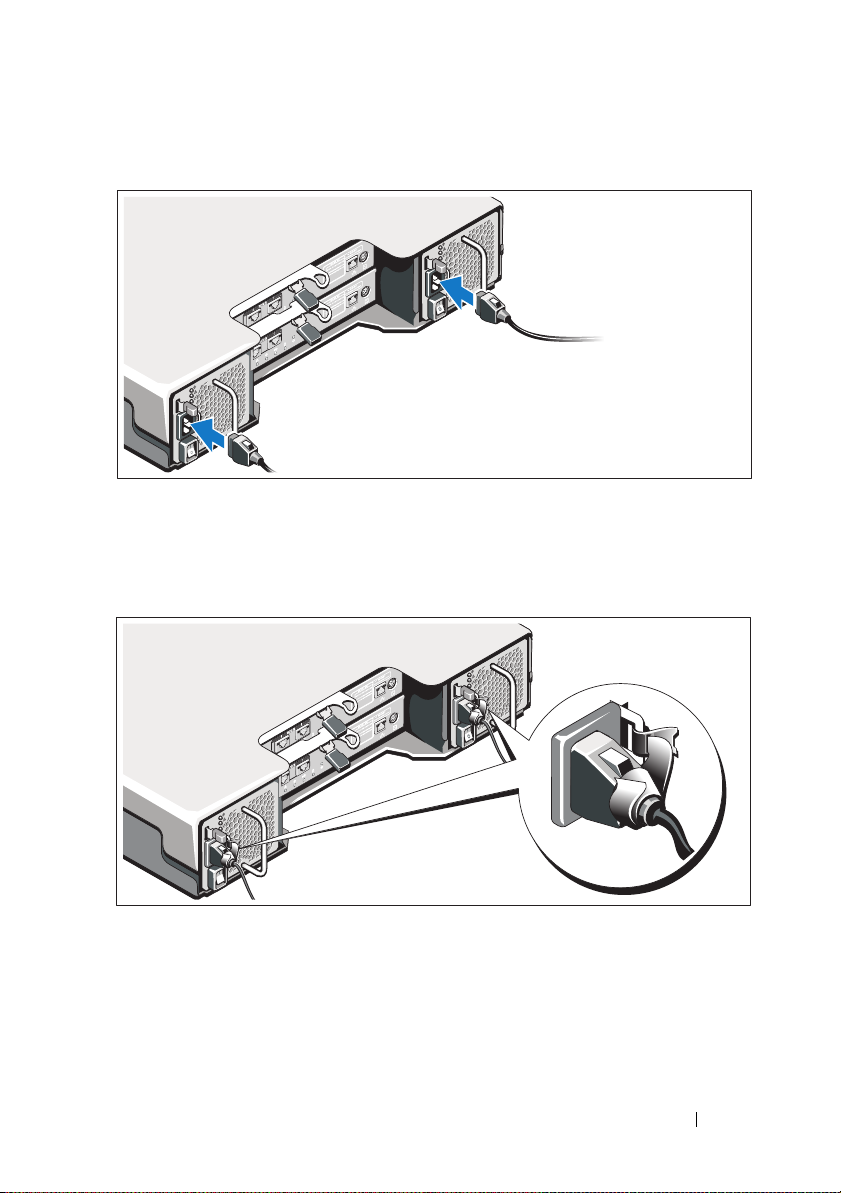
Connecting the Power Cable(s)
Ensure that the power switch is in the OFF position before connecting the
power cables. Connect the system’s power cable(s) to the system.
Securing the Power Cable(s)
Secure the cable(s) firmly to the bracket using the provided strap.
Plug the other end of the power cable(s) into a grounded electrical outlet or
a separate power source such as an uninterrupted power supply (UPS) or
a power distribution unit (PDU). Each power supply must be connected
to a separate power circuit.
Getting Started With Your System
11
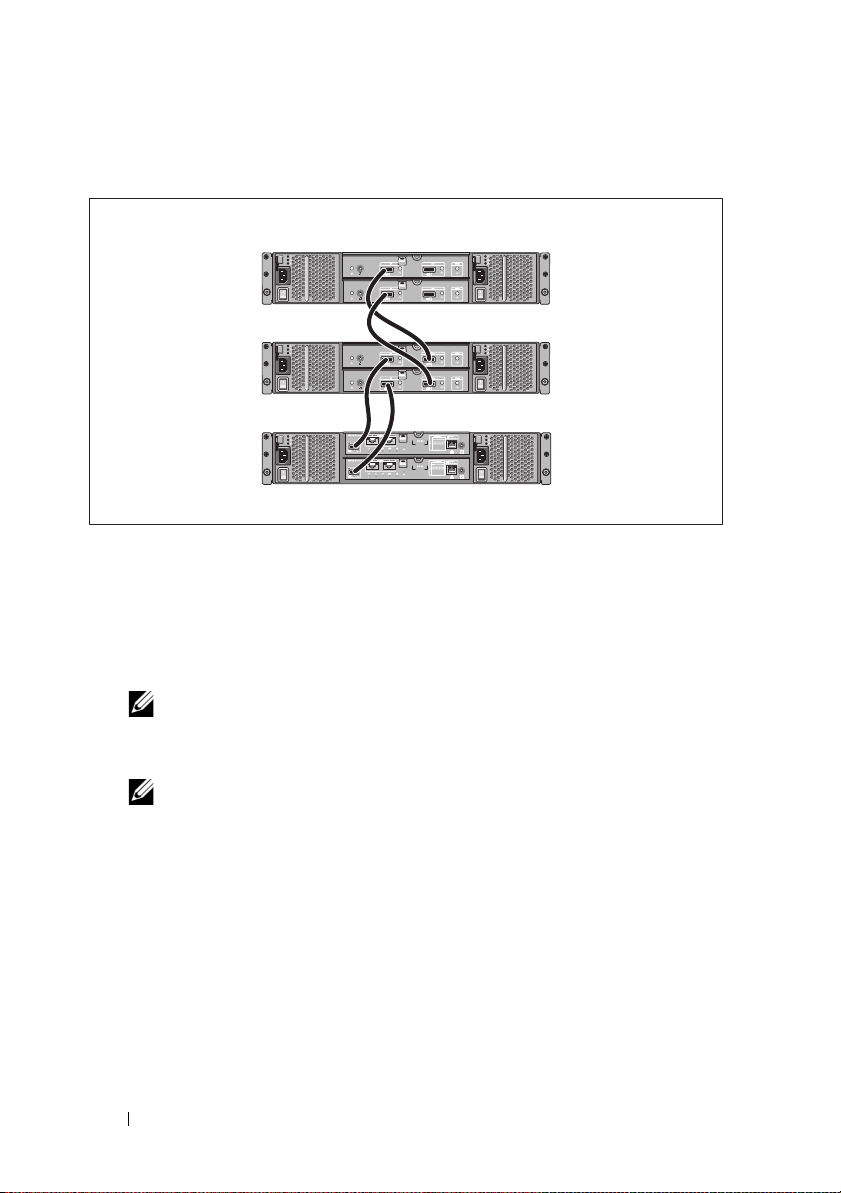
Cabling Your Expansion Enclosure
PowerVault MD3600i series storage array
PowerVault MD1200
series expansion
enclosure 1 (optional)
PowerVault MD1200
series expansion
enclosure 2 (optional)
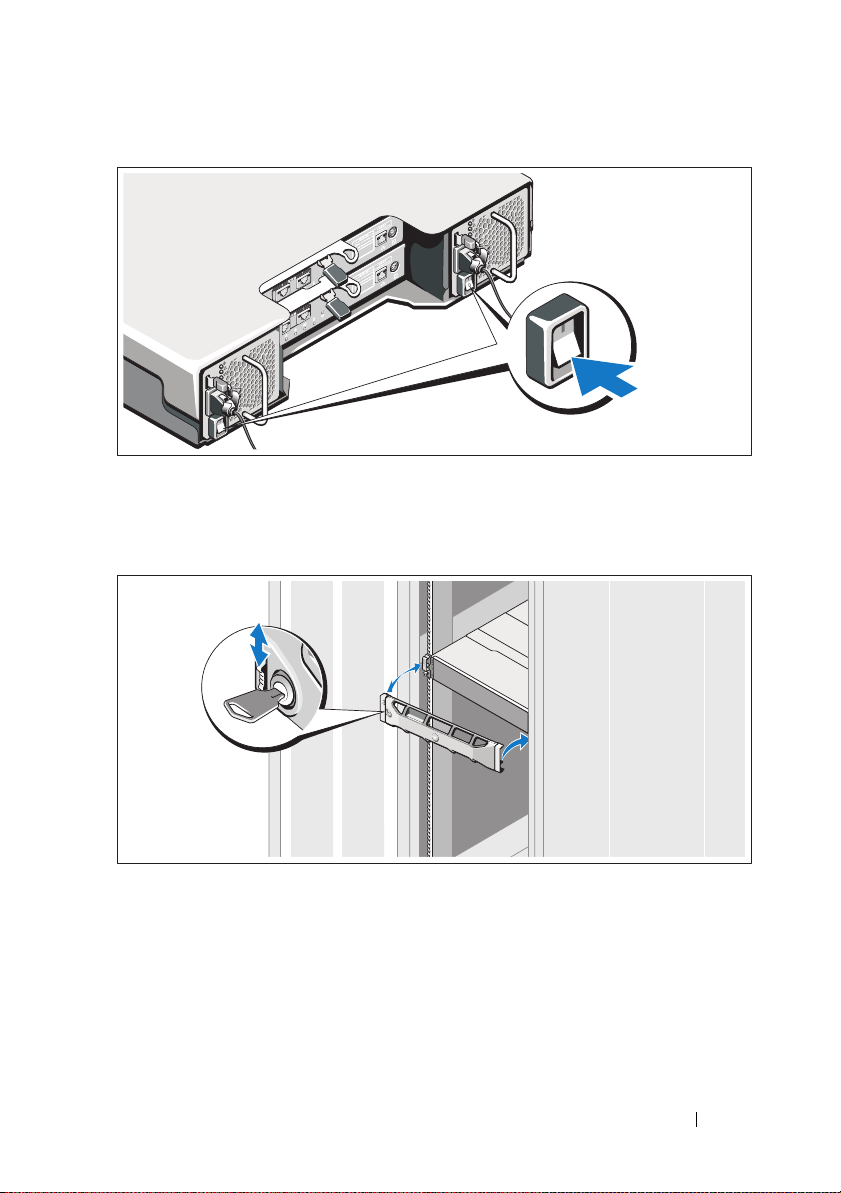
Turning On the Enclosure
Turn on components in the following order
1
Ethernet switches (if used)
2
PowerVault MD1200 series expansion enclosures (if used)
NOTE:
Before turning on the storage array, ensure that the expansion
enclosure status LED on the front of the enclosure is blue.
3
PowerVault MD3600i series storage array
12
NOTE:
Before turning on the host server(s), ensure that the storage array
status LED on the front of the storage array is blue.
Getting Started With Your System
4
Host server(s)
Installing the Bezel
Install the bezel (optional).
Getting Started With Your System
13

Installing the MD Storage Software
NOTE:
For detailed instructions about installing the MD storage software, setting
up the enclosure, and the post-installation tasks, see the Deployment Guide.
The MD Storage Manager software configures, manages and monitors the
storage array. The MD Configuration Utility (MDCU) is an optional utility
that provides a consolidated approach for configuring the management and
iSCSI host ports, and creating sessions for the iSCSI modular disk storage
arrays. It is recommended that you use MDCU to configure iSCSI on each
host server connected to the storage array. To install the MD storage software:
1
Insert the MD series resource media.
Depending on your operating system, the installer may launch
automatically. If the installer does not launch automatically, navigate to
the root directory of the installation media (or downloaded installer
image) and run the
navigate to the root of the resource media and run the
NOTE:
By default, the Red Hat Enterprise Linux operating system mounts the
resource media with the -noexec mount option which does not allow you to
run executable files. To change this setting, see the Readme file in the root
directory of the installation media.
2
Select
Install MD Storage Software
3
Read and accept the license agreement.
4
Select one of the following installation options from the
drop-down menu:
•
Full (recommended)
software, host-based storage agent, multipath driver, and hardware
providers.
•
Host Only
drivers.
•
Management
providers.
•
Custom
md_launcher.exe
file. For Linux-based systems,
autorun
file.
.
Install Set
—Installs the MD Storage Manager (client)
—Installs the host-based storage agent and multipath
—Installs the management software and hardware
—Allows you to select specific components.
14
Getting Started With Your System

5
Select the MD storage array model(s) you are setting up to serve as data storage for this host server.
6
Choose whether to start the event monitor service automatically when the host server reboots or manually
NOTE:
This option is applicable only to Windows client software installation.
7
Confirm the installation location and click
8
If prompted, reboot the host server after the installation completes.
9
When the reboot is complete, the MDCU may launch automatically.
Install
.
If the MDCU does not launch automatically, launch it manually.
• In a Windows-based operating system, click
Disk Configuration Utility
.
• In a Linux-based operating system, double-click the
Configuration Utility
NOTE:
If MDCU is not installed, see the Deployment Guide at
support.dell.com/manuals.
10
Start the
11
If applicable, activate any premium features purchased with your storage
MD Storage Manager
icon on the desktop.
and discover the array(s).
Start→
Dell→
Modular
Modular Disk
array. If you purchased premium features, see the printed activation card
shipped with your storage array.
NOTE:
The MD Storage Manager installer automatically installs the required
drivers, firmware, and operating system patches/hotfixes to operate your storage
array. These drivers and firmware are also available at support.dell.com. In
addition, see the Support Matrix at support.dell.com/manuals for any additional
settings and/or software required for your specific storage array.
Getting Started With Your System
15
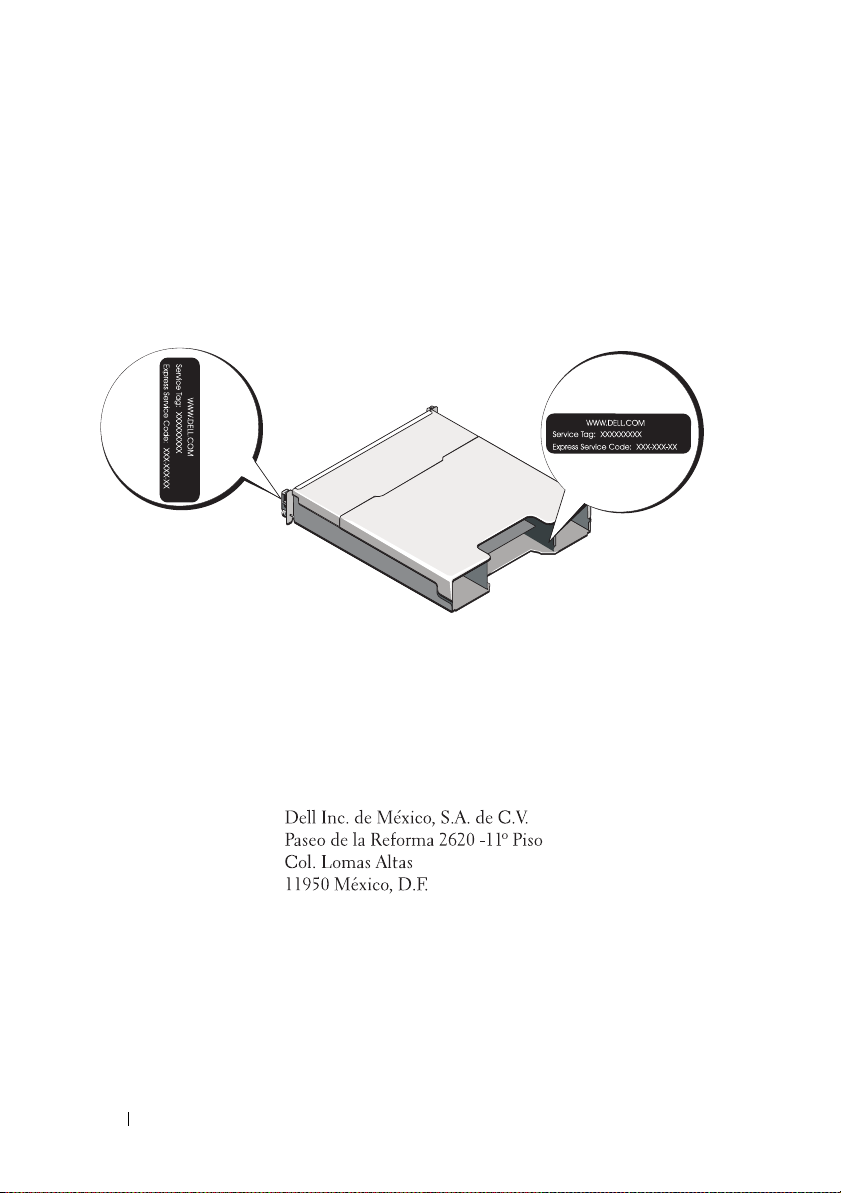
Locating Your Service Tag
Your system is identified by a unique Express Service Code and Service Tag
number. The Express Service Code and Service Tag are found on the front of
the system and at the back of the system next to the RAID controller
modules. This information is used by Dell to route support calls to the
appropriate personnel.
NOM Information (Mexico Only)
The following information is provided on the device described
in this document in compliance with the requirements of the
official Mexican standards (NOM):
Importer:
Model number: E03J and E04J
Supply voltage: 100–240 V CA
Frequency: 50/60 Hz
Current consumption: 8.6 A
16
Getting Started With Your System

Technical Specifications
Drives
PowerVault MD3600i Up to twelve 3.5-inch SAS hot-swappable
hard drives (3.0 Gbps and 6.0 Gbps)
PowerVault MD3620i Up to twenty four 2.5-inch SAS
hot-swappable hard drives (3.0 Gbps and
6.0 Gbps)
RAID Controller Modules
RAID controller modules
Back-Panel Connectors (Per RAID Controller Module)
iSCSI connectors Two 10 GB iSCSI IN connectors to
SAS expansion connector One SAS OUT port for expansion to an
Serial connector One 6-pin mini-DIN connector
Management Ethernet connector One 100/1000 Base-T port Ethernet for
• One or two hot-swappable modules
with temperature sensors
• 2 GB of cache per controller
connect hosts
additional PowerVault MD1200 series
enclosure.
NOTE:
SAS connectors are SFF-8088 compliant.
NOTE:
For technical support use only.
out-of-band management of the enclosure
NOTE:
The default management port IP
addresses for the primary and secondary RAID
controller modules are 192.168.128.101 and
192.168.128.102, respectively. By default, the
management ports are set to Dynamic Host
Configuration Protocol (DHCP). If the controller
is unable to get an IP address configuration
from a DHCP server within a specified time out
period (approximately 3 minutes), it defaults
back to static IP addressing. For more
information, see the Deployment Guide.
Getting Started With Your System
17

Expansion
PowerVault MD1200 series Supports a maximum of 192 hard drives with
any combination of PowerVault MD1200 or
PowerVault MD1220 expansion enclosures.
Support for 192 hard drives is a Premium
Feature and requires activation. The
maximum number of hard drives supported
without using the Premium Feature is 120.
Redundant path connectivity provides
redundant data paths to each hard drive.
Backplane Board
Connectors
Sensors Two temperature sensors
LED Indicators
Front panel
Hard-drive carrier
Power supply/cooling fan Three LED status indicators for power supply
• 12 or 24 SAS hard-drive connectors
• Two power supply/cooling fan
module connectors
• Two sets of RAID controller module
connectors
• One control panel connector for front LEDs
and enclosure mode switch
• One two-color LED indicator for
system status
• Two single-color LED indicators for power
and enclosure mode
NOTE:
The enclosure mode LED is not
applicable to the PowerVault MD3600i series
storage array.
• One single-color activity LED
• One two-color LED status indicator
per drive
status, power supply/fan fault, and AC status
18
Getting Started With Your System

LED Indicators (continued)
RAID controller module Eight single-color LEDs:
• One battery fault
• One cache active
• One controller fault
• One controller power
• One system identification
• One management Ethernet activity
• Two iSCSI IN port activity
Four two-color LEDs:
• Two iSCSI IN link speed
• One SAS OUT link or fault
• One management Ethernet link speed
Switch
System identification button Located on the front control panel.
This button is used to locate a system
within a rack.
Enclosure mode switch Located on the front of the system.
This switch is not applicable to the
PowerVault MD3600i series storage array.
Password reset switch Located on the back panel of the RAID
controller module. This switch is used to
reset the storage array password.
Power Supplies
AC power supply (per power supply)
Wattage
Vo lt ag e
Heat dissipation
Maximum inrush current
600 W
100–240 VAC (8.6 A–4.3 A)
100 W
Under typical line conditions and over the
entire system ambient operating range,
the inrush current may reach a maximum of
55 A per power supply for 10 ms or less.
Getting Started With Your System
19

Available Hard-Drive Power (Per Slot)
PowerVault MD3600i 25 W
PowerVault MD3620i 12 W
RAID Controller Module Power (Per Slot)
Maximum power consumption 100 W
Physical
PowerVault MD3600i
Height
Width
Depth
Weight (maximum configuration)
Weig h t ( em pt y)
PowerVault MD3620i
Height
Width
Depth
Weight (maximum configuration)
Weig h t ( em pt y)
8.68 cm (3.41 inches)
44.63 cm (17.57 inches)
60.20 cm (23.70 inches)
29.30 kg (64.6 lb)
8.84 kg (19.5 lb)
8.68 cm (3.41 inches)
44.63 cm (17.57 inches)
54.90 cm (21.61 inches)
24.2 kg (53.4 lb)
8.61 kg (19lb)
Environmental
NOTE:
For additional information about environmental measurements for specific
system configurations, see www.dell.com/environmental_datasheets.
Te mp e ra t u re
20
Operating
Getting Started With Your System
10 °C to 35 °C (50 °F to 95 °F) with a
maximum temperature gradation of 10 °C per
hour
NOTE:
For altitudes above 2950 feet, the
maximum operating temperature is derated
1ºF/550 ft.

Environmental (continued)
Storage
Relative humidity
Operating
Storage
Maximum vibration
Operating
Storage
Maximum shock
Operating
Storage
Altitude
Operating
Storage
Airborne Contaminant Level
Class
–40° to 65°C (–40° to 149°F) with
a maximum temperature gradation
of 20°C per hour
20% to 80% (noncondensing) with
a maximum humidity gradation
of 10% per hour
5% to 95% (noncondensing)
0.25 G at 3–200 Hz for 15 min
0.5 G at 3–200 Hz for 15 min
One shock pulse in the positive z axis
(one pulse on each side of the system) of
31 G for 2.6 ms in the operational orientation
Six consecutively executed shock pulses
in the positive and negative x, y, and z axes
(one pulse on each side of the system)
of 71 G for up to 2 ms
–16 to 3048 m (–50 to 10,000 ft)
NOTE:
For altitudes above 2950 feet,
the maximum operating temperature
is derated 1ºF/550 ft.
–16 to 10,600 m (–50 to 35,000 ft)
G1 as defined by ISA-S71.04-1985
Getting Started With Your System
21

22
Getting Started With Your System

Dell PowerVault MD3600i
和 MD3620i
存储阵列
系统使用入门
管制型号系列 E03J 和 E04J

注、小心和警告
注:
“注”表示可以帮助您更好地使用计算机的重要信息。
小心:
“小心”表示如果不遵循说明,就有可能损坏硬件或导致数据丢失。
警告:
“警告”表示可能会导致财产损失、人身伤害甚至死亡。
____________________
本出版物中的信息如有更改,恕不另行通知。
© 2011 Dell Inc. 版权所有,翻印必究。
未经 Dell Inc. 书面许可,严禁以任何形式复制这些材料。
本文中使用的商标:Dell™
Windows Server
Red Hat
®
SUSE
国和 / 或其他管辖区域的注册商标。
本出版物中述及的其它商标和商品名称是指拥有相应商标和商品名称的公司或其产品。
Dell Inc. 对不属于自己的商标和商品名称不拥有任何所有权。
管制型号系列 E03J 和 E04J
2011 - 08 P/N 22P7F Rev. A02
®
®
是 Novell, Inc. 在美国和其他国家或地区的注册商标。VMware
是 Microsoft Corporation 在美国和 / 或其他国家或地区的商标或注册商标。
和 Red Hat Enterprise Linux
、 DELL 徽标和 PowerVault™ 是 Dell Inc. 的商标。 Microsoft®和
®
是 Red Hat, Inc. 在美国和其他国家或地区的注册商标。
®
是 VMware, Inc. 在美
开始之前
注:
在本说明文件中, Dell PowerVault MD3600i 系列存储阵列指代 Dell
PowerVault MD3600i 和 Dell PowerVault MD3620i。 Dell PowerVault MD1200 系列
扩展柜指代 Dell PowerVault MD1200 和 Dell PowerVault MD1220.
在设置您的
惯例以确保您的存储阵列以最高效率运作并提供完全冗余 (如果需要)。
• PowerVault MD3600i 是 10GBase-T
•
•
•
•
•
•
•
•
•
Dell PowerVault MD3600i
6
架构,包括
要使用现有的
10GBase-T
类或更高的电缆、支持
1GBase-T
交换机,也可以手动将
运行。您也可以使用
置端口速度。有关
MDCU
基础架构,可以通过互连
Modular Disk Configuration Utility (MDCU)
存储阵列之前,您必须考虑某些最佳
产品,需要支持
10GBase-T
10GBase-T
的配线板和交换机。
10GBase-T
iSCSI
端口配置为以
的详情,请参阅第
35
1GBase-T
页上的 “安装
的基础
网络的
速度
来配
MD
储软件”。
注:
不支持自动协商,必须手动配置运作速度。
在整个网络中,请始终使用
建议您为
iSCSI
数据传输使用专用的
6
类 (或更高)以太网电缆。
IP SAN
。管理通信可以独立存在
于一个单独的管理网络上。
配置
iSCSI
iSCSI
完成
iSCSI
总是配置冗余的
前先完成
iSCSI
配置工作表。请参阅第
26
页上的 “完成
工作表”。工作表将物理网络信息收集至单个信息源。
工作表后,在设置解决方案前先进行配置。
iSCSI
数据通道以备其中一条数据通道不可用时提供
到达和来自主机服务器的其它可用通道。
如果主机上安装了多块网卡,建议为管理和
iSCSI
数据链路各使用不
同的子网。
在主机服务器和存储阵列之间连接任何电缆之前,请物理地标签每个
端口和连接器。
当对整个网络通电时,请始终遵循正确的上电和断电步骤。您还必须
确保关键的网络组件位于单独的电源电路上。
注:
本文中的插图显示在
的布线情况。这些插图也仅显示
要在
SAN
环境中对多个
《部署指南》。
SAN
环境中只有一个
PowerVault MD36xxi
PowerVault MD3600i
PowerVault MD3600i
存储阵列的默认
存储阵列进行布线,请参阅
存储阵列
IP
地址。
存
系统使用入门
25
完成 iSCSI 工作表
交互
CHAP 机密
目标
CHAP 机密
A
B
主机服务器
PowerVault MD3600f
系列存储阵列
192.168.130.101
(In [ 输入 ] 0 默认值)
192.168.131.101
(In [ 输入 ] 1 默认值)
192.168.128.101
(管理网络端口)
192.168.130.102
(In [ 输入 ] 0 默认值)
192.168.131.102
(In [ 输入 ] 1 默认值)
192.168.128.102 (管理网络端口)
如果您需要将更多空间用于多台主机服务器,请使用附加表。
iSCSI 端口 0
iSCSI 端口 1
管理端口
子网掩码
默认网关
A
___ .___ .___ .___
___ .___ .___ .___
___ .___ .___ .___
___ .___ .___ .___
___ .___ .___ .___
___ .___ .___ .___
___ .___ .___ .___
___ .___ .___ .___
___ .___ .___ .___
静态 IP 地址 (存储阵列)
子网掩码
默认网关
B
___ .___ .___ .___
___ .___ .___ .___
___ .___ .___ .___
___ .___ .___ .___
___ .___ .___ .___
___ .___ .___ .___
iSCSI
控制器 0,In(输入)
0
iSCSI
控制器 0,In(输入)
1
管理端口
cntrl 0
iSCSI
控制器 1,In(输入)
0
iSCSI
控制器 1,In(输入)
1
管理端口
cntrl 1
___ .___ .___ .___
___ .___ .___ .___
___ .___ .___ .___
___ .___ .___ .___
___ .___ .___ .___
___ .___ .___ .___
___ .___ .___ .___
___ .___ .___ .___
___ .___ .___ .___
___ .___ .___ .___
___ .___ .___ .___
___ .___ .___ .___
静态 IP 地址 (主机服务器)
注 :
质询握手身份验证协议 (CHAP) 是一种可选的 iSCSI 身份验证方法,存储阵列 (目标)
通过此方法对主机服务器上的 iSCSI 启动程序进行身份验证。有关详情,请参阅 《部署指
南》中的 “了解 CHAP 验证”。
IPv4 设置
26
系统使用入门
注:
有关 IPv6 工作表的信息,请参阅 《部署指南》。
您可能需要的其他说明文件和介质
警告:
请参阅系统附带的安全与管制信息。保修信息可能包括在该说明文
件中,也可能作为单独的说明文件提供。
注:
所有 PowerVault MD3600i 系列说明文件均在 support.dell.com/manuals
提供。
•
机架解决方案附带机架说明文件,介绍了如何将系统安装到机架中。
•
《用户手册》提供了有关系统功能的信息,并说明了如何排除系统故障
以及安装或更换系统组件。
•
《部署指南》提供了有关安装和配置软件与硬件的信息。
•《CLI
•《SMI-S
•
指南》提供了有关使用命令行界面 (
CLI
)配置和管理存储阵列
的信息。
提供程序安装指南》提供了有关安装
SMI-S
提供程序的信息。
系统随附的任何介质,其中提供了用于配置和管理系统的说明文件和
工具,包括与系统预装的操作系统、系统管理软件、系统更新以及系
统组件相关的说明文件和工具。
注:
请经常访问 support.dell.com/manuals 以获得更新,并首先阅读这些更
新,因为这些更新通常会取代其他说明文件中的信息。
系统使用入门
27

准备主机服务器
支持的操作系统
• Microsoft Windows Server
• Red Hat Enterprise Linux
• SUSE Linux Enterprise Server
• VMware
注:
关于所有支持的操作系统版本的最新信息,请参见
support.dell.com/manuals 上的 《Support Matrix (支持信息表)》。
在 iSCSI 中使用更多网卡的情况
在安装更多网卡时,建议:
•
为
iSCSI
通信使用专用的冗余存储网络。如果专用网络不可行,使用
VLAN
)将
iSCSI
虚拟局网 (
•
使用专用于
•
必须成对添加网卡以实现冗余。
iSCSI
通信的附加网卡。
注:
也支持单独一块网卡。
网卡配置
在 SAN 环境中,根据交换机的数目建议为 iSCSI 通信使用两个单独的子
网。对于直接连接的存储环境,直接连接到 PowerVault MD36xxi 的每块
网卡必须处于不同的子网中。在安装 MD 存储软件之前,必须配置所有
主机 IP 地址。
通信与普通网络通信隔离。
28
系统使用入门
 Loading...