

Dell EMC PowerEdge MX
2
1
Getting Started Guide
Guide de mise en route
Handbuch zum Einstieg
Руководство по началу работы
Guía de introducción
הדובעה תליחתל ךירדמ
Scan to see how-to videos, documentation, and
troubleshooting information.
Scannez pour voir des didacticiels vidéo, obtenir de la
documentation et des informations de dépannage.
Hier finden Sie Anleitungsvideos, Dokumentationen
und Informationen zur Behebung von Störungen.
Сканируйте, чтобы увидеть видео с практическими
Quick Resource Locator
Dell.com/QRL/Server/PEMX7000
рекомендациями, документацию и информацию по
устранению неполадок.
Escanear para ver vídeos explicativos, documentación
e información para la solución de problemas.
ןורתפ יבגל עדימו דועית ,ואדיו תומגדה תוארל ידכ קורס
.תויעב
Before you begin
Avant de commencer | Vorbereitungen | Перед началом работы | Antes de empezar
ליחתתש ינפל
WARNING: Before setting up your system, follow the safety
instructions included in the Safety, Environmental, and
Regulatory Information document shipped with the system.
WARNING: To prevent damage to the I/O connectors, ensure
that you cover the connectors when you remove the sleds and
other modules from the enclosure.
WARNING: To ensure proper thermal performance install
blanks in all unused slots.
NOTE: The documentation set for your system is available at Dell.
com/poweredgemanuals. Ensure that you always check the
documentation set for all the latest updates.
NOTE: For detailed instructions pertaining to cabling, refer to the
Installation and Service Manual or the User Guide that is available at
Dell.com/poweredgemanuals.
AVERTISSEMENT : avant de configurer votre système, suivez
les consignes de sécurité mentionnées dans le document
informatif livré avec le système et relatif à la sécurité, à
l’environnement et aux réglementations.
AVERTISSEMENT : pour éviter d’endommager les connecteurs
d’E/S, assurez-vous de recouvrir les connecteurs lorsque vous
retirez les traîneaux et les autres modules du boîtier.
AVERTISSEMENT : afin de garantir de bonnes performances
thermiques, installez les caches dans tous les logements vides.
REMARQUE: toute la documentation relative à votre système est
disponible sur la page Dell.com/poweredgemanuals. Assurezvous de toujours vérifier la documentation pour connaître toutes les
dernières mises à jour.
REMARQUE: pour obtenir des instructions détaillées
concernant le câblage, reportez-vous au Manuel d’entretien et
d’installation ou au Guide d’utilisation qui est disponible à l’adresse
Dell.com/poweredgemanuals.
WARNUNG: Befolgen Sie vor der Einrichtung des Systems
die Sicherheitshinweise im Dokument mit den Sicherheits-,
Umwelt- und Betriebsbestimmungen, das im Lieferumfang des
Systems enthalten ist.
WARNUNG: Um Schäden an den E/A-Anschlüssen zu
vermeiden, decken Sie die Anschlüsse ab, nachdem die
Schlitten und anderen Module aus dem Gehäuse entfernt
wurden.
WARNUNG: Um angemessene thermische Bedingungen
zu erreichen, sollten Platzhalter in alle nicht verwendeten
Steckplätzen eingesetzt werden.
ANMERKUNG:: Die Dokumentation für Ihr System ist unter
Dell.com/poweredgemanuals verfügbar. Stellen Sie sicher, dass
die Dokumentation dem neuesten Stand entspricht.
ANMERKUNG: Ausführliche Anweisungen zur Verkabelung finden Sie
im Installations- und Service-Handbuch oder im Benutzerhandbuch,
das unter Dell.com/poweredgemanuals verfügbar ist.
Product
Produit | Produkt | Продукт
Producto | רצומ
MX7000 E44S/E44S001
MX740c E04B/E04B001
MX840c E05B/E05B001
MX5016s E04B/E04B002
MX5000s E21M/E21M001
MXG610s MXG610s
MX9116n E23/E23M003
MX7116n E23/E23M005
MX5108n E23/E23M004
25G Pass-Through Module E23/E23M001
10G Pass-Through Module E23/E23M002
Regulatory model/type
Modèle/type réglementaire | Muster-Modellnummer/-Typnummer
Модель и тип согласно нормативной документации | Tipo/modelo reglamentario | הניקת גוס/םגד
ПРЕДУПРЕЖДЕНИЕ. Перед установкой системы выполните
инструкции по технике безопасности, приведенные
в прилагаемом к системе документе «Информация по
технике безопасности, воздействию на окружающую среду
и соответствию нормативным требованиям».
ПРЕДУПРЕЖДЕНИЕ. Для предотвращения повреждения
разъемов ввода-вывода не забудьте закрывать разъемы
крышкой при извлечении салазок и других модулей
из корпуса.
ПРЕДУПРЕЖДЕНИЕ. Для обеспечения надлежащего
температурного режима установите заглушки во все
неиспользуемые слоты.
ПРИМЕЧАНИЕ. Набор документации для вашей системы доступен
на странице Dell.com/poweredgemanuals. Всегда проверяйте
данный комплект документов и загружайте последние обновления.
ПРИМЕЧАНИЕ. Для получения подробных инструкций по
прокладке кабелей обратитесь к руководству по установке
и обслуживанию или руководству пользователя, которое доступно
по адресу dell.com/poweredgemanuals.
AVISO: Antes de comenzar a configurar el sistema, siga
las instrucciones de seguridad incluidas en el documento
informativo sobre seguridad, medioambiente y normativa que
se le envió junto con el sistema.
AVISO: Para evitar que se produzcan daños en los conectores
de E/S, asegúrese de cubrirlos cuando extraiga los sleds y
otros módulos del gabinete.
AVISO: Para asegurar un buen rendimiento térmico instale
paneles vacíos en todas las ranuras no utilizadas.
NOTA: La documentación sobre el sistema está disponible en
Dell.com/poweredgemanuals. Siempre asegúrese de revisar la
documentación sobre todas las actualizaciones más recientes.
NOTA: Para obtener instrucciones detalladas relacionadas con el
cableado, consulte el Manual de servicio o la Guía del usuario que se
encuentra disponible en Dell.com/poweredgemanuals.
תוחיטבה תוארוה יפל לעפ ,תכרעמה תנקתה ינפל :הרהזא
עדימו הביבס יאנת ,תוחיטב אשונב עדימה ךמסמב תולולכה
תא תוסכל דפקה ,טלפ/טלקה ירבחמל קזנ עונמל ידכ :הרהזא
.זראמהמ םירחא םילדומו תוריגמה תאצוה תעב םירבחמה
לכב םייוסיכ ןקתה םיניקת םיימרת םיעוציב חיטבהל ידכ :הרהזא
תבותכב הנימז ךלש תכרעמה רובע דועיתה תכרע :הרעה
דועית תכרע דימת קודבל דפקה .Dell.com/poweredgemanuals
ןייע ,םילבכל תורושקה תוטרופמ תוארוה תלבקל :הרעה
הנקתהה ךירדמ( Installation and Service Manual-ב
תבותכב םינימזש )שמתשמל ךירדמ( User Guide-ב וא )תורישהו
.תכרעמה םע עיגהש ירוטלוגר
.שומישב םניאש םיצירחה
.םינורחאה םינוכדעה לכ תא לבקל ידכ וז
.Dell.com/poweredgemanuals
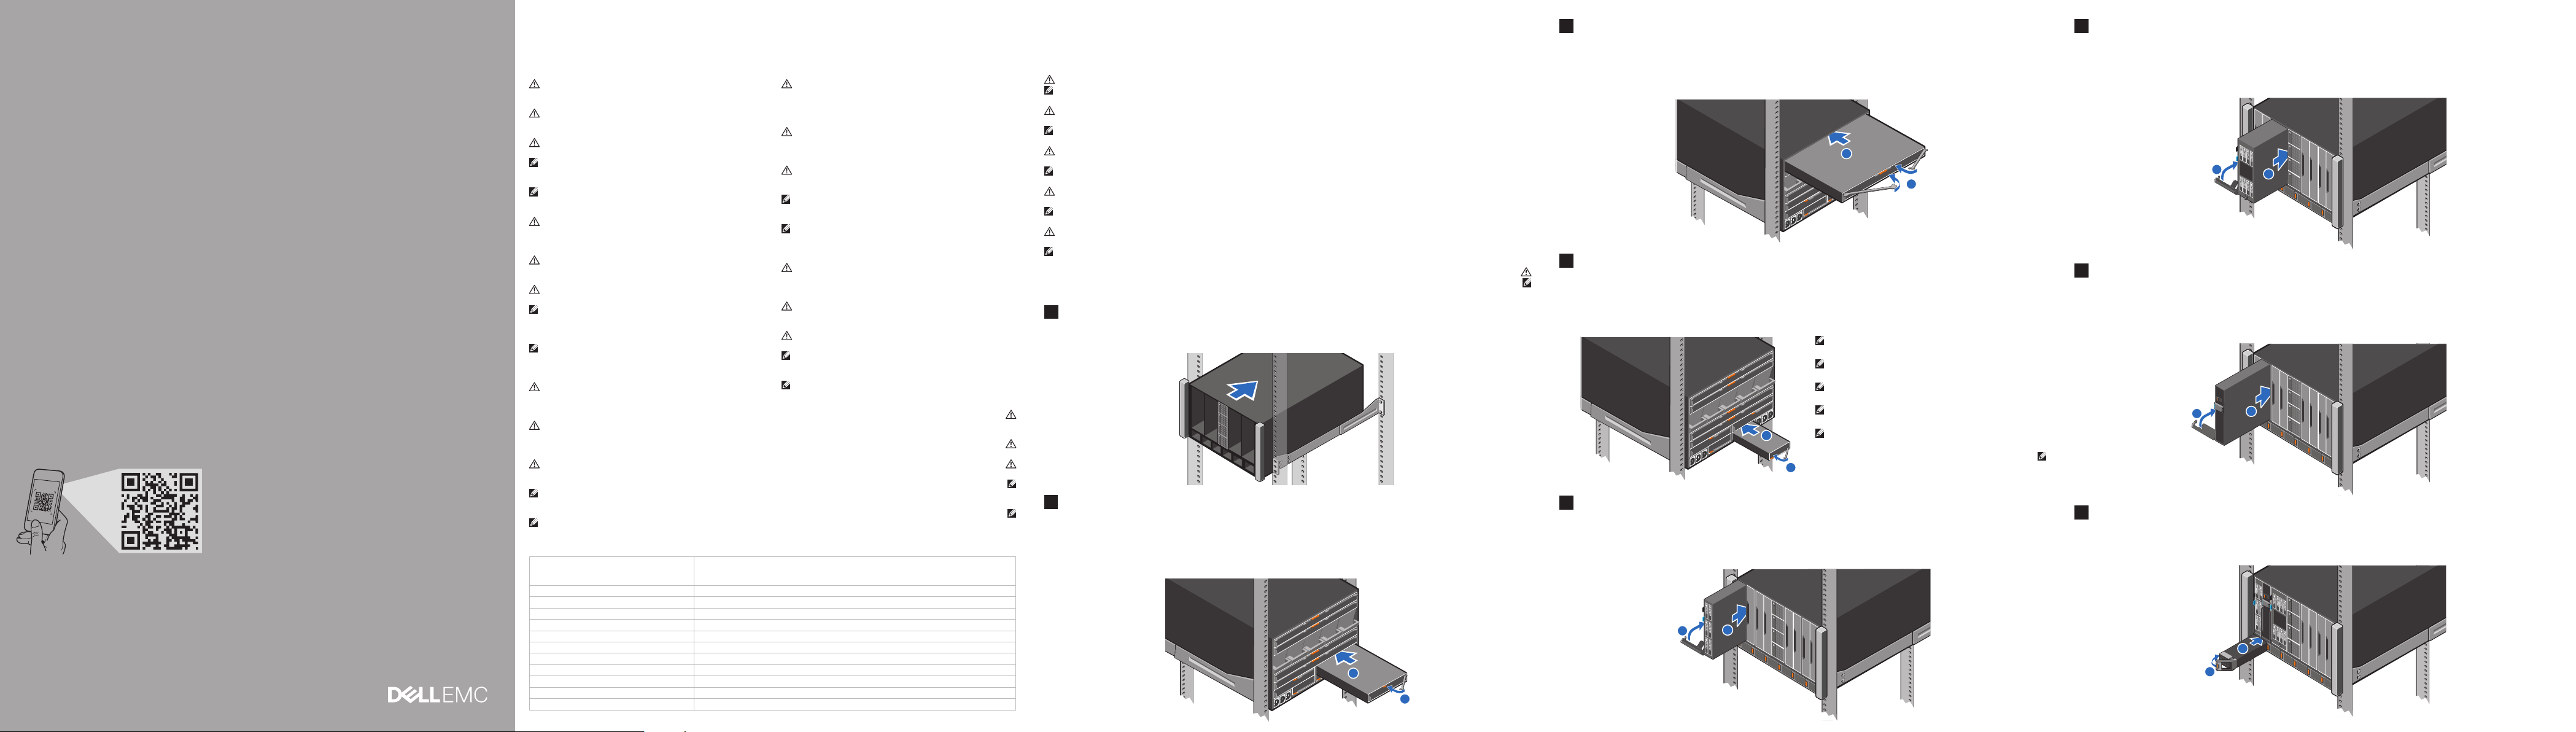
Setting up your enclosure
Configuration de votre boîtier | Einrichten des Gehäuses | Настройка корпуса | Configuración de su gabinete
זראמה תבכרה
WARNING: Before installing the enclosure into the rack, ensure that you remove all installed sleds, I/O modules, and power supplies.
NOTE: Ensure that the system is installed and secured. For more information about installing and securing the enclosure into the rails, see the rail
documentation included with your rail kit.
AVERTISSEMENT : avant d’installer le boîtier dans le rack, supprimez tous les traîneaux installés, les modules d’E/S, et les blocs
d’alimentation.
REMARQUE : assurez-vous que le système est correctement installé et fixé. Pour en savoir plus sur l’installation et la fixation du boîtier dans les
rails, reportez-vous à la documentation relative aux rails fournie avec votre kit de rails.
WARNUNG: Vor dem Einbau des Gehäuses in das Rack müssen alle installierten Schlitten, E/A-Module und Netzteile entfernt
werden.
ANMERKUNG:: Stellen Sie sicher, dass das System eingesetzt und befestigt ist. Weitere Informationen zum Anbringen und Fixieren des Gehäuses
auf den Schienen finden Sie in der mit dem Schienen-Kit bereitgestellten Dokumentation.
ПРЕДУПРЕЖДЕНИЕ. Перед установкой корпуса в стойку не забудьте извлечь все установленные салазки, модули ввода-вывода и
блоки питания.
ПРИМЕЧАНИЕ. Убедитесь, что система установлена и надежно закреплена. Для получения дополнительной информации об установке и
креплении системы в направляющие см. документацию, прилагаемую к комплекту направляющих.
AVISO: Antes de instalar el gabinete en el rack, asegúrese de retirar todos los sled instalados, los módulos de E/S y los suministros
de alimentación.
NOTE: Asegúrese de que el sistema esté instalado y sujetado. Para obtener más información sobre la instalación y sujeción del sistema en los rieles,
consulte la documentación sobre rieles que se incluye en su kit de rieles.
תכרעל ףרוצמה תוליסמ אשונב דועיתב ןייע ,תוליסמב זראמה תחטבאו הבכרה אשונב ףסונ עדימ תלבקל .תחטבואמו תנקתומ תכרעמהש אדו :הרעה
1
Install the enclosure in the rack
Installez le boîtier dans le rack | Bauen Sie das Gehäuse in das Rack ein | Установите корпус в стойку
Instale el gabinete en el rack | תרושקתה ןוראב זראמה תא ןקתה
2
Install a half-width I/O module to Fabric C in the enclosure
Installez un module d’E/S demi-largeur pour la structureC dans le boîtier
Setzen Sie ein E/A-Modul mit halber Breite in Fabric C im Gehäuse ein
Установите модуль ввода-вывода половинной ширины в матрицу C в корпусе
Instale un módulo de E/S de altura media a la red Fabric C en el gabinete
.חוכה יקפסו טלפ/טלקה ילודומ ,תוריגמה לכ תא ריסהל דפקה ,תרושקתה ןוראב זראמה תבכרה ינפל :הרהזא
.ךלש תוליסמה
זראמב C גראמב בחור יצחב טלפ/טלק לודומ ןקתה
1
2
3 6
Install a full-width I/O module to Fabrics A and/or B in the enclosure
Installez un module d’E/S pleinelargeur pour les structuresA et/ouB dans le boîtier
Setzen Sie E/A-Module voller Breite in die Fabrics A und/oder B im Gehäuse ein
Установите модуль ввода-вывода полной ширины в матрицы А и (или) B в корпусе
Instale un módulo de E/S de altura completa a las redes Fabric A o B en el gabinete
4
Install a Management Module in the enclosure
Installez un module de gestion dans le boîtier
Bauen Sie ein Management-Modul in das Gehäuse ein
Установите в корпус модуль управления
Instale un módulo de administración en el gabinete
5
Install a single-width compute sled in the enclosure
Installez un traîneau de calcul simple largeur dans le boîtier | Bauen Sie einen Rechnerschlitten mit einfacher Breite in das Gehäuse ein
Установите в корпус выдвижной вычислительный блок одиночной ширины
Instale un sled de computación de ancho simple en el gabinete
זראמב B וא/ו A םיגראמב אלמ בחורב טלפ/טלק לודומ ןקתה
1
זראמב לוהינ לודומ ןקתה
NOTE: If there are two management modules installed, ensure
that both the modules are connected to the network.
REMARQUE : s’il y a deux modules de gestion installés, les
deux modules doivent être connectés au réseau.
HINWEIS: Wenn zwei Management-Module eingebaut sind,
müssen beide mit dem Netzwerk verbunden sein.
ПРИМЕЧАНИЕ. Если установлены два модуля управления,
убедитесь, что они оба подключены к сети
1
NOTA: Si hay dos módulos de administración instalados,
asegúrese de que ambos módulos estén conectados a la red.
2
םירבוחמ םילודומה ינשש אדו ,לוהינ ילודומ ינש םינקתומ םא :הרעה
2
.תשרל
זראמב דיחי בחורב בושחמ תריגמ ןקתה
Install a double-width compute sled in the enclosure
Installez un traîneau de calcul double largeur dans le boîtier
Bauen Sie einen Rechnerschlitten mit doppelter Breite in das Gehäuse ein
Установите в корпус выдвижной вычислительный блок двойной ширины
Instale un sled de computación de ancho doble en el gabinete
7
Install a single-width storage sled in the enclosure
Installez un traîneau de stockage simple largeur dans le boîtier
Bauen Sie einen Speicherschlitten mit einfacher Breite in das Gehäuse ein
Установите в корпус выдвижной блок хранения одиночной ширины
Instale el sled de almacenamiento de ancho simple en el gabinete
8
Install the PSUs in the enclosure
Installez lesPSU dans le boîtier | Setzen Sie die Netzteile in das Gehäuse ein
Установите в корпус блоки питания | Coloque la PSU en el gabinete
זראמב לופכ בחורב בושחמ תריגמ ןקתה
2
2
2
1
זראמב דיחי בחורב ןוסחא תריגמ ןקתה
1
זראמב חוכה יקפס תודיחי תא ןקתה
1
9
Connect the cables to the enclosure
Branchez les câbles au boîtier | Schließen Sie die Kabel an das Gehäuse an
Подключите кабели к корпусу | Conecte los cables al gabinete
זראמל םילבכה תא רבח
10
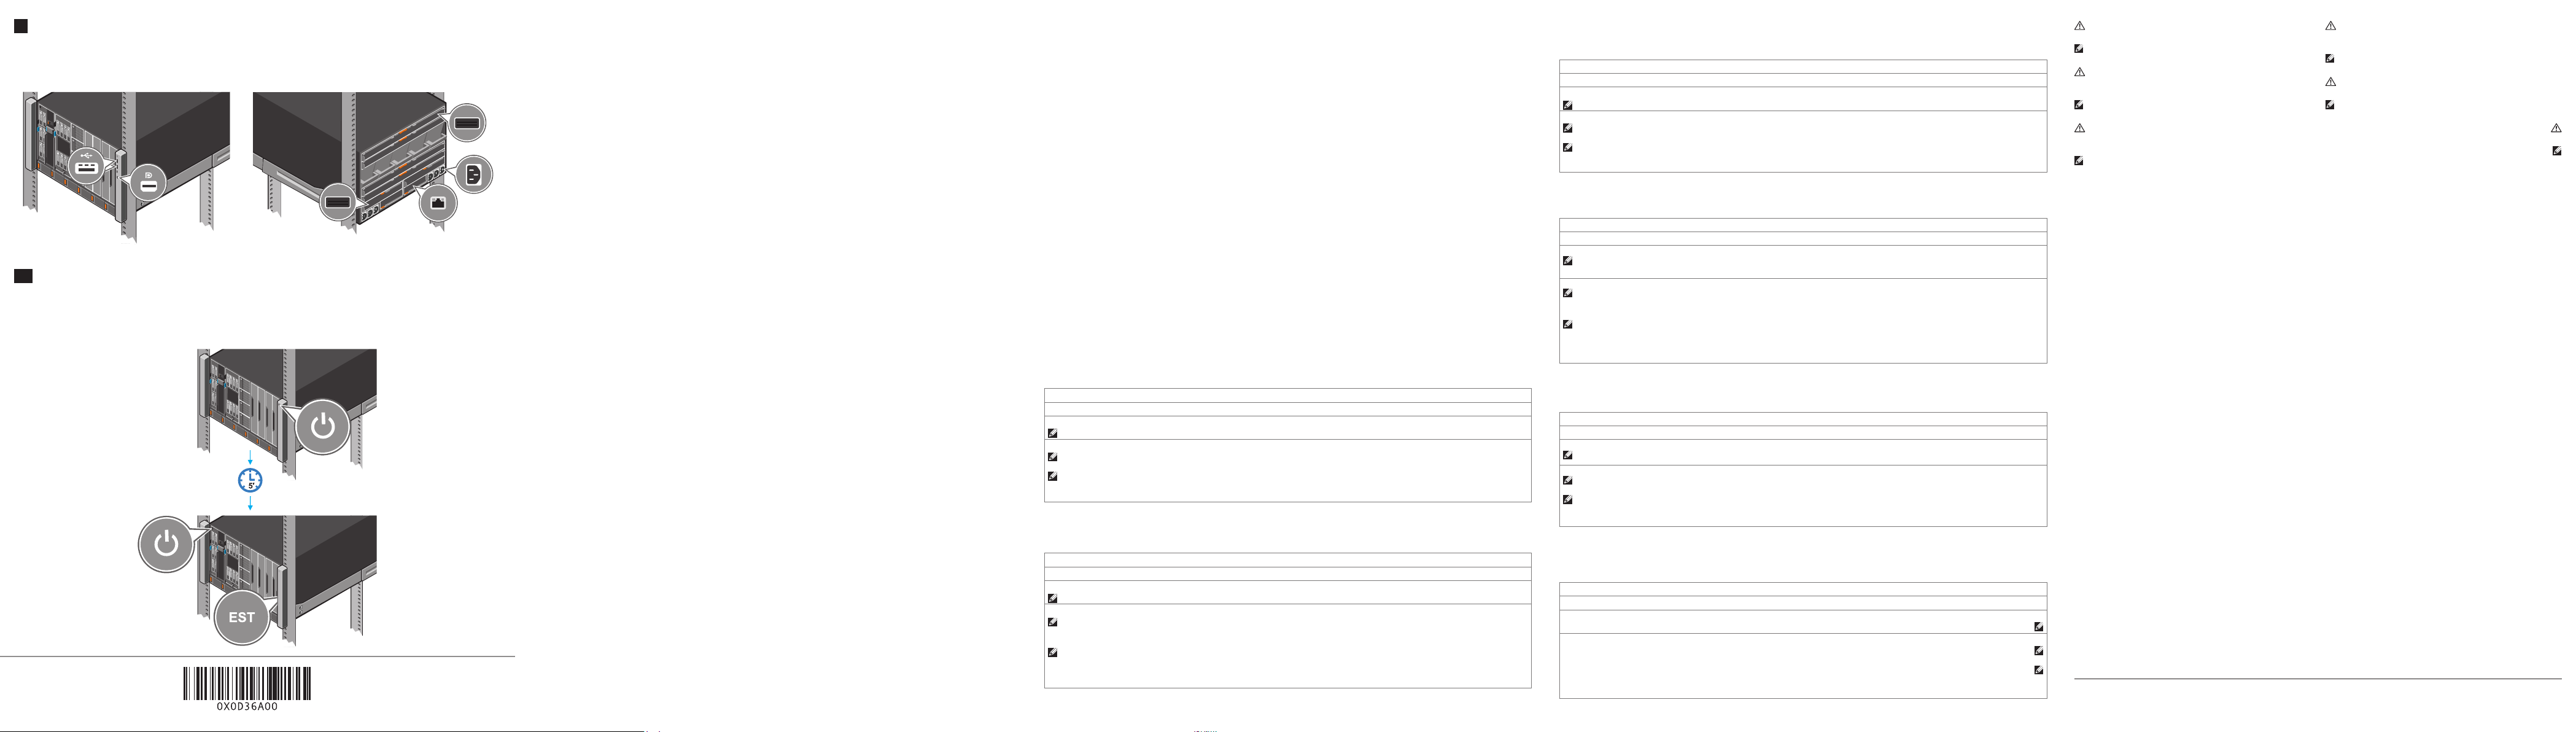
Power on the enclosure and then the sled(s)
Mettez sous tension le boîtier, puis le(s) traîneau(x) | Schalten Sie zuerst das Gehäuse und dann den/die Schlitten ein
Включите питание корпуса, а затем — питание выдвижных блоков | Encienda el gabinete y, a continuación, el(los) sled(s)
תוריגמה תא ןכמ רחאלו זראמה תא לעפה
© 2018 Dell Inc. or its subsidiaries.
Setting up a Management Module
When the chassis is powered on for the first time the IP address can be viewed or changed with the KVM, (optional) LCD or (optional) OpenManage
Mobile app.
By default, the network port on the Management Module is enabled and set to DHCP.
To configure additional network settings such as hostname and DNS:
1. Open a browser and enter the IP address obtained from the above and login with the credentials provided on the pull-out tag.
2. Follow the Chassis Deployment Wizard that appears on the first login. (Or) Select the Settings tab on the home page for more options.
For more information see the OpenManage Enterprise-Modular (OME-M) User Guide at Dell.com/poweredgemanuals.
Setting up an I/O module
1. In the OME-M interface, click Devices→ I/O Modules→ highlight the I/O module to configure→ click View Details.
2. In the displayed Settings window, select Network, and configure the settings.
For more information on setting up the module, see the module’s User Guide.
Installation du module de gestion
Lorsque le boîtier est mis sous tension pour la première fois, l’adresse IP peut être consultée ou modifiée avec l’application KVM, LCD (en option) ou
OpenManage Mobile (en option).
Par défaut, le port réseau sur le module de gestion est activé et défini sur le protocole DHCP.
Pour configurer d’autres paramètres réseau tels que le nom d’hôte et le DNS :
1. Ouvrez un navigateur et entrez l’adresseIP obtenue ci-dessus et ouvrez une session avec les informations d’identification fournies sur
l’étiquette extractible.
2. Suivez l’Assi
Settings (Paramètres) sur la page d’accueil pour d’autres options.
Pour plus d’informations, reportez-vous au Guide d’utilisation OpenManage Enterprise-Modular (OME-M) sur Dell.com/poweredgemanuals.
stant Déploiement du boîtier qui apparaît lors de la première ouverture de session. (Ou) Sélectionnez l’onglet
Configuration d’un module d’E/S
1. Dans l’interfaceOME-M, cliquez sur Devices (Périphériques)→ I/O Modules (Modules d’E/S)→ mettez en surbrillance le module d’E/S
à configurer→ cliquez sur View Details (Afficher les détails).
2. Dans la fenêtre Settings (Paramètres) affichée, sélectionnez Network (Réseau), et configurez les paramètres.
Pour plus d’informations sur la configuration du module, consultez le Guide d’utilisation du module.
Einrichten eines Management-Moduls
Wenn das Gehäuse zum ersten Mal hochgefahren wird, kann die IP-Adresse über die KVM (optional) LCD (optional) oder OpenManage-App
eingesehen oder geändert werden.
Standardmäßig ist die Netzwerkschnittstelle des Management-Moduls aktiviert und auf DHCP eingestellt.
So konfigurieren Sie zusätzliche Netzwerkeinstellungen wie den Hostnamen und DNS:
1. Öffnen Sie einen Browser, geben Sie die IP-Adresse ein, die Sie wie oben angegeben erhalten haben, und melden Sie sich mit den
Anmeldeinformationen an, die auf dem herausziehbaren Tag angegeben sind.
2. Befolgen Sie die Schritte des Bereitstellungsassistenten für das Gehäuse, der bei der ersten Anmeldung erscheint. (Oder) Wählen Sie die
Registerkarte Settings (Einstellungen) auf der Startseite, um weitere Optionen aufzurufen.
Weitere Informationen finden Sie im Benutzerhandbuch für OpenManage Enterprise-Modular (OME-M) unter Dell.com/poweredgemanuals.
Einrichten eines E/A-Moduls
1. Klicken Sie In der OME-M-Benutzeroberfläche auf Devices (Geräte) → I/O Modules (E/A-Module) → markieren Sie das E/A-Modul, das
konfiguriert werden soll → klicken Sie auf View Details (Details anzeigen).
2. Wählen Sie im Fenster Settings (Einstellungen) Network (Netzwerk), und legen Sie die Einstellungen fest.
Weitere Informationen zum Einrichten des Moduls finden Sie im Benutzerhandbuch des Moduls.
Настройка модуля управления
При первом включении питания корпуса можно просмотреть или изменить IP-адрес с помощью ЖК-экрана KVM (опционально) или приложения
OpenManage Mobile (опционально).
По умолчанию сетевой порт на модуле управления включен и настроен на использование DHCP.
Чтобы настроить дополнительные параметры сети, такие как имя хоста и DNS, выполните следующие действия.
1. Откройте браузер и введите IP-адрес, полученный приведенный выше способом, затем выполните вход с учетными данными,
предоставленными на выдвижной метке.
2. Следуйте инструкциям мастера развертывания корпуса, который открывается при первом входе в систему. (Или) выберите вкладку
Settings (Параметры) на главной странице для выбора дополнительных настроек.
Для получения дополнительной информации см. руководство пользователя OpenManage Enterprise-Modular (OME-M) по адресу
Dell.com/poweredgemanuals.
Настройка модуля ввода-вывода
1. В интерфейсе OME-M щелкните Devices (Устройства)→ I/O Modules (Модули ввода-вывода)→ выделите настраиваемый модуль ввода-
вывода→ нажмите View Details (Просмотреть сведения).
2. В открывшемся окне Settings (Параметры) выберите Network (Сеть) и настройте параметры.
Для получения дополнительной информации о настройке модуля см. руководство пользователя соответствующего модуля.
2018-04P/N X0D36 Rev. A00
Configuración del módulo de administración
Cuando el chasis se enciende por primera vez la dirección IP se puede ver o cambiar con el KVM, (opcional) del LCD o la aplicación OpenManage
(opcional).
De manera predeterminada, el puerto de red en el módulo de administración se activa y se establece en DHCP.
Para configurar parámetros de red adicionales tales como el nombre de host y el DNS:
1. Abra un explorador e introduzca la dirección IP que se obtuvo de lo anterior e inicie sesión con las credenciales proporcionadas de la etiqueta.
2. Siga el Asistente de implementación del chasis que aparece en el primer inicio de sesión. (O) Seleccione la ficha Configuración en la
página de inicio para ver más opciones.
Para obtener más información, consulte la Guia del usuario de OpenManage Enterprise-Modular (OME-M) en Dell.com/poweredgemanuals.
Configuración de un módulo de E/S
1. En la interfaz de OME-M, haga clic en Dispositivos→ Módulos de E/S→ resalte el módulo de E/S a configurar→ haga clic en Ver detalles.
2. En la ventana Configuraciones que se muestra, seleccione Red y ajuste la configuración.
Para obtener más información sobre la configuración del módulo, consulte la Guía del usuario del módulo.
OpenManage Mobile םושייה וא )ילנויצפוא( LCD , KVM תועצמאב IP-ה תבותכ תא תונשל וא תוארל ןתינ ,הנושארה םעפב לעפומ זראמה רשאכ
.DHCP-כ תרדגומו תלעפומ לוהינה לודומב תשרה תאיצי ,לדחמ תרירבכ
OpenManage Enterprise--ב שמתשמל ךירדמ( OpenManage Enterprise-Modular )OME-M( User Guide-ב ןייע ףסונ עדימ תלבקל
:DNS-ו hostname ןוגכ ,תופסונ תשר תורדגה עובקל ידכ
.תופסונ תויורשפא תלבקל תיבה ףדב )תורדגה(
.Dell.com/poweredgemanuals תבותכב )Modular
לוהינ לודומ תרדגה
.)ילנויצפוא(
טלפ/טלק לודומ תרדגה
.)םיטרפ גצה( View Details לע
.לודומה לש שמתשמל ךירדמב ןייע ,לודומה תרדגה לע ףסונ עדימ תלבקל
Technical specifications
The following specifications are only those required by law to ship with your system. For a complete and current listing of the
specifications for your system, see Dell.com/poweredgemanuals.
Supply voltage: 100-240 V AC, 50/60 Hz
Current consumption: 16 A (x6)
Power: 3000 W Platinum AC 100-240 V, 50/60 Hz, 16 A - 14 A
NOTE: If the system operates at low line 100-120 V AC, then the power rating per PSU is derated to 1400 W.
Temperature: Maximum ambient temperature for continuous operation: 40°C/104°F
NOTE: Certain configurations of this enclosure may require a reduction in the maximum ambient temperature limit. The performanceof the
system may be impacted when operating above the maximum ambient temperature limit or with a faulty fan.
NOTE: These systems are designed to be connected to IT power systems with a phase-to-phase voltage not exceeding 240 V.
For information on Dell Fresh Air and supported expanded operating temperature range, see the Installation and Service Manual at
Dell.com/poweredgemanuals.
Caractéristiques techniques
Les caractéristiques suivantes se limitent à celles que la législation impose de fournir avec le système. Pour obtenir la liste complète et à
jour des caractéristiques du système, rendez-vous sur Dell.com/poweredgemanuals.
Tension d’alimentation : 100 à 240 V CA, 50/60 Hz
Consommation électrique : 16 A (x6)
Alimentation : 3000 W Platinum CA 100 à 240 V, 50/60 Hz, 16 A - 14 A
REMARQUE : si le système fonctionne à basse tension (100 à 120 V CA), alors la puissance nominale par PSU est réduite à 1400 W.
Température : température ambiante maximale en fonctionnement continu : 40 °C/104 °F
REMARQUE : certaines configurations de boîtier peuvent nécessiter une réduction de la limite de température ambiante maximale. Les
performances du système peuvent être affectées s’il fonctionne au-delà de la limite de température ambiante maximale ou avec un ventilateur
défaillant.
REMARQUE : ces systèmes sont également conçus pour être connectés à des systèmes d’alimentation informatiques avec une tension entre
phases inférieure à 240 V.
Pour en savoir plus sur Dell Fresh Air et les plages de température de fonctionnement prises en charge, reportez-vous au Manuel
d’installation et de maintenance à l’adresse Dell.com/poweredgemanuals.
Technische Daten
Die folgenden Angaben enthalten nur die technischen Daten, die laut Gesetz im Lieferumfang Ihres Computers enthalten sein müssen.
Eine vollständige und aktuelle Übersicht der technischen Daten Ihres Systems finden Sie unter Dell.com/poweredgemanuals.
Netzspannung: 100–240 V Wechselstrom, 50/60 Hz
Stromverbrauch: 16 A (x6)
Leistung: 3000 W (Platin) Wechselstrom 100–240 V, 50/60 Hz, 16–14 A
ANMERKUNG: Falls das System mit Wechselstrom an der Untergrenze von 100–120 V arbeitet, liegt die Strombelastung pro Netzteil bei bis zu 1400 W.
Temperatur: Die maximale Umgebungstemperatur für den Dauerbetrieb ist 40 °C/104 °F.
ANMERKUNG: Bestimmte Konfigurationen dieses Gehäuses können eine Herabsetzung des maximalen Temperaturgrenzwerts erfordern.
Der Betrieb über dem maximalen Temperaturgrenzwert oder mit einem fehlerhaften Lüfter kann die Systemleistung beeinträchtigen.
ANMERKUNG: Diese Systeme sind für den Anschluss an IT-Stromsysteme mit einer Außenleiterspannung von höchstens 240 V konzipiert.
Weitere Informationen zu Dell Fresh Air und unterstützten erweiterten Betriebstemperaturbereichen finden Sie im Installations- und
Service-Handbuch unter Dell.com/poweredgemanuals.
Технические характеристики
Ниже приведены только те технические характеристики, которые необходимо указывать в соответствии с требованиями
законодательства. Полный актуальный список технических характеристик вашей системы см. по адресу Dell.com/poweredgemanuals.
1 ..ףלשנה גתב םיניוצמש הסינכה ירושיא םע רבחתהו ליעל תלביקש IP תבותכ תא ןזהו ןפדפד חתפ
Напряжение питания: 100–240 В переменного тока, 50/60 Гц
2 . Settings הייסיטרכב רחב )וא( .הנושארה הסינכב עיפומש )זראמה תסירפ ףשא( Chassis Deployment Wizard-ב תולועפה תא עצב
Потребляемый ток: 16 А (x6)
Мощность: 3000 Вт Platinum, переменный ток, 100–240 В, 50/60 Гц, 16 А–14 А
ПРИМЕЧАНИЕ. Если система подключена к линии переменного тока низкого напряжения 100–120 В, то номинальная мощность на один
блок питания снижается до 1400 Вт.
Температура. Максимальная температура окружающей среды при непрерывной эксплуатации: 40 °C/104 °F
1 . ץחל →רידגהל שיש טלפ/טלקה לודומ תא ןמס → )טלפ/טלק ילודומ( I/O Modules → )םינקתה( Devices לע ץחל ,OME-M לש קשממב
2 ..תורדגה עבקו )תשר( Network תורשפא רחב ,חתפנש )תורדגה( Settings ןולחב
ПРИМЕЧАНИЕ. Для некоторых конфигураций данного корпуса может потребоваться уменьшение максимальной температуры окружающей
среды. Производительность системы может ухудшаться, если превышена максимальная температура окружающей среды или неисправен
вентилятор.
ПРИМЕЧАНИЕ. Эти системы также предназначены для подключения к системам питания ИТ-оборудования, межфазное напряжение которых
не превышает 240 В.
Информацию о технологии Dell Fresh Air и поддерживаемом расширенном диапазоне рабочих температур см. в руководстве по
установке и обслуживанию на странице Dell.com/poweredgemanuals.
Especificaciones técnicas
Las especificaciones siguientes son únicamente las que deben incluirse por ley con el envío del equipo. Para obtener una lista completa y
actualizada de las especificaciones de su sistema, consulte Dell.com/poweredgemanuals.
Tensión de alimentación: 100 a 240 V CA, 50/60 Hz
Consumo eléctrico: 16 A (x6)
Energía: 3000 W (Platinum) de 100 a 240 V CA, 50/60 Hz, 16 A-14 A
NOTA: Si el sistema funciona en línea baja de 100-120 V CA, la clasificación de energía por PSU se reduce a 1400 W.
Temperatura: La temperatura ambiente máxima de funcionamiento continuo es de 40 °C/104 °F
NOTE: Ciertas configuraciones de este gabinete pueden requerir una reducción de límite de la temperatura ambiente máxima. El rendimiento del
sistema puede verse afectado cuando funciona por encima del límite de temperatura ambiente máxima o con un ventilador defectuoso.
NOTA: Estos sistemas también están diseñados para conectarse a sistemas de alimentación de TI con un voltaje entre fases no superior a 240 V.
Para obtener información sobre Dell Fresh Air y el rango de temperatura de funcionamiento expandido admitido, consulte el Manual de
instalación y servicio en Dell.com/poweredgemanuals.
םיינכט םיטרפמ
,ךלש תכרעמה רובע םיטרפמה לש תנכדועמהו האלמה המישרל .בשחמה םע דחי וחלשייש שרוד קוחהש הלא קר םה םיאבה םיטרפמה
.)PSU( חוכ קפס תדיחי לכל 1400W לש רועישב דרוי ילנימונה קפסהה ,120-100VAC ךומנ חתמ וקב תלעופ תכרעמה םא :הרעה
עגפיהל םילולע תכרעמה יעוציב .רתוי הכומנ תויהל שרדית תיברמה הביבסה תרוטרפמט לש הלבגמה ,הז זראמ לש תומיוסמ תורוצתבש ןכתיי :הרעה
.240V לע הלוע וניאש הזאפל הזאפ ןיב חתמ םע IT לש למשח תוכרעמל םג רבחתהל תוננכותמ הלא תוכרעמ :הרעה
תבותכב תורישהו הנקתהה ךירדמב ןייע ,ךמתנש בחרומ הלועפ תורוטרפמט חווטו Dell Fresh Air לע ףסונ עדימ תלבקל
.ררוואמב הלקת שישכ וא תיברמה הרוטרפמטה תלבגממ ההובג הביבסה תרוטרפמטשכ
14A–16A , 50/60Hz , 100–240V , 3000W Platinum AC :קפסה
104°F/ 40°C :תכשמתמ הלעפהל תיברמ הביבס תרוטרפמט :הרוטרפמט
.Dell.com/poweredgemanuals האר
50/60Hz , 100-240VAC :ילמשח חתמ
)x6( 16A :םרז תכירצ
.Dell.com/poweredgemanuals
WARNING: A WARNING indicates a potential for property
damage, personal injury, or death.
NOTE: A NOTE indicates important information that helps you
make better use of your system.
AVERTISSEMENT : un AVERTISSEMENT signale un risque
d’endommagement du matériel, de blessure corporelle ou de
mort.
REMARQUE: une REMARQUE fournit des informations
importantes qui vous aident à mieux utiliser votre système.
WARNUNG: Eine WARNUNG weist auf eine potenziell
gefährliche Situation hin, die zu Sachschäden, Verletzungen
oder zum Tod führen könnte.
ANMERKUNG: Eine ANMERKUNG macht auf wichtige
Informationen aufmerksam, mit denen Sie das System besser
nutzen können.
Dell End User License Agreement
Before using your system, read the Dell Software License
Agreement that shipped with your system. If you do not accept
the terms of agreement, see Dell.com/contactdell.
Save all software media that shipped with your system. These
media are backup copies of the software installed on your
system.
Dell Contrat de licence utilisateur final
Avant d’utiliser le système, lisez le contrat de licence logicielle Dell
fourni avec le système. Si vous n’acceptez pas les conditions du
contrat, rendez-vous sur Dell.com/contactdell.
Conservez tous les supports de logiciel fournis avec le système.
Ces supports sont des copies de sauvegarde du logiciel installé
sur le système.
Dell Endbenutzer-Lizenzvereinbarung
Bevor Sie das System verwenden, lesen Sie die im
Lieferumfang enthaltene Dell Software-Lizenzvereinbarung.
Wenn Sie die Bedingungen nicht akzeptieren, besuchen Sie
Dell.com/contactdell.
Speichern Sie sämtliche im Lieferumfang Ihres Systems
enthaltene Softwaremedien. Diese Medien sind Sicherungskopien
der auf Ihrem System installierten Software.
European Union Radio Equipment Directive
Directive européenne relative aux équipements radio | Richtlinie der Europäischen Union über Funkanlagen
Директива ЕС о радиооборудовании | Directiva para equipos de radio para la Unión Europea
יפוריאה דוחיאב וידר דויצ יבגל היחנה
Quick Sync 2.0 option: RF Module Model Number
Option Quick Sync 2.0 : numéro de modèle du module RF — ATWILC3000-R110CA
Quick Sync 2.0 Option: Modellnummer des Funkmoduls – ATWILC3000-R110CA
Опциональная функция Quick Sync 2.0: номер модели радиочастотного модуля — ATWILC3000-R110CA
Opción de Quick Sync 2.0: número de modelo del módulo de RF: ATWILC3000-R110CA
Wireless Technology
Technologie sans fil
Wireless-Technologie
Технология беспроводной связи
Tecnología inalámbrica
Wifi IEEE 802.11 b/g/n 2400 ~ 2483.5 MHz 19.92 dBm
Bluetooth 2400 ~ 2483.5 MHz 9.2 dBm
ATWILC3000-R110CA - RF לודומ םגד רפסמ :Quick Sync 2.0 תורשפא
תיטוחלא תרושקת
– ATWILC3000-R110CA
Standard/Band
Standard/bande
Standard/Band
Стандарт/диапазон
Estándar/Banda
ספ/ליגר
ПРЕДУПРЕЖДЕНИЕ. Указывает на потенциальную
опасность серьезного материального ущерба, получения
травм или летального исхода.
ПРИМЕЧАНИЕ. Содержит важную информацию, позволяющую
оптимизировать работу системы.
AVISO: Un mensaje de AVISO indica posibles daños
materiales, lesiones corporales o incluso la muerte.
NOTA: Una NOTA indica información importante que le ayuda a
hacer un mejor uso del sistema.
וא תינפוג העיגפ ,שוכרל קזנ לש תורשפא תנייצמ הרהזא :הרהזא
רתיב תכרעמב שמתשהל עייסמה בושח עדימ תנייצמ "הרעה" :הרעה
.תוומ
.תוליעי
Dell Лицензионное соглашение
конечного пользователя
Перед тем, как использовать систему, ознакомьтесь с
Лицензионным соглашением на использование ПО Dell,
которое поставляется в комплекте с вашей системой. Если вы не
согласны с условиями соглашения, см. информацию по адресу
Dell.com/contactdell.
Сохранить все носители с программным обеспечением,
прилагаемые к системе. Данные мультимедийные записи
являются резервными копиями программного обеспечения,
установленного на вашей системе.
Dell Acuerdo de licencia de usuario final
Antes de utilizar el sistema, lea el Acuerdo de licencia de software
Dell que se incluye con el sistema. Si no acepta las condiciones
del acuerdo, consulte Dell.com/contactdell.
Guarde todos los medios de software que se enviaron con su
sistema. Estos medios son copias de seguridad del software
instalado en su sistema.
הצק שמתשמל ןוישיר םכסה Dell
,Dell לש הנכותה ןוישיר םכסה תא ארק ,תכרעמב שומישה ינפל
האר ,םכסהה יאנת תא לבקמ ךניא םא .תכרעמה םע דחי עיגהש
איה וז הידמ .ךלש תכרעמה םע דחי חלשנש הנכותה הידמ לכ תא רומש
Frequency
Fréquence
Frequenz
Частота
Frecuencia
רדת
Max Output Power
Puissance maximale de sortie
Maximale Ausgangsleistung
Максимальная выходная мощность
Potencia de salida máxima
.Dell.com/contactdell
.תכרעמב תונקתומה תונכותל יוביג
יברמ אצומ קפסה
 Loading...