

Page 1

Dell™ PowerEdge™ 800 Systems
Information Update
信息更新
Mise à jour des informations
Aktuelle Informationen
アップデート情報
정보 업데이트
Actualización de información
www.dell.com | support.dell.com
Page 2

Page 3

Dell™ PowerEdge™ 800 Systems
Information Update
www.dell.com | support.dell.com
Page 4

Notes, Notices, and Cautions
NOTE: A NOTE indicates important information that helps you make better use of your computer.
NOTICE: A NOTICE indicates either potential damage to hardware or loss of data and tells you
how to avoid the problem.
CAUTION: A CAUTION indicates a potential for property damage, personal injury, or death.
Abbreviations and Acronyms
For a complete list of abbreviations and acronyms, see the "Glossary" in your
User’s Guide
.
____________________
Information in this document is subject to change without notice.
© 2004 Dell Inc. All rights reserved.
Reproduction in any manner whatsoever without the written permission of Dell Inc. is strictly forbidden.
Trademarks used in this text: Dell, the DELL logo, and PowerEdge are trademarks of Dell Inc.; Intel is a registered trademark
of Intel Corporation; Red Hat is a registered trademark of Red Hat, Inc.
Other trademarks and trade names may be used in this document to refer to either the entities claiming the marks and names
or their products. Dell Inc. disclaims any proprietary interest in trademarks and trade names other than its own.
October 2004 P/N H6440 Rev. A01
Page 5

This document provides updated information for your system on the following topics:
• Broadcom driver limitation with Red Hat
• Using DRAC 4/P with Red Hat Enterprise Linux 3 (RHEL 3)
• 64-bit capability
• Microprocessor replacement
®
Linux
Broadcom Driver Limitation With Red Hat Linux
On systems running the Red Hat Linux operating system, if you use the IPMI Pass Through
(IPMI PT) for remote manageability over a LAN and you want to configure VLAN, you must use
the Broadcom Advanced Server Program (BASP) and bcm5700 driver instead of the native Linux
tg3 driver. If you use the native Linux tg3 driver with IPMI PT enabled, the VLAN functionality
will not work correctly. The operating system utilities will let you configure the VLANS, but you
will not receive any traffic over the VLAN interface.
Using DRAC 4/P With Red Hat Enterprise Linux 3
If your system has a DRAC 4/P card installed, the integrated IDE controllers and their devices will
not be available on systems running RHEL 3. As a temporary solution, append the following kernel
parameter to the kernel line for each stanza in the
go to
rhn.redhat.com
and upgrade your kernel to version 2.4.21.15.EL or higher.
grub.conf
file:
ide2=0x1f0
. As an alternative,
64-Bit Capability
If the processor installed in your system has 64-bit capability, the
CPU Information
system has a 32-bit processor installed, the
specifies if the installed processor supports Intel 64-bit technology.
screen in the System Setup program will show
64-bit Technology
64-bit Technology
Yes (Intel® EM64T)
option will show No. This field
option on the
. If your
Microprocessor Replacement
You can upgrade the system processor to take advantage of future options in speed and
functionality.
The processor upgrade kit contains a processor and thermal grease; you will need to re-use
the processor heat sink that came with your system.
Information Update 3
Page 6

Removing the Processor
CAUTION: Many repairs may only be done by a certified service technician. You should only perform
troubleshooting and simple repairs as authorized in your product documentation, or as directed by the
online or telephone service and support team. Damage due to servicing that is not authorized by Dell is
not covered by your warranty. Read and follow the safety instructions that came with the product.
Turn off the system, including any attached peripherals, and disconnect the system from
1
the electrical outlet.
2
Remove the bezel. See "Removing the Bezel" in "Troubleshooting Your System" in your
Installation and Troubleshooting Guide
3
Lay the system on its right side.
4
www.dell.com | support.dell.com
Remove the cover. See "Removing the Cover" in "Troubleshooting Your System" in your
Installation and Troubleshooting Guide
5
Remove the cooling shroud. See "Removing the Cooling Shroud" in "installing System
Components" in your
NOTICE: After removing the heat sink, place it upside down on a flat surface to prevent the thermal
interface material from being damaged or contaminated.
Remove the heat sink. See Figure 1-1.
6
a
Open one securing clip by pressing the end of the clip down and away from the retention
until it clears the securing tab on the retention module, and then lift the clip up.
b
Repeat step a for the remaining securing clip.
c
Rotate the heat sink slightly and then lift the heat sink off the processor. Do not pry
the heat sink off the processor.
.
.
Installation and Troubleshooting Guide
.
4 Information Update
Page 7
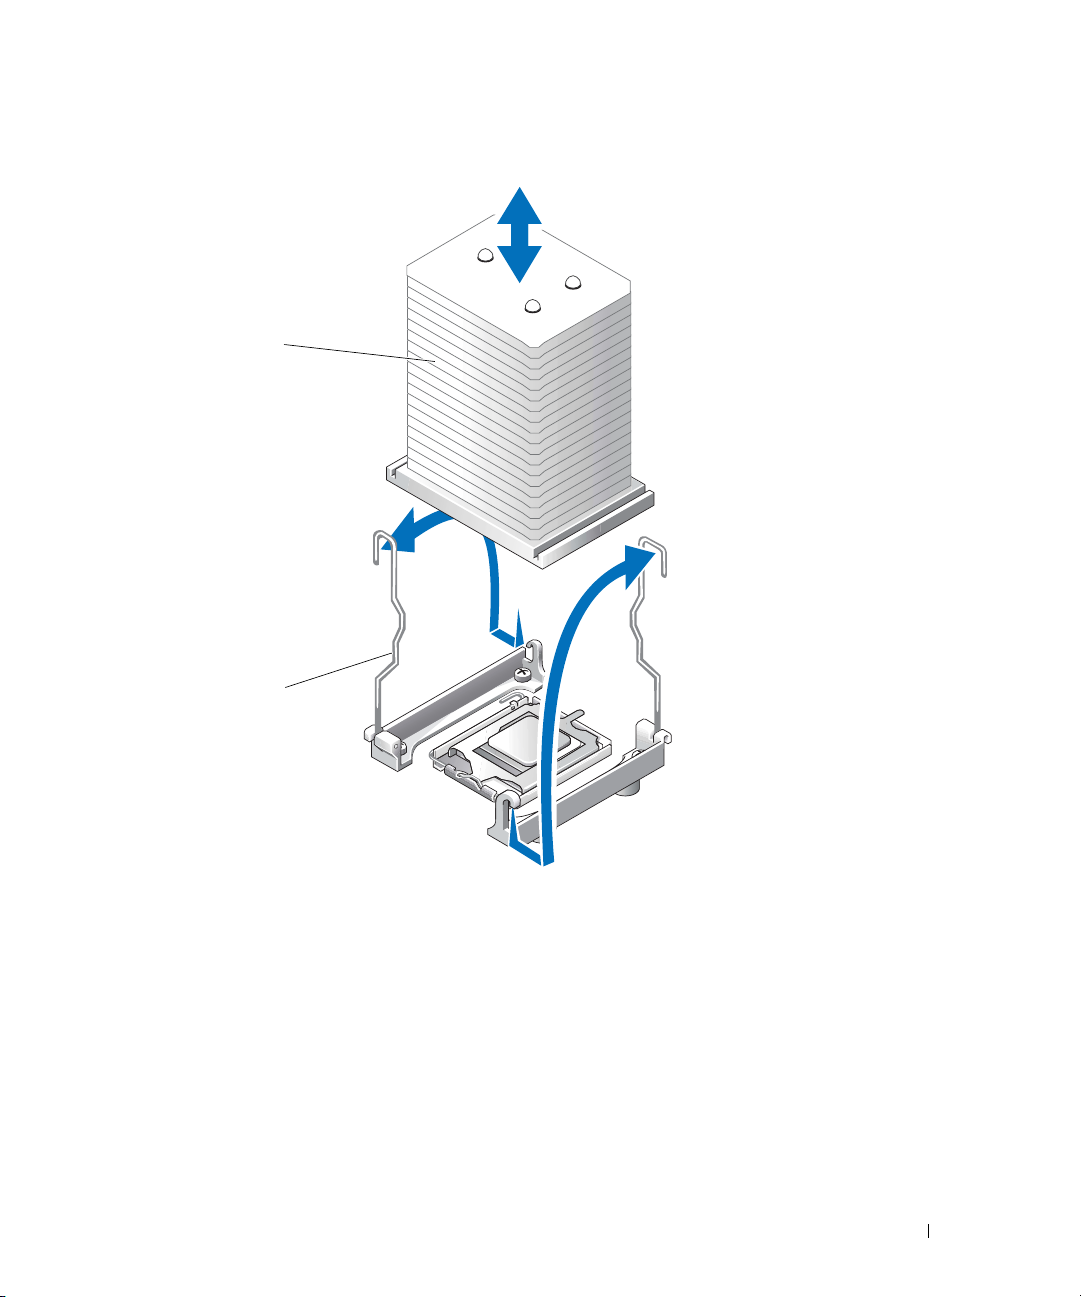
Figure 1-1. Removing the Heat Sink
heat sink
securing clips (2)
7
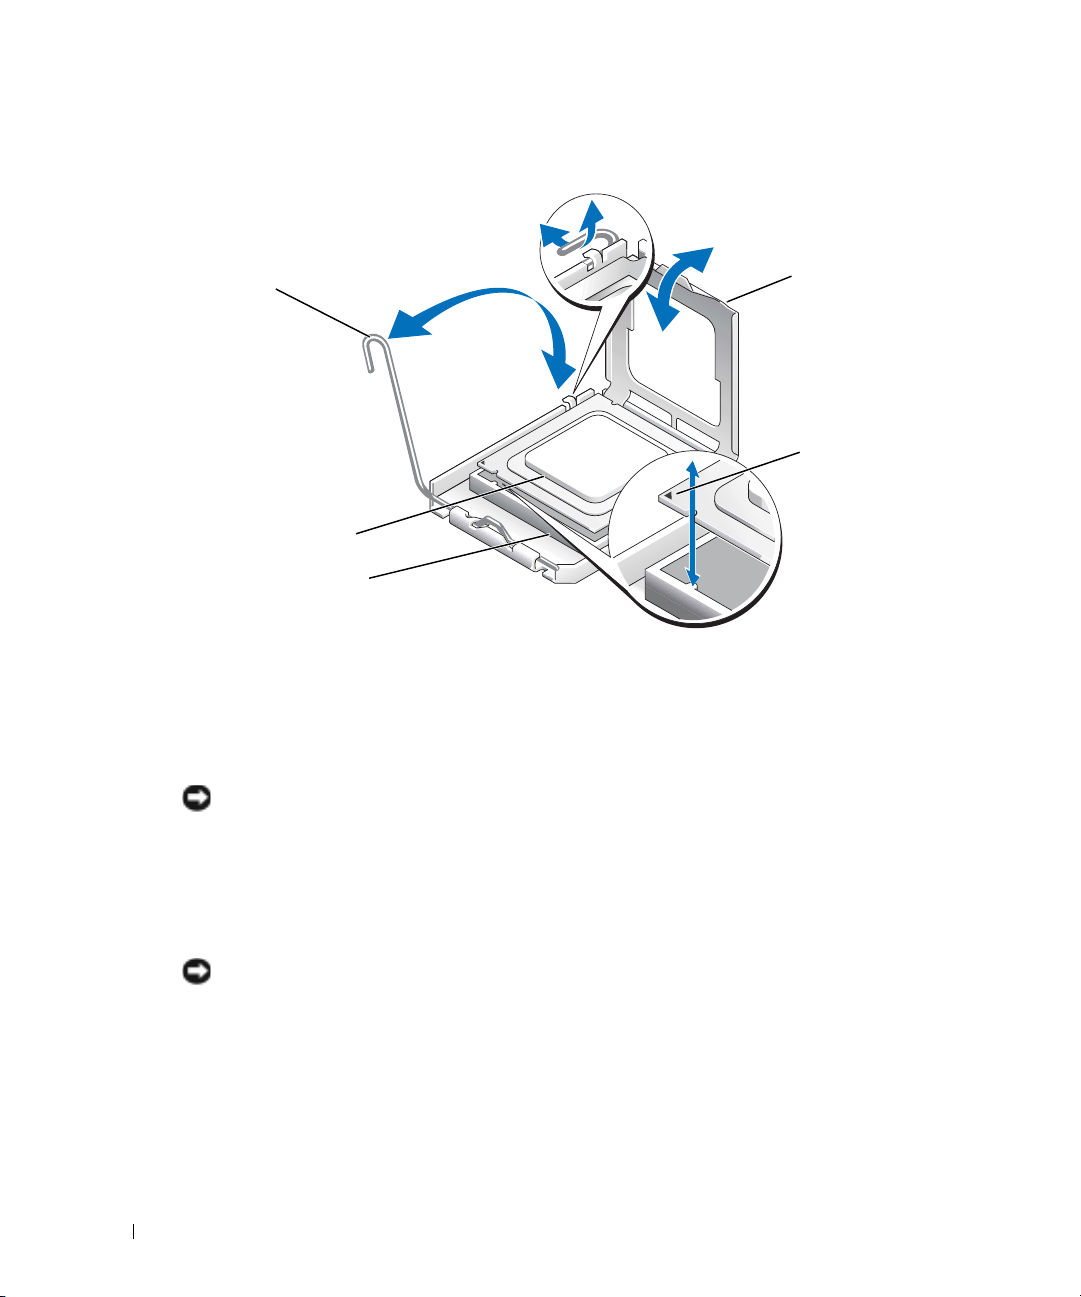
Press down on the processor socket release lever, then pull the release lever upward to the fully
open position. See Figure 1-2.
8
Open the processor cover. See Figure 1-2.
9
Lift the processor vertically out of the socket. Leave the processor cover and release lever in
the open position so that the socket is ready for the new processor. See Figure 1-2.
Information Update 5
Page 8
Figure 1-2. Replacing the Processor
processor socket
release lever
www.dell.com | support.dell.com
processor
processor socket
Installing a Processor
1
Unpack the new processor.
2
Ensure that the processor socket release lever is in the fully open position.
3
Align the pin 1 corners of the processor and socket. See Figure 1-2.
NOTICE: You must position the processor correctly in the socket to avoid damaging the processor and
the system board when you turn on the system. Be careful not to touch or bend the pins on the socket.
Set the processor lightly in the socket and ensure that the processor is level in the socket.
4
When the processor is positioned correctly, press it gently to seat it in the socket.
5
Close the processor cover.
6
Rotate the release lever back down until it snaps into place, securing the processor cover.
processor cover
pin-1 locators (2)
NOTICE: Do not operate the system without the heat sink installed. The heat sink is required to maintain
proper thermal conditions.
7
Using a clean lint-free cloth, remove the existing thermal grease from the heat sink that you
removed earlier in this procedure.
8
Apply thermal grease evenly to the top of the processor.
9
Lower the heat sink onto the processor. See Figure 1-1.
6 Information Update
Page 9

10
Secure the heat sink to the retention module.
a
Gently press down on the heat sink and then press one securing clip to secure it.
b
Repeat step a for the remaining securing clip.
11
Ensure that the back fan connector is connected to the BACK_FAN connector on the system
board. See Figure A-3 in your
12
Install the cooling shroud. See "Installing the Cooling Shroud" in "Installing System
Components" in your
13
Install the cover. See "Replacing the Cover" in "Troubleshooting Your System" in your
Installation and Troubleshooting Guide
Installation and Troubleshooting Guide
14
Stand the system upright.
15
Install the bezel. See "Installing the Bezel" in "Troubleshooting Your System" in your
Installation and Troubleshooting Guide
16
Reconnect the system to its electrical outlet and turn the system on, including any attached
Installation and Troubleshooting Guide
.
.
.
.
peripherals.
17
Enter the System Setup program, and ensure that the processor options match the new
system configuration. See "Using the System Setup Program" in your
User's Guide
.
As the system boots, it detects the presence of the new processor and automatically changes
the system configuration information in the System Setup program. A message similar to the
following appears:
One 2.3 GHz Processor, Processor Bus: 533 MHz, L2 cache 256 KB
18
Confirm that the top line of the system data area in the System Setup program correctly
identifies the installed processor. See "Using the System Setup Program" in your
19
Exit the System Setup program.
20
Ensure that your system is running the latest BIOS version.
You can download the latest BIOS version from the Dell Support website located at
support.dell.com
21
Run the system diagnostics to verify that the new processor is operating correctly.
See "Running the System Diagnostics" in your
Installation and Troubleshooting Guide
information on running the diagnostics and troubleshooting any problems that may occur.
Information Update 7
User's Guide
for
.
Page 10

www.dell.com | support.dell.com
8 Information Update
Page 11

Dell™ PowerEdge™ 800 系统
信息更新
www.dell.com | support.dell.com
Page 12

注、注意和警告
注: 注表示可以帮助您更好地使用计算机的重要信息。
注意:
注意表示可能会损坏硬件或导致数据丢失,并告诉您如何避免此类问题。
警告:
警告表示存在可能导致财产损失、人身伤害或死亡的潜在危险。
缩写词和缩略词
有关缩写词和缩略词的完整列表,请参阅 《用户指南》中的 “词汇表”。
____________________
本文中的信息如有更改,恕不另行通知。
© 2004 Dell Inc.
未经
Dell Inc.
本文件中使用的商标:
Red Hat 是 Red Hat, Inc.
本文件中述及的其它商标和产品名称是指拥有相应商标和名称的公司或其制造的产品。
Dell Inc.
版权所有,翻印必究。
书面许可,不得以任何方式进行复制。
Dell、DELL
的注册商标。
对本公司的商标和产品名称之外的其它商标和产品名称不拥有任何专有权。
徽标和
PowerEdge 是 Dell Inc.
的商标;
Intel 是 Intel Corporation
的注册商标;
2004 年 10
月
P/N H6440 Rev. A01
Page 13

本说明文件针对您的系统提供了有关以下主题的更新信息:
•
在
Red Hat® Linux 中 Broadcom
•
在
Red Hat Enterprise Linux 3 (RHEL 3)
位能力
•
64
•
微处理器的更换
驱动程序的限制
中使用
DRAC 4/P
在
Red Hat Linux 中 Broadcom
在运行
Red Hat Linux
进行远程管理并希望配置
Broadcom
果使用内置的
公用程序将允许您配置
在
如果系统中安装了
设备。作为一种临时解决方案,请在
ide2=0x1f0
2.4.21.15.EL
64
如果系统中安装的处理器具有
屏幕上的
[Intel EM64T]
选项将显示
高级服务器程序)和
Linux tg3
Red Hat Enterprise Linux 3
。作为一种备用方法,也可以访问
或更高版本。
位能力
64-bit Technology(64
)。如果系统中安装的是
(否)。该字段指定了所安装的处理器是否支持
No
操作系统的系统上,如果通过
,则必须使用
VLAN
bcm5700
驱动程序并启用
VLANS
DRAC 4/P
,但通过
卡,则在运行
grub.conf
位能力,则系统设置程序的
64
位技术)选项将显示
驱动程序,而不能使用内置的
IPMI PT,则 VLAN
VLAN
32
驱动程序的限制
LAN 使用 IPMI Pass Through (IPMI PT)
Broadcom Advanced Server Program(BASP
Linux tg3
功能将无法正常工作。操作系统
接口将不会收到任何流量。
中使用
RHEL 3
文件中将下列内核参数添加到每节的内核行:
rhn.redhat.com
位处理器,则
DRAC 4/P
的系统中将无法使用集成
并将您的内核升级至版本
CPU Information(CPU
Yes (Intel® EM64T)(是
64-bit Technology(64
Intel 64
位技术。
驱动程序。如
控制器及其
IDE
位技术)
,
信息)
微处理器的更换
您可以升级处理器,以便充分利用未来选件的速度和功能。
处理器升级套件包含一个处理器和散热膏;您将需要重复使用系统附带的处理器散热器。
信息更新 11
Page 14

卸下处理器
警告: 大多数修理只能由合格的维修技术人员进行。您只能根据产品说明文件中的授权来执行
故障排除和简单修理,或者根据在线或电话服务和支持小组的指导执行操作。如果是由于非
授权维修而导致的损坏,将不能享受保修。请阅读并遵循产品附带的安全说明。
关闭系统 (包括连接的任何外围设备)的电源,然后断开系统与电源插座的连接。
1
2
卸下挡板。请参阅 《安装与故障排除指南》中 “排除系统故障”的 “卸下挡板”部分。
3
将系统侧放,使其右侧朝下。
4
卸下主机盖。请参阅 《安装与故障排除指南》中 “排除系统故障”的 “卸下主机盖”
部分。
5
www.dell.com | support.dell.com
卸下冷却护罩。请参阅 《安装与故障排除指南》中 “安装系统组件”的 “卸下冷却护
罩”部分。
注意: 卸下散热器后,请将其倒置放在平坦的表面上,以防止损坏或污染散热材料。
卸下散热器。请参阅图
6
a
向下按一个固定夹的末端并使其离开固定支架,直至与固定模块上的固定卡舌分开,
这样打开固定夹,然后将固定夹向上提起。
b
对其余固定夹重复步骤 a。
c
轻轻旋转散热器,然后将散热器从处理器上提起。请勿将散热器从处理器上撬下。
1-1
Dell
。
12 信息更新
Page 15

图
1-1.
卸下散热器
散热器
固定夹 (2 个)
7
向下按压处理器插槽释放拉杆,然后将释放拉杆向上拉至完全打开位置。请参阅图
8
打开处理器护盖。请参阅图
9
将处理器从插槽中垂直取出。使处理器护盖和释放拉杆保持在打开位置,以便可以在插
槽中安装新处理器。请参阅图
1-2
。
1-2
。
。
1-2
信息更新 13
Page 16
图
1-2.
更换处理器
处理器插槽释放拉杆
www.dell.com | support.dell.com
安装处理器
1
打开新处理器的包装。
2
确保处理器插槽释放拉杆处于完全打开位置。
3
将处理器的插针
注意: 您必须将处理器正确地放置在插槽中,以免开机时损坏处理器和主板。请注意不要触摸
或弯曲插槽上的插针。
将处理器轻轻放置在插槽中,并确保处理器在插槽中处于水平位置。处理器正确定位后,
4
轻轻按压处理器,使其固定在插槽中。
5
合上处理器护盖。
6
向下转回释放拉杆直至其卡入到位,从而固定处理器护盖。
注意: 如果还未安装散热器,请勿操作系统。要保持正确散热,散热器必不可少。
使用不起毛的干净软布擦掉本过程前面卸下的散热器上的散热膏。
7
8
在处理器顶部均匀涂上散热膏。
9
将散热器放到处理器上。请参阅图
处理器
处理器插槽
边角与插槽的插针
1
边角对齐。请参阅图
1
。
1-1
处理器护盖
插针 1 定位器 (2 个)
。
1-2
14 信息更新
Page 17

10
将散热器固定到固定模块上。
a
轻轻向下按压散热器,然后按下其中一个固定夹,将散热器固定。
b
对其余固定夹重复步骤a。
11
请确保将后端风扇连接器连接至主板上的
《安装与故障排除指南》中的图
12
安装冷却护罩。请参阅 《安装与故障排除指南》中 “安装系统组件”的
A-3
BACK_FAN
。
连接器。请参阅
“安装冷却护罩”部分。
13
安装主机盖。请参阅 《安装与故障排除指南》中 “排除系统故障”的
“装回主机盖”部分。
14
将系统直立放置。
15
安装挡板。请参阅 《安装与故障排除指南》中 “排除系统故障”的 “安装挡板”部分。
16
将系统 (包括连接的任何外围设备)重新连接至电源插座,然后开机。
17
进入系统设置程序,并确保处理器选项与新的系统配置相符。请参阅 《用户指南》中的
“使用系统设置程序”。
系统在引导时将检测是否存在新的处理器,并且自动更改系统设置程序中的系统配置信
息。屏幕上将显示与下面类似的信息:
One 2.3 GHz Processor, Processor Bus:533 MHz, L2 cache 256 KB
18
在系统设置程序中,确认系统数据区域的顶行正确识别了已安装的处理器。请参阅
《用户指南》中的 “使用系统设置程序”。
19
退出系统设置程序。
20
确保系统运行的是最新
您可以从
Dell 支持 Web
版本。
BIOS
站点
support.ap.dell.com/china
下载最新的
BIOS
版本。
21
运行系统诊断程序,验证新处理器是否正常工作。
有关运行诊断程序和排除可能出现的任何故障的信息,请参阅 《安装与故障排除指南》
中的 “运行系统诊断程序”。
信息更新 15
Page 18

www.dell.com | support.dell.com
16 信息更新
Page 19

Systèmes Dell™ PowerEdge™ 800
Mise à jour des informations
www.dell.com | support.dell.com
Page 20

Remarques, avis et précautions
REMARQUE : une REMARQUE indique des informations importantes qui peuvent vous aider à mieux utiliser
votre ordinateur.
AVIS : un AVIS vous avertit d'un risque de dommage matériel ou de perte de données et vous indique
comment éviter le problème.
PRÉCAUTION : une PRÉCAUTION indique un risque potentiel d'endommagement du matériel,
de blessure corporelle ou de mort.
Abréviations et sigles
Pour obtenir une liste complète des abréviations et des acronymes, reportez-vous au glossaire
Guide d'utilisation
du
.
____________________
Les informations contenues dans ce document peuvent être modifiées sans préavis.
© 2004 Dell Inc. Tous droits réservés.
La reproduction de ce document de quelque manière que ce soit sans l'autorisation écrite de Dell Inc. est strictement interdite.
Marques utilisées dans ce document : Dell, le logo DELL et PowerEdge sont des marques de Dell Inc. ;
Red Hat est une marque déposée de Red Hat, Inc. ; Intel est une marque déposée de Intel Corporation.
Tous les autres noms de marques et marques commerciales utilisés dans ce document se rapportent aux sociétés propriétaires
des marques et des noms de ces produits. Dell Inc. décline tout intérêt dans l'utilisation des marques déposées et des noms
de marques ne lui appartenant pas.
Octobre 2004 P/N H6440 Rev. A01
Page 21

Ce document contient des informations mises à jour portant sur les sujets suivants :
• Obligation d'utilisation du pilote Broadcom sous Red Hat
• Utilisation de DRAC 4/P avec Red Hat Enterprise Linux 3 (RHEL 3)
• Fonctionnalités 64 bits
• Remplacement du microprocesseur
®
Linux
Obligation d'utilisation du pilote Broadcom sous Red Hat Linux
Si vous utilisez le module d'intercommunication IPMI PT sur un système Red Hat Linux pour
procéder à des opérations de gestion à distance sur le LAN et souhaitez configurer un VLAN, vous
devez utiliser le programme BASP (Broadcom Advanced Server Program) et le pilote bcm5700 à la
place du pilote Linux tg3 natif. L'utilisation du pilote natif alors qu' IPMI PT est activé empêche
le fonctionnement correct du VLAN. Même si les utilitaires du système d'exploitation vous
permettent de configurer les VLAN, vous ne recevrez aucun trafic sur l'interface correspondante.
Utilisation de DRAC 4/P avec Red Hat Enterprise Linux 3
Si votre système est équipé d'une carte DRAC 4/P, les contrôleurs IDE intégrés et les périphériques
associés ne seront pas disponibles sur les systèmes exécutant Red Hat Enterprise Linux 3. La
solution temporaire consiste à ajouter le paramètre supplémentaire suivant à la ligne concernant le
noyau dans chaque paragraphe du fichier
sur le site
suivante.
rhn.redhat.com
et mettre le noyau à niveau en installant la version 2.4.21.15.EL ou
grub.conf
:
ide2=0x1f0
. Vous pouvez aussi vous rendre
Fonctionnalités 64 bits
Si le processeur installé dans le système est doté de fonctionnalités 64 bits, l'option
Technology
processeur) du programme de configuration du système a pour valeur
système est doté d'un processeur 32 bits, l'option
indique si le processeur installé prend en charge la technologie Intel 64 bits.
(Technologie 64 bits) affichée dans l'écran
64-bit Technology
CPU Information
Yes (Intel® EM64T)
a pour valeur No. Cette zone
(Informations sur le
64-bit
. Si le
Remplacement du microprocesseur
Vous pouvez mettre le processeur du système à niveau pour tirer parti de nouvelles fréquences
et fonctionnalités.
Le kit de mise à niveau du processeur contient uniquement un processeur et de la graisse
thermique : vous devez réutiliser le dissipateur de chaleur d'origine fourni avec le système.
Mise à jour des informations 19
Page 22

Retrait du processeur
PRÉCAUTION : la plupart des réparations doivent être effectuées uniquement par un technicien
de maintenance certifié. Procédez uniquement aux dépannages et réparations indiqués dans la
documentation du produit ou recommandés par les services de support en ligne ou par téléphone.
Les dommages causés par des interventions de maintenance non autorisées par Dell ne sont pas
couverts par votre garantie. Lisez et respectez les consignes de sécurité fournies avec le produit.
Éteignez le système et les périphériques connectés, puis débranchez-le de la prise de courant.
1
2
Retirez le cadre. Consultez la section “Retrait du cadre” du chapitre
“Dépannage du système”, dans le
3
Couchez le système sur son côté droit.
4
www.dell.com | support.dell.com
Retirez le capot. Consultez la section “Retrait du capot” dans le chapitre
“Dépannage du système” du
5
Retirez le carénage de ventilation. Consultez la section “Retrait du carénage de ventilation”
du chapitre “Installation des composants du système”, dans le
dépannage
AVIS : après avoir retiré le dissipateur de chaleur, placez-le à l'envers sur une surface plane
afin d'empêcher toute détérioration ou contamination du matériau de l'interface thermique.
Retirez le dissipateur de chaleur. Voir la figure 1-1.
6
a
Pour dégager l'un des clips de fixation, appuyez sur son extrémité puis dégagez-le
de la patte du module de fixation. Ensuite, relevez-le.
b
Répétez l'opération pour l'autre clip de fixation.
c
Faites pivoter légèrement le dissipateur de chaleur et soulevez-le pour le détacher
du processeur. Ne tirez pas sur le dissipateur de chaleur pour l'arracher du processeur.
Guide d'installation et de dépannage
Guide d'installation et de dépannage
.
.
Guide d'installation et de
.
20 Mise à jour des informations
Page 23

Figure 1-1. Retrait du dissipateur de chaleur
Dissipateur de chaleur
Clips de fixation (2)
7
Appuyez sur le levier d'éjection du support du processeur, puis relevez complètement ce levier.
Voir la figure 1-2.
8
Ouvre le cache du processeur. Voir la figure 1-2.
9
Retirez le processeur de son support verticalement. Laissez le levier d'éjection et le cache du
processeur en position ouverte, afin que le support soit prêt à accueillir le nouveau processeur.
Voir la figure 1-2.
Mise à jour des informations 21
Page 24

Figure 1-2. Remplacement du processeur
Levier d'éjection du
support du processeur
www.dell.com | support.dell.com
Processeur
Support de processeur
Installation d'un processeur
1
Déballez le nouveau processeur.
2
Vérifiez que le levier d'éjection est totalement ouvert.
3
Alignez les angles de la broche 1 du processeur et du connecteur. Voir la figure 1-2.
AVIS : le processeur doit être correctement positionné dans le support, sans quoi vous risquez de
l'endommager, ainsi que l'ordinateur lorsque vous l'allumerez. Prenez garde de ne pas toucher ni tordre
les broches du support.
4
Installez doucement le processeur dans son support et vérifiez qu'il est correctement
positionné. Lorsqu'il est en place, appuyez légèrement dessus pour le fixer dans le support.
5
Fermez le cache du processeur.
6
Abaissez le levier d'éjection pour le remettre en place et fixer le cache du processeur.
Cache du processeur
Repères de la broche 1 (2)
AVIS : n'utilisez pas le système si le dissipateur de chaleur n'est pas installé. Le dissipateur de chaleur
est nécessaire pour maintenir les conditions de température adéquates.
7
À l'aide d'un chiffon propre et non pelucheux, retirez la graisse thermique qui recouvre
le dissipateur de chaleur que vous avez retiré auparavant.
8
Appliquez une couche de graisse thermique de façon égale sur la partie supérieure
du processeur.
9
Abaissez le dissipateur de chaleur sur le processeur. Voir la figure 1-1.
22 Mise à jour des informations
Page 25

10
Immobilisez le dissipateur de chaleur à l'aide du module de fixation.
a
Appuyez doucement sur le dissipateur, puis sur l'une des languettes de fixation
pour la mettre en position.
b
Répétez l'étape a pour l'autre clip de fixation.
11
Assurez-vous que le connecteur du ventilateur arrière est bien raccordé au connecteur
BACK_FAN sur la carte système. Voir la Figure A-3 du
12
Installez le carénage de ventilation. Consultez la section “Installation du carénage de
ventilation” du chapitre “Installation des composants du système”, dans le
d'installation et de dépannage
13
Installez le capot. Consultez la section “Remise en place du capot” du chapitre
“Dépannage du système”, dans le
14
Redressez le système.
15
Installez le cadre. Consultez la section “Installation du cadre” du chapitre
“Dépannage du système”, dans le
16
Rebranchez le système sur la prise de courant et allumez-le, ainsi que tous les périphériques
.
Guide d'installation et de dépannage
Guide d'installation et de dépannage
Guide d'installation et de dépannage
Guide
.
.
connectés.
17
Accédez au programme de configuration du système et vérifiez que les options du processeur
correspondent bien à la nouvelle configuration. Consultez la section “Utilisation du
programme de configuration du système” dans le
Guide d'utilisation
.
Lorsque le système démarre, il détecte la présence du nouveau processeur et modifie
automatiquement les informations du programme de configuration du système.
Un message de ce type apparaît :
.
One 1.26 GHz Processor, Processor Bus: 533 MHz, L2 cache 256 KB
18
Vérifiez que la ligne supérieure de la zone des données système du programme de
configuration identifie correctement le processeur installé. Consultez la section
“Utilisation du programme de configuration du système” dans le
19
Quittez le programme de configuration du système.
20
Vérifiez que vous utilisez la version la plus récente du BIOS.
Guide d'utilisation
Vous pouvez télécharger la dernière version du BIOS à partir du site d'assistance technique
de Dell,
21
Exécutez les diagnostics du système pour vérifier que le nouveau processeur fonctionne
support.dell.com
correctement.
Consultez la section “Exécution des diagnostics du système” dans le
dépannage
pour savoir comment exécuter les diagnostics et résoudre les incidents éventuels.
Guide d'installation et de
Mise à jour des informations 23
.
Page 26

www.dell.com | support.dell.com
24 Mise à jour des informations
Page 27

Dell™ PowerEdge™ 800-Systeme
Aktuelle Informationen
www.dell.com | support.dell.com
Page 28

Anmerkungen, Hinweise und Warnungen
ANMERKUNG: Eine ANMERKUNG macht auf wichtige Informationen aufmerksam, die die Arbeit mit dem Computer
erleichtern.
HINWEIS: Ein HINWEIS warnt vor möglichen Beschädigungen der Hardware oder vor Datenverlust und zeigt auf,
wie derartige Probleme vermieden werden können.
VORSICHT: VORSICHT weist auf eine potentiell gefährliche Situation hin, die zu Sachschäden, Verletzungen
oder zum Tod führen könnte.
Abkürzungen und Akronyme
Eine vollständige Liste der verwendeten Abkürzungen und Akronyme finden Sie im
Benutzerhandbuch
unter „Glossar“.
____________________
Irrtümer und technische Änderungen vorbehalten.
© 2004 Dell Inc. Alle Rechte vorbehalten.
Die Reproduktion dieses Dokuments in jeglicher Form ohne schriftliche Genehmigung von Dell Inc. ist streng untersagt.
Marken in diesem Text: Dell, das DELL Logo und PowerEdge sind Marken von Dell Inc.; Intel ist eine eingetragene Marke
von Intel Corporation; Red Hat ist eine eingetragene Marke von Red Hat, Inc.
Alle anderen in dieser Dokumentation genannten Marken und Handelsbezeichnungen sind Eigentum der jeweiligen Hersteller und Firmen.
Dell Inc. erhebt keinen Anspruch auf Marken und Handelsbezeichnungen mit Ausnahme der eigenen.
Oktober 2004 P/N H6440 Rev. A01
Page 29

Dieses Dokument enthält aktualisierte Informationen zum System. Folgende Themen werden
behandelt:
®
• Broadcom-Treiberbeschränkung bei Red Hat
• DRAC 4/P mit Red Hat Enterprise Linux 3 (RHEL 3) verwenden
• 64-Bit-Betrieb
• Austausch des Mikroprozessors
Linux
Broadcom-Treiberbeschränkung bei Red Hat Linux
Wenn Sie bei Systemen unter dem Betriebssystem Red Hat Linux für die Fernverwaltung über
ein LAN IPMI Pass-Through (IPMI PT) verwenden und VLAN konfigurieren wollen, müssen Sie
das Broadcom Advanced Server Program (BASP) und den Treiber bcm5700 anstelle des nativen
Treibers tg3 von Linux verwenden. Wenn Sie den nativen tg3-Treiber von Linux bei aktiviertem
IPMI PT einsetzen, funktioniert VLAN nicht ordnungsgemäß. Sie können zwar mit den Dienstprogrammen des Betriebssystems VLANS konfigurieren, erreichen jedoch keinen Datenverkehr
über die VLAN-Schnittstelle.
DRAC 4/P mit Red Hat Enterprise Linux 3 verwenden
Wenn im System eine DRAC 4/P-Karte installiert ist, sind die integrierten IDE-Controller
und deren Geräte bei Systemen unter RHEL 3 nicht verfügbar. Um dem Problem vorübergehend
abzuhelfen, ergänzen Sie in jedem Abschnitt der Datei
folgenden Kernel-Parameter:
und einen Kernel-Upgrade auf die Version 2.4.21.15.EL oder höher durchführen.
ide2=0x1f0
. Alternativ können Sie
grub.conf
die Kernel-Zeile um den
rhn.redhat.com
aufrufen
64-Bit-Betrieb
Wenn der im System installierte Prozessor für 64-Bit-Betrieb ausgelegt ist, wird im System-SetupProgramm bei der Option
®
(Intel
wird bei der Option
darüber, ob der installierte Prozessor die Intel 64-Bit-Technologie unterstützt.
EM64T)
(Ja) angezeigt. Wenn das System mit einem 32-Bit-Prozessor ausgestattet ist,
64-bit Technology
64-bit Technology
des Bildschirms
der Eintrag No (Nein) angezeigt. Dieses Feld informiert
CPU Information
der Eintrag
Yes
Austausch des Mikroprozessors
Sie können einen Prozessor-Upgrade durchführen, um zukünftige Verbesserungen bei
der Geschwindigkeit und beim Funktionsumfang zu nutzen.
Das Kit für den Prozessor-Upgrade enthält einen Prozessor und Wärmeleitpaste; der Prozessorkühlkörper aus dem System wird wiederverwendet.
Aktuelle Informationen 27
Page 30

Prozessor entfernen
VORSICHT: Viele Reparaturarbeiten dürfen nur von zugelassenen Servicetechnikern durchgeführt
werden. Fehlerbehebungsmaßnahmen oder einfache Reparaturen sollten Sie nur dann selbst
übernehmen, wenn dies mit der Produktdokumentation im Einklang steht oder Sie vom Team des
Online- oder Telefonsupports dazu aufgefordert werden. Schäden durch nicht von Dell genehmigte
Wartungsversuche sind nicht durch die Garantie abgedeckt. Lesen und befolgen Sie die zusammen
mit dem Produkt gelieferten Sicherheitshinweise.
Schalten Sie das System und die Peripheriegeräte aus, und trennen Sie das System
1
vom Stromnetz.
2
Entfernen Sie die Frontblende. Siehe dazu „Frontblende entfernen“ im Abschnitt
„Fehlerbehebung beim System“ in der
www.dell.com | support.dell.com
3
Legen Sie das System auf die rechte Seite.
4
Entfernen Sie die Abdeckung. Siehe dazu „Abdeckung entfernen“ im Abschnitt
„Fehlerbehebung beim System“ in der
5
Entfernen Sie die Kühlkörperabdeckung. Siehe dazu „Kühlkörperabdeckung entfernen“
im Abschnitt „Installieren von Systemkomponenten“ in der
und Fehlersuche
HINWEIS: Wenn der Kühlkörper abgenommen ist, legen Sie ihn umgedreht auf eine ebenen Fläche,
damit die Kontaktfläche nicht beschädigt oder verschmutzt wird.
Entfernen Sie den Kühlkörper. Siehe Abbildung 1-1.
6
a
Öffnen Sie einen Halteclip, indem Sie das Ende des Clips nach unten und von
der Haltenase weg drücken, bis der Clip freiliegt und angehoben werden kann.
b
Wiederholen Sie Schritt „a“ für den anderen Halteclip.
c
Drehen Sie den Kühlkörper ein wenig, und heben Sie ihn dann vom Prozessor ab.
Trennen Sie den Kühlkörper nicht gewaltsam vom Prozessor.
Anleitung zur Installation und Fehlersuche
Anleitung zur Installation und Fehlersuche
.
.
Anleitung zur Installation
.
28 Aktuelle Informationen
Page 31

Abbildung 1-1. Kühlkörper entfernen
Kühlkörper
Sicherungsklammern (2)
7
Drücken sie den Freigabehebel des Prozessorsockels nach unten, und ziehen Sie dann
den Freigabehebel nach oben in die vollständig geöffnete Position. Siehe Abbildung 1-2.
8
Öffnen Sie die Prozessorabdeckung. Siehe Abbildung 1-2.
9
Heben Sie den Prozessor gerade nach oben aus dem Sockel heraus. Belassen Sie die
Prozessorabdeckung und den Freigabehebel in der geöffneten Position, so dass der Sockel
zur Aufnahme des neuen Prozessors bereitsteht. Siehe Abbildung 1-2.
Aktuelle Informationen 29
Page 32

Abbildung 1-2. Prozessor auswechseln
Freigabehebel des
Prozessorsockels
www.dell.com | support.dell.com
Prozessor
Prozessorsockel
Prozessor installieren
1
Entnehmen Sie den neuen Prozessor der Verpackung.
2
Stellen Sie sicher, dass sich der Freigabehebel des Prozessorsockels in der vollständig
geöffneten Position befindet.
3
Richten Sie die Pin-1-Ecken des Prozessors und des Sockels aufeinander aus.
Siehe Abbildung 1-2.
HINWEIS: Der Prozessor muss korrekt in den Sockel eingesetzt werden, um Schäden am Prozessor
oder an der Systemplatine beim Einschalten des Systems zu vermeiden. Achten Sie sorgfältig darauf,
die Pins am Sockel nicht zu berühren oder zu verbiegen.
4
Setzen Sie den Prozessor leicht auf den Sockel auf und stellen Sie sicher, dass der Prozessor
gerade im Sockel aufliegt. Wenn der Prozessor korrekt positioniert ist, drücken Sie ihn sanft
in seinen Sitz im Sockel.
5
Schließen Sie die Prozessorabdeckung.
6
Schwenken Sie den Freigabehebel zurück nach unten, bis er einrastet und die Prozessorabdeckung sichert.
Prozessorabdeckung
Pin-1-Markierungen (2)
HINWEIS: Nehmen Sie das System nicht in Betrieb, bevor Sie den Kühlkörper installiert haben.
Der Kühlkörper ist zur Aufrechterhaltung der korrekten Temperaturbedingungen erforderlich.
30 Aktuelle Informationen
Page 33

7
Entfernen Sie die Wärmeleitpaste mit einem sauberen und fusselfreien Tuch von dem zuvor
entfernten Kühlkörper.
8
Tragen Sie die Wärmeleitpaste gleichmäßig auf der Oberseite des Prozessors auf.
9
Setzen Sie den Kühlkörper auf den Prozessor. Siehe Abbildung 1-1.
10
Befestigen Sie den Kühlkörper in der Halterung.
a
Drücken Sie vorsichtig den Kühlkörper nach unten, und sichern Sie ihn dann mit
einem der Halteclips.
b
Wiederholen Sie Schritt „a“ für den anderen Halteclip.
11
Stellen Sie sicher, dass der Anschluss des hinteren Lüfters an den Anschluss BACK_FAN auf
der Systemplatine angeschlossen ist. Siehe Abbildung A-3 in der
und Fehlersuche
12
Installieren Sie die Kühlkörperabdeckung. Siehe dazu „Kühlkörperabdeckung installieren“
.
im Abschnitt „Installieren von Systemkomponenten“ in der
Fehlersuche
13
Installieren Sie die Abdeckung. Siehe dazu „Abdeckung anbringen“ im Abschnitt
„Fehlerbehebung beim System“ in der
14
Stellen Sie das System aufrecht auf.
15
Installieren Sie die Frontblende. Siehe dazu „Frontblende installieren“ im Abschnitt
„Fehlerbehebung beim System“ in der
16
Schließen Sie das System wieder an das Stromnetz an, und schalten Sie das System
.
Anleitung zur Installation und Fehlersuche
Anleitung zur Installation und Fehlersuche
Anleitung zur Installation
Anleitung zur Installation und
.
.
und alle angeschlossenen Peripheriegeräte ein.
Aktuelle Informationen 31
Page 34

17
Rufen Sie das Setup-Programm des Systems auf und stellen Sie sicher, dass die ProzessorOptionen mit der neuen Systemkonfiguration übereinstimmen. Weitere Informationen
finden Sie im
Beim Startvorgang erkennt das System den neuen Prozessor und ändert automatisch die
Systemkonfiguration im System-Setup-Programm. Eine Meldung ähnlich der folgenden wird
eingeblendet:
One 2.3 GHz Processor, Processor Bus: 533 MHz, L2 cache 256 KB
18
Bestätigen Sie, dass der installierte Prozessor in der obersten Zeile des Systemdatenbereichs
im System-Setup-Programm korrekt angegeben ist. Weitere Informationen finden Sie im
Benutzerhandbuch
19
www.dell.com | support.dell.com
Beenden Sie das System-Setup-Programm.
20
Stellen Sie sicher, dass Sie die aktuelle BIOS-Version verwenden.
Sie können die aktuelle BIOS-Version von der Dell Support-Website unter
support.euro.dell.com
21
Führen Sie die Systemdiagnose aus, um sicherzustellen, dass der neue Prozessor
ordnungsgemäß funktioniert.
Informationen zum Ausführen des Diagnoseprogramms und zur Suche nach möglichen
Fehlern finden Sie unter Systemdiagnose ausführen in der
und Fehlersuche
Benutzerhandbuch
unter „Verwenden des System-Setup-Programms“.
unter „System-Setup-Programm verwenden“.
herunterladen.
.
Anleitung zur Installation
32 Aktuelle Informationen
Page 35

Dell™ PowerEdge™ 800 システム
アップデート情報
www.dell.com | support.dell.com
Page 36

メモ、注意、警告
メモ: コンピュータを使いやすくするための重要な情報を説明しています。
注意: ハードウェアの損傷やデータの損失の可能性を示し、その危険を回避するため
の方法を説明しています。
警告: 物的損害、けが、または死亡の原因となる可能性があることを示します。
略語について
略語の一覧は、『ユーザーズガイド』 の「用語集」を参照してください。
____________________
本書の内容は予告なく変更されることがあります。
© 2004 すべての著作権は Dell Inc. にあります。
Dell Inc. の書面による許可のない複製は、いかなる形態においても厳重に禁じられています。
このマニュアルに使用されている商標: Dell、DELL ロゴ、および PowerEdge は Dell Inc. の商標です。
Intel は Intel Corporation の登録商標です。Red Hat は Red Hat, Inc. の登録商標です。
本書では、必要に応じて上記記載以外の商標や会社名が使用されている場合がありますが、 これらの商標や会社名は、
一切 Dell Inc. に所属するものではありません。
2004 年 10 月 P/N H6440 Rev. A01
Page 37

本書では、以下のトピックについて、お使いのシステムに関するアップデート情報を提供
します。
•
Red Hat® Linux
•
Red Hat Enterprise Linux 3(RHEL 3
•
64
ビット機能
•
マイクロプロセッサの交換
に関する
Broadcom
ドライバの制限事項
)での
DRAC 4/P
の使い方
Red Hat Linux に関する Broadcom ドライバの制限事項
Red Hat Linux
モート管理するために
ネイティブの
(
BASP
)および
ネイティブの
ティングシステムのユーティリティで
スでトラフィックの受信ができません。
オペレーティングシステムを実行しているシステムでは、
IPMI Pass Through(IPMI PT
Linux tg3
bcm5700
Linux tg3
ドライバの代わりに
ドライバを使用する必要があります。
ドライバを使用すると、
Broadcom Advanced Server Program
VLANS
)を使用し、
VLAN
が正常に機能しません。 オペレー
の設定はできますが、
VLAN
IPMI PT
VLAN
LAN
を設定する場合、
を有効に設定して
Red Hat Enterprise Linux 3 での DRAC 4/P の使い方
システムに
では、内蔵
て、
ide2=0x1f0 を追加します。 または、
2.4.21.15.EL
DRAC 4/P
IDE
grub.conf
以降にアップグレードします。
カードが取り付けられている場合、
コントローラおよびそのデバイスは使用できません。 一時的な解決策とし
ファイル内の各スタンザにつき、カーネル行にカーネルパラメータ
rhn.redhat.com
RHEL 3
を開いて、カーネルをバージョン
を実行しているシステム
64 ビット機能
システムに取り付けられているプロセッサが
ユーティリティ内の
®
(Intel
の場合は、
取り付けられているプロセッサが
が示されます。
EM64T)
64-bit Technology
CPU Information
と表示されます。 システムに取り付けられているプロセッサが
オプションに
Intel 64
64
ビット機能を持つ場合は、セットアップ
画面の
64-bit Technology
No
と表示されます。 このフィールドには、
ビットテクノロジをサポートしているかどうか
オプションに
を介してリ
のインタフェー
Yes
32
ビット
マイクロプロセッサの交換
システムプロセッサは、将来速度と機能が向上したプロセッサに交換して、アップグレー
ドできます。
プロセッサアップグレードキットには、プロセッサとサーマルグリースが含まれています。
プロセッサヒートシンクはシステムに付属のものを再利用してください。
アップデート情報 35
Page 38

プロセッサの取り外し
警告: 修理の多くは、資格を持つサービス技術者のみが行うことができます。 お客様は、製
品マニュアルで許可されている範囲に限り、またはオンラインサービスもしくはテレホン
サービスおよびサポートチームの指示によってのみ、トラブルシューティングと簡単な修理
を行うことができます。 デルが認可していないサービスによる故障は、保証の対象になりま
せん。 製品に付属のマニュアルに書かれている安全にお使いいただくための注意をお読みに
なり、指示に従ってください。
システムおよび接続されているすべての周辺機器の電源を切って、電源コンセントか
1
ら外します。
2
ベゼルを取り外します。 『インストール&トラブルシューティング』にある「システ
ムのトラブルシューティング」の「ベゼルの取り外し」を参照してください。
www.dell.com | support.dell.com
3
右側を下にしてシステムを置きます。
4
カバーを取り外します。 『インストール&トラブルシューティング』にある「システ
ムのトラブルシューティング」の「カバーの取り外し」を参照してください。
5
冷却用エアフローカバーを取り外します。 『インストール&トラブルシューティング』
にある「システム部品の取り付け」の「冷却用エアフローカバーの取り外し」を参照
してください。
注意: 取り外したヒートシンクは、平面の上に裏返して置き、サーマルインタフェース材の
損傷や汚れを防止します。
ヒートシンクを取り外します。 図
6
a
一方の固定クリップの端を押し下げて保持モジュールの固定タブから外し、
次に起こします。これで固定クリップが開きます。
b
もう
c
ヒートシンクを少し回転させ、プロセッサからヒートシンクを持ち上げます。
ヒートシンクをプロセッサから無理に外そうとしないでください。
1-1
を参照してください。
1
つの固定クリップについても同じ手順を繰り返します。
36 アップデート情報
Page 39

図 1-1 ヒートシンクの取り外し
ヒートシンク
固定クリップ(2)
7
プロセッサソケットのリリースレバーを押し下げた後に、完全に開いた位置まで起こ
します。
8
プロセッサカバーを開きます。 図
9
プロセッサをまっすぐに持ち上げてソケットから取り出します。 ソケットに新しいプ
図1-2
を参照してください。
1-2
を参照してください。
ロセッサをすぐに取り付けることができるように、プロセッサカバーとリリースレ
バーは開いたままの状態にしておきます。
図1-2
を参照してください。
アップデート情報 37
Page 40

図 1-2 プロセッサの交換
プロセッサソケットのリリースレバー
www.dell.com | support.dell.com
プロセッサ
プロセッサソケット
プロセッサの取り付け
1
新しいプロセッサをパッケージから取り出します。
2
プロセッサソケットのリリースレバーが、完全に開いた状態であることを確認します。
3
プロセッサとソケットの
注意: システムの電源投入時にプロセッサとシステム基板に損傷を与えないように、プロ
セッサをソケットに正しく装着してください。 ソケットのピンに触れたり、ピンを曲げたり
しないように注意してください。
プロセッサをソケットにわずかに差し込み、プロセッサがソケット内で水平になって
4
いることを確認します。
押すとソケットに収まります。
5
プロセッサカバーを閉じます。
6
所定の位置にカチッと収まるまでリリースレバーを倒して、プロセッサを固定します。
注意: ヒートシンクが取り付けられていない状態でシステムを動作させないでください。
ヒートシンクは適切な温度条件を保つために必要な部品です。
糸くずのでない清潔な布を使って、先に取り外したヒートシンクからサーマルグリー
7
スを拭き取ります。
8
サーマルグリースをプロセッサ上面に均等に塗布します。
9
ヒートシンクをプロセッサの上に置きます。 図
プロセッサカバー
ピン 1 ロケーター(2)
1
番ピンの角を合わせます。 図
プロセッサが所定の位置に正しくセットされていれば、軽く
1-1
1-2
を参照してください。
を参照してください。
38 アップデート情報
Page 41

10
ヒートシンクを保持モジュールに固定します。
a
ヒートシンクを静かに押し下げ、固定クリップの
b
もう
1
つの固定クリップについても同じ手順を繰り返します。
11
背面ファンコネクタがシステム基板の
認します。
12
冷却用エアフローカバーを取り付けます。 『インストール&トラブルシューティング』
『インストール&トラブルシューティング』の図
BACK_FAN
1
つを押して固定します。
コネクタに接続されていることを確
A-3
を参照してください。
にある「システム部品の取り付け」の「冷却用エアフローカバーの取り付け」を参照
してください。
13
カバーを取り付けます。 『インストール&トラブルシューティング』にある「システ
ムのトラブルシューティング」の「カバーの取り付け」を参照してください。
14
システムを通常の状態に起こします。
15
ベゼルを取り付けます。 『インストール&トラブルシューティング』にある「システ
ムのトラブルシューティング」の「ベゼルの取り付け」を参照してください。
16
システムおよびシステムに接続されている周辺機器を電源コンセントに接続し、
電源を入れます。
17
セットアップユーティリティを起動し、プロセッサのオプションが新しいシステム設
定と一致していることを確認します。
『ユーザーズガイド』の「セットアップユー
ティリティの使い方」を参照してください。
システムが起動すると、新しいプロセッサの存在を検知し、セットアップユーティリ
ティのシステム設定情報を自動的に変更します。
次のようなメッセージが表示されます。
One 2.3 GHz Processor, Processor Bus: 533 MHz, L2 cache 256 KB
18
セットアップユーティリティのシステムデータ領域の一番上の行で、取り付けたプロ
セッサが正しく認識されていることを確認します。
『ユーザーズガイド』の「セット
アップユーティリティの使い方」を参照してください。
19
セットアップユーティリティを終了します。
20
システムで最新バージョンの
最新バージョンの
BIOS
BIOS
を実行していることを確認します。
は、デルサポート
Web
サイト(
support.dell.com
ウンロードできます。
21
システム診断プログラムを実行し、新しいプロセッサが正しく動作することを確認し
てください。
診断プログラムの実行方法や問題の解決方法については、『インストール
&
シューティング』の「システム診断プログラムの実行」を参照してください。
アップデート情報 39
)からダ
トラブル
Page 42

www.dell.com | support.dell.com
40 アップデート情報
Page 43

Dell™ PowerEdge™ 800 시스템
정보 업데이트
www.dell.com | support.dell.com
Page 44

참고 , 알림 , 주의
참고: 참고는 컴퓨터를 보다 효율적으로 사용하는데 도움이 되는 중요 정보를 제공합니다.
주의사항: 알림은 하드웨어의 손상 또는 데이터 유실 위험을 설명하며, 이러한 문제를 방지할 수 있는 방법을
알려줍니다.
주의: 경고는 재산상의 피해나 심각한 부상 또는 사망을 유발할 수 있는 위험이 있음을 경고합니다.
약어 및 머리글자
약어 및 머리글자의 전체 목록은 사용 설명서의 "용어집"을 참조하십시오
.
____________________
본 설명서에 수록된 정보는 사전 통보 없이 변경될 수 있습니다.
© 2004 Dell Inc. All rights reserved.
어떠한 경우에도 Dell Inc.의 사전 승인 없이 무단 복제하는 행위는 엄격하게 금지되어 있습니다.
본 설명서에 사용된 상표인 Dell, DELL 로고 및 PowerEdge는 Dell Inc.의 상표입니다. Intel은 Intel Corporation의 등록 상표이며,
Red Hat은 Red Hat, Inc.의 등록 상표입니다.
본 설명서에서 특정 회사의 표시나 제품 이름을 지칭하기 위해 기타 상표나 상호를 사용할 수도 있습니다.
Dell Inc.는 자사가 소유하고 있는 것 이외에 기타 모든 등록 상표 및 상표 이름에 대한 어떠한 소유권도 보유하지 않습니다.
2004 년 10 월 P/N H6440 Rev. A01
Page 45

본 설명서는 다음 내용에 관한 시스템 업데이트 정보를 제공합니다
®
•Red Hat
• RHEL 3(Red Hat Enterprise Linux 3)
•64비트
•
마이크로프로세서 교체
Linux 관련 Broadcom
기능
드라이버 제한
에서
DRAC 4/P
사용
.
Red Hat Linux 관련 Broadcom 드라이버 제한
Red Hat Linux 운영
PT(IPMI Pass Through)
BASP(Broadcom Advanced Server Program)
가 활성화된 상태에서 기본
하지
않습니다. 운영 체제 유틸리티를 사용하면
상에서 트래픽을 전혀 수신할 수 없습니다
체제를 실행하는 시스템에서
를 사용하고
Linux tg3
VLAN을
구성하려는 경우, 기본
와
bcm5700
드라이버를 사용하는 경우
VLANS를
.
LAN을 통한 원격 관리
Linux tg3
드라이버를 사용해야 합니다
VLAN
구성할 수 있지만
용이성을 위해
드라이버 대신에
기능이 올바르게 작동
VLAN
IPMI
. IPMI PT
인터페이스
Red Hat Enterprise Linux 3 에서 DRAC 4/P 사용
시스템에
및 장치를 사용할 수 없습니다. 임시 해결 방법으로서 grub.conf 파일의 각 절마다 커널 매개 변
수
2.4.21.15.EL
DRAC 4/P
ide2=0x1f0을 커널
이상 버전으로 업그레이드하십시오
카드가 설치된 경우
, RHEL 3을
라인에 추가하십시오. 또는 rhn.redhat.com을
실행하는 시스템에서 통합
.
IDE
컨트롤러
방문하여 커널을
64 비트 기능
시스템에 설치된 프로세서가
Information
32
비트 프로세서가 설치된 경우 64-bit Technology
프로세서에서
화면에서 64-bit Technology 옵션이 Yes (Intel® EM64T)로
Intel 64비트
64비트
기술을 지원하는지 여부를 지정합니다
기능을 지원하는 경우
옵션이 No로
System Setup
표시됩니다. 이 필드는 설치된
프로그램의 CPU
표시됩니다. 시스템에
.
마이크로프로세서 교체
추후에 시스템 프로세서를 업그레이드하여 속도와 기능 관련 옵션을 활용할 수 있습니다
프로세서 업그레이드 키트에는 프로세서 및 열 그리즈가 포함되어 있으므로, 시스템과 함께 제
공된
프로세서 방열판을 다시 시용해야 할 것입니다
.
.
정보 업데이트 43
Page 46

프로세서 제거
주의 : 대부분의 수리 작업은 유자격 서비스 기술자에 의해서만 이루어져야 합니다 . 사용자는 제
품 설명서에서 허가한 경우나 온라인 또는 전화서비스 / 지원팀에서 지시한 경우에만 문제 해결
절차 및 단순 수리 작업을 수행할 수 있습니다 . Dell 의 승인을 받지 않은 서비스 작업으로 인한 손
상에 대해서는 보상을 받을 수 없습니다 . 제품과 함께 제공된 안전 지침을 읽고 따르십시오 .
시스템과 시스템에 연결된 모든 주변장치의 전원을 끄고 전원 콘센트에서 시스템을 분리
1
하십시오
2
베젤을 분리하십시오. 설치 및 문제 해결 설명서에 있는 "시스템 문제 해결"의 "베젤 분리
를 참조하십시오
3
시스템을 오른쪽으로 눕히십시오
4
www.dell.com | support.dell.com
덮개를 분리하십시오. 설치 및 문제 해결 설명서에 있는 "시스템 문제 해결"의 "덮개 분리
를 참조하십시오
5
냉각기 덮개를 분리하십시오. 설치 및 문제 해결 설명서에 있는 "시스템 구성 요소 설치
의 "냉각기 덮개 제거"를 참조하십시오
주의사항: 방열판을 분리한 후에는 방열재(TIM: Thermal Interface Material)가 손상되거나 오염되
지 않도록 평평한 곳에 뒤집어 놓아야 합니다.
방열판을 분리하십시오. 그림
6
a
고정 모듈의 고정 탭이 빠질 때까지 클립 끝부분을 아래로 누르면서 고정 클립을 완전
연 다음
히
b
나머지 고정 클립에 대하여 단계 a를 반복하십시오
c
방열판을 조금 돌려 프로세서에서 방열판을 살짝 들어 올리십시오. 프로세서에서 방
열판을
.
.
.
클립을 위로 올리십시오
꺼내지 마십시오
1-1을
.
.
.
참조하십시오
.
"
"
"
.
.
44 정보 업데이트
Page 47

그림 1-1. 방열판 분리
방열판
고정 클립(2)
7
프로세서 소켓 분리 레버를 아래로 누른 다음 분리 레버를 위로 당겨 완전히 젖혀지도록
하십시오. 그림
8
프로세서 덮개를 여십시오. 그림
9
소켓에서 프로세서를 수직으로 똑바로 들어 올리십시오. 소켓에 새 프로세서를 설치할 수
있도록 프로세서 덮개와 분리 레버를 열림 위치에 그대로 두십시오. 그림
시오
.
1-2를
참조하십시오
.
1-2를
참조하십시오
.
1-2를
참조하십
정보 업데이트 45
Page 48

그림 1-2. 프로세서 교체
프로세서 소켓 분리 레버
www.dell.com | support.dell.com
프로세서
프로세서 소켓
프로세서 설치
1
새 프로세서의 포장을 제거하십시오
2
프로세서 소켓 분리 레버가 완전히 젖혀졌는지 확인하십시오
3
소켓과 프로세서 모서리에 있는 1번 핀을 맞추십시오. 그림
주의사항: 시스템의 전원을 켰을 때 프로세서와 시스템 보드가 손상되지 않도록 프로세서를 소
켓에 정확하게 꽂아야 합니다. 소켓 핀에 닿거나 핀이 구부러지지 않도록 주의하십시오.
소켓에서 프로세서가 수평이 되도록 프로세서를 소켓에 살짝 내려 놓으십시오. 프로세서
4
가
제대로 놓여졌으면 프로세서를 천천히 눌러서 소켓에 끼우십시오
5
컴퓨터 덮개를 닫으십시오
6
제자리에 딸깍 소리를 내면서 설치될 때까지 분리 레버를 아래쪽으로 다시 돌려서 프로세
덮개를 고정시키십시오
서
주의사항: 방열판이 설치되지 않은 상태에서 시스템을 작동시키지 마십시오. 방열판은 온도를
알맞게 유지하는 데 필요합니다.
깨끗하고 보풀이 없는 천으로 앞에서 분리한 방열판에서 열 그리즈를 닦아 내십시오
7
8
프로세서 맨 위에 열 그리즈를 고르게 바르십시오
9
프로세서 위에 방열판을 놓으십시오. 그림
프로세서 덮개
1번 핀 위치 지정자(2)
.
.
1-2를
참조하십시오
.
.
.
.
.
.
1-1을
참조하십시오
.
46 정보 업데이트
Page 49

10
고정 모듈에 방열판을 고정시키십시오
a
방열판을 가볍게 아래로 누른 다음 고정 클립을 눌러 방열판을 고정시키십시오
b
나머지 고정 클립에 대해서도 단계a를 반복하십시오
11
후면 팬 커넥터가 시스템 보드 상의
설치 및 문제 해결 설명서의 그림
12
냉각기 덮개를 설치하십시오. 설치 및 문제 해결 설명서에 있는 "시스템 구성 요소 설치
의 "냉각기 덮개 설치"를 참조하십시오
13
덮개를 설치하십시오. 설치 및 문제 해결 설명서에 있는 "시스템 문제 해결"의 "덮개 다시
끼우기"를 참조하십시오
14
시스템을 똑바로 세우십시오
15
베젤을 설치하십시오. 설치 및 문제 해결 설명서에 있는 "시스템 문제 해결"의 "베즐 설치
를 참조하십시오
16
시스템을 전원 콘센트에 다시 연결하고 시스템과 시스템에 연결된 주변장치의 전원을 모
켜십시오
두
17
System Setup
인하십시오
.
.
프로그램으로 들어가서 프로세서 옵션이 새 시스템 구성과 일치하는지 확
.
사용 설명서의 "시스템 설치 프로그램 사용"을 참조하십시오
.
.
시스템을 부팅하면, 시스템에서 새로운 프로세서를 감지하고
.
BACK_FAN
A-3을
참조하십시오
.
.
커넥터에 연결되어 있는지 확인하십시오
.
.
System Setup
프로그램의
시스템 구성 정보를 자동으로 변경합니다. 다음과 비슷한 메시지가 표시됩니다
One 2.3 GHz Processor, Processor Bus: 533 MHz, L2 cache 256 KB
18
System Setup
르게
인식하는지를 확인하십시오. 사용 설명서의 "시스템 설치 프로그램 사용"을 참조하
십시오
19
System Setup
20
시스템에서 최신
Dell
지원 웹 사이트(support.ap.dell.com)에서 최신
프로그램에서 시스템 데이터 영역의 맨 위 줄에서 설치된 프로세서를 올바
.
프로그램을 종료하십시오
BIOS
버전이 실행되고 있는지 확인하십시오
.
.
BIOS
버전을 다운로드할 수 있습니다
.
.
"
"
.
.
21
시스템 진단 프로그램을 실행하여 새로 설치한 프로세서가 올바르게 작동하는지 점검하
십시오
.
진단 프로그램을 실행하여 발생할 수 있는 문제를 해결하는 자세한 내용은 설치 및 문제
해결 설명서의 "시스템 진단 프로그램 실행"을 참조하십시오
.
정보 업데이트 47
Page 50

www.dell.com | support.dell.com
48 정보 업데이트
Page 51

Sistemas Dell™ PowerEdge™ 800
Actualización de información
www.dell.com | support.dell.com
Page 52

Notas, avisos y precauciones
NOTA: una NOTA proporciona información importante que le ayudará a utilizar mejor el ordenador.
AVISO: un AVISO indica la posibilidad de daños en el hardware o la pérdida de datos, e informa
de cómo evitar el problema.
PRECAUCIÓN: un mensaje de PRECAUCIÓN indica el riesgo de daños materiales, lesiones corporales
o incluso la muerte.
Abreviaturas y siglas
Para ver una lista completa de las abreviaturas y las siglas, consulte el glosario de la
Guía del usuario
.
____________________
La información contenida en este documento puede modificarse sin previo aviso.
© 2004 Dell Inc. Reservados todos los derechos.
Queda estrictamente prohibida la reproducción de este documento en cualquier forma sin la autorización por escrito de Dell Inc.
Marcas comerciales utilizadas en este texto: Dell, el logotipo de DELL y PowerEdge son marcas comerciales de Dell Inc.;
Intel es una marca comercial registrada de Intel Corporation; Red Hat es una marca comercial registrada de Red Hat, Inc.
Otras marcas y otros nombres comerciales pueden utilizarse en este documento para hacer referencia a las entidades que los poseen
o a sus productos. Dell Inc. renuncia a cualquier interés sobre la propiedad de marcas y nombres comerciales que no sean los suyos.
Octubre de 2004 P/N H6440 Rev. A01
Page 53

En este documento se proporciona información actualizada sobre los temas siguientes relativos
al sistema:
®
• Limitación de los controladores Broadcom con Red Hat
• Uso de DRAC 4/P con Red Hat Enterprise Linux 3 (RHEL 3)
• Capacidad de 64 bits
• Sustitución del microprocesador
Linux
Limitación de los controladores Broadcom con Red Hat Linux
En los sistemas que se ejecutan en el sistema operativo Red Hat Linux, si utiliza IPMI Pass
Through (IPMI PT) para la capacidad de administración remota en una LAN y desea configurar
una VLAN, deberá utilizar los controladores Broadcom Advanced Server Program (BASP) y
bcm5700 en lugar del controlador nativo Linux tg3. Si utiliza el controlador nativo Linux tg3
cuando IPMI PT está activado, las VLAN no funcionarán correctamente. Las utilidades del sistema
operativo le permitirán configurar las VLAN, pero no recibirá ningún tráfico en la interfaz de
VLAN.
Uso de DRAC 4/P con Red Hat Enterprise Linux 3
Si su sistema tiene instalada una tarjeta DRAC 4/P, las controladoras IDE integradas y los
dispositivos correspondientes no estarán disponibles en los sistemas que se ejecuten en RHEL 3.
Como solución temporal, añada el parámetro de kernel siguiente a la línea del kernel para cada
entrada del archivo
el kernel a la versión 2.4.21.15.EL o a una superior.
grub.conf: ide2=0x1f0
. Como alternativa, vaya a
rhn.redhat.com
y actualice
Capacidad de 64 bits
Si el procesador instalado en su sistema tiene capacidad para 64 bits, la opción
(Tecnología de 64 bits) de la pantalla
configuración del sistema mostrará
instalado un procesador de 32 bits, la opción
No
. Este campo especifica si el procesador instalado admite la tecnología Intel de 64 bits.
CPU Information
Yes (Intel® EM64T)
64-bit Technology
(Información de la CPU) del programa de
(Sí [Intel® EM64T]). Si su sistema tiene
(Tecnología de 64 bits) mostrará
64-bit Technology
Sustitución del microprocesador
Puede actualizar el procesador del sistema para beneficiarse de las opciones futuras de velocidad
y funcionalidad.
El kit de actualización del procesador contiene un procesador y un lubricante térmico; en cuanto
al disipador de calor del procesador, deberá reutilizar el proporcionado con el sistema.
Actualización de información 51
Page 54

Extracción del procesador
PRECAUCIÓN: muchas reparaciones deben realizarlas únicamente los técnicos de servicio
autorizados. El usuario tan sólo debe solucionar los problemas y realizar las reparaciones sencillas
que se autorizan en la documentación del producto o si se lo indica el equipo de servicio y asistencia
en línea o telefónica. La garantía no cubre los daños debidos a reparaciones no autorizadas por Dell.
Lea y siga las instrucciones de seguridad entregadas con el producto.
Apague el sistema, incluidos todos los periféricos conectados, y desconéctelo de la toma
1
eléctrica.
2
Extraiga el embellecedor. Consulte “Extracción del embellecedor” en la sección
“Solución de problemas del sistema” de la
3
www.dell.com | support.dell.com
Apoye el sistema sobre su lado derecho.
4
Extraiga la cubierta. Consulte “Extracción de la cubierta” en la sección “Solución
de problemas del sistema” de la
5
Extraiga la cubierta de refrigeración. Consulte “Extracción de la cubierta de refrigeración” en
la sección “Instalación de los componentes del sistema” de la
de problemas
AVISO: tras retirar el disipador térmico, colóquelo del revés sobre una superficie plana para evitar
que el material de la interfaz térmica se dañe o se contamine.
6
Extraiga el disipador de calor. Consulte la figura 1-1.
a
Abra un gancho de fijación presionando el extremo hacia abajo y hacia fuera hasta que
se separe de la lengüeta de fijación del módulo de retención; a continuación, levante
el gancho.
b
Repita el mismo procedimiento para el otro gancho de fijación.
c
Gire un poco el disipador de calor y levántelo para extraerlo del procesador.
No intente extraer el disipador de calor del procesador.
Guía de instalación y solución de problemas
Guía de instalación y solución de problemas
.
.
Guía de instalación y solución
.
52 Actualización de información
Page 55

Figura 1-1. Extracción del disipador de calor
Disipador de calor
Ganchos de fijación (2)
7
Presione la palanca de liberación del zócalo del procesador; a continuación, tire de la palanca
hasta la posición totalmente abierta. Consulte la figura 1-2.
8
Abra la cubierta del procesador. Consulte la figura 1-2.
9
Levante el procesador verticalmente para extraerlo del zócalo. Deje la cubierta del procesador
y la palanca de liberación en la posición abierta de modo que el zócalo esté listo para alojar
el nuevo procesador. Consulte la figura 1-2.
Actualización de información 53
Page 56

Figura 1-2. Sustitución del procesador
Palanca de liberación del
zócalo del procesador
www.dell.com | support.dell.com
Procesador
Zócalo del procesador
Instalación de un procesador
1
Desembale el nuevo procesador.
2
Asegúrese de que la palanca de liberación del zócalo del procesador esté en posición
completamente abierta.
3
Alinee las esquinas de la pata 1 del procesador y el zócalo. Consulte la figura 1-2.
AVISO: deberá colocar el procesador correctamente en el zócalo para evitar que el procesador y la
placa base resulten dañados cuando encienda el ordenador. No toque ni doble las patas del zócalo.
Inserte el procesador ligeramente en el zócalo de forma que quede nivelado. Cuando el
4
procesador esté en la posición correcta, presione con cuidado hasta asentarlo en el zócalo.
5
Cierre la cubierta del procesador.
6
Baje de nuevo la palanca de liberación hasta que encaje en su sitio; de este modo,
la cubierta del procesador queda fijada.
Cubierta del procesador
Localizadores de
la pata 1 (2)
AVISO: no haga funcionar el sistema sin el disipador de calor instalado. El disipador de calor
es necesario para mantener las condiciones térmicas adecuadas.
7
Con un paño limpio que no deje pelusa, retire el lubricante térmico del disipador
de calor que ha extraído anteriormente en este procedimiento.
8
Aplique lubricante térmico de manera uniforme en la parte superior del procesador.
9
Coloque el disipador de calor sobre el procesador. Consulte la figura 1-1.
54 Actualización de información
Page 57

10
Fije el disipador de calor al módulo de retención.
a
Presione suavemente el disipador de calor y luego presione un gancho de fijación para
fijarlo.
b
Repita el mismo procedimiento para el otro gancho de fijación.
11
Asegúrese de que el conector de ventilador posterior esté conectado al conector VENT_POST
en la placa base. Consulte la figura A-3 de la
12
Instale la cubierta de refrigeración. Consulte “Instalación de la cubierta de refrigeración” en la
sección “Instalación de los componentes del sistema” de la
problemas
13
Coloque la cubierta. Consulte “Colocación de la cubierta” en la sección “Solución de
problemas del sistema” de la
14
Coloque el sistema en posición vertical.
15
Coloque el embellecedor. Consulte “Instalación del embellecedor” en la sección
.
Guía de instalación y solución de problemas
“Solución de problemas del sistema” de la
16
Vuelva a conectar el sistema a la toma eléctrica y encienda el sistema y todos los periféricos
Guía de instalación y solución de problemas
Guía de instalación y solución de
.
Guía de instalación y solución de problemas
conectados.
17
Ejecute el programa de configuración del sistema y compruebe que las opciones del
procesador coinciden con la nueva configuración del sistema. Consulte “Uso del programa
de configuración del sistema” en la
Guía del usuario
.
Cuando el sistema se inicia, detecta la presencia del nuevo procesador y cambia automáticamente la información de configuración del sistema en el programa de configuración del
sistema. Aparece un mensaje similar al siguiente:
.
.
One 2.3 GHz Processor, Processor Bus: 533 MHz, L2 cache 256 KB
(Un procesador de 2,3 GHz, bus del procesador: 533 MHz,
caché L2 de 256 KB)
18
Confirme que la línea superior del área de datos del programa de configuración del sistema
identifica de forma correcta el procesador instalado. Consulte “Uso del programa de configuración del sistema” en la
19
Salga del programa de configuración del sistema.
20
Asegúrese de que el sistema está ejecutando la última versión del BIOS.
Guía del usuario
.
Puede descargar la última versión del BIOS desde la página Web de soporte
de Dell (
21
Ejecute los diagnósticos del sistema para verificar que el nuevo procesador funciona
support.dell.com
).
correctamente.
Consulte “Ejecución de los diagnósticos del sistema” en la
problemas
para obtener información sobre cómo ejecutar los diagnósticos y cómo solucionar
Guía de instalación y solución de
los problemas que puedan producirse.
Actualización de información 55
Page 58

www.dell.com | support.dell.com
56 Actualización de información
 Loading...