

Dell PowerEdge 750 User Manual [en, de, fr, es]
C3740am0.fm Page 1 Tuesday, December 16, 2003 5:31 PM
About Cautions
CAUTION: A CAUTION indicates a potential for property damage, personal injury, or death.
Installing the Optional CD Drive
CAUTION: See your System Information Guide for complete information about safety precautions,
working inside the computer, and protecting against electrostatic discharge.
NOTE: For additional information about removing system components, see the Installation
and Troubleshooting Guide.
If applicable, remove the bezel.
1
a
If applicable, unlock the bezel.
b
While grasping the bezel, slide it toward the key lock.
c
Rotate the right side of the bezel away from the front panel.
d
Pull the bezel away from the system.
2
Turn off the system and attached peripherals, and disconnect the system from the electrical
outlet.
3
To remove the system cover, loosen the two captive screws at the back of the system.
4
While pressing down on the cover indention, slide the cover backward about an inch,
and grasp the cover on both sides.
5
Carefully lift the cover away from the system.
6
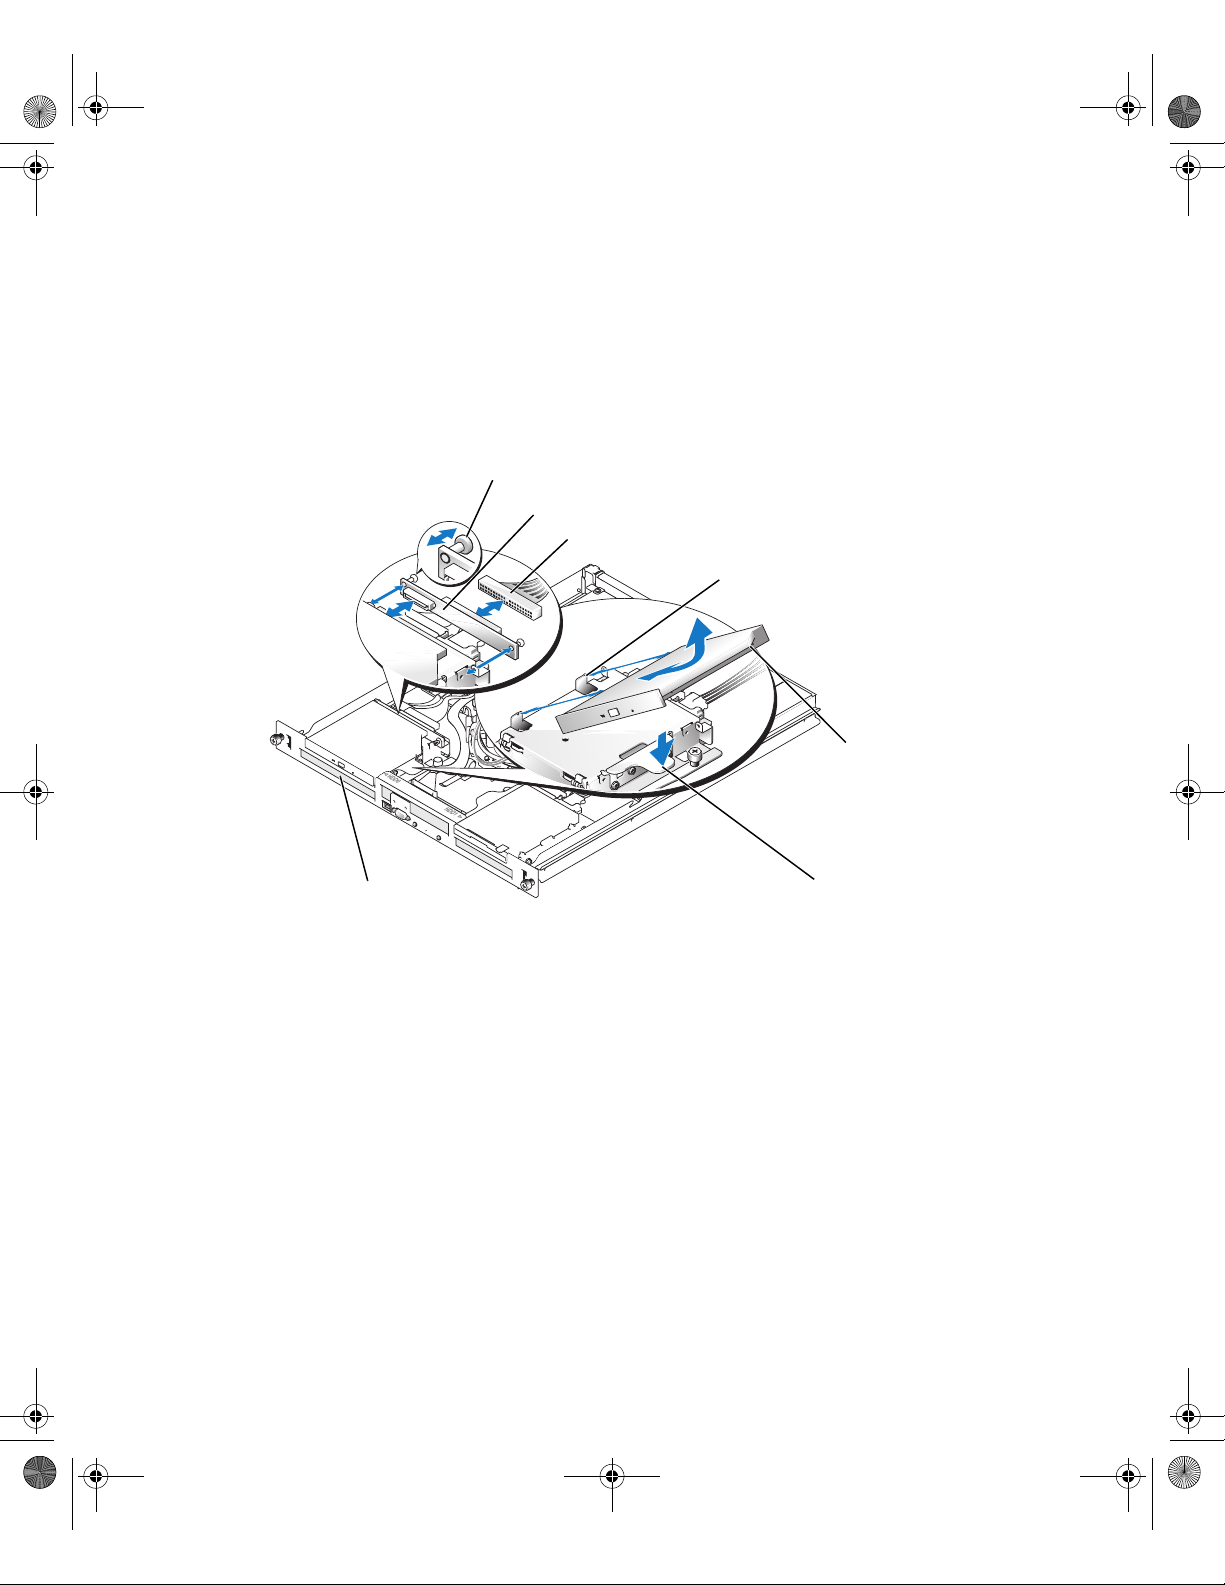
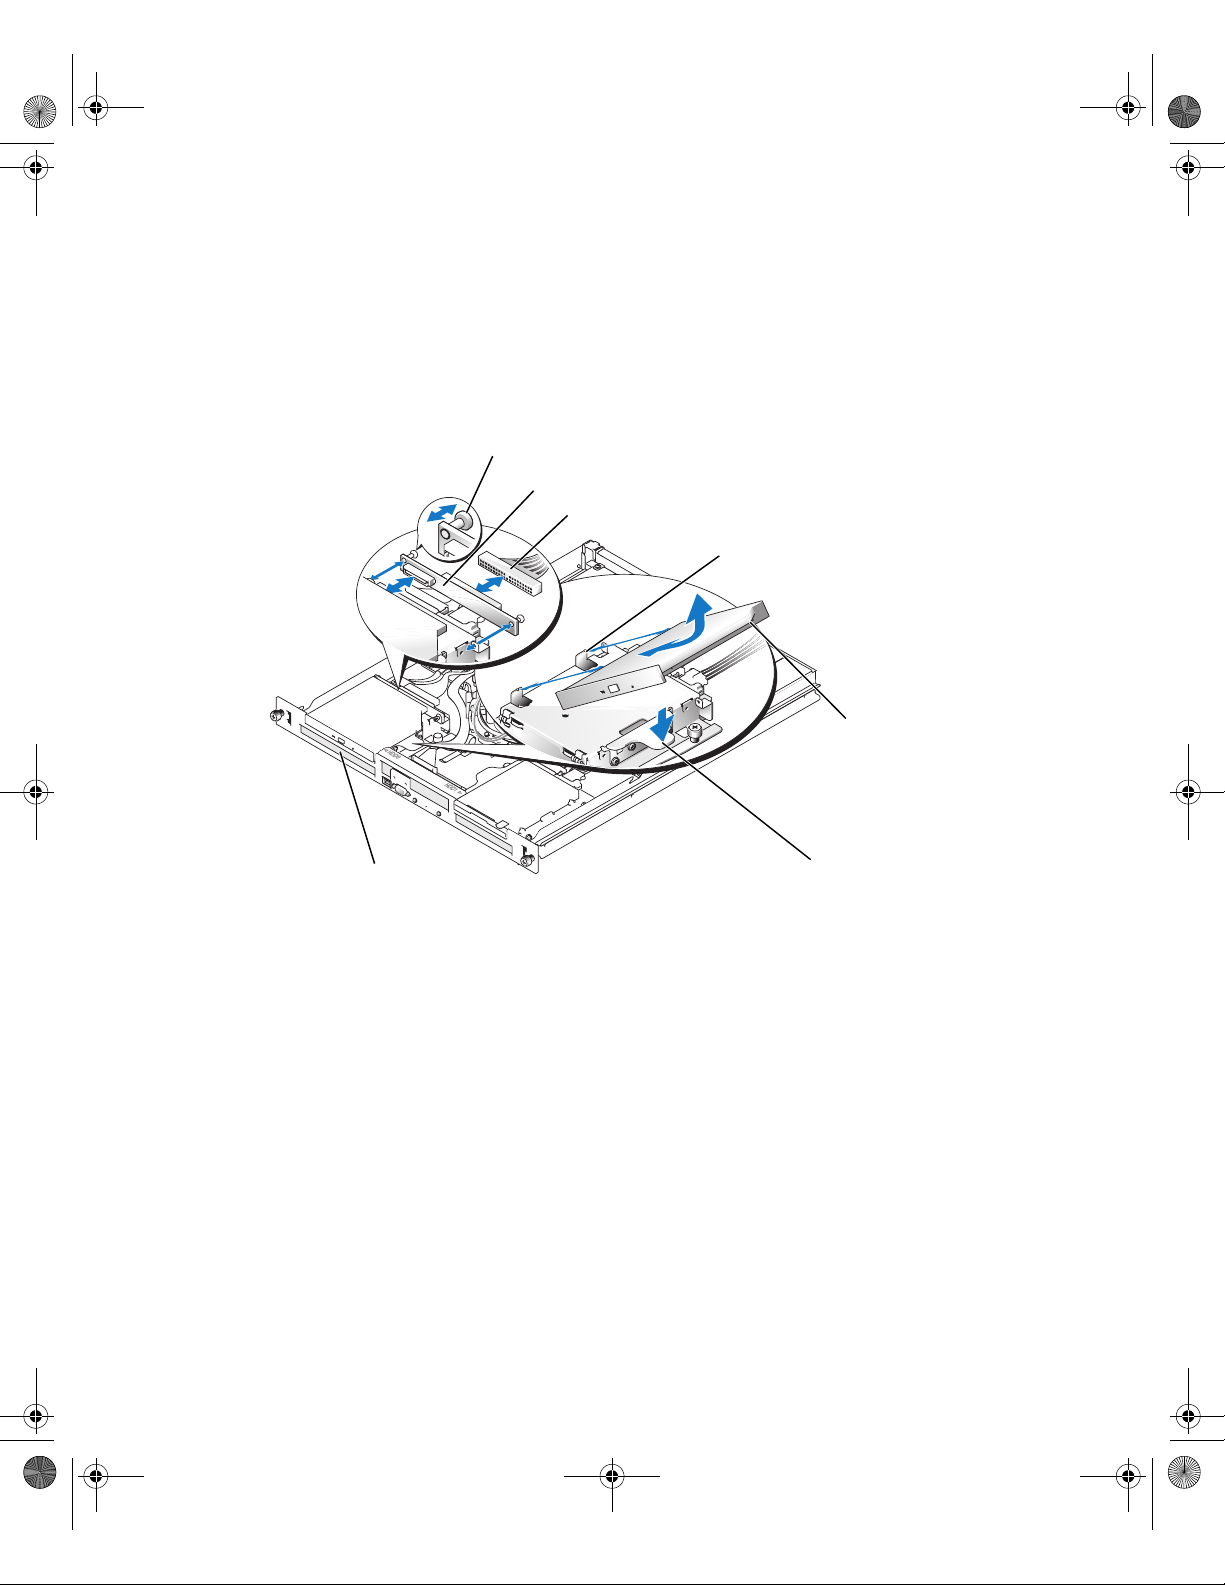
Align the CD drive's mounting holes with the retaining pins on the hard drive 0 bracket.
See Figure 1.
7
Rotate the drive downward until it snaps into place.
8
Connect the interposer card to the CD drive.
9
Push the plungers into the fastener barrels until they snap into place.
10
Connect the interface and power cables.
a
Connect the CD-ROM connector of the interface cable to the CD drive’s interposer
card.
b
Connect the PLNR connector of the interface cable to system board connector Pri-IDE.
See Figure A-3 in your
Installation and Troubleshooting Guide
www.dell.com | support.dell.com
for connector locations.
December 2003
0C3740A00
C3740am0.fm Page 2 Tuesday, December 16, 2003 5:31 PM
c
Locate the P4 power cable connector.
The P4 connector is part of a cable assembly that connects the power supply to both hard
drives and the CD drive’s interposer card.
d
Connect the P4 power cable connector to the CD drive’s interposer card.
Figure 1. Removing and Installing the Optional CD Drive
fasteners (2)
interposer board
interface cable
www.dell.com | support.dell.com
hard drive 0
11
Place the cover over the sides of the chassis, and slide the cover forward until it snaps
into place.
12
Tighten the two captive screws at the back of the system to secure the cover.
13
Reconnect the system to the electrical outlet, and turn on the system.
14
If applicable, replace the bezel.
a
Align the hole in the left-side bezel securing tab with the tab on the front panel.
b
While rotating the bezel toward the front panel, slide the bezel toward the key lock
until the bezel snaps into place.
retaining pins (4)
mounting holes (4)
bracket release lever

C3740am0.fm Page 3 Tuesday, December 16, 2003 5:31 PM
www.dell.com | support.dell.com
____________________
Information in this document is subject to change without notice.
© 2003 Dell Inc. All rights reserved. Printed in the U.S.A.
Reproduction in any manner whatsoever without the written permission of Dell Inc. is strictly forbidden.
Trademarks used in this text: Dell and the DELL logo are trademarks of Dell Inc.
Other trademarks and trade names may be used in this document to refer to either the entities claiming the marks and names
or their products. Dell Inc. disclaims any proprietary interest in trademarks and trade names other than its own.

C3740am0.fm Page 4 Tuesday, December 16, 2003 5:31 PM
www.dell.com | support.dell.com
C3740cam0.fm Page 1 Wednesday, December 17, 2003 4:37 PM
关于警告
警告: 警告表示存在可能导致财产损失、人身伤害或死亡的潜在危险。
安装可选
警告: 有关安全预防措施、拆装计算机内部组件以及防止静电损害的完整信息,
请参阅 《系统信息指南》。
注:
有关卸下系统组件的其它信息,请参阅 《安装与故障排除指南》。
如果适用,请卸下挡板。
1
a
如果适用,请打开挡板锁。
b
抓住挡板,同时将其朝钥匙锁方向滑动。
c
旋转挡板的右侧使挡板与前面板分开。
d
将挡板从系统中拉出。
2
关闭系统和连接的外围设备,然后断开系统与电源插座的连接。
3
要卸下系统机盖,请拧下系统背面的两颗固定螺钉。
4
向下按机盖凹槽处,同时将机盖向后滑动大约一英寸,并抓住机盖两侧。
5
小心地将机盖提离系统。
6
将
驱动器的固定孔与硬盘驱动器
CD
7
向下转动驱动器,直至其卡入到位。
8
将内插卡连接至
9
将柱塞推入扣件套筒中,直至其卡入就位。
10
连接接口和电源电缆。
a
将接口电缆的
b
将接口电缆的
请参阅 《安装与故障排除指南》的图
CD
驱动器
驱动器。
CD
CD-ROM
连接器连接至主机板连接器主
PLNR
支架上的固定插销对准。请参阅图 1。
0
连接器连接至
驱动器的内插卡。
CD
。
A-3
-
。有关连接器位置,
IDE
www.dell.com | support.dell.com
2003 年 12
月
C3740cam0.fm Page 2 Wednesday, December 17, 2003 4:37 PM
c
找出
P4
d
将
图
卸下和安装可选
1.
www.dell.com | support.dell.com
电源电缆连接器。
P4
连接器是电缆部件的一部分,用来将电源连接至硬盘驱动器和
电源电缆连接器连接至
P4
驱动器
CD
扣件 (2 个)
CD
内插板
接口电缆
驱动器的内插卡。
固定插销 (4 个)
驱动器的内插卡。
CD
硬盘驱动器 0
11
将机盖放在机箱两侧上方,然后将机盖向前滑动,直至卡入到位。
12
拧紧系统背面的两颗固定螺钉,将机盖固定。
13
将系统重新连接至电源插座,然后打开系统。
14
如果适用,请装回挡板。
a
将左侧挡板固定卡舌上的孔与前面板上的卡舌对齐。
b
将挡板朝前面板方向旋转,同时将挡板朝钥匙锁方向滑动,直至挡板卡入到位。
支架释放拉杆
固定孔 (4 个)

C3740cam0.fm Page 3 Wednesday, December 17, 2003 4:37 PM
www.dell.com | support.dell.com
____________________
本文中的信息如有更改,恕不另行通知。
© 2003 Dell Inc.
未经
Dell Inc.
本文件中使用的商标:
本文件中述及的其它商标和产品名称是指拥有相应商标和名称的公司或其制造的产品。
Dell Inc.
保留所有权利。美国印制。
书面许可,不准以任何形式进行复制。
Dell 和 DELL
对本公司的商标和产品名称之外的其它商标和产品名称不拥有任何专利权。
徽标是
Dell Inc.
的商标。
C3740cam0.fm Page 4 Wednesday, December 17, 2003 4:37 PM
www.dell.com | support.dell.com

C3740fam0.fm Page 1 Tuesday, December 16, 2003 4:55 PM
Mentions Attention
ATTENTION : le message ATTENTION indique une situation potentiellement dangereuse qui, si elle
n'est pas évitée, peut provoquer une détérioration du matériel et des blessures pouvant entraîner
la mort.
Installation du lecteur de CD en option
ATTENTION : consultez votre Guide d'informations du système pour obtenir des informations
détaillées sur les consignes de sécurité, les interventions dans l'ordinateur et la protection contre
les décharges électrostatiques.
REMARQUE : reportez-vous au Guide d'installation et de dépannage pour davantage d’informations
sur le retrait des composants.
Retirez le cache, le cas échéant.
1
a
Déverrouillez le cache, si nécessaire.
b
Saisissez le cache et faites-le glisser vers le verrou.
c
Faites pivoter le côté droit du cache pour l'écarter du panneau avant.
d
Dégagez le cache du système.
2
Mettez le système hors tension, y compris les périphériques qui lui sont connectés,
puis débranchez-le du secteur.
3
Pour retirer le capot du système, dévissez les deux vis captives à l'arrière du système.
4
Appuyez vers le bas sur l’indentation du capot, faites-le glisser vers l’arrière d’environ
deux centimètres, et prenez-le par les deux côtés.
5
Dégagez avec précaution le capot du système.
6
Alignez les trous du lecteur de CD avec les plots de retenue du support du disque dur 0.
Voir la figure 1.
7
Faites pivoter le disque vers le bas jusqu’à ce qu’il s’enclenche en place.
8
Connectez la carte intermédiaire au lecteur de CD.
9
Appuyez sur les têtes des clips de fixation jusqu'à ce qu'ils s'enclenchent en place.
10
Branchez les câbles d'interface et d’alimentation
a
Branchez l’extrémité CD-ROM du câble d'interface au connecteur correspondant
sur la carte intermédiaire.
b
Branchez le connecteur PLNR du câble d’interface au connecteur Pri-IDE de la carte
système. Pour identifier les connecteurs, reportez-vous à la figure A-3 du
d'installation et de dépannage
www.dell.com | support.dell.com
Guide
.
Décembre 2003
 Loading...