

Dell P703w All In One Photo, P703w Printer User Manual

Dell™ Photo P703w All-In-One Printer User's Guide
To order ink or supplies from Dell:
1. Double-click the following icon on your desktop.
2. Visit Dell's website, or order Dell printer supplies by phone.
www.dell.com/supplies
For the best service, ensure you have the Dell printer Service Tag available.
Finding Information Understanding the Software
About Your Printer Configuring Wireless
Understanding the Operator Panel Menus Maintenance
Loading Paper and Originals Troubleshooting
Printing Specifications
Printing From a Memory Card or USB Key Ordering Printer Supplies
Copying Appendix
Scanning Licensing Notice
Notes, Notices, and Cautions
NOTE: A NOTE indicates important information that helps you make better use of your computer.
NOTICE: A NOTICE indicates either potential damage to hardware or loss of data and tells you how to avoid the
problem.
CAUTION: A CAUTION indicates a potential for property damage, personal injury, or death.
Information in this document is subject to change without notice.
© 2008 Dell Inc. All rights reserved.
Reproduction of these materials in any manner whatsoever without the written permission of Dell Inc. is strictly forbidden.
Trademarks used in this text: Dell, the DELL, and Dell Ink Management System are trademarks of Dell Inc.; Intel, Pentium, and Xeon are
registered trademarks of Intel Corporation in the United States and/or other countries; Microsoft, Windows, and Windows Vista are either
trademarks or registered trademarks of Microsoft Corporation in the United States and/or other countries; AMD, Athlon, and Opteron are
trademarks of Advanced Micro Devices, Inc.; Bonjour, the Bonjour logo, and the Bonjour symbol are trademarks of Apple Computer, Inc.;
Bluetooth is a registered trademark owned by Bluetooth SIG, Inc. and used by Dell Inc. under license.
Other trademarks and trade names may be used in this document to refer to either the entities claiming the marks and names or their
products. Dell Inc. disclaims any proprietary interest in trademarks and trade names other than its own.
UNITED STATES GOVERNMENT RESTRICTED RIGHT
This software and documentation are provided with RESTRICTED RIGHTS. Use, duplication or disclosure by the Government is subject to
restrictions as set forth in subparagraph (c)(1)(ii) of the Rights in Technical Data and Computer Software clause at DFARS 252.227- 7013 and
in applicable FAR provisions: Dell Inc., One Dell Way, Round Rock, Texas, 78682, USA.
August 2008 Rev. A00
Model P703w
Back to Contents Page
Finding Information
Dell™ Photo P703w All-In-One Printer User's Guide
What are you
looking for?
Find it here
Drivers for
my printer
My User's
Guide
Warranty
information
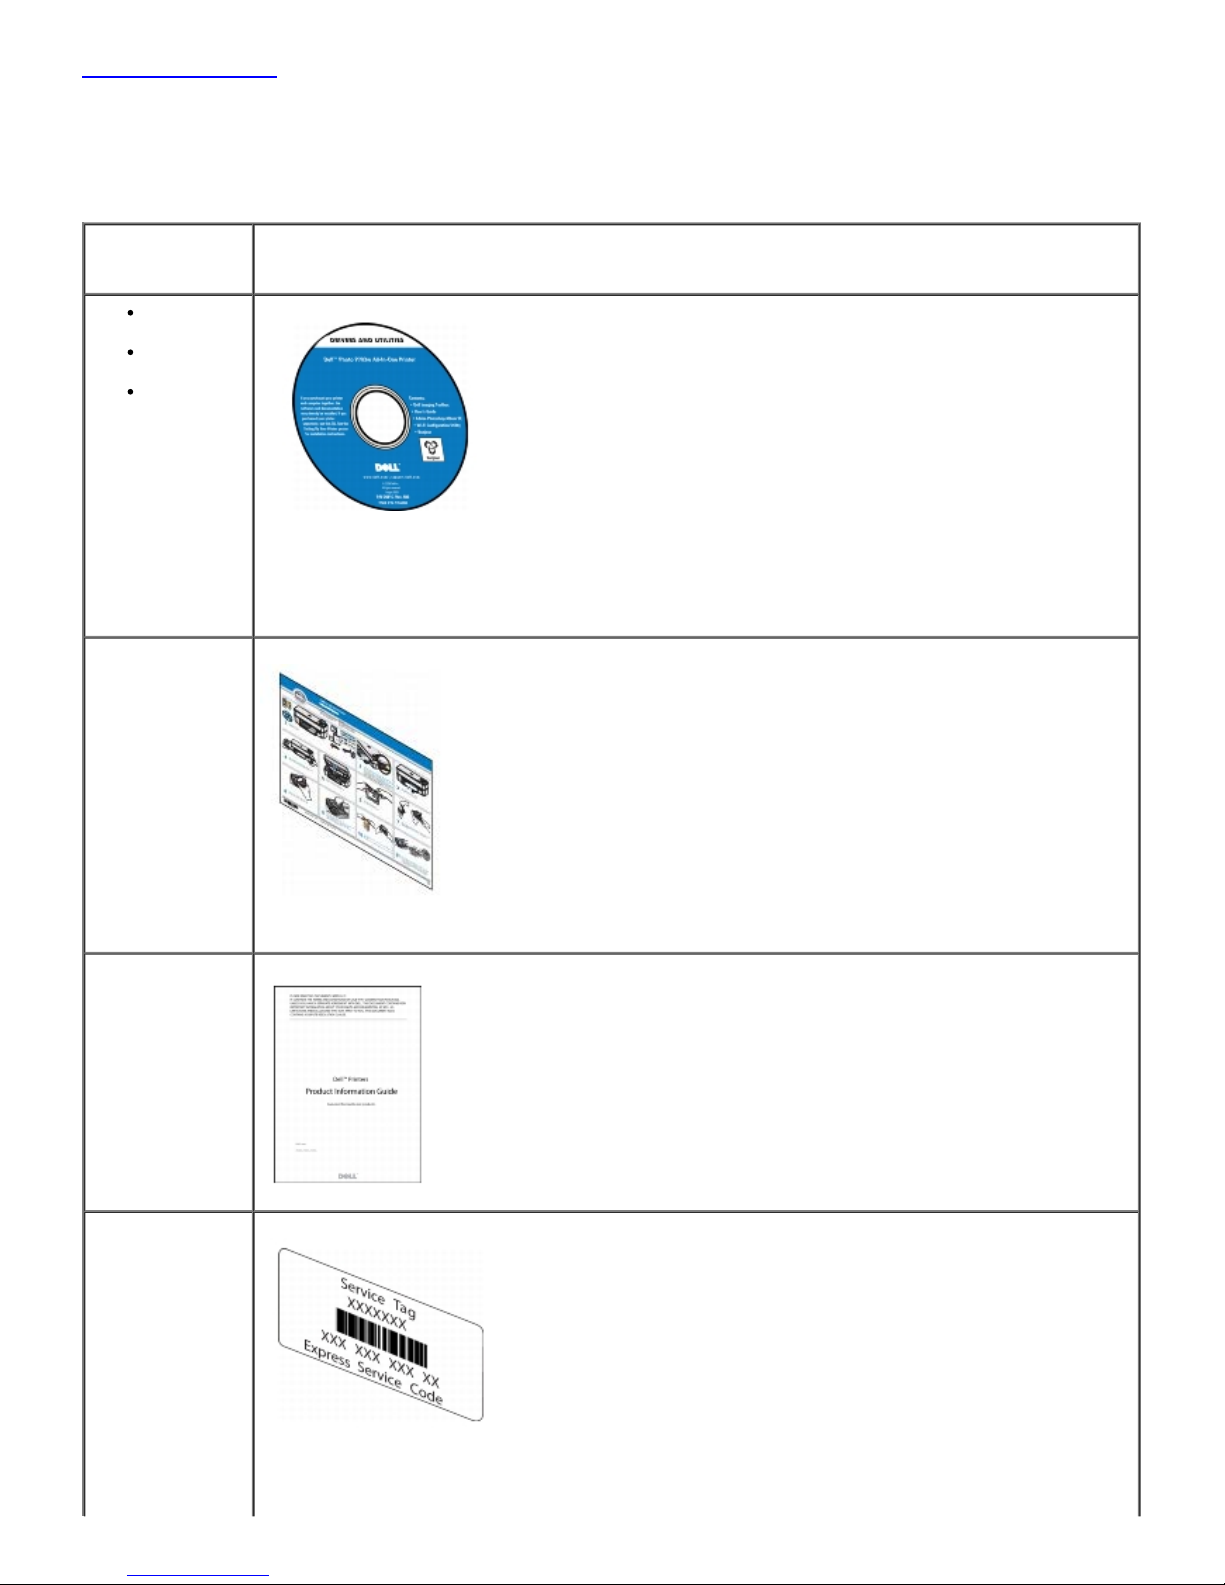
Drivers and Utilities CD
If you purchased your Dell™ computer and printer at the same time, documentation and drivers for
your printer are already installed on your computer. You can use the CD to uninstall/reinstall drivers
or access your documentation. Readme files may be included on your CD to provide last-minute
updates about technical changes to your printer or advanced technical reference material for
experienced users or technicians.
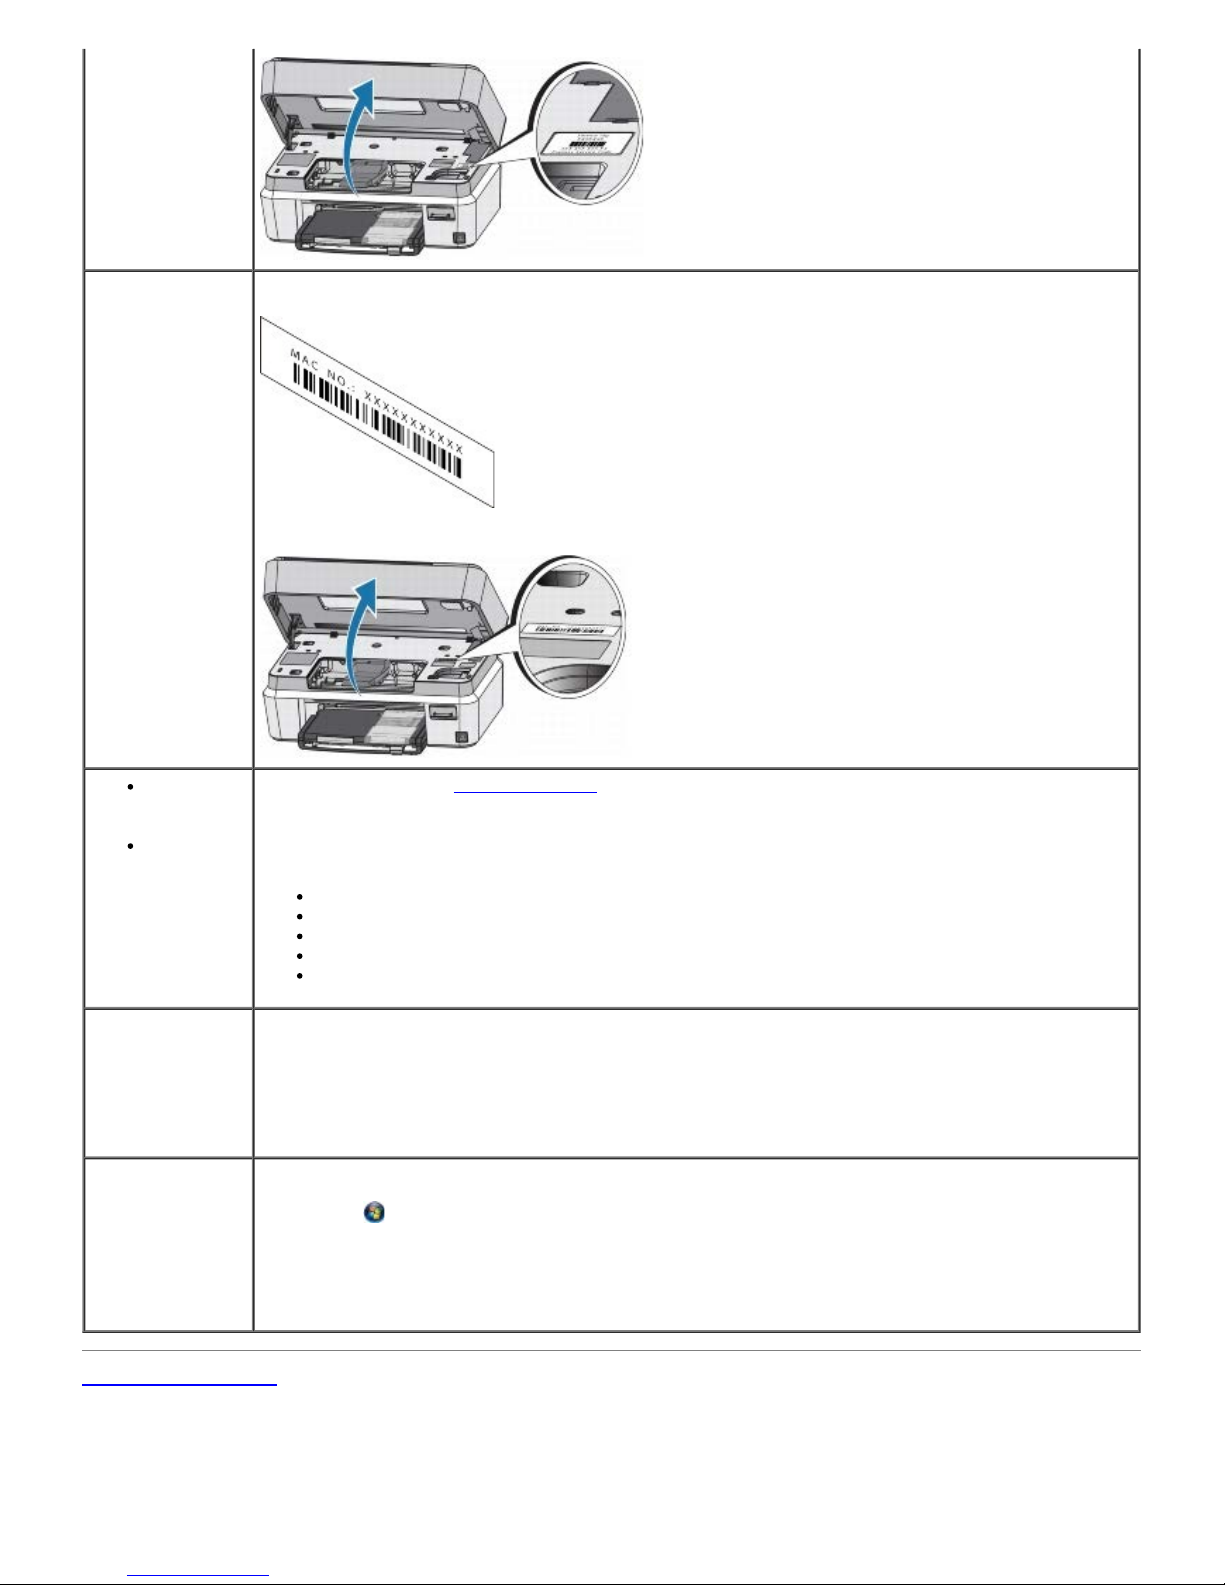
How to set up my
printer
Setting Up Your Printer poster
Safety
information
Product Information Guide
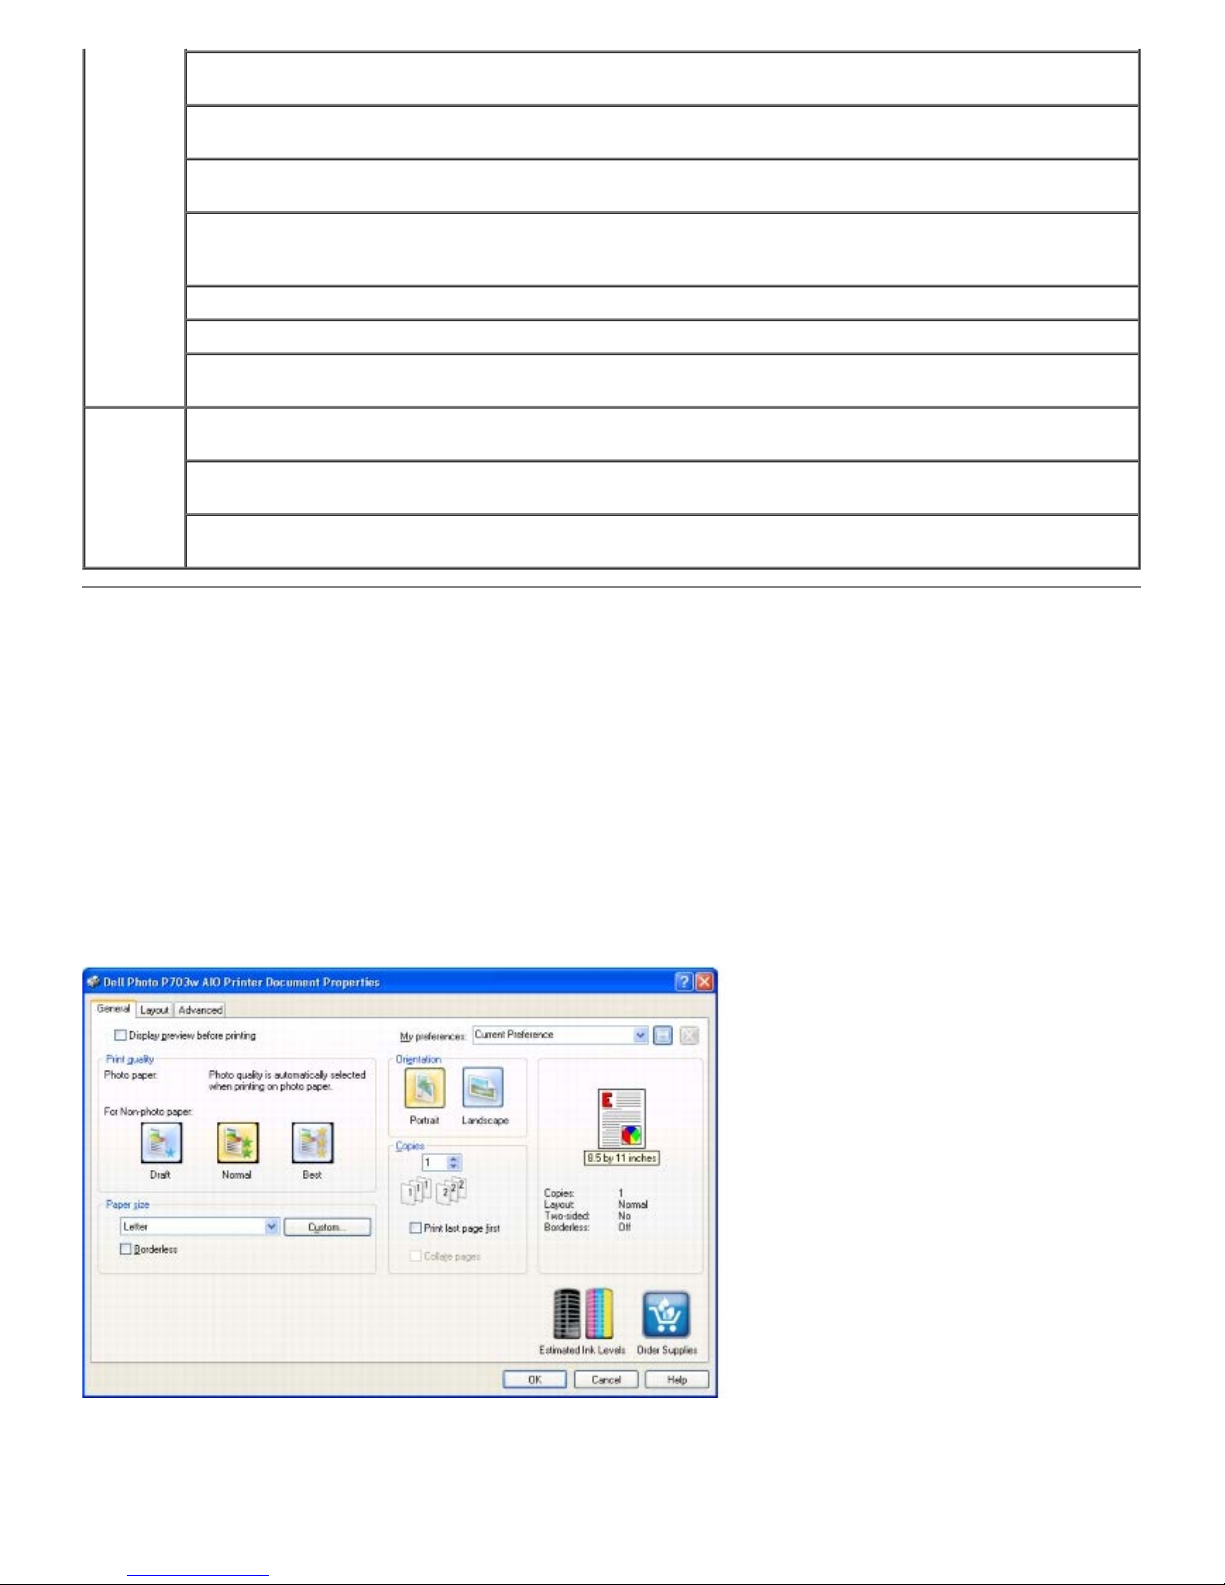
Express Service
Code and Service
Tag number
Express Service Code and Service Tag number
This label is located on the printer (see below).
Mac No. Mac No.
This label is located on the printer (see below).
Latest
drivers for
my printer
Answers to
technical
service and
support
questions
Dell Support Website:
support.dell.com
The Dell Support website provides several online tools, including:
Solutions—Troubleshooting hints and tips, articles from technicians, and online courses
Upgrades—Upgrade information for components, such as Bluetooth dongle
Customer Care—Contact information, order status, warranty, and repair information
Downloads—Drivers and Utilities CD
Reference—Printer documentation and product specifications
How to use
Windows® XP
Windows XP Help and Support Center
1. Click Start® Help and Support or press F1.
2. Type a word or phrase that best describes your problem, and then click the arrow icon.
3. Click the topic that describes your problem.
4. Follow the instructions shown on the screen.
How to use
Windows Vista®
Windows Vista Help and Support Center
1. Click
® Help and Support or press F1.
2. Type a word or phrase that best describes your problem, and then click the magnifying
glass.
3. Click the topic that describes your problem.
4. Follow the instructions shown on the screen.
Back to Contents Page

Back to Contents Page
Understanding the Software
Dell™ Photo P703w All-In-One Printer User's Guide
Using the Dell Imaging Toolbox
Configuring Printer Settings
Using Printing Preferences
Dell Ink Management System
Removing and Reinstalling Software
The printer software includes:
Dell Imaging Toolbox- Allows you to scan, copy, and print either the newly scanned or previously scanned
documents and images. It also allows you to configure print, copy, scan, and Wi-Fi settings.
Printing Preferences- Allows you to adjust printer settings.
Dell Ink Management System™- Warns you when your printer is running low on ink.
Using the Dell Imaging Toolbox
The Dell Imaging Toolbox allows you to:
Scan pictures and documents
Copy pictures
Print and share pictures
Access troubleshooting and maintenance information
Preview images you want to print or copy
Manage photos (copy them to folders, print them, and perform creative copying)
To access Dell Imaging Toolbox:
1. Click Start® Programs® Dell Printers® Dell Photo P703w AIO Printer.
In Windows Vista®:
a. Click ® Programs.
b. Click Dell Printers.
c. Click Dell Photo P703w AIO Printer.
2. Select Dell Imaging Toolbox.
The Dell Imaging Toolbox opens. The Dell Imaging Toolbox has four main sections:
In this section You can
Scan
Scan a photo or a document.
Save, edit, or share the scanned photo or document.
Copy Copy a photo or a document.
Edit or resize the copied photo or document.

Print Print one or multiple files.
Settings Configure print and copy settings for standalone use of your printer.
Configure scan settings for standalone use of your printer.
Configure Wi-Fi settings for standalone use of your printer.
For more information, click Help in the Dell Imaging Toolbox.
Configuring Printer Settings
To access Configure Settings:
1. Click Start® Programs® Dell Printers® Dell Photo P703w AIO Printer.
In Windows Vista®:
a. Click
® Programs.
b. Click Dell Printers.
c. Click Dell Photo P703w AIO Printer.
2. Select Dell Imaging Toolbox.
The Dell Imaging Toolbox opens.
3. Click Settings.
NOTE: Changes made to the printer settings become the default settings for most of the programs.
Tab Options
AIO
PrinterGeneral
Printer date and time- Select the check box to synchronize your printer's date and time with the computer.
Power save- Select timeout values between 1 and 60 minutes to enter standby mode.
Printer- Select the check box to hear a beep when you press a button on the Operator Panel.
Name- Your printer has a serial number that is used to construct name for Bluetooth printing. The default
name is DellP703w+XXXX, where XXXX represents the last four digits of the printer's serial number. You can
change this to a more personalized name by entering a new name.
AIO
PrinterPrint
Print quality- Select Draft, Normal, or Best for non-photo paper. Draft produces the fastest print speed,
but the lowest quality. Normal delivers high-quality output and is the default setting. Best produces the
highest quality for all paper.
Print options- Select Borderless, Bordered, 2 to 9 per page, 2 X 2, 3 X 3, and 4 X 4 Poster Layout.
The photo layouts on your printer "snap" to the nearest standard print size based on the combination of
layout and paper size loaded whenever possible. Otherwise the layouts are based on a standard 2x3 aspect
ratio.
Print date on front- Select to print today's date on the front of the picture.
Quantity- Select the number to print.
Print colors as grayscale- Select the check box to print a color photo in black and white. The grayscale
palette contains white, black, and 254 shades of gray. Each color in the image is replaced with a gray that
matches its lightness value.
Automatically apply screen balance to digital camera pictures- Select the check box to adjust the color and
density of digital images for brighter color and truer flesh tones.
Enable printing of tagged pictures- Select the check box to enable the printer to detect tagged photo files
(DPOF) and prompt you for the options.
AIO
PrinterCopy
Output quality- Select Draft, Normal, or Best for non-photo paper output quality.
Copy options- Select Same Size, Fit to Page, Scale Percent, or Photo Layouts.
Size- Set the percentage you want to scale your copies. It is enabled when you select Scale Percent in the
Output.
Layout- Select your preferred layout to print one of more photos on the size paper loaded (see Layouts). It
is enabled when you select Photo Layouts from the Output.
Brightness- Use the slide-bar to increase or decrease the brightness of copies.
Quantity- Sets the default number of copies to the value you select.
Print colors as grayscale- Select the check box to print a color photo in black-and-white. The grayscale
palette contains white, black, and 254 shades of gray. Each color in the image is replaced with a gray that
matches its lightness value.
ScanGeneral
Default item type- Select Documents or Pictures.
Default scan destination- Select Memory card, File, or Application that list by default.
Application List- You can add and remove applications from the destination list for scanned items.
ScanDocument
Scan as- Select a color. Color sets the printer to scan a color photo in color. Grayscale sets the printer to
scan a black and white photo and convert it to gray. Black & White sets the printer to scan in black and
white.
Resolution- You can choose a resolution you want to use for scanning: 75, 150, 300, 600, and 1200 dpi.
File format- Select to save the scanned image as PDF, RTF, JPEG, or TIFF file.
Prompt for filename and location- Select to have Dell Imaging Toolbox prompt you for the filename and
location to save the file.
Automatically save- Select to automatically save scans to the name and location you specify. The default
filename base is Scan appended with a three digit integer that increments sequentially as photos are
scanned and saved.
Base name- Edit field for entering your base filename.
Location- Click Browse for choosing a new location.
Save into new folder with current date as file name- Select the check box to save scanned files to the base
name and location you specified.
ScanPicture
Scan as- Select a color. Color sets the printer to scan a color photo in color. Grayscale sets the printer to
scan a black and white photo and convert it to gray. Black & White sets the printer to scan in black and
white.
Resolution- You can choose a resolution you want to use for scanning: 75, 150, 300, 600, and 1200 dpi.
File format- Select to save the scanned image as PDF, RTF, JPEG, or TIFF file.
Automatically detect picture- Select the check box so that your printer automatically detects how you
arrange the pictures on the scanner glass. When it is unchecked, the entire glass is scanned as one picture.
Quality- When scanning to a file and the selected file format is JPEG, you can select the compression quality
of the saved file. A higher quality means the compression is lower, resulting in a larger file size.
Prompt for filename and location- Select to have Dell Imaging Toolbox prompt you for the filename and
location to save the file.
Automatically save- Select to automatically save scans to the name and location you specify. The default
filename base is Scan appended with a three digit integer that increments sequentially as photos are
scanned and saved.
Base name- Edit field for entering your base filename.
Location- Click Browse for choosing a new location.
Save into new folder with current date as file name- Select the check box to save scanned files to the base
name and location you specified.
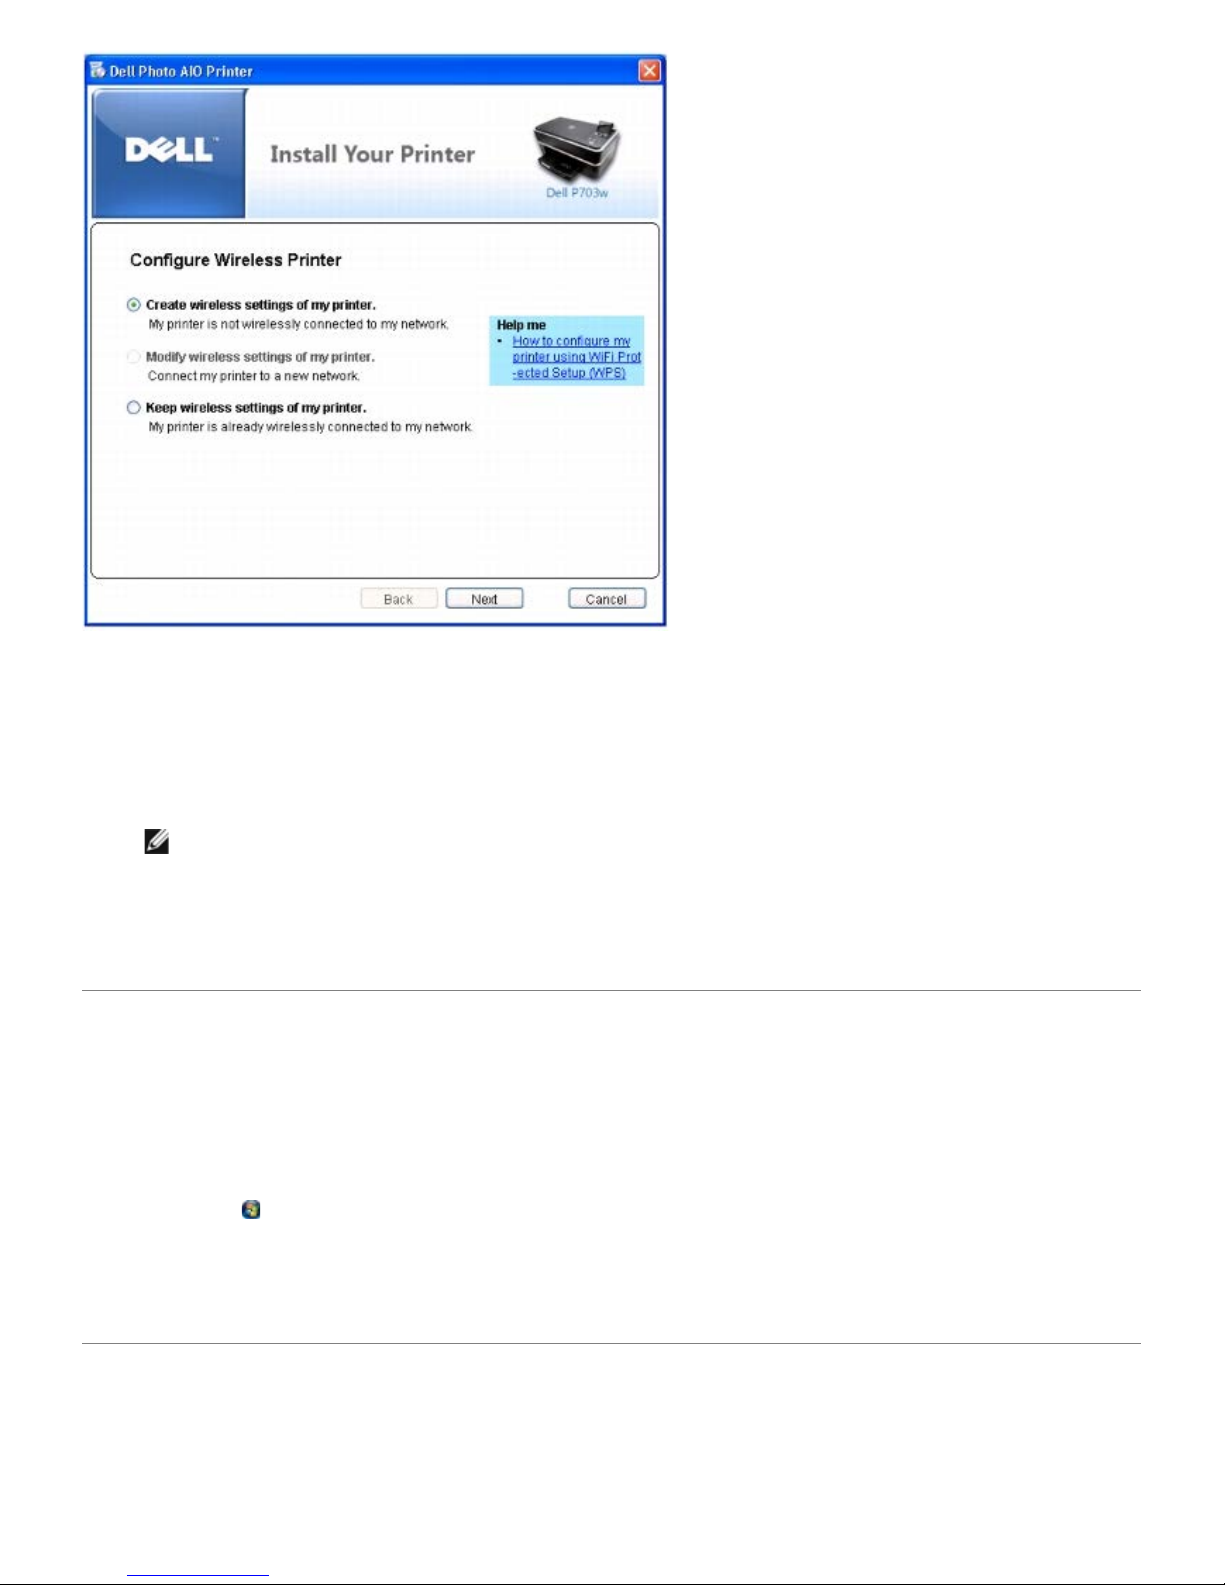
Wi-Fi Select Create wireless settings of my printer if you have not yet configured the wireless settings of your
printer.
Select Modify wireless settings of my printer if your printer's wireless settings have already been
configured but would like to change the wireless settings. For example, connecting to a different network.
Select Keep wireless settings of my printer if your printer's wireless settings are already configured and
you would like to add the printer to another computer in the same network.
Using Printing Preferences
You can change your printer settings in Printing Preferences depending on the type of project you want to create.
To access Printing Preferences when a document is open:
1. Click File® Print.
The Print dialog box opens.
2. Click Preferences, Properties, Options, or Setup (depending on the program or operating system).
The Printing Preferences dialog box opens.
To access Printing Preferences when a document is not open:
1. In Windows XP, click Start® Control Panel® Printers and Other Hardware® Printers and Faxes.
In Windows Vista®:
a. Click ® Control Panel.
b. Click Hardware and Sound.
c. Click Printers.
2. Right-click the printer icon, and then select Printing Preferences.
NOTE: Changes made to the printer settings from the Printers folder become the default settings for most
programs.
Tab Options
General Display preview before printing- Select the check box if you want to see a preview.
Print quality- Select Draft, Normal, or Best depending on your desired output quality. Draft is the fastest
option, but the lowest quality. Normal delivers high-quality output and is the default setting. Best produces
the highest quality for all paper eliminates the banding (striping) effect that sometimes occurs in solid areas.
Note: Dell picture quality is automatically selected when photo paper is selected.
Paper size- Select the paper size of your paper. If you want to customize the paper, click Custom....
Borderless- Select the check box if you want to print borderless photos.
Orientation- Select how the document is arranged on the printed page. You can print using portrait or
landscape orientation.
Copies- Customize how the printer prints several copies of a single print job
Print Last Page First- Select the check box if you want to print the last page first and end with the first page.
Collate pages- Select the check box if you want to collate the pages.
The checkbox is enabled when the value in the spin box is greater than one.
My preferences- Select a set option to load the saved settings for the selected option into each of the
printing preference fields.
Save Current Preferences- Click to save the current settings.
Delete Current Preferences- Deletes the selected preference.
Estimated Ink Levels- Click black and color icons to display the ink levels box. The level shown for the color
ink cartridge is the current lowest level for the five colors within the cartridge.
Note: A warning icon is displayed over the ink level icon when a low ink condition exists. A critical icon is
displayed over the low level icon when an ink cartridge needs to be replaced.
Order Supplies- Click to buy supplies from Dell online.
Layout Layout- Select Normal, Multi-page, Poster, or Booklet. Normal is the default layout where each
document page is printed on a sheet of paper. If multi-page is selected, multiple pages are printed on a
sheet of paper. When you select Poster, a picture is divided into segments and printed on individual pages.
Booklet allows you to print a document as a small booklet by printing two pages per sheet.
Scale- Select By to enable the spin box to choose a value between 10 and 500 percent. Select To fit to
enable drop-down list that contains all supported paper sizes.
Print mirror image- Select the check box to flip the image for iron-on printing.
Two-sides printing- Select No to print on one side of the paper only. Select Manual (Instructions provided) to
perform manual duplexing where you print on one side, rotate the printed pages 180 degrees, and place
them back in the main input tray to print on the other side.
Advanced Color- Select how the document is to be printed. You can print in color or black and white.
Watermark- Select the watermark from the drop-down list. Custom... enables you to select predefined
watermarks or create and edit your own watermarks. The option Print only on first page places the
watermark only on the first page of the document.
Paper Type- Select the paper type from the drop-down list.
Color Space- Select to determine a color range: sRGB or Adobe RGB. sRGB is a default color space for the
internet. Adobe RGB encompasses most of the colors achievable on your printer by using RGB primary colors.

Maintenance- You can perform the following maintenance tasks: Calibration, Printhead Cleaning, Disable
Update, or Firmware Upgrade.
Estimated Ink Levels- Displays both black and color ink levels.
Order Supplies- Click to order ink cartridges online or by phone.
Dell Ink Management System
Dell Ink Management System (DIMS) notifies you when ink levels run low, and connects you to Dell.com and the right
replacement cartridge. The DIMS displays warning/error messages if the ink level in any one of the cartridges touches or
falls below the minimum prescribed limit.
Warning
If the ink level in any one of the cartridges touches 15 percent or below, the printing status expands with a warning
(yellow bar) that the ink cartridge is low on ink. For more information, see
Replacing Ink Cartridges.
Error
If the ink level in any one of the cartridges touches 5 percent or below, the printing status expands with an error (red bar)
that the ink cartridge is almost empty. For more information, see
Replacing Ink Cartridges.
To order ink cartridges:
1. Click Start® Programs® Dell Printers® Dell Photo P703w AIO Printer.
In Windows Vista®:
a. Click
® Programs.
b. Click Dell Printers.
c. Click Dell Photo P703w AIO Printer.
2. Select Dell Imaging Toolbox.
3. Click Order Supplies.

4. If you want to order online, click Order Online. Follow the instructions in the Dell website.
or
If you want to order by phone, select language to display the phone number you can contact to place an order.
Alternatively, you can order ink cartridges through the Status Monitor or in the Printing Status window by clicking Order
Supplies and following the instructions in step 4.
Removing and Reinstalling Software
If your printer does not function properly, or communication error messages appear when using your printer, you can
remove and reinstall the printer software.
1. Click Start® Programs® Dell Printers® Dell Photo P703w AIO Printer.
In Windows Vista®:
a. Click
® Programs.
b. Click Dell Printers.
c. Click Dell Photo P703w AIO Printer.
2. Click Uninstall Dell Photo P703w AIO Printer.
3. Follow the instructions on the screen.
4. Restart your computer.
5. Insert the Drivers and Utilities CD, and then follow the instructions on the screen.
If the installation screen does not appear:
a. In Windows XP, click Start® My Computer.
In Windows Vista®, click
® Computer.
b. Double-click the CD/DVD drive icon, and then double-click setup.exe.
c. When the printer software installation screen appears, click Personal Installation or Network
Installation.
d. Follow the instructions on your screen to complete the installation.
Back to Contents Page
Back to Contents Page
About Your Printer
Dell™ Photo P703w All-In-One Printer User's Guide
Understanding the Printer Parts
Understanding the Operator Panel
You can use your printer to perform a variety of tasks. Your printer can perform tasks with or without a connection to a
computer.
If the printer is connected to a computer, you can use either the printer operator panel or the printer software to
produce quality documents.
You do not need to connect your printer to a computer to print, copy, and scan. Printing without computer is
through card slot or PictBridge port only.
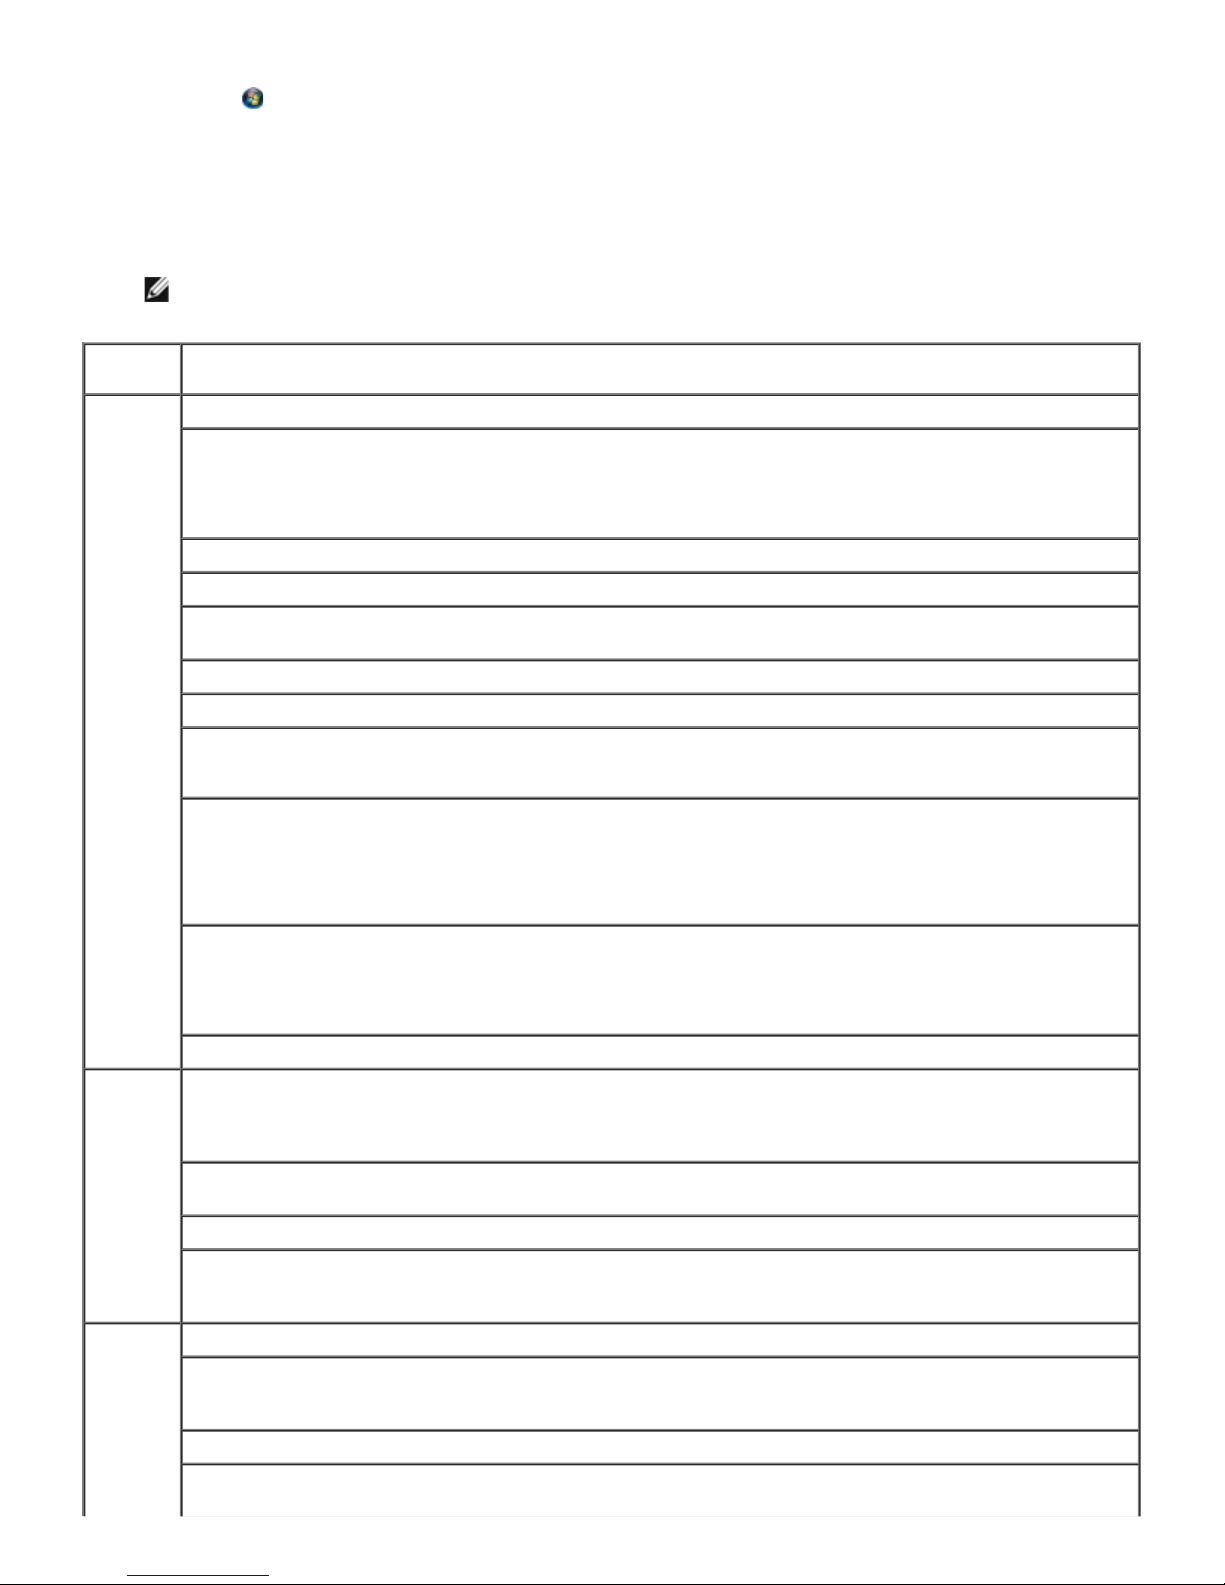
Understanding the Printer Parts
Number Part Description
1 Scanner lid Upper cover of printer that holds your document or photograph in place while you scan it.
2 LCD display Displays photos, messages, status, and menus.
3 Operator panel Panel on the printer you use to control copying, scanning, and printing.
4 Wi-Fi LED Indicates Wi-Fi setup status. Lights up blue once Wi-Fi setup is successful.
5 Scanner base unit Unit you lift to gain access to the ink cartridges.
6 Memory card
indicator
Indicates whether a memory card is inserted in the memory card slot.
7 Memory card slots Slots into which you insert a memory card containing digital pictures.
8 PictBridge
connector
The connector you use to connect your PictBridge-enabled digital camera or a USB key to
your printer.
9 Photo tray light Lights up when the photo tray is engaged.
10 Photo tray Tray that holds the photo paper.
11 Paper-length
guide
Guide that helps the paper feed into the printer properly.
12 Output tray
extender
Extender that extends the paper output tray.
13 Paper-width guide Guide that helps the paper feed into the printer properly.
14 Paper output tray Tray that holds the paper output by the printer.
15 Rear access door Part that you have to open to clear paper jams.
16 Power connector Connector into which you plug the power cable.
17 USB connector Connector into which you plug in the USB cable. The other end of the USB cable plugs
into your computer.
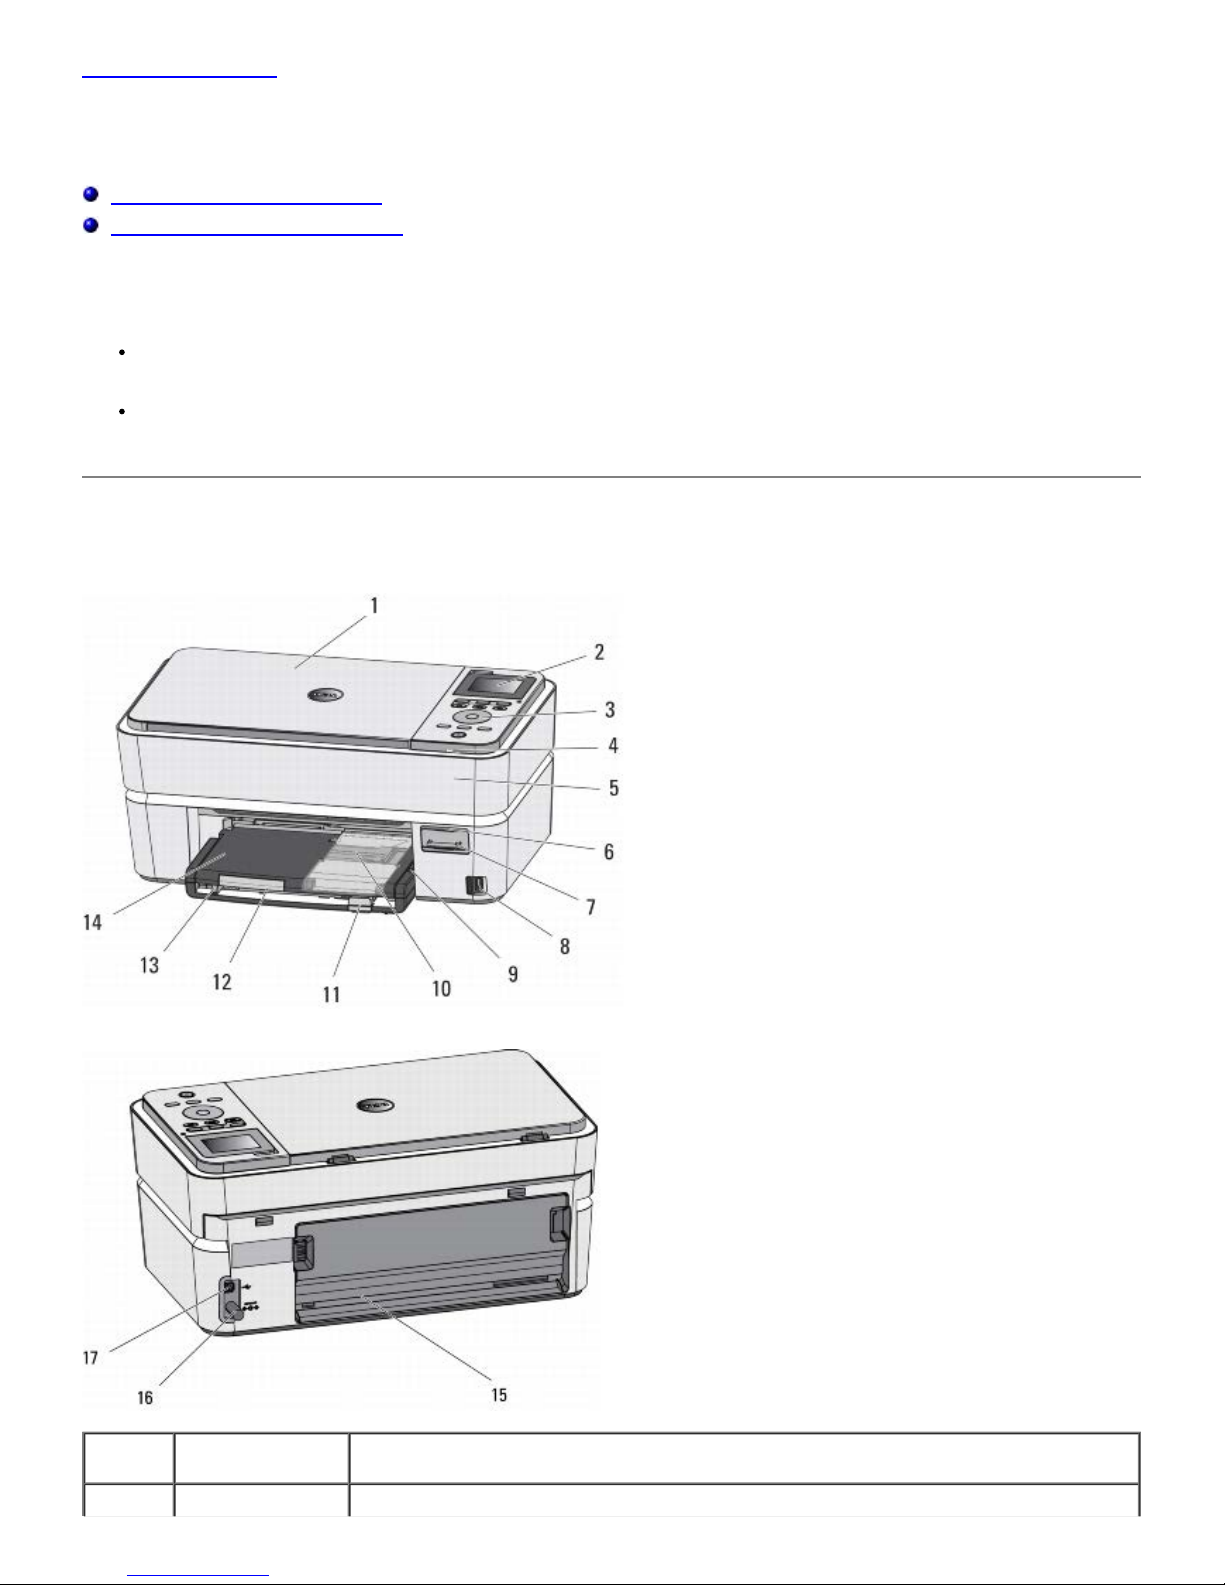
Understanding the Operator Panel
Number Use
the
To
1 LCD display Display photos, messages, status, and menus.
2 Error
LED
Flashes amber when printer is in error state.

3 Zoom
in
button
When in Photo Preview mode, magnifies the photo to 1.25X. Subsequent presses
zoom in 0.25X increments to a maximum of 5X. When in thumbnail view, displays
the current photo in preview mode.
4 Copy
button
Press to enter Copy mode. Lights up when in Copy mode.
5 Scan
button
Press to enter Scan mode. Lights up when in Scan mode.
6 Start
button
Start copy, print, or scan operation.
7 Power
button
Turn your printer on or off.
8 Power
light
Power light flashes white when starting up.
9 Menu
button
Display the main menu screen.
10 Cancel
button
Cancel the current operation.
11 Select
button
Used for selection in conjunction with the arrow button.
12 Arrow
buttons
Used to navigate Up , Down , Left , and Right .
13 Photo
button
Press to enter Photo mode. Lights up when in Photo mode.
14 Rotate
button
Rotate picture on the display, clockwise, 90 degrees.
15 Zoom
out
button
When the printer is in Photo Preview mode, pressing enters thumbnail view.
When a photo has been magnified with the Zoom in button, pressing the Zoom out
button decreases the magnification in 0.25X increments.
Back to Contents Page
Back to Contents Page
Configuring Wireless
Dell™ Photo P703w All-In-One Printer User's Guide
Minimum Requirements for Setup
Wireless Network Settings
Wireless Encryption
Configuring Wireless Using a Temporary USB Cable
Configuring Wireless Using Wi-Fi Config Utility
Configuring Wireless using Wi-Fi Protected Setup (WPS) – Advanced Users Only
Minimum Requirements for Setup
Dell™ Photo P703w AIO Printer
An existing wireless network
Drivers and Utilities CD that shipped with your printer
A computer running one of the following operating systems:
Windows Vista®
Windows® XP
NOTE: Install the wireless access point or router in a central location. If you have only one wireless client, installing
the base station near the client is recommended for the best Wi-Fi performance.
Wireless Network Settings
Some wireless network settings may be needed to configure the adapter that has been installed in the printer. Here are
some of the settings that you may need:
Network Name, also known as SSID (Service Set ID)
BSS (Basic Service Set) Type (the type of wireless network you use - Ad-Hoc or Infrastructure)
Wireless Channel Number
Network Authentication and encryption type
Security Key(s)
Wireless Encryption
The following security types are supported:
No security
WEP with either 64-bit or 128-bit key
WPA with either 128-bit TKIP encryption engine, or 128-bit AES-CCMP encryption engine
A WPA (Wi-Fi Protected Access) pre-shared key is like a password and must meet the following criteria:

If you are using Hex characters, valid keys are 64 characters long.
If you are using ASCII, valid keys are at least 8 characters long.
The wireless network may use anywhere from one to four WEP keys. A WEP key is like a password and must meet the
following criteria:
If you are using Hex characters, valid keys are either 10 or 26 characters long.
If you are using ASCII, valid keys are either 5 or 13 characters long.
Configuring Wireless Using a Temporary USB Cable
1. Plug the printer power cable into the wall outlet.
2. Press the Power button .
At your printer's Operator Panel:
3. Press the Menu button
.
4. Press the down Arrow button
to scroll to Network.
5. Press the Select button .
6. Press the down Arrow button
to scroll to WiFi Radio.
7. Press the left or right Arrow button
to set the parameter value to on.
8. Press the Select button .
At your computer:
9. If you are using your printer with an existing computer: Go to step 10.
If you are using your printer with a new Dell computer: Go to step 11.
10. Ensure that your computer is on, and then insert the Drivers and Utilities CD. The CD launches automatically.
NOTE: If you do not have your Drivers and Utilities CD, you can download the appropriate software from
support.dell.com. The Windows firewall settings might have to be disabled before you download the software.
11. Connect the USB cable between the port on the back of the printer and the computer.
12. Follow the on-screen instructions until you reach the below screen. By default the USB connection option is
selected.

13. Select the Wireless connection, and click Next.
NOTE: Ensure that your computer is connected to the same network.
Configure Wireless Printer window opens.
14. Select Create wireless settings of my printer if you have not yet configured the wireless settings of your
printer.
or
Select Keep wireless settings of my printer if your printer's wireless settings are already configured and you
would like to add the printer to another computer in the same network.
NOTE: Modify wireless settings of my printer is enabled only if your printer is already connected to a
wireless network. Select Modify wireless settings of my printer if your printer's wireless settings have
already been configured but would like to change the wireless settings. For example, connecting to a different
network.
15. Click Next, and follow instructions on the screen to complete the setup.
Configuring Wireless Using Wi-Fi Config Utility
For configuring wireless after installing Dell Imaging Toolbox:
Click Start® Programs® Dell Printers® Dell Photo P703w AIO Printer® WiFi Config Utility.
In Windows Vista®:
a. Click
® Programs.
b. Click Dell Printers.
c. Click Dell Photo P703w AIO Printer® WiFi Config Utility.
Configuring Wireless using Wi-Fi Protected Setup (WPS) –
Advanced Users Only
Follow these instructions carefully to configure your printer's wireless settings using Wi-Fi Protected Setup.
WPS is available only if you are using a WPS-enabled router. If you are not sure if your router is WPS enabled, check the
router for the WPS logo.
NOTE: Wireless configuration using WPS is only recommended for advanced users.
Before configuring your printer using WPS, you must know the router's IP address. If you are not sure of the router's IP
address, you can configure wireless using a temporary USB cable. For more information, see
Configuring Wireless Using a
Temporary USB Cable.
NOTE: Ensure that your computer is connected to the wireless network.
At your computer:
1. Using an Internet browser type your router's IP address and press the Enter key. Your router's web page opens.
NOTE: You may be prompted to enter your username and password. If you are not sure of the username and
password, contact your router manufacturer's helpline or your Internet service provider.
2. On your router's web page, navigate to the WPS section.
NOTE: The location of this page may change depending on the manufacturer of the router you are using.
At your printer's Operator Panel:
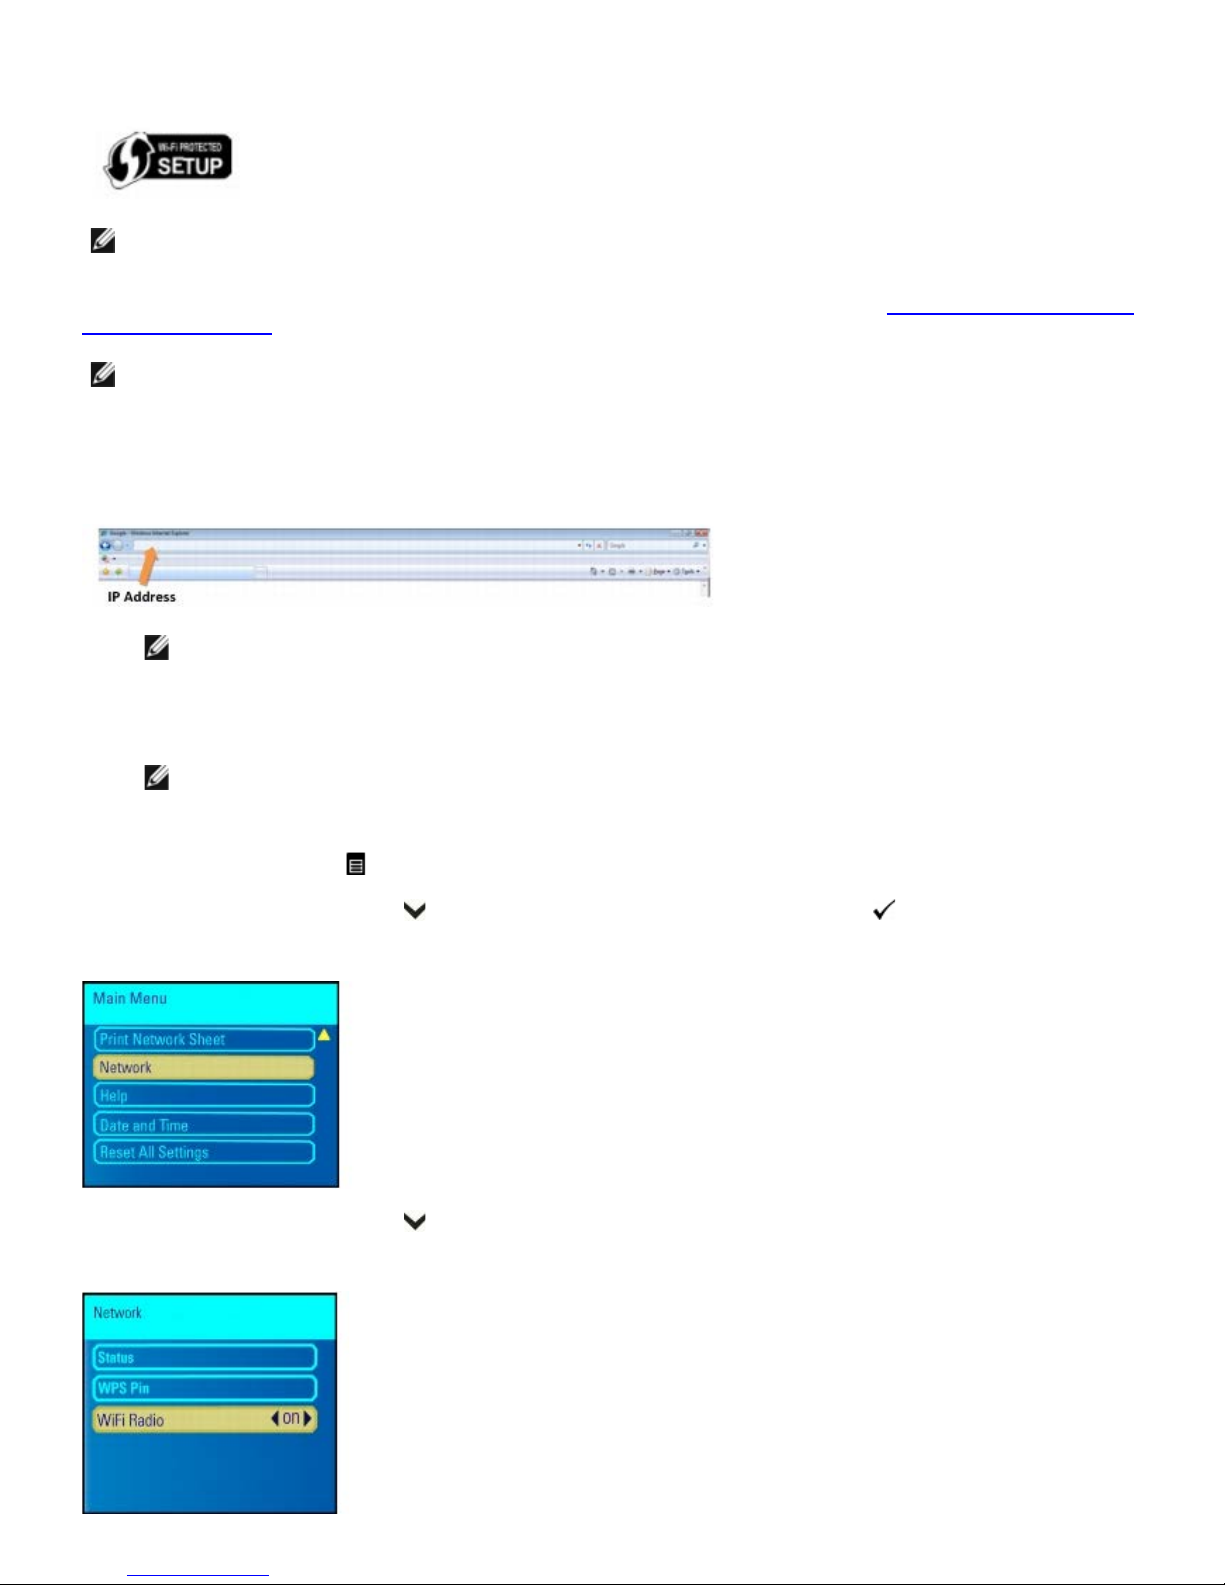
3. Press the Menu button .
4. Press the down Arrow button to scroll to Network, then press the Select button .
5. Press the down Arrow button to scroll to WiFi Radio and ensure that it is turned On.

NOTE: The blue Wi-Fi indicator LED starts flashing blue.
6. In the Network menu, press the up or down Arrow button
to scroll to WPS Pin, then press the Select
button.
7. Note down the PIN shown on the LCD display. Do NOT press the Select button
.
At your computer:
8. Enter the PIN into the PIN textbox on your router's WPS page and initiate the WPS search on the router. Complete
step 9 within 2 minutes.
At your printer's Operator Panel:
9. Return to the printer within 2 minutes of initiating WPS search on the web page and press the Select button
to
initiate the process at the printer.
10. Wait for the configuration to complete. This may take few minutes.
If setup is successful, the following screen appears on your printer's LCD screen. Proceed with step 11.
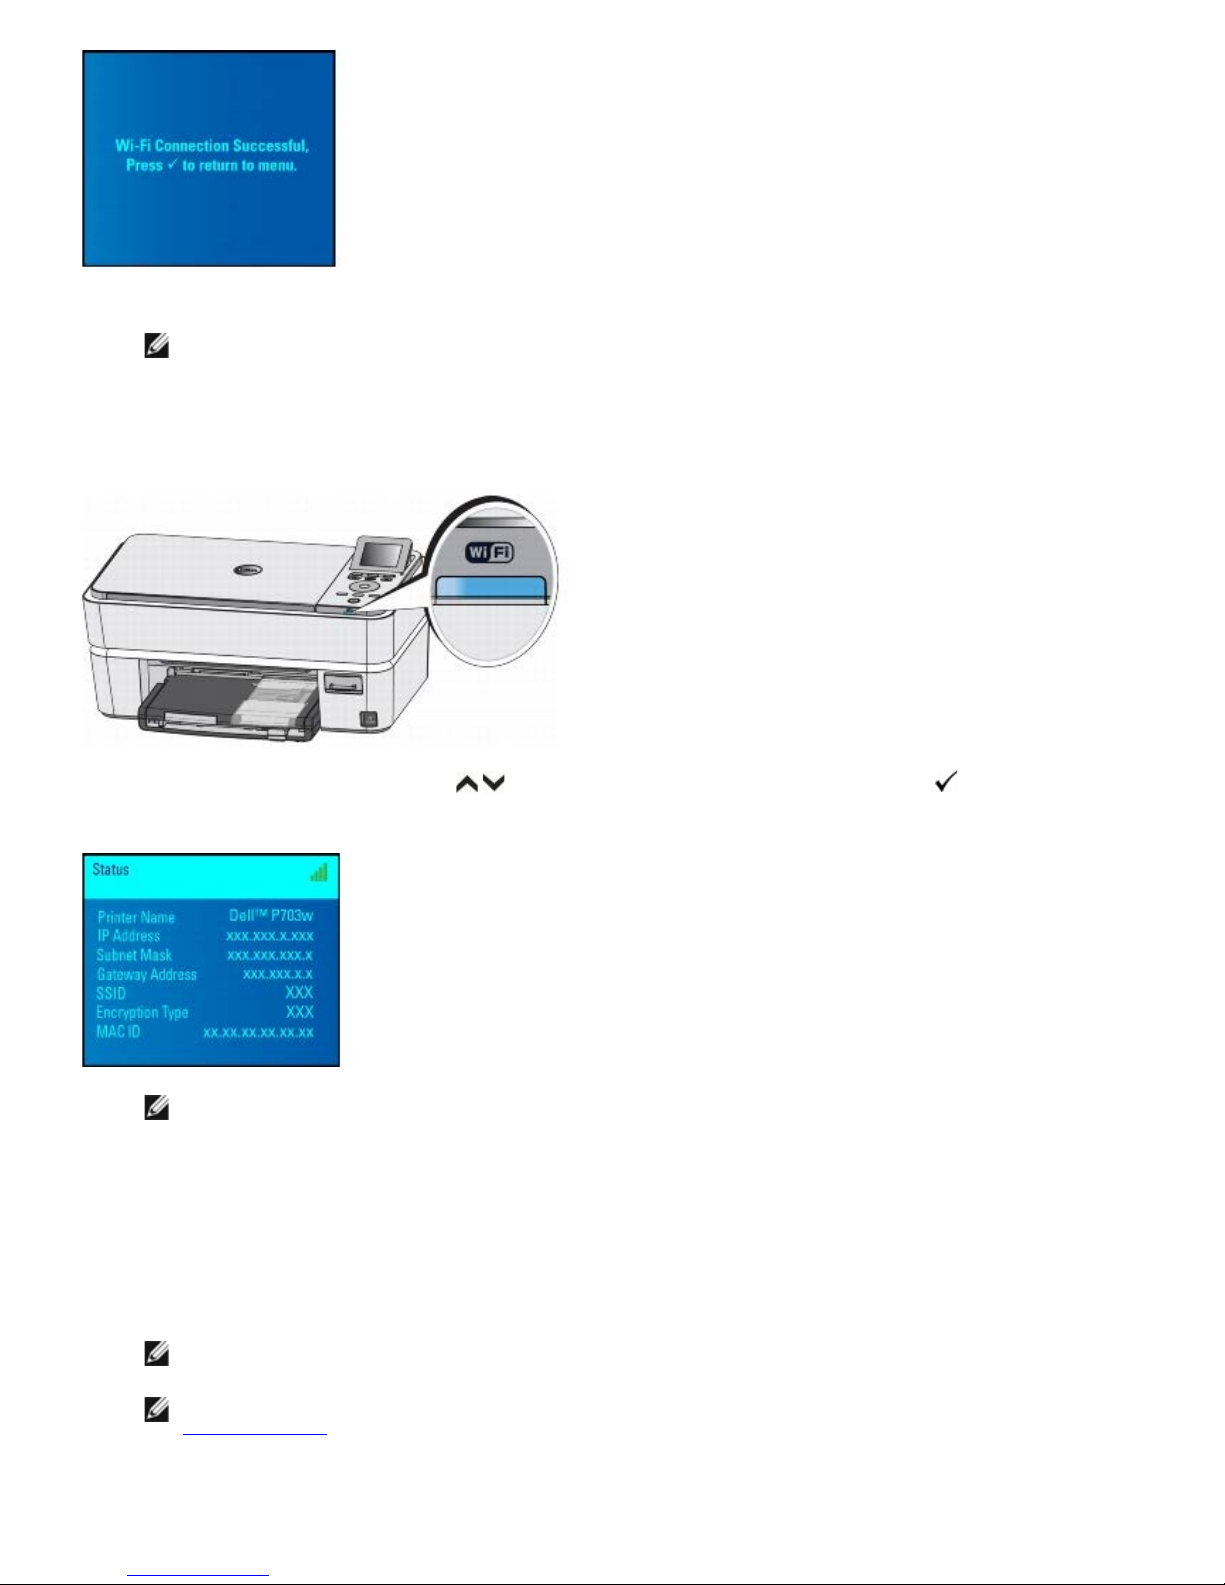
If setup is unsuccessful or times out, wait for a few minutes and repeat steps 5-10.
NOTE: Your printer's internal wireless antenna is located on the right side of the printer close to the operator
panel. Move the printer closer to the router with the printer's operator panel closer to the router for a better
wireless signal.
11. Wait for the Wi-Fi LED on the printer to stop flashing and turn solid blue. This may take few minutes.
12. Press the up or down Arrow button
to scroll to Status, then press the Select button .
NOTE: Ensure that the printer shows the correct SSID and that it has been assigned an IP address (i.e. NOT
0.0.0.0). If the printer IP address has not been assigned restart the printer and re-check. If the IP address
still is not assigned, repeat from step 5.
At your computer:
13. Return to your computer and close the router's web page. Proceed from step 14 to install the printer drivers on
your computer.
14. Insert the Drivers and Utilities CD if you have not already done so.
NOTE: If you have already installed your printer on your computer, launch the installed Wi-Fi Config Utility
program. Skip to step 16.
NOTE: If you do not have your Drivers and Utilities CD, you can download the appropriate software from
support.dell.com.
15. Follow the on-screen instructions until you reach the below screen. By default the USB connection option is
selected.
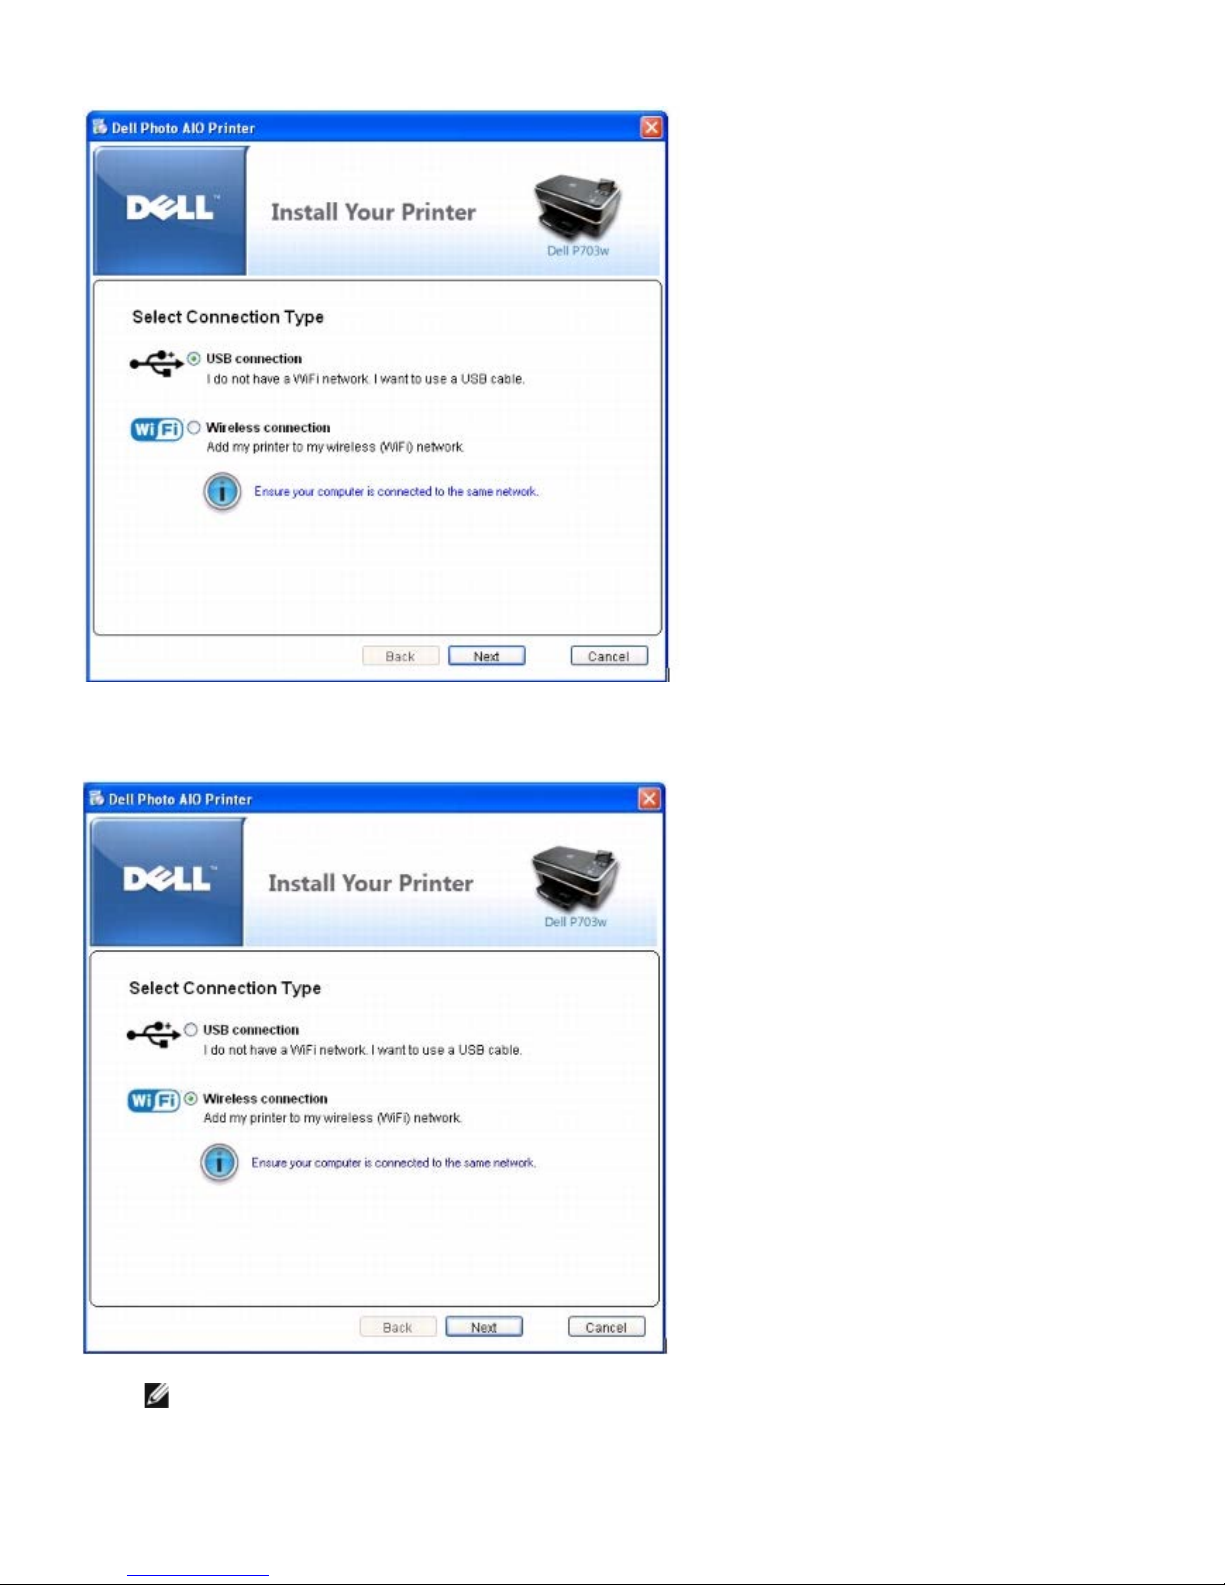
16. Select the Wireless connection, and click Next.
NOTE: Ensure that your computer is connected to the same network.
17. Configure Wireless Printer window opens. Select Keep wireless settings of my printer, and click Next.

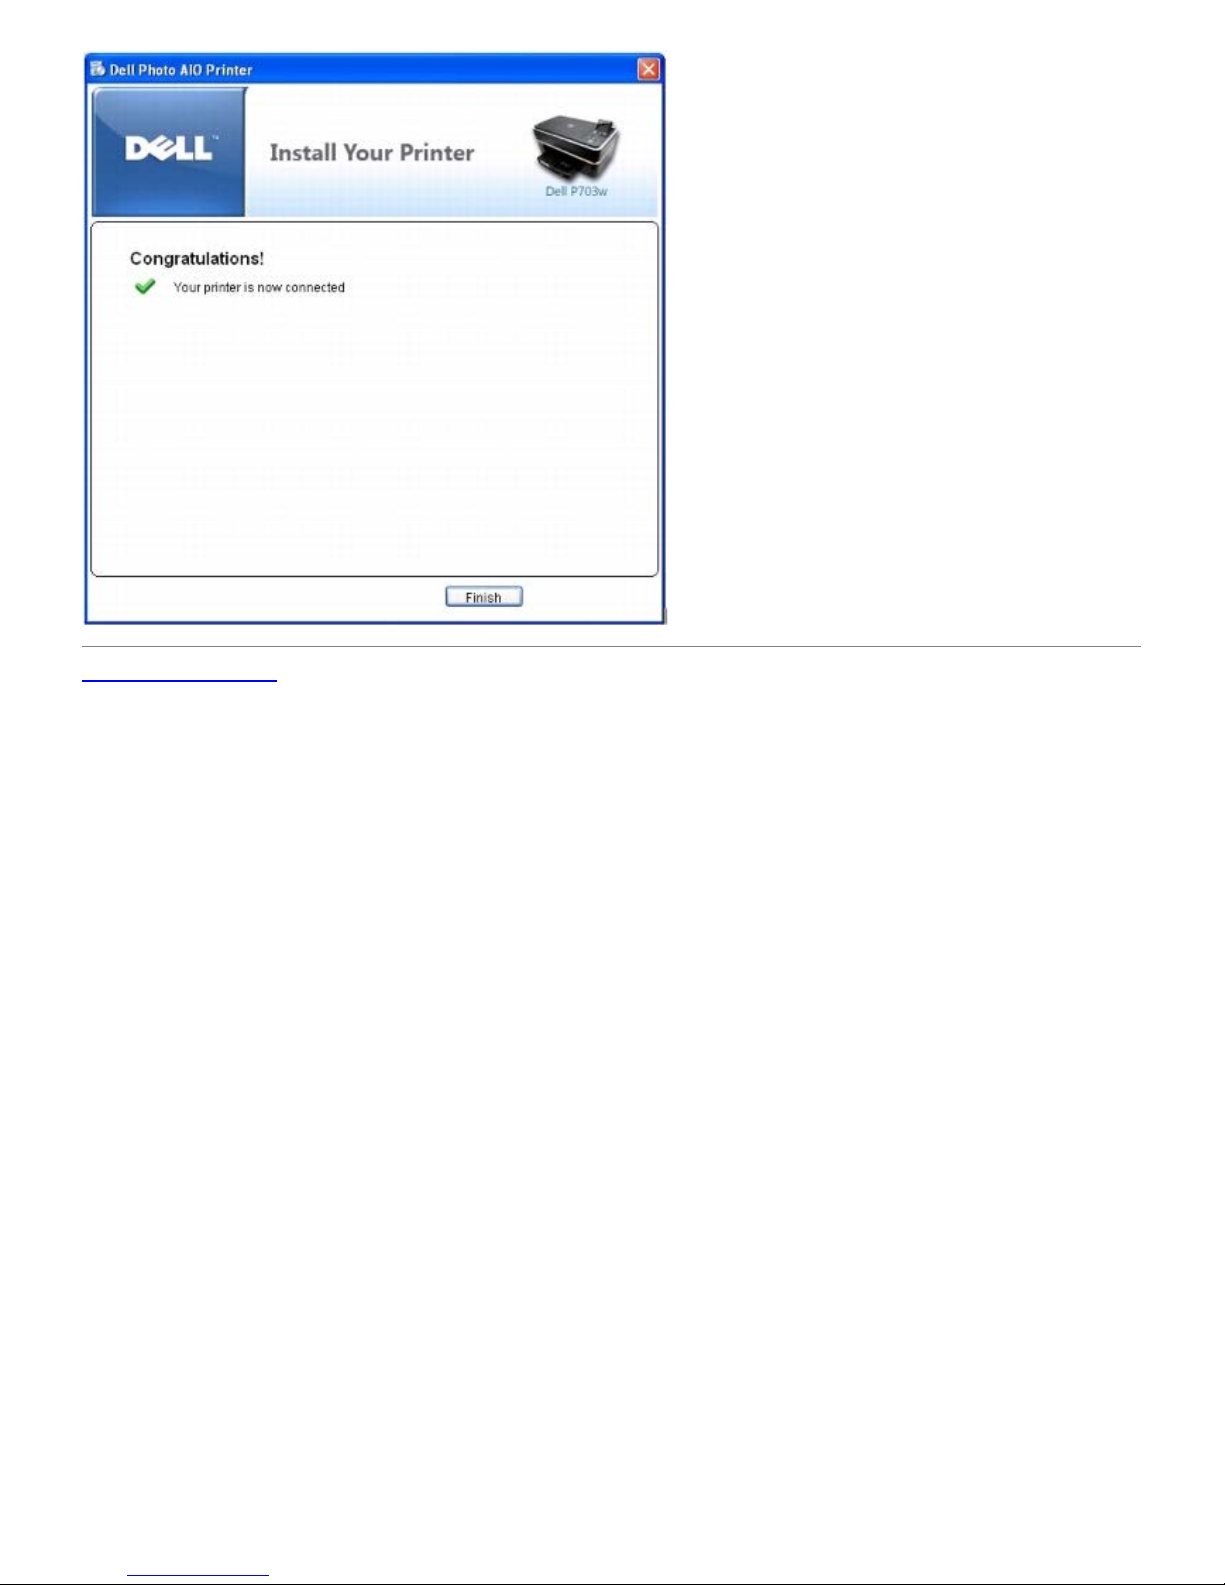
18. Select your printer, and click Next.
19. Click Finish to complete the installation.
Back to Contents Page

Back to Contents Page
Understanding the Operator Panel Menus
Dell™ Photo P703w All-In-One Printer User's Guide
Copy Mode
Photo Mode
Scan Mode
Copy Mode
To view or change the Copy Mode menu:
1. Press the Copy button
on the printer's operator panel.
Copy Menu
item
Settings
Quantity
1. From the Copy Menu, press the down Arrow button
to scroll to Quantity.
2. Press the left or right Arrow button
to change the number of copies (1-99).
3. Press the Select button
to set and continue setting options, or Start button .
The default is one copy.
Color
1. From the Copy Menu, press the down Arrow button
to scroll to Color.
2. Press the left or right Arrow button
to change the copy color (Black and White/Color).
3. Press the Select button
to set and continue setting options, or Start button .
Quality
1. From the Copy Menu, press the down Arrow button
to scroll to Quality.
2. Press the left or right Arrow button
to change the copy quality (Draft/Normal/Best).
3. Press the Select button
to set and continue setting options, or Start button .
Output
1. From the Copy Menu, press the down Arrow button
to scroll to Output.
2. Press the left or right Arrow button
to change the copy output (Scale Percent/Photo layouts/Same size/ Fit to Page).
3. Press the Select button
to set and continue setting options, or Start button .
Size
NOTE: You can change the Size if you have selected Scale percent or Photo layouts as an Output.
Scale Percent:
1. From the Copy Menu, press the down Arrow button
to scroll to Size.
2. Press the left or right Arrow button
to scroll to Scale Percent.
3. Press the left or right Arrow button
to change the Scale percent (10-500).
4. Press the Select button
to set and continue setting options, or Start button .
Photo layouts:
1. From the Copy Menu, press the down Arrow button
to scroll to Size.
2. Press the left or right Arrow button
to scroll to Photo layouts.
3. Press the left or right Arrow button
to change the Photo layout (Borderless/Bordered/2 per page/3 per page/4 per page/9
per page/2x2 poster/3x3 poster/4x4 poster).
4. Press the Select button
to set and continue setting options, or Start button .
Brightness
1. From the Copy Menu, press the down Arrow button
to scroll to Brightness.
2. Press the left or right Arrow button
to select darken or lighten.
3. Press the Select button
to set and continue setting options, or Start button .
Preview
1. From the Copy Menu, press the down Arrow button
to scroll to Preview.
2. Press the left or right Arrow button
to enable or disable Preview.
3. Press the Select button
to set and continue setting options, or Start button .
Save Copy
Settings
1. From the Copy Menu, press the down Arrow button
to scroll to Save Settings.
2. Press the left or right Arrow button
to save copy settings to Yes or No.
Photo Mode
To view or change the Photo Mode menu settings:
1. Insert a memory card. The printer automatically switches to Photo mode after the card is read.
NOTICE: Do not attempt to remove a memory card while it is being accessed. Doing so can damage files on the card. You can safely remove a card only
when the status light next to the slots is not blinking.
Photo Menu
Item
Settings
Layout
1. From the Layout, press the left or right Arrow button to scroll to Photo layout:
Index
2x2 Poster
3x3 Poster
4x4 Poster
Borderless (default)
Bordered
2 per Page
3 per Page
4 per Page
9 per Page
2. Press the Select button
to set and continue setting options, or Start button .
Quantity
1. From the Photo Menu, press the down Arrow button
to scroll to Quantity.
2. Press the left or right Arrow button
to change the number (1-99).
3. Press the Select button
to set and continue setting options, or Start button .
Color
1. From the Photo Menu, press the down Arrow button
to scroll to Color.
2. Press the left or right Arrow button
to change the color (Black and White/Color).
3. Press the Select button
to set and continue setting options, or Start button .
Quality
1. From the Photo Menu, press the down Arrow button
to scroll to Quality.
2. Press the left or right Arrow button
to change the photo quality (Draft/Normal/Best).
3. Press the Select button
to set and continue setting options, or Start button .
Save settings
1. From the Photo Menu, press the down Arrow button
to scroll to Save Settings.
2. Press the left or right Arrow button
to set save photo settings to Yes or No.
Scan Mode
To view or change the Scan Mode menu settings:
1. Press the Scan button
on the printer's operator panel.
Scan Menu
Item
Settings
Scan what
1. From the Scan Menu, press the down Arrow button
to scroll to Scan what.
2. Press the left or right Arrow button
to select Document/Photo.
3. Press the Select button
to set and continue setting options, or Start button .
Scan to
1. From the Scan Menu, press the down Arrow button
to scroll to Scan to.
2. Press the left or right Arrow button
to select PC-USB/Memory Card/Wifi-host.
3. Press the Select button
to set and continue setting options, or Start button .
Scan destination
1. From the Scan Menu, press the down Arrow button
to scroll to Scan destination.
2. Press the left or right Arrow button
to select the File.
3. Press the Select button
to set and continue setting options, or Start button .
Save settings
1. From the Scan Menu, press the down Arrow button
to scroll to Save Settings.
2. Press the left or right Arrow button
to set save scan settings to Yes or No.
Back to Contents Page

Back to Contents Page
Maintenance
Dell™ Photo P703w All-In-One Printer User's Guide
Cleaning the Scanner Glass
Cleaning the Scanner Lid
Formatting a Memory Card
Printing a Diagnostic Sheet
Checking Ink Levels
Replacing Ink Cartridges
Running a Calibration
Cleaning the Printhead
Replacing the Printhead
Disabling the Upgrade
Upgrading the Firmware
Dell™ ink cartridges are available through Dell. You can order more ink online at www.dell.com/supplies or by phone.
It is recommended that you use Dell ink cartridges for your printer. Dell does not provide warranty coverage for problems
caused by using accessories, parts, or components not supplied by Dell.
Cleaning the Scanner Glass
1. Turn off the printer and unplug it from the wall outlet.
2. Lift the scanner lid.
3. Clean the glass with a soft cloth or sponge slightly moistened with a nonabrasive glass cleaner.
NOTICE: Do not use abrasives, acetone, benzene, or carbon tetrachloride on the glass, since they can damage it.
Do not place or spray liquid directly on the glass. The liquid might seep under the glass and damage the device.
4. Dry the glass with a lint free cloth.
Cleaning the Scanner Lid
1. Turn off the printer and unplug it from the wall outlet.
2. Lift the scanner lid.
3. Clean the lid underside with a soft cloth or sponge slightly moistened with a mild soap and warm water.
4. Wipe the underside gently to loosen the debris.
5. Dry the underside with a chamois or soft cloth.
NOTICE: Do not use paper-based wipes, as these might scratch the underside.
6. If further cleaning is needed, repeat the previous steps using isopropyl (rubbing) alcohol and wipe the underside
thoroughly with a damp cloth to remove any residual alcohol.
Formatting a Memory Card
Formatting erases all the data on a memory card.
1. Insert a memory card into the appropriate slot.
2. Press the Menu button
.
3. Press the down Arrow button
to scroll to Format Memory Card.
4. Press the Select button .
5. Press the Start button
.
The formatting of the memory card begins.
Printing a Diagnostic Sheet
The Diagnostic Page contains information about your printer that can be useful when contacting Dell support.
1. Press the Menu button
.
2. Press the down Arrow button
to scroll to Print Diagnostic Sheet.
3. Press the Select button .
4. Press the Start button
.
Printing of the diagnostic sheet begins.
Checking Ink Levels
Your printer uses separate black and color ink cartridges. You can check the ink levels to determine how soon you might
need to replace an ink cartridge. The ink level supply screen shows the amount of ink remaining in the ink tanks.
1. Press the Menu button .
2. Press the down Arrow button
to scroll to Ink Levels.
3. Press the Select button .
The Ink Levels screen shows ink levels in a vertical gauge format with one gauge for the Black Ink cartridge and another
for the Color Ink cartridge.
Replacing Ink Cartridges
A Low ink warning message is displayed when one of the ink levels drops below 15 percent.
NOTE: For the best quality prints, store ink cartridges in a location where the temperature does not exceed 85° F
(30° C).
NOTICE: Use genuine Dell ink cartridges to ensure the best results and avoid printhead damage.
1. Turn on your printer.
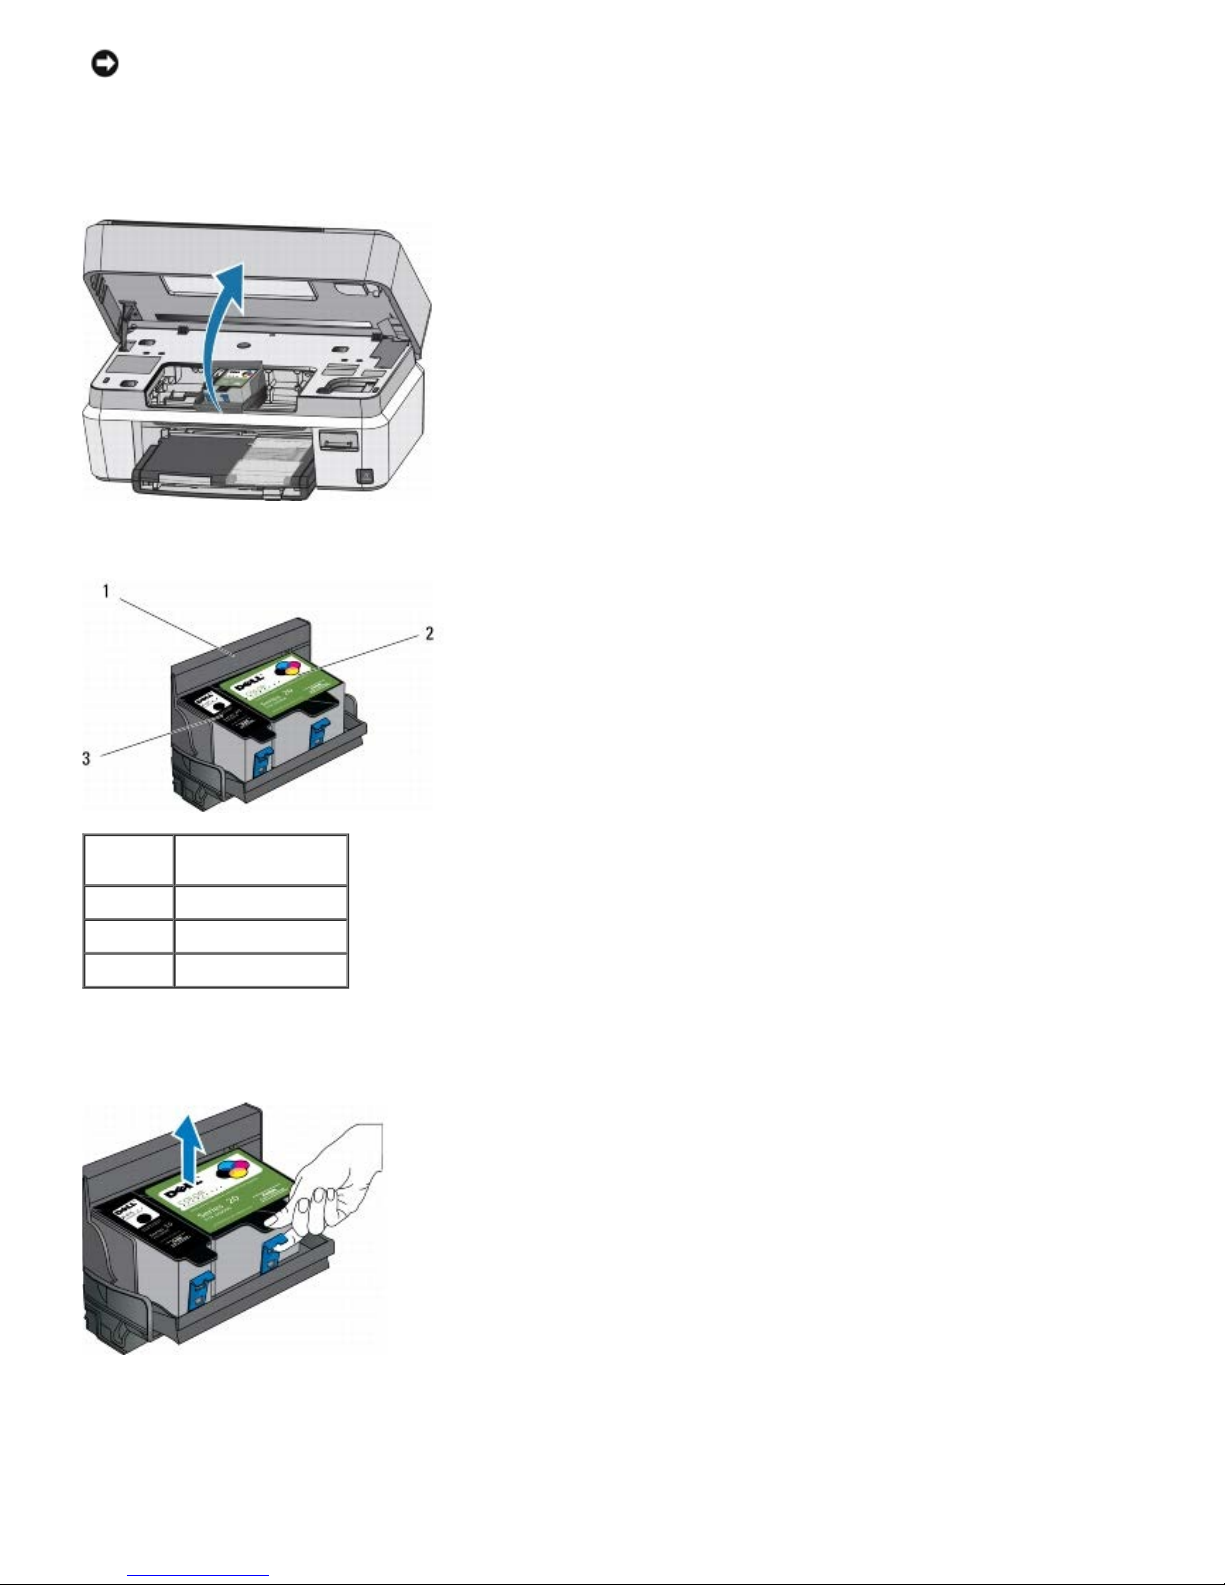
2. Lift the scanner base unit from the front.
The printhead moves to a center position. The ink tanks are located in the printhead.
Number Part
1 Printhead
2 Color ink cartridge
3 Black ink cartridge
3. Wait until the printhead is idle and silent, then pinch the pinch latch on the old ink cartridge with your thumb and
forefinger.
4. Lift it out of the printhead.

5. Remove the bagged ink cartridge from the box, tear open the bag at the notch, and remove the ink cartridge.
6. Remove the orange cap from the cartridge by grasping the top edge and pulling/rotating it off the ink cartridge.
NOTE: Insert the ink cartridge into the printhead immediately to prevent any drying of the ink.
7. Slide the ink cartridge into the printhead.
8. Press down the tab until you hear a click and feel the latch snap into position.

9. Close the scanner base unit.
Running a Calibration
Your printer performs a calibration every time you install or replace a printhead. However, you can also run a calibration if
you see changes in the image quality. Calibration aligns the printheads and performs a nozzle health check to enable highquality prints.
Calibrating From the Computer
1. Load the main tray or photo tray.
NOTE: If you do not have any photo paper, you can use plain paper, but photo paper is highly recommended
for calibrations.
2. Click Start® Programs® Dell Printers® Dell Photo P703w AIO Printer.
In Windows Vista®:
a. Click
® Programs.
b. Click Dell Printers.
c. Click Dell Photo P703w AIO Printer.
3. Select Dell Imaging Toolbox.
The Dell Imaging Toolbox opens.
4. Click the Help button
.
5. Click Maintenance.
 Loading...