

Page 1
Dell™ OptiPlex™ Systems
Setup and Quick Reference Guide
Guide de configuration et de référence rapide
Guía de instalación y de referencia rápida
Models DHS, DHP, and DHM
www.dell.com | support.dell.com
Page 2

Dell™ OptiPlex™ Systems
Setup and Quick Reference Guide
www.dell.com | support.dell.com
Page 3

Notes, Notices, and Cautions
NOTE: A NOTE indicates important information that helps you make better
use of your computer.
NOTICE: A NOTICE indicates either potential damage to hardware or loss of
data and tells you how to avoid the problem.
CAUTION: A CAUTION indicates a potential for property damage,
personal injury, or death.
____________________
Information in this document is subject to change without notice.
© 2000–2002 Dell Computer Corporation. All rights reserved.
Reproduction in any manner whatsoever without the written permission of
Dell Computer Corporation is strictly forbidden.
Trademarks used in this text: Dell, OptiPlex, and the DELL logo are trademarks of
Dell Computer Corporation; Intel, Pentium, and Celeron are registered trademarks of
Intel Corporation; Microsoft and Windows are registered trademarks of Microsoft Corporation.
Other trademarks and trade names may be used in this document to refer to either the entities claiming
the marks and names or their products. Dell Computer Corporation disclaims any proprietary interest
in trademarks and trade names other than its own.
August 2002 P/N 81FTK Rev. A07
Page 4

Contents
About This Guide . . . . . . . . . . . . . . . . . . . . . . . . . . 5
Finding Information for Your Computer
CAUTION: Safety Instructions
When Using Your Computer
Getting Started/Setup
Solving Problems
. . . . . . . . . . . . . . . . . . . . . . . 12
. . . . . . . . . . . . . . . . . . . . . . . . . 17
Regulatory Information
. . . . . . . . . . . . . . . . . . . 8
. . . . . . . . . . . . . . . . . . . . 10
. . . . . . . . . . . . . . . . . . . . . . 20
Limited Warranties and Return Policy
À propos de ce guide
. . . . . . . . . . . . . . . . . . . . . . . 39
. . . . . . . . . . . . . . 5
. . . . . . . . . . . . . . 23
Obtention d'informations concernant votre ordinateur
PRÉCAUTION : Consignes de sécurité
Lors de l'utilisation de votre ordinateur
Prise en main et configuration
Résolution de problèmes
Informations réglementaires
. . . . . . . . . . . . . . . . . . . . . 51
. . . . . . . . . . . . . . . . . . . 55
. . . . . . . . . . . . . . 42
. . . . . . . . . . . . . . 44
. . . . . . . . . . . . . . . . . . 46
. . . . . . 39
Garanties limitées et règles de retour
Acerca de esta guía
. . . . . . . . . . . . . . . . . . . . . . . . 71
. . . . . . . . . . . . . . . 57
Búsqueda de información para su equipo
PRECAUCIÓN: Instrucciones de seguridad
. . . . . . . . . . . . . 71
. . . . . . . . . . . . 74
Contents 3
Page 5

Al usar el equipo . . . . . . . . . . . . . . . . . . . . . . . . . . 76
Para comenzar/Configuración
Solución de problemas
Información reglamentaria
. . . . . . . . . . . . . . . . . . . 78
. . . . . . . . . . . . . . . . . . . . . . . 83
. . . . . . . . . . . . . . . . . . . . 87
Garantías limitadas y política de devoluciones
. . . . . . . . . . 90
4 Contents
Page 6
About This Guide
This document contains getting started/setup; solving problems; and
safety, regulatory, and warranty information about your Dell
computer.
To obtain the latest versions of the documents on your hard drive, go to the
Dell Support website at support.dell.com.
Regulatory model numbers appear throughout this document; their chassis
type equivalents are shown below:
Regulatory Model Numbers and Chassis Types
DHS = small desktop (SD) chassis
DHP = small form-factor (SF) chassis
DHM = small mini-tower (SMT) chassis
™ OptiPlex™
Finding Information for Your Computer
What Are You Looking For? Find it Here
• A diagnostic program for my computer
• Drivers for my computer
• My computer documentation
• My device documentation
Drivers and Utilities CD (also known as the
ResourceCD)
You can use this CD to access documentation, reinstall drivers, or run
diagnostics tools.
Setup and Quick Reference Guide 5
Page 7

What Are You Looking For? Find it Here
• Express Service Code and Service
Express Service Code and Product Key
Ta g N um b e r
• Microsoft
®
Windows® License Label
(Product Key)
Located on your computer.
• How to reinstall my operating system Operating System CD and Installation Guide
www.dell.com | support.dell.com
If you reinstall your operating system, use the Drivers and Utilities CD
to reinstall drivers for the devices that came with your computer.
6 Setup and Quick Reference Guide
Page 8
What Are You Looking For? Find it Here
• How to remove and replace parts
User’s Guide icon
• Technical specifications
• How to configure system settings
• How to troubleshoot and solve problems
Depending on your operating system, double-click the User’s Guides
icon on your desktop or click the Start button and then click Help and
Support to access the electronic documentation stored on your
hard drive.
• Latest drivers for my computer
Dell Support website
• Answers to technical service and
support questions
• Online discussions with other users and
technical support
• Documentation for my computer
The Dell Support website provides several online tools, including:
• Knowledge Base — hints, tips, and online courses
• Customer Forum — online discussion with other Dell customers
• Upgrades — upgrade information for components, such as memory,
the hard drive, and the operating system
• Customer Care — contact information, order status, warranty, and
repair information
• Downloads — drivers, patches, and software updates
• Reference — computer documentation, product specifications, and
white papers
• Service call status
Dell Premier Support website
• Top technical issues for my computer
• Frequently asked questions
• File downloads
• Details on my computer’s configuration
• Service contract for my computer
• How to use Windows XP
• Documentation for my computer and
devices
The Dell Premier Support website is customized for corporate,
government, and education customers. This site may not be available in
all regions.
Windows XP Help and Support Center
1 Click the Start button, and then click Help and Support.
2 Type a word or phrase that describes your problem, and then click
the arrow icon.
3 Click the topic that describes your problem.
4 Follow the instructions shown on the screen.
Setup and Quick Reference Guide 7
Page 9
CAUTION: Safety Instructions
Use the following safety guidelines to help ensure your own personal safety and to help protect
your computer and working environment from potential damage.
General
• Do not attempt to service the computer yourself unless you are a trained service
technician. Always follow installation instructions closely.
• To help prevent electric shock, plug the computer and device power cables into properly
www.dell.com | support.dell.com
grounded electrical outlets. These cables are equipped with 3-prong plugs to help ensure
proper grounding. Do not use adapter plugs or remove the grounding prong from a cable.
If you must use an extension cable, use a 3-wire cable with properly grounded plugs.
• To help avoid the potential hazard of electric shock, do not use your computer during an
electrical storm.
• To help avoid the potential hazard of electric shock, do not connect or disconnect
any cables or perform maintenance or reconfiguration of this product during an
electrical storm.
• If your computer includes a modem, the cable used with the modem should be
manufactured with a minimum wire size of 26 American wire gauge (AWG) and an
FCC-compliant RJ-11 modular plug.
• Before you clean your computer, disconnect the computer from the electrical outlet.
Clean your computer with a soft cloth dampened with water. Do not use liquid or aerosol
cleaners, which may contain flammable substances.
• To help avoid possible damage to the system board, wait 5 seconds after turning off the
computer before disconnecting a device from the computer.
8 Setup and Quick Reference Guide
Page 10

CAUTION: Safety Instructions (continued)
• To avoid shorting out your computer when disconnecting a network cable, first unplug
the cable from the network adapter on the back of your computer, and then from the
network jack. When reconnecting a network cable to your computer, first plug the cable
into the network jack, and then into the network adapter.
• To help protect your computer from sudden, transient increases and decreases in
electrical power, use a surge suppressor, line conditioner, or uninterruptible power
supply (UPS).
• Ensure that nothing rests on your computer’s cables and that the cables are not located
where they can be stepped on or tripped over.
• Do not push any objects into the openings of your computer. Doing so can cause fire or
electric shock by shorting out interior components.
• Keep your computer away from radiators and heat sources. Also, do not block cooling
vents. Avoid placing loose papers underneath your computer; do not place your computer
in a closed-in wall unit or on a bed, sofa, or rug.
• Do not spill food or liquids on your computer. If the computer gets wet, consult your
User’s Guide.
Setup and Quick Reference Guide 9
Page 11

When Using Your Computer
As you use your computer, observe the following safe-handling guidelines.
CAUTION: Do not operate your computer with any cover(s) (including computer
covers, bezels, filler brackets, front-panel inserts, and so on) removed.
• Your computer is equipped with one of the following:
– A fixed-voltage power supply — Computers with a fixed-voltage power supply do not
have a voltage selection switch on the back panel and operate at only one voltage
(see the regulatory label on the outside of the computer for its operating voltage).
www.dell.com | support.dell.com
– An auto-sensing voltage circuit — Computers with an auto-sensing voltage circuit do
not have a voltage selection switch on the back panel and automatically detect the
correct operating voltage.
– A manual voltage selection switch — Computers with a voltage selection switch on
the back panel must be manually set to operate at the correct operating voltage.
NOTICE: To help avoid damaging a computer with a manual voltage selection switch, set the
switch for the voltage that most closely matches the AC power available in your location. For Japan,
the voltage selection switch must be set to the 115-V position even though the AC power available in
Japan is 100 V. Also, ensure that your monitor and attached devices are electrically rated to
operate with the AC power available in your location.
• Before working inside the computer, unplug the computer to help prevent electric shock
or system board damage. Certain system board components continue to receive power
any time the computer is connected to AC power.
10 Setup and Quick Reference Guide
Page 12

When Using Your Computer (continued)
When Working Inside Your Computer
Before you open the computer cover, perform the following steps in the sequence indicated.
CAUTION: Do not attempt to service the computer yourself, except as explained in
your online Dell documentation or in instructions otherwise provided to you by Dell.
Always follow installation and service instructions closely.
NOTICE: To help avoid possible damage to the system board, wait 5 seconds after turning off the
computer before removing a component from the system board or disconnecting a device from the
computer.
1
Perform an orderly computer shutdown using the operating system menu.
2 Turn off your computer and any devices connected to the computer.
3 Ground yourself by touching an unpainted metal surface on the chassis, such as the metal
around the card-slot openings at the back of the computer, before touching anything
inside your computer.
While you work, periodically touch an unpainted metal surface on the computer chassis
to dissipate any static electricity that might harm internal components.
4 Disconnect your computer and devices, including the monitor, from their electrical
outlets. Also, disconnect any telephone or telecommunication lines from the computer.
Doing so reduces the potential for personal injury or shock.
In addition, take note of these safety guidelines when appropriate:
• When you disconnect a cable, pull on its connector or on its strain-relief loop, not on the
cable itself. Some cables have a connector with locking tabs; if you are disconnecting this
type of cable, press in on the locking tabs before disconnecting the cable. As you pull
connectors apart, keep them evenly aligned to avoid bending any connector pins. Also,
before you connect a cable, ensure that both connectors are correctly oriented and
aligned.
• Handle components and cards with care. Do not touch the components or contacts on a
card. Hold a card by its edges or by its metal mounting bracket. Hold a component such
as a microprocessor chip by its edges, not by its pins.
CAUTION: There is a danger of a new battery exploding if it is incorrectly installed.
Replace the battery only with the same or equivalent type recommended by the
manufacturer. Do not dispose of the battery along with household waste. Contact
your local waste disposal agency for the address of the nearest battery deposit site.
Setup and Quick Reference Guide 11
Page 13
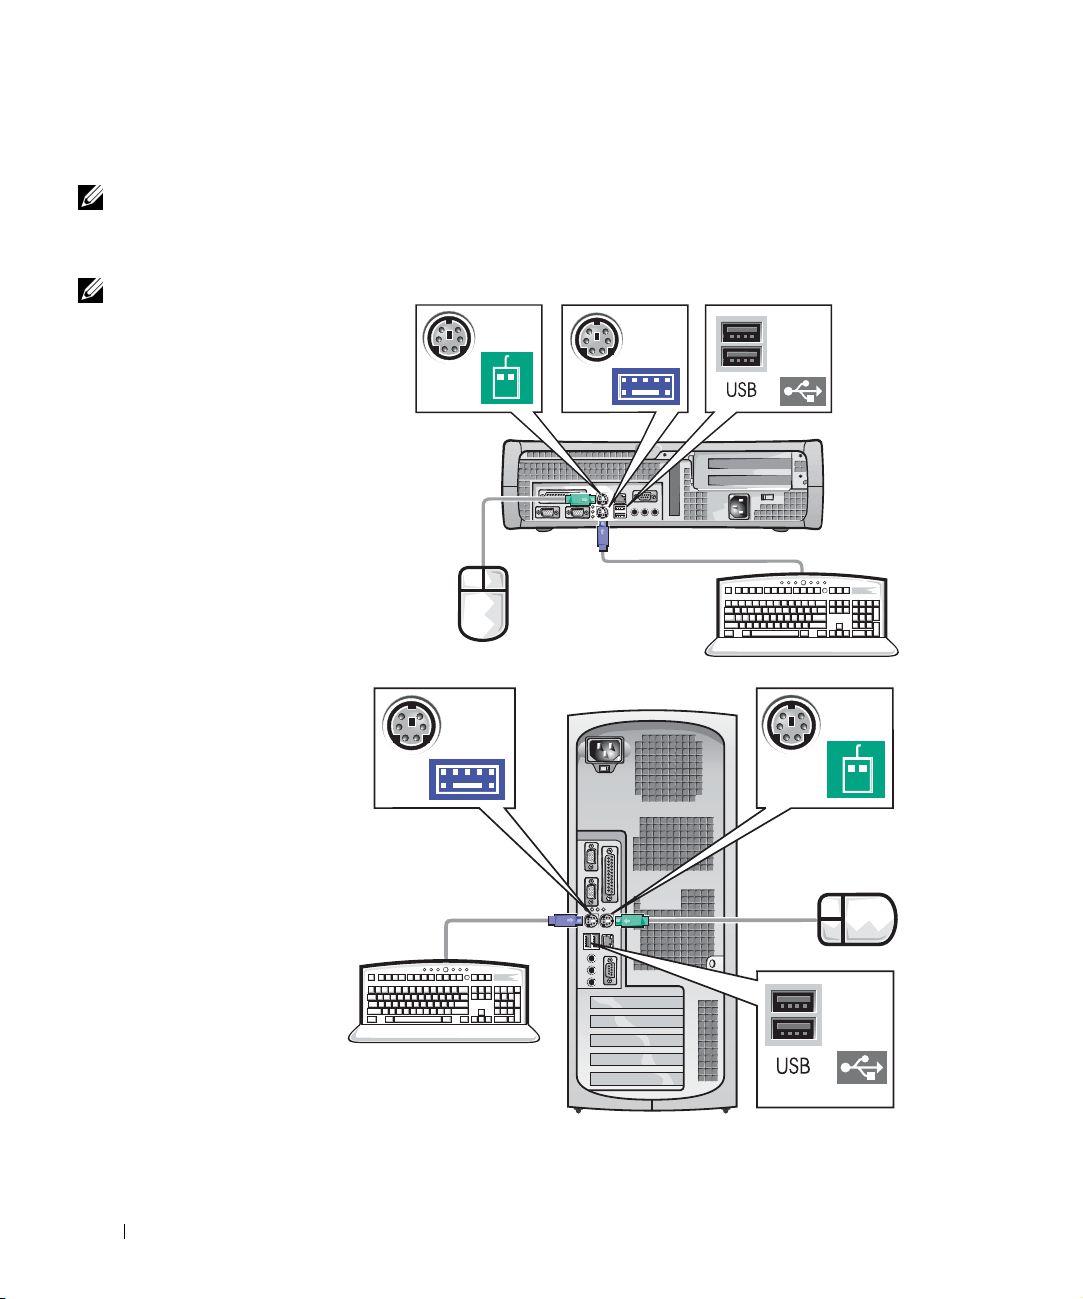
Getting Started/Setup
NOTE: Connect only one
keyboard and one mouse.
NOTE: If you have a
Universal Serial Bus
(USB)-compliant mouse
or keyboard, use the USB
connectors on the back of
your system.
www.dell.com | support.dell.com
Use the following steps to connect external devices to your computer via the
input/output (I/O) panel. The back of your Dell system, including the I/O
panel, may look different from the examples shown here.
1
12 Setup and Quick Reference Guide
Page 14
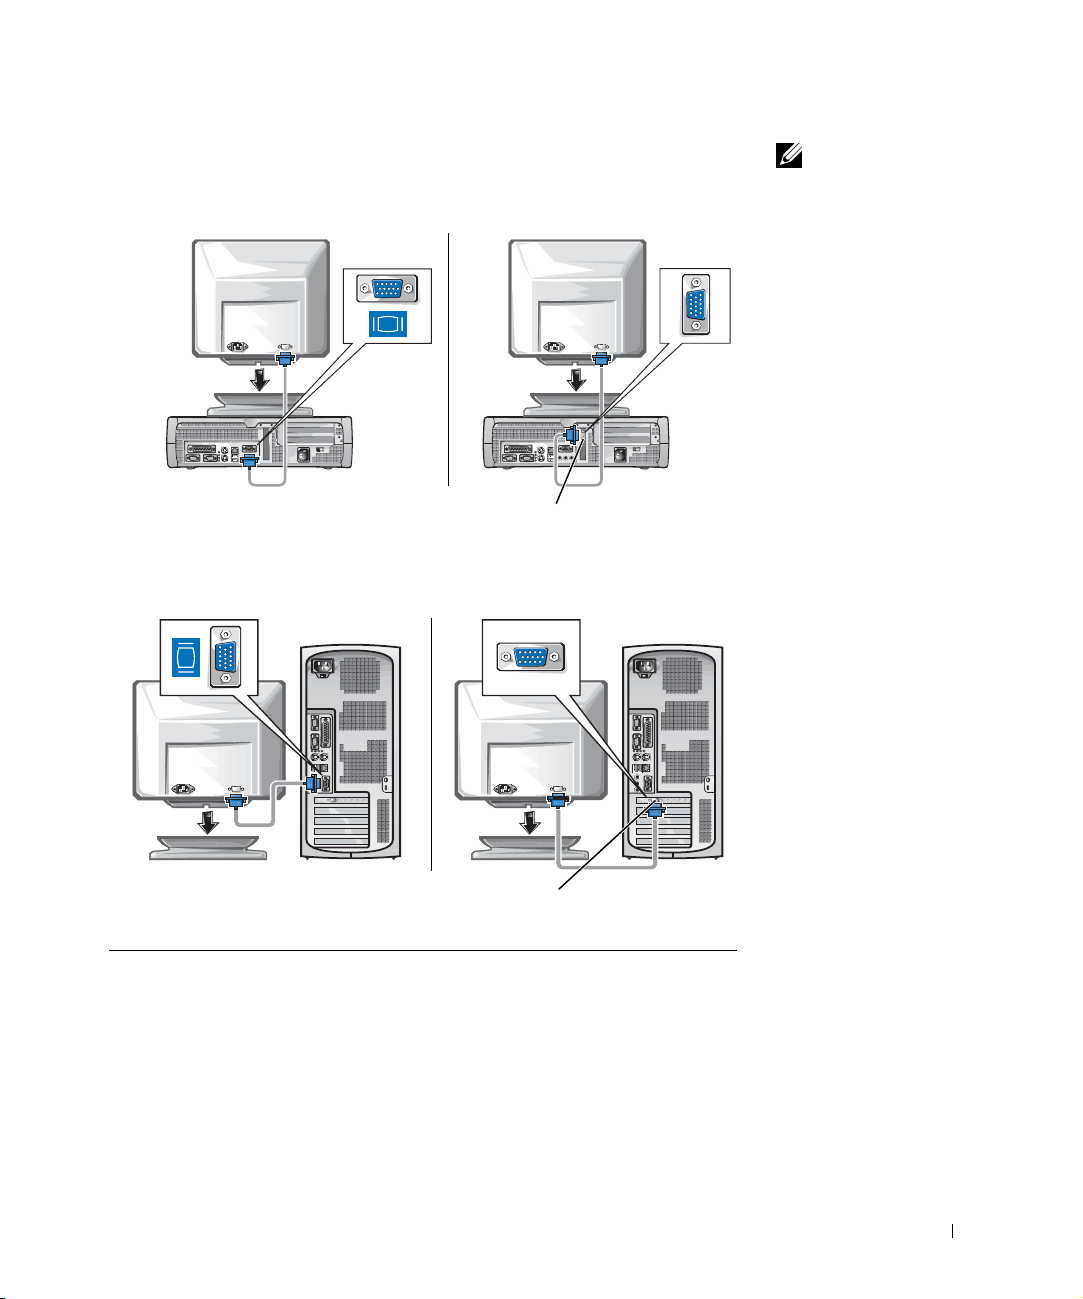
System with
2
one video connector
System with
two video connectors
video connector on expansion card
NOTE: If your system
has two video connectors,
the integrated video
connector is disabled and
has a protective cap on it.
Use the expansion card
connector, as shown in the
illustrations on the right
in step 2.
System with
one video connector
video connector on expansion card
System with
two video connectors
Setup and Quick Reference Guide 13
Page 15

NOTE: If your system
4
Verif
has two audio connectors,
use the one on the
expansion card, as shown
in the illustrations on the
right in step 3.
3
www.dell.com | support.dell.com
NOTE: Auto-select power
supplies do not require a
voltage selection switch.
Your computer may not
have this switch.
diagnostics lights diagnostics lights
diagnostics
lights
y that the voltage selection switch is set correctly for your location.
For more information, see "When Using Your Computer" on page 10.
diagnostics
lights
14 Setup and Quick Reference Guide
Page 16

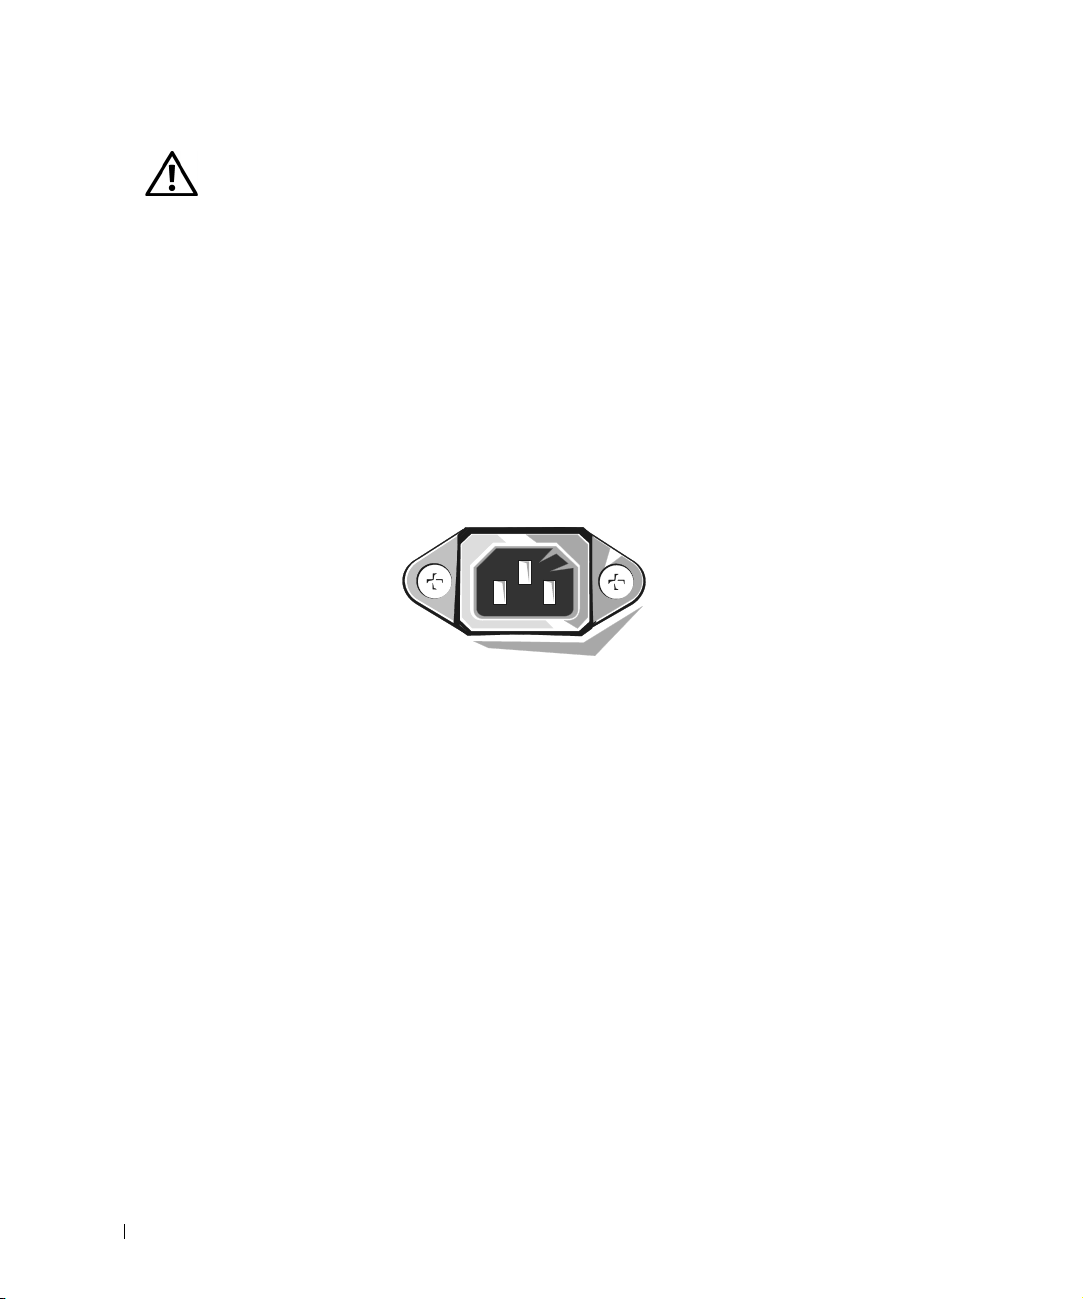
CAUTION: To help prevent electric shock, use only the power
cable provided and ensure that it is plugged into a properly
grounded power source.
5
Setup and Quick Reference Guide 15
Page 17
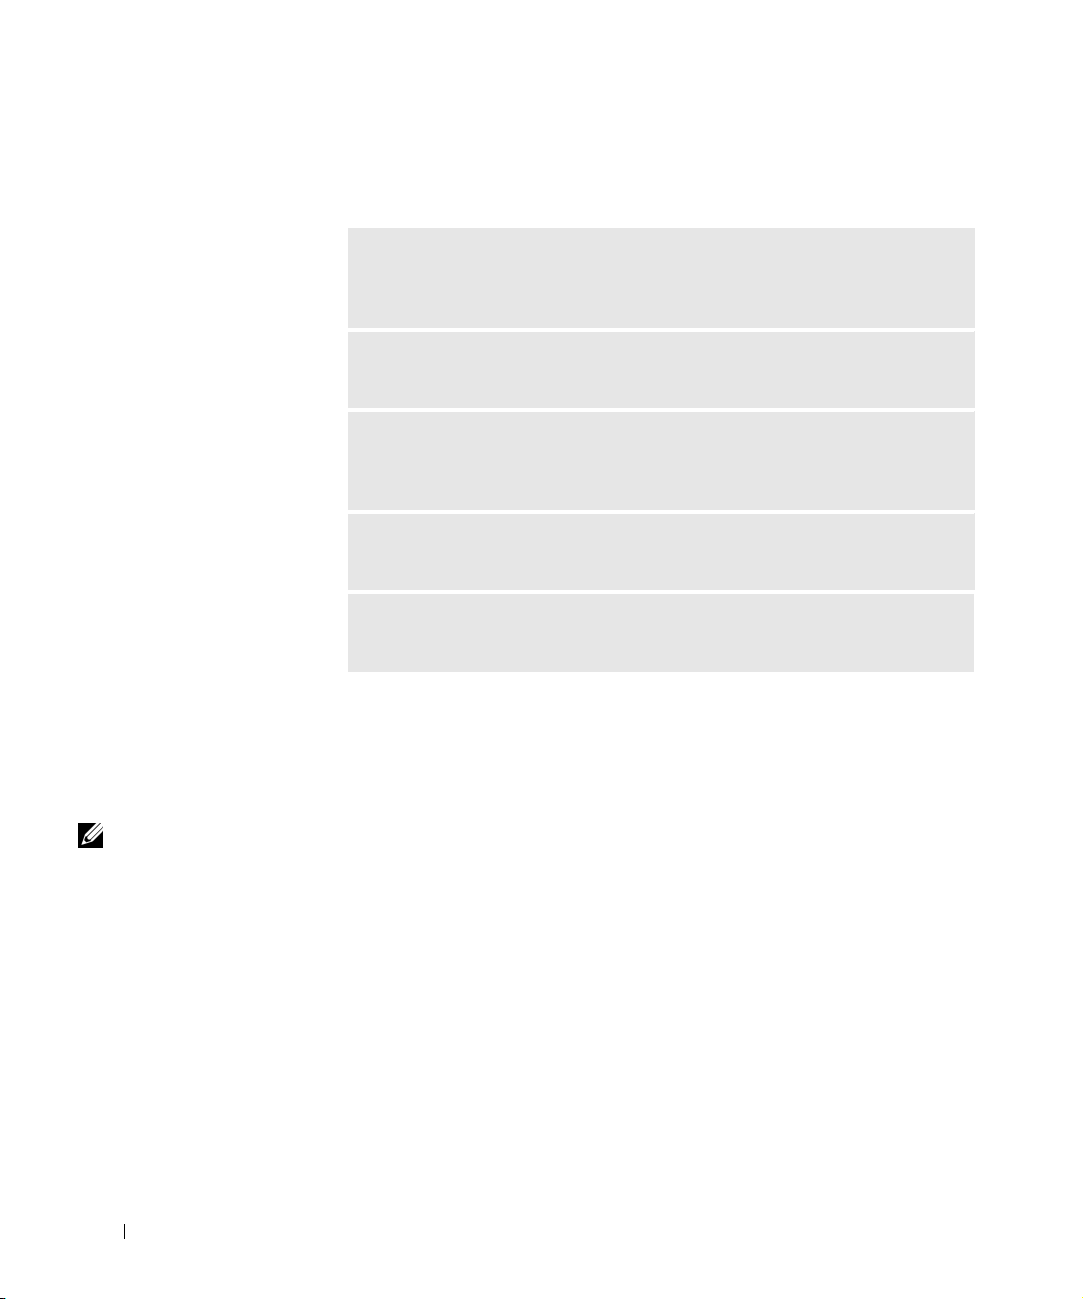
www.dell.com | support.dell.com
The following illustrations show power button locations and monitor
controls.
6
16 Setup and Quick Reference Guide
brightness
contrast
Page 18

Read the software license agreement and follow the operating system setup
instructions on the screen.
Congratulations! You have completed your system setup.
Depending on your operating system, double-click the User’s Guides icon
on your desktop (shown below), or click the Start button and then select
Help and Support to access the electronic documentation stored on your
hard drive.
Solving Problems
Dell provides a number of tools to help you if your system does not perform
as expected. For the latest troubleshooting information available for your
system, see the Dell Support website at support.dell.com. You can also
find descriptions of Dell troubleshooting tools in the section titled
"Getting Help" in your online User’s Guide.
If computer problems occur that require help from Dell, write a detailed
description of the error, beep codes, or diagnostics light patterns; record
your Express Service Code and Service Tag Number below; and then
contact Dell from the same location as your computer.
See "Finding Information for Your Computer" on page 5 for an example of
the express service code and service tag numbers.
Express Service Code: ___________________________
Service Tag Number: ___________________________
Setup and Quick Reference Guide 17
Page 19
Your computer includes the following tools that can help you solve a
problem:
DELL DIAGNOSTICS — The Dell Diagnostics test various components in your
computer and help to identify the cause of computer problems. For more
information, see "Running the Dell Diagnostics" on page 19.
SYSTEM LIGHTS — Located on the front of the computer, these lights can
indicate a computer problem. For more information, see your User ’s Guide.
www.dell.com | support.dell.com
NOTE: To access
device drivers and user
documentation, you must
use the Drivers and
Utilities CD while you
are running Windows.
DIAGNOSTIC LIGHTS — Located on the back of the computer, these lights
can help troubleshoot a computer problem. For more information, see your
User’s Guide.
SYSTEM MESSAGES — The computer reports these messages to warn you of
current or possible failure. For more information, see your User’s Guide.
BEEP CODES — A series of audible beep codes emitted by your computer can
help identify a problem. For more information, see your User ’s Guide.
Using the Drivers and Utilities CD
To use the Drivers and Utilities CD (also known as the Resource CD) while
you are running the Microsoft Windows operating system, perform the
following steps.
Turn on the computer and allow it to boot to the Windows desktop.
1
2 Insert the Drivers and Utilities CD into the CD drive.
If you are using the Drivers and Utilities CD for the first time on this
computer, the ResourceCD Installation window opens to inform you
that the Drivers and Utilities CD is about to begin installation.
3 Click OK to continue.
To complete the installation, respond to the prompts offered by the
installation program.
4 Click Next at the Welcome Dell System Owner screen.
5 Choose the appropriate System Model, Operating System, Device
Ty p e , and Topic.
18 Setup and Quick Reference Guide
Page 20

Drivers for Your Computer
To display a list of device drivers for your computer, perform the following steps:
1 Click My Drivers in the Topic pull-down menu.
The Drivers and Utilities CD scans your computer’s hardware and
operating system, and then a list of device drivers for your system
configuration is displayed on the screen.
2 Click the appropriate driver and follow the instructions to download
the driver to your computer.
To view all available drivers for your computer, click Drivers from the Topic
pull-down menu.
Running the Dell Diagnostics
The Dell Diagnostics is a program that tests various components in your
computer. Run this program whenever you have a computer problem to
help you identify the source of the problem.You can run the Dell
Diagnostics from your hard drive or the Drivers and Utilities CD.
NOTICE: If your hard drive fails, run the Dell IDE Hard Drive Diagnostics
(see "Running the Dell IDE Hard Drive Diagnostics" on page 20).
Turn on your computer (if your computer is already on, restart it).
1
2 When F2 = Setup appears in the upper-right corner of the screen,
press <Ctrl><Alt><F10>.
The diagnostics initialization begins immediately; then the
Diagnostics Menu appears.
3 Select the appropriate diagnostic option for your computer.
To use the diagnostics, follow instructions on the screen.
Changing the Boot Sequence
To run the Dell Diagnostics from the Drivers and Utilities CD, perform the
following steps to enable your computer to boot from the CD:
1 Insert the Drivers and Utilities CD into the CD drive.
2 Turn on (or restart) your computer.
Setup and Quick Reference Guide 19
Page 21

3 When F2 = Setup appears in the upper-right corner of the screen,
press <Ctrl><Alt><F8>.
NOTE: This feature
changes the boot sequence
for one time only. On the
next start-up, the
computer boots according
to the devices specified in
system setup.
www.dell.com | support.dell.com
The Boot Device Menu appears.
If you wait too long and the Windows logo appears, continue to wait
until you see the Windows desktop. Then shut down your computer
and try again.
4 Select the CD-ROM Device option.
Running the Dell IDE Hard Drive Diagnostics
The Dell IDE Hard Drive Diagnostics is a utility that tests the hard drive to
troubleshoot or confirm a hard drive failure.
1 Turn on your computer (if your computer is already on, restart it).
2 When F2 = Setup appears in the upper-right corner of the screen,
press <Ctrl><Alt><D>.
3 Follow the instructions on the screen.
If a failure is reported, see "Hard Drive Problems" in your User’s Guide.
Regulatory Information
Electromagnetic Interference (EMI) is any signal or emission, radiated in
free space or conducted along power or signal leads, that endangers the
functioning of a radio navigation or other safety service or seriously
degrades, obstructs, or repeatedly interrupts a licensed radio
communications service.
Your Dell computer system is designed to comply with applicable
regulations regarding EMI. Changes or modifications not expressly
approved by Dell could void the user’s authority to operate the equipment.
20 Setup and Quick Reference Guide
Page 22

Dell computer systems are designed, tested, and classified for their
intended electromagnetic environment. These electromagnetic
environment classifications fall into two groups:
• Class A designates a device which may be operated in business or
industrial environments only.
• Class B designates a device which may be operated in residential
settings as well as business or industrial environments.
Class A
Class A equipment has been tested and found to comply with the limits for
a Class A digital device, pursuant to part 15 of the FCC Rules. These limits
are designed to provide reasonable protection against harmful interference
in a commercial environment. This equipment generates, uses, and can
radiate radio frequency energy and, if not installed and used in accordance
with the instructions, may cause harmful interference to radio
communications. Operation of this equipment in a residential area is likely
to cause harmful interference, in which case the user will be required to
correct the interference at his/her own expense.
Class B
Class B equipment has been tested and found to comply with the limits for
a Class B digital device, pursuant to part 15 of the FCC Rules. These limits
are designed to provide reasonable protection against harmful interference
in a residential installation. This equipment generates, uses, and can radiate
radio frequency energy and, if not installed and used in accordance with the
instructions, may cause harmful interference to radio communications.
However, there is no guarantee that interference will not occur in a
particular installation. If this equipment does cause harmful interference to
radio or television reception, which can be determined by turning the
equipment off and on, the user is encouraged to try to correct the
interference by one or more of the following measures:
NOTE: Inspect the
regulatory label affixed to
the back or bottom of
your Dell system to
determine the
environments in which
your system may be
operated.
• Reorient or relocate the receiving antenna
• Increase the separation between the equipment and receiver
• Connect the equipment into an outlet on a circuit different from that
to which the receiver is connected
• Consult Dell or an experienced radio/TV technician for help
Setup and Quick Reference Guide 21
NOTE: Additional
regulatory information
regarding your system
can be found in your
User’s Guide.
Page 23

The following information is provided on the device or devices covered in
this document in compliance with FCC regulations:
• Model number: DHS, DHP, and DHM
• Company name:
Dell Computer Corporation
One Dell Way
Round Rock, Texas 78682 USA
512-338-4400
www.dell.com | support.dell.com
NOM Information (Mexico Only)
The following information is provided on the device(s) described in this
document in compliance with the requirements of the official Mexican
standards (NOM):
Exporter: Dell Computer Corporation
One Dell Way
Round Rock, TX 78682
Importer: Dell Computer de México,
S.A. de C.V.
Paseo de la Reforma 2620 - 11° Piso
Col. Lomas Altas
11950 México, D.F.
Ship to: Dell Computer de México,
S.A. de C.V. al Cuidado
de Kuehne & Nagel de
México S. de R.I.
Avenida Soles No. 55
Col. Peñon de los Baños
15520 México, D.F.
Supply voltage: 115/230 VAC
Frequency: 60/50 Hz
Input current rating: DHS—2.0/1.0 A
or
DHP—1.5/0.75 A
or
DHM—3.0/1.5 A
22 Setup and Quick Reference Guide
Page 24

Limited Warranties and Return Policy
Dell-branded hardware products purchased in the U.S. or Canada come
with either a 90-day, one-year, two-year, three-year, or four-year (U.S. only)
limited warranty. To determine which warranty you purchased, see the Dell
invoice that accompanied your computer. The following sections describe
the limited warranties for the U.S., the Return Policy for the U.S., the
limited warranties for Canada, and the manufacturer guarantee for Latin
America and the Caribbean.
Limited Warranty for the U.S.
What is covered by this limited warranty?
This limited warranty covers defects in materials and workmanship in your—our end-user
customer's—Dell-branded hardware products, including Dell-branded monitors, keyboards,
and pointing devices (mice).
What is not covered by this limited warranty?
This limited warranty does not cover:
• Software, including the operating system and software added to the Dell-branded
hardware products through our factory-integration system, third-party software, or the
reloading of software
• Non-Dell-branded products and accessories
• Problems that result from:
– External causes such as accident, abuse, misuse, or problems with electrical power
– Servicing not authorized by us
– Usage that is not in accordance with product instructions
– Failure to follow the product instructions or failure to perform preventive
maintenance
– Problems caused by using accessories, parts, or components not supplied by us
• Products with missing or altered service tags or serial numbers
• Products for which we have not received payment
Setup and Quick Reference Guide 23
Page 25

www.dell.com | support.dell.com
THIS WARRANTY GIVES YOU SPECIFIC LEGAL RIGHTS, AND YOU MAY ALSO
HAVE OTHER RIGHTS WHICH VARY FROM STATE TO STATE (OR JURISDICTION
TO JURISDICTION). DELL'S RESPONSIBILITY FOR MALFUNCITONS AND
DEFECTS IN HARDWARE IS LIMITED TO REPAIR AND REPLACEMENT AS SET
FORTH IN THIS WARRANTY STATEMENT. ALL EXPRESS AND IMPLIED
WARRANTIES FOR THE PRODUCT, INCLUDING BUT NOT LIMITED TO ANY
IMPLIED WARRANTIES AND CONDITIONS OF MERCHANTABILITY AND
FITNESS FOR A PARTICULAR PURPOSE, ARE LIMITED IN TIME TO THE TERM
OF THE LIMITED WARRANTY PERIOD REFLECTED ON YOUR INVOICE. NO
WARRANTIES, WHETHER EXPRESS OR IMPLIED, WILL APPLY AFTER THE
LIMITED WARRANTY PERIOD HAS EXPIRED. SOME STATES DO NOT ALLOW
LIMITATIONS ON HOW LONG AN IMPLIED WARRANTY LASTS, SO THIS
LIMITATION MAY NOT APPLY TO YOU.
WE DO NOT ACCEPT LIABILITY BEYOND THE REMEDIES PROVIDED FOR IN
THIS LIMITED WARRANTY OR FOR CONSEQUENTIAL OR INCIDENTAL
DAMAGES, INCLUDING, WITHOUT LIMITATION, ANY LIABILTY FOR THIRD
PARTY CLAIMS AGAINST YOU FOR DAMAGES, FOR PRODUCTS NOT BEING
AVAILABLE FOR USE, OR FOR LOST DATA OR LOST SOFTWARE. OUR LIABILITY
WILL BE NO MORE THAN THE AMOUNT YOU PAID FOR THE PRODUCT THAT IS
THE SUBJECT OF A CLAIM. THIS IS THE MAXIMUM AMOUNT FOR WHICH WE
ARE RESPONSIBLE.
SOME STATES DO NOT ALLOW THE EXCLUSION OR LIMITATION OF
INCIDENTAL OR CONSEQUENTIAL DAMAGES, SO THE ABOVE LIMITATION OR
EXCLUSION MAY NOT APPLY TO YOU.
How long does this limited warranty last?
This limited warranty lasts for the time period indicated on your invoice, except that the
limited warranty on Dell-branded batteries lasts only one year and the limited warranty on the
lamps for Dell-branded projectors lasts only ninety days. The limited warranty begins on the
date of the invoice. The warranty period is not extended if we repair or replace a warranted
product or any parts. Dell may change the availability of limited warranties, at its discretion,
but any changes will not be retroactive.
What do I do if I need warranty service?
Before the warranty expires, please call us at the relevant number listed in the following table.
Please also have your Dell service tag number or order number available.
Individual Home Consumers:
Technical Support 800 624 9896
Customer Service 800 624 9897
Individual Home Consumers who purchased
through an Employee Purchase Program:
Technical Support and Customer Service 800 822 8965
Home and Small Business Commercial Customers:
Technical Support and Customer Service 800 456 3355
24 Setup and Quick Reference Guide
Page 26

Medium, Large, or Global Commercial
Customers, Healthcare Customers, and Value
Added Resellers (VARs):
Technical Support and Customer Service 800 822 8965
Government and Education Customers:
Technical Support and Customer Service 800 234 1490
Dell-Branded Memory
888 363 5150
What will Dell do?
During the first 90 days of the 90-day limited warranty and the first year of all other limited
warranties: For the first 90 days of the 90-day limited warranty and the first year of all other
limited warranties, we will repair any Dell-branded hardware products returned to us that prove
to be defective in materials or workmanship. If we are not able to repair the product, we will
replace it with a comparable product that is new or refurbished.
When you contact us, we will issue a Return Material Authorization Number for you to include
with your return. You must return the products to us in their original or equivalent packaging,
prepay shipping charges, and insure the shipment or accept the risk if the product is lost or
damaged in shipment. We will return the repaired or replacement products to you. We will pay
to ship the repaired or replaced products to you if you use an address in the United States
(excluding Puerto Rico and U.S. possessions). Otherwise, we will ship the product to you
freight collect.
If we determine that the product is not covered under this warranty, we will notify you and
inform you of service alternatives that are available to you on a fee basis.
NOTE: Before you ship the product(s) to us, make sure to back up the data on the hard
drive(s) and any other storage device(s) in the product(s). Remove any confidential, proprietary,
or personal information and removable media such as diskettes, CDs, or PC Cards. We are not
responsible for any of your confidential, proprietary, or personal information; lost or corrupted
data; or damaged or lost removable media.
During the remaining years: For the remaining period of the limited warranty, we will replace
any defective part with new or refurbished parts, if we agree that it needs to be replaced. When
you contact us, we will require a valid credit card number at the time you request a
replacement part, but we will not charge you for the replacement part as long as you return the
original part to us within thirty days after we ship the replacement part to you. If we do not
receive the original part within thirty days, we will charge to your credit card the then-current
standard price for that part.
We will pay to ship the part to you if you use an address in the United States (excluding Puerto
Rico and U.S. possessions). Otherwise, we will ship the part freight collect. We will also include
a prepaid shipping container with each replacement part for your use in returning the replaced
part to us.
NOTE: Before you replace parts, make sure to back up the data on the hard drive(s) and any
other storage device(s) in the product(s). We are not responsible for lost or corrupted data.
Setup and Quick Reference Guide 25
Page 27

www.dell.com | support.dell.com
What if I purchased a service contract?
If your on-site service contract is with Dell, on-site service will be provided to you under the
terms of the on-site service agreement. Please refer to that contract for details on how to obtain
service.
If you purchased through us a service contract with one of our third-party service providers,
please refer to that contract for details on how to obtain service.
How will you fix my product?
We use new and refurbished parts made by various manufacturers in performing warranty
repairs and in building replacement parts and systems. Refurbished parts and systems are parts
or systems that have been returned to Dell, some of which were never used by a customer. All
parts and systems are inspected and tested for quality. Replacement parts and systems are
covered for the remaining period of the limited warranty for the product you bought.
What do I do if I am not satisfied?
We pride ourselves on our great customer service. If you are not satisfied with the service you
receive under this limited warranty, please let us know. We have found that the best way to
resolve issues regarding our limited warranty is to work together. If, after those discussion, you
are still not satisfied, we believe arbitration is the most expeditious way to resolve your
concerns. Therefore, ANY CLAIM, DISPUTE, OR CONTROVERSY (WHETHER IN
CONTRACT, TORT, OR OTHERWISE, WHETHER PREEXISTING, PRESENT, OR
FUTURE, AND INCLUDING STATUTORY, COMMON LAW, INTENTIONAL TORT,
AND EQUITABLE CLAIMS) AGAINST DELL arising from or relating to this limited
warranty, its interpretation, or the breach, termination, or validity thereof, the relationships
which result from this limited warranty (including, to the full extent permitted by applicable
law, relationships with third parties), Dell's advertising, or any related purchase SHALL BE
RESOLVED EXCLUSIVELY AND FINALLY BY BINDING ARBITRATION
ADMINISTERED BY THE NATIONAL ARBITRATION FORUM (NAF) under its Code
of Procedure then in effect (available via the Internet at http://www.arb-forum.com/ or via
telephone at 1-800-474-2371). The arbitration will be limited solely to the dispute or
controversy between you and Dell. Any award of the arbitrator(s) shall be final and binding on
each of the parties, and may be entered as a judgment in any court of competent jurisdiction.
Information may be obtained and claims may be filed with the NAF at P.O. Box 50191,
Minneapolis, MN 55405. This provision applies only to individual home consumers and
consumers who purchased through an employee purchase program. It does not apply to small,
medium, large, and global commercial customers or government, education, and healthcare
customers.
26 Setup and Quick Reference Guide
Page 28

May I transfer the limited warranty?
Limited warranties on systems may be transferred if the current owner transfers ownership of
the system and records the transfer with us. The limited warranty on Dell-branded memory
may not be transferred. You may record your transfer by going to Dell's website:
• If you are an Individual Home Consumer, go to
http://www.dell.com/us/en/dhs/topics/sbtopic_015_ccare.htm
• If you are a Small, Medium, Large, or Global Commercial Customer, go to
http://www.dell.com/us/en/biz/topics/sbtopic_ccare_nav_015_ccare.htm
• If you are a Government, Education, or Healthcare Customer, or an Individual
Consumer who purchased through an employee purchase program, go to
http://www.dell.com/us/en/pub/topics/sbtopic_015_ccare.htm
If you do not have Internet access, please call your customer care representative or call
1-800-624-9897.
"Total Satisfaction" Return Policy (U.S. Only)
We value our relationship with you and want to make sure that you're satisfied with your
purchases. That's why we offer a "Total Satisfaction" return policy for most products that you—
the end-user customer—purchase directly from Dell. Under this policy, you may return to Dell
products that you purchased directly from Dell for a credit or a refund of the purchase price
paid, less shipping and handling and applicable restocking fees as follows:
• New Hardware Products and Accessories — All new hardware, accessories, parts, and
unopened software still in its sealed package, excluding the products listed below, may
be returned within thirty days from the invoice date. To return applications software or
an operating system that has been installed by Dell, you must return the entire
computer. A different return policy applies to nondefective products purchased through
Dell's Software and Peripherals division by customers of our Small and Medium Business
divisions. Those products may be returned within thirty days from the invoice date, but
a fifteen percent (15%) restocking fee will be deducted from any refund or credit. The
"Total Satisfaction" Return Policy and Software and Peripherals division return policy are
not available for Dell | EMC storage products, EMC-branded products, or enterprise
software.
• Reconditioned or Refurbished Dell-Branded Hardware Products and Parts — All
reconditioned or refurbished Dell-branded server and storage products may be returned
within thirty days from the invoice date. All other reconditioned or refurbished
Dell-branded hardware products and parts may be returned within fourteen days of the
invoice date.
To return products, call Dell customer service to receive a Credit Return Authorization
Number within the return policy period applicable to the product you want to return. You
must obtain a Credit Return Authorization Number in order to return the product. See
"Contacting Dell" or "Getting Help" in your customer documentation to find the appropriate
contact information for obtaining customer assistance.
Setup and Quick Reference Guide 27
Page 29

www.dell.com | support.dell.com
You must ship the products to Dell within five days of the date that Dell issues the Credit
Return Authorization Number. You must also return the products to Dell in their original
packaging, in as-new condition along with any media, documentation, and all other items that
were included in the original shipment, prepay shipping charges, and insure the shipment or
accept the risk of loss or damage during shipment.
Limited Warranty for Canada
One-Year Limited Warranty (Canada Only)
Dell Computer Corporation ("Dell") manufactures its hardware products from parts and
components that are new or equivalent to new in accordance with industry-standard practices.
Dell warrants that the hardware products it manufactures will be free from defects in materials
and workmanship. The limited warranty term is one year beginning on the date of invoice, as
further described in the following text.
Damage due to shipping the products to you is covered under this limited warranty. Otherwise,
this limited warranty does not cover damage due to external causes, including accident, abuse,
misuse, problems with electrical power, servicing not authorized by Dell, usage not in
accordance with product instructions, failure to perform required preventive maintenance, and
problems caused by use of parts and components not supplied by Dell.
This limited warranty does not cover any items that are in one or more of the following
categories: software; external devices (except as specifically noted); accessories or parts added
to a Dell system after the system is shipped from Dell; accessories or parts added to a Dell
system through Dell’s system integration department; accessories or parts that are not installed
in the Dell factory; or Dell Software and Peripherals products. Monitors, keyboards, and mice
that are Dell-branded or that are included on Dell’s standard price list are covered under this
limited warranty; all other monitors, keyboards, and mice (including those sold through the
Dell Software and Peripherals program) are not covered.
Dell will repair or replace products covered under this limited warranty that are returned to
Dell’s facility. To request warranty service, you must contact Dell’s Customer Technical
Support within the warranty period. See "Contacting Dell" or "Getting Help" in your customer
documentation to find the appropriate contact information for obtaining customer assistance.
If warranty service is required, Dell will issue a Return Material Authorization Number. You
must ship the products back to Dell in their original or equivalent packaging, prepay shipping
charges, and insure the shipment or accept the risk of loss or damage during shipment. Dell will
ship the repaired or replacement products to you (freight prepaid) if you use an address in
Canada, where applicable. Shipments to other locations will be made freight collect.
NOTE: Before you ship the product(s) to Dell, back up the data on the hard drive(s) and any
other storage device(s) in the product(s). Remove any removable media, such as floppy disks,
CDs, or PC Cards. Dell does not accept liability for lost data or software.
Dell owns all parts removed from repaired products. Dell uses new and reconditioned parts
made by various manufacturers in performing warranty repairs and building replacement
products. If Dell repairs or replaces a product, its warranty term is not extended.
28 Setup and Quick Reference Guide
Page 30

DELL MAKES NO EXPRESS WARRANTIES OR CONDITIONS BEYOND THOSE
STATED IN THIS LIMITED WARRANTY STATEMENT. DELL DISCLAIMS ALL
OTHER WARRANTIES AND CONDITIONS, EXPRESS OR IMPLIED, INCLUDING
WITHOUT LIMITATION IMPLIED WARRANTIES AND CONDITIONS OF
MERCHANTABILITY AND FITNESS FOR A PARTICULAR PURPOSE. SOME
STATES (OR JURISDICTIONS) DO NOT ALLOW LIMITATIONS ON IMPLIED
WARRANTIES OR CONDITIONS, SO THIS LIMITATION MAY NOT APPLY TO YOU.
DELL’S RESPONSIBILITY FOR MALFUNCTIONS AND DEFECTS IN HARDWARE
IS LIMITED TO REPAIR AND REPLACEMENT AS SET FORTH IN THIS LIMITED
WARRANTY STATEMENT. THESE WARRANTIES GIVE YOU SPECIFIC LEGAL
RIGHTS, AND YOU MAY ALSO HAVE OTHER RIGHTS, WHICH VARY FROM
STATE TO STATE (OR JURISDICTION TO JURISDICTION).
DELL DOES NOT ACCEPT LIABILITY BEYOND THE REMEDIES SET FORTH IN
THIS LIMITED WARRANTY STATEMENT OR LIABILITY FOR INCIDENTAL,
INDIRECT, SPECIAL, PUNITIVE, OR CONSEQUENTIAL DAMAGES, INCLUDING
WITHOUT LIMITATION ANY LIABILITY FOR PRODUCTS NOT BEING
AVAILABLE FOR USE OR FOR LOST DATA OR SOFTWARE.
SOME STATES (OR JURISDICTIONS) DO NOT ALLOW THE EXCLUSION OR
LIMITATION OF INCIDENTAL, INDIRECT, SPECIAL, PUNITIVE, OR
CONSEQUENTIAL DAMAGES, SO THE PRECEDING EXCLUSION OR
LIMITATION MAY NOT APPLY TO YOU.
These provisions apply to Dell’s one-year limited warranty only. For provisions of any service
contract covering your system, see your invoice or the separate service contract that you will
receive.
If Dell elects to exchange a product or portion of a product, the exchange will be made in
accordance with Dell’s Exchange Policy in effect on the date of the exchange. In any instance
in which Dell issues a Return Material Authorization Number, Dell must receive the
product(s) for repair prior to the expiration of the warranty period in order for the repair(s) to
be covered by the limited warranty.
Two-Year Limited Warranty (Canada Only)
Dell Computer Corporation ("Dell") manufactures its hardware products from parts and
components that are new or equivalent to new in accordance with industry-standard practices.
Dell warrants that the hardware products it manufactures will be free from defects in materials
and workmanship. The warranty term is two years beginning on the date of invoice, as
described in the following text.
Damage due to shipping the products to you is covered under this limited warranty. Otherwise,
this limited warranty does not cover damage due to external causes, including accident, abuse,
misuse, problems with electrical power, servicing not authorized by Dell, usage not in
accordance with product instructions, failure to perform required preventive maintenance, and
problems caused by use of parts and components not supplied by Dell.
Setup and Quick Reference Guide 29
Page 31

www.dell.com | support.dell.com
This limited warranty does not cover any items that are in one or more of the following
categories: software; external devices (except as specifically noted); accessories or parts added
to a Dell system after the system is shipped from Dell; accessories or parts added to a Dell
system through Dell’s system integration department; accessories or parts that are not installed
in the Dell factory; or Dell Software and Peripherals products. Monitors, keyboards, and mice
that are Dell-branded or that are included on Dell’s standard price list are covered under this
limited warranty; all other monitors, keyboards, and mice (including those sold through the
Dell Software and Peripherals program) are not covered. Batteries for portable computers are
covered only during the initial one-year period of this limited warranty.
Limited Warranty Coverage During Year One
During the one-year period beginning on the invoice date, Dell will repair or replace products
covered under this limited warranty that are returned to Dell's facility. To request warranty
service, you must contact Dell’s Customer Technical Support within the warranty period. See
"Contacting Dell" or "Getting Help" in your customer documentation to find the appropriate
contact information for obtaining customer assistance. If warranty service is required, Dell will
issue a Return Material Authorization Number. You must ship the products back to Dell in
their original or equivalent packaging, prepay shipping charges, and insure the shipment or
accept the risk of loss or damage during shipment. Dell will ship the repaired or replacement
products to you freight prepaid if you use an address in Canada, where applicable. Shipments
to other locations will be made freight collect.
NOTE: Before you ship the product(s) to Dell, back up the data on the hard drive(s) and any
other storage device(s) in the product(s). Remove any removable media, such as floppy disks,
CDs, or PC Cards. Dell does not accept liability for lost data or software.
Dell owns all parts removed from repaired products. Dell uses new and reconditioned parts
made by various manufacturers in performing warranty repairs and building replacement
products. If Dell repairs or replaces a product, its warranty term is not extended.
Limited Warranty Coverage During Year Two
During the second year of this limited warranty, Dell will provide, on an exchange basis and
subject to Dell’s Exchange Policy in effect on the date of the exchange, replacement parts for
the Dell hardware product(s) covered under this limited warranty when a part requires
replacement. You must report each instance of hardware failure to Dell’s Customer Technical
Support in advance to obtain Dell’s concurrence that a part should be replaced and to have
Dell ship the replacement part. Dell will ship parts (freight prepaid) if you use an address in
Canada, where applicable. Shipments to other locations will be made freight collect. Dell will
include a prepaid shipping container with each replacement part for your use in returning the
replaced part to Dell. Replacement parts are new or reconditioned. Dell may provide
replacement parts made by various manufacturers when supplying parts to you. The warranty
term for a replacement part is the remainder of the limited warranty term.
You will pay Dell for replacement parts if the replaced part is not returned to Dell. The process
for returning replaced parts, and your obligation to pay for replacement parts if you do not
return the replaced parts to Dell, will be in accordance with Dell’s Exchange Policy in effect on
the date of the exchange.
You accept full responsibility for your software and data. Dell is not required to advise or
remind you of appropriate backup and other procedures.
30 Setup and Quick Reference Guide
Page 32

General Provisions
DELL MAKES NO EXPRESS WARRANTIES OR CONDITIONS BEYOND THOSE
STATED IN THIS LIMITED WARRANTY STATEMENT. DELL DISCLAIMS ALL
OTHER WARRANTIES AND CONDITIONS, EXPRESS OR IMPLIED, INCLUDING
WITHOUT LIMITATION IMPLIED WARRANTIES AND CONDITIONS OF
MERCHANTABILITY AND FITNESS FOR A PARTICULAR PURPOSE. SOME
STATES (OR JURISDICTIONS) DO NOT ALLOW LIMITATIONS ON IMPLIED
WARRANTIES OR CONDITIONS, SO THIS LIMITATION MAY NOT APPLY TO YOU.
DELL'S RESPONSIBILITY FOR MALFUNCTIONS AND DEFECTS IN HARDWARE
IS LIMITED TO REPAIR AND REPLACEMENT AS SET FORTH IN THIS LIMITED
WARRANTY STATEMENT. THESE WARRANTIES GIVE YOU SPECIFIC LEGAL
RIGHTS, AND YOU MAY ALSO HAVE OTHER RIGHTS, WHICH VARY FROM
STATE TO STATE (OR JURISDICTION TO JURISDICTION).
DELL DOES NOT ACCEPT LIABILITY BEYOND THE REMEDIES SET FORTH IN
THIS LIMITED WARRANTY STATEMENT OR LIABILITY FOR INCIDENTAL,
INDIRECT, SPECIAL, PUNITIVE, OR CONSEQUENTIAL DAMAGES, INCLUDING
WITHOUT LIMITATION ANY LIABILITY FOR PRODUCTS NOT BEING
AVAILABLE FOR USE OR FOR LOST DATA OR SOFTWARE.
SOME STATES (OR JURISDICTIONS) DO NOT ALLOW THE EXCLUSION OR
LIMITATION OF INCIDENTAL, INDIRECT, SPECIAL, PUNITIVE, OR
CONSEQUENTIAL DAMAGES, SO THE PRECEDING EXCLUSION OR
LIMITATION MAY NOT APPLY TO YOU.
These provisions apply to Dell’s two-year limited warranty only. For provisions of any service
contract covering your system, see your invoice or the separate service contract that you will
receive.
If Dell elects to exchange a system or component, the exchange will be made in accordance
with Dell’s Exchange Policy in effect on the date of the exchange. In any instance in which Dell
issues a Return Material Authorization Number, Dell must receive the product(s) for repair
prior to the expiration of the warranty period in order for the repair(s) to be covered by the
limited warranty.
Three-Year Limited Warranty (Canada Only)
Dell Computer Corporation ("Dell") manufactures its hardware products from parts and
components that are new or equivalent to new in accordance with industry-standard practices.
Dell warrants that the hardware products it manufactures will be free from defects in materials
and workmanship. The warranty term is three years beginning on the date of invoice, as
described in the following text.
Damage due to shipping the products to you is covered under this limited warranty. Otherwise,
this limited warranty does not cover damage due to external causes, including accident, abuse,
misuse, problems with electrical power, servicing not authorized by Dell, usage not in
accordance with product instructions, failure to perform required preventive maintenance, and
problems caused by use of parts and components not supplied by Dell.
Setup and Quick Reference Guide 31
Page 33

www.dell.com | support.dell.com
This limited warranty does not cover any items that are in one or more of the following
categories: software; external devices (except as specifically noted); accessories or parts added
to a Dell system after the system is shipped from Dell; accessories or parts added to a Dell
system through Dell’s system integration department; accessories or parts that are not installed
in the Dell factory; or Dell Software and Peripherals products. Monitors, keyboards, and mice
that are Dell-branded or that are included on Dell’s standard price list are covered under this
limited warranty; all other monitors, keyboards, and mice (including those sold through the
Dell Software and Peripherals program) are not covered. Batteries for portable computers are
covered only during the initial one-year period of this limited warranty.
Limited Warranty Coverage During Year One
During the one-year period beginning on the invoice date, Dell will repair or replace products
covered under this limited warranty that are returned to Dell’s facility. To request warranty
service, you must contact Dell’s Customer Technical Support within the warranty period. To
request warranty service, you must contact Dell’s Customer Technical Support within the
warranty period. See "Contacting Dell" or "Getting Help" in your customer documentation to
find the appropriate contact information for obtaining customer assistance. If warranty service
is required, Dell will issue a Return Material Authorization Number. You must ship the
products back to Dell in their original or equivalent packaging, prepay shipping charges, and
insure the shipment or accept the risk of loss or damage during shipment. Dell will ship the
repaired or replacement products to you freight prepaid if you use an address in Canada, where
applicable. Shipments to other locations will be made freight collect.
NOTE: Before you ship the product(s) to Dell, back up the data on the hard drive(s) and any
other storage device(s) in the product(s). Remove any removable media, such as floppy disks,
CDs, or PC Cards. Dell does not accept liability for lost data or software.
Dell owns all parts removed from repaired products. Dell uses new and reconditioned parts
made by various manufacturers in performing warranty repairs and building replacement
products. If Dell repairs or replaces a product, its warranty term is not extended.
Limited Warranty Coverage During Years Two and Three
During the second and third years of this limited warranty, Dell will provide, on an exchange
basis and subject to Dell’s Exchange Policy in effect on the date of the exchange, replacement
parts for the Dell hardware product(s) covered under this limited warranty when a part requires
replacement. You must report each instance of hardware failure to Dell’s Customer Technical
Support in advance to obtain Dell’s concurrence that a part should be replaced and to have
Dell ship the replacement part. Dell will ship parts (freight prepaid) if you use an address in
Canada, where applicable. Shipments to other locations will be made freight collect. Dell will
include a prepaid shipping container with each replacement part for your use in returning the
replaced part to Dell. Replacement parts are new or reconditioned. Dell may provide
replacement parts made by various manufacturers when supplying parts to you. The warranty
term for a replacement part is the remainder of the limited warranty term.
You will pay Dell for replacement parts if the replaced part is not returned to Dell. The process
for returning replaced parts, and your obligation to pay for replacement parts if you do not
return the replaced parts to Dell, will be in accordance with Dell’s Exchange Policy in effect on
the date of the exchange.
You accept full responsibility for your software and data. Dell is not required to advise or
remind you of appropriate backup and other procedures.
32 Setup and Quick Reference Guide
Page 34

General Provisions
DELL MAKES NO EXPRESS WARRANTIES OR CONDITIONS BEYOND THOSE
STATED IN THIS LIMITED WARRANTY STATEMENT. DELL DISCLAIMS ALL
OTHER WARRANTIES AND CONDITIONS, EXPRESS OR IMPLIED, INCLUDING
WITHOUT LIMITATION IMPLIED WARRANTIES AND CONDITIONS OF
MERCHANTABILITY AND FITNESS FOR A PARTICULAR PURPOSE. SOME
STATES (OR JURISDICTIONS) DO NOT ALLOW LIMITATIONS ON IMPLIED
WARRANTIES OR CONDITIONS, SO THIS LIMITATION MAY NOT APPLY TO YOU.
DELL’S RESPONSIBILITY FOR MALFUNCTIONS AND DEFECTS IN HARDWARE
IS LIMITED TO REPAIR AND REPLACEMENT AS SET FORTH IN THIS LIMITED
WARRANTY STATEMENT. THESE WARRANTIES GIVE YOU SPECIFIC LEGAL
RIGHTS, AND YOU MAY ALSO HAVE OTHER RIGHTS, WHICH VARY FROM
STATE TO STATE (OR JURISDICTION TO JURISDICTION).
DELL DOES NOT ACCEPT LIABILITY BEYOND THE REMEDIES SET FORTH IN
THIS LIMITED WARRANTY STATEMENT OR LIABILITY FOR INCIDENTAL,
INDIRECT, SPECIAL, PUNITIVE, OR CONSEQUENTIAL DAMAGES, INCLUDING
WITHOUT LIMITATION ANY LIABILITY FOR PRODUCTS NOT BEING
AVAILABLE FOR USE OR FOR LOST DATA OR SOFTWARE.
SOME STATES (OR JURISDICTIONS) DO NOT ALLOW THE EXCLUSION OR
LIMITATION OF INCIDENTAL, INDIRECT, SPECIAL, PUNITIVE, OR
CONSEQUENTIAL DAMAGES, SO THE PRECEDING EXCLUSION OR
LIMITATION MAY NOT APPLY TO YOU.
These provisions apply to Dell’s three-year limited warranty only. For provisions of any service
contract covering your system, see your invoice or the separate service contract that you will
receive.
If Dell elects to exchange a system or component, the exchange will be made in accordance
with Dell’s Exchange Policy in effect on the date of the exchange. In any instance in which Dell
issues a Return Material Authorization Number, Dell must receive the product(s) for repair
prior to the expiration of the warranty period in order for the repair(s) to be covered by the
limited warranty.
One-Year End-User Manufacturer Guarantee (Latin America and
the Caribbean Only)
Guarantee
Dell Computer Corporation ("Dell") warrants to the end user in accordance with the following
provisions that its branded hardware products, purchased by the end user from a Dell company
or an authorized Dell distributor in Latin America or the Caribbean, will be free from defects
in materials, workmanship, and design affecting normal use, for a period of one year from the
original purchase date. Products for which proper claims are made will, at Dell’s option, be
repaired or replaced at Dell’s expense. Dell owns all parts removed from repaired products. Dell
uses new and reconditioned parts made by various manufacturers in performing repairs and
building replacement products.
Setup and Quick Reference Guide 33
Page 35

www.dell.com | support.dell.com
Exclusions
This Guarantee does not apply to defects resulting from: improper or inadequate installation,
use, or maintenance; actions or modifications by unauthorized third parties or the end user;
accidental or willful damage; or normal wear and tear.
Making a Claim
Claims must be made in Latin America or the Caribbean by contacting the Dell point of sale
within the guarantee period. The end user must always supply proof of purchase, indicating
name and address of the seller, date of purchase, model and serial number, name and address of
the customer, and details of symptoms and configuration at the time of malfunction, including
peripherals and software used. Otherwise, Dell may refuse the guarantee claim. Upon diagnosis
of a warranted defect, Dell will make arrangements and pay for ground freight and insurance to
and from Dell’s repair/replacement center. The end user must ensure that the defective
product is available for collection properly packed in original or equally protective packaging
together with the details listed above and the return number provided to the end user by Dell.
Limitation and Statutory Rights
Dell makes no other warranty, guarantee or like statement other than as explicitly stated above,
and this Guarantee is given in place of all other guarantees whatsoever, to the fullest extent
permitted by law. In the absence of applicable legislation, this Guarantee will be the end user’s
sole and exclusive remedy against Dell or any of its affiliates, and neither Dell nor any of its
affiliates shall be liable for loss of profit or contracts, or any other indirect or consequential loss
arising from negligence, breach of contract, or howsoever.
This Guarantee does not impair or affect mandatory statutory rights of the end user against
and/or any rights resulting from other contracts concluded by the end user with Dell and/or
any other seller.
Dell World Trade LP
One Dell Way, Round Rock, TX 78682, USA
Dell Computadores do Brasil Ltda (CNPJ No. 72.381.189/0001-10)/
Dell Commercial do Brasil Ltda (CNPJ No. 03 405 822/0001-40)
Avenida Industrial Belgraf, 400
92990-000 - Eldorado do Sul – RS - Brasil
Dell Computer de Chile Ltda
Coyancura 2283, Piso 3- Of.302,
Providencia, Santiago - Chile
Dell Computer de Colombia Corporation
Carrera 7 #115-33 Oficina 603
Bogota, Colombia
Dell Computer de Mexico SA de CV
Paseo de la Reforma 2620 - 11° Piso
Col. Lomas Altas
11950 México, D.F.
34 Setup and Quick Reference Guide
Page 36

Intel® Warranty Statement for Pentium® and Celeron®
Processors Only (U.S. and Canada Only)
Setup and Quick Reference Guide 35
Page 37

www.dell.com | support.dell.com
36 Setup and Quick Reference Guide
Page 38

Systèmes Dell™ OptiPlex™
Guide de configuration et de référence rapide
www.dell.com | support.dell.com
Page 39

Remarques, avis et précautions
REMARQUE : Une REMARQUE indique des informations importantes qui
vous permettent de mieux utiliser votre ordinateur.
AVIS : Un AVIS vous avertit d’un risque de dommage matériel ou de perte de
données et vous indique comment éviter le problème.
PRÉCAUTION : Une PRÉCAUTION indique un risque de dommage
matériel, de blessure ou de mort.
____________________
Les informations contenues dans ce document sont sujettes à modification sans préavis.
© 2000–2002 Dell Computer Corporation. Tous droits réser vés.
Toute reproduction, sous quelque forme que ce soit, sans l'autorisation écrite de
Dell Computer Corporation, est strictement interdite.
Marques utilisées dans ce texte : Dell, OptiPlex et le logo DELL sont des marques de
Dell Computer Corporation ; Microsoft et Windows sont des marques déposées de
Microsoft Corporation ; Intel, Pentium et Celeron sont des marques déposées de Intel Corporation.
D'autres marques et noms commerciaux peuvent être utilisés dans ce document pour faire référence
aux entités se réclamant de ces marques et de ces noms ou à leurs produits. Dell Computer
Corporation dénie tout intérêt propriétaire vis-à-vis des marques et des noms commerciaux autres
que les siens.
Août 2002 P/N 81FTK Rev. A07
Page 40

À propos de ce guide
Ce document contient des informations concernant la prise en main, la
configuration, la résolution de problèmes, la sécurité, les réglementations et
la garantie de votre système Dell
Pour obtenir les versions les plus récentes des documents sur votre disque
dur, allez sur le site Web de support Dell à l'adresse support.dell.com.
Des numéros de modèle réglementaires apparaissent tout au long de ce
document ; les types de châssis qui y correspondent sont présentés
ci-dessous :
Numéros de modèle réglementaires et types de châssis
DHS = châssis SD (Small Desktop [petit châssis de bureau])
DHP = châssis SF (Small Factor [compact])
DHM = châssis SMT (Small Mini-Tower [micro-tour])
™ OptiPlex™.
Obtention d'informations concernant votre ordinateur
Que cherchez-vous ? Vous le trouverez ici
• Un programme de diagnostic pour mon
ordinateur
• Des pilotes pour mon ordinateur
• La documentation de mon ordinateur
• La documentation de mes périphériques
CD Drivers and Utilities (appelé aussi CD
ResourceCD)
Vous pouvez utiliser ce CD pour accéder à la documentation, réinstaller
des pilotes ou exécuter les outils de diagnostic.
Guide de configuration et de référence rapide 39
Page 41

Que cherchez-vous ? Vous le trouverez ici
• Le code de service express et le numéro de
Code de service express et code clé du produit
service
• L'étiquette de licence (code clé du produit)
de Microsoft
®
Windows
®
Situés sur votre ordinateur.
• Comment réinstaller mon système
www.dell.com | support.dell.com
d'exploitation
CD du système d'exploitation et Guide
d'installation
Si vous réinstallez votre système d'exploitation, utilisez le CD Drivers
and Utilities pour réinstaller les pilotes des périphériques fournis avec
votre ordinateur.
40 Guide de configuration et de référence rapide
Page 42

Que cherchez-vous ? Vous le trouverez ici
• Comment retirer des pièces et les
remettre en place
• Les spécifications techniques
• Comment configurer les paramètres
du système
• Comment identifier et résoudre
les problèmes
• Les derniers pilotes pour mon ordinateur
• Des réponses à mes questions concernant
les services et l'assistance techniques
• Des discussions en lignes avec d'autres
utilisateurs et le support technique
• La documentation pour mon ordinateur
• Le suivi de l'appel de service
• Les problèmes techniques principaux
concernant mon ordinateur
• Une foire aux questions
• Des téléchargements de fichiers
• Des détails sur la configuration de mon
ordinateur
• Un contrat de service pour mon ordinateur
Îcone du Guide d'utilisation
En fonction de votre système d'exploitation, double-cliquez sur l'icône
User's Guides (Guides d'utilisation) de votre bureau ou cliquez sur le
bouton Start (Démarrer) puis sur Help and Support (Aide et support)
pour accéder à la documentation électronique stockée sur votre
disque dur.
Site Web Support Dell
Le site Web Support Dell fournit plusieurs outils en ligne, y compris :
• Une base de connaissances : des idées, des astuces et des cours
en ligne
• Un forum pour les clients : des discussions en ligne avec d'autres
clients Dell
• Des mises à niveau : des informations sur la mise à niveau des
composants, tels que la mémoire, le disque dur et le système
d'exploitation
• Un service clientèle : les informations de contact, le suivi de
commande, les garanties et des informations sur les réparations
• Des téléchargements : des pilotes, des correctifs et des mises à jour
de logiciel
• Des références : de la documentation sur les ordinateurs, des
spécifications pour les produits et des livres blancs
Site Web Dell Premier Support
Le site Web Dell Premier Support est conçu pour les grandes
entreprises, les gouvernements et les institutions d'enseignement.
Ce site n'est pas disponible partout.
Guide de configuration et de référence rapide 41
Page 43

Que cherchez-vous ? Vous le trouverez ici
• Comment utilisez Windows XP
• La documentation de mon ordinateur et de
mes périphériques
Centre d'aide et de support Windows XP
1 Cliquez sur le bouton Start (Démarrer), puis sur Help and Support
(Aide et support).
2 Tapez un mot ou une phrase décrivant votre problème, puis cliquez
sur l'icône en forme de flèche.
3 Cliquez sur la rubrique qui décrit votre problème.
4 Suivez les instructions qui s'affichent à l'écran.
PRÉCAUTION : Consignes de sécurité
www.dell.com | support.dell.com
Respectez les consignes de sécurité suivantes afin d’assurer votre propre sécurité et de protéger
votre ordinateur et votre environnement de travail contre d'éventuels dommages.
Généralités
• N'essayez pas de réviser votre ordinateur vous-même si vous n'êtes pas un technicien de
service qualifié. Suivez toujours les instructions d'installation à la lettre.
• Pour éviter les décharges électriques, branchez les câbles d'alimentation de l'ordinateur et
des périphériques dans des prises de terre. Ces câbles sont équipés de prises à trois
broches pour assurer une bonne mise à la terre. N'utilisez pas de prises adaptatrices et ne
retirez pas la broche de mise à la terre d'un câble. Si vous devez utiliser une rallonge,
utilisez une rallonge à 3 fils avec prises de terre.
• Pour éliminer les risques de décharge électrique, n'utilisez pas votre ordinateur pendant
un orage.
• Pour éliminer les risques de décharge électrique, ne branchez et ne débranchez aucun
câble, et ne procédez pas à l'entretien ou à la reconfiguration de ce produit pendant un
orage.
• Si votre ordinateur comporte un modem, le câble utilisé avec le modem doit être fabriqué
avec un fil de calibre de 26 AWG (American Wire Gauge [norme américaine des
dimensions de fils]) minimal et une prise modulaire RJ-11conforme aux normes FCC.
42 Guide de configuration et de référence rapide
Page 44

PRÉCAUTION : Consignes de sécurité (suite)
• Avant de nettoyer votre ordinateur, débranchez-le de sa prise de courant. Nettoyez votre
ordinateur avec un chiffon légèrement humide. N'utilisez pas de nettoyant liquide ou en
bombe, car il pourrait contenir des produits inflammables.
• Pour ne pas endommager la carte système, patientez 5 secondes après avoir éteint
l'ordinateur avant de déconnecter un périphérique de l'ordinateur.
• Pour éviter de court-circuiter votre ordinateur en débranchant un câble de réseau,
débranchez d'abord le câble de la carte réseau à l'arrière de votre ordinateur, puis de la
prise de réseau. Pour rebrancher un câble de réseau à votre ordinateur, branchez d'abord le
câble à la prise du réseau, puis dans la carte réseau.
• Afin de protéger votre ordinateur des augmentations et diminutions soudaines et
passagères de courant, utilisez un limiteur de surtension, un onduleur ou un UPS
(Uninterruptible Power Supply [système d'alimentation sans coupure]).
• Ne posez rien sur les câbles de votre ordinateur et placez les câbles de telle sorte que l'on
ne puisse pas marcher ou trébucher dessus.
• N’insérez pas d’objets dans les ouvertures de votre ordinateur. Cela risquerait de
court-circuiter des composants internes et de provoquer un incendie ou une décharge
électrique.
• Placez l'ordinateur à l'écart des radiateurs et des autres sources de chaleur. Ne bloquez
pas les ouvertures de refroidissement. Évitez de placer des feuilles de papier sous votre
ordinateur ; ne placez pas votre ordinateur dans un meuble sans ventilation, sur un lit, un
canapé ou un tapis.
• Ne renversez ni aliments ni liquides sur votre ordinateur.Si l'ordinateur a été mouillé,
consultez votre Guide d'utilisation.
Guide de configuration et de référence rapide 43
Page 45

Lors de l'utilisation de votre ordinateur
Lorsque vous utilisez votre ordinateur, respectez les consignes de sécurité suivantes concernant
la manipulation.
PRÉCAUTION : N'utilisez pas votre ordinateur si l'un des panneaux (y compris les
capots de l'ordinateur, les cadres, les languettes métalliques, les caches du panneau
avant, etc.) est retiré.
• Votre ordinateur est équipé d'un des éléments suivants :
– Un bloc d'alimentation à tension fixe : les ordinateurs dotés d'un bloc d'alimentation
à tension fixe n'ont pas de sélecteur de tension sur le panneau arrière et ne
www.dell.com | support.dell.com
fonctionnent qu'à une tension (consultez l'étiquette réglementaire à l'extérieur
de l'ordinateur pour connaître sa tension de fonctionnement).
– Un circuit de tension à sélection automatique : les ordinateurs qui ont un circuit de
tension à sélection automatique n'ont pas de sélecteur de tension sur le panneau
arrière et détectent automatiquement la tension de fonctionnement correcte.
– Un sélecteur de tension manuel : les ordinateurs équipés d'un sélecteur de tension sur
le panneau arrière de l'ordinateur doivent être réglés manuellement pour fonctionner
à la tension de fonctionnement adéquate.
AVIS : Pour éviter d'endommager un ordinateur muni d'un sélecteur de tension manuel, réglez le
sélecteur sur la tension qui se rapproche le plus de l'alimentation en CA disponible là où vous vous
trouvez. Au Japon, le sélecteur de tension doit être réglé sur 115 V bien que la tension du CA soit de
100 V. Assurez-vous aussi que votre moniteur et les périphériques connectés sont approuvés pour
fonctionner avec le CA disponible là où vous vous trouvez.
• Avant d'intervenir à l'intérieur de votre ordinateur, débranchez l'ordinateur pour éviter les
décharges électriques et ne pas endommager la carte système. Certains composants de la
carte système continuent à être alimentés tant que le système est connecté à une source
d'alimentation en CA.
Interventions à l'intérieur de l'ordinateur
Avant d'ouvrir le capot de l'ordinateur, effectuez les étapes suivantes dans l'ordre indiqué.
PRÉCAUTION : Ne tentez pas de réviser votre ordinateur vous-même, sauf si les
explications nécessaires se trouvent dans la documentation en ligne de Dell ou si
des instructions particulières vous sont fournies d'une autre façon par Dell. Suivez
toujours scrupuleusement les instructions d’installation et de maintenance.
44 Guide de configuration et de référence rapide
Page 46

Lors de l'utilisation de votre ordinateur (suite)
AVIS : Pour ne pas endommager la carte système, patientez 5 secondes après avoir éteint
l'ordinateur avant de retirer un composant de la carte système ou de déconnecter un périphérique de
l'ordinateur.
Exécutez un arrêt normal de l'ordinateur en utilisant le menu du système d'exploitation.
1
2 Éteignez votre ordinateur et tous les périphériques qui y sont raccordés.Mettez-vous à la
terre en touchant une surface métallique non peinte du châssis, comme le métal autour
des ouvertures des connecteurs de cartes à l'arrière de l'ordinateur, avant de toucher quoi
que ce soit à l'intérieur de votre ordinateur.
Pendant que vous travaillez, touchez régulièrement une surface métallique non peinte du
châssis de l'ordinateur pour dissiper l'électricité statique qui pourrait endommager les
composants internes.
3 Débranchez votre ordinateur et ses périphériques, y compris le moniteur, de leurs prises
de courant. Débranchez également tous les fils téléphoniques et de télécommunication
de l'ordinateur.
Ceci réduit le risque de blessure corporelle et d'électrocution.
De plus, prenez connaissance des consignes de sécurité suivantes qui s'appliquent à votre cas :
• Lorsque vous débranchez un câble, tirez sur son connecteur ou sur sa boucle de serrage, et
non pas sur le câble lui-même. Certains câbles possèdent un connecteur à languettes de
verrouillage ; si vous déconnectez un câble de ce type, appuyez sur les languettes de
verrouillage avant de déconnecter le câble. Lorsque vous séparez deux connecteurs,
veillez à les maintenir alignés pour éviter de tordre leurs broches. De même, avant de
raccorder un câble, assurez-vous que les deux connecteurs sont correctement orientés
et alignés.
• Manipulez les composants et les cartes avec soin. Ne touchez ni les composants ni les
broches de contact d'une carte. Tenez une carte par ses bords ou par sa patte de montage
métallique. Un composant tel qu'une puce de microprocesseur doit être tenu par ses
bords et non pas par ses broches.
PRÉCAUTION : Une nouvelle pile mal installée risque d'exploser. Remplacez la pile
par une pile de type identique ou d'un type équivalent recommandé par le fabricant.
Ne jetez pas la pile avec les ordures ménagères. Contactez le service de ramassage
des ordures local pour trouver le lieu de dépôt des déchets chimiques le plus proche.
Guide de configuration et de référence rapide 45
Page 47

Prise en main et configuration
REMARQUE : Ne
connectez qu'un clavier
et qu'une souris.
REMARQUE : Si vous
avez un clavier ou une
souris compatible USB
(Universal Serial Bus
[bus série universel]),
www.dell.com | support.dell.com
utilisez les connecteurs
USB situés à l'arrière de
votre système.
Effectuez les étapes suivantes pour connecter les périphériques externes à
votre ordinateur par le panneau d'entrées/sorties (E/S). Il est possible que
l'arrière de votre système Dell, notamment le panneau d'E/S, soit différent
des exemples présentés ci-dessous.
1
46 Guide de configuration et de référence rapide
Page 48

Système avec
2
un connecteur vidéo
connecteur vidéo de la carte d’extension
Système avec
deux connecteurs vidéo
REMARQUE : Si
votre système a deux
connecteurs vidéo, le
connecteur vidéo intégré
est désactivé et recouvert
d'un capuchon. Utilisez le
connecteur de la carte
d'extension comme le
montrent les illustrations
de droite de l'étape 2.
Système avec
un connecteur vidéo
connecteur vidéo de la carte d’extension
Système avec
deux connecteurs vidéo
Guide de configuration et de référence rapide 47
Page 49

REMARQUE : Si
4
Vérifi
votre système a deux
connecteurs audio,
utilisez celui de la carte
d'extension comme
l'indiquent les illustrations
de droite de l'étape 3.
3
www.dell.com | support.dell.com
REMARQUE : Les blocs
d'alimentation à sélection
automatique n'ont pas
besoin de sélecteur de
tension. Votre ordinateur
n'est peut-être pas muni
de ce sélecteur.
voyants de diagnostic voyants de diagnostic
voyants de
diagnostic
ez que le réglage du sélecteur de tension est le bon pour l'endroit
où vous vous trouvez. Pour plus d'informations, consultez la section
« Lors de l'utilisation de votre ordinateur », page 44.
voyants de
diagnostic
48 Guide de configuration et de référence rapide
Page 50

PRÉCAUTION : Pour éviter les décharges électriques, n'utilisez
que le câble d'alimentation fourni et assurez-vous qu'il est
branché à une source d'alimentation correctement mise à la terre.
5
Guide de configuration et de référence rapide 49
Page 51

www.dell.com | support.dell.com
Les illustrations suivantes présentent l'emplacement du bouton
d'alimentation et les boutons de réglage du moniteur.
6
50 Guide de configuration et de référence rapide
luminosité
contraste
Page 52

Lisez le contrat de licence du logiciel et suivez les instructions de
configuration de votre système d'exploitation à l'écran.
Félicitations ! La configuration de votre système est terminée.
En fonction de votre système d'exploitation, double-cliquez sur l'icône
Guides d'utilisation de votre bureau (illustré ci-dessous) ou cliquez sur le
bouton Démarrer puis sélectionnez Aide et support pour accéder à la
documentation électronique stockée sur votre disque dur.
Résolution de problèmes
Dell met à votre disposition plusieurs outils d'aide si votre système ne
fonctionne pas comme prévu. Pour obtenir les toutes dernières informations
de dépannage disponibles pour votre système, allez sur le site Web Dell
Support à l'adresse support.dell.com. Vous trouverez également une
description des outils de dépannage Dell dans la section intitulée
« Obtention d'aide » de votre Guide d'utilisation en ligne.
Si vous avez des problèmes d'ordinateur qui requièrent l'intervention de
Dell, décrivez en détails les erreurs, les codes sonores et les voyants de
diagnostic ; notez le code de service express et le numéro de service en
dessous, puis placez-vous près de votre ordinateur pour contacter Dell.
Consultez la section « Obtention d'informations concernant votre
ordinateur », page 39, pour obtenir un exemple de code de service express et
de numéro de service.
Code de service express : ___________________________
Numéro de service : ___________________________
Guide de configuration et de référence rapide 51
Page 53

www.dell.com | support.dell.com
Votre ordinateur dispose des outils suivants pour vous aider à résoudre les
problèmes :
DIAGNOSTICS DELL — Les Diagnostics Dell servent à tester divers
composants de votre ordinateur et vous aident à identifier la source des
problèmes de l'ordinateur. Pour plus d'informations, consultez la section
« Exécution des Diagnostics Dell », page 53.
VOYANTS DU SYSTÈME — Situés à l'avant de l'ordinateur, ces voyants
peuvent indiquer un problème de l'ordinateur. Pour des informations
supplémentaires, consultez votre Guide d'utilisation.
VOYANTS DE DIAGNOSTIC — Situés à l'arrière de l'ordinateur, ces voyants
peuvent aider à identifier un problème de l'ordinateur. Pour des informations
supplémentaires, consultez votre Guide d'utilisation.
MESSAGES DU SYSTÈME — L'ordinateur affiche ces messages pour vous
alerter de pannes en cours ou potentielles. Pour des informations
supplémentaires, consultez votre Guide d'utilisation.
CODES SONORES — Une série de codes sonores émis par votre ordinateur
peut vous aider à identifier un problème. Pour des informations supplémentaires,
consultez votre Guide d'utilisation.
Utilisation du CD Drivers and Utilities
Pour utiliser le CD Drivers and Utilities (appelé aussi ResourceCD) sous le
système d'exploitation Microsoft Windows, effectuez les étapes suivantes :
REMARQUE : Pour
accéder aux pilotes
de périphériques et à
la documentation
d'utilisation, vous devez
utiliser le CD Drivers and
Utilities sous Windows.
52 Guide de configuration et de référence rapide
Allumez l'ordinateur et attendez que le bureau Windows ait démarré.
1
2 Insérez le CD Drivers and Utilities dans le lecteur de CD.
Si c'est la première fois que vous utilisez le CD Drivers and Utilities sur
cet ordinateur, la fenêtre ResourceCD Installation (Installation de
ResourceCD) s'ouvre pour vous prévenir que le CD Drivers and
Utilities va commencer l'installation.
3 Cliquez sur OK pour continuer.
Pour terminer l'installation, répondez aux invites du programme
d'installation.
Page 54

4 Cliquez sur Next (Suivant) dans l'écran Welcome Dell System Owner
(Bienvenue au propriétaire du système Dell).
5 Sélectionnez les System Model (Modèle du système), Operating
System (Système d'exploitation), Device Type (Type de périphérique)
et Topic (Rubrique) appropriés.
Pilotes pour votre ordinateur
Pour afficher une liste des pilotes de périphériques pour votre ordinateur,
effectuez les étapes suivantes :
1 Cliquez sur My Drivers (Mes pilotes) dans le menu déroulant
Rubrique.
Le CD Drivers and Utilities examine le matériel et le système
d'exploitation de votre ordinateur, puis une liste des pilotes de
périphériques correspondant à la configuration de votre système
apparaît à l'écran.
2 Cliquez sur le pilote qui convient et suivez les instructions pour
télécharger le pilote sur votre ordinateur.
Pour afficher tous les pilotes disponibles pour votre ordinateur, cliquez sur
Drivers (Pilotes) dans le menu déroulant Rubrique.
Exécution des Diagnostics Dell
Les Diagnostics Dell constituent un programme qui sert à tester divers
composants de votre ordinateur. Exécutez ce programme chaque fois que
vous avez un problème avec votre ordinateur pour vous permettre d'en
identifier la source. Vous pouvez exécuter les Diagnostics Dell à partir de
votre disque dur ou du CD Drivers and Utilities.
AVIS : Si votre lecteur de disque dur tombe en panne, exécutez les
Diagnostics de lecteur de disque dur IDE Dell (consultez la section « Exécution
des diagnostics de lecteur de disque dur IDE Dell », page 54).
Allumez votre ordinateur (s'il l'est déjà, redémarrez-le).
1
2 Quand F2 = Setup (F2 = Installation) apparaît dans le coin
supérieur droit de l'écran, appuyez sur <Ctrl><Alt><F10>.
L'initialisation des diagnostics commence immédiatement, puis le
Diagnostics Menu (Menu des diagnostics) apparaît.
Guide de configuration et de référence rapide 53
Page 55

3 Sélectionnez l'option de diagnostic qui correspond à votre ordinateur.
Pour utiliser les diagnostics, suivez les instructions qui s'affichent à
l'écran.
Modification de la séquence d'amorçage
Pour exécuter les Diagnostics Dell à partir du CD Drivers and Utilities,
effectuez les étapes suivantes pour que votre ordinateur démarre sur le CD :
1 Insérez le CD Drivers and Utilities dans le lecteur de CD.
2 Allumez (ou redémarrez) votre ordinateur.
www.dell.com | support.dell.com
REMARQUE : Cette
fonction modifie la
séquence d'amorçage pour
un seul démarrage.
Au démarrage suivant,
l'ordinateur démarre en
fonction des périphériques
spécifiés dans la
configuration du système.
3 Quand F2 = Setup (F2 = Installation) apparaît dans le coin
supérieur droit de l'écran, appuyez sur <Ctrl><Alt><F8>.
Le Boot Device Menu (Menu des périphériques d'amorçage)
apparaît.
Si vous attendez trop longtemps et que le logo Windows apparaît,
patientez jusqu'à ce que le bureau de Windows apparaisse. Éteignez
ensuite votre ordinateur et essayez de nouveau.
4 Sélectionnez l'option CD-ROM Device (Lecteur de CD-ROM).
Exécution des diagnostics de lecteur de disque dur IDE Dell
Les diagnostics de lecteur de disque dur IDE Dell représentent un utilitaire
qui teste votre lecteur de disque dur pour identifier ou confirmer une panne
de ce lecteur.
1 Allumez votre ordinateur (s'il l'est déjà, redémarrez-le).
2 Quand F2=Setup (F2 = Installation) apparaît dans le coin
supérieur droit de l'écran, appuyez sur <Ctrl><Alt><D>.
3 Suivez les instructions qui s'affichent à l'écran.
Si une panne est signalée, consultez la section « Problèmes de lecteur
de disque dur » de votre Guide d'utilisation.
54 Guide de configuration et de référence rapide
Page 56

Informations réglementaires
Les EMI (ElectroMagnetic Interference [perturbations
électromagnétiques]) correspondent aux signaux et aux émissions, transmis
dans l'espace libre ou par conduction sur les câbles d'alimentation ou de
signalisation, susceptibles de nuire au fonctionnement du service de
radionavigation ou de tout autre service de sécurité, ou encore de dégrader,
d'entraver ou d'interrompre de façon répétée le service autorisé des
radiocommunications.
Votre système informatique Dell est conçu de façon à être conforme aux
réglementations en vigueur sur les EMI. Les changements et modifications
qui ne sont pas explicitement approuvés par Dell peuvent résilier le droit
d’utiliser cet équipement.
Les systèmes informatiques Dell sont conçus pour fonctionner dans un
environnement électromagnétique et ils sont testés et classés selon ce
dernier. Ces classifications sur l'environnement électromagnétique se
répartissent en deux groupes :
• La Classe A désigne les appareils qui ne peuvent être utilisés que dans
des environnements commerciaux ou industriels.
•La Classe B désigne les appareils qui peuvent être utilisés dans les
milieux résidentiels aussi bien que dans des environnements
commerciaux ou industriels.
Classe A
Cet équipement de Classe A a été testé et reconnu conforme aux
contraintes des appareils numériques de Classe A, en vertu de l’alinéa 15 de
la réglementation de la FCC. Ces contraintes sont conçues pour fournir une
protection raisonnable contre les perturbations nuisibles quand
l’équipement est utilisé dans un environnement commercial. Cet
équipement crée, utilise et peut émettre de l'énergie de fréquence radio et
risque, s'il n'est pas installé et utilisé conformément aux instructions, de
produire des perturbations nuisibles aux radiocommunications. L’utilisation
de cet équipement dans une zone résidentielle risque de créer des
perturbations nuisibles que l'utilisateur devra corriger à ses propres frais.
REMARQUE : Inspectez
l'étiquette réglementaire
apposée à l'arrière de
votre système Dell ou en
dessous pour déterminer
les environnements dans
lesquels vous pouvez
l'utiliser.
Guide de configuration et de référence rapide 55
Page 57

www.dell.com | support.dell.com
Classe B
Cet équipement de Classe B a été testé et reconnu conforme aux limites
des appareils numériques de Classe B, en vertu de l’alinéa 15 de la
réglementation de la FCC. Ces restrictions sont conçues pour fournir une
protection suffisante contre les perturbations nuisibles quand l’équipement
est utilisé dans une installation résidentielle. Cet équipement crée, utilise et
peut émettre de l'énergie de fréquence radio et risque, s'il n'est pas installé
et utilisé conformément aux instructions, de produire des perturbations
nuisibles aux radiocommunications. Il n'y a cependant aucune garantie que
les perturbations ne se produiront pas dans une installation particulière. Si
cet équipement crée des perturbations nuisibles à la réception radio et de
télévision, ce qui peut être déterminé en l’éteignant et en l’allumant,
l'utilisateur devrait essayer de les corriger en prenant une ou plusieurs des
mesures suivantes :
• Changer l'orientation ou l'emplacement de l'antenne de réception.
• Éloigner l'équipement du récepteur.
REMARQUE : Vous
trouverez d'autres
informations sur les
réglementations qui
s'appliquent à votre
système dans le Guide
d'utilisation.
• Brancher l'équipement et le récepteur sur des circuits distincts.
• Consulter Dell ou un technicien qualifié en radio/télévision pour
obtenir de l'aide.
Les informations suivantes sont fournies à propos des appareils décrits dans
ce document et en conformité avec les normes de la FCC :
• Numéro de modèle : DHS, DHP et DHM
• Nom de la société :
Dell Computer Corporation
One Dell Way
Round Rock, Texas 78682 USA
512-338-4400
56 Guide de configuration et de référence rapide
Page 58

Garanties limitées et règles de retour
Le matériel Dell acheté aux États-Unis ou au Canada est couvert par une
garantie limitée de 90 jours, d'un an, de deux ans, de trois ans ou de quatre
ans (États-Unis uniquement). Pour déterminer quelle garantie vous avez
acheté, reportez-vous à la facture Dell qui a été fournie avec votre
ordinateur. Les sections suivantes décrivent les garanties limitées aux
États-Unis, les règles de retour aux États-Unis, les garanties limitées au
Canada et la garantie du fabricant en Amérique latine et aux Caraïbes.
Garantie limitée pour les États-Unis
Que couvre la garantie limitée ?
Cette garantie limitée couvre les défauts matériels et de fabrication de vos produits matériels
de marque Dell (produits vous appartenant en tant qu'utilisateur final), y compris les
moniteurs, les claviers et les périphériques de pointage (souris) de marque Dell.
Que ne couvre pas la garantie limitée ?
Cette garantie limitée ne couvre pas :
• Les logiciels, y compris le système d'exploitation et les logiciels installés sur les produits
matériels de marque Dell par notre système d'intégration en usine, les logiciels
provenant de tierces parties, ou le rechargement de logiciel
• Les produits et accessoires de marques autres que Dell
• Les problèmes provenant :
– de causes externes tels que les accidents, les abus, les mauvaises utilisations ou les
problèmes liés à l'alimentation électrique
– de réparations ou de maintenance que nous n'avons pas autorisés
– d'une utilisation non conforme aux instructions du produit
– du fait de ne pas suivre les instructions du produit ou de ne pas effectuer les tâches
d'entretien préventif
– des problèmes causés par des accessoires, des pièces ou des composants non fournis
par nous
• De produits dont les numéros de série ou les étiquettes de service sont manquants ou
altérés
• De produits pour lesquels nous n'avons pas reçu de paiement
Guide de configuration et de référence rapide 57
Page 59

www.dell.com | support.dell.com
CETTE GARANTIE LIMITÉE VOUS DONNE DES DROITS SPÉCIFIQUES ET VOUS
POUVEZ AVOIR D'AUTRES DROITS QUI VARIENT D'ÉTAT EN ÉTAT (OU DE
JURIDICTION EN JURIDICTION). LA RESPONSABILITÉ DE DELL POUR LE
FONCTIONNEMENT DÉFECTUEUX ET LES DÉFAUTS DU MATÉRIEL SE LIMITE
À LA RÉPARATION OU AU REMPLACEMENT COMME INDIQUÉ DANS CE
CONTRAT DE GARANTIE. TOUTES LES GARANTIES, EXPLICITES OU TACITES
DE CE PRODUIT, Y COMPRIS, MAIS SANS S'Y LIMITER, LES GARANTIES ET
CONDITIONS DE QUALITÉ MARCHANDE ET D'APTITUDE À UN USAGE
PARTICULIER, ONT UNE DURÉE LIMITÉE AU TERME DE LA GARANTIE
LIMITÉE INDIQUÉ SUR VOTRE FACTURE. AUCUNE GARANTIE, EXPLICITE OU
TACITE, NE SERA EN EFFET APRÈS EXPIRATION DE LA PÉRIODE DE
GARANTIE. DANS LES ÉTATS QUI N'AUTORISENT PAS DE LIMITATION DE
DURÉE AUX GARANTIES TACITES, CETTE LIMITATION NE S'APPLIQUE PAS.
NOUS NE POUVONS PAS ÊTRE TENUS RESPONSABLES AU-DELÀ DES REMÈDES
INDIQUÉS DANS CETTE GARANTIE LIMITÉE, OU EN CAS DE DOMMAGES
INCIDENTS OU INDUITS, Y COMPRIS, MAIS SANS S'Y LIMITER, EN CAS DE
RÉCLAMATIONS À VOTRE ENCONTRE PAR DES TIERCES PARTIES POUR
DOMMAGES, EN CAS DE NON-DISPONIBILITÉ D'UN PRODUIT OU DE PERTE
DE DONNÉES OU DE LOGICIEL. NOTRE RESPONSABILITÉ NE DÉPASSERA PAS
LA SOMME QUE VOUS AVEZ PAYÉE POUR LE PRODUIT FAISANT L'OBJET D'UNE
RÉCLAMATION. CECI EST LA SOMME MAXIMALE POUR LAQUELLE NOUS
NOUS TENONS RESPONSABLES.
DANS LES ÉTATS QUI NE PERMETTENT PAS D'EXCLUSION OU DE LIMITES AUX
DOMMAGES INCIDENTS OU INDUITS, L'EXCLUSION OU LES LIMITES
PRÉCÉDENTES NE S'APPLIQUENT PAS.
Durée de cette garantie limitée
Cette garantie limitée dure pour la période indiquée sur votre facture, à l'exception de la
garantie limitée concernant les batteries de marque Dell, qui ne dure qu'une année, et la
garantie limitée concernant les lampes des projecteurs de marque Dell, qui ne dure que quatrevingt-dix jours. La garantie limitée commence à la date de facturation. La période de garantie
n'est pas prorogée si nous réparons ou échangeons un produit ou des pièces sous garantie. Dell
peut changer la disponibilité des garanties limitées, selon sa convenance, mais aucun
changement ne sera rétroactif.
Que faire si je requiers un dépannage sous garantie ?
Avant que la garantie n'expire, veuillez nous appeler au numéro approprié indiqué dans le
tableau suivant. Ayez votre numéro de service ou votre numéro de commande Dell à portée de
main.
Particuliers :
Support technique 800 624 9896
Service clientèle 800 624 9897
Particuliers dont l'achat a été effectué au sein
d'un programme d'achat pour les employés :
Support technique et service clientèle 800 822 8965
58 Guide de configuration et de référence rapide
Page 60

Particuliers et petites entreprises :
Support technique et service clientèle 800 456 3355
Clients commerciaux appartenant à une grande
ou moyenne entreprise ou à un groupe global, et
clients du secteur de la santé et distributeurs à
valeur ajoutée (VAR) :
Support technique et service clientèle 800 822 8965
Gouvernement et enseignement :
Support technique et service clientèle 800 234 1490
Mémoire de marque Dell
888 363 5150
Que fera Dell ?
Durant les premiers 90 jours de la garantie limitée de 90 jours et durant la première année des
autres garanties limitées : Durant les premiers 90 jours de la garantie limitée de 90 jours et
durant la première année des autres garanties limitées, nous réparerons tout produit matériel
de marque Dell qui nous sera renvoyé et que nous jugerons défectueux de par ses composants
ou sa fabrication. Si nous ne pouvons pas réparer le produit, nous le remplacerons par un
produit comparable, neuf ou remis à neuf.
Lorsque vous nous contacterez, nous vous fournirons un numéro d'autorisation de retour de
matériel, que vous inclurez au produit renvoyé. Vous devez nous renvoyer les produits dans leur
emballage d’origine ou dans un emballage équivalent, payer les frais d’expédition à l’avance, et
assurer l’envoi ou accepter les risques de perte ou de dommage du produit pendant le
transport. Nous vous renverrons les produits réparés ou des produits de remplacement. Nous
vous renverrons à nos frais les produits réparés ou des produits de remplacement si vous utilisez
une adresse aux États-Unis (Puerto-Rico et territoires exclus). Sinon, nous vous renverrons les
produits port dû.
Si nous déterminons que le produit n'est pas couvert par cette garantie, nous vous notifierons
et vous informerons des services payants disponibles.
REMARQUE : Avant de nous renvoyer le ou les produits, sauvegardez les données des
disques durs et des autres dispositifs de stockage des produits. Retirez toutes les informations
confidentielles, personnelles ou à caractère propriétaire, ainsi que les médias amovibles tels
que les disquettes, les CD et les cartes PC. Nous ne sommes pas responsables en ce qui concerne
vos informations confidentielles, personnelles ou à caractère propriétaire, les données perdues
ou corrompues, ou les médias amovibles perdus ou endommagés.
Durant les années restantes : Durant la période restante de la garantie limitée, nous
remplacerons toute pièce défectueuse par des pièces neuves ou remises à neuf, si nous jugeons
que cette pièce doit effectivement être remplacée. Quand vous nous contactez, nous vous
demandons un numéro de carte de crédit valide lorsque vous demandez une pièce de rechange,
mais nous ne débiterons pas le coût de cette pièce de rechange si vous nous retournez la pièce
d'origine dans les trente jours qui suivent la date de livraison de la pièce de remplacement à
votre adresse. Si nous ne recevons pas la pièce d'origine dans les trente jours, nous débiterons le
prix standard actuel de cette pièce de votre carte de crédit.
Guide de configuration et de référence rapide 59
Page 61

www.dell.com | support.dell.com
Nous vous enverrons la pièce à nos frais si vous utilisez une adresse aux États-Unis
(Puerto-Rico et territoires exclus). Sinon, nous vous renverrons la pièce port dû. Nous inclurons
aussi un emballage affranchi avec chaque pièce de remplacement pour que vous nous renvoyiez
la pièce remplacée.
REMARQUE : Avant de remplacer des pièces, sauvegardez les données des disques durs et
des autres dispositifs de stockage des produits. Nous n'assumons aucune responsabilité quant à
la perte ou la corruption de données.
Que se passe-t'il si j'ai acheté un contrat de maintenance ?
Si vous possédez un contrat Dell de maintenance sur site, nous vous fournirons un service sur
site, selon les termes du contrat de maintenance sur site. Veuillez vous reporter à ce contrat-là
pour des détails sur l'obtention d'un service.
Si vous avez acheté un contrat de maintenance d'un prestataire de service par notre
intermédiaire, veuillez vous reporter à ce contrat pour des détails sur la façon d'obtenir
un service.
Comment réparerez-vous mon produit ?
Nous utilisons des pièces neuves ou remises à neuf provenant de divers fabricants pour les
réparations sous garantie et pour la fabrication des pièces et des systèmes de remplacement.
Les pièces et les systèmes remis à neuf sont des pièces ou des systèmes ayant été renvoyés à
Dell, et certains n'ont jamais été utilisés par un client. Toutes les pièces et tous les systèmes
sont inspectés et testés pour assurer leur qualité. Les pièces et les systèmes de rechange sont
couverts pour la période restante de la garantie limitée du produit que vous avez acheté.
Que faire si je ne suis pas satisfait ?
Nous nous félicitons de notre excellent service clientèle. Si vous n'êtes pas satisfait du service
que vous avez reçu dans le cadre de cette garantie limitée, veuillez nous le faire savoir. Nous
estimons que la meilleure façon de résoudre les litiges concernant notre garantie limitée est de
travailler ensemble. Si, après ces discussions, vous n'êtes toujours pas satisfait, un arbitrage
constituera, selon nous, le moyen le plus rapide pour résoudre vos problèmes. Ainsi,
TOUTE RÉCLAMATION, CONTESTATION OU CONTROVERSE (DANS UN
CADRE CONTRACTUEL, EXTRA CONTRACTUEL OU AUTRE, QU'ELLE SOIT
PRÉ-EXISTANTE, PRÉSENTE OU FUTURE, Y COMPRIS SELON LA LOI DES
PARTIES, STATUTAIRE, LES PRÉJUDICES INTENTIONNELS ET LES
RÉCLAMATIONS ÉQUITABLES) CONTRE DELL provenant de ou se rapportant à cette
garantie limitée, à son interprétation, ou à sa rupture, sa cessation ou sa validité, les relations
résultant de cette garantie limitée (y compris, en pleine application de la Loi, les relations avec
des tierces parties), la publicité de Dell ou tout achat s'y rattachant DOIT ÊTRE RÉSOLUE
EXCLUSIVEMENT ET EN DERNIER RESSORT PAR UN ARBITRAGE NON
CONTESTABLE ADMINISTRÉ PAR L'ORGANISME D'ARBITRAGE NATIONAL NAF
(NATIONAL ARBITRATION FORUM) sous le Code de Procédure en cours d'application
60 Guide de configuration et de référence rapide
Page 62

(disponible sur Internet à http://www.arb-forum.com/ ou par téléphone au numéro
1-800-474-2371). L'arbitrage sera limité exclusivement à la contestation ou controverse entre
vous et Dell. Toute décision du ou des arbitres sera finale et s'imposera à chacune des parties,
et pourra être valablement produite comme jugement devant tout tribunal de juridiction
compétente. Vous pouvez obtenir des informations à ce sujet et remplir des dossiers de
réclamation auprès de l'organisme NAF, à l'adresse P.O. Box 50191, Minneapolis, MN 55405.
Cette clause ne s'applique qu'aux particuliers et aux clients ayant effectué leur achat dans
le cadre d'un programme d'achat pour les employés. Elle ne s'applique pas aux clients
commerciaux appartenant à des PME/PMI, à de grandes entreprises, ou à des groupes globaux,
ou pour le gouvernement, le secteur de l'enseignement ou le domaine de la santé.
Puis-je transférer la garantie limitée ?
La garantie limitée d'un système peut être transférée si le propriétaire actuel transfère le titre
de propriété du système et enregistre ce transfert auprès de notre société. La garantie limitée
d'une barrette de mémoire de marque Dell ne peut pas être transférée. Vous pouvez enregistrer
votre transfert en allant sur le site Web de Dell :
• Si vous êtes un particulier, allez à
http://www.dell.com/us/en/dhs/topics/sbtopic_015_ccare.htm
• Si vous êtes un client commercial appartenant à une PME/PMI, une grande entreprise
ou une compagnie globale, allez à
http://www.dell.com/us/en/biz/topics/sbtopic_ccare_nav_015_ccare.htm
• Si vous êtes un client travaillant pour le gouvernement, le secteur de l'enseignement ou
le domaine de la santé, ou si vous êtes un particulier ayant effectué votre achat par le
biais d'un programme d'achat pour les employés, allez à
http://www.dell.com/us/en/pub/topics/sbtopic_015_ccare.htm
Si vous n'avez pas accès à Internet, veuillez contacter votre représentant du service clientèle ou
appeler le 1-800-624-9897.
Règles de retour « Satisfait ou remboursé » (États-Unis
uniquement)
Nous accordons une grande importance à la relation que vous entretenez avec nous et nous
voulons que vous soyez satisfait de vos achats. C'est pourquoi nous offrons les règles de retour
« Satisfait ou remboursé » pour la plupart des produits que vous, l'utilisateur final, achetez
directement chez Dell. Sous ces règles, vous pouvez renvoyer à Dell les produits que vous avez
achetés chez Dell pour recevoir un avoir ou un remboursement du prix d'achat payé, moins les
frais de livraison, de manutention et de restockage qui s'appliquent, comme indiqué ci-après :
Guide de configuration et de référence rapide 61
Page 63

www.dell.com | support.dell.com
• Nouveaux produits matériels et accessoires : tout le matériel, accessoires et pièces neufs,
et tous les logiciels non ouverts se trouvant encore dans leur emballage scellé, à
l'exception des produits mentionnés ci-dessous, peuvent être renvoyés dans les trente
jours à compter de la date de facturation. Pour renvoyer un logiciel d'application ou un
système d'exploitation installé par Dell, vous devez retourner tout l'ordinateur. Des
règles de retour différentes s'appliquent aux produits non défectueux achetés par
l'intermédiaire du service Software and Peripherals de Dell par les clients de nos services
aux PME/PMI. Ces produits peuvent être renvoyés dans les trente jours à compter de la
date de facturation, mais des frais de restockage de quinze pour cent (15 %) seront
déduits de tout remboursement ou avoir. Les règles de retour « Satisfait ou remboursé »
et celles de notre service Software and Peripherals ne s'appliquent ni aux produits de
stockage Dell | CEM, ni aux produits de marque CEM, ni aux logiciels d'entreprise.
• Pièces et produits matériels de marque Dell reconditionnés ou remis à neuf : tous les
produits de stockage et serveurs de marque Dell reconditionnés ou remis à neuf peuvent
être renvoyés dans les trente jours à compter de la date de facturation. Les autres
produits matériels et pièces de marque Dell reconditionnés ou remis à neuf peuvent être
renvoyés dans les quatorze jours à compter de la date de facturation.
Pour renvoyer des produits, appelez le service clientèle de Dell afin de recevoir un numéro
d'autorisation de retour pour avoir, durant la période de retour applicable au produit que vous
souhaitez retourner. Vous devez disposer d'un numéro d'autorisation de retour pour avoir pour
pouvoir renvoyer le produit. Consultez la section « Obtention d'aide » ou « Contacter Dell » de
la documentation de votre ordinateur pour trouver les informations dont vous avez besoin pour
obtenir une assistance clientèle.
Vous devez expédier les produits à Dell dans les cinq jours à compter de la date à laquelle Dell
a émis le numéro d'autorisation de retour pour avoir. Vous devez également renvoyer les
produits à Dell dans leur emballage d'origine, comme neufs, avec tous les médias, toute la
documentation et tous les autres articles inclus dans l'emballage d'origine, prépayer les frais
d'expédition, et assurer la livraison ou accepter le risque de perte ou de dommage lors du
transport.
Garantie limitée pour le Canada
Garantie limitée d'un an (Canada uniquement)
Dell Computer Corporation (« Dell ») fabrique ses produits matériels à partir de pièces et de
composants neufs ou comme neufs conformément aux normes en vigueur dans l'industrie.
Dell garantit les produits matériels qu’il fabrique contre tout défaut matériel et de fabrication.
Cette garantie est en vigueur pendant un an à compter de la date de facturation, selon les
modalités énoncées ci-après.
Les dommages survenus pendant la livraison des produits sont couverts par cette garantie
limitée. Ceci mis à part, cette garantie limitée ne couvre pas les dommages dus à des causes
externes, y compris les accidents, les abus, les problèmes d'alimentation électrique, les
interventions non autorisées par Dell, une utilisation non conforme aux instructions du
produit, le fait de ne pas effectuer les révisions exigées, et les problèmes dus à l’utilisation de
pièces ou de composants non fournis par Dell.
62 Guide de configuration et de référence rapide
Page 64

Cette garantie limitée ne couvre aucun des articles faisant partie des rubriques suivantes :
logiciels ; périphériques externes (sauf si cela est spécifiquement mentionné) ; accessoires ou
pièces ajoutés à un système Dell après qu'il ait été livré ; accessoires ou pièces ajoutés à un
système Dell par le département d'intégration de systèmes de Dell ; accessoires ou pièces qui
ne sont pas installés par Dell ; ou produits Dell Software and Peripherals. Les moniteurs, les
claviers et les souris de marque Dell ou qui font partie de la liste de prix standard de Dell sont
couverts par cette garantie limitée ; tous les autres moniteurs, claviers et souris (notamment
ceux qui sont vendus par le programme Dell Software and Peripherals) ne sont pas couverts.
Dell réparera ou remplacera les produits couverts par cette garantie limitée s'ils sont renvoyés à
l'atelier Dell. Pour obtenir un dépannage sous garantie, vous devez contacter le support
technique clientèle de Dell pendant la période de garantie. Consultez la section « Obtention
d'aide » ou « Contacter Dell » de la documentation de votre ordinateur pour trouver les
informations dont vous avez besoin pour obtenir une assistance clientèle. Si une réparation
sous garantie est nécessaire, Dell vous fournira un numéro d’autorisation de retour de matériel.
Vous devez renvoyer les produits à Dell dans leur emballage d’origine ou dans un emballage
équivalent et vous devez payer les frais d’expédition à l’avance et assurer l’envoi ou accepter les
risques de perte ou de dommage pendant le transport. Dans la mesure du possible, Dell reverra
le produit réparé ou le remplacement (à ses frais) s'il s'agit d'une adresse au Canada. Les frais
d'envoi seront payés à la réception pour les autres adresses.
REMARQUE : Avant d'envoyer le ou les produits à Dell, sauvegardez les données des
lecteurs de disque dur et des autres dispositifs de stockage des produits. Retirez les médias
amovibles comme les disquettes, les CD et les cartes PC. Dell ne peut être tenu responsable en
cas de perte de données ou de logiciels.
Dell est propriétaire de toutes les pièces retirées des produits réparés. Dell utilise des pièces
neuves ou remises à neuf provenant de divers fabricants pour les réparations sous garantie et
pour la fabrication des produits de remplacement. Quand Dell répare ou remplace un produit,
le terme de sa garantie n'est pas prorogé.
DELL NE FOURNIT AUCUNE GARANTIE OU CONDITION EXPLICITE AU-DELÀ
DE CELLES EXPRIMÉES DANS CE CONTRAT DE GARANTIE LIMITÉE.DELL
REFUSE TOUTES LES AUTRES GARANTIES ET CONDITIONS, EXPLICITES
OU TACITES, Y COMPRIS, MAIS SANS S'Y LIMITER, LES GARANTIES ET
CONDITIONS IMPLICITES DE QUALITÉ MARCHANDE ET D'APTITUDE À
UN USAGE PARTICULIER. DANS LES ÉTATS (OU JURIDICTIONS) QUI
N'AUTORISENT PAS DE LIMITATION SUR LES GARANTIES OU CONDITIONS
TACITES, CETTE LIMITATION NE S'APPLIQUE PAS.
LA RESPONSABILITÉ DE DELL POUR LE FONCTIONNEMENT DÉFECTUEUX
ET LES DÉFAUTS DU MATÉRIEL SE LIMITE À LA RÉPARATION OU AU
REMPLACEMENT COMME INDIQUÉ DANS CE CONTRAT DE GARANTIE. CES
GARANTIES VOUS DONNENT DES DROITS SPÉCIFIQUES, ET VOUS POUVEZ
AVOIR D'AUTRES DROITS QUI VARIENT D'ÉTAT EN ÉTAT (OU DE JURIDICTION
EN JURIDICTION).
DELL NE PEUT ÊTRE TENU RESPONSABLE AU-DELÀ DES REMÈDES INDIQUÉS
DANS CETTE DÉCLARATION DE GARANTIE LIMITÉE, OU EN CAS DE
DOMMAGES INCIDENTS, INDIRECTS, PARTICULIERS, PUNITIFS OU INDUITS,
Y COMPRIS, MAIS SANS S'Y LIMITER, EN CAS DE NON-DISPONIBILITÉ D'UN
PRODUIT OU DE PERTE DE DONNÉES OU DE LOGICIEL.
Guide de configuration et de référence rapide 63
Page 65

www.dell.com | support.dell.com
DANS LES ÉTATS (OU JURIDICTIONS) QUI NE PERMETTENT PAS D'EXCLUSION
OU DE LIMITES AUX DOMMAGES INCIDENTS, INDIRECTS, PARTICULIERS,
PUNITIFS OU INDUITS, L'EXCLUSION OU LES LIMITES PRÉCÉDENTES NE
S'APPLIQUENT PAS.
Ces dispositions ne sont valables que pour la garantie limitée d'un an de Dell. Pour les
conditions concernant un contrat de service couvrant votre système, reportez-vous à votre
facture ou au contrat de service que vous recevrez séparément.
Si Dell choisit d'échanger un produit ou une partie d'un produit, l’échange se fera en
conformité aux règles d’échange de Dell en vigueur à la date de l'échange. Au cas où Dell émet
un numéro d’autorisation de retour du matériel, Dell doit recevoir le ou les produits à réparer
avant l’expiration de la garantie afin que la réparation soit couverte par la garantie limitée.
Garantie limitée de deux ans (Canada uniquement)
Dell Computer Corporation (« Dell ») fabrique ses produits matériels à partir de pièces et de
composants neufs ou comme neufs conformément aux normes en vigueur dans l'industrie.
Dell garantit les produits matériels qu’il fabrique contre tout défaut matériel et de fabrication.
La garantie est valable pendant deux ans à compter de la date de facturation, comme le décrit
le texte qui suit.
Les dommages survenus pendant la livraison des produits sont couverts par cette garantie
limitée. Ceci mis à part, cette garantie limitée ne couvre pas les dommages dus à des causes
externes, y compris les accidents, les abus, les problèmes d'alimentation électrique, les
interventions non autorisées par Dell, une utilisation non conforme aux instructions du
produit, le fait de ne pas effectuer les révisions exigées, et les problèmes dus à l’utilisation de
pièces ou de composants non fournis par Dell.
Cette garantie limitée ne couvre aucun des articles faisant partie des rubriques suivantes :
logiciels ; périphériques externes (sauf si cela est spécifiquement mentionné) ; accessoires ou
pièces ajoutés à un système Dell après qu'il ait été livré ; accessoires ou pièces ajoutés à un
système Dell par le département d'intégration de systèmes de Dell ; accessoires ou pièces qui
ne sont pas installés par Dell ; ou produits Dell Software and Peripherals. Les moniteurs, les
claviers et les souris de marque Dell ou qui font partie de la liste de prix standard de Dell sont
couverts par cette garantie limitée ; tous les autres moniteurs, claviers et souris (notamment
ceux qui sont vendus par le programme Dell Software and Peripherals) ne sont pas couverts.
Les batteries pour ordinateurs portables ne sont couvertes que pendant la première année de
cette garantie limitée.
64 Guide de configuration et de référence rapide
Page 66

Première année de la garantie limitée
Pendant la première année à partir de la date de facturation, Dell réparera ou remplacera les
produits couverts par cette garantie limitée qui sont retournés à l'atelier de Dell. Pour obtenir
un dépannage sous garantie, vous devez contacter le support technique clientèle de Dell
pendant la période de garantie. Consultez la section « Obtention d'aide » ou « Contacter Dell »
de la documentation de votre ordinateur pour trouver les informations dont vous avez besoin
pour obtenir une assistance clientèle. Si une réparation sous garantie est nécessaire, Dell vous
fournira un numéro d’autorisation de retour de matériel. Vous devez renvoyer les produits à
Dell dans leur emballage d’origine ou dans un emballage équivalent, vous devez payer les frais
d’expédition à l’avance et vous devez assurer l’envoi ou accepter les risques de perte ou de
dommage pendant le transport. Dans la mesure du possible, Dell vous renverra à ses frais le
produit réparé ou un remplacement si vous utilisez une adresse au Canada. Les frais d'envoi
seront payés à la réception pour les autres adresses.
REMARQUE : Avant d'envoyer le ou les produits à Dell, sauvegardez les données des
lecteurs de disque dur et des autres dispositifs de stockage des produits. Retirez les médias
amovibles comme les disquettes, les CD et les cartes PC. Dell ne peut être tenu responsable en
cas de perte de données ou de logiciels.
Dell est propriétaire de toutes les pièces retirées des produits réparés. Dell utilise des pièces
neuves ou remises à neuf provenant de divers fabricants pour les réparations sous garantie et
pour la fabrication des produits de remplacement. Quand Dell répare ou remplace un produit,
le terme de sa garantie n'est pas prorogé.
Deuxième année de la garantie limitée
Pendant la deuxième année de cette garantie limitée, Dell fournira, sur une base d’échange et
conformément aux règles d'échange de Dell en vigueur à la date de l'échange, des pièces de
remplacement si des pièces doivent être remplacées dans un produit matériel Dell couvert par
cette garantie limitée. Vous devez signaler chaque panne de matériel au support technique
clientèle de Dell pour que Dell convienne que la pièce doit être remplacée et expédie la pièce
de remplacement. Dans la mesure du possible, Dell expédiera les pièces (à ses frais) si vous
utilisez une adresse au Canada. Les frais d'envoi seront payés à la réception pour les autres
adresses. Dell inclura un emballage affranchi avec chaque pièce de remplacement pour que
vous renvoyiez la pièce remplacée à Dell. Les pièces de remplacement sont neuves ou remises à
neuf. Dell peut fournir des pièces de remplacement provenant de divers fabricants. La pièce de
remplacement est couverte par la garantie pendant le reste de la période de garantie limitée.
Vous paierez Dell pour les pièces de remplacement si la pièce remplacée n’est pas renvoyée à
Dell. Le renvoi des pièces remplacées et votre obligation de payer les pièces de remplacement si
vous ne renvoyez pas les pièces remplacées à Dell seront conformes aux règles d’échange de
Dell en vigueur à la date de l’échange.
Vous êtes pleinement responsable de vos logiciels et de vos données. Dell n’a pas à vous
indiquer ou à vous rappeler les procédures de sauvegarde et les autres procédures appropriées.
Guide de configuration et de référence rapide 65
Page 67

www.dell.com | support.dell.com
Conditions générales
DELL NE FOURNIT AUCUNE GARANTIE OU CONDITION EXPLICITE AU-DELÀ
DE CELLES EXPRIMÉES DANS CE CONTRAT DE GARANTIE LIMITÉE.DELL
REFUSE TOUTES LES AUTRES GARANTIES ET CONDITIONS, EXPLICITES
OU TACITES, Y COMPRIS, MAIS SANS S'Y LIMITER, LES GARANTIES ET
CONDITIONS IMPLICITES DE QUALITÉ MARCHANDE ET D'APTITUDE À
UN USAGE PARTICULIER. DANS LES ÉTATS (OU JURIDICTIONS) QUI
N'AUTORISENT PAS DE LIMITATION SUR LES GARANTIES OU CONDITIONS
TACITES, CETTE LIMITATION NE S'APPLIQUE PAS.
LA RESPONSABILITÉ DE DELL POUR LE FONCTIONNEMENT DÉFECTUEUX
ET LES DÉFAUTS DU MATÉRIEL SE LIMITE À LA RÉPARATION OU AU
REMPLACEMENT COMME INDIQUÉ DANS CE CONTRAT DE GARANTIE. CES
GARANTIES VOUS DONNENT DES DROITS SPÉCIFIQUES, ET VOUS POUVEZ
AVOIR D'AUTRES DROITS QUI VARIENT D'ÉTAT EN ÉTAT (OU DE JURIDICTION
EN JURIDICTION).
DELL NE PEUT ÊTRE TENU RESPONSABLE AU-DELÀ DES REMÈDES INDIQUÉS
DANS CETTE DÉCLARATION DE GARANTIE LIMITÉE, OU EN CAS DE
DOMMAGES INCIDENTS, INDIRECTS, PARTICULIERS, PUNITIFS OU INDUITS,
Y COMPRIS, MAIS SANS S'Y LIMITER, EN CAS DE NON-DISPONIBILITÉ D'UN
PRODUIT OU DE PERTE DE DONNÉES OU DE LOGICIEL.
DANS LES ÉTATS (OU JURIDICTIONS) QUI NE PERMETTENT PAS D'EXCLUSION
OU DE LIMITES AUX DOMMAGES INCIDENTS, INDIRECTS, PARTICULIERS,
PUNITIFS OU INDUITS, L'EXCLUSION OU LES LIMITES PRÉCÉDENTES NE
S'APPLIQUENT PAS.
Ces conditions ne s'appliquent qu'à la garantie limitée de deux ans de Dell. Pour les conditions
concernant un contrat de service couvrant votre système, reportez-vous à votre facture ou au
contrat de service que vous recevrez séparément.
Si Dell choisit d'échanger un système ou un composant, l’échange se fera en conformité aux
règles d’échange de Dell en vigueur à la date de l'échange. Au cas où Dell émet un numéro
d’autorisation de retour du matériel, Dell doit recevoir le ou les produits à réparer avant
l’expiration de la garantie afin que la réparation soit couverte par la garantie limitée.
Garantie limitée de trois ans (Canada uniquement)
Dell Computer Corporation (« Dell ») fabrique ses produits matériels à partir de pièces et de
composants neufs ou comme neufs conformément aux normes en vigueur dans l'industrie.
Dell garantit les produits matériels qu’il fabrique contre tout défaut matériel et de fabrication.
La garantie est valable pendant trois ans à compter de la date de facturation, comme le décrit
le texte qui suit.
Les dommages survenus pendant la livraison des produits sont couverts par cette garantie
limitée. Ceci mis à part, cette garantie limitée ne couvre pas les dommages dus à des causes
externes, y compris les accidents, les abus, les problèmes d'alimentation électrique, les
interventions non autorisées par Dell, une utilisation non conforme aux instructions du
produit, le fait de ne pas effectuer les révisions exigées, et les problèmes dus à l’utilisation de
pièces ou de composants non fournis par Dell.
66 Guide de configuration et de référence rapide
Page 68

Cette garantie limitée ne couvre aucun des articles faisant partie des rubriques suivantes :
logiciels ; périphériques externes (sauf si cela est spécifiquement mentionné) ; accessoires ou
pièces ajoutés à un système Dell après qu'il ait été livré ; accessoires ou pièces ajoutés à un
système Dell par le département d'intégration de systèmes de Dell ; accessoires ou pièces qui
ne sont pas installés par Dell ; ou produits Dell Software and Peripherals. Les moniteurs, les
claviers et les souris de marque Dell ou qui font partie de la liste de prix standard de Dell sont
couverts par cette garantie limitée ; tous les autres moniteurs, claviers et souris (notamment
ceux qui sont vendus par le programme Dell Software and Peripherals) ne sont pas couverts.
Les batteries pour ordinateurs portables ne sont couvertes que pendant la première année de
cette garantie limitée.
Première année de la garantie limitée
Pendant la première année à partir de la date de facturation, Dell réparera ou remplacera les
produits couverts par cette garantie limitée qui sont retournés à l'atelier de Dell. Pour obtenir
un dépannage sous garantie, vous devez contacter le support technique clientèle de Dell
pendant la période de garantie. Pour obtenir un dépannage sous garantie, vous devez contacter
le support technique clientèle de Dell pendant la période de garantie. Consultez la section «
Obtention d'aide » ou « Contacter Dell » de la documentation de votre ordinateur pour trouver
les informations dont vous avez besoin pour obtenir une assistance clientèle. Si une réparation
sous garantie est nécessaire, Dell vous fournira un numéro d’autorisation de retour de matériel.
Vous devez renvoyer les produits à Dell dans leur emballage d’origine ou dans un emballage
équivalent et vous devez payer les frais d’expédition à l’avance et assurer l’envoi ou accepter les
risques de perte ou de dommage pendant le transport. Dans la mesure du possible, Dell vous
renverra à ses frais le produit réparé ou un remplacement si vous utilisez une adresse au
Canada. Les frais d'envoi seront payés à la réception pour les autres adresses.
REMARQUE : Avant d'envoyer le ou les produits à Dell, sauvegardez les données des
lecteurs de disque dur et des autres dispositifs de stockage des produits. Retirez les médias
amovibles comme les disquettes, les CD et les cartes PC. Dell ne peut être tenu responsable en
cas de perte de données ou de logiciels.
Dell est propriétaire de toutes les pièces retirées des produits réparés. Dell utilise des pièces
neuves ou remises à neuf provenant de divers fabricants pour les réparations sous garantie et
pour la fabrication des produits de remplacement. Quand Dell répare ou remplace un produit,
le terme de sa garantie n'est pas prorogé.
Pendant les deuxième et troisième années de la garantie limitée
Pendant les deuxième et troisième années de cette garantie limitée, Dell fournira, sur une base
d’échange et conformément aux règles d'échange de Dell en vigueur à la date de l'échange, des
pièces de remplacement pour les produits matériels Dell couverts par cette garantie limitée
quand une pièce doit être remplacée. Vous devez signaler chaque panne de matériel au support
technique clientèle de Dell pour que Dell convienne que la pièce doit être remplacée et
expédie la pièce de remplacement. Dans la mesure du possible, Dell expédiera les pièces (à ses
frais) si vous utilisez une adresse au Canada. Les frais d'envoi seront payés à la réception pour
les autres adresses. Dell inclura un emballage affranchi avec chaque pièce de remplacement
pour que vous renvoyiez la pièce remplacée à Dell. Les pièces de remplacement sont neuves ou
remises à neuf. Dell peut fournir des pièces de remplacement provenant de divers fabricants.
La pièce de remplacement est couverte par la garantie pendant le reste de la période de
garantie limitée.
Guide de configuration et de référence rapide 67
Page 69

www.dell.com | support.dell.com
Vous paierez Dell pour les pièces de remplacement si la pièce remplacée n’est pas renvoyée à
Dell. Le renvoi des pièces remplacées et votre obligation de payer les pièces de remplacement si
vous ne renvoyez pas les pièces remplacées à Dell seront conformes aux règles d’échange de
Dell en vigueur à la date de l’échange.
Vous êtes pleinement responsable de vos logiciels et de vos données. Dell n’a pas à vous
indiquer ou à vous rappeler les procédures de sauvegarde et les autres procédures appropriées.
Conditions générales
DELL NE FOURNIT AUCUNE GARANTIE OU CONDITION EXPLICITE AU-DELÀ
DE CELLES EXPRIMÉES DANS CE CONTRAT DE GARANTIE LIMITÉE. DELL
REFUSE TOUTES LES AUTRES GARANTIES ET CONDITIONS, EXPLICITES
OU TACITES, Y COMPRIS, MAIS SANS S'Y LIMITER, LES GARANTIES ET
CONDITIONS IMPLICITES DE QUALITÉ MARCHANDE ET D'APTITUDE À
UN USAGE PARTICULIER. DANS LES ÉTATS (OU JURIDICTIONS) QUI
N'AUTORISENT PAS DE LIMITATION SUR LES GARANTIES OU CONDITIONS
TACITES, CETTE LIMITATION NE S'APPLIQUE PAS.
LA RESPONSABILITÉ DE DELL POUR LE FONCTIONNEMENT DÉFECTUEUX
ET LES DÉFAUTS DU MATÉRIEL SE LIMITE À LA RÉPARATION OU AU
REMPLACEMENT COMME INDIQUÉ DANS CE CONTRAT DE GARANTIE. CES
GARANTIES VOUS DONNENT DES DROITS SPÉCIFIQUES, ET VOUS POUVEZ
AVOIR D'AUTRES DROITS QUI VARIENT D'ÉTAT EN ÉTAT (OU DE JURIDICTION
EN JURIDICTION).
DELL NE PEUT ÊTRE TENU RESPONSABLE AU-DELÀ DES REMÈDES INDIQUÉS
DANS CETTE DÉCLARATION DE GARANTIE LIMITÉE, OU EN CAS DE
DOMMAGES INCIDENTS, INDIRECTS, PARTICULIERS, PUNITIFS OU INDUITS, Y
COMPRIS, MAIS SANS S'Y LIMITER, EN CAS DE NON-DISPONIBILITÉ D'UN
PRODUIT OU DE PERTE DE DONNÉES OU DE LOGICIEL.
DANS LES ÉTATS (OU JURIDICTIONS) QUI NE PERMETTENT PAS D'EXCLUSION
OU DE LIMITES AUX DOMMAGES INCIDENTS, INDIRECTS, PARTICULIERS,
PUNITIFS OU INDUITS, L'EXCLUSION OU LES LIMITES PRÉCÉDENTES NE
S'APPLIQUENT PAS.
Ces conditions ne s'appliquent qu'à la garantie limitée de trois ans de Dell. Pour les conditions
concernant un contrat de service couvrant votre système, reportez-vous à votre facture ou au
contrat de service que vous recevrez séparément.
Si Dell choisit d'échanger un système ou un composant, l’échange se fera en conformité aux
règles d’échange de Dell en vigueur à la date de l'échange. Au cas où Dell émet un numéro
d’autorisation de retour du matériel, Dell doit recevoir le ou les produits à réparer avant
l’expiration de la garantie afin que la réparation soit couverte par la garantie limitée.
Déclaration de garantie Intel® pour les processeurs Pentium® et
®
Celeron
Consultez la section « Intel® Warranty Statement for Pentium® and
Celeron
68 Guide de configuration et de référence rapide
uniquement (États-Unis et Canada uniquement)
®
Processors Only (U.S. and Canada Only) », page 35.
Page 70

Sistemas Dell™ OptiPlex™
Guía de instalación y de referencia rápida
www.dell.com | support.dell.com
Page 71

Notas, avisos y precauciones
NOTA: Una NOTA indica información importante que le ayuda a conseguir un
mejor rendimiento de su equipo.
AVISO: Un AVISO indica la posibilidad de daños al hardware o pérdida de
datos y le explica cómo evitar el problema.
PRECAUCIÓN: Una PRECAUCIÓN indica la posibilidad de daños a
la propiedad, de lesiones personales o muerte.
____________________
La información contenida en este documento puede modificarse sin previo aviso.
© 2000–2002 Dell Computer Corporation. Quedan reservados todos los derechos.
Queda estrictamente prohibida la reproducción de este documento en cualquier forma sin la
autorización por escrito de Dell Computer Corporation.
Marcas comerciales utilizadas en este texto: Dell, OptiPlex y el logotipo DELL son marcas
comerciales de Dell Computer Corporation; Microsoft y Windows son marcas comerciales
registradas de Microsoft Corporation; Intel, Pentium y Celeron son marcas comerciales registradas
de Intel Corporation.
Otras marcas y otros nombres comerciales pueden utilizarse en este documento para hacer referencia
a las entidades que los poseen o a sus productos. Dell Computer Corporation renuncia a cualquier
interés sobre la propiedad de marcas y nombres comerciales que no sean los suyos.
Agosto de 2002 P/N 81FTK Rev. A07
Page 72

Acerca de esta guía
Este documento contiene información acerca de la introducción y
configuración; solución de problemas; y sobre la seguridad, reglamentos y
garantía del equipo Dell
Para obtener las versiones más recientes de los documentos contenidos en la
unidad de disco duro, visite el sitio Dell Support en support.dell.com.
Los números de modelo reglamentarios aparecen a lo largo de este
documento; a continuación se muestran los equivalentes del tipo de chasis:
Números de modelo reglamentarios y tipos de chasis
DHS = chasis de escritorio pequeño (SD)
DHP = chasis de factor de forma pequeño (SF)
DHM = chasis de mini gabinete vertical pequeño (SMT)
™ OptiPlex™
Búsqueda de información para
su equipo
¿Qué está buscando? Encuéntrelo aquí
• Un programa de diagnóstico para mi equipo
• Controladores para mi equipo
• Documentación de mi equipo
• Documentación de mi dispositivo
Drivers and Utilities CD (también conocido como
ResourceCD)
Puede utilizar este CD para acceder a la documentación, instalar
controladores o ejecutar las herramientas de diagnósticos.
Guía de instalación y de referencia rápida 71
Page 73

¿Qué está buscando? Encuéntrelo aquí
• Código de servicio rápido y número de
Código de servicio rápido y clave del producto
etiqueta de servicio
• Etiqueta de licencia (clave del producto)
Microsoft
®
Windows
®
Ubicados en su equipo.
• Cómo volver a instalar el sistema operativo Operating System CD (CD del sistema operativo) y
www.dell.com | support.dell.com
Guía de instalación
Si vuelve a instalar el sistema operativo, use el CD Drivers and Utilities
para volver a instalar controladores para los dispositivos incluidos con
el equipo.
72 Guía de instalación y de referencia rápida
Page 74

¿Qué está buscando? Encuéntrelo aquí
• Cómo desmontar y reemplazar piezas
• Especificaciones técnicas
• Cómo configurar los valores del sistema
• Cómo manejar y solucionar problemas
• Controladores más recientes para mi equipo
• Respuestas a preguntas sobre asistencia o
servicio técnico
• Discusiones en línea con otros usuarios y
asistencia técnica
• Documentación para mi equipo
• Estado de llamadas de servicio
• Asuntos técnicos principales sobre mi
equipo
• Preguntas frecuentes
• Descargas de archivos
• Detalles de la configuración de mi equipo
• Contrato de servicio para mi equipo
Icono de la Guía del usuario
Dependiendo de su sistema operativo, haga doble clic en el icono
User's Guides (Guías del usuario) ubicado en el escritorio, o haga clic
en el botón Start (Inicio) y luego haga clic en Help and Assistance
(Ayuda y asistencia) para acceder a la documentación electrónica
almacenada en la unidad de disco duro.
Sitio web Dell Support
El sitio web Dell Support proporciona varias herramientas en línea,
incluyendo:
• Base de aprendizaje: trucos, consejos y cursos en línea
• Foro para clientes: discusiones en línea con otros clientes de Dell
• Actualizaciones: información sobre la actualización de componentes,
tales como la memoria, la unidad de disco duro y el sistema
operativo
• Atención al cliente: información de contacto, estado de pedidos,
garantía e información de reparaciones
• Descargas: controladores, revisiones y actualizaciones de software
• Referencia: documentación del equipo, especificaciones del
producto y papeles blancos
Sitio web de Asistencia Dell Premier Support
El sitio web de Asistencia Dell Premier Support está personalizado para
clientes corporativos, gubernamentales y del ámbito educativo. Es
posible que este sitio no esté disponible en todas las regiones.
Guía de instalación y de referencia rápida 73
Page 75

¿Qué está buscando? Encuéntrelo aquí
• Cómo utilizar Windows XP
• Documentación para el equipo y los
dispositivos
Centro de ayuda y asistencia de Windows XP
1 Haga clic en el botón Inicio y luego haga clic en Ayuda y asistencia.
2 Teclee una palabra o frase que describa su problema y luego haga clic
en el icono de flecha.
3 Haga clic en el tema que describe su problema.
4 Siga las instrucciones que aparecen en la pantalla.
PRECAUCIÓN: Instrucciones de
www.dell.com | support.dell.com
seguridad
Utilice las pautas de seguridad siguientes para ayudar a garantizar su seguridad personal y
ayudar a proteger su equipo y el ambiente de trabajo contra un daño potencial.
General
• No trate de dar servicio al equipo usted mismo, a menos que sea un técnico de servicio
capacitado. Siga siempre las instrucciones de instalación al pie de la letra.
• Para prevenir choques eléctricos, conecte el equipo y los cables de alimentación del
dispositivo a sus enchufes eléctricos con conexión apropiada a tierra. Estos cables están
equipados con 3 enchufes de clavijas que ayudan a garantizar una conexión a tierra
correcta. No utilice enchufes adaptadores ni retire la clavija de conexión a tierra de ningún
cable. Si necesita utilizar un cable de extensión, utilice un cable de 3 líneas con enchufes
adecuadamente conectados a tierra.
• Para ayudar a evitar los peligros potenciales de choques eléctricos, no use el equipo
durante tormentas eléctricas.
• Para ayudar a evitar los peligros potenciales de choques eléctricos, no conecte ni
desconecte los cables, ni realice mantenimiento o reconfiguración de este producto
durante una tormenta eléctrica.
74 Guía de instalación y de referencia rápida
Page 76

PRECAUCIÓN: Instrucciones de
seguridad (continuación)
• Si su equipo incluye un módem, el cable que se utilice con el módem debe estar
fabricado con un cable que tenga una medida mínima de 26 AWG (American wire gauge
[Medida estadounidense de cables]) y un conector modular RJ-11 compatible con las
especificaciones de la FCC.
• Antes de limpiar el equipo, desconéctelo del enchufe eléctrico. Limpie el equipo con un
paño suave humedecido con agua. No use limpiadores líquidos o en aerosol que puedan
contener sustancias inflamables.
• Para evitar posibles daños a la placa base, espere 5 segundos una vez apagado el equipo
antes de desconectar un dispositivo del equipo.
• Para evitar cortocircuitos en el equipo al momento de desconectar un cable de red,
desconecte primero el cable del adaptador de red de la parte posterior del equipo y luego
del enchufe de la red. Cuando vuelva a conectar el cable de red al equipo, conecte primero
el cable al enchufe de la red y después al adaptador de red.
• Para ayudar a proteger su equipo contra altas y bajas de energía eléctrica transitorias y
bruscas, utilice un protector contra voltajes extremos, un acondicionador de línea, o un
UPS (Uninterruptible Power Supply [sistema de energía ininterrumpida]).
• Asegúrese de que no haya ningún objeto encima de los cables del equipo y de que éstos
estén en un lugar en que no puedan pisarse y no se pueda tropezar con ellos.
• No introduzca ningún objeto por las aberturas del equipo. El hacerlo puede ocasionar un
incendio o un choque eléctrico al provocar un cortocircuito entre los componentes
internos.
• Mantenga el equipo alejado de radiadores y fuentes de calor. Asimismo, no obstruya las
rendijas de ventilación. Evite colocar papeles sueltos debajo del equipo; no coloque el
equipo en una unidad limitada por paredes cerradas o una cama, un sofá o una alfombra.
• No derrame comida o líquidos sobre el equipo.Si el equipo se moja, consulte la Guía
del usuario.
Guía de instalación y de referencia rápida 75
Page 77

Al usar el equipo
Cuando utilice el equipo, respete las siguientes pautas de manejo seguro.
PRECAUCIÓN: No permita el funcionamiento del equipo si ha retirado alguna
cubierta(s) (incluyendo cubiertas de la PC, biseles, soportes de relleno, carátulas
del panel anterior, etc.).
• Su equipo está provisto de uno de los siguientes elementos:
– Un suministro de energía de voltaje fijo: Los equipos con suministro de energía de
voltaje fijo no tienen un interruptor para la selección de voltaje en el panel posterior y
funcionan solamente con un voltaje (consulte la etiqueta reglamentaria en el exterior
www.dell.com | support.dell.com
del equipo para saber cuál es su voltaje de operación).
– Un circuito de detección automática de voltaje: Los equipos con circuito de
detección automática de voltaje no tienen un interruptor para la selección de voltaje
en el panel posterior y automáticamente detectan el voltaje de operación correcto.
– Un interruptor manual para la selección de voltaje: Los equipos con un interruptor
para la selección de voltaje en el panel posterior se deben ajustar manualmente para
que funcionen con el voltaje de operación correcto.
AVISO: Para ayudar a prevenir daños a un equipo con un interruptor manual para la selección de
voltaje, coloque el interruptor en la posición de voltaje que mejor coincida con la corriente alterna
disponible en su localidad. En Japón, el conmutador de selección de voltaje debe marcar la posición
115V incluso si el suministro de corriente alterna disponible en Japón es de 100 V. También
asegúrese de que el monitor y los dispositivos conectados estén clasificados eléctricamente para
operar con la alimentación de corriente alterna disponible en su localidad.
• Antes de trabajar en el interior de la PC, desenchufe el equipo para ayudar a evitar
descargas eléctricas o daños a la placa base. Algunos componentes de la placa base
continúan recibiendo energía siempre que el equipo esté conectado a la corriente alterna.
Al trabajar en el interior de su equipo
Antes de abrir la cubierta de la PC, realice los siguientes pasos en el orden indicado.
PRECAUCIÓN: No intente darle servicio al equipo usted mismo, excepto los
servicios que se explican en la documentación en línea Dell o en instrucciones que
se le hayan proporcionado por parte de Dell. Siga siempre las instrucciones de
instalación y servicio al pie de la letra.
76 Guía de instalación y de referencia rápida
Page 78

Al usar el equipo (continuación)
AVISO: Con el fin de prevenir un posible daño a la placa base, espere cinco segundos después de
apagar el equipo para desmontar un componente de la placa base o desconectar un dispositivo del
equipo.
Realice un apagado ordenado del equipo utilizando el menú del sistema operativo.
1
2 Apague el equipo y los dispositivos conectados al mismo.
3 Conéctese a tierra tocando una superficie metálica sin pintura en el chasis, tal como el
metal alrededor de aberturas de las ranuras para tarjetas en la parte posterior del equipo,
antes de tocar cualquier objeto en el interior de su equipo.
Conforme trabaje, toque periódicamente una superficie metálica sin pintura en el chasis
del equipo para disipar la electricidad estática que podría dañar los componentes
internos.
4 Desconecte el equipo y los dispositivos, incluido el monitor, de los enchufes eléctricos.
Asimismo, desconecte las líneas de teléfono o de telecomunicaciones conectadas
al equipo.
El hacerlo reduce la posibilidad de sufrir lesiones personales o choques eléctricos.
Además, tome nota de las siguientes pautas de seguridad cuando sea pertinente:
• Cuando desconecte un cable, tire de su conector o de su lazo liberador de tensión y no
del cable mismo. Algunos cables tienen un conector con lengüetas de seguro; si va a
desconectar este tipo de cable, oprima las lengüetas hacia adentro antes de desconectarlo.
Cuando separe conectores, manténgalos alineados para evitar doblar sus patas. Asimismo,
antes de conectar un cable, asegúrese de que los conectores estén orientados y alineados
correctamente.
• Maneje con cuidado los componentes y las tarjetas. No toque los componentes o
contactos ubicados en una tarjeta. Sujete las tarjetas por sus bordes o por su soporte
metálico de montaje. Sujete componentes tales como un chip microprocesador por sus
bordes y no por sus patas.
PRECAUCIÓN: Existe el peligro de que una nueva batería explote si no se instala
correctamente. Reemplace la batería únicamente con otra del mismo tipo o su
equivalente recomendado por el fabricante. No deseche la batería junto con los
desechos domésticos. Comuníquese con su agencia de desechos local para obtener la
dirección del depósito de baterías más cercano.
Guía de instalación y de referencia rápida 77
Page 79

Para comenzar/Configuración
NOTA: Conecte sólo un
teclado y un mouse.
NOTA: Si tiene un mouse
o un teclado compatible
con un USB (Universal
Serial Bus [bus serie
universal]), utilice los
www.dell.com | support.dell.com
conectores USB de la
parte posterior del
sistema.
Siga los siguientes pasos para conectar dispositivos externos al equipo por
medio del panel de E/S (entrada/salida). La parte posterior de su sistema
Dell, incluyendo el panel de E/S, puede ser distinta a los ejemplos que se
muestran aquí.
1
78 Guía de instalación y de referencia rápida
Page 80

Sistema con
2
un conector de vídeo
conector de vídeo en la tarjeta de expansión
Sistema con
dos conectores de vídeo
NOTA: Si su equipo
cuenta con dos conectores
de vídeo, el conector de
vídeo integrado está
desactivado y tiene una
tapa protectora. Utilice el
conector de la tarjeta de
expansión, como se
muestra en las
ilustraciones de la
derecha en el paso 2.
Sistema con
un conector de vídeo
conector de vídeo en la tarjeta de expansión
Sistema con
dos conectores de vídeo
Guía de instalación y de referencia rápida 79
Page 81

NOTA: Si su sistema
4
C
dispone de dos conectores
de audio, utilice el que se
encuentra en la tarjeta de
expansión, como se
muestra en las
ilustraciones de la
derecha en el paso 3.
3
www.dell.com | support.dell.com
NOTA: Los
suministros de energía
autoseleccionables no
necesitan un interruptor
de selección de voltaje. Es
posible que su equipo no
disponga de este
interruptor.
luces de diagnóstico luces de diagnóstico
luces de
diagnóstico
ompruebe que el interruptor de selección de voltaje esté en la
posición correcta para su área. Para obtener más información, consulte
"Al usar el equipo" en la página 76.
luces de
diagnóstico
80 Guía de instalación y de referencia rápida
Page 82

PRECAUCIÓN: Para evitar un choque eléctrico, utilice sólo el
cable de alimentación que se haya suministrado y asegúrese de
que esté conectado a una fuente de energía conectada a tierra.
5
Guía de instalación y de referencia rápida 81
Page 83

www.dell.com | support.dell.com
Las ilustraciones siguientes muestran las ubicaciones del botón de
encendido y los controles del monitor.
6
82 Guía de instalación y de referencia rápida
brillo
contraste
Page 84

Lea el acuerdo de licencia del software y siga las instrucciones de instalación
del sistema operativo que aparecen en la pantalla.
¡Felicitaciones! Ha completado la configuración del sistema.
Dependiendo de su sistema operativo, haga doble clic en el icono Guías del
usuario en el escritorio (que se muestra más abajo), o haga clic en el botón
Inicio y seleccione Ayuda y asistencia para acceder a la documentación
electrónica almacenada en la unidad de disco duro.
Solución de problemas
Dell proporciona una serie de herramientas para ayudarlo si su sistema no
funciona como se esperaba. Para obtener la información más actualizada
sobre la solución de problemas disponible para su sistema, consulte el sitio
web Dell Support en support.dell.com. También puede encontrar
descripciones de las herramientas de solución de problemas de Dell en la
sección titulada "Obtención de ayuda" en la Guía del usuario en línea.
Si el equipo tiene problemas que requieren la ayuda de Dell, escriba una
descripción detallada del error, códigos de sonido o patrones de luz de
diagnósticos; escriba su código de servicio rápido y número de etiqueta de
servicio a continuación y póngase en contacto con Dell en el mismo lugar en
que adquirió su equipo.
Consulte "Búsqueda de información para su equipo" en la página 71 para
ver un ejemplo del código de servicio rápido y números de etiqueta de
servicio.
Código de servicio rápido: ___________________________
Número de etiqueta de servicio: ___________________________
Guía de instalación y de referencia rápida 83
Page 85

www.dell.com | support.dell.com
Su equipo incluye las herramientas siguientes que le pueden ayudar a
solucionar un problema:
DIAGNÓSTICOS DELL:—Los Diagnósticos Dell prueban varios
componentes en el equipo y le ayudan a identificar las causas de los problemas
del mismo. Para obtener más información, consulte "Ejecución de los
Diagnósticos Dell" en la página 85.
LUCES DEL SISTEMA — Localizado en la parte anterior del equipo, estas
luces pueden indicarle un problema en el equipo. Para obtener más información,
consulte la Guía del usuario.
LUCES DE DIAGNÓSTICO — Localizado en la parte posterior del equipo,
estas luces pueden ayudarle a resolver un problema del equipo. Para obtener más
información, consulte la Guía del usuario.
MENSAJES DEL SISTEMA — El equipo reporta estos mensajes para
advertirle de fallas actuales o potenciales. Para obtener más información, consulte
la Guía del usuario.
CÓDIGOS DE SONIDO — Una serie de códigos de sonido emitidos por el
equipo que pueden ayudarle a identificar un problema. Para obtener más
información, consulte la Guía del usuario.
Utilización del CD Drivers and Utilities
Para poder utilizar el CD Drivers and Utilities (también conocido
como Resource CD) mientras está ejecutando el sistema operativo de
Microsoft Windows, realice los siguientes pasos.
NOTA: Para acceder a
los controladores de
dispositivos y a la
documentación del
usuario, debe usar el
Drivers and Utilities CD
mientras ejecuta
Windows.
84 Guía de instalación y de referencia rápida
Encienda el equipo y permita que se inicie el escritorio de Windows.
1
2 Inserte el CD Drivers and Utilities en la unidad de CD.
Si está utilizando el CD Drivers and Utilities por primera vez en este
equipo, se abrirá la ventana ResourceCD Installation (Instalación de
ResourceCD) para informarle que el CD Drivers and Utilities está a
punto de empezar su instalación.
3 Haga clic en OK (Aceptar) para continuar.
Para completar la instalación, responda a las peticiones ofrecidas por el
programa de instalación.
Page 86

4 Haga clic en Next (Siguiente) en la pantalla Welcome Dell System
Owner (Bienvenida al propietario del sistema Dell).
5 Seleccione el System Model (Modelo del sistema), Operating System
(Sistema operativo), Device Type (Tipo de dispositivo) y Topic
(Tema) correspondientes.
Controladores para su equipo
Para visualizar una lista de los controladores de dispositivos del equipo,
realice los siguientes pasos:
1 Haga clic en My Drivers (Mis controladores) en el menú
desplegable Tem a.
Drivers and Utilities CD examina el sistema operativo y el hardware del
equipo y después aparece en la pantalla una lista de los controladores
de dispositivos de la configuración del sistema.
2 Haga clic en el controlador adecuado y siga las instrucciones para
descargar el controlador en su equipo.
Para ver todos los controladores disponibles para su equipo, haga clic en
Drivers (Controladores) en el menú desplegable Te ma .
Ejecución de los Diagnósticos Dell
Los Diagnósticos Dell son un programa que prueba varios componentes en
su equipo. Ejecute este programa cada vez que tenga un problema con el
equipo para ayudar a identificar la fuente del problema. Puede ejecutar los
Diagnósticos Dell desde la unidad de disco duro o desde el Drivers and
Utilities CD.
AVISO: Si la unidad de disco duro falla, ejecute los Diagnósticos de la unidad
de disco duro IDE de Dell (consulte la sección "Ejecución de los Diagnósticos
de la unidad de disco duro IDE de Dell" en la página 86).
Encienda el equipo (si el equipo ya está encendido, reinícielo).
1
2 Cuando aparezca F2 = Setup (F2 = Configuración) en la
esquina superior derecha de la pantalla, oprima
<Control><Alt><F10>.
La inicialización de los diagnósticos empieza inmediatamente; luego
aparece el Diagnostics Menu (Menú de diagnósticos).
Guía de instalación y de referencia rápida 85
Page 87

3 Seleccione la opción de diagnósticos más apropiada para su equipo.
Para utilizar los diagnósticos, siga las instrucciones que aparecen en la
pantalla.
Cambiar la secuencia de inicio
Para ejecutar los Diagnósticos Dell desde el Drivers and Utilities CD, realice
los siguientes pasos para lograr que el equipo se inicie desde el CD:
1 Inserte el Drivers and Utilities CD en la unidad de CD.
2 Encienda (o reinicie) el equipo.
www.dell.com | support.dell.com
NOTA: Esta
característica cambia la
secuencia de inicio
solamente una vez. La
próxima vez, el equipo se
iniciará de acuerdo con
los dispositivos
especificados en la
configuración del sistema.
3 Cuando aparezca F2 = Setup (F2 = Configuración) en la
esquina superior derecha de la pantalla, oprima
<Control><Alt><F8>.
Aparece el Boot Device Menu (Menú del dispositivo de inicio).
Si espera demasiado y aparece el logotipo de Windows, siga esperando
hasta que aparezca el escritorio de Windows. En ese momento, apague
el equipo y vuelva a intentarlo.
4 Seleccione la opción CD-ROM Device (Dispositivo de CD-ROM).
Ejecución de los Diagnósticos de la unidad de disco duro IDE
de Dell
Los Diagnósticos de la unidad de disco duro IDE de Dell son una utilidad
que prueba la unidad de disco duro para solucionar o confirmar un fallo de
la unidad de disco duro.
1 Encienda el equipo (si el equipo ya está encendido, reinícielo).
2 Cuando aparezca F2 = Setup (F2 = Configuración)
en la esquina superior derecha de la pantalla, oprima
<Control><Alt><D>.
3 Siga las instrucciones que aparecen en la pantalla.
Si se reporta un error, consulte "Problemas de la unidad de disco duro"
en la Guía del usuario.
86 Guía de instalación y de referencia rápida
Page 88

Información reglamentaria
La EMI (Electromagnetic Interference [interferencia electromagnética]) es
cualquier señal o emisión, irradiada en el espacio o conducida mediante
cables de alimentación o de señales, que pone en peligro el funcionamiento
de dispositivos de navegación por radio u otros dispositivos de seguridad o
que degrada seriamente, obstruye o interrumpe repetidamente un servicio
de radiocomunicaciones con licencia.
El sistema del equipo Dell está diseñado para cumplir con todas las
reglamentaciones relacionadas con la EMI. Los cambios o modificaciones
no aprobados expresamente por Dell podrían anular la autoridad para
operar el equipo.
Los equipos Dell están diseñados, probados y clasificados para su ambiente
electromagnético específico. Estas clasificaciones del entorno
electromagnético se pueden dividir en dos grupos:
• La Clase A designa un dispositivo que sólo se puede utilizarse en
entornos industriales o empresariales.
•La Clase B designa un dispositivo que puede utilizarse en entornos
residenciales así como en entornos industriales y empresariales.
Clase A
Equipos de Clase A han sido sometidos a pruebas y se ha determinado que
cumplen con los límites para un dispositivo digital Clase A, de acuerdo con
el Apartado 15 de los Reglamentos de la FCC. Estos límites están diseñados
para proporcionar una protección razonable contra una interferencia
perjudicial en un entorno comercial. Este equipo genera, utiliza y puede
emitir energía de radiofrecuencia y, si no se instala o no se utiliza de acuerdo
con el manual de instrucciones, puede ocasionar una interferencia
perjudicial a las comunicaciones de radio. Es probable que el
funcionamiento de este dispositivo en un área residencial ocasione una
interferencia perjudicial, en cuyo caso el usuario deberá corregir la
interferencia por cuenta propia.
NOTA: Examine la
etiqueta reglamentaria,
que se encuentra fijada en
la parte posterior o
inferior de su sistema
Dell, para determinar los
entornos en los se puede
utilizar el sistema.
Guía de instalación y de referencia rápida 87
Page 89

www.dell.com | support.dell.com
Clase B
Equipos de Clase B han sido sometidos a pruebas y se ha determinado que
cumplen con los límites para un dispositivo digital Clase B de acuerdo con
el Apartado 15 de los Reglamentos de la FCC. Estos límites están diseñados
para proporcionar una protección razonable contra una interferencia
perjudicial en una instalación residencial. Este equipo genera, utiliza y
puede emitir energía de radiofrecuencia y, si no se instala o no se utiliza de
acuerdo con el manual de instrucciones, puede ocasionar una interferencia
perjudicial a las comunicaciones de radio. Sin embargo, no hay garantía de
que no ocurrirá interferencia en una instalación específica. Si este equipo
ocasiona una interferencia con el servicio de radio o televisión, lo cual puede
determinarse apagando y volviendo a encender el equipo, se le sugiere al
usuario intentar corregir la interferencia mediante uno de los siguientes
métodos:
• Reoriente o cambie de lugar la antena receptora.
• Aumente la separación entre el equipo y el receptor.
NOTA: Puede encontrar
más información sobre
reglamentaciones en la
Guía del usuario.
• Conecte el equipo a un enchufe en un circuito diferente al que está
conectado el receptor.
• Consulte a Dell o a un técnico de radio/TV cualificado para
obtener ayuda
La información siguiente se proporciona en cumplimiento de los
reglamentos de la FCC:
• Número de modelo: DHS, DHP y DHM
• Nombre del fabricante:
Dell Computer Corporation
One Dell Way
Round Rock, Texas 78682 512-338-4400USA
88 Guía de instalación y de referencia rápida
Page 90

Información para NOM (México solamente)
La información siguiente se proporciona en el dispositivo o en los
dispositivos descritos en este documento, en cumplimiento con los
requisitos de la Norma Oficial Mexicana (NOM):
Exportador: Dell Computer Corporation
One Dell Way
Round Rock, TX 78682
Importador: Dell Computer de México,
S.A. de C.V.
Paseo de la Reforma 2620 - 11° Piso
Col. Lomas Altas
11950 México, D.F.
Enviar a: Dell Computer de México,
S.A. de C.V. al Cuidado
de Kuehne & Nagel de
México S. de R.I.
Avenida Soles No. 55
Col. Peñón de los Baños
15520 México, D.F.
Tensión de
alimentación: 115/230 VCA
Frecuencia: 60/50 Hz
Valor nominal de la
corriente de entrada: DHS: 2,0/1,0 A
ó
DHP: 1,5/0,75 A
ó
DHM: 3,0/1,5 A
Guía de instalación y de referencia rápida 89
Page 91

Garantías limitadas y política de devoluciones
Los productos de la marca Dell que se adquieren en los EE.UU. o Canadá
tienen garantía limitada de 90 días, un año, tres años o cuatro años
(únicamente en los EE.UU.). Para determinar qué tipo de garantía adquirió,
consulte el recibo de Dell que viene con el equipo. Las secciones siguientes
describen las garantías limitadas y la política de devoluciones para los
EE.UU., las garantías limitadas para Canadá y la garantía del fabricante para
Latinoamérica y el Caribe.
www.dell.com | support.dell.com
Garantía del fabricante para el usuario final por un año
(únicamente Latinoamérica y el Caribe)
Garantía del fabricante
Dell Computer Corporation ("Dell") garantiza al usuario en acuerdo con las siguientes
provisiones que los productos de hardware que llevan su marca, adquiridos por el usuario por
medio de una compañía de Dell o un distribuidor de Dell autorizado en Latinoamérica o el
Caribe, estarán libres de defectos en materiales, mano de obra y diseño que puedan afectar su
uso normal por un periodo de un año a partir de la fecha original de compra. Los productos
para los cuales se haga una debida reclamación serán, según la decisión de Dell, reparados o
reemplazados a cuenta de Dell. Todas las piezas desmontadas de equipos reparados son
propiedad de Dell. Dell utiliza piezas nuevas y reacondicionadas hechas por varios fabricantes
cuando hace reparaciones y en la fabricación de productos de reemplazo.
Exclusiones
Esta garantía no cubre defectos causados por: instalación, uso o mantenimiento inadecuado o
incorrecto; acciones o modificaciones hechas por terceras personas no autorizadas o por el
usuario final; daños accidentales o intencionales; o por el desgaste normal.
Cómo realizar una reclamación
Las reclamaciones deben ser hechas en Latinoamérica o el Caribe poniéndose en contacto con
el lugar de ventas de Dell dentro del periodo de garantía. El usuario siempre debe proporcionar
un comprobante de adquisición, indicando el nombre y la dirección del vendedor, la fecha de
adquisición, números de serie y de modelo, nombre y dirección del cliente, y los detalles de los
síntomas y de la configuración al momento en el que ocurrió la falla, incluyendo los
dispositivos periféricos y el software que se estaban utilizando. De lo contrario, Dell puede
rehusar la demanda. Una vez diagnosticado un defecto bajo la garantía, Dell hará los arreglos
correspondientes y pagará el envío por tierra, así como por el seguro de ida y venida al centro de
reparación y reemplazo Dell. El usuario se debe encargar de que el producto defectuoso esté
disponible para ser recogido debidamente, embalado en la caja original o en una caja protectora
similar junto con los detalles que se mencionan anteriormente y el número de devolución
proporcionado al usuario por Dell.
90 Guía de instalación y de referencia rápida
Page 92

Limitación y derechos estatutarios
Dell no ofrece ninguna otra garantía o declaración similar que la explícitamente descrita
anteriormente y esta garantía se proporciona en lugar de toda otra garantía, al máximo
permitido por la ley. En la ausencia de leyes aplicables esta garantía será el único y exclusivo
recurso del usuario en contra de Dell o cualquiera de sus socios, y ni Dell ni cualquiera de sus
socios serán responsables por la pérdida de ganancias o contratos, o cualquier otra pérdida
indirecta o consiguiente que resulte de la negligencia, incumplimiento de contrato o cualquier
otra circunstancia.
Esta garantía no perjudica o afecta los derechos estatutarios obligatorios del usuario en
contra y/o cualquier otro derecho que resulte de otros contratos entre el usuario final y Dell
y/o cualquier otro vendedor.
Dell World Trade LP
One Dell Way, Round Rock, TX 78682, EE.UU.
Dell Computadores do Brasil Ltda (CNPJ No. 72.381.189/0001-10)/
Dell Commercial do Brasil Ltda (CNPJ No. 03 405 822/0001-40)
Avenida Industrial Belgraf, 400
92990-000 - Eldorado do Sul – RS - Brasil
Dell Computer de Chile Ltda
Coyancura 2283, Piso 3- Of.302,
Providencia, Santiago - Chile
Dell Computer de Colombia Corporation
Carrera 7 #115-33 Oficina 603
Bogotá, Colombia
Dell Computer de México S.A. de C.V.
Paseo de la Reforma 2620 - 11° Piso
Col. Lomas Altas
11950 México, D.F.
Guía de instalación y de referencia rápida 91
Page 93

www.dell.com | support.dell.com
92 Guía de instalación y de referencia rápida
Page 94

Printed in the U.S.A.
Imprimé aux U.S.A.
Impreso en los EE.UU.
081FTKA07
P/N 81FTK Rev. A07
www.dell.com | support.dell.com
Page 95

Printed in Brazil.
Imprimé au Brasil.
Impreso en Brasil.
081FTKA07
P/N 81FTK Rev. A07
www.dell.com | support.dell.com
 Loading...