

Page 1

Dell™ OptiPlex™ Systems
Setup and Quick Reference Guide
Guia de configuração e de referência rápida
Guía de instalación y de referencia rápida
Models DHS, DHP, and DHM
www.dell.com | support.dell.com
Page 2

Dell™ OptiPlex™ Systems
Setup and Quick Reference Guide
www.dell.com | support.dell.com
Page 3

Notes, Notices, and Cautions
NOTE: A NOTE indicates important information that helps you make better
use of your computer.
NOTICE: A NOTICE indicates either potential damage to hardware or loss of
data and tells you how to avoid the problem.
CAUTION: A CAUTION indicates a potential for property damage,
personal injury, or death.
____________________
Information in this document is subject to change without notice.
© 2000–2001 Dell Computer Corporation. All rights reserved.
Reproduction in any manner whatsoever without the written permission of Dell Computer
Corporation is strictly forbidden.
Trademarks used in this text: Dell, OptiPlex, and the DELL logo are trademarks of Dell Computer
Corporation; Microsoft, MS-DOS, Windows NT, and Windows are registered trademarks of
Microsoft Corporation.
Other trademarks and trade names may be used in this document to refer to either the entities
claiming the marks and names or their products. Dell Computer Corporation disclaims any
proprietary interest in trademarks and trade names other than its own.
November 2001 P/N 38WYD Rev. A05
Page 4

Contents
About This Guide . . . . . . . . . . . . . . . . . . . . . . . . . . 5
Finding Information and Assistance
Getting Started/Setup
Solving Problems
. . . . . . . . . . . . . . . . . . . . . . . . 8
. . . . . . . . . . . . . . . . . . . . . . . . . 20
Using the Dell OptiPlex ResourceCD
Running the Dell Diagnostics
. . . . . . . . . . . . . . . . 5
. . . . . . . . . . . . . . 21
. . . . . . . . . . . . . . . . . . 22
Running the Dell IDE Hard Drive Diagnostics
Safety Instructions
. . . . . . . . . . . . . . . . . . . . . . . . 23
When Working Inside Your Computer
When Using Your Computer System
Ergonomic Computing Habits
Regulatory Information
. . . . . . . . . . . . . . . . . . . . . . 26
Limited One-Year Warranty (U.S. Only)
. . . . . . . . . . . . . . 24
. . . . . . . . . . . . . . . . . 26
. . . . . . . . . . . . . . 27
One-Year Limited Warranty (Canada Only)
Three-Year Limited Warranty (U.S. Only)
Coverage During Year One
. . . . . . . . . . . . . . . . . . . 32
Coverage During Years Two and Three
General Provisions
. . . . . . . . . . . . . . . . . . . . . . . 33
. . . . . . . . . 23
. . . . . . . . . . . . . 23
. . . . . . . . . . . . 29
. . . . . . . . . . . . . 31
. . . . . . . . . . . . . 33
Three-Year Limited Warranty (Canada Only)
Coverage During Year One
Coverage During Years Two and Three
General Provisions
. . . . . . . . . . . . . . . . . . . 35
. . . . . . . . . . . . . 36
. . . . . . . . . . . . . . . . . . . . . . . 37
. . . . . . . . . . . 34
Contents 3
Page 5

One-Year End-User Manufacturer Guarantee
(Latin America and the Caribbean Only)
. . . . . . . . . . . . . 38
“Total Satisfaction” Return Policy
(U.S. and Canada Only)
. . . . . . . . . . . . . . . . . . . . . . 40
4 Contents
Page 6
About This Guide
This document contains getting started/setup; solving problems; and safety
and regulatory information about your Dell™ OptiPlex™ computer.
To obtain the latest versions of the documents on your hard drive, go to the
Dell support website at support.dell.com.
Regulatory model numbers appear throughout this document; their chassis
type equivalents are shown below:
Regulatory Model Numbers and Chassis Types
DHS = small desktop (SD) chassis
DHP = small form-factor (SF) chassis
DHM = small mini-tower (SMT) chassis
Finding Information and Assistance
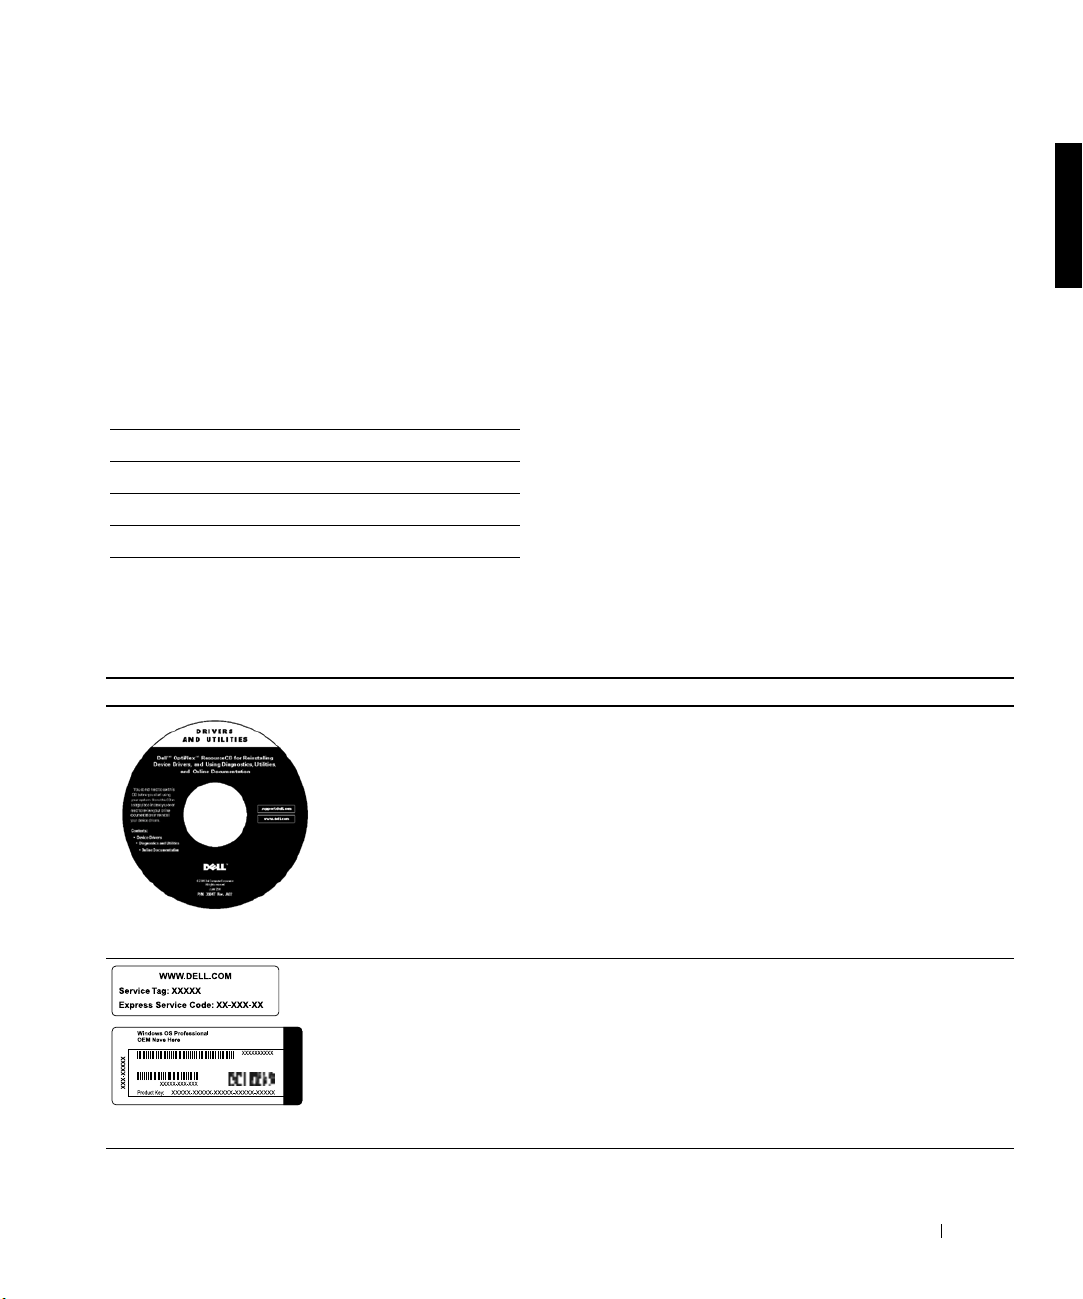
Resources and Support Tools
Resource Contents Using the Resource
Dell OptiPlex ResourceCD
• Dell Diagnostics
• Drivers
• Utilities
• Computer and device
documentation
Service and Registration
Labels—located on the front or
side of your Dell computer.
• Express Service Code and
Service Tag Number
• Product Key (also called the
Product ID or Certificate of
Authenticity [COA])
See the main menu on the ResourceCD that was shipped
with your computer. Use the pull-down menu to make
selections appropriate for your computer. You can perform
the following tasks:
• Diagnose a problem
• Install or reinstall drivers
• Obtain information on your computer and devices
NOTE: User documentation and drivers are already
installed on your computer when shipped from Dell. You
can use this CD to access documentation, reinstall drivers,
or run diagnostics tools.
The Express Service Code and Service Tag Number are
unique identifiers for your Dell computer.
You may need the Product Key (or Product ID) number to
complete the operating system setup.
Setup and Quick Reference Guide 5
Page 7

Resources and Support Tools (continued)
Resource Contents Using the Resource
Operating system CD To reinstall your operating system, use the operating
system CD that was shipped with your computer.
NOTE: The operating system CD may not include all the
latest drivers for your computer. If you reinstall your
operating system, use the ResourceCD to reinstall drivers
for the devices shipped with your computer.
For more information about reinstalling your operating
system, see the operating system installation
documentation that was shipped with your computer.
www.dell.com | support.dell.com
Operating system installation
guide
See the operating system installation guide for
information on reinstalling and configuring your
operating system.
Click the Start button and select Help or Help and
Support, depending on your operating system, to obtain
more information on your operating system.
User’s guides for your computer
and devices
User’s Guides
6 Setup and Quick Reference Guide
Depending on your operating system, double-click the
User’s Guides icon on your desktop, or click the Start
button and then select Help and Support to access the
electronic documentation stored on your hard drive.
Obtain information on the following:
• Using your computer
• Configuring system settings
• Removing and installing parts
• Installing and configuring software
• Diagnosing a problem
• Technical specifications
• Device documentation (on selected operating systems)
• Getting technical assistance
Page 8

Resources and Support Tools (continued)
Resource Contents Using the Resource
Dell support website
• Technical support and
information
• Downloads for your
computer
• Order or delivery status
• Hints and tips, technology
papers, service information
Dell Premier Support website
• Service call status
• Top technical issues by
product
• Frequently asked questions
by product number
• Customized service tags
• System configuration detail
Go to support.dell.com and complete the one-time
registration.
• Get help with general usage, installation, and
troubleshooting questions
• Obtain answers to technical service and support
questions
• Get the latest versions of the drivers for your computer
• Access documentation about your computer and
devices
• Join online discussions with other Dell customers and
Dell technical professionals
• Explore a list of online links to Dell's primary vendors
Go to premiersupport.dell.com:
The Dell Premier Support website is customized for
corporate, government, and education customers.
This site may not be available in all regions.
Setup and Quick Reference Guide 7
Page 9

www.dell.com | support.dell.com
Getting Started/Setup
Use the following steps to connect external devices to your computer via the
input/output (I/O) panel. The back of your Dell system, including the I/O
panel, may look different from the examples shown here.
1
8 Setup and Quick Reference Guide
Page 10
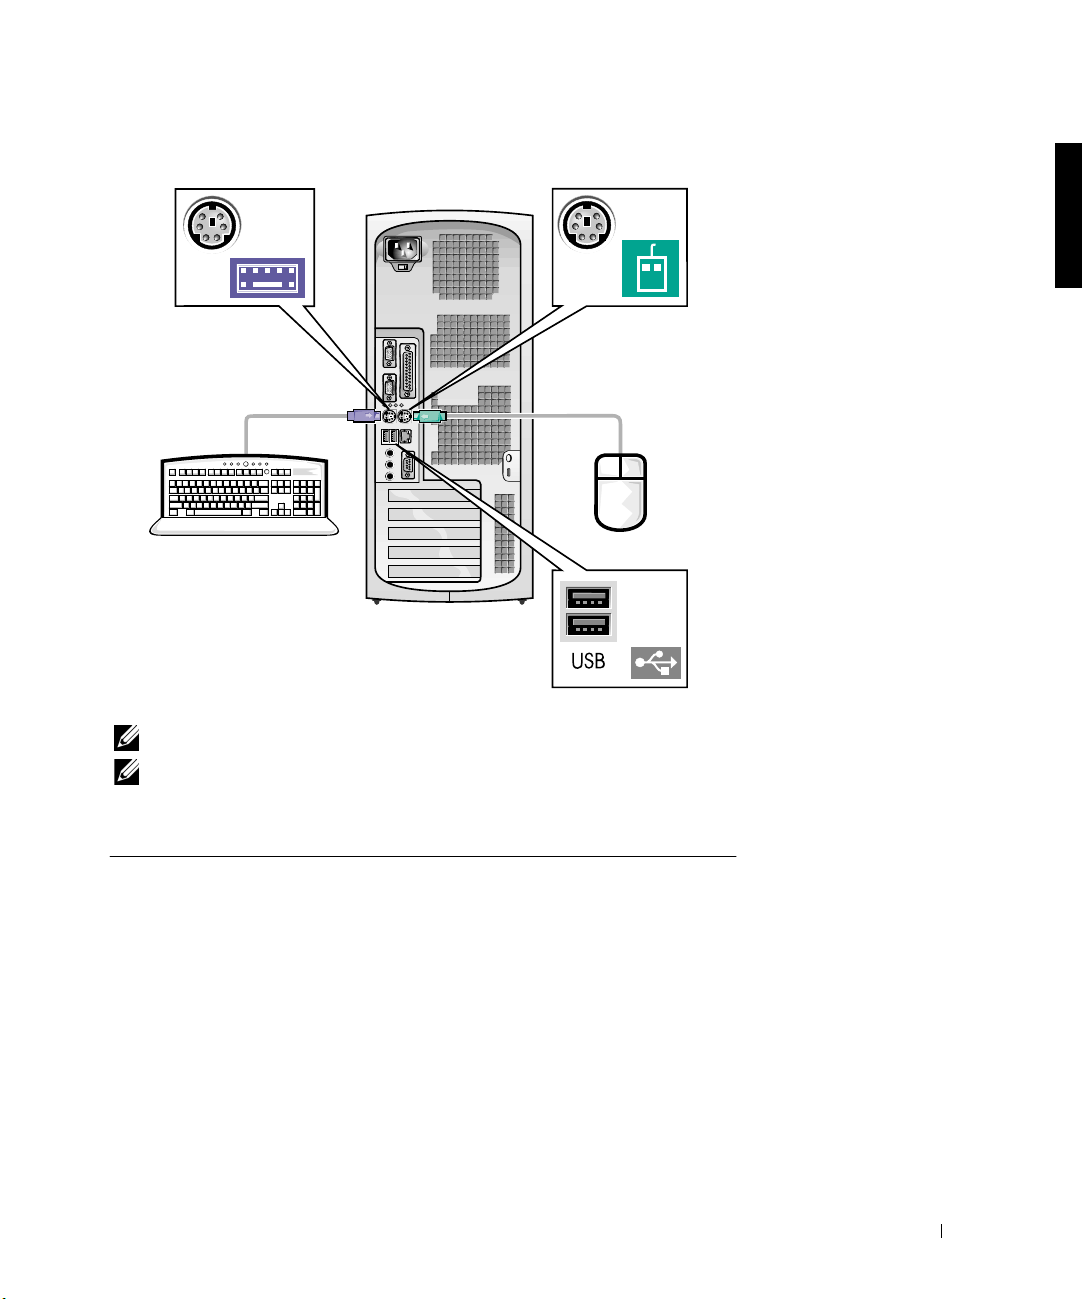
NOTE: Connect only one keyboard and one mouse.
NOTE: If you have a Universal Serial Bus (USB)-compliant mouse or
keyboard, use the USB connectors on the back of your system.
Setup and Quick Reference Guide 9
Page 11

www.dell.com | support.dell.com
System with
2
one video connector
System with
two video connectors
video connector
on expansion card
NOTE: If your system has two video connectors, the integrated video
connector is disabled and has a protective cap on it. Use the expansion card
connector, as shown in the illustrations on the right in step 2.
10 Setup and Quick Reference Guide
video connector
on expansion card
Page 12

System with
one video connector
NOTE: If your system has two video connectors, the integrated video
connector is disabled and has a protective cap on it. Use the expansion card
connector, as shown in the illustrations on the right in step 2.
System with
two video connectors
video connector
on expansion card
Setup and Quick Reference Guide 11
Page 13

3
www.dell.com | support.dell.com
diagnostics lights diagnostics lights
diagnostics lights
12 Setup and Quick Reference Guide
Page 14

diagnostics
lights
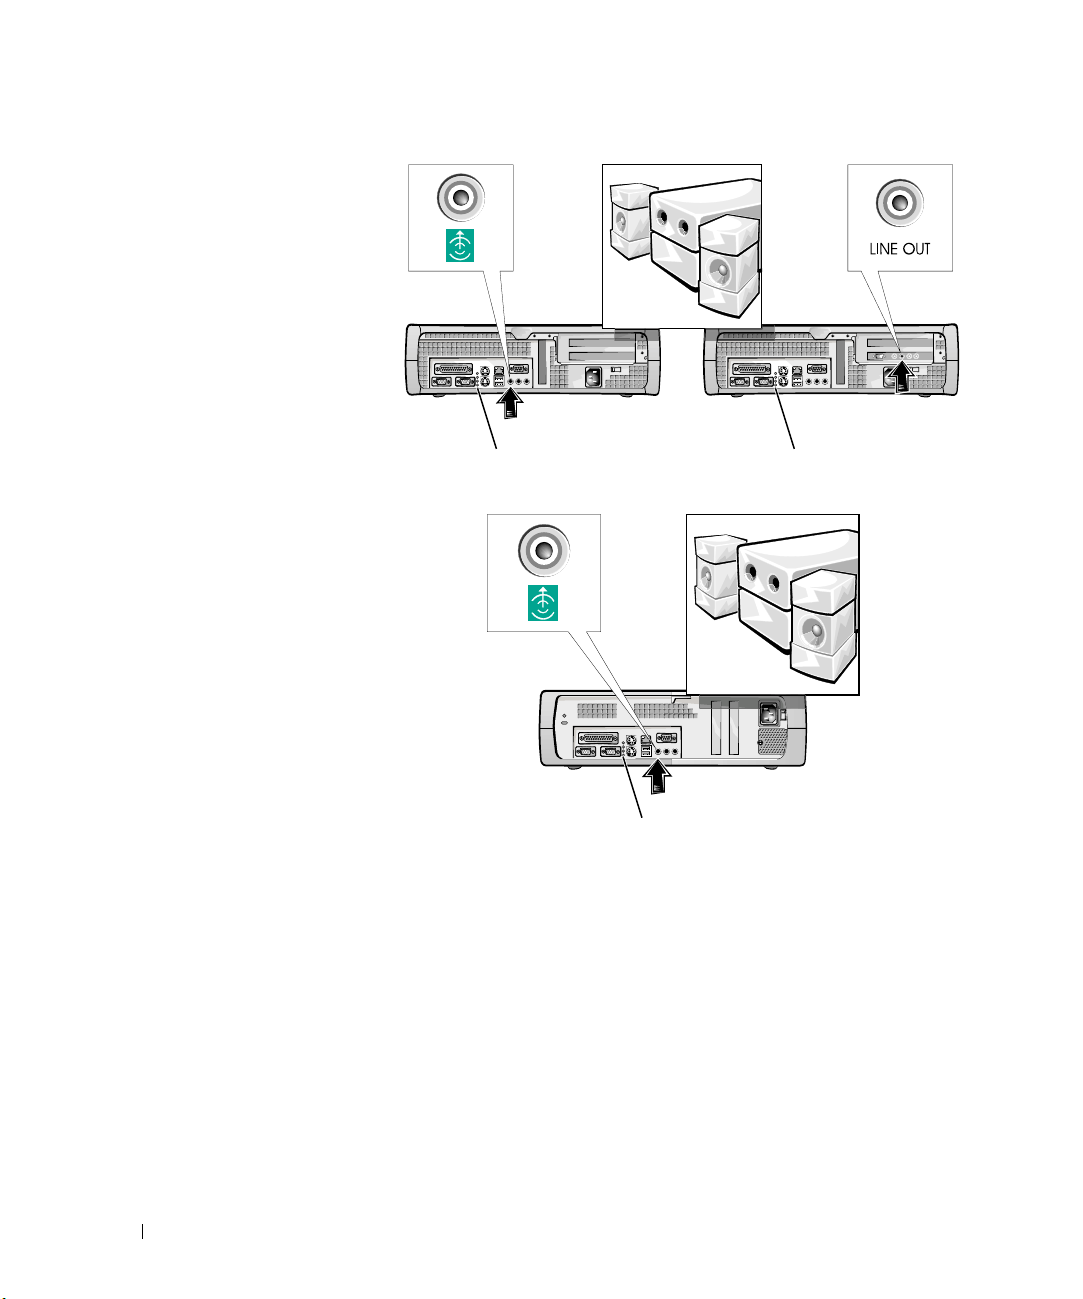
NOTE: If your system has two audio connectors, use the one on the expansion
card, as shown in the illustrations on the right in step 3.
diagnostics
lights
Setup and Quick Reference Guide 13
Page 15

www.dell.com | support.dell.com
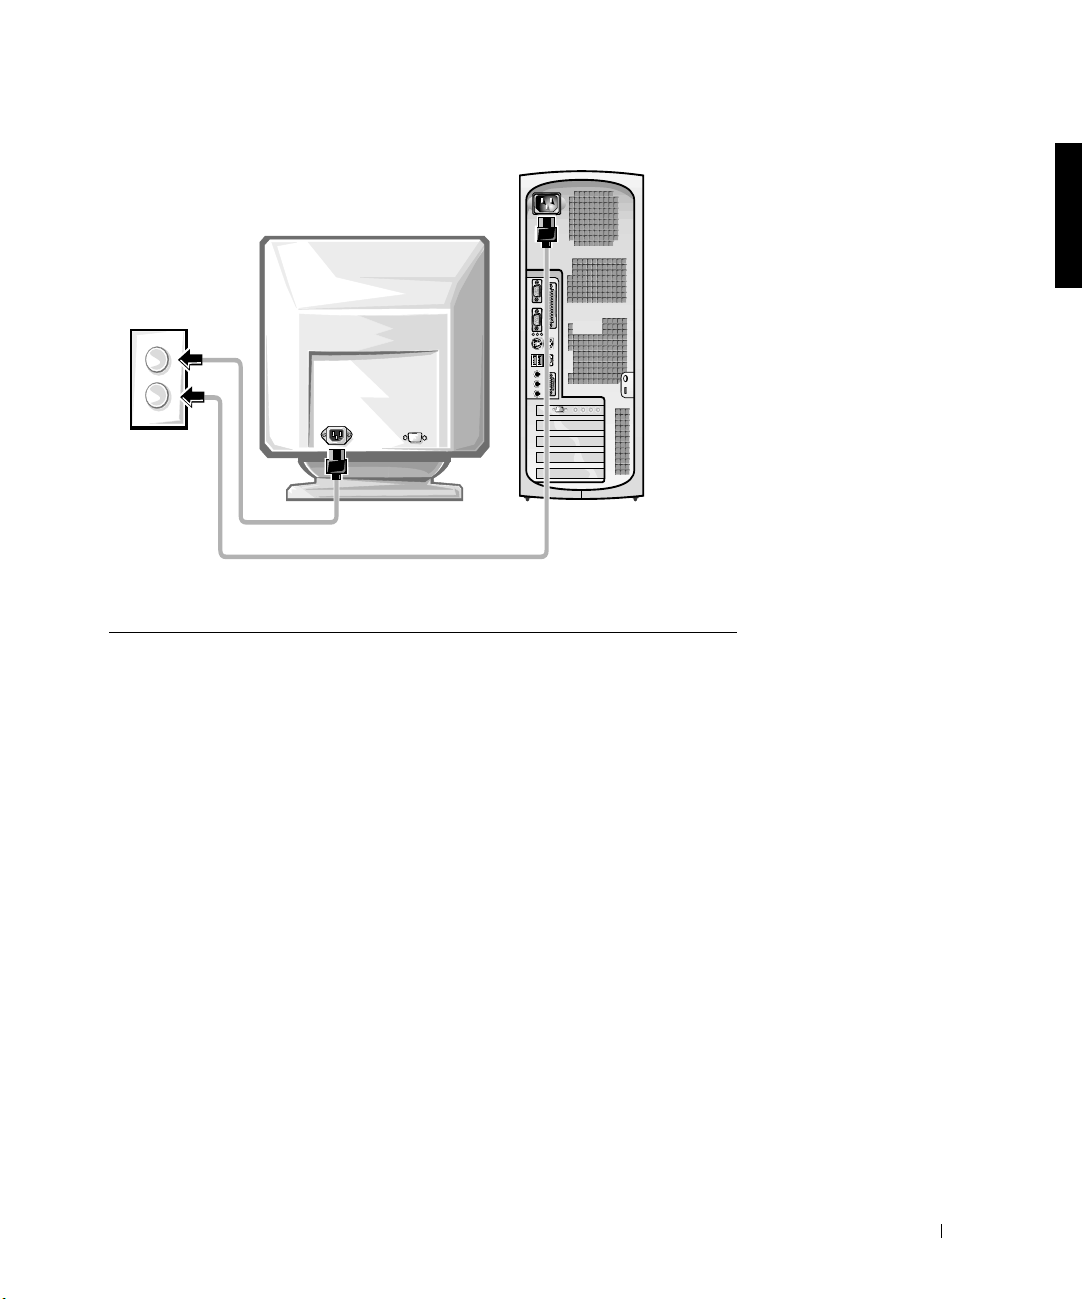
Verify that the voltage selection switch is set correctly for your location. For
more information, see “When Using Your Computer System” found later in
this document.
4
NOTE: Auto-select power supplies do not require a voltage selection
switch. Your power supply may not have this switch.
14 Setup and Quick Reference Guide
Page 16

Setup and Quick Reference Guide 15
Page 17
www.dell.com | support.dell.com
CAUTION: To help prevent electric shock, use only the power
cable provided and ensure that it is plugged into a properly
grounded power source.
5
16 Setup and Quick Reference Guide
Page 18
Setup and Quick Reference Guide 17
Page 19

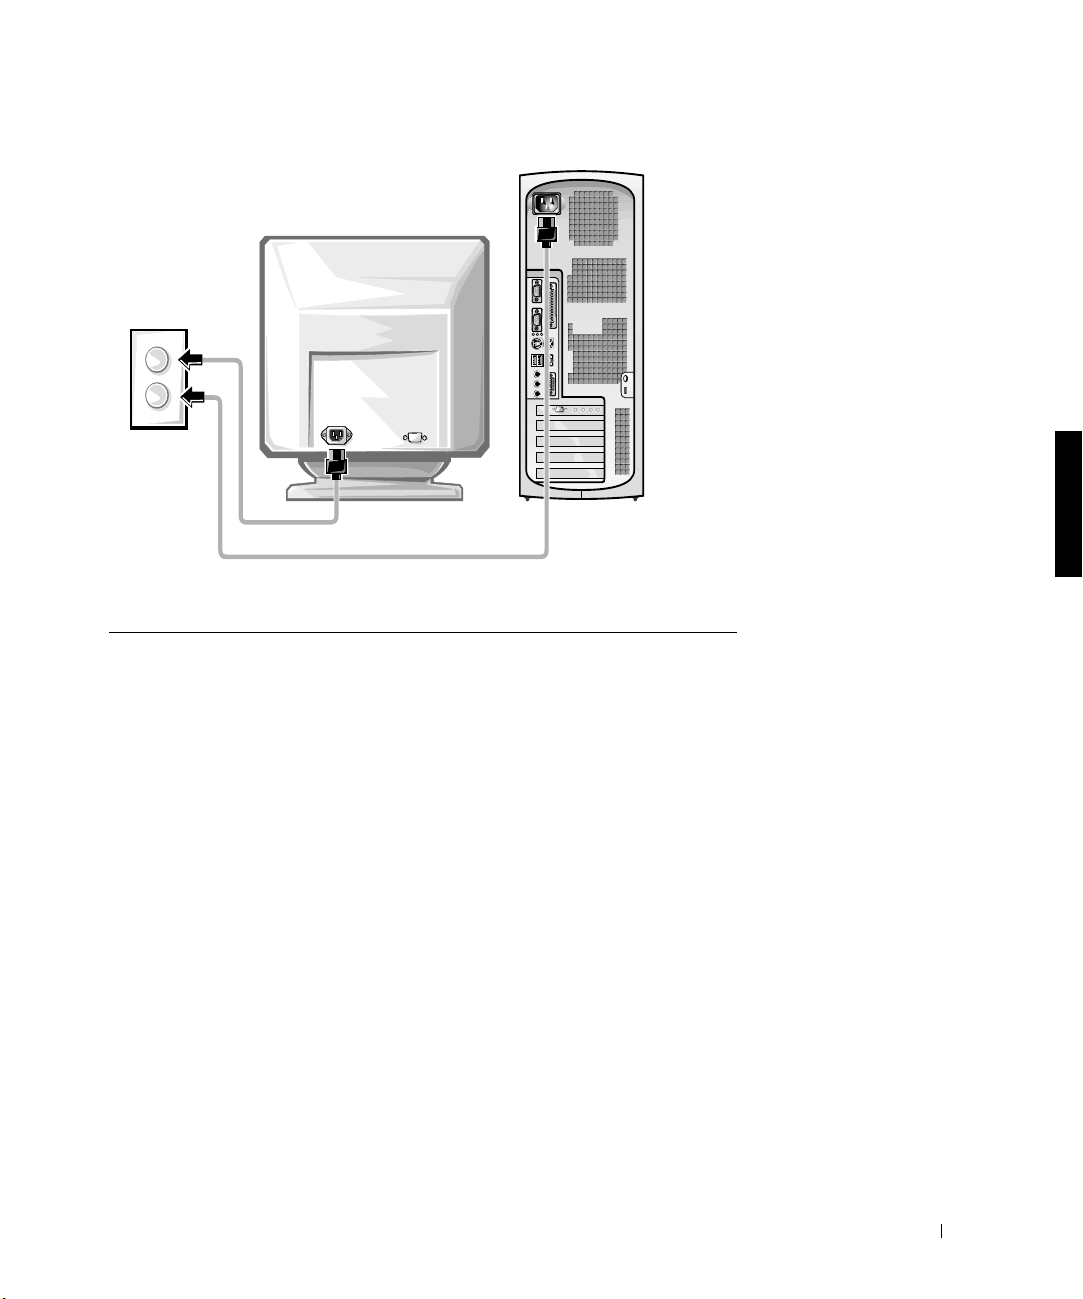
The following illustrations show power button locations and monitor
controls.
www.dell.com | support.dell.com
6
brightness
contrast
brightness
contrast
18 Setup and Quick Reference Guide
contrast
brightness
Page 20

Read the software license agreement and follow the operating system setup
instructions on the screen.
7
Congratulations! You have completed your system setup.
Depending on your operating system, double-click the User’s Guides icon
on your desktop (shown below), or click the Start button and then select
Help and Support to access the electronic documentation stored on your
hard drive.
Setup and Quick Reference Guide 19
Page 21

www.dell.com | support.dell.com
Solving Problems
Dell provides a number of tools to help you if your system does not perform
as expected. For the latest troubleshooting information available for your
system, see the Dell support website at support.dell.com. You can also find
descriptions of Dell troubleshooting tools in the section titled “Getting
Help” in your online User’s Guide.
If computer problems occur that require help from Dell, write a detailed
description of the error, beep codes, or diagnostics light patterns; record
your Express Service Code and Service Tag Number below; and then
contact Dell from the same location as your computer.
See “Finding Information and Assistance” on page 5 for an example of the
express service code and service tag numbers.
Express Service Code: ___________________________
Service Tag Number: ___________________________
Your computer includes the following tools that can help you solve a
problem:
DELL DIAGNOSTICS— The Dell Diagnostics test various components in your
computer and help to identify the cause of computer problems. For more
information, see "Running the Dell Diagnostics" on page 22.
SYSTEM LIGHTS— Located on the front of the computer, these lights can help
troubleshoot a computer problem. For more information, see your User’s Guide.
DIAGNOSTIC LIGHTS— Located on the back of the computer, these lights can
help troubleshoot a computer problem. For more information, see your User’s
Guide.
SYSTEM MESSAGES— The computer reports these messages to warn you of
current or possible failure. For more information, see your User’s Guide.
BEEP CODES— A series of audible beep codes emitted by your computer can
help identify a problem. For more information, see your User ’s Guide.
20 Setup and Quick Reference Guide
Page 22

Using the Dell OptiPlex ResourceCD
To use the Dell OptiPlex ResourceCD while you are running the Microsoft®
Windows
1
2 Insert the Dell OptiPlex ResourceCD into the CD drive.
3 Click OK to continue.
4 Click Next at the Welcome Dell System Owner screen.
5 Choose the appropriate System Model, Operating System, Device
Drivers for Your Computer
To display a list of device drivers for your computer, perform the following
steps:
®
operating system, perform the following steps.
NOTE: To access device drivers and user documentation, you must use the
ResourceCD while you are running Windows.
Turn on the computer and allow it to boot to the Windows desktop.
If you are using the Dell OptiPlex ResourceCD for the first time on this
computer, the ResourceCD Installation window opens to inform you
that the ResourceCD is about to begin installation.
To complete the installation, respond to the prompts offered by the
installation program.
Ty p e , and Topic.
1 Click My Drivers in the Topic pull-down menu.
The ResourceCD scans your computer’s hardware and operating
system, and then a list of device drivers for your system configuration
is displayed on the screen.
2 Click the appropriate driver and follow the instructions to download
the driver to your computer.
To view all available drivers for your computer, click Drivers from the Topic
pull-down menu.
Setup and Quick Reference Guide 21
Page 23

www.dell.com | support.dell.com
Running the Dell Diagnostics
The Dell Diagnostics is a program that tests various components in your
computer. Run this program whenever you have a computer problem to
help you identify the source of the problem.You can run the Dell
Diagnostics from your hard drive or the ResourceCD.
NOTICE: If your hard drive fails, run the Dell IDE Hard Drive Diagnostics
(see “Running the Dell IDE Hard Drive Diagnostics” on page 23).
Turn on your computer (if your computer is already on, restart it).
1
2 When F2 = Setup appears in the upper-right corner of the screen,
press <Ctrl><Alt><F10>.
The diagnostics initialization begins immediately; then the
Diagnostics Menu appears.
3 Select the appropriate diagnostic option for your computer.
To use the diagnostics, follow instructions on the screen.
Changing the Boot Sequence
To run the Dell Diagnostics from the ResourceCD, perform the following
steps to enable your computer to boot from the CD:
1 Insert the Dell OptiPlex ResourceCD into the CD drive.
2 Turn on (or restart) your computer.
3 When F2 = Setup appears in the upper-right corner of the screen,
press <Ctrl><Alt><F8>.
NOTE: This feature changes the boot sequence for one time only. On the next
start-up, the computer boots according to the devices specified in system setup.
The Boot Device Menu appears.
If you wait too long and the Windows logo appears, continue to wait
until you see the Windows desktop. Then shut down your computer
and try again.
4 Select the CD-ROM Device option.
22 Setup and Quick Reference Guide
Page 24

Running the Dell IDE Hard Drive Diagnostics
The Dell IDE Hard Drive Diagnostics is a utility that tests the hard drive to
troubleshoot or confirm a hard drive failure.
1 Turn on your computer (if your computer is already on, restart it).
2 When F2 = Setup appears in the upper-right corner of the screen,
press <Ctrl><Alt><D>.
3 Follow the instructions on the screen.
If a failure is reported, see “Hard Drive Problems” in your User’s Guide.
Safety Instructions
Use the following safety guidelines to help protect your computer system
from potential damage and to ensure your own personal safety.
When Working Inside Your Computer
Before you remove the computer cover, perform the following steps in the
sequence indicated.
NOTICE: Do not attempt to service the computer yourself, except as
explained in your online Dell documentation or otherwise provided to you.
Always follow installation and service instructions closely.
CAUTION: There is a danger of a new battery exploding if it is
incorrectly installed. Replace the battery only with the same or
equivalent type recommended by the manufacturer. Discard used
batteries according to the manufacturer’s instructions.
Turn off your computer and any peripherals.
1
2 Ground yourself by touching an unpainted metal surface on the
chassis, such as the metal around the card-slot openings at the back of
the computer, before touching anything inside your computer.
While you work, periodically touch an unpainted metal surface on the
computer chassis to dissipate any static electricity that might harm
internal components.
Setup and Quick Reference Guide 23
Page 25

3 Disconnect your computer and peripherals from their power sources.
Also, disconnect any telephone or telecommunication lines from the
computer..
Doing so reduces the potential for personal injury or shock.
In addition, take note of these safety guidelines when appropriate:
• To avoid shorting out your computer when disconnecting a network
cable, first unplug the cable from the network interface controller
(NIC) on the back of your computer, and then from the network jack
on the wall. When reconnecting a network cable to your computer,
first plug the cable into the network jack, and then into the NIC.
www.dell.com | support.dell.com
• When you disconnect a cable, pull on its connector or on its strainrelief loop, not on the cable itself. Some cables have a connector with
locking tabs; if you are disconnecting this type of cable, press in on the
locking tabs before disconnecting the cable. As you pull connectors
apart, keep them evenly aligned to avoid bending any connector pins.
Also, before you connect a cable, make sure both connectors are
correctly oriented and aligned.
• Handle components and cards with care. Do not touch the
components or contacts on a card. Hold a card by its edges or by its
metal mounting bracket. Hold a component such as a microprocessor
chip by its edges, not by its pins.
When Using Your Computer System
As you use your computer system, observe the following safety guidelines.
CAUTION: Do not operate your computer system with any cover(s)
(including computer covers, bezels, filler brackets, and frontpanel inserts) removed.
• To help avoid damaging your computer, be sure the voltage selection
switch on the power supply is set to match the AC power available at
your location:
– 115 volts (V)/60 hertz (Hz) in most of North and South America
and some Far Eastern countries such as South Korea and Taiwan
24 Setup and Quick Reference Guide
Page 26

– 100 V/50 Hz in eastern Japan and 100 V/60 Hz in western Japan
NOTE: The voltage selection switch must be set to the 115V position
even though the AC supply in Japan is 100 V.
– 230 V/50 Hz in most of Europe, the Middle East, and the Far East
Also be sure your monitor and attached peripherals are electrically
rated to operate with the AC power available in your location.
NOTE: Auto-select power supplies do not require a voltage selection
switch. Your power supply may not have this switch.
• To help prevent electric shock, plug the computer and peripheral
power cables into properly grounded power sources. These cables are
equipped with three-prong plugs to help ensure proper grounding. Do
not use adapter plugs or remove the grounding prong from a cable. If
you must use an extension cable, use a three-wire cable with properly
grounded plugs.
• Before working inside the computer, unplug the system to help prevent
electric shock or system board damage. Certain system board
components continue to receive power any time the computer is
connected to AC power.
• To help avoid possible damage to the system board, wait 15 seconds
after unplugging the system before disconnecting a device from the
computer.
NOTICE: Observe when the auxiliary power light-emitting diode (LED)
indicator on the system board turns off to verify that system power is off (see
your User’s Guide for the location of this LED).
Setup and Quick Reference Guide 25
Page 27

• To help protect your computer system from sudden, transient
increases and decreases in electrical power, use a surge suppressor, line
conditioner, or uninterruptible power supply (UPS).
• Be sure nothing rests on your computer system’s cables and that the
cables are not located where they can be stepped on or tripped over.
• Do not spill food or liquids on your computer. If the computer gets
wet, consult your User’s Guide.
• Do not push any objects into the openings of your computer. Doing so
can cause fire or electric shock by shorting out interior components.
www.dell.com | support.dell.com
• Keep your computer away from radiators and heat sources. Also, do not
block cooling vents. Avoid placing loose papers underneath your
computer; do not place your computer in a closed-in wall unit or on a
bed, sofa, or rug.
Ergonomic Computing Habits
CAUTION: Improper or prolonged keyboard use may result in
injury.
CAUTION: Viewing the monitor screen for extended periods of
time may result in eye strain.
For comfort and efficiency, observe the ergonomic guidelines in your User’s
Guide when setting up and using your computer system.
Regulatory Information
Electromagnetic Interference (EMI) is any signal or emission, radiated in
free space or conducted along power or signal leads, that endangers the
functioning of a radio navigation or other safety service or seriously
degrades, obstructs, or repeatedly interrupts a licensed radio
communications service.
Your Dell computer system is designed to comply with applicable
regulations regarding EMI. Changes or modifications not expressly
approved by Dell could void the user’s authority to operate the equipment.
NOTE: Additional regulatory information regarding your system can be found
in your User’s Guide.
26 Setup and Quick Reference Guide
Page 28

Limited One-Year Warranty (U.S. Only)
Dell Computer Corporation (“Dell”) manufactures its hardware products
from parts and components that are new or equivalent to new in accordance
with industry-standard practices. Dell warrants that the hardware
products it manufactures will be free from defects in materials and
workmanship. The limited warranty term is one year beginning on the date
of invoice, as further described in the following text.
Damage due to shipping the products to you is covered under this limited
warranty. Otherwise, this limited warranty does not cover damage due to
external causes, including accident, abuse, misuse, problems with electrical
power, servicing not authorized by Dell, usage not in accordance with
product instructions, failure to perform required preventive maintenance,
and problems caused by use of parts and components not supplied by Dell.
This limited warranty does not cover any items that are in one or more of
the following categories: software; external devices (except as specifically
noted); accessories or parts added to a Dell system after the system is
shipped from Dell; accessories or parts added to a Dell system through
Dell’s system integration department; accessories or parts that are not
installed in the Dell factory; or Dell Software and Peripherals products.
Monitors, keyboards, and mice that are Dell-branded or that are included
on Dell’s standard price list are covered under this limited warranty; all
other monitors, keyboards, and mice (including those sold through the Dell
Software and Peripherals program) are not covered.
Dell will repair or replace products covered under this limited warranty that
are returned to Dell’s facility. To request warranty service, you must contact
Dell’s Customer Technical Support within the limited warranty period. See
“Getting Help” in your User’s Guide to find the appropriate contact
information for obtaining customer assistance. If warranty service is
required, Dell will issue a Return Material Authorization Number. You must
ship the products back to Dell in their original or equivalent packaging,
prepay shipping charges, and insure the shipment or accept the risk of loss
or damage during shipment. Dell will ship the repaired or replacement
products to you (freight prepaid) if you use an address in the continental
U.S., where applicable. Shipments to other locations will be made freight
collect.
Setup and Quick Reference Guide 27
Page 29

www.dell.com | support.dell.com
NOTE: Before you ship the product(s) to Dell, back up the data on the hard-
disk drive(s) and any other storage device(s) in the product(s). Remove any
removable media, such as diskettes, CDs, or PC Cards.
Dell owns all parts removed from repaired products. Dell uses new and
reconditioned parts made by various manufacturers in performing warranty
repairs and building replacement products. If Dell repairs or replaces a
product, its warranty term is not extended.
THIS LIMITED WARRANTY GIVES YOU SPECIFIC LEGAL RIGHTS,
AND YOU MAY ALSO HAVE OTHER RIGHTS, WHICH VARY FROM
STATE TO STATE (OR JURISDICTION TO JURISDICTION). DELL'S
RESPONSIBILITY FOR MALFUNCTIONS AND DEFECTS IN
HARDWARE IS LIMITED TO REPAIR AND REPLACEMENT AS SET
FORTH IN THIS LIMITED WARRANTY STATEMENT. ALL EXPRESS
AND IMPLIED WARRANTIES FOR THE PRODUCT, INCLUDING
BUT NOT LIMITED TO ANY IMPLIED WARRANTIES OF AND
CONDITIONS OF MERCHANTABILITY AND FITNESS FOR A
PARTICULAR PURPOSE, ARE LIMITED IN DURATION TO THE
WARRANTY PERIOD SET FORTH ABOVE AND NO WARRANTIES,
WHETHER EXPRESS OR IMPLIED, WILL APPLY AFTER SUCH
PERIOD.
SOME STATES (OR JURISDICTIONS) DO NOT ALLOW
LIMITATIONS ON HOW LONG AN IMPLIED WARRANTY LASTS, SO
THE PRECEDING LIMITATION MAY NOT APPLY TO YOU.
DELL DOES NOT ACCEPT LIABILITY BEYOND THE REMEDIES
SET FORTH IN THIS LIMITED WARRANTY STATEMENT OR
LIABILITY FOR INCIDENTAL OR CONSEQUENTIAL DAMAGES,
INCLUDING WITHOUT LIMITATION ANY LIABILITY FOR
PRODUCTS NOT BEING AVAILABLE FOR USE OR FOR LOST DATA
OR SOFTWARE.
SOME STATES (OR JURISDICTIONS) DO NOT ALLOW THE
EXCLUSION OR LIMITATION OF INCIDENTAL OR
CONSEQUENTIAL DAMAGES, SO THE PRECEDING EXCLUSION
OR LIMITATION MAY NOT APPLY TO YOU.
28 Setup and Quick Reference Guide
Page 30

These provisions apply to Dell’s one-year limited warranty only. For
provisions of any service contract covering your system, refer to your invoice
or the separate service contract that you will receive.
If Dell elects to exchange a product or portion of a product, the exchange
will be made in accordance with Dell’s Exchange Policy in effect on the date
of the exchange. In any instance in which Dell issues a Return Material
Authorization Number, Dell must receive the product(s) for repair prior to
the expiration of the warranty period in order for the repair(s) to be covered
by the limited warranty.
One-Year Limited Warranty (Canada Only)
Dell Computer Corporation (“Dell”) manufactures its hardware products
from parts and components that are new or equivalent to new in accordance
with industry-standard practices. Dell warrants that the hardware
products it manufactures will be free from defects in materials and
workmanship. The limited warranty term is one year beginning on the date
of invoice, as further described in the following text.
Damage due to shipping the products to you is covered under this limited
warranty. Otherwise, this limited warranty does not cover damage due to
external causes, including accident, abuse, misuse, problems with electrical
power, servicing not authorized by Dell, usage not in accordance with
product instructions, failure to perform required preventive maintenance,
and problems caused by use of parts and components not supplied by Dell.
This limited warranty does not cover any items that are in one or more of
the following categories: software; external devices (except as specifically
noted); accessories or parts added to a Dell system after the system is
shipped from Dell; accessories or parts added to a Dell system through
Dell’s system integration department; accessories or parts that are not
installed in the Dell factory; or Dell Software and Peripherals products.
Monitors, keyboards, and mice that are Dell-branded or that are included
on Dell’s standard price list are covered under this limited warranty; all
other monitors, keyboards, and mice (including those sold through the Dell
Software and Peripherals program) are not covered.
Setup and Quick Reference Guide 29
Page 31

www.dell.com | support.dell.com
Dell will repair or replace products covered under this limited warranty that
are returned to Dell’s facility. To request warranty service, you must contact
Dell’s Customer Technical Support within the warranty period. See
“Getting Help” in your User’s Guide to find the appropriate contact
information for obtaining customer assistance. If warranty service is
required, Dell will issue a Return Material Authorization Number. You must
ship the products back to Dell in their original or equivalent packaging,
prepay shipping charges, and insure the shipment or accept the risk of loss
or damage during shipment. Dell will ship the repaired or replacement
products to you (freight prepaid) if you use an address in Canada, where
applicable. Shipments to other locations will be made freight collect.
NOTE: Before you ship the product(s) to Dell, back up the data on the hard-
disk drive(s) and any other storage device(s) in the product(s). Remove any
removable media, such as diskettes, CDs, or PC Cards.
Dell owns all parts removed from repaired products. Dell uses new and
reconditioned parts made by various manufacturers in performing warranty
repairs and building replacement products. If Dell repairs or replaces a
product, its warranty term is not extended.
DELL MAKES NO EXPRESS WARRANTIES OR CONDITIONS
BEYOND THOSE STATED IN THIS LIMITED WARRANTY
STATEMENT. DELL DISCLAIMS ALL OTHER WARRANTIES AND
CONDITIONS, EXPRESS OR IMPLIED, INCLUDING WITHOUT
LIMITATION IMPLIED WARRANTIES AND CONDITIONS OF
MERCHANTABILITY AND FITNESS FOR A PARTICULAR PURPOSE.
SOME STATES (OR JURISDICTIONS) DO NOT ALLOW
LIMITATIONS ON IMPLIED WARRANTIES OR CONDITIONS, SO
THIS LIMITATION MAY NOT APPLY TO YOU.
DELL’S RESPONSIBILITY FOR MALFUNCTIONS AND DEFECTS IN
HARDWARE IS LIMITED TO REPAIR AND REPLACEMENT AS SET
FORTH IN THIS LIMITED WARRANTY STATEMENT. THESE
WARRANTIES GIVE YOU SPECIFIC LEGAL RIGHTS, AND YOU MAY
ALSO HAVE OTHER RIGHTS, WHICH VARY FROM STATE TO
STATE (OR JURISDICTION TO JURISDICTION).
30 Setup and Quick Reference Guide
Page 32

DELL DOES NOT ACCEPT LIABILITY BEYOND THE REMEDIES
SET FORTH IN THIS LIMITED WARRANTY STATEMENT OR
LIABILITY FOR INCIDENTAL OR CONSEQUENTIAL DAMAGES,
INCLUDING WITHOUT LIMITATION ANY LIABILITY FOR
PRODUCTS NOT BEING AVAILABLE FOR USE OR FOR LOST DATA
OR SOFTWARE.
SOME STATES (OR JURISDICTIONS) DO NOT ALLOW THE
EXCLUSION OR LIMITATION OF INCIDENTAL OR
CONSEQUENTIAL DAMAGES, SO THE PRECEDING EXCLUSION
OR LIMITATION MAY NOT APPLY TO YOU.
These provisions apply to Dell’s one-year limited warranty only. For
provisions of any service contract covering your system, refer to your invoice
or the separate service contract that you will receive.
If Dell elects to exchange a product or portion of a product, the exchange
will be made in accordance with Dell’s Exchange Policy in effect on the date
of the exchange. In any instance in which Dell issues a Return Material
Authorization Number, Dell must receive the product(s) for repair prior to
the expiration of the warranty period in order for the repair(s) to be covered
by the limited warranty.
Three-Year Limited Warranty (U.S. Only)
Dell Computer Corporation (“Dell”) manufactures its hardware products
from parts and components that are new or equivalent to new in accordance
with industry-standard practices. Dell warrants that the hardware products
it manufactures will be free from defects in materials and workmanship.
The limited warranty term is three years beginning on the date of invoice, as
described in the following text.
Damage due to shipping the products to you is covered under this limited
warranty. Otherwise, this limited warranty does not cover damage due to
external causes, including accident, abuse, misuse, problems with electrical
power, servicing not authorized by Dell, usage not in accordance with
product instructions, failure to perform required preventive maintenance,
and problems caused by use of parts and components not supplied by Dell.
Setup and Quick Reference Guide 31
Page 33

www.dell.com | support.dell.com
This limited warranty does not cover any items that are in one or more of
the following categories: software; external devices (except as specifically
noted); accessories or parts added to a Dell system after the system is
shipped from Dell; accessories or parts added to a Dell system through
Dell’s system integration department; accessories or parts that are not
installed in the Dell factory; or Dell Software and Peripherals products.
Monitors, keyboards, and mice that are Dell-branded or that are included
on Dell’s standard price list are covered under this limited warranty; all
other monitors, keyboards, and mice (including those sold through the Dell
Software and Peripherals program) are not covered. Batteries for portable
computers are covered only during the initial one-year period of this limited
warranty.
Coverage During Year One
During the one-year period beginning on the invoice date, Dell will repair or
replace products covered under this limited warranty that are returned to
Dell’s facility. To request warranty service, you must contact Dell’s
Customer Technical Support within the warranty period. See “Getting
Help” in your User’s Guide to find the appropriate contact information for
obtaining customer assistance. If warranty service is required, Dell will issue
a Return Material Authorization Number. You must ship the products back
to Dell in their original or equivalent packaging, prepay shipping charges,
and insure the shipment or accept the risk of loss or damage during
shipment. Dell will ship the repaired or replacement products to you freight
prepaid if you use an address in the continental U.S., where applicable.
Shipments to other locations will be made freight collect.
NOTE: Before you ship the product(s) to Dell, back up the data on the hard-
disk drive(s) and any other storage device(s) in the product(s). Remove any
removable media, such as diskettes, CDs, or PC Cards. Dell does not accept
liability for lost data or software.
Dell owns all parts removed from repaired products. Dell uses new and
reconditioned parts made by various manufacturers in performing warranty
repairs and building replacement products. If Dell repairs or replaces a
product, its warranty term is not extended.
32 Setup and Quick Reference Guide
Page 34

Coverage During Years Two and Three
During the second and third years of this limited warranty, Dell will provide,
on an exchange basis and subject to Dell’s Exchange Policy in effect on the
date of the exchange, replacement parts for the Dell hardware product(s)
covered under this limited warranty when a part requires replacement. You
must report each instance of hardware failure to Dell’s Customer Technical
Support in advance to obtain Dell’s concurrence that a part should be
replaced and to have Dell ship the replacement part. Dell will ship parts
(freight prepaid) if you use an address in the continental U.S., where
applicable. Shipments to other locations will be made freight collect. Dell
will include a prepaid shipping container with each replacement part for
your use in returning the replaced part to Dell. Replacement parts are new
or reconditioned. Dell may provide replacement parts made by various
manufacturers when supplying parts to you. The warranty term for a
replacement part is the remainder of the limited warranty term.
You will pay Dell for replacement parts if the replaced part is not returned to
Dell. The process for returning replaced parts, and your obligation to pay for
replacement parts if you do not return the replaced parts to Dell, will be in
accordance with Dell’s Exchange Policy in effect on the date of the
exchange.
You accept full responsibility for your software and data. Dell is not required
to advise or remind you of appropriate backup and other procedures.
General Provisions
THIS LIMITED WARRANTY GIVES YOU SPECIFIC LEGAL RIGHTS,
AND YOU MAY ALSO HAVE OTHER RIGHTS, WHICH VARY FROM
STATE TO STATE (OR JURISDICTION TO JURISDICTION). DELL'S
RESPONSIBILITY FOR MALFUNCTIONS AND DEFECTS IN
HARDWARE IS LIMITED TO REPAIR AND REPLACEMENT AS SET
FORTH IN THIS LIMITED WARRANTY STATEMENT. ALL EXPRESS
AND IMPLIED WARRANTIES FOR THE PRODUCT, INCLUDING
BUT NOT LIMITED TO ANY IMPLIED WARRANTIES OF AND
CONDITIONS OF MERCHANTABILITY AND FITNESS FOR A
PARTICULAR PURPOSE, ARE LIMITED IN DURATION TO THE
WARRANTY PERIOD SET FORTH ABOVE AND NO WARRANTIES,
WHETHER EXPRESS OR IMPLIED, WILL APPLY AFTER SUCH
PERIOD.
Setup and Quick Reference Guide 33
Page 35

www.dell.com | support.dell.com
SOME STATES (OR JURISDICTIONS) DO NOT ALLOW
LIMITATIONS ON HOW LONG AN IMPLIED WARRANTY LASTS, SO
THE PRECEDING LIMITATION MAY NOT APPLY TO YOU.
DELL DOES NOT ACCEPT LIABILITY BEYOND THE REMEDIES
SET FORTH IN THIS LIMITED WARRANTY STATEMENT OR
LIABILITY FOR INCIDENTAL OR CONSEQUENTIAL DAMAGES,
INCLUDING WITHOUT LIMITATION ANY LIABILITY FOR
PRODUCTS NOT BEING AVAILABLE FOR USE OR FOR LOST DATA
OR SOFTWARE.
SOME STATES (OR JURISDICTIONS) DO NOT ALLOW THE
EXCLUSION OR LIMITATION OF INCIDENTAL OR
CONSEQUENTIAL DAMAGES, SO THE PRECEDING EXCLUSION
OR LIMITATION MAY NOT APPLY TO YOU.
These provisions apply to Dell’s three-year limited warranty only. For
provisions of any service contract covering your system, refer to your invoice
or the separate service contract that you will receive.
If Dell elects to exchange a system or component, the exchange will be
made in accordance with Dell’s Exchange Policy in effect on the date of the
exchange. In any instance in which Dell issues a Return Material
Authorization Number, Dell must receive the product(s) for repair prior to
the expiration of the warranty period in order for the repair(s) to be covered
by the limited warranty.
NOTE: If you chose one of the available warranty and service options in place
of the standard three-year limited warranty described in the preceding text, the
option you chose will be listed on your invoice.
Three-Year Limited Warranty (Canada Only)
Dell Computer Corporation (“Dell”) manufactures its hardware products
from parts and components that are new or equivalent to new in accordance
with industry-standard practices. Dell warrants that the hardware products
it manufactures will be free from defects in materials and workmanship.
The warranty term is three years beginning on the date of invoice, as
described in the following text.
34 Setup and Quick Reference Guide
Page 36

Damage due to shipping the products to you is covered under this limited
warranty. Otherwise, this limited warranty does not cover damage due to
external causes, including accident, abuse, misuse, problems with electrical
power, servicing not authorized by Dell, usage not in accordance with
product instructions, failure to perform required preventive maintenance,
and problems caused by use of parts and components not supplied by Dell.
This limited warranty does not cover any items that are in one or more of
the following categories: software; external devices (except as specifically
noted); accessories or parts added to a Dell system after the system is
shipped from Dell; accessories or parts added to a Dell system through
Dell’s system integration department; accessories or parts that are not
installed in the Dell factory; or Dell Software and Peripherals products.
Monitors, keyboards, and mice that are Dell-branded or that are included
on Dell’s standard price list are covered under this limited warranty; all
other monitors, keyboards, and mice (including those sold through the Dell
Software and Peripherals program) are not covered. Batteries for portable
computers are covered only during the initial one-year period of this limited
warranty.
Coverage During Year One
During the one-year period beginning on the invoice date, Dell will repair or
replace products covered under this limited warranty that are returned to
Dell’s facility. To request warranty service, you must contact Dell’s
Customer Technical Support within the warranty period. See “Getting
Help” in your User’s Guide to find the appropriate contact information for
obtaining customer assistance. If warranty service is required, Dell will issue
a Return Material Authorization Number. You must ship the products back
to Dell in their original or equivalent packaging, prepay shipping charges,
and insure the shipment or accept the risk of loss or damage during
shipment. Dell will ship the repaired or replacement products to you freight
prepaid if you use an address in Canada, where applicable. Shipments to
other locations will be made freight collect.
NOTE: Before you ship the product(s) to Dell, back up the data on the hard-
disk drive(s) and any other storage device(s) in the product(s). Remove any
removable media, such as diskettes, CDs, or PC Cards. Dell does not accept
liability for lost data or software.
Setup and Quick Reference Guide 35
Page 37

www.dell.com | support.dell.com
Dell owns all parts removed from repaired products. Dell uses new and
reconditioned parts made by various manufacturers in performing warranty
repairs and building replacement products. If Dell repairs or replaces a
product, its warranty term is not extended.
Coverage During Years Two and Three
During the second and third years of this limited warranty, Dell will provide,
on an exchange basis and subject to Dell’s Exchange Policy in effect on the
date of the exchange, replacement parts for the Dell hardware product(s)
covered under this limited warranty when a part requires replacement. You
must report each instance of hardware failure to Dell’s Customer Technical
Support in advance to obtain Dell’s concurrence that a part should be
replaced and to have Dell ship the replacement part. Dell will ship parts
(freight prepaid) if you use an address in Canada, where applicable.
Shipments to other locations will be made freight collect. Dell will include a
prepaid shipping container with each replacement part for your use in
returning the replaced part to Dell. Replacement parts are new or
reconditioned. Dell may provide replacement parts made by various
manufacturers when supplying parts to you. The warranty term for a
replacement part is the remainder of the limited warranty term.
You will pay Dell for replacement parts if the replaced part is not returned to
Dell. The process for returning replaced parts, and your obligation to pay for
replacement parts if you do not return the replaced parts to Dell, will be in
accordance with Dell’s Exchange Policy in effect on the date of the
exchange.
You accept full responsibility for your software and data. Dell is not required
to advise or remind you of appropriate backup and other procedures.
36 Setup and Quick Reference Guide
Page 38

General Provisions
DELL MAKES NO EXPRESS WARRANTIES OR CONDITIONS
BEYOND THOSE STATED IN THIS LIMITED WARRANTY
STATEMENT. DELL DISCLAIMS ALL OTHER WARRANTIES AND
CONDITIONS, EXPRESS OR IMPLIED, INCLUDING WITHOUT
LIMITATION IMPLIED WARRANTIES AND CONDITIONS OF
MERCHANTABILITY AND FITNESS FOR A PARTICULAR PURPOSE.
SOME STATES (OR JURISDICTIONS) DO NOT ALLOW
LIMITATIONS ON IMPLIED WARRANTIES OR CONDITIONS, SO
THIS LIMITATION MAY NOT APPLY TO YOU.
DELL’S RESPONSIBILITY FOR MALFUNCTIONS AND DEFECTS IN
HARDWARE IS LIMITED TO REPAIR AND REPLACEMENT AS SET
FORTH IN THIS LIMITED WARRANTY STATEMENT. THESE
WARRANTIES GIVE YOU SPECIFIC LEGAL RIGHTS, AND YOU MAY
ALSO HAVE OTHER RIGHTS, WHICH VARY FROM STATE TO
STATE (OR JURISDICTION TO JURISDICTION).
DELL DOES NOT ACCEPT LIABILITY BEYOND THE REMEDIES
SET FORTH IN THIS LIMITED WARRANTY STATEMENT OR
LIABILITY FOR INCIDENTAL OR CONSEQUENTIAL DAMAGES,
INCLUDING WITHOUT LIMITATION ANY LIABILITY FOR
PRODUCTS NOT BEING AVAILABLE FOR USE OR FOR LOST DATA
OR SOFTWARE.
SOME STATES (OR JURISDICTIONS) DO NOT ALLOW THE
EXCLUSION OR LIMITATION OF INCIDENTAL OR
CONSEQUENTIAL DAMAGES, SO THE PRECEDING EXCLUSION
OR LIMITATION MAY NOT APPLY TO YOU.
These provisions apply to Dell’s three-year limited warranty only. For
provisions of any service contract covering your system, refer to your invoice
or the separate service contract that you will receive.
If Dell elects to exchange a system or component, the exchange will be
made in accordance with Dell’s Exchange Policy in effect on the date of the
exchange. In any instance in which Dell issues a Return Material
Authorization Number, Dell must receive the product(s) for repair prior to
the expiration of the warranty period in order for the repair(s) to be covered
by the limited warranty.
Setup and Quick Reference Guide 37
Page 39

www.dell.com | support.dell.com
NOTE: If you chose one of the available warranty and service options in place
of the standard three-year limited warranty described in the preceding text, the
option you chose will be listed on your invoice.
One-Year End-User Manufacturer Guarantee (Latin America and the Caribbean Only)
Guarantee
Dell Computer Corporation (“Dell”) warrants to the end user in accordance
with the following provisions that its branded hardware products, purchased
by the end user from a Dell company or an authorized Dell distributor in
Latin America or the Caribbean, will be free from defects in materials,
workmanship, and design affecting normal use, for a period of one year from
the original purchase date. Products for which proper claims are made will,
at Dell’s option, be repaired or replaced at Dell’s expense. Dell owns all
parts removed from repaired products. Dell uses new and reconditioned
parts made by various manufacturers in performing repairs and building
replacement products.
Exclusions
This Guarantee does not apply to defects resulting from: improper or
inadequate installation, use, or maintenance; actions or modifications by
unauthorized third parties or the end user; accidental or willful damage; or
normal wear and tear.
38 Setup and Quick Reference Guide
Page 40

Making a Claim
Claims must be made in Latin America or the Caribbean by contacting the
Dell point of sale within the guarantee period. The end user must always
supply proof of purchase, indicating name and address of the seller, date of
purchase, model and serial number, name and address of the customer, and
details of symptoms and configuration at the time of malfunction,
including peripherals and software used. Otherwise, Dell may refuse the
guarantee claim. Upon diagnosis of a warranted defect, Dell will make
arrangements and pay for ground freight and insurance to and from Dell’s
repair/replacement center. The end user must ensure that the defective
product is available for collection properly packed in original or equally
protective packaging together with the details listed above and the return
number provided to the end user by Dell.
Limitation and Statutory Rights
Dell makes no other warranty, guarantee or like statement other than as
explicitly stated above, and this Guarantee is given in place of all other
guarantees whatsoever, to the fullest extent permitted by law. In the absence
of applicable legislation, this Guarantee will be the end user’s sole and
exclusive remedy against Dell or any of its affiliates, and neither Dell nor
any of its affiliates shall be liable for loss of profit or contracts, or any other
indirect or consequential loss arising from negligence, breach of contract, or
howsoever.
This Guarantee does not impair or affect mandatory statutory rights of the
end user against and/or any rights resulting from other contracts
concluded by the end user with Dell and/or any other seller.
Dell World Trade LP
One Dell Way, Round Rock, TX 78682, USA
Dell Computadores do Brasil Ltda (CNPJ No. 72.381.189/0001-10)/
Dell Commercial do Brasil Ltda (CNPJ No. 03 405 822/0001-40)
Avenida Industrial Belgraf, 400
92990-000 - Eldorado do Sul – RS - Brasil
Dell Computer de Chile Ltda
Coyancura 2283, Piso 3- Of.302,
Providencia, Santiago - Chile
Setup and Quick Reference Guide 39
Page 41

Dell Computer de Colombia Corporation
Carrera 7 #115-33 Oficina 603
Bogota, Colombia
Dell Computer de Mexico SA de CV
Paseo de la Reforma 2620 - 11° Piso
Col. Lomas Altas
11950 México, D.F.
“Total Satisfaction” Return Policy
www.dell.com | support.dell.com
(U.S. and Canada Only)
If you are an end-user customer who bought new products directly from a
Dell company, you may return them to Dell within 30 days of the date of
invoice for a refund or credit of the product purchase price. If you are an
end-user customer who bought reconditioned or refurbished products from
a Dell company, you may return them to Dell within 14 days of the date of
invoice for a refund or credit of the product purchase price. In either case,
the refund or credit will not include any shipping and handling charges
shown on your invoice. If you are an organization that bought the products
under a written agreement with Dell, the agreement may contain different
terms for the return of products than specified by this policy.
To return products, you must contact Dell Customer Service to receive a
Credit Return Authorization Number. See “Getting Help” in your User’s
Guide to find the appropriate contact information for obtaining customer
assistance. To expedite the processing of your refund or credit, Dell expects
you to return the products to Dell in their original packaging within five
days of the date that Dell issues the Credit Return Authorization Number.
You must also prepay shipping charges and insure the shipment or accept
the risk of loss or damage during shipment. You may return software for
refund or credit only if the sealed package containing the diskette(s) or
CD(s) is unopened. Returned products must be in as-new condition, and all
of the manuals, diskette(s), CD(s), power cables, and other items included
with a product must be returned with it. For customers who want to return,
for refund or credit only, either applications software or an operating system
that has been installed by Dell, the whole system must be returned, along
with any media and documentation that may have been included in the
original shipment.
40 Setup and Quick Reference Guide
Page 42

This “Total Satisfaction” Return Policy does not apply to Dell Software and
Peripherals products, which may be returned under Dell Software and
Peripherals’ then-current return policy. In addition, reconditioned parts
purchased through Dell Spare Parts Sales in Canada are nonreturnable.
Setup and Quick Reference Guide 41
Page 43

www.dell.com | support.dell.com
42 Setup and Quick Reference Guide
Page 44

Sistemas Dell™ OptiPlex™
Guia de configuração e de referência rápida
www.dell.com | support.dell.com (em Inglês)
Page 45

Notas, Avisos e Cuidados
NOTA: indica informações importantes que ajudam a utilizar melhor o
computador.
AVISO: indica riscos para o hardware ou de perda de dados e ensina como
evitar o problema.
CUIDADO: indica riscos de danos materiais, lesões pessoais ou
morte.
____________________
As informações neste documento estão sujeitas a alterações sem aviso prévio.
© 2000–2001 Dell Computer Corporation. Todos os direitos reservados.
É terminantemente proibida a reprodução de qualquer natureza sem a autorização por escrito
da Dell Computer Corporation.
As marcas comerciais utilizadas neste texto: Dell, OptiPlex e o logotipo DELL são marcas
comerciais da Dell Computer Corporation; Microsoft, MS-DOS, Windows NT e Windows são
marcas comerciais registradas da Microsoft Corporation.
Outras marcas e nomes comerciais podem ser utilizados neste documento para fazer referência
às entidades proprietárias das marcas e nomes e aos seus produtos. A Dell Computer Corporation
renuncia qualquer interesse proprietário em marcas e nomes comerciais que não sejam de sua
propriedade.
Novembro de 2001 P/N 38WYD Rev. A05
Page 46

Conteúdo
Sobre este Guia . . . . . . . . . . . . . . . . . . . . . . . . . . 47
Como obter informações e assistência
Primeiros passos/Configuração
Resolução de problemas
. . . . . . . . . . . . . . . . . . 50
. . . . . . . . . . . . . . . . . . . . . . 62
Utilização do Dell OptiPlex ResourceCD
Como executar o programa Dell Diagnostics
Como executar o programa
Dell IDE Hard Drive Diagnostics
Instruções de segurança
. . . . . . . . . . . . . . . . . . . . . . 66
Ao trabalhar na parte interna do computador
Ao utilizar o computador
. . . . . . . . . . . . . . . . . . . . 67
Hábitos ergonômicos de computação
Informações sobre regulamentação
. . . . . . . . . . . . . . 47
. . . . . . . . . . . . 64
. . . . . . . . . . 65
. . . . . . . . . . . . . . . . 66
. . . . . . . . . 66
. . . . . . . . . . . . . . 69
. . . . . . . . . . . . . . . . 70
Conteúdo 45
Page 47

46 Conteúdo
Page 48

Sobre este Guia
Este documento contém informações sobre primeiros passos/configuração;
solução de problemas e regulamentação e segurança do computador
Dell™ OptiPlex™.
Para obter as últimas versões dos documentos em sua unidade de disco
rígido, vá para o site de suporte da Dell no endereço support.dell.com (em
Inglês).
Números de regulamentação do modelo aparecem por todo este
documento; seus tipos de chassi equivalentes estão relacionados a seguir:
Números de regulamentação do modelo e tipos de chassi
DHS = chassi de mesa pequeno (SD)
DHP = chassi de fator de forma pequeno (SF)
DHM = chassi tipo mini-torre (SMT) pequeno
Como obter informações e assistência
Recursos e ferramentas de suporte
Recurso Conteúdo Utilização do recurso
Dell OptiPlex ResourceCD
• Programa Dell Diagnostics
• Drivers
• Utilitários
• Documentação do
computador e do dispositivo
Consulte o menu principal no ResourceCD que foi
enviado com o seu computador. Use o menu suspenso
para fazer as seleções apropriadas para o seu computador.
Você pode executar as seguintes tarefas:
• Diagnosticar um problema
• Instalar ou reinstalar drivers
• Obter informações sobre os dispositivos e o seu
computador
NOTA: a documentação do usuário e os drivers já estão
instalados no computador quando este é enviado pela Dell.
Você pode usar este CD para acessar documentação,
reinstalar drivers ou executar ferramentas de diagnóstico.
Guia de configuração e de referência rá pida 47
Page 49

Recursos e ferramentas de suporte (continuação)
Recurso Conteúdo Utilização do recurso
Etiquetas de serviço e de
registro — localizadas na frente
ou na lateral do seu
computador Dell.
• Código de serviço expresso e
Número da etiqueta de
O Express Service Code (Código de serviço expresso) e o
Service Tag Number (Número da etiqueta de serviço) são
os únicos identificadores do seu computador Dell.
Vo cê poderá precisar do número do Product Key (Chave
do produto) (ou Product ID [Identificação do produto])
para completar a configuração do sistema operacional.
serviço
• Product Key (também
chamado de Product ID ou
de Certificate of
Authenticity [COA])
CD do sistema operacional Para reinstalar o sistema operacional, use o CD do sistema
operacional que foi enviado com o seu computador.
NOTA: o CD do sistema operacional pode não incluir os
www.dell.com | support.dell.com (em Inglês)
últimos drivers para o seu computador. Se você reinstalar
o sistema operacional, use o Res ou rce CD para reinstalar
drivers para os dispositivos enviados com o seu
computador.
Para mais informações sobre a reinstalação do sistema
operacional, consulte a documentação de instalação do
sistema operacional enviada com o computador.
Guia de instalação do sistema
operacional
Consulte o guia de instalação do sistema para informações
sobre reinstalação e configuração do sistema operacional.
Clique no botão Start (Iniciar) e selecione Help (Ajuda)
ou Help and Support (Ajuda e Suporte) de acordo com o
seu sistema operacional, para obter mais informações
sobre o mesmo.
48 Guia de configuração e de referê ncia rápida
Page 50

Recursos e ferramentas de suporte (continuação)
Recurso Conteúdo Utilização do recurso
Guias do usuário para o
computador e os dispositivos
Guias do usuário
Página do suporte da Dell na
Internet
• Suporte técnico e
informações
• Downloads para o seu
computador
• Status do pedido ou da
entrega
• Dicas e pistas, artigos de
tecnologia, informações de
serviço
Site do Dell Premier Support
na Internet
• Status das chamadas de
serviço
• Principais questões técnicas
separadas por produto
• Perguntas mais freqüentes
separadas por número do
produto
• Etiquetas de serviço
personalizadas
• Detalhes da configuração do
sistema
Dependendo do seu sistema operacional, clique duas
vezes no ícone User's Guides (Guias do usuário) na área
de trabalho ou clique no botão Iniciar e, em seguida,
selecione Ajuda e suporte para acessar a documentação
eletrônica armazenada na sua unidade de disco.
Obtenha informações sobre o seguinte:
• Utilização do computador
• Configuração das definições do sistema
• Remoção e instalação de peças
• Instalação e configuração de software
• Diagnóstico de problemas
• Especificações técnicas
• Documentação do dispositivo (em alguns sistemas
operacionais)
• Obtenção de assistência técnica
Vá para support.dell.com (em Inglês) e complete o
registro apenas uma vez.
• Obtenha ajuda para dúvidas de uso geral, instalação e
solução de problemas
• Receba respostas sobre o serviço técnico e perguntas
feitas ao suporte
• Obtenha as últimas versões de drivers para o seu
computador
• Acesse a documentação sobre o seu computador e
dispositivos
• Entre em discussões on-line com outros clientes da
Dell e com profissionais técnicos da Dell
• Explore uma lista de links on-line para os principais
fornecedores da Dell
Vá para premiersupport.dell.com (em Inglês):
O site Dell Premier Support é personalizado para clientes
do governo, corporativos e do setor educacional.
Esta página pode não estar disponível em alguns países.
Guia de configuração e de referência rá pida 49
Page 51

www.dell.com | support.dell.com (em Inglês)
Primeiros passos/Configuração
Siga as seguintes etapas para conectar dispositivos externos ao computador
através do painel de E/S (Entrada/Saída). A parte de trás do seu computador
Dell, incluindo o painel E/S, pode ser diferente dos exemplos mostrados
aqui.
1
50 Guia de configuração e de referê ncia rápida
Page 52

NOTA: conecte somente um teclado e um mouse.
NOTA: se você tiver um mouse ou teclado compatível com USB (Universal
Serial Bus [Barramento serial universal]), use os conectores USB na parte de
trás do seu computador.
Guia de configuração e de referência rá pida 51
Page 53

www.dell.com | support.dell.com (em Inglês)
Sistema com
2
um conector de ví deo
Sistema com
dois conectores de vídeo
conector de vídeo
na placa de expansão
NOTA: se o seu computador tiver dois conectores de vídeo, o conector de vídeo
integrado está desativado e possui uma tampa protetora sobre ele. Use o
conector da placa de expansão, conforme mostrado nas ilustrações da direita
na etapa 2.
52 Guia de configuração e de referê ncia rápida
conector de vídeo
na placa de expansão
Page 54

Sistema com
um conector de vídeo
NOTA: se o seu computador tiver dois conectores de vídeo, o conector de vídeo
integrado está desativado e possui uma tampa protetora sobre ele. Use o
conector de placa de expansão, conforme mostrado na ilustração à direita na
etapa 2.
Sistema com
dois conectores de vídeo
conector de vídeo
na placa de expansão
Guia de configuração e de referência rá pida 53
Page 55
www.dell.com | support.dell.com (em Inglês)
3
luzes de diagnóstico luzes de diagnóstico
54 Guia de configuração e de referê ncia rápida
luzes de diagnóstico
Page 56

luzes de
diagnóstico
NOTA: se o seu computador tiver dois conectores de áudio, use o conector da
placa de expansão, conforme mostrado nas ilustrações à direita na etapa 3.
luzes de
diagnóstico
Guia de configuração e de referência rá pida 55
Page 57

www.dell.com | support.dell.com (em Inglês)
Verifique se o interruptor do seletor de voltagem está corretamente definido
para a sua região. Para mais informações, consulte “Ao utilizar o
computador” mais adiante neste documento.
4
NOTA: as fontes de alimentação de seleção automática não exigem um
interruptor de seleção de voltagem. Sua fonte de alimentação pode não
ter este interruptor.
56 Guia de configuração e de referê ncia rápida
Page 58

Guia de configuração e de referência rá pida 57
Page 59

www.dell.com | support.dell.com (em Inglês)
CUIDADO: para evitar choque elétrico, use apenas o cabo de força
fornecido e certifique-se de que esteja conectado a uma fonte de
força adequadamente aterrada.
5
58 Guia de configuração e de referê ncia rápida
Page 60
Guia de configuração e de referência rá pida 59
Page 61

As ilustrações a seguir mostram as localizações dos botões Liga/Desliga e dos
controles do monitor.
www.dell.com | support.dell.com (em Inglês)
6
brilho
contraste
brilho
contraste
brilho
60 Guia de configuração e de referê ncia rápida
contraste
Page 62

Leia o contrato de lincença do software e siga as instruções de configuração
do sistema operacional na tela.
7
Par abéns! Você completou a configuração do seu sistema.
Dependendo do seu sistema operacional, clique duas vezes no ícone Guias
do usuário na área de trabalho (mostrado abaixo) ou clique no botão Iniciar
e, em seguida, selecione Ajuda e suporte para acessar a documentação
eletrônica armazenada na sua unidade de disco rígido.
Guia de configuração e de referência rá pida 61
Page 63

Resolução de problemas
A Dell fornece uma série de ferramentas para ajudá-lo se o seu sistema não
apresentar o desempenho esperado. Para as informações mais recentes
disponíveis para o seu computador sobre solução de problemas, consulte a
página de suporte da Dell na Internet no endereço support.dell.com (em
Inglês). Também é possível encontrar descrições das ferramentas da Dell
para a solução de problemas na seção “Obtenção de ajuda” do Guia do
usuário on-line.
Se ocorrerem problemas no computador que exijam a ajuda da Dell, escreva
uma descrição detalhada do erro, os códigos de bipe ou os padrões das luzes
de diagnósticos; anote o Código de serviço expresso e o Número da etiqueta
de serviço abaixo e, em seguida, contate a Dell do mesmo local em que
estiver o seu computador.
www.dell.com | support.dell.com (em Inglês)
Consulte “Como obter informações e assistência” na página 47 para obter
um exemplo dos números de Código de serviço expresso e da Etiqueta de
serviço.
Código de serviço expresso: ___________________________
Número da etiqueta de serviço: ___________________________
62 Guia de configuração e de referê ncia rápida
Page 64

O seu computador possui as seguintes ferramentas que podem ajudá-lo a
resolver problemas:
PROGRAMA DELL DIAGNOSTICS— O Programa Dell Diagnostics testa vários
componentes em seu computador e ajuda a identificar a causa dos problemas do
computador. Para mais informações, consulte "Como executar o programa Dell
Diagnostics" na página 65.
LUZES DO SISTEMA— Localizadas na frente do computador, essas luzes
podem ajudar na solução de um problema do computador. Para mais
informações, consulte o Guia do usuário.
LUZES DE DIAGNÓSTICOS— Localizadas na parte de trás do computador,
essas luzes podem ajudar na solução de um problema do computador. Para mais
informações, consulte o Guia do usuário.
MENSAGENS DO SISTEMA— O computador envia essas mensagens para
alertá-lo sobre uma falha atual ou possível. Para mais informações, consulte o
Guia do usuário.
CÓDIGOS DE BIPE— Uma série de códigos de bipe audíveis emitidos pelo
computador podem ajudá-lo a identificar o problema. Para mais informações,
consulte o Guia do usuário.
Guia de configuração e de referência rá pida 63
Page 65

Utilização do Dell OptiPlex ResourceCD
Para utilizar o Dell OptiPlex ResourceCD enquanto estiver executando o
sistema operacional Microsoft
NOTA: para acessar os drivers de dispositivo e a documentação do usuário,
você precisará utilizar o Res our ceC D enquanto estiver executando o Windows.
1
Ligue o computador e deixe que inicialize a área de trabalho do
Windows.
2 Insira o Dell OptiPlex ResourceCD na unidade de CD.
Se estiver utilizando o Dell OptiPlex ResourceCD pela primeira vez no
seu computador, a janela ResourceCD Installation (Instalação do
ResourceCD) se abre para informá-lo que o ResourceCD começará a
instalação.
3 Clique em OK para continuar..
®
Windows®, execute as etapas a seguir.
www.dell.com | support.dell.com (em Inglês)
Para completar a instalação, responda às solicitações do programa de
instalação.
4 Clique em Next (Próximo) na tela Welcome Dell System Owner
(Bem-vindo, proprietário do sistema Dell).
5 Escolha o System Model (Modelo de sistema), o Operating System
(Sistema operacional), o Device Type (Tipo de dispositivo) e o Topic
(Tópico) apropriados.
Drivers para o seu computador
Para exibir uma lista dos drivers de dispositivo para o seu computador,
execute as etapas a seguir:
1 Clique em My Drivers (Meus drivers) no menu suspenso Tópicos.
O ResourceCD faz uma varredura no hardware do computador e no
sistema operacional e depois exibe na tela uma lista dos drivers de
dispositivos para a configuração do seu sistema.
2 Clique no driver apropriado e siga as instruções para fazer o download
do driver para o seu computador.
Para visualizar todos os drivers disponíveis para o seu computador, clique em
Drivers a partir do menu suspenso Tópico.
64 Guia de configuração e de referê ncia rápida
Page 66

Como executar o programa Dell Diagnostics
O Dell Diagnostics é um programa que testa vários componentes em seu
computador. Execute este programa sempre que houver um problema no
computador para identificar a origem do problema. Você pode executar o
programa Dell Diagnostics a partir da sua unidade de disco rígido ou do
ResourceCD.
AVISO: se a sua unidade de disco rígido falhar, execute o programa Dell IDE
Hard Drive Diagnostics (consulte “Como executar o programa Dell IDE Hard
Drive Diagnostics” na página 66).
Ligue o computador (se o computador já estiver ligado, reinicie-o).
1
2 Quando aparecer a mensagem F2 = Setup (F2 = Configuração)
no canto superior direito da tela, pressione <Ctrl><Alt><F10>.
A inicialização do diagnóstico começa imediatamente e, em seguida, o
Diagnostics Menu (Menu de diagnósticos) aparece.
3 Selecione a opção de diagnóstico adequada para o seu computador.
Para usar o diagnóstico, siga as instruções da tela.
Alteração da seqüência de inicialização
Para executar o Programa Dell Diagnostics a partir do ResourceCD, execute
as etapas a seguir para permitir que o seu computador inicialize a partir do
CD:
1 Insira o Dell OptiPlex ResourceCD na unidade de CD.
2 Ligue (ou reinicie) o computador.
3 Quando aparecer a mensagem F2 = Setup (F2 = Configuração)
no canto superior direito da tela, pressione <Ctrl><Alt><F8>.
NOTA: esse recurso altera a seqüência de inicialização apenas uma vez. Na
próxima inicialização, o computador iniciará de acordo com os dispositivos
especificados na configuração do sistema.
O Boot Device Menu (Menu do dispositivo de inicialização) aparece.
Se você esperar muito e o logotipo do Windows aparecer, espere até
que apareça a área de trabalho do Windows. Em seguida, desligue o
computador e tente novamente.
4 Selecione a opção CD-ROM Device (Dispositivo de CD-ROM).
Guia de configuração e de referência rá pida 65
Page 67

www.dell.com | support.dell.com (em Inglês)
Como executar o programa Dell IDE Hard Drive Diagnostics
O programa Dell IDE Hard Drive Diagnostics é um utilitário que testa o
disco rígido para solucionar ou confirmar uma falha no mesmo.
1 Ligue o computador (se o computador já estiver ligado, reinicie-o).
2 Quando aparecer a mensagem F2 = Setup (F2 = Configuração)
no canto superior direito da tela, pressione <Ctrl><Alt><D>.
3 Siga as instruções da tela.
Se uma falha for informada, consulte “Problemas na unidade de disco
rígido” no Guia do usuário.
Instruções de segurança
Use as diretrizes de segurança a seguir para proteger o computador contra
possíveis danos e para garantir sua segurança pessoal.
Ao trabalhar na parte interna do computador
Antes de remover a tampa do computador, siga as etapas abaixo na
seqüência indicada.
AVISO: não tente fazer a manutenção do computador sozinho, exceto
conforme explicado na documentação on-line da Dell ou de outra forma
fornecido a você. Sempre siga rigorosamente as instruções de instalação e
serviço.
CUIDADO: há o perigo de uma nova bateria explodir se for
instalada incorretamente. Substitua a bateria somente por outra
do mesmo tipo ou de tipo equivalente recomendado pelo
fabricante. Descarte as baterias usadas de acordo com as
instruções do fabricante.
1 Desligue o computador e quaisquer periféricos.
2 Faça o aterramento tocando uma superfície de metal não pintada no
chassi, como o metal ao redor das aberturas do slot da placa na parte
de trás do computador, antes de tocar qualquer componente interno
do computador.
Enquanto trabalha, toque periodicamente uma superfície de metal
não pintada no chassi do computador para dissipar qualquer
eletricidade estática que possa prejudicar os componentes internos.
66 Guia de configuração e de referê ncia rápida
Page 68

3 Desconecte o computador e os periféricos de suas fontes de energia.
Além disso, desconecte todas as linhas telefônicas ou de
telecomunicações do computador.
Isso reduz o potencial de lesões pessoais ou choque.
Além disso, anote estas regras de segurança quando apropriado:
• Para evitar curto-circuito no seu computador ao desconectar um cabo
de rede, desconecte primeiro o cabo do NIC (Network Interface
Controller [Controlador de interface de rede]) na parte de trás do seu
computador e, depois, da tomada da parede. Ao reconectar um cabo de
rede ao computador, conecte-o primeiro na tomada de rede e depois
no NIC.
• Ao desconectar um cabo, puxe-o pelo seu conector ou pelo loop de
alívio de tensão e não pelo cabo em si. Alguns cabos possuem um
conector com presilhas de travamento; se estiver desconectando esse
tipo de cabo, pressione as presilhas de travamento antes de
desconectar o cabo. À medida que você separa os conectores,
mantenha-os alinhados para evitar que algum pino do conector fique
dobrado. Além disso, antes de conectar um cabo assegure-se de que
ambos conectores estejam corretamente alinhados.
• Manuseie os componentes e as placas com cuidado. Não toque os
componentes ou os contatos em uma placa. Segure uma placa pelas
bordas ou pelo suporte de montagem de metal. Segure um
componente, como um chip de microprocessador, pelas bordas, não
pelos pinos.
Ao utilizar o computador
Ao utilizar o seu computador, observe as seguintes diretrizes de segurança.
CUIDADO: não opere o seu computador se qualquer tampa
(incluindo as tampas do computador, painel, suportes de
preenchimento e inserções do painel frontal) tiver sido removida.
• Para evitar danos ao computador, verifique se o interruptor do seletor
de voltagem (se existir) na fonte de alimentação está definido para
corresponder à fonte de CA (Corrente Alternada) disponível na sua
localidade:
– 115 Volts (V)/60 Hertz (Hz) na maioria dos países da América do
Norte e do Sul e em alguns do Extremo Oriente, como Coréia do
Sul e Taiwan
Guia de configuração e de referência rá pida 67
Page 69

www.dell.com | support.dell.com (em Inglês)
– 100 V/50 Hz no Japão oriental e 100 V/60 Hz no Japão ocidental
NOTA: O interruptor do seletor de voltagem precisa estar na posição de
115 V mesmo que a fonte de CA disponível no Japão seja de 100 V.
– 230 V/50 Hz na maioria dos países europeus, Oriente Médio e
Extremo Oriente
Certifique-se também de que o monitor e os periféricos conectados
sejam eletricamente classificados para operarem com a fonte de CA
disponível em sua localidade.
NOTA: as fontes de alimentação de seleção automática não exigem um
interruptor de seleção de voltagem. Sua fonte de alimentação pode não
ter este interruptor.
• Para evitar choque elétrico, conecte os cabos de força do computador e
dos periféricos a fontes de força adequadamente aterradas. Estes cabos
são equipados com plugues de três pinos para ajudar a assegurar o
aterramento apropriado. Não use plugues adaptadores nem remova o
pino de aterramento de um cabo. Se for necessário usar um cabo de
extensão, use um cabo de três fios com conectores adequadamente
aterrados.
• Antes de trabalhar dentro do computador, desconecte o computador
para evitar choques elétricos ou danos à placa de sistema. Certos
componentes da placa de sistema continuam a receber energia no
momento em que o computador é conectado à fonte de corrente
alternada.
68 Guia de configuração e de referê ncia rápida
Page 70

• Para evitar possíveis danos à placa de sistema, espere 15 segundos
depois de desligar o computador da tomada para desconectar um
dispositivo do mesmo.
AVISO: observe quando o LED (Light-Emitting Diode [Diodo emissor de luz])
indicador de força auxiliar da placa de sistema desligar para verificar se a
energia do computador está desligada (consulte o Guia do usuário para a
localização deste LED).
• Para proteger o computador contra oscilações de energia elétrica
repentinas e transitórias, use um supressor de surtos de tensão, um
estabilizador de linha ou uma UPS (Uninterruptible Power Supply
[Fonte de alimentação ininterrupta]).
• Verifique-se se não há objetos sobre os cabos do computador e se que
esses não estão em locais onde se possa pisar ou tropeçar neles.
• Não respingue líquidos ou alimentos no seu computador. Se o
computador for molhado, consulte o Guia do usuário.
• Não insira nenhum objeto nas aberturas do computador. Isso
pode causar incêndio ou choque elétrico por curto-circuito nos
componentes internos.
• Mantenha os computador longe de aquecedores e fontes de calor.
Além disso, não bloqueie as aberturas de ventilação. Evite colocar
papéis soltos embaixo do computador; não o coloque próximo a uma
parede ou em uma cama, sofá ou tapete.
Hábitos ergonômicos de computação
CUIDADO: o uso impróprio e prolongado do teclado pode causar
lesões.
CUIDADO: visualizar a tela do monitor por um período de tempo
prolongado pode resultar em fadiga visual.
Para conforto e eficiência, observe as seguintes regras de ergonomia no Guia
do usuário ao configurar e utilizar o computador.
Guia de configuração e de referência rá pida 69
Page 71

www.dell.com | support.dell.com (em Inglês)
Informações sobre regulamentação
EMI (Electromagnetic Interference [Interferência eletromagnética]) é
qualquer sinal ou emissão, irradiada no espaço livre ou conduzida por fiação
de energia ou de sinal, que põe em perigo o funcionamento de um serviço
de rádio navegação ou outro serviço de segurança ou que degrada
seriamente, obstrui ou interrompe repetidamente um serviço licenciado de
comunicação por rádio.
O computador da Dell é projetado para estar de acordo com as
regulamentações aplicáveis sobre EMI. Note que as regulamentações da
FCC definem quais alterações ou modificações não aprovadas
expressamente pela Dell podem anular a autoridade do usuário para operar
o equipamento.
NOTA: informações adicionais de regulamentação sobre o seu sistema podem
ser encontradas no Guia do usuário.
70 Guia de configuração e de referê ncia rápida
Page 72

Sistemas Dell™ OptiPlex™
Guía de instalación y de referencia rápida
www.dell.com | support.dell.com
Page 73

Notas, avisos y precauciones
NOTA: Una NOTA indica información importante que le ayuda a conseguir un
mejor rendimiento de su equipo.
AVISO: Un AVISO indica la posibilidad de daños al hardware o pérdida de
datos y le explica cómo evitar el problema.
PRECAUCIÓN: Una PRECAUCIÓN indica la posibilidad de daños a
la propiedad, lesiones personales o muerte.
____________________
La información contenida en este documento puede modificarse sin previo aviso.
© 2000–2001 Dell Computer Corporation. Quedan reservados todos los derechos.
Queda estrictamente prohibida la reproducción de este documento en cualquier forma sin la
autorización por escrito de Dell Computer Corporation.
Marcas comerciales utilizadas en este texto: Dell, OptiPlex y el logotipo DELL son marcas
comerciales de Dell Computer Corporation; Microsoft, MS-DOS, Windows NT y Windows son
marcas comerciales registradas de Microsoft Corporation.
Otras marcas y otros nombres comerciales pueden utilizarse en este documento para hacer
referencia a las entidades que los poseen o a sus productos. Dell Computer Corporation renuncia
a cualquier interés sobre la propiedad de marcas y nombres comerciales que no sean los suyos.
Noviembre de 2001 P/N 38WYD Rev. A05
Page 74

Contenido
Acerca de esta guía . . . . . . . . . . . . . . . . . . . . . . . . 75
Búsqueda de información y asistencia
Para comenzar/Configuración
Solución de problemas
. . . . . . . . . . . . . . . . . . . 78
. . . . . . . . . . . . . . . . . . . . . . . 90
Utilización del CD Dell OptiPlex ResourceCD
Ejecución de los Diagnósticos Dell
. . . . . . . . . . . . . . 75
. . . . . . . . . . 92
. . . . . . . . . . . . . . . 93
Ejecución de los Diagnósticos de la unidad de
disco duro IDE de Dell
Instrucciones de seguridad
Al trabajar en el interior de su equipo
Cuando utilice el sistema
Hábitos de ergonomía con su equipo
Información reglamentaria
. . . . . . . . . . . . . . . . . . . . . 94
. . . . . . . . . . . . . . . . . . . . 94
. . . . . . . . . . . . . 94
. . . . . . . . . . . . . . . . . . . . 95
. . . . . . . . . . . . . . 97
. . . . . . . . . . . . . . . . . . . . 98
Garantía del fabricante para el usuario final
por un año (únicamente Latinoamérica y el Caribe)
. . . . . . . 98
Contenido 73
Page 75

74 Contenido
Page 76

Acerca de esta guía
Este documento contiene información acerca de la introducción y
configuración, solución de problemas, seguridad y reglamentos del equipo
Dell™ OptiPlex™.
Para obtener las versiones más recientes de los documentos contenidos en la
unidad de disco duro, visite el sitio web de asistencia de Dell en
support.dell.com.
Los números de modelos reglamentarios aparecen a lo largo de este
documento; a continuación se muestran los equivalentes del tipo de chasis:
Números de modelos reglamentarios y tipos de chasis
DHS = chasis de escritorio pequeño (SD)
DHP = chasis de factor de forma pequeño (SF)
DHM = chasis de minigabinete vertical pequeño (SMT)
Búsqueda de información y asistencia
Recursos y herramientas de asistencia
Recurso Contenido Utilización del recurso
Dell OptiPlex ResourceCD (CD
de recursos de Dell OptiPlex)
• Diagnósticos Dell
• Controladores
• Utilidades
• Documentación del equipo
y de los dispositivos
Consulte el menú principal del ResourceCD que se
entregó con su equipo. Use el menú desplegable para
realizar las selecciones apropiadas para su equipo. Puede
realizar las tareas siguientes:
• Diagnóstico de un problema
• Instalar o reinstalar controladores
• Obtener información sobre su equipo y sus dispositivos
NOTA: La documentación del usuario y los controladores
ya vienen instalados en el equipo cuando Dell lo envía.
Puede utilizar este CD para acceder a la documentación,
instalar controladores o ejecutar las herramientas de
diagnóstico.
Guía de instalación y de referencia rá pida 75
Page 77
Recursos y herramientas de asistencia (continuación)
Recurso Contenido Utilización del recurso
Etiquetas de servicio y registro;
situadas en la parte anterior o
lateral de su equipo Dell.
• Código de servicio rápido y
número de etiqueta de
El Código de servicio rápido y el Número de etiqueta de
servicio son identificadores únicos de su equipo Dell.
Es posible que necesite el número de código del producto
(o identificación del producto) para completar la
instalación del sistema operativo.
servicio
• Clave del producto (llamada
también identificación del
producto o COA (Certificate
of Authenticity [Certificado
www.dell.com | support.dell.com
de autenticidad])
Operating System CD (CD del
sistema operativo)
Para volver a instalar el sistema operativo, use el CD del
sistema operativo que se entrega con su equipo.
NOTA: Es posible que el CD de sistema operativo no
incluya todos los controladores más recientes para el
equipo. Si reinstala el sistema operativo, utilice el
ResourceCD para reinstalar los controladores para los
dispositivos incluidos con el equipo.
Para obtener más información sobre cómo reinstalar el
sistema operativo, consulte la documentación de
instalación del sistema operativo incluida con el equipo.
Guía de instalación del sistema
operativo
Para obtener información sobre cómo reinstalar y
configurar el sistema operativo, consulte la guía de
instalación del sistema operativo.
Haga clic en el botón Start (Inicio) y seleccione Help
(Ayuda) o Help and Support (Ayuda y asistencia),
dependiendo del sistema operativo, para obtener más
información sobre el sistema operativo.
76 Guí a de instalación y de referencia rápida
Page 78

Recursos y herramientas de asistencia (continuació n)
Recurso Contenido Utilización del recurso
Guías de usuario del equipo y
los dispositivos
Guías del usuario
Sitio web de asistencia de Dell
• Asistencia técnica e
información
• Descargas para su equipo
• Estado del pedido o entrega
• Sugerencias, documentos
sobre tecnología e
información de servicio
Sitio web de Asistencia Dell
Premier Support
• Estado de llamadas de
servicio
• Problemas técnicos
principales, por producto
• Preguntas frecuentes según
número de producto
• Etiquetas de servicio
personalizadas
• detalles de la configuración
del sistema
Dependiendo de su sistema operativo, haga doble clic en
el icono User's Guides (Guías del usuario) en el escritorio
o haga clic en el botón Inicio y seleccione Ayuda y
asistencia para acceder a la documentación electrónica
almacenada en la unidad de disco duro.
Obtenga información sobre lo siguiente:
• Uso del equipo
• Configuración de los valores del sistema
• Desmontaje e instalación de piezas
• Instalación y configuración de software
• Diagnóstico de un problema
• Especificaciones técnicas
• Documentación del dispositivo (en los sistemas
operativos seleccionados)
• Obtención de asistencia técnica
Diríjase a support.dell.com y complete el registro que se
ofrece por vez única.
• Obtenga ayuda mediante preguntas sobre uso,
instalación y solución de problemas
• Obtenga respuesta a preguntas sobre asistencia o
servicio técnico
• Obtenga las últimas versiones de los controladores para
el equipo
• Acceda a la documentación sobre su equipo y
dispositivos
• Participe en discusiones en línea con otros clientes de
Dell y con profesionales técnicos de Dell
• Explore una lista de vínculos en línea a los principales
proveedores de Dell
Diríjase a premiersupport.dell.com:
El sitio web de Asistencia Dell Premier Support está
personalizado para clientes corporativos, gubernamentales
y del ámbito educativo.
Es posible que este sitio no esté disponible en todas las
regiones.
Guía de instalación y de referencia rá pida 77
Page 79

www.dell.com | support.dell.com
Para comenzar/Configuración
Siga los siguientes pasos para conectar dispositivos externos al equipo por
medio del panel de E/S (entrada/salida). La parte posterior de su sistema
Dell, incluyendo el panel de E/S, puede ser distinta a los ejemplos que se
muestran aquí.
1
78 Guí a de instalación y de referencia rápida
Page 80

NOTA: Conecte sólo un teclado y un mouse.
NOTA: Si tiene un mouse o un teclado compatible con un USB (Universal
Serial Bus [Bus serie universal]), utilice los conectores USB de la parte
posterior del sistema.
Guía de instalación y de referencia rá pida 79
Page 81

www.dell.com | support.dell.com
Sistema con un
2
conector de vídeo
Sistema con dos
conectores de vídeo
conector de vídeo en
la tarjeta de expansión
NOTA: Si su equipo cuenta con dos conectores de vídeo, el conector de vídeo
integrado está desactivado y tiene una tapa protectora. Utilice el conector de
la tarjeta de expansión, como se muestra en las ilustraciones de la derecha en
el paso 2.
80 Guí a de instalación y de referencia rápida
conector de vídeo en
la tarjeta de expansión
Page 82

Sistema con un
conector de vídeo
conector de vídeo en
la tarjeta de expansión
NOTA: Si su equipo cuenta con dos conectores de vídeo, el conector de vídeo
integrado está desactivado y tiene una tapa protectora. Utilice el conector de
la tarjeta de expansión, como se muestra en las ilustraciones de la derecha en
el paso 2.
Sistema con dos
conectores de vídeo
Guía de instalación y de referencia rá pida 81
Page 83

3
www.dell.com | support.dell.com
luces de
diagnósticos
luces de
diagnósticos
luces de diagnósticos
82 Guí a de instalación y de referencia rápida
Page 84

luces de
diagnósticos
NOTA: Si su sistema dispone de dos conectores de audio, utilice el que se
encuentra en la tarjeta de expansión, como se muestra en las ilustraciones de
la derecha en el paso 3.
luces de
diagnósticos
Guía de instalación y de referencia rá pida 83
Page 85
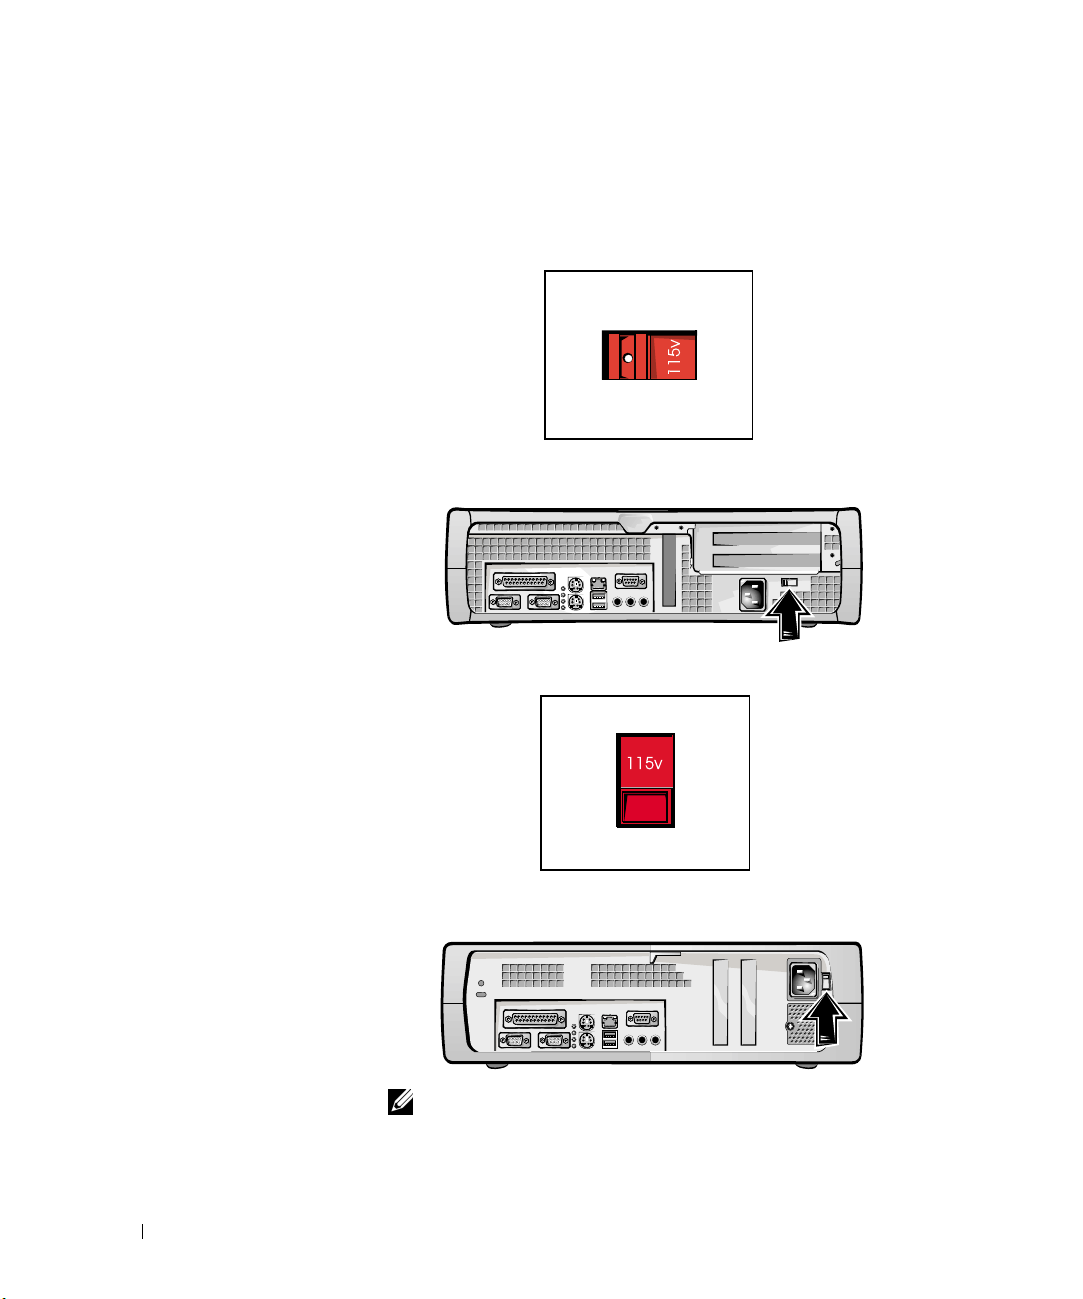
www.dell.com | support.dell.com
Compruebe que el interruptor de selección de voltaje esté en la posición
correcta para su área. Para obtener más información, consulte la sección
“Cuando utilice el sistema” más adelante en este documento.
4
NOTA: Los suministros de energía autoseleccionables no necesitan un
interruptor de selección de voltaje. Es posible que el suministro de energía
no disponga de este interruptor.
84 Guí a de instalación y de referencia rápida
Page 86

Guía de instalación y de referencia rá pida 85
Page 87

www.dell.com | support.dell.com
PRECAUCIÓN: Para evitar una descarga eléctrica, utilice sólo el
cable de alimentación que se suministra y asegúrese de que esté
conectado a una fuente de energía con conexión a tierra.
5
86 Guí a de instalación y de referencia rápida
Page 88

Guía de instalación y de referencia rá pida 87
Page 89
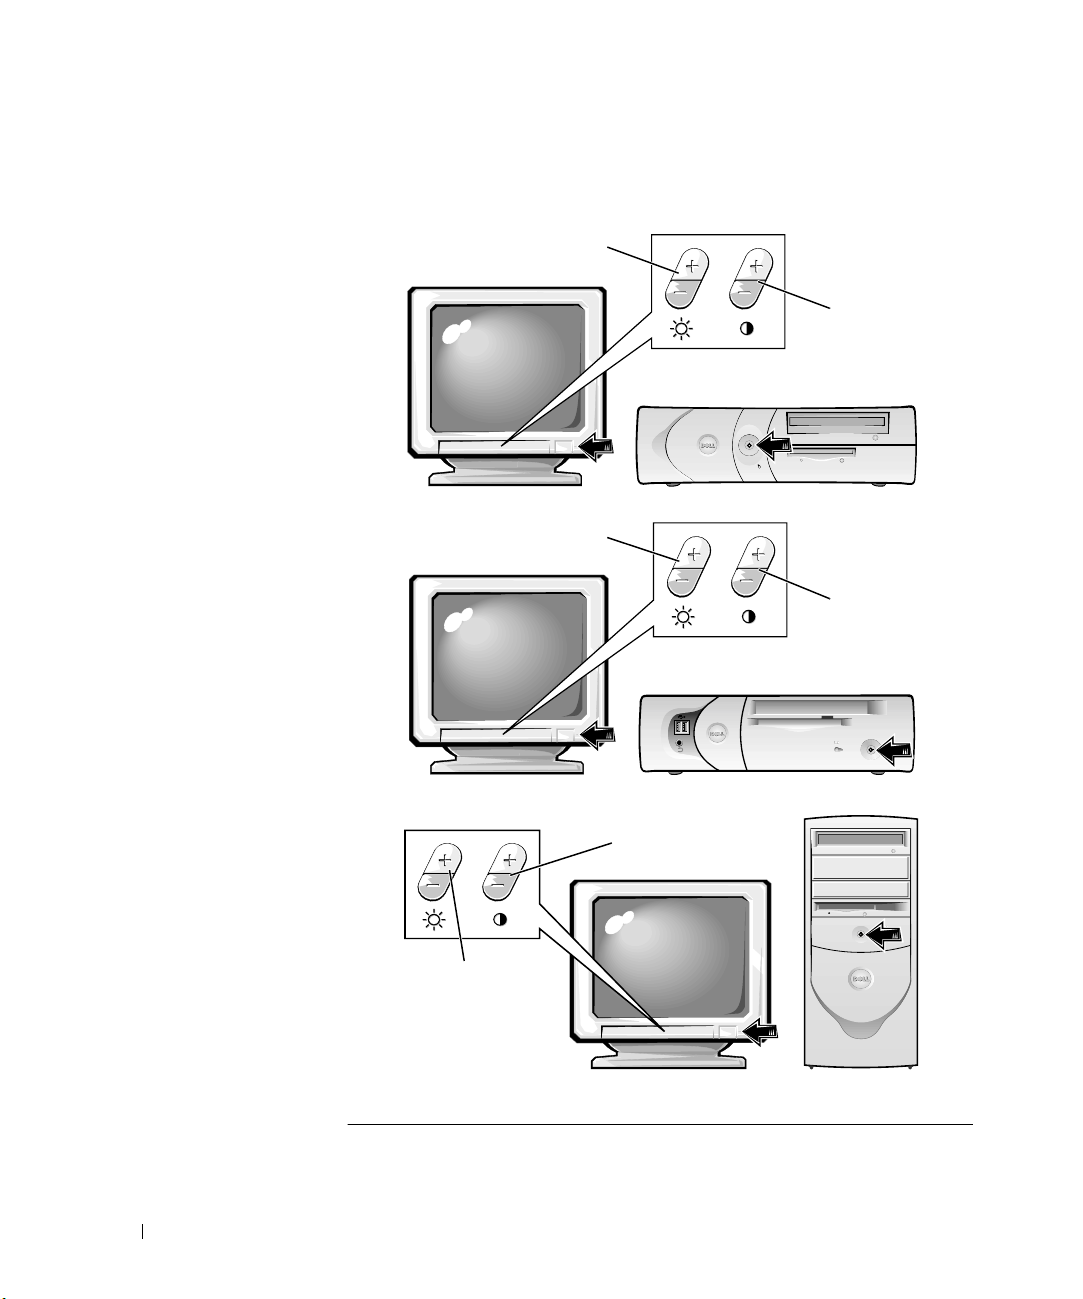
Las ilustraciones siguientes muestran las ubicaciones del botón de
encendido y los controles del monitor.
www.dell.com | support.dell.com
6
brillo
contraste
brillo
contraste
brillo
88 Guí a de instalación y de referencia rápida
contraste
Page 90

Lea el acuerdo de licencia del software y siga las instrucciones de instalación
del sistema operativo en la pantalla.
7
¡Enhorabuena! Ha completado la configuración del sistema.
Dependiendo de su sistema operativo, haga doble clic en el icono Guías del
usuario en el escritorio (que se muestra más abajo), o haga clic en el botón
Inicio y seleccione Ayuda y asistencia para acceder a la documentación
electrónica almacenada en la unidad de disco duro.
Guía de instalación y de referencia rá pida 89
Page 91

www.dell.com | support.dell.com
Solución de problemas
Dell proporciona una serie de herramientas para ayudarlo si su sistema no
funciona como se esperaba. Para obtener la información más actualizada
sobre la solución de problemas disponible para su sistema, consulte la
página web de asistencia de Dell en support.dell.com. También puede
encontrar descripciones de las herramientas de solución de problemas de
Dell en la sección titulada “Obtención de ayuda” en la Guía del usuario en
línea.
Si el equipo tiene problemas que requieren la ayuda de Dell, escriba una
descripción detallada del error, códigos de sonido o patrones de luz de
diagnósticos; escriba su código de servicio rápido y número de etiqueta de
servicio a continuación y póngase en contacto con Dell en el mismo lugar en
que adquirió su equipo.
Consulte “Búsqueda de información y asistencia” en la página 75 para ver
un ejemplo del código de servicio rápido y números de etiqueta de servicio.
Código de servicio rápido: ___________________________
Número de etiqueta de servicio: ___________________________
90 Guí a de instalación y de referencia rápida
Page 92

Su equipo incluye las herramientas siguientes que le pueden ayudar a
solucionar un problema:
DIAGNÓSTICOS DELL— Los Diagnósticos Dell prueban varios componentes
en el equipo y le ayudan a identificar las causas de los problemas del mismo. Para
obtener más información, consulte "Ejecución de los Diagnósticos Dell" en la
página 93.
LUCES DEL SISTEMA— Localizado en la parte anterior del equipo, estas luces
pueden ayudarle a resolver un problema del equipo. Para obtener más
información, consulte la Guía del usuario.
LUCES DE DIAGNÓSTICO— Localizado en la parte posterior del equipo, estas
luces pueden ayudarle a resolver un problema del equipo. Para obtener más
información, consulte la Guía del usuario.
MENSAJES DEL SISTEMA— El equipo reporta estos mensajes para advertirle
de fallas actuales o potenciales. Para obtener más información, consulte la Guía
del usuario.
CÓDIGOS DE SONIDO— Una serie de códigos de sonido emitidos por el equipo
que pueden ayudarle a identificar un problema. Para obtener más información,
consulte la Guía del usuario.
Guía de instalación y de referencia rá pida 91
Page 93

www.dell.com | support.dell.com
Utilización del CD Dell OptiPlex ResourceCD
Para usar el Dell OptiPlex ResourceCD desde el sistema operativo de
Microsoft
1
2 Introduzca el Dell OptiPlex ResourceCD en la unidad de CD.
3 Haga clic sobre OK (Aceptar) para continuar.
4 Haga clic en Next (Siguiente) en la pantalla Welcome Dell System
5 Seleccione el System Model (Modelo del sistema), Operating System
®
Windows®, realice los pasos siguientes.
NOTA: Para acceder a los controladores de dispositivos y a la documentación
del usuario, usted debe usar el ResourceCD desde Windows.
Encienda el equipo y permita que se inicie el escritorio de Windows.
Si va a utilizar el Dell OptiPlex ResourceCD por primera vez en este
equipo, se abre la ventana ResourceCD Installation (Instalación del
ResourceCD) para informarle que el ResourceCD está a punto de
iniciar la instalación.
Para completar la instalación, responda a las peticiones ofrecidas por el
programa de instalación.
Owner (Bienvenida al propietario del sistema Dell).
(Sistema operativo), Device Type (Tipo de dispositivo) y Top i c
(Tema) correspondientes.
Controladores para su equipo
Para visualizar una lista de los controladores de dispositivos del equipo,
realice los siguientes pasos:
1 Haga clic en My Drivers (Mis controladores) en el menú desplegable
Te ma .
ResourceCD examina el sistema operativo y el hardware del equipo y
después aparece en la pantalla una lista de los controladores de
dispositivos de la configuración del sistema.
2 Haga clic en el controlador adecuado y siga las instrucciones para
descargar el controlador en su equipo.
Para ver todos los controladores disponibles para su equipo, haga clic en
Drivers (Controladores) en el menú desplegable Te ma .
92 Guí a de instalación y de referencia rápida
Page 94

Ejecución de los Diagnósticos Dell
Los Diagnósticos Dell son un programa que prueba varios componentes en
su equipo. Ejecute este programa cada vez que tenga un problema con el
equipo para ayudar a identificar la fuente del problema. Puede ejecutar los
Diagnósticos Dell desde la unidad de disco duro o desde el ResourceCD.
AVISO: Si la unidad de disco duro falla, ejecute los Diagnósticos de la unidad
de disco duro IDE de Dell (consulte la sección “Ejecución de los Diagnósticos
de la unidad de disco duro IDE de Dell” en la página 94).
Encienda el equipo (si el equipo ya está encendido, reinícielo).
1
2 Cuando aparezca F2 = Setup (F2 = Configuración) en la
esquina superior derecha de la pantalla, oprima
<Ctrl><Alt><F10>.
La inicialización de los diagnósticos empieza inmediatamente; luego
aparece el Diagnostics Menu (Menú de diagnósticos).
3 Seleccione la opción de diagnósticos más apropiada para su equipo.
Para utilizar los diagnósticos, siga las instrucciones que aparecen en la
pantalla.
Cambio en la secuencia de inicio
Para ejecutar los Diagnósticos Dell desde el ResourceCD, realice los
siguientes pasos para lograr que el equipo se inicie desde el CD:
1 Introduzca el Dell OptiPlex ResourceCD en la unidad de CD.
2 Encienda (o reinicie) el equipo.
3 Cuando aparezca F2 = Setup (F2 = Configuración) en la
esquina superior derecha de la pantalla, oprima <Ctrl><Alt><F8>.
NOTA: Esta característica cambia la secuencia de inicio solamente una vez.
La próxima vez, el equipo se iniciará de acuerdo con los dispositivos
especificados en la configuración del sistema.
Aparece el Boot Device Menu (Menú del dispositivo de inicio).
Si espera demasiado y aparece el logotipo de Windows, siga esperando
hasta que vea el escritorio de Windows. En ese momento, apague el
equipo y vuélvalo a intentar.
4 Seleccione la opción CD-ROM Device (Dispositivo de CD-ROM).
Guía de instalación y de referencia rá pida 93
Page 95

Ejecución de los Diagnósticos de la unidad de disco duro IDE de Dell
Los Diagnósticos de la unidad de disco duro IDE de Dell son una utilidad
que prueba la unidad de disco duro para solucionar o confirmar un fallo de
la unidad de disco duro.
1 Encienda el equipo (si el equipo ya está encendido, reinícielo).
2 Cuando aparezca F2 = Configuración en la esquina superior
derecha de la pantalla, oprima <Ctrl><Alt><D>.
3 Siga las instrucciones que aparecen en la pantalla.
www.dell.com | support.dell.com
Si se reporta un error, consulte “Problemas de la unidad de disco duro”
en la Guía del usuario.
Instrucciones de seguridad
Utilice las siguientes directrices de seguridad para ayudar a proteger su
equipo de posibles daños y garantizar su propia seguridad personal.
Al trabajar en el interior de su equipo
Antes de desmontar la cubierta de la PC, realice los pasos siguientes en la
secuencia indicada.
AVISO: No intente proporcionar servicio al equipo, a excepción de lo que se
explica en su documentación Dell en línea. Siga siempre las instrucciones de
instalación y servicio al pie de la letra.
PRECAUCIÓN: Existe el peligro de que una nueva batería explote
si no se instala correctamente. Reemplace la batería únicamente
con otra del mismo tipo o su equivalente recomendado por el
fabricante. Deseche las baterías agotadas de acuerdo con las
instrucciones del fabricante.
Apague su equipo y todos los periféricos.
1
2 Conéctese a tierra tocando una superficie metálica sin pintura en el
chasis, tal como el metal alrededor de aberturas de las ranuras para
tarjetas en la parte posterior del equipo, antes de tocar cualquier
objeto al interior de su PC.
Conforme trabaje, toque periódicamente una superficie metálica sin
pintura en el chasis del equipo para disipar la electricidad estática que
podría dañar los componentes internos.
94 Guí a de instalación y de referencia rápida
Page 96

3 Desconecte su equipo y los periféricos de sus fuentes de energía.
Asimismo, desconecte las líneas telefónicas o de telecomunicaciones
conectadas al equipo.
Al hacerlo reduce la posibilidad de sufrir lesiones personales o
descargas eléctricas.
Además de lo anterior, tome nota de las siguientes pautas de seguridad
cuando sea pertinente:
• Para evitar que se produzca un cortocircuito en el equipo, desenchufe
primero el cable del NIC (network interface controller [controlador de
interfaces de red]) en la parte posterior del equipo y luego el enchufe
de red en la pared. Cuando vuelva a conectar un cable de red al equipo,
primero conecte el cable en el enchufe de red y luego en el NIC.
• Cuando desconecte un cable, tire de su conector o de su lazo liberador
de tensión y no del cable mismo. Algunos cables tienen un conector
con lengüetas de seguridad. Si está desconectando este tipo de cables,
oprima las lengüetas hacia adentro antes de desconectarlo. Cuando
separe conectores, manténgalos alineados para evitar doblar las patas
de conexión. Asimismo, antes de conectar un cable, asegúrese de que
los conectores estén orientados y alineados correctamente.
• Maneje con cuidado los componentes y las tarjetas. No toque los
componentes ni los contactos de las tarjetas. Sujete las tarjetas por sus
bordes o por su soporte metálico de montaje. Sujete los componentes
tales como un chip de microprocesador por sus bordes y no por sus
patas.
Cuando utilice el sistema
Cuando utilice el equipo, respete las siguientes directrices de seguridad.
PRECAUCIÓN: No utilice el equipo si está desmontada alguna de
las cubiertas (incluidas las cubiertas de la PC, los biseles, los
soportes de relleno y las carátulas del panel anterior).
• Para ayudar a evitar daños al equipo, asegúrese de que el interruptor de
selección de voltaje en el suministro de energía esté fijado para
coincidir con la corriente alterna disponible en su área:
– 115 voltios (V)/60 hercios (Hz) en la mayoría de las regiones de
América del Norte y del Sur, y en algunos países del Lejano
Oriente, tales como Corea del Sur y Taiwán
Guía de instalación y de referencia rá pida 95
Page 97

www.dell.com | support.dell.com
– 100 V/50 Hz en el Este de Japón y 100 V/60 Hz en el Oeste de
Japón
NOTA: El interruptor de selección de voltaje debe estar en la posición
115V, aunque el suministro de corriente alterna en Japón es de 100 V.
– 230 V/50 Hz en la mayoría de las regiones de Europa, el Medio
Oriente y el Lejano Oriente
Ta m b i én asegúrese de que su monitor y los periféricos conectados
estén clasificados eléctricamente para operar con la corriente alterna
disponible en su localidad.
NOTA: Los suministros de energía autoseleccionables no necesitan un
interruptor de selección de voltaje. Es posible que el suministro de energía
no disponga de este interruptor.
• Con el fin de prevenir una descarga eléctrica, conecte el equipo y los
cables de alimentación de los periféricos a una fuente de energía con
una conexión adecuada a tierra. Estos cables cuentan con enchufes de
tres clavijas para asegurar una conexión adecuada a tierra. No utilice
enchufes adaptadores ni retire la clavija de conexión a tierra de ningún
cable. Si necesita utilizar un cable de extensión, utilice un cable de tres
líneas con enchufes adecuadamente conectados a tierra.
• Antes de trabajar en el interior de su PC, desconecte el sistema para
evitar una descarga eléctrica o daños en la placa base. Algunos
componentes de la placa base siguen recibiendo energía cuando el
equipo está conectado a la corriente alterna.
96 Guí a de instalación y de referencia rápida
Page 98

• Para evitar cualquier tipo de daño en la placa base, espere 15 segundos
después de desenchufar el sistema antes de desconectar un dispositivo
del equipo.
AVISO: Observe cuando se apague el indicador LED (light-emitting diode
[diodo emisor de luz]) de energía auxiliar en la placa base para verificar que el
sistema está apagado (consulte la Guía del usuario para conocer la ubicación
de este LED).
• Para proteger su equipo contra cambios repentinos en la alimentación
eléctrica, utilice un protector contra sobrevoltajes, un acondicionador
de línea o un UPS (Uninterruptible Power Supply [Sistema de energía
ininterrumpida]).
• Asegúrese de que no haya ningún objeto encima de los cables de
alimentación del equipo y que los cables no estén en un lugar donde
uno pueda tropezarse con ellos o pisarlos.
• No derrame comida ni líquidos en su equipo. Si el equipo se moja,
consulte la Guía del usuario.
• No introduzca ningún objeto por las aberturas del equipo. Puede
ocasionar un incendio o una descarga eléctrica al provocar un
cortocircuito entre los componentes internos.
• Mantenga el equipo alejado de radiadores y fuentes de calor.
Asimismo, no obstruya las rendijas de ventilación. Evite colocar hojas
sueltas debajo del equipo; no coloque el equipo cerca de una pared
cerrada, sobre una cama, un sofá o un tapete.
Hábitos de ergonomía con su equipo
PRECAUCIÓN: La utilización inapropiada o prolongada del teclado
puede ocasionarle una lesión.
PRECAUCIÓN: El observar la pantalla del monitor durante
períodos prolongados puede causar fatiga ocular.
Para asegurar su comodidad y eficiencia, observe las pautas de ergonomía en
su Guía del usuario al instalar y utilizar su equipo.
Guía de instalación y de referencia rá pida 97
Page 99

www.dell.com | support.dell.com
Información reglamentaria
La EMI (Electromagnetic Interference [Interferencia electromagnética]) es
cualquier señal o emisión, irradiada en el espacio o conducida mediante
cables de alimentación o de señales, que pone en peligro el funcionamiento
de dispositivos de navegación por radio u otros dispositivos de seguridad o
que degrada seriamente, obstruye o interrumpe repetidamente un servicio
de radiocomunicaciones con licencia.
El sistema del equipo Dell está diseñado para cumplir con todas las
reglamentaciones relacionadas con la EMI. Los cambios o modificaciones
no aprobados expresamente por Dell podrían anular la autoridad para
operar el equipo.
NOTA: Puede encontrar más información sobre reglamentaciones en la Guía
del usuario.
Garantía del fabricante para el usuario final por un año (únicamente Latinoamérica y el Caribe)
Garantía
Dell Computer Corporation (“Dell”) garantiza al usuario en acuerdo con las
siguientes provisiones que los productos de hardware que llevan su marca,
adquiridos por el usuario por medio de una compañía de Dell o un
distribuidor de Dell autorizado en Latinoamérica o el Caribe, estarán libres
de defectos en materiales, mano de obra y diseño que puedan afectar su uso
normal por un periodo de un año a partir de la fecha original de compra. Los
productos para los cuales se hace un debido reclamo serán, según la decisión
de Dell, reparados o reemplazados a cuenta de Dell. Dell es propietario de
todas las piezas desmontadas de equipos reparados. Dell utiliza piezas
nuevas y reacondicionadas hechas por varios fabricantes cuando hace
reparaciones y en la fabricación de productos de reemplazo.
98 Guí a de instalación y de referencia rápida
Page 100

Exclusiones
Esta garantía no es aplicable a defectos resultantes por: instalación, uso o
mantenimiento inadecuado o incorrecto; acciones o modificaciones por
terceras personas no autorizadas o por el usuario mismo; daños accidentales
o intencionales; o por desgaste normal.
Cómo realizar una reclamación
Las reclamaciones deben ser hechas en Latinoamérica o el Caribe
poniéndose en contacto con el lugar de ventas de Dell dentro del periodo de
garantía. El usuario siempre debe proporcionar un comprobante de
adquisición, indicando el nombre y la dirección del vendedor, la fecha de
adquisición, números de serie y de modelo, nombre y dirección del cliente, y
los detalles de los síntomas y de la configuración al momento en el que
ocurrió la falla, incluyendo los dispositivos periféricos y el software que se
estaba utilizando. De lo contrario, Dell puede rehusar la demanda. Una vez
diagnosticado un defecto bajo la garantía, Dell se encargará del problema y
pagará el envío por tierra, así como el seguro de ida y venida al centro de
reparación y reemplazo de Dell. El usuario se debe encargar de que el
producto defectuoso esté disponible para ser recogido debidamente
embalado en la caja original o en una caja protectora similar junto con los
detalles que se mencionan anteriormente y el número de devolución
proporcionado al usuario por Dell.
Limitación y derechos estatutarios
Dell no ofrece ninguna otra garantía o declaración similar que la
explícitamente descrita anteriormente y esta garantía se proporciona en
lugar de toda otra garantía, al máximo permitido por la ley. En la ausencia
de leyes aplicables esta garantía será el único y exclusivo recurso del usuario
en contra de Dell o cualquiera de sus socios, y ni Dell ni cualquiera de sus
socios serán responsables por la pérdida de ganancias o contratos, o
cualquier otra pérdida indirecta o por consecuencia que resulte del
descuido, violación de contrato o cualquier otra evento.
Guía de instalación y de referencia rá pida 99
 Loading...