

Page 1

Dell™ Venue
0FTHF5A00
Getting Started Guide
Ring/Silent
button
Slide up to
silence ringer
3.5 mm Headset
connector
connector
MenuMicro-USB
Power/Lock
button
Press and hold
to turn on/off
Volume
buttons
Camera
button
HomeBack
Setting Up Your PhoneAbout Your Phone
1. Remove the back cover.
2. Insert the SIM card and microSD (optional) card.
NOTE: The SIM card and microSD card may be pre-
installed.
3. Insert the battery.
4. Close the back cover and charge the phone.
Charge time:
~2 hours
Lock Screen
The phone enters sleep mode automatically after a preset
duration of inactivity. To wake up the phone from sleep
mode, press the power/lock button.
The lock screen appears
when you wake up the
phone from sleep mode.
To unlock the screen, touch
and drag to the right.
You can set a screen lock
to prevent unauthorized
access of your phone.
To set a screen lock, touch
on the Home screen
and then touch
Settings → Location
& Security→ Set up
screen lock and follow the
instructions on the screen.
Information in this document is subject to change
without notice.
© 2010 Dell Inc. All rights reserved.
Trademarks used in this text: Dell and the DELL logo
are trademarks of Dell Inc.
November 2010 P/N FTHF5 Rev. A00
Printed in China.
Dell Stage
Your phone has seven Home screens that you can customize. The Dell Stage widgets appear on the Home screens and provide quick access to recently used applications, contacts,
music, pictures, and so on.
To navigate across the Home screens, flick your finger to the right or
left on the screen.
The appearance of the
Home screens on your
phone may vary.
MUSIC widget –
Displays the music
albums and playlists
available on your
phone. Touch the
album or playlist to
view the available
songs.
SOCIAL widget –
Allows you to access
social networking
websites such as
Facebook and Twitter.
Center Home screen
HOME widget – Displays
the current weather
and the recently used
applications. Touch to
go to the Stage Home from
anywhere.
CONTACTS widget –
Displays your favorite
contacts as tiles. Touch
a contact’s tile to call,
message, or mail the
contact.
EMAIL widget – Allows
you to send and
receive e-mail from the
e-mail accounts you
have added.
To add a widget,
shortcut, or folder
touch and hold your
finger on an empty
area on the Home
screen, and follow the
instructions on the
screen.
Status Bar
The status bar appears at the top of every screen. It
displays icons to indicate the notifications you have
received, the phone’s status, and the current time.
Notification
area
Notification area – Displays icons for missed calls, new
e-mail, messages, and so on.
Status area – Displays icons for battery charge, charging
progress, alarms set, network connections, and so on.
To open the notifications panel that displays the phone
status and list of notifications, touch the status bar and
drag it down to the bottom of the screen.
Touch a notification in the list to open it in the
appropriate application.
To close the notification panel, touch the tab at
the bottom of the panel and drag it up to the top of the
screen.
Status area
Making calls
You can make a call by selecting a contact from the
contacts list, call log, favorites, or by using the onscreen
dialpad.
Touch on the Home
screen to open the phone
application.
Dial the number using the
onscreen dialpad and touch
to make the call.
To switch to a recently used
application while you are
on a call, touch and hold
and then touch the
application’s icon.
If you open other
applications during a call
and want to return to the
phone application, touch
the status bar and drag it
down to the bottom of the
screen, and then touch
Current call.
Answer or Reject Calls
When you receive a call, the Incoming call screen
displays the caller ID. The Incoming call screen will
display additional information if the caller is available
on your contacts list.
To answer a call,
touch and drag it to
the right of the screen.
To reject a call,
touch and drag it to
the left of the screen.
Page 2
Launch Applications
The Launcher displays all the available applications
on your phone, including any applications that you
downloaded and installed from Android Market or
other sources.
To open the Launcher,
touch on the Home
screen.
Flick the Launcher
screen to the left or right
to view all the available
applications.
To open an application,
touch the appropriate
icon.
To create a shortcut
to an application,
touch and hold the
application’s icon until
your phone vibrates, and
then drag it to another
location on the Home
screen.
Touch Screen Gestures
The multi-touch screen on your phone allows you to use
your finger to move the screen content, scroll through
menus, view photos, and so on.
Flick – Allows you to scroll
through menus or pages, and
move sideways in screens.
Slide a finger quickly in the
direction you want the screen
content to move.
Stretch – Allows you to zoom-in
on websites, maps, or pictures.
Move two fingers away from
each other to enlarge the view of
the screen content.
Pinch – Allows you to zoom-out
on websites, maps, or pictures.
Move two fingers close together
to reduce the view of the screen
content.
Text Input
The onscreen keyboard allows you to enter text. Your
phone may support the Swype feature that allows you to
type a word by sliding your finger continuously over the
keys on the screen.
To type a word using
Swype, touch the first letter
of the word and slide to
the following letters of the
word without lifting your
finger. Lift your finger after
the last letter.
To delete characters to
the left of the cursor,
touch .
NOTE: To learn how to
use Swype, touch the
Swype key and then
touch either Tutorial or
More Tips on the Tips
screen.
To switch between Swype and Android keyboard:
Touch and hold a text field until the 1. Edit text pop-up
window appears.
Touch 2. Input method and then select the keyboard you
prefer.
Messaging
You can use the Messaging feature to exchange text
(SMS) and multimedia (MMS) messages.
To send a new message:
Touch 1. Messaging on
the Home screen or in the
Launcher.
Touch 2. New message.
Type a name or mobile 3.
phone number in the
To field.
Type a message in the 4.
Type to compose field.
NOTE: Touch
to include a subject,
attach a file, or insert
an emoticon.
Touch 5. Send.
NOTE: Messaging automatically converts a message
to an MMS if you send it to an e-mail address, add a
subject, or attach a media file.
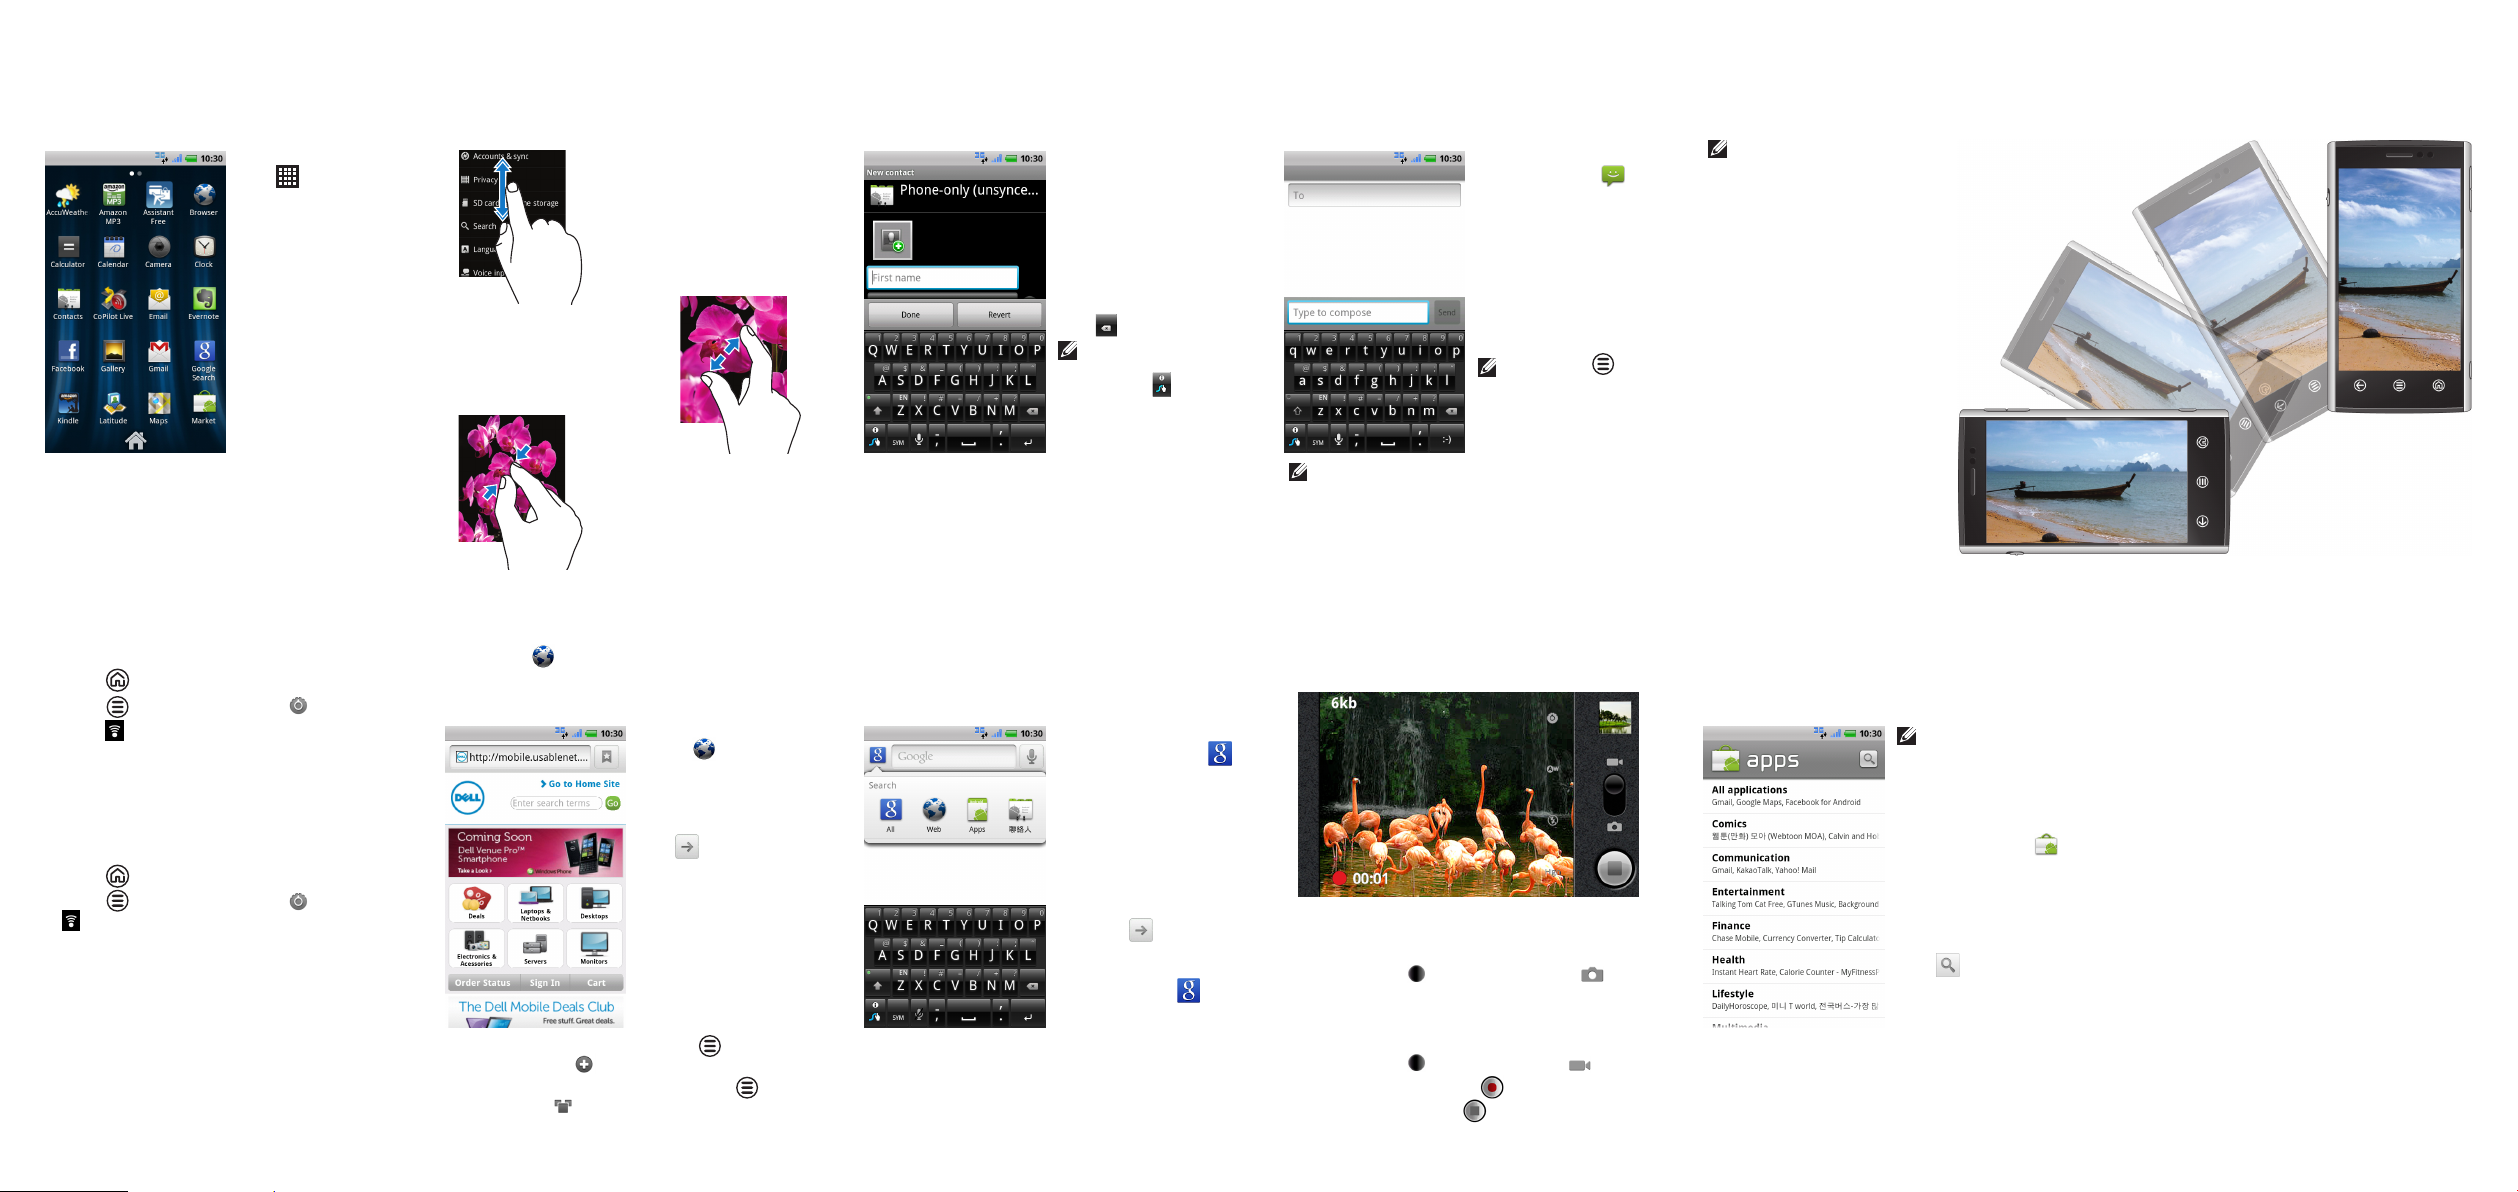
Screen Orientation
The screen reorients automatically depending on the way you hold the phone.
Rotate the phone sideways to change the orientation of the screen from portrait to landscape mode, and vice versa.
In landscape mode, the screen content expands to fit the screen.
NOTE: The Home screens and
Launcher screen always appear
in portrait mode. Applications
downloaded from the Android
Market may not support
automatic screen orientation to
landscape or portrait format.
Wi-Fi and Bluetooth
To turn on Wi-Fi and connect to a network:
Touch 1. to go to the Home screen.
Touch 2. and then touch Settings .
Touch 3. Wireless & networks→ Wi-Fi.
The phone scans and lists the available Wi-Fi
networks.
Touch the network you want to connect to.4.
To turn on Bluetooth and make your phone
discoverable:
Touch 1. to go to the Home screen.
Touch 2. and then touch Settings →
Wireless & networks→ Bluetooth settings.
Touch 3. Bluetooth to turn on Bluetooth.
Touch 4. Discoverable to make your phone
discoverable.
To pair with another Bluetooth device:
Turn on Bluetooth.1.
Touch the ID of the device you want to pair your 2.
phone with and follow the instructions on the
screen.
Internet
The Browser allows you to view web pages and
search for information on the Internet. You can open up
to eight browser windows at a time and switch between
them.
To open the browser, touch
Browser on the Home
screen or in the Launcher.
To go to a web page, enter
the address in the Search
or type URL field, and then
touch .
To scroll through a web
page, slide your finger
on the screen.
To go to a link on a web
page, touch the link.
To zoom-in or -out on
sections of a web page, use
the stretch or pinch gestures.
To open a new browser window, touch and then
touch New window .
To switch to another browser window, touch and
touch Windows and then touch the window you
want to open.
Search
You can search for information and items on your phone
or on the Internet using Google Search.
To start a search:
Touch 1. Google Search
on the Home screen or in
the Launcher.
In the search box, type 2.
the keyword you want to
search.
A list of matching results
appear on the screen.
Touch a matched result 3.
or touch to search
the Internet.
To specify a location for
your search, touch on
the Google Search screen,
and then touch to select
the appropriate option.
Camera
The camera allows you to capture photos and videos and
save them on the microSD card.
To open the camera, press the camera button on the side
of your phone.
To capture a picture:
Touch and drag 1. to the camera position .
Press the camera button half-way to focus, and press 2.
it completely to capture the picture.
To capture a video:
Touch and drag 1. to the video position .
Frame the scene and touch 2. to start recording.
To stop recording, touch 3. .
Android Market
The Android Market provides access to applications and
games you can download and install on your phone.
Open the Android Market to browse for free and paid
applications.
NOTE: Ensure that
you are connected
to the Internet before
you open the Android
Market.
To open the Android
Market, touch Market
on the Home screen or in
the Launcher.
To see the available
applications, touch Apps
and then touch a category.
Touch to search the
market.
To see the items that you
have already downloaded
from the Android Market,
touch Downloads.
Additional Information
You can sync contacts and personal content such
as music and pictures between your phone and a
computer using the Dell Mobile Sync tool. To install
the Dell Mobile Sync tool, run the Sync installer
available on the microSD card.
For more information about the features and
advanced options available on your phone, see the
User’s Manual available on the microSD card.
The Dell Mobile Sync tool and User’s Manual are also
available at support.dell.com/manuals.
 Loading...