

Page 1

TM
User’s Manual
Page 2

Notes, Cautions, and Warnings
NOTE: A NOTE indicates important information that helps you make better use of your smartphone.
CAUTION: A CAUTION indicates either potential damage to hardware or loss of data and tells you how
to avoid the problem.
WARNING: A WARNING indicates a potential for property damage, personal injury, or death.
Information in this document is subject to change without notice.
© 2009 Dell Inc. All rights reserved.
Reproduction of these materials in any manner whatsoever without the written permission of Dell Inc. is strictly forbidden.
Trademarks used in this text: Dell and the DELL logo are trademarks of Dell Inc.; Bluetooth is a registered trademark owned by Bluetooth SIG, Inc.
and is used by Dell under license.
Other trademarks and trade names may be used in this document to refer to either the entities claiming the marks and names or their products. Dell
Inc. disclaims any proprietary interest in trademarks and trade names other than its own.
Designs, images, and other depictions of products may change from when this publication was produced.
July 2009
Page 3

Contents
Contents
Before You Use Your Smartphone 7
Safety Warnings . . . . . . . . . . . . 7
General Statement on RF Energy . . 8
Proper Disposal . . . . . . . . . . . 8
Setting Up Your Smartphone . . . 9
What You Need. . . . . . . . . . . . 9
Activate Phone Service . . . . . . . 9
Setting Up the Smartphone for the First
Time . . . . . . . . . . . . . . . . . 9
Maintaining Your Smartphone. . 13
Charging the Battery . . . . . . . . 13
Removing the Battery . . . . . . . 14
Replacing the Battery . . . . . . . 14
Replacing the SIM Card . . . . . . 15
Replacing the microSD Card . . . . 16
Mini3i Smartphone Accessories . . 18
Mini3i Smartphone Features . . 20
Front View . . . . . . . . . . . . . 20
Back View . . . . . . . . . . . . . 20
Left View . . . . . . . . . . . . . . 21
Right view. . . . . . . . . . . . . . 22
Status Bar. . . . . . . . . . . . . . 23
Using The Touch Screen. . . . . . . . 25
Entering Text or Numbers . . . . . . . 27
Selecting Input Methods . . . . . . 27
Entering Text with Qwerty . . . . . 28
1
Page 4

Contents
Changing the Language . . . . . . 28
Entering Numbers and Symbols . . 29
Exiting the Input Panel . . . . . . . 29
Using FullScreenHandWriting . . . 29
Using the 4x4 Keyboard . . . . . . 31
Understanding Sleep Mode. . . . . . 32
Understanding Phone Lock . . . . . . 32
Using the Home Screen . . . . . . . . 34
Connecting to the Internet . . . . . . 36
Selecting Cellular Data Networks . 36
Understanding Phone Basics. . . . . 36
Display Settings . . . . . . . . . . 37
Date & Time Settings . . . . . . . . 39
2
Location Settings . . . . . . . . . . 42
Language Settings . . . . . . . . . 43
Profile Settings . . . . . . . . . . . 44
Mini3i Smartphone . . . . . . . . 48
Using the Dialer. . . . . . . . . . . . 48
Answering an Incoming Call . . . . 53
Accessing the Call Log. . . . . . . . 54
Understanding Call Settings. . . . . 55
Fixed Dial Number (FDN) list . . . . 57
Call Barring . . . . . . . . . . . . . 58
Call Forwarding . . . . . . . . . . . 59
Other Basic Call Settings . . . . . . 60
Using Speed Dial . . . . . . . . . . 61
Page 5

Contents
Editing SMS Messages For Rejected
Calls . . . . . . . . . . . . . . . . 62
Using Voicemail . . . . . . . . . . 62
Using The In-call Timer. . . . . . . 63
Understanding Smartphone Settings 63
Managing Bluetooth Connections . 63
Understanding Network Settings . . 65
Configuring Mobile Networks . . . 65
Setting Security Options . . . . . . . 66
Managing SD Card and Phone Storage
67
Using Internet Features . . . . . . 68
Available Monternet Services . . . . 68
Using the Internet Browser . . . . . . 68
Go to URL . . . . . . . . . . . . . . 68
Zoom In and Zoom Out . . . . . . . 70
Window Overview . . . . . . . . . 72
Bookmarks . . . . . . . . . . . . . 72
Accessing Browser Options . . . . . 75
Changing Browser Settings . . . . . . 76
Using Email Features . . . . . . . 78
Introducing 139 Mail . . . . . . . . . . 78
Managing Email Accounts . . . . . . 79
Adding an Account From 139 Mail, 21cn,
or Gmail . . . . . . . . . . . . . . . 79
Setting Up and Editing Accounts . . 80
3
Page 6

Contents
Removing an Account . . . . . . . 82
Managing Email Messages . . . . . . 82
Sending Emails . . . . . . . . . . . 82
Receiving Emails . . . . . . . . . . 83
Deleting Messages . . . . . . . . . 84
Deleting Email Permanently . . . . 85
Using Fetion . . . . . . . . . . . . . . . 85
Managing Your Fetion Account and
Messages. . . . . . . . . . . . . . 86
Changing Fetion Settings . . . . . . . 87
Using My Favorites . . . . . . . . . 88
Browsing and Playing Music . . . . . 88
Managing Music Files . . . . . . . . . 89
4
Creating a Playlist. . . . . . . . . . 89
Managing Playlists . . . . . . . . . 91
Creating Ringtones From Songs . . 91
Understanding the Music Player . . 92
Browsing and Playing Videos . . . . 93
Managing Videos . . . . . . . . . . 94
Using the Video Player . . . . . . . 97
Using the Picture Application . . . . 97
Browsing Pictures . . . . . . . . . 98
Managing Picture Files . . . . . . 100
Changing Picture Settings . . . . 102
Using the Camera. . . . . . . . . . . 104
Camera mode . . . . . . . . . . . 104
Using Video Recording Mode. . . 105
Page 7

Contents
Using the Recorder Application . . 106
Using Applications . . . . . . . . 107
Messaging . . . . . . . . . . . . . . 107
To read unread messages . . . . 107
To reply to a message . . . . . . 107
To send messages to your contacts 107
To add more to messages . . . . 109
To open Folder View . . . . . . . 110
To backup messages . . . . . . . 110
To restore data . . . . . . . . . . 111
Messaging Settings . . . . . . . 112
Expire Time . . . . . . . . . . . . 113
Request Read Reports . . . . . . 113
Auto-retrieval . . . . . . . . . . 113
Auto-retrieval while roaming . . 114
Data Connection . . . . . . . . . 114
Service Center . . . . . . . . . . 115
Signature . . . . . . . . . . . . . 115
Calendar . . . . . . . . . . . . . . . . 116
Calendar Views . . . . . . . . . . 116
Using the Calendar . . . . . . . . 119
Hide declined events . . . . . . . 120
Set default view . . . . . . . . . 121
Set alerts & notifications . . . . . 121
Set default reminder . . . . . . . 122
Alarm Clock . . . . . . . . . . . . . . 122
Calculator . . . . . . . . . . . . . . . 126
File Manager . . . . . . . . . . . . . 126
5
Page 8

Contents
Notes. . . . . . . . . . . . . . . . . . 132
To Do List . . . . . . . . . . . . . . . 135
World Clock . . . . . . . . . . . . . . 136
Clock setting . . . . . . . . . . . 138
Applications. . . . . . . . . . . . . . 138
Program Manager . . . . . . . . 138
Toolbox . . . . . . . . . . . . . . 138
Search . . . . . . . . . . . . . . . . . 138
Using Search . . . . . . . . . . . 139
Select search preferences . . . . 139
Advanced search. . . . . . . . . 139
Index statistic. . . . . . . . . . . 140
Backup. . . . . . . . . . . . . . . . . 140
6
Backup . . . . . . . . . . . . . . 140
Restore . . . . . . . . . . . . . . . . . 141
DCD . . . . . . . . . . . . . . . . . . . 141
DCD Settings . . . . . . . . . . . . . 142
Connection . . . . . . . . . . . . 142
Scrolling. . . . . . . . . . . . . . 142
Read-Items Display . . . . . . . . 142
Close DCD Window . . . . . . . . 142
PC Sync Tool. . . . . . . . . . . . . . 142
Installing PC Sync Application . . 142
Connecting the smart phone . . . 143
Using the PC Sync Tool . . . . . . 144
Index . . . . . . . . . . . . . . . . . . . . . 146
Page 9

Before You Use Your Smartphone
Before You Use Your Smartphone
Safety Warnings
Read the following safety warnings carefully before
using your cell phone.
• This equipment is intended for use with
power supplied from supplied battery
charger(s) and/or power supply unit(s). Other
usage will invalidate any certification given
to this product and may be dangerous.
• Switch off your cell phone when in an
aircraft. The use of cellphone in an aircraft
may be dangerous to the operation of the
aircraft, could disrupt cellular networks, and
may be illegal. Failure to observe this
instruction may lead to suspension or denial
of cell phone services to the offender, legal
action, or both.
• Do not use the cell phone or cell phone
equipment when at a refueling point or gas
station.
• Observe restrictions on the use of radio
equipment in fuel depots, gas stations,
chemical plants, or where blasting
operations are in progress.
• You MUST exercise proper control of your
vehicle at all times. Observe the following
safety precautions when driving:
• Do not use a hand-held telephone or
microphone while you are driving.
• When driving, find a safe place to stop
the vehicle before using the cell phone.
• Do not speak into a hands-free
microphone if it will distract you from
driving.
7
Page 10
Before You Use Your Smartphone
• You MUST NOT stop on the hard
shoulder of a motorway to answer or
make a call, except in an emergency.
NOTE: In some areas where electric
current fluctuates, it is recommended
that you plug the charger to an AVR
(AC Voltage Regulator) instead of a
direct connection to a power outlet.
Fluctuation in the electric current may
damage the charger and/or the
device.
General Statement on RF Energy
Your phone contains a transmitter and a receiver.
When it is on, it receives and transmits radio
frequency (RF) energy. When you communicate
with your phone, the system handling your call
controls the power level at which your phone
transmits RF energy.
8
Proper Disposal
The symbol of the crossed out bin
indicates that the product
(electrical and electronic
equipment) should not be placed
in municipal waste. Please check
local regulations for disposal of
electronic products.
Page 11

Setting Up Your Smartphone
Setting Up Your Smartphone
Congratulations on the purchase of your Dell Mini
3i. Please ensure that you read this manual
carefully and keep it in a safe place for future
reference.
What You Need
To use all of the phone features, you need:
• A wireless service plan with a carrier
• An Internet connection
• A computer with a USB 2.0 port
Activate Phone Service
Before you can use any of the phone features, you
must activate the phone. To activate the phone you
must:
• Sign up for a service plan with a service
carrier in your area
• Register the phone with the network
If you purchased this phone from a service carrier,
activation may have been done during the
purchase.
Setting Up the Smartphone for the First Time
The phone ships with some components uninstalled
(such as the battery and sometimes SIM card). You
will need to install these parts and charge the
battery before you can use your smartphone.
To set up your phone for the first time:
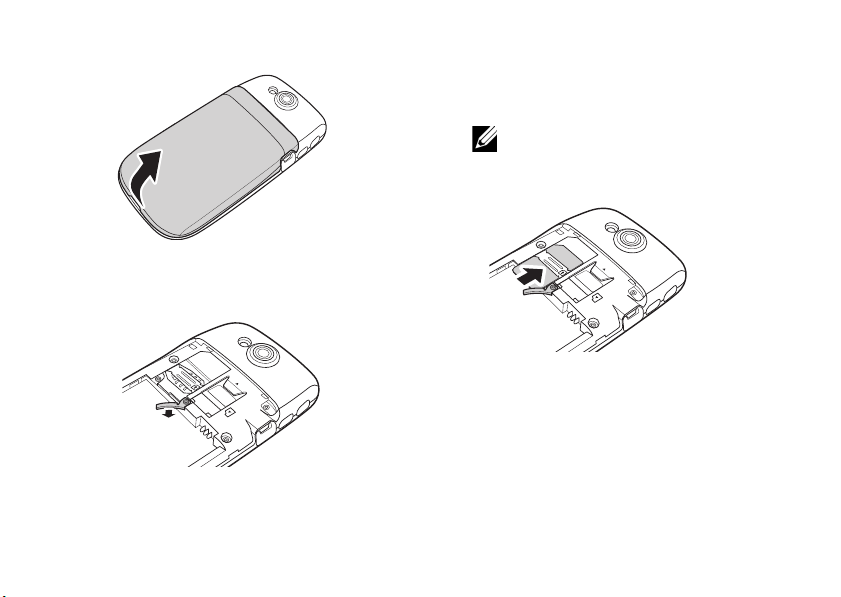
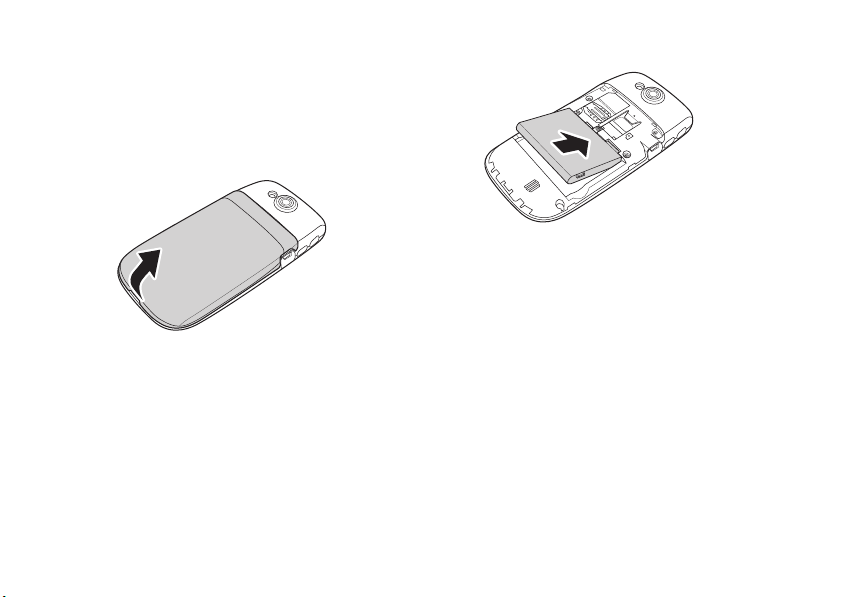
1 Open the cover.
Slide a finger into the finger slot, then lift and
remove the cover.
9
Page 12
Setting Up Your Smartphone
P
R
E
S
S
b Hold the SIM card with the metal
contacts facing down and insert the
card into the SIM card holder.
NOTE: To ensure proper installation,
align the cut corners in the card and
the SIM card slot.
2 Install the SIM card.
a Rotate the SIM card lock outwards.
10
P
R
E
S
S
Page 13
Setting Up Your Smartphone
P
R
E
S
S
P
R
E
S
S
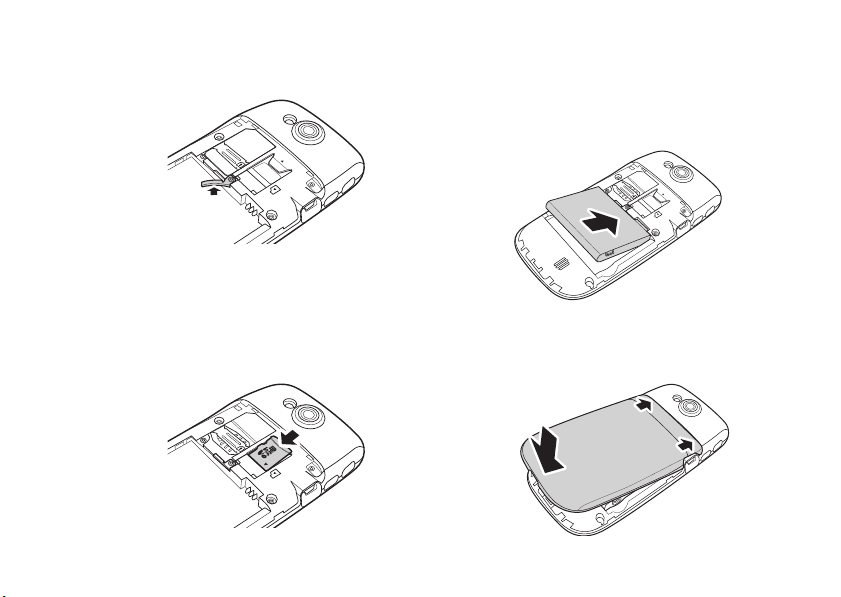
c Rotate the SIM card lock back into
place to lock the SIM card.
3 Install the microSD card.
a Hold the microSD card with the metal
contacts facing down.
b Slide the microSD card into the
microSD card holder.
4 Install the battery.
Align the metal contacts on the battery with
the contacts on the battery holder and insert
the battery.
PRESS
5 Close the cover.
Insert the tabs on the cover into the slots on
the phone and snap the cover in place.
11
Page 14

Setting Up Your Smartphone
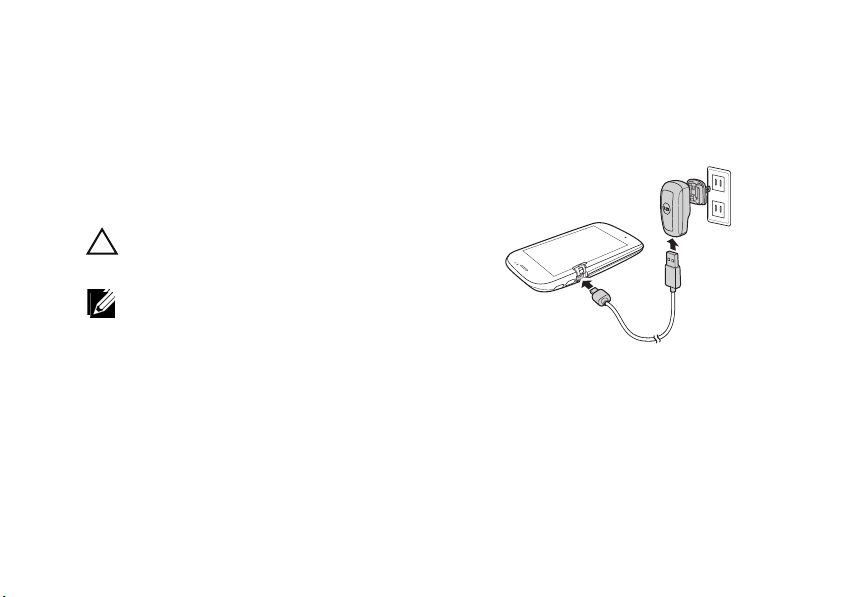
6 Charge the battery.
CAUTION: Do not use any non-approved
chargers as they may damage your phone
and invalidate any warranties.
NOTE: It takes at least one charging-
discharging cycle for the battery to reach its
peak performance.
a Using the Mini-USB to USB cable, plug
the power adapter into a power outlet
and then into your phone.
12
b Charge your phone for at least 2 hours.
Ensure that your phone is fully charged
by checking the charge indicator on the
status bar.
7 Turn on your phone.
Press and hold the power button for two
seconds.
Page 15
Maintaining Your Smartphone
Maintaining Your Smartphone
This section provides information on charging the
battery and replacing components (SIM card,
microSD card, and battery) in your smartphone.
Charging the Battery
CAUTION: Do not use any non-approved
chargers as they may damage your phone
and invalidate any warranties.
NOTE: It takes at least one chargingdischarging cycle for the battery to reach its
peak performance.
1 Ensure the battery is installed.
2 Using the Mini-USB to USB cable, plug the
power adapter into a power outlet and then
into your phone.
3 Charge your phone for 2 hours. Ensure that
the phone is fully charged.
4 When charging is complete, press the power
button for 2 seconds to exit the charge
screen.
13
Page 16
Maintaining Your Smartphone
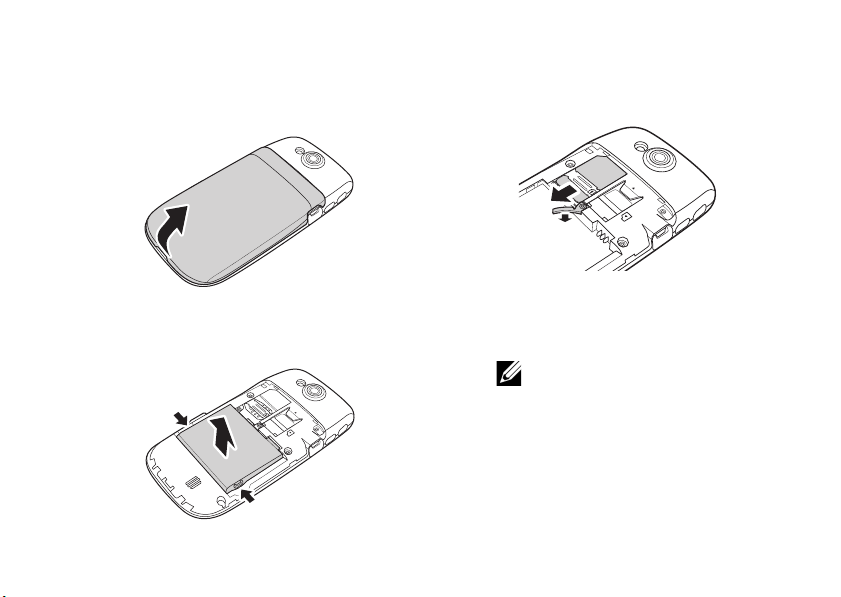
Removing the Battery
1 Slide a finger into the finger slot, and then lift
to remove the cover.
2 Slide fingers into the finger slots, and then lift
to remove the battery.
3 Side fingers into the finger lots, and then lift
to remove the battery
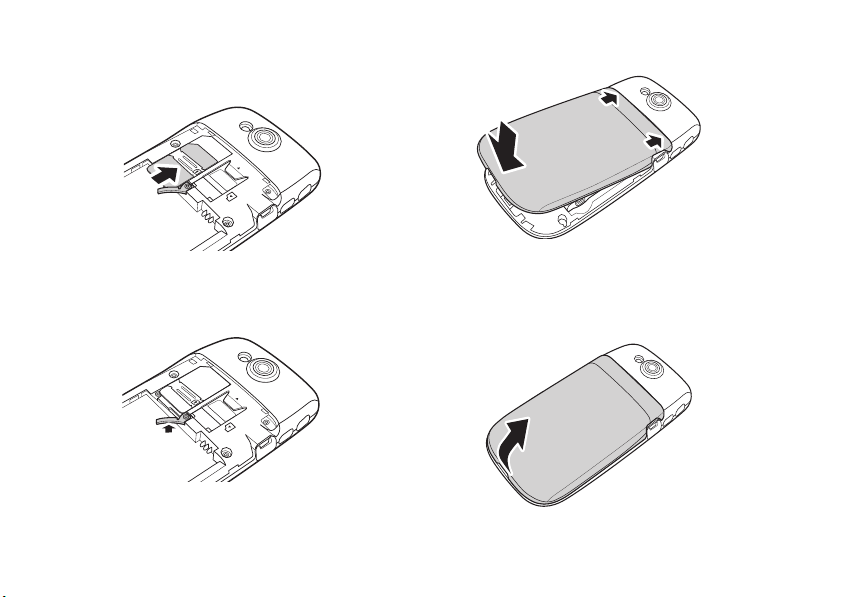
Replacing the Battery
1 Align the metal contacts on the battery with
the contacts on the battery holder and insert
the battery.
14
PRESS
2 Close the cover.
Page 17
Maintaining Your Smartphone
PRESS
Replacing the SIM Card
1 Slide a finger into the finger slot, and then lift
to remove the cover.
2 Remove the battery from the battery holder
(see "Removing the battery" on page 14).
3 Rotate the SIM card lock outwards to
release the lock and then slide the SIM card
out of the SIM card holder.
P
R
E
S
S
4 Hold the SIM card with the metal contacts
facing down and insert the card into the SIM
card holder.
NOTE: To ensure proper installation,
align the cut corners in the card and
the SIM card slot.
15
Page 18
Maintaining Your Smartphone
P
R
E
S
S
5 Insert the SIM card into the SIM card holder.
Make sure it goes in completely.
P
R
E
S
S
6 Rotate the SIM card lock back into place to
lock the SIM card.
7 Close the cover.
16
Replacing the microSD Card
1 Slide a finger into the finger slot, and then lift
to remove the cover.
Page 19
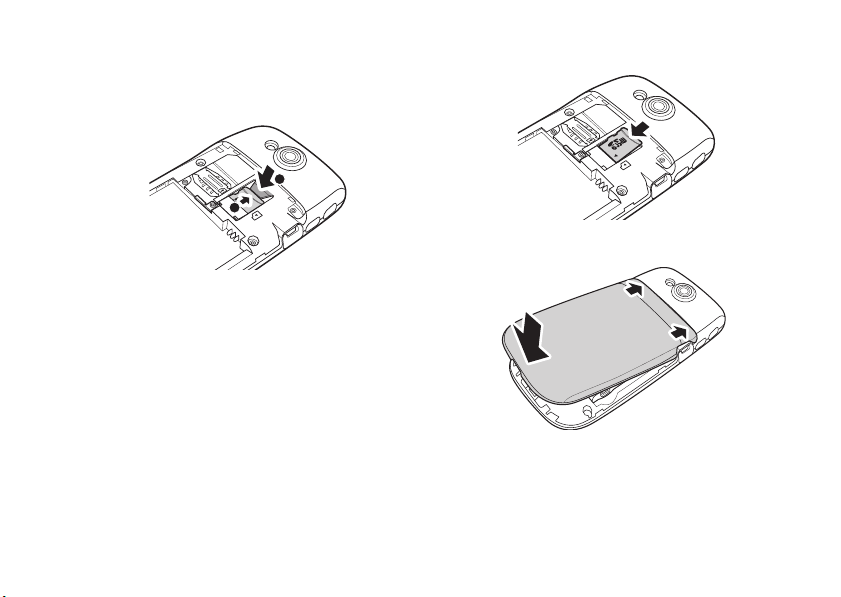
2 Press down on the release tab at the top of
P
R
E
S
S
B
A
P
R
E
S
S
the microSD card holder, and then slide the
microSD card out.
3 Hold the microSD card with the metal
contacts facing down.
4 Slide the microSD card into the microSD
card holder. Ensure that the microSD card
goes in completely
Maintaining Your Smartphone
5 Close the cover.
17
Page 20
Maintaining Your Smartphone
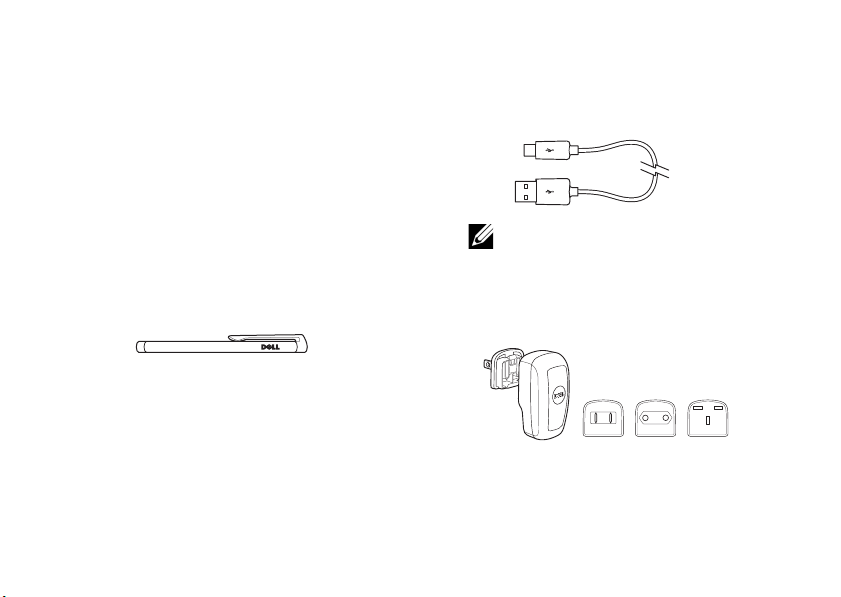
Mini3i Smartphone Accessories
Your smartphone may ship with the following
accessories:
• Mini-USB headset — allows you to listen to
music or a phone conversation. Callers hear
you through the integrated microphone. To
use the headset, connect it to the Mini-USB
port (see
“Left View” on page 21).
• Stylus — allows you to quickly enter text
using the on-screen keyboards and
handwriting tools (see
Methods” on page 27).
18
“Selecting Input
• USB to Mini-USB data cable — allows you to
connect your smartphone to a computer for
file transfers and data synchronization (see
“PC Sync Tool” on page 142).
NOTE: The USB to Mini-USB cable is
also use to connect to the power
adapter to charge the battery.
• Power adapter — use to charge the battery
(see
“Charging the Battery” on page 13).
TOP
TOP
CAUTION
RISK OF ELECTRIC SHOCK
DRY LOCATION USE ONLY
TOP
CAUTION
RISK OF ELECTRIC SHOCK
DRY LOCATION USE ONLY
CAUTION
RISK OF ELECTRIC SHOCK
DRY LOCATION USE ONLY
Page 21

NOTE: The type(s) and number of the
power adapter plug head(s) that
shipped with your smartphone may
vary depending on the country where
you purchased the phone.
• Microfiber pouch — allows you to store the
phone for protection when not in use, and to
clean the screen as needed.
CAUTION: Do Not use solvents, water, or
other liquids to clean your smartphone. The
included pouch is designed to be used dry.
Liquids may damage your smartphone and
invailidate any warranties.
Maintaining Your Smartphone
19
Page 22
Mini3i Smartphone Features
1
2
3
1
2
3
Mini3i Smartphone Features
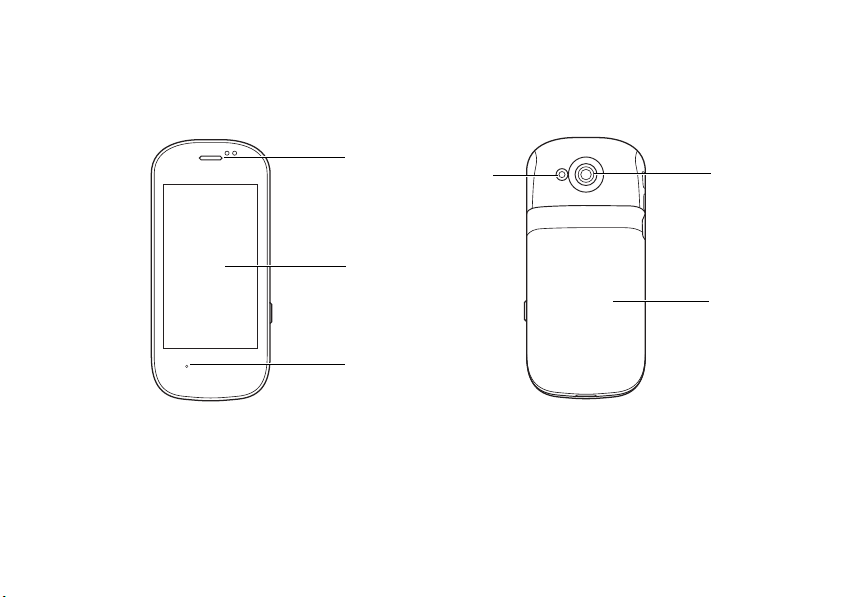
Front View Back View
1 Speaker — Use to listen to phone
conversations.
2 LCD Panel — Displays phone images.
3 Microphone — Use for voice calls.
20
1 Camera — Use to take photos and capture
video.
2Cover — Covers the battery, SIM card, and
microSD card holders.
3 Camera flash — Use to take photos in dim light.
Page 23
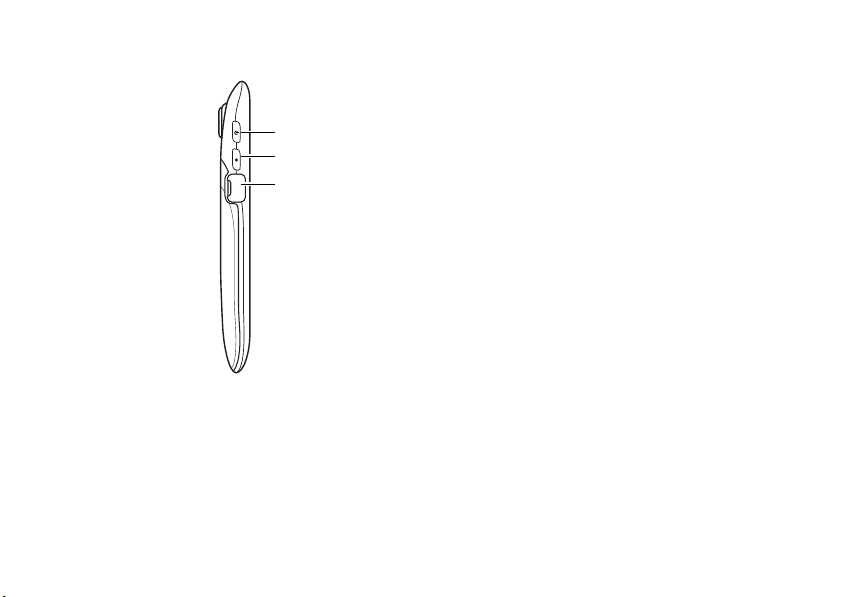
Left View
1
2
3
Mini3i Smartphone Features
1 Power/Lock button — Short press (when the
display is active): locks or unlocks the display.
Short press (when the display is in sleep mode):
wakes up the display.
MINI USB
Long Press: PowerOn/Power Off.
2 Home/Back button — Short press: navigate
back one screen at a time.
Long press: return to the Home screen.
3 Mini-USB Port — Use to charge the phone,
connect to a computer, or connect to a headset.
21
Page 24

Mini3i Smartphone Features
1
4
2
3
Right view
22
1 Volume up — Press to increase the volume
level.
2 Volume down — Press to decrease the volume
level.
3 Options button — Short press to open the
Options menu.
4 Camera button — Press to activate the camera
and take photos or capture video.
Page 25
Mini3i Smartphone Features
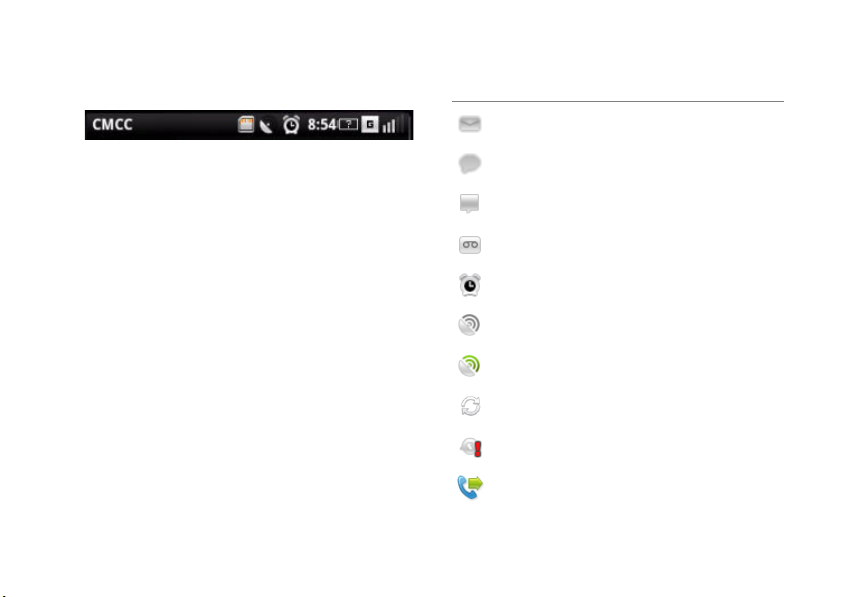
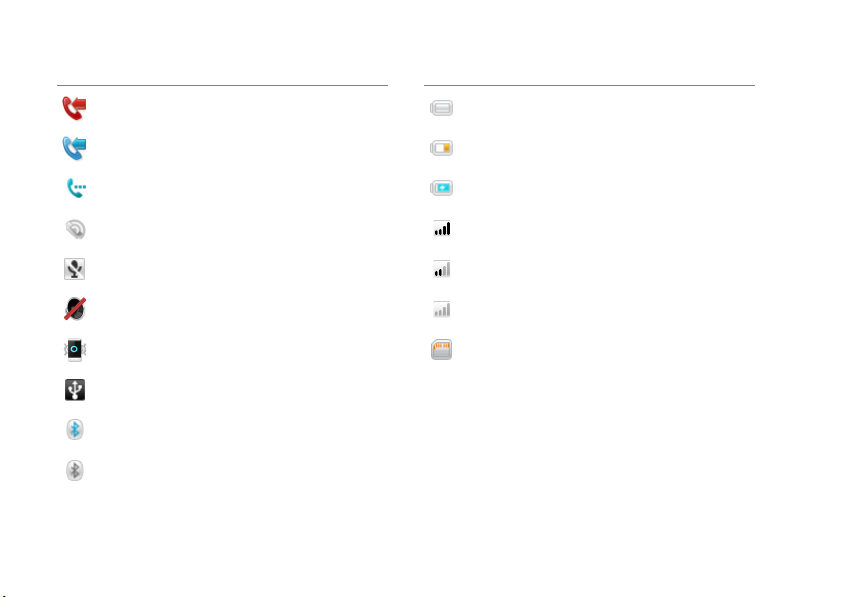
Status Bar
The status bar appears at the top of the screen.
Icons appear on the status bar to notify you of a
new message, upcoming calendar event, alarm, or
other information important to you.
The following table outlines status icons:
Status Icons
Icon Information
New email
New SMS or MMS
New instant message
New voicemail
Alarm is set
GPS is enabled
GPS is connected
Sync
Sync error
Outgoing call
23
Page 26
Mini3i Smartphone Features
Icon Information
Missed call
Incoming call
Call forwarding is active
Speakerphone is on
Microphone is on mute
Silent mode
Vibrate mode
USB is connected
Bluetooth is connected
Bluetooth is enabled
24
Icon Information
Battery charge is full
Battery charge is 20%
Battery is charging
Full signal strength
Half signal strength
No signal
microSD card is installed
Page 27
Using The Touch Screen
2
3
1
This section provides instructions to use the touch
screen.
• Selection — To select an item or open an
application, tap the item or application with
your fingertip.
To go back to the previous screen, tap the
Back icon.
To go back to the home screen, tap the Home
icon.
Mini3i Smartphone Features
1 Home icon
2 Back icon
3 Options panel
25
Page 28

Mini3i Smartphone Features
• Options panel — Provides additional options
for the currently selected application. Tap
and hold an option for a second, and then
release to view a pop-up menu of the
available functions.
• Pop-up menu — Lists the functions available
for the currently selected application. You
can scroll up or down within the menu of all
the available functions are not visible on the
screen.
• Zoom in/Zoom out — To zoom in or out on the
current screen, use the zoom icons of the
program you are using.
NOTE: In Browser and Picture Viewer
modes, multi touch is enabled to
enlarge or minimize the images on
the screen.
• Drag items —
To move an item on the screen, tap
and drag the item to the desired
position.
26
• Scroll up or down —
To scroll up or down in a list or on
a page on the screen, slide your
finger up or down on the screen.
• Scroll right/left —
To scroll right or left in a menu
or to go back to the previous
menu, slide your finger to the
right or left on the screen.
Page 29
Entering Text or Numbers
1
2
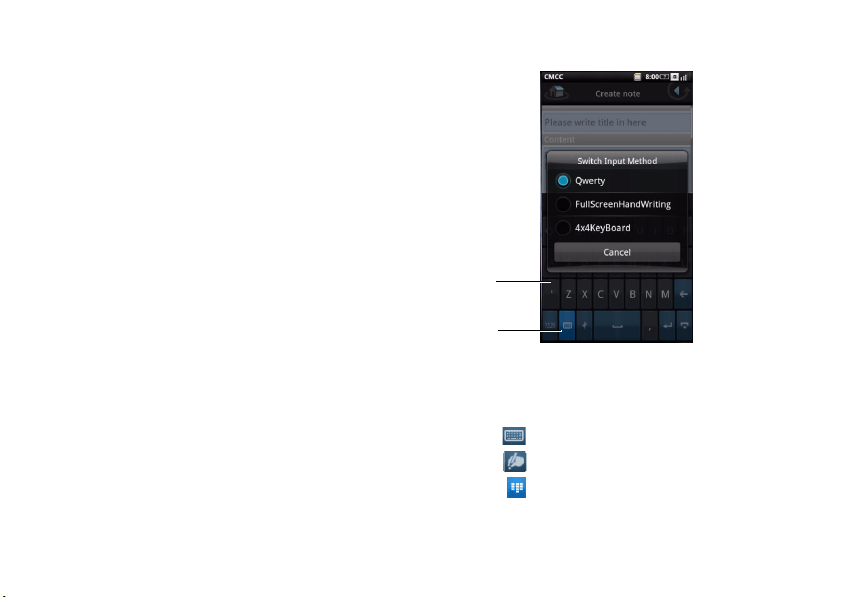
When you start a program or select a field that
requires text or numbers, the input panel appears
automatically. You can select an input method and
start inputting the text. The phone may
automatically suggest vocabularies or commonly
used phrases as you enter text.
Your phone supports inputs in multiple languages,
and provides the following input methods:
•Qwerty
• FullScreenHandWriting
• 4x4KeyBoard
Mini3i Smartphone Features
Selecting Input Methods
1 Tap a text field, such as in a note or new
contact, to open the input panel.
2 Tap the Switch Input Method icon to open
the Switch Input Method screen.
3 Tap the input method you prefer.
1 Input panel
2 Switch Input Method icon
Keyboard
Full screen handwriting
4 x 4 Keyboard
27
Page 30
Mini3i Smartphone Features
1
1
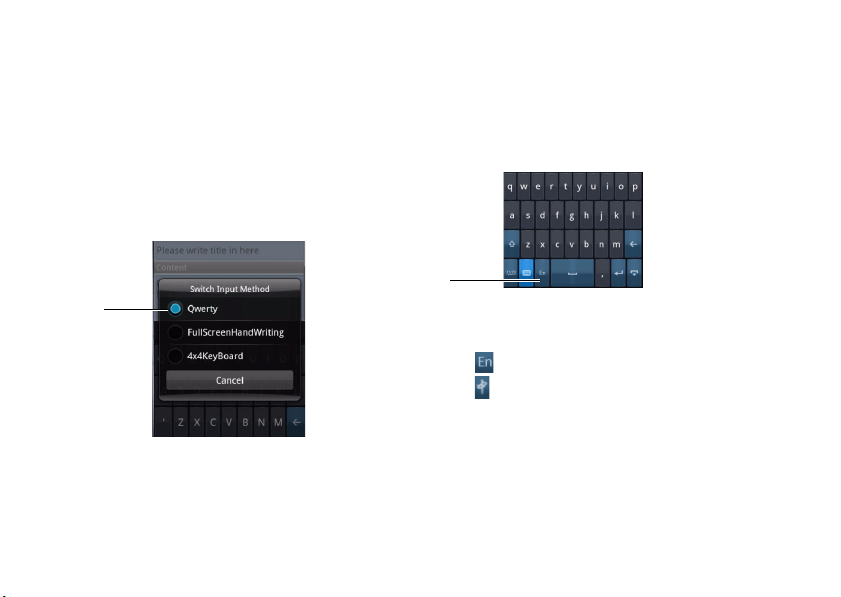
Entering Text with Qwerty
As you type, each letter appears above your thumb
or finger. The letter is not entered until you release
your finger from the key.
1 Tap a text field, such as in a note or new
contact, to open the input panel.
2 Tap the Switch Input Method icon and select
Qwerty as your input method.
1 Switch Input Method menu
28
3 Tap keys on the keyboard to enter text.
Changing the Language
Tap the Language icon to switch between English
and Simplified Chinese.
1 Language icons
English
Simplified Chinese
Page 31

Mini3i Smartphone Features
1 2
Entering Numbers and Symbols
Tap the Numbers and Symbols icon to change the
input to numbers and symbols.
1 Numbers and Symbols icon
2 Exit icon
Exiting the Input Panel
Tap the Exit icon to exit the input panel.
Using FullScreenHandWriting
FullscreenHandwriting allows you to write across
the entire screen.
1 Tap a text field, such as in a note or new
contact, to open the input panel.
2 Tap the Switch Input Method icon and select
FullScreenHandWriting as your input
method.
3 Use a stylus or your finger to write anywhere
on the screen. The handwriting will be
converted to text shortly after you lift the
stylus or your finger from the screen.
29
Page 32

Mini3i Smartphone Features
1
1 Screen
30
Switch Input Method icons
Tap the Language icon to switch between
English and Simplified Chinese.
Tap the Numbers and Symbols icon to change
the input to numbers and symbols.
Tap the Exit icon to exit the input panel.
Page 33

Using the 4x4 Keyboard
1
In the 4x4Keyboard, you can either enter text by
entering letters similar to texting on a numeric
keypad.
1 Tap a text field, such as in a note or new
contact, to bring up the input panel.
2 Tap the Switch Input Method icon and select
4x4Keyboard as your input method.
3 Use a stylus or your finger to touch a key on
the keypad. Characters, numbers, or symbols
appear around the keyboard.
Mini3i Smartphone Features
1 Text for the selected key appears in the
highlighted area
4 Continue touching the key to toggle different
characters, numbers, or symbols.
5 Tap the desired character, number or symbol
to insert the it immediately.
6 Tap the Exit icon to exit the input panel.
31
Page 34

Mini3i Smartphone Features
Understanding Sleep Mode
After a period of inactivity, your screen will go to
sleep (no image appears on the display). In sleep
mode, your phone uses lesser battery power.
Waking up the phone
To wake up the phone, press the Power On/Off or
the Back/Home button.
32
Understanding Phone Lock
While not on a call, you can lock your control
buttons and the screen for security and to avoid
accidental touch activation.
Locking the phone
1 Tap the Settings icon on from the Home
screen and then tap Security, Phone Lock
Settings to open Phone Lock Settings
screen.
2 Enable the Phone lock function by checking
the Phone lock checkbox.
3 Enter a 4-8 digits phone lock password.
Page 35

Unlocking the phone
Mini3i Smartphone Features
4 Tap OK to save and exit to the previous
screen.
5 Select Lock now to lock your phone.
1 Enter the 4-8 digits phone lock password. 2 Tap Unlock to unlock your phone.
33
Page 36

Mini3i Smartphone Features
The Home screen provides you access to all of the applications available on your phone. The following
applications are available on your phone:
Using the Home Screen
Applications Descriptions
Mobile Music Provides a rich mobile music experience with playlist management for both
Fetion Send free messages to friends, enjoy low charge voice group chatting and file
online music and local music.
interchange between cell phones and computers.
139Mail 139Mail allows you to use your phone number as an email account to send and
receive messages via Internet, SMS, MMS, or WAP mobile Internet access.
Monternet Provides links to portals for sports, entertainment, news, ringtones, games,
Browser Used to access the World Wide Web.
Settings Set up connections, networks, basic functions, and applications.
Dialer Make calls and access recent callers and all your contacts. Or dial manually
Messaging Send and receive SMS text messages.
34
images, video, and so on.
using the numeric keypad.
Page 37

Mini3i Smartphone Features
Applications Descriptions
Calendar Set alerts to remind you of events, appointments, and deadlines.
Contacts View, search, add, change, or delete contacts.
My Favorites Includes Music, Videos, Pictures, Magic Box and other files
Sound recorder Allows you to record audio.
Alarm Set up, add or delete alarms.
Calculator Allows you to perform simple calculation.
File Manager Access, use, and manage the files on the phone or the MicroSD card.
Notes Allows you to record notes.
To Do List Time management program that allows you to add time, date, priority, and status
World Clock View the time in cities around the world by adding clocks of your favorite cities.
Search Search for contents on the phone or the SIM card.
Backup Back up the data on your phone so you can restore the original data after a data
Applications
to your tasks.
loss.
Includes Program Manager and Tool Box applications.
35
Page 38

Mini3i Smartphone Features
1
Moving Items On the Home Screen
1 To move an item from your Home screen,
touch and hold the item until the delete icon
appears.
1 Delete icon
2 Hold and drag the item to its new location.
36
Remove items from the Home screen
1 To remove an item from your Home screen,
touch and hold the item until the delete icon
appears.
2 Tap the delete icon to remove the selected
sitem.
Connecting to the Internet
Your phone connects to the Internet using a cellular
data network.
Selecting Cellular Data Networks
You may connect to the Internet through EDGE or
GPRS networks. Check the carrier’s network
coverage in your area for availability.
Understanding Phone Basics
This section provides information about changing
the basic settings on your phone.
Page 39

Mini3i Smartphone Features
Tap the Settings icon on the Home page to open the
Settings screen.
Display Settings
Display settings allow you to adjust the screen
brightness, screen timeout, and screen lock
settings.
To enable the auto brightness:
1 In the Home screen, tap the Settings icon on
the Home page to open the Settings screen.
2 In the Phone basics section, tap Display
Settings to open the Display Settings screen.
3 In the Brightness settings section, tap the
Auto Brightness check box to enable auto
brightness.
37
Page 40

Mini3i Smartphone Features
1
To set brightness manually:
1 In the Home screen, tap the Settings icon on
the Home screen to open the Settings
screen.
2 In the Phone basics section, tap Display
settings to open the Display settings screen.
3 In the Brightness settings section, tap
Brightness to open the Brightness panel.
NOTE: Ensure that the Auto
Brightness check box is not selected
38
4 Use your finger or stylus to move the slider
on the Brightness panel to the left or right to
adjust the brightness.
1 Slider
5 Tap OK to save and exit the Brightness panel.
Page 41

Mini3i Smartphone Features
To set up screen time out:
1 In the Home screen, tap the Settings icon on
the Home screen to open the Settings
screen.
2 In the Phone basics section, tap Display
settings to open the Display settings screen.
3 In the Other Display settings section, tap
Screen timeout to open the Screen timeout
panel.
4 Tap the time you wish the phone to turn off
the screen after idle. The available options
are 15 seconds, 30 seconds, 1 minute, 2
minutes, 10 minutes and Never timeout.
5 Tap OK to save and exit the Screen timeout
panel.
Date & Time Settings
Date and time settings allow you to set date, time,
time zone, and formats.
To set dat e :
1 In the Home screen, tap the Settings icon to
open the Settings screen.
2 In the Phone basics section, tap Date & time
settings to open the Date & time settings
screen.
39
Page 42

Mini3i Smartphone Features
3 In the Set Date and Time section, tap Set
date to open the Change date panel.
4 Slide your finger up or down on each field to
change the date, month, or year.
5 Tap Save to save your changes and exit the
Change date panel.
To set time zone:
1 In the Home screen, tap the Settings icon on
the Home screen to open the Settings
screen.
40
2 In the Phone basics section, tap Date & time
settings to open the Date & time settings
screen.
3 In the Set Date and Time section, tap Set
time zone to open the Set time zone screen.
4 Slide your finger up or down on the screen to
view the entire country/time zone list.
5 Tap the time zone you desire to select the
time zone.
Page 43

Mini3i Smartphone Features
To set time:
1 In the Home screen, tap the Settings icon on
the Home screen to open the Settings
screen.
2 In the Phone basics section, tap Date & time
settings to open the Date & time settings
screen.
3 In the Set Date and Time section, tap Set
time to open the Change time panel.
4 Slide your finger up or down on the hour and
the minute fields to change the time and am
or pm field.
5 Tap Save to save your changes and exit the
Change time panel.
To use the 24-hour format:
1 In the Home screen, tap the Settings icon on
the Home screen to open the Settings
screen.
2 In the Phone basics section, tap Date & time
settings to open the Date & time settings
screen.
3 Tap to select the Use 24-hour format
checkbox to use 24-hour format.
41
Page 44

Mini3i Smartphone Features
Select date format:
1 In the Home screen, tap the Settings icon on
the Home screen to open the Settings
screen.
2 In the Phone Basics section, tap Date & time
settings to open the Date & time settings
screen.
3 Tap Select date format to open the Select
date format panel.
4 Tap the date format you prefer from the list.
42
5 Tap OK to save and exit the Select Date
Format panel.
Location Settings
Select sources for determining location.
To set location:
1 In the Home screen, tap the Settings icon on
the Home screen to open the Settings
screen.
2 In the Phone basics section, tap My Location
to open the My Location screen.
3 Tap to select the appropriate check boxes to
turn on the mobile networks or GPS
satellites.
Page 45

Mini3i Smartphone Features
Language Settings
To select the language to display:
1 In the Home screen, tap the Settings icon to
open the Settings screen.
2 In the Phone basics section, tap Language,
Select Language to open the Language
screen.
3 Tap Select language to select the language
you prefer from the list including English or
Simplified Chinese. The screen exits
automatically after your selection.
To activate the input methods:
1 In the Home screen, tap the Settings icon to
open the Settings screen.
2 In the Phone basics section, tap Language to
open the Language screen.
3 Tap Input methods to open the Input methods
screen.
4 Tap the checkboxes to check the input
methods you want to activate.
5 Tap the Back icon to save and exit the Input
methods screen.
43
Page 46

Mini3i Smartphone Features
1
Profile Settings
You can use profile settings to set your phone to
certain preset configurations.
To select a profile to use:
1 In the Home screen, tap the Settings icon on
the Home screen to open the Settings
screen.
2 In the Phone Basics section, tap Profiles to
open the Profiles screen. The Profile icon
appears next to the selected profile. Profiles
include Normal, Vibrate, Silent, Meeting,
Airplane mode, and Sleeping.
44
.
1 Profile icon
3 Tap the profile you prefer to enter the Edit
Profile screen.
Page 47

Mini3i Smartphone Features
1
4 You may set up the individual settings by
tapping the options on the menu including
6 In the Options panel, tap Select to activate
the selected profile and exit the screen.
Alert Style, Volume, Ringtone, Message
Alert, Email Alert, Calendar Alert, Alarm
Alert, Reminder Alert, and Fetion Alert.
5 Press the Options button on the phone to
1 Options panel
open the Options panel at the bottom.
45
Page 48

Mini3i Smartphone Features
To set up profiles:
1 In the Home screen, tap the Settings icon on
the Home screen to open the Settings
screen.
2 In the Phone Basics section, tap Profiles to
open the Profiles screen.
3 Tap the profile you want to set up to enter the
Edit Profile screen.
4 Set up alert style, volume, and ring tones for
different events by tapping an option from
the list.
• Alert Style — Tap Ring, Vibrate, or Ring
and Vibrate on the Alert Style panel to
change the alert style and tap OK to
exit.
46
• Volume — Slide your finger to the right
or left on the screen to increase or
decrease the volume level and tap OK
to close the Volume screen.
Page 49

• Ringtone — Tap Message Alert, Email
Alert, Calendar Alert, Alarm Alert,
Reminder Alert, or Fetion Alert from the
Edit Profile screen to open Select a
ringtone screen. Tap the ringtone you
prefer to select it and tap OK to exit.
Mini3i Smartphone Features
47
Page 50

Mini3i Smartphone
3
4
2
5
1
Mini3i Smartphone
To make calls using your phone, tap a contact in the
contact list or recent caller list. You can also make
calls by using the on-screen dial pad.
Using the Dialer
To dial a number using the on-screen dialer:
1 In the Home screen, tap the Dialer to open
the Dialer screen.
48
2 Tap the Dialer tab at the top of the Dialer
screen to open the on-screen dial pad.
Page 51

1 Call log tab
1
2 Dialer tab
3 Backspace icon
4 On-screen dial pad
5 Dialer icon
3 Touch the on-screen dial pad to enter a
number. Use the Backspace icon to make
corrections.
As you dial the numbers, the phone automatically
matches the numbers already stored in your
Contacts list. Both the number you are dialing and
the potential matches appear on the screen. If you
see a match, you can tap it to place the call.
If you do not find a match, finish dialing the number
and then tap the Dialer icon to dial the number you
entered.
To use the other features on your phone while you
are on a call, tap the Back icon to clear the dial pad.
Mini3i Smartphone
The Ongoing call icon is displayed on top of the
Home screen during your phone call.
1 Ongoing call icon
49
Page 52

Mini3i Smartphone
21
To end a call:
1 Pull down the Ongoing call panel and click
the Ongoing call icon to return to the In call
screen.
2 Slide the In call panel down as shown to end
the phone call
.
NOTE: Placing a new phone call
before ending the current call will
cause your current phone call to be
placed on hold.
50
To dial a number using the call log:
1 In the Home screen, tap the Dialer to open
the Dialer screen.
2 Tap the Call log tab at the top of the Dialer
screen to open the Call log screen.
1 Call log tab
2 Dialer tab
Page 53

3 Tap a contact from the log to dial the number
1
directly.
To look up a contact from your phone book:
1 In the Home screen, tap the Dialer to open
the Dialer screen.
2 Tap the Dialer tab at the top of the Dialer
screen to open the on screen dial pad.
3 Tap the Phonebook icon on the Dialer to
open the Contacts panel.
Mini3i Smartphone
1 Phonebook icon
To add new contacts:
1 In the Home screen, tap the Dialer to open
the Dialer screen.
2 Tap the Dialer tab at the top of the Dialer
screen to open the on screen dial pad.
51
Page 54

Mini3i Smartphone
1
2
1
2
3 Tap the New Contact icon on the Dialer to
open the New contacts screen.
1 New Contact icon
2 Dialer tab
52
4 Enter the contact information and add a new
field for the contact.
Tap the More Info icon to add more
information.
Tap the Delete icon to delete a field.
Page 55

1 Delete icon
More info icon
2 Options panel
5 Press the Options button on the phone to
open the Options panel at the bottom of the
screen.
6 In the Options panel, tap Save to save your
contact information and exit, Discard
changes to exit without saving, or More Info
to add new data fields.
Answering an Incoming Call
To answer a call, slide up the slider panel on the
screen to receive (ANSWER) the call or slide the
bar downwards to reject the call. To silence the
ringtone or alert, press the volume key on the side
of the phone.
Mini3i Smartphone
53
Page 56

Mini3i Smartphone
1
Accessing the Call Log
1 In the Home screen, tap the Dialer to open
the Dialer screen.
2 Tap the Call log tab at the top of the Dialer
screen to open the on-screen dial pad. The
call log lists all incoming and outgoing calls,
including missed calls.
54
1 Call log tab
Incoming calls
Outgoing calls
Missed calls
To sort or delete entries from the call log, press the
Options button and tap the required item on the
OPtions panel that appears at the bottom of the
screen.
Page 57

Mini3i Smartphone
1
Sending SMS/MMS
1 Options panel
1 Select an entry to open the detailed Call log
screen.
2 Press the Options button to open the Options
panel.
3 Tap Send SMS/MMS to send SMS/MMS to
the contact.
Understanding Call Settings
The following options are available from the Call
settings screen:
• Fixed Dial Number list (see “Fixed Dial
Number (FDN) list” on page 57)
• Call-Barring (see “Call Barring” on page 58)
• Call forwarding (see “Call Forwarding” on
page 59)
• Other basic settings (see “Other Basic Call
Settings” on page 60)
• Speed dial (see “Using Speed Dial” on
page 61)
• Reject call with SMS (see “Editing SMS
Messages For Rejected Calls” on page 62)
• Voicemail (see “Using Voicemail” on
page 62)
• In-call timer (see “Using The In-call Timer”
on page 63)
55
Page 58

Mini3i Smartphone
12
To edit your call settings:
1 In the Home screen, tap the Settings icon on
the Home screen to open the Settings
screen.
2 In the Settings screen, tap Call settings to
open the Call settings screen.
3 Tap the appropriate setting that you want to
change.
56
1 Settings screen
2 Call settings screen
4 To exit the screen tap the Back icon.
See the following sections for more information on
each Call setting option.
Page 59

Mini3i Smartphone
Fixed Dial Number (FDN) list
The Fixed Dial Number list allows you to restrict
outgoing calls from your phone to a restricted list of
numbers. To enable this feature, you must know the
SIM PIN2 code for your phone. You can get this
number from your cellular operator, provided this
feature is supported.
To manage the FDN list:
1 In the Fixed Dialing Number screen, tap FDN
is disabled. Type in your PIN2 number to
enable FDN feature.
2 Select Manage FDN list. If you have numbers
on your SIM card you can select numbers
from it. If not, you will be able to add contacts
or numbers to your list.
3 To add new numbers, Select Add, Type the
name and number of the contact and then
select Save. Your FDN list now contains the
newly added contact.
57
Page 60

Mini3i Smartphone
4 Continue adding numbers until you have all
the contacts you wish to include on the FDN
list.
You may also edit or delete contacts at any
time.
5 To disable FDN functionality, reselect the
FDN Enabled option. This changes the FDN
status to FDN Disabled.
Call Barring
The call-barring screen allows you to enable or
disable a function to bar outgoing or incoming calls
from a specific number or contact by using a
password that you set.
58
To enable or disable the call barring functions, tap
the option on the screen that you would like to set
up.
To exit the Call barring screen, tap the Back icon.
Page 61

Mini3i Smartphone
Call Forwarding
The Call forwarding option allows you to forward
calls directly to voicemail.
The following options are available when setting up
call forwarding:
• Always forward — Select to specify a
forwarding number and to enable this
feature. When this feature is enabled, the
Forward when busy, Forward when
unanswered, and Forward when
unreacheable features are disabled.
• Forward when busy — Select to enable this
feature. When enabled, incoming calls are
forwarded to voicemail when you are on a
call.
• Forward when unanswered — Select to
enable this feature. When enabled, incoming
calls are forwarded to voicemail when
unanswered.
• Forward when unreachable — Select to
enable this feature. When enabled, calls are
forwarded to voicemail if an incoming call
cannot connect.
To exit this screen tap the Back icon.
59
Page 62

Mini3i Smartphone
Other Basic Call Settings
60
The following options are available from the Other
basic settings screen:
• Caller ID — Select this check box to hide or
show your number to recipient’s of your call.
When your number shows, your phone
number and Caller ID picture will appear to
people you call, provided the call recipient’s
device supports this feature.
• Call waiting — Select this check box to
display incoming calls when you are on a
call. Clear the check box to ignore incoming
calls when you are already on a call.
NOTE: When call waiting is set to
ignore incoming calls, routing of the
ignored call is determined by your Call
forwarding settings.
• Auto Answer — Select this check box to
answer incoming calls automatically without
performing any action.
• Auto Redial — Select this check box to auto
redial when making a call failed the first time.
To exit this screen tap the Back icon.
Page 63

Mini3i Smartphone
Using Speed Dial
The Speed dialing option allows you to set up your
most frequently used numbers for quick dialing.
To set up Speed dialing:
Tap the Speed Dial number (1 to 9), and enter the
phone number for the speed dial. Press the Options
button and tap Save to save the number.
To use Speed dialing:
Open Dialer from the Home screen and tap and hold
the Speed dial number. For example, tap and hold 1
to call Speed dial #1.
To exit this screen tap the Back icon.
61
Page 64

Mini3i Smartphone
Editing SMS Messages For Rejected Calls
This feature allows you to edit a message that will
automatically be sent to the caller after you have
rejected their call.
To save your message tap the Save icon.
To exit this screen tap the Back icon.
62
Using Voicemail
Your Voicemail number is set by your cellular
operator and is stored on your SIM card. Use the
Voicemail option to view your voicemail number.
When you have completed using the voicemail
option, tap OK to save and exit the screen.
Page 65

Mini3i Smartphone
Using The In-call Timer
The in-call timer option allows you to monitor the
duration of your calls. You can set the timer to 30,
60, 90, or 120 seconds. You can also use this option
to enable or disable the in-call timer function.
When you have completed setting the time for the
in-call timer function, tap OK to save and exit the
screen.
Understanding Smartphone Settings
Settings allows you to configure your network
connection, phone settings, applications, and other
preferences.
To open Settings, select Settings from the Home
screen.
Managing Bluetooth Connections
Bluetooth® is a short-range wireless
communication technology. Using Bluetooth
technology, devices within a 10 meter range can
exchange information without requiring a physical
connection.
63
Page 66

Mini3i Smartphone
Changing Bluetooth Settings
Select the Bluetooth check box on the Settings
screen to turn on Bluetooth.
Select this setting to manage connections, and set
device name.
Pairing with Bluetooth devices
1 Ensure that Bluetooth is enabled before
beginning to pair with another device.
64
2 Select the Bluetooth device listed in
Bluetooth devices to initiate a connection.
3 You might be prompted to enter a passkey to
authenticate. Enter the same passkey on
both devices, or enter the specific one
provided by the device manufacturer.
Changing Data Connection Settings
Select this setting to set your default data
connection for multimedia.
To add a new data connection:
1 Select “New” to create Browser session
over 2G.
2 Fill in required fields with provisioning data
from your carrier including Name the
session, Enter the APN, Set Type to, Proxy,
and Port.
3 Tap Save to save the session.
Page 67

Mini3i Smartphone
Understanding Network Settings
The Network settings enable you to set options for
roaming and networks.
Configuring Mobile Networks
• Current Network — Select this setting to
view your current network.
• Operator Selection — Use this setting to
select a network operator.
• Search Mode — Select this setting to set the
search mode to manual or auto.
• Preferred Networks — Select this setting to
set network preferences.
65
Page 68

Mini3i Smartphone
Setting Security Options
Using SIM Card Lock
Select this setting to open SIM Card lock settings
where you can enable the SIM Card lock and
change your pin code.
• Lock SIM card — Select this check box to
lock your SIM card.
66
• Change PIN code — Select this setting to
change your SIM card PIN code.
Phone Lock Setting
• Select this setting to open Phone Lock
Setting where you can turn on Phone lock
and change your password.
• Phone lock — Select this check box to turn
on the phone lock.
Page 69

Mini3i Smartphone
• Change Password — Select this setting to
change the password for your phone.
• Data protection — Select this setting to turn
on data protection.
Managing SD Card and Phone Storage
Select this setting to view storage information such
as Total space, Available space, and Unmount/eject
SD card for your phone and SD card.
67
Page 70

Using Internet Features
Using Internet Features
Available Monternet Services
From the Home screen, tap Monternet to open the
Monternet portals.
Monternet services include:
• China Mobile's wireless data business
applications
• Unified messaging services
• Service providers (SP) business cooperation
• Corporate wireless network business
applications
• Mobile commerce
• Development of mobile Internet technologies
such as wireless-related content
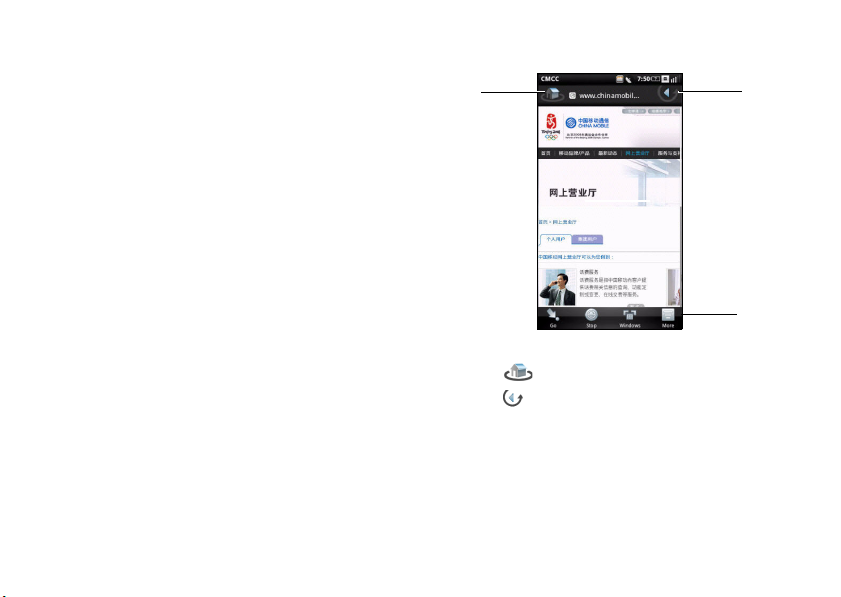
Using the Internet Browser
The Options panel and on-screen tools enhance
your browsing experience by making it faster, and
easier to find Internet content.
68
From the Home screen, tap the Browser icon to
open the Browser screen.
Go to URL
1 Open the Browser screen and press the
Options button to open the Options panel.
Page 71

Using Internet Features
12
12
2 Tap the Go to URL icon on the Options panel
to open the Go to URL screen.
3 Select a URL from the list or tap the Search
on Internet dialog box to type in the URL
manually.
4 Possible matches appear on a list of links as
you type. Select a match or continue typing
the URL.
5 Tap the Go icon to follow the link to the
selected address.
1 Go to URL icon
2 Options panel
69
Page 72

Using Internet Features
3
1
2
4
1 Search on Internet dialog box
2 Go icon
Zoom In and Zoom Out
Tap and drag the screen to open the magnifier tools.
Use the Zoom In icon to zoom in on the web page.
Use the Zoom Out icon to zoom out on the web
page.
NOTE: Multi touch is enabled to enlarge or
minimize the images on the screen.
70
Page 73

Using Internet Features
1
1 Zoom In icon
2 Zoom Out icon
3
Selection tool
4
Back icon
Use the Selection tool to select an area of the web
page to zoom in on.
1
Selected area
To exit this screen tap the Back icon.
71
Page 74

Using Internet Features
1
2
3
Window Overview
Window overview allows you to open and manage
multiple web pages.
1 Press the Options button to access the
Window overview option.
2 Tap New Window to open new web pages.
72
1 New window icon
2 Web page
3 Close button
3 Tap a window to view the opened web page. 4 Tap the Close button to close opened pages.
Bookmarks
You can store your favorite web pages as
bookmarks on the phone.
To view bookmarks:
1 Open the Browser screen and press the
Options button to open the Options panel.
2 Tap More and then tap Bookmarks on the
Options panel to open the Bookmarks
screen.
Page 75

Using Internet Features
Bookmarks are separated by categories
including My favorites, News, and Sports.
You can also add new categories.
3 Tap a category to view saved bookmarks.
Bookmarks are organized in the order of
when they were saved. The more recent
bookmarks will appear on the top of the list.
To add bookmarks:
1 Open the Browser screen and press the
Options button to open the Options panel.
2 Tap Bookmarks on the Options panel to open
the Bookmarks screen.
73
Page 76

Using Internet Features
1
2
3
4
1
3 Press the Options button again to open the
Options panel.
4 Tap Bookmark page to open the Bookmark
link screen.
1 Bookmark page icon
74
5 Type the bookmark name and location (URL)
in the dialog boxes and choose the category
from the drop-down list.
Page 77

1 OK icon
1
2 Name dialog box
3 Location dialog box
4 Category drop-down list
6 Tap the OK icon to save and exit the screen.
Accessing Browser Options
The following Browser Options are available by
tapping the More icon on the Options panel:
• History — View the web pages you visited
recently.
• Downloads — View the history of your
downloads.
• Advanced — View advanced settings.
• Find on Page — Search the web page.
• Settings - Browser settings (see “Changing
Browser Settings” on page 76).
Using Internet Features
• Exit — Exit the menu.
1 More icon
75
Page 78

Using Internet Features
Changing Browser Settings
The following are the available Browser settings:
• Text size — Select this setting to set the size
of the text displayed on web pages.
• Block pop-up windows — Select this check
box to prevent pop-up windows from
appearing.
• Load images — Select this check box to
display images on web pages.
• Enable JavaScript — Select this check box
to enable Javascript.
• Set home page — Select this setting to set
your home page.
• Search portal — Select this setting to set the
default search engine to use.
• Data connection — Select this setting to set
the data network to which you wish to
connect.
• Clear cache — Select this setting to delete
all cached page contents.
76
• Clear history — Select this setting to clear
the browser navigation history.
• Accept cookies — Select this check box to
allow sites to save and read “cookie” data.
• Clear all cookie data — Select this setting to
delete all browser cookies.
• Remember form data — Select this check
box to save the data you typed in forms for
later use.
• Clear form data — Select this setting to
delete all saved form data.
• Remember passwords — Select this check
box to save usernames and passwords for
web sites.
• Clear passwords — Select this setting to
delete all saved passwords.
• Show security warning — Select this check
box to show security warnings if there is a
problem with a web site.
• Restore to default — Select this setting to
clear all browser data and reset all settings
to factory default.
Page 79

To change Browser settings:
1 Open the Browser’s home page. 2 Press the Options button to open the Options
panel.
3 Tap More Settings on the Options panel.
NOTE: To change the Browser
settings, you must be on the
Browser’s home page.
Using Internet Features
77
Page 80

Using Email Features
Using Email Features
Introducing 139 Mail
139 Mail is your default email client. It allows you to
use your phone number as an email account to
send and receive messages using the Internet,
SMS, MMS, or WAP mobile Internet access.
Besides 139 Mail, you can use 21cn, Gmail, and
more that are also included or add your own email
clients. Contact your email providers for the
required setup information.
78
To use 139 Mail, 21cn, Gmail, or other email
services, select 139 Mail from the Home screen and
select Enter at the welcome screen. The Account
Settings screen opens.
Page 81

Managing Email Accounts
Adding an Account From 139 Mail, 21cn, or Gmail
1 Tap 139 Mail, 21cn, or Gmail from the
Account Settings to open the account input
screen.
2 Enter your user name, password, and from
name.
Using Email Features
3 Press the Options button to open the Options
panel and tap Save to save your account
settings. The Accounts screen appears.
4 Tap the account you just set up to open your
email account and start sending and
receiving emails.
5 To exit this screen tap the Back icon.
79
Page 82

Using Email Features
12
To add more accounts, press the Options button and
select New Account on the Options panel.
Setting Up and Editing Accounts
Open 139 Mail by tapping 139 Mail from the Home
screen.
If you have not added an account, you can tap Set
up manually to create a new account.
2 New Account icon
2 Options Panel
NOTE: Contact your email providers for the
required setup information.
80
Page 83

Using Email Features
To edit your account settings:
1 Tap to select the email account you want to
edit.
2 Scroll through the list and select the setting
you would like to change.
3 Tap OK when you are done to save and exit
each change.
The following are the available Email Account
settings:
• Email Address — Select this setting to edit
your email address
• User Name — Select this setting to edit your
user name.
• Password — Select this setting to edit your
password for the account.
• Protocol — Select this setting to choose the
protocol used to send and receive emails
including POP3, POP3/SSL, CMPCP, and
CMPCP/SSL. Contact your service provider
for information.
• Server — Select this setting to edit the
address of the server that provides your mail.
• Port (Incoming) — Select this setting to edit
the port value used for incoming traffic.
• SMTP Server — Select this setting to edit
the address of the server through which you
send your mail.
• Authentication — Select this setting to
select the authentication type for your mail.
81
Page 84

Using Email Features
• Port (Outgoing) — Select this setting to edit
the port value used for outgoing traffics.
• Data Connection — Select this setting to
select the CMCC network to use for data
connection.
• Delete email from server — Select this
setting to choose how emails are deleted
from the server.
• Reply to mails with the original — Select this
check box to include the original messages
when you reply mails.
• Poll Frequency — Select this setting to
select how often automatic POP3 retrievals
are performed.
• Read Limit — Select this setting to set the
read limit for your emails if you wish to set a
send/receive message size limit. You can
select Headers Only, First 5k, First 10k, or
Entire Message. Notice that setting the limit
to Headers Only will allow you to only see the
message subjects.
• From name — Select this setting to edit your
full name displayed to recipients.
82
• Signature — Select this setting to input your
signature.
Removing an Account
1 Tap 139 Mail from the Home screen. 2 Tap and hold the email account you want to
remove to open the function menu.
3 Select Delete to remove the account. 4 Tap the Back icon to exit the screen.
Managing Email Messages
Sending Emails
1 Tap 139 Mail from the Home screen and tap
an email account to open the email screen.
2 Tap Inbox to open your inbox folder.
Page 85

Using Email Features
1
3 Press the Options button and select
Compose to open the Compose Mail screen.
4 Type a subject and message. 5 Press the Options button to select CC/BCC or
Priority on the Options panel.
6 To exit this screen tap the Back icon.
Receiving Emails
1 Tap 139 Mail from the Home screen and tap
an email account to open the email screen.
The email screen contains Inbox, Sent,
Drafts, Outbox, and Trash.
2 Press the Options button and select Receive/
Send on the Options panel to receive new
mails.
83
Page 86

Using Email Features
1 Receive/Send icon
3 Tap Inbox to open your inbox folder and read
your unread mails.
4 To exit this screen tap the Back icon.
Deleting Messages
1 Tap 139 Mail from the Home screen and tap
an email account to open the email screen.
2 Tap Inbox to open your inbox folder.
84
3 Tap the message you want to delete to select
it.
4 Press the Options button and tap More from
the Options panel.
5 Tap Delete. Your message is moved to the
Trash folder.
6 Tap the Back icon to exit this screen.
Page 87

Using Email Features
Deleting Email Permanently
1 Tap 139 Mail from the Home screen and tap
an email account to open the email screen.
2 Tap Tr as h to open the Trash folder. 3 Tap the message you want to delete to select
it.
4 Press the Options button and tap More from
the Options panel.
5 Tap Delete. 6 Tap the Back icon to exit this screen.
Using Fetion
Fetion is a messaging application that lets you send
free messages to friends, make low charge voice
group chats and exchange files between cell
phones and computers. Go to www.fetion.com.cn
for more information and download Fetion for your
phone.
85
Page 88

Using Email Features
To open Fetion, tap Fetion from the Home screen.
You are logged in automatically if Auto Login Fetion
is enabled.
Managing Your Fetion Account and Messages
1 Tap Fetion from the Home screen.
86
2 Press the Options button to open the options
panel.
3 To log on to Fetion manually, tap Login on the
Options panel.
4 To sort your messages, tap Sort By to sort
your messages.
5 To get help, tap Help. 6 To exit Fetion, tap More > Exit.
Page 89

Using Email Features
Changing Fetion Settings
To edit your Fetion settings, select Fetion from the
Home screen and press the Options button to select
Settings.
The following Fetion settings are available:
• Auto Login Fetion — Select this check box to
enable auto login.
87
Page 90

Using My Favorites
Using My Favorites
My Favorites lets you to watch videos, capture and
view photos, and listen to and record audio files on
your phone. Tap My Favorites from the Home
screen to open My Favorites.
88
Browsing and Playing Music
1 To open Music, select, My Favorites > Music
from the Home screen.
Your music is organized into five categories:
Albums, Artists, Tracks, Genres, and
Playlists. Select a category to view the lists
within each.
Page 91

Using My Favorites
2 You may start Party shuffle (all the songs in
your library are added to a playlist in random
order) by pressing the Options button then
tap Party shuffle.
3 To browse all audio files on the phone
including the SIM card and the microSD
card, press the Options button then tap
Search.
4 Double tap any song to start playing the
song.
Managing Music Files
Creating a Playlist
1 From the Tracks screen, select a category.
89
Page 92

Using My Favorites
2 From the list that appears, navigate to the
artist, album, or song that you want on a
playlist.
3 Long tap the artist, album, or song to open
the function menu. Tap Add to playlist.
NOTE: You can also use this
menu to Play, change
Properties, or Delete the songs.
90
4 In the Add to playlist menu that opens, select
My favorites or other ones you created.
The selected song(s) are added.
Page 93

Using My Favorites
Managing Playlists
Go to the Music screen and select Playlists. All your
playlists appear.
Select the playlist to play the songs in the list.
You can long tap the playlist to open the function
menu and select Play to play the songs.
To exit this screen tap the Back icon.
Creating Ringtones From Songs
1 Tap the song you wish to set as ringtone to
open the Music Player.
2 Press the Options button to select Set
ringtone. The ringtone is set as your default
incoming call ringtone.
91
Page 94

Using My Favorites
6
7
8
9
10
5
4
3
2
1
11
Understanding the Music Player
1 To open the Music Player, short tap an audio
file. The Music Player appears on the
screen.
92
1 Time elapsed
2 Progress bar
3Artist
4 Album
5 View current playlist
6 Shuffle model
7 Repeat songs
8 Album art
9 Total Time
10 Playback controls
11 Lyrics
Page 95

Using My Favorites
2 To use the Music Player controls:
Tap to pause
Tap to play
Enable shuffle mode and play songs randomly
Repeat all songs or only the current song
Tap to go to the next song
Tap to go to the previous song
Browsing and Playing Videos
1 Tap My Favorites on the Home screen. 2 Tap Videos on the My Favorites screen.
3 Your videos are displayed as a thumbnail list.
4 Slide your finger up and down on the list to
view the entire list.
5 To exit the screen tap the Back icon.
93
Page 96

Using My Favorites
1
Managing Videos
To sort videos:
1 Press the Options button and tap the Sort by
name or Sort by time icon to sort your videos.
94
1 Sort by time icon
Sort by name icon
2 To exit the screen tap the Back icon.
To delete a file on the list:
Page 97

1 Long tap a video file to open the function
menu.
2 Tap Delete to delete the video file. 3 Tap OK to confirm.
Using My Favorites
95
Page 98

Using My Favorites
2
1
To view video properties:
1 Long tap a video file to open the function
menu.
2 Tap Property to view the properties of the
selected video file.
3 Tap the Back icon to exit the screen.
96
To delete multiple videos:
1 To delete multiple videos, press the Options
button and tap Delete to open the Delete
screen.
2 Tap to check the check boxes of the videos
you want to delete.
You can also press the Options button and tap
Select All to select all files.
Page 99

Using My Favorites
1
6
2
3
4
5
1 Select All icon
2 Check box
3 Press the Options button to open the Options
panel and tap OK to delete the files.
Using the Video Player
Short tap a video file to open the Video player.
1 Playback controls
2 Switch sreen mode
3 Back icon
4 Time remaining
Progress bar
5
Time elapsed
6
To use Video player:
Use the following icons on the video player to
control video playback
Tap to pause video
Tap to view full screen
Tap to play next video
Tap to play previous video
Using the Picture Application
1 Tap My Favorites on the Home screen.
97
Page 100

Using My Favorites
2 Tap Pictures on the My Favorites screen.
Browsing Pictures
Your pictures are displayed as thumbnails. Slide
your finger up and down on the list to view the
entire list.
1 Short tap a thumbnail to view the photo in full
screen view.
98
2 Tap the Zoom in icon to enlarge the view of
the picture and Zoom out icon to reduce the
view of the picture.
3 Swipe your finger to the left or right to go to
the previous or next picture.
4 Press the Options button and then tap More
in the Options panel.
 Loading...