

Dell Inspiron 531s User Manual

Dell™ Inspiron™ 531s Owner’s Manual
Model DCSLA
www.dell.com | support.dell.com
Notes, Notices, and Cautions
NOTE: A NOTE indicates important information that helps you make better use of
your computer.
NOTICE: A NOTICE indicates either potential damage to hardware or loss of data
and tells you how to avoid the problem.
CAUTION: A CAUTION indicates a potential for property damage, personal injury,
or death.
If you purchased a Dell™ n Series computer, any references in this document to
Microsoft
®
Windows® operating systems are not applicable.
Abbreviations and Acronyms
For a complete list of abbreviations and acronyms, see the "Glossary" on page 189.
__________________
Information in this document is subject to change without notice.
© 2008 Dell Inc. All rights reserved.
Reproduction in any manner whatsoever without the written permission of Dell Inc. is strictly
forbidden.
Trademarks used in this text: Dell, the DELL logo, YOURS IS HERE, Inspiron, Dell TravelLite, and
Strike Zone, are trademarks of Dell Inc.; Bluetooth is a registered trademark o wned by Bluetooth SIG,
Inc. and is used by Dell under license; Microsoft, Windows, Windows Vista, and Windows Vista start
button are either trademarks or registered trademarks of Microsoft Corporation in the United States
and/or other countries; Intel and Intel SpeedStep are registered trademarks of Intel Corporation; AMD,
AMD Athlon, AMD Sempron, and Cool ’n’ Quiet are trademarks of Advanced Micro Devices, Inc;
Nvidia is a registered trademark of Nvidia Corporation in the United States and/or other countries.
Other trademarks and trade names may be used in this document to refer to either the entities claiming
the marks and names or their products. Dell Inc. disclaims any proprietary interest in trademarks and
trade names other than its own.
Model DCSLA
April 2008 Rev. A00

Contents
Finding Information . . . . . . . . . . . . . . . . . . . 11
1 Setting Up and Using Your Computer . . . 15
Front View of the Computer . . . . . . . . . . . . . . . 15
Back View of the Computer
Back Panel Connectors
. . . . . . . . . . . . . . . 17
. . . . . . . . . . . . . . 19
Installing Your Computer in an Enclosure
Setting Up a Printer
Printer Cable
Connecting a USB Printer
Playing CDs and DVDs
Adjusting the Volume
Adjusting the Picture
Copying CDs and DVDs
How to Copy a CD or DVD
Using Blank CDs and DVDs
Helpful Tips
. . . . . . . . . . . . . . . . . . . 23
. . . . . . . . . . . . . . . . . . . . 23
. . . . . . . . . . . . . 23
. . . . . . . . . . . . . . . . . 25
. . . . . . . . . . . . . . . . 27
. . . . . . . . . . . . . . . . 27
. . . . . . . . . . . . . . . . . 28
. . . . . . . . . . . . . 28
. . . . . . . . . . . . 29
. . . . . . . . . . . . . . . . . . . . . 30
. . . . . . . 21
Using a Media Card Reader (Optional)
. . . . . . . . . 31
Contents 3

Connecting Two Monitors . . . . . . . . . . . . . . . . 33
Connecting Two Monitors With VGA
Connectors
. . . . . . . . . . . . . . . . . . . . . 33
Connecting One Monitor With a VGA Connector
and One Monitor With a DVI Connector
. . . . . . 34
Connecting a TV
. . . . . . . . . . . . . . . . . . 34
Changing the Display Settings
Power Management
. . . . . . . . . . . . . . . . . . . 35
Power Management Options in
®
Microsoft
Power Options Properties
Power Schemes Tab
Advanced Tab
Hibernate Tab
Windows® XP . . . . . . . . . . . . . 35
. . . . . . . . . . . . . 37
. . . . . . . . . . . . . . . . 37
. . . . . . . . . . . . . . . . . . . 38
. . . . . . . . . . . . . . . . . . . . 38
Power Management Options in
Windows Vista
Standby Mode
Hibernate Mode
Power Plan Properties
®
. . . . . . . . . . . . . . . . . . 38
. . . . . . . . . . . . . . . . . . . 39
. . . . . . . . . . . . . . . . . . 40
. . . . . . . . . . . . . . . 40
Enabling Cool ’n’ Quiet Technology
. . . . . . . . . . . 35
. . . . . . . . . . . 42
4 Contents
About RAID Configurations
(For Windows Vista
RAID Level 1 Configuration
®
only) . . . . . . . . . . . . . . . 43
. . . . . . . . . . . . . 43
Configuring Your Hard Drives for RAID
Using the Nvidia MediaShield ROM Utility
Using Nvidia MediaShield
. . . . . . . . . . . . . 46
Transferring Information to a New Computer
®
Windows Vista
: . . . . . . . . . . . . . . . . . . 48
. . . . . . . 44
. . . . . 45
. . . . . . 47

Setting Up a Home and Office Network . . . . . . . . 49
Connecting to a Network Adapter
Network Setup Wizard
Connecting to the Internet
. . . . . . . . . . . . . . . 50
. . . . . . . . . . . . . . . 51
Setting Up Your Internet Connection
. . . . . . . . . 49
. . . . . . . . 51
2 Solving Problems . . . . . . . . . . . . . . . . . . 55
Troubleshooting Tips . . . . . . . . . . . . . . . . . . 55
Battery Problems
Drive Problems
CD and DVD drive problems
Hard drive problems
E-Mail, Modem, and Internet Problems
. . . . . . . . . . . . . . . . . . . . 55
. . . . . . . . . . . . . . . . . . . . . 56
. . . . . . . . . . . . 57
. . . . . . . . . . . . . . . . 58
. . . . . . . . 58
Error Messages
Keyboard Problems
. . . . . . . . . . . . . . . . . . . . . 60
. . . . . . . . . . . . . . . . . . . 62
Lockups and Software Problems
The computer does not start up
The computer stops responding
A program stops responding
A program crashes repeatedly
A program is designed for an earlier
Microsoft
®
Windows® operating system . . . . . 64
A solid blue screen appears
Other software problems
Media Card Reader Problems
Memory Problems
. . . . . . . . . . . . . . . . . . . . 67
. . . . . . . . . . . . . . 66
. . . . . . . . . . . . 62
. . . . . . . . . . 62
. . . . . . . . . . 63
. . . . . . . . . . . . 63
. . . . . . . . . . 63
. . . . . . . . . . . . 64
. . . . . . . . . . . . . 65
Contents 5

Mouse Problems . . . . . . . . . . . . . . . . . . . . . 68
Network Problems
Power Problems
Printer Problems
Scanner Problems
Sound and Speaker Problems
No sound from speakers
No sound from headphones
Video and Monitor Problems
If the screen is blank
If the screen is difficult to read
. . . . . . . . . . . . . . . . . . . . 69
. . . . . . . . . . . . . . . . . . . . . 70
. . . . . . . . . . . . . . . . . . . . . 71
. . . . . . . . . . . . . . . . . . . . 73
. . . . . . . . . . . . . . 74
. . . . . . . . . . . . . . 74
. . . . . . . . . . . . 75
. . . . . . . . . . . . . . 76
. . . . . . . . . . . . . . . . 76
. . . . . . . . . . . 77
3 Troubleshooting Tools . . . . . . . . . . . . . . . 79
Power Lights . . . . . . . . . . . . . . . . . . . . . . . 79
Beep Codes
System Messages
Dell Diagnostics
When to Use the Dell Diagnostics
. . . . . . . . . . . . . . . . . . . . . . . 80
. . . . . . . . . . . . . . . . . . . . 82
. . . . . . . . . . . . . . . . . . . . . 84
. . . . . . . . . 84
Starting the Dell Diagnostics From
Your Hard Drive
. . . . . . . . . . . . . . . . . . . 84
Starting the Dell Diagnostics From the
Drivers and Utilities Media
Dell Diagnostics Main Menu
Drivers
. . . . . . . . . . . . . . . . . . . . . . . . . . 87
What Is a Driver?
Identifying Drivers
. . . . . . . . . . . . . . . . . . 87
. . . . . . . . . . . . . . . . . 87
Reinstalling Drivers and Utilities
. . . . . . . . . . . . . 85
. . . . . . . . . . . . 85
. . . . . . . . . . 88
6 Contents

Resolving Software and Hardware
Incompatibilities
. . . . . . . . . . . . . . . . . . . . 91
Restoring Your Operating System
Using Microsoft Windows System Restore
Using Dell PC Restore
. . . . . . . . . . . . . . . 95
Using the Operating System CD
. . . . . . . . . . . . 92
. . . . 93
. . . . . . . . . . 98
4 Removing and Installing Parts . . . . . . . 101
Before You Begin . . . . . . . . . . . . . . . . . . . . 101
Recommended Tools
Turning Off Your Computer
Before Working Inside Your Computer
Removing the Computer Cover
Removing the Support Bracket
Inside View of Your Computer
. . . . . . . . . . . . . . . . 101
. . . . . . . . . . . . . 102
. . . . . . . 102
. . . . . . . . . . . . . 103
. . . . . . . . . . . . . 104
. . . . . . . . . . . . . 106
System Board Components
. . . . . . . . . . . . . . . 107
Power Supply DC Connector Pin Assignments
Memory
Cards
Bezel
. . . . . . . . . . . . . . . . . . . . . . . . . 112
Memory Installation Guidelines
Installing Memory
Removing Memory
. . . . . . . . . . . . . . . . . . . . . . . . . . . 116
. . . . . . . . . . . . . . . . . 113
. . . . . . . . . . . . . . . . . 115
PCI and PCI Express Cards
. . . . . . . . . . . . . . . . . . . . . . . . . . . 123
Removing the Bezel
Replacing the Bezel
. . . . . . . . . . . . . . . . 123
. . . . . . . . . . . . . . . . 124
. . . . . . . . . . 112
. . . . . . . . . . . . . 116
. . . . . 109
Contents 7

Drives . . . . . . . . . . . . . . . . . . . . . . . . . . 124
Recommended Drive Cable Connections
Connecting Drive Cables
Drive Interface Connectors
. . . . . . . . . . . . . . 125
. . . . . . . . . . . . 126
Connecting and Disconnecting Drive Cables
Hard Drives
. . . . . . . . . . . . . . . . . . . . . 126
Installing a Second Hard Drive (Optional)
Floppy Drive
Media Card Reader
CD or DVD Drive
Battery
. . . . . . . . . . . . . . . . . . . . . . . . . . 144
Replacing the Battery
Power Supply
Replacing the Power Supply
Processor
. . . . . . . . . . . . . . . . . . . . . . . . 148
. . . . . . . . . . . . . . . . . . . . 131
. . . . . . . . . . . . . . . . . 137
. . . . . . . . . . . . . . . . . . 141
. . . . . . . . . . . . . . . 144
. . . . . . . . . . . . . . . . . . . . . . 146
. . . . . . . . . . . . 146
. . . . . 125
. . . 126
. . . . . 129
Removing the Processor
Installing the Processor
I/O Panel
. . . . . . . . . . . . . . . . . . . . . . . . . 153
Removing the I/O Panel
Installing the I/O Panel
Processor Fan
. . . . . . . . . . . . . . . . . . . . . . 155
Removing the Processor Fan
Installing the Processor Fan
Chassis Fan
. . . . . . . . . . . . . . . . . . . . . . . 160
Removing the Chassis Fan
Replacing the Chassis Fan
System Board
. . . . . . . . . . . . . . . . . . . . . . 162
Removing the System Board
. . . . . . . . . . . . . . 148
. . . . . . . . . . . . . . 150
. . . . . . . . . . . . . . 153
. . . . . . . . . . . . . . . 154
. . . . . . . . . . . . 155
. . . . . . . . . . . . 158
. . . . . . . . . . . . . 160
. . . . . . . . . . . . . 161
. . . . . . . . . . . . 162
8 Contents
Installing the System Board
. . . . . . . . . . . . 164

Replacing the Support Bracket . . . . . . . . . . . . . 164
Replacing the Computer Cover
Specifications
System Setup
Overview
Entering System Setup
System Setup Options
Boot Sequence
. . . . . . . . . . . . . . . . . . . . . . 167
. . . . . . . . . . . . . . . . . . . . . . 172
. . . . . . . . . . . . . . . . . . . . . . 172
. . . . . . . . . . . . . . . 172
. . . . . . . . . . . . . . . 173
. . . . . . . . . . . . . . . . . . . 175
Changing Boot Sequence for the
Current Boot
. . . . . . . . . . . . . . . . . . . . 175
Clearing Forgotten Passwords
Clearing CMOS Settings
Flashing the BIOS
. . . . . . . . . . . . . . . . . . . . 178
Cleaning Your Computer
. . . . . . . . . . . . . . . . 177
. . . . . . . . . . . . . . . . 179
. . . . . . . . . . . . . 165
. . . . . . . . . . . . . 176
Computer, Keyboard, and Monitor
Mouse
Floppy Drive
CDs and DVDs
. . . . . . . . . . . . . . . . . . . . . . . 179
. . . . . . . . . . . . . . . . . . . . 180
. . . . . . . . . . . . . . . . . . . 180
. . . . . . . . . 179
Dell Technical Support Policy (U.S. Only)
Definition of "Dell-Installed" Software
and Peripherals
. . . . . . . . . . . . . . . . . . 181
Definition of "Third-Party" Software
and Peripherals
FCC Notice (U.S. Only)
FCC Class B
. . . . . . . . . . . . . . . . . . 181
. . . . . . . . . . . . . . . . . . 181
. . . . . . . . . . . . . . . . . . . . . 181
. . . . . . . 180
Contents 9

Getting Help . . . . . . . . . . . . . . . . . . . . . . . 183
Obtaining Assistance
. . . . . . . . . . . . . . . . 183
Technical Support and Customer Service
DellConnect
Online Services
AutoTech Service
Automated Order-Status Service
Problems With Your Order
Product Information
. . . . . . . . . . . . . . . . . . . . . 184
. . . . . . . . . . . . . . . . . . . 184
. . . . . . . . . . . . . . . . . . 185
. . . . . . . . . 185
. . . . . . . . . . . . . . . . 185
. . . . . . . . . . . . . . . . . . . 185
Returning Items for Warranty Repair or Credit
Before You Call
Contacting Dell
. . . . . . . . . . . . . . . . . . . . . 186
. . . . . . . . . . . . . . . . . . . . . 188
. . . . . 183
. . . . . 186
Glossary . . . . . . . . . . . . . . . . . . . . . . . . . . . 189
Index
. . . . . . . . . . . . . . . . . . . . . . . . . . . . . . 205
10 Contents
Finding Information
NOTE: Some features or media may be optional and may not ship with your
computer. Some features or media may not be available in certain countries.
NOTE: Additional information may ship with your computer.
What Are You Looking For? Find it Here
• Warranty information
• Terms and Conditions (U.S. only)
• Safety instructions
• Regulatory information
• Ergonomics information
• End User License Agreement
• How to set up my computer
Dell™ Product Information Guide
Setup Diagram
NOTE: See the setup diagram that came with
your system.
NOTE: The appearance of your setup diagram
may vary.
Finding Information 11
What Are You Looking For? Find it Here
• Service Tag and Express Service
Code
• Microsoft Windows License Label
Service Tag and Microsoft® Windows® License
These labels are located on your computer.
• Use the Service Tag to identify your
computer when you use
contact support.
• Enter the Express Service Code to direct
your call when contacting support.
support.dell.com
or
NOTE: As an increased security measure, the
newly designed Microsoft Windows license
label incorporates a missing portion or "hole" to
discourage removal of the label.
12 Finding Information

What Are You Looking For? Find it Here
• Solutions — Troubleshooting hints
and tips, articles from technicians,
online courses, and frequently asked
questions
• Community — Online discussion
with other Dell customers
• Upgrades — Upgrade information
for components, such as memory,
the hard drive, and the operating
system
• Customer Care — Contact
information, service call and order
status, warranty, and repair
information
• Service and support — Service call
status and support history, service
contract, online discussions with
technical support
• Reference — Computer
documentation, details on my
computer configuration, product
specifications, and white papers
Dell Support Website — support.dell.com
NOTE: Select your region to view the
appropriate support site.
NOTE: Corporate, government, and education
customers can also use the customized Dell
Premier Support website at
premier.support.dell.com.
• Downloads — Certified drivers,
patches, and software updates
• Desktop System Software (DSS)—
If you reinstall the operating system
for your computer, you should also
reinstall the DSS utility. DSS
provides critical updates for your
operating system and support for
Dell™ 3.5-inch USB floppy drives,
optical drives, and USB devices.
DSS is necessary for correct
operation of your Dell computer.
The software automatically detects
your computer and operating
system and installs the updates
appropriate for your configuration.
To download
1
Go to
Downloads
and
2
Enter your Service Tag or Product Type and
Product Model and click
3
Scroll to
Utilities
and click
Desktop
support.dell.com
System and Configuration
→
Dell Desktop System Software
Download Now
System Software:
and click
.
Go
.
.
Drivers
NOTE: The support.dell.com user interface may
vary depending on your selection.
Finding Information 13
What Are You Looking For? Find it Here
• How to use Windows XP
• How to use Windows Vista
• How to work with programs and
files
• How to personalize my desktop
Windows Help and Support Center
1
To access Windows Help and Support:
Start
• In Windows XP, click
and Support
• In Windows Vista
.
®
, click the Windows
Vista Start button™ and click
and Support
2
Type a word or phrase that describes your
.
and click
Help
problem and press <Enter>.
3
Click the topic that describes your problem.
Follow the instructions on the screen.
Help
14 Finding Information
Setting Up and Using Your Computer
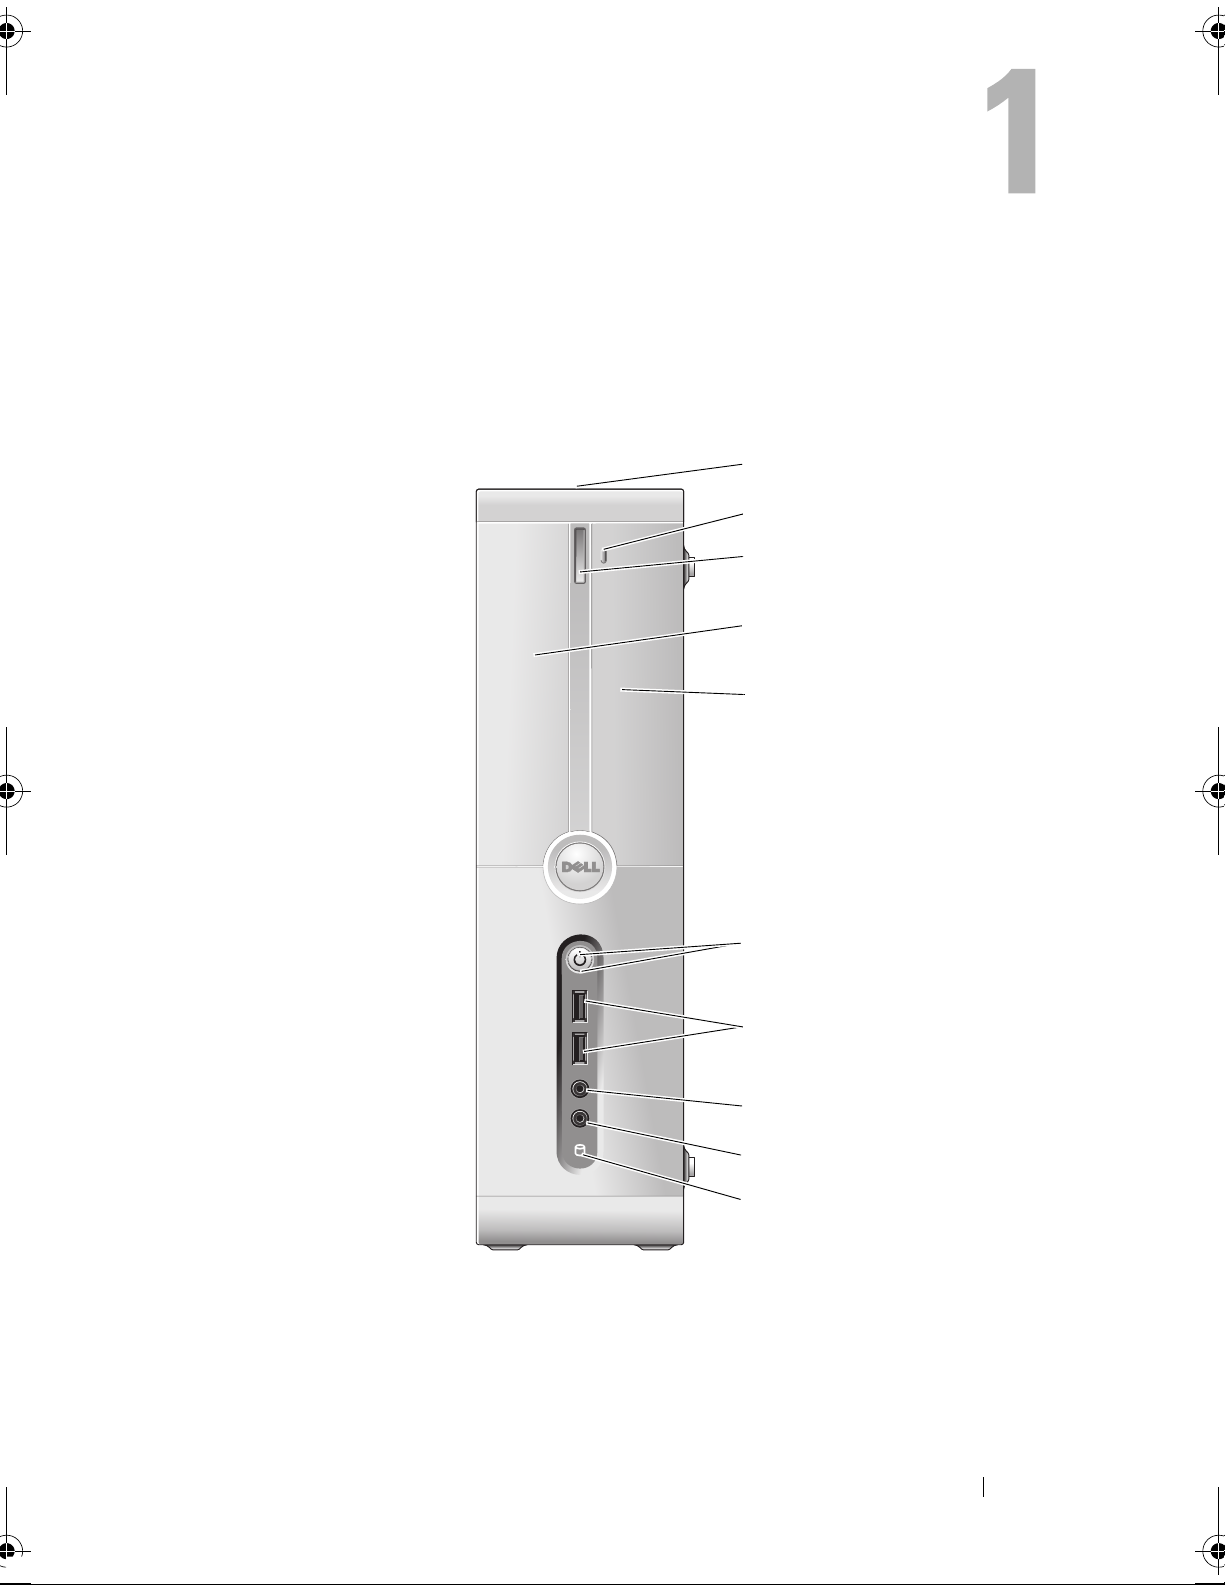
Front View of the Computer
1
2
3
4
5
6
7
8
9
10
Setting Up and Using Your Computer 15
1 Service Tag
(located on top of the
chassis towards the
rear)
2 FlexBay open/close Press here to open or close the floppy/media card
3 CD or DVD eject button Press to eject a disk from the CD or DVD drive.
4 CD or DVD drive panel This panel covers the CD or DVD drive.
5 FlexBay drive panel Can contain an optional floppy drive or optional Media
Use the Service Tag to identify your computer when you
access the Dell Support website or call technical support.
reader panel.
Card Reader. For information on using the Media Card
Reader, see "Using a Media Card Reader (Optional)" on
page 31.
6 power button,
power light
Press the power button to turn on the computer.
The light in the center of this button indicates
power state (see "Controls and Lights" on page 170 for
more information).
NOTICE: To avoid losing data, do not use the power
button to turn off the computer. Instead, perform an
operating system shutdown.
7 USB 2.0 connectors (2) Use the front USB connectors for devices that you connect
occasionally, such as joysticks or cameras, or for bootable
USB devices (see "System Setup Options" on page 173
for more information on booting to a USB device).
It is recommended that you use the back USB
connectors for devices that typically remain connected,
such as printers and keyboards.
8 headphone connector Use the headphone connector to attach headphones
and most kinds of speakers.
9 microphone connector Use the microphone connector to attach a personal
computer microphone for voice or musical input into a
sound or telephony program.
On computers with a sound card, the microphone
connector is on the card.
10 drive activity light The drive activity light is on when the computer reads
data from or writes data to the hard drive. The light
might also be on when a device such as a CD player is
operating.
16 Setting Up and Using Your Computer
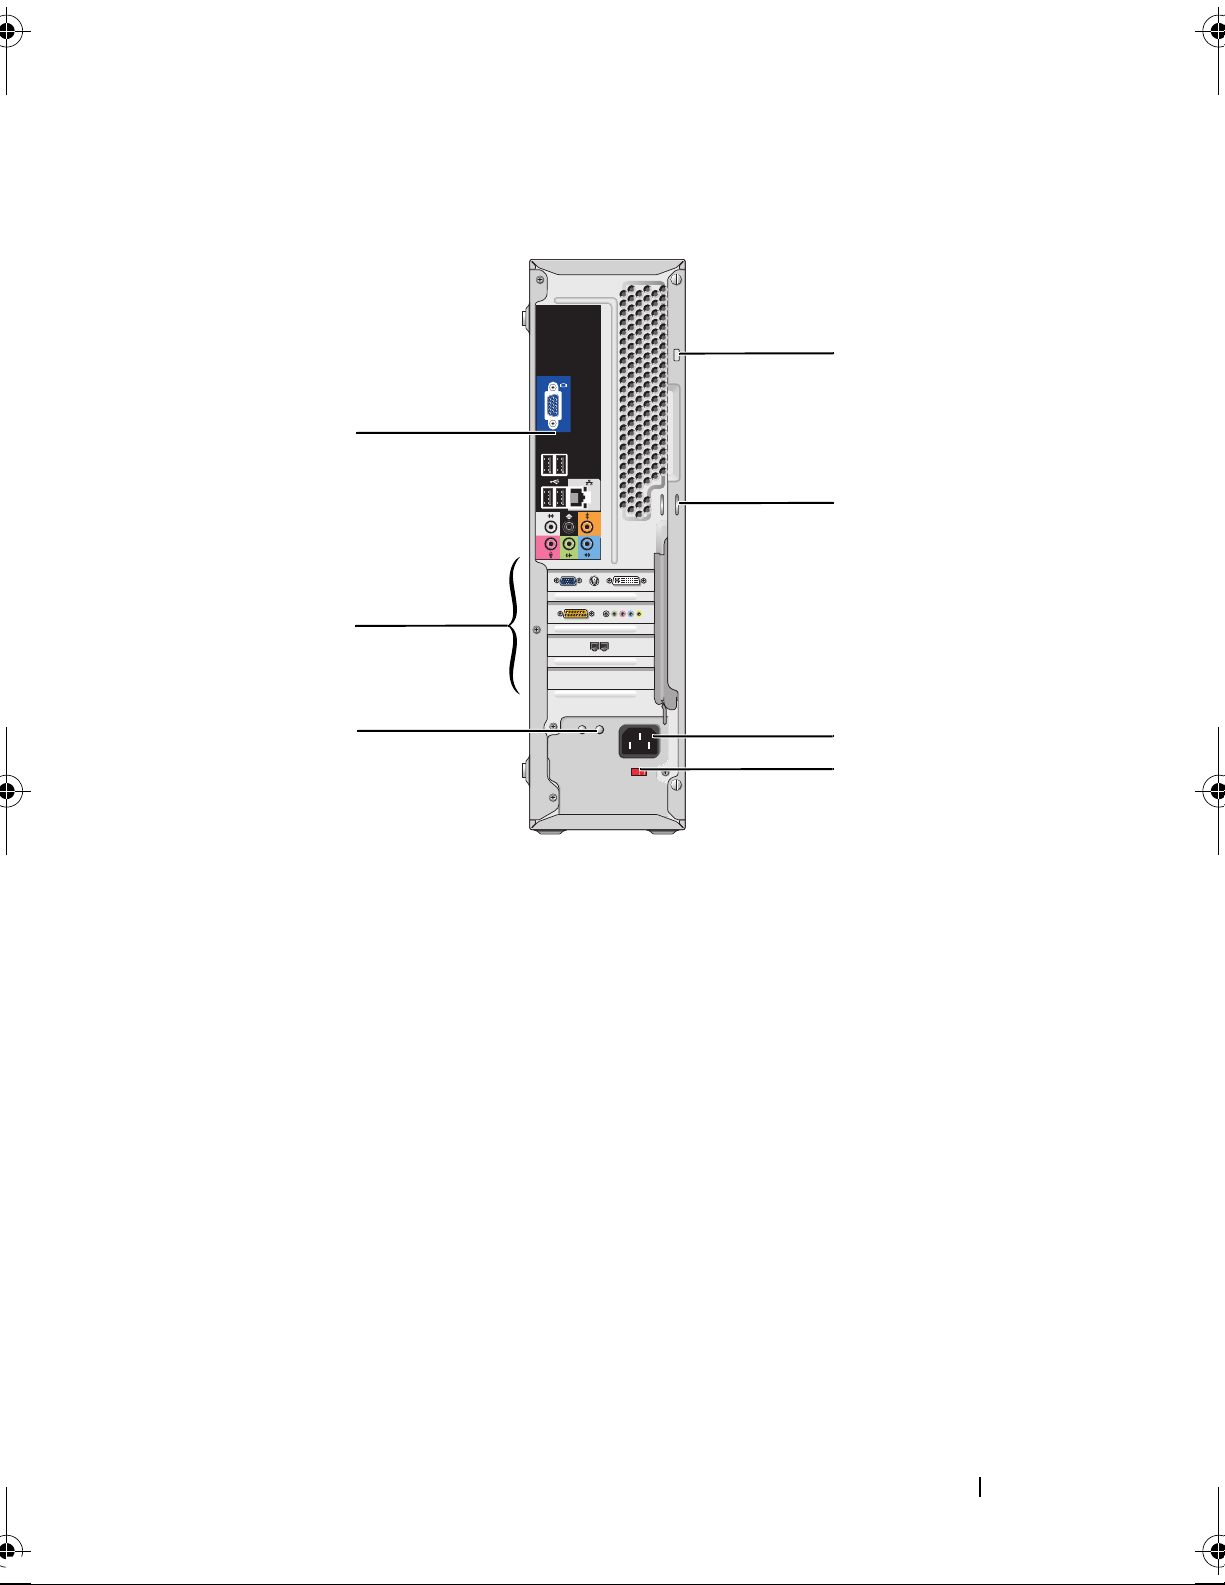
Back View of the Computer
1
2
7
6
3
5
4
Setting Up and Using Your Computer 17
1 back panel connectors Plug USB, audio, and other devices into the
appropriate connector (see "Back Panel Connectors" on
page 19 for more information).
2 card slots Access connectors for any installed PCI and PCI
Express cards.
3 power supply LED Indicates power availability for power supply.
NOTE: May or may not be available on your computer.
4 voltage selector switch For selecting voltage rating.
5 power connector Insert the power cable.
6 padlock rings Padlock rings are for attaching a commercially available
theft-deterrent device. The padlock rings allows you to
secure the computer cover to the chassis with a padlock
to prevent unauthorized access to the inside of the
computer. To use the padlock rings, insert a
commercially available padlock through the rings, and
then lock the padlock.
7 security cable slot Security cable slot lets you attach a commercially available
antitheft device to the computer. For more information,
see the instructions included with the device.
18 Setting Up and Using Your Computer
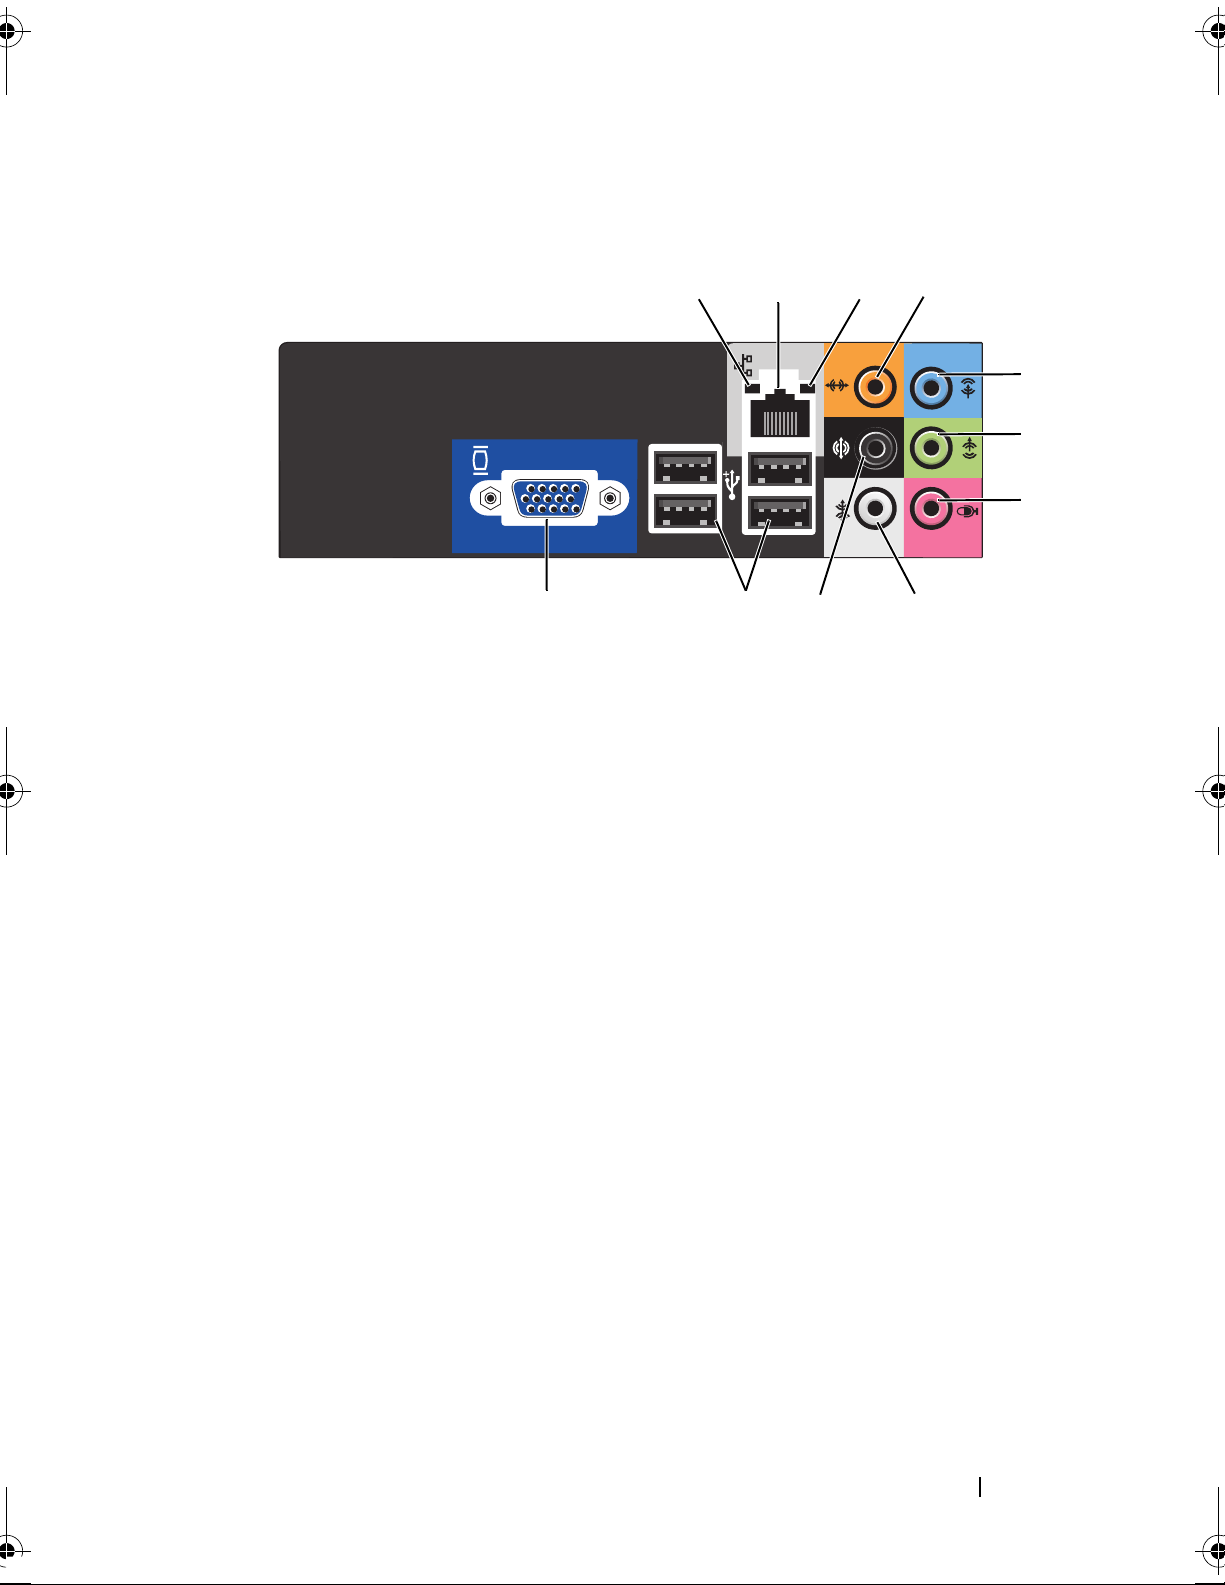
Back Panel Connectors
1 network activity
light
2 network adapter
connector
12
11
Flashes a yellow light when the computer is transmitting or
receiving network data. A high volume of network traffic
may make this light appear to be in a steady "on" state.
To attach your computer to a network or broadband device,
connect one end of a network cable to either a network port
or your network or broadband device. Connect the other
end of the network cable to the network adapter connector
on the back panel of your computer. A click indicates that
the network cable has been securely attached.
10
34
9
5
6
7
8
3 link integrity light
NOTE: Do not plug a telephone cable into the network connector.
On computers with a network connector card, use the
connector on the card.
It is recommended that you use Category 5 wiring and
connectors for your network. If you must use Category 3
wiring, force the network speed to 10 Mbps to ensure
reliable operation.
• Green — A good connection exists between the network
and the computer.
• Off — The computer is not detecting a physical
connection to the network.
Setting Up and Using Your Computer 19

4 center/subwoofer
connector
5 line-in connector Use the blue line-in connector to attach a record/playback
Use the orange connector to attach a speaker to a Low
Frequency Effects (LFE) audio channel. LFE audio channel
is found in digital surround sound audio schemes that
carries only low frequency information of 80 Hz and below.
The LFE channel drives a subwoofer to provide extremely
low bass extension. Systems not using subwoofers can shunt
the LFE information to the main speakers in the surround
sound set-up.
device such as a cassette player, CD player, or VCR.
On computers with a sound card, use the connector on
the card.
6 front L/R line-out
connector
7 microphone Use the pink connector to attach a personal computer
8 side L/R surround
connector
9 rear L/R surround
connector
10 USB 2.0
connectors (4)
Use the green line-out connector (available on computers
with integrated sound) to attach headphones and most
speakers with integrated amplifiers.
On computers with a sound card, use the connector on the
card.
microphone for voice or musical input into a sound or
telephony program.
On computers with a sound card, the microphone connector
is on the card.
Use the gray connector to provide enhanced surround audio
for computers with 7.1 speakers.
On computers with a sound card, the microphone connector
is on the card.
Use the black surround connector to attach multichannelcapable speakers.
Use the back USB connectors for devices that typically
remain connected, such as printers and keyboards.
It is recommended that you use the front USB connectors
for devices that you connect occasionally, such as joysticks or
cameras.
11 VGA video
connector
Connect the monitor’s VGA cable to the VGA connector on
the computer.
On computers with a video card, use the connector on
the card.
20 Setting Up and Using Your Computer
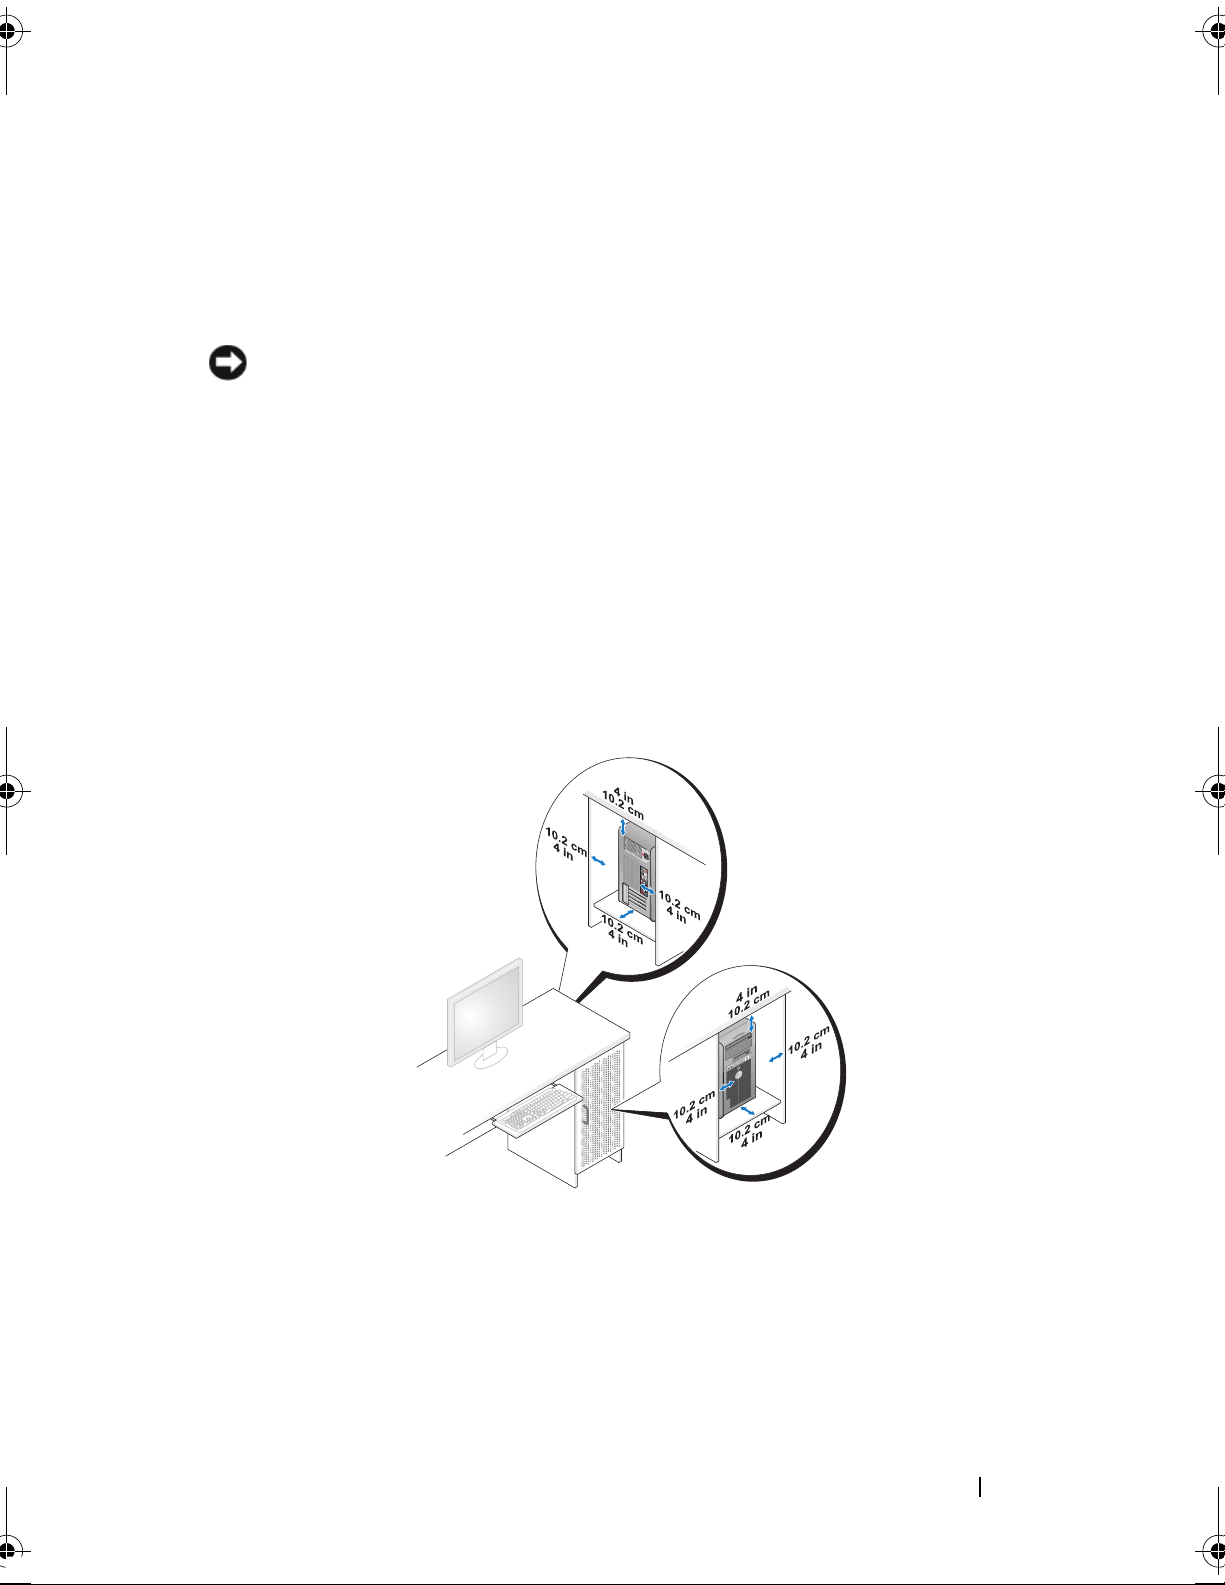
Installing Your Computer in an Enclosure
Installing your computer in an enclosure can restrict the airflow and impact
your computer’s performance, possibly causing it to overheat. Follow the
guidelines below when installing your computer in an enclosure:
NOTICE: The operating temperature specifications indicated in this manual reflect
the maximum ambient operating temperature. The ambient room temperature
needs to be a consideration when installing your computer in an enclosure.
For example, if the ambient room temperature is at 25°C (77°F), depending on your
computer’s specifications, you only have 5° to 10°C (9° to 18°F) temperature margin
before you reach your computer’s maximum operating temperature. For details
about your computer’s specifications, see "Specifications" on page 167.
• Leave a 10.2 cm (4 inches) minimum clearance on all vented sides of the
computer to permit the airflow required for proper ventilation.
• If your enclosure has doors, they need to be of a type that allows at least
30 percent airflow through the enclosure (front and back).
• If your computer is installed in a corner on a desk or under a desk, leave at
least 5.1 cm (2 inches) clearance from the back of the computer to the wall
to permit the airflow required for proper ventilation.
Setting Up and Using Your Computer 21
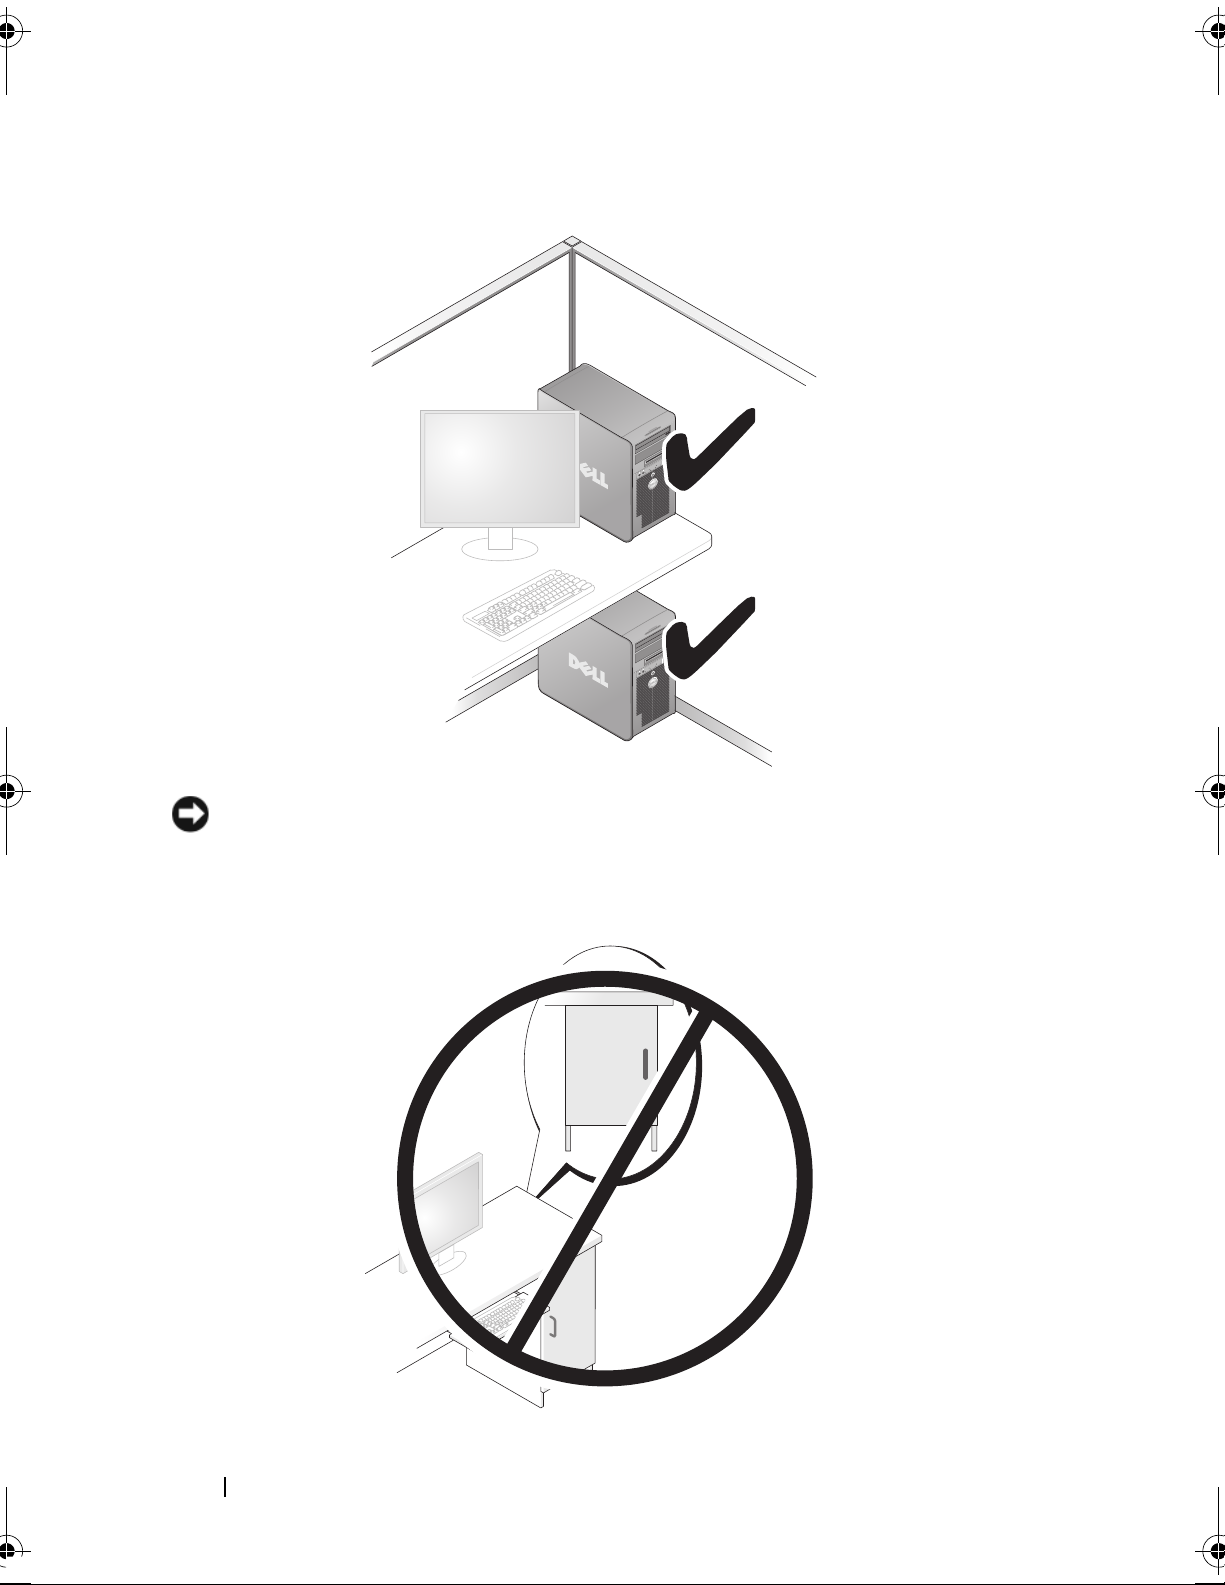
NOTICE:
airflow.
Do not install your computer in an enclosure that does not allow
Restricting the airflow impacts your computer’s performance,
possibly causing it to overheat.
22 Setting Up and Using Your Computer
Setting Up a Printer
NOTICE: Complete the operating system setup before you connect a printer to
the computer.
See the documentation that came with the printer for setup information,
including how to:
• Obtain and install updated drivers.
• Connect the printer to the computer.
• Load paper and install the toner or ink cartridge.
For technical assistance, refer to the printer owner's manual or contact the
printer manufacturer.
Printer Cable
Your printer connects to your computer with either a USB cable or a parallel
cable. Your printer may not come with a printer cable, so if you purchase a
cable separately, ensure that it is compatible with your printer and computer.
If you purchased a printer cable at the same time you purchased your
computer, the cable may arrive in the computer’s shipping box.
Connecting a USB Printer
NOTE: You can connect USB devices while the computer is turned on.
1
Complete the operating system setup if you have not already done so.
2
Attach the USB printer cable to the USB connectors on the computer and
the printer. The USB connectors fit only one way.
Setting Up and Using Your Computer 23
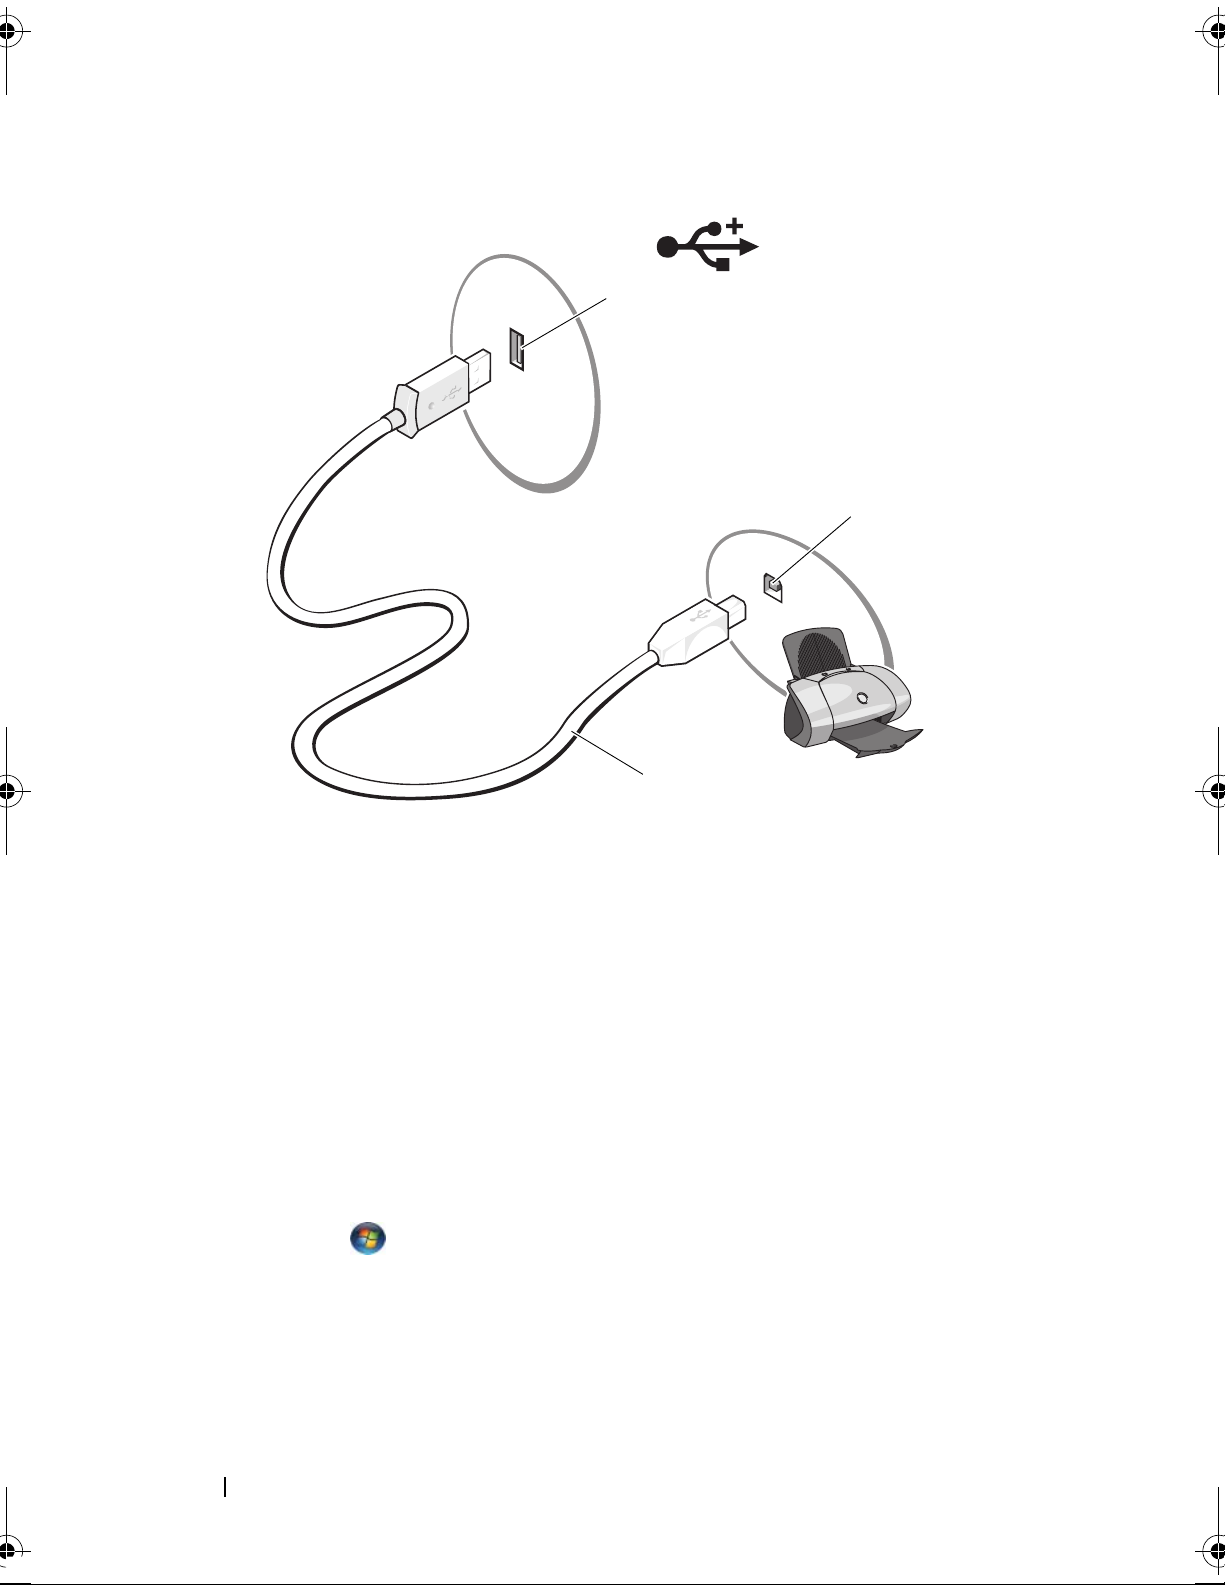
1
2
3
1 USB connector on
computer
3
Turn on the printer and then turn on the computer.
4
Depending on your computer’s operating system, a printer wizard may be
2 USB connector on
printer
3 USB printer
cable
available to help you install the printer driver:
Windows® XP
Click
Start→
Control Panel→
Printers and Faxes→
Add a printer
to start
the Add Printer Wizard
®
and click
Network→ Add a printer
to start the Add Printer
Windows Vista
Click
Start
Wizard.
5
Install the printer driver if necessary (see "Reinstalling Drivers and
Utilities" on page 88 and the documentation that came with your printer).
24 Setting Up and Using Your Computer
Playing CDs and DVDs
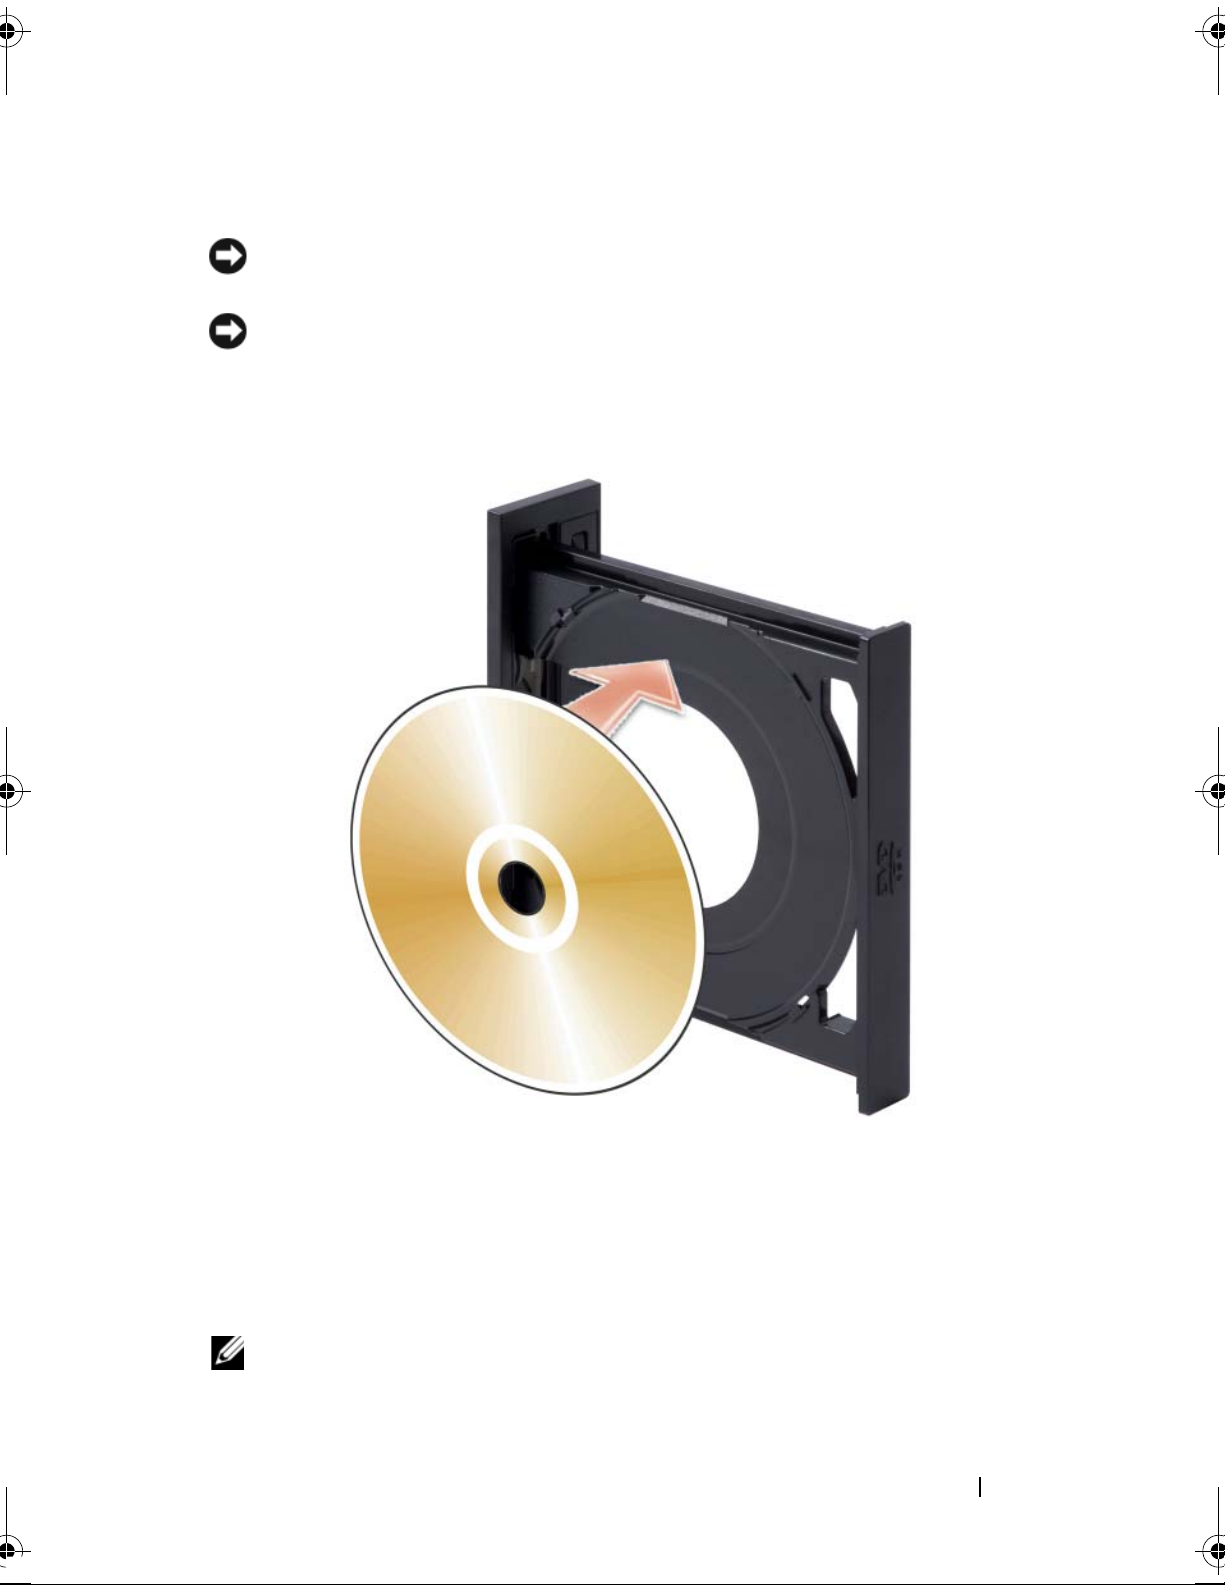
NOTICE: Do not press down on the CD or DVD tray when you open or close it. Keep
the tray closed when you are not using the drive.
NOTICE: Do not move the computer when you are playing CDs or DVDs.
1
Press the eject button on the front of the drive.
2
Place the disc, label side out, in the center of the tray.
3
Ensure that the lower edge of the CD or DVD is seated inside the lower lip
of the tray.
4
Gently push in the tray.
To format CDs for storing data, to create music CDs, or to copy CDs, see the
CD software that came with your computer.
NOTE: Ensure that you follow all copyright laws when you create CDs.
Setting Up and Using Your Computer 25
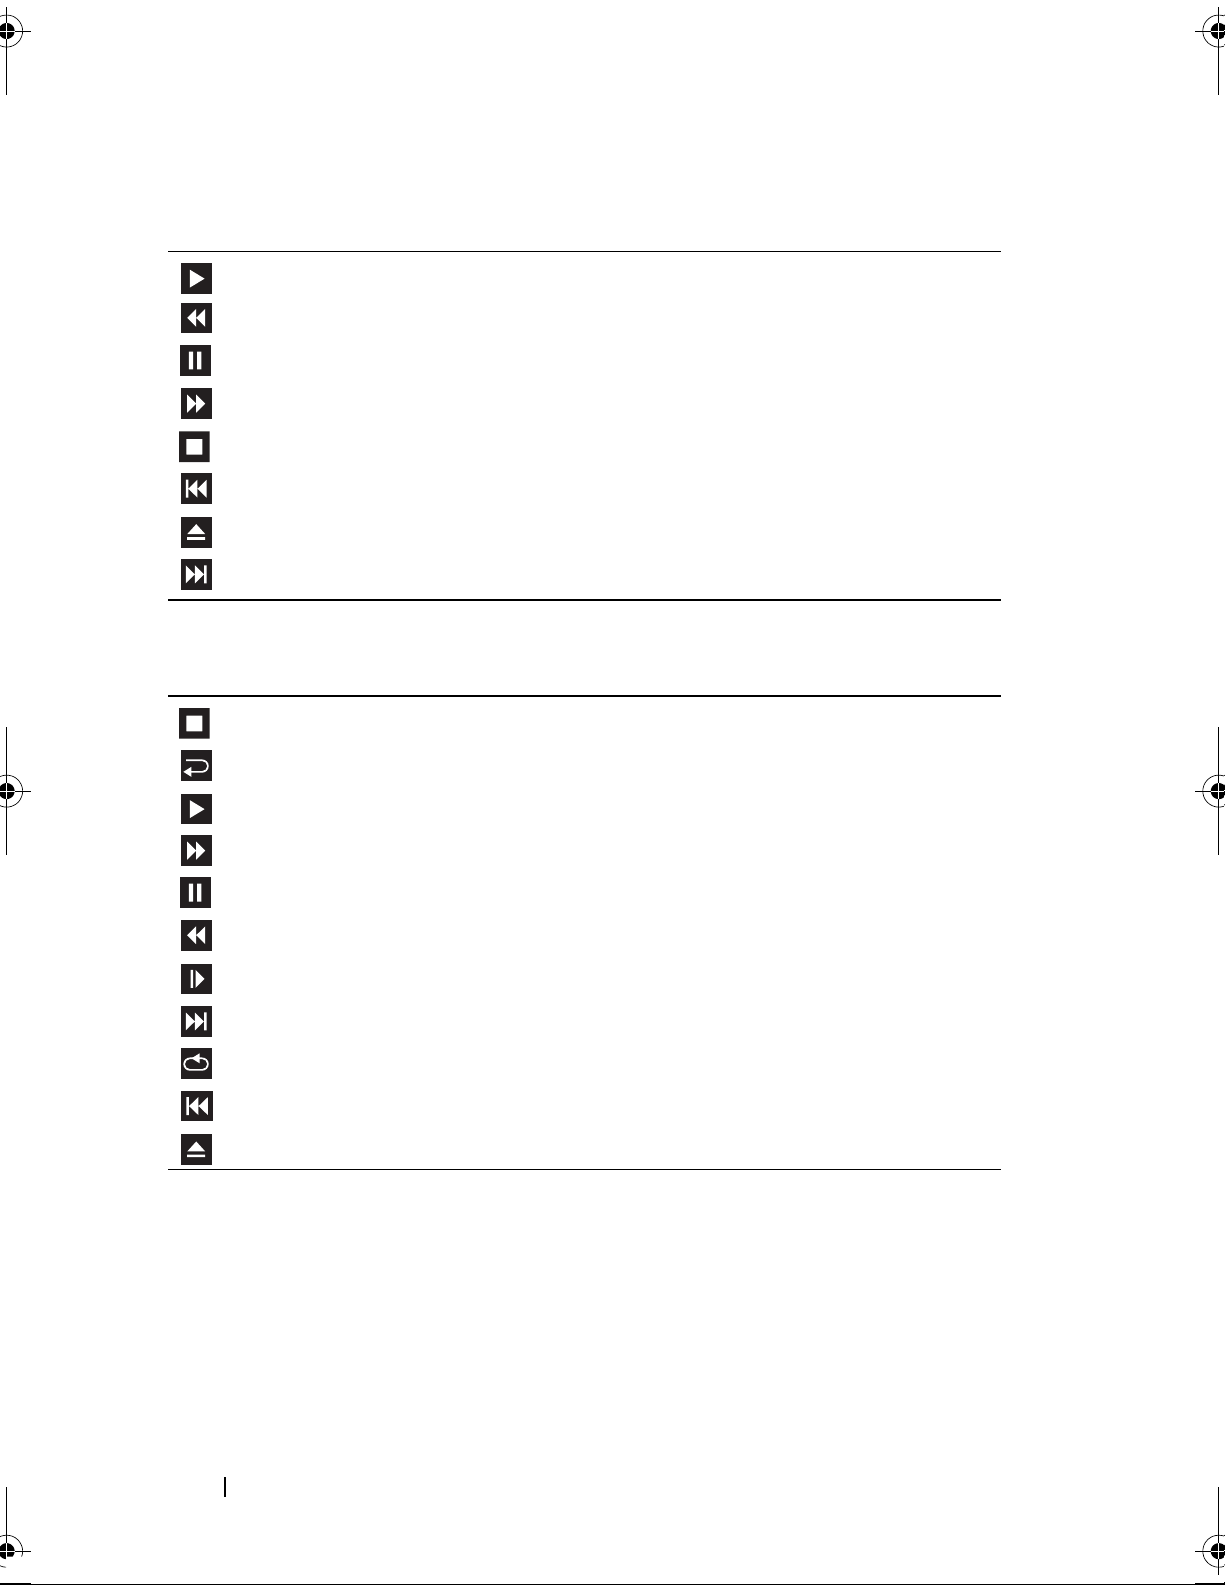
A CD player includes the following basic buttons:
Play
Move backward within the current track
Pause
Move forward within the current track
Stop
Go to the previous track
Eject
Go to the next track
A DVD player includes the following basic buttons:
Stop
Restart the current chapter
Play
Fast forward
Pause
Fast reverse
Advance a single frame while in pause mode
Go to the next title or chapter
Continuously play the current title or chapter
Go to the previous title or chapter
Eject
For more information on playing CDs or DVDs, click Help on the CD or
DVD player (if available).
26 Setting Up and Using Your Computer
Adjusting the Volume
NOTE: When the speakers are muted, you do not hear the CD or DVD playing.
Windows XP:
1
Click the
Entertainment
2
In the
Volume
volume.
For more information on volume control options, click Help in the Volu me
Control window.
Windows Vista:
1
Click
and then click
2
In the
column and slide it up or down to increase or decrease the volume.
Start
button, point to
, and then click
Master Volume
control window, click and drag the bar in the
All Programs→ Accessories→
Volume Control
.
column and slide it up or down to increase or decrease the
Start
Volume Mixer
, point to
Control Panel→ Hardware and Sound→ Sound
Adjust System Volume
window, click and drag the bar in the
.
Speakers
Master
,
Adjusting the Picture
If an error message notifies you that the current resolution and color depth
are using too much memory and preventing DVD playback, adjust the display
properties:
Windows XP:
1
Click the
2
Under
3
Under
4
In the
resolution
5
Under
(16 bit)
6
Click OK.
Windows Vista:
1
Click
Start
button, and then click
Pick a category
Pick a task...
, click
, click
Display Properties
to change the setting to
Color quality
, click the drop-down menu, and then click
.
Start
and click
Control Panel
Appearance and Themes
Change the screen resolution
.
.
.
window, click and drag the bar in
800 by 600 pixels
Control Panel
.
.
Screen
Medium
2
Click
Appearance and Personalization
Setting Up and Using Your Computer 27
.
3
Under
4
In the
change the setting to
5
Click the drop-down menu under
6
Click OK.
Personalization
Display Settings
800 by 600 pixels
, click
window, click and drag the bar in
Adjust screen resolution
.
Colors
, and then click
.
Resolution
Medium (16 bit)
to
Copying CDs and DVDs
NOTE: Ensure that you observe all copyright laws when creating CDs or DVDs.
This section applies only to computers that have a CD-RW, DVD+/-RW, or
CD-RW/DVD (combo) drive.
NOTE: The types of CD or DVD drives offered by Dell may vary by country.
The following instructions explain how to make an exact copy of a CD or
DVD. You can also use Sonic Digital Media for other purposes, such as
creating music CDs from audio files stored on your computer or backing up
important data. For help, open Sonic Digital Media and then click the
question mark icon in the upper-right corner of the window.
.
How to Copy a CD or DVD
NOTE: CD-RW/DVD combo drives cannot write to DVD media. If you have a
CD-RW/DVD combo drive and you experience recording problems, check for
available software patches on the Sonic support website at www.sonic.com.
The DVD-writable drives installed in Dell™ computers can write to and read
DVD+/-R, DVD+/-RW, and DVD+R DL (dual layer) media, but cannot
write to and may not read DVD-RAM or DVD-R DL media.
NOTE: Most commercial DVDs have copyright protection and cannot be copied
using Sonic DigitalMedia.
Windows® XP
1
Click the
Projects
Start
button, point to
→
Copy→ Disc Copy
All Programs→ Sonic→ DigitalMedia
.
28 Setting Up and Using Your Computer

2
To copy the CD or DVD:
• If you have one CD or DVD drive, ensure that the settings are correct and
click the Disc Copy button. The computer reads your source CD or DVD
and copies the data to a temporary folder on your computer hard drive.
When prompted, insert a blank CD or DVD into the drive and click OK.
• If you have two CD or DVD drives, select the drive into which you have
inserted your source CD or DVD and click the Disc Copy button. The
computer copies the data from the source CD or DVD to the blank CD or
DVD.
Windows Vista®:
1
Click
Start
→
Disc Copy
2
To copy the CD or DVD:
•
If you have one CD or DVD drive
click the
.
Disc Copy
All Programs→
button. The computer reads your source CD or DVD
Sonic→ DigitalMedia Projects→ Copy
, ensure that the settings are correct and
and copies the data to a temporary folder on your computer hard drive.
→
When prompted, insert a blank CD or DVD into the drive and click
If you have two CD or DVD drives
•
inserted your source CD or DVD and click the
, select the drive into which you have
Disc Copy
button. The
OK
computer copies the data from the source CD or DVD to the blank
CD or DVD.
Once you have finished copying the source CD or DVD, the CD or DVD
that you have created automatically ejects.
Using Blank CDs and DVDs
CD-RW drives can write to CD recording media only (including high-speed
CD-RW) while DVD-writable drives can write to both CD and DVD
recording media.
Use blank CD-Rs to record music or permanently store data files. After
creating a CD-R, you cannot write to that CD-R again (see the Sonic
documentation for more information). Use blank CD-RWs to write to CDs
or to erase, rewrite, or update data on CDs.
.
Setting Up and Using Your Computer 29

Blank DVD+/-Rs can be used to permanently store large amounts of
information. After you create a DVD+/-R disc, you may not be able to write
to that disc again if the disc is "finalized" or "closed" during the final stage of
the disc creation process. Use blank DVD+/-RWs if you plan to erase, rewrite,
or update information on that disc later.
CD-Writable Drives
Media Type Read Write Rewritable
CD-R Yes Yes No
CD -R W Yes Yes Yes
DVD-Writable Drives
Media Type Read Write Rewritable
CD-R Yes Yes No
CD -R W Yes Yes Yes
DVD+R Yes Yes No
DVD-R Yes Yes No
DVD +R W Ye s Ye s Yes
DVD -R W Yes Yes Yes
DVD+R DL Yes Yes No
Helpful Tips
• Use Microsoft® Windows® Explorer to drag and drop files to a CD-R or
CD-RW only after you start Sonic DigitalMedia and open a DigitalMedia
project.
• Use CD-Rs to burn music CDs that you want to play in regular stereos.
CD-RWs do not play in most home or car stereos.
• You cannot create audio DVDs with Sonic Digital Media.
• Music MP3 files can be played only on MP3 players or on computers that
have MP3 software installed.
30 Setting Up and Using Your Computer
 Loading...