

Page 1

Dell™ Inspiron™ 5000
REFERENCE AND
TROUBLESHOOTING GUIDE
www.dell.com
support.dell.com
™
Page 2

____________________
Information in this document is subject to change without notice.
© 1999–2000 Dell Computer Corporation. All rights reserved.
Reproduction in any manner whatsoever without the written permission of Dell Computer Corporation is strictly forbidden.
Trademarks used in this text: Dell, the DELL logo, DellWare, and Inspiron are trademarks of Dell Computer Corporation; Microsoft,
MS-DOS, and Windows are registered trademarks of Microsoft Corporation; Intel and Pentium are registered trademarks and
SpeedStep is a trademark of Intel Corporation.
Other trademarks and trade names may be used in this document to refer to either the entities claiming the marks and names or their
products. Dell Computer Corporation disclaims any proprietary interest in trademarks and trade names other than its own.
April 2000 P/N 3959U Rev. A01
Page 3

Safety Instructions
Use the following safety guidelines to help protect your computer from potential damage and to help ensure your own personal safety.
When Using Your Computer
As you use your computer, observe the following safety guidelines:
Do not attempt to service the computer yourself. Always follow installation
•
instructions closely.
Do not carry a battery pack in your pocket, purse, or other container where metal
•
objects (such as car keys) could short-circuit the battery terminals. The resulting
excessive current flow can cause extremely high temperatures and may result in
damage from burns.
Be sure that nothing rests on your AC adapter’s power cable and that the cable is
•
not located where it can be tripped over or stepped on.
Place the AC adapter in a ventilated area, such as a desk top or on the floor, when
•
you use it to run the computer or to charge the battery. Do not cover the AC
adapter with papers or other items that will reduce cooling; also, do not use the
AC adapter inside a carrying case.
Do not use your computer in a wet environment, for example, near a bath tub,
•
sink, or swimming pool or in a wet basement.
Do not push objects into air vents or openings of your computer. Doing so can
•
cause fire or electric shock by shorting out interior components.
Use only the AC adapter and batteries that are approved for use with this com-
•
puter as indicated in this document. Use of another type of battery pack or AC
adapter may risk fire or explosion.
Before you connect the computer to a power source, ensure that the voltage rat-
•
ing of the AC adapter matches that of the available power source:
— 115 volts (V)/60 hertz (Hz) in most of North and South America and some Far
Eastern countries such as South Korea and Taiwan
— 100 V/50 Hz in eastern Japan and 100 V/60 Hz in western Japan
— 230 V/50 Hz in most of Europe, the Middle East, and the Far East
v
Page 4

To help prevent electric shock, plug the AC adapter and peripheral power cables
•
into properly grounded power sources. These cables are equipped with
three-prong plugs to help ensure proper grounding. Do not use adapter plugs or
remove the grounding prong from a cable. If you must use an extension cable,
use a three-wire cable with properly grounded plugs.
If you use an extension cable with your AC adapter, ensure that the total ampere
•
rating of the products plugged in to the extension cable does not exceed the
ampere rating of the extension cable.
To remove power from the computer, turn it off, remove the battery pack, and dis-
•
connect the AC adapter from the electrical outlet.
If your computer includes an integrated or optional (PC Card) modem, disconnect
•
the modem cable during an electrical storm to avoid the remote risk of electric
shock from lightning via the telephone line.
To help avoid the potential hazard of electric shock, do not connect or disconnect
•
any cables or perform maintenance or reconfiguration of this product during an
electrical storm.
PC Cards may become very warm during normal operation. Use care when
•
removing PC Cards after their continuous operation.
Do not dispose of battery packs in a fire. They may explode. Check with local
•
authorities for disposal instructions.
When setting up the computer for work, place it on a level surface.
•
When traveling, do not check the computer as baggage. You can put your com-
•
puter through an X-ray security machine, but never put your computer through a
metal detector. If you have the computer checked by hand, be sure to have a
charged battery available in case you are asked to turn on the computer.
When traveling with the hard-disk drive removed from the computer, wrap the
•
drive in a nonconducting material, such as cloth or paper. If you have the drive
checked by hand, be ready to install the drive in the computer. You can put the
hard-disk drive through an X-ray security machine, but never put the drive through
a metal detector.
When traveling, do not place the computer in overhead storage compartments
•
where it could slide around. Do not drop your computer or subject it to other
mechanical shocks.
Protect your computer, battery, and hard-disk drive from environmental hazards
•
such as dirt, dust, food, liquids, temperature extremes, and overexposure to
sunlight.
When you move your computer between environments with very different tem-
•
perature and/or humidity ranges, condensation may form on or within the
computer. To avoid damaging the computer, allow sufficient time for the moisture
to evaporate before using the computer.
NOTICE: When taking the computer f ro m low-temperatur e cond iti ons
into a warmer environment or from high-temperature conditions into a
cooler environment, allow the computer to acclimate to room temperature before t ur n ing on power.
vi
Page 5

When you disconnect a cable, pull on its connector or on its strain-relief loop, not
•
on the cable itself. As you pull out the connector, keep it evenly aligned to avoid
bending any connector pins. Also, before you connect a cable make sure both
connectors are correctly oriented and aligned.
Handle components with care. Hold a component such as a memory module by
•
its edges, not its pins.
When removing a memory module from the system board or disconnecting a
•
peripheral device from the computer, wait 5 seconds after turning off the computer before removing the memory module or disconnecting the device to help
avoid possible damage to the system board.
Before you clean your computer, turn it off, unplug it from its power source, and
•
remove the battery pack(s).
Clean your computer with a soft cloth dampened with water rather than with liq-
•
uid or aerosol cleaners.
Clean the display with a soft, clean cloth and commercial window cleaner that
•
does not contain wax or abrasives. Apply the cleaner to the cloth; then stroke the
cloth across the display in one direction, moving from the top of the display to the
bottom. If the display contains grease or some other contaminant, use isopropyl
alcohol instead of commercial window cleaner.hese chapters a
If your computer gets wet or is damaged, follow the procedures described in
•
Chapter 2, “Troubleshooting Your Computer.” If, after following these procedures, you confirm that your computer is not operating properly, contact Dell
Computer Corporation. (See Chapter 4, “Getting Help,” for the appropriate telephone number.)
Ergonomic Computing Habits
CAUTION: Improper or prolong ed keyboard use may result in injury.
CAUTION: Viewing the display or external monitor screen for extended
periods of time may result in eye strain.
For comfort and efficiency, observe the following ergonomic guidelines when setting
up and using your computer:
Position your computer directly in front of you as you work.
•
Adjust the tilt of the computer’s display, its contrast and/or brightness settings,
•
and the lighting around you (such as overhead lights, desk lamps, and the curtains or blinds on nearby windows) to minimize reflections and glare on the
display.
When using an external monitor with your computer, set the monitor at a com-
•
fortable viewing distance (usually 510 to 610 millimeters [20 to 24 inches] from
your eyes). Make sure the monitor screen is at eye level or slightly lower when
you are sitting in front of the monitor.
Use a chair that provides good lower-back support.
•
vii
Page 6

Keep your forearms horizontal with your wrists in a neutral, comfortable position
•
while using the keyboard, trackball, touch pad, or external mouse.
Always use the palmrest with the keyboard, touch pad, or trackball. Leave space
•
to rest your hands when using an external mouse.
Let your upper arms hang naturally at your sides.
•
Sit erect with your feet resting on the floor and your thighs level.
•
When sitting, make sure the weight of your legs is on your feet and not on the
•
front of your chair seat. Adjust your chair’s height or use a footrest, if necessary,
to maintain proper posture.
Vary your work activities. Try to organize your work so that you do not have to
•
type for extended periods of time. When you stop typing, try to do things that
use both hands.
wrists relaxed
and flat
computer positioned
directly in front
of user
viii
arms at desk level
Page 7

When Removing or Installing Memory Modules
Before removing or installing memory modules, perform the following steps in the
sequence indicated.
NOTICE: The only time you should ever access the inside of your computer
is when you are installing memory modules.
NOTICE: W ait 5 seco nds after tu rning off the computer before disco nnecting
a peripheral device or re m o vin g a memory module to help preve n t possible damage to the system board.
1. Turn off your computer and any attached peripherals.
2. Disconnect your computer and peripherals from electrical outlets to reduce the
potential for personal injury or shock. Also, disconnect any telephone or telecommunication lines from the computer.
3. Remove the main battery from the Battery Bay and, if necessary, the secondary
battery from the media bay.
4. Ground yourself by touching the unpainted metal surface of the I/O panel on the
back of the computer.
While you work, periodically touch the I/O panel to dissipate any static electricity
that might harm internal components.
Protecting Against Electrostatic Discharge
Static electricity can harm electronic components inside your computer. To prevent
static damage, discharge static electricity from your body before you touch any of
your computer’s electronic components, such as a memory module. You can do so by
touching an unpainted metal surface on the computer’s I/O panel.
As you continue to work inside the computer, periodically touch an I/O connector to
remove any static charge your body may have accumulated.
You can also take the following steps to prevent damage from electrostatic discharge
(ESD):
When unpacking a static-sensitive component from its shipping carton, do not
•
remove the component from the antistatic packing material until you are ready to
install the component. Just before unwrapping the antistatic packaging, be sure
to discharge static electricity from your body.
When transporting a sensitive component, first place it in an antistatic container
•
or packaging.
Handle all sensitive components in a static-safe area. If possible, use antistatic
•
floor pads and workbench pads.
ix
Page 8

The following notice may appear throughout this document to remind you of these
precautions:
NOTICE: See “Protecting Against Electrostatic Discharge” in the safety
instructions at the front of this guide.
The following notice may appear throughout your Dell documentation to remind you
of these precautions:
NOTICE: See “Protecting Against Electrostatic Discharge” in your
Information
guide.
System
x
Page 9

Preface
About This Guide
This guide is intended for anyone who uses a Dell portable computer. It can be used
by both first-time and experienced computer users who want to learn about the features of the computer. This guide also provides basic troubleshooting procedures and
instructions for using the Dell Diagnostics to test your computer and its components.
Summaries of the chapters and appendixes of this guide follow:
Chapter 1, “Options and Upgrades,” describes the installation procedures for the
•
options and upgrades available from Dell for your computer.
Chapter 2, “Troubleshooting,” contains some initial checks and procedures that
•
you can use to solve basic computer problems and for some general guidelines
on analyzing software problems.
Chapter 3, “Installing System Software,” provides detailed instructions for rein-
•
stalling system drivers and software.
Chapter 4, “Getting Help,” describes the help tools Dell provides to assist you if
•
you have a problem with the computer. It also explains how and when to call Dell
for technical assistance.
Appendix A, “Technical Specifications,” is intended primarily as reference mate-
•
rial if you are interested in learning more about the details of your computer.
Appendix B, “Using the System Setup Program,” shows you how to access the
•
system setup program, which allows you to change system settings, such as the
boot device sequence.
Appendix C, “System Messages,” defines system messages and suggests a
•
solution if the message indicates a problem.
Appendix D, “Regulatory Notices,” is for those who are interested in which regu-
•
latory agencies have tested and approved the computer.
Appendix E, “Limited Warranty and Return Policy,” describes the warranty for
•
your Dell computer and the “Total Satisfaction” Return Policy.
xi
Page 10

Warranty and Return Policy Information
Dell Computer Corporation (“Dell”) manufactures its hardware products from parts
and components that are new or equivalent to new in accordance with industrystandard practices.
For information about the Dell warranty and return policy, see Appendix E, “Limited
Warranty and Return Policy.”
Other Documents You May Need
In addition to this Reference and Troubleshooting Guide, the following documentation is
included with your computer:
The Setup Guide provides instructions for setting up a Dell Inspiron computer and
•
for using your computer’s hardware.
The system Help contains essential information you need to use your computer.
•
To open the Help, click the
and click
You may also have one or more of the following documents:
Information updates describing changes to your computer or software.
•
NOTE: Always read any included update
tion—the updates contain the latest information.
System Help
.
button, point to
Start
Programs
consulting any other documenta-
before
-->
Dell Accessories
,
Operating system documentation is included if Dell installed the operating sys-
•
tem on your hard-disk drive. This documentation describes how to configure and
use your operating system software.
Notational Conventions
The following subsections list notational conventions used in this document.
Notes, Notices, and Cautions
Throughout this guide, blocks of text may be accompanied by an icon and printed in
bold type or in italic type. These blocks are notes, notices, and cautions, and they are
used as follows:
NOTE: A NOTE indicates important information that helps you make better use of
your computer system.
NOTICE: A NO TICE indicates ei th er potential dam age to hardware or lo s s
of data and tells you how to avoid the problem.
CAUTION: A CAUTION indicates a potentially hazar do u s si tuation which, if
not avoided, may result in minor or moderate injury .
xii
Page 11

Typographical Conventions
The following list defines (where appropriate) and illustrates typographical conventions used as visual cues for specific elements of text throughout this document:
Interface components are window titles, button and icon names, menu names
•
and selections, and other options that appear on the monitor screen or display.
They are presented in bold.
Example: Click OK.
Keycaps, the labeling that appears on the keys on a keyboard, are enclosed in
•
angle brackets.
Example: <Enter>
Key combinations are series of keys to be pressed simultaneously (unless
•
otherwise indicated) to perform a single function.
Example: <Ctrl><Alt><Enter>
Commands presented in lowercase bold are for reference purposes only and are
•
not intended to be typed at that particular point in the discussion.
Example: “Use the
In contrast, commands presented in the Courier New font are intended to be
typed as part of an instruction.
command to....”
setup
Example: “Type
Filenames and directory names are presented in lowercase bold.
•
Examples:
Synt ax lines consist of a command and all its possible parameters. Commands
•
are displayed in lowercase bold; variable parameters (those for which you substitute a value) are displayed in lowercase italics; constant parameters are displayed
in lowercase bold. The brackets indicate items that are optional.
Example:
Command lines consist of a command and may include one or more of the com-
•
mand’s possible parameters. Command lines are presented in the Courier New
font.
Example:
Screen text is text that appears on the screen of your display or external monitor.
•
It can be a system message, for example, or it can be text that you are instructed
to type as part of a command (referred to as a command line). Screen text is pre-
sented in the Courier New font.
Example: The following message appears on your screen:
No boot device available
Variables are symbols for which you substitute a value. They are presented in
•
italics.
Example: module n (where n represents the memory module number).
format
autoexec.bat
[drive:] [[path]filename] [/p]
del
del c:\myfile.doc
to format the diskette in drive A.”
and
c:\windows
xiii
Page 12

xiv
Page 13

Contents
Chapter 1 Options and Upgrades . . . . . . . . . . . . . . . . . . . . . . . . 1-1
Available Options and Upgrades . . . . . . . . . . . . . . . . . . . . . . . . . . . . . . . . . . . . . . . 1-1
Using Drives in the Media Bay . . . . . . . . . . . . . . . . . . . . . . . . . . . . . . . . . . . . . . . . 1-2
Swapping Media Bay Devices . . . . . . . . . . . . . . . . . . . . . . . . . . . . . . . . . . . . . 1-2
Swapping Devices While the Computer Is Turned Off . . . . . . . . . . . . . . . 1-2
Swapping Devices Using Softex BayManager . . . . . . . . . . . . . . . . . . . . . 1-3
Installing an Internal Hard-Disk Drive. . . . . . . . . . . . . . . . . . . . . . . . . . . . . . . . . . . . 1-4
Returning a Hard-Disk Drive to Dell . . . . . . . . . . . . . . . . . . . . . . . . . . . . . . . . . 1-5
Installing Memory Modules. . . . . . . . . . . . . . . . . . . . . . . . . . . . . . . . . . . . . . . . . . . 1-6
Connecting Other External Devices . . . . . . . . . . . . . . . . . . . . . . . . . . . . . . . . . . . . 1-9
Using a Port Replicator . . . . . . . . . . . . . . . . . . . . . . . . . . . . . . . . . . . . . . . . . . . . . . 1-9
Chapter 2 Troubleshooting . . . . . . . . . . . . . . . . . . . . . . . . . . . . . 2-1
Checking the Basics . . . . . . . . . . . . . . . . . . . . . . . . . . . . . . . . . . . . . . . . . . . . . . . . 2-1
Check Connections . . . . . . . . . . . . . . . . . . . . . . . . . . . . . . . . . . . . . . . . . . . . . 2-2
Evaluate Environmental Factors . . . . . . . . . . . . . . . . . . . . . . . . . . . . . . . . . . . . 2-2
Check the Electrical Power Source . . . . . . . . . . . . . . . . . . . . . . . . . . . . . . . . . 2-3
Running the Dell Diagnostics . . . . . . . . . . . . . . . . . . . . . . . . . . . . . . . . . . . . . . . . . 2-3
Start the Dell Diagnostics. . . . . . . . . . . . . . . . . . . . . . . . . . . . . . . . . . . . . . . . . 2-4
Dell Diagnostics Main Screen . . . . . . . . . . . . . . . . . . . . . . . . . . . . . . . . . . . . . 2-6
Confirm the System Configuration Information . . . . . . . . . . . . . . . . . . . . . . . . 2-7
Use the Dell Diagnostics Help Menu . . . . . . . . . . . . . . . . . . . . . . . . . . . . . . . . 2-8
Menu. . . . . . . . . . . . . . . . . . . . . . . . . . . . . . . . . . . . . . . . . . . . . . . . . . . . . 2-8
Keys . . . . . . . . . . . . . . . . . . . . . . . . . . . . . . . . . . . . . . . . . . . . . . . . . . . . . 2-8
Device Group . . . . . . . . . . . . . . . . . . . . . . . . . . . . . . . . . . . . . . . . . . . . . . 2-8
Device . . . . . . . . . . . . . . . . . . . . . . . . . . . . . . . . . . . . . . . . . . . . . . . . . . . . 2-8
Test . . . . . . . . . . . . . . . . . . . . . . . . . . . . . . . . . . . . . . . . . . . . . . . . . . . . . . 2-9
Versions . . . . . . . . . . . . . . . . . . . . . . . . . . . . . . . . . . . . . . . . . . . . . . . . . . 2-9
Exit the Dell Diagnostics . . . . . . . . . . . . . . . . . . . . . . . . . . . . . . . . . . . . . . . . . 2-9
xv
Page 14

Troubleshooting Procedures . . . . . . . . . . . . . . . . . . . . . . . . . . . . . . . . . . . . . . . . . . 2-9
Restart Your Computer . . . . . . . . . . . . . . . . . . . . . . . . . . . . . . . . . . . . . . . . . 2-10
Dry Out a Wet Computer. . . . . . . . . . . . . . . . . . . . . . . . . . . . . . . . . . . . . . . . 2-10
Test a Dropped or Damaged Computer. . . . . . . . . . . . . . . . . . . . . . . . . . . . . 2-11
Recover From a Program That Is Not Responding . . . . . . . . . . . . . . . . . . . . 2-12
Restart a Computer That Is Not Responding . . . . . . . . . . . . . . . . . . . . . . . . . 2-12
Resolve Audio Problems . . . . . . . . . . . . . . . . . . . . . . . . . . . . . . . . . . . . . . . . 2-13
Resolve CD-ROM or DVD-ROM Drive Problems. . . . . . . . . . . . . . . . . . . . . . 2-13
Resolve Diskette Drive Problems . . . . . . . . . . . . . . . . . . . . . . . . . . . . . . . . . 2-13
Resolve Display Problems . . . . . . . . . . . . . . . . . . . . . . . . . . . . . . . . . . . . . . . 2-14
Resolve External Monitor Problems . . . . . . . . . . . . . . . . . . . . . . . . . . . . . . . 2-14
Resolve External Keyboard Problems . . . . . . . . . . . . . . . . . . . . . . . . . . . . . . 2-15
Resolve Hard-Disk Drive Problems . . . . . . . . . . . . . . . . . . . . . . . . . . . . . . . . 2-15
Resolve Hardware Conflicts. . . . . . . . . . . . . . . . . . . . . . . . . . . . . . . . . . . . . . 2-15
Resolve Infrared Port Problems . . . . . . . . . . . . . . . . . . . . . . . . . . . . . . . . . . . 2-16
Resolve Memory Problems . . . . . . . . . . . . . . . . . . . . . . . . . . . . . . . . . . . . . . 2-17
Resolve Modem, Fax, and Internet Connection Problems . . . . . . . . . . . . . . 2-18
Resolve PC Card Problems . . . . . . . . . . . . . . . . . . . . . . . . . . . . . . . . . . . . . . 2-18
Resolve Software Problems . . . . . . . . . . . . . . . . . . . . . . . . . . . . . . . . . . . . . 2-19
Install and Configure Software . . . . . . . . . . . . . . . . . . . . . . . . . . . . . . . . 2-19
Resolve Touch Pad and Mouse Problems . . . . . . . . . . . . . . . . . . . . . . . . . . . 2-19
Resolve Television Problems . . . . . . . . . . . . . . . . . . . . . . . . . . . . . . . . . . . . . 2-20
Check the Television Type Setting . . . . . . . . . . . . . . . . . . . . . . . . . . . . . 2-20
Check the System Setup Program Settings . . . . . . . . . . . . . . . . . . . . . . 2-20
Chapter 3 Installing System Software . . . . . . . . . . . . . . . . . . . . . 3-1
Installing the Windows 98 Operating System. . . . . . . . . . . . . . . . . . . . . . . . . . . . . 3-1
Recreating the Hibernate (Save-to-Disk Suspend) File (Windows 98) . . . . . . . . . . 3-2
Boot Your Computer With the System Software CD . . . . . . . . . . . . . . . . . . . 3-2
Delete the Hibernate File. . . . . . . . . . . . . . . . . . . . . . . . . . . . . . . . . . . . . . . . . 3-3
Create the Hibernate File. . . . . . . . . . . . . . . . . . . . . . . . . . . . . . . . . . . . . . . . . 3-4
Enable Hibernate Support . . . . . . . . . . . . . . . . . . . . . . . . . . . . . . . . . . . . . . . . 3-4
View the Hibernate File Information . . . . . . . . . . . . . . . . . . . . . . . . . . . . . . . . 3-4
Installing Drivers and Utilities for Windows 98 . . . . . . . . . . . . . . . . . . . . . . . . . . . . 3-5
Install the Audio Driver (Windows 98) . . . . . . . . . . . . . . . . . . . . . . . . . . . . . . . 3-5
Install the Video Driver (Windows 98) . . . . . . . . . . . . . . . . . . . . . . . . . . . . . . . 3-6
Install the Touch Pad Driver (Windows 98) . . . . . . . . . . . . . . . . . . . . . . . . . . . 3-6
Install Softex BayManager (Windows 98) . . . . . . . . . . . . . . . . . . . . . . . . . . . . 3-7
Install the Internal Modem Driver (Windows 98) (Optional). . . . . . . . . . . . . . . 3-8
Install the Software DVD Decoder (Windows 98) (Optional) . . . . . . . . . . . . . . 3-9
Configuring the Television Control Panel Setting . . . . . . . . . . . . . . . . . . 3-10
Setting and Changing the DVD-ROM Drive Region Code . . . . . . . . . . . 3-10
xvi
Page 15

Install the Intel SpeedStep Utility (Windows 98) (Optional) . . . . . . . . . . . . . . 3-10
Installing Drivers and Utilities for Windows 2000 . . . . . . . . . . . . . . . . . . . . . . . . . 3-11
Install the Audio Driver (Windows 2000) . . . . . . . . . . . . . . . . . . . . . . . . . . . . 3-11
Install the Video Driver (Windows 2000) . . . . . . . . . . . . . . . . . . . . . . . . . . . . 3-12
Install the Touch Pad Driver (Windows 2000) . . . . . . . . . . . . . . . . . . . . . . . . 3-13
Install the Software DVD Decoder (Windows 2000) (Optional) . . . . . . . . . . . 3-14
Setting and Changing the DVD-ROM Drive Region Code. . . . . . . . . . . . 3-15
Install the Intel SpeedStep Utility (Windows 2000) (Optional) . . . . . . . . . . . . 3-15
Install the System Help From the System Software CD. . . . . . . . . . . . . . . . . . . . 3-16
Download the System Help From the Dell Support Web Site . . . . . . . . . . . . . . . 3-17
Updating Drivers and Utilities . . . . . . . . . . . . . . . . . . . . . . . . . . . . . . . . . . . . . . . . 3-17
Chapter 4 Getting Help . . . . . . . . . . . . . . . . . . . . . . . . . . . . . . . . 4-1
Technical Assistance Help Tools . . . . . . . . . . . . . . . . . . . . . . . . . . . . . . . . . . . . . . . 4-1
World Wide Web . . . . . . . . . . . . . . . . . . . . . . . . . . . . . . . . . . . . . . . . . . . . . . . 4-2
AutoTech Service . . . . . . . . . . . . . . . . . . . . . . . . . . . . . . . . . . . . . . . . . . . . . . . 4-2
TechFax Service . . . . . . . . . . . . . . . . . . . . . . . . . . . . . . . . . . . . . . . . . . . . . . . . 4-3
Automated Order-Status System . . . . . . . . . . . . . . . . . . . . . . . . . . . . . . . . . . . 4-3
Technical Support Service . . . . . . . . . . . . . . . . . . . . . . . . . . . . . . . . . . . . . . . . 4-3
Problems With Your Order . . . . . . . . . . . . . . . . . . . . . . . . . . . . . . . . . . . . . . . . . . . 4-3
Product Information. . . . . . . . . . . . . . . . . . . . . . . . . . . . . . . . . . . . . . . . . . . . . . . . . 4-4
Returning Items for Warranty Repair or Credit . . . . . . . . . . . . . . . . . . . . . . . . . . . . 4-4
Before You Call . . . . . . . . . . . . . . . . . . . . . . . . . . . . . . . . . . . . . . . . . . . . . . . . . . . . 4-5
Dell Contact Numbers . . . . . . . . . . . . . . . . . . . . . . . . . . . . . . . . . . . . . . . . . . . . . . . 4-7
Appendix A Technical Specifications . . . . . . . . . . . . . . . . . . . . . . . A-1
Appendix B Using the System Setup Program . . . . . . . . . . . . . . . . B-1
Accessing the System Setup Program . . . . . . . . . . . . . . . . . . . . . . . . . . . . . . . . . . B-1
Navigating Through the System Setup Program . . . . . . . . . . . . . . . . . . . . . . . B-2
Main Menu. . . . . . . . . . . . . . . . . . . . . . . . . . . . . . . . . . . . . . . . . . . . . . . . . . . . B-3
System Devices Menu. . . . . . . . . . . . . . . . . . . . . . . . . . . . . . . . . . . . . . . . . . . B-4
Security Menu . . . . . . . . . . . . . . . . . . . . . . . . . . . . . . . . . . . . . . . . . . . . . . . . . B-5
Power Menu. . . . . . . . . . . . . . . . . . . . . . . . . . . . . . . . . . . . . . . . . . . . . . . . . . . B-6
Boot Menu . . . . . . . . . . . . . . . . . . . . . . . . . . . . . . . . . . . . . . . . . . . . . . . . . . . . B-7
Exit Menu. . . . . . . . . . . . . . . . . . . . . . . . . . . . . . . . . . . . . . . . . . . . . . . . . . . . . B-8
Appendix C System Messages . . . . . . . . . . . . . . . . . . . . . . . . . . . . C-1
xvii
Page 16

Appendix D Regulatory Notices . . . . . . . . . . . . . . . . . . . . . . . . . . . D-1
FCC Notices (U.S. Only) . . . . . . . . . . . . . . . . . . . . . . . . . . . . . . . . . . . . . . . . . . . . . D-2
Class A. . . . . . . . . . . . . . . . . . . . . . . . . . . . . . . . . . . . . . . . . . . . . . . . . . . . . . . D-2
Class B. . . . . . . . . . . . . . . . . . . . . . . . . . . . . . . . . . . . . . . . . . . . . . . . . . . . . . . D-3
Modem Regulatory Information. . . . . . . . . . . . . . . . . . . . . . . . . . . . . . . . . . . . D-3
Fax Branding. . . . . . . . . . . . . . . . . . . . . . . . . . . . . . . . . . . . . . . . . . . . . . . D-4
IC Notice (Canada Only) . . . . . . . . . . . . . . . . . . . . . . . . . . . . . . . . . . . . . . . . . . . . . D-4
Modem Regulatory Information. . . . . . . . . . . . . . . . . . . . . . . . . . . . . . . . . . . . D-5
CTR21 Declaration . . . . . . . . . . . . . . . . . . . . . . . . . . . . . . . . . . . . . . . . . . . . . . . . . D-6
New Zealand Telecom Warnings . . . . . . . . . . . . . . . . . . . . . . . . . . . . . . . . . . . . . . D-6
General. . . . . . . . . . . . . . . . . . . . . . . . . . . . . . . . . . . . . . . . . . . . . . . . . . . . . . . D-6
Important Notice . . . . . . . . . . . . . . . . . . . . . . . . . . . . . . . . . . . . . . . . . . . . . . . D-7
CE Notice (European Union) . . . . . . . . . . . . . . . . . . . . . . . . . . . . . . . . . . . . . . . . . . D-7
Battery Disposal . . . . . . . . . . . . . . . . . . . . . . . . . . . . . . . . . . . . . . . . . . . . . . . . . . . D-8
EN 55022 Compliance (Czech Republic Only). . . . . . . . . . . . . . . . . . . . . . . . . . . . . D-8
VCCI Notice (Japan Only) . . . . . . . . . . . . . . . . . . . . . . . . . . . . . . . . . . . . . . . . . . . . D-8
Class A ITE. . . . . . . . . . . . . . . . . . . . . . . . . . . . . . . . . . . . . . . . . . . . . . . . . . . . D-9
Class B ITE. . . . . . . . . . . . . . . . . . . . . . . . . . . . . . . . . . . . . . . . . . . . . . . . . . . . D-9
Polish Center for Testing and Certification Notice . . . . . . . . . . . . . . . . . . . . . . . . . D-9
!"#$%$&'$()*+,-'.%*(/.&012#(3$4$5('(/.10"6'-$78'
)*9*,0$:.('&,012-78.(;.9<'.79.5,0=$
NOM Information (Mexico Only). . . . . . . . . . . . . . . . . . . . . . . . . . . . . . . . . . . . . . D-11
Información para NOM (únicamente para México) . . . . . . . . . . . . . . . . . . . . . . . . D-12
. . . . . . . . . . . . . . . . . . . . . . . . . . . . . . . . . . D-10
. . . . . . . . . . . . . . . . . . . . . . D-10
Appendix E Limited Warranty and Return Policy . . . . . . . . . . . . . E-1
Three-Year Limited Warranty (U.S. Only) . . . . . . . . . . . . . . . . . . . . . . . . . . . . . . . . E-1
Coverage During Year One . . . . . . . . . . . . . . . . . . . . . . . . . . . . . . . . . . . . . . . E-1
Coverage During Years Two and Three . . . . . . . . . . . . . . . . . . . . . . . . . . . . . . E-2
General Provisions . . . . . . . . . . . . . . . . . . . . . . . . . . . . . . . . . . . . . . . . . . . . . . E-2
Three-Year Limited Warranty (Canada Only). . . . . . . . . . . . . . . . . . . . . . . . . . . . . . E-3
Coverage During Year One . . . . . . . . . . . . . . . . . . . . . . . . . . . . . . . . . . . . . . . E-4
Coverage During Years Two and Three . . . . . . . . . . . . . . . . . . . . . . . . . . . . . . E-4
General Provisions . . . . . . . . . . . . . . . . . . . . . . . . . . . . . . . . . . . . . . . . . . . . . . E-5
One-Year End-User Manufacturer Guarantee
(Latin America and the Caribbean Only) . . . . . . . . . . . . . . . . . . . . . . . . . . . . . . . . . E-5
Guarantee . . . . . . . . . . . . . . . . . . . . . . . . . . . . . . . . . . . . . . . . . . . . . . . . . . . . E-5
Exclusions . . . . . . . . . . . . . . . . . . . . . . . . . . . . . . . . . . . . . . . . . . . . . . . . . . . . E-6
Making a Claim . . . . . . . . . . . . . . . . . . . . . . . . . . . . . . . . . . . . . . . . . . . . . . . . E-6
Limitation and Statutory Rights . . . . . . . . . . . . . . . . . . . . . . . . . . . . . . . . . . . . E-6
“Total Satisfaction” Return Policy (U.S. and Canada Only). . . . . . . . . . . . . . . . . . . E-7
Macrovision Product Notice . . . . . . . . . . . . . . . . . . . . . . . . . . . . . . . . . . . . . . . . . . E-8
xviii
Page 17

Index
Figures
Tables
Figure 1-1. Removing a Device From the Media Bay . . . . . . . . . . . . . . . . . . . . . 1-3
Figure 1-2. Removing the Internal Hard-Disk Drive . . . . . . . . . . . . . . . . . . . . . . . 1-5
Figure 1-3. Repackaging the Hard-Disk Drive . . . . . . . . . . . . . . . . . . . . . . . . . . . 1-6
Figure 1-4. Removing the Memory Module Cover . . . . . . . . . . . . . . . . . . . . . . . 1-7
Figure 1-5. Removing a Memory Module . . . . . . . . . . . . . . . . . . . . . . . . . . . . . . 1-8
Figure 1-6. Installing a Memory Module . . . . . . . . . . . . . . . . . . . . . . . . . . . . . . . 1-8
Figure 2-1. Diagnostics Menu . . . . . . . . . . . . . . . . . . . . . . . . . . . . . . . . . . . . . . . 2-5
Figure 2-2. Dell Diagnostics Main Screen . . . . . . . . . . . . . . . . . . . . . . . . . . . . . . 2-7
Figure 3-1. Diagnostics Menu . . . . . . . . . . . . . . . . . . . . . . . . . . . . . . . . . . . . . . . 3-3
Figure 4-1. Diagnostics Checklist. . . . . . . . . . . . . . . . . . . . . . . . . . . . . . . . . . . . . 4-6
Figure B-1. Main Menu. . . . . . . . . . . . . . . . . . . . . . . . . . . . . . . . . . . . . . . . . . . . . B-3
Figure B-2. System Devices Menu. . . . . . . . . . . . . . . . . . . . . . . . . . . . . . . . . . . . B-4
Figure B-3. Security Menu . . . . . . . . . . . . . . . . . . . . . . . . . . . . . . . . . . . . . . . . . . B-5
Figure B-4. Power Menu . . . . . . . . . . . . . . . . . . . . . . . . . . . . . . . . . . . . . . . . . . . B-6
Figure B-5. Boot Menu. . . . . . . . . . . . . . . . . . . . . . . . . . . . . . . . . . . . . . . . . . . . . B-7
Figure B-6. Exit Menu. . . . . . . . . . . . . . . . . . . . . . . . . . . . . . . . . . . . . . . . . . . . . . B-8
Figure D-1. VCCI Class A ITE Regulatory Mark . . . . . . . . . . . . . . . . . . . . . . . . . . D-9
Figure D-2. VCCI Class B ITE Regulatory Mark . . . . . . . . . . . . . . . . . . . . . . . . . . D-9
Table 4-1. International Dialing Codes . . . . . . . . . . . . . . . . . . . . . . . . . . . . . . . . 4-8
Table 4-2. Dell Contact Numbers . . . . . . . . . . . . . . . . . . . . . . . . . . . . . . . . . . . . 4-9
Table A-1. Technical Specifications. . . . . . . . . . . . . . . . . . . . . . . . . . . . . . . . . . . A-1
Table B-1. System Setup Program Navigation Keys . . . . . . . . . . . . . . . . . . . . . . B-2
Table C-1. System Error Messages . . . . . . . . . . . . . . . . . . . . . . . . . . . . . . . . . . C-1
xix
Page 18

xx
Page 19

CHAPTER 1
Options and Upgrades
This chapter describes the installation procedures for the options and upgrades available from Dell for your computer.
Available Options and Upgrades
Dell offers the following options for your computer:
Internal 56-kilobyte/second (KB/sec) modem
•
DVD-ROM drive module for the media bay
•
Zip drive module for the media bay
•
External devices, such as pointing devices, printers, external monitors, external
•
keyboards, and numeric keypads
Batteries
•
Replacement hard-disk drives
•
Port replicator with a Sony Philips Digital Interface (SPDIF) AC3 (may include an
•
optional network interface controller [NIC])
NOTE: The Sony Philips Digital Interface does not function with the Microsoft®
Windows
®
2000 operating system.
Memory modules (32-, 64-, 128-, 192-, and 256-megabyte [MB] capacities)
•
Leather and nylon carr ying cases
•
External microphone, external speakers, and headphones
•
Network PC Cards
•
To order any of these upgrades, call Dell. For instructions, refer to Chapter 4, “Getting
Help,” or to “Contacting Dell” in the system Help. To open the Help, click the
button, point to
support.dell.com Options and Upgrades 1-1
Programs —> Dell Accessories
, and click
System Help
.
Start
Page 20

Using Drives in the Media Bay
The media bay, located in the center of the front of the computer, supports the following types of drive modules:
CD-ROM drive module
•
CD-RW drive module
•
DVD-ROM drive module
•
Zip drive module
•
Dell ships your computer with a CD-ROM drive module (or an optional DVD-ROM
drive module) installed in the media bay.
Swapping Media Bay Devices
You can swap devices while the computer is turned off or, by using the Softex
BayManager application program, while the computer is turned on.
NOTE: Device swapping is a feature that is built into the Windows 2000 operating
system. Consequently, Softex BayManager is not supported by Windows 2000.
NOTICE: To prevent irreparable damage to the docking connector, do not
remove or replace media bay devices while the computer is connected to a
port replicator.
Swapping Devices While the Computer Is Turned Off
1. Save and close any open files, exit any open application programs, and shut down
the computer.
2. Remove the device from the media bay:
a. Close the display and turn the computer over so that it is oriented as illus-
trated in Figure 1-1.
b. Slide and hold the latch release in the direction of the arrow shown in
Figure 1-1.
c. Pull the device out of the media bay.
1-2 Dell Inspiron 5000 Reference and Troubleshooting Guide
Page 21
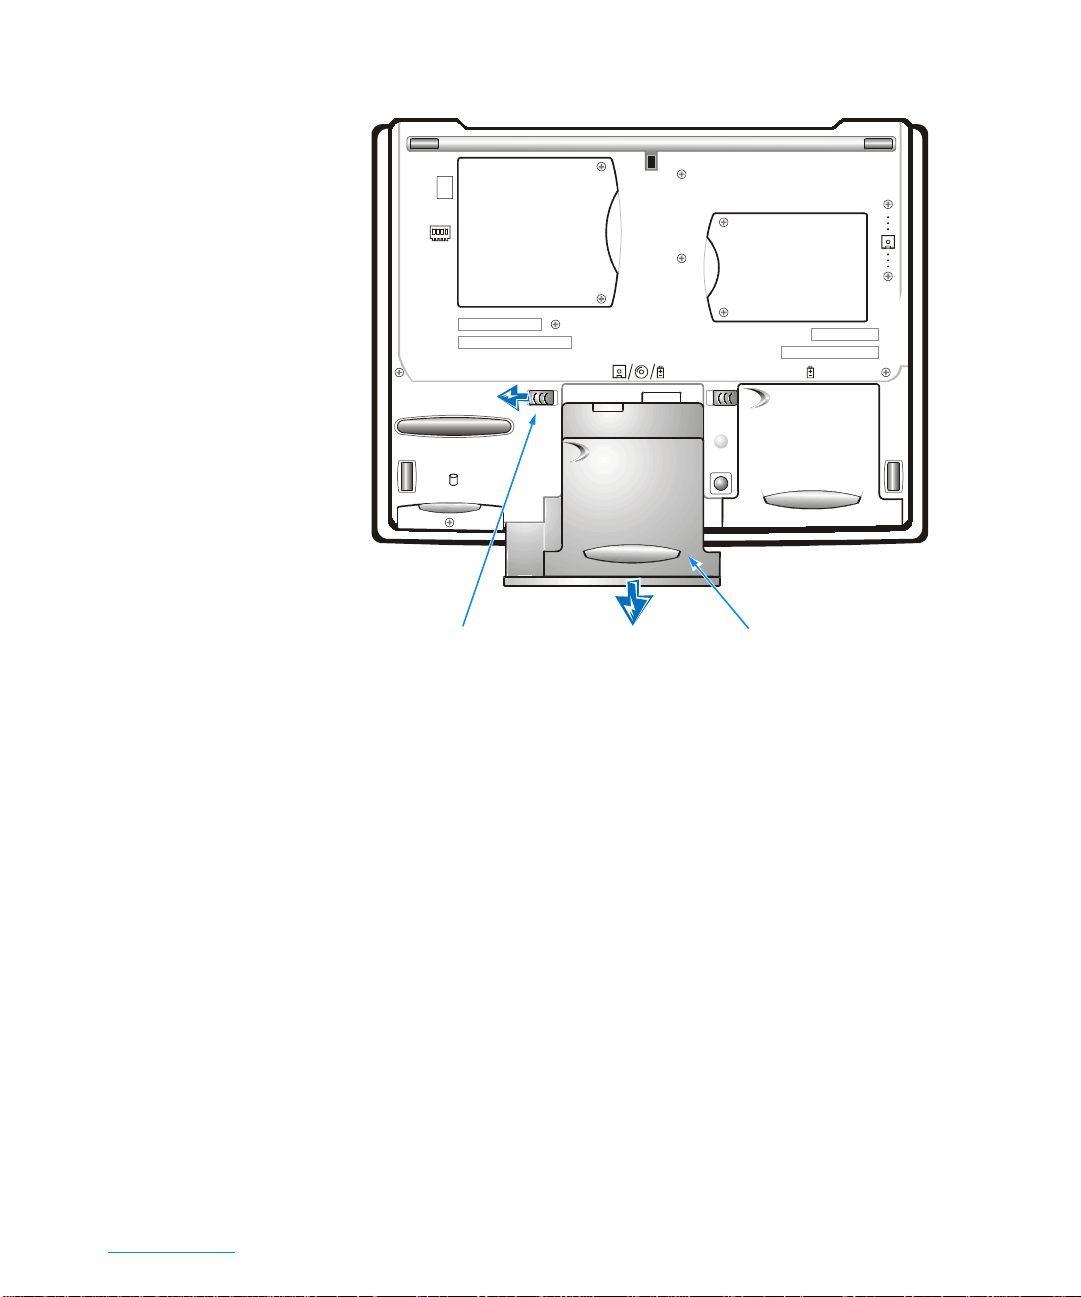
bottom of computer
latch release
optional device
in media bay
Figure 1-1. Removing a Device From the Media Bay
NOTICE: If you wish to inse rt an o th e r m e dia bay de vice, insert the device
before you dock and turn on the computer.
3. Insert the device into the media bay and push in the device until you see and hear
the latch release click.
4. Turn on the computer.
Swapping Devices Using Softex BayManager
Softex BayManager is a utility that makes it possible to swap media bay devices without turning off the computer.
NOTICE: If you atte m pt to remove a device usin g the Softex BayManager
utility and the computer is docked, you see an error message stating that
the operation cannot be performed.
1. Right-click the Softex BayManager icon on the Microsoft
2. Click the appropriate option—
Remove/Swap or Insert a Device
®
Windows® taskbar.
.
support.dell.com Options and Upgrades 1-3
Page 22

3. Follow the instructions on the display.
When the display is blank and the power indicator light flashes, it is safe to
remove or swap devices.
Installing an Internal Hard-Disk Drive
NOTICE: Hard-disk drives are extremely fragile and must be handled carefully. Even a slig ht jar or b ump can dam age th e spi nning heads and plates ,
rendering the drive inop erable.
CAUTION: The hard-disk drive may be
metal housing of the hard-disk drive if you remove the drive from the computer when the drive is hot.
NOTES: You need the Microsoft Windows Installation CD and the System Software
CD to install the Microsoft Windows operating system as well as device drivers and
utilities on the new hard-disk drive.
The basic input/output system (BIOS) may not support hard-disk drives obtained from
vendors other than Dell. Dell does not guarantee compatibility or provide support for
hard-disk drives obtained from other sources.
NOTICE: To prevent data loss, turn off your computer before removing or
installing a hard-disk drive. Do not remove the hard-disk drive if the computer is in standby mode or hibern ate (save-to-disk suspen d) mode, or if
the hard-disk drive acc e ss in dicator is lit.
To install an internal hard-disk drive, perform the following steps:
1. Save and close any open files, exit any open application programs, and shut down
the computer.
2. Remove all installed batteries and peripherals, and disconnect the AC adapter
cable from the computer.
3. Turn the computer over, and remove the screw securing the hard-disk drive cover
as shown in Figure 1-2.
NOTICE: When the hard-disk drive is not in the computer, protect the drive
from exposure to static electricity by storing it in protective antistatic
packaging.
to the touch.
hot
Do not touch
the
1-4 Dell Inspiron 5000 Reference and Troubleshooting Guide
Page 23
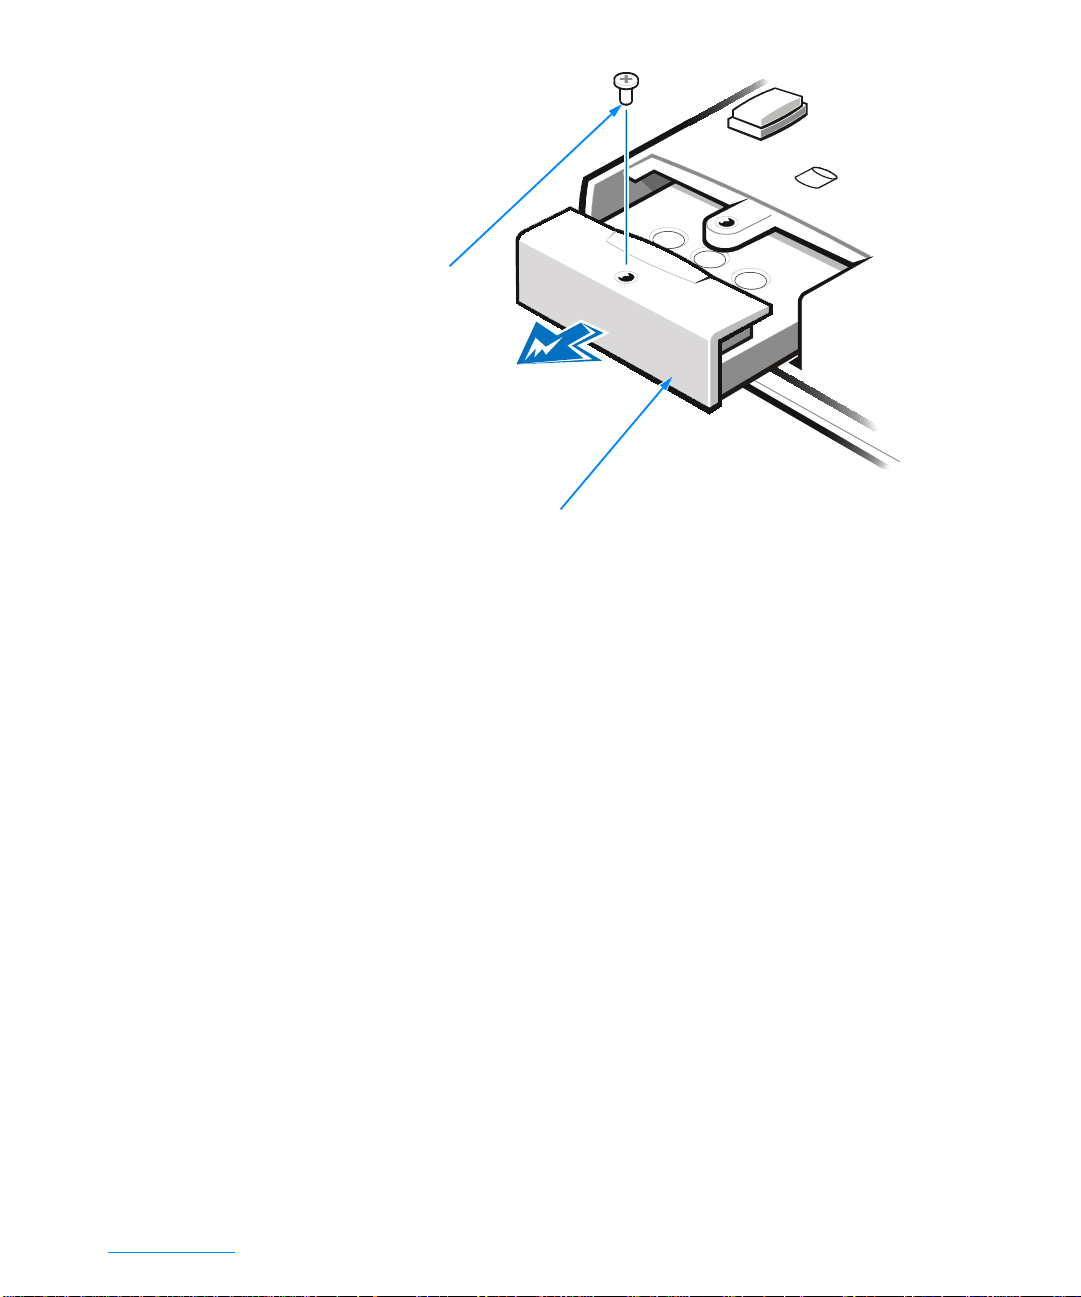
bottom of computer
screw
hard-disk drive
Figure 1-2. Removing the Int ern al Hard-Disk Drive
4. Slide out the hard-disk drive.
5. Remove the new hard-disk drive from its packaging.
Save the original packaging to use when storing or shipping the hard-disk drive.
C
NOTICE: You may notice some resistance as the driv e conne cts to its interface connector at the back of the hard-disk drive bay. Use firm, even
pressure to slide the drive into place. Do not forc e the drive into place.
6. Slide the new drive into place.
7. Tighten the screw you loosened in step 3.
8. Test the drive by running the
IDE Devices
tests in the Dell Diagnostics.
For information on running the diagnostics, see “Running the Dell Diagnostics” in
Chapter 2.
9. Install the Dell-provided operating system as well as the drivers and utilities.
See Chapter 3, “Installing System Software,” for instructions.
Returning a Hard-Disk Drive to Dell
To return your hard-disk drive to Dell, you must ship it in its original foam packaging.
Otherwise, the hard-disk drive may be damaged in transit.
support.dell.com Options and Upgrades 1-5
Page 24

I
hard-disk drive
Figure 1-3. Repackaging the Hard-Disk Drive
Installing Memory Modules
NOTE: Your computer has two memory module sockets. All Dell memory modules
(except the 192-MB capacity module) can be installed in either socket.
NOTICE: The 192-MB memory modules are socket-specific. Before installing a 192-MB memory module, refer to the markings on the memory
module to determine which socket accepts the module.
CAUTION: Before working inside your computer, read “Protecting Against
Electrostatic Discharge” found in th e “ Safety Instructio n s ” at the front of
this guide.
NOTICE: Do not install or remove a memory module when the computer is
turned on, in standby mode , or in hibernate (save-to-disk suspend) mode.
To install a memory module, perform the following steps:
1. Save and close any open files, exit any open application programs, and shut down
the computer.
2. Remove all installed batteries and peripherals, and disconnect the AC adapter
cable from the computer.
3. Ground yourself by touching a metal input/output (I/O) connector on the back of
the computer.
4. Turn the computer over as shown in Figure 1-4, remove the screws, and lift up
the memory module cover.
1-6 Dell Inspiron 5000 Reference and Troubleshooting Guide
Page 25
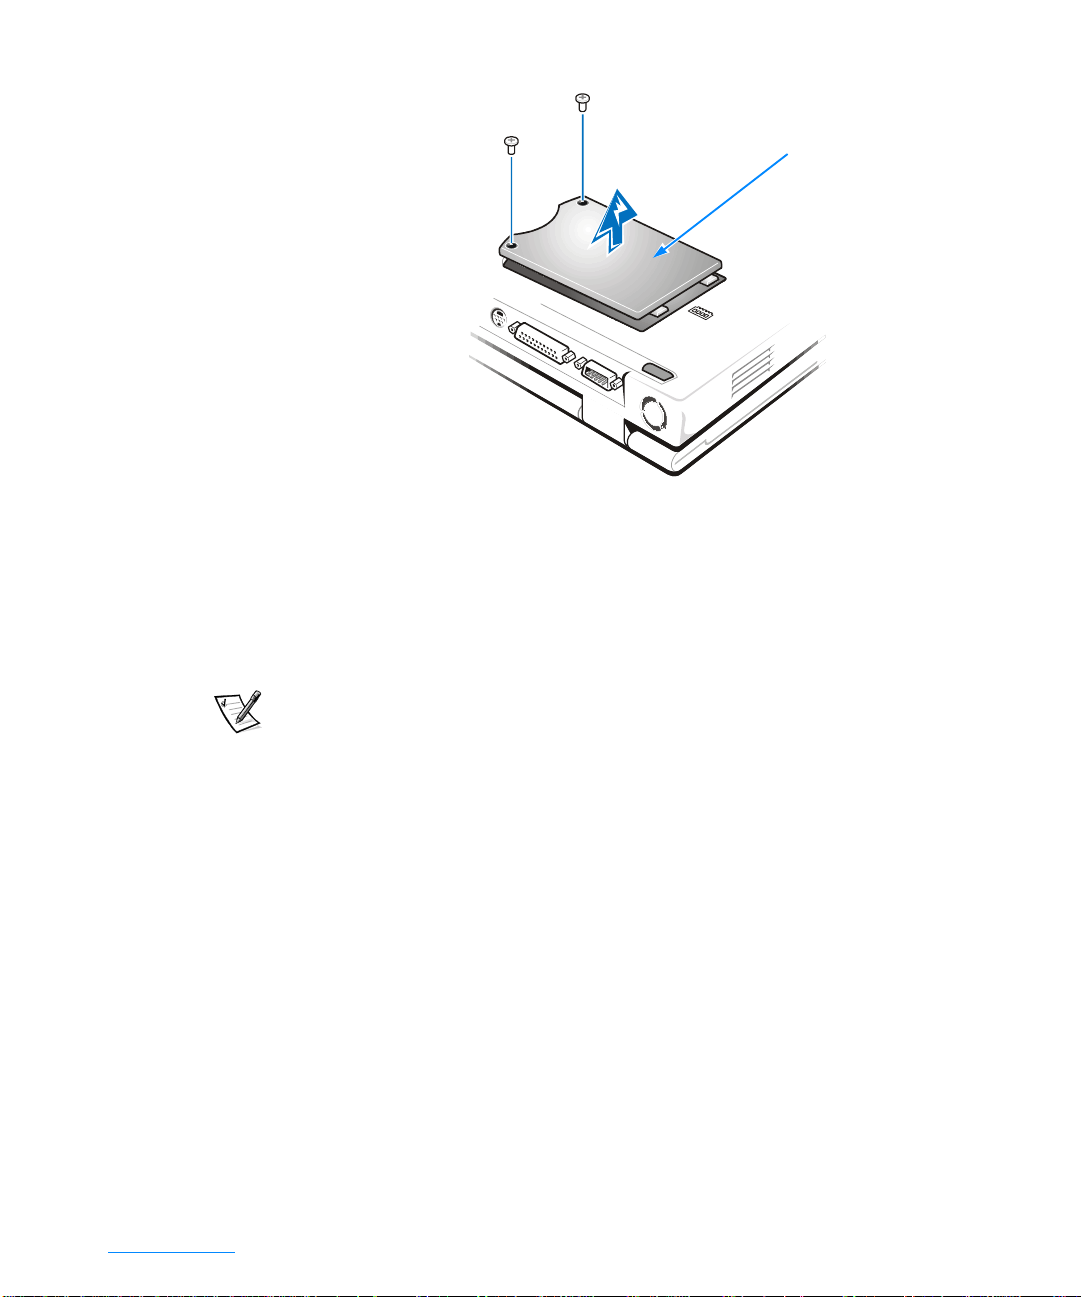
bottom of computer
memory module
cover
Figure 1-4. Removing the Memory Module Cover
NOTICE: T o prev ent damage to th e computer, do not use tools to spread the
inner metal tabs of the socket when you are installing or removing a memory module.
5. If you are replacing a memory module, remove the installed memory module.
NOTES: The 192-MB memory modules are socket-specific. If you install a
192-MB memory module, refer to the markings on the memory module to determine which socket will accept the module.
If a single memory module is installed and you are adding an additional memory
module, put the additional module in the available socket. You must remove a
memory module only to replace a module.
6. Using your fingernails, carefully spread apart the inner metal tabs of the memory
module socket just far enough for the memory module to disengage from the
socket (the module should pop up slightly). Then lift the memory module away
from the socket.
support.dell.com Options and Upgrades 1-7
Page 26

memory
module
Figure 1-5. Removing a Memory Module
7. Insert the memory module as shown in Figure 1-6:
a. Align the notch in the edge connector with the slot in the center of the mem-
ory module socket.
b. Press the memory module edge connector firmly into the socket.
c. Pivot the module down until it clicks.
memory
module
Figure 1-6. Installing a Memory Module
8. Replace the memory module cover screws.
9. Reinstall the battery in the battery bay.
10. Reconnect peripherals to your computer, and connect your computer and peripherals to electrical outlets.
11. Turn on the computer.
As the computer boots, the system setup program detects the additional memory and automatically updates the system configuration information.
1-8 Dell Inspiron 5000 Reference and Troubleshooting Guide
Page 27

12. Confirm that the system configuration information reflects the newly installed
memory by checking the
value on the
To enter the system setup program, press <F2> while the computer is booting.
The
Main
Memory
modules may not be installed properly. Repeat steps 1 through 12 until the memory total is correct.
NOTES: The memory total shown in the system setup program may be approximately 384 KB less than the total amount of installed memory.
If the memory module is not installed properly, the computer will not boot. No
error message indicates this failure.
Main
menu appears. If the
value does not equal the approximate total of the installed memory, the
System Memory
menu of the system setup program.
System Memory
value and the
value plus the
Extended Memory
Extended
13. Run th e
installed memory modules operate correctly.
For instructions, see “Running the Dell Diagnostics” in Chapter 2.
14. If you add additional memory to your computer, you must delete and recreate the
hibernate (save-to-disk suspend) file on your hard-disk drive to accommodate the
new memory.
For instructions, see “Recreating the Hibernate (Save-to-Disk Suspend) File” in
Chapter 3.
System Memory
test in the Dell Diagnostics to confirm that the
Connecting Other External Devices
For instructions, see “Connecting External Devices” in the system Help. To open the
Help, click the
System Help.
button, point to
Start
Programs—> Dell Accessories
, and click
Using a Port Replicator
If you purchased a port replicator from Dell, see the Port Replicator User’s Guide for
operating instructions.
support.dell.com Options and Upgrades 1-9
Page 28

1-10 Dell Inspiron 5000 Reference and Troubleshooting Guide
Page 29

CHAPTER 2
Troubleshooting
This chapter helps you to solve some typical computer problems. Complete the steps
in this chapter before you call Dell for technical assistance. If you find that you need
technical assistance to solve your problem, record your findings on a copy of the
Diagnostics Checklist (see Figure 4-1) before you call Dell.
NOTE: Before you begin any of the troubleshooting procedures, ensure that
Quiet Boot
Appendix B, “Using the System Setup Program.”
CAUTION: To help prevent the risk of electrical shock, disconnect all external devices, re move the battery, and disconnect the AC adapter from the
computer before installing or replacin g th e ha rd-disk drive and m emo ry
modules.
is set to
Disabled
Checking the Basics
NOTE: If your computer is wet or damaged, proceed directly to “Dry Out a Wet Computer” or “Test a Dropped or Damaged Computer” found later in this chapter.
in the
menu of the system setup program. See
Main
If the problem you are experiencing began after making a change to your computer,
such as installing new hardware or software, undo the change if possible. If undoing
the change resolves the problem, review the documentation and any updates or supplements (for example, readme files) for the software or hardware that you changed.
Typically, readme files provide installation information, describe new product enhancements or corrections that have not yet been documented, and list known problems.
If you were trying to install new hardware, ensure that you changed the appropriate
settings in the system setup program for the new hardware configuration (refer to
Appendix B, “Using the System Setup Program”).
™
NOTE: DellWare
manufacturer’s documentation that accompanies the item.
support.dell.com Troubleshooting 2-1
products are supported by the product manufacturer. Refer to the
Page 30

Check Connections
Be sure the following items are properly connected or installed:
AC adapter and AC power cable
•
Second battery or other optional device in the media bay
•
Cables that connect external devices through the input/output (I/O) connectors
•
and ports on the computer.
NOTE: See “System Features” in the system Help for the location of the external connectors and controls.
Loose or improperly connected cables are likely sources of problems for your computer, external monitor, or other peripherals (such as a printer, external keyboard, or
mouse). A quick check of all cable connections can easily solve these problems. If the
connector has two small thumbscrews, ensure that the screws are tight. In addition,
check for damaged or frayed cables and for bent pins on connectors.
Evaluate Environmental Fact or s
A number of external factors, including temperature extremes and humidity, magnetic
influences, sources of electromagnetic interference (EMI), and poor input power or
signal quality, can interfere with the performance of your computer and attached
devices. Monitors are especially susceptible to environmental factors. The following
items can adversely affect the performance of a computer:
Inadequate ventilation from operating the computer in a confined space, such as
•
a desk enclosure
Direct sunlight
•
Power sags and surges
•
Substandard electrical wiring
•
Excessive telephone line noise
•
High-voltage electrical appliances on the same circuit or placed in close proximity
•
to the computer
Generation of magnetic fields by speakers (especially a subwoofer) or a tele-
•
phone placed too close to the monitor
Fluorescent lights
•
Use of electrical extension cords and keyboard and mouse extension cables
•
Use of an overloaded power strip or multiple power strips from one electrical outlet
•
Presence of electrical conduits in an adjoining wall or elevators on the other side
•
of the wall
Presence of large metal beams inside the wall behind the computer
•
To alleviate the effects of these factors, try removing the potential problem source or
move the computer to another location.
2-2 Dell Inspiron 5000 Reference and Troubleshooting Guide
Page 31

Check the Electrical Power Source
If you are experiencing problems with power, perform the following checks:
Check the computer power indicator. When lit, the power indicator verifies that
•
the power supply is operating.
Verify that the electrical outlet is functional by plugging an operational device,
•
such as a lamp, into the outlet.
Plug the computer directly into a functioning electrical outlet.
•
If your computer is connected to a power strip, shut down the computer. Turn off
•
and then turn on the power strip to reset it.
Running the Dell Diagnostic s
The Dell Diagnostics helps you to check your computer hardware without any additional equipment and without destroying any data. By using the diagnostics, you can
have confidence in your computer’s operation. If you find a problem you cannot solve
by yourself, the diagnostic tests can provide you with important information. Record
this information on a copy of the Diagnostics Checklist (see Figure 4-1) before you call
Dell for technical assistance.
NOTICE: The Dell Diagnostics is specifically designed for your computer. Do
not run the Dell Diagnostics on any other computer. Using this diagnostic
program with oth er computers may cause inco rrect computer responses or
result in error messa ge s.
The Dell Diagnostics provides a series of menus and options from which you can
choose particular device group tests. You can also control the sequence in which the
tests are run. Other helpful features include:
A menu category called
•
An option that allows you to choose the number of times a device group test is
•
repeated
The ability to display or print out test results, or to save them in a file
•
The ability to choose the option to temporarily suspend testing if an error is
•
detected, or to terminate testing if an adjustable error limit is reached
A menu category called
•
parameters
A menu category called
•
the selected device group
Status messages that inform you whether device group tests ran successfully
•
Error messages that appear if problems are detected
•
support.dell.com Troubleshooting 2-3
Options
Devices
Config
that lets you run tests individually or collectively
that briefly describes each test and its
that describes the configuration of the devices in
Page 32

If a major component or device in your computer does not function properly, you may
have a component failure. You can use the Dell Diagnostics as long as the following
components are functioning properly:
Microprocessor
•
Display
•
Keyboard
•
CD-ROM or DVD-ROM drive module
•
If you know which components you need to test, select the appropriate diagnostic
device group tests you want to run. If you are unsure about how to begin diagnosing a
problem, see the following sections.
Start the Dell Diagnostics
NOTES: The Dell Diagnostics runs in MS-DOS® mode. When the computer runs on a
battery in MS-DOS mode, the battery status indicator glows amber when approximately 10 percent of the battery charge remains, and it flashes amber when
approximately 3 percent of the battery charge remains. If the battery status indicator
becomes amber, connect the computer to AC power using the AC adapter. If AC
power is not available, turn off the computer until AC power is available.
The standby and hibernate modes are Windows power management features. These
power management modes are not available while the computer is running in
MS-DOS mode. For information on the standby and hibernate modes, see “Conserving Power” in the system Help.
External Universal Serial Bus (USB) keyboards only function when Windows 98
Second Edition is running. Use the integrated keyboard when you use the Dell
Diagnostics.
1. Save and close any open files, exit any open application programs, and shut down
the computer.
2. If the computer is docked, undock it.
For instructions, see the Port Replicator User’s Guide.
3. Turn on the computer.
4. Press <F2> when you see the Dell logo to access the system setup program.
5. Press the right-arrow key to highlight
6. Press the down-arrow key to highlight a device, and then press <F5> to move the
device down the list or press <F6> to move the device up the list. Select the following boot sequence:
•
Floppy
•
Internal Hard Drive
•
CD ROM/DVD
2-4 Dell Inspiron 5000 Reference and Troubleshooting Guide
Boot
.
Page 33

7. Press <F10> to save your changes and exit the system setup program.
8. When the
you want to save the configuration changes and exit the system setup program.
The computer restarts automatically.
9. Insert the System Software CD into the CD-ROM or DVD-ROM drive.
10. Ensure that the diskette drive does not contain a diskette.
11. Shut down the computer.
12. Turn on the computer.
The Dell Diagnostics begins automatically.
NOTES: You must turn off the computer and turn on the computer with the
System Software CD in the CD-ROM or DVD-ROM drive module to use the Dell
Diagnostics.
Do not run the Dell Diagnostics while Windows is running.
Before you read the rest of this section, you may want to start the Dell
Diagnostics so that you can see it on your display.
When you start the diagnostics, the Dell
sage telling you that the diagnostics is loading.
After the diagnostic utility loads, the
Setup Confirmation
screen appears, press <Enter> to confirm that
™
logo screen appears, followed by a mes-
Diagnostics Menu
appears (see Figure 2-1).
Fully Test All Devices
Quickly Test All Devices
Select Devices to Test
Exit to MS-DOS
Figure 2-1. Diagnostics Menu
The menu allows you to choose to run all or specific diagnostic tests or to exit to the
MS-DOS prompt. You can choose from the following options:
•
Fully Test All Devices
components.
•
Quickly Test All Devices
require your interaction. Dell recommends that you choose this option—you may
be able to trace the problem quickly.
support.dell.com Troubleshooting 2-5
— This option thoroughly checks all computer
— This option runs only the subtests that do not
Page 34

•
Select Devices to Test
for testing.
To select an option from this menu, press the up- or down-arrow key to highlight the
option and press <Enter>.
— This option allows you to select particular components
Dell Diagnostics Main Screen
When you select
nostics screen appears (see Figure 2-2).
Information on the main screen of the diagnostics is presented in the following areas:
Text at the top of the screen identifies the Dell Diagnostics version on your
•
computer.
On the left side of the screen, the
•
groups in the order they will run if you select
gory. Press the up- or down-arrow key to highlight a device group.
On the right side of the screen, the
•
currently detected hardware.
The lines at the bottom of the screen show the menu choices. The first line lists
•
the categories you can select; press the left- or right-arrow key to highlight a
menu category. The last line gives information about the category currently
highlighted.
Select Devices to Test
from the
Device Groups
Devices for Highlighted Group
Diagnostics Menu
area lists the diagnostic test
from the
All
Run tests
, the main diag-
menu cate-
area lists the
2-6 Dell Inspiron 5000 Reference and Troubleshooting Guide
Page 35

Dell Computer Corporation (www.dell.com)
Diagnostics Version X.XX
Device Groups
System Board Devices
Processor Cache
System Memory
Inspiron
VESA/VGA Interface
Universal Serial Bus Interface
Devices for Highlighted Group
DMA Controller
Realtime Clock
System Timer
Interrupt Controller
System Speaker
Floating Point Unit
PC-AT Compatible Keyboards
Pointing Devices
Serial Ports
Parallel Ports
Diskette
IDE Devices
Audio Controller
Misc. PCI Devices
Device Groups: Run Tests Devices Select Config Help
Display the Run tests menu. Press ESC for previous menu.
Figure 2-2. Dell Diagnostics Main Screen
Confirm the System Configuration Information
When you boot your computer from your System Software CD, the diagnostics displays a list of the computer devices and components in the
the main screen.
Do not be concerned if the
components or devices connected to your computer. For example, you may not see a
printer listed, although you know one is attached to your computer. If the printer is
connected to the computer through the parallel port connector, you can test the
printer connection with the
support.dell.com Troubleshooting 2-7
Device Groups
Parallel Ports
area does not list the names of all the
test.
Device Groups
area on
Page 36

Use the Dell Diagnostics Help Menu
Several comprehensive
nostics. Each category explains the menu item, test group, subtest, and test and error
results. To enter the
Help
menus provide instructions on how to use the Dell Diag-
Help
menu, perform the following steps:
1. Press the up- or down-arrow key to highlight
nostics Menu
2. Press <Enter>.
3. Press <h>.
The categories on the
Versions
testing.
. The categories provide detailed descriptions of the devices that you are
.
menu are
Help
Menu, Keys, Device Group, Device, Te s t
Select Devices to Test
in the
Diag-
, and
Menu
The
the different diagnostic menus and commands as well as instructions on how to use
them.
category provides descriptions of the main screen, the device groups, and
Menu
Keys
The
Diagnostics.
category explains the functions of all of the keystrokes available in the Dell
Keys
Device Group
The
Device Group
the
Device Groups
appears when you select the
category describes the test group that is presently highlighted in
list on the main screen. For example, the following information
Device Group
category for
System Memory
:
System Memory
This module provides tests for system memory. The address
lines, data lines, and memory cells are tested for coupling
faults, opens, and shorts.
Device
The
the function of the highlighted device in the
following information appears when you select the
Memory
System Memory
System memory is the primary mechanism in a computer used for
storage of data. Because a computer works by manipulating data,
memory is vital for most operations performed by a computer.
2-8 Dell Inspiron 5000 Reference and Troubleshooting Guide
category is the educational section the Dell Diagnostics
Device
:
Device Groups
Device
. It describes
Help
area. For example, the
category for
System
Page 37

Test
The
test. For example, the following information appears when you select the
category for
System Memory Line Address Test
This test checks the system DRAM to find multiple “stuck-at”
faults in address lines, decoder logic, and the memory cell
array.
category provides a thorough explanation of the test procedure of each sub-
Te s t
Te s t
System Memory
:
Versions
The
Versions
category lists the version numbers of the tests in the Dell Diagnostics.
Exit the Dell Diag nost i c s
1. Press <Esc> until the
Diagnostics Menu
appears (see Figure 2-1).
2. Press the down-arrow key to select
3. Remove the System Software CD from the CD-ROM or DVD-ROM drive module.
4. When
5. Restart your computer.
Dell recommends that you return the boot sequence back to the original
configuration:
•
•
•
See “Start the Dell Diagnostics” found earlier in this chapter for instructions.
X:\DIAGS
puter turns off.
Floppy
Internal Hard Drive
CD ROM/DVD
appears on your screen, press the power button until the com-
Exit to MS-DOS
and then press <Enter>.
Troubleshooting Procedures
Before performing any of the procedures in this section, see “Checking the Basics”
found earlier in this chapter and read the “Safety Instructions” at the front of this
guide. Then perform the appropriate troubleshooting procedure.
NOTE: Before you begin any of the troubleshooting procedures, ensure that
is set to
Boot
Appendix B, “Using the System Setup Program,” for information on using the system
setup program.
Disabled
in the
menu of the system setup program. See
Main
Quiet
support.dell.com Troubleshooting 2-9
Page 38

Restart Your Computer
Several of the following sections advise you to restart the computer as part of the
troubleshooting process. To perform a proper restart, perform the following steps:
1. Save and close any open files and exit any open application programs.
2. Click the
The computer restarts automatically.
button, click
Start
Shut Down
, select
Restart
, and then click OK.
Dry Out a Wet Computer
Liquids, rain, and excessive humidity can cause damage to the computer.
CAUTION: P erform the followi ng procedure only afte r you are certain that it
is safe to do so. If t he compu ter is c onne cted to an el ectr ical o utl et, Dell recommends that you turn off AC power at the circuit brea ker befor e
attempting to remove the power cables from the electrical outlet. Use the
utmost caution when removing wet cables from a liv e po we r source.
1. Turn off the computer and disconnect the AC adapter from the computer.
2. Disconnect the AC adapter from the electrical outlet.
3. Turn off any attached peripherals and disconnect them from their power sources
and then from the computer.
4. Ground yourself by touching one of the metal connectors on the back of the
computer.
5. Remove the media bay device and PC Cards (if installed.)
Put the device and cards in a safe place to dry.
6. Remove the batteries from the battery bay and the media bay.
Wipe off each battery and put them in a safe place to dry.
7. Remove the hard-disk drive.
For instructions, refer to “Installing an Internal Hard-Disk Drive” in Chapter 1.
8. Remove the memory modules.
For instructions, refer to “Installing Memory Modules” in Chapter 1.
9. Open the display, and place the computer right-side up across two books or similar props to let air circulate all around it.
Let the computer dry for at least 24 hours in a dry area at room temperature.
NOTICE: Do not use artificial means to speed up the drying process.
2-10 Dell Inspiron 5000 Reference and Troubleshooting Guide
Page 39

CAUTION: T o help prevent electrical shock, verify that the computer is thoroughly dry before co n tinuing with the rema in de r o f th is procedure.
10. Ground yourself by touching one of the unpainted metal connectors on the back
of the computer.
11. Replace the memory modules.
CAUTION: T o help prevent electrical shock, verify that the computer is thoroughly dry before co n tinuing with the rema in de r o f th is procedure.
12. Replace the memory module cover and screw.
13. Replace the hard-disk drive and screw.
14. Replace the media bay device and PC Cards.
15. Replace the batteries.
16. Connect the peripherals to the computer.
17. Connect the computer and peripherals to an electrical outlet.
18. Turn on the computer and the peripherals.
19. Press <Esc> twice.
The Boot Menu appears.
20. Select
If you cannot identify the damaged components, call Dell for technical assistance. For
instructions, refer to Chapter 4, “Getting Help,”.
CD ROM/DVD
and press <Enter>.
Test a Dropped or Damaged Computer
1. Save and close any open files, exit any open application programs, and shut down
the computer.
2. Remove the battery.
3. Disconnect the AC adapter from the computer and then disconnect the AC
adapter from the electrical outlet.
4. Turn off any attached peripherals and disconnect them from the electrical outlet
and then from the computer.
5. Ground yourself by touching one of the metal connectors on the back of the
computer.
6. Remove the media bay device.
7. Remove the hard-disk drive.
For instructions, refer to “Installing an Internal Hard-Disk Drive” in Chapter 1.
support.dell.com Troubleshooting 2-11
Page 40

8. Remove the memory module cover and the memory modules.
For instructions, refer to “Installing Memory Modules” in Chapter 1.
9. Replace the memory modules.
10. Replace the memory module cover and screw.
11. Replace the hard-disk drive.
12. Ensure that the PC Cards are properly seated in the PC Card connectors.
13. Replace the battery.
14. Connect the peripherals to the computer.
15. Connect the computer and peripherals to the electrical outlet.
NOTE: Do not dock the computer at this time.
16. Insert the System Software CD into the CD-ROM or DVD-ROM drive.
17. Ensure that the diskette drive does not contain a diskette.
18. Turn on the computer.
The Dell Diagnostics loads automatically.
19. Select
If the computer does not operate properly, make a copy of and complete the Diagnostics Checklist (see Figure 4-1). Then call Dell for technical assistance. See Chapter 4,
“Getting Help,” for instructions.
Fully Test All Devices
See “Running the Dell Diagnostics” found earlier in this chapter for more
information.
.
Recover Fr om a Program That Is Not Respo nding
1. Press <Ctrl><Alt><Delete>.
The
Close Program
2. Click the program that no longer responds.
3. Click
End Task
window appears.
.
Restart a Computer That Is Not Responding
1. Press and hold the power button until the computer turns off.
2. To turn on the computer, press the power button.
ScanDisk, a program that checks for and repairs errors on the hard-disk drive,
may run during the boot process. Windows loads and runs after the scan
completes.
2-12 Dell Inspiron 5000 Reference and Troubleshooting Guide
Page 41

Resolve Audio Problems
Use the volume control buttons on the left side of the computer to adjust the
•
volume.
Run the
•
found earlier in this chapter.
If you still have an audio problem, call Dell for technical assistance. See Chapter 4,
“Getting Help,” for instructions.
Audio Controller
test as described in “Running the Dell Diagnostics”
Resolve CD-ROM or DVD-ROM Drive Problems
NOTE: Inconsistencies in the manufacturing of CD-ROM media may cause some high
speed CD-ROM drives to vibrate more than others. This vibration and the associated
noise does not indicate a defect in the drive or the CD.
Double-click the My
•
recognized by the operating system. Most of the common boot sector viruses
cause the CD-ROM or DVD-ROM drive to “disappear.” Use the virus-scanning
software to check for and remove viruses.
Clean the disc using a commercially available cleaning kit.
•
Clean the drive using a commercially available cleaning kit.
•
Try another CD or DVD.
•
NOTE: Because of different DVD file types currently used in the industry, not all
DVD titles work in all DVD-ROM drives.
Enter the system setup program as described in Appendix B, “Using the System
•
Setup Program,” and verify that
Run the
•
earlier in this chapter.
Turn off the computer and remove the CD-ROM or DVD-ROM drive from the
•
media bay. Replace the drive and turn on the computer.
If you still have a CD-ROM or DVD-ROM drive problem, call Dell for technical assistance. See Chapter 4, “Getting Help,” for instructions.
IDE Devices
Computer
tests as described in “Running the Dell Diagnostics” found
icon on your desktop and verify that the drive is
IDE Controller
is set to
Both
.
Resolve Diskette Drive Problems
Ensure that the diskette is not write-protected if you are trying to copy data to it.
•
Try a different diskette in the drive. If the new diskette works, the original diskette
•
may be defective.
Check the settings on the
•
gram as described in Appendix B, “Using the System Setup Program.”
Run the
•
lier in this chapter.
Clean the drive using a commercially available cleaning kit.
•
Restart the computer.
•
Diskette
tests as described in “Running the Dell Diagnostics” found ear-
Diskette Options
submenu of the system setup pro-
support.dell.com Troubleshooting 2-13
Page 42

If you still have a diskette drive problem, call Dell for technical assistance. See
Chapter 4, “Getting Help,” for instructions.
NOTICE: Do not attempt to clean drive heads with a s wab. You could accidentally misalign the heads and render the drive inoperable.
Resolve Display Problems
If the display is blank, the computer may be in standby or hibernate (save-to-disk
•
suspend) mode. To resume normal operations, press the power button.
Check the
•
described in Appendix B, “Using the System Setup Program.” To use the integrated display on the computer, this option must be set to
Mode
NOTE: The operating system overrides the settings in the system setup program
if the computer is in MS-DOS mode.
Adjust brightness setting.
•
Run the
•
tics” found earlier in this chapter.
Restart the computer.
•
If you still have a display problem, call Dell for technical assistance. See Chapter 4,
“Getting Help,” for instructions.
Video Display Device
.
VESA/VGA Interface
setting in the system setup program as
LCD Mode
tests as described in “Running the Dell Diagnos-
or
Simul
Resolve External Monitor Problems
If the display is blank, the computer may be in standby or hibernate (save-to-disk
•
suspend) mode. To resume normal operations, press the power button.
Ensure that the video cable is firmly attached to the video connector on the back
•
of the computer and that the monitor power cable is plugged into a functional
electrical outlet.
Check the
•
described in Appendix B, “Using the System Setup Program.” To use an external
monitor, this option must be set to
NOTE: The operating system overrides the settings in the system setup program
if the computer is in MS-DOS mode.
Adjust brightness and contrast settings.
•
Run the
•
Diagnostics” found earlier in this chapter.
Restart the computer.
•
If you still have an external monitor problem, call Dell for technical assistance. See
Chapter 4, “Getting Help,” for instructions.
2-14 Dell Inspiron 5000 Reference and Troubleshooting Guide
Video Display Device
VESA/VGA Interface
setting in the system setup program as
CRT Mode
tests as described in “Running the Dell
or
Simul Mode
.
Page 43

NOTE: If your computer is connected to the TV-out connector on your television and
there is no picture on your television screen, see “Resolve Television Problems”
found later in this chapter.
Resolve Exte rnal Keyboard Problems
NOTE: External Universal Serial Bus (USB) keyboards only function when
Windows 98 Second Edition is running. Use the integrated keyboard when you use
the Dell Diagnostics, the system setup program, or you are working in the MS-DOS
mode.
Disconnect the keyboard cable from the computer and check the cable connector
•
for bent or broken pins.
Run the
•
Diagnostics” found earlier in this chapter.
Restart the computer.
•
If you still have a an external keyboard problem, call Dell for technical assistance. See
Chapter 4, “Getting Help,” for instructions.
PC-AT Compatible Keyboards
tests as described in “Running the Dell
Resolve Hard-Disk Drive Problems
Run the ScanDisk utility: click the
•
Accessories—> System Tools
Run the
•
earlier in this chapter.
Check the setting on the
•
as described in Appendix B, “Using the System Setup Program.”
If you still have a hard-disk drive problem, call Dell for technical assistance. See
Chapter 4, “Getting Help,” for instructions.
IDE Devices
tests as described in “Running the Dell Diagnostics” found
, and then click
IDE Controller
button, point to
Start
ScanDisk
submenu of the system setup program
Programs—>
.
Resolve Hardware Conflicts
Hardware conflicts occur if the device is detected by the operating system but is configured incorrectly. To check for conflicts, perform the following steps:
1. C l i c k t he
2. In the
3. Click the
support.dell.com Troubleshooting 2-15
Control Panel
Conflicts are indicated in the
(!) beside the conflicting device. A red X beside a device indicates that the device
is disabled in the current hardware profile.
If a hardware conflict exists, the
shows the conflicting expansion cards or devices.
button, point to
Start
, double-click
Device Manager
Settings
System.
tab.
Device Manager
Device status
, and click
Control Panel
list by a yellow exclamation point
area in the
.
Properties
window
Page 44

To resolve conflicts, you can use the Windows Hardware Conflict Troubleshooter.
1. C l i c k t he
2. Click the
3. Double-click
screen.
button and then click
Start
Contents
tab and then double-click
If you have a hardware conflict
Help
.
Troubleshooting
and follow the instructions on the
.
Resolve Infrared Port Problems
To configure the infrared port, perform the following steps:
1. C l i c k t he
2. Double-click the
3. Click the
4. If you previously attempted to configure the infrared port, remove all device listings that refer to
•
Infrared devices
•
Network adapters
•
Ports (COM & LPT)
Click the entry you wish to remove and then click
5. If you remove a device, when prompted, ensure that
computer now
button, click
Start
Infrared
icon.
tab.
or
System
Device Manager
is selected, and then click
Settings
Virtual Devices
, and then click
Control Panel
in the following categories:
.
Yes, I want to restart my
Finish
Remove
.
.
The computer restarts automatically.
NOTE: If you have not attempted to configure the infrared port, the infrared and
virtual entries will not be listed in the
remove a device, restart the computer and continue with the next step.
6. When you see the Dell
7. Press the right-arrow key to highlight the
8. Press the down-arrow key to highlight
change the setting to
9. Press the down-arrow key to highlight
ting to
trying to communicate with to determine the correct setting.
If you set the
cally changes to
If you set the
cally changes to
2-16 Dell Inspiron 5000 Reference and Troubleshooting Guide
SIR
or
FIR
Mode
Mode
logo, press <F2> to enter the system setup program.
Customized
. Refer to the documentation of the infrared device that you are
setting to
2F8 IRQ3
2F8 IRQ3
.
setting to
and the
Device Manager
Infrared Port
.
Mode
, the
SIN
, the
FIR
DMA channel
. If you do not need to
System Devices
and press <F5> to change the set-
Base I/O address/IRQ
Base I/O address/IRQ
setting changes to 0.
menu item.
and then press <F5> to
setting automati-
setting automati-
Page 45

NOTE: If the
asterisk appears to the right of the
press the <F5> or <F6> key to select another
setting.
10. Press <F10> to save your changes and exit the system setup program.
SIR
or
setting causes a conflict with another device, a yellow
FIR
Infrared Port
setting. To resolve the conflict,
Base I/O address/IRQ
or
DMA
11. When the
you want to save the configuration changes and exit the system setup program.
The computer restarts automatically. During the restart, the infrared hardware is
detected by the operating system.
12. In the
13. Click th e
14. Double-click the
15. Click th e
16. Ensure that the following options are checked:
•
•
•
17. Click
18. Try communicating with your external infrared device.
If you still have an infrared port problem, call Dell for technical assistance. See
Chapter 4, “Getting Help,” for instructions.
Setup Confirmation
Systems Settings Change
button, point to
Start
Infrared
Options
Enable infrared communication.
Search for and provide status for devices within range.
Install software for Plug and Play devices within range.
Apply
tab.
and then click OK.
screen appears, press <Enter> to confirm that
icon.
window, click
Settings,
and then click
to restart the computer.
Ye s
Control Panel
.
Resolve Memory Problems
If an insufficient memory message appears, save and close any open files and
•
exit any open application programs not in use.
Consider installing additional system memory.
•
Run the
•
found earlier in this chapter.
Reseat the memory modules. Refer to “Installing Memory Modules” in
•
Chapter 1.
Restart the computer.
•
If you still have a memory problem, call Dell for technical assistance. See Chapter 4,
“Getting Help,” for instructions.
System Memory
test as described in “Running the Dell Diagnostics”
NOTE: When you install additional memory and restart your computer, a
log box appears on your screen stating that you must recreate the hibernate file. To
recreate the hibernate file, see “Recreating the Hibernate (Save-to-Disk Suspend)
File” in Chapter 3.
support.dell.com Troubleshooting 2-17
Warni ng
dia-
Page 46

Resolve Modem, Fax, and Internet Connection Problems
NOTICE: Connect the modem to an analog line only. Connecting your
modem to a nonanalog line, such as a digital or private branch exchange
(PBX) line, will cause damage.
NOTE: If you can connect to your Internet service provider (ISP) and send or receive a
fax, your modem is functioning properly. If you are sure that your modem is working
properly and you still experience problems connecting to your ISP, contact the ISP
technical support department for assistance.
Ensure that you have touchtone telephone service.
•
If you have call-waiting service, disable call-waiting. Refer to your local telephone
•
directory or call your telephone service provider for information on temporarily
disabling call-waiting.
If you have voice mail service, you may hear an irregular dial tone when you have
•
messages. Contact your telephone service provider for information on restoring a
normal dial tone.
If you have any other telephone devices plugged into this line, such as answering
•
machines, dedicated fax machines, or line splitters, bypass them and plug the
modem cable directly into the telephone connector on the wall.
Reseat the cable connections.
•
Try a different cable; if you are using a cable that is 10 feet or more in length, try a
•
shorter one.
Disconnect the cable from the modem and plug it directly into a telephone.
•
Listen for a dial tone.
Line noise can cause low connection speeds. If you have persistent problems, try
•
connecting the modem to a different telephone connector. You may also wish to
contact your telephone company to report the problem.
If you still have problems with a Dell-provided modem, call Dell for technical assistance. See Chapter 4, “Getting Help,” for instructions. If you have problems with a
non-Dell-provided modem, call the modem manufacturer.
Resolve PC Card Problems
Ensure that the PC Card is properly inserted into the connector.
•
Ensure that the card is recognized by the Windows operating system:
•
1. C li c k th e
2. Double-click the
3. Ensure that the card is listed in the
If you still have problems with a Dell-provided PC Card, call Dell for technical assistance. See Chapter 4, “Getting Help,” for instructions. If you have problems with a
non-Dell-provided PC Card, call the card manufacturer.
2-18 Dell Inspiron 5000 Reference and Troubleshooting Guide
button, point to
Start
PC Card (PCMCIA)
Settings
, and then click
icon.
PC Card (PCMCIA) Properties
Control Panel
window.
.
Page 47

Resolve Software Problems
Software problems can result from the following circumstances:
Improper installation or configuration of an application program
•
Input errors
•
Drivers that may conflict with certain application programs
•
Memory conflicts
•
You can confirm that a problem is software-related by running the
Devices
chapter. If all tests in the device group run successfully, the error condition may be
related to a software problem.
NOTE: For detailed troubleshooting information on a particular application program,
see the software documentation or contact the software manufacturer.
tests as described in “Running the Dell Diagnostics” found earlier in this
Install and Configure Software
Before installing additional software, ensure that the application program is
compatible with Microsoft Windows 98 Second Edition or Microsoft Windows 2000
(depending on the operating system software installed in your computer) and that
your computer meets the minimum hardware requirements needed to run the
software.
Before installing software on your hard-disk drive, use a virus-scanning application program to check the diskettes or CDs for viruses. Viruses can quickly use all available
system memory, damage and/or destroy data stored on the hard-disk drive, and permanently affect the performance of the application programs they infect.
System Board
Software usually includes installation instructions in its accompanying documentation
and a software setup program (usually called
or CD.
setup.exe
or
install.exe
,) on a diskette
Resolve Touch Pad and Mouse Problems
If you are using a PS/2 or USB mouse, ensure that the connector is firmly
•
attached.
If you are using the touch pad or a PS/2 mouse, run the
•
described in “Running the Dell Diagnostics” found earlier in this chapter.
Reinstall the touch pad driver. For instructions, see “Install the Touch Pad Driver”
•
in Chapter 3.
NOTE: Be sure to refer to the section specific to your operating system.
Restart the computer.
•
If you still have a touch pad or mouse problem, call Dell for technical assistance. See
Chapter 4, “Getting Help,” for instructions.
support.dell.com Troubleshooting 2-19
Pointing Devices
test as
Page 48

Resolve Te levision Problems
If your television is connected to the TV-out connector on your computer and there is
no picture on your television screen, verify the following connections and settings:
A composite video cable is connected to the S-video connector on your television
•
and the TV-out connector on your computer.
NOTE: If your television did not come with a composite video cable, you can purchase one from a local electronics store.
•
Television Type
for your country.
•
Television Port
in the system setup program is set to the correct video standard
is
Enabled
in the system setup program.
Check the Television Type Setting
1. Save and close any open files, and exit any open application programs.
2. Shut down your computer.
3. Connect a composite video cable to the TV-out connector on your computer and
the S-video connector on your television.
4. Turn on your television.
5. Restart your computer.
6. Click the
7. Double-click the
8. Click the
9. Click the
10. Click t he TV button.
11. Set the television type to
button, point to
Start
Display
Settings
Advanced
tab.
icon
button.
.
NTSC
Settings
(US) or
, and click
(Europe).
PA L
Control Panel
.
Check the System Setup Program Settings
1. C l i c k t he
2. In the
3. Click
4. When you see the Dell
5. Press the right- or left-arrow key to select the
2-20 Dell Inspiron 5000 Reference and Troubleshooting Guide
Shut Down
Ye s
Your computer shuts down and restarts.
The system setup program screen appears.
button, and select
Start
window, select
.
logo, press <F2> to enter the system setup program.
Shut Down
Restart the Computer
.
Main
menu.
.
Page 49

6. Press the down-arrow key to scroll down to
Te l e v i si on Ty p e
.
Either
NTSC
or
PA L
is highlighted.
7. To change your selection, press <F6>.
NOTE: The function key tasks may be different for your particular system setup
program. Be sure to check the function key menu at the bottom of your system
setup screen.
8. To save your selection, press <F10>.
The
Setup Confirmation
9. Select
and press <Enter>.
Ye s
window appears.
The computer shuts down and restarts.
NOTE: For more information on connecting a television to your computer, see
“Connecting External Devices” in the Dell Inspiron 5000 System Help.
support.dell.com Troubleshooting 2-21
Page 50

2-22 Dell Inspiron 5000 Reference and Troubleshooting Guide
Page 51

CHAPTER 3
Installing System Software
This chapter explains how to reinstall the Microsoft Windows 98 Second Edition operating system as well as the Dell-provided device drivers and utilities for both
Windows 98 Second Edition and Microsoft Windows 2000. You may need to refer to
this chapter under the following conditions:
You are reinstalling the Microsoft Windows 98 Second Edition operating system.
•
You are reinstalling the Dell-provided drivers and utilities.
•
You installed a new primary hard-disk drive and you must install all of the system
•
software.
Installing the Windows 98 Operating System
Perform the following steps to install Windows 98 Second Edition on the hard-disk
drive before you install any device drivers or utilities:
1. Insert the Microsoft Boot Disk Windows 98 Series diskette into the diskette
drive.
2. Turn on the computer.
3. When the
Windows 98 CD into the CD-ROM or DVD-ROM drive.
4. Select
The system setup program runs ScanDisk to check your hard-disk drive.
5. When the hard-disk drive check is complete, type
6. Follow the instructions on the screen to continue with the installation.
7. When prompted to create a start-up diskette, remove the Microsoft Boot Disk
Windows 98 Series diskette, and click
support.dell.com Installing System Software 3-1
Microsoft Windows 98 Startup
Start Windows 98 Setup from CD-ROM
menu appears, insert the Microsoft
and press <Enter>.
to exit ScanDisk.
x
.
Next>
Page 52

8. Label a blank, high-density diskette as instructed, insert the diskette into the diskette drive, and then click OK.
9. Follow the instructions on the screen to complete the installation.
Recreating the Hibernate (Save-to-Disk
Suspend) File (Windows 98)
When the hibernate mode is activated, all system data is stored in the hibernate
(save-to-disk suspend) file on your hard-disk drive. The hibernate file on your hard-disk
drive cannot be accessed by the Windows operating system or application programs.
You must recreate the hibernate file if you perform any of the following actions:
Delete the hibernate file
•
Install a new hard-disk drive
•
Reformat your hard-disk drive
•
Install additional memory
•
NOTE: If you install additional memory, you must delete the hibernate file before you
recreate the file.
Boot Your Computer With the System Software CD
1. Save and close any open files, exit any open application programs, and shut down
the computer.
2. If the computer is docked, undock it.
For instructions, see the Port Replicator User’s Guide.
3. Turn on the computer.
4. Press <F2> when you see the Dell logo to access the system setup program.
5. Press the right-arrow key to highlight
6. Press the down-arrow key to highlight a device, and then press <F5> to move the
device down the list or press <F6> to move the device up the list. Select the following boot sequence:
•
Floppy
•
CD ROM/DVD
•
Internal Hard Drive
7. Insert the System Software CD into the CD-ROM or DVD-ROM drive.
8. Press <F10> to save your changes and exit the system setup program.
3-2 Dell Inspiron 5000 Reference and Troubleshooting Guide
Boot
.
Page 53

9. When the
you want to save the configuration changes and exit the system setup program.
The computer restarts automatically.
The Dell Diagnostics begins automatically.
Setup Confirmation
screen appears, press <Enter> to confirm that
After the diagnostic utility loads, the
Diagnostics Menu
appears (see Figure 3-1).
Fully Test All Devices
Quickly Test All Devices
Select Devices to Test
Exit to MS-DOS
Figure 3-1. Diagnostics Menu
10. Press the down-arrow key to select
For instructions on deleting and creating the hibernate file, refer to the following
sections.
Exit to MS-DOS
Delete the Hibernate File
1. Boot your computer from the CD-ROM or DVD-ROM drive with the System
Software CD in the CD-ROM or DVD-ROM drive.
For instructions, refer to the preceding section, “Boot Your Computer With the
System Software CD.”
and then press <Enter>.
2. At the
3. At the
4. Type
5. Follow the instructions on your screen to delete the hibernate file.
To create a new hibernate file immediately after deleting it, perform the following
steps:
1. When the
2. Complete steps 2 through 6 in the next section, “Create the Hibernate File.”
support.dell.com Installing System Software 3-3
R:\DIAGS
R:\
phdisk /delete /file
NOTE: You must type a space between
The computer automatically restarts.
Exit to MS-DOS
prompt, type
prompt, type
Diagnostics Menu
and then press <Enter>.
cd\UTILITY
and press <Enter>.
cd\
and press <Enter>.
and press <Enter>.
phdisk
appears, press the down-arrow key to select
and
/delete
and
/file
.
Page 54

Create the Hibernate File
1. Boot your computer from the CD-ROM or DVD-ROM drive with the System
Software CD in the CD-ROM or DVD-ROM drive.
For instructions, refer to the preceding section, “Boot Your Computer With the
System Software CD.”
2. Exit to
3. At the
4. At the
5. Type
6. At the
7. Follow the instructions on your screen to create the hibernate file.
8. When the Dell logo appears on your screen, remove the System Software CD
MS-DOS
R:\DIAGS
R:\
phdisk
R:\WIN98\UTILITY
NOTES: You must type a space between
The utility calculates the size of the file, in kilobytes, based on the amount of system memory in your computer, plus the amount of video memory in your
computer, plus 2 MB to handle additional system requirements.
from the CD-ROM or DVD-ROM drive.
Windows automatically starts and runs. After you create the hibernate file, you
must enable hibernate support in Windows 98 Second Edition.
from the
prompt, type
prompt, type
/create
Dell Diagnostic Menu
and then press <Enter>.
cd\
cd\WIN98\UTILITY
and press <Enter>.
/file
prompt, type
phdisk /info
phdisk
.
and press <Enter>.
and press <Enter>.
and
/create
and
/file
Enable Hibernate Support
1. C l i c k t he
2. Double-click the
button, point to
Start
Power Management
Settings
, and click
icon.
Control Panel
.
.
3. Click the
4. Ensure that
5. Click OK to close the Control Panel.
Hibernate
tab.
Enable hibernate support
View the Hibernate File Information
1. E x i t t o
2. At the
3. At the
4. At the
3-4 Dell Inspiron 5000 Reference and Troubleshooting Guide
MS-DOS
R:\DIAGS
R:\
R:\WIN98\UTILITY
NOTE: You must type a space between
from the
prompt, type
prompt, type
Dell Diagnostics Menu
cd\WIN98\UTILITY
is selected and click
and then press <Enter>.
cd\
prompt, type
phdisk
.
and press <Enter>.
phdisk /info
and
/info
Apply
.
.
.
Page 55

Installing Drivers and Utilities for Windows 98
To install the system software, you need the following items:
CD-ROM or DVD-ROM drive installed in the media bay of the computer
•
System Software CD
•
Dell Inspiron 5000 Software DVD Decoder CD
•
Microsoft Windows 98 Second Edition CD
•
Microsoft Boot Disk Windows 98 Series diskette
•
NOTES: Verify that Windows 98 is already installed on the hard-disk drive before you
install any device drivers. To install Windows 98 Second Edition, refer to “Installing
the Windows 98 Operating System” found earlier in this chapter.
The drivers on the System Software CD are the same files that Dell installed on your
hard-disk drive before shipping the computer to you. To download the latest versions
of these drivers, visit the Dell support Web site at
http://support.dell.com
Install the Audio Driver (Windows 98)
The audio driver allows you to customize the sound features of your computer.
1. Save and close any open files, and exit any open application programs.
2. Insert the System Software CD into the CD-ROM or DVD-ROM drive.
.
3. Click the
4. In the
5. Click OK.
6. In the
7. In the
8. When prompted, ensure that
support.dell.com Installing System Software 3-5
Run
CD-ROM or DVD-ROM drive letter.
The CD-ROM or DVD-ROM drive letter is usually D.
Welcome
Main Menu, Upgrade Drivers
The audio files are copied to your hard-disk drive.
selected, and then click
NOTE: If the computer is set to boot from the CD-ROM or DVD-ROM drive
before the hard-disk drive, remove the System Software CD before the computer
restarts so that the computer does not boot from the CD. For information on
changing the boot sequence, refer to Appendix B, “Using the System Setup
Program.”
button, and then click
Start
dialog box, type
window, click
Finish
.
Run
Next>
.
where x is the
x:\win98\audio\setup.exe,
.
Next>
is selected. Click
Yes, I want to restart my computer now
.
is
Page 56

The
New Hardware Found
installed, and the installation is complete.
window appears, the software for the hardware is
Install the Video Driver (Windows 98)
The video driver controls video resolution and color palette.
NOTE: If you need to use extended video modes, check the documentation that
accompanied the application program to determine if the driver is provided. If it is not,
contact the software manufacturer for the necessary driver.
1. Save and close any open files, and exit any open application programs.
2. Insert the System Software CD into the CD-ROM or DVD-ROM drive.
3. Click the
4. In the
5. In the
Run
CD-ROM or DVD-ROM drive.
The CD-ROM or DVD-ROM drive letter is usually D.
Setup Complete
computer now.
The computer restarts automatically.
NOTES: If the computer is set to boot from the CD-ROM or DVD-ROM drive
before the hard-disk drive, remove the System Software CD before the computer
restarts so that the computer does not boot from the CD. For information on
changing the boot sequence, refer to Appendix B, “Using the System Setup
Program.”
After the computer restarts, you can change the video resolution.
button, and then click
Start
dialog box, type
window, ensure that
is selected, and then click
.
Run
x:\win98\video\setup.exe
Yes, I want to restart my
.
Finish
, where x is the
Install the Touch Pad Driver (Windows 98)
The touch pad driver controls touch pad and mouse functions.
NOTE: When you are prompted to select a directory, Dell recommends using the
default directory settings.
1. Save and close any open files, and exit any open application programs.
2. Insert the System Software CD into the CD-ROM or DVD-ROM drive.
3. Click the
4. In the
3-6 Dell Inspiron 5000 Reference and Troubleshooting Guide
Run
where x is the CD-ROM or DVD-ROM drive letter.
If you are using a Japanese-language version of Windows, type
x:\touchpad\japanese\setup.exe
drive letter.
button, and then click
Start
dialog box, type
x:\win98\touchpad\english\setup.exe
.
Run
, where x is the CD-ROM or DVD-ROM
,
Page 57

The CD-ROM or DVD-ROM drive letter is usually D.
NOTICE: Do not install the Japanese -language driver o n a computer
with a non-Japanese-language operating system.
5. Click OK.
6. In the
7. At the
8. At the
Welcome
At the
Choose Destination Location
Start Copying Files
The touch pad drivers are copied to your hard-disk drive.
Setup Complete
computer now
NOTE: If the computer is set to boot from the CD-ROM or DVD-ROM drive
before the hard-disk drive, remove the System Software CD before the computer
restarts so that the computer does not boot from the CD. For information on
changing the boot sequence, refer to Appendix B, “Using the System Setup
Program.”
The
Information about your Touch Pad
window to appear each time you start the computer, uncheck the box that says
Show this message the next time Windows starts
window, click
window, click
window, be sure that the
button is selected, and then click
Next>
.
window, click
Next>
window appears. If you do no want this
.
Next>
.
Yes, I want to restart my
.
Finish
. Then click
Close
.
Install Softex BayManager (Windows 98)
Softex BayManager is a utility that makes it possible to swap media bay devices without turning off the computer.
NOTICE: You must uninstall Softex BayManager befo re yo u do wn lo ad and
install a Softex BayManager software upgrade from the support Web site
File Library.
To uninstall Softex BayManager, perform the following steps:
1. Save and close any open files, and exit any open application programs.
2. Click the
3. Double-click
4. Select
5. Follow the instructions on the screen to complete the uninstall process.
To install the Softex BayManager software from the System Software CD, perform the
following steps:
1. Insert the System Software CD into the CD-ROM or DVD-ROM drive.
2. Click the
support.dell.com Installing System Software 3-7
Softex BayManager
button, point to
Start
Add/Remove Programs
and click
button, and then click
Start
Settings
.
Add/Remove
Run
, and click
.
Control Panel
.
.
Page 58

3. In the
CD-ROM or DVD-ROM drive letter.
The CD-ROM or DVD-ROM drive letter is usually D.
4. Click OK.
dialog box, type
Run
x:\win98\baymgr\setup.exe
, where x is the
5. In the
6. At the
Welcome
Setup Complete
computer now
NOTE: If the computer is set to boot from the CD-ROM or DVD-ROM drive
before the hard-disk drive, remove the System Software CD before the computer
restarts so that the computer does not boot from the CD. For information on
changing the boot sequence, refer to Appendix B, “Using the System Setup
Program.”
window, click
window, ensure that the
is selected, and then click
Next>
.
Yes, I want to restart my
.
Finish
Install the Internal Modem Driver (Windows 98) (Optional)
NOTICE: Do not use this modem driver with a PC Card modem. The modem
driver on the
nal modem.
If your computer has an internal modem, perform the following steps to install the
driver:
1. Save and close any open files, and exit any open application programs.
2. Insert the System Software CD into the CD-ROM or DVD-ROM drive.
3. Click the
4. In the
CD-ROM or DVD-ROM drive letter.
System Software
button, and then click
Start
dialog box, type
Run
CD is compatible only with the optional inter-
.
Run
x:\win98\modem\setup.exe
, where x is the
The CD-ROM or DVD-ROM drive letter is usually D.
5. Click OK.
6. In the
3-8 Dell Inspiron 5000 Reference and Troubleshooting Guide
Welcome
The
New Hardware Found
installed, and the installation is complete.
window, click
window appears, the software for the modem is
Next>
.
Page 59

Install the Software DVD Decoder (Windows 98) (Optional)
The DVD decoder driver allows you to play DVD movies using your DVD-ROM drive on
the computer.
NOTE: When you are prompted to select a directory, Dell recommends that you use
the default directory setting.
1. Insert the Dell Inspiron 5000 Software DVD Decoder CD into the DVD-ROM
drive.
2. Click the
3. In the
4. Click OK.
5. Click
6. In the
7. In the
8. In the
9. In the
10. Insert your DVD into the DVD-ROM drive.
Run
drive letter.
The DVD-ROM drive letter is usually D.
The
Welcome
Next>
Choose Destination Location
Select Program Folder
Start Copying Files
Setup Complete
computer now
The first time you insert a DVD into your DVD-ROM drive, a
appears, explaining that DVD playback performance is dependent on your overall
system configuration and that some DVD titles are protected with an antitaping
product provided by Macrovision, Inc.
NOTES: A variety of factors determine the DVD’s playback performance. For
more information, read the “Requirements” section in the release notes that
came with your DVD software.
button, and then click
Start
dialog box, type
window appears.
.
is selected, and then click
x:\win98\setup.exe
window, click
window, ensure that the
.
Run
window, click
window, click
Next>
, where x is the DVD-ROM
.
Next>
.
Next>
.
Yes, I want to restart my
.
Finish
Warni ng
dialog box
The Macrovision product allows you to view your DVD on most televisions, but it
distorts the video image if played back from a videotape. The DVD decoder software provided with your system does not allow you to play back DVDs with
graphics cards that contain a TV-out connector.
If you have a TV-out connector on your computer and your DVD-ROM drive does
not play your DVD title, make sure the TV-out feature in your graphics card’s software is turned off. Dell does not currently provide a TV-out connector as an
accessory item.
11. C l i c k OK.
support.dell.com Installing System Software 3-9
Page 60

Configuring the Television Control Panel Setting
1. C l i c k t he
button and select
Start
Settings —> Control Panel
.
2. In the
3. In the
4. Click the
5. In the
6. In the TV section, click the
7.Click OK.
8. Click OK.
9. Close the
NOTE: The DVD-ROM drive displays a DVD movie on the Primary display. To view the
DVD on the television screen, set the TV display to
Control Panel
Display Properties
Advanced
Multiple Monitors
The
Display Properties
Control Panel
window, click the
window, click the
button.
window, click the
Primary
window appears.
window.
Display
button.
icon.
Settings
Displays
Primary.
tab.
tab.
Setting and Changing the DVD-ROM Drive Region Code
If you reinstall the DVD decoder software, you must set the DVD-ROM drive region
code before you can play a movie. The region code can be reset if you relocate to
another region.
NOTICE: You should reset the region code on ly w h en absolutely necessary.
You can reset the region code up to four times.
To reset the drive region code, perform the following steps:
1. Insert a DVD coded for the new region into the DVD-ROM drive.
A notification box appears, explaining that the disc belongs to another region and
cannot be played. The notification also explains how to reset the region setting.
2. Follow the instructions on the screen to change the region setting.
Install the Intel® SpeedStep™ Utility (Windows 98) (Optional)
NOTICE: Do not install the Intel SpeedStep utility unless your computer has
a Mobile Intel Pentium
mine if your computer has a Mobile Intel Pentium III processor with
SpeedStep technology, check for the Intel SpeedStep item in the Power
menu of the system setup program. For instructions on using the system
setup progra m , refer to Appendix B, “ Using the System Setu p Program.”
3-10 Dell Inspiron 5000 Reference and Troubleshooting Guide
®
III processor with SpeedStep technology. To deter-
Page 61

If your computer has a Mobile Intel Pentium III processor with Intel SpeedStep technology, you must reinstall the Intel SpeedStep utility after you install a new hard-disk
drive or reformat your hard-disk drive.
1. Save and close any open files, and exit any open application programs.
2. Insert the System Software CD into the CD-ROM or DVD-ROM drive.
3. Click the
4. In the
5. Click OK.
6. In the
7. At the
Run
CD-ROM or DVD-ROM drive letter.
The CD-ROM or DVD-ROM drive letter is usually D.
Welcome
Setup Complete
computer now
button, and then click
Start
dialog box, type
window, click
window, ensure that the
is selected, and then click
.
Run
x:\win98\spd_stp\setup.exe
.
Next>
Yes, I want to restart my
.
Finish
, where x is the
Installing Drivers and Utilities for
Windows 2000
To install the system software, you need the following items:
System Software CD
•
CD-ROM or DVD-ROM drive installed in the media bay of the computer
•
NOTE: The drivers on the System Software CD are the same files that Dell installed
on your hard-disk drive before shipping the computer to you. To download the latest
versions of these drivers, visit the Dell support Web site at
http://support.dell.com
.
Install the Audio Driver (Windows 2000)
The audio driver allows you to customize the sound features of your computer.
1. Save and close any open files, and exit any open application programs.
2. Insert the System Software CD into the CD-ROM or DVD-ROM drive.
3. Click the
4. In the
5. Click OK.
support.dell.com Installing System Software 3-11
Run
CD-ROM or DVD-ROM drive letter.
The CD-ROM or DVD-ROM drive letter is usually D.
button, and then click
Start
dialog box, type
.
Run
x:\win2000\audio\setup.exe,
where x is the
Page 62

6. In the
7.Click OK.
Welcome
An information dialog box appears, stating that the audio driver is installed on
your computer.
window, click
Next>
.
8. When prompted, ensure that
selected, and then click
NOTE: If the computer is set to boot from the CD-ROM or DVD-ROM drive
before the hard-disk drive, remove the System Software CD before the computer
restarts so that the computer does not boot from the CD. For information on
changing the boot sequence, refer to Appendix B, “Using the System Setup
Program.”
The audio drivers are installed, and the installation is complete.
Yes, I want to restart my computer now
.
Finish
is
Install the Video Driver (Windows 2000)
The video driver controls video resolution and the color palette.
NOTE: If you need to use extended video modes, check the documentation that
accompanied the application program to determine if the driver is provided. If it is not,
contact the software manufacturer for the necessary driver.
1. Save and close any open files, and exit any open application programs.
2. Insert the System Software CD into the CD-ROM or DVD-ROM drive.
3. Click the
4. In the
Run
CD-ROM or DVD-ROM drive.
The CD-ROM or DVD-ROM drive letter is usually D.
button, and then click
Start
dialog box, type
.
Run
x:\win2000\video\setup.exe
, where x is the
5. In the
6. In the
3-12 Dell Inspiron 5000 Reference and Troubleshooting Guide
Choose Setup Language
Setup Complete
computer now
The computer restarts automatically.
NOTES: If the computer is set to boot from the CD-ROM or DVD-ROM drive
before the hard-disk drive, remove the System Software CD before the computer
restarts so that the computer does not boot from the CD. For information on
changing the boot sequence, refer to Appendix B, “Using the System Setup
Program.”
After the computer restarts, you can change the video resolution.
is selected, and then click
window, ensure that
window, select
Yes, I want to restart my
Finish
U.S. English
.
, and then click OK.
Page 63

Install the Touch Pad Driver (Windows 2000)
The touch pad driver controls touch pad and mouse functions.
NOTE: When you are prompted to select a directory, Dell recommends using the
default directory settings.
1. Save and close any open files, and exit any open application programs.
2. Insert the System Software CD into the CD-ROM or DVD-ROM drive.
3. Click the
4. In the
5. Click
6. Click OK.
7. In the
8. At the
9. At the
10. At the
Run
where x is the CD-ROM or DVD-ROM drive letter.
The
WinZip Self-Extractor
If you are using a Japanese-language version of Windows, type
x:\win2000\touchpad\japanese\setup.exe
DVD-ROM drive letter.
The CD-ROM or DVD-ROM drive letter is usually D.
NOTICE: Do not install the Japanese -language driver o n a computer
with a non-Japanese-language operating system.
Unzip
Welcome
Important Information
Start Copying Files
The touch pad driver is copied to your hard-disk drive.
Setup Complete
computer now
button, and then click
Start
dialog box, type
.
window, click
button is selected, and then click
x:\win2000\touchpad\english\setup.exe
window appears.
Next>
window, click
window, click
window, be sure that the
Run
.
.
Next>
Next>
, where x is the CD-ROM or
twice.
.
Yes, I want to restart my
.
Finish
,
NOTE: If the computer is set to boot from the CD-ROM or DVD-ROM drive
before the hard-disk drive, remove the System Software CD before the computer
restarts so that the computer does not boot from the CD. For information on
changing the boot sequence, refer to Appendix B, “Using the System Setup
Program.”
The
Information about your Touch Pad
window to appear each time you start the computer, uncheck the box that says
Show this message the next time Windows starts
support.dell.com Installing System Software 3-13
window appears. If you do not want this
. Then click
Close
.
Page 64

Install the Software DVD Decoder (Windows 2000) (Optional)
The DVD decoder driver allows you to play DVD movies using your DVD-ROM drive on
the computer.
NOTE: When you are prompted to select a directory, Dell recommends that you use
the default directory setting.
1. Insert the Dell Inspiron 5000 Software DVD Decoder CD into the DVD-ROM
drive.
The installation program starts automatically and the
window appears.
NOTE: If the installation program does not start automatically, navigate to the Dell
Inspiron 5000 Software DVD Decoder CD and click the
2. Select
3. Click
4. Click
5. Click
6. Ensure that the
7. Insert your DVD into the DVD-ROM drive.
English
The
Welcome
Next>
The
Software License Agreement
Ye s
The
Choose Destination
Next>
The files are copied to your disk and the
click
Finish
Your computer restarts and the desktop appears.
When you start your DVD for the first time, a
explaining that DVD playback performance is dependent on your overall system
configuration and that some DVD titles are protected with an antitaping product
provided by Macrovision, Inc.
, then click OK.
screen appears.
.
window appears.
.
window appears.
.
Setup Complete
Yes, I want to restart my computer now
.
Choose Setup Language
icon.
Setup
window appears.
is selected, and then
Warnin g
dialog box appears,
NOTES: A variety of factors determine the DVD’s playback performance. For
more information, read the “Requirements” section in the release notes that
came with your DVD software.
The Macrovision product allows you to view your DVD on most televisions, but it
distorts the video image if played back from a videotape. The DVD decoder software provided with your system does not allow you to play back DVDs with
graphics cards that contain a TV-out connector.
3-14 Dell Inspiron 5000 Reference and Troubleshooting Guide
Page 65

If you have a TV-out connector on your computer and your DVD-ROM drive does
not play your DVD title, make sure the TV-out feature in your graphics card’s software is turned off. Dell does not currently provide a TV-out connector as an
accessory item.
8. Click OK.
Setting and Changing the DVD-ROM Drive Region Code
If you reinstall the DVD decoder software, you must set the DVD-ROM drive region
code before you can play a movie. The region code can be reset if you relocate to
another region.
NOTICE: You should reset the region code only when absolut ely necessary.
You can reset the region code up to four times.
To reset the drive region code, perform the following steps:
1. Insert a DVD coded for the new region into the DVD-ROM drive.
A notification box appears, explaining that the disc belongs to another region and
cannot be played. The notification also explains how to reset the region setting.
2. Follow the instructions on the screen to change the region setting.
Install the Intel SpeedStep Utility (Windows 2000) (Optional)
NOTICE: Do not install the Intel SpeedStep utility unless your computer has
a Mobile Intel Pentium III processor with SpeedSt ep technology. To de termine if your computer has a Mobile Intel Pentium III processor with
SpeedStep technology, check for the Intel SpeedStep item in the Power
menu of the system setup program. For instructions on using the system
setup progra m , refer to Appendix B, “ Using the System Setu p Program,”
found later in this guide.
If your computer has a Mobile Intel Pentium III processor with Intel SpeedStep technology, you must reinstall the Intel SpeedStep utility after you install a new hard-disk
drive or reformat your hard-disk drive.
1. Save and close any open files, and exit any open application programs.
2. Insert the System Software CD into the CD-ROM or DVD-ROM drive.
3. Click the
4. In the
5. Click OK.
6. In the
support.dell.com Installing System Software 3-15
Run
where x is the CD-ROM or DVD-ROM drive letter.
The CD-ROM or DVD-ROM drive letter is usually D.
Welcome
button, and then click
Start
dialog box, type
window, click
.
Run
x:\win2000\spd_step\english\setup.exe
.
Next>
,
Page 66

7. In the
Software License Agreement
window, click
Ye s
.
8. At the
Setup Complete
computer now
NOTE: If the computer is set to boot from the CD-ROM or DVD-ROM drive
before the hard-disk drive, remove the System Software CD before the computer
restarts so that the computer does not boot from the CD. For information on
changing the boot sequence, refer to Appendix B, “Using the System Setup
Program.”
button is selected, and then click
window, be sure that the
Yes, I want to restart my
.
Finish
Install the System Help From the System Software CD
The Dell Inspiron system Help is available on the System Software CD.
NOTE: You can also access it from the Dell support Web site at:
For instructions, see the following section, “Download the System Help From the Dell
Support Web Site.”
To install the system Help from the System Software CD, perform the following steps:
1. Insert the System Software CD into the CD-ROM or DVD-ROM drive.
2. Double-click the
DVD-ROM
3. Double-click the
drive icon.
My Computer
folder.
Guide
icon, and then double-click the
http://support.dell.com
CD-ROM
or
.
4. Right-click the
5. Double-click the
6. Double-click the
click
Paste
7.Click
8. Type
9. Click OK when a message window indicates the file was successfully registered.
10. Double-click the
11. Double-click the
12. Right-click and hold
13. Release the right mouse button.
14. Click
3-16 Dell Inspiron 5000 Reference and Troubleshooting Guide
Start
regsvr32 popup.ocx
DVD-ROM
folder.
Copy Here
popup.ocx
My Computer
Windows
.
, and then click
My Computer
icon.
Guide
.
file, and then click
folder, double-click the
Run
folder, and then double-click the appropriate language
5000help
.
Copy
icon, and then double-click the C: drive icon.
System
.
and then press <Enter>.
icon, and then double-click the
and drag it to the Windows desktop.
folder, and then right-
CD-ROM
or
Page 67

Download the System Help From the Dell
Support Web Site
As updated information about your computer is incorporated into the system Help,
Dell compiles and posts the latest version to the Dell support Web site. Dell invites
you to occasionally visit the site to see if an updated system Help is available.
To download the latest system Help from
service tag sequence, click
for your computer.
NOTE: You must copy the
regserv32 popup.ocx
Dell support Web site.
before you run the system Help. For instructions, refer to the
, and then follow the links to the documentation page
Go!
popup.ocx
file into the
http://support.dell.com
Windows System
, enter your
folder and run
Updating Drivers and Utilities
The Dell support Web site,
updates, as well as technical assistance with questions about your computer. Dell
regularly tests and releases certified drivers and utilities for Inspiron computers.
In addition, if you have access to a computer with a modem and/or fax capabilities,
you can access the Dell TechConnect bulletin board service (BBS), AutoTech service,
and TechFax service. The Dell Web site,
these services.
http://support.dell.com
http://www.dell.com
, provides driver and utility
, also contains links to
support.dell.com Installing System Software 3-17
Page 68

3-18 Dell Inspiron 5000 Reference and Troubleshooting Guide
Page 69

CHAPTER 4
Getting Help
This chapter describes the tools Dell provides to help you when you have a problem
with your computer. It also tells you when and how to call Dell for technical or customer assistance.
Technical Assistance
If you need assistance with a technical problem, perform the following steps:
1. Complete the troubleshooting checks in Chapter 2, “Troubleshooting.”
2. Run the Dell Diagnostics as described in Chapter 2, “Running the Dell
Diagnostics.”
3. Make a copy of and complete the Diagnostics Checklist (see Figure 4-1).
4. Use Dells’ extensive suite of online services available at Dell’s World Wide Web
site (
http://www.dell.com
procedures.
) for help with installation and troubleshooting
For more information, refer to “World Wide Web” found later in this chapter.
5. If the preceding steps have not resolved the problem, call Dell for technical
assistance.
When prompted by Dell’s automated telephone system, enter your Express Service Code to route the call directly to the proper support personnel. If you do not
have an Express Service Code, open the
Express Service Code
NOTE: Dell’s Express Service Code system may not be available in all countries.
For instructions on using the technical support service, refer to “Technical Support Service” and “Before You Call” found later in this chapter.
icon, and follow the directions.
Dell Accessories
folder, double-click the
Help Tools
Dell provides a number of tools to assist you. These tools are described in the following sections.
support.dell.com Getting Help 4-1
Page 70

NOTE: Some of the following tools are not always available in all locations outside the
continental U.S. Please call your local Dell representative for information on
availability.
World Wide Web
The Internet is your most powerful tool for obtaining information about your computer
and other Dell products. Through the Internet, you can access most of the services
described in this chapter, including AutoTech, TechFax, order status, technical support,
and product information.
You can access Dell’s support Web site at
country, click the map that appears. The
Enter your system information to access help tools and information. Dell can be
accessed electronically using the following addresses:
World Wide Web
•
http://www.dell.com/
http://www.dell.com/ap/
http://www.euro.dell.com
http://www.dell.com/la
Anonymous file transfer protocol (FTP)
•
ftp1.dell.com/
Log in as
Electronic Support Service
•
mobile_support@us.dell.com
apsupport@dell.com
http://support.euro.dell.com
Electronic Quote Service
•
sales@dell.com
user:
(for Asian/Pacific countries only)
(for Europe only)
(for Latin American countries)
anonymous
(for Asian/Pacific countries only)
, and use your e-mail address as your password.
http://support.dell.com.
Welcome to support.dell.com
(for Europe only)
To select your
page opens.
apmarketing@dell.com
Electronic Information Service
•
info@dell.com
(for Asian/Pacific countries only)
AutoTech Service
Dell’s automated technical support service—AutoTech—provides recorded answers
to the questions most frequently asked by Dell customers.
When you call AutoTech, you use your touch-tone telephone to select the subjects
that correspond to your questions. You can even interrupt an AutoTech session and
4-2 Dell Inspiron 5000 Reference and Troubleshooting Guide
Page 71

continue the session later. The code number that the AutoTech service gives you
allows you to continue your session where you ended it.
The AutoTech service is available 24 hours a day, seven days a week. You can also
access this service through the technical support service. For the telephone number
to call, refer to “Dell Contact Numbers” found later in this chapter.
TechFax Service
Dell takes full advantage of fax technology to serve you better. Twenty-four hours a
day, seven days a week, you can call the Dell TechFax line toll-free for all kinds of technical information.
Using a touch-tone phone, you can select from a full directory of topics. The technical
information you request is sent within minutes to the fax number you designate. For
the TechFax telephone number to call, refer to “Dell Contact Numbers” found later in
this chapter.
Automated Order-Status System
You can call this automated service to check on the status of any Dell products that
you have ordered. A recording prompts you for the information needed to locate and
report on your order. For the telephone number to call, refer to “Dell Contact Numbers” found later in this chapter.
Technical Support Service
Dell’s industry-leading hardware technical-support service is available 24 hours a day,
seven days a week, to answer your questions about Dell hardware.
Our technical support staff pride themselves on their track record: more than 90 percent of all problems and questions are taken care of in just one toll-free call, usually in
less than 10 minutes. When you call, our experts can refer to records kept on your
Dell system to better understand your particular question. Our technical support staff
use computer-based diagnostics to provide fast, accurate answers to questions.
To contact Dell’s technical support service, first refer to the section titled “Before You
Call” and then call the number for your country as listed in “Dell Contact Numbers”
found later in this chapter.
Problems With Your Order
If you have a problem with your order, such as missing parts, wrong parts, or incorrect
billing, contact Dell Computer Corporation for customer assistance. Have your invoice
or packing slip handy when you call. For the telephone number to call, refer to “Dell
Contact Numbers” found later in this chapter.
support.dell.com Getting Help 4-3
Page 72

Product Information
If you need information about additional products available from Dell Computer Corporation, or if you would like to place an order, visit Dell’s World Wide Web site at
http://www.dell.com/
ist, refer to “Dell Contact Numbers” found later in this chapter.
. For the telephone number to call to speak to a sales special-
Returning Items for Warranty Repair or Credit
Prepare all items being returned, whether for repair or credit, as follows:
1. Call Dell to obtain an authorization number, and write it clearly and prominently
on the outside of the box.
For the telephone number to call, refer to “Dell Contact Numbers” found later in
this chapter.
2. Include a copy of the invoice and a letter describing the reason for the return.
3. Include a copy of the Diagnostics Checklist indicating the tests you have run and
any error messages reported by the Dell Diagnostics.
4. Include any accessories that belong with the item(s) being returned (power
cables, software diskettes, guides, and so on) if the return is for credit.
5. Pack the equipment to be returned in the original (or equivalent) packing
materials.
You are responsible for paying shipping expenses. You are also responsible for
insuring any product returned, and you assume the risk of loss during shipment
to Dell Computer Corporation. Collect-on-delivery (C.O.D.) packages are not
accepted.
Returns that are missing any of the preceding requirements will be refused at our
receiving dock and returned to you.
4-4 Dell Inspiron 5000 Reference and Troubleshooting Guide
Page 73

Before You Call
NOTE: Have your Express Service Code or service tag sequence ready when you call.
The code helps Dell’s automated-support telephone system direct your call more
efficiently.
Remember to fill out the Diagnostics Checklist (Figure 4-1). If possible, turn on your
computer before you call Dell for technical assistance and call from a telephone at or
near the computer. You may be asked to type some commands at the keyboard, relay
detailed information during operations, or try other troubleshooting steps possible
only at the computer system itself. Make sure that the system documentation is
available.
CAUTION: To help prevent the risk of electrical shock, disconnect all external devices, re move the battery, and disconnect the AC adapter from the
computer before installing or replacin g th e ha rd-disk drive and m emo ry
modules.
support.dell.com Getting Help 4-5
Page 74

Diagnostics Checklist
Name: ______________________________________________________________Date: ______________________
Address: ________________________________________________________Phone number:
Service tag (an alphanumeric code on the back or bottom of the computer):______________________________
Express Service Code: ____________________________________________________________________________
Return Material Authorization Number (if provided by Dell support technician):
Operating system and version: _____________________________________________________________________
Peripherals: ____________________________________________________________________________________
_______________________________________________________________________________________________
_______________________________________________________________________________________________
Expansion cards:_________________________________________________________________________________
_______________________________________________________________________________________________
_______________________________________________________________________________________________
Are you connected to a network? yes no
Network, version, and network card: _______________________________________________________________
Programs and versions: ___________________________________________________________________________
_______________________________________________________________________________________________
_______________________________________________________________________________________________
_______________________________________________________________________________________________
___________________________
__________________
Refer to your operating system documentation to determine the contents of the system’s start-up files. If the
computer is connected to a printer, print each file. Otherwise, record the contents of each file before
calling Dell.
Error message or diagnostic code: _________________________________________________________________
Description of problem and troubleshooting procedures you performed: ________________________________
_______________________________________________________________________________________________
_______________________________________________________________________________________________
Figure 4-1. Diagnostics Checklist
4-6 Dell Inspiron 5000 Reference and Troubleshooting Guide
Page 75

Dell Contact Number s
When you need to contact Dell, use the telephone numbers, codes, and electronic
addresses provided in Tables 4-1 and 4-2. Table 4-1 provides the various codes
required to make long-distance and international calls. Table 4-2 provides local telephone numbers, area codes, toll-free numbers, Web site and e-mail addresses, if
applicable, for each department or service available in various countries around the
world. If you are making a direct-dialed call to a location outside of your local telephone service area, determine which codes to use (if any) in Table 4-1 in addition to
the local numbers provided in Table 4-2. For example, to place an international call
from Paris, France to Bracknell, England, dial the international access code for France
followed by the country code for the U.K., the city code for Bracknell, and then the
local number as shown in the following illustration.
00
International
Access Code
(in France)
44
Country
Code
(for U.K.)
1344
City Code
(Bracknell)
________
Local
Number
To place a long-distance call within your own country, use area codes instead of international access codes, country codes, and city codes. For example, to call Paris,
France from Montpellier, France, dial the area code plus the local number as shown in
the following illustration.
01
Area Code
(for Paris from
outside Paris)
________
Local
Number
The codes required depend on where you are calling from as well as the destination
of your call; in addition, each country has a different dialing protocol. If you need assistance in determining which codes to use, contact a local or an international operator.
NOTE: Toll-free numbers are for use only within the country for which they are listed.
Area codes are most often used to call long distance within your own country (not
internationally)—in other words, when your call originates in the same country you are
calling.
support.dell.com Getting Help 4-7
Page 76

Table 4-1. International Dialing Codes
Country (Cit y)
International
Access Code Country Code City Code
Australia (Sydney) 0011 61 2
Austria (Vienna) 900 43 1
Belgium (Brussels) 00 32 2
Brazil 0021 55 51
Brunei — 673 —
Canada (North York, Ontario) 011 — Not required
Chile (Santiago) — 56 2
China (Xiamen) — 86 592
Czech Republic (Prague) 00 420 2
Denmark (Horsholm) 009 45 Not required
Finland (Helsinki) 990 358 9
France (Paris) (Montpellier) 00 33 (1) (4)
Germany (Langen) 00 49 6103
Hong Kong 001 852 Not required
Ireland (Bray) 16 353 1
Italy (Milan) 00 39 2
Japan (Kawasaki) 001 81 44
Korea (Seoul) 001 82 2
Luxembourg 00 352 —
Macau — 853 Not required
Malaysia (Penang) 00 60 4
Mexico (Colonia Granada) 95 52 5
Netherlands (Amsterdam) 00 31 20
New Zealand 00 64 —
Norway (Lysaker) 095 47 Not required
Poland (Warsaw) 011 48 22
Singapore (Singapore) 005 65 Not required
South Africa (Johannesburg) 09/091 27 11
4-8 Dell Inspiron 5000 Reference and Troubleshooting Guide
Page 77

Table 4-1. International Dialing Codes
(continued)
Country (Cit y)
Spain (Madrid) 07 34 91
Sweden (Upplands Vasby) 009 46 8
Switzerland (Geneva) 00 41 22
Ta iw a n 0 0 2 8 86 —
Thailand 001 66 —
U.K. (Bracknell) 010 44 1344
U.S.A. (Austin, Texas) 011 1 Not required
Table 4-2. Dell Contact Numbers
Country (City)
Aus tralia
(Sydney)
Department Name or Service Code Toll-Free Number
Home and Small Business . . . . . . . . . . . . . . . . . . . . . . . . . . . . . . . . . 1-300-65-55-33
Government and Business. . . . . . . . . . . . . . . . . . . . . . . . . . toll free: 1-800-633-559
Preferred Accounts Division (PAD) . . . . . . . . . . . . . . . . . . . . toll free: 1-800-060-889
Customer Care . . . . . . . . . . . . . . . . . . . . . . . . . . . . . . . . . . . .toll free: 1-800-819-339
Corporate Sales . . . . . . . . . . . . . . . . . . . . . . . . . . . . . . . . . . toll free: 1-800-808-385
Transaction Sales . . . . . . . . . . . . . . . . . . . . . . . . . . . . . . . . . .toll free: 1-800-808-312
Fax . . . . . . . . . . . . . . . . . . . . . . . . . . . . . . . . . . . . . . . . . . . . .toll free: 1-800-818-341
International
Access Code Country Code City Code
Area Local Number or
Aus tria
(Vienna)
NOTE: Customers
in Austria call Germany for technical
and customer
assistance.
Home/Small Business Sales . . . . . . . . . . . . . . . . . . 01. . . . . . . . . . . . . .795 567602
Home/Small Business Fax . . . . . . . . . . . . . . . . . . . . 01. . . . . . . . . . . . . . .795 67605
Home/Small Business Customer Care. . . . . . . . . . . 01. . . . . . . . . . . . . . .795 67603
Preferred Accounts/Corporate Customer Care. . . . . . . . . . . . . . . . . . . . . 0660 8056
Home/Small Business Technical Support . . . . . . . . . 01. . . . . . . . . . . . . . .795 67604
Preferred Accounts/Corporate Technical Support. . . . . . . . . . . . . . . . . . . 0660 8779
Switchboard . . . . . . . . . . . . . . . . . . . . . . . . . . . . . . . 01. . . . . . . . . . . . . . . . 491 04 0
Web site:
http://support.euro.dell.com
E-mail: tech_support_germany@dell.com
support.dell.com Getting Help 4-9
Page 78

Table 4-2. Dell Contact Numbers
(continued)
Country (City)
Belgium
(Brussels)
Brazil
Brunei
NOTE: Customers
in Brunei call
Malaysia for sales,
customer, and technical assistance.
Canada
(North York, Ontario)
NOTE: Customers
in Canada call the
U.S.A. for access to
TechConnect BBS.
Department Name or Service Code Toll-Free Number
Area Local Number or
Technical Support. . . . . . . . . . . . . . . . . . . . . . . . . . . 02 . . . . . . . . . . . . . . 481 92 88
Customer Care. . . . . . . . . . . . . . . . . . . . . . . . . . . . . 02 . . . . . . . . . . . . . . 481 9119
Home/Small Business Sales . . . . . . . . . . . . . . . . . . . . . . . . . . .toll free: 0800 16884
Corporate Sales . . . . . . . . . . . . . . . . . . . . . . . . . . . . 02 . . . . . . . . . . . . . . 481 91 00
Fax . . . . . . . . . . . . . . . . . . . . . . . . . . . . . . . . . . . . . . 02 . . . . . . . . . . . . . . 481 92 99
Switchboard . . . . . . . . . . . . . . . . . . . . . . . . . . . . . . . 02 . . . . . . . . . . . . . . 481 91 00
Web site:
http://support.euro.dell.com
E-mail: tech_be@dell.com
Sales, Customer Support, Technical Support. . . . . . . . . . . . . . . . . . . . 0800 90 3355
Customer Technical Support (Penang, Malaysia) . . . . . . . . . . . . . . . . . . . . .810 4966
Customer Service (Penang, Malaysia) . . . . . . . . . . . . . . . . . . . . . . . . . . . . .810 4949
Transaction Sales (Penang, Malaysia). . . . . . . . . . . . . . . . . . . . . . . . . . . . . . 810 4955
Automated Order-Status System . . . . . . . . . . . . . . . . . . . . . toll free: 1-800-433-9014
AutoTech (Automated technical support) . . . . . . . . . . . . . . .toll free: 1-800-247-9362
Customer Care (From outside Toronto) . . . . . . . . . . . . . . . .toll free: 1-800-387-5759
Customer Care (From within Toronto) . . . . . . . . . . 416 . . . . . . . . . . . . . . .758-2400
Customer Technical Support . . . . . . . . . . . . . . . . . . . . . . . .toll free: 1-800-847-4096
Sales (Direct Sales—from outside Toronto) . . . . . . . . . . . . .toll free: 1-800-387-5752
Sales (Direct Sales—from within Toronto) . . . . . . . 416 . . . . . . . . . . . . . . .758-2200
Sales (Federal government,
education, and medical) . . . . . . . . . . . . . . . . . . . . . . . . . . . . toll free: 1-800-567-7542
Sales (Major Accounts) . . . . . . . . . . . . . . . . . . . . . . . . . . . .toll free: 1-800-387-5755
TechConnect BBS (Austin, Texas, U.S.A.) . . . . . . . 512 . . . . . . . . . . . . . . .728-8528
TechFax . . . . . . . . . . . . . . . . . . . . . . . . . . . . . . . . . . . . . . . .toll free: 1-800-950-1329
Chile
Sales, Customer Support, and Technical Support . . . . . . . . toll free: 1230-020-4823
(Santiago)
NOTE: Customers
in Chile call the
U.S.A for sales, customer, and technical
assistance.
4-10 Dell Inspiron 5000 Reference and Troubleshooting Guide
Page 79

Table 4-2. Dell Contact Numbers
(continued)
Country (City)
China
(Xiamen)
Czech Republic
(Prague)
Denmark
(Horsholm)
NOTE: Customers
in Denmark call
Sweden for fax
technical support.
Finland
(Helsinki)
Department Name or Service Code Toll-Free Number
Area Local Number or
Customer Service . . . . . . . . . . . . . . . . . . . . . . . . . . . . . . . . . toll free: 800 858 2437
Sales. . . . . . . . . . . . . . . . . . . . . . . . . . . . . . . . . . . . . . . . . . . . toll free: 800 858 2222
Technical Support . . . . . . . . . . . . . . . . . . . . . . . . . . . 02. . . . . . . . . . . . . 22 83 27 27
Customer Care . . . . . . . . . . . . . . . . . . . . . . . . . . . . . 02. . . . . . . . . . . . . 22 83 27 11
Fax . . . . . . . . . . . . . . . . . . . . . . . . . . . . . . . . . . . . . . 02 . . . . . . . . . . . . . 22 83 27 14
TechFax. . . . . . . . . . . . . . . . . . . . . . . . . . . . . . . . . . . 02. . . . . . . . . . . . . 22 83 27 28
Switchboard . . . . . . . . . . . . . . . . . . . . . . . . . . . . . . . 02. . . . . . . . . . . . . .22 83 27 11
Web site:
http://support.euro.dell.com
E-mail: czech_dell@dell.com
Technical Support . . . . . . . . . . . . . . . . . . . . . . . . . . . . . . . . . . . . . . . . . . . . 45170182
Home/Small Business Customer Care. . . . . . . . . . . . . . . . . . . . . . . . . . . . 32875505
Switchboard . . . . . . . . . . . . . . . . . . . . . . . . . . . . . . . . . . . . . . . . . . . . . . . . 45170100
Fax Technical Support (Upplands Vasby, Sweden) . . . . . . . . . . . . . . . . . . 859005594
Fax Switchboard. . . . . . . . . . . . . . . . . . . . . . . . . . . . . . . . . . . . . . . . . . . . . .45170117
Web site:
http://support.euro.dell.com
E-mail: den_support@dell.com
Technical Support . . . . . . . . . . . . . . . . . . . . . . . . . . . 09. . . . . . . . . . . . . . 253 313 60
Technical Support Fax. . . . . . . . . . . . . . . . . . . . . . . . 09. . . . . . . . . . . . . . 253 313 81
Home/Small Business Customer Care. . . . . . . . . . . 09. . . . . . . . . . . . . . 693 791 94
Fax . . . . . . . . . . . . . . . . . . . . . . . . . . . . . . . . . . . . . . 09 . . . . . . . . . . . . . . 253 313 99
Switchboard . . . . . . . . . . . . . . . . . . . . . . . . . . . . . . . 09. . . . . . . . . . . . . . 253 313 00
Web site:
http://support.euro.dell.com
E-mail: fin_support@dell.com
support.dell.com Getting Help 4-11
Page 80

Table 4-2. Dell Contact Numbers
(continued)
Country (City)
France
(Paris/Montpellier)
Germany
(Langen)
Department Name or Service Code Toll-Free Number
Area Local Number or
Technical Support. . . . . . . . . . . . . . . . . . . . . . . . . 0803 . . . . . . . . . . . . . . . .387 270
Customer Care (Paris) . . . . . . . . . . . . . . . . . . . . . . . 01 . . . . . . . . . . . . .47 62 68 92
Customer Care (Montpellier) . . . . . . . . . . . . . . . . . . 04 . . . . . . . . . . . . .67 06 61 96
TechConnect BBS (Montpellier) . . . . . . . . . . . . . . . . 04 . . . . . . . . . . . . .67 22 53 04
Fax (Montpellier) . . . . . . . . . . . . . . . . . . . . . . . . . . . 04 . . . . . . . . . . . . .67 06 60 07
Switchboard (Paris) . . . . . . . . . . . . . . . . . . . . . . . . . 01 . . . . . . . . . . . . .47 62 69 00
Switchboard (Montpellier) . . . . . . . . . . . . . . . . . . . . 04 . . . . . . . . . . . . .67 06 60 00
Web site:
http://support.euro.dell.com
E-mail: web_fr_tech@dell.com
Technical Support. . . . . . . . . . . . . . . . . . . . . . . . 06103 . . . . . . . . . . . . . . . 766-7200
Technical Support Fax . . . . . . . . . . . . . . . . . . . . 06103 . . . . . . . . . . . . . . . 766-9222
Home/Small Business Customer Care . . . . . . . . . . . . . . . . . . . . . . 0180-5-224400
Global Segment Customer Care . . . . . . . . . . . . 06103 . . . . . . . . . . . . . . . 766-9570
Preferred Accounts Customer Care . . . . . . . . . . 06103 . . . . . . . . . . . . . . .766-9420
Large Accounts Customer Care. . . . . . . . . . . . . 06103 . . . . . . . . . . . . . . . 766-9560
Public Accounts Customer Care . . . . . . . . . . . . 06103 . . . . . . . . . . . . . . . 766-9555
TechConnect BBS . . . . . . . . . . . . . . . . . . . . . . . 06103 . . . . . . . . . . . . . . . 766-9666
Switchboard . . . . . . . . . . . . . . . . . . . . . . . . . . . . 06103 . . . . . . . . . . . . . . .766-7000
Web site:
http://www.dell.de/support
E-mail: tech_support_germany@dell.com
Hong Kong
NOTE: Customers
in Hong Kong call
Malaysia for customer assistance.
4-12 Dell Inspiron 5000 Reference and Troubleshooting Guide
Technical Support. . . . . . . . . . . . . . . . . . . . . . . . . . . . . . . . . . . toll free: 800 96 4107
Customer Service (Penang, Malaysia) . . . . . . . . . . . . . . . . . . . . . . . . . . . . .810 4949
Transaction Sales . . . . . . . . . . . . . . . . . . . . . . . . . . . . . . . . . . . toll free: 800 96 4109
Corporate Sales . . . . . . . . . . . . . . . . . . . . . . . . . . . . . . . . . . . . toll free: 800 96 4108
Page 81

Table 4-2. Dell Contact Numbers
(continued)
Country (City)
Ireland
(Bray)
NOTE: Customers
in Ireland call the
U.K. for Home/Small
Business customer
assistance.
Italy
(Milan)
Department Name or Service Code Toll-Free Number
Area Local Number or
Technical Support . . . . . . . . . . . . . . . . . . . . . . . . . . . . . . . . . . . . . . . . .1-850-543-543
Customer Care . . . . . . . . . . . . . . . . . . . . . . . . . . . . . 01. . . . . . . . . . . . . . . 204 4026
Home/Small Business Customer Care (Bracknell, U.K.). . . . . . . . . . . 0870 906 0010
Sales. . . . . . . . . . . . . . . . . . . . . . . . . . . . . . . . . . . . . . . . . . . . . . . . . . .1-850-235-235
SalesFax. . . . . . . . . . . . . . . . . . . . . . . . . . . . . . . . . . 01. . . . . . . . . . . . . . . 286 2020
Fax . . . . . . . . . . . . . . . . . . . . . . . . . . . . . . . . . . . . . . 01 . . . . . . . . . . . . . . . 286 6848
TechConnect BBS. . . . . . . . . . . . . . . . . . . . . . . . . . . 01. . . . . . . . . . . . . . . .204 4711
TechFax. . . . . . . . . . . . . . . . . . . . . . . . . . . . . . . . . . . 01. . . . . . . . . . . . . . . 204 4708
Switchboard . . . . . . . . . . . . . . . . . . . . . . . . . . . . . . . 01. . . . . . . . . . . . . . . 286 0500
Web site:
http://support.euro.dell.com
E-mail: dell_direct_support@dell.com
Technical Support . . . . . . . . . . . . . . . . . . . . . . . . . . . . 2. . . . . . . . . . . . . . 57782.690
Customer Care . . . . . . . . . . . . . . . . . . . . . . . . . . . . . . 2. . . . . . . . . . . . . . 57782.555
Sales. . . . . . . . . . . . . . . . . . . . . . . . . . . . . . . . . . . . . . 2 . . . . . . . . . . . . . . .57782.411
Fax . . . . . . . . . . . . . . . . . . . . . . . . . . . . . . . . . . . . . . . 2 . . . . . . . . . . . . . . . 57503530
Switchboard . . . . . . . . . . . . . . . . . . . . . . . . . . . . . . . . 2. . . . . . . . . . . . . . . . 57782.1
Web site:
http://support.euro.dell.com
E-mail: support_italy@dell.com
Japan
(Kawasaki)
Technical Support (Inspiron) . . . . . . . . . . . . . . . . . . . . . . . . toll free: 0120-1982-56 or
0088-25-3355
Y2K Support . . . . . . . . . . . . . . . . . . . . . . . . . . . . . . 044. . . . . . . . . . . . . . . 556-4298
Customer Care . . . . . . . . . . . . . . . . . . . . . . . . . . . . 044. . . . . . . . . . . . . . . 556-4240
Home and Small Business Group Sales. . . . . . . . . 044. . . . . . . . . . . . . . . 556-3344
Preferred Accounts Division Sales . . . . . . . . . . . . . 044. . . . . . . . . . . . . . . 556-3433
Large Corporate Accounts . . . . . . . . . . . . . . . . . . . 044. . . . . . . . . . . . . . . 556-3430
Faxbox Service . . . . . . . . . . . . . . . . . . . . . . . . . . . . . . . . . . . . . . . . . . . 03-5972-5840
Switchboard . . . . . . . . . . . . . . . . . . . . . . . . . . . . . . 044 . . . . . . . . . . . . . . . 556-4300
Web site:
support.dell.com Getting Help 4-13
http://support.jp.dell.com
Page 82

Table 4-2. Dell Contact Numbers
(continued)
Country (City)
Korea
(Seoul)
Latin America
NOTE: Customers
in Latin America call
the U.S.A. for sales,
customer, and technical assistance.
Luxembourg
NOTE: Customers
in Luxembourg call
Belgium for sales,
customer, and technical assistance.
Department Name or Service Code Toll-Free Number
Area Local Number or
Technical Support. . . . . . . . . . . . . . . . . . . . . . . . . . . . . . . . . . toll free: 080-200-3800
Sales . . . . . . . . . . . . . . . . . . . . . . . . . . . . . . . . . . . . . . . . . . . toll free: 080-200-3777
Customer Service (Seoul, Korea). . . . . . . . . . . . . . . . . . . . . . . . . . . . . . . . 2194-6220
Customer Service (Penang, Malaysia) . . . . . . . . . . . . . . . . . . . . . . . . . 604-810-4949
Fax . . . . . . . . . . . . . . . . . . . . . . . . . . . . . . . . . . . . . . . . . . . . . . . . . . . . . . . 2194-6202
Switchboard . . . . . . . . . . . . . . . . . . . . . . . . . . . . . . . . . . . . . . . . . . . . . . . .2194-6000
Customer Technical Support
(Austin, Texas, U.S.A.) . . . . . . . . . . . . . . . . . . . . . . 512 . . . . . . . . . . . . . . .728-4093
Customer Service (Austin, Texas, U.S.A.) . . . . . . . 512 . . . . . . . . . . . . . . .728-3619
Fax (Technical Support and Customer Service)
(Austin, Texas, U.S.A.) . . . . . . . . . . . . . . . . . . . . . . 512 . . . . . . . . . . . . . . .728-3883
Sales (Austin, Texas, U.S.A.) . . . . . . . . . . . . . . . . . 512 . . . . . . . . . . . . . . .728-4397
SalesFax (Austin, Texas, U.S.A.). . . . . . . . . . . . . . . 512 . . . . . . . . . . . . . . .728-4600
728-3772
Technical Support (Brussels, Belgium). . . . . . . . . . . 02 . . . . . . . . . . . . . . 481 92 88
Home/Small Business Sales (Brussels, Belgium) . . . . . . . . . . . toll free: 080016884
Corporate Sales (Brussels, Belgium) . . . . . . . . . . . . 02 . . . . . . . . . . . . . . 481 91 00
Customer Care (Brussels, Belgium). . . . . . . . . . . . . 02 . . . . . . . . . . . . . . 481 9119
Fax (Brussels, Belgium) . . . . . . . . . . . . . . . . . . . . . . 02 . . . . . . . . . . . . . . 481 92 99
Switchboard (Brussels, Belgium) . . . . . . . . . . . . . . . 02 . . . . . . . . . . . . . . 481 91 00
Web site:
http://support.euro.dell.com
E-mail: tech_be@dell.com
Macau
NOTE: Customers
in Macau call
Technical Support. . . . . . . . . . . . . . . . . . . . . . . . . . . . . . . . . . . . . toll free: 0800 582
Customer Service (Penang, Malaysia) . . . . . . . . . . . . . . . . . . . . . . . . . . . . .810 4949
Transaction Sales . . . . . . . . . . . . . . . . . . . . . . . . . . . . . . . . . . . . . toll free: 0800 581
Malaysia for customer assistance.
Malaysia
(Penang)
Technical Support. . . . . . . . . . . . . . . . . . . . . . . . . . . . . . . . . toll free: 1 800 888 298
Customer Service . . . . . . . . . . . . . . . . . . . . . . . . . . 04 . . . . . . . . . . . . . . . 810 4949
Transaction Sales . . . . . . . . . . . . . . . . . . . . . . . . . . . . . . . . . toll free: 1 800 888 202
Corporate Sales . . . . . . . . . . . . . . . . . . . . . . . . . . . . . . . . . . .toll free: 1 800 888 213
4-14 Dell Inspiron 5000 Reference and Troubleshooting Guide
Page 83

Table 4-2. Dell Contact Numbers
(continued)
Country (City)
Mexico
(Colonia Granada)
NOTE: Customers
in Mexico call the
U.S.A. for access to
the Automated
Order-Status
System and
AutoTech.
Netherlands
(Amsterdam)
Department Name or Service Code Toll-Free Number
Area Local Number or
Automated Order-Status System
(Austin, Texas, U.S.A.) . . . . . . . . . . . . . . . . . . . . . . 512. . . . . . . . . . . . . . . 728-0685
AutoTech (Automated technical support)
(Austin, Texas, U.S.A.) . . . . . . . . . . . . . . . . . . . . . . 512. . . . . . . . . . . . . . . 728-0686
Customer Technical Support. . . . . . . . . . . . . . . . . . 525. . . . . . . . . . . . . . . 228-7870
Sales. . . . . . . . . . . . . . . . . . . . . . . . . . . . . . . . . . . . 525. . . . . . . . . . . . . . . .228-7811
toll free: 91-800-900-37
toll free: 91-800-904-49
Customer Service . . . . . . . . . . . . . . . . . . . . . . . . . 525. . . . . . . . . . . . . . . 228-7878
Main . . . . . . . . . . . . . . . . . . . . . . . . . . . . . . . . . . . . 525. . . . . . . . . . . . . . . 228-7800
Technical Support . . . . . . . . . . . . . . . . . . . . . . . . . . 020. . . . . . . . . . . . . . . 581 8838
Customer Care . . . . . . . . . . . . . . . . . . . . . . . . . . . . 020. . . . . . . . . . . . . . . . 581 8740
Home/Small Business Sales . . . . . . . . . . . . . . . . . . . . . . . . . . . toll free: 0800-0663
Home/Small Business Sales Fax . . . . . . . . . . . . . . 020. . . . . . . . . . . . . . . .682 7171
Corporate Sales . . . . . . . . . . . . . . . . . . . . . . . . . . . 020. . . . . . . . . . . . . . . .581 8818
Corporate Sales Fax . . . . . . . . . . . . . . . . . . . . . . . . 020. . . . . . . . . . . . . . . 686 8003
Fax . . . . . . . . . . . . . . . . . . . . . . . . . . . . . . . . . . . . . 020. . . . . . . . . . . . . . . 686 8003
Switchboard . . . . . . . . . . . . . . . . . . . . . . . . . . . . . . 020 . . . . . . . . . . . . . . . .581 8818
Web site:
http://support.euro.dell.com
E-mail: tech_nl@dell.com
New Zealand
Home and Small Business . . . . . . . . . . . . . . . . . . . . . . . . . . . . . . . . . . 0800 446 255
Government and Business. . . . . . . . . . . . . . . . . . . . . . . . . . . . . . . . . . 0800 444 617
Sales. . . . . . . . . . . . . . . . . . . . . . . . . . . . . . . . . . . . . . . . . . . . . . . . . . . 0800 441 567
Fax . . . . . . . . . . . . . . . . . . . . . . . . . . . . . . . . . . . . . . . . . . . . . . . . . . . . 0800 441 566
Norway
(Lysaker)
NOTE: Customers
in Norway call
Sweden for fax
technical support.
Technical Support . . . . . . . . . . . . . . . . . . . . . . . . . . . . . . . . . . . . . . . . . . . .67116882
Home/Small Business Customer Care. . . . . . . . . . . . . . . . . . . . . . . . . . . . 23162298
Switchboard . . . . . . . . . . . . . . . . . . . . . . . . . . . . . . . . . . . . . . . . . . . . . . . 671 16800
Fax Technical Support (Upplands Vasby, Sweden) . . . . . . . . . . . . . . . . . . 590 05 594
Fax Switchboard. . . . . . . . . . . . . . . . . . . . . . . . . . . . . . . . . . . . . . . . . . . . .671 16865
Web site:
http://support.euro.dell.com
E-mail: nor_support@dell.com
support.dell.com Getting Help 4-15
Page 84

Table 4-2. Dell Contact Numbers
(continued)
Country (City)
Polan d
(Warsaw)
Singapore
(Singapore)
NOTE: Customers
in Singapore call
Malaysia for customer assistance.
South Africa
(Johannesburg)
Department Name or Service Code Toll-Free Number
Area Local Number or
Technical Support. . . . . . . . . . . . . . . . . . . . . . . . . . . 22 . . . . . . . . . . . . . . 60 61 999
Customer Care. . . . . . . . . . . . . . . . . . . . . . . . . . . . . 22 . . . . . . . . . . . . . . 60 61 999
Sales . . . . . . . . . . . . . . . . . . . . . . . . . . . . . . . . . . . . 22 . . . . . . . . . . . . . . 60 61 999
Fax . . . . . . . . . . . . . . . . . . . . . . . . . . . . . . . . . . . . . . 22 . . . . . . . . . . . . . . 60 61 998
Switchboard . . . . . . . . . . . . . . . . . . . . . . . . . . . . . . . 22 . . . . . . . . . . . . . . 60 61 999
Web site:
http://support.euro.dell.com
E-mail: pl_support@dell.com
Technical Support. . . . . . . . . . . . . . . . . . . . . . . . . . . . . . . . . . toll free: 800 6011 051
Customer Service (Penang, Malaysia) . . . . . . . . . . . 04 . . . . . . . . . . . . . . .810 4949
Transaction Sales . . . . . . . . . . . . . . . . . . . . . . . . . . . . . . . . . . toll free: 800 6011 054
Corporate Sales . . . . . . . . . . . . . . . . . . . . . . . . . . . . . . . . . . . toll free: 800 6011 053
Technical Support. . . . . . . . . . . . . . . . . . . . . . . . . . 011 . . . . . . . . . . . . . . . 709 7710
Customer Care. . . . . . . . . . . . . . . . . . . . . . . . . . . . 011 . . . . . . . . . . . . . . . 709 7710
Sales . . . . . . . . . . . . . . . . . . . . . . . . . . . . . . . . . . . 011 . . . . . . . . . . . . . . .706 7700
Fax . . . . . . . . . . . . . . . . . . . . . . . . . . . . . . . . . . . . . 011 . . . . . . . . . . . . . . .709 0495
Switchboard . . . . . . . . . . . . . . . . . . . . . . . . . . . . . . 011 . . . . . . . . . . . . . . .709 7700
Web site:
http://support.euro.dell.com
E-mail: dell_za_support@dell.com
Southeast Asian/
Pacific Countries
Customer Technical Support, Customer Service,
and Sales (Penang, Malaysia). . . . . . . . . . . . . . . . . . . . . . . . . . . . . . . . 60 4 810-4810
(excluding Australia,
Brunei, China, Hong
Kong, Japan, Korea,
Macau, Malaysia,
New Zealand, Singapore, Taiwan, and
Thailand—refer to
individual listings for
these countries)
4-16 Dell Inspiron 5000 Reference and Troubleshooting Guide
Page 85

Table 4-2. Dell Contact Numbers
(continued)
Country (City)
Spain
(Madrid)
Sweden
(Upplands Vasby)
Switzerland
(Geneva)
Department Name or Service Code Toll-Free Number
Area Local Number or
Technical Support . . . . . . . . . . . . . . . . . . . . . . . . . . . . . . . . . . . . . . . . . . 902 100 130
Corporate Customer Care . . . . . . . . . . . . . . . . . . . . . . . . . . . . . . . . . . . 902 118 546
Home/Small Business Customer Care. . . . . . . . . . . . . . . . . . . . . . . . . . 902 118 540
TechConnect BBS. . . . . . . . . . . . . . . . . . . . . . . . . . . 91. . . . . . . . . . . . . . . 329 33 53
Corporate Sales . . . . . . . . . . . . . . . . . . . . . . . . . . . . . . . . . . . . . . . . . . . 902 100 185
Home/Small Business Sales . . . . . . . . . . . . . . . . . . . . . . . . . . . . . . . . . 902 118 541
Switchboard . . . . . . . . . . . . . . . . . . . . . . . . . . . . . . . 91. . . . . . . . . . . . . . . 722 92 00
Web site:
http://support.euro.dell.com
E-mail: es_support@dell.com
Technical Support . . . . . . . . . . . . . . . . . . . . . . . . . . . 08. . . . . . . . . . . . . . 590 05 199
Home/Small Business Customer Care. . . . . . . . . . . . . . . . . . . . . . . . . . . 587 70 527
Fax Technical Support. . . . . . . . . . . . . . . . . . . . . . . . 08. . . . . . . . . . . . . . 590 05 594
Sales. . . . . . . . . . . . . . . . . . . . . . . . . . . . . . . . . . . . . 08 . . . . . . . . . . . . . . 590 05 185
Web site:
http://support.euro.dell.com
E-mail: swe_support@dell.com
Technical Support . . . . . . . . . . . . . . . . . . . . . . . . . . . . . . . . . . . . . . . . . 0844 811 411
Customer Care . . . . . . . . . . . . . . . . . . . . . . . . . . . . . . . . . . . . . . . . . . . 0848 802 802
Fax . . . . . . . . . . . . . . . . . . . . . . . . . . . . . . . . . . . . . 022. . . . . . . . . . . . . . . 799 01 90
Switchboard . . . . . . . . . . . . . . . . . . . . . . . . . . . . . . 022 . . . . . . . . . . . . . . . 799 0101
Web site:
http://support.euro.dell.com
E-mail: swisstech@dell.com
Ta i w a n
Technical Support . . . . . . . . . . . . . . . . . . . . . . . . . . . . . . . . . . toll free: 0080 60 1255
Transaction Sales . . . . . . . . . . . . . . . . . . . . . . . toll free: 0080 651 228/0800 33 556
Corporate Sales . . . . . . . . . . . . . . . . . . . . . . . . toll free: 0080 651 227/0800 33 555
Thailand
NOTE: Customers
in Thailand call
Technical Support . . . . . . . . . . . . . . . . . . . . . . . . . . . . . . . . . . . toll free: 0880 060 07
Customer Service (Penang, Malaysia) . . . . . . . . . . . . . . . . . . . . . . . . . . . . .810 4949
Sales. . . . . . . . . . . . . . . . . . . . . . . . . . . . . . . . . . . . . . . . . . . . . toll free: 0880 060 09
Malaysia for customer assistance.
support.dell.com Getting Help 4-17
Page 86

Table 4-2. Dell Contact Numbers
(continued)
Country (City)
U.K.
(Bracknell)
Department Name or Service Code Toll-Free Number
Area Local Number or
Technical Support. . . . . . . . . . . . . . . . . . . . . . . . . . . . . . . . . . . . . . . . 0870-908-0800
Corporate Customer Care . . . . . . . . . . . . . . . . . 01344 . . . . . . . . . . . . . . . . 720206
Home/Small Business Customer Care . . . . . . . . . . . . . . . . . . . . . . . 0870-906-0010
TechConnect BBS . . . . . . . . . . . . . . . . . . . . . . . . . . . . . . . . . . . . . . . 0870-908-0610
Sales . . . . . . . . . . . . . . . . . . . . . . . . . . . . . . . . . 01344 . . . . . . . . . . . . . . . . 720000
AutoFax . . . . . . . . . . . . . . . . . . . . . . . . . . . . . . . . . . . . . . . . . . . . . . . 0870-908-0510
Web site:
http://support.euro.dell.com
E-mail: dell_direct_support@dell.com
4-18 Dell Inspiron 5000 Reference and Troubleshooting Guide
Page 87

Table 4-2. Dell Contact Numbers
(continued)
Country (City)
U.S.A.
(Austin, Texas)
Department Name or Service Code Toll-Free Number
Area Local Number or
Dedicated Technical Support for
Inspiron 5000 Computers . . . . . . . . . . . . . . . . . . . . . . . . . . toll free: 1-877-711-3355
Automated Order-Status System . . . . . . . . . . . . . . . . . . . . . toll free: 1-800-433-9014
AutoTech (Automated technical support) . . . . . . . . . . . . . . .toll free: 1-800-247-9362
Dell Home and Small Business Group:
Customer Technical Support
(Return Material Authorization Numbers). . . . . . . . . . . . . . toll free: 1-800-624-9896
Customer Technical Support
(Home sales purchased via
http://www.dell.com
) . . . . . . toll free: 1-877-576-3355
Customer Service
(Credit Return Authorization Numbers) . . . . . . . . . . . . . . . toll free: 1-800-624-9897
National Accounts
(systems purchased by established Dell national accounts [have
your account number handy], medical institutions, or value-added resellers [VARs]):
Customer Service and Technical Support
(Return Material Authorization Numbers). . . . . . . . . . . . . . toll free: 1-800-822-8965
Public Americas International
(systems purchased by governmental agencies
[local, state, or federal] or educational institutions):
Customer Service and Technical Support
(Return Material Authorization Numbers). . . . . . . . . . . . . . .toll free: 1-800-234-1490
Dell Sales . . . . . . . . . . . . . . . . . . . . . . . . . . . . . . . . . . . . . . toll free: 1-800-289-3355
toll free: 1-800-879-3355
Spare Parts Sales . . . . . . . . . . . . . . . . . . . . . . . . . . . . . . . . .toll free: 1-800-357-3355
DellWare Technical Support Locator Service . . . . . . . . . . . .toll free: 1-800-753-7201
DellWare FaxBack Service . . . . . . . . . . . . . . . . . . . 512. . . . . . . . . . . . . . . .728-1681
Fee-Based Technical Support . . . . . . . . . . . . . . . . . . . . . . . toll free: 1-800-433-9005
Sales (Catalogs) . . . . . . . . . . . . . . . . . . . . . . . . . . . . . . . . . .toll free: 1-800-426-5150
Fax . . . . . . . . . . . . . . . . . . . . . . . . . . . . . . . . . . . . . . . . . . . .toll free: 1-800-727-8320
TechFax. . . . . . . . . . . . . . . . . . . . . . . . . . . . . . . . . . . . . . . . .toll free: 1-800-950-1329
TechConnect BBS. . . . . . . . . . . . . . . . . . . . . . . . . . 512. . . . . . . . . . . . . . . 728-8528
Dell Services for the Deaf, Hard-of-
Hearing, or Speech-Impaired . . . . . . . . . . toll free: 1-877-DELLTTY (1-877-335-5889)
Switchboard . . . . . . . . . . . . . . . . . . . . . . . . . . . . . . 512. . . . . . . . . . . . . . . 338-4400
‘
support.dell.com Getting Help 4-19
Page 88

4-20 Dell Inspiron 5000 Reference and Troubleshooting Guide
Page 89

APPENDIX A
Technical Specifications
The most complete specifications for your computer are available on Dell’s World
Wide Web Support site at
http://support.dell.com
Table A-1. Technical Specifications
Microprocessor
Microprocessor type . . . . . . . . . Intel mobile microprocessor
L1 cache . . . . . . . . . . . . . . . . . . 32 KB (internal)
L2 cache . . . . . . . . . . . . . . . . . . 128- or 256-KB (integrated) SRAM
External bus frequency . . . . . . . 66 or 100 MHz
Math coprocessor . . . . . . . . . . . internal to the microprocessor
Chip Set and Bus Architecture
System chip set . . . . . . . . . . . . . Intel mobile 440BX AGP
Data bus width . . . . . . . . . . . . . 64 bits
.
DRAM bus width. . . . . . . . . . . . 64 bits
Microprocessor address bus
width . . . . . . . . . . . . . . . . . . . . . 32 bits
Flash EPROM . . . . . . . . . . . . . . 4 Mb
NOTE: For the full name of an abbreviation or acronym used in this table, see the Glossary in the
system Help.
support.dell.com Technical Specifications A-1
Page 90

Table A-1. Technical Specifications
(continued)
PC Card
PCI controller. . . . . . . . . . . . . . . Texas Instruments PCI 1225 CardBus controller
PC Card connectors . . . . . . . . . two (supports two Type I or Type II cards or one Type III
card)
Cards supported . . . . . . . . . . . . 3.3 V and 5 V
PC Card connector size . . . . . . . 68 pins
Data width (maximum) . . . . . . . 32 bits
Memory
Architecture. . . . . . . . . . . . . . . . SDRAM
Memory module capacities. . . . 32, 64, 192, 128, and 256 MB
Minimum RAM . . . . . . . . . . . . . 32 MB
Maximum RAM. . . . . . . . . . . . . 512 MB
Memory access time/clock
frequency . . . . . . . . . . . . . . . . . 66 or 100 MHz
BIOS address . . . . . . . . . . . . . . F000:0000
Connectors
Serial (DTE) . . . . . . . . . . . . . . . . 9-pin connector; 16550-compatible, 16-byte buffer
Parallel. . . . . . . . . . . . . . . . . . . . 25-hole connector; bidirectional, normal, PS/2, EPP
1. 9 , or E C P
Video . . . . . . . . . . . . . . . . . . . . . 15-hole connector
PS/2 keyboard/mouse . . . . . . . . 6-pin mini-DIN connector
Infrared . . . . . . . . . . . . . . . . . . . IrDA 1.1 sensor
Expansion/docking. . . . . . . . . . . 240-pin connector
Audio. . . . . . . . . . . . . . . . . . . . . microphone-in, line-out, and line-in connectors
TV-out . . . . . . . . . . . . . . . . . . . . S-video (composite video supported with adapter
USB . . . . . . . . . . . . . . . . . . . . . . 4-pin connector
NOTE: For the full name of an abbreviation or acronym used in this table, see the Glossary in the
system Help.
A-2 Dell Inspiron 5000 Reference and Troubleshooting Guide
cable
Page 91

Table A-1. Technical Specifications
Integrated Audio
(continued)
Audio type . . . . . . . . . . . . . . . . . Sound Blaster Pro-compatible voice and music func-
tions, HRTF 3D positional audio, hardware wavetable
Audio controller . . . . . . . . . . . . . ESS Technology Maestro-2E
Conversion. . . . . . . . . . . . . . . . . 16-bit (stereo analog-to-digital and digital-to-analog)
FM music. . . . . . . . . . . . . . . . . . 20 voice, 72 operator
Interfaces: . . . . . . . . . . . . . . . . .
Internal . . . . . . . . . . . . . . . . PCI bus, microphone, dual stereo speakers
External . . . . . . . . . . . . . . . microphone-in, line-out, line-in
Internal speaker amplifier . . . . . 1.0-W stereo (0.5 W per speaker)
External microphone input
voltage range. . . . . . . . . . . . . . . 280 mV peak to peak
Line/audio input voltage
range . . . . . . . . . . . . . . . . . . . . . 2.8 V peak to peak
Volume controls. . . . . . . . . . . . . keyboard commands, volume buttons, application pro-
gram menus
Video
Video type . . . . . . . . . . . . . . . . . 64-bit (128-bit hardware-accelerated) AGP
Video controller . . . . . . . . . . . . . 4- or 8-MB ATI Mobility-P AGP
Video memory . . . . . . . . . . . . . . 4- or 8-MB, 125-MHz SGRAM
LCD interface. . . . . . . . . . . . . . . 65-MHz LVDS
TV support . . . . . . . . . . . . . . . . . NTSC or PAL in S-video and composite modes
Display
Type . . . . . . . . . . . . . . . . . . . . . . Active-matrix color TFT
Response time (typical) . . . . . . . 80 ms
Operating angle . . . . . . . . . . . . . 0° (closed) to 140
°
Dot pitch . . . . . . . . . . . . . . . . . . 0.264 mm
Power consumption. . . . . . . . . . 3.9 W
Controls . . . . . . . . . . . . . . . . . . . brightness can be controlled through key
combinations
NOTE: For the full name of an abbreviation or acronym used in this table, see the Glossary in the
system Help.
support.dell.com Technical Specifications A-3
Page 92

Table A-1. Technical Specifications
Integrated Keyboard
(continued)
Number of keys. . . . . . . . . . . . . 87 (U.S. and Canada); 88 (Europe); 90(Japan)
Key travel. . . . . . . . . . . . . . . . . . 3.0 ± 0.5 mm (0.12 ± 0.02 inch)
Key spacing . . . . . . . . . . . . . . . . 19.1 mm (0.75 inch)
Layout . . . . . . . . . . . . . . . . . . . . QWERTY/AZERTY/Kanji
Touch Pad
Interface . . . . . . . . . . . . . . . . . . PS/2-compatible
X/Y position resolution
(graphics table mode) . . . . . . . . 20 points/mm (500 points/inch)
Size:
Thickness . . . . . . . . . . . . . . 4.65 mm (0.18 inch) at highest component
Width . . . . . . . . . . . . . . . . . 64-mm (2.52-inch) sensor-active area
Height . . . . . . . . . . . . . . . . 47.0-mm (1.85-inch) rectangle with 0.5-mm (0.02-inch)
tabs
Weight . . . . . . . . . . . . . . . . 15 g (0.52 ounce) ± 0.5 g (0.001 ounce)
Powe r:
Supply voltage . . . . . . . . . . 5 V ± 10%
Supply current . . . . . . . . . . 4 mA (maximum operating current)
Battery
Type . . . . . . . . . . . . . . . . . . . . . . lithium ion
Dimensions:
Depth . . . . . . . . . . . . . . . . . 148.2 mm (5.83 inches)
Height . . . . . . . . . . . . . . . . 23.8 mm (0.94 inch)
Width . . . . . . . . . . . . . . . . . 116.2 mm (4.58 inches)
Weight . . . . . . . . . . . . . . . . 0.43 to 0.46 kg (0.98 to 1.01lb)
Voltage . . . . . . . . . . . . . . . . . . . 14.4 VDC
NOTE: For the full name of an abbreviation or acronym used in this table, see the Glossary in the
system Help.
A-4 Dell Inspiron 5000 Reference and Troubleshooting Guide
Page 93

Table A-1. Technical Specifications
Battery
Charge time (approximate)
1
(continued)
(continued)
Computer on . . . . . . . . . . . 2.5 to 3.5 hours
Computer off . . . . . . . . . . . 1.5 hours
Operating time
(approximate): . . . . . . . . . . . . . . 2 to 3 hours with a single battery, 4 to 6 hours with an
additional battery installed in the media bay
Life span (approximate)
. . . . . . . . .
400 discharge/charge cycles
0
Temperature range:
Charge . . . . . . . . . . . . . . . . 5° to 35°C (41° to 95°F)
Discharge . . . . . . . . . . . . . . 5° to 35°C (41°F to 95°F)
Storage. . . . . . . . . . . . . . . . –20° to 50°C (–4° to 122°F)
AC Adapter
Input voltage . . . . . . . . . . . . . . . 100 to 240 VAC
Input current (maximum) . . . . . . 1.5 at 90 VAC, full load
Input frequency . . . . . . . . . . . . . 50 to 60 Hz
Output current. . . . . . . . . . . . . . 3.5 A (continuous)
Output power . . . . . . . . . . . . . . 70 W
Rated output voltage . . . . . . . . . 19 VDC
Dimensions:
Height. . . . . . . . . . . . . . . . . 30 mm (1.2 inches)
Width . . . . . . . . . . . . . . . . . 62.0 mm (2.4 inches)
Depth . . . . . . . . . . . . . . . . . 110 mm (4.3 inches)
Weight (with cables). . . . . . 0.32 kg (0.71 lb)
Temperature range:
Operating . . . . . . . . . . . . . . 0° to 40°C (32°F to 104°F)
Storage. . . . . . . . . . . . . . . . –20° to 65°C (–4°F to 149°F)
1
Battery performance features such as charge time, operating time, and life span can vary according
to the conditions under which the computer and battery are used.
NOTE: For the full name of an abbreviation or acronym used in this table, see the Glossary in the
system Help.
support.dell.com Technical Specifications A-5
Page 94

Table A-1. Technical Specifications
Environmental (Computer)
(continued)
Temperature:
Operating . . . . . . . . . . . . . . 5° to 35°C (41° to 95°F)
Storage. . . . . . . . . . . . . . . . –20° to 50°C (–4° to 122°F)
Relative humidity. . . . . . . . . . . . 10% to 90% (noncondensing)
Maximum vibration:
Operating . . . . . . . . . . . . . . 0.9 GRMS using a random-vibration spectrum that
simulates shipment by air
Storage. . . . . . . . . . . . . . . . 1.3 GRMS using a random-vibration spectrum that sim-
ulates shipment by truck
Maximum shock:
Operating . . . . . . . . . . . . . . 1.52 m/sec (60 inches/sec) (less than or equal to a
pulse width of 2 ms)
Storage. . . . . . . . . . . . . . . . 2.03 m/sec (80 inches/sec) (less than or equal to a
pulse width of 2 ms)
Altitude:
Operating . . . . . . . . . . . . . . 0 to 3048 m (0 to 10,000 ft)
Storage. . . . . . . . . . . . . . . . 0 to 12,192 m (0 to 40,000 ft)
NOTE: For the full name of an abbreviation or acronym used in this table, see the Glossary in the
system Help.
A-6 Dell Inspiron 5000 Reference and Troubleshooting Guide
Page 95

APPENDIX B
Using the System Setup Program
NOTICE: Dell recommends that you change the system setup program settings only when absolut e ly necessary. Changing certain system device
settings could cause hardware conflicts.
You can use the system setup program to:
Change your system configuration information after you add, change, or remove
•
hardware connected to or installed inside your computer
Verify information about your current computer configuration, such as the amount
•
of system memory
Set or change selectable settings—for example, the system password
•
NOTE: When your computer is running the Microsoft
Second Edition operating system, certain
setup program settings. For more information, see “Power Menu” found later in
this appendix.
Control Panel
Windows 98
settings override system
Accessing the System Setup Program
NOTICE: To avoid data loss, save and close any open files and exit any
open application programs before you access the system setup program.
To access the system setup program, turn on the computer and press <F2> as soon
as you see the Dell logo.
NOTE: The computer restarts automatically when you exit the system setup program.
The system setup program includes the following menus on the main screen:
•
Main
•
System Devices
•
Security
•
Power
•
Boot
•
Exit
support.dell.com Using the System Setup Program B-1
Page 96

Navigating Through the System Setup Program
Use the integrated keyboard (see Table B-1) to make all selections in the system
setup program.
NOTE: External Universal Serial Bus (USB) keyboards only function when
Windows 98 Second Edition is running.
Table B-1. System Setup Program Navigation Keys
Key Function
<F1> System setup program Help information appears
or <
<↑>
<↑>
<↑> <↑>
<F5> or <F6> Changes the setting value
<F9> Selects the default settings for all settings in the system setup
<Esc> Exits the system setup program without saving changes
<←>
<Enter> Highlights a submenu item
<F10> Saves your changes and exits the system setup program
or <
↓>
↓>
↓>↓>
→>
Highlights an item
program
Highlights a system setup program menu item
Executes a command (on the
menu only)
Exit
B-2 Dell Inspiron 5000 Reference and Troubleshooting Guide
Page 97

Main Menu
To see information about a specific item, highlight the item and refer to the
Item Specific Help
NOTE: When your computer is running the Microsoft
operating system, the
tem. For more information, see “Power Menu” found later in this appendix.
area on the screen.
Te l e v i s i o n Ty p e
PhoenixBIOS Setup Utility
setting can be overridden by the operating sys-
Windows 98 Second Edition
Main
System Time
System Date:
Floppy Drive:
Hard Disk:
Quiet Boot:
Video Display Device:
Television Port:
Television Type:
System Memory:
Extended Memory:
Service Tag Number:
Visit our WebSite http://www.dell.com
Help
F1
Exit
ESC
System Devices Security Power Boot Exit
[00:06:57]
[11/09/99]
Enabled
4871MB
[Enabled]
[Simul]
[Enabled]
[NTSC]
[640 KB]
[31 KB]
[A2B3C4D5E]
Select Item
Select Menu
Figure B-1. Main Menu
F5/F6
Enter
Change Values
Select Sub-Menu
Item Specific Help
Setup Defaults
F9
Save and Exit
F10
support.dell.com Using the System Setup Program B-3
Page 98

System Devices Menu
To see information about a specific item, highlight the item and refer to the
Item Specific Help
NOTICE: Dell recommends that you change the system setup program settings only when absolut e ly necessary. Changing certain system device
settings could cause hardware conflicts.
area on the screen.
PhoenixBIOS Setup Utility
Main
IDE Controller
FDD COntroller
Internal Touchpad
Serial Port
Infrared Port
Parallel Port
Mode:
Base I/O address:
Interrupt:
DMA channel:
Modem
Help
F1
Exit
ESC
System Devices
Select Item
Select Menu
Figure B-2. Sy stem De vic es Menu
Security Power Boot Exit
[Both]
[Enabled]
[Enabled]
[Auto}
[Off]
[Customized]
[ECP]
[378]
[IRQ 7]
[DMA 3]
[Installed]
F5/F6
Enter
Change Values
Select Sub-Menu
Item Specific Help
Setup Defaults
F9
Save and Exit
F10
B-4 Dell Inspiron 5000 Reference and Troubleshooting Guide
Page 99

Security Menu
To see information about a specific item, highlight the item and refer to the
Item Specific Help
area on the screen.
PhoenixBIOS Setup Utility
Main
System Password is
Set System Password:
Password on Boot:
Processor Serial Number:
Help
F1
Exit
ESC
System Devices
Security
Clear
[Enter]
[Disabled]
[Disabled]
Select Item
Select Menu
F5/F6
Enter
Figure B-3. Security Menu
Power Boot Exit
Change Values
Select Sub-Menu
Item Specific Help
Setup Defaults
F9
Save and Exit
F10
support.dell.com Using the System Setup Program B-5
Page 100

Power M enu
To see information about a specific item, highlight the item and refer to the
Item Specific Help
NOTES: The power management settings of the Windows 98 Second Edition operating system take precedence over the settings in the system setup menu Power
menu. For more information, see “Conserving Power” in the system Help.
If your computer has a Mobile Intel Pentium III processor with SpeedStep technology,
the
menu has the Intel SpeedStep item.
Power
area on the screen.
PhoenixBIOS Setup Utility
Main
Power Management Mode
Standby Time-out:
Suspend Time-out:
Suspend Mode:
Resume On Modem Ring:
Resume On Time of Day:
Resume Time:
Intel(R) SpeedStep(TM)
Help
F1
Exit
ESC
System Devices Security
[Customized]
[Disabled]
[Disabled]
[Save-To-RAM]
[Off]
[Disabled]
[00:00:00]
[Automatic]
Select Item
Select Menu
F5/F6
Enter
Figure B-4. Power Menu
Power
Change Values
Select Sub-Menu
Boot Exit
Item Specific Help
Setup Defaults
F9
Save and Exit
F10
B-6 Dell Inspiron 5000 Reference and Troubleshooting Guide
 Loading...