

Dell Inspiron 02T7WRA02, Inspiron 2T7WR, Inspiron N4010, Inspiron P11G, Inspiron P11G001 Setup Manual

SETUP GUIDE
INSPIRON
™


SETUP GUIDE
Regulatory model: P11G series Regulatory type: P11G001
INSPIRON
™

Notes, Cautions, and Warnings
NOTE: A NOTE indicates important information that helps you make better use of your
computer.
CAUTION: A CAUTION indicates either potential damage to hardware or loss of data and tells
you how to avoid the problem.
WARNING: A WARNING indicates a potential for property damage, personal injury, or death.
If you purchased a Dell™ n Series computer, any references in this document to Microsoft® Windows® operating systems
are not applicable.
__________________
Information in this document is subject to change without notice.
©
2010
Dell Inc. All rights reserved.
Reproduction of these materials in any manner whatsoever without the written permission of Dell Inc. is strictly forbidden.
Trademarks used in this text:
Dell
, the
DELL
logo,
YOURS IS HERE, Inspiron, Solution Station
, and
DellConnect
are
trademarks of Dell Inc.;
Intel
and
Pentium
are registered trademarks and
Core
is a trademark of Intel Corporation in the
U.S. and other countries;
Microsoft, Windows, Windows Vista
, and
Windows Vista
start button logo are either trademarks
or registered trademarks of Microsoft Corporation in the United States and/or other countries;
AMD
and
ATI Mobility
Radeon
are trademarks or registered trademarks of Advanced Micro Devices, Inc.;
Blu‑ray Disc
is a trademark of the
Blu‑ray Disc Association;
Bluetooth
is a registered trademark owned by Bluetooth SIG, Inc. and is used by Dell under
license.
Other trademarks and trade names may be used in this document to refer to either the entities claiming the marks and
names or their products. Dell Inc. disclaims any proprietary interest in trademarks and trade names other than its own.
November 2010 P/N 2T7WR Rev. A04

3
Setting Up Your Inspiron Laptop. . . . . . . . . .5
Before Setting Up Your Computer . . . . . . . . . 5
Connect the AC Adapter . . . . . . . . . . . . . . . . .6
Connect the Network Cable (Optional) . . . . . 7
Press the Power Button . . . . . . . . . . . . . . . . . 8
Set Up the Operating System . . . . . . . . . . . . . 9
Create System Recovery Media
(Recommended). . . . . . . . . . . . . . . . . . . . . . . 10
Install the SIM Card (Optional). . . . . . . . . . . 12
Enable or Disable Wireless (Optional). . . . . 14
Set Up Wireless Display (Optional) . . . . . . . 16
Connect to the Internet (Optional) . . . . . . . . 18
Using Your Inspiron Laptop. . . . . . . . . . . . .22
Right View Features. . . . . . . . . . . . . . . . . . . . 22
Left View Features. . . . . . . . . . . . . . . . . . . . . 24
Front View Features. . . . . . . . . . . . . . . . . . . . 26
Back View Features . . . . . . . . . . . . . . . . . . . 27
Status Lights and Indicators. . . . . . . . . . . . . 28
Computer Base and Keyboard Features . . . 30
Touch Pad Gestures. . . . . . . . . . . . . . . . . . . . 32
Multimedia Control Keys. . . . . . . . . . . . . . . . 34
Using the Optical Drive . . . . . . . . . . . . . . . . . 36
Display Features . . . . . . . . . . . . . . . . . . . . . . 38
Removing and Replacing the Battery . . . . . 40
Software Features . . . . . . . . . . . . . . . . . . . . . 42
Dell DataSafe Online Backup . . . . . . . . . . . .43
Dell Dock . . . . . . . . . . . . . . . . . . . . . . . . . . . . 44
Solving Problems . . . . . . . . . . . . . . . . . . . . .45
Beep Codes . . . . . . . . . . . . . . . . . . . . . . . . . . 45
Network Problems . . . . . . . . . . . . . . . . . . . . . 46
Power Problems. . . . . . . . . . . . . . . . . . . . . . . 47
Contents

4
Contents
Memory Problems . . . . . . . . . . . . . . . . . . . . . 49
Lockups and Software Problems . . . . . . . . . 49
Using Support Tools . . . . . . . . . . . . . . . . . . .52
Dell Support Center . . . . . . . . . . . . . . . . . . . . 52
My Dell Downloads . . . . . . . . . . . . . . . . . . . . 53
System Messages . . . . . . . . . . . . . . . . . . . . . 54
Hardware Troubleshooter . . . . . . . . . . . . . . . 55
Dell Diagnostics. . . . . . . . . . . . . . . . . . . . . . . 56
Restoring Your Operating System . . . . . . .60
System Restore . . . . . . . . . . . . . . . . . . . . . . . 61
Dell DataSafe Local Backup. . . . . . . . . . . . . 62
System Recovery Media . . . . . . . . . . . . . . . .65
Dell Factory Image Restore . . . . . . . . . . . . .66
Getting Help . . . . . . . . . . . . . . . . . . . . . . . . .68
Technical Support and Customer
Service . . . . . . . . . . . . . . . . . . . . . . . . . . . . . . 69
DellConnect . . . . . . . . . . . . . . . . . . . . . . . . . . 69
Online Services . . . . . . . . . . . . . . . . . . . . . . . 70
Automated Order‑Status Service. . . . . . . . . 71
Product Information. . . . . . . . . . . . . . . . . . . . 71
Returning Items for Repair Under
Warranty or for Credit . . . . . . . . . . . . . . . . . . 72
Before You Call. . . . . . . . . . . . . . . . . . . . . . . . 73
Contacting Dell. . . . . . . . . . . . . . . . . . . . . . . . 75
Finding More Information and
Resources . . . . . . . . . . . . . . . . . . . . . . . . . . .76
Specifications . . . . . . . . . . . . . . . . . . . . . . .78
Appendix. . . . . . . . . . . . . . . . . . . . . . . . . . . .86
Macrovision Product Notice. . . . . . . . . . . . . 86
Information for NOM, or Official
Mexican Standard (Only for Mexico). . . . . . 87
Index . . . . . . . . . . . . . . . . . . . . . . . . . . . . . . .88

5
This section provides information about setting
up your Dell™ Inspiron™ laptop.
Before Setting Up Your
Computer
When positioning your computer, ensure that
you allow easy access to a power source,
adequate ventilation, and a level surface to
place your computer.
Restricting airflow around your laptop may
cause it to overheat. To prevent overheating
ensure that you leave at least 10.2 cm (4 inches)
at the back of the computer and a minimum of
5.1 cm (2 inches) on all other sides. You should
never place your computer in an enclosed
space, such as a cabinet or drawer when it is
powered on.
WARNING: Do not block, push objects
into, or allow dust to accumulate in the air
vents. Do not place your Dell™ computer
in a low-airflow environment, such as a
closed briefcase, while it is powered on.
Restricting the airflow can damage the
computer or cause a fire. The computer
turns on the fan when the computer gets
hot. Fan noise is normal and does not
indicate a problem with the fan or the
computer.
CAUTION: Placing or stacking heavy or
sharp objects on the computer may result
in permanent damage to the computer.
Setting Up Your Inspiron Laptop
INSPIRON

6
Setting Up Your Inspiron Laptop
Connect the AC Adapter
Connect the AC adapter to the computer and then plug it into an electrical outlet or surge protector.
WARNING: The AC adapter works with electrical outlets worldwide. However, power
connectors and power strips vary among countries. Using an incompatible cable or
improperly connecting the cable to a power strip or electrical outlet may cause fire or
permanent damage to your computer.
7
Setting Up Your Inspiron Laptop
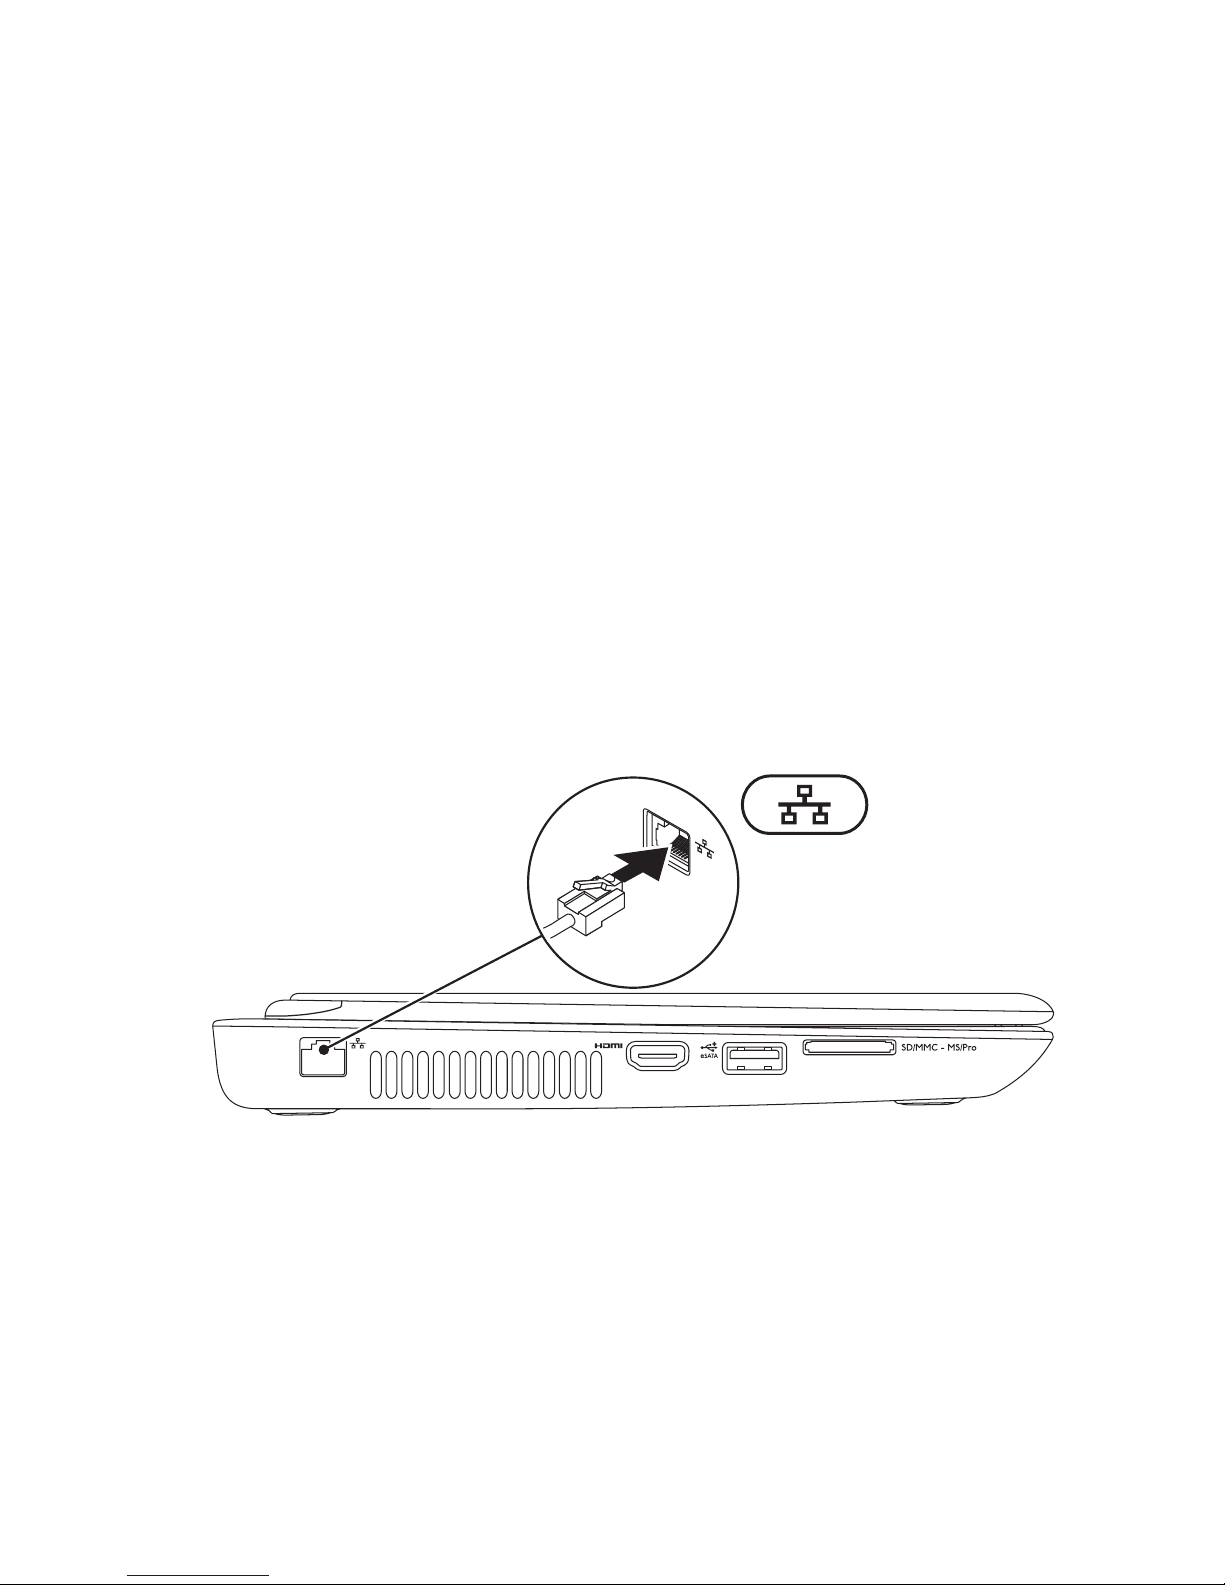
Connect the Network Cable (Optional)
To use a wired network connection, connect the network cable.

8
Setting Up Your Inspiron Laptop
Press the Power Button

9
Setting Up Your Inspiron Laptop
Set Up the Operating System
Your Dell computer is preconfigured with the operating system you selected at the time of purchase.
Set Up Microsoft Windows
To set up Microsoft® Windows® for the first time, follow the instructions on the screen. These
steps are mandatory and may take some time to complete. The Windows setup screens will take
you through several procedures including accepting license agreements, setting preferences, and
setting up an Internet connection.
CAUTION: Do not interrupt the operating system’s setup process. Doing so may render your
computer unusable and you will need to reinstall the operating system.
NOTE: For optimal performance of your computer, it is recommended that you download and
install the latest BIOS and drivers for your computer available at support.dell.com.
NOTE: For more information on the operating system and features, see
support.dell.com/MyNewDell.
Set Up Ubuntu
To set up Ubuntu® for the first time, follow the instructions on the screen. See the Ubuntu
documentation for more operating system specific information.

10
Setting Up Your Inspiron Laptop
Create System Recovery Media (Recommended)
NOTE: It is recommended that you create a system recovery media as soon as you set up
Microsoft Windows.
The system recovery media can be used to restore your computer to the operating state it was in
when you purchased the computer, while preserving data files (without the need of the
Operating
System
disc). You can use the system recovery media if changes to the hardware, software, drivers,
or other system settings have left the computer in an undesirable operating state.
You will require the following to create the system recovery media:
Dell DataSafe Local Backup•
USB key with a minimum memory of 8 GB or DVD‑R/DVD+R/Blu‑ray Disc•
™
NOTE: Dell DataSafe Local Backup does not support rewritable discs.

11
Setting Up Your Inspiron Laptop
To create a system recovery media:
Ensure that the AC adapter is connected (see “Connect the AC Adapter” on page 1. 6).
Insert the disc or USB key in the computer.2.
Click 3. Start → Programs→ Dell DataSafe Local Backup.
Click 4. Create Recovery Media.
Follow the instructions on the screen.5.
NOTE: For information on using the system recovery media, see “System Recovery Media” on
page 65.

12
Setting Up Your Inspiron Laptop
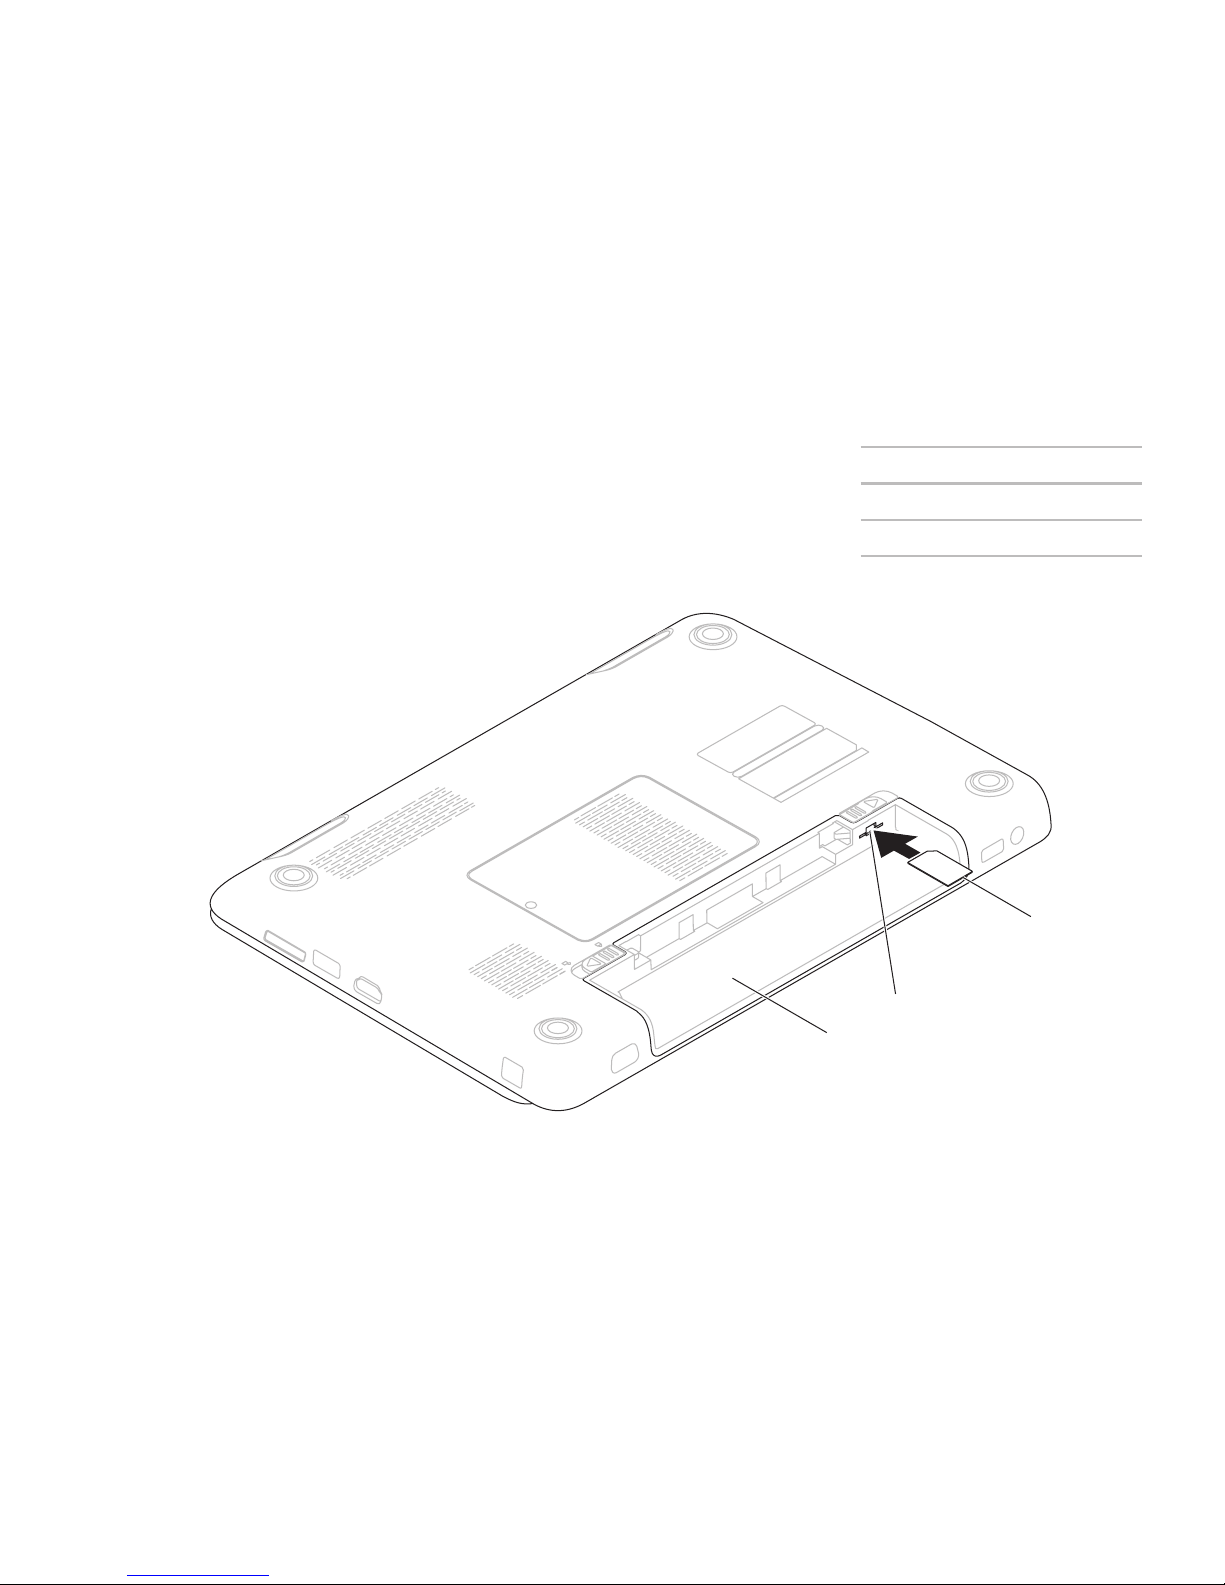
Install the SIM Card (Optional)
CAUTION: Do not insert a SIM card into the SIM card slot if you have not purchased a
computer with a Mobile Broadband card. Doing so may render your computer unusable and
you will need a service technician to fix the computer. Check your purchase invoice to see if
you have purchased a Mobile Broadband card.
NOTE: Installing a SIM is not required if you are using an EVDO card to access the Internet.
Installing a Subscriber Identity Module (SIM) card on your computer allows you to connect to the
Internet. To access the Internet you must be within the network of your cellular service provider.
To install the SIM card:
Turn off your computer.1.
Remove the battery (see “Removing and Replacing the Battery” on page 2. 40).
In the battery bay, slide the SIM card into the SIM card slot.3.
Replace the battery (see “Removing and Replacing the Battery” on page 4. 40).
Turn on your computer.5.
To remove the SIM card, press and eject the SIM card.
13
Setting Up Your Inspiron Laptop
1
battery bay
2
SIM card slot
3
SIM card
3
2
1
14
Setting Up Your Inspiron Laptop
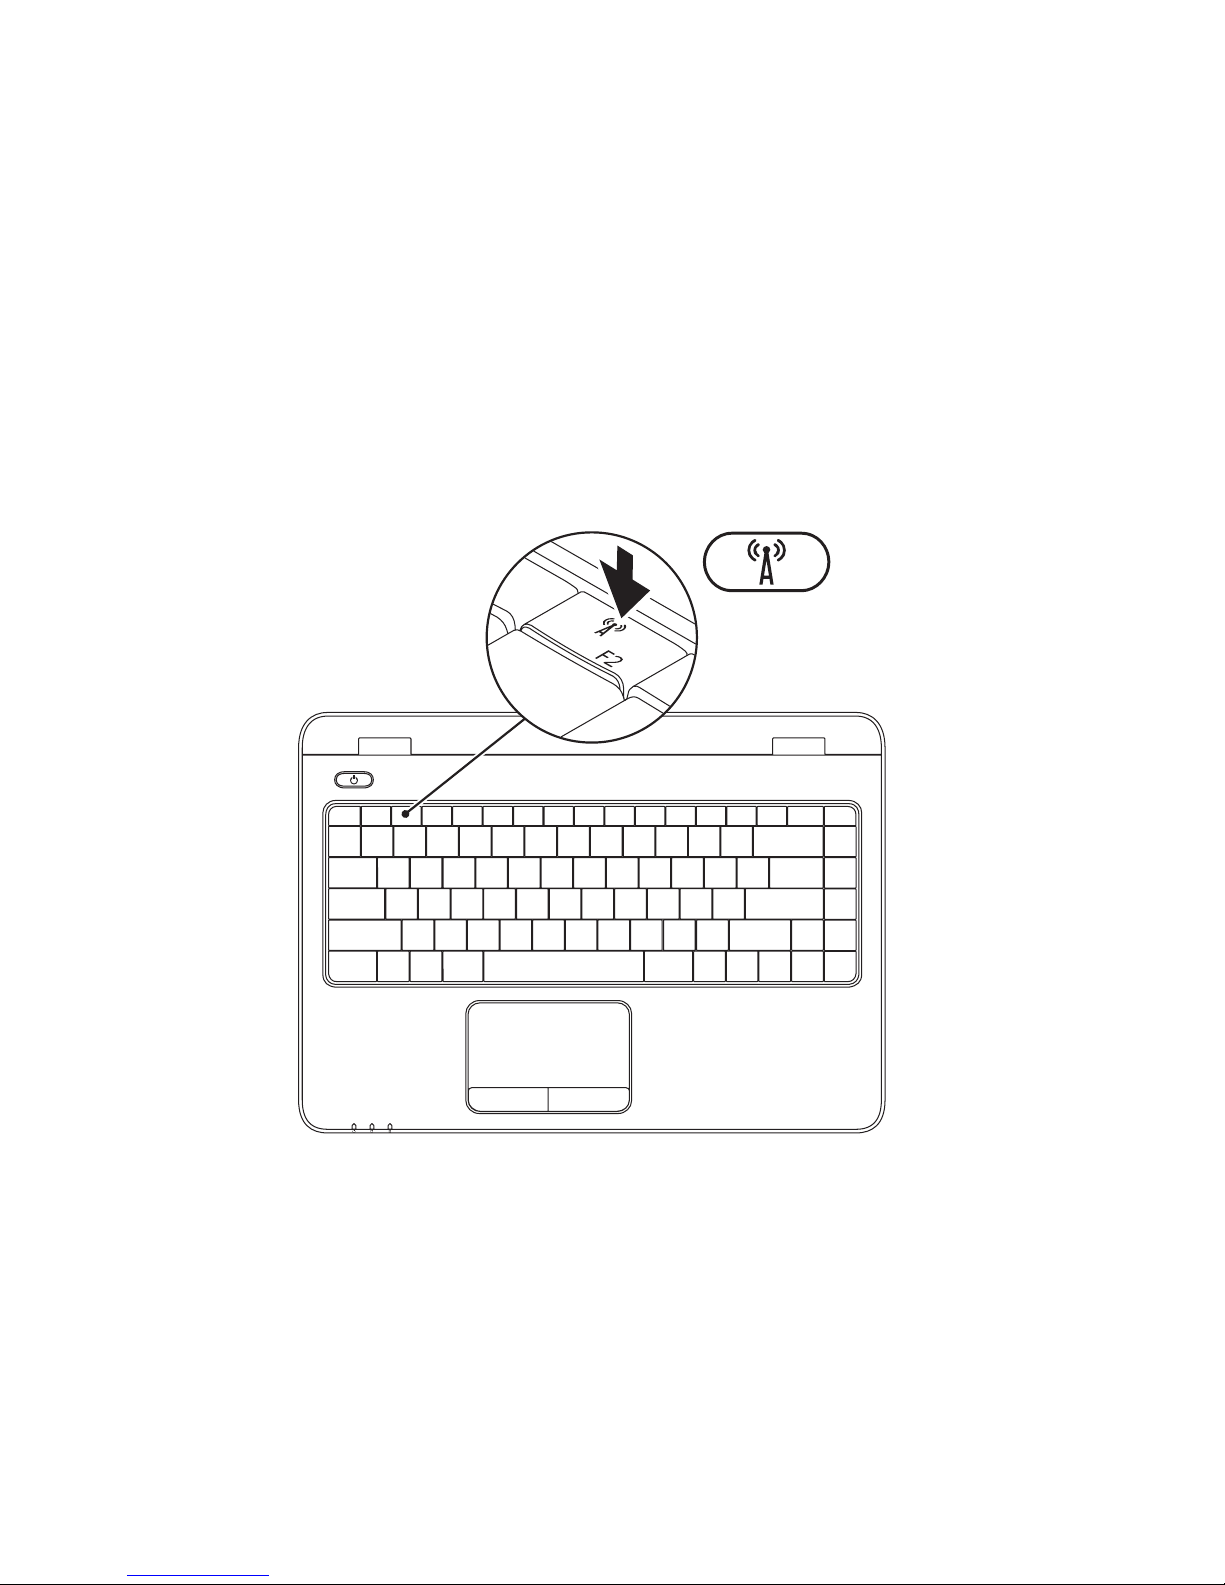
Enable or Disable Wireless (Optional)
15
Setting Up Your Inspiron Laptop
NOTE: The wireless feature is available on your computer only if you ordered a WLAN card
at the time of purchase. For more information on the cards supported by your computer, see
“Specifications” on page 79.
To enable wireless:
Ensure that your computer is turned on.1.
Press the wireless key 2. on the keyboard.
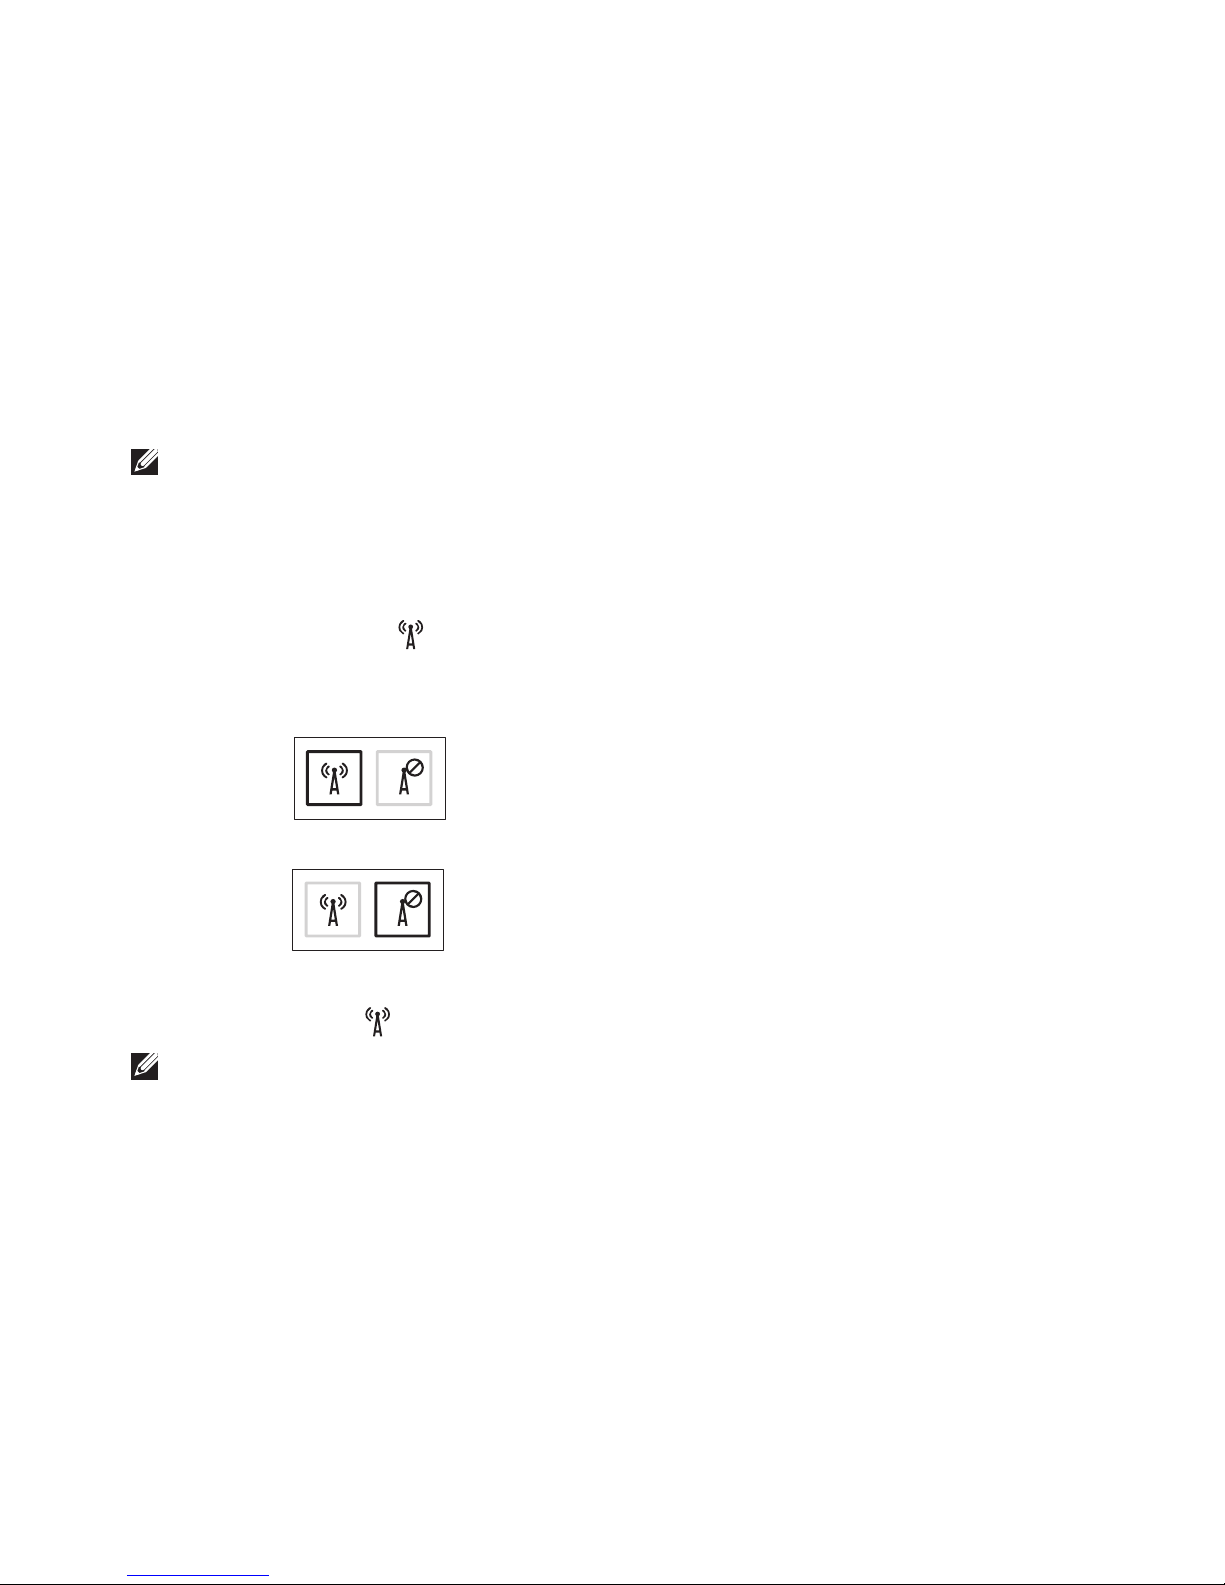
A confirmation of your selection appears on the screen.
Wireless enabled
Wireless disabled
To disable wireless:
Press the wireless key on the keyboard again to turn off all radios.
NOTE: The wireless key allows you to quickly turn off wireless radios, such as when you are
asked to disable all wireless radios on an airplane flight.

16
Setting Up Your Inspiron Laptop
Set Up Wireless Display
(Optional)
NOTE: The wireless display feature may
not be supported on all computers. For
information about the hardware and
software requirements for setting up
wireless display, see www.intel.com.
The Intel wireless display feature allows you
to share your computer display to a TV without
the use of cables. You must connect a wireless
display adapter to your TV before setting up
wireless display.
NOTE: The wireless display adapter does
not ship with your computer and must be
purchased separately.
If your computer supports the wireless display
feature, the Intel Wireless Display icon will
be available on the Windows desktop.
To set up wireless display:
Turn on your computer.1.
Press <Fn> along with the 2. key on the
function key row on the keyboard to enable
wireless.
Connect the wireless display adapter to 3.
the TV.
Turn on the TV.4.
Select the appropriate video source for your 5.
TV, such as HDMI1, HDMI2, or S‑Video.
Click the Intel Wireless Display icon 6. on
the desktop.
The Intel Wireless Display window appears.
Select 7. Scan for available displays.
Select your wireless display adapter from 8.
the Detected wireless displays list.
Enter the security code that appears on 9.
your TV.

17
Setting Up Your Inspiron Laptop
To enable wireless display:
Click the Intel Wireless Display icon 1. on
the desktop.
The Intel Wireless Display window appears.
Select 2. Connect to Existing Adapter.
NOTE: You can download and install the
latest driver for “Intel Wireless Display
Connection Manager” from
support.dell.com.
NOTE: For more information about wireless
display, see the wireless display adapter
documentation.

18
Setting Up Your Inspiron Laptop
Connect to the Internet
(Optional)
To connect to the Internet, you need an external
modem or network connection and an Internet
Service Provider (ISP).
If an external USB modem or WLAN adapter
is not a part of your original order, you can
purchase one at www.dell.com.
Setting Up a Wired Connection
If you are using a dial‑up connection, •
connect the telephone line to the optional
external USB modem and to the telephone
wall connector before you set up your
Internet connection.
If you are using a DSL or cable/satellite •
modem connection, contact your ISP
or cellular telephone service for setup
instructions.
To complete setting up your wired Internet
connection, follow the instructions in “Setting
Up Your Internet Connection” on page 20.

19
Setting Up Your Inspiron Laptop
Setting Up a Wireless Connection
NOTE: To set up your wireless router, see
the documentation that shipped with your
router.
Before you can use your wireless Internet
connection, you need to connect to your
wireless router.
To set up your connection to a wireless router:
Windows Vista
®
Ensure that wireless is enabled on your 1.
computer (see “Enable or Disable Wireless”
on page 14).
Save and close any open files, and exit any 2.
open programs.
Click 3. Start → Connect To.
Follow the instructions on the screen to 4.
complete the setup.
Windows® 7
Ensure that wireless is enabled on your 1.
computer (see “Enable or Disable Wireless”
on page 14).
Save and close any open files, and exit any 2.
open programs.
Click 3. Start → Control Panel.
In the search box, type 4. network, and
then click Network and Sharing Center→
Connect to a network.
Follow the instructions on the screen to 5.
complete the setup.

20
Setting Up Your Inspiron Laptop
Setting Up Your Internet Connection
ISPs and ISP offerings vary by country. Contact
your ISP for offerings available in your country.
If you cannot connect to the Internet but have
successfully connected in the past, the ISP
might have a service outage. Contact your ISP
to check the service status, or try connecting
again later.
Have your ISP information ready. If you do not
have an ISP, the Connect to the Internet wizard
can help you get one.
To set up your Internet connection:
Windows Vista
Save and close any open files, and exit any 1.
open programs.
Click 2. Start → Control Panel.
In the search box, type 3. network, and then
click Network and Sharing Center→ Set up
a connection or network→ Connect to the
Internet.
The Connect to the Internet window appears.
NOTE: If you do not know which type of
connection to select, click Help me choose
or contact your ISP.
Follow the instructions on the screen and 4.
use the setup information provided by your
ISP to complete the setup.

21
Setting Up Your Inspiron Laptop
Windows 7
Save and close any open files, and exit any 1.
open programs.
Click 2. Start → Control Panel.
In the search box, type 3. network, and then
click Network and Sharing Center→ Set up
a new connection or network→ Connect to
the Internet.
The Connect to the Internet window appears.
NOTE: If you do not know which type of
connection to select, click Help me choose
or contact your ISP.
Follow the instructions on the screen and 4.
use the setup information provided by your
ISP to complete the setup.
22
Using Your Inspiron Laptop
This section provides information about the features available on your Inspiron™ laptop.
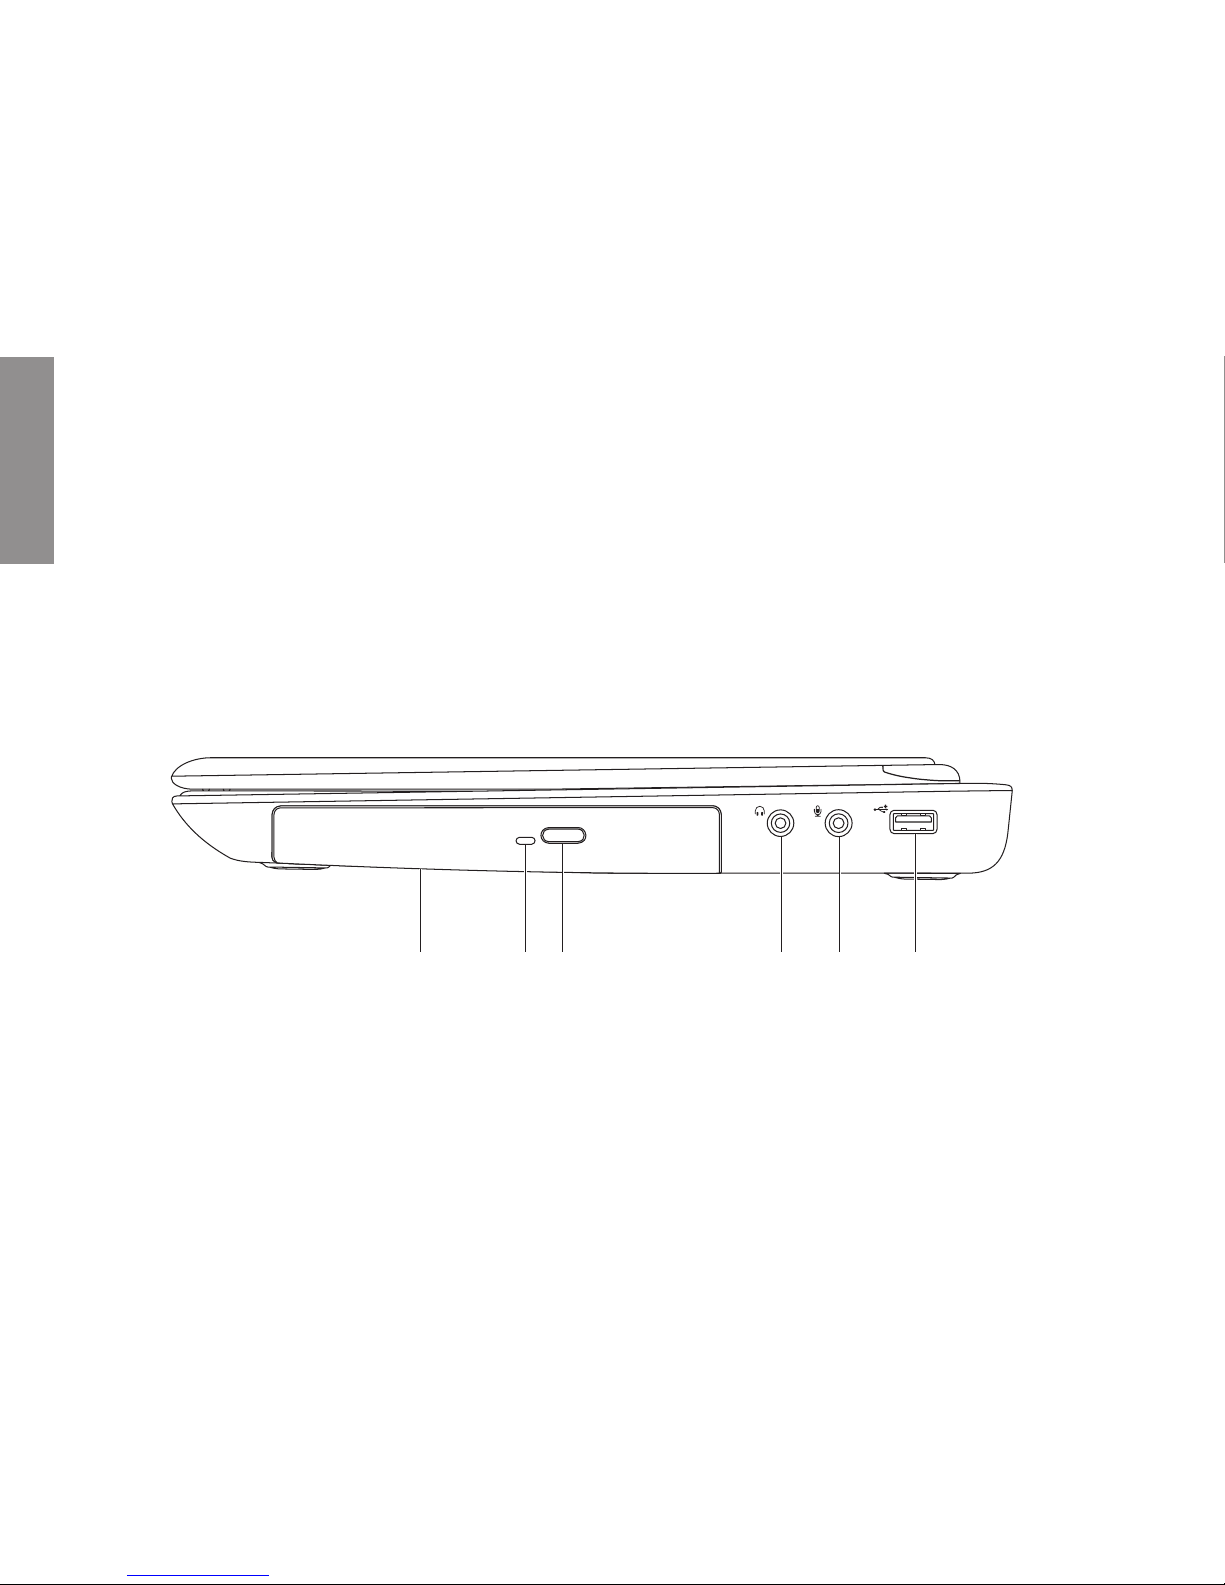
Right View Features
1
2 3
4
5 6
INSPIRON
23
Using Your Inspiron Laptop
1
Optical drive — Plays or records CDs, DVDs, and Blu‑ray Discs.
For more information, see “Using the Optical Drive” on page 36.
2
Optical drive light — Blinks when you press the optical drive eject button or when you insert a
disc and it is being read.
3
Optical drive eject button — Opens the optical drive when pressed.
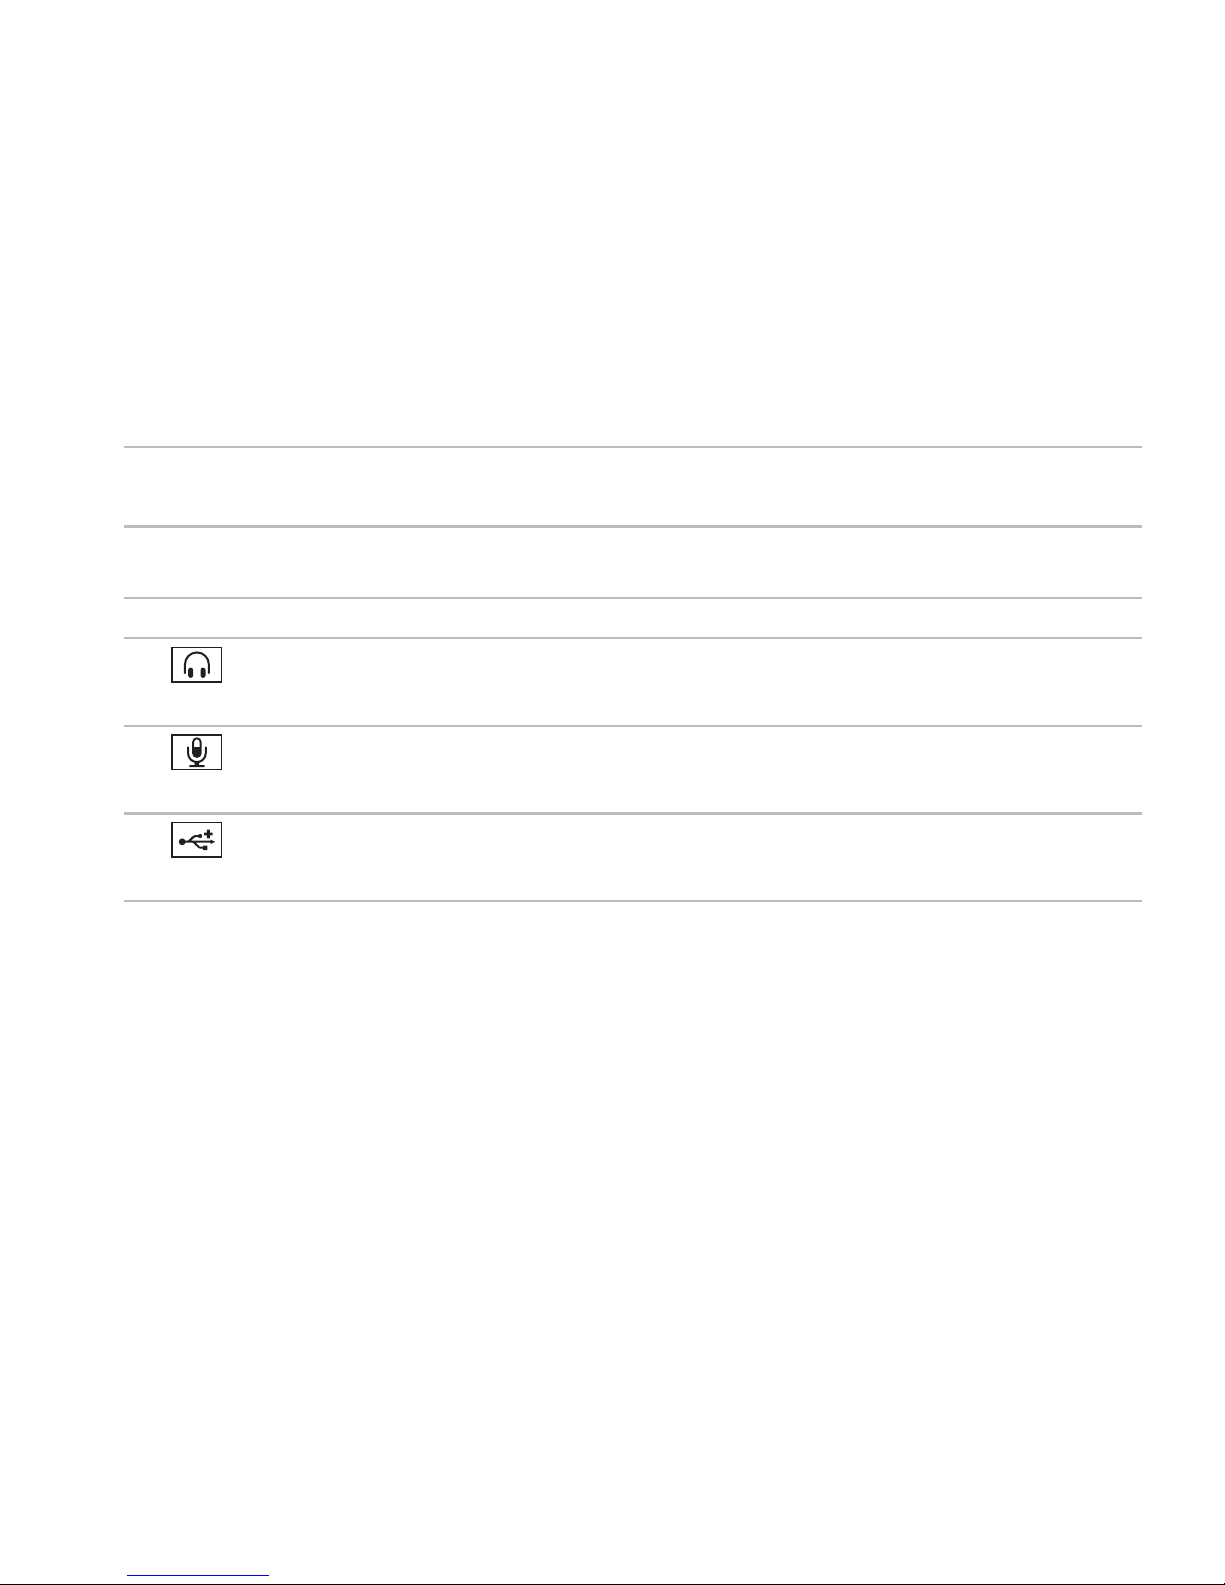
4
Audio out/Headphone connector — Connects to a pair of headphones or to a powered
speaker or sound system.
5
Audio in/Microphone connector — Connects to a microphone or inputs signal for use
with audio programs.
6
USB 2.0 connector — Connects to USB devices, such as a mouse, keyboard, printer,
external drive, or MP3 player.
24
Using Your Inspiron Laptop
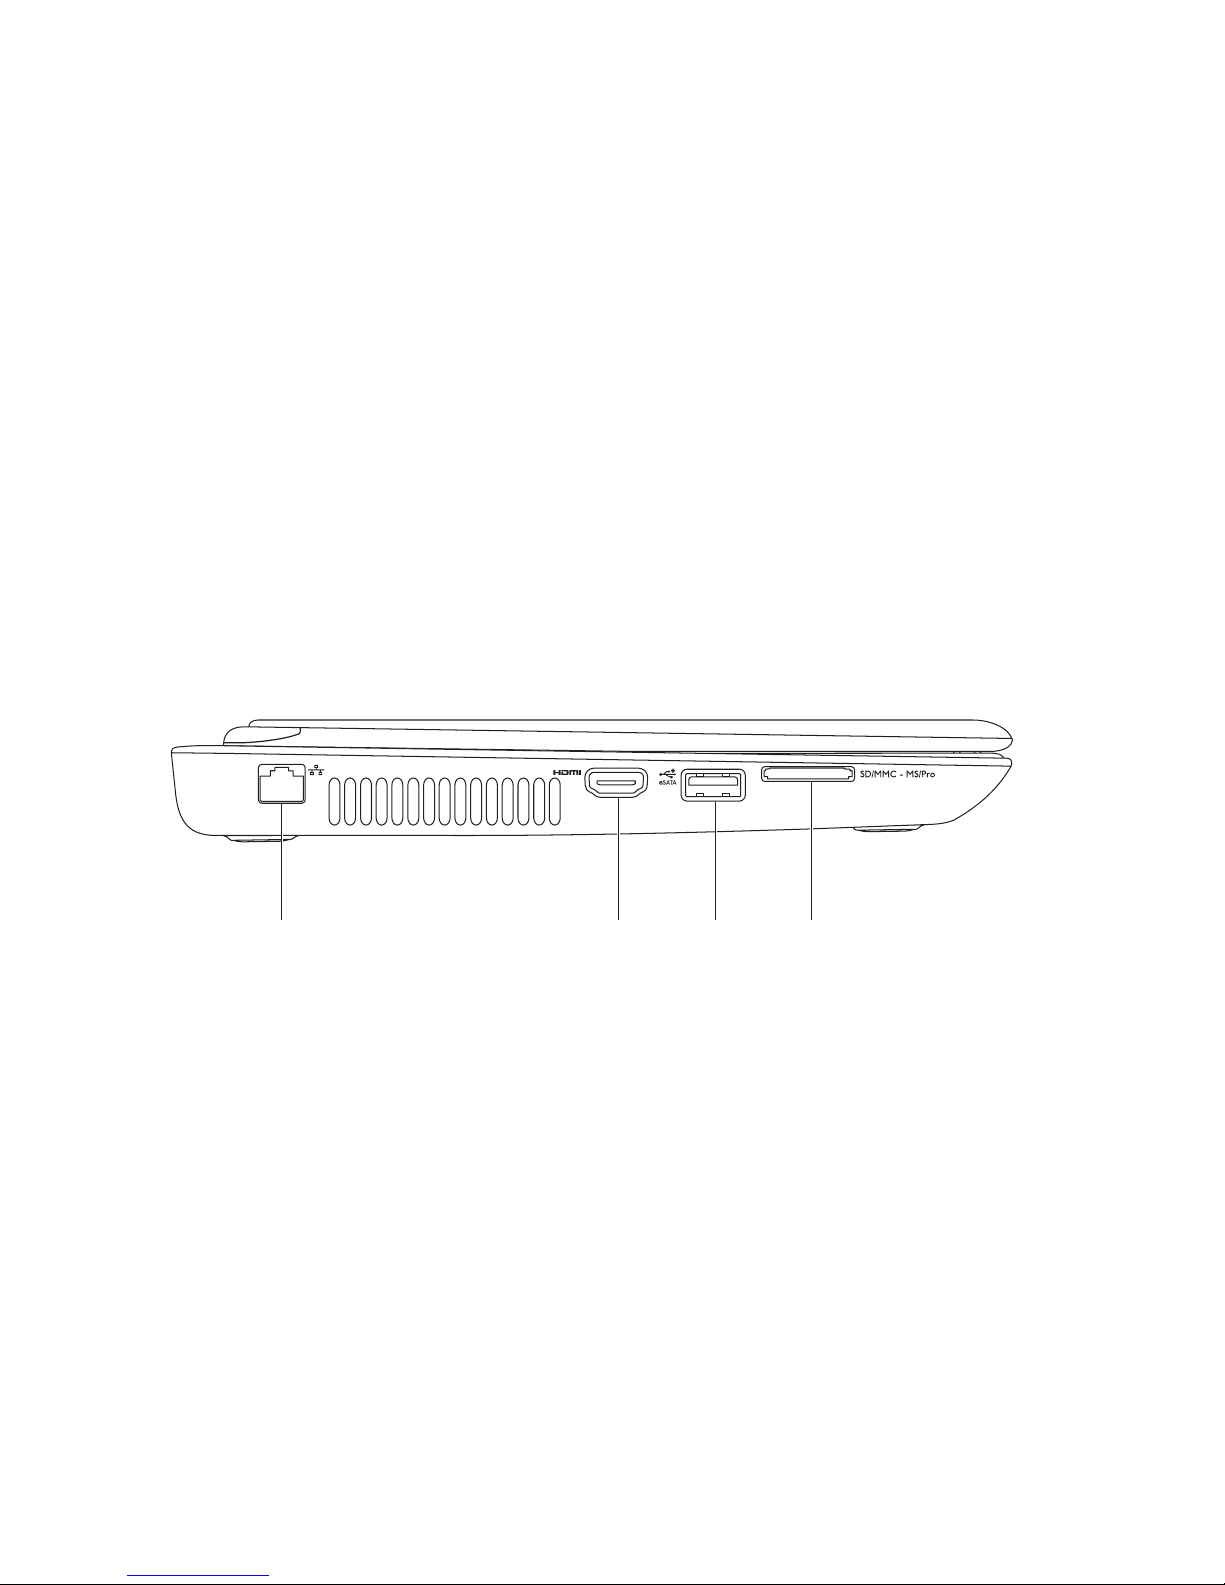
Left View Features
1
2
3
4
25
Using Your Inspiron Laptop
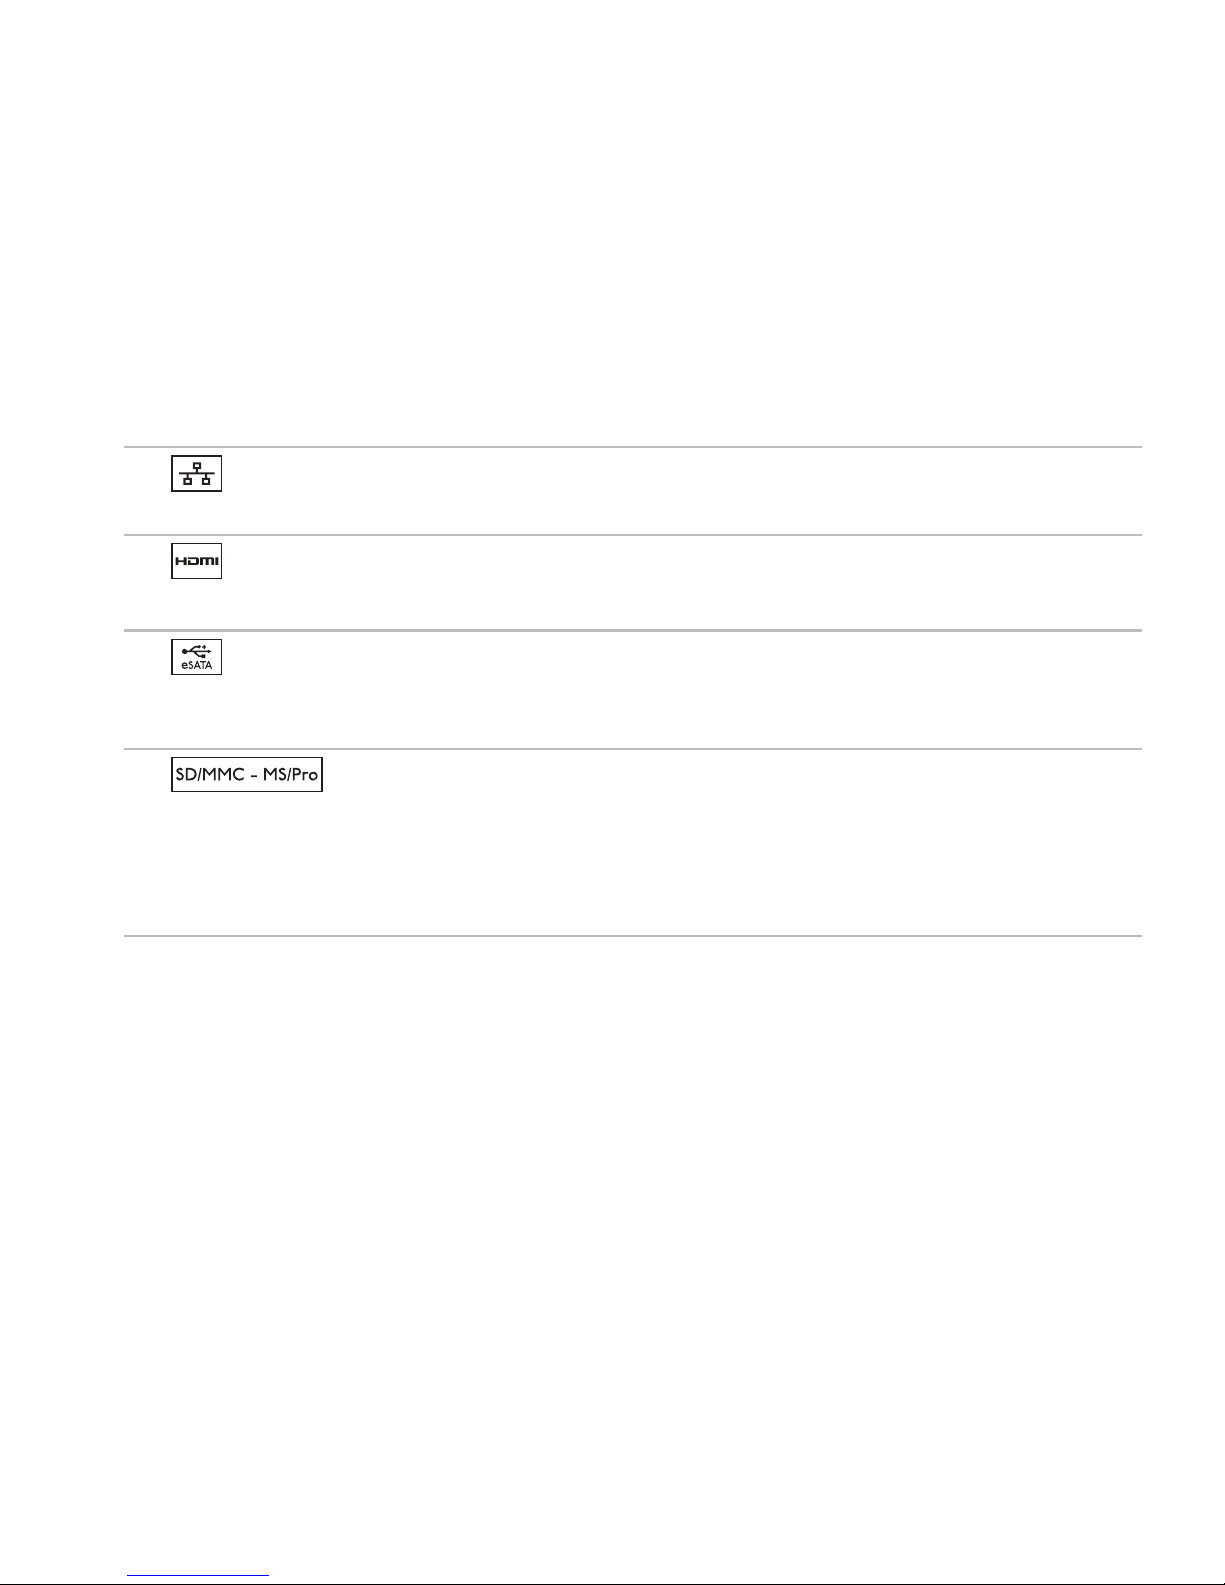
1
Network connector — Connects your computer to a network or a broadband device if
you are using a wired network.
2
HDMI connector — Connects to a TV for both 5.1 audio and video signals.
NOTE: When used with a monitor, only the video signal is read.
3
eSATA/USB combo connector — Connects to eSATA compatible storage devices (such
as external hard drives or optical drives) or USB devices (such as a mouse, keyboard, printer,
external drive, or MP3 player).
4
7-in-1 Media Card Reader — Provides a fast and convenient way to view and
share digital photos, music, videos, and documents stored on the memory cards.
NOTE: Your computer ships with a plastic blank installed in the media card slot. Blanks protect
unused slots from dust and other particles. Save the blank for use when no media card is
installed in the slot; blanks from other computers may not fit your computer.

26
Using Your Inspiron Laptop
Front View Features
123
1
Power indicator light — Indicates the power states. For more information on the power
indicator light status, see “Status Lights and Indicators” on page 28.
2
Hard drive activity light — Turns on when the computer reads or writes data. A blinking
light indicates hard drive activity.
CAUTION: To avoid loss of data, never turn off the computer while the hard drive activity
light is flashing.
3
Battery status light — Indicates the battery charge status. For more information on the
battery status light, see “Status Lights and Indicators” on page 28.
NOTE: The battery is charging when the computer is powered using an AC adapter.
27
Using Your Inspiron Laptop
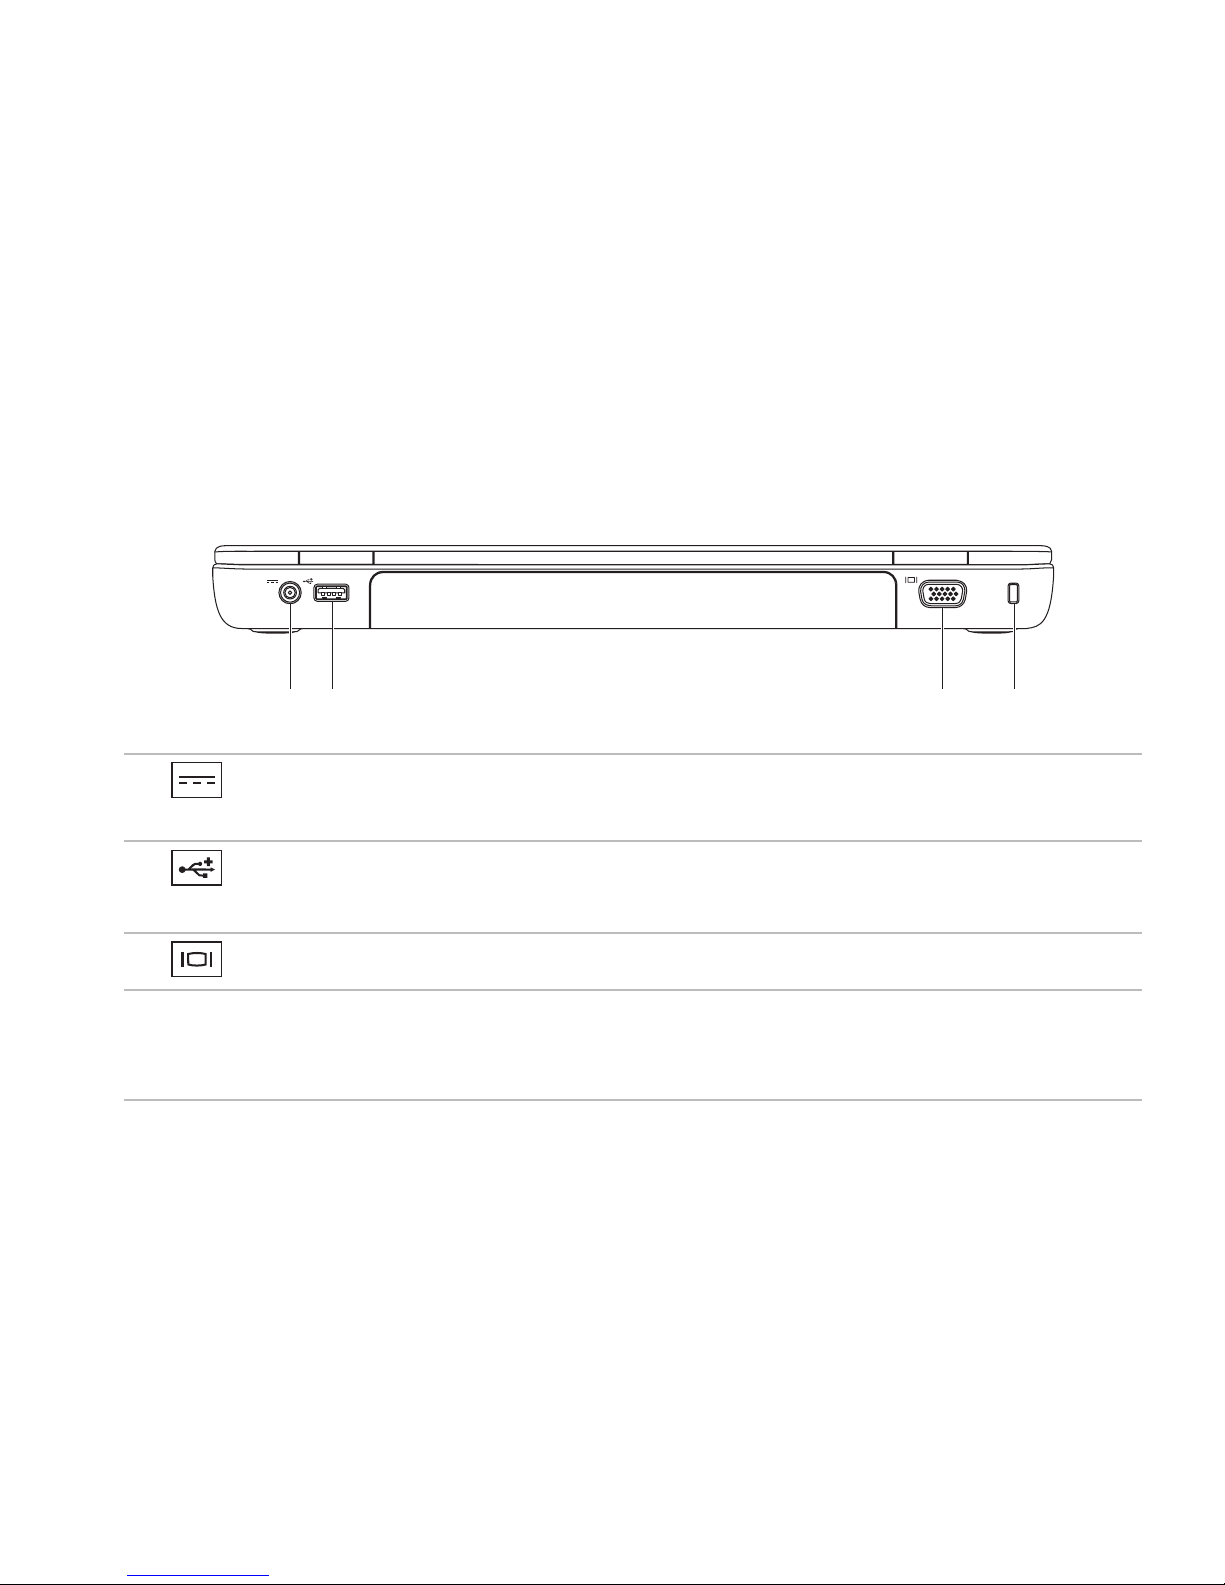
Back View Features
1
2
3
4
1
AC adapter connector — Connects to the AC adapter to power the computer and charge
the battery.
2
USB 2.0 connector — Connects to USB devices, such as a mouse, keyboard, printer,
external drive, or MP3 player.
3
VGA connector — Connects to a monitor or projector.
4
Security cable slot — Attaches a commercially available security cable to the computer.
NOTE: Before you buy a security cable, ensure that it fits into the security cable slot on your
computer.
 Loading...