

Dell Inspirion 8100 Solution Manual

Dell™ Inspiron™ 8100 Systems
Solutions Guide
www.dell.com | support.dell.com

Hints, Notices, and Cautions
HINT: A HINT indicates important information that helps you make better
use of your computer.
NOTICE: A NOTICE indicates either potential damage to hardware or loss of
data and tells you how to avoid the problem.
CAUTION: A CAUTION indicates a potentially hazardous situation
which, if not avoided, may result in minor or moderate injury.
Abbreviations and Acronyms
For a complete list of abbreviations and acronyms, see the Tel l Me How help
®
file (click the Start button on the Microsoft
Programs—> User’s Guides, and click Tel l M e H ow).
Windows® desktop, point to
____________________
Information in this document is subject to change without notice.
© 2001 Dell Computer Corporation. All rights reserved.
Reproduction in any manner whatsoever without the written permission of Dell Computer
Corporation is strictly forbidden.
Trademarks used in this text:
OptiPlex, Dell Precision
Pentium
Go
of Microsoft Corporation.
Other trademarks and trade names may be used in this document to refer to either the entities
claiming the marks and names or their products. Dell Computer Corporation disclaims any
proprietary interest in trademarks and trade names other than its own.
This product incorporates copyright protection technology that is protected by method claims of
certain U.S. patents and other intellectual property rights owned by Macrovision Corporation
and other rights owners. Use of this copyright protection technology must be authorized by
Macrovision Corporation, and is intended for home and other limited viewing uses only unless
otherwise authorized by Macrovision Corporation. Reverse engineering or disassembly is
prohibited.
June 2001 P/N 0E214 Rev. A00
are registered trademarks and
is a trademark of NVIDIA Corporation;
Dell, Dell TravelLite, Inspiron, DellWare, TrueMobil e, Dimension
, and
Latitude
are trademarks of Dell Computer Corporation;
Celeron
is a trademark of Intel Corporation;
Microsoft
and
Windows
are registered trademarks
Intel
and
GeForce2
,

Contents
Safety and EMC Instructions:
Portable Computers
. . . . . . . . . . . . . . . . . . . . . . . . 7
Safety Instructions
EMC Instructions
When Using Your Computer
When Removing or Installing Memory Modules
Protecting Against Electrostatic Discharge
1 Setting Up
Connecting a Printer . . . . . . . . . . . . . . . . . . . . . . . . 16
Installing the Printer Driver
Parallel Printer
USB Printer
Turning Off the Computer
Windows Millennium Edition (Me) and Windows 2000
Using the Media Bay
Swapping Devices While the Computer Is Turned Off
Swapping Devices While Windows Is Running
. . . . . . . . . . . . . . . . . . . . . . . 7
. . . . . . . . . . . . . . . . . . . . . . . . 10
. . . . . . . . . . . . . . . . . . . 11
. . . . . . . . . 12
. . . . . . . . . . . 13
. . . . . . . . . . . . . . . . . . . 16
. . . . . . . . . . . . . . . . . . . . . . . . . 16
. . . . . . . . . . . . . . . . . . . . . . . . . . 17
. . . . . . . . . . . . . . . . . . . . . 18
. . . . . 18
. . . . . . . . . . . . . . . . . . . . . . . . 19
. . . . . . 20
. . . . . . . . . . 21
Setting Up the Dolby Headphone
Setting Up the APR to Connect to a Network
Setting Up the APR for Windows Me
Setting Up the APR for Windows 2000
. . . . . . . . . . . . . . . . . 22
. . . . . . . . . . . 22
. . . . . . . . . . . . . . 22
. . . . . . . . . . . . . 23
Contents 3

2 Solving Problems
Finding Solutions . . . . . . . . . . . . . . . . . . . . . . . . . 26
Accessing Help Files
Power Problems
Start-Up Error Messages
Video and Display Problems
If the display is blank
. . . . . . . . . . . . . . . . . . . . . . . . 28
. . . . . . . . . . . . . . . . . . . . . . . . . . 28
. . . . . . . . . . . . . . . . . . . . . 29
. . . . . . . . . . . . . . . . . . . . 30
. . . . . . . . . . . . . . . . . . . . . 30
If the display is difficult to read
Sound and Speaker Problems
Integrated Speakers
External Speakers
Printer Problems
. . . . . . . . . . . . . . . . . . . . . . . 31
. . . . . . . . . . . . . . . . . . . . . . . . . 32
. . . . . . . . . . . . . . . . . . . 31
. . . . . . . . . . . . . . . . . . . . . . 31
If you cannot print to a parallel port printer
If you cannot print to a USB printer
Modem Problems
Scanner Problems
. . . . . . . . . . . . . . . . . . . . . . . . . 33
. . . . . . . . . . . . . . . . . . . . . . . . . 34
. . . . . . . . . . . . . . . . 30
. . . . . . . . . . 32
. . . . . . . . . . . . . . 33
4 Contents
Touch Pad Problems
External Keyboard Problems
Unexpected Characters
Drive Problems
. . . . . . . . . . . . . . . . . . . . . . . . 35
. . . . . . . . . . . . . . . . . . . 35
. . . . . . . . . . . . . . . . . . . . . . 35
. . . . . . . . . . . . . . . . . . . . . . . . . . 36
If you cannot save a file to a floppy disk
If you cannot play a music CD
or install a program from a CD
If you cannot play a DVD movie
If the CD-RW drive stops writing
If you have a hard drive problem
Network Problems
. . . . . . . . . . . . . . . . . . . . . . . . . 39
. . . . . . . . . . . . 36
. . . . . . . . . . . . . . . . . 37
. . . . . . . . . . . . . . . . 38
. . . . . . . . . . . . . . . . 38
. . . . . . . . . . . . . . . . 38

Windows Error Messages . . . . . . . . . . . . . . . . . . . . . . 39
General Program Problems
A program crashes
A program stops responding
A solid blue screen appears
Internet Connection Problems
E-Mail Problems
. . . . . . . . . . . . . . . . . . . . . . . . . . 42
If Your Computer Gets Wet
. . . . . . . . . . . . . . . . . . . . . 40
. . . . . . . . . . . . . . . . . . . . . . . 40
. . . . . . . . . . . . . . . . . . . 40
. . . . . . . . . . . . . . . . . . . 41
. . . . . . . . . . . . . . . . . . . 41
. . . . . . . . . . . . . . . . . . . . . 42
If You Drop or Damage Your Computer
Resolving Other Technical Problems
Reinstalling Drivers and Utilities
Reinstalling Windows
. . . . . . . . . . . . . . . . . . . . . . . . 45
Reinstalling Windows Me
Reinstalling Windows 2000
. . . . . . . . . . . . . . . . . . 44
. . . . . . . . . . . . . . . . . . . . 45
. . . . . . . . . . . . . . . . . . . 47
. . . . . . . . . . . . . . 43
. . . . . . . . . . . . . . . . 44
3 Adding Parts
Replacing the Palm Rests . . . . . . . . . . . . . . . . . . . . . . 50
Using the Advanced Port Replicator
Connecting External Devices to the APR
APR Controls and Indicators
Docking the Computer
Undocking the Computer
Monitor Stand
Adding Memory
Installing a Mini PCI Card
Replacing a Hard Drive
Returning a Hard Drive to Dell
. . . . . . . . . . . . . . . . 51
. . . . . . . . . . . . 51
. . . . . . . . . . . . . . . . . . 53
. . . . . . . . . . . . . . . . . . . . . . 54
. . . . . . . . . . . . . . . . . . . . 55
. . . . . . . . . . . . . . . . . . . . . . . . . 56
. . . . . . . . . . . . . . . . . . . . . . . . . . . 57
. . . . . . . . . . . . . . . . . . . . . 59
. . . . . . . . . . . . . . . . . . . . . . . 62
. . . . . . . . . . . . . . . . . 64
Contents 5

4 Appendix
Specifications . . . . . . . . . . . . . . . . . . . . . . . . . . . 66
Standard Settings
System Setup Pages
Viewing the System Setup Pages
Contacting Dell
Contact Numbers and Addresses
. . . . . . . . . . . . . . . . . . . . . . . . . 72
. . . . . . . . . . . . . . . . . . . . . . 72
. . . . . . . . . . . . . . . . 73
. . . . . . . . . . . . . . . . . . . . . . . . . . 73
. . . . . . . . . . . . . . . . 73
Returning Items for Warranty Repair or Credit
Regulatory Information
General EMC Guidelines
FCC Notices (U.S. Only)
Battery Disposal
NOM Information (Mexico Only)
. . . . . . . . . . . . . . . . . . . . . . 87
. . . . . . . . . . . . . . . . . . . . 87
. . . . . . . . . . . . . . . . . . . . 88
. . . . . . . . . . . . . . . . . . . . . . . . 91
. . . . . . . . . . . . . . . . 92
Información para NOM (únicamente para México)
Limited Warranties and Return Policy
. . . . . . . . . . . . . . 93
One-Year Limited Warranty (U.S. Only)
Two-Year Limited Warranty (U.S. Only)
Three-Year Limited Warranty (U.S. Only)
One-Year Limited Warranty (Canada Only)
Two-Year Limited Warranty (Canada Only)
Three-Year Limited Warranty (Canada Only)
“Total Satisfaction” Return Policy
(U.S. and Canada Only)
. . . . . . . . . . . . . . . . . . . . 111
One-Year End-User Manufacturer Guarantee
(Latin America and the Caribbean Only)
. . . . . . . . . 87
. . . . . . . 93
. . . . . . . . . . . . 94
. . . . . . . . . . . . 96
. . . . . . . . . . . 99
. . . . . . . . . . . 102
. . . . . . . . . . . 104
. . . . . . . . . . 107
. . . . . . . . . . . . 112
Index . . . . . . . . . . . . . . . . . . . . . . . . . . . . . . . . . . 115
6 Contents
Safety and EMC Instructions:
Portable Computers
The following information defines the meaning of symbols used in the
Safety and Electromagnetic Compatibility (EMC) Instructions.
Attention Risk of electric shock
Risk of explosion Aircraft
Risk of fire Use of this feature may be prohibited on
aircraft
Safety Instructions
General
• Do not attempt to service the computer yourself. Always follow
installation instructions closely.
• If you use an extension power cable with your AC adapter, ensure that
the total ampere rating of the products plugged in to the extension
power cable does not exceed the ampere rating of the extension cable.
• Do not push objects into air vents or openings of your computer.
Doing so can cause fire or electric shock by shorting out interior
components.
• Place the AC adapter in a ventilated area, such as a desk top or on the
floor, when you use it to run the computer or to charge the battery. Do
not cover the AC adapter with papers or other items that will reduce
cooling; also, do not use the AC adapter inside a carrying case.
Safety and EMC Instructions: Portable Computers 7

• Do not allow your portable computer to operate with the base resting
directly on exposed skin, for example, legs, for an extended period of
time. With extended operation, heat can potentially build up in the
base. Allowing sustained contact with the skin could cause discomfort
or, eventually, a burn.
• Do not use your computer in a wet environment, for example, near a
bath tub, sink, or swimming pool or in a wet basement.
• If your computer includes an integrated or optional (PC Card)
modem, disconnect the modem cable if an electrical storm is
approaching to avoid the remote risk of electric shock from lightning
via the telephone line.
www.dell.com | support.dell.com
• To help avoid the potential hazard of electric shock, do not connect or
disconnect any cables or perform maintenance or reconfiguration of
this product during an electrical storm. Do not use your computer
during an electrical storm unless all cables have been disconnected and
the computer is operating on battery power.
• If your computer includes a modem, the cable used with the modem
should be manufactured with a minimum wire size of 26 American
wire gauge (AWG) and an FCC-compliant RJ-11 modular plug.
• PC Cards may become very warm during normal operation. Use care
when removing PC Cards after their continuous operation.
• Before you clean your computer, remove power. Clean your computer
with a soft cloth dampened with water. Do not use liquid or aerosol
cleaners, which may contain flammable substances.
Power (Safety Instructions, continued)
• Use only the Dell-provided AC adapter approved for use with this
computer. Use of another AC adapter may cause a fire or explosion.
• Before you connect the computer to an electrical outlet, check the AC
adapter voltage rating to ensure that the required voltage and
frequency match the available power source.
• To remove power from the computer, turn it off, remove the battery
8 Safety and EMC Instructions: Portable Computers
pack, and disconnect the AC adapter from the electrical outlet.

• To help prevent electric shock, plug the AC adapter and peripheral
power cables into properly grounded power sources. These power
cables may be equipped with three-prong plugs to provide an earth
grounding connection. Do not use adapter plugs or remove the
grounding prong from the power cable plug. If you use a power
extension cable, use the appropriate type, two-prong or three-prong, to
mate with the AC adapter power cable.
• Be sure that nothing rests on your AC adapter’s power cable and that
the cable is not located where it can be tripped over or stepped on.
• If you are using a multiple-outlet power strip, use caution when
plugging the AC adapter’s power cable into the power strip. Some
power strips may allow you to insert the plug incorrectly. Incorrect
insertion of the power plug could result in permanent damage to your
computer, as well as risk of electric shock and/or fire. Ensure that the
ground prong of the power plug is inserted into the mating ground
contact of the power strip.
Battery (Safety Instructions, continued)
• Use only Dell battery modules that are approved for use with this
computer. Use of other types may increase the risk of fire or explosion.
• Do not carry a battery pack in your pocket, purse, or other container
where metal objects (such as car keys or paper clips) could short-circuit
the battery terminals. The resulting excessive current flow can cause
extremely high temperatures and may result in damage to the battery
pack or cause fire or burns.
• The battery poses a burn hazard if you handle it improperly. Do not
disassemble it. Handle a damaged or leaking battery pack with extreme
care. If the battery is damaged, electrolyte may leak from the cells and
may cause personal injury.
• Keep away from children.
• Do not store or leave your computer or battery pack near a heat source
such as a radiator, fireplace, stove, electric heater, or other heatgenerating appliance. When heated to excessive temperatures, battery
cells could explode or vent, posing a risk of fire.
Safety and EMC Instructions: Portable Computers 9

www.dell.com | support.dell.com
• Do not dispose of your computer’s battery in a fire or with normal
household waste. Battery cells may explode. Discard a used battery
according to the manufacturer’s instructions or contact your local
waste disposal agency for disposal instructions. Dispose of a spent or
damaged battery promptly.
Air Travel (Safety Instructions, continued)
• Certain Federal Aviation Administration regulations and/or airline-
specific restrictions may apply to the operation of your Dell™
computer while you are onboard an aircraft. For example, such
regulations/restrictions may prohibit the use of any personal electronic
device (PED) that has the capacity for intentional transmission of
radio frequency or other electromagnetic signals while on an aircraft.
– In order to best comply with all such restrictions, if your Dell
portable computer is equipped with Dell TrueMobile™ or some
other wireless communication device, please disable this device
before you board the aircraft and follow all instructions provided
by airline personnel with regard to such device.
– Additionally, the use of any PED, such as a portable computer,
may be prohibited in aircraft during certain critical phases of
flight, for example, takeoff and landing. Some airlines may further
define the critical flight phase as any time the aircraft is below
3050 m (10,000 ft). Please follow the airline’s specific instructions
as to when the use of a PED is allowed.
EMC Instructions
• Use shielded signal cables to ensure that you maintain the appropriate
EMC classification for the intended environment. For parallel printers,
a cable is available from Dell. If you prefer, you can order a cable from
Dell at its world-wide website at http://www.dell.com.
• Static electricity can harm electronic components inside your
computer. To prevent static damage, discharge static electricity from
your body before you touch any of your computer’s electronic
components, such as a memory module. You can do so by touching an
unpainted metal surface on the computer’s input/output panel.
10 Safety and EMC Instructions: Portable Computers

When Using Your Computer
Observe the following safety guidelines to prevent damage to your
computer:
• When setting up the computer for work, place it on a level surface.
• When traveling, do not check the computer as baggage. You can put
your computer through an X-ray security machine, but never put your
computer through a metal detector. If you have the computer checked
by hand, be sure to have a charged battery available in case you are
asked to turn on the computer.
• When traveling with the hard drive removed from the computer, wrap
the drive in a nonconducting material, such as cloth or paper. If you
have the drive checked by hand, be ready to install the drive in the
computer. You can put the hard drive through an X-ray security
machine, but never put the drive through a metal detector.
• When traveling, do not place the computer in overhead storage
compartments where it could slide around. Do not drop your
computer or subject it to other mechanical shocks.
• Protect your computer, battery, and hard drive from environmental
hazards such as dirt, dust, food, liquids, temperature extremes, and
overexposure to sunlight.
• When you move your computer between environments with very
different temperature and/or humidity ranges, condensation may form
on or within the computer. To avoid damaging the computer, allow
sufficient time for the moisture to evaporate before using the
computer.
NOTICE: When taking the computer from low-temperature conditions into a
warmer environment or from high-temperature conditions into a cooler
environment, allow the computer to acclimate to room temperature before
turning on power.
• When you disconnect a cable, pull on its connector or on its strain-
relief loop, not on the cable itself. As you pull out the connector, keep
it evenly aligned to avoid bending any connector pins. Also, before you
connect a cable make sure both connectors are correctly oriented and
aligned.
• Handle components with care. Hold a component such as a memory
module by its edges, not its pins.
Safety and EMC Instructions: Portable Computers 11

• When removing a memory module from the system board or
disconnecting a peripheral device from the computer, wait 5 seconds
after turning off the computer before removing the memory module or
disconnecting the device to help avoid possible damage to the system
board.
• Clean the display with a soft, clean cloth and commercial window
cleaner that does not contain wax or abrasives. Apply the cleaner to the
cloth; then stroke the cloth across the display in one direction, moving
from the top of the display to the bottom. If the display contains
grease or some other contaminant, use isopropyl alcohol instead of
commercial window cleaner.
www.dell.com | support.dell.com
• If your computer gets wet or is damaged, follow the procedures
described in “If Your Computer Gets Wet” on page 42 and “If You
Drop or Damage Your Computer” on page 43. If, after following these
procedures, you confirm that your computer is not operating properly,
contact Dell (see page 73).
When Removing or Installing Memory Modules
Before removing or installing memory modules, perform the following steps
in the sequence indicated.
NOTICE: The only time you should ever access the inside of your computer is
when you are installing memory modules.
NOTICE: Wait 5 seconds after turning off the computer before disconnecting
a peripheral device or removing a memory module to help prevent possible
damage to the system board.
1
Turn off your computer and any attached peripherals.
2 Disconnect your computer and peripherals from electrical outlets to
reduce the potential for personal injury or shock. Also, disconnect any
telephone or telecommunication lines from the computer.
3 Remove the main battery from the battery bay and, if necessary, the
secondary battery from the media bay.
4 Ground yourself by touching the unpainted metal surface of the I/O
12 Safety and EMC Instructions: Portable Computers
panel on the back of the computer.
While you work, periodically touch the I/O panel to dissipate any
static electricity that might harm internal components.

Protecting Against Electrostatic Discharge
Static electricity can harm electronic components inside your computer. To
prevent static damage, discharge static electricity from your body before you
touch any of your computer’s electronic components, such as a memory
module. You can do so by touching an unpainted metal surface on the
computer’s I/O panel.
As you continue to work inside the computer, periodically touch an I/O
connector to remove any static charge your body may have accumulated.
You can also take the following steps to prevent damage from electrostatic
discharge (ESD):
• When unpacking a static-sensitive component from its shipping
carton, do not remove the component from the antistatic packing
material until you are ready to install the component. Just before
unwrapping the antistatic packaging, be sure to discharge static
electricity from your body.
• When transporting a sensitive component, first place it in an antistatic
container or packaging.
• Handle all sensitive components in a static-safe area. If possible, use
antistatic floor pads and workbench pads.
The following notice may appear throughout this document to remind you
of these precautions:
NOTICE: See “Protecting Against Electrostatic Discharge” in the safety
instructions at the front of this guide.
Safety and EMC Instructions: Portable Computers 13

www.dell.com | support.dell.com
14 Safety and EMC Instructions: Portable Computers

1
SECTION 1
Setting Up
Connecting a Printer
Turning Off the Computer
Using the Media Bay
Setting Up the Dolby Headphone
Setting Up the APR to Connect to a Network
www.dell.com | support.dell.com

Connecting a Printer
See the documentation that came with the printer for any recommended
preparation procedures, such as:
• Removing the packaging
• Installing the toner or ink cartridge
• Loading paper
Then follow the instructions that came with the printer to connect it to the
computer. If no information is provided, see the following sections.
www.dell.com | support.dell.com
HINT: For complete
printer driver installation
instructions, refer to your
printer documentation.
Installing the Printer Driver
Dell installs drivers for some new printers. Click the Start button, point to
Settings, and then click Printers. If your printer is listed in the Printers
window, the printer is ready to use.
If you need to install a printer driver, insert the installation CD into the CD
or DVD drive. Then follow the prompts on the screen using the instructions
that came with the printer.
If your printer installation CD does not automatically run, click the Start
®
button on the Microsoft
Windows® desktop, click Run, and type
x:\setup.exe (where x is the letter of your CD or DVD drive [usually
drive D]). Then click OK and follow the prompts on your screen.
Parallel Printer
1 Turn off the computer (see page 18).
NOTICE: Use only a standard IEEE parallel cable measuring 3 m (10 ft) or
less to connect the printer to the computer. Use of a nonstandard cable may
prevent the printer from working.
2
16 Setting Up
Attach the parallel printer cable to the parallel connector on the
computer and tighten the two screws. Attach the cable to the parallel
connector on the printer and snap the two clips into the two notches.
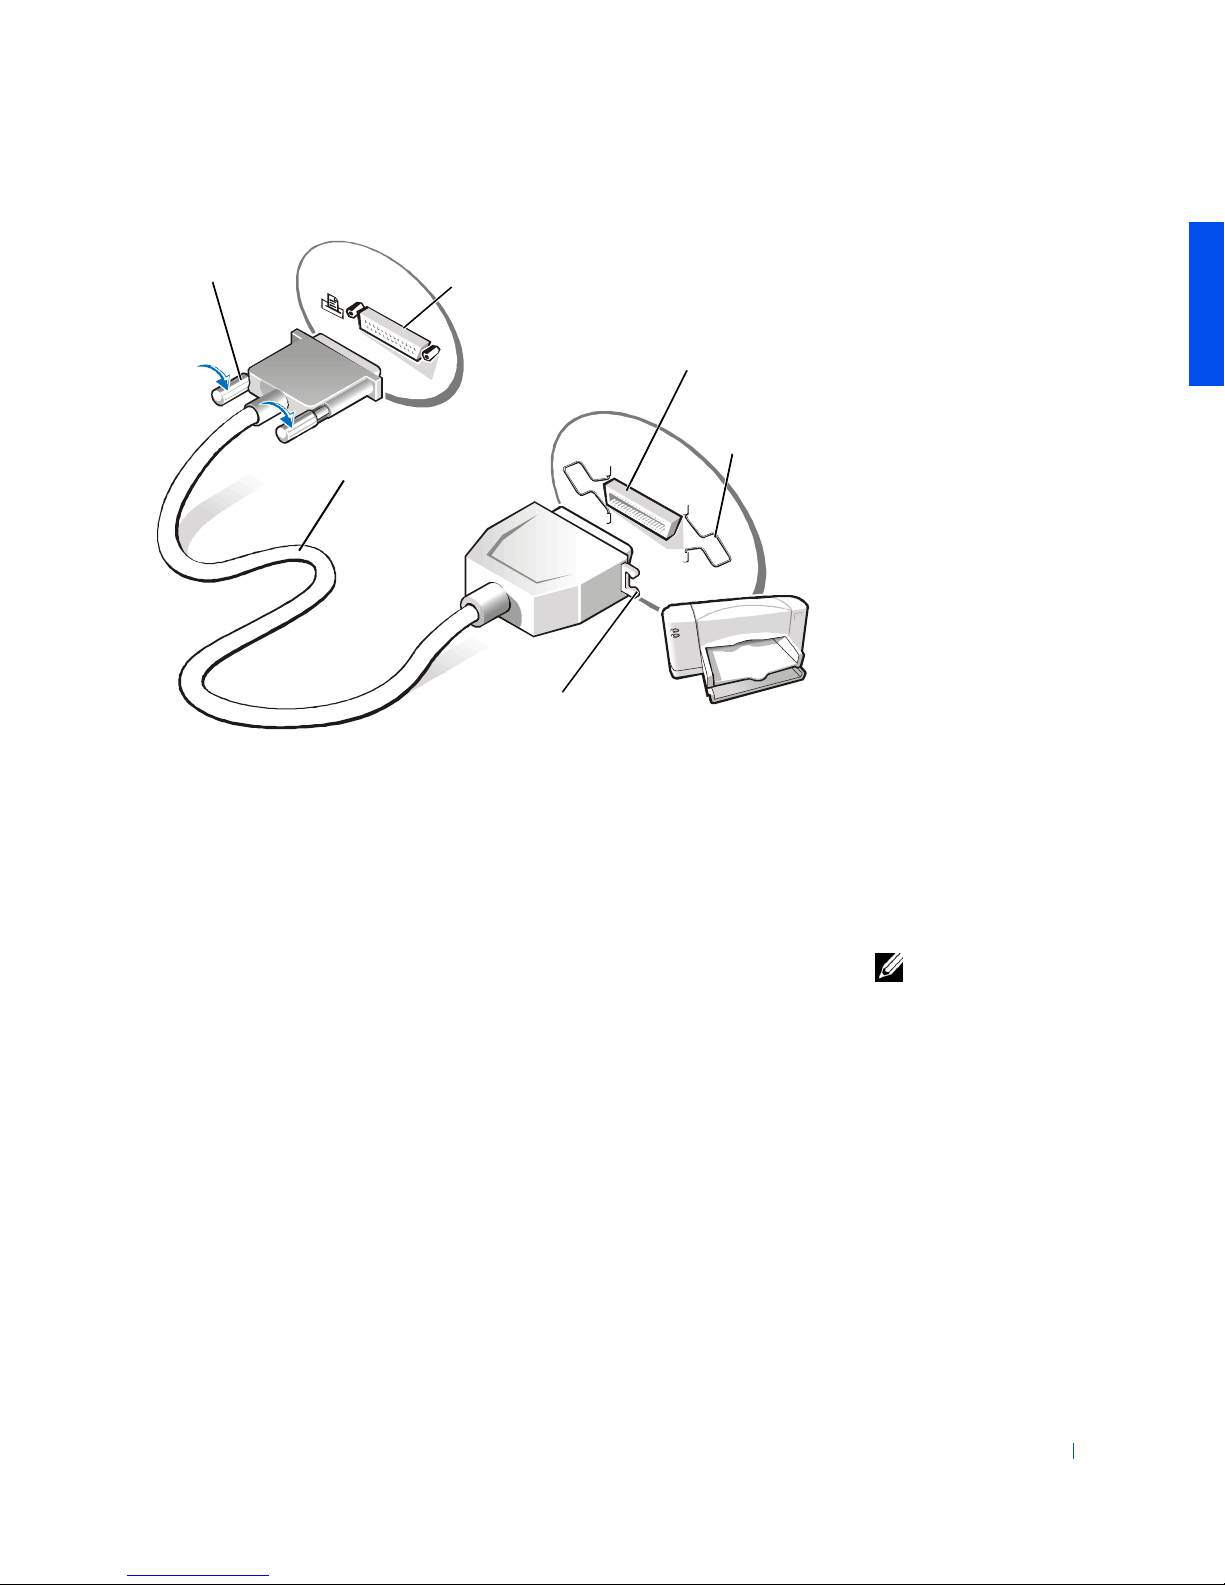
screws (2)
parallel printer
cable
3 Turn on the printer and then turn on the computer. If the Add New
parallel connector on
computer
parallel
connector on
printer
clips (2)
notches (2)
Hardware Wizard window appears, click Cancel.
4 Install the printer driver if necessary (see page 16).
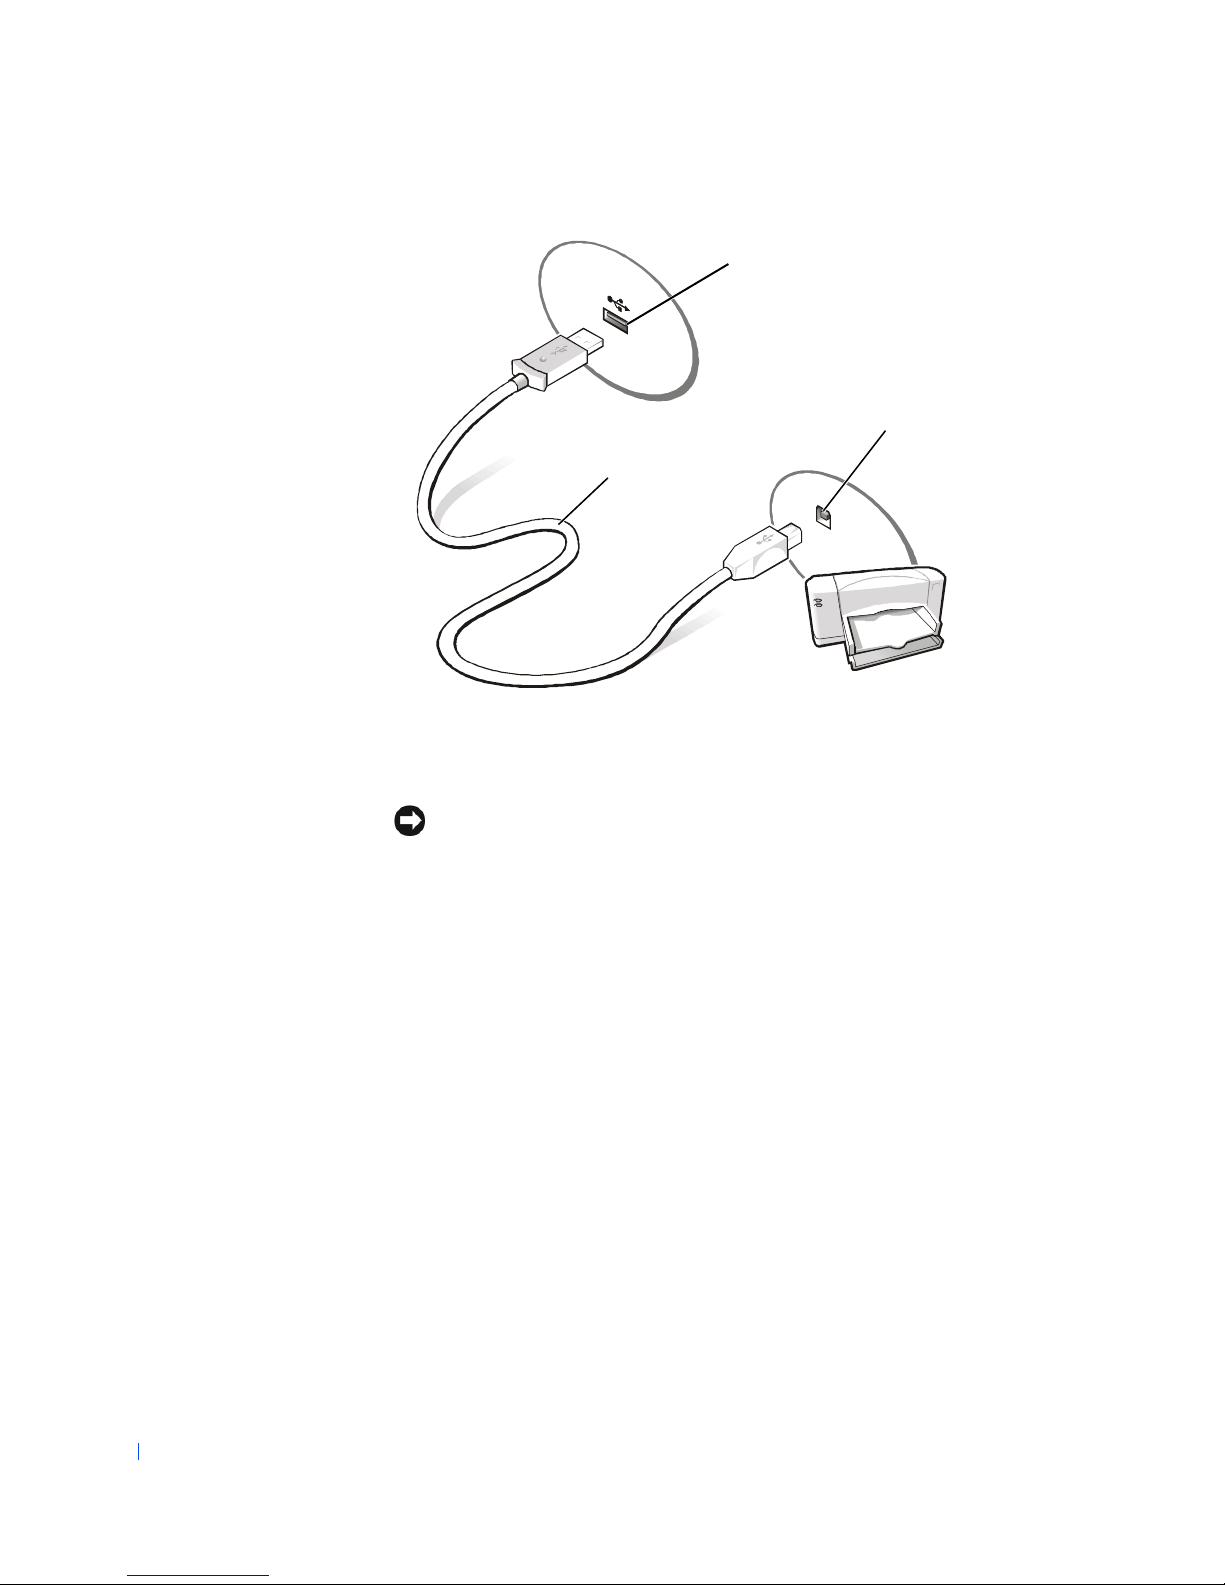
USB Printer
1
Install the printer driver if necessary (see page 16).
2 Attach the USB printer cable to the USB connector on the computer
and the printer. The USB connectors fit only one way.
HINT: You can connect
USB devices while the
computer is turned on.
Setting Up 17
www.dell.com | support.dell.com
USB connector on
back of computer
USB connector on
printer
USB printer
cable
Turning Off the Computer
NOTICE: To prevent data loss, you must perform the Windows shutdown
procedure to turn off your computer.
18 Setting Up
Windows Millennium Edition (Me) and Windows 2000
1 Save and close any open files and exit any open programs.
2 Click the Start button and then click Shut Down.
3 Click the pull-down menu under What do you want the computer to
do?.
4 Click Shut down and then click OK.
The computer automatically turns off after the shutdown process
finishes.

Using the Media Bay
Dell ships your computer with a floppy drive installed in the media bay. The
media bay also supports the following devices:
• CD drive
• CD-RW drive
• DVD drive
• DVD/CD-RW combo drive
• Zip drive
• Second hard drive
• Second battery
• Dell TravelLite™ module
NOTICE: To prevent irreparable damage to the docking connector, do not
remove or replace devices while the computer is connected to an advanced port
replicator (APR).
Setting Up 19
www.dell.com | support.dell.com
bott
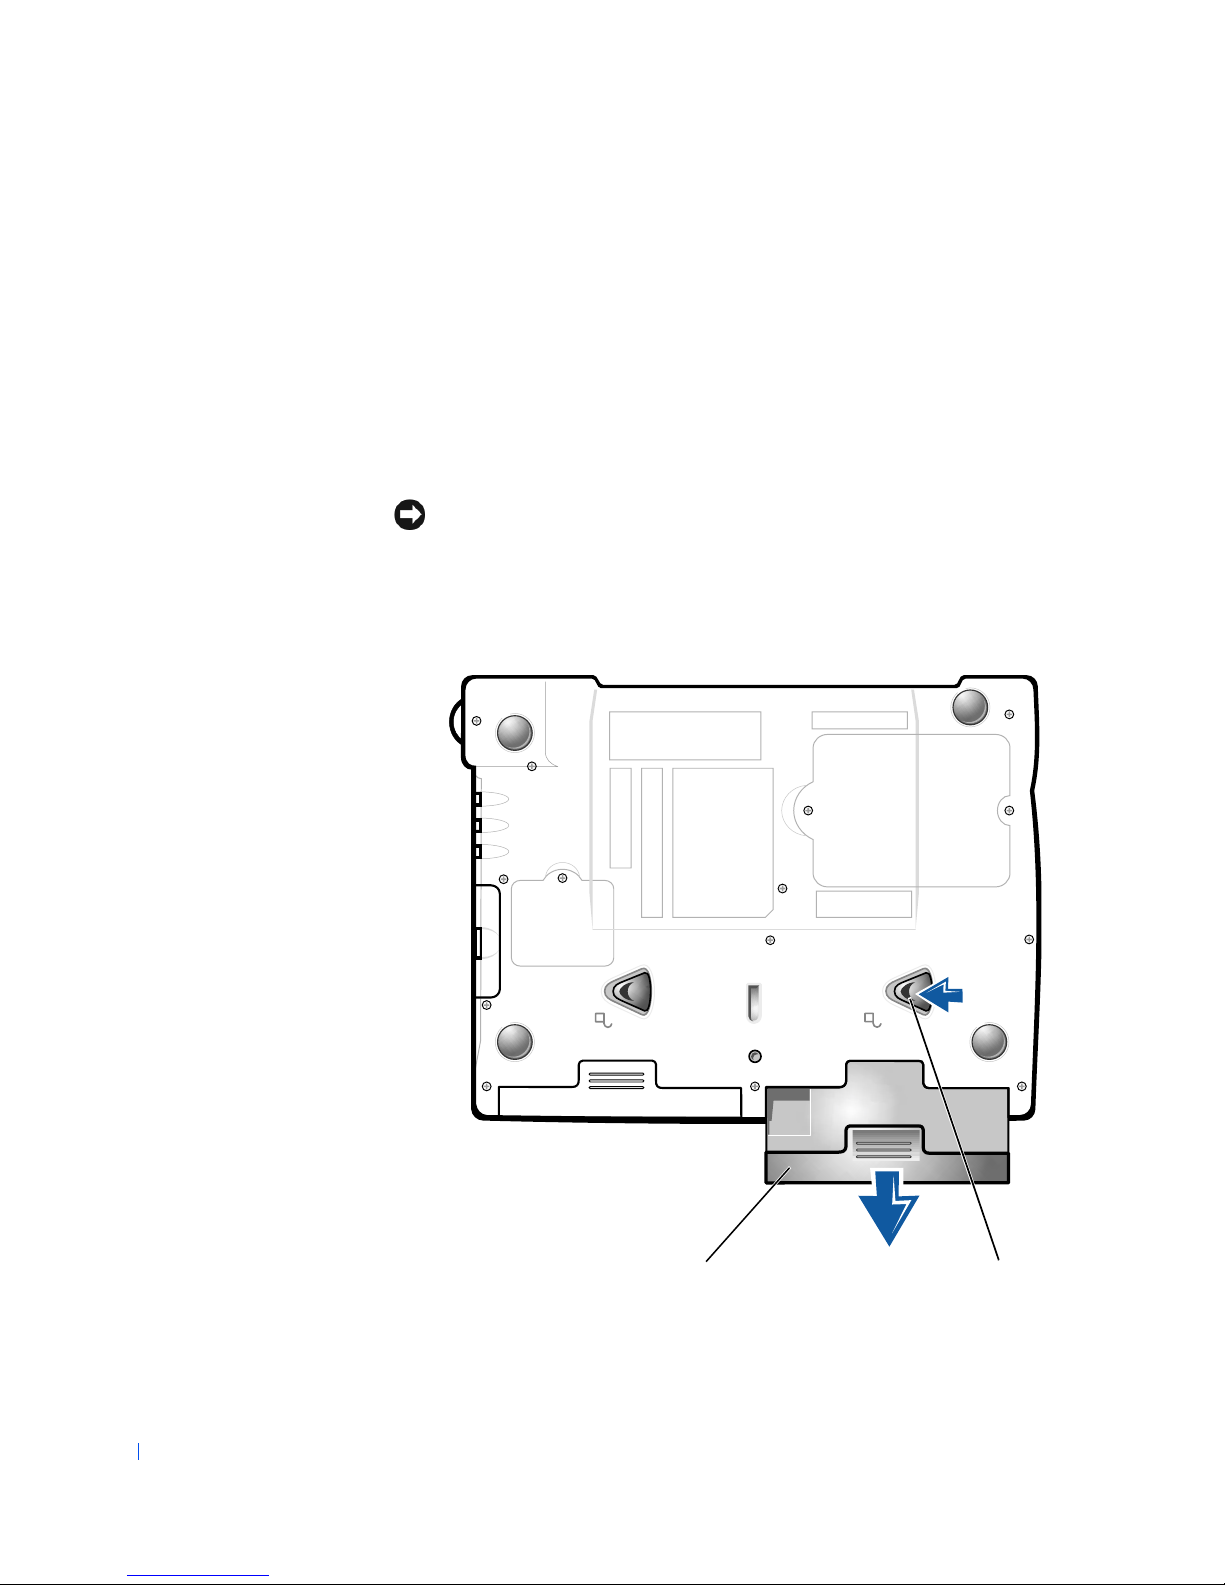
Swapping Devices While the Computer Is Turned Off
1 Save and close any open files, exit any open programs, and shut down
the computer (see page 18).
2 If the computer is connected (docked) to an APR, undock it (see
page 55).
3 Close the display and turn the computer over.
4 Slide and hold the latch release, and pull the device out of the media
bay.
NOTICE: To prevent damage, place devices in a travel case when they are not
inserted in the computer. Store devices in a dry, safe place, and avoid placing
heavy objects on top of them.
om of computer
device latch release
20 Setting Up

NOTICE: Insert devices before you dock and turn on the computer.
5 Insert the new device into the bay, and push it until you hear a click.
6 Turn on the computer.
Swapping Devices While Windows Is Running
NOTICE: To prevent irreparable damage to the docking connector, do not
replace devices while the computer is connected to an APR.
In Microsoft Windows Me
1 Right-click the Softex BayManager icon on the Microsoft Windows
taskbar.
2 Click Remove/Swap.
3 Keep the display open, and tilt the computer back so that you can
access the bottom of the computer.
4 Slide and hold the latch release, and pull the device out of the media
bay.
5 Insert the new device into the bay, and push it until you hear a click.
6 Click OK. Then click OK again to close the Softex BayManager
window.
In Microsoft Windows 2000
1 Double-click the Unplug or Eject Hardware icon on the Microsoft
Windows taskbar.
2 Click the device you want to eject and then click Stop.
3 Click OK, and wait until the device you want to eject is cleared from
the list of devices in the Unplug or Eject Hardware window.
4 Keep the display open, and tilt the computer back so that you can
access the bottom of the computer.
5 Slide and hold the latch release, and pull the device out of the media
bay.
6 Insert the new device into the bay, and push it until you hear a click.
7 When Windows recognizes the new device, click Close.
Setting Up 21

Setting Up the Dolby Headphone
www.dell.com | support.dell.com
HINT: The Dolby
headphone feature is
available only if your
computer has a DVD
drive.
HINT: Icon labels may be
visible only when you
place the pointer over the
icon.
HINT: A network adapter
is also referred to as a
network interface
controller (NIC).
1
Double-click the Intervideo Win DVD icon on the Windows desktop.
2 Click the Properties icon.
3
Click the Dolby Headphone tab.
4 Click Enable Dolby Headphone.
5
Select one of the four options to set the level of surround sound
effects. Option 1 is a baseline stereo option and Options 2, 3, and 4
are surround sound levels.
6 Click Apply, and then click OK to close the WinDVD Properties
window.
7 Click Exit.
Setting Up the APR to Connect to a
Network
NOTICE: Do not install a network adapter or a network adapter/modem
combination PC Card until you complete the advanced port replicator (APR)
setup.
If you purchased the APR with an integrated network adapter, you must
first configure the computer to use the APR with a network.
22 Setting Up
Setting Up the APR for Windows Me
1 If the computer is on, shut down the operating system and turn off the
computer (see page 18).
2 Disconnect all external devices from the APR.
3 Connect the AC adapter to the APR and an electrical outlet.
4 Insert the computer into the APR.
5 Turn on the computer.
The computer automatically detects the network adapter and begins
the software installation.
6 At the Add New Hardware Wizard window, click Automatic search for
a better driver (Recommended) and then click Next.

7 Click Finish when Windows displays a message that the driver is
installed.
8 Click Yes to restart the computer.
After the computer restarts, Windows modifies settings, creates a
Dock 1 configuration, and then displays a
Setup is complete
message.
9 Click OK.
10 If the Updated display settings message appears, click OK.
11 If necessary, consult your network administrator for instructions on
configuring the network adapter settings.
Setting Up the APR for Windows 2000
NOTICE: Do not install the drivers from the CD that is shipped with the APR.
The network adapter will not work if they are installed.
1
If the computer is on, shut down the operating system and turn off the
computer (see page 18).
2 Disconnect all external devices from the APR.
3 Insert the computer into the APR.
4 Attach the network cable and the AC adapter to the APR.
5 Turn on the computer.
6 Log on as a user with administrative privileges.
7 Make sure that Intel 3Com PCI Ethernet Adapter (10/100) appears
in the Found New Hardware window.
Windows 2000 automatically installs the network adapter drivers.
Setting Up 23

www.dell.com | support.dell.com
24 Setting Up

2
SECTION 2
Solving Problems
Finding Solutions
Accessing Help Files
Power Problems
Start-Up Error Messages
Video and Display Problems
Sound and Speaker Problems
Printer Problems
Modem Problems
Scanner Problems
Touch Pad Problems
External Keyboard Problems
Unexpected Characters
Drive Problems
Network Problems
Windows Error Messages
General Program Problems
Internet Connection Problems
E-Mail Problems
If Your Computer Gets Wet
If You Drop or Damage Your Computer
Resolving Other Technical Problems
www.dell.com | support.dell.com
Reinstalling Drivers and Utilities
Reinstalling Windows
www.dell.com | support.dell.com
HINT: If you have a
problem with an external
device, see the device
documentation or contact
the manufacturer.
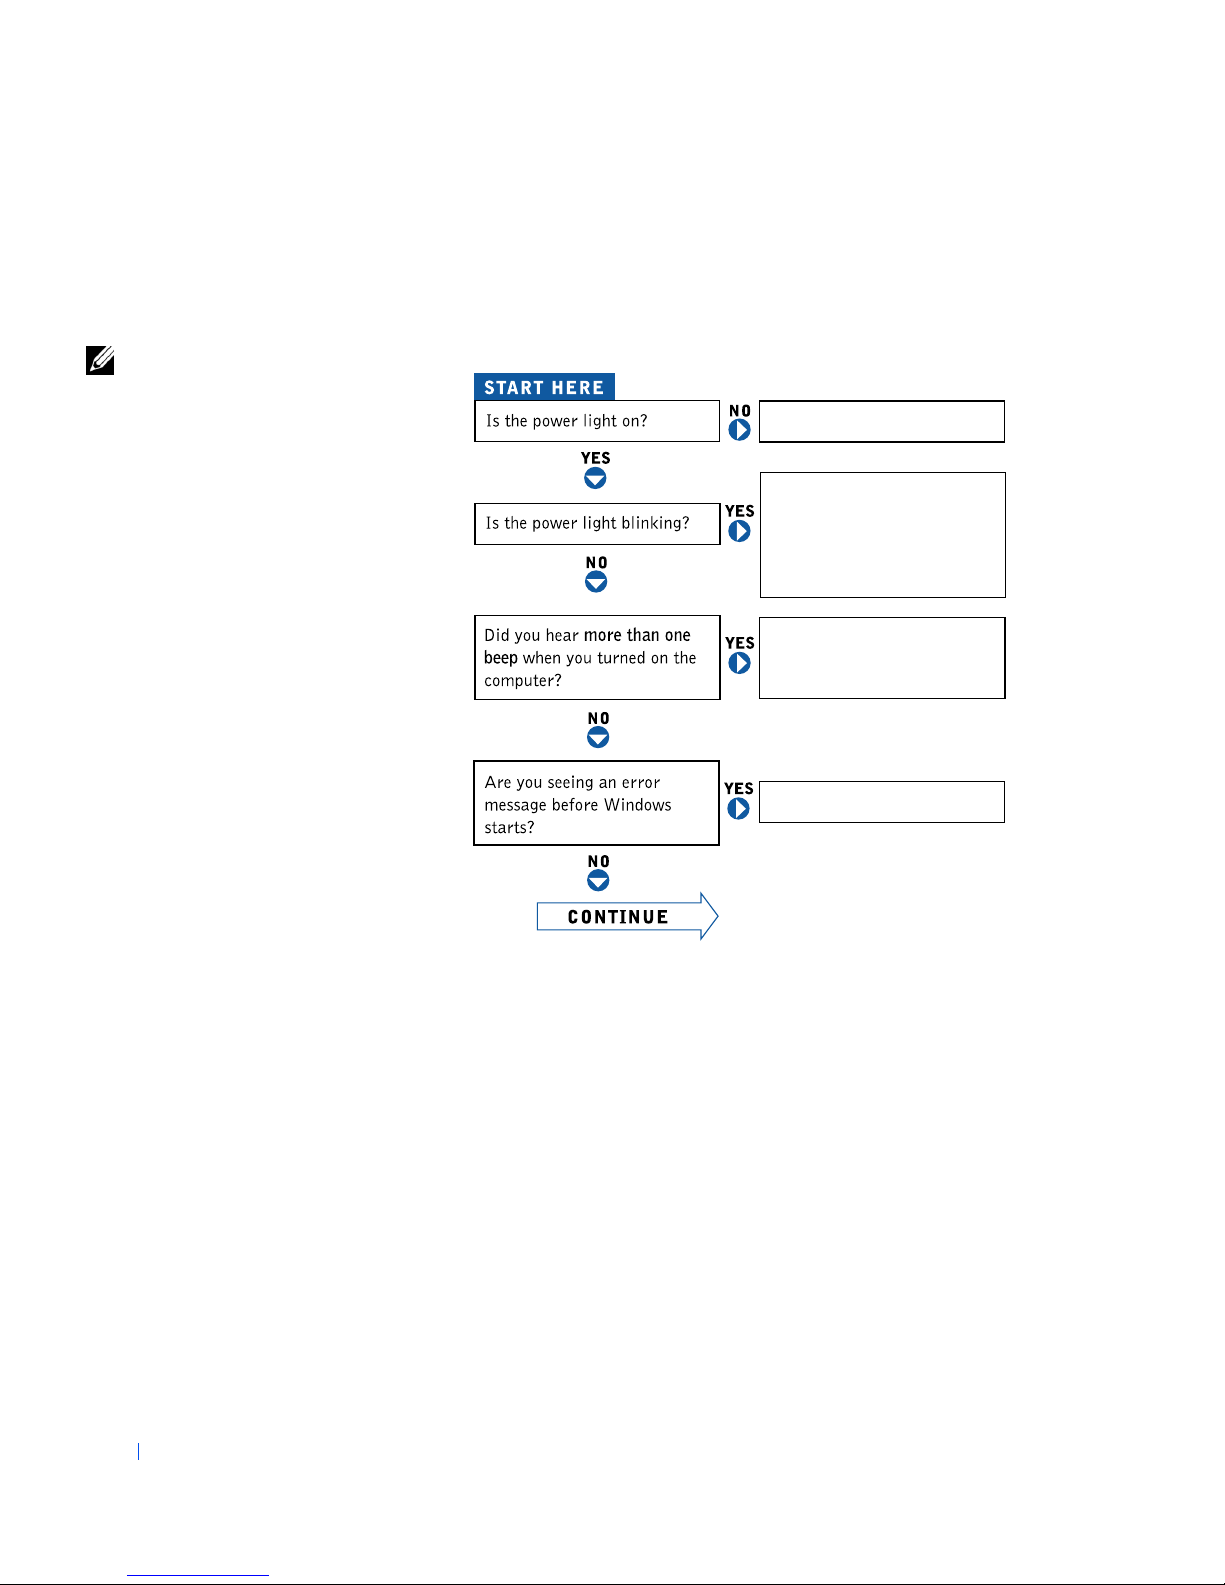
Finding Solutions
Sometimes it’s difficult to figure out where to go for answers. Use this chart
to quickly find the answers to your questions.
See page 28.
Press the power button to
resume from standby mode.
See the
for more information on
standby mode.
Get technical assistance from
Dell. See page 73.
Tell Me How
help file
®
See page 29.
26 Solving Problems
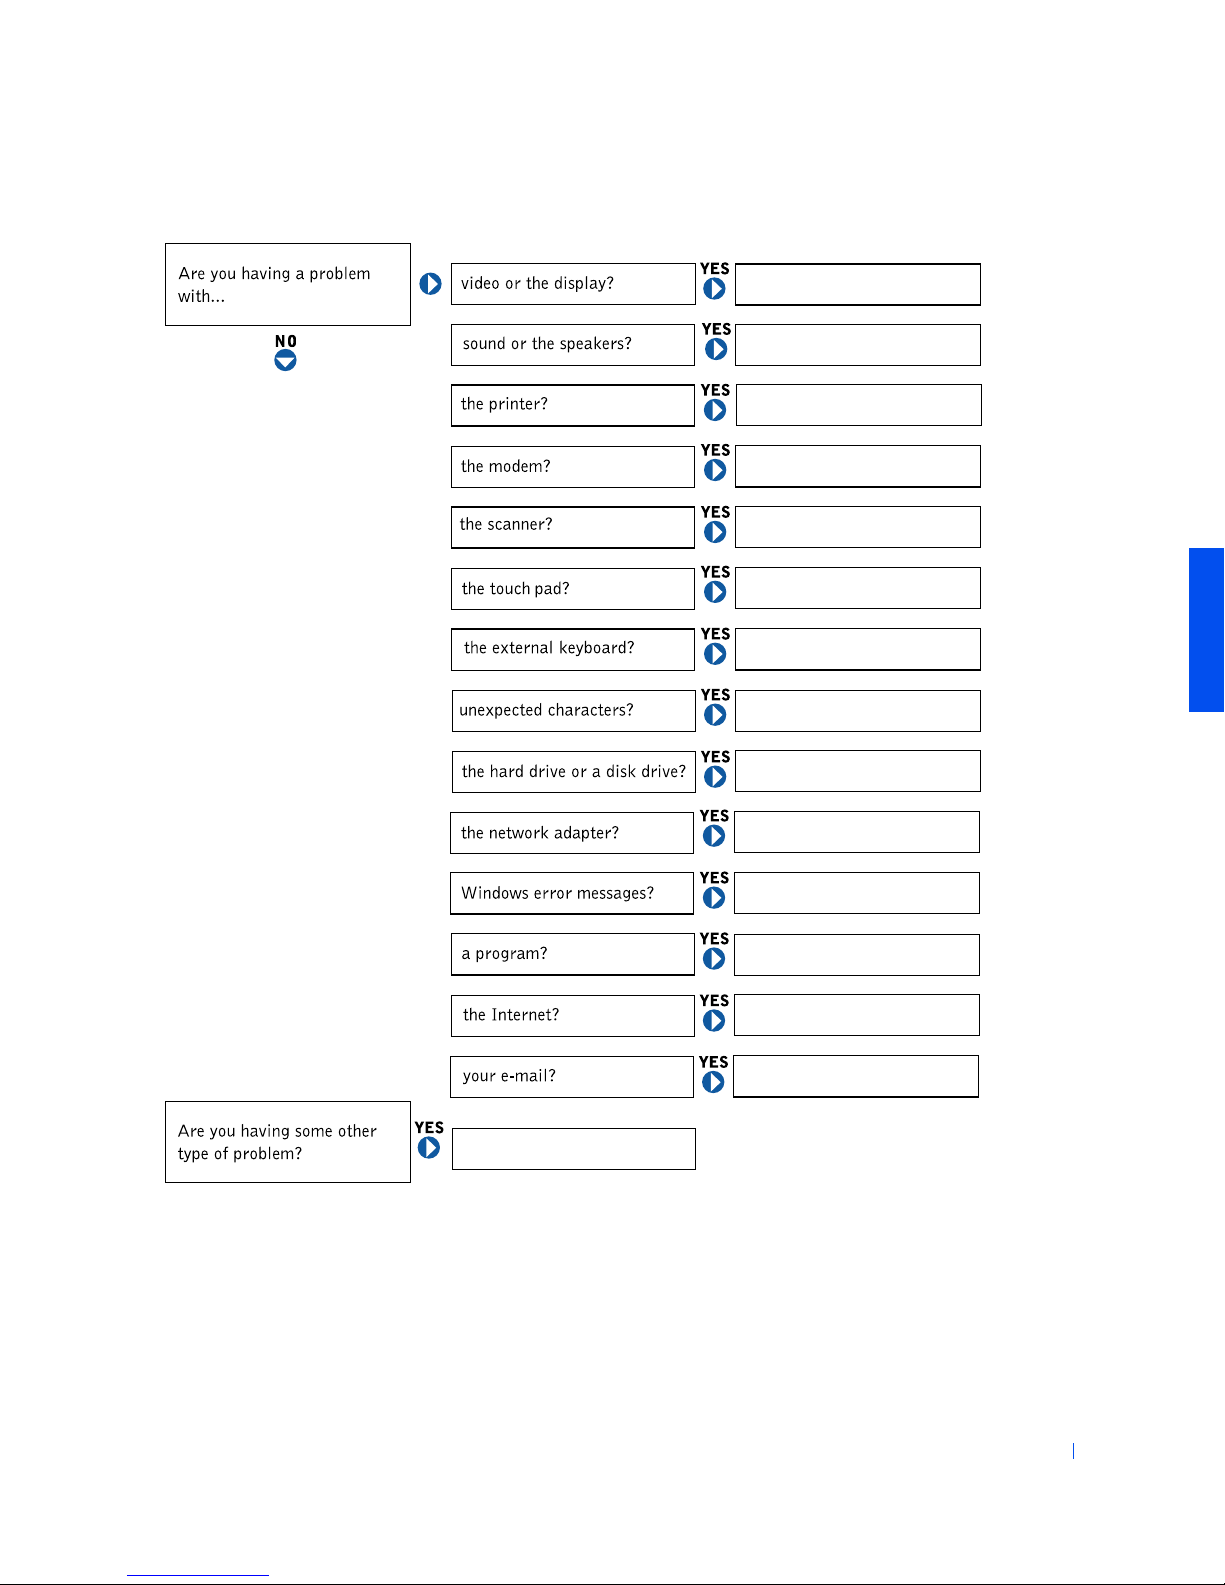
See page 30.
See page 31.
See page 32.
See page 33.
See page 34.
See page 35.
See page 35.
See page 35.
See page 36.
See page 39.
See page 44.
See page 39.
See page 40.
See page 41.
See page 42.
Solving Problems 27

Accessing Help Files
www.dell.com | support.dell.com
TO ACCESS THE
1 Click the Start button, point to Programs—> User’s Guides, and then click
Tell Me How.
TO ACCESS
1 Click the Start button and then click Help.
2 Click the Search tab.
3 Type a word or phrase that describes your problem and then click List Topics.
4 Click the topic that describes your problem and then click Display.
5 Follow the instructions shown on the screen.
TO ACCESS
1 Click the Start button and then click Help.
2 Type a word or phrase that describes your problem in the Search box and then
click Go.
3 Click the topic that describes your problem and then click Display.
4 Follow the instructions shown on the screen.
T
ELL ME HOW
M
ICROSOFT
W
INDOWS ME HELP
®
W
HELP FILE
INDOWS
2000 H
ELP
Power Problems
HINT: See the
How
help file for
information on standby
mode.
28 Solving Problems
Tell Me
CHECK THE POWER LIGHT— When the power light is lit or blinking, the
computer has power. If the power light is blinking, the computer is in standby
mode—press the power button to resume from standby mode. If the power light
is off, press the power button.
CHECK THE BATTERY— If you are using a battery to power your computer, the
battery charge may be depleted. Connect the computer to an electrical outlet
using the AC adapter, and turn on the computer.
TEST THE ELECTRICAL OUTLET— Ensure that the electrical outlet is working
by testing it with another device, such as a lamp.

CHECK THE AC ADAPTER— Be sure that the power cable is firmly inserted
into the electrical outlet and the green light on the AC adapter is on.
CONNECT THE COMPUTER DIRECTLY TO AN ELECTRICAL OUTLET—
Bypass power protection devices, power strips, and the extension cable to verify
that the computer turns on.
CHECK FOR INTERFERENCE— Electrical appliances on the same circuit or
operating near the computer can cause interference. Other causes of
interference: power extension cables, too many devices on a power strip, or
multiple power strips connected to the same electrical outlet.
ADJUST THE POWER PROPERTIES— See the Te ll M e Ho w help file or search
for the keyword standby in Windows Help. To access help files, see page 28.
RESEAT THE MEMORY MODULES— If your computer power light turns on
but the display remains blank, you may need to reseat the memory modules (see
page 57).
Start-Up Error Messages
OPERATING SYSTEM NOT FOUND— Contact Dell for technical assistance
(see page 73).
INSERT BOOTABLE MEDIA— The operating system is trying to boot to a
nonbootable floppy disk or CD. Insert a bootable floppy disk or CD.
NON-SYSTEM DISK ERROR— A floppy disk is in the floppy drive. Remove the
floppy disk and restart the computer.
Solving Problems 29

www.dell.com | support.dell.com
Video and Display Problems
If the display is blank
CHECK THE POWER LIGHT— When the power light is blinking, the computer
has power. If the power light is blinking, the computer is in standby mode—press
the power button to exit standby mode. If the power light is off, press the power
button.
CHECK THE BATTERY— If you are using a battery to power your computer, the
battery charge may be depleted. Connect the computer to an electrical outlet
using the AC adapter, and turn on the computer.
TEST THE ELECTRICAL OUTLET— Ensure that the electrical outlet is working
by testing it with another device, such as a lamp.
CHECK THE AC ADAPTER— Be sure that the power cable is firmly inserted
into the electrical outlet and the green light on the AC adapter is on.
ADJUST THE POWER PROPERTIES— Search for the keyword standby in
Windows Help. To access help files, see page 28.
30 Solving Problems
If the display is difficult to read
ADJUST THE BRIGHTNESS— See the Tell Me H ow help file (see page 28) for
instructions on adjusting the brightness.
MOVE THE SUBWOOFER AWAY FROM THE COMPUTER OR MONITOR—
If your external speaker system includes a subwoofer, ensure that the subwoofer is
at least 60 cm (2 ft) away from the computer or external monitor.
ELIMINATE POSSIBLE INTERFERENCE— Turn off nearby fans, fluorescent
lights, or halogen lamps to check for interference.
ROTATE THE COMPUTER TO FACE A DIFFERENT DIRECTION— Eliminate
sunlight glare, which can cause poor picture quality.
 Loading...