

Page 1

Contents: Dell Inspiron 3800 System Reference
Dell™ Inspiron™ 3800 System Reference
Conventions
Technical Overview
Using the Computer
Utilities and Drivers for Microsoft Windows 98
Utilities and Drivers for Microsoft Windows NT
Utilities and Drivers for Microsoft Windows 2000
Technical Specifications
System Setup Program
System Error Messages
Passwords and Security
Ports and Connectors
Power Sources
Power Conservation
Removing and Replacing Parts
Information in this document is subject to change without notice.
© 1999–2000 Dell Computer Corporation. All rights reserved.
Reproduction in any manner whatsoever without the written permission of Dell Computer Corporation is strictly
forbidden. Trademarks used in this text: Dell, the DELL logo, DualPoint, ExpressCharge, and Inspiron are
trademarks of Dell Computer Corporation; Microsoft, Windows, MS-DOS, and Windows NT are registered
trademarks of Microsoft Corporation; Intel and Pentium are registered trademarks, and Celeron and SpeedStep are
trademarks of Intel Corporation; Adobe is a trademark of Adobe Systems Incorporated, which may be registered in
certain jurisdictions.
Other trademarks and trade names may be used in this document to refer to either the entities claiming the marks
and names or their products. Dell Computer Corporation disclaims any proprietary interest in trademarks and trade
file:///I|/SERVICE%20MANUALS/DELL%20MANUALS/LA...ok/Inspiron/3800/3800_SERVICE_MANUAL/index.htm (1 of 2)6/21/2004 12:54:57 AM
Page 2

Contents: Dell Inspiron 3800 System Reference
names other than its own.
Initial release: 20 Sep 1999
Last revised: 22 Feb 2000
file:///I|/SERVICE%20MANUALS/DELL%20MANUALS/LA...ok/Inspiron/3800/3800_SERVICE_MANUAL/index.htm (2 of 2)6/21/2004 12:54:57 AM
Page 3
Conventions: Dell Inspiron 3800 System Reference
Back to Contents Page
Conventions: Dell™ Inspiron™ 3800 System Reference
Notes, Notices, and Cautions
Typographical Conventions
Notes, Notices, and Cautions
Throughout this guide, blocks of text may be accompanied by an icon and printed in bold type
or in italic type. These blocks are notes, notices, and cautions, and they are used as follows:
NOTE: A NOTE indicates important information that helps you make better
use of your computer system.
NOTICE: A NOTICE indicates either potential damage to hardware or loss of data and
tells you how to avoid the problem.
CAUTION: A CAUTION indicates a potentially hazardous situation
which, if not avoided, may result in minor or moderate injury.
Typographical Conventions
The following list defines (where appropriate) and illustrates typographical conventions used as
visual cues for specific elements of text throughout this document:
● Interface components are window titles, button and icon names, menu names and
selections, and other options that appear on the monitor screen or display. They are
presented in bold.
Example: Click OK.
● Keycaps are labels that appear on the keys on a keyboard. They are enclosed in angle
file:///I|/SERVICE%20MANUALS/DELL%20MANUALS/LA.../Inspiron/3800/3800_SERVICE_MANUAL/convent.htm (1 of 2)6/21/2004 12:54:58 AM
Page 4

Conventions: Dell Inspiron 3800 System Reference
brackets.
Example: <Enter>
● Key combinations are series of keys to be pressed simultaneously (unless otherwise
indicated) to perform a single function.
Example: <Ctrl><Alt><Enter>
● Commands presented in lowercase bold are for reference purposes only and are not
intended to be typed when referenced.
Example: “Use the format command to . . . .”
In contrast, commands presented in the Courier New font are part of an
instruction and intended to be typed.
Example: “Type format a: to format the diskette in drive A.”
● Filenames and directory names are presented in lowercase bold.
Examples: autoexec.bat and c:\windows
● Screen text is a message or text that you are instructed to type as part of a command
(referred to as a command line). Screen text is presented in the Courier New font.
Example: The following message appears on your screen:
No boot device available
Example: “Type md c:\programs and press <Enter>.”
● Variables are placeholders for which you substitute a value. They are presented in italics.
Example: DIMM_x (where x represents the DIMM socket designation)
Back to Contents Page
file:///I|/SERVICE%20MANUALS/DELL%20MANUALS/LA.../Inspiron/3800/3800_SERVICE_MANUAL/convent.htm (2 of 2)6/21/2004 12:54:58 AM
Page 5
Technical Overview: Dell Inspiron 3800 System Reference
Back to Contents Page
Technical Overview: Dell™ Inspiron™ 3800 System Reference
System Features IRQ Line Assignments
Video
Memory
System Features
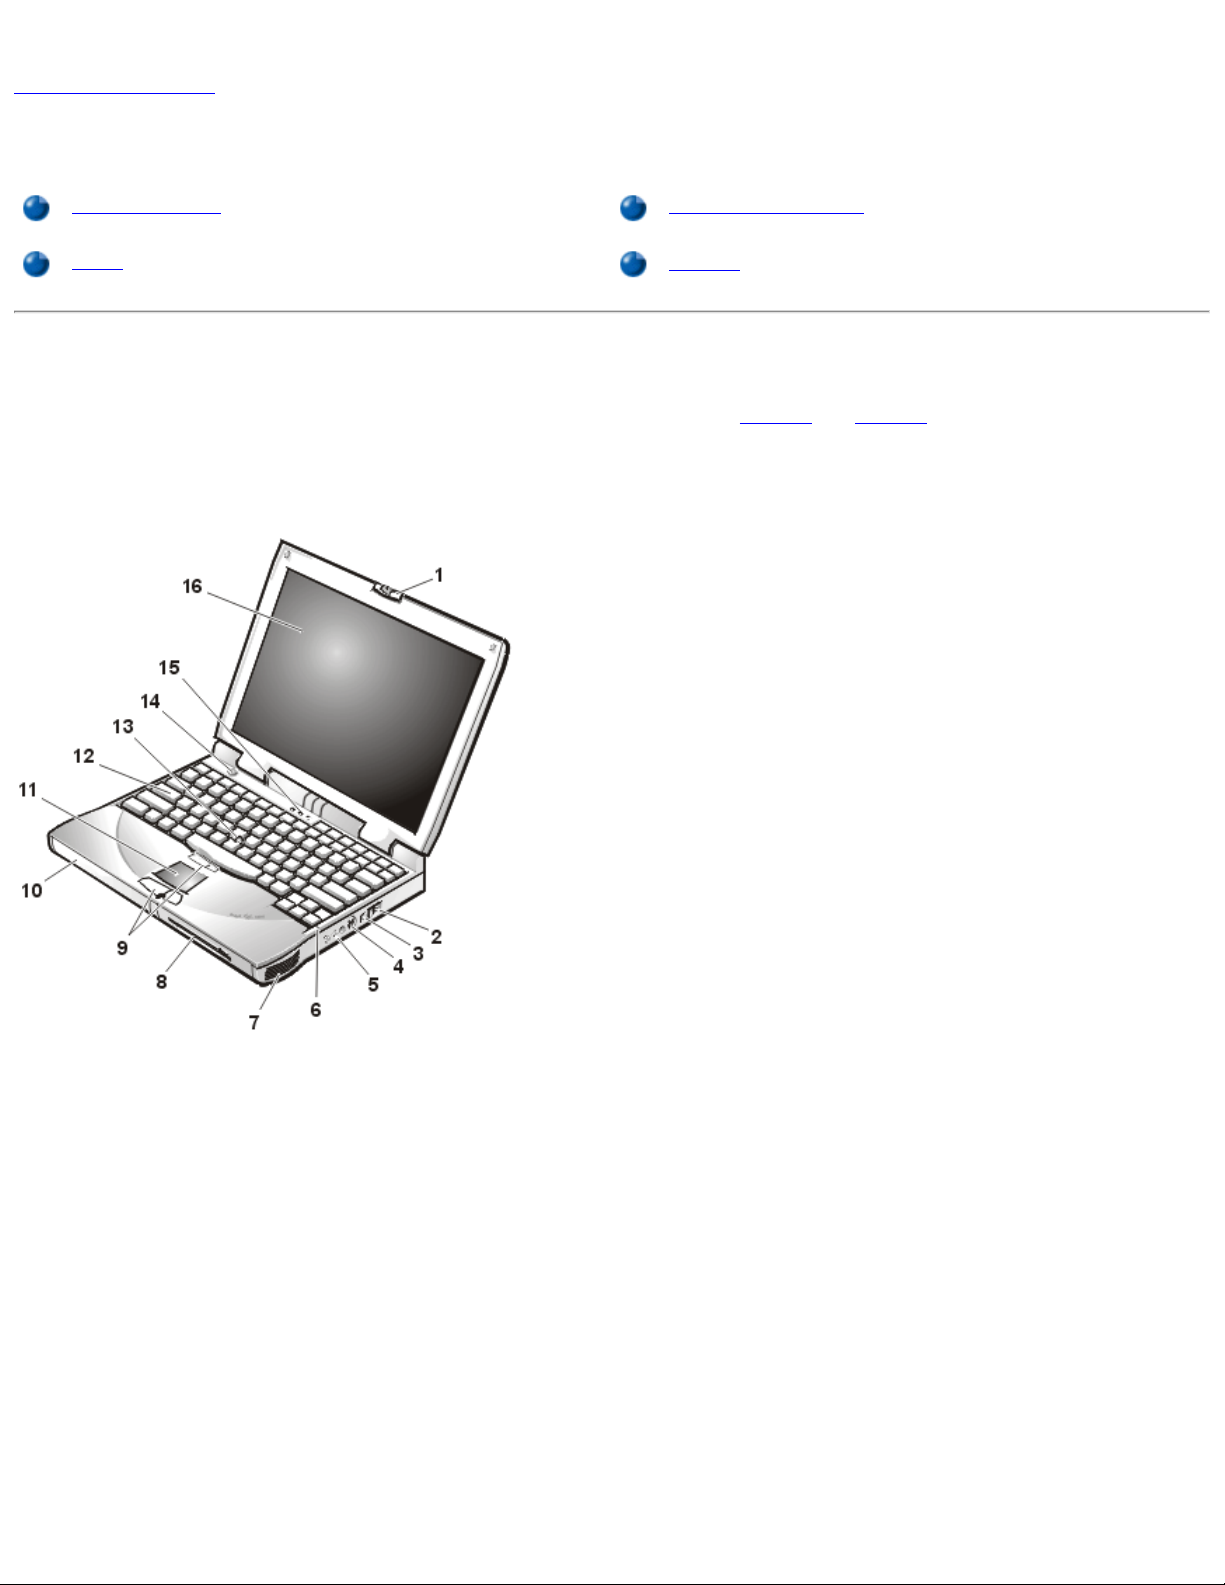
This section describes the major hardware and software features of your computer. Figure 1 and Figure 2 show the front and back view
of the computer, respectively.
Figure 1. Front View of the Computer
1
Display latch
9
DualPoint™ buttons
2
Air intake
10
Battery bay
3
Modem connector
11
Touch pad
4
TV-out S-video connector
12
Keyboard
5
Audio connectors (3)
13
Track stick
6
Integrated microphone
14
Power button
7
Speaker
15
Keyboard status indicators
8
Media bay
16
Display
Figure 2. Back View of the Computer
file:///I|/SERVICE%20MANUALS/DELL%20MANUALS/L...nspiron/3800/3800_SERVICE_MANUAL/overview.htm (1 of 10)6/21/2004 12:55:00 AM
Page 6
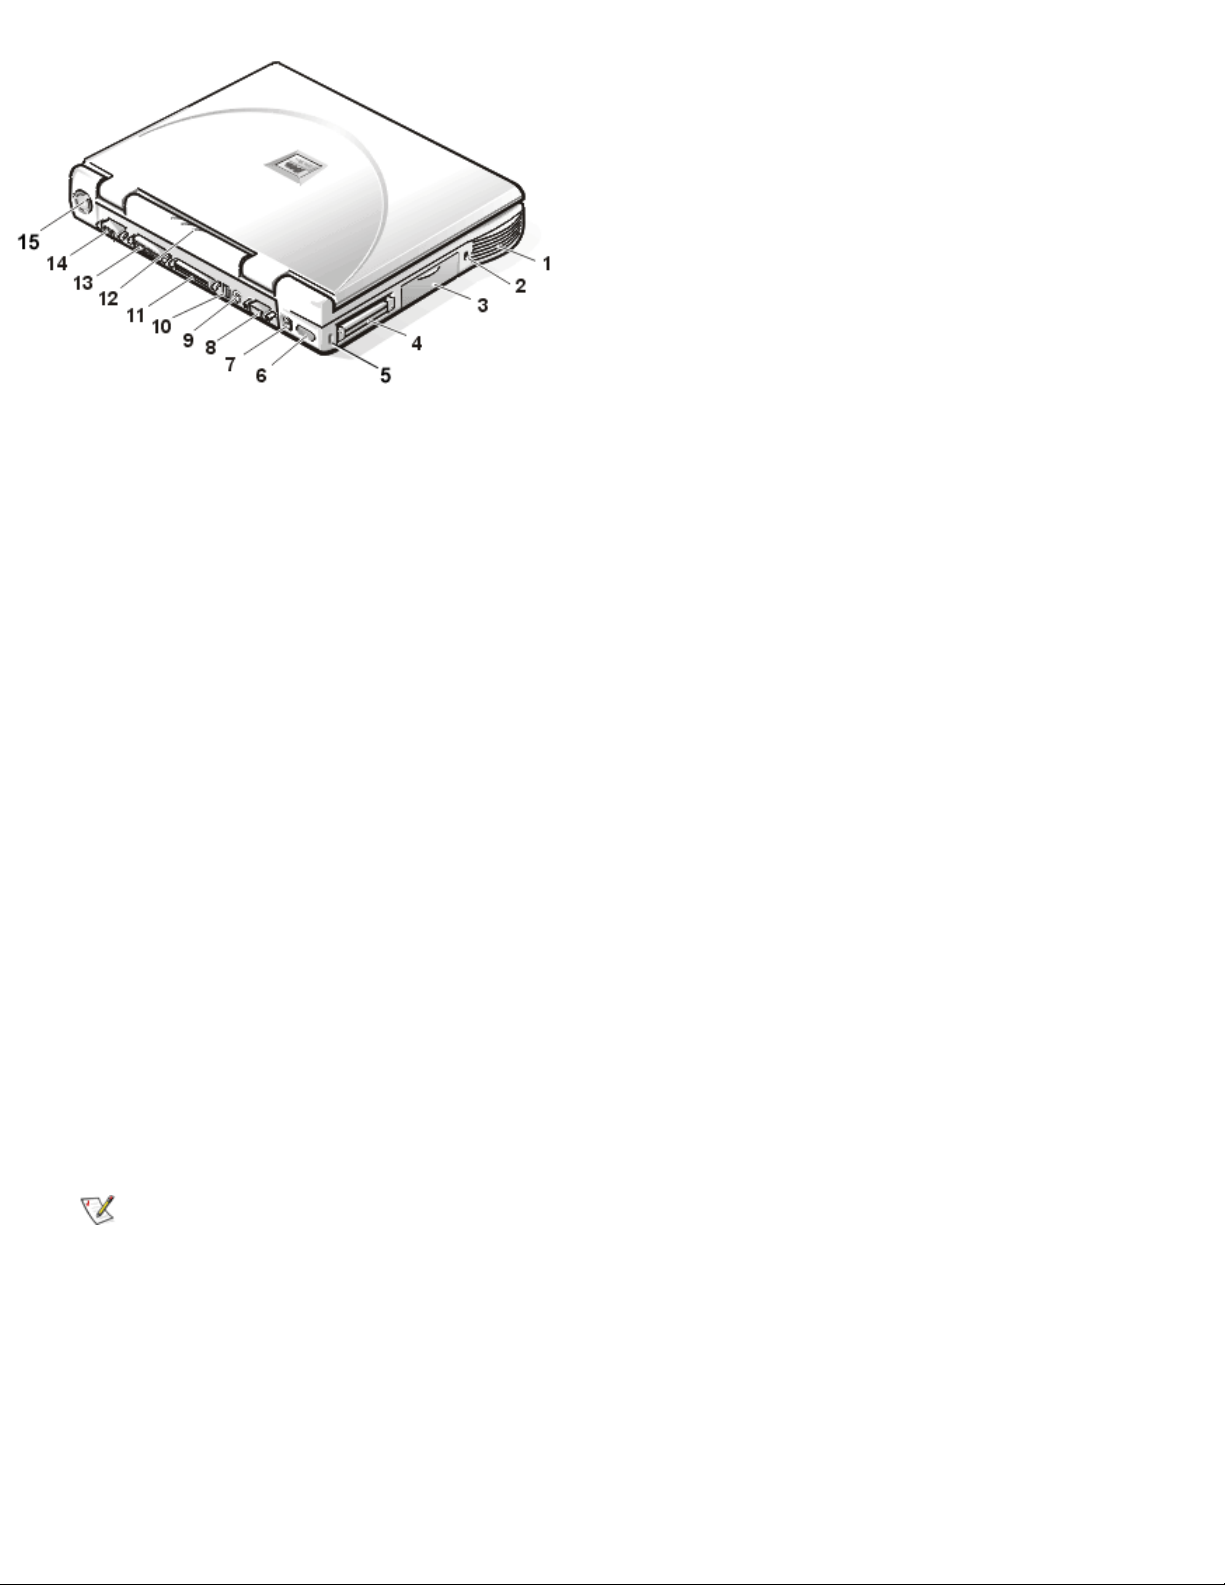
Technical Overview: Dell Inspiron 3800 System Reference
1
Speaker
9
PS/2 connector
2
Security cable slot
10
USB connector
3
Hard-disk drive
11
Docking connector
4
PC Card slot
12
Device access/status indicators
5
Security cable slot
13
Parallel port connector
6
Infrared port
14
Video connector
7
AC adapter connector
15
Fan exhaust
8
Serial port connector
Hardware Features
● An Intel® mobile microprocessor incorporating the latest processor technology.
● An internal, Level 1 (L1) cache consisting of 64 kilobytes (KB) of high-speed memory that resides in the processor core. The
microprocessor has either a 128-KB or 256-KB (integrated) Level 2 (L2) cache or a 512-KB pipelined-burst static random-access
memory (SRAM) (external) L2 cache.
● A minimum of 32 megabytes (MB) of synchronous dynamic random-access memory (SDRAM) system memory, with support for a
maximum of 512 MB.
● A media bay in which you can install a variety of modules, including a diskette drive, CD-ROM drive, CD-RW drive, DVD-ROM
drive (on computers running Microsoft® Windows® 98 Second Edition or Windows 2000), Zip drive, SuperDisk LS-120 drive,
second battery, or a second hard-disk drive.
NOTES: Your computer was shipped with a diskette drive in the media bay. For information on
removing the diskette drive and installing a different device in the bay, see "Using the Media Bay" in
Chapter 2 of the Reference and Troubleshooting Guide.
Because the Microsoft Windows NT® operating system does not support DVD technology, the DVDROM drive is available only on computers that use the Windows 98 Second Edition or Windows 2000
operating system.
● A 64-bit hardware-accelerated ATI Mobility-M video controller with 8 MB of video memory, accelerated graphics port (AGP) 2X, 3D
assist, motion compensation, extended desktop, OpenGL support, and a flicker-free TV-out S-video connector.
● An active-matrix extended graphics array (XGA) or super extended graphics array (SXGA) thin-film transistor (TFT) color display.
file:///I|/SERVICE%20MANUALS/DELL%20MANUALS/L...nspiron/3800/3800_SERVICE_MANUAL/overview.htm (2 of 10)6/21/2004 12:55:00 AM
Page 7

Technical Overview: Dell Inspiron 3800 System Reference
● ESS Maestro-3I audio controller with hardware wavetable support and 3D surround sound.
● Integrated stereo speakers and microphone.
● Connectors for connecting external speakers, headphones, or an external microphone to the computer.
● A TV-out S-video connector and composite TV-out adapter cable that allows you to connect a television to your computer. You can
obtain the latest video drivers on Dell's World Wide Web site at http://www.dell.com/filelib.
● Ultra direct memory access (DMA)/33 data transfer protocol for Advanced Technology Attachment (ATA)/integrated drive
electronics (IDE) hard-disk drive interface. Ultra DMA/33 allows data transfer rates of up to 33 MB/second.
● An integrated keyboard that includes two special keys that support the Windows operating systems.
● A Personal System/2 (PS/2)-compatible touch pad that provides full mouse functionality. A set of left and right buttons, located
below the touch pad, operate like the left and right buttons on a mouse. You can also perform many pointing functions by tapping
the touch pad, which is positioned for both left- and right-handed users. Click-and-drag buttonless functions are also supported.
An optional Dell™ DualPoint™ integrated pointing device is available, which provides a track stick in addition to the PS/2compatible touch pad. The DualPoint options also includes a second set of left and right buttons, located above the touch
pad. The track stick controls the cursor on the display screen and is positioned in the keyboard to allow you to move the
cursor while keeping your fingers in a typing position. You can also perform many pointing functions by tapping the track
stick. Click-and-drag buttonless functions are also supported.
● Universal Serial Bus (USB) capability, which simplifies connecting peripheral devices such as mice, printers, and computer
speakers. The USB port connector on your computer's back panel provides a single connection point for multiple USB-compliant
devices such as keyboards, mice, printers, and computer speakers. Also, you can connect and disconnect USB-compliant devices
while the computer is running.
NOTES: Microsoft Windows NT does not support USB functions.
If you attach a USB device that was not included in your original system configuration, you may need to
install a specific driver for that device to obtain its full functionality. Contact the USB device
manufacturer for more information.
● A lithium-ion battery or nickel-metal hydride battery in the battery bay, with support for a second battery in the media bay. The Dell
ExpressCharge™ technology charges a single lithium-ion battery in approximately 1 hour (when the computer is off or in save-todisk suspend [S2D] mode).
● An Infrared Data Association (IrDA) 1.1-compliant infrared port that permits you to transfer files without connecting cables.
NOTE: Windows NT does not support IrDA.
● A PC Card slot with connectors for two 3.3-volt (V) or 5-V cards. Both PC Card connectors support CardBus technology. In
addition, the lower PC Card connector (slot 0) supports the use of a zoomed video (ZV) port card.
NOTE: Windows NT does not support zoomed video functions.
● One high-performance serial port connector.
● One parallel port connector that can be set to AT, PS/2, or Extended Capabilities Port (ECP) mode.
● One PS/2 keyboard/mouse port connector.
● An integrated 56-kilobits per second (Kbps) v.90 modem with support for telephone hardware worldwide.
● One docking connector for the optional advanced port replicator (APR).
file:///I|/SERVICE%20MANUALS/DELL%20MANUALS/L...nspiron/3800/3800_SERVICE_MANUAL/overview.htm (3 of 10)6/21/2004 12:55:00 AM
Page 8

Technical Overview: Dell Inspiron 3800 System Reference
● Two security cable connectors to which you can attach a commercially available security cable to prevent unauthorized removal of
the computer.
● Two power conservation modes—standby mode and save-to-disk suspend mode—that help you conserve battery power. If the
batteries run out of power, save-to-disk suspend mode prevents data loss by copying all system data to the hard-disk drive and
turning off the computer.
● An automatic thermal management system that uses a variable-speed fan and microprocessor speed changes to keep the
computer running at the optimum temperature.
CAUTION: Do not allow your portable computer to operate with the base resting directly on exposed skin.
With extended operation, heat can potentially build up in the base. Allowing sustained contact with the
skin could cause discomfort, or eventually, a burn.
Software Features
● Microsoft Windows 98 Second Edition, Windows 2000, or Windows NT operating system installed on your hard-disk drive.
● Virus-scanning software.
● A standard set of video drivers provided for supporting video resolutions greater than 640 x 480 pixels.
● Audio utilities for computers with integrated audio capabilities.
● Internal modem software capable of communicating up to a speed of 56K.
● DualPoint integrated pointing device software (for use with the optional Dell integrated pointing device), which allows you to set the
default for the type of cursor pointing device that you want to use, as well as sensitivity, motion, and drag-and-drop features of both
the touch pad and track stick.
● Optional software DVD decoder driver on computers that use the Microsoft Windows 98 Second Edition or Windows 2000
operating system.
NOTE: Windows NT does not support the DVD decoder driver.
● Two power conservation modes—standby mode and save-to-disk suspend mode—that help you conserve battery power. If the
batteries run out of power, save-to-disk suspend mode prevents data loss by copying all system data to the hard-disk drive and
turning off the computer.
● The System Setup program for quickly viewing and changing system configuration information.
● Software support for the optional advanced port replicator (APR).
● Dell Diagnostics for evaluating the computer's components and devices. For information on using the diagnostics, refer to
"Running the Dell Diagnostics" in Chapter 3 of the Reference and Troubleshooting Guide.
Customizing Your System Configuration
As the computer environment changes, you may want to use the System Setup program to customize the configuration of your computer.
The
System Setup program lets you control the hardware and software features of the computer. It also helps you reduce power
consumption when the computer is running on battery power.
Available Options and Upgrades
● APRs
● Additional batteries
file:///I|/SERVICE%20MANUALS/DELL%20MANUALS/L...nspiron/3800/3800_SERVICE_MANUAL/overview.htm (4 of 10)6/21/2004 12:55:00 AM
Page 9

Technical Overview: Dell Inspiron 3800 System Reference
● External keyboards and a numeric keypad
● External monitors
● External pointing devices
● External speakers, headphones, and microphones
● Printers
● Hard-disk drives
● Second hard-disk drive for the media bay
● DVD-ROM drive modules
● SuperDisk LS-120 drive modules
● AC adapter
● PC Cards
● 32-, 64-, 128-, 192-, and 256-MB memory modules
● Carrying case
Instructions for connecting or installing these options are included in the upgrade kit you receive from Dell.
Video
The Dell-installed video drivers work with the operating system to let you customize the video resolution and number of screen colors on
your display.
NOTE: The Dell-installed video drivers are designed to offer the best performance on your computer. Dell
recommends that you use only these drivers with your factory-installed operating system.
Table 1 lists the combinations of resolutions and colors that the computer supports.
Table 1. Display Resolution, Colors, and Refresh Rates
Resolution Color Depth
Computer Display Only—
Available Refresh Rate
Television as Secondary Display—
Available Refresh Rate
640 x 480 (video graphics array [VGA]) 256 (8-bit) 60, 75, 85 hertz (Hz) 60-Hz NTSC, 50-Hz PAL
640 x 480 (VGA) 65 k (16-bit) 60, 75, 85 Hz 60-Hz NTSC, 50-Hz PAL
640 x 480 (VGA) 16 M (24-bit) 60, 75, 85 Hz 60-Hz NTSC, 50-Hz PAL
640 x 480 (VGA) 4.2 B (32-bit) 60, 75, 85 Hz 60-Hz NTSC, 50-Hz PAL
800 x 600 (super VGA [SVGA]) 256 (8-bit) 60, 75, 85 Hz 60-Hz NTSC, 50-Hz PAL
800 x 600 (SVGA) 65 k (16-bit) 60, 75, 85 Hz 60-Hz NTSC, 50-Hz PAL
file:///I|/SERVICE%20MANUALS/DELL%20MANUALS/L...nspiron/3800/3800_SERVICE_MANUAL/overview.htm (5 of 10)6/21/2004 12:55:00 AM
Page 10
Technical Overview: Dell Inspiron 3800 System Reference
800 x 600 (SVGA) 16 M (24-bit) 60, 75, 85 Hz 60-Hz NTSC, 50-Hz PAL
800 x 600 (SVGA) 4.2 B (32-bit) 60, 75, 85 Hz 60-Hz NTSC, 50-Hz PAL
1024 x 768 (extended graphics array [XGA]) 256 (8-bit) 60, 70, 75, 85 Hz 60-Hz NTSC, 50-Hz PAL
1024 x 768 (XGA) 65 k (16-bit) 60, 70, 75, 85 Hz 60-Hz NTSC, 50-Hz PAL
1024 x 768 (XGA) 16 M (24-bit) 60, 70, 75, 85 Hz 60-Hz NTSC, 50-Hz PAL
1024 x 768 (XGA) 4.2 B (32-bit) 60, 70, 75, 85 Hz 60-Hz NTSC, 50-Hz PAL
1280 x 1024 (super XGA [SXGA])* 256 (8-bit) 60, 70, 75, 85 Hz 60-Hz NTSC, 50-Hz PAL
1280 x 1024 (SXGA)* 65 k (16-bit) 60, 70, 75, 85 Hz 60-Hz NTSC, 50-Hz PAL
1280 x 1024 (SXGA)* 16 M (24-bit) 60, 70, 75, 85 Hz 60-Hz NTSC, 50-Hz PAL
1280 x 1024 (SXGA)* 4.2 B (32-bit) 60, 70, 75, 85 Hz 60-Hz NTSC, 50-Hz PAL
1400 x 1050 (SXGA Plus)* 256 (8-bit) 60 Hz 60-Hz NTSC, 50-Hz PAL
1400 x 1050 (SXGA Plus)* 65 k (16-bit) 60 Hz 60-Hz NTSC, 50-Hz PAL
1400 x 1050 (SXGA Plus)* 16 M (24-bit) 60 Hz 60-Hz NTSC, 50-Hz PAL
1400 x 1050 (SXGA Plus)* 4.2 B (32-bit) 60 Hz 60-Hz NTSC, 50-Hz PAL
1600 x 1200 (UGA)* 256 (8-bit) 60 Hz 60-Hz NTSC, 50-Hz PAL
1600 x 1200 (UGA)* 65 k (16-bit) 60 Hz 60-Hz NTSC, 50-Hz PAL
1600 x 1200 (UGA)* 16 M (24-bit) 60 Hz 60-Hz NTSC, 50-Hz PAL
1600 x 1200 (UGA)* 4.2 B (32-bit) 60 Hz 60-Hz NTSC, 50-Hz PAL
*Pan mode may be turned on for the 1280 x 1024 (SXGA), 1400 x 1050 (SXGA Plus), and 1600 x 1200 (ultra graphics array [UGA])
computer displays. In pan mode, the screen resolution is too high to be completely displayed on the computer display. For example, the
taskbar that usually appears at the bottom of the desktop may no longer be visible. To view the rest of the screen, use the touch pad or
track stick to pan up and down and left and right.
To display more colors, select a lower resolution. If you select a resolution and color combination that the system does not support, the
system automatically selects the next supported combination.
NOTE: Color depth is based on 256 colors for 8-bit, 65,536 colors for 16-bit, 16,842,752 colors for 24-bit, and
4,294,967,296 colors for 32-bit displays.
To find the maximum color depth for various combinations of resolutions without DVD or 3D software, select the primary resolution in the
first column in Table 2 and move across the row to the right under the corresponding second resolution.
Table 2. Display Resolution and Color Depth Without DVD and 3D Software Running (in Bits)
Secondary
640 x 480 800 x 600 1024 x 768 1280 x 1024
640 x 480 (8 bit) 32 32 32 32
file:///I|/SERVICE%20MANUALS/DELL%20MANUALS/L...nspiron/3800/3800_SERVICE_MANUAL/overview.htm (6 of 10)6/21/2004 12:55:00 AM
Page 11

Technical Overview: Dell Inspiron 3800 System Reference
P
r
i
m
a
r
y
800 x 600 (8 bit) 32
32
32 32
1024 x 768 (8 bit) 32 32 32 32
1280 x 1024 (8 bit) 32 32 32 32
1600 x 1200 (8 bit) 32 32 32 32
640 x 480 (16 bit) 32 32 32 32
800 x 600 (16 bit) 32 32 32 32
1024 x 768 (16 bit) 32 32 32 32
1280 x 1024 (16 bit) 32 32 32 32
1600 x 1200 (16 bit) 32 32 24 24
640 x 480 (24 bit) 32 32 32 32
800 x 600 (24 bit) 32 32 32 32
1024 x 768 (24 bit) 32 32 32 32
1280 x 1024 (24 bit) 32 32 32 24
1600 x 1200 (24 bit) 24 24 16 8
640 x 480 (32 bit) 32 32 32 32
800 x 600 (32 bit) 32 32 32 32
1024 x 768 (32 bit) 32 32 32 24
1280 x 1024 (32 bit) 32 32 24 16
1600 x 1200 (32 bit) 8 8 -- --
IRQ Line Assignments
Problems can arise if two devices attempt to use the same interrupt request (IRQ) line. To avoid this type of conflict, check the
documentation for the default IRQ line setting for each installed device. Then consult Table 3 to configure the device for one of the
available IRQ lines.
NOTE: Installed devices cannot share the same COM port address. The default address of your computer's serial
port is COM1.
To view IRQ line assignments in Windows 98, click the Start button, point to Settings, and click Control Panel. Double-click the System
icon. Select the Device Manager tab, and then double-click Computer.
To view IRQ line assignments in Windows 2000, click the Start button, point to Settings, and click Control Panel. Double-click the
System icon. Select the Hardware tab, and then click Device Manager. Click View, and then click Resources by connection. Doubleclick Interrupt request (IRQ) to view the IRQ assignments.
Table 3. IRQ Line Assignments
IRQ Line Reserved/Available
IRQ0 Reserved; generated by the system timer
IRQ1 Reserved; generated by the keyboard controller to signal that the keyboard output buffer is full
IRQ2 Reserved; generated internally by the interrupt controller to enable IRQ8 through IRQ15
file:///I|/SERVICE%20MANUALS/DELL%20MANUALS/L...nspiron/3800/3800_SERVICE_MANUAL/overview.htm (7 of 10)6/21/2004 12:55:00 AM
Page 12
Technical Overview: Dell Inspiron 3800 System Reference
IRQ3 Available for use by a PC Card unless the integrated serial port or infrared port is configured for COM2 or COM4
IRQ4 Available for use by a PC Card unless the integrated serial port or infrared port is configured for COM1 (the default) or
COM3
IRQ5 Available for use by the audio controller
IRQ6 Generated by the diskette drive controller to indicate that the diskette drive requires the attention of the microprocessor
IRQ7 Available for use by a PC Card or audio controller if the parallel port is disabled
IRQ8 Reserved; generated by the system input/output (I/O) controller's real-time clock (RTC)
IRQ9 Reserved; generated by the video controller
IRQ10 Available for use by a PC Card or audio controller unless the APR is attached
IRQ11 Generated by USB, PC Card, and audio controllers; available for use by a PC Card
IRQ12 Reserved; generated by the keyboard controller to indicate that the output buffer of the DualPoint integrated pointing device
or the external PS/2 mouse is full
IRQ13 Reserved; generated by the math coprocessor
IRQ14 Reserved; generated by the hard-disk drive to indicate that the drive requires the attention of the microprocessor
IRQ15 Reserved; generated by the CD-ROM drive in the media bay to indicate that the drive requires the attention of the
microprocessor
Memory
Memory Allocations
Table 4 provides a map of the conventional memory area. When the microprocessor or a program addresses a location within the
conventional memory range, it is physically addressing a location in main memory.
To view memory allocations in Windows 98, click the Start button, point to Settings, and click Control Panel. Double-click the System
icon. Click the Device Manager tab, and then double-click Computer.
To view memory allocations in Windows NT, start the Windows NT Diagnostics in the Administrative Tools (Common) folder.
To view memory allocations in Windows 2000, click the Start button, point to Settings, and click Control Panel. Double-click the
System icon. Click the Hardware tab, and then click Device Manager.
Table 4. Conventional Memory Map
Address Range Use
0000h-003FFh Interrupt vector table
00400h-00FFFF BIOS data area
00500h-005FFh MS-DOS® and BASIC work area
00600h-9FBFFh User memory
Table 5 provides a map of the upper memory area. Some of these addresses are dedicated to various system devices, such as the
system/video basic input/output system (BIOS). Others are available for use by expansion cards and/or an expanded memory manager
(EMM).
When the microprocessor or a program addresses a location within the upper memory area, it is physically addressing a location within
one of these devices.
file:///I|/SERVICE%20MANUALS/DELL%20MANUALS/L...nspiron/3800/3800_SERVICE_MANUAL/overview.htm (8 of 10)6/21/2004 12:55:00 AM
Page 13
Technical Overview: Dell Inspiron 3800 System Reference
Table 5. Upper Memory Map
Address Range Use
0009FC00-0009FFFF PS/2-mouse data area
000A0000-000BFFFF Video random-access memory (RAM)
000C0000-000CFFFF Video BIOS
000CC000-000CDFFF Reserved for PC Card
000F0000-000FFFFF System BIOS
00100000-03FFFFFF High memory area
FD000000-FDFFFFFF Video RAM
FF200000-FF2FFFFF Video RAM
FFFE0000-FFFFFFFF BIOS ROM
I/O Memory Map
Table 6 provides a map of memory addresses reserved by the system for peripheral I/O devices. Use the information in Table 6 to
determine if the memory address of an external peripheral (such as a PC Card) conflicts with a memory address reserved by the
computer.
Check the documentation of the external I/O device to determine its memory address. If there is a conflict with a memory address
reserved by the computer, change the address of the device.
To view I/O addresses in Windows 98, click the Start button, point to Settings, and click Control Panel. Double-click the System icon.
Click the Device Manager tab, and then double-click Computer.
To view I/O addresses in Windows NT, start the Windows NT Diagnostics in the Administrative Tools (Common) folder.
To view I/O addresses in Windows 2000, click the Start button, point to Settings, and click Control Panel. Double-click the System
icon. Click the Hardware tab, and then click Device Manager.
Table 6. I/O Memory Map
Address Device
0000-001F DMA controller #1
0020-003F Interrupt controller #1
0040-005F System timers
0060-006F Keyboard controller
0070-007F RTC and nonmaskable interrupt (NMI) enable
0080-009F DMA page registers
00A0-00BF Interrupt controller #2
00C0-00DF DMA controller #2
00F0-00FF Math coprocessor
0170-0177 CD-ROM drive controller
file:///I|/SERVICE%20MANUALS/DELL%20MANUALS/L...nspiron/3800/3800_SERVICE_MANUAL/overview.htm (9 of 10)6/21/2004 12:55:00 AM
Page 14

Technical Overview: Dell Inspiron 3800 System Reference
01F0-01F7 Hard-disk drive controller
0210-0217 Audio controller
0220-022F Audio controller
0270-0277 Fast IR
0376-0376 Integrated drive electronics (IDE) controller
0378-037F LPT1
0388-038B Audio controller
038B-03BB Video graphics array (VGA)
03C0-03DF VGA
03E0-03E1 PC Card controller
03E8-03EF Fast IR
03F0-03F7 Diskette controller
03F8-03FF COM1
0530-0537 Audio controller
0778-077B Extended Capabilities Port (ECP) registers
ECE0-ECFF USB controller
FFA0-FFAF Peripheral Component Interconnect (PCI)-IDE bus registers
Back to Contents Page
file:///I|/SERVICE%20MANUALS/DELL%20MANUALS/L...nspiron/3800/3800_SERVICE_MANUAL/overview.htm (10 of 10)6/21/2004 12:55:00 AM
Page 15

Using the Computer: Dell Inspiron 3800 System Reference
Back to Contents Page
Using the Computer: Dell™ Inspiron™ 3800 System Reference
Storage Devices Touch Pad and Track Stick
CD-ROM, CD-RW, and DVD-ROM Drives PC Cards
Audio Devices Display
Embedded Numeric Keypad Extended Desktop Mode
Key Combinations
Storage Devices
Using the Media Bay
Your computer comes with a diskette drive installed in the media bay. You can also install a battery, a CD drive, a DVD-ROM drive, a SuperDisk LS-120 drive
module, a second hard-disk drive, or a Zip drive in the media bay. To make the computer as light as possible, use the travel module in the media bay in place
the available drives. of any of
NOTICE: When the CD-ROM, DVD-ROM, LS-120, and diskette drives are not inside the computer, they are fragile and must be
handled carefully to avoid damage. Do not press down on the drives or place heavy objects on top of them. Place the drives in a
travel case to keep them free of dust and liquids. Store the drives in a safe place.
If your computer is running Microsoft® Windows NT® with Softex Docking Services or Microsoft Windows® 98 with Softex BayManager, see "Installing
Devices in the Media Bay With Softex Docking Services or Softex BayManager Software."
If your system does not have Softex Docking Services or Softex BayManager, see "Installing Devices in the Media Bay Without Softex Docking Services or
Softex BayManager Software."
Installing Devices in the Media Bay With Softex Docking Services or BayManager Software
Softex Docking Services for Windows NT and Softex BayManager for Windows 98 allow you to swap a device to and from the media bay while the computer
is on. You do not have to shut down or restart the computer for the device to be recognized. You may swap diskette drives, hard-disk drives, SuperDisk LS120 drives, CD-ROM drives, DVD-ROM drives, and Zip drives.
file:///I|/SERVICE%20MANUALS/DELL%20MANUALS/LAPTOPS_checked%20ok/Inspiron/3800/3800_SERVICE_MANUAL/computer.htm (1 of 22)6/21/2004 12:55:03 AM
Page 16

Using the Computer: Dell Inspiron 3800 System Reference
To install a device in the media bay, perform the following steps:
1. Verify that the Diskette Reconfig option in the System Setup program is set to Any Time.
2. Save your work and close all open files and application programs.
3. If the computer is docked, undock it.
NOTICE: When the CD-ROM, DVD-ROM, SuperDisk LS-120, diskette drives, and Zip drives are not inside the computer, they are
fragile and must be handled carefully to avoid damage. Do not press down on the drives or place heavy objects on top of them.
Place the drives in a travel case to keep them free of dust and liquids. Store the drives in a safe place.
4. Double-click the Docking Services or BayManager icon in the Windows system tray on the taskbar.
The Softex BayManager window appears for Windows 98, and the Docking Services window appears for Windows NT.
5. Click Remove/Swap.
6. If the media bay contains a device, remove the device as follows:
a. Verify that the Display Close option in the System Setup program is set to Active.
b. Close the computer display and turn the computer over.
c. Slide the media bay latch toward the Unlock icon.
d. Hold the media bay latch with one hand while pulling the device out of the bay your other hand.
e. Release the media bay latch after you remove the device.
f. Turn the computer over and open the computer display.
g. If you want the computer to activate save-to-disk suspend mode when you close the display while the computer is turned on, set the Display
Close option in the System Setup program to Suspend.
7. Slide the new device firmly into the media bay. You should hear a click when the device is fully seated.
NOTE: Softex BayManager and Softex Docking Services do not report a second battery installed in the media bay on the
Storage Devices tab.
8. Click OK. Then click OK again to close the Softex BayManager window.
file:///I|/SERVICE%20MANUALS/DELL%20MANUALS/LAPTOPS_checked%20ok/Inspiron/3800/3800_SERVICE_MANUAL/computer.htm (2 of 22)6/21/2004 12:55:03 AM
Page 17

Using the Computer: Dell Inspiron 3800 System Reference
Installing Devices in the Media Bay Without Softex Docking Services or Softex BayManager
To install a device in the media bay, perform the following steps:
1. Verify that the Diskette Reconfig option in the System Setup program is set to Any Time.
2. Save and close any open files, exit any open application programs, and shut down the computer.
3. If the computer is docked, undock it.
NOTICE: When the CD-ROM, DVD-ROM, SuperDisk LS-120, diskette drives, and Zip drives are not inside the computer, they are
fragile and must be handled carefully to avoid damage. Do not press down on the drives or place heavy objects on top of them.
Place the drives in a travel case to keep them free of dust and liquids. Store the drives in a safe place.
4. If the media bay contains a device, remove the device as follows:
a. Close the computer display and turn the computer over.
b. Slide the media bay latch toward the Unlock icon.
c. Hold the media bay latch with one hand while pulling the device out of the bay your other hand.
d. Release the media bay latch after you remove the device.
5. Slide the new device firmly into the media bay.
You should hear a click when the device is fully seated.
6. Dock the computer if necessary.
7. Turn on the computer.
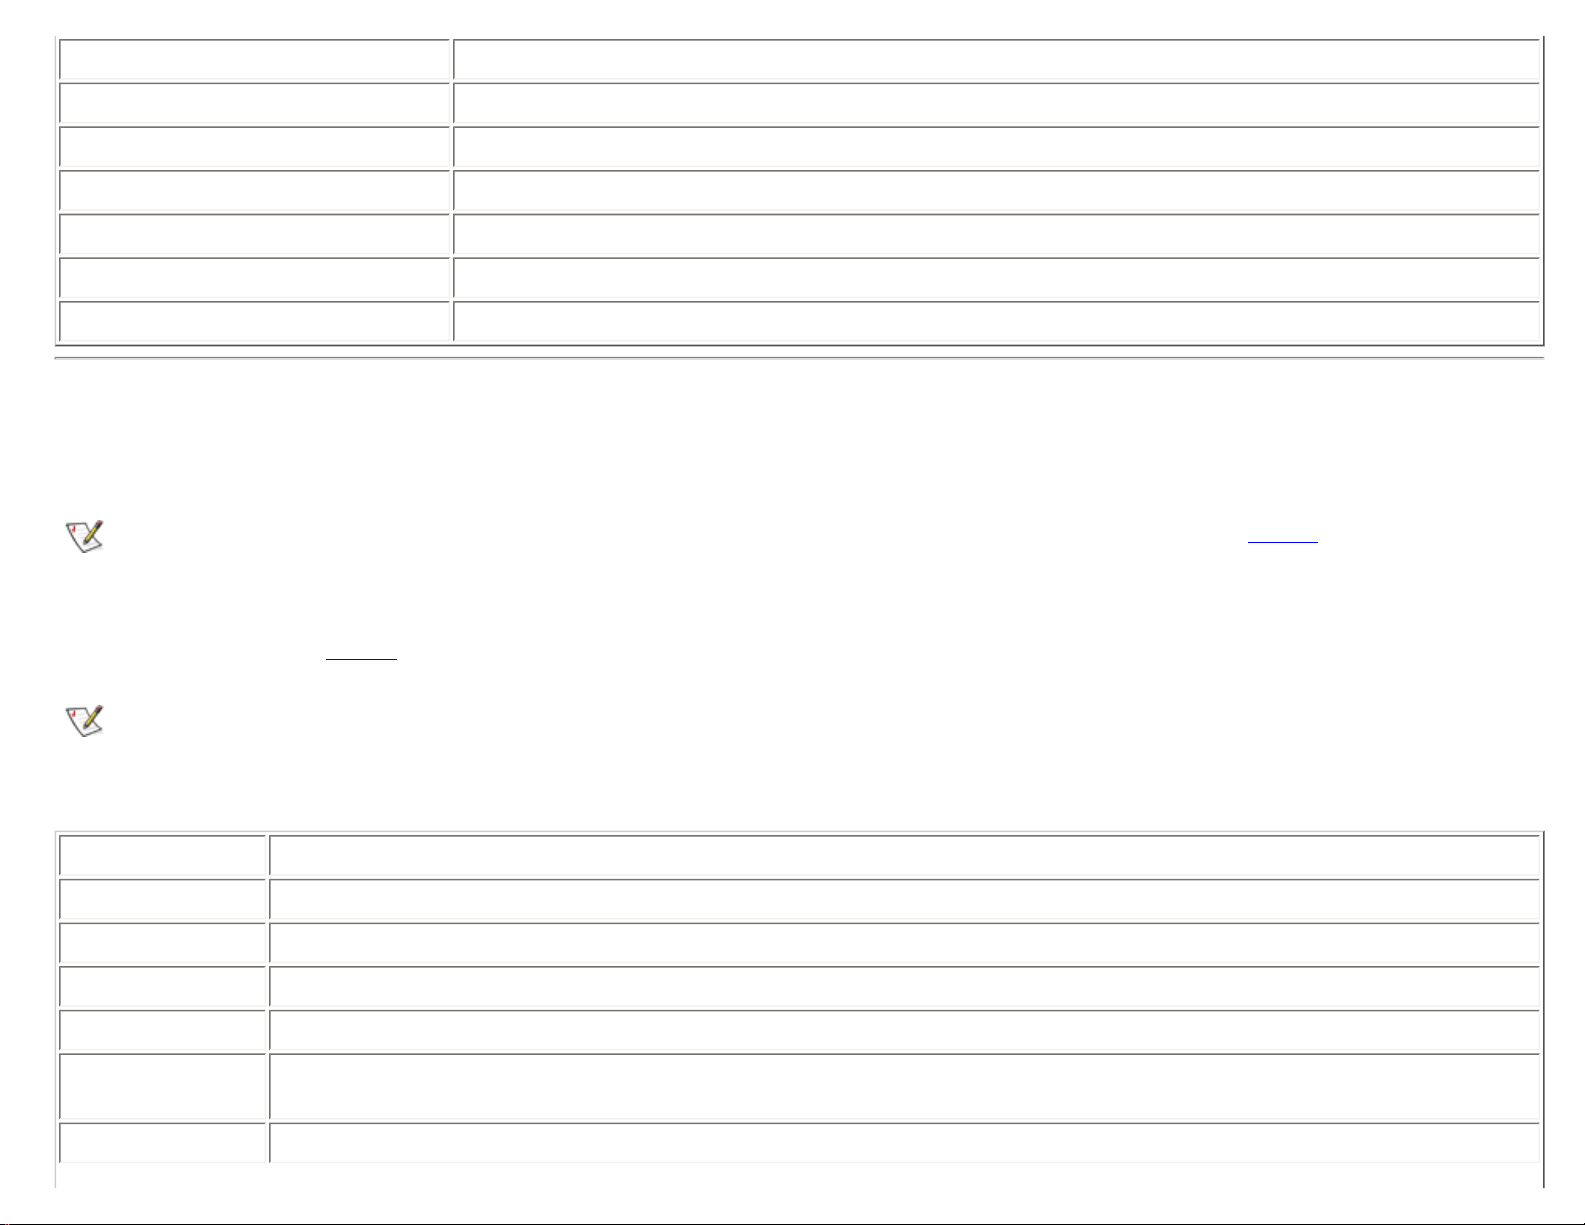
Using the Diskette Drive
Your computer was shipped with a 3.5-inch diskette drive (see Figure 1) in the media bay. To use another device in the media bay, first remove the diskette
drive. For detailed instructions on installing devices in the media bay, see "Using the Media Bay" in Chapter 2 of the Reference and Troubleshooting Guide.
NOTE: If the computer is docked to the advanced port replicator (APR), turn off the computer and undock it before installing or
removing a diskette drive.
file:///I|/SERVICE%20MANUALS/DELL%20MANUALS/LAPTOPS_checked%20ok/Inspiron/3800/3800_SERVICE_MANUAL/computer.htm (3 of 22)6/21/2004 12:55:03 AM
Page 18

Using the Computer: Dell Inspiron 3800 System Reference
The diskette drive lets you install programs and transfer data using 3.5-inch diskettes.
Figure 1. Diskette Drive Installed in Computer
To use the diskette drive, insert a 3.5-inch diskette into the drive (label side up and metal end first). Push the diskette into the drive until the eject button
extends outside the drive casing.
NOTICE: Do not travel with a diskette in the diskette drive. Doing so could break the eject button and damage the drive.
To remove a diskette from the drive, press the eject button to release the diskette, and then pull the diskette out of the drive.
When data is being accessed from the diskette drive in the media bay, the drive access indicator blinks.
NOTE: You can use the diskette drive externally by connecting it to the parallel port connector on the back of the computer. If you are
running the Microsoft Windows 98 or Windows 2000 operating system on your computer and the Diskette Reconfig option is enabled
in the System Setup program, you do not have to reboot the computer when you connect the diskette drive to the parallel port
connector. If you are running the Microsoft Windows NT operating system on your computer, you do need to reboot the computer after
you connect the diskette drive.
Setting Up a Second Hard-Disk Drive
The first time you install a second hard-disk drive in the media bay, you must format that drive. For instructions, see the documentation that came with the
device.
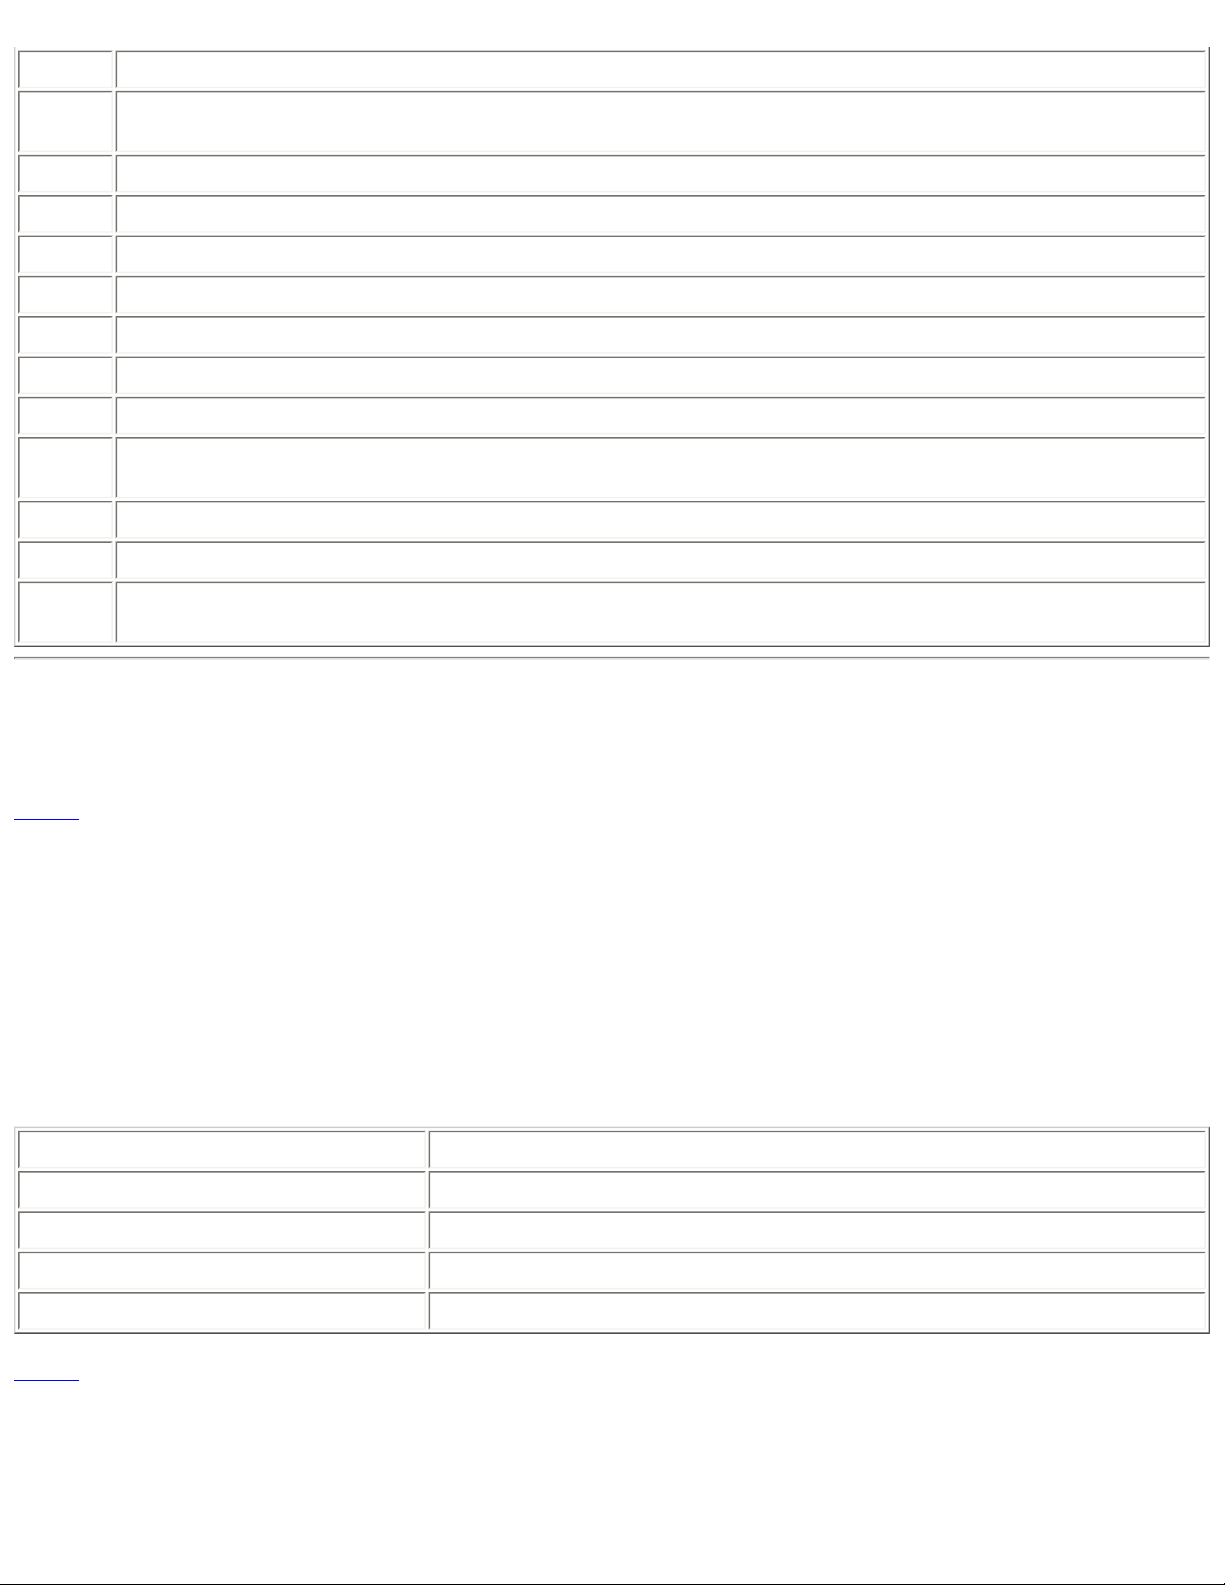
Using the Diskette Drive as an External Device
If the external media bay in your computer is already occupied by another device, you can use the diskette drive as an external device.
NOTICE: Use this diskette drive cable with the diskette drive only.
file:///I|/SERVICE%20MANUALS/DELL%20MANUALS/LAPTOPS_checked%20ok/Inspiron/3800/3800_SERVICE_MANUAL/computer.htm (4 of 22)6/21/2004 12:55:03 AM
Page 19
Using the Computer: Dell Inspiron 3800 System Reference
Use the diskette drive cable to connect the diskette drive to the parallel connector on the back of the computer.
Figure 2. External Diskette Drive Connected to Computer
CD-ROM, CD-RW, and DVD-ROM Drives
Using the CD-ROM and DVD-ROM Drives
CD-ROM and DVD-ROM drives are read-only devices that let you play most commercially available 8- or 12-centimeter (cm) sound and video CDs on the
computer. The DVD-ROM drive can also play DVDs. CD-RW drives are read-writable devices that let you play CDs, and allow you to write information to a
CD-RW disc. Dell installed the appropriate CD-ROM drive device drivers on your hard-disk drive.
Use the CD-ROM, CD-RW, and DVD-ROM drive in the computer’s media bay. None of the drives can be used externally. You must turn the computer off
before installing the drive in the media bay. For detailed instructions on installing devices in the media bay, see "Using the Media Bay" in Chapter 2 of the
Reference and Troubleshooting Guide.
Figure 3. CD-ROM, CD-RW, or DVD-ROM Drive Installed in Computer
file:///I|/SERVICE%20MANUALS/DELL%20MANUALS/LAPTOPS_checked%20ok/Inspiron/3800/3800_SERVICE_MANUAL/computer.htm (5 of 22)6/21/2004 12:55:03 AM
Page 20

Using the Computer: Dell Inspiron 3800 System Reference
NOTICE: Protect the CD-ROM, CD-RW, and DVD-ROM drives when they are not in the media bay. Do not squeeze the drive or place
objects on top of it; doing so could damage the drive motor. Keep the drive as clean as possible.
NOTICE: If the CD or DVD is not seated correctly, the drive can be damaged.
To play a CD, press the eject button on the face of the CD-ROM, CD-RW, or DVD-ROM drive or press <Fn><F10>. When the tray slides out, place the CD
into the tray label side up. Make sure that the CD is seated correctly on the spindle by pressing down on the disc until it clicks in place. Then gently push in
the tray.
To play a DVD, press the eject button on the face of the DVD-ROM drive or press <Fn><F10>. When the tray slides out, place the DVD into the tray label side
up. Make sure that the DVD is seated correctly on the spindle by pressing down on the disc until it clicks in place. Then gently push in the tray.
NOTICE: Do not use the CD-ROM, CD-RW, or DVD-ROM drive while the computer is in motion. Doing so could interrupt the flow of
data between the drive and the hard-disk drive or diskette drive.
When the CD-ROM, CD-RW, or DVD-ROM drive is in use, the drive access indicator blinks on the computer’s front panel.
Caring for CDs and DVDs
When handling and using CDs and DVDs, follow these precautions:
● Never use a damaged or warped CD or DVD.
● Always hold the CD or DVD by its edges. Do not touch the surface of the disc.
● Use a clean, dry cloth to remove dust, smudges, or fingerprints from the surface of the CD or DVD. When cleaning, wipe from the center of the CD or
DVD to the edge.
● Never use solvents, such as benzene, record cleaners, or antistatic sprays, to clean the CD or DVD.
● Do not write on the surface of the CD or DVD.
file:///I|/SERVICE%20MANUALS/DELL%20MANUALS/LAPTOPS_checked%20ok/Inspiron/3800/3800_SERVICE_MANUAL/computer.htm (6 of 22)6/21/2004 12:55:04 AM
Page 21

Using the Computer: Dell Inspiron 3800 System Reference
● Store CD or DVDs in their containers, placing them in a cool, dry place. Extreme temperatures may damage CDs or DVDs.
● Do not bend or drop a CD or DVD.
● Do not place objects on top of a CD or DVD.
Types of Supported Discs
Your computer's CD-ROM, CD-RW, and DVD-ROM drives are able to play the following types of disc formats:
● CD-ROM red-book compact disc-digital audio (CD-DA)
● CD-ROM yellow-book mode-1 and mode-2 data discs
● CD-ROM Extended Architecture (CD-ROM/XA) (mode-2 form 1 and form 2; without Adaptive Differential Pulse Code Modulation [ADPCM])
● CD-Interactive (CD-I) (mode-2 form 1 and form 2)
● CD-I Ready
● CD-Bridge
● Photo CD, CD-recordable (CD-R) (single and multisession)
● Video CD
● CD-rewritable (CD-RW) (The 24x CD-ROM and DVD-ROM drives support reading CD-RW discs—this format is supported as read-only for CD-ROM
and DVD-ROM drives; only a CD-RW drive can write to this type of disc.)
● DVD-5 (The DVD-ROM drive supports the DVD-5 format.)
Audio Devices
You can connect speakers, a microphone, headphones, and record/playback devices such as cassette players, CD players, and VCRs to the audio
connectors on the computer. The connectors are located on the right side of the computer. Dell recommends using amplified speakers for the best sound.
See your Microsoft Windows documentation for the location of sound application programs such as mixers and volume control.
You can control the sound coming from the external speakers and the computer's integrated speakers with the volume control dial. You can also use the
keyboard to adjust the volumes. Press <Fn><Page Dn> to lower the volume. Press <Fn><Page Up> to increase the volume. Press <Fn><End> to enable or
file:///I|/SERVICE%20MANUALS/DELL%20MANUALS/LAPTOPS_checked%20ok/Inspiron/3800/3800_SERVICE_MANUAL/computer.htm (7 of 22)6/21/2004 12:55:04 AM
Page 22
Using the Computer: Dell Inspiron 3800 System Reference
disable both the integrated and external speakers.
NOTE: If no sound comes from the speakers, make sure that the sound is not disabled. Press <Fn><End> and check the volume
control dial.
See "Utilities and Drivers for Microsoft Windows 98," "Utilities and Drivers for Microsoft Windows NT® ," and "Utilities and Drivers for Microsoft Windows
2000" for information about reinstalling the audio drivers. The drivers are located on the System Software CD.
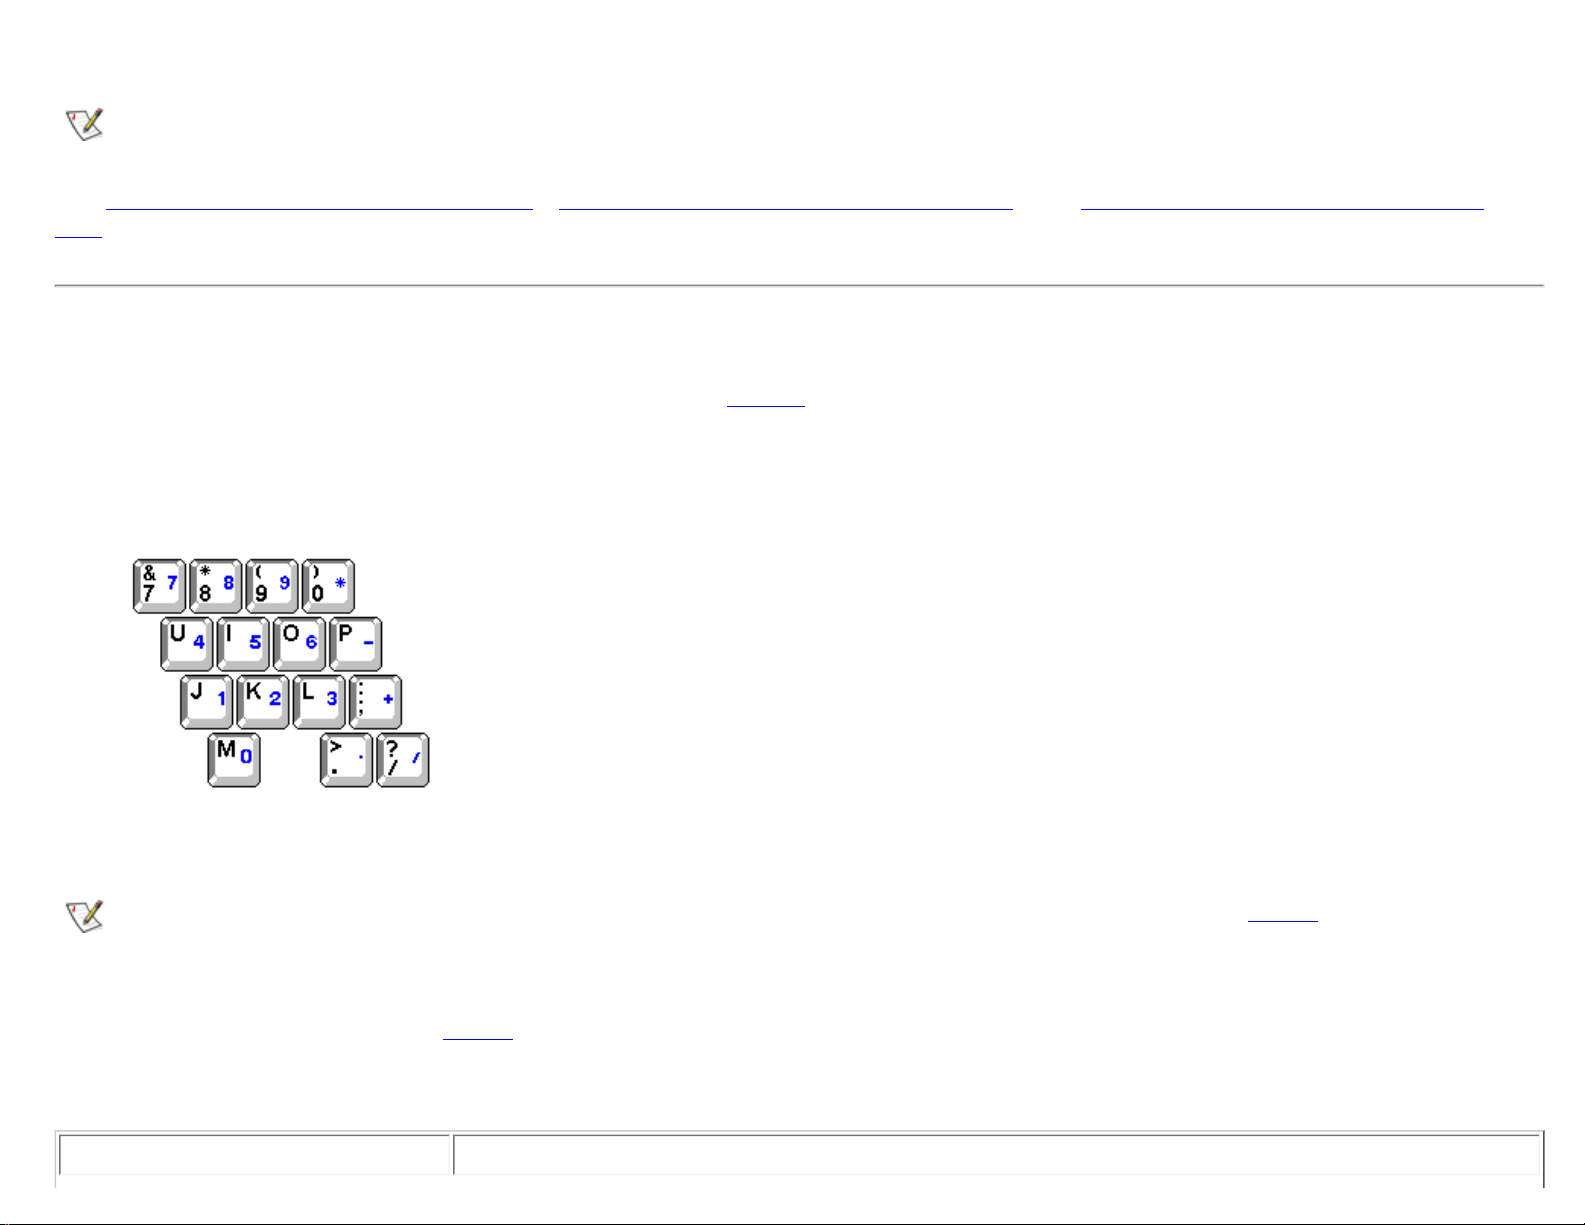
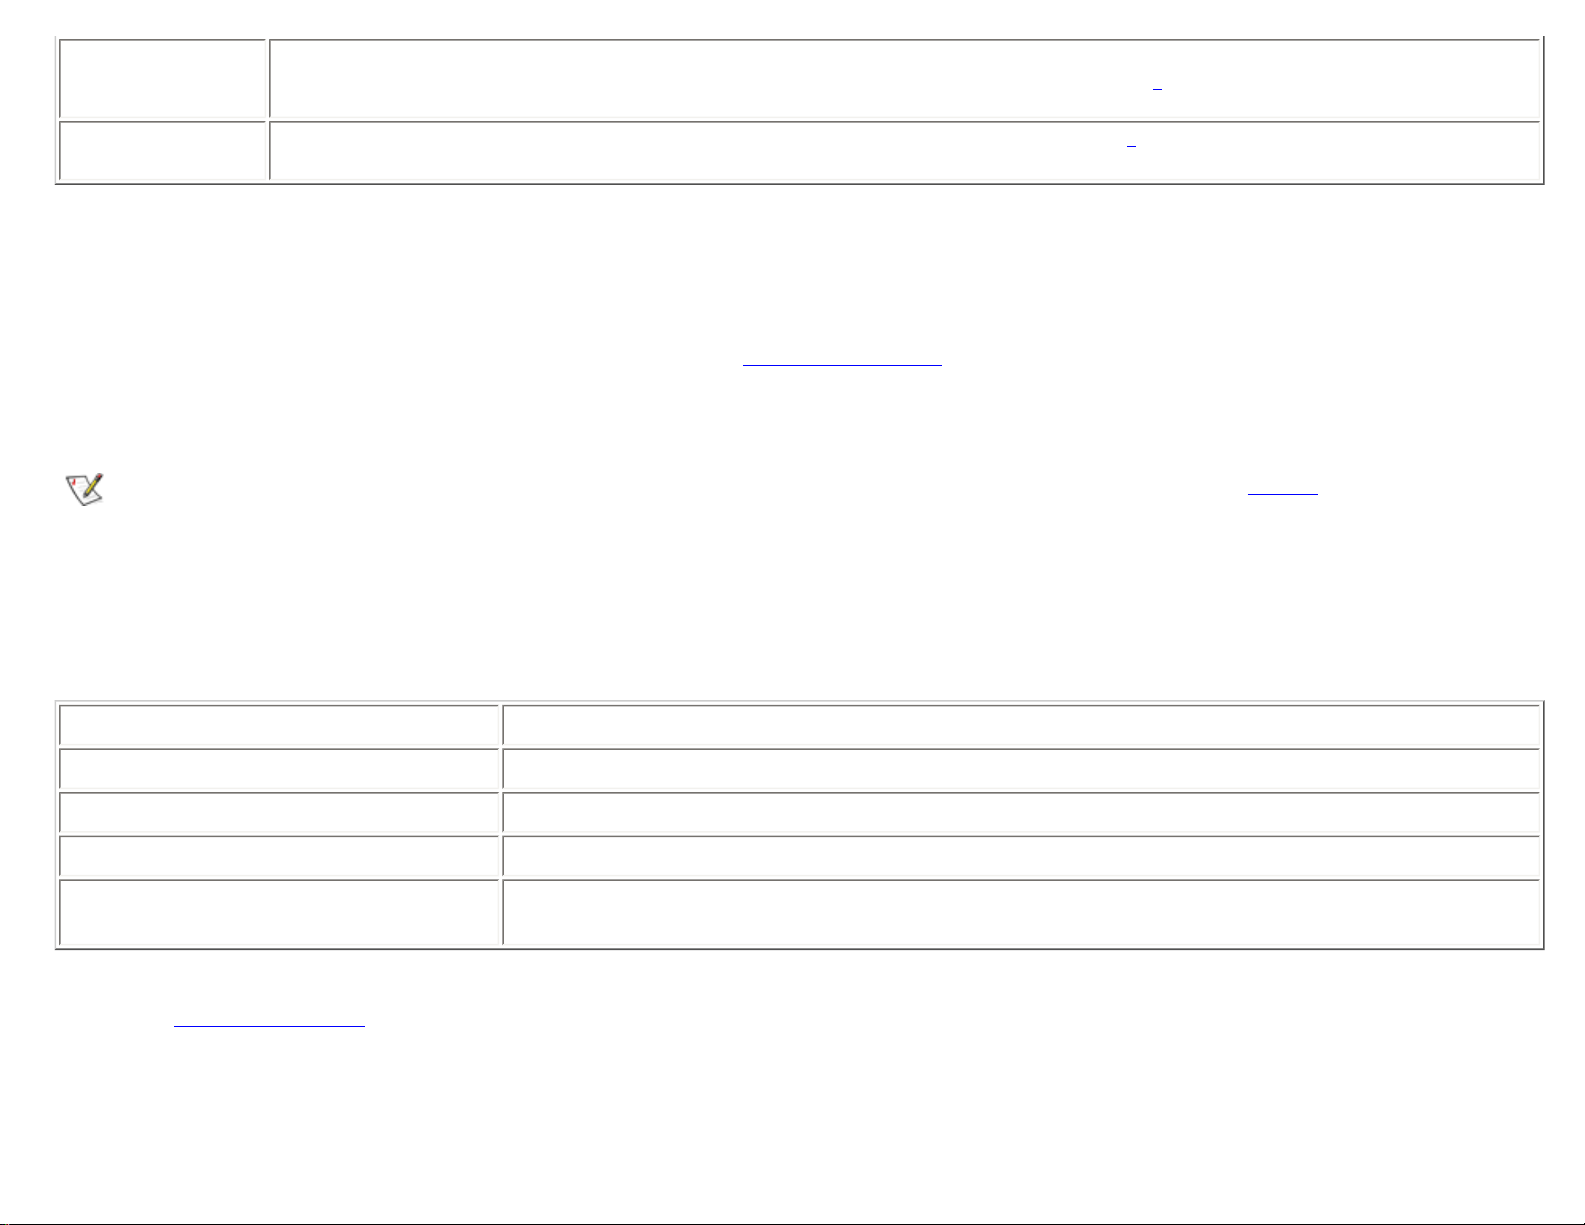
Embedded Numeric Keypad
As you work, you may want to use the embedded numeric keypad (see Figure 4) to enter numbers in spreadsheet or financial programs. The embedded
numeric keypad shares some of the keys on your computer's keyboard. The number and symbol characters are marked to the right on these keys; the cursor-
control functions are marked on the front of these keys. To activate the embedded numeric keypad, press <Num Lk>. (The Num Lock indicator lights up).
Figure 4. Embedded Numeric Keypad
Some key combinations can be used whether the keypad is off or on.
NOTE: When using the integrated keyboard, you press <Fn> and the appropriate keys to perform certain functions (see Table 1). To
perform such functions on an external keyboard, you press <Scroll Lock> and the appropriate keys. You must be sure that the
External Hot Key option is enabled in the System Setup program.
Use the numeric keypad combinations in Table 1 to enable and disable several numeric keypad functions.
Table 1. Embedded Numeric Keypad Key Combinations
When Keypad Is On Function
file:///I|/SERVICE%20MANUALS/DELL%20MANUALS/LAPTOPS_checked%20ok/Inspiron/3800/3800_SERVICE_MANUAL/computer.htm (8 of 22)6/21/2004 12:55:04 AM
Page 23
Using the Computer: Dell Inspiron 3800 System Reference
<Num Lk> Toggles the embedded numeric keypad off
<Fn><key> Temporarily disables the embedded numeric keypad; enables the lowercase characters/functions of the keyboard
<Fn><Shift><key> Temporarily disables the embedded numeric keypad; enables the uppercase characters/functions of the keyboard
<Shift><cursor key> Temporarily enables a cursor-control key in the embedded numeric keypad
When Keypad Is Off Function
<Num Lk> Toggles the embedded numeric keypad on
<Fn><cursor key> Temporarily enables a cursor-control key in the embedded numeric keypad
Key Combinations
Display Key Combinations
NOTE: When using the integrated keyboard, you press <Fn> and the appropriate keys to perform certain functions (see Table 2). To
perform such functions on an external keyboard, you press <Scroll Lock> and the appropriate keys. You must be sure that the
External Hot Key option is enabled in the System Setup program.
Use the key combinations in Table 2 to adjust the computer's display.
NOTE: The display key combinations function for super-twist nematic (STN) displays only.
Table 2. Display Key Combinations
Key Combinations Function
<Fn> + down arrow Incrementally decreases brightness.
<Fn> + up arrow Incrementally increases brightness.
<Fn> + right arrow Decreases contrast, which has no effect on an active-matrix display.
<Fn> + left arrow Increases contrast, which has no effect on an active-matrix display.
<Fn><F5> Toggles the computer's display between regular video mode and reverse video mode (white on black). This key combination works
only if the computer is in text mode; it has no effect if the computer is running a graphical operating system or application program.
<Fn><F7> Toggles the computer’s display between expanded mode and regular video mode.
file:///I|/SERVICE%20MANUALS/DELL%20MANUALS/LAPTOPS_checked%20ok/Inspiron/3800/3800_SERVICE_MANUAL/computer.htm (9 of 22)6/21/2004 12:55:04 AM
Page 24
Using the Computer: Dell Inspiron 3800 System Reference
<Fn><F8> Switches the video image to the next display in the following sequence: the display, an external monitor, or both the display and the
monitor simultaneously. This key combination may not be supported under certain conditions.
1
<Fn><d>
Turns off the display. This key combination may not be supported under certain conditions.
2
1
The extended desktop feature (the ability to simultaneously display video of the same content and resolution on both the computer display
screen and the external monitor) is not supported if the computer is booted to MS-DOS®, using a full-screen MS-DOS session under a
Microsoft Windows operating system, or the ATI Mobility M1 video driver is not loaded. This limitation may also be noted in operating
systems other than Microsoft Windows.
2
Certain key combinations may not function with the Advanced Configuration and Power Interface (ACPI) or may require configuration with
the Power Management Properties window in the Control Panel. See
"Power Conservation."
Power Conservation Key Combinations
NOTE: When using the integrated keyboard, you press <Fn> and the appropriate keys to perform certain functions (see Table 3). To
perform such functions on an external keyboard, you press <Scroll Lock> and the appropriate keys. You must be sure that the
External Hot Key option is enabled in the System Setup program.
Use the key combinations in Table 3 to activate or turn off the computer's power conservation features.
Table 3. Power Conservation Key Combinations
Key Combinations Function
<Fn><d> Turns off the display*
<Fn><h> Turns off the hard-disk drive*
<Fn><Esc> Activates sleep or standby mode
<Fn><a> or
<Fn><q> on French keyboards
Activates save-to-disk suspend (S2D) mode or hibernate mode(ACPI only)*
* This key combination does not function with ACPI if the settings have not been configured with the Power Management Properties window in the Control
Panel. See "
Power Conservation."
Processing Speed Key Combinations
file:///I|/SERVICE%20MANUALS/DELL%20MANUALS/LAPTOPS_checked%20ok/Inspiron/3800/3800_SERVICE_MANUAL/computer.htm (10 of 22)6/21/2004 12:55:04 AM
Page 25

Using the Computer: Dell Inspiron 3800 System Reference
NOTE: When using the integrated keyboard, you press <Fn> and the appropriate keys to perform certain functions (see Table 4). To
perform such functions on an external keyboard, you press <Scroll Lock> and the appropriate keys. You must be sure that the
External Hot Key option is enabled in the System Setup program.
Use the key combinations in Table 4 to change the computer's processing speed.
Table 4. Processing Speed Key Combinations
Key Combinations Function
<Fn><\> Switches between the microprocessor's maximum speed and a slower compatibility speed
<Ctrl><\> In full MS-DOS mode or in a full-screen DOS box, switches between the microprocessor’s maximum speed and a slower compatibility
speed
Speaker Key Combinations
NOTE: When using the integrated keyboard, you press <Fn> and the appropriate keys to perform certain functions (see Table 5). To
perform such functions on an external keyboard, you press <Scroll Lock> and the appropriate keys. You must be sure that the
External Hot Key option is enabled in the System Setup program.
Use the key combinations in Table 5 to adjust the computer's speaker volume and to enable and disable the speakers.
Table 5. Speaker Key Combinations
Key Combinations Function
<Fn><Page Up> Increases the volume of the integrated speakers and the external speakers, if attached
<Fn><Page Dn> Decreases the volume of the integrated speakers and the external speakers, if attached
<Fn><End> Enables and disables the integrated speakers and the external speakers, if attached
System Function Key Combinations
NOTE: When using the integrated keyboard, you press <Fn> and the appropriate keys to perform certain functions (see Table 6). To
perform such functions on an external keyboard, you press <Scroll Lock> and the appropriate keys. You must be sure that the
External Hot Key option is enabled in the System Setup program.
Use the key combinations in Table 6 to access MS-DOS, open the System Setup program, and open the Battery Status screen of the System Setup program.
file:///I|/SERVICE%20MANUALS/DELL%20MANUALS/LAPTOPS_checked%20ok/Inspiron/3800/3800_SERVICE_MANUAL/computer.htm (11 of 22)6/21/2004 12:55:04 AM
Page 26

Using the Computer: Dell Inspiron 3800 System Reference
Table 6. System Function Key Combinations
Key Combinations Function
<Ctrl><Alt><Del> Restarts (reboots) the computer in MS-DOS mode. In the Microsoft Windows 98 and Windows NT operating systems, click the Start
button and click Shut Down.
<Fn><F1>* Opens the System Setup program.
<Fn><F3>* Opens the Battery Status screen of the System Setup program.
* This key combination does not function with ACPI.
CD-ROM and DVD-ROM Drive Key Combinations
NOTE: When using the integrated keyboard, you press <Fn> and the appropriate keys to perform certain functions. To perform such
functions on an external keyboard, you press <Scroll Lock> and the appropriate keys. You must be sure that the External Hot Key
option is enabled in the System Setup program.
To eject the CD-ROM or DVD-ROM drive tray, press <Fn><F10>.
Touch Pad and Track Stick
Cursor Pointing Devices
Your computer it equipped with a Personal System/2 (PS/2)-compatible touch pad that provides full mouse functionality. A set of left and right buttons, located
below the touch pad, operate like the left and right buttons on a mouse. You can also perform many pointing functions by tapping the touch pad, which is
positioned for both left- and right-handed users. Click-and-drag buttonless functions are also supported.
An optional Dell™ DualPoint™ integrated pointing device is available, which provides a track stick in addition to the PS/2-compatible touch pad. The
DualPoint option also includes a second set of left and right buttons, located above the touch pad (see Figure 5 and Figure 6). The track stick controls the
cursor on the display screen and is positioned in the keyboard to allow you to move the cursor while keeping your fingers in a typing position. You can also
perform many pointing functions by tapping the track stick. Click-and-drag buttonless functions are also supported.
DualPoint integrated pointing device software allows you to set the default for the type of cursor pointing device you want to use, as well as sensitivity, motion,
and drag-and-drop features of both the touch pad and the track stick.
file:///I|/SERVICE%20MANUALS/DELL%20MANUALS/LAPTOPS_checked%20ok/Inspiron/3800/3800_SERVICE_MANUAL/computer.htm (12 of 22)6/21/2004 12:55:04 AM
Page 27
Using the Computer: Dell Inspiron 3800 System Reference
NOTES: When enabled, the DualPoint integrated pointing device (whether touch pad only, track stick only, or both) uses interrupt
request (IRQ) 12. No other device can use IRQ12 while the DualPoint integrated pointing device is enabled.
When you attach an external Personal System/2 (PS/2)-mouse to the computer, the DualPoint integrated pointing device is
automatically disabled.
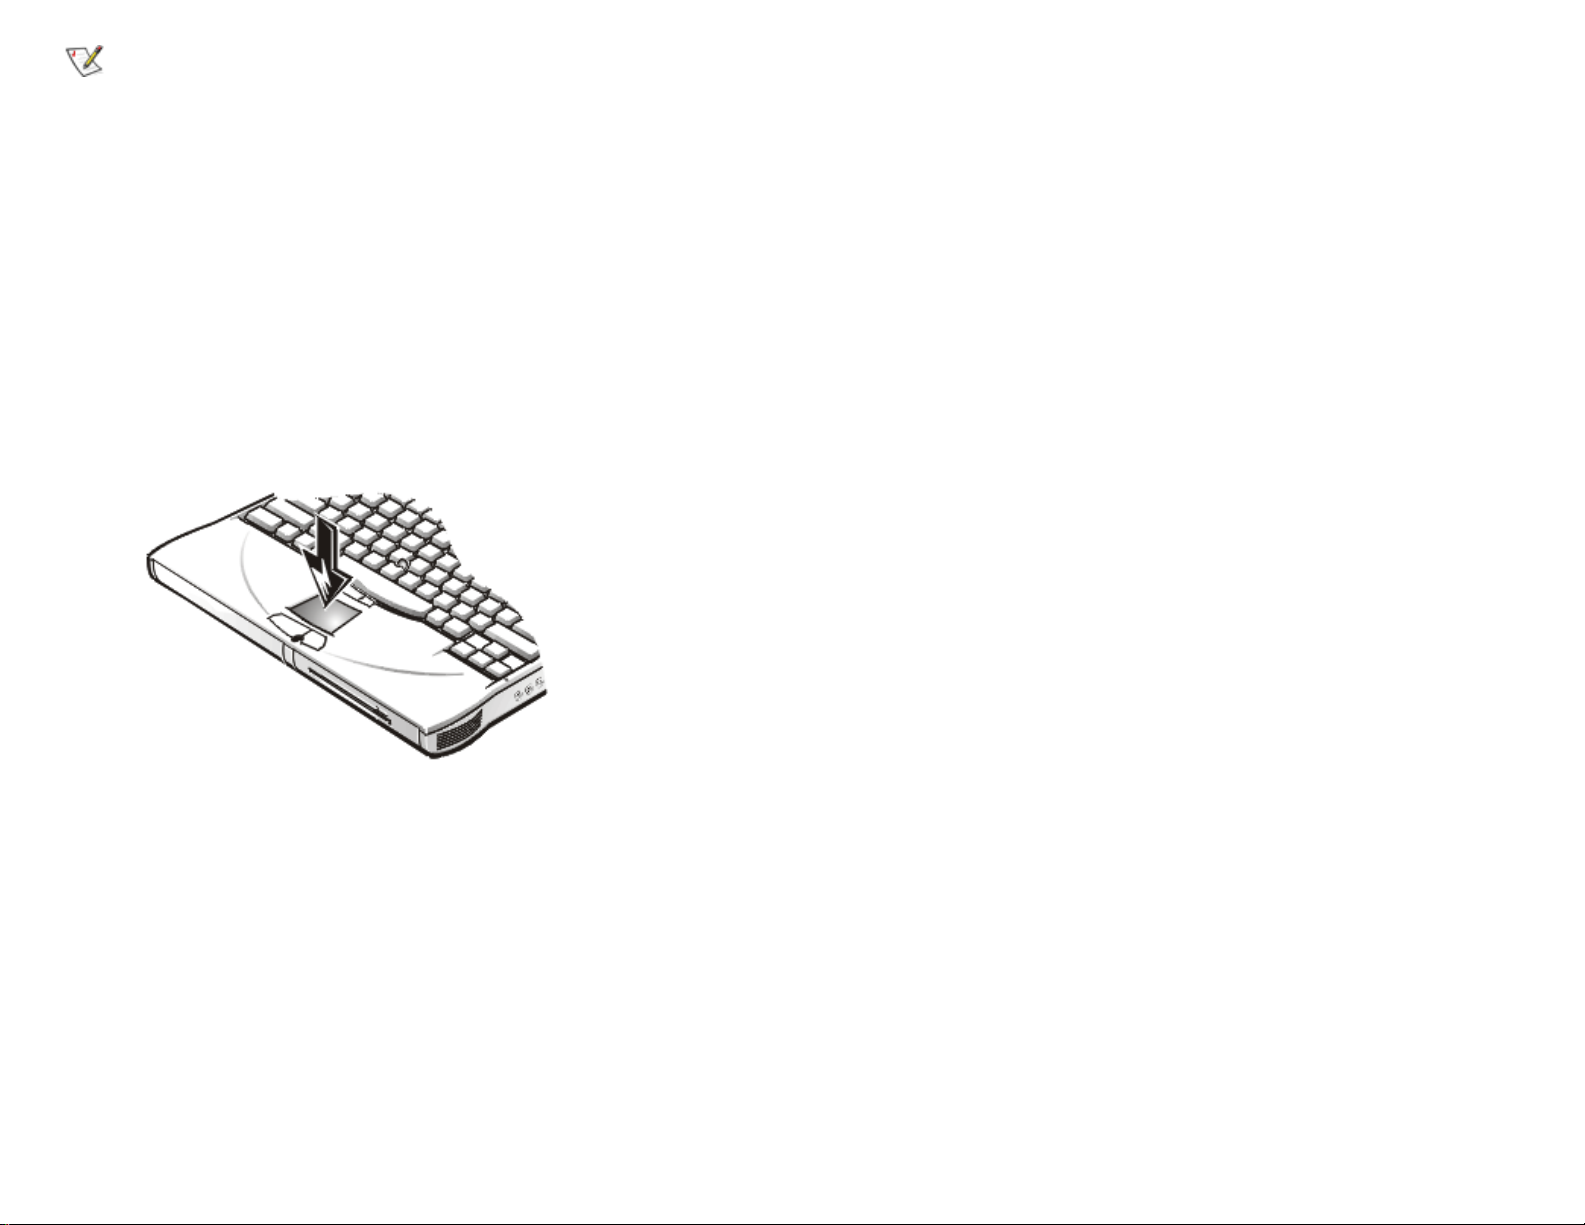
Using the Touch Pad
The PS/2 touch pad detects the position of your finger over a touch-sensitive area to position the cursor within the display screen. The touch pad provides the
computer with full mouse functionality. The touch pad’s two buttons, located directly below the touch pad, correspond to the left and right buttons on a
standard mouse.
Figure 5. PS/2 Touch Pad
To best use the touch pad, use the following techniques:
● To move the cursor, lightly slide your finger over the smooth sensor area.
● To select an object, gently tap once on the surface of the touch pad or use your thumb to press the left touch pad button. The touch pad buttons
perform standard mouse functions.
● To select and move (or drag) an object, position the cursor on the object and double-tap on the touch pad. On the second tap, leave your finger on the
touch pad and move the selected object by sliding your finger across the surface.
● To double-click an object, position the cursor on the object and then tap the touch pad or the left touch pad button twice.
Using the Track Stick
file:///I|/SERVICE%20MANUALS/DELL%20MANUALS/LAPTOPS_checked%20ok/Inspiron/3800/3800_SERVICE_MANUAL/computer.htm (13 of 22)6/21/2004 12:55:04 AM
Page 28
Using the Computer: Dell Inspiron 3800 System Reference
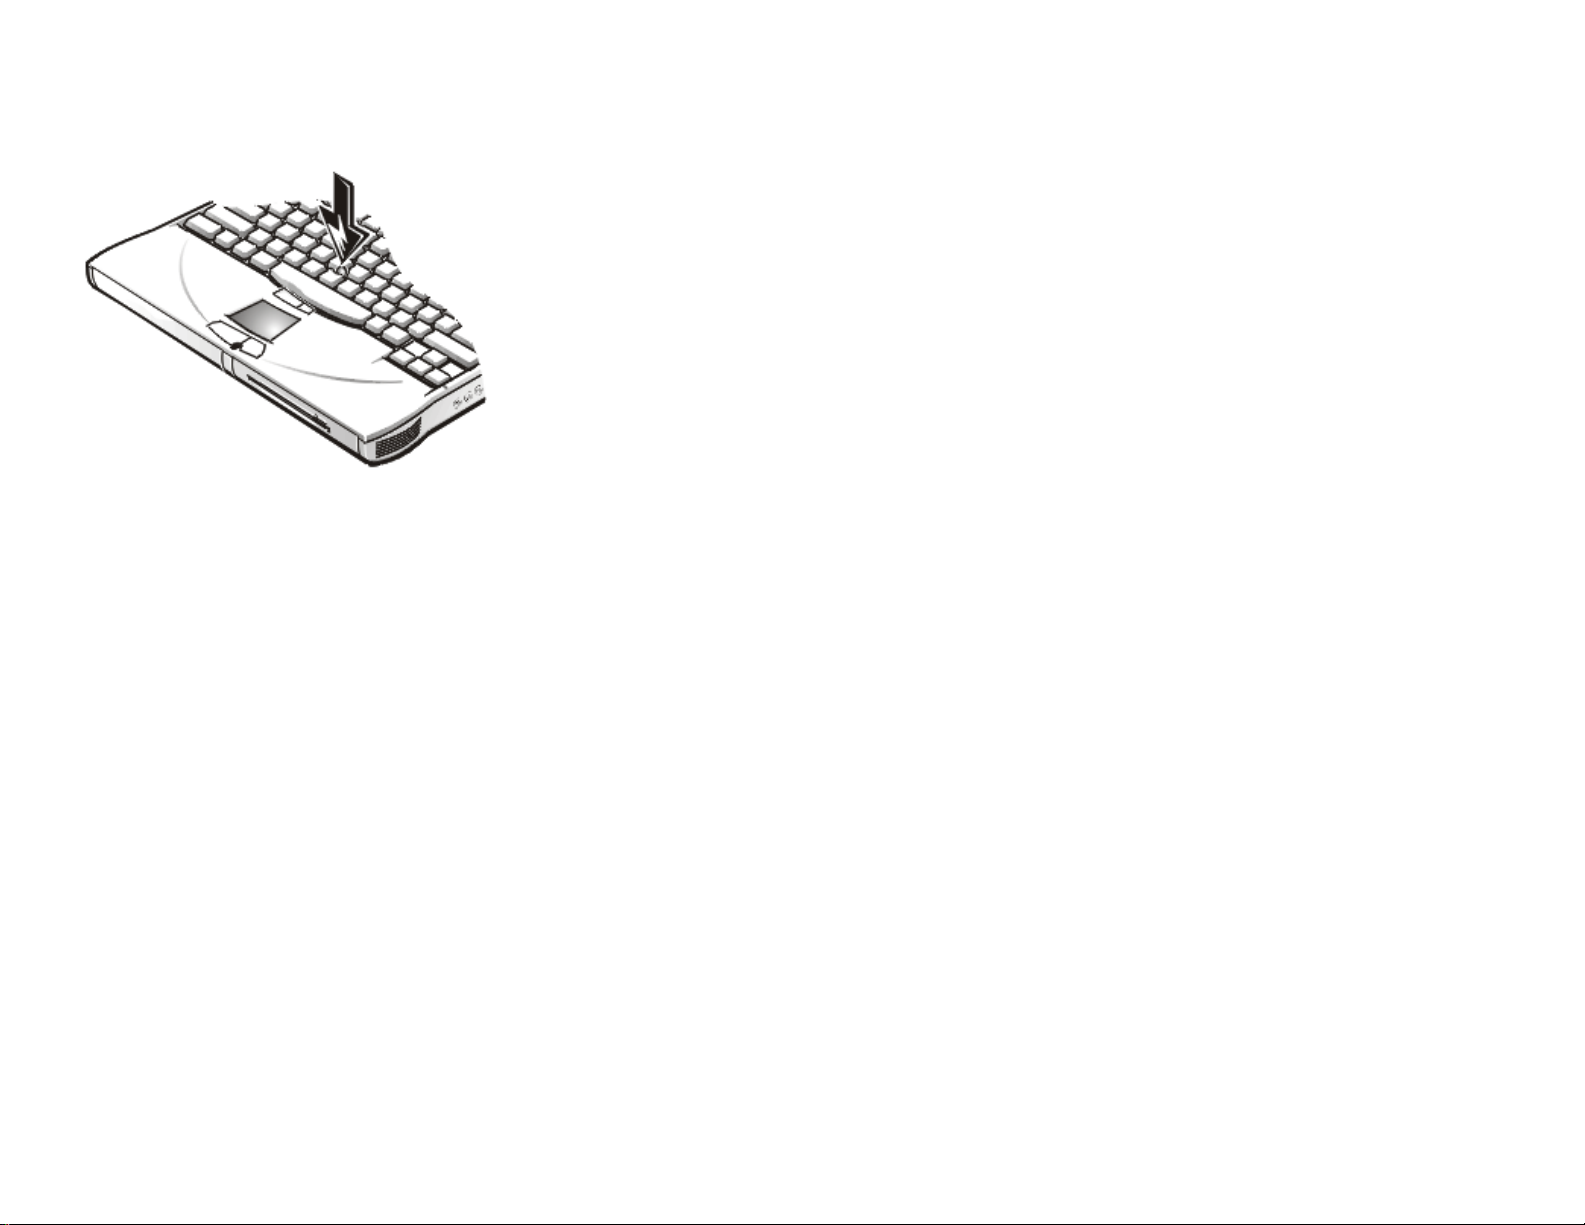
The track stick detects the pressure and direction that you move your finger when touching the track stick cap located near the center of the keyboard. The
two buttons located between the touch pad and the space bar on the keyboard correspond to the left and right buttons on a standard mouse.
Figure 6. Track Stick
To best use the track stick, use the following techniques:
● To move the cursor, apply pressure to the track stick with your right or left index finger. Press up or down to move the cursor to the top or bottom of the
display screen. Press left or right to move the cursor to the left or right of the display screen.
● To select an object, tap once on the track stick or use your thumb to press the left track stick button. The track stick buttons perform standard mouse
functions.
● To select and move (or drag) an object, position the cursor on the object. Then press and hold the left track stick button. Leave your thumb on the
button and move the selected object by pressing the track stick in the desired direction.
● To double-click an object, position the cursor on the object and then tap the left track stick button twice or tap the track stick itself twice. The track stick
functions much like the touch pad in that it allows you to use buttons for mouse functions or the pointing device itself.
Customizing the Touch Pad and Track Stick
The DualPoint integrated pointing device software allows you to set the default for the type of cursor pointing device you want to use, as well as sensitivity,
motion, and drag-and-drop features of both the touch pad and track stick. To customize the DualPoint integrated pointing device, perform the following steps:
1. Click the Start button, point to Settings, and click Control Panel.
2. Double-click the Mouse icon to open the Mouse Properties window and click the Touch tab.
file:///I|/SERVICE%20MANUALS/DELL%20MANUALS/LAPTOPS_checked%20ok/Inspiron/3800/3800_SERVICE_MANUAL/computer.htm (14 of 22)6/21/2004 12:55:04 AM
Page 29

Using the Computer: Dell Inspiron 3800 System Reference
3. Select the settings that work best for you and click Apply.
4. Click OK to save the settings and close the window.
You can also click the touch pad icon on the taskbar and click Touch Pad Properties to open the Mouse Properties control panel.
Changing the Track Stick Cap
Your computer came with four additional track stick caps in assorted colors. You may need to change the track stick cap if it wears down from prolonged use.
To change the track stick cap, perform the following steps:
1. Pull the cap off the track stick.
Figure 7. Removing the Track Stick Cap
2. Align a new cap over the square track stick post and gently press the cap down onto the post.
3. Test the track stick to ensure that the cap is seated properly.
PC Cards
About PC Cards
The computer has a slot into which you can install up to two PC Cards if the PC Cards comply with Release 2.01 of the Personal Computer Memory Card
file:///I|/SERVICE%20MANUALS/DELL%20MANUALS/LAPTOPS_checked%20ok/Inspiron/3800/3800_SERVICE_MANUAL/computer.htm (15 of 22)6/21/2004 12:55:04 AM
Page 30

Using the Computer: Dell Inspiron 3800 System Reference
International Association (PCMCIA) standard and Release 4.2 of the Japanese Electronic Industry Development Association (JEIDA) standard.
The computer supports Type I, Type II, and Type III PC Cards (including memory cards) and advanced technology attachment (ATA) cards that emulate
integrated drive electronics (IDE) hard-disk drives. Also supported are input/output (I/O) cards such as modems, local area network (LAN) cards, wireless LAN
cards, and small computer system interface (SCSI) cards.
If you are using the Microsoft Windows 98 or Windows 2000 operating system, you can use a zoomed video (ZV) PC Card only in the lower PC Card
connector. (The Microsoft Windows NT 4.0 operating system does not support ZV.)
NOTES: A PC Card is not a boot device. The "type" of a card refers to its thickness, not its functionality.
Your computer recognizes most I/O cards and automatically loads the device driver associated with that card.
NOTICE: Take extra precautions if you use extended PC Cards in your computer. Extended cards are longer versions of standard
PC Cards. They fit into, and operate correctly with, your computer. However, they extend beyond the edge of the computer when
installed. If something strikes the exposed end of an installed card, your system board can be damaged. Because of space
considerations, you may have trouble using two PC Cards in your computer if one of them is an extended card. It may be easier to
use an extended card if you install it in the upper PC Card connector. Always remove an extended PC Card before you pack the
computer in its carrying case.
Installing PC Cards
You can use the following PC Card combinations in the PC Card slots:
● A single Type I or Type II card (using either the upper or lower PC Card connector)
● A single Type III card (using the lower PC Card connector only)
● One Type I card and one Type II card (using either connector)
● Two Type I cards or two Type II cards
NOTE: Use a ZV PC Card in the lower connector only.
PC Cards are generally marked with a symbol, such as a triangle or an arrow, to indicate which end should be inserted into the slot. The cards are keyed to
prevent incorrect insertion. If card orientation is not clear, see the documentation that came with the card.
You do not need to turn off your computer or exit standby mode before you install a PC Card. To install a PC Card (see Figure 8), perform the following steps:
1. If necessary, remove the blank from the PC Card connector you intend to use by pressing the eject button and pulling the blank out.
file:///I|/SERVICE%20MANUALS/DELL%20MANUALS/LAPTOPS_checked%20ok/Inspiron/3800/3800_SERVICE_MANUAL/computer.htm (16 of 22)6/21/2004 12:55:04 AM
Page 31

Using the Computer: Dell Inspiron 3800 System Reference
2. Hold the card with its orientation symbol pointing into the slot and the top side of the card facing up.
3. Insert the card into the slot, and press in firmly until the card is completely seated in the internal PC Card connector.
4. If you encounter too much resistance when inserting it, do not force the card. Check the card's orientation and try again.
Figure 8. Installing a PC Card
PC Card Blanks
Save the blank to use whenever you do not have a PC Card installed. The blank protects the PC Card connector from dust and other particles.
Removing PC Cards
NOTICE: Use the PC Card configuration utility on the taskbar to select and stop a card from functioning before you remove it from
the computer. If you do not remove the card in the configuration utility, you could lose data from open application programs.
To remove a PC Card (see Figure 9), perform the following steps:
1. Press the PC Card eject button. The PC Card or blank protrudes from the slot slightly. It does not come out all the way.
2. Gently remove the card.
Figure 9. Removing a PC Card
file:///I|/SERVICE%20MANUALS/DELL%20MANUALS/LAPTOPS_checked%20ok/Inspiron/3800/3800_SERVICE_MANUAL/computer.htm (17 of 22)6/21/2004 12:55:04 AM
Page 32

Using the Computer: Dell Inspiron 3800 System Reference
To protect the PC Card connectors, install a blank if you are not going to use the connector.
Configuring PC Cards
The PC Card configuration utility performs the following functions:
● Notifies you whenever a PC Card is inserted and tells you how the card is configured
● Automatically loads the proper device driver if it is available on the hard-disk drive
● If drivers are not available on the hard-disk drive, prompts you to install them using the device driver diskette that came with the card
To configure a PC Card in Windows 98 or Windows 2000, perform the following steps:
1. Click the Start button, point to Settings, and then click Control Panel.
2. Double-click the PC Card icon to open the PC Card (PCMCIA) Properties window.
For more information, check the documentation that came with your operating system.
To configure a PC Card in Windows NT, perform the following steps:
1. Click the Start button, point to Settings, and then click Control Panel.
2. Double-click the Softex PC Card Controller icon to open the Softex PC Card Controller window.
For more information, click the Help tab.
Display
file:///I|/SERVICE%20MANUALS/DELL%20MANUALS/LAPTOPS_checked%20ok/Inspiron/3800/3800_SERVICE_MANUAL/computer.htm (18 of 22)6/21/2004 12:55:04 AM
Page 33

Using the Computer: Dell Inspiron 3800 System Reference
Adjusting the Brightness
To accommodate local lighting conditions or video output from the software you are using, you can use the key combinations shown in Table 7.
NOTE: When you run the computer on battery power, set your computer's brightness control to the lowest setting that affords
comfortable viewing. You can conserve up to 10 percent of battery power by using the minimum brightness setting.
Table 7. Brightness Key Combinations and Their Functions
Key Combinations Function
<Fn> + down arrow Decreases brightness
<Fn> + up arrow Increases brightness
<Fn> + right arrow Decreases contrast
(has no effect on an active-matrix display)
<Fn> + left arrow Increases contrast
(has no effect on an active-matrix display)
NOTES: You cannot change contrast on an active-matrix (thin film transistor [TFT]) display. Contrast adjustments are only necessary
on passive matrix displays.
When using the integrated keyboard, you press <Fn> and the appropriate keys to perform certain functions. To perform such
functions on an external keyboard, you press <Scroll Lock> and the appropriate keys. You must be sure that the External Hot Key
option is enabled in the System Setup program.
Expanded Video Mode
When working in text mode, you can select the font used to display text. Press <Fn><F7> to toggle between a regular serif font and a serif font with extra
leading. Expanded video mode is useful if you are working in 800 x 600 resolution on a 14.1-inch extended graphics array (XGA) display.
NOTE: You may have trouble using the display fonts feature with MS-DOS® programs that use downloaded fonts.
file:///I|/SERVICE%20MANUALS/DELL%20MANUALS/LAPTOPS_checked%20ok/Inspiron/3800/3800_SERVICE_MANUAL/computer.htm (19 of 22)6/21/2004 12:55:04 AM
Page 34

Using the Computer: Dell Inspiron 3800 System Reference
Customizing Video Resolution
1. Click the Start button, point to Settings, and then click Control Panel.
The Control Panel window appears.
2. Double-click the Display icon.
The Display Properties window appears.
3. Click the Settings tab, and then set the resolution by dragging the slider in the Screen Area box. In the Colors box, choose the number of colors from
the menu provided.
For more information, see your operating system documentation. If you choose a resolution or color palette that is higher than the display
supports, the settings adjust automatically to the closest possible setting.
If You Have Display Problems
If your computer is receiving power, but nothing appears on your display (such as light, text, or graphics) or the display image does not appear as you would
expect, try the following measures to resolve the problem:
1. If the display is blank, you may be in standby mode. Press the power button to resume from standby mode.
If the display is blank and the power light-emitting diode (LED) is on, the display may have timed out. In this case, press any key on the keyboard
to resume normal operation.
2. If the low-battery light is blinking, connect the AC adapter to the computer or replace the battery.
3. Adjust the brightness.
4. If your computer is attached to an external monitor, press <Fn><F8> to switch the video image to the display.
Extended Desktop Mode
With the Microsoft Windows 98 or Windows 2000 operating system, you can use an external monitor as an extension of your display. The extended desktop
feature gives your computer the ability to display video of different content and resolution on both the computer display screen and the external display. To set
up your computer for extended desktop, perform the following steps:
1. Save your work, close all open files and application programs, and shut down the computer.
file:///I|/SERVICE%20MANUALS/DELL%20MANUALS/LAPTOPS_checked%20ok/Inspiron/3800/3800_SERVICE_MANUAL/computer.htm (20 of 22)6/21/2004 12:55:04 AM
Page 35

Using the Computer: Dell Inspiron 3800 System Reference
2. Connect the external monitor, TV, or projector to the computer.
3. Turn your computer on.
4. Click the Start button, point to Settings, and then click Control Panel.
5. Double-click the Display icon, and then click the Settings tab.
6. Change the Colors option to High Color (16 bit) or True Color (24 bit).
7. Click on the picture of Monitor 2.
The Monitor # 2 dialog box appears. It asks if you want to activate Monitor 2.
8. Click Yes.
9. Adjust the Screen Area to the desired resolution to be displayed on your external monitor.
10. Change the Colors option to High Color (16 bit) or True Color (24 bit).
11. Drag the picture of Monitor 2 to match the physical position of the external monitor relative to your computer's display.
For example, if the external monitor is located physically above your computer's display, drag the Monitor 2 picture to place it above the Monitor 1
picture.
12. Verify that the Extend my Windows desktop to this monitor check box is checked.
If it is not checked, click on the check box to check it.
13. Click Apply.
14. Click OK.
15. Click Yes.
16. Click OK to close the Display Properties dialog box.
NOTE: True Simul-mode (the ability to simultaneously display video of the same content and resolution on both the computer display
screen and the external monitor) is not supported if the computer is booted to MS-DOS, using a full-screen MS-DOS session under a
Microsoft Windows operating system, or the ATI Mobility M1 video driver is not loaded. This limitation may also be noted in operating
systems other than Microsoft Windows.
file:///I|/SERVICE%20MANUALS/DELL%20MANUALS/LAPTOPS_checked%20ok/Inspiron/3800/3800_SERVICE_MANUAL/computer.htm (21 of 22)6/21/2004 12:55:04 AM
Page 36

Using the Computer: Dell Inspiron 3800 System Reference
Back to Contents Page
file:///I|/SERVICE%20MANUALS/DELL%20MANUALS/LAPTOPS_checked%20ok/Inspiron/3800/3800_SERVICE_MANUAL/computer.htm (22 of 22)6/21/2004 12:55:04 AM
Page 37

Utilities and Drivers for Microsoft Windows 98: Dell Inspiron 3800 System Reference
Back to Contents Page
Utilities and Drivers for Microsoft® Windows® 98: Dell™
Inspiron™ 3800 System Reference
Overview Installing Touch Pad Drivers
Installing the System Utilities Installing the DVD Decoder Driver
(Optional)
Installing the Video Driver Installing the Intel SpeedStep Utility
Installing the Audio Driver and the
Modem Driver
Installing MS-DOS CD-ROM Drivers
Installing the Docking Drivers (Optional) Installing Softex BayManager
Installing the DualPoint Integrated
Pointing Device Drivers
Installing the System Help
Overview
All of your computer’s drivers for Dell-installed devices are operative when you receive the
computer. No further installation or configuration is needed. However, if you ever need to
reinstall any of these drivers, the driver files are provided on the System Software CD. For
instructions on reinstalling a particular driver, see the following subsection that corresponds to
that driver.
Often device problems can be corrected by reinstalling the appropriate drivers. Also, hardware
manufacturers frequently provide updated drivers that support feature enhancements or that
correct problems. Obtain updated drivers for products purchased from Dell at the Dell World
Wide Web support site (http://support.dell.com).
NOTICE: Drivers available on the Dell Web site have been validated for correct
operation on Dell systems. Installing drivers obtained from other sources may cause
errors or performance degradation.
file:///I|/SERVICE%20MANUALS/DELL%20MANUALS/L...k/Inspiron/3800/3800_SERVICE_MANUAL/win98.htm (1 of 13)6/21/2004 12:55:06 AM
Page 38

Utilities and Drivers for Microsoft Windows 98: Dell Inspiron 3800 System Reference
To install the system software, you need the following items:
● System Software CD
● CD-ROM or DVD-ROM drive installed in the media bay of the computer
● Microsoft Windows 98 CD
● Microsoft Boot Disk Windows 98 Series diskette
NOTE: Your System Software CD contains drivers for operating systems that
may not be on your computer. Verify that the driver you are loading is under
your operating system subdirectory.
Dell recommends that you print these procedures before you begin. If you need to reinstall
drivers on your computer, reinstall them in the order presented here.
NOTES: For more information on using the operating system installed on
your computer by Dell, see the operating system user's guide that came with
your computer. You can also access system tools and documentation from
Dell's technical support Web site (http://support.dell.com) by entering your
service tag or Express Service Code, and then clicking Go!.
To install the drivers and utilities correctly, you must install them in the order
presented in this document.
NOTICE: Do not dock the computer before turning it on the first time.
Installing the System Utilities
System utilities let you configure features such as the save-to-disk suspend (S2D) partition. To
copy the system utilities to your hard-disk drive, perform the following steps.
NOTE: You can also run the system utilities directly from the System
Software CD.
1. Insert the System Software CD into the CD-ROM drive.
file:///I|/SERVICE%20MANUALS/DELL%20MANUALS/L...k/Inspiron/3800/3800_SERVICE_MANUAL/win98.htm (2 of 13)6/21/2004 12:55:06 AM
Page 39

Utilities and Drivers for Microsoft Windows 98: Dell Inspiron 3800 System Reference
2. Copy each of the following utilities on the System Software CD to the c:\dell directory on
your hard-disk drive: mks2d.exe, rms2d.exe, and readme.s2d.
For more information on copying files, see the documentation that came with the
operating system.
After you copy the utilities to your hard-disk drive, you must restart your computer in the MSDOS® mode to use the utilities.
See the readme.s2d file on the System Software CD for more information on using the S2D
utilities.
Installing the Video Driver
The video driver controls features such as video resolution and the color palette.
NOTE: If you need to use extended video modes, check the documentation
that came with the application program to determine if the drivers are
provided. If not, contact the software manufacturer to get the necessary
drivers.
To install the video driver for Windows 98, perform the following steps:
1. Save your work in all open application programs, because you will need to restart your
computer at the end of this procedure to complete the installation.
2. Insert the System Software CD into the CD-ROM drive.
3. Click the Start button, and then click Run.
The Run dialog box appears.
4. Type x:\win98\video\setup, where x is the drive letter of your CD-ROM drive, and
click OK or press <Enter>.
5. Follow the instructions on the screen.
6. After the files are copied to your hard-disk drive, remove the System Software CD from
file:///I|/SERVICE%20MANUALS/DELL%20MANUALS/L...k/Inspiron/3800/3800_SERVICE_MANUAL/win98.htm (3 of 13)6/21/2004 12:55:06 AM
Page 40

Utilities and Drivers for Microsoft Windows 98: Dell Inspiron 3800 System Reference
the CD-ROM drive, and click Finish to restart your computer.
After installing the video drivers and restarting your computer, perform the following steps to
set the display parameters:
1. Click the Start button, point to Settings, and then click Control Panel.
The Control Panel window appears.
2. Double-click the Display icon.
The Display Properties window appears.
3. Click the Settings tab.
4. Change the Colors option from 256 colors to True Color (24 bit).
5. Set the Screen area for your display to 1024 x 768.
6. Click Apply.
Installing the Audio Driver and the Modem Driver
The audio driver allows you to customize the sound features of your computer. For computers
with an integrated modem, installing the audio driver also installs the modem driver, which
allows you to use your computer to send and receive information over telephone lines. To
install the audio driver, perform the following steps:
1. Save your work in all open application programs, because you will need to restart your
computer at the end of this procedure to complete the installation.
2. Insert the System Software CD into the CD-ROM drive.
3. Click the Start button, and then click Run.
The Run dialog box appears.
4. Type x:\win98\audio\setup, where x is the drive letter of your CD-ROM drive, and
file:///I|/SERVICE%20MANUALS/DELL%20MANUALS/L...k/Inspiron/3800/3800_SERVICE_MANUAL/win98.htm (4 of 13)6/21/2004 12:55:06 AM
Page 41

Utilities and Drivers for Microsoft Windows 98: Dell Inspiron 3800 System Reference
click OK or press <Enter>.
5. Follow the instructions on the screen.
6. After the files are copied to your hard-disk drive, remove the System Software CD from
the CD-ROM drive, and click Finish to restart your computer.
Installing the Docking Drivers (Optional)
NOTE: If your computer uses Windows 98, the computer is already
configured to work with the advanced port replicator (APR). However, if you
must reinstall Windows 98, you must reload these docking drivers.
If you have an APR, you must install the Dock QuickInstall program to install docking drivers.
Installing Dock QuickInstall
1. If the computer has never been turned on, turn it on now while it is undocked and
complete the operating system setup. Then continue to step 2.
If you have completed the operating system setup, turn on the computer, and
then continue to step 2.
For setup instructions, see the Dell Inspiron Systems Setup Guide that came with
the computer.
2. Save your work in all open applications programs, because you will need to restart your
computer at the end of this procedure to complete the installation.
3. Insert the System Software CD into the CD-ROM drive.
4. Click the Start button, and then click Run.
The Run dialog box appears.
5. Type x:\win98\dockquik\setup, where x is the drive letter of your CD-ROM drive,
and click OK or press <Enter>.
file:///I|/SERVICE%20MANUALS/DELL%20MANUALS/L...k/Inspiron/3800/3800_SERVICE_MANUAL/win98.htm (5 of 13)6/21/2004 12:55:06 AM
Page 42

Utilities and Drivers for Microsoft Windows 98: Dell Inspiron 3800 System Reference
6. Follow the instructions on the screen.
7. When the CMD PCI IDE Driver Setup Utility window appears, click Yes to continue.
8. When prompted to restart the Windows operating system, remove the System Software
CD from the CD-ROM drive, and then click Yes.
9. After Windows restarts, shut down the computer.
10. Dock the computer as described in your Advanced Port Replicator User's Guide.
11. Turn on the computer.
12. When the Add New Hardware Wizard window appears, click Next.
13. When prompted, click the Search for the best driver for your device
(Recommended) radio button, and then click Next.
14. When prompted to specify where Windows should search for the driver, click Next.
15. When Windows locates the driver, click Next to begin the driver installation.
NOTE: The installation may appear to pause for 10 to 15 seconds while
Windows copies files.
16. When Windows has finished installing the driver, click Finish.
17. When prompted to restart, click Yes to restart the computer.
18. After Windows restarts, makes adjustments, and finishes setting up the new
configuration (called Dock 1), click OK.
19. When prompted to restart, click OK. The computer restarts.
20. When the New Display Settings window prompts you to restart, click OK.
21. When the Latitude Docking Utility for Windows 98 window appears and notifies you
that an adjustment must be made, click OK.
The computer shuts down and turns off.
file:///I|/SERVICE%20MANUALS/DELL%20MANUALS/L...k/Inspiron/3800/3800_SERVICE_MANUAL/win98.htm (6 of 13)6/21/2004 12:55:06 AM
Page 43

Utilities and Drivers for Microsoft Windows 98: Dell Inspiron 3800 System Reference
22. Press the power button to restart the computer. The APR is now ready to use.
Docking for the First Time
To dock your computer for the first time, perform the following steps:
1. If the computer has never been turned on, turn it on now while it is undocked and
complete the operating system setup.
Then go to step 2. For setup instructions, see the Dell Inspiron Systems Setup Guide
that came with the computer.
If you have completed the operating system setup, turn on the computer, and then go to
step 2.
2. Dock the computer by aligning the dock connector on your computer with the dock
connector on the APR and attaching the two.
For instructions, see your Advanced Port Replicator User’s Guide. The operating
system creates a hardware profile for the APR.
3. To load the appropriate drivers for use with the APR, follow the instructions on the
display.
When prompted, restart the computer.
Installing the DualPoint™ Integrated Pointing Device Drivers
DualPoint integrated pointing device drivers and associated utilities allow you to use and
customize the integrated touch pad, track stick, or an external mouse. To install these drivers,
perform the following steps.
NOTICE: Use these steps to install touch pad drivers only if your computer
has a track stick. If your computer does not have a track stick, follow the
instructions in "Installing the Touch Pad Drivers."
1. Save your work in all open application programs, because you will need to restart your
file:///I|/SERVICE%20MANUALS/DELL%20MANUALS/L...k/Inspiron/3800/3800_SERVICE_MANUAL/win98.htm (7 of 13)6/21/2004 12:55:06 AM
Page 44

Utilities and Drivers for Microsoft Windows 98: Dell Inspiron 3800 System Reference
computer at the end of this procedure to complete the installation.
2. Insert the System Software CD into the CD-ROM drive.
3. Click the Start button, and then click Run.
The Run dialog box appears.
4. Type x:\win98\touchpad\dual\setup, where x is the drive letter of your CD-ROM
drive, and click OK or press <Enter>.
5. Follow the instructions on the screen.
6. After the files are copied to your hard-disk drive, remove the System Software CD from
the CD-ROM drive, and click Finish to restart your computer.
Installing the Touch Pad Drivers
Touch pad drivers and associated utilities allow you to use and customize the integrated touch
pad or external mouse. To install these drivers, perform the following steps.
NOTICE: Use these steps to install touch pad drivers only if your computer
does not have a track stick. If your computer has a track stick, follow the
instructions in "Installing the DualPoint Integrated Pointing Device Drivers."
1. Save your work in all open application programs, because you will need to restart your
computer at the end of this procedure to complete the installation.
2. Insert the System Software CD into the CD-ROM drive.
3. Click the Start button, and then click Run.
The Run dialog box appears.
4. Type x:\win98\touchpad\single\setup, where x is the drive letter of your CD-
ROM drive, and click OK or press <Enter>.
5. Follow the instructions on the screen.
file:///I|/SERVICE%20MANUALS/DELL%20MANUALS/L...k/Inspiron/3800/3800_SERVICE_MANUAL/win98.htm (8 of 13)6/21/2004 12:55:06 AM
Page 45

Utilities and Drivers for Microsoft Windows 98: Dell Inspiron 3800 System Reference
6. After the files are copied to your hard-disk drive, remove the System Software CD from
the CD-ROM drive, and click Finish to restart your computer.
Installing the DVD Decoder Driver (Optional)
The DVD decoder driver allows you to play DVD movies on the computer.
NOTE: When you are prompted to select a directory, Dell recommends using
the default directory settings.
1. Insert the Software DVD Decoder CD into the DVD-ROM drive.
2. Click the Start button, and then click Run.
3. In the Run dialog box, type x:\setup.exe, where x is the DVD-ROM drive letter. The
DVD-ROM drive letter is usually D.
4. Click OK. The Welcome window appears.
5. Click Next.
6. At the Choose Destination Location screen, click Next.
7. At the Select Program Folder screen, click Next.
8. At the Start Copying Files screen, click Next.
9. At the Setup Complete screen, be sure that the Yes, I want to restart my computer
now radio button is selected, and then click Finish.
The first time you play a DVD after installing this driver, you may be prompted to change the
region setting.
Installing the Intel® SpeedStep™ Utility
file:///I|/SERVICE%20MANUALS/DELL%20MANUALS/L...k/Inspiron/3800/3800_SERVICE_MANUAL/win98.htm (9 of 13)6/21/2004 12:55:06 AM
Page 46

Utilities and Drivers for Microsoft Windows 98: Dell Inspiron 3800 System Reference
Intel SpeedStep conserves battery power by automatically adjusting the processor speed
when you run your computer from the battery instead of AC power. SpeedStep reduces the
processor speed when using the battery and resumes maximum processor speed when
plugged into an electrical outlet. To install SpeedStep, perform the following steps:
1. Save your work in all open application programs, because you will need to restart your
computer at the end of this procedure to complete the installation.
2. Insert the System Software CD into the CD-ROM drive.
3. Click the Start button, and then click Run.
The Run dialog box appears.
4. Type x:\win98\speedstp\language\setup, where x is the drive letter of your CD-
ROM drive and language is Dutch, English, French, German, Japanese, Korean,
Spanish, Swedish, SChinese (Simplified Chinese), TChinese (Traditional Chinese), or
Thai.
5. Click OK or press <Enter>.
6. Follow the instructions on the screen.
7. After the files are copied to your hard-disk drive, remove the System Software CD from
the CD-ROM drive, and click Finish to restart your computer.
Installing MS-DOS CD-ROM Drivers
CD-ROM drivers must be installed to use the MS-DOS CD-ROM utility. To install the CD-ROM
drivers, perform the following steps:
1. Save your work in all open application programs, because you will need to restart your
computer at the end of this procedure to complete the installation.
2. Insert the System Software CD into the drive.
3. Click the Start button, and then click Run.
The Run dialog box appears.
file:///I|/SERVICE%20MANUALS/DELL%20MANUALS/L...k/Inspiron/3800/3800_SERVICE_MANUAL/win98.htm (10 of 13)6/21/2004 12:55:06 AM
Page 47

Utilities and Drivers for Microsoft Windows 98: Dell Inspiron 3800 System Reference
4. Type x:\win98\cdrom\setup.
5. Click OK or press <Enter>.
6. Follow the instructions on the screen.
7. After the files are copied to your hard-disk drive, remove the System Software CD from
the CD-ROM drive, and click Finish to restart your computer.
Installing Softex BayManager
The Softex BayManager software allows you to swap media bay devices without shutting down
and rebooting your computer. To install Softex BayManager, perform the following steps:
1. If the computer is docked, undock it. For instructions, see your Advanced Port Replicator
User's Guide.
2. Make sure that the CD-ROM or DVD-ROM drive is installed in the media bay.
3. Turn on the computer and insert the System Software CD into your CD-ROM or DVD-
ROM drive.
4. Click the Start button, and then click Run.
The Run dialog box appears.
5. Type x:\win98\baymgr\setup, where x is the drive letter of your CD-ROM drive,
and click OK or press <Enter>.
6. Follow the instructions on the screen.
7. After the files are copied to your hard-disk drive, remove the System Software CD from
the CD-ROM drive, and click Finish to restart your computer.
Installing the System Help
file:///I|/SERVICE%20MANUALS/DELL%20MANUALS/L...k/Inspiron/3800/3800_SERVICE_MANUAL/win98.htm (11 of 13)6/21/2004 12:55:06 AM
Page 48

Utilities and Drivers for Microsoft Windows 98: Dell Inspiron 3800 System Reference
The Dell Inspiron system Help is available on the System Software CD. You can also access it
from Dell’s support Web site (http://support.dell.com).
Installing Help From the CD
To install the system Help from the System Software CD, perform the following steps:
1. Insert the System Software CD into the CD-ROM or DVD-ROM drive.
2. Double-click the My Computer icon, and then double-click the CD-ROM or DVD-ROM
drive icon.
3. Double-click the Guide folder, and then double-click the appropriate language folder for
the version of the Help you want to install.
4. Right-click the popup.ocx file, and then click Copy.
NOTE: You must copy the popup.ocx file into the Windows registry;
otherwise, error messages may appear.
5. Double-click the My Computer icon, and then double-click the C: drive icon.
6. Double-click the Windows folder, double-click the System folder, and then right-click
Paste.
7. Click Start, and then click Run.
8. Type regsvr32 popup.ocx and then press <Enter>.
9. Click OK when a window indicates that the file was successfully registered.
10. Double-click the My Computer icon, and then double-click the CD-ROM or DVD-ROM
icon.
11. Double-click the Guide folder, and then double-click the appropriate language folder for
the version of the Help you want to install.
12. Right-click and hold 3800help and drag it to the Windows desktop.
file:///I|/SERVICE%20MANUALS/DELL%20MANUALS/L...k/Inspiron/3800/3800_SERVICE_MANUAL/win98.htm (12 of 13)6/21/2004 12:55:06 AM
Page 49

Utilities and Drivers for Microsoft Windows 98: Dell Inspiron 3800 System Reference
13. Release the right mouse button.
14. Left-click Copy Here.
15. Double-click the 3800help icon to access the system Help.
Downloading Help From the Support Web Site
To download the system Help from http://support.dell.com, see "Online Documentation" for
instructions.
Back to Contents Page
file:///I|/SERVICE%20MANUALS/DELL%20MANUALS/L...k/Inspiron/3800/3800_SERVICE_MANUAL/win98.htm (13 of 13)6/21/2004 12:55:06 AM
Page 50

Utilities and Drivers for Microsoft Windows NT: Dell Inspiron 3800 System Reference
Back to Contents Page
Utilities and Drivers for Microsoft® Windows NT®: Dell™
Inspiron™ 3800 System Reference
Overview Installing Softex Docking Services
Installing the System Utilities Installing the DualPoint™ Integrated
Pointing Device Drivers
Installing the Video Driver Installing the Touch Pad Drivers
Installing the Audio Driver and the
Modem Driver
Installing the Intel SpeedStep Utility
Installing the Power Management Utility Installing MS-DOS CD-ROM Drivers
Installing the PC Card Utility Installing the System Help
Overview
All of your computer’s drivers for Dell-installed devices are operative when you receive the
computer. No further installation or configuration is needed. However, if you ever need to
reinstall any of these drivers, the driver files are provided on the System Software CD. For
instructions on reinstalling a particular driver, see the following subsection that corresponds to
that driver.
Often device problems can be corrected by reinstalling the appropriate drivers. Also, hardware
manufacturers frequently provide updated drivers that support feature enhancements or that
correct problems. Obtain updated drivers for products purchased from Dell at the Dell World
Wide Web support site (http://support.dell.com).
NOTICE: Drivers available on the Dell Web site have been validated for correct
file:///I|/SERVICE%20MANUALS/DELL%20MANUALS/L...k/Inspiron/3800/3800_SERVICE_MANUAL/winnt.htm (1 of 11)6/21/2004 12:55:08 AM
Page 51

Utilities and Drivers for Microsoft Windows NT: Dell Inspiron 3800 System Reference
operation on Dell systems. Installing drivers obtained from other sources may cause
errors or performance degradation.
To install the system software, you need the following items:
● Microsoft Windows NT 4.0 CD
● Microsoft Windows NT 4.0 Service Pack 5 CD
● System Software CD
● CD-ROM drive (installed)
● One formatted diskette
NOTE: Your System Software CD contains drivers for operating systems that
may not be on your computer. Verify that the driver you are loading is under
your operating system subdirectory.
Dell recommends that you print these procedures before you begin. If you need to reinstall
drivers on your computer, reinstall them in the order presented here.
NOTES: For more information on using the operating system installed on
your computer by Dell, see the operating system user's guide that came with
your computer. You can also access system tools and documentation from
Dell's technical support Web site (http://support.dell.com) by entering your
service tag or Express Service Code, and then clicking Go!.
To install the drivers and utilities correctly, you must install them in the order
presented in this document.
NOTICE: Do not dock the computer before turning it on the first time.
Installing the System Utilities
System utilities allow you to configure features such as the save-to-disk suspend (S2D)
partition. To copy the system utilities to your hard-disk drive, perform the following steps.
file:///I|/SERVICE%20MANUALS/DELL%20MANUALS/L...k/Inspiron/3800/3800_SERVICE_MANUAL/winnt.htm (2 of 11)6/21/2004 12:55:08 AM
Page 52

Utilities and Drivers for Microsoft Windows NT: Dell Inspiron 3800 System Reference
NOTE: You can also run the system utilities directly from the System
Software CD.
1. Insert the System Software CD into the CD-ROM drive.
2. Copy each of the following utilities on the System Software CD to the c:\dell directory on
your hard-disk drive: mks2d.exe, rms2d.exe, and readme.s2d.
For more information on copying files, see the documentation that came with the
operating system.
After you copy the utilities to your hard-disk drive, you must restart your computer in the MSDOS® mode to use the utilities.
See the readme.s2d file on the System Software CD for more information on using the S2D
utilities.
Installing the Video Driver
The video driver controls features such as video resolution and the color palette.
NOTE: If you need to use extended video modes, check the documentation
that came with the application program to determine if the drivers are
provided. If the drivers are not provided, contact the software manufacturer to
get the necessary drivers.
To install the video driver for Windows NT 4.0, perform the following steps:
1. Save your work in all open application programs, because you will need to restart your
computer at the end of this procedure to complete the installation.
2. Insert the System Software CD into the CD-ROM drive.
3. Click the Start button, and then click Run.
The Run dialog box appears.
file:///I|/SERVICE%20MANUALS/DELL%20MANUALS/L...k/Inspiron/3800/3800_SERVICE_MANUAL/winnt.htm (3 of 11)6/21/2004 12:55:08 AM
Page 53

Utilities and Drivers for Microsoft Windows NT: Dell Inspiron 3800 System Reference
4. Type x:\winnt4\video\setup, where x is the drive letter of your CD-ROM drive,
and click OK or press <Enter>.
5. Follow the instructions on the screen.
6. After the files are copied to your hard-disk drive, remove the System Software CD from
the CD-ROM drive, and click Finish to restart your computer.
After installing the video drivers and restarting your computer, perform the following steps to
set the display parameters:
1. Click the Start button, point to Settings, and then click Control Panel.
The Control Panel window appears.
2. Double-click the Display icon.
The Display Properties window appears.
3. Click the Settings tab.
4. Change the Colors option from 256 colors to True Color (24 bit).
5. Set the Screen area for your display to 1024 x 768.
6. Click Apply.
Installing the Audio Driver and the Modem Driver
The audio driver allows you to customize the sound features of your computer. For computers
with an integrated modem, installing the audio driver also installs the modem driver, which
allows you to use your computer to send and receive information over telephone lines. To
install the audio driver, perform the following steps:
1. Save your work in all open application programs, because you will need to restart your
computer at the end of this procedure to complete the installation.
2. Insert the System Software CD into the CD-ROM drive.
file:///I|/SERVICE%20MANUALS/DELL%20MANUALS/L...k/Inspiron/3800/3800_SERVICE_MANUAL/winnt.htm (4 of 11)6/21/2004 12:55:08 AM
Page 54

Utilities and Drivers for Microsoft Windows NT: Dell Inspiron 3800 System Reference
3. Click the Start button, and then click Run.
The Run dialog box appears.
4. Type x:\winnt4\audio\setup, where x is the drive letter of your CD-ROM drive,
and click OK or press <Enter>.
5. Follow the instructions on the screen.
6. After the files are copied to your hard-disk drive, remove the System Software CD from
the CD-ROM drive, and click Finish to restart your computer.
Installing the Power Management Utility
Dell provides a power management utility that helps you conserve battery power and view
available power levels. To install the power management utility, perform the following steps:
1. Save your work in all open application programs, because you will need to restart your
computer at the end of this procedure to complete the installation.
2. Insert the System Software CD into the CD-ROM drive.
3. Click the Start button, and then click Run.
The Run dialog box appears.
4. Type x:\winnt4\powermgt\setup, where x is the drive letter of your CD-ROM drive,
and click OK or press <Enter>.
5. Follow the instructions on the screen.
6. After the files are copied to your hard-disk drive, remove the System Software CD from
the CD-ROM drive, and click Finish to restart your computer.
Installing the PC Card Utility
file:///I|/SERVICE%20MANUALS/DELL%20MANUALS/L...k/Inspiron/3800/3800_SERVICE_MANUAL/winnt.htm (5 of 11)6/21/2004 12:55:08 AM
Page 55

Utilities and Drivers for Microsoft Windows NT: Dell Inspiron 3800 System Reference
Dell provides a PC Card utility that allows you to view and configure settings for your PC Card
(s). To install the PC Card utility, perform the following steps:
1. Save your work in all open application programs, because you will need to restart your
computer at the end of this procedure to complete the installation.
2. Insert the System Software CD into the CD-ROM drive.
3. Click the Start button, and then click Run.
The Run dialog box appears.
4. Type x:\winnt4\pccard\setup, where x is the drive letter of your CD-ROM drive,
and click OK or press <Enter>.
5. Follow the instructions on the screen.
6. Restart your computer.
7. After the computer completes the starting sequence, the Softex PC Card Controller
Diagnostics window appears.
8. Follow the instructions on the screen.
9. When prompted to restart, remove the System Software CD from the CD-ROM drive,
and restart your computer to activate the utility.
Installing Softex Docking Services
Softex Docking Services enables you to connect a computer running Windows NT to a port
replicator and to hot-swap devices to and from the computer's media bay. It also enables you
to dock and undock the computer while it is in standby mode. Softex Docking Services
provides compatibility with the power management controller, which allows you to suspend and
resume the operation of your computer without affecting your ability to use the port replicator.
To install Softex Docking Services, perform the following steps:
1. Save your work in all open application programs, because you will need to restart your
computer at the end of this procedure to complete the installation.
file:///I|/SERVICE%20MANUALS/DELL%20MANUALS/L...k/Inspiron/3800/3800_SERVICE_MANUAL/winnt.htm (6 of 11)6/21/2004 12:55:08 AM
Page 56

Utilities and Drivers for Microsoft Windows NT: Dell Inspiron 3800 System Reference
2. Insert the System Software CD into the CD-ROM drive.
3. Click the Start button, and then click Run.
The Run dialog box appears.
4. Type x:\winnt4\docking\setup, where x is the drive letter of your CD-ROM drive,
and click OK or press <Enter>.
5. Follow the instructions on the screen.
6. When the installation is complete, click OK.
7. When the Reboot Now dialog box appears, remove the System Software CD from the
CD-ROM drive, and click Restart Now to reboot your computer.
Installing the DualPoint™ Integrated Pointing Device Drivers
DualPoint integrated pointing device drivers and associated utilities allow you to use and
customize the integrated touch pad, track stick, or an external mouse. To install these drivers,
perform the following steps.
NOTICE: Use these steps to install touch pad drivers only if your computer
has a track stick. If your computer does not have a track stick, follow the
instructions in "Installing the Touch Pad Drivers."
1. Save your work in all open application programs, because you will need to restart your
computer at the end of this procedure to complete the installation.
2. Insert the System Software CD into the CD-ROM drive.
3. Click the Start button, and then click Run.
The Run dialog box appears.
4. Type x:\winnt4\touchpad\dual\setup, where x is the drive letter of your CD-
ROM drive, and click OK or press <Enter>.
file:///I|/SERVICE%20MANUALS/DELL%20MANUALS/L...k/Inspiron/3800/3800_SERVICE_MANUAL/winnt.htm (7 of 11)6/21/2004 12:55:08 AM
Page 57

Utilities and Drivers for Microsoft Windows NT: Dell Inspiron 3800 System Reference
5. Follow the instructions on the screen.
6. After the files are copied to your hard-disk drive, remove the System Software CD from
the CD-ROM drive, and click Finish to restart your computer.
Installing the Touch Pad Drivers
Touch pad drivers and associated utilities allow you to use and customize the integrated touch
pad or external mouse. To install these drivers, perform the following steps.
NOTICE: Use these steps to install touch pad drivers only if your computer
does not have a track stick. If your computer has a track stick, follow the
instructions in "
Installing the DualPoint Integrated Pointing Device Drivers."
1. Save your work in all open application programs, because you will need to restart your
computer at the end of this procedure to complete the installation.
2. Insert the System Software CD into the CD-ROM drive.
3. Click the Start button, and then click Run.
The Run dialog box appears.
4. Type x:\winnt4\touchpad\single\setup, where x is the drive letter of your CD-
ROM drive, and click OK or press <Enter>.
5. Follow the instructions on the screen.
6. After the files are copied to your hard-disk drive, remove the System Software CD from
the CD-ROM drive, and click Finish to restart your computer.
Installing the Intel® SpeedStep™ Utility
Intel SpeedStep conserves battery power by automatically adjusting the processor speed
when you run your computer from the battery instead of AC power. SpeedStep reduces the
file:///I|/SERVICE%20MANUALS/DELL%20MANUALS/L...k/Inspiron/3800/3800_SERVICE_MANUAL/winnt.htm (8 of 11)6/21/2004 12:55:08 AM
Page 58

Utilities and Drivers for Microsoft Windows NT: Dell Inspiron 3800 System Reference
processor speed when using the battery and resumes maximum processor speed when
plugged into an electrical outlet. To install SpeedStep, perform the following steps:
1. Save your work in all open application programs, because you will need to restart your
computer at the end of this procedure to complete the installation.
2. Insert the System Software CD into the CD-ROM drive.
3. Click the Start button, and then click Run.
The Run dialog box appears.
4. Type x:\winnt4\speedstp\language\setup, where x is the drive letter of your
CD-ROM drive and language is Dutch, English, French, German, Japanese, Korean,
Spanish, Swedish, SChinese (Simplified Chinese), TChinese (Traditional Chinese), or
Thai.
5. Click OK or press <Enter>.
6. Follow the instructions on the screen.
7. After the files are copied to your hard-disk drive, remove the System Software CD from
the CD-ROM drive, and click Finish to restart your computer.
Installing MS-DOS CD-ROM Drivers
CD-ROM drivers must be installed to use the MS-DOS CD-ROM utility. To install the CD-ROM
drivers, perform the following steps:
1. Save your work in all open application programs, because you will need to restart your
computer at the end of this procedure to complete the installation.
2. Insert the System Software CD into the drive.
3. Click the Start button, and then click Run.
The Run dialog box appears.
file:///I|/SERVICE%20MANUALS/DELL%20MANUALS/L...k/Inspiron/3800/3800_SERVICE_MANUAL/winnt.htm (9 of 11)6/21/2004 12:55:08 AM
Page 59

Utilities and Drivers for Microsoft Windows NT: Dell Inspiron 3800 System Reference
4. Type x:\win98\cdrom\setup.
5. Click OK or press <Enter>.
6. Follow the instructions on the screen.
7. After the files are copied to your hard-disk drive, remove the System Software CD from
the CD-ROM drive, and click Finish to restart your computer.
Installing the System Help
The Dell Inspiron system Help is available on the System Software CD. You can also access it
from Dell’s support Web site (http://support.dell.com).
NOTE: You must install Microsoft Internet Explorer 4.01 from the Microsoft
Windows NT 4.0 Service Pack 5 CD prior to installing the system Help.
Installing Help From the CD
To install the system Help from the System Software CD, perform the following steps:
1. Insert the CD into the CD-ROM drive.
2. Double-click the My Computer icon, and then double-click the CD-ROM drive icon.
3. Double-click the Guide folder, and then double-click the appropriate language folder for
the version of the Help you want to install.
4. Right-click and hold 3800help and drag it to the Windows desktop.
5. Release the right mouse button.
6. Left-click Copy Here.
7. Double-click the 3800help icon to access the system Help.
Downloading Help From the Support Web Site
file:///I|/SERVICE%20MANUALS/DELL%20MANUALS/L...k/Inspiron/3800/3800_SERVICE_MANUAL/winnt.htm (10 of 11)6/21/2004 12:55:08 AM
Page 60

Utilities and Drivers for Microsoft Windows NT: Dell Inspiron 3800 System Reference
To download the system Help from http://support.dell.com, see "Online Documentation" for
instructions.
Back to Contents Page
file:///I|/SERVICE%20MANUALS/DELL%20MANUALS/L...k/Inspiron/3800/3800_SERVICE_MANUAL/winnt.htm (11 of 11)6/21/2004 12:55:08 AM
Page 61

Utilities and Drivers for Microsoft Windows 2000: Dell Inspiron 3800 System Reference
Back to Contents Page
Utilities and Drivers for Microsoft® Windows® 2000: Dell™
Inspiron™ 3800 System Reference
Overview Installing the Touch Pad Drivers
Installing the Video Driver Installing the Intel SpeedStep Utility
Installing the Audio Driver and the
Modem Driver
Installing MS-DOS CD-ROM Drivers
Installing the DualPoint Integrated
Pointing Device Drivers
Installing the System Help
Overview
All of your computer’s drivers for Dell-installed devices are operative when you receive the
computer. No further installation or configuration is needed. However, if you ever need to
reinstall any of these drivers, the driver files are provided on the System Software CD. For
instructions on reinstalling a particular driver, see the following subsection that corresponds to
that driver.
Often device problems can be corrected by reinstalling the appropriate drivers. Also, hardware
manufacturers frequently provide updated drivers that support feature enhancements or that
correct problems. Obtain updated drivers for products purchased from Dell at the Dell World
Wide Web support site (http://support.dell.com).
NOTICE: Drivers available on the Dell Web site have been validated for correct
operation on Dell systems. Installing drivers obtained from other sources may cause
errors or performance degradation.
To install the system software, you need the following items:
● System Software CD
● CD-ROM or DVD-ROM drive installed in the media bay of the computer
file:///I|/SERVICE%20MANUALS/DELL%20MANUALS/L...Inspiron/3800/3800_SERVICE_MANUAL/win2000.htm (1 of 8)6/21/2004 12:55:09 AM
Page 62

Utilities and Drivers for Microsoft Windows 2000: Dell Inspiron 3800 System Reference
● Microsoft Windows 2000 CD
NOTE: Your System Software CD contains drivers for operating systems that
may not be on your computer. Verify that the driver you are loading is under
your operating system subdirectory.
Dell recommends that you print these procedures before you begin.
NOTES: For more information on using the operating system installed on
your computer by Dell, see the operating system user's guide that came with
your computer. You can also access system tools and documentation from
Dell's technical support Web site (http://support.dell.com) by entering your
service tag or Express Service Code, and then clicking Go!.
To install the drivers and utilities correctly, you must install them in the order
presented in this document.
NOTICE: Do not dock the computer before turning it on the first time.
Installing the Video Driver
The video driver controls features such as video resolution and the color palette.
NOTE: If you need to use extended video modes, check the documentation
that came with the application program to determine if the drivers are
provided. If not, contact the software manufacturer to get the necessary
drivers.
To install the video driver for Windows 98, perform the following steps:
1. Save your work in all open application programs, because you will need to restart your
computer at the end of this procedure to complete the installation.
2. Insert the System Software CD into the CD-ROM drive.
3. Click the Start button, and then click Run.
The Run dialog box appears.
file:///I|/SERVICE%20MANUALS/DELL%20MANUALS/L...Inspiron/3800/3800_SERVICE_MANUAL/win2000.htm (2 of 8)6/21/2004 12:55:09 AM
Page 63

Utilities and Drivers for Microsoft Windows 2000: Dell Inspiron 3800 System Reference
4. Type x:\win2000\video\setup, where x is the drive letter of your CD-ROM drive,
and click OK or press <Enter>.
5. Follow the instructions on the screen.
6. After the files are copied to your hard-disk drive, remove the System Software CD from
the CD-ROM drive, and click Finish to restart your computer.
After installing the video drivers and restarting your computer, perform the following steps to
set the display parameters:
1. Click the Start button, point to Settings, and then click Control Panel.
The Control Panel window appears.
2. Double-click the Display icon.
The Display Properties window appears.
3. Click the Settings tab.
4. Change the Colors option from 256 colors to True Color (24 bit).
5. Set the Screen area for your display to 1024 x 768.
6. Click Apply.
Installing the Audio Driver and the Modem Driver
The audio driver allows you to customize the sound features of your computer. For computers
with an integrated modem, installing the audio driver also installs the modem driver, which
allows you to use your computer to send and receive information over telephone lines. To
install the audio driver, perform the following steps:
1. Save your work in all open application programs, because you will need to restart your
computer at the end of this procedure to complete the installation.
2. Insert the System Software CD into the CD-ROM drive.
file:///I|/SERVICE%20MANUALS/DELL%20MANUALS/L...Inspiron/3800/3800_SERVICE_MANUAL/win2000.htm (3 of 8)6/21/2004 12:55:09 AM
Page 64

Utilities and Drivers for Microsoft Windows 2000: Dell Inspiron 3800 System Reference
3. Click the Start button, and then click Run.
The Run dialog box appears.
4. Type x:\win2000\audio\setup, where x is the drive letter of your CD-ROM drive,
and click OK or press <Enter>.
5. Follow the instructions on the screen.
6. After the files are copied to your hard-disk drive, remove the System Software CD from
the CD-ROM drive, and click Finish to restart your computer.
Installing the DualPoint™ Integrated Pointing Device Drivers
DualPoint integrated pointing device drivers and associated utilities allow you to use and
customize the integrated touch pad, track stick, or an external mouse. To install these drivers,
perform the following steps.
NOTICE: Use these steps to install touch pad drivers only if your computer
has a track stick. If your computer does not have a track stick, follow the
instructions in "Installing the Touch Pad Drivers."
1. Save your work in all open application programs, because you will need to restart your
computer at the end of this procedure to complete the installation.
2. Insert the System Software CD into the CD-ROM drive.
3. Click the Start button, and then click Run.
The Run dialog box appears.
4. Type x:\win2000\touchpad\dual\setup, where x is the drive letter of your CD-
ROM drive, and click OK or press <Enter>.
5. Follow the instructions on the screen.
6. After the files are copied to your hard-disk drive, remove the System Software CD from
file:///I|/SERVICE%20MANUALS/DELL%20MANUALS/L...Inspiron/3800/3800_SERVICE_MANUAL/win2000.htm (4 of 8)6/21/2004 12:55:09 AM
Page 65

Utilities and Drivers for Microsoft Windows 2000: Dell Inspiron 3800 System Reference
the CD-ROM drive, and click Finish to restart your computer.
Installing the Touch Pad Drivers
Touch pad drivers and associated utilities allow you to use and customize the integrated touch
pad or external mouse. To install these drivers, perform the following steps.
NOTICE: Use these steps to install touch pad drivers only if your computer
does not have a track stick. If your computer has a track stick, follow the
instructions in "Installing the DualPoint Integrated Pointing Device Drivers."
1. Save your work in all open application programs, because you will need to restart your
computer at the end of this procedure to complete the installation.
2. Insert the System Software CD into the CD-ROM drive.
3. Click the Start button, and then click Run.
The Run dialog box appears.
4. Type x:\win2000\touchpad\single\setup, where x is the drive letter of your CD-
ROM drive, and click OK or press <Enter>.
5. Follow the instructions on the screen.
6. After the files are copied to your hard-disk drive, remove the System Software CD from
the CD-ROM drive, and click Finish to restart your computer.
Installing the Intel® SpeedStep™ Utility
Intel SpeedStep conserves battery power by automatically adjusting the processor speed
when you run your computer from the battery instead of AC power. SpeedStep reduces the
processor speed when using the battery and resumes maximum processor speed when
plugged into an electrical outlet. To install SpeedStep, perform the following steps:
1. Save your work in all open application programs, because you will need to restart your
file:///I|/SERVICE%20MANUALS/DELL%20MANUALS/L...Inspiron/3800/3800_SERVICE_MANUAL/win2000.htm (5 of 8)6/21/2004 12:55:09 AM
Page 66

Utilities and Drivers for Microsoft Windows 2000: Dell Inspiron 3800 System Reference
computer at the end of this procedure to complete the installation.
2. Insert the System Software CD into the CD-ROM drive.
3. Click the Start button, and then click Run.
The Run dialog box appears.
4. Type x:\win2000\speedstp\language\setup, where x is the drive letter of your
CD-ROM drive and language is Dutch, English, French, German, Japanese, Korean,
Spanish, Swedish, SChinese (Simplified Chinese), TChinese (Traditional Chinese), or
Thai.
5. Click OK or press <Enter>.
6. Follow the instructions on the screen.
7. After the files are copied to your hard-disk drive, remove the System Software CD from
the CD-ROM drive, and click Finish to restart your computer.
Installing MS-DOS CD-ROM Drivers
CD-ROM drivers must be installed to use the MS-DOS CD-ROM utility. To install the CD-ROM
drivers, perform the following steps:
1. Save your work in all open application programs, because you will need to restart your
computer at the end of this procedure to complete the installation.
2. Insert the System Software CD into the drive.
3. Click the Start button, and then click Run.
The Run dialog box appears.
4. Type x:\win98\cdrom\setup.
5. Click OK or press <Enter>.
file:///I|/SERVICE%20MANUALS/DELL%20MANUALS/L...Inspiron/3800/3800_SERVICE_MANUAL/win2000.htm (6 of 8)6/21/2004 12:55:09 AM
Page 67

Utilities and Drivers for Microsoft Windows 2000: Dell Inspiron 3800 System Reference
6. Follow the instructions on the screen.
7. After the files are copied to your hard-disk drive, remove the System Software CD from
the CD-ROM drive, and click Finish to restart your computer.
Installing the System Help
The Dell Inspiron system Help is available on the System Software CD. You can also access it
from Dell’s support Web site (http://support.dell.com).
Installing Help From the CD
To install the system Help from the System Software CD, perform the following steps:
1. Insert the System Software CD into the CD-ROM or DVD-ROM drive.
2. Double-click the My Computer icon, and then double-click the CD-ROM or DVD-ROM
drive icon.
3. Double-click the Guide folder, and then double-click the appropriate language folder for
the version of the Help you want to install.
4. Right-click the popup.ocx file, and then click Copy.
NOTE: You must copy the popup.ocx file into the Windows registry;
otherwise, error messages may appear.
5. Double-click the My Computer icon, and then double-click the C: drive icon.
6. Double-click the Windows folder, double-click the System folder, and then right-click
Paste.
7. Click Start, and then click Run....
8. Type regsvr32 popup.ocx and then press <Enter>.
9. Click OK when a window indicates that the file was successfully registered.
file:///I|/SERVICE%20MANUALS/DELL%20MANUALS/L...Inspiron/3800/3800_SERVICE_MANUAL/win2000.htm (7 of 8)6/21/2004 12:55:09 AM
Page 68

Utilities and Drivers for Microsoft Windows 2000: Dell Inspiron 3800 System Reference
10. Double-click the My Computer icon, and then double-click the CD-ROM or DVD-ROM
icon.
11. Double-click the Guide folder, and then double-click the appropriate language folder for
the version of the Help you want to install.
12. Right-click and hold 3800help and drag it to the Windows desktop.
13. Release the right mouse button.
14. Left-click Copy Here.
15. Double-click the 3800help icon to access the system Help.
Downloading Help From the Support Web Site
To download the system Help from http://support.dell.com, see "Online Documentation" for
instructions.
Back to Contents Page
file:///I|/SERVICE%20MANUALS/DELL%20MANUALS/L...Inspiron/3800/3800_SERVICE_MANUAL/win2000.htm (8 of 8)6/21/2004 12:55:09 AM
Page 69

Technical Specifications: Dell Inspiron 3800 System Reference
Back to Contents Page
Technical Specifications: Dell™ Inspiron™ 3800 System Reference
Microprocessor Display
Chip Set and Bus Keyboard
PC Cards Batteries
Memory AC Adapter
Connectors Physical
Modem Environmental (Computer)
Audio Touch Pad
Video Track Stick
Microprocessor
Microprocessor type Intel® Mobile Pentium® II or III microprocessor
L1 cache 32 KB (internal)
L2 cache 128- or 256-KB (integrated) or 512-KB pipelined-burst
SRAM (external)
External bus frequency 100 MHz
Math coprocessor internal to the microprocessor
Chip Set and Bus
System chip set Intel Mobile 440BX AGP set
file:///I|/SERVICE%20MANUALS/DELL%20MANUALS/LA...ok/Inspiron/3800/3800_SERVICE_MANUAL/specs.htm (1 of 9)6/21/2004 12:55:10 AM
Page 70

Technical Specifications: Dell Inspiron 3800 System Reference
Microprocessor data bus width 64 bits
DRAM bus width 64 bits
Address bus width 32 bits
Flash EPROM 4 Mb
AGP bus 133 MHz
PCI bus 33 MHz
PC Cards
CardBus controller Texas Instruments PCI 1225 CardBus controller
PC Card connectors two (supports Type I and Type II cards in any
combination; Type III cards can be used only in the
lower connector; the lower connector supports zoomed
video cards on computers using the Microsoft®
Windows® 98 or Windows 2000 operating system)
Cards supported 3.3-V and 5-V cards
PC Card connector size 68 pins
Data width (maximum):
PCMCIA 16 bits
CardBus 32 bits
Memory
Architecture SDRAM
Memory module sockets two
Memory module capacities and type 32-, 64-, 128-, 192-, and 256-MB 3.3-V SDRAM
modules
Minimum RAM 32-MB memory module
Maximum RAM 512 MB
file:///I|/SERVICE%20MANUALS/DELL%20MANUALS/LA...ok/Inspiron/3800/3800_SERVICE_MANUAL/specs.htm (2 of 9)6/21/2004 12:55:10 AM
Page 71

Technical Specifications: Dell Inspiron 3800 System Reference
Memory clock speed 100 MHz
Memory access time CL2 or CL3
NOTE: CL3 indicates a CAS latency of 3 clocks.
BIOS address F000:0000-F000:FFFF
Connectors
Serial (DTE) 9-pin connector; 16,550-compatible, 16-byte buffer
Parallel 25-hole connector; unidirectional, bidirectional, or ECP
Video 15-hole connector
PS/2 6-pin mini-DIN connector
Infrared IrDA 1.1 lens
Audio
microphone-in connector;
line-in connector;
line-out connector
USB 4-pin connector
Docking 240-pin connector
TV-out S-video 7-pin mini-DIN connector (an S-video to composite
video adapter is also included with the computer)
Modem
Modem type/speed internal 56K software modem
Modem cable minimum wire size of 26 American wire gauge (AWG)
and FCC-compliant RJ-11 connector
Audio
Audio type DirectX/PCI Sound Blaster emulation
file:///I|/SERVICE%20MANUALS/DELL%20MANUALS/LA...ok/Inspiron/3800/3800_SERVICE_MANUAL/specs.htm (3 of 9)6/21/2004 12:55:10 AM
Page 72

Technical Specifications: Dell Inspiron 3800 System Reference
Audio controller ESS Maestro 3I
Stereo conversion 16 bit (analog-to-digital and digital-to-analog)
Interfaces:
Internal PCI bus/AC97
External
microphone in; line-in; line-out
Speakers two 8-ohm speakers
Internal speaker amplifier 1-W channel into 8-ohms stereo
Controls (volume) key combinations or application program menus
Video
Video type 256-bit hardware-accelerated
Data bus 2X AGP
Video controller ATI Mobility M1
Video memory 8.0 MB
Display
Type active-matrix color (TFT)
Maximum resolution
12.1-inch display 800 x 600 pixels
14.1-inch display 1024 x 768 pixels
Maximum colors 262,144-color display
Response time (typical) 30 ms rise/20 ms fall
Operating angle 0° to 180°
file:///I|/SERVICE%20MANUALS/DELL%20MANUALS/LA...ok/Inspiron/3800/3800_SERVICE_MANUAL/specs.htm (4 of 9)6/21/2004 12:55:10 AM
Page 73

Technical Specifications: Dell Inspiron 3800 System Reference
Dot pitch 0.30 mm
Power consumption:
Panel (typical) 0.7 W
Backlight 1.6 W maximum
Controls brightness controlled through a key combination
Keyboard
Number of keys 87 (U.S., Canada, Korea, Thailand, and locations that
use traditional Chinese);
88 (Europe);
90 (Japan)
Key travel 3.0 mm + 0.5 mm/–0.2 mm (0.12 inch + 0.02 inch/
–0.0008 inch)
Key spacing 19.05 mm ± 0.3 mm (0.75 inch ± 0.012 inch)
Batteries
Type lithium ion or nickel-metal hydride
Dimensions:
Height 21.5 mm (0.83 inch)
Depth 88.5 mm (3.48 inches)
Width 139.0 mm (5.47 inches)
Weight lithium ion—0.39 kg (0.87 lb)
nickel-metal hydride—0.46 kg (1.01 lb)
Voltage lithium ion—14.8 VDC
nickel-metal hydride—9.6 VDC
file:///I|/SERVICE%20MANUALS/DELL%20MANUALS/LA...ok/Inspiron/3800/3800_SERVICE_MANUAL/specs.htm (5 of 9)6/21/2004 12:55:10 AM
Page 74

Technical Specifications: Dell Inspiron 3800 System Reference
Capacity lithium ion—53 WH
nickel-metal hydride—32 WH
Charge time (approximate):
1
Computer on 2.5 hours
Computer off lithium ion—1 hour
nickel-metal hydride—2.5 hours
Life span (approximate)
1
400 discharge/charge cycles
Temperature range:
Charge 0° to 40°C (32° to 104°F)
Storage –20° to 60°C (–4° to 140°F)
AC Adapter
Input voltage 90 to 135 VAC and 164 to 264 VAC
Input current (maximum) 1.5 A
Input frequency 47 to 63 Hz
Output current
4.5 A (maximum at 4-second pulse);
3.51 A (continuous)
Output power 70 W
Rated output voltage 20.0 VDC
Dimensions:
Height 27.94 mm (1.1 inches)
Width 58.42 mm (2.3 inches)
Depth 133.35 mm (5.25 inches)
Weight (with cables) 0.4 kg (0.9 LB)
file:///I|/SERVICE%20MANUALS/DELL%20MANUALS/LA...ok/Inspiron/3800/3800_SERVICE_MANUAL/specs.htm (6 of 9)6/21/2004 12:55:10 AM
Page 75

Technical Specifications: Dell Inspiron 3800 System Reference
Temperature range:
Operating 0° to 40°C (32° to 104°F)
Storage –20° to 60°C (–4° to 140°F)
Physical
Dimensions:
Height 38.6 mm (1.52 inches)
Width 306.0 mm (12.05 inches)
Depth 241.0 mm (9.49 inches)
Environmental (Computer)
Temperature:
Operating 0° to 40°C (32° to 104°F)
Storage –20° to 60°C (–4° to 140°F)
Relative humidity (maximum):
Operating 10% to 90% (noncondensing)
Storage 5% to 95% (noncondensing)
Maximum vibration:
Operating 0.9 GRMS using a random-vibration spectrum that
simulates user environment
file:///I|/SERVICE%20MANUALS/DELL%20MANUALS/LA...ok/Inspiron/3800/3800_SERVICE_MANUAL/specs.htm (7 of 9)6/21/2004 12:55:10 AM
Page 76

Technical Specifications: Dell Inspiron 3800 System Reference
Storage 1.3 GRMS using a random-vibration spectrum that
simulates air/truck shipment
Maximum shock:
2
Operating
152.4 cm/sec (60.0 inches/sec)
(equal to a half-sine pulse width of 2 ms)
Storage
203.2 cm/sec (80 inches/sec)
(equal to a half-sine pulse width of 2 ms)
Altitude (maximum):
Operating –18.0 to 3048 m (–59 to 10,000 ft)
Storage –18.0 to 10,668 m (–59 to 35,000 ft)
Touch Pad
Interface PS/2-compatible
X/Y position resolution (graphics table
mode)
240 cpi
Size:
Thickness 2.8 mm (0.11 inch) at highest component
Width (sensor-active area) 55 mm (2.17 inch)
Height 39 mm (1.54-inch) rectangle
Weight 9.02 g (0.29 oz)
Power:
Supply voltage 5 V ± 10%
Supply current 25 mA (maximum operating for track stick and touch
pad combined)
file:///I|/SERVICE%20MANUALS/DELL%20MANUALS/LA...ok/Inspiron/3800/3800_SERVICE_MANUAL/specs.htm (8 of 9)6/21/2004 12:55:10 AM
Page 77

Technical Specifications: Dell Inspiron 3800 System Reference
ESD in accordance with IEC-801-2
Track Stick
Interface PS/2-compatible
X/Y position resolution 250 counts/sec.@100gf
Size protrudes .5 mm higher than surrounding keycaps
Power:
Supply voltage 5 V ± .5 VDC
Supply current 25 ma (maximum operating for track stick and touch
pad combined)
ESD in accordance with IEC-801-2
1
Battery performance features such as charge time and life span can vary according to the
conditions under which the computer and battery are used.
2
Measured with the hard-disk drive in head-parked position.
Back to Contents Page
file:///I|/SERVICE%20MANUALS/DELL%20MANUALS/LA...ok/Inspiron/3800/3800_SERVICE_MANUAL/specs.htm (9 of 9)6/21/2004 12:55:10 AM
Page 78

System Setup Program: Dell Inspiron 3800 System Reference
Back to Contents Page
System Setup Program: Dell™ Inspiron™ 3800 System Reference
Overview Page 2 Options
Entering the System Setup Program Page 3 Options
Using the System Setup Program Page 4 Options
Page 1 Options
Overview
Each time you turn on your computer, it compares the installed hardware with the system configuration
information stored in nonvolatile random-access memory (NVRAM). If the system detects a
discrepancy, it generates an error message for each incorrect configuration setting. You can use the
System Setup program to adjust the configuration settings.
You can use the System Setup program to:
● Change your system configuration information after you add, change, or remove hardware
connected to or installed inside your computer
● Verify information about your computer's current configuration, such as the amount of system
memory
● Set or change selectable settings—for example, the system password
For some setup options, you must reboot the computer before any changes take effect. Changes for
other options take effect immediately.
NOTE: If you change an option that is activated by rebooting, the System Setup
program displays the setting you selected rather than the setting currently in effect.
You must reboot for the new setting to take effect.
After you set up your computer, run the System Setup program to familiarize yourself with your system
configuration information and optional settings. Dell recommends that you write down the information
for future reference.
file:///I|/SERVICE%20MANUALS/DELL%20MANUALS/LA...ok/Inspiron/3800/3800_SERVICE_MANUAL/setup.htm (1 of 5)6/21/2004 12:55:11 AM
Page 79

System Setup Program: Dell Inspiron 3800 System Reference
NOTE: If the computer uses the Microsoft® Windows NT® 4.0 or Windows® 98
operating system, you must use the System Setup program to view and change your
system configuration.
Entering the System Setup Program
NOTICE: To avoid data loss, save and close any open files and exit any open
application programs before you access the System Setup program.
Enter the System Setup program as follows:
● For computers running the Microsoft Windows 98 or Windows NT operating system: Press
<Fn><F1> at any time on the keyboard (or <Scroll Lock><F1> on an external keyboard if the
External Hot Key option is enabled). If you press <Fn><F3> (or <Scroll Lock><F3> on an
external keyboard if the External Hot Key option is enabled), the System Setup program opens
directly to the Battery Status screen. While your computer is booting, you can also press <F2>
when the Dell screen appears.
● For computers running the Windows 2000 operating system: While your computer is booting,
press <F2> when the Dell screen appears.
NOTE: Certain key combinations may not function with the Advanced Configuration
and Power Interface (ACPI) or may require activation with the Power Management
Properties window in the Control Panel. See "
Power Conservation."
To enter System Setup on a computer running ACPI, you must enter System Setup before the
operating system loads. Enter System Setup by pressing <Fn><F1> or <F2> when the F2 message
appears during system start-up.
To exit the System Setup program, press <Esc>. If you change the setting of an option that requires
rebooting to take effect, exit the operating system before rebooting. The text in the upper-right corner
of the System Setup pages 1, 2, and 4 tells you if the computer must be rebooted.
NOTE: If the System Setup program is running when the computer enters standby
mode, the computer exits the System Setup program and then activates standby
mode.
Using the System Setup Program
The System Setup screens display the current setup and configuration information and optional
file:///I|/SERVICE%20MANUALS/DELL%20MANUALS/LA...ok/Inspiron/3800/3800_SERVICE_MANUAL/setup.htm (2 of 5)6/21/2004 12:55:11 AM
Page 80

System Setup Program: Dell Inspiron 3800 System Reference
settings for your computer. Information on the screens is organized in five boxed areas:
● Title
The box at the top of all screens lists the page number, system name, and version number of
the basic input/output system (BIOS).
● Options
The box on the left half of screens 1, 2, and 4 lists options that define the installed hardware in
your computer and the power conservation and security features for your computer.
Fields next to the options contain settings or values. You can change those values that appear
bright on the screen. Options or values that you cannot change (because they are determined or
calculated by the computer) appear less bright.
● Help
The box on the upper-right half of screens 1, 2, and 4 displays help information for the option
with a currently highlighted field.
● Computer data
The box in the lower-right corner of screens 1, 2, and 4 displays information about your
computer.
● Key functions
The line of boxes across the bottom of all screens lists keys and their functions within the
System Setup program.
Page 1 Options
file:///I|/SERVICE%20MANUALS/DELL%20MANUALS/LA...ok/Inspiron/3800/3800_SERVICE_MANUAL/setup.htm (3 of 5)6/21/2004 12:55:11 AM
Page 81

System Setup Program: Dell Inspiron 3800 System Reference
Page 2 Options
Page 3 Options
file:///I|/SERVICE%20MANUALS/DELL%20MANUALS/LA...ok/Inspiron/3800/3800_SERVICE_MANUAL/setup.htm (4 of 5)6/21/2004 12:55:11 AM
Page 82

System Setup Program: Dell Inspiron 3800 System Reference
Page 4 Options
Back to Contents Page
file:///I|/SERVICE%20MANUALS/DELL%20MANUALS/LA...ok/Inspiron/3800/3800_SERVICE_MANUAL/setup.htm (5 of 5)6/21/2004 12:55:11 AM
Page 83

System Error Messages: Dell Inspiron 3800 System Reference
Back to Contents Page
System Error Messages: Dell™ Inspiron™ 3800 System
Reference
Your application programs, operating system, and the computer itself can identify problems
and alert you to them. When this occurs, a message may appear on the computer's display or
on an external monitor (if one is attached), or a flash code may be emitted.
If an error message appears on the display or external monitor, make a note of the message.
For an explanation of the message and suggestions for correcting any errors, see Table 1. The
messages are listed alphabetically.
NOTES: If the message is not listed in Table 1, see the documentation for
the application program that was running at the time the message appeared
and/or the operating system documentation for an explanation of the
message and a recommended action.
When Table 1 suggests that you run a Dell Diagnostics test, refer to
"Running the Dell Diagnostics" in Chapter 3 of the Reference and
Troubleshooting Guide for instructions. When Table 1 suggests that you call
Dell for technical assistance, refer to "Contacting Dell" in the system Help for
instructions. When Table 1 suggests that you enable or disable a System
Setup program option, see "System Setup Program."
Table 1. System Error Messages
Message Cause Action
file:///I|/SERVICE%20MANUALS/DELL%20MANUALS/LA...Inspiron/3800/3800_SERVICE_MANUAL/syscodes.htm (1 of 9)6/21/2004 12:55:12 AM
Page 84

System Error Messages: Dell Inspiron 3800 System Reference
Auxiliary device
failure
The touch pad, track stick,
or external Personal
System/2 (PS/2) mouse
may be faulty.
If you are using an external
mouse only, check the
connection for a loose or
improperly connected
cable. If the problem
persists, enable the
Pointing Device option.
For information, see "
Page
2 Options." If the problem
persists, call Dell for
technical assistance.
Bad command or file
name
The command you entered
does not exist or is not in
the pathname you
specified.
Make sure that you have
typed the command
correctly, placed spaces in
the proper location, and
used the correct pathname.
Cache disabled due to
failure
The primary cache internal
to the microprocessor has
failed.
Call Dell for technical
assistance.
CD-ROM drive
controller failure 1
The CD-ROM drive does
not respond to commands
from the computer.
Turn off the computer,
remove the drive, and boot
the computer from a
bootable diskette. Then turn
off the computer again,
reinstall the drive, and
reboot the computer. If the
problem persists, try
another drive. Then run the
IDE Devices tests in the
Dell Diagnostics.
Data error
The diskette or hard-disk
drive cannot read the data.
Run the appropriate utility
to check the file structure of
the diskette drive or harddisk drive. See the
documentation that came
with your operating system.
file:///I|/SERVICE%20MANUALS/DELL%20MANUALS/LA...Inspiron/3800/3800_SERVICE_MANUAL/syscodes.htm (2 of 9)6/21/2004 12:55:12 AM
Page 85

System Error Messages: Dell Inspiron 3800 System Reference
Decreasing available
memory
One or more memory
modules may be faulty or
improperly seated.
Reseat the memory
modules and, if necessary,
replace them.
Disk C: failed
initialization
The hard-disk drive failed
initialization.
Run the IDE Devices tests
in the Dell Diagnostics.
Diskette drive 0 seek
failure
A cable may be loose, or
the system configuration
information may not match
the hardware configuration.
Run the Diskette tests in
the Dell Diagnostics. If the
error is not corrected, have
the cables checked by an
authorized service
technician.
Diskette read failure
A cable may be loose, or
the diskette may be faulty.
If the diskette-drive access
indicator lights up, try a
different diskette.
Diskette subsystem
reset failed
The diskette drive
controller may be faulty.
Run the Diskette tests in
the Dell Diagnostics.
Diskette writeprotected
Because the diskette is
write-protected, the
operation cannot be
completed.
Slide the write-protect notch
up.
Drive not ready
No diskette is in the
diskette drive, or no harddisk drive is in the media
bay. The operation
requires a diskette in the
drive or a hard-disk drive
in the bay before it can
continue.
Put a diskette in the drive
bay and push the diskette
all the way into the drive
until the eject button pops
out. Or, install a hard-disk
drive in the media bay.
Error reading PCMCIA
card
The computer cannot
identify the PC Card.
Reseat the card or try
another PC Card that you
know works.
Extended memory size
has changed
The amount of memory
recorded in NVRAM does
not match the memory
installed in the computer.
Reboot the computer. If the
error appears on the
display again, call Dell for
technical assistance.
file:///I|/SERVICE%20MANUALS/DELL%20MANUALS/LA...Inspiron/3800/3800_SERVICE_MANUAL/syscodes.htm (3 of 9)6/21/2004 12:55:12 AM
Page 86

System Error Messages: Dell Inspiron 3800 System Reference
Gate A20 failure
An installed memory
module may be loose.
Reseat the memory
modules and, if necessary,
replace them.
General failure
The operating system is
unable to carry out the
command.
This message is usually
followed by specific
information—for example,
Printer out of
paper. Respond by taking
the appropriate action.
Hard-disk drive
configuration error
The computer cannot
identify the drive type.
Turn off the computer,
remove the drive, and boot
the computer from a
bootable diskette. Then turn
off the computer, reinstall
the drive, and reboot the
computer. Run the IDE
Devices tests in the Dell
Diagnostics.
Hard-disk drive
controller failure 0
The hard-disk drive does
not respond to commands
from the computer.
Turn off the computer,
remove the drive, and boot
the computer from a
bootable diskette. Then turn
off the computer again,
reinstall the drive, and
reboot the computer. If the
problem persists, try
another drive. Then run the
IDE Devices tests in the
Dell Diagnostics.
file:///I|/SERVICE%20MANUALS/DELL%20MANUALS/LA...Inspiron/3800/3800_SERVICE_MANUAL/syscodes.htm (4 of 9)6/21/2004 12:55:12 AM
Page 87

System Error Messages: Dell Inspiron 3800 System Reference
Hard-disk drive failure
The hard-disk drive does
not respond to commands
from the computer.
Turn off the computer,
remove the drive, and boot
the computer from a
bootable diskette. Then turn
off the computer again,
reinstall the drive, and
reboot the computer. If the
problem persists, try
another drive. Then run the
IDE Devices tests in the
Dell Diagnostics
Hard-disk drive read
failure
The hard-disk drive may
be faulty.
Turn off the computer,
remove the drive, and boot
the computer from a
bootable diskette. Then turn
off the computer again,
reinstall the drive, and
reboot the computer. If the
problem persists, try
another drive. Then run the
IDE Devices tests in the
Dell Diagnostics
Invalid configuration
information-please run
System Setup Program
The system configuration
information does not
match the hardware
configuration. This
message is most likely to
occur after a memory
module is installed.
Correct the appropriate
options in the System
Setup program.
Keyboard clock line
failure
A cable or connector may
be loose, or the keyboard
may be faulty.
Run the PC-AT
Compatible Keyboards
test in the Dell Diagnostics.
file:///I|/SERVICE%20MANUALS/DELL%20MANUALS/LA...Inspiron/3800/3800_SERVICE_MANUAL/syscodes.htm (5 of 9)6/21/2004 12:55:12 AM
Page 88

System Error Messages: Dell Inspiron 3800 System Reference
Keyboard controller
failure
A cable or connector may
be loose, or the keyboard
may be faulty.
Reboot the computer, and
avoid touching the
keyboard or the mouse
during the boot routine. If
the problem persists, run
the PC-AT Compatible
Keyboards test in the Dell
Diagnostics.
Keyboard data line
failure
A cable or connector may
be loose, or the keyboard
may be faulty.
Run the PC-AT
Compatible Keyboards
test in the Dell Diagnostics.
Keyboard stuck key
failure
If an external keyboard or
keypad is being used, a
cable or connector may be
loose or the keyboard may
be faulty. If the integrated
keyboard is being used,
the keyboard may be
faulty.
A key on the integrated
keyboard or external
keyboard may have been
pressed while the
computer was booting.
Run the PC-AT
Compatible Keyboards
test in the Dell Diagnostics.
Memory address line
failure at address,
read value expecting
value
An installed memory
module may be faulty or
improperly seated.
Reseat the memory
modules and, if necessary,
replace them.
Memory allocation error
The software you are
attempting to run is
conflicting with the
operating system, another
application program, or a
utility.
Turn off the computer, wait
30 seconds, and then
restart it. Try to run the
program again. If the
problem persists, contact
the software company.
Memory data line
failure at address,
read value expecting
value
An installed memory
module may be faulty or
improperly seated.
Reseat the memory
modules and, if necessary,
replace them.
file:///I|/SERVICE%20MANUALS/DELL%20MANUALS/LA...Inspiron/3800/3800_SERVICE_MANUAL/syscodes.htm (6 of 9)6/21/2004 12:55:12 AM
Page 89

System Error Messages: Dell Inspiron 3800 System Reference
Memory double word
logic failure at
address, read value
expecting value
An installed memory
module may be faulty or
improperly seated.
Reseat the memory
modules and, if necessary,
replace them.
Memory odd/even logic
failure at address,
read value expecting
value
An installed memory
module may be faulty or
improperly seated.
Reseat the memory
modules and, if necessary,
replace them.
Memory write/read
failure at address,
read value expecting
value
An installed memory
module may be faulty or
improperly seated.
Reseat the memory
modules and, if necessary,
replace them.
No boot device
available
The computer cannot find
the diskette or hard-disk
drive.
If the diskette drive is your
boot device, make sure that
there is a bootable diskette
in the drive. If the hard-disk
drive is your boot device,
make sure that the drive is
installed, properly seated,
and partitioned as a boot
device.
No boot sector on harddisk drive
The operating system may
be corrupted.
Reinstall your operating
system. See the
documentation that came
with your operating system.
No timer tick interrupt
A chip on the system
board may be
malfunctioning.
Run the System Board
Devices tests in the Dell
Diagnostics.
Non-system disk or
disk error
The diskette in drive A or
your hard-disk drive does
not have a bootable
operating system installed
on it.
If you are trying to boot
from the diskette, replace it
with one that has a
bootable operating system.
Not a boot diskette
There is no operating
system on the diskette.
Boot the computer with a
diskette that contains an
operating system.
file:///I|/SERVICE%20MANUALS/DELL%20MANUALS/LA...Inspiron/3800/3800_SERVICE_MANUAL/syscodes.htm (7 of 9)6/21/2004 12:55:12 AM
Page 90

System Error Messages: Dell Inspiron 3800 System Reference
Optional ROM bad
checksum
The optional ROM
apparently failed.
Call Dell for technical
assistance.
Sector not found
The operating system
cannot locate a sector on
the diskette or hard-disk
drive. You probably have a
bad sector or corrupted file
allocation table ( FAT) on
the diskette or hard-disk
drive.
Run the appropriate utility
to check the file structure
on the diskette or hard-disk
drive. If a large number of
sectors are defective, back
up the data (if possible),
and then reformat the
diskette or hard-disk drive.
Seek error
The operating system
cannot find a specific track
on the diskette or harddisk drive.
If the error is on the diskette
drive, try another diskette in
the drive.
Shutdown failure
A chip on the system
board may be
malfunctioning.
Run the System Board
Devices tests in the Dell
Diagnostics.
Time-of-day clock lost
power
Data stored in NVRAM
has become corrupted.
Connect your computer to
an electrical outlet to
charge the battery. If the
problem persists, try to
restore the data. To restore
the data, press <Fn><F1>
to enter the System Setup
program. Then immediately
exit it. If the message
reappears, call Dell for
technical assistance.
Time-of-day clock
stopped
The reserve battery that
supports the data stored in
NVRAM may be read.
Connect your computer to
an electrical outlet to
charge the battery. If the
problem persists, call Dell
for technical assistance.
Time-of-day not setplease run the System
Setup program
The time or date stored in
the System Setup program
does not watch the system
clock.
Correct the settings for the
Date and Time options.
(For instructions, see
"
System Setup Program.")
file:///I|/SERVICE%20MANUALS/DELL%20MANUALS/LA...Inspiron/3800/3800_SERVICE_MANUAL/syscodes.htm (8 of 9)6/21/2004 12:55:12 AM
Page 91

System Error Messages: Dell Inspiron 3800 System Reference
Timer chip counter 2
failed
A chip on the system
board may be
malfunctioning.
Run the System Board
Devices tests in the Dell
Diagnostics.
Unexpected interrupt
in protected mode
The keyboard controller
may be malfunctioning, or
an installed memory
module may be loose.
Run the System Memory
tests and the PC-AT
Compatible Keyboards
test in the Dell Diagnostics.
Warning: Battery is
critically low.
The battery is running out
of charge.
Replace the battery, or
connect the computer to an
electrical outlet. Otherwise,
activate
save-to-disk
suspend (S2D) mode or
turn off the computer.
Back to Contents Page
file:///I|/SERVICE%20MANUALS/DELL%20MANUALS/LA...Inspiron/3800/3800_SERVICE_MANUAL/syscodes.htm (9 of 9)6/21/2004 12:55:12 AM
Page 92

Passwords and Security: Dell Inspiron 3800 System Reference
Back to Contents Page
Passwords and Security: Dell™ Inspiron™ 3800 System
Reference
About Passwords Using a Hard-Disk Drive Password
Using a Primary Password Physically Securing the Computer and
the Hard-Disk Drive
Using an Administrator Password Asset Tag Utility
About Passwords
A primary password prevents unauthorized access to the computer at start-up. An
administrator password can be used in place of the primary password. A hard-disk drive
password helps prevent the unauthorized access of data on the hard-disk drive, even when the
device is placed into another computer.
NOTES: All three passwords are disabled when you receive your computer.
You need to assign those passwords if you require password security for
your computer. Some companies may assign any or all of these passwords
before distributing the computer.
If you are using the Microsoft® Windows NT® operating system, use the
System Setup program to assign all passwords.
NOTICE: The password features provide a high level of security for the data
in your computer or hard-disk drive. However, they are not foolproof. If your
data requires more security, you should obtain and use additional forms of
protection, such as data encryption programs or PC Cards with encryption
features.
If you forget any of your passwords, call Dell. For your protection, Dell’s technical support staff
will ask you for proof of your identity to make sure that an unauthorized person is not trying to
use the computer.
file:///I|/SERVICE%20MANUALS/DELL%20MANUALS/L...nspiron/3800/3800_SERVICE_MANUAL/password.htm (1 of 7)6/21/2004 12:55:13 AM
Page 93

Passwords and Security: Dell Inspiron 3800 System Reference
Using a Primary Password
The primary password allows you to protect the computer from unauthorized access.
After assigning a primary password, you must enter it each time you turn on your computer.
The following message appears each time you turn on the computer:
Please type in the primary or administrator password and press
<Enter>.
To continue, type your password and press <Enter>.
NOTE: If no password is entered within 2 minutes, the computer returns to its
previous state.
If you have assigned an administrator password, you can use it instead of the primary
password. The computer does not specifically prompt you for the administrator password.
NOTICE: If you disable the administrator password, the primary password is
also disabled.
Using an Administrator Password
The administrator password is designed to give system administrators or service technicians in
large companies access to computers for repair or reconfiguration. The administrators or
technicians can assign identical administrator passwords to groups of computers as they are
unpacked and configured, leaving the primary password free to be assigned by the user.
When you set an administrator password, the Configure Setup option becomes available in
the System Setup program. The Configure Setup option allows you to restrict access to the
System Setup program in the same way a system password restricts access to the system.
The administrator password can be used in place of the primary password. Whenever you are
prompted to enter the primary password, you can enter the administrator password instead.
file:///I|/SERVICE%20MANUALS/DELL%20MANUALS/L...nspiron/3800/3800_SERVICE_MANUAL/password.htm (2 of 7)6/21/2004 12:55:13 AM
Page 94

Passwords and Security: Dell Inspiron 3800 System Reference
NOTE: The administrator password provides access to the system, but it
does not provide access to the hard-disk drive when it is protected by a
password.
If you forget the primary password and do not have an administrator password assigned, or if
you have both a primary and an administrator password assigned but forget them both, call
Dell.
NOTICE: If you disable the administrator password, the primary password is
also disabled.
Using a Hard-Disk Drive Password
The hard-disk drive password helps protect the data on your hard-disk drive from unauthorized
access. You can also assign a password for the modular hard-disk drive (if one is being used)
that can be the same as or different from the password for the primary hard-disk drive.
NOTE: Only hard-disk drives purchased from Dell for use with your Dell
computer support the hard-disk drive password option.
After assigning a hard-disk drive password, you must enter it each time you turn on the
computer and each time you resume normal operation from standby mode.
If the hard-disk drive password is enabled, the following message appears each time you turn
on the computer:
Please type in the hard-disk drive password and press <Enter>.
To continue, enter the hard-disk drive password. Press <Esc> to return the computer to its
previous state—standby mode.
NOTE: If no password is entered within 2 minutes, the computer returns to its
previous state.
If you enter the wrong password, the following message appears:
Invalid password
[Press Enter to retry]
file:///I|/SERVICE%20MANUALS/DELL%20MANUALS/L...nspiron/3800/3800_SERVICE_MANUAL/password.htm (3 of 7)6/21/2004 12:55:13 AM
Page 95

Passwords and Security: Dell Inspiron 3800 System Reference
If the correct password is not entered in three attempts, the computer tries to boot from
another bootable device if the Boot First device option in the System Setup program is set to
allow it. If the Boot First device option is not set to allow booting from another device, the
computer returns to the state it was in when you turned it on—standby mode.
NOTES: If the hard-disk drive password, the modular hard-disk drive
password, and the primary password are the same, you are prompted only
for the primary password. If the hard-disk drive password is different from the
primary password, you are prompted for both. Two different passwords
provide greater security.
The administrator password provides access to the system, but it does not
provide access to the hard-disk drive when it is protected by a password.
Physically Securing the Computer and the Hard-Disk Drive
To prevent unauthorized removal of the computer, you can use a security cable to attach the
computer to an immovable object. Your computer has two security cable slots: One security
cable slot is located between the speaker and the hard-disk drive. (See Figure 1 in "Technical
Overview.") The other security cable slot is located between the TV-out S-video connector and
the fan's air intake. (See
Figure 2 in "Technical Overview.")
Description of Security Cable Slots
The security cable slots allow you to attach a commercially available antitheft device to the
computer. Antitheft devices for portable computers usually include a segment of metalstranded cable with an attached locking device and associated key.
When your computer is installed in an advanced port replicator (APR), use the security cable
slot located between the TV-out S-video connector and the fan's air intake to secure your
computer.
You can use either security cable slot to secure your computer when it is not docked to an
APR. However, to lock your computer and prevent unauthorized removal of the hard-disk
drive, insert the locking device into the security cable slot located between the hard-disk drive
and the speaker, and lock the device with its associated key.
Basic Instructions for Using Security Cable Slots
file:///I|/SERVICE%20MANUALS/DELL%20MANUALS/L...nspiron/3800/3800_SERVICE_MANUAL/password.htm (4 of 7)6/21/2004 12:55:13 AM
Page 96

Passwords and Security: Dell Inspiron 3800 System Reference
To prevent unauthorized removal of your computer, loop the cable around an immovable
object, insert the locking device into either of the security cable slots, and lock the device. See
Figure 1 for an example of how to secure your computer. Complete instructions for installing
this kind of antitheft device are usually included with the device.
Figure 1. Securing the Computer
NOTE: Antitheft devices are of differing designs. Before purchasing such a
device, make sure that it will work with the security cable slot in your
computer.
Asset Tag Utility
Dell has installed the Asset Tag utility on your computer. The Asset Tag utility allows you to
enter an asset tag number that you or your company assigns to the computer. The default
System Setup screens do not show the asset tag number unless you enter one by using this
utility.
You can also use the Asset Tag utility to enter an owner tag that appears in the system log-on
screen and with the primary password prompt.
Viewing Existing Asset Tag and Service Numbers
To view existing asset tag and service tag numbers, perform the following steps:
1. Click the Start button, point to Programs, and click MS-DOS Prompt.
file:///I|/SERVICE%20MANUALS/DELL%20MANUALS/L...nspiron/3800/3800_SERVICE_MANUAL/password.htm (5 of 7)6/21/2004 12:55:13 AM
Page 97

Passwords and Security: Dell Inspiron 3800 System Reference
2. Type cd c:\dell\util and press <Enter>.
3. Type asset and press <Enter>.
Assigning an Asset Tag Number
An asset tag number can have up to ten characters; any combination of characters excluding
spaces is valid. To assign or change an asset tag number, perform the following steps:
1. Click the Start button, point to Programs, and click MS-DOS Prompt.
2. Type cd c:\dell\util and press <Enter>.
3. Type asset and a space followed by the new number, and press <Enter>. For example,
type the following command line and press <Enter>:
asset 1234$ABCD&
4. When the system prompts you to verify the asset tag number, type y and press <Enter>.
The system displays the new or modified asset tag number and the service tag number.
Deleting an Asset Tag Number
To delete the asset tag number without assigning a new one, perform the following steps:
1. Click the Start button, point to Programs, and click MS-DOS Prompt.
2. Type cd c:\dell\util and press <Enter>.
3. Type asset /d and press <Enter>.
Assigning an Owner Tag
An owner tag can have up to 48 characters; any combination of letters, numbers, and spaces
is valid. To assign an owner tag, perform the following steps:
1. Click the Start button, point to Programs, and click MS-DOS Prompt.
2. Type cd c:\dell\util and press <Enter>.
file:///I|/SERVICE%20MANUALS/DELL%20MANUALS/L...nspiron/3800/3800_SERVICE_MANUAL/password.htm (6 of 7)6/21/2004 12:55:13 AM
Page 98

Passwords and Security: Dell Inspiron 3800 System Reference
3. Type asset /o and a space followed by the new owner tag, and press <Enter>. For
example, type the following command line and press <Enter>:
asset /o ABC Company
4. When the system prompts you to verify the owner tag, type y and press <Enter>. The
system displays the new owner tag.
Deleting an Owner Tag
To delete the owner tag without assigning a new one, perform the following steps:
1. Click the Start button, point to Programs, and click MS-DOS Prompt.
2. Type cd c:\dell\util and press <Enter>.
3. Type asset /o /d and press <Enter>.
NOTE: For security, you cannot set, change, or delete the owner tag if the
primary or administrator password is set.
Table 1 lists the command-line options you can use with the Asset Tag utility. To use one of
these options, open an MS-DOS® prompt, type asset and a space followed by the option,
and then press <Enter>.
Table 1. Asset Tag Utility Command-Line Options
Asset Tag
Option Description
/d Deletes the asset tag number
/o <tag> Specifies a new owner tag
/o /d Deletes the owner tag
/? Displays the Asset Tag utility help screen
Back to Contents Page
file:///I|/SERVICE%20MANUALS/DELL%20MANUALS/L...nspiron/3800/3800_SERVICE_MANUAL/password.htm (7 of 7)6/21/2004 12:55:13 AM
Page 99

Ports and Connectors: Dell Inspiron 3800 System Reference
Back to Contents Page
Ports and Connectors: Dell™ Inspiron™ 3800 System
Reference
About the I/O Connectors USB Connector
Audio Connectors PS/2 Connector
Video Connector Serial Port Connector
Parallel Port Connector AC Power Connector
Docking Connector Infrared Port
About the I/O Connectors
You can connect external devices to the input/output (I/O) connectors. The computer's basic
input/output system (BIOS) detects the presence of external devices when you boot (start) or
reboot your computer. Figure 1 shows the connectors on the back of your computer.
NOTICE: When disconnecting external devices from the back of the
computer, wait 5 seconds after turning off the computer before you
disconnect a device to avoid possible damage to the system board.
Figure 1. I/O Connectors
file:///I|/SERVICE%20MANUALS/DELL%20MANUALS/L...k/Inspiron/3800/3800_SERVICE_MANUAL/ports.htm (1 of 10)6/21/2004 12:55:15 AM
Page 100

Ports and Connectors: Dell Inspiron 3800 System Reference
1
Video connector
5
Mini-Deutsche Industrie Norm (DIN)
PS/2 connector
2
Parallel port connector
6
Serial port connector
3
Docking connector
7
AC adapter connector
4
USB connector
8
Infrared port
NOTES: Some external devices require you to load software called device
drivers into system memory before the devices will work. These device
drivers help your computer recognize the external device and direct its
operation. Instructions for installing this software are usually included in the
upgrade kits.
The advanced port replicator (APR) has the same I/O connectors as your
computer. In addition, the APR has a second Personal System/2 (PS/2)
connector, a second Universal Serial Bus (USB) connector, and an Ethernet
network connector.
Audio Connectors
You can connect audio devices such as speakers, microphones, headphones, and record/
playback devices to your computer. The following information tells you how to connect the
cables. Figure 2 shows the locations of the audio connectors and the TV-out S-video
connector.
● Connect the audio cable from a microphone to the microphone-in connector.
● Connect the audio cable from the speakers to the line-out connector.
● Connect the line-out cable from a record/playback device to the line-in connector.
Cassette players, CD players, radios, stereo systems, and tape players are all record/
playback devices.
● Connect the TV-out S-video I/O cable from a record/playback device to the TV-out S-
video connector. VCRs and video cameras are record/playback devices.
Figure 2. Connecting Audio and S-Video Devices
file:///I|/SERVICE%20MANUALS/DELL%20MANUALS/L...k/Inspiron/3800/3800_SERVICE_MANUAL/ports.htm (2 of 10)6/21/2004 12:55:15 AM
 Loading...