

Page 1

Dell EMC Avamar
Product Security Guide
18.2
Dell Inc.
June 2020
Rev. 06
Page 2

Notes, cautions, and warnings
NOTE: A NOTE indicates important information that helps you make better use of your product.
CAUTION: A CAUTION indicates either potential damage to hardware or loss of data and tells you how to avoid the
problem.
WARNING: A WARNING indicates a potential for property damage, personal injury, or death.
© 2001 - 2020 Dell Inc. or its subsidiaries. All rights reserved. Dell, EMC, and other trademarks are trademarks of Dell Inc. or its subsidiaries. Other
trademarks may be trademarks of their respective owners.
Page 3

Contents
Figures.......................................................................................................................................... 7
Tables............................................................................................................................................8
Preface.........................................................................................................................................12
Chapter 1: Introduction.................................................................................................................. 15
Security patches.................................................................................................................................................................. 15
Periodic security updates for multiple components...................................................................................................15
Remedying security patch compatibility issues.......................................................................................................... 15
Email home notification using ConnectEMC.................................................................................................................... 15
Remote access..................................................................................................................................................................... 16
Avamar security features.................................................................................................................................................... 16
Avamar firewall hardening.............................................................................................................................................16
Chapter 2: Authentication.............................................................................................................. 17
About authentication............................................................................................................................................................17
Overview of Avamar user accounts...................................................................................................................................17
Login security settings.........................................................................................................................................................18
Login banner configuration........................................................................................................................................... 18
Configure login security.................................................................................................................................................18
Failed login behavior.......................................................................................................................................................19
Configure failed login behavior..................................................................................................................................... 19
Authentication types and setup......................................................................................................................................... 21
Avamar internal authentication.....................................................................................................................................21
Directory service authentication...................................................................................................................................21
Common Access Card and Personal Identity Verification........................................................................................23
Unauthenticated interfaces .........................................................................................................................................35
Selecting the authentication source........................................................................................................................... 35
User and credential management......................................................................................................................................36
Pre-loaded user accounts.............................................................................................................................................36
Customer Support password....................................................................................................................................... 38
Removing local account................................................................................................................................................38
Disabling Avamar server account................................................................................................................................ 38
Password complexity.................................................................................................................................................... 39
Secure credential requirements....................................................................................................................................41
Authentication to external systems................................................................................................................................... 41
Configuring remote connections.................................................................................................................................. 41
Remote component authentication.............................................................................................................................44
Credential security.........................................................................................................................................................60
Chapter 3: Authorization............................................................................................................... 62
About authorization.............................................................................................................................................................62
Contents 3
Page 4

Default roles......................................................................................................................................................................... 62
Administrator roles........................................................................................................................................................ 62
Operator roles................................................................................................................................................................ 63
User roles........................................................................................................................................................................64
Role-based access control and the AUI........................................................................................................................... 64
Role mapping....................................................................................................................................................................... 66
External role associations................................................................................................................................................... 66
Default authorizations.........................................................................................................................................................66
Running commands with elevated privileges.............................................................................................................66
Entitlement export.............................................................................................................................................................. 69
Actions that do not require authorization.........................................................................................................................70
Chapter 4: Network Security.......................................................................................................... 71
Network exposure................................................................................................................................................................71
Terminology.....................................................................................................................................................................71
Utility node ports............................................................................................................................................................ 71
Storage node ports........................................................................................................................................................77
Avamar client ports........................................................................................................................................................78
Avamar Downloader Service host ports.....................................................................................................................80
Ports when using a Data Domain system...................................................................................................................80
NDMP accelerator node ports......................................................................................................................................81
Remote management interface ports.........................................................................................................................83
Avamar VMware Combined Proxy ports....................................................................................................................84
Ports when using Avamar Virtual Edition................................................................................................................... 86
Communication security..................................................................................................................................................... 87
External Web interfaces................................................................................................................................................87
Network access control................................................................................................................................................88
Firewall settings................................................................................................................................................................... 88
Controlling the firewall daemon................................................................................................................................... 88
Editing the Firewall in Avamar......................................................................................................................................89
Configuring the Avamar firewall.................................................................................................................................. 90
Adding the NAS IP address to the NDMP firewall table.......................................................................................... 96
Chapter 5: Data Security and Integrity............................................................................................99
About Data-in-flight encryption.........................................................................................................................................99
Data-in-flight encryption.............................................................................................................................................. 99
Data-in-flight encryption in Avamar versions 7.1 through 7.4................................................................................ 100
Unencrypted data-in-flight.......................................................................................................................................... 101
Client/server encryption behavior..............................................................................................................................101
Increasing Avamar server cipher strength ...............................................................................................................102
SHA-2 SSL security certificates................................................................................................................................ 102
Data-at-rest encryption.................................................................................................................................................... 102
Internal data-at-rest encryption key management..................................................................................................103
Avamar Key Manager.................................................................................................................................................. 103
Data integrity...................................................................................................................................................................... 103
Data erasure....................................................................................................................................................................... 104
Requirements for securely deleting backups............................................................................................................104
Securely deleting a backup......................................................................................................................................... 105
4
Contents
Page 5

Chapter 6: System Monitoring, Auditing, and Logging.................................................................... 107
Auditing and logging...........................................................................................................................................................107
Monitoring server status............................................................................................................................................. 107
Monitoring system events...........................................................................................................................................107
Event notification profiles........................................................................................................................................... 108
Email home notification............................................................................................................................................... 108
Auditing......................................................................................................................................................................... 109
Audit logging................................................................................................................................................................. 109
Logs...................................................................................................................................................................................... 110
Single-node system log files........................................................................................................................................ 110
Utility node log files........................................................................................................................................................111
Storage node log files...................................................................................................................................................112
Spare node log file........................................................................................................................................................ 113
Avamar NDMP Accelerator log files...........................................................................................................................113
Access node log files.................................................................................................................................................... 113
Avamar Administrator client log files.......................................................................................................................... 113
Backup client log files................................................................................................................................................... 114
Monitoring server status and statistics......................................................................................................................114
Event monitoring..........................................................................................................................................................125
Log management............................................................................................................................................................... 132
Server monitoring with syslog.................................................................................................................................... 132
Server monitoring with SNMP................................................................................................................................... 137
Logging format...................................................................................................................................................................139
Monitoring server status............................................................................................................................................. 139
Monitoring system events.......................................................................................................................................... 139
Email home notification............................................................................................................................................... 140
Auditing..........................................................................................................................................................................140
Server monitoring with syslog.....................................................................................................................................141
Alerting................................................................................................................................................................................. 141
Server monitoring with SNMP................................................................................................................................... 142
Automatic notifications to Avamar Support............................................................................................................. 144
Email Home................................................................................................................................................................... 145
ConnectEMC................................................................................................................................................................ 146
Chapter 7: Server Security Hardening........................................................................................... 150
Overview.............................................................................................................................................................................150
STIG compliance.......................................................................................................................................................... 150
Server security hardening levels................................................................................................................................ 150
Level-1 security hardening................................................................................................................................................ 150
Advanced Intrusion Detection Environment (AIDE)................................................................................................150
The auditd service.........................................................................................................................................................151
sudo implementation.................................................................................................................................................... 151
Command logging........................................................................................................................................................ 152
Locking down single-user mode on RHEL servers.................................................................................................. 152
Disabling Samba........................................................................................................................................................... 152
Removing suid bit from non-essential system binaries on RHEL...........................................................................153
Preventing unauthorized access to GRUB configuration.......................................................................................153
Preventing the OS from loading USB storage......................................................................................................... 154
Contents
5
Page 6

Level-2 security hardening............................................................................................................................................... 155
Additional operating system hardening..................................................................................................................... 155
Additional password hardening...................................................................................................................................156
Additional firewall hardening (avfirewall).................................................................................................................. 158
Installing level-2 security hardening features........................................................................................................... 158
Custom ssh banner not supported............................................................................................................................ 159
Complexity and aging configuration changes for password hardening................................................................ 159
Preventing host header injection vulnerabilities on Apache web server................................................................161
Level-3 security hardening................................................................................................................................................ 161
Disabling Apache web server...................................................................................................................................... 161
Stopping the EMT........................................................................................................................................................162
Disabling Dell OpenManage web server....................................................................................................................162
Disabling SSLv2 and weak ciphers.............................................................................................................................163
Updating OpenSSH......................................................................................................................................................164
Disabling RPC............................................................................................................................................................... 164
Configuring the firewall to block access to port 9443............................................................................................ 165
Changing file permissions............................................................................................................................................165
Preparing for a system upgrade.................................................................................................................................166
Chapter 8: Intelligent Platform Management Interface ...................................................................167
IPMI subsystem security................................................................................................................................................... 167
Finding all LAN channels................................................................................................................................................... 168
Disabling privileges for Cipher Suite 0.............................................................................................................................169
Securing anonymous logins.............................................................................................................................................. 169
Creating strong passwords for BMC accounts..............................................................................................................170
Additional BMC security tasks...........................................................................................................................................171
Appendix A: IAO Information......................................................................................................... 172
System-level accounts...................................................................................................................................................... 172
Files with SUID bit and SGID bit.......................................................................................................................................172
Permissions within /var folder..........................................................................................................................................173
Appendix B: Enterprise Authentication.......................................................................................... 174
Enterprise authentication..................................................................................................................................................174
Supported components and systems........................................................................................................................ 174
Configuring Enterprise authentication.............................................................................................................................175
Configuring an LDAP interface...................................................................................................................................175
Configuring an NIS interface.......................................................................................................................................177
Enabling certificate authorization for PostgreSQL........................................................................................................179
Configuring DTLT to use PostgreSQL certificate authorization mode.......................................................................179
Appendix C: Avamar internal certificate usage and note...................................................................181
Avamar internal mcssl certificate usage and note..........................................................................................................181
Appendix D: Manage Certificates.................................................................................................. 182
Importing commercially signed security certificates for Apache................................................................................. 182
Importing commercially signed security certificates for Tomcat DTLT and Jetty.....................................................184
6
Contents
Page 7

Figures
1. Users in Avamardomains.............................................................................................................................................. 17
2. PIN Authentication dialog box..................................................................................................................................30
3. Certificate Confirmation dialog box.......................................................................................................................30
4. Insert Smart Card dialog box.....................................................................................................................................31
5. Avamar Administrator Login window.....................................................................................................................31
6. Avamar Administrator Login window....................................................................................................................32
7. Logout dialog box...........................................................................................................................................................33
Figures 7
Page 8

Tables
1. Revision history.................................................................................................................................................................12
2. Typographical conventions.........................................................................................................................................13
3. Avamar user account information........................................................................................................................... 17
4. STIG requirements satisfied by the additional OS hardening package.................................................. 18
5. STIG requirements satisfied by additional password hardening................................................................19
6. Parameters that control behavior of failed logins...........................................................................................20
7. Supported directory service types..........................................................................................................................21
8. Key values......................................................................................................................................................................... 26
9. Properties.......................................................................................................................................................................... 26
10. Avamar Web Restore interfaces that do not require authentication...................................................35
11. Avamar server Linux OS default user accounts..............................................................................................36
12. Avamar server software default user account............................................................................................... 36
13. MCS default user accounts..................................................................................................................................... 37
14. MCS PostgreSQL database default user accounts......................................................................................37
15. Proxy virtual machine Linux OS default user account.................................................................................37
16. Parameters that control the password complexity and length...............................................................39
17. Software version requirements..............................................................................................................................45
18. Port requirements........................................................................................................................................................46
19. Default expiration periods and regeneration methods................................................................................ 47
20. Communication security setting...........................................................................................................................50
21. Mapping security and encryption settings to a communication protocol........................................... 51
22. Mapping security and encryption settings to source work order flags............................................... 51
23. Mapping security and encryption settings to destination work order flags..................................... 52
24. Alternative commands.............................................................................................................................................. 53
25. General fields.................................................................................................................................................................54
8 Tables
Page 9

26. Fields................................................................................................................................................................................. 58
27. Fields................................................................................................................................................................................. 59
28. Administrator roles......................................................................................................................................................62
29. Operator roles...............................................................................................................................................................63
30. User roles........................................................................................................................................................................64
31. AUI feature pane access by administrator user role.................................................................................... 65
32. AUI feature pane access by operator user role............................................................................................. 65
33. Commands authorized for sudo........................................................................................................................... 66
34. Actions that do not require authorization........................................................................................................ 70
35. Required inbound ports on the utility node......................................................................................................72
36. Optional inbound ports on the utility node.......................................................................................................75
37. Required outbound ports for the utility node................................................................................................. 75
38. Required inbound ports on each storage node.............................................................................................. 77
39. Required outbound ports for each storage node..........................................................................................78
40. Required inbound ports on an Avamar client..................................................................................................79
41. Required outbound ports for an Avamar client.............................................................................................. 79
42. Required inbound port on an Avamar Downloader Service host...........................................................80
43. Required outbound ports for an Avamar Downloader Service host.................................................... 80
44. Required ports when using a Data Domain system......................................................................................81
45. Required inbound ports for each accelerator node......................................................................................81
46. Required outbound ports for each accelerator node..................................................................................82
47. Inbound ports for the remote management interface on all Gen4T-based nodes........................ 83
48. Inbound ports for the remote management interface on all Gen4S-based nodes........................83
49. Outbound ports for the remote management interface on all Avamar nodes................................ 84
50. Required inbound ports for the Avamar VMware Combined Proxy.................................................... 84
51. Required outbound ports for the Avamar VMware Combined Proxy..................................................85
52. Required ports for the Avamar vSphere Combined Proxy...................................................................... 85
Tables
9
Page 10

53. Inbound ports for the Azure network security group.................................................................................86
54. Outbound ports for the Azure network security group.............................................................................87
55. Firewall customization.............................................................................................................................................. 89
56. Cipher levels and associated OpenSSL suites............................................................................................... 99
57. Component log files on a single-node Avamar system..............................................................................110
58. Component log files on a utility node................................................................................................................. 111
59. Component log files on a storage node............................................................................................................112
60. Component log file on a spare node.................................................................................................................. 113
61. Component log files for the NDMP Accelerator........................................................................................... 113
62. Component log files on an access node...........................................................................................................113
63. Component log files on an Avamar Administrator client...........................................................................113
64. Component log files for an Avamar backup client.......................................................................................114
65. Node details on the Avamar tab of the Server Monitor...........................................................................115
66. CPU details on the Avamar tab of the Server Monitor............................................................................ 115
67. Network details on the Avamar tab of the Server Monitor.................................................................... 115
68. Disk details on the Avamar tab of the Server Monitor..............................................................................115
69. Node details on the Data Domain tab of the Server Monitor................................................................ 116
70. CPU details on the Data Domain tab of the Server Monitor..................................................................116
71. Disk (KB/S) details on the Data Domain tab of the Server Monitor................................................... 116
72. Network (KB/S) details on the Data Domain tab of the Server Monitor.........................................116
73. Data display based on selections on the Server Management tab...................................................... 117
74. Bytes Protected Summary properties on the Server Management tab............................................117
75. Server Details on the Server Management tab............................................................................................ 117
76. Maintenance Activities Details on the Server Management tab...........................................................118
10
77. Garbage Collection Details on the Server Management tab...................................................................119
78. Module properties on the Server Management tab .................................................................................. 119
79. Status indicators on the Node Information part of Server Management.........................................119
Tables
Page 11

80. Server details on the Node Information part of Server Management.............................................. 120
81. OS details on the Node Information part of Server Management........................................................121
82. Hardware details on the Node Information part of Server Management.........................................121
83. Status indicators on the Partition Information part of Server Management..................................122
84. Server Details on the Node Information part of Server Management.............................................. 122
85. Data Domain system properties on the Server Management tab.......................................................122
86. Event information...................................................................................................................................................... 125
87. Example of a batch email notification message........................................................................................... 126
88. Mappings of syslog fields to Avamar event data........................................................................................ 133
89. Locations for the Avamar MIB definition file.................................................................................................137
90. Mappings of syslog fields to Avamar event data.........................................................................................141
91. Locations for the Avamar MIB definition file..................................................................................................142
92. STIG requirements satisfied by AIDE................................................................................................................150
93. STIG requirements satisfied by the auditd service..................................................................................... 151
94. STIG requirements satisfied by the implementation of sudo..................................................................151
95. STIG requirements satisfied by the additional OS hardening package............................................. 155
96. STIG requirements satisfied by additional password hardening...........................................................156
97. Cipher levels and associated OpenSSL suites.............................................................................................. 163
98. Descriptions of security tasks for the IPMI subsystem............................................................................167
99. Supported external authentication systems..................................................................................................174
100. Certificate details.....................................................................................................................................................182
Tables
11
Page 12

Preface
As part of an effort to improve the product lines, revisions of the software and hardware are periodically released. Therefore, some
functions that are described in this document might not be supported by all versions of the software or hardware currently in use. The
product release notes provide the most up-to-date information on product features.
Contact the technical support professional when a product does not function correctly or does not function as described in this
document.
NOTE: This document was accurate at publication time. To find the latest version of this document, go to Online
Support (https://www.dell.com/support).
Purpose
This guide discusses various aspects of Avamar product security.
Audience
This publication is primarily intended for Field Engineers, contracted representatives, and business partners who are responsible for
configuring, troubleshooting, and upgrading Avamar systems at customer sites, as well as system administrators or application integrators
who are responsible for installing software, maintaining servers and clients on a network, and ensuring network security.
Revision history
The following table presents the revision history of this document.
Table 1. Revision history
Revision Date Description
06 June, 2020 Added port information in the Avamar VMware Combined Proxy inbound ports
section.
05 April, 2020 Added Appendix D: Manage Certificates
04 March 20, 2020 Added vSphere as a destination for port 443 with the Avamar Combined
VMware Proxy.
03 November 15, 2019
02 August 28, 2019 Updated the Required ports when using a Data Domain system section.
This revision includes the following updates:
• Required outbound ports for the Avamar VMware Combined Proxy
updates.
• Utility node required inbound ports updates.
• Importing commercially signed security certificates for Tomcat DTLT and
Jetty updates.
• Added steps to verify the Avamar firewall version and add the NAS IP
address to the NDMP firewall.
• Added steps for configuring LDAPS.
01 December 14, 2018 First release of this document for Avamar 18.2.
Related documentation
The following publications provide additional information:
• Avamar Release Notes
• Avamar Administration Guide
12 Preface
Page 13

• Avamar Operational Best Practices Guide
The following other publications also provide information:
• US Department of Defense (DoD) Security Technical Implementation Guide (STIG) for Unix
Typographical conventions
These type style conventions are used in this document.
Table 2. Typographical conventions
Bold Used for names of interface elements, such as names of windows, dialog boxes, buttons, fields, tab
names, key names, and menu paths (what the user specifically selects or clicks)
Italic Used for full titles of publications that are referenced in text
Monospace
Monospace italic Used for variables
Monospace bold
[ ] Square brackets enclose optional values
| Vertical bar indicates alternate selections - the bar means "or"
{ } Braces enclose content that the user must specify, such as x or y or z
... Ellipses indicate nonessential information that is omitted from the example
Used for:
• System code
• System output, such as an error message or script
• Pathnames, filenames, prompts, and syntax
• Commands and options
Used for user input
Where to get help
The Avamar support page provides access to licensing information, product documentation, advisories, and downloads, as well as how-to
and troubleshooting information. This information may resolve a product issue before contacting Customer Support.
To access the Avamar support page:
1. Go to https://www.dell.com/support.
2. Type a product name in the Enter a Service Tag, Serial Number, Service Request, Model, or Keyword search box.
3. Select the product from the list that appears. When you select a product, the Product Support page loads automatically.
4. (Optional) Add the product to the My Products list by clicking Add to My Saved Products in the upper right corner of the Product
Support page.
Documentation
The Avamar product documentation provides a comprehensive set of feature overview, operational task, and technical reference
information. To supplement the information in product administration and user guides, review the following documents:
• Release notes provide an overview of new features and known limitations for a release.
• Technical notes provide technical details about specific product features, including step-by-step tasks, where necessary.
• White papers provide an in-depth technical perspective of a product or products as applied to critical business issues or requirements.
Knowledgebase
The Knowledgebase contains applicable solutions that you can search for either by solution number (for example, KB000xxxxxx) or by
keyword.
To search the Knowledgebase:
1. Go to https://www.dell.com/support.
2. Under the Support tab, click Knowledge Base.
Preface
13
Page 14

3. Type either the solution number or keywords in the search box. Optionally, you can limit the search to specific products by typing a
product name in the search box and then selecting the product from the list that appears.
Live chat
To engage Customer Support by using live interactive chat, click Join Live Chat on the Service Center panel of the Avamar support
page.
Service Requests
For in-depth help from Customer Support, submit a service request by clicking Create Service Requests on the Service Center panel
of the Avamar support page.
NOTE: To open a service request, you must have a valid support agreement. Contact a sales representative for details
about obtaining a valid support agreement or with questions about an account.
To review an open service request, click the Service Center link on the Service Center panel, and then click View and manage
service requests.
Enhancing support
It is recommended to enable ConnectEMC and Email Home on all Avamar systems:
• ConnectEMC automatically generates service requests for high priority events.
• Email Home sends configuration, capacity, and general system information to Customer Support.
Comments and suggestions
Comments and suggestions help to continue to improve the accuracy, organization, and overall quality of the user publications. Send
comments and suggestions about this document to DPAD.Doc.Feedback@emc.com.
Please include the following information:
• Product name and version
• Document name, part number, and revision (for example, 01)
• Page numbers
• Other details to help address documentation issues
14
Preface
Page 15

1
Introduction
Topics:
• Security patches
• Email home notification using ConnectEMC
• Remote access
• Avamar security features
Security patches
Each Avamar release is available with a set of up-to-date security patches.
Periodic security updates for multiple components
Security updates are periodically provided for components of the Avamar system’s host operating system. These periodic updates
combine patches and updates that the operating system’s company (Red Hat or SUSE) released since the previous Avamar periodic
security update. The updates also include relevant kernel-level and OS-level security patches and changes.
The periodic updates are cumulative. Install each periodic update that is issued for the Avamar system in order of release, starting with the
first periodic update issued after the release of the Avamar system software.
Each periodic update is announced through a Security Advisory (ESA). The ESA provides details about the contents of the periodic update
and installation instructions. Go to https://www.dell.com/support/home/us/en/04/product-support/product/avamar-server/overview
to view these advisories and to register for email notifications.
Periodic updates are provided as Avamar update packages that can normally be installed through Avamar Installation Manager.
Remedying security patch compatibility issues
About this task
If you separately install other security patches or security applications that are found to be incompatible with Avamar:
1. Remove the separately installed patches or applications.
2. Restore the Avamar system to its previous working configuration.
3. File a support case with Avamar Customer Support that includes a specific description of the separately installed patches or
applications.
NOTE:
It is the responsibility of the customer to ensure that the Avamar system is configured to protect against
unauthorized access. Back up all important files before you apply new security patches, applications, or updates.
Email home notification using ConnectEMC
When configured and enabled, the “email home” feature automatically emails configuration, capacity, and general system information to
Avamar Customer Support using ConnectEMC. Summary emails are sent once daily; critical alerts are sent in near-real time on an as
needed basis.
The Avamar Administration Guide provides details on how to enable the email home feature.
Introduction 15
Page 16

Remote access
If Avamar Customer Support must connect to a customer system to perform analysis or maintenance, the customer can initiate a web
conference using a web-based conferencing application such as WebEx.
Additionally, customers can install a Secure Remote Support (ESRS) gateway to allow Customer Support to access their systems without
WebEx.
Avamar security features
Installing or upgrading the Avamar server software installs hardening and firewall packages that improve security capabilities on the
Avamar server. Installation of the hardening package does not restrict supported server functionality. Installation of the firewall package
prevents unencrypted backups from running. These packages cannot be uninstalled.
If you are upgrading from an older version and the scheduled backups are unencrypted, follow the instructions in Permitting unencrypted
data-in-flight on page 101 to enable unencrypted backups. For some other tasks, Customer Support provides the steps and tools that are
required to complete the task (for instance, FTP capabilities for downloading packages to the server).
Avamar firewall hardening
Starting in Avamar 7.2, the Avamar firewall blocks outgoing FTP access. Commands such as wget and curl fail to reach the target hosts
or download any files.
About this task
To download hotfixes and other updates from FTP sites, you must disable the Avamar firewall for the duration of the transfer and then reenable the firewall after the transfer completes.
Steps
1. Open a command shell and log in by using one of the following methods:
• For a single-node server, log in to the server as admin.
• For a multi-node server, log in to the utility node as admin.
2. Switch user to root by typing the following command:
su -
3. Disable the Avamar firewall by typing the following command:
service avfirewall stop
4. Enable FTP access by typing the following command:
/usr/local/avamar/lib/admin/security/ftp_service
5. Change directory by typing the following command:
cd /usr/local/avamar/src/
6. Download the required file by typing the following command on one line:
curl --disable-eprt -P `hostname -i`:35000-35010 -O <url>
where <url> is the location of the required file.
7. After the transfer completes, enable the Avamar firewall by typing the following command:
service avfirewall start
16
Introduction
Page 17

2
Authentication
Topics:
• About authentication
• Overview of Avamar user accounts
• Login security settings
• Authentication types and setup
• User and credential management
• Authentication to external systems
About authentication
The concept of authentication governs the identification of all users who are permitted to take action within an Avamar server.
Authentication prescribes certain users as possessing credentials that enable the Avamar server to recognize their identity and, later, grant
any authorized permissions.
This chapter describes how users log in to an Avamar server, including means of preventing unauthorized access, and how to manage and
configure both user and component authentication.
The Avamar Administration Guide provides specific tasks to add, configure, and delete Avamar user accounts, and to configure directory
service authentication.
Overview of Avamar user accounts
A user account in Avamar can administer a domain or client. The user account defines the authentication system that is used to grant
users access to the Avamar server. It also defines the role for the user, which controls the operations that a user can perform.
You can add user accounts to domains or individual clients. When you add a user account to a domain, the account can administer that
domain and any subdomains beneath it. When you add a user account to an individual client, the account can perform backups and
restores of that client, and access backups belonging to that client in the system.
In Avamar, users are entries in a domain or client access list. When you add a user account to the Avamar system, you are adding an entry
to a domain or client user access list.
In the following example, the user “Gretchen” has been added to both the Accounting domain and a computer. However, the
authentication system and role are completely separate user accounts that happen to have the same username.
Figure 1. Users in Avamardomains
The following table describes the information that comprises an Avamar user account.
Table 3. Avamar user account information
Information Description
Username The username depends on the authentication system and must be
in the format that the authentication system accepts. For example,
the internal authentication system uses case-sensitive usernames,
Authentication 17
Page 18

Table 3. Avamar user account information (continued)
Information Description
whereas Windows Active Directory usernames are caseinsensitive. Usernames cannot be longer than 31 characters.
Authentication system An authentication system is a username/password system that is
used to grant users access to the Avamar server.
Role Roles define the allowable operations for each user account.
Login security settings
The following sections provide information on configuring the login security settings for Avamar.
Login banner configuration
This section provides information on configuring the login banners for Avamar.
STIG requirement GEN005550 requires that the ssh protocol support a customer banner. However, the Avamar system is not compliant
with this requirement. Custom ssh banners are not supported.
Configure login security
This topic provides information about the login behavior for Avamar components.
Most login security configuration options are part of level-2 security hardening features that you can install during Avamar server software
installation, or manually after server software installation. Level-2 security features also provide additional behaviors described elsewhere in
this guide.
Level-2 security hardening
The additional OS hardening package provides the following capabilities that are specific to server logins:
• Setting terminal timeout at 15 minutes
• Removal of unnecessary default accounts and groups
This package satisfies the following STIG requirements that relate to server logins:
Table 4. STIG requirements satisfied by the additional OS hardening package
Requirement ID Requirement title
GEN000460 Unsuccessful Login Attempts - Account Disabled
GEN000480 Unsuccessful Login Attempts - Fail Delay
GEN000500 Terminal Lockout
GEN000980 Root Console Access
GEN001000 Remote Consoles Defined
GEN001020 Direct Root Login
GEN001120 Encrypting Root Access
Level-2 additional password hardening
You can configure Avamar servers to provide additional password hardening features, such as:
• Aging — how long a password can be used before it must be changed
• Complexity — required number and type of characters in passwords
• Reuse — number of previously used passwords that can be recycled
18
Authentication
Page 19

NOTE: Password hardening is not appropriate for all customers. Successful implementation of this feature requires
structures and policies that enforce changes to all operating system user accounts every 60 days, and require users to
log in to those accounts at least once every 35 days. Failure to implement proper structures and policies before
installing the password hardening feature might cause you to be locked out of your Avamar server.
NOTE: Recent versions of Avamar require the passwords for system user accounts, and the admin and root accounts, to
expire every 60 days. The SSH console prompts users to change the password.
You can also change the current complexity configuration and aging rules. User and credential management on page 36 provides more
information. However, use the same caution when changing any password configuration details to ensure successful implementation, and
perform a backup of the configuration files before making any changes.
Additional password hardening satisfies the following STIG requirements that relate to server logins:
Table 5. STIG requirements satisfied by additional password hardening
Requirement ID Requirement title
GEN000540 Password Change 24 Hours
GEN000560 Password Protect Enabled Accounts
GEN000580 Password Length
GEN000600 Password Character Mix
GEN000620 Password Character Mix
GEN000640 Password Character Mix
GEN000660 Password Contents
GEN000680 Password Contents
GEN000700 Password Change Every 60 Days
GEN000740 Password Change Every Year
GEN000760 Inactive Accounts are not locked
GEN000780 Easily Guessed Passwords
GEN000800 Password Reuse
GEN000820 Global Password Configuration Files
GEN000840 Root Account Access
Following successful installation and configuration, the Avamar server enforces the following rules for all local Avamar server operating
system user accounts and passwords:
• Password aging
• Password complexity, length, and reuse
Failed login behavior
You can configure the maximum allowed number of failed login attempts for the Avamar server. When a user reaches the failed login
attempt threshold, the server locks the user out of the system.
The default threshold value is five failed attempts. The server automatically unlocks after a configurable interval. By default, the interval is
5 minutes, however the admin user can also reset the lock by restarting the MCS.
Configure failed login behavior
Configuring actions on reaching the authentication failure threshold is a level-2 security feature.
About this task
The documentation for pam_tally provides more information about parameters and values.
Authentication
19
Page 20

Steps
1. Open a command shell and log in by using one of the following methods:
• For a single-node server, log in to the server as admin, and then switch user to root by typing su -.
• For a multi-node server, log in to the utility node as admin, and then switch user to root by typing su -.
2. Back up the login configuration file by typing the following command:
cp /etc/pam.d/common-auth /etc/pam.d/common-auth.`date +%s`
3. Using a Linux text editor, such as vi, open the file /etc/pam.d/common-auth.
4. Locate the line that begins with auth required pam_tally2.so.
For example: auth required pam_tally2.so deny=3 lock_time=5
a. If this line does not exist, or is commented out, insert a new line with the necessary parameters after the comment # BEGIN
Avamar modifications, before the remaining lines.
5. Update the parameters that control the behavior for failed logins, which are listed in the following table:
Table 6. Parameters that control behavior of failed logins
Parameter Description
deny The threshold for failed authentication attempts, after which the operating system locks the user
account.
lock_time The duration for which the operating system prevents login to the user account after each
authentication failure. The operating system locks the user account for this duration even if the user
has not reached the authentication failure threshold. Use this parameter to rate-limit failed logins.
unlock_time The interval for which the operating system should wait before re-enabling the specified user
account, after a user reaches the authentication failure threshold.
magic_root Do not track the number of failed authentication attempts for the root user account.
even_deny_root_accountAllow the operating system to disable access to the root user account after reaching the
authentication failure threshold. Dell EMC does not recommend using this parameter.
Do not modify the configuration values on other lines.
Note that user accounts which reach the authentication failure threshold are permanently locked, unless you specify the
unlock_time parameter or manually unlock the user account.
6. Save and close the file.
Example
For example:
• To configure a policy that denies login for five seconds after each authentication failure, triggers lockout after six failed attempts, and
requires an administrator to manually enable locked user accounts:
# BEGIN Avamar modifications
auth required pam_tally2.so deny=6 lock_time=5
• To configure a policy that denies login for five seconds after each authentication failure, triggers lockout after three failed attempts,
and automatically restores access after five minutes:
# BEGIN Avamar modifications
auth required pam_tally2.so deny=3 lock_time=5 unlock_time=300
Next steps
For a multi-node server, repeat this task on all storage nodes.
To manually enable a user account, type the following command as the root user:
pam_tally2 -u AccountName --reset
20
Authentication
Page 21

Authentication types and setup
An authentication system is a username/password system that is used to grant domain and client users access to the Avamar server.
Avamar supports its own internal authentication system (“Avamar authentication” or “avs”), as well as directory service authentication.
Directory service authentication uses an existing LDAP v.3 directory service or an existing Network Information Service (NIS) to provide
authentication.
The following topics provide information on the available authentication types and configuration options.
Avamar internal authentication
With Avamar internal authentication, you define the username and password for Avamar user accounts, and Avamar stores the
information. Usernames are case-sensitive and cannot be longer than 31 characters.
No additional steps are required to use internal Avamar authentication to authenticate user accounts. You define the username and
password for each account when you add the user in Avamar Administrator or the AUI.
Directory service authentication
Use directory service authentication to authenticate and assign roles to Avamar users by using information from an existing directory
service. Directory service authentication works with specific LDAP directory services and provides additional functionality when used with
an OpenLDAP directory service. Directory service authentication also works with a Network Information Service (NIS), on its own or with
one of the supported LDAP directory services.
Avamar products that use directory service authentication
The following Avamar products can use directory service authentication to authenticate and authorize users:
• Avamar Administrator
• Avamar Web Restore
• Avamar client web UI (Avamar Desktop/Laptop)
Avamar product that uses directory service client records
Avamar Client Manager does not use directory service authentication to authenticate and authorize user logins. However, Avamar Client
Manager can use the directory service mechanism to obtain information about computers that are potential Avamar clients. Avamar Client
Manager queries the directory service to obtain information about clients and, if available, directory service organizational units, such as
directory domains, and directory groups.
Directory services types
Directory service authentication supports the following types of directory services:
Table 7. Supported directory service types
Type Supported implementations
LDAP
• Active Directory for Windows Server 2003
• Active Directory Domain Services for Windows Server 2008
• Active Directory Domain Services for Windows Server 2012
• Active Directory Domain Services for Windows Server 2016
• 389 Directory Server version 1.1.35
OpenLDAP SUSE OpenLDAP version 2.4
NIS Network Information Service
Avamar supports encrypted LDAP and OpenLDAP directory service authentication via SSL/TLS. By default, Avamar uses TLS 1.2 if
supported by the LDAP or OpenLDAP server. Otherwise, Avamar falls back to a supported version of SSL/TLS. However, the Avamar
server does not provide an SSL/TLS certificate to the LDAP or OpenLDAP server for client authentication.
Authentication
21
Page 22

LDAP maps
Directory service authentication uses LDAP maps to form a group of Avamar domain users by using information from a directory service.
Link Avamar authorization levels to mapped directory service user accounts to create LDAP maps. The Adding an LDAP map section
provides more information.
NOTE: Deleting an Avamar domain removes the LDAP maps that rely on that Avamar domain for access. However,
removing LDAP maps does not affect the directory service groups or the directory service user records that are
associated with the removed maps.
Add a secure LDAP directory service
Avamar supports encrypted LDAP directory service authentication over SSL (LDAPS). To configure an Avamar system to use an LDAPS
directory service for authentication, complete the following steps.
Prerequisites
The following information is required:
• Domain name of the LDAP server (for example, mydomain.com)
• FQDN or IP address of the LDAP server (for example, dc-server.mydomain.com)
• The certificate that is used on the Domain Controller in base64 format (for example, dc-server.cer).
Export the Domain Controller's certificate and upload it to the Avamar Server /tmp directory.
Configure LDAP directory authentication (non-LDAPS). The Avamar Administration Guide provides more information.
About this task
This procedure uses the following examples:
• mydomain.com
where mydomain.com is the domain name of the LDAP server.
• dc-server.mydomain.com
where dc-server.mydomain.com is the FQDN or IP address of the LDAP server.
• dc-server.cer
where dc-server.cer is the LDAP server certificate.
Steps
1. Open a command shell and log in by using one of the following methods:
• For a single-node server, log in to the server as admin.
• For a multi-node server, log in to the utility node as admin.
2. Switch user to root by typing the following command:
su -
3. Back up the existing LDAP files by typing the following commands:
cp /usr/local/avamar/etc/ldap.properties /usr/local/avamar/etc/ldap.properties.`date -I`
cp /usr/local/avamar/etc/krb5.conf /usr/local/avamar/etc/krb5.conf.`date -I`
4. Log in to the root domain in Avamar Administrator.
5. In Avamar Administrator, click the Administration launcher link.
The Administration window is displayed.
6. Click the LDAP Management tab.
7. Add the LDAPS server by completing the procedure for a regular LDAP server.
To add a supported LDAP directory service, follow the steps in the Avamar Administration Guide.
The subsequent steps modify the ldap.properties file to convert the configuration to LDAPS.
8. Click Close to close the Directory Service Management window.
9. Click Edit LDAP file:
10. Locate the following section:
22
Authentication
Page 23

ldap.qualified-name-default=MyDomain.com
ldap.url.MyDomain.com=ldap\://dc-server.MyDomain.com\:389
11. Change the ldap.url.MyDomain.com parameter from ldap to ldaps.
12. Change the port number to 636.
13. Add the following line:
ldap.sasl.authentication=false
14. Save and close the ldap.properties file.
The LDAP file resembles the following:
ldap.qualified-name-default=MyDomain.com
ldap.url.MyDomain.com=ldaps\://dc-server.MyDomain.com\:636
ldap.sasl.authentication=false
15. Click Edit KRB5 file.
16. Locate the following lines in the [libdefaults] section.
default_tkt_enctypes = rc4-hmac des3-cbc-sha1-kd des-cbc-crc des-cbc-md5
default_tgs_enctypes = rc4-hmac des3-cbc-sha1-kd des-cbc-crc des-cbc-md5
17. Add the aes256-cts parameter to each line.
18. Save and close the ldap.properties file.
The KRB5 file resembles the following:
default_tkt_enctypes = aes256-cts rc4-hmac des3-cbc-sha1-kd des-cbc-crc des-cbc-md5
default_tgs_enctypes = aes256-cts rc4-hmac des3-cbc-sha1-kd des-cbc-crc des-cbc-md5
19. Copy the LDAP server certificate to the /tmp directory on the Avamar utility node or single-node server.
20. Ensure that you are still logged in as the root user.
21. Back up rmi_ssl_keystore by typing the following command on one line:
cp -p /usr/local/avamar/lib/rmi_ssl_keystore /usr/local/avamar/lib/rmi_ssl_keystore-backup
22. Import the LDAP server certificate to the keystore by typing the following command:
keytool -importcert -file /tmp/dc-server.cer -keystore /usr/local/avamar/lib/rmi_ssl_keystore
-storepass password
The default keystore password is changeme.
23. Restart the MCS and the backup scheduler by typing the following commands:
su - admin
mcserver.sh --stop
mcserver.sh --start
dpnctl start sched
24. Verify that you can login to Avamar Administrator as an LDAPS user.
Common Access Card and Personal Identity Verification
Avamar supports user authentication by using a Common Access Card (CAC) for United States Department of Defense (DoD) personnel
or a Personal Identity Verification (PIV) smart card for US federal government employees and contractors.
About CAC/PIV authentication
Avamar implements CAC/PIV authentication by presenting alternative login prompts for Avamar Installation Manager and Avamar
Administrator. After an administrator configures the Avamar server for CAC/PIV authentication, the following actions occur:
1. The Avamar software displays the CAC/PIV authentication prompts and requires the insertion of a smart card in the smart card reader
before proceeding.
2. When prompted, the user supplies a PIN to unlock the list of security certificates that are stored on the smart card.
3. The user selects a security certificate with appropriate authorization.
4. The Avamar software or web browser retrieves the security certificate from the smart card.
5. The validation authority (VA) service verifies the security certificate.
6. Avamar extracts login credentials from the security certificate.
Authentication
23
Page 24

7. An external LDAP server provides the LDAP groups that are associated with the login credentials.
8. Avamar maps these LDAP groups to a corresponding Avamar authorization.
When CAC/PIV authentication is configured, use the login procedures in this appendix whenever a procedure directs you to log in to the
Avamar Installation Manager or to Avamar Administrator.
The topics in this appendix assume the following:
• You have a general understanding of the principles of operation for smart cards and LDAP authentication.
• You have configured Avamar for LDAP directory service authentication and the LDAP server contains appropriate users and roles.
The Avamar Administration Guide provides more information.
• You have configured a VA server to validate user security certificates.
• You have the CA issuer certificate that signed the end-user security certificates, in .pem, .cer, or .p7b format.
You may also optionally supply a CAC/PIV security certificate for the Avamar server, in .pem, .cer, or .p7b format.
NOTE:
This optional server-specific CAC/PIV certificate is unique to each Avamar server and signed by the CA issuer.
Either security certificate can be used to secure communication between the Avamar server and CAC/PIV-enabled
clients. However, supplying a server-specific CAC/PIV certificate configures CAC/PIV-enabled clients to trust only
communication with this specific Avamar server.
• You know the details of your site implementation of CAC/PIV authentication, including:
○ The hostnames and IP addresses of the LDAP and VA servers.
○ The LDAP search username, password, and filter.
A Microsoft TechNet article provides details about configuring Windows behavior in the event of smart card removal: https://
technet.microsoft.com/en-us/library/jj852235(v=ws.11).aspx.
Important information
CAC/PIV authentication presents the following requirements:
• Avamar 7.4.1 or later.
• Microsoft Windows operating system.
• Internet Explorer 8 or later.
• OpenSC libraries, version 0.16 or later.
CAC/PIV authentication is not compatible with Network Information Service (NIS) or Kerberos authentication.
Before you enable or disable CAC/PIV authentication, ensure that the following additional prerequisites are met:
• The Avamar Installation Manager is not configuring or installing workflow packages.
• There are no active or waiting backup jobs.
Some Avamar interfaces do not support CAC/PIV authentication, including:
• The Avamar Installation Manager command line interface.
• The management console command line interface (MCCLI).
• The management console software development kit (MCSDK) interface for simple object access protocol (SOAP) web services.
• The Avamar Downloader Service.
• SSH console access.
• The local console service ports on ADS Gen4S and Gen4T nodes.
• Interfaces for third-party resources, such as vCenter.
Log file locations
The following logs contain information related to CAC/PIV authentication:
• cac.pl script:
/usr/local/avamar/var/log/cac.log
• Avamar Installation Manager:
/usr/local/avamar/var/avi/server_log/avinstaller.log.0
/usr/local/avamar/var/avi/webserv_log/jetty.log
• Management console server:
24
Authentication
Page 25

/usr/local/avamar/var/mc/server_log/mcserver.log.0
• Avamar Administrator client:
C:\Users\username\.avamardata\var\mc\gui_log\mcclient.log.0
• VA service:
/opt/vas/logs/vas.log
• Apache:
/var/log/apache2/access_log
/var/log/apache2/error_log
/var/log/apache2/ssl_request_log
• Avamar software upgrade workflows:
/usr/local/avamar/var/avi/server_data/package_data/AvamarUpgrade-version/workflow.log
Enabling CAC/PIV authentication
Enabling CAC/PIV authentication on an Avamar server is a multi-step process that consists of the following tasks:
• Updating the server configuration files.
• Opening the appropriate ports in the Avamar firewall.
• Enabling the CAC/PIV feature, which includes:
○ Importing the security certificates into the keystore.
○ Enabling two-way client authentication.
○ Configuring the VA service to start automatically on system startup.
○ Configuring the Apache web server.
○ Restarting the AvInstaller, management console, VA, and Apache services.
NOTE:
When you enable CAC/PIV authentication, the Avamar REST API and Avamar User Interface (AUI) authentication
is disabled and you will not be able to log in using these methods.
Updating server configuration files
This task updates two configuration files that provide the Avamar software with access to the VA server.
Steps
1. Open a command shell and log in by using one of the following methods:
• For a single-node server, log in to the server as admin.
• For a multi-node server, log in to the utility node as admin.
2. Switch user to root by typing the following command:
su -
3. Copy the CA issuer and optional server-specific CAC/PIV security certificates to /root.
4. Edit mcserver.xml with a text editor, such as vi, by typing the following command:
vi /usr/local/avamar/var/mc/server_data/prefs/mcserver.xml
5. Search for the cac node. The following example shows key/value pairs for an unconfigured server:
<node name="cac">
<map>
<entry key="san_index" value="" />
<entry key="ldap_login_ap" value="" />
<entry key="ldap_domain_mapping" value="" />
<entry key="ldap_search_filter" value="userPrincipalName" />
<entry key="ldap_login_user" value="" />
<entry key="cac_settings_path" value="/usr/local/avamar/lib/cac/settings.properties" />
<entry key="vas_url" value="http://localhost:7480/validation/cert" />
</map>
</node>
6. Configure the following keys with appropriate values, as listed in the following table:
Authentication
25
Page 26

Table 8. Key values
Key name Value description
ldap_login_user The username for LDAP authorization.
ldap_login_ap The password for LDAP authorization.
ldap_search_filter The filter to use when searching for LDAP authorization.
san_index Specify which Subject Alternative Name (SAN) to use in the certificate if multiple SANs are available.
By default, Avamar MCS loops the SANs to discover the first qualified one.
ldap_domain_mapping If the certificate contains a SAN that ends with a uPNSuffix instead of an actual domain that contains
the user, use this key to specify the actual LDAP domain so that the domain that contains the user
can be discovered.
When you enable CAC/PIV authentication, Avamar encrypts the plaintext password.
NOTE: Ensure that the appropriate user entries exist on the LDAP server and that the proper roles are assigned to
each user. After validating the security certificate, Avamar consults the LDAP server to determine a role for the
user. LDAP directory searches use the value of the security certificate's subjectAltName field.
7. Save and close the file.
8. Edit vas.properties with a text editor, such as vi, by typing the following command:
vi /opt/vas/config/vas.properties
Output similar to the following appears:
# VA server configuration
va.use.https.communication=false
va.http.host=localhost
va.http.port=7080
va.https.port=7043
va.signing.cert.path=/opt/vas/config/va.cer
va.hashing.algorithm.oid=1.2.840.113549.1.1.11
va.ocsp.nonce.ext=true
va.ocsp.response.cache=false
va.max.cache.size=300
va.max.cache.time=3600
va.verify.response.signature=true
va.ssl.cert.path=/opt/vas/config/va_ssl.cer
# Cert configuration
issuer.cert.path=/opt/vas/config/issuer.cer
cert.store.path=/root/.keystore
cert.store.pass=password
crl.repo.url=http://localhost/CRLD/ca_crl.crl
crl.local.path=/opt/vas/config/ca_crl.crl
end.cert.upload.repo=/tmp
# cert validation methods [OCSP, SCVP, CRL]
cert.validation.method=OCSP
9. Configure the properties that are listed in the following table with appropriate values:
Table 9. Properties
Property name Value description
va.http.host The hostname or IP address of the VA server.
va.http.port The port number of the VA server.
va.signing.cert.path The local path to the server certificate.
issuer.cert.path The local path to the CA issuer certificate.
Note the port numbers that you configure for the va.http.port and va.https.port properties.
10. Save and close the file.
26
Authentication
Page 27

Configuring the Avamar firewall
This task opens two ports in the Avamar firewall for the VA service to communicate with the VA server.
Steps
1. Change directory by typing the following command:
cd /usr/local/avamar/lib/admin/security
2. Run the firewall rules script by typing the following command:
./edit-firewall-rules.sh
The following output appears:
Choose an Action
----------------
1) Add a custom rule
2) Remove a custom rule
3) List Current Custom Rules
4) Exit
5) Save & Exit
Enter desired action:
3. Type 1 to add a custom rule and press Enter.
The following output appears:
Firewall Rule Types
-------------------
1) IPv4 Rule
2) IPv6 Rule
Enter Firewall Rule Type:
4. Type the number that corresponds to the addressing system in use and press Enter.
The following output appears:
Firewall Chains
---------------
1) OUTPUT
2) INPUT
3) LOGDROP
4) FORWARD
Select Chain:
5. Type 1 to add an output rule and press Enter.
The following output appears:
Protocol
--------
1) TCP
2) UDP
3) ICMP
Enter Protocol:
6. Type 1 to select TCP and press Enter.
The following output appears:
Enter source IP (leave blank for none):
7. Type the IP address of this Avamar server and press Enter.
The following output appears:
Enter source port (leave blank for none):
8. Leave this field blank and press Enter.
The following output appears:
Enter Destination IP Address (leave blank for none):
9. Type the IP address of the VA server that you specified in the va.http.host property for vas.properties and press Enter.
If you specified a hostname for the va.http.host property, type the corresponding IP address in this field.
The following output appears:
Authentication
27
Page 28

Enter Destination Port (leave blank for none):
10. Type the VA server port number that you specified in the va.http.port property for vas.properties and press Enter.
The following output appears:
Targets
-------
1) ACCEPT
2) REJECT
3) DROP
4) LOGDROP
Select Target:
11. Type 1 to allow packets that are destined for the VA server and press Enter.
The following output appears:
Node Types
----------
1) ALL
2) DATA
3) UTILITY
4) ACCELERATOR
Select node type to apply rule to:
12. Type 3 to select the utility node and press Enter.
Output similar to the following appears:
Add rule |7080|10.7.100.105||tcp||ACCEPT|OUTPUT|UTILITY to file? (Y/N):
13. Type Y to save the new rule and press Enter.
The script writes the new rule to avfwb_custom_config.txt.
Output similar to the following appears:
Adding |7080|10.7.100.105||tcp||ACCEPT|OUTPUT|UTILITY to file...
Add another rule? (Y/N):
14. Repeat the preceding steps to add another new rule for the same VA server and the va.https.port property.
At the completion of the process, output similar to the following appears:
Adding |7043|10.7.100.105||tcp||ACCEPT|OUTPUT|UTILITY to file...
Add another rule? (Y/N):
15. Type N and press Enter.
The following output appears:
Return to main menu? (Y/N):
16. Type N and press Enter.
The following output appears:
Save and execute rules now? (Y/N):
17. Type Y to save the new firewall rules and press Enter.
The script saves the new rules to the system firewall tables and automatically restarts the Avamar firewall, then exits.
Output similar to the following appears:
Rules have been saved to /usr/local/avamar/lib/admin/security/avfwb_custom_config.txt
|7080|10.7.100.105||tcp||ACCEPT|OUTPUT|UTILITY will be applied
|7043|10.7.100.105||tcp||ACCEPT|OUTPUT|UTILITY will be applied
Applying rule /usr/sbin/iptables -A OUTPUT -p tcp --dport 7080 -d 10.6.197.105 -j ACCEPT
Applying rule /usr/sbin/iptables -A OUTPUT -p tcp --dport 7043 -d 10.6.197.105 -j ACCEPT
Enabling the CAC/PIV feature
This task imports the security certificates and enables CAC/PIV authentication prompts.
Prerequisites
Ensure that you are still logged in as the root user.
28
Authentication
Page 29

It is recommended but not required to import the optional server-specific CAC/PIV security certificate into the keystore.
Steps
1. Change directory by typing the following command:
cd /root
2. Enable the CAC/PIV feature and import the security certificates into the keystore by typing the following command:
cac.pl --enable --cacert <cacert> --cert <servercert> --force
where:
• <cacert> is the filename of the CA issuer security certificate.
• <servercert> is the filename of the optional server-specific CAC/PIV security certificate.
NOTE:
If you do not have a server-specific CAC/PIV security certificate, omit the --cert <servercert> argument.
3. Verify that Avamar has enabled CAC/PIV authentication by typing the following command:
cac.pl --status
When CAC/PIV authentication is enabled, the following output appears:
cac: enabled
4. Check the status of the CAC/PIV components by typing the following command:
cac.pl --report
Output similar to the following appears:
cac.enabled=true
client.auth=true
server-cert-exists=false
issuer-cert-exists=true
vas-installed=true
vas-running=true
vas-autostart-enabled=true
mc-running=true
apache-installed=true
apache-running=true
apache-secure=true
The value of server-cert-exists may be true or false, depending on whether you imported a server-specific CAC/PIV security
certificate.
Logging in using CAC/PIV authentication
Before trying to log into Avamar Installation Manager or Avamar Administrator by using CAC/PIV authentication, take the following
actions:
• Enable CAC/PIV authentication on the Avamar server.
• Install Avamar Administrator on the local computer. This installs the necessary smart card libraries.
Ensure that the local computer meets all other prerequisites that are listed in the Avamar Administration Guide.
• Connect a supported smart card reader to the local computer.
• Insert a smart card into the smart card reader.
NOTE: CAC/PIV authentication is not supported when launching Avamar Administrator from the web interface.
Smart card reader libraries
Review the following information before logging in using CAC/PIV authentication.
Avamar Administrator provides an option to install the required OpenSC smart card driver during installation of the management console
software. The Avamar Desktop/Laptop interface also provides a stand-alone OpenSC driver.
If the site uses Gemalto smart card readers, you must obtain and install a Gemalto smart card driver. Ensure that the driver is compatible
with the release of the JRE that is included with the Avamar software.
The OpenSC or Gemalto DLL file must reside in one of the following locations:
Authentication
29
Page 30
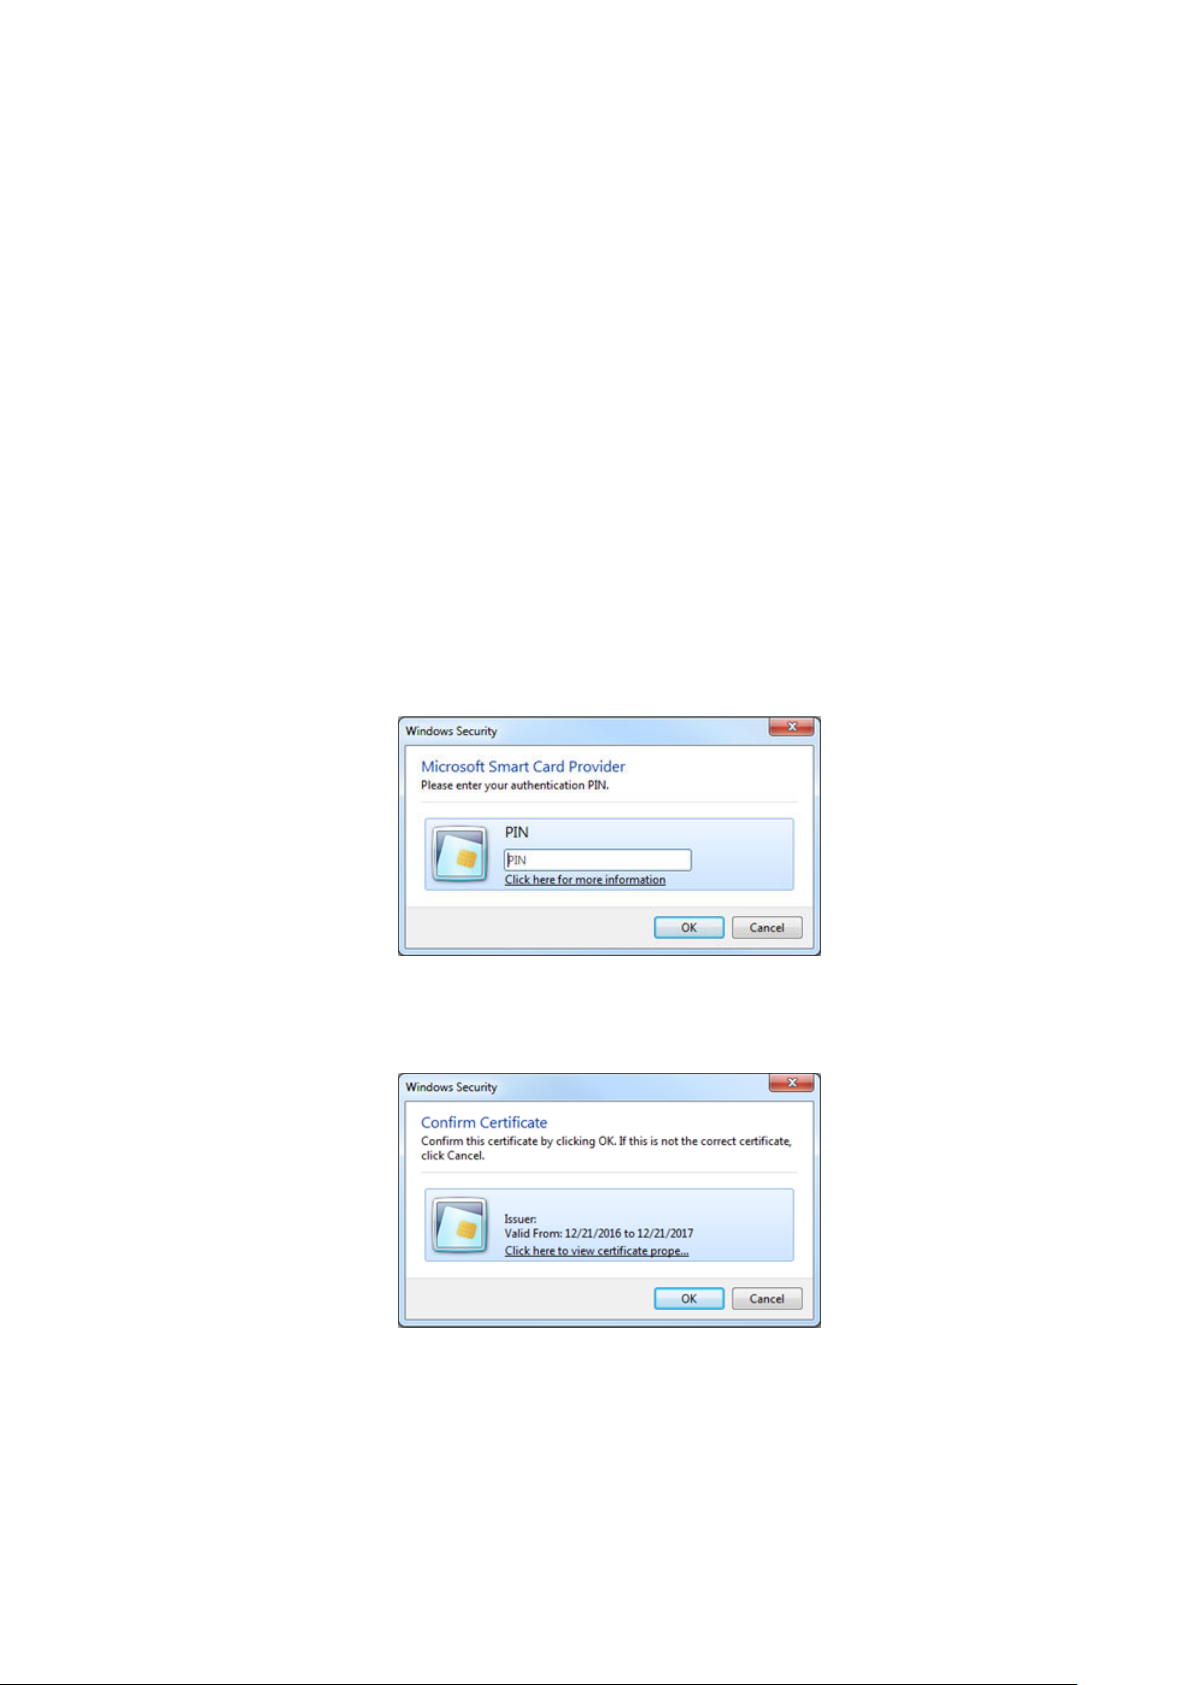
• A user-defined path that is specified in the pkcs11_library key in mcclient.xml
• For 64-bit Windows installations:
○ C:\Program Files\OpenSC Project\PKCS11-Spy\pkcs11-spy.dll
○ C:\Program Files (x86)\Gemalto\IDGo 800 PKCS#11\IDPrimePKCS1164.dll
• For 32-bit Windows installations:
○ C:\Program Files (x86)\OpenSC Project\PKCS11-Spy\pkcs11-spy.dll
○ C:\Program Files (x86)\Gemalto\IDGo 800 PKCS#11\IDPrimePKCS11.dll
If the Avamar client software cannot locate the DLL file, the client prompts the user for the file's location, and then stores this information
for the next session.
Logging in to the Avamar Installation Manager with CAC/PIV authentication
When CAC/PIV authentication is enabled, use the following steps to log in to the Avamar Installation Manager.
Steps
1. In a supported web browser, type:
https://<AvamarServer>/avi
where <AvamarServer> is the hostname (as defined in DNS) or the IP address of the Avamar server. Ensure that you type the s in
https.
You may be required to acknowledge a browser warning regarding self-signed certificates before continuing.
A Windows Security dialog box appears, prompting the user to type the authentication PIN for the smart card.
Figure 2. PIN Authentication dialog box
2. Type the PIN that is assigned to the smart card and click OK.
3. Confirm the details of the security certificate from the smart card and click OK. The security certificate must correspond to an
account with administrator permissions.
Figure 3. Certificate Confirmation dialog box
The Avamar server validates the security certificate with the VA server and interfaces with the LDAP server to complete the login
process.
The Avamar Installation Manager window appears.
30
Authentication
Page 31

Next steps
If you remove the smart card from the smart card reader, or a smart card is not inserted, the web browser displays a notification.
Figure 4. Insert Smart Card dialog box
Use of the Avamar Installation Manager is not possible until you insert a smart card.
Logging in to Avamar Administrator with CAC/PIV authentication
When CAC/PIV authentication is enabled, use the following steps to log in to Avamar Administrator.
Steps
1. Launch Avamar Administrator by double-clicking the Avamar Administrator icon on the Windows desktop or from the Avamar
folder on the Start menu.
The Login window appears.
Figure 5. Avamar Administrator Login window
Authentication
31
Page 32

2. In the Server field, type the IP address or DNS name of the Avamar server to log in to.
3. In the Domain field, select or type the Avamar domain to log in to:
• To log in to the root domain, use the default entry of a single slash (/) character.
• To log in to a specific domain or subdomain, type the domain path by using the syntax /domain/subdomain1/subdomain2.
4. In the Enter your PIN to view your certificates field, type the PIN that is assigned to the smart card.
5. Click Fetch Certificates.
Avamar Administrator retrieves the list of security certificates that are stored on the smart card.
Figure 6. Avamar Administrator Login window
6. In the Choose a certificate field, select a certificate from the list of security certificates on the smart card.
To access all Avamar Administrator functionality, the account that is associated with this security certificate must be assigned the role
of Administrator. Other roles provide reduced functionality.
7. Click Login.
The Avamar server validates the selected security certificate with the VA server and interfaces with the LDAP server to complete the
login process.
The Avamar Administrator dashboard appears.
Next steps
If you remove the smart card from the smart card reader, the Avamar Administrator window displays a notification and closes.
32
Authentication
Page 33

Figure 7. Logout dialog box
Disabling CAC/PIV authentication
Disabling CAC/PIV authentication on an Avamar server is a multi-step process that consists of the following tasks:
• Disabling the CAC/PIV feature, which includes:
○ Disabling two-way client authentication.
○ Configuring the Apache web server.
○ Restarting the AvInstaller, management console, VA, and Apache services.
○ Removing the security certificates from the keystore.
• Closing the VA service ports in the Avamar firewall.
Modifying the server configuration files is not required.
Disabling the CAC/PIV feature
This task disables CAC/PIV authentication prompts and removes the security certificate from the Avamar server keystore.
Steps
1. Open a command shell and log in by using one of the following methods:
• For a single-node server, log in to the server as admin.
• For a multi-node server, log in to the utility node as admin.
2. Switch user to root by typing the following command:
su -
3. Verify that CAC/PIV authentication is enabled by typing the following command:
cac.pl --status
When CAC/PIV authentication is enabled, the following output appears:
cac: enabled
4. Check the status of the CAC/PIV components by typing the following command:
cac.pl --report
Output similar to the following appears:
cac.enabled=true
client.auth=true
server-cert-exists=false
issuer-cert-exists=true
vas-installed=true
vas-running=true
vas-autostart-enabled=true
mc-running=true
apache-installed=true
apache-running=true
apache-secure=true
The value of server-cert-exists may be true or false, depending on whether you imported a server-specific CAC/PIV security
certificate.
Depending on the state of the Avamar subsystems, the values of mc-running or apache-running may be true or false.
5. Disable the CAC/PIV feature, and remove the security certificates from the keystore, by typing the following command:
cac.pl --disable --clean --force
Authentication
33
Page 34

NOTE: If you do not need to remove the CA issuer and server-specific CAC/PIV security certificates, omit the --
clean option.
6. Verify that CAC/PIV authentication is disabled by typing the following command:
cac.pl --status
When CAC/PIV authentication is disabled, the following output appears:
cac: disabled
7. Check the status of the CAC/PIV components by typing the following command:
cac.pl --report
Output similar to the following appears:
cac.enabled=false
client.auth=false
server-cert-exists=false
issuer-cert-exists=false
vas-installed=true
vas-running=false
vas-autostart-enabled=false
mc-running=true
apache-installed=true
apache-running=true
apache-secure=false
Depending on the state of the Avamar subsystems, the values of mc-running or apache-running may be true or false.
If you did not remove the security certificates, the values of issuer-cert-exists and server-cert-exists may be true.
Configuring the Avamar firewall
This task closes the two ports in the Avamar firewall that are used by the VA service to communicate with the VA server.
Steps
1. Change directory by typing the following command:
cd /usr/local/avamar/lib/admin/security
2. Run the firewall rules script by typing the following command:
./edit-firewall-rules.sh
The following output appears:
Choose an Action
----------------
1) Add a custom rule
2) Remove a custom rule
3) List Current Custom Rules
4) Exit
5) Save & Exit
Enter desired action:
3. Type 2 to remove custom rules and press Enter.
Output similar to the following appears:
Rules in configuration file:
1 |7080|10.7.100.105||tcp||ACCEPT|OUTPUT|UTILITY
2 |7043|10.7.100.105||tcp||ACCEPT|OUTPUT|UTILITY
Select line to remove (ENTER to go back):
4. Type the number of the rule corresponding to the VA server HTTP port, which is 7080 by default, and then press Enter.
Output similar to the following appears:
Line |7080|10.7.100.105||tcp||ACCEPT|OUTPUT|UTILITY has been removed from configuration file
Return to main menu? (Y/N):
5. Type Y to return to the main menu and press Enter.
The following output appears:
34
Authentication
Page 35

Choose an Action
----------------
1) Add a custom rule
2) Remove a custom rule
3) List Current Custom Rules
4) Exit
5) Save & Exit
Enter desired action:
6. Type 2 to remove additional custom rules and press Enter.
Output similar to the following appears:
Rules in configuration file:
1 |7043|10.7.100.105||tcp||ACCEPT|OUTPUT|UTILITY
Select line to remove (ENTER to go back):
7. Type the number of the rule corresponding to the VA server HTTPS port, which is 7043 by default, and then press Enter.
Output similar to the following appears:
Line |7043|10.7.100.105||tcp||ACCEPT|OUTPUT|UTILITY has been removed from configuration file
Return to main menu? (Y/N):
8. Type N and press Enter.
The following output appears:
Save and execute rules now? (Y/N):
9. Type Y and press Enter.
The script removes the CAC/PIV authentication rules from the system firewall tables, automatically restarts the Avamar firewall, and
then exits.
The following output appears:
Rules have been saved to /usr/local/avamar/lib/admin/security/avfwb_custom_config.txt
Unauthenticated interfaces
The Avamar Web Restore (Desktop/Laptop) page requires no authentication to access the top-level navigation items. However, most
top-level navigation items require subsequent authentication to use interfaces that may provide access to customer data.
Table 10. Avamar Web Restore interfaces that do not require authentication
Interface Effects
Downloads Allows a user to download platform-specific Avamar client plug-ins
and related items.
Administrator Allows a user to download the Avamar Administrator application for
use on the local computer. The Avamar Administrator software
requires authentication and authorization to access any system
functions.
Help Provides description of the functions available through Avamar
Web Restore.
Selecting the authentication source
Select the authentication source during the process of creating a user account.
• If you have configured enterprise authentication, the AUI enables the Authentication System list when you create a user account.
• If you have not configured enterprise authentication, the Authentication System list is unavailable and the Axion
Authentication System (Avamar internal authentication) becomes the default.
Directory service authentication requires no additional selection beyond the normal process of configuring LDAP maps.
The Avamar Administration Guide provides more information about creating user accounts.
Authentication
35
Page 36

How Avamar authenticates users and assigns roles
To provide backward compatibility with enterprise authentication and to account for the possibility of users in more than one LDAP
mapped group, Avamar uses the following authentication and role assignment sequence for each login try:
1. When the username is in the format user, where user is a username without @server appended, then Avamar checks the internal
Avamar authentication database.
If the username, password, and domain match, then the login is successful and Avamar assigns the user a role in the Avamar database.
If they do not match, then the login fails.
2. When the username is in the format user@server, where user is a username and server is the fully qualified domain name of the
authentication server, then Avamar checks the login information by using enterprise authentication.
If the username, password, and domain match, then the login is successful and Avamar assigns the user a role in the Avamar database.
If there is no match, then the evaluation continues.
3. When the username is in the format user@server and authentication by using enterprise authentication fails, then Avamar checks the
LDAP mapping system.
The login try is checked against all mapped groups for a match of each of the following identifiers:
• Username, the portion of the User Name field entry before the @ symbol.
• Password, as typed in the Password field.
• Avamar domain, as typed in the Domain Name field.
• Directory service domain, the portion of the User Name field entry after the @ symbol.
When all identifiers match, the login is successful and Avamar assigns the user a role from the mapped group.
A user can be the member of mapped groups in different directory service domains. The role of the mapped group that matches the
directory service domain that is provided during login is assigned to the user for that session.
When the user is a member of more than one mapped group in the same directory service domain, the role with the greatest authority
is assigned.
4. When the login information does not meet the requirements of any of the previous steps, then the login fails and a failure message
appears.
User and credential management
The following topics describe the local user accounts, default practices and credentials, and how to secure user account login and the
associated credentials.
Pre-loaded user accounts
The Avamar server uses the following default user accounts and default passwords. Changing the default password is an installation
requirement.
Table 11. Avamar server Linux OS default user accounts
User account Default password Description
root changeme Linux OS root account on all Avamar nodes.
NOTE: The use of ssh to the root
user is allowed:
• Internally on all nodes (via
localhost)
• From the utility node to itself
and to all storage nodes.
admin changeme Linux OS account for Avamar administrative
user.
Table 12. Avamar server software default user account
User account Default password Description
root 8RttoTriz Avamar server software root user account.
36 Authentication
Page 37

Table 13. MCS default user accounts
User account Default password Description
MCUser MCUser1 Default Avamar Administrator
administrative user account.
backuponly backuponly1 Account for internal use by the MCS.
restoreonly restoreonly1 Account for internal use by the MCS.
backuprestore backuprestore1 Account for internal use by the MCS.
repluser 9RttoTriz Account for internal use by the MCS for
replication.
Table 14. MCS PostgreSQL database default user accounts
User account Default password Description
admin No password, logged in on local node only.
viewuser viewuser1 Administrator server database view
account.
Table 15. Proxy virtual machine Linux OS default user account
User account Default password Description
root avam@r Linux OS root account on all proxies
deployed using the Avamar proxy appliance.
This account is for internal use only.
admin avam@r Linux OS admin account on all proxies
deployed by using the Avamar proxy
appliance.
AvamarCIM avam@r Linux OS AvamarCIM account for accessing
CIM the interface by using the Avamar
proxy appliance.
Changing server passwords and OpenSSH keys
Use the change-passwords utility to change the passwords for operating system user accounts and Avamar server user accounts.
Also use change-passwords to create and modify SSH keys for those accounts.
About this task
The change-passwords utility guides you through the following operations:
• Changing passwords for the operating system accounts: admin and root
• Changing passwords for the internal Avamar server accounts: root, MCUser, repluser, and viewuser
• Creating and changing SSH keys
Steps
1. Suspend all scheduled operations:
a. In Avamar Administrator, select Tools > Manage Schedules.
b. On the Manage All Schedules window, click Suspend All.
2. Open a command shell:
a. Log in to the server as admin.
b. Switch user to root by typing the following command:
su -
c. For a multi-node server, load the rootid OpenSSH key by typing the following command:
Authentication
37
Page 38

ssh-agent bash
ssh-add /root/.ssh/rootid
3. Start the utility by typing change-passwords.
On a multi-node server, the output prompts you to specify whether to change passwords on all nodes or selected nodes.
4. Type y to change passwords on all nodes or n to change passwords on selected nodes, and then press Enter.
The output prompts you to indicate whether you plan to specify SSH private keys that are authorized for root operations.
5. Type n and press Enter.
The output prompts you to specify whether to change admin or root operating system user account passwords.
6. Type y to change the passwords or n to skip the process of changing the passwords, and then press Enter.
7. If you typed y in the previous step, then follow the system prompts to change the passwords for one or more of the admin or root
operating system user accounts.
The output prompts you to specify whether to change SSH keys.
8. Type y to change or create an SSH key, or type n, and then press Enter.
9. If you typed y in the previous step, then follow the system prompts to change or create the keys.
The output prompts you to specify whether to change Avamar server passwords.
10. When prompted, type y to change the MCUser, Avamar root, repluser, and viewuser passwords, or if you do not want to change the
passwords, type n, and then press Enter.
11. If you typed y in the previous step, then follow the system prompts to change the passwords.
The output prompts you to accept or reject the changes that are made to passwords or SSH keys during this utility session.
12. Type y to accept the changes or type n to exit this utility session without changes, and then press Enter.
The output provides the status of the operation.
13. When the operation completes, resume scheduled operations:
a. In Avamar Administrator, select Tools > Manage Schedules.
b. On the Manage All Schedules window, click Resume All.
Customer Support password
The Customer Support password in the Avamar Installation Manager is an additional control that restricts customers from installing certain
packages which might lead to system instability or corruption when installed without assistance from Customer Support. This control is
not intended to provide any confidentiality protection.
The Customer Support password is a predefined, hard-coded string that customers cannot change. However, the Customer Support
password changes for each Avamar release.
Removing local account
This section describes how to disable and remove local accounts for Avamar.
About this task
To remove a user account from the Avamar MCGUI, do the following:
Steps
1. Login to the Avamar administrator with the administrator credentials.
2. Navigate to Switch to Administrator.
3. Select the user that you want to remove.
4. Click Delete User.
An MCGUI user account cannot be disabled from the Avamar administrator.
Disabling Avamar server account
To disable user access to Avamar server, do the following:
Steps
1. Open a command shell and login with administrator credentials.
2. Update /ect/passwd user information to sbin/nologin.
38
Authentication
Page 39

Example
For example, to disable avi user access, type the following command:
avi:x:510:510:Daemon user for Avamar Installation Manager:/home/avi:/sbin/nologin
Password complexity
The following topics describe customer options for configuring password complexity rules:
Password complexity, length, and reuse
As part of the level-2 security features, Avamar requires that all local server operating system accounts have passwords with the following
characteristics:
• Password complexity requires that you use at least three of the following four character sets:
○ Two or more lowercase characters
○ Two or more uppercase characters
○ Two or more numeric characters
○ Two or more special (non-alphanumeric) characters
• Password complexity determines the minimum length:
○ If you use any three character sets, the password must be at least 14 characters.
○ If you use all four character sets, the password must be at least 11 characters.
• Passwords must contain at least three characters that are different from the last password.
• The previous 10 passwords cannot be reused.
• The length of the password limits the number of pairs of neighboring alphabetical characters. For example, the string 23abcdfed
contains six pairs: 23, ab, bc, cd, fe, ed.
○ For a minimum length password, four pairs are permitted.
○ For every 12 characters beyond the minimum length, another pair is permitted.
Configure password complexity, length, and reuse
About this task
The documentation for pam_cracklib provides more information about parameters and values.
Steps
1. Open a command shell and log in by using one of the following methods:
• For a single-node server, log in to the server as admin, and then switch user to root by typing su -.
• For a multi-node server, log in to the utility node as admin, and then switch user to root by typing su -.
2. Back up the login configuration file by typing the following command:
cp /etc/pam.d/common-password /etc/pam.d/common-password.`date +%s`
3. Using a Linux text editor, such as vi, open the file /etc/pam.d/common-password.
4. Locate the line that begins with password requisite.
For example: password requisite pam_cracklib.so retry=3 minlen=14 lcredit=-2 ucredit=-2
dcredit=-2 ocredit=-2 difok=4
5. Update the parameters that control the password complexity and length, which are listed in the following table:
Table 16. Parameters that control the password complexity and length
Parameter Description
retry The number of opportunities for a user to type a new password that meets the specified
criteria, before the password change command fails.
minlen The minimum password length, subject to adjustment in the form of "credit" toward shorter
lengths, depending on the number of character sets in use and the credit parameters.
lcredit The maximum credit toward password length for lowercase characters.
Authentication 39
Page 40

Table 16. Parameters that control the password complexity and length (continued)
Parameter Description
ucredit The maximum credit toward password length for uppercase characters.
dcredit The maximum credit toward password length for digit characters (0-9).
ocredit The maximum credit toward password length for special (non-alphanumeric) characters.
difok The minimum number of characters which must change from the previous password.
Negative values for the credit parameters force users to select passwords that contain at least the specified number of characters
from that character set.
For example, with a setting of ucredit=-2, a user must include at least two uppercase characters in the password.
6. Locate the line that begins with password sufficient.
For example: password sufficient pam_unix.so use_authtok shadow remember=5 sha512
7. Update the remember parameter that controls password history and reuse.
The value for this parameter indicates the number of previous passwords that the new password cannot match.
8. Save and close the file.
Example
For example, to configure a policy that requires passwords with a minimum of eight characters, one letter, and one digit, and that prevents
the last three passwords from being reused:
password requisite pam_cracklib.so retry=6 minlen=8 ucredit=-1 dcredit=-1
password sufficient pam_unix.so use_authtok shadow remember=3 sha512
Next steps
For a multi-node server, repeat this task on all storage nodes.
Configure password aging
Password aging is a level-2 security feature. By default, all local Avamar server operating system accounts must have their passwords
changed every 60 days. Once a password is changed, it cannot be changed again for at least 24 hours.
About this task
To change the password expiry interval, complete the following steps:
Steps
1. Open a command shell and log in by using one of the following methods:
• For a single-node server, log in to the server as admin, and then switch user to root by typing su -.
• For a multi-node server, log in to the utility node as admin, and then switch user to root by typing su -.
2. Back up the login configuration file by typing the following command:
cp /etc/login.defs /etc/login.defs.`date +%s`
3. Using a Linux text editor, such as vi, open the file /etc/login.defs.
4. In the Password aging controls section, locate the PASS_MAX_DAYS parameter.
5. Change the PASS_MAX_DAYS parameter to a different value, in days.
For example, PASS_MAX_DAYS 90.
This value controls the maximum password age before expiry.
6. Verify that the value for the PASS_WARN_AGE parameter is appropriate for the new password expiry interval.
7. If required, change the value for the PASS_WARN_AGE parameter to a different value, in days.
This value controls the warning period for a user to prepare for password expiry.
8. If required, change the value for the PASS_MIN_DAYS parameter to a different value, in days.
This value controls the minimum password age before a password can be changed again.
9. Save and close the file.
10. List the operating system user accounts by typing the following command:
cat /etc/passwd | cut -f 1 -d :
40
Authentication
Page 41

11. Set the password expiry interval for an operating system user account by typing the following command:
chage -M interval account-name
where:
• interval is the new password expiry interval, in days.
• account-name is one of the operating system user accounts from the previous step.
Repeat this step for all Avamar operating system user accounts.
Next steps
For a multi-node server, repeat this task on all storage nodes.
Secure credential requirements
This section provides information on Secure credential requirements for Avamar.
Avamar requires an advance encryption level of AES128 for credential hashing algorithm. The salt size settings for hashed credentials is
not applicable for Avamar.
Authentication to external systems
Configure authentication of components outside of Avamar, including components providing services to the Avamar server and remote
clients.
Avamar supports the following external systems:
• Data Domain
• VMware vCenter
• EMC Secure Remote Services (ESRS)
• Dell EMC repository server
• External LDAP server
• KMIP server
For each external system, there are two common operations: identifying the system and establishing trust.
In most cases, identifying an external system is easy: a user or administrator specifies an IP address or a hostname for a known device that
is under the users control, to which Avamar connects. Some external systems, such as ESRS are preconfigured in the Avamar software.
Where applicable, follow the procedures in this section to authenticate external systems that are not under the user's control.
After you verify the identity of the external system, you can configure Avamar to trust many known external systems. In general, this
process involves exchanging a certificate or other shared secret that distinguishes a known system from an imposter.
Configuring remote connections
The following topics provide information about the external systems to which Avamar connects, and the means of establishing trust with
those systems.
Authentication with Data Domain
The following sections provide information about identifying the Data Domain system, and establishing trust between the Avamar server
and Data Domain system.
Identifying a Data Domain system
Avamar and Data Domain do not verify the identity information that is supplied with the certificates. Rather, Avamar verifies that the
certificate matches the one that was used during the import process. The user is required to provide accurate credentials when
integrating a Data Domain system with an Avamar server. Additionally, a user must verify the information in the certificates before
instructing the Avamar server or the Data Domain system to trust those certificates. No further identification occurs.
Authentication
41
Page 42

Establishing trust with the Data Domain system
About this task
When you integrate Data Domain with an Avamar server, mutual trust needs to be established between both systems. To establish a
trusted connection, Avamar and Data Domain introduce security certificates to each end point that become known to the other end point.
Each time a connection occurs, Avamar verifies the security certificate presented by the Data Domain, and vice versa. Successful
verification establishes trust.
Avamar control data that is exchanged with the Data Domain travels via an SSH connection that is secured by means of public key
authentication. These public keys are exchanged during the initial integration process. The Data Domain System Integration Guide provides
more information.
After this pathway is established, Avamar controls the encryption of backup data.
Authentication with ESRS
The following sections provide information about identifying the EMC Secure Remote Services (ESRS) server, and establishing trust
between the Avamar server and the ESRS server.
Identifying an ESRS server
To identify an EMC Secure Remote Services (ESRS) server, Avamar relies on a user to provide a hostname and IP address that the user
has already identified. Log in to the ESRS Web UI to verify the configuration details and identify the ESRS server.
Establishing trust with the ESRS server
About this task
Integration of ESRS with an Avamar server requires the establishment of mutual trust between both systems. To establish a trusted
connection, complete the following steps:
Steps
1. Export the ESRS gateway certificate from the ESRS Web UI.
The ESRS Operations Guide provides more information.
2. Open a command shell and log in by using one of the following methods:
• For a single-node server, log in to the server as admin, and then switch user to root by typing su -.
• For a multi-node server, log in to the utility node as admin, and then switch user to root by typing su -.
3. Load the rootid OpenSSH key by typing:
ssh-agent bash
ssh-add /root/.ssh/rootid
4. Copy the ESRS gateway certificate to the /tmp folder on the Avamar server.
5. Import the ESRS gateway certificate into the key store by typing the following command on one line:
keytool -importcert -alias esrs -keystore /usr/local/avamar/lib/rmi_ssl_keystore -storepass
changeme –file /tmp/esrs.cer
6. To proceed without establishing trust, update the mcserver.xml file:
a. Open /usr/local/Avamar/var/mc/server_data/prefs/mcserver.xml in a text editor.
b. Find the ignore_cert key.
c. Change the value to true.
<entry key="ignore_cert" value="true"/>
d. Close mcserver.xml and save the changes.
e. Restart the MCS by typing the following commands:
dpnctl stop mcs
dpnctl start mcs
42
Authentication
Page 43

Authentication with VMware vCenter
The following sections provide information about identifying the vCenter server, and establishing trust between the Avamar server and
vCenter server.
Identifying a VMware vCenter server
To identify a vCenter server, Avamar relies on a user to provide a hostname and IP address that the user has already identified. Launch the
vSphere Client or Web Client, and log in to the vCenter server to verify the configuration details and identify the vCenter server.
Establishing trust with the VMware vCenter server
Integration of vCenter with an Avamar server requires the establishment of mutual trust between both systems To establish a trusted
connection, complete the following tasks:
1. Export the vCenter authentication certificate from vCenter.
The VMware vSphere documentation provides more information.
2. Use the Avamar Web User Interface (AUI) to import the vCenter authentication certificate to the MCS keystore.
The VMware User Guide describes how to import vCenter authentication certificates.
Authentication with the Dell EMC repository server
The following sections provide information about identifying the repository server, and establishing trust between the Avamar server and
repository server.
Identifying the Dell EMC repository server
When a user connects to the Dell EMC repository server, the Local Downloader Service (LDLS) presents the certificate to the user
through the Avamar Installation Manager UI. The Avamar sever requires the user to verify the information in the certificate and accept the
certificate. No further identification occurs.
Establishing trust with the Dell EMC repository server
The legacy Avamar Downloader Service cannot establish trust. It does not verify the certificate provided by the repository.
• To establish trust for the source of packages:
The Local Downloader Service (LDLS) presents the identification portion of the certificate to the user and prompts for acceptance.
The user accepts the certificate and the LDLS stores the certificate to verify future connections to the repository. This establishes
one-way trust between the LDLS (and Avamar Installation Manager) and the repository.
• To establish trust for the authenticity of workflow packages:
All workflow packages obtained from the repository are signed by a master GPG key that is controlled by Dell EMC. The corresponding
public key is built into the Avamar Installation Manager. On receipt of the package, the Avamar Installation Manager verifies the
signature on the workflow package against the public key to detect and reject invalid signatures that might indicate possible tampering
or corruption.
Authentication with the LDAP server
The following sections provide information about identifying the LDAP server, and establishing trust between the Avamar server and
LDAP server.
Identifying an LDAP server
To identify an LDAP server, Avamar requires the user to provide the correct hostname and IP address at the time that you configure
Avamar to use the LDAP directory service. Log in to Avamar Administrator to verify the configuration details and identify the LDAP server.
By default, Avamar is configured to verify the identity of the LDAP server by using Kerberos. However, other methods are available. For
more information, see the Avamar Administration Guide.
Establishing trust with the LDAP server
The establishment of mutual trust between the LDAP server and Avamar server is not required. Each LDAP session is unique and relies on
the certificates that are used to establish each connection and the credentials that are provided during initial configuration.
Authentication
43
Page 44

Authentication with the KMIP server
Identifying a KMIP server
To identify a KMIP server, Avamar requires the user to provide the correct hostname and IP address at the time that you configure
Avamar to work with the KMIP server. Connect to the KMIP server to verify configuration details and identify the KMIP server.
Establishing trust with the KMIP server
Integration of a KMIP server with an Avamar server requires the establishment of mutual trust between both systems. For the KMIP
server, trust is established by means of public key authentication. These public keys are exchanged during the initial integration process.
To establish a trusted connection, connect to the KMIP server at configuration time, and exchange keys for the Avamar and KMIP server.
For more information, contact Customer Support.
Remote component authentication
Some Avamar components can be customized to accept trustworthy certificates that the user provides, or that a user's remote
environment is able to authenticate. Remote components can include an Avamar client operating system, Avamar client software, and a
human user or web browser.
• Avamar client operating systems can use code signing to ensure the authenticity and integrity of Avamar software downloads. Code
signing on page 60 provides more information.
• Avamar clients can use session security to secure all communications between the Avamar server and the Avamar client software. The
Avamar server provides authentication to the Avamar client and the Avamar client provides authentication to the Avamar server.
Session security features on page 44 provides more information.
• Web browsers and the human users who rely on them need security certificates to verify the authenticity of the content that is
available on Avamar web portals. Certificates help these users identify the Avamar server to which they connect and provide
credentials. You can replace the default self-signed certificates with certificates that are provided by your organization. Server
authentication using Apache on page 52 and Commercially signed SSL certificates on page 57 provides more information.
Session security features
Avamar session security features are provided by the Avamar installation, Avamar Virtual Edition (AVE) configuration, and upgrade
workflow packages as well as a standalone session security configuration workflow.
Session security features include security improvements for communications between Avamar system processes.
The Avamar system secures all communications between Avamar system processes by using session tickets. A valid session ticket is
required before an Avamar system process accepts a transmission from another Avamar system process.
The session tickets have the following general characteristics:
• The session ticket is encrypted and signed to protect against modification
• The session ticket is valid for a very short time
• Each session ticket contains a unique signature and is assigned to only one Avamar system process
• The integrity of a session ticket is protected by encryption
• Each Avamar system node separately verifies the session ticket signature
• When required, a session can be extended beyond the life of the session ticket
Avamar server authentication
After installing the session security features, the Avamar system acts as a private certification authority and generates a unique server
certificate for the Avamar system.
The Avamar system installs the public key for the server certificate on every Avamar client that is registered with the Avamar server.
Avamar clients use the public key to authenticate transmissions from the Avamar system.
For clients that are currently registered, the public key for the server certificate and other required certificate files are propagated to the
client within an hour of the installation.
The Avamar system also automatically shares the Avamar server certificate with the Avamar storage nodes. Sharing the certificate allows
the utility node and the storage nodes to provide the same certificate for authentication.
44
Authentication
Page 45

Avamar client authentication
Enable client authentication when installing the session security features to have the Avamar system act as a private certification authority
and generate a unique client certificate for each Avamar client.
A client certificate is generated when the Avamar server registers an Avamar client.
After generating a client certificate, the Avamar system uses an encrypted connection with the Avamar client to install the certificate on
the client. The Avamar system also stores the public key for the client certificate. The public key is used to authenticate the client in all
subsequent communications.
Improved security for communications between Avamar system processes
Session security features are provided by several workflow packages, including installation, upgrade, and standalone session security
configuration workflows.
The security features include:
• Generation and propagation of certificates
• Authentication that is based on X.509 v3 certificates
• Certificate expiration
NOTE: When upgrading from Avamar 7.3 and 7.4 to a subsequent release of Avamar when using secure session tickets,
you must re-register your clients in order to generate new certificates for these clients.
Installing the session security features
Session security can be implemented and configured during the installation of the Avamar software, the configuration of AVE, and the
upgrade from a previous version of the Avamar software. Session security also can be implemented post-installation or post-upgrade.
Install the session security features by running one of four workflows, whichever is appropriate to the Avamar server, including:
• Avamar software installation workflow
• AVE configuration workflow
• Avamar upgrade workflow
• Session Security Configuration workflow
Use the workflow's Security Settings tab to configure the session security features. The workflow guide that is associated with each
workflow in the Avamar Installation Manager provides more information about each option. On the Security Settings tab, you can:
• Select the type of communication that is desired between the Management Server and Avamar client agents.
• Select the type of communication that is desired between the Avamar clients and Avamar server.
• Select the authentication type to use between the server and client when communication is initiated:
○ Single - the client authenticates the server
○ Dual - both client and server authenticate each other
• Create and propagate server certificates on the Avamar server and storage nodes, which are used for server or client authentication
(or both). The certificates are created using the CA certificate that is installed in the keystore.
• Set a timeframe for the generated server certificates to expire.
• Run the mcrootca all command, which generates all new certificates for root, TLS, and EC root. This command forces the creation
of new server certificates
NOTE:
If you want to generate all new certificates for root, TLS, and EC root on an Avamar system, run the Session
Security Configuration workflow and use the last option (Generate All New Certificates) on the Security Settings tab.
The workflow guide provides complete instructions on the use of the workflow.
Requirements
Do not use the Avamar session security features in an environment that includes unsupported operating systems, clients, plug-ins, or
devices. Installing the session security features stops communication with the Avamar processes on the unsupported operating systems,
clients, plug-ins, and devices.
Table 17. Software version requirements
Software Minimum version
Avamar server Avamar 7.1 Service Pack 1 on SUSE Linux Enterprise Server (SLES) only
Avamar client Avamar 7.1 Service Pack 1
Authentication 45
Page 46

Prepare multiple Avamar clients for the session security features by pushing out Avamar client upgrades with the Avamar Client Manager.
Prepare individual Avamar clients by downloading and running a supported Avamar client software installer.
Table 18. Port requirements
Port/Protocol Source Destination Description
29000/TCP Utility node Storage node Avamar subsystem using SSL.
29000/TCP Storage node Utility node Avamar subsystem using SSL.
30001/TCP Utility node Storage node MCS using SSL.
30001/TCP Storage node Utility node MCS using SSL.
30002/TCP Avamar server Avamar client Avamar client using SSL.
30002/TCP Avamar client Avamar server Avamar client using SSL.
30003/TCP Utility node Storage node MCS using SSL.
30003/TCP Storage node Utility node MCS using SSL.
The Avamar session security features are subject to some limitations:
• Server operating system
Session security features cannot be used with an Avamar server running on the Red Hat Enterprise Linux (RHEL) operating system.
• Clients
Session security features cannot be used with any of the following Avamar clients:
○ Avamar cluster client for Solaris on Veritas Cluster Server
○ Avamar client for Solaris in Solaris clusters
• Other products
The use of NTP time synchronization of the Avamar server, Avamar clients, and the Data Domain system (if applicable) is strongly
encouraged. If the time is not synchronized, it could result in registration and backup/restore failure due to certificate validity and
expiration times. Changing the time zone on a host may have a similar impact and may require certificate regeneration.
Generation and propagation of certificates
Session security-enabling workflow packages enable automatic generation and propagation of certificates.
The Avamar system acts as a private certification authority and generates the certificates that permit the authentication and encryption
of communications between Avamar system processes, including processes running on:
• The Avamar utility node
• The Avamar storage nodes
• Avamar clients
The Avamar system also securely propagates the certificates and the public keys to the required locations on each involved computer.
Generating new certificates with Data Domain systems
After generating new certificates on the Avamar server, the following steps are required for Data Domain systems that are configured for
Avamar backup storage. Session tickets are supported with Data Domain systems at release 5.6 or greater.
Steps
1. Wait for the Data Domain server to be aware of the updated certificate.
The Data Domain server displays a yellow status in Avamar Administrator with the status message Unable to retrieve ssh
key file pair. This process may take up to 30 minutes.
2. Open the Data Domain server in Avamar Administrator:
a. In Avamar Administrator, click the Server launcher link button.
The Server window appears.
b. Click the Server Management tab.
c. Select the Data Domain system to edit.
d. Select Actions > Edit Data Domain System.
The Edit Data Domain System dialog box appears.
e. Click OK.
46
Authentication
Page 47

There is no need to change the Data Domain configuration.
3. Restart DD Boost on the Data Domain system:
a. Log in to the Data Domain System.
b. Type the following commands in the Data Domain CLI:
ddboost disable
ddboost enable
Results
If multiple Avamar servers are attached to a single Data Domain system and one of those Avamar servers is detached from the system,
disable and then re-enable DD Boost to ensure that backups from the other Avamar servers succeed.
Authentication based on X.509 v3 certificates
The Avamar session security features use X.509 v3 certificates with the following default characteristics:
• Key type: RSA
• Key length: 3072 bits
• Cryptographic hash function and digest: SHA512
Certificate expiration
To enhance security, the Avamar session security features include the regular expiration of certificates.
Table 19. Default expiration periods and regeneration methods
Certificate type Default expiration period Regeneration method
Root authentication keys Five years Use the session security features workflow package to
generate new certificates.
Session ticket signing key One month Avamar generates a new key automatically on a monthly cycle.
Client certificates Five years Generate a new certificate by manually reregistering the client.
Network configuration changes
Enabling the session security features requires changes to some network configuration tasks that are normally performed after installation.
• Changing the IP address or hostname of the Avamar server.
• Replacing the utility node.
• Replacing a storage node.
• Adding a storage node.
The following resources provide more information about changes to the network configuration tasks:
• Avamar Server Software Post-Installation Network Configuration Technical Note.
• Avamar SolVe Desktop procedure documentation.
Certificate acceptance workflow
Avamar uses a specific workflow when a client validates a server certificate, and when a server validates a client certificate:
1. Obtain the fully qualified domain name (FQDN) of the computer.
When connected to a computer through an IP address, use reverse-DNS to determine the FQDN of the computer.
2. Compare the FQDN to the value specified in the Common Name (CN) field of the certificate.
• When the FQDN matches the value that is specified in the CN field, accept that the certificate validates the computer.
• When the FQDN does not match, continue the workflow.
3. If the certificate has a wildcard character (*) in the hostname portion of the value that is specified in the CN field, perform a simple
wildcard match of the FQDN to the CN.
• When the wildcard match is successful, accept that the certificate validates the computer.
• When the match is unsuccessful, continue the workflow.
For example, the value r*.example.com in the CN field of the certificate would match an FQDN such as real.example.com,
right.example.com, or reality.example.com, but would not match alright.example.com.
Authentication
47
Page 48

4. Compare the IP address of the computer to each IP address listed in the Subject Alternative Name (SAN) field of the certificate.
• When the IP address of the computer matches an IP address in the SAN field, accept that the certificate validates the computer.
• When the match is unsuccessful, reject the certificate and terminate the connection.
Client/server authentication
Avamar clients and Avamar servers use Transport Layer Security (TLS) certificates and Public Key Infrastructure (PKI) for authentication
and optional data-in-flight encryption.
Avamar supports the X.509 v3 standard for formatting digital certificates. Installing the Avamar server automatically generates a public/
private key pair and a self-signed certificate in the /data01/home/admin directory on each Avamar server storage node and in
the /usr/local/avamar/etc directory on the utility node.
Use the Session Security Configuration workflow to create the root certification authority (CA) certificates for the Avamar server, and
the server and client certificates. Clients automatically sent a certificate signing request (CSR) the first time that they register with the
Avamar server, and receive a client certificate signed by the Avamar server's root CA certificate.
Configure the Avamar environment for one-way or two-way authentication between Avamar clients and the Avamar server by using the
Session Security Configuration workflow. This workflow is a maintenance task and can be invoked multiple times, as needed.
• Use one-way authentication to have the Avamar client request authentication from the Avamar server, and the server send a
certificate to the client. The client then validates the certificate. One-way authentication is also called server-to-client authentication
in this guide.
• Use two-way authentication to have the client request authentication from the Avamar server, and have the Avamar server request
authentication from the client. This client-to-server authentication combined with server-to-client authentication provides a stronger
level of security.
In most cases, one-way authentication provides sufficient security. However, to provide more security, set up two-way authentication.
Both configurations provide the capability of data-in-flight encryption.
One-way authentication
With one-way authentication, the Avamar client requests authentication from the Avamar server, and the server sends the appropriate
certificate to the client. The client then validates the certificate, using the certificate acceptance workflow.
Create the certificates required for one-way authentication and install the certificates by running the Session Security Configuration
workflow.
Two-way authentication
When two-way authentication is enabled, the Avamar server provides authentication to the Avamar client and the Avamar client provides
authentication to the Avamar server.
With two-way authentication, both of the following occur:
• The Avamar client requests authentication from the Avamar server, and the server sends the appropriate certificate to the client. The
client then validates the certificate, using the certificate acceptance workflow.
• The Avamar server requests authentication from the Avamar client, and the client sends the appropriate certificate to the server. The
server then validates the certificate, using the certificate acceptance workflow.
Enforcing encrypted client/server communications
Configure the MCS to refuse plain-text communication from Avamar clients.
About this task
Completing this task forces Avamar clients to use the Avamar server's trusted public key to encrypt all communication sent to the Avamar
server.
Steps
1. Open a command shell and log in by using one of the following methods:
• For a single-node server, log in to the server as admin.
• For a multi-node server, log in to the utility node as admin.
2. Open /usr/local/avamar/var/mc/server_data/prefs/mcserver.xml in a plain text editor.
3. Locate the enforce_client_msg_encryption preference and change it to the following:
enforce_client_msg_encryption=true
4. Save and close the file.
5. Restart the MCS by typing the following commands:
48
Authentication
Page 49

dpnctl stop mcs
dpnctl start mcs
Verify client/server authentication
Verify an implementation of client/server authentication by running a test backup with server authentication enabled.
The test backup can be run by using either avtar from the command line or by using Avamar Administrator.
Verify authentication with the avtar command
Use the avtar command to verify client/server authentication by running a backup and including the server authentication option -encrypt=tls-sa.
The server authentication option requires authentication of the Avamar server by using the trusted certificates that are installed on the
Avamar client.
Verify authentication with Avamar Administrator
To verify client/server authentication with Avamar Administrator, run a backup and select High from the Encryption method list. The
Encryption method list appears on both the On Demand Backup Options dialog box and the Restore Options dialog box.
The Avamar Administration Guide provides more information on how to run a backup with the Avamar Administrator.
NOTE: In Avamar 7.5 and later and Avamar 18.1 and later:
• The Medium encryption method is not available.
• The None encryption method is not available when the session security features are enabled.
Mapping session security settings to data-in-flight encryption settings
The session security settings directly affect the selection of the communication protocol and work order flags for backup and replication
jobs.
To map the communication protocol and work order flags for a replication job, repeat the following procedure on both the source and
destination servers to determine the session security settings. The source and destination encryption methods are both obtained from the
source server.
NOTE:
The Medium encryption method is not available in Avamar 7.5 and later and Avamar 18.1 and later. If Medium encryption
was in place before an upgrade from a previous version of Avamar, the upgrade does not change the existing behavior.
However, Avamar Administrator displays this setting as High. The communication protocol and work order flag mapping
is the same as for High, but with a different cipher level. If you change the encryption method to another value, you
cannot select Medium again.
The None encryption method is not available in Avamar 7.5 and later and Avamar 18.1 and later when the session security
features are enabled. If None was in place before an upgrade from a previous version of Avamar, the upgrade changes
this setting to High. The session security features are enabled if the communication security setting is anything other
than Disabled/Off.
Determining the communication security setting
To determine the communication security setting, examine the Client-Server Communication and Authentication Type setting in the
Session Security Configuration workflow, or perform the following procedure.
Steps
1. Open a command shell:
a. Log in to the server as admin.
b. Switch user to root by typing the following command:
su -
c. For a multi-node server, load the rootid OpenSSH key by typing the following command:
ssh-agent bash
ssh-add /root/.ssh/rootid
2. Display the session security settings by typing the following command:
/usr/local/avamar/bin/enable_secure_config.sh --showconfig
Authentication
49
Page 50

Output similar to the following appears:
Current Session Security Settings
---------------------------------"encrypt_server_authenticate" ="true"
"secure_agent_feature_on" ="true"
"session_ticket_feature_on" ="true"
"secure_agents_mode" ="secure_only"
"secure_st_mode" ="secure_only"
"secure_dd_feature_on" ="true"
"verifypeer" ="yes"
Client and Server Communication set to Authenticated mode with Two-Way/Dual Authentication.
Client Agent and Management Server Communication set to secure_only mode.
Secure Data Domain Feature is Enabled.
Note the session security settings and use the following table to map session security settings to a communication security setting
value.
Table 20. Communication security setting
Communication security setting Session security setting Value
Authenticated/Dual encrypt_server_authenticate true
secure_agent_feature_on true
session_ticket_feature_on true
secure_agents_mode secure_only
secure_st_mode secure_only
secure_dd_feature_on true
verifypeer yes
Authenticated/Single encrypt_server_authenticate true
secure_agent_feature_on true
session_ticket_feature_on true
secure_agents_mode secure_only
secure_st_mode secure_only
secure_dd_feature_on true
verifypeer no
Mixed/Single encrypt_server_authenticate true
secure_agent_feature_on true
session_ticket_feature_on true
secure_agents_mode mixed
secure_st_mode mixed
secure_dd_feature_on true
verifypeer no
Disabled/Off encrypt_server_authenticate false
secure_agent_feature_on false
session_ticket_feature_on false
secure_agents_mode unsecure_only
secure_st_mode unsecure_only
secure_dd_feature_on false
verifypeer no
50 Authentication
Page 51

Determining the source server encryption method
The source server encryption method controls communication between the source server and clients.
Steps
1. In the AUI, navigate to Administration > System .
2. Click the Replication Destination tab, and then select the replication destination you want to edit.
3. Click Edit.
The Edit Replication Destination wizard appears.
4. Note the selection in the Encryption field. This is the source encryption method. The options can be High or None.
5. Click Cancel to exit the Edit Replication Destination wizard.
Determining the destination server encryption method
The source server encryption method controls communication between the destination server and clients.
Steps
1. In the AUI, navigate to Administration > System .
2. Click the Replication Destination tab, and then select the replication destination you want to edit.
3. Click Edit.
The Edit Replication Destination wizard appears.
4. Note the selection in the Encryption field. This is the source encryption method. The options can be High or None.
5. Click Cancel to exit the Edit Replication Destination wizard.
Determining the communication protocol in use
Use the following table to map the communication security setting and encryption method to a communication protocol. The same rules
apply to the selection of a communication protocol whether a client communicates with the source or the destination server.
Table 21. Mapping security and encryption settings to a communication protocol
Encryption method Communication security setting
Disabled/Off Mixed/Single Authenticated/Single Authenticated/Dual
None Plain TCP with cleartext TLS with server
authentication and high
encryption
High TLS with high encryption TLS with server
authentication and high
encryption
Determining the work order flags in use
Use the following tables to map the communication security settings and encryption methods to the flags that are applied to each work
order.
The dstencrypt and dstencrypt-strength flags depend on:
• The destination server encryption method.
• The lowest setting of either the source or destination server communication security settings.
TLS with server
authentication and high
encryption
TLS with server
authentication and high
encryption
TLS with mutual
authentication of server
and client, and high
encryption
TLS with mutual
authentication of server
and client, and high
encryption
Table 22. Mapping security and encryption settings to source work order flags
Source server
communication security
setting
Source server
encryption method
encrypt flag
encryptstrength flag
Disabled/Off None proprietary cleartext
High tls high
Mixed/Single
Authenticated/Single
None tls-sa high
Authentication 51
Page 52

Table 22. Mapping security and encryption settings to source work order
flags (continued)
Source server
communication security
setting
Authenticated/Dual High tls-sa high
Source server
encryption method
encrypt flag
encryptstrength flag
Table 23. Mapping security and encryption settings to destination work order flags
Destination server
communication security
setting
Disabled/Off Disabled/Off
Mixed/Single
Authenticated/Single
Authenticated/Dual
Mixed/Single
Source server
communication security
setting
Mixed/Single
Authenticated/Single
Authenticated/Dual
Disabled/Off None proprietary cleartext
Mixed/Single
Destination server
encryption method
None proprietary cleartext
High tls high
High tls high
None tls-sa high
dstencrypt flag
dstencryptstrength flag
Authenticated/Single
Authenticated/Dual
Authenticated/Single
Authenticated/Dual
High tls-sa high
Server authentication using Apache
Several Avamar web-based services use the Apache HTTP server (Apache) to supply a secure web browser-based user interface. Web
browser connections with these applications use secure socket layer/transport layer security (SSL/TLS) to provide authentication and
data security.
Apache handles the SSL/TLS sockets for Avamar web-based services when a connection is made on the default HTTP port. Apache
redirects the connection request to an SSL/TLS socket and handles the encryption and authentication for that socket.
Web browser authentication warning
When a web browser accesses a secure web page from an unauthenticated web server, the SSL/TLS protocol causes it to display an
authentication warning. An unauthenticated web server is one that does not authenticate itself using a trusted public key certificate.
The Apache HTTP server that is provided with Avamar is installed with a self-signed certificate, not a trusted public key certificate. The
self-signed certificate is sufficient to establish an encrypted channel between web browsers and the server, but it cannot be used for
authentication.
To enable Apache to provide authentication, and prevent web browser authentication warnings, complete the following tasks:
• Create a private key for Apache
• Generate a certificate signing request for Apache
• Obtain a public key certificate for Apache
• Configure Apache to provide public key authentication
The tools that are used to perform these tasks are part of the OpenSSL toolkit. OpenSSL is provided with Avamar.
Avamar web interfaces are unavailable to web browsers that do not support TLS 1.2. Ensure that the web
NOTE:
browser supports TLS 1.2.
52 Authentication
Page 53

Support for Subject Alternative Names
On an Avamar system, the Apache HTTP server (Apache), and each Apache Tomcat (Tomcat) web server, supports the X509 Version 3
(RFC 2459, section 4.2.1.7) extension. This extension provides support for certificates that include the Subject Alternative Name (SAN)
field.
Apache and Tomcat can use a certificate with several IP addresses in the SAN field to provide authentication for:
• A multi-homed server, by using any one of its IP addresses.
• Several servers that share the certificate, by parsing the list of IP addresses.
Not all combinations of browser and OS support Subject Alternative Names. Test a SAN certificate with the browser and OS combinations
used by your company before installing the certificate on a production system.
Create a private key for Apache
The public key infrastructure (PKI) private key for an Avamar system's Apache HTTP server (Apache) can be generated using various
levels of security.
Use the private key generation method that is appropriate for the level of security required by your organization.
The methods for generating a private key are:
• Create a private key without randomness and without a passphrase
• Create a private key with randomness and without passphrase
• Create a private key with passphrase and without randomness
• Create a private key with randomness and with a passphrase
When a passphrase-protected private key is used, Apache prompts for the passphrase every time the Apache process starts. The Apache
configuration setting SSLPassPhraseDialog can be used to obtain the passphrase from a script. For more information, refer to
Apache documentation available through the Apache web site at www.apache.org.
Creating a private key for Apache
Create a public key infrastructure (PKI) private key for the Avamar system's Apache HTTP server (Apache).
Steps
1. Open a command shell:
a. Log in to the server as admin.
b. Switch user to root by typing the following command:
su -
c. For a multi-node server, load the rootid OpenSSH key by typing the following command:
ssh-agent bash
ssh-add /root/.ssh/rootid
2. Type one of the following alternative commands that are listed in the table:
Table 24. Alternative commands
Key type Command
Private key without randomness and
without a passphrase
Private key with randomness and
without a passphrase
Private key without randomness and
with a passphrase
Private key with randomness and
with a passphrase
openssl genrsa -out server.key 3072
openssl genrsa -rand binary-files -out server.key 3072
openssl genrsa -aes128 -out server.key 3072
openssl genrsa -rand binary-files -aes128 -out server.key 3072
where:
• server.key is a pathname you provide for the private key.
• binary-files is a colon-separated list of paths to two or more binary files that OpenSSL uses to generate randomness.
Authentication
53
Page 54

3. (Key with passphrase) At the prompt, type a passphrase.
4. (Key with passphrase) At the prompt, retype the passphrase.
Generating a certificate signing request for Apache
Create a certificate signing request (CSR) for the Apache HTTP server (Apache) on an Avamar system.
Prerequisites
Generate a private key for Apache.
About this task
A commercial certification authority (CA) uses the CSR when issuing a trusted private key certificate.
Steps
1. Open a command shell:
a. Log in to the server as admin.
b. Switch user to root by typing the following command:
su -
c. For a multi-node server, load the rootid OpenSSH key by typing the following command:
ssh-agent bash
ssh-add /root/.ssh/rootid
2. Generate the CSR by typing:
openssl req -new -key server.key -out server.csr
where:
• server.key is a name you provide for the private key.
• server.csr is a name you provide for the CSR.
3. (Key with passphrase) Type the passphrase for the private key and press Enter.
4. At each prompt, type the information described in the following table. Press Enter after each entry.
For optional fields, you can provide an empty value by typing a period (.) and pressing Enter.
Table 25. General fields
Field Description
Country Name The two-letter ISO abbreviation for the country. The list of abbreviations is available on the ISO web site at
www.iso.org.
State or Province
Name
Locality Name City where the organization is located.
Organization
Name
Organizational
Unit Name
In countries where it is applicable, the state or province where the organization is located. This entry cannot be
abbreviated.
The exact legal name of the company. This entry cannot be abbreviated.
Optional entry for more information about the organization, such as a department name.
Common Name
(CN)
Email Address Email address of the primary administrator of the computer or computers.
Challenge
password
Company name Name for your company. The exact legal name is not required. Optional field.
54 Authentication
FQDN of the computer, or a wildcard FQDN for several computers. The wildcard character (*) must only
appear once, and only in the hostname portion of the FQDN value. Example for single computer:
corp-1.example.com. Example wildcard FQDN for several computers: corp-*.example.com.
A password that must be provided before revoking the certificate. The password is only required if your
certificate is compromised. Optional field.
Page 55

OpenSSL creates the CSR and key in the current working directory.
Next steps
Use the CSR to obtain a trusted public key certificate from a commercial CA.
Obtain a public key certificate for Apache
Obtain a public key certificate for the Avamar system's Apache HTTP server (Apache) from a commercial CA.
Provide a commercial CA with the CSR that was generated for Apache and complete any other requirements specific to that CA. After its
requirements are met, the CA provides a public key certificate for Apache in the form of an electronic file, usually with the .crt filename
extension.
The CA may also provide a certificate chain. A certificate chain is a series of certificates that link the public key certificate you receive to a
trusted root CA certificate. Combine the certificate chain into a single file.
Combining a multiple file certificate chain
Commercial certification authorities sometime provide a multiple file certificate chain that links the private key certificate to a trusted root
CA certificate. Use this procedure to combine those files into a single file.
Prerequisites
From a commercial CA, obtain a multiple file trusted root CA certificate chain.
Steps
1. Open a command shell:
a. Log in to the server as admin.
b. Switch user to root by typing the following command:
su -
c. For a multi-node server, load the rootid OpenSSH key by typing the following command:
ssh-agent bash
ssh-add /root/.ssh/rootid
2. Use cat with the redirect and append operators to combine the certificates by typing:
cat chain-cert-1 > cachain.crt
cat chain-cert-2 >> cachain.crt
cat chain-cert-3 >> cachain.crt
cat chain-cert-4 >> cachain.crt
cat chain-cert-5 >> cachain.crt
where chain-cert-1 through chain-cert-5 represent the path to each certificate in the certificate chain and cachain.crt is a name that
you provide for the combined file.
Results
The cat command with the redirect and append operators combines all of the files into a single file.
Configuring Apache to use a key and a root CA certificate
Configure the Avamar system's Apache HTTP server (Apache) to use a private key, a public key certificate, and a trusted root CA
certificate.
Prerequisites
Place in a temporary directory on the Avamar system's utility node the following:
• Private key for Apache
• Public key certificate for Apache
• Trusted root CA certificate for the public key certificate used by Apache
Authentication
55
Page 56

Steps
1. Open a command shell:
a. Log in to the server as admin.
b. Switch user to root by typing the following command:
su -
c. For a multi-node server, load the rootid OpenSSH key by typing the following command:
ssh-agent bash
ssh-add /root/.ssh/rootid
2. Change the working directory to the temporary location of the certificate, key, and certificate chain file.
3. Use the correct command sequence to move the certificate, key, and certificate chain file to the OS-specific default locations.
• On Red Hat Enterprise Linux:
mv server.crt /etc/httpd/conf/ssl.crt/server.crt
mv server.key /etc/httpd/conf/ssl.key/server.key
mv cachain.crt /etc/httpd/conf/ssl.crt/ca.crt
• On SUSE Linux Enterprise Server:
mv server.crt /etc/apache2/ssl.crt/server.crt
mv server.key /etc/apache2/ssl.key/server.key
mv cachain.crt /etc/apache2/ssl.crt/ca.crt
NOTE: Custom locations can be specified for these files by changing the Apache SSL configuration file. However,
the Apache SSL configuration file is overwritten during Avamar system upgrades. Restore that file after a system
upgrade.
4. Restart Apache by typing:
website restart
Restoring the Apache SSL configuration file
The Apache SSL configuration file is overwritten during Avamar system upgrades. This also overwrites custom paths for the certificate,
key, and certificate chain file. To use custom paths restore the Apache SSL configuration file from the backup copy made during the
upgrade.
Steps
1. Open a command shell:
a. Log in to the server as admin.
b. Switch user to root by typing the following command:
su -
c. For a multi-node server, load the rootid OpenSSH key by typing the following command:
ssh-agent bash
ssh-add /root/.ssh/rootid
2. Back up the latest version of the Apache SSL configuration file.
• On Red Hat Enterprise Linux:
cd /etc/httpd/conf.d/
cp ssl.conf ssl.conf.orig
• On SUSE Linux Enterprise Server:
cd /etc/apache2/vhosts.d/
cp vhost-ssl.conf vhost-ssl.conf.orig
3. Change the current working directory.
cd /usr/local/avamar/var/avi/server_data/package_data/UPGRADE_FROM_VERSION/
ConfigureApacheSsl/
where UPGRADE_FROM_VERSION is the name of the directory created during the latest upgrade.
4. Extract the previous version backup copy of the Apache SSL configuration file, by typing:
56
Authentication
Page 57

tar -xzf node_0.s_*.*.*.tgz -C /
5. Restart Apache, by typing:
website restart
Commercially signed SSL certificates
An alternative to the self-signed Avamar security certificates for Tomcat DTLT, Jetty, and Apache is to use security certificates that are
signed by a third party.
When you install Avamar, the installation process creates self-signed security certificates that rely on the authority of the Avamar server
for trust. Some web browsers issue security exceptions for untrusted certificates. You may want to use security certificates that you
submitted for signature by a commercial certificate authority (CA) or that are otherwise specific to the environment.
The installation of particular hotfixes may affect the tasks that follow. Before importing any security certificates, identify the installed
hotfixes. Note whether hotfix 263998 or 275068 is installed and then leave the command shell open.
Identifying the installed hotfixes
Most hotfixes can be identified by inspecting the list of workflows that are installed on the Avamar server.
Steps
1. Open a command shell and log in by using one of the following methods:
• For a single-node server, log in to the server as admin.
• For a multi-node server, log in to the utility node as admin.
2. Display the list of installed workflows by typing the following command:
ls -1 /usr/local/avamar/var/avi/server_data/package_data
Information similar to the following is displayed in the command shell:
AvamarInstallSles-7.3.1-125.avp
AvPlatformOsRollup_2016-Q4-v2.avp
Hotfix275068-7.3.1-125.avp
UpgradeClientDownloads-7.3.1-125.avp
UpgradeClientPluginCatalog-7.3.1-125.avp
Importing commercially signed security certificates for Tomcat DTLT and Jetty
Tomcat DTLT answers requests on ports 8543 and 8444, and Jetty answers requests on port 7543. The Tomcat DTLT security certificate
is stored in /home/admin/.keystore -alias tomcat and the Jetty security certificate is stored in /usr/local/
avamar/lib/avi/avi_keystore -alias tomcat.
Steps
1. Switch user to root by typing the following command:
su -
2. Back up the keystores by typing the following commands, each on one line:
cp -p /home/admin/.keystore /home/admin/.keystore_bak
cp -p /usr/local/avamar/lib/rmi_ssl_keystore /usr/local/avamar/lib/rmi_ssl_keystore_bak
cp -p /usr/local/avamar/lib/avi/avi_keystore /usr/local/avamar/lib/avi/avi_keystore_bak
3. Delete the current security certificate from the admin keystore by typing the following command on one line:
keytool -delete -alias tomcat -keystore /home/admin/.keystore -storepass changeit
4. Regenerate the security certificate and keys from the admin keystore by typing the following command on one line:
keytool -genkeypair -keysize 3072 -alias tomcat -keyalg RSA -sigalg SHA512withRSA -keystore /
home/admin/.keystore -storepass changeit -noprompt -dname "CN=CommonName,
OU=OrganizationalUnit, O=Organization, L=LocalityName, S=StateName, C=Country"
where:
Authentication
57
Page 58

Table 26. Fields
Field Description
Country The two-letter ISO abbreviation for the country. The list of abbreviations is available on the ISO web site at
www.iso.org.
StateName In countries where it is applicable, the state or province where the organization is located. This entry cannot
be abbreviated.
LocalityName City where the organization is located.
Organization The exact legal name of the company. This entry cannot be abbreviated.
OrganizationalUnit Optional entry for more information about the organization, such as a department name.
CommonName FQDN of the server, or a wildcard FQDN for several servers. The wildcard character (*) must only appear
once, and only in the hostname portion of the FQDN value. Example for single server:
corp-1.example.com. Example wildcard FQDN for several servers: corp-*.example.com.
Press Enter to retain the same keypass.
5. Create a certificate signing request (CSR) by typing the following command on one line:
keytool -certreq -alias tomcat -file /home/admin/tomcat.csr -keystore /home/admin/.keystore storepass changeit
6. Obtain the CSR from the server in the following location and submit it to a CA for signing.
• /home/admin/tomcat.csr
7. Obtain a text file from the CA that contains the signed security certificate and place it on the server.
The CA may supply additional security certificates, such as an intermediate or root CA certificate, or a certificate chain. Import these
certificates before importing the signed certificate.
The following steps assume that a CA root certificate exists in /var/tmp/CA.crt and that the signed certificate exists
in /var/tmp/tomcat_signed.crt.
8. Import the CA root certificate into the admin keystore by typing the following command on one line:
keytool -importcert -file /var/tmp/CA.crt -trustcacerts -keystore /home/admin/.keystore storepass changeit
9. Import the signed certificate into the admin keystore by typing the following command on one line:
keytool -importcert -file /var/tmp/tomcat_signed.crt -keystore /home/admin/.keystore storepass changeit -alias tomcat
10. Copy the admin keystore to the avi keystore by typing the following commands:
cp -f /home/admin/.keystore /usr/local/avamar/lib/avi/avi_keystore
chown avi:avi /usr/local/avamar/lib/avi/avi_keystore
chmod 644 /usr/local/avamar/lib/avi/avi_keystore
11. Import the CA root certificate into the Avamar keystore by typing the following command on one line:
keytool -importcert -file /var/tmp/CA.crt -keystore /usr/local/avamar/lib/rmi_ssl_keystore storepass changeme
12. Restart the Avamar Installation Manager by typing the following command:
dpnctl stop avinstaller && dpnctl start avinstaller
13. Restart EM Tomcat by typing the following command:
dpnctl stop emt && dpnctl start emt
14. If the REST API is installed, restart the REST server by typing the following commands:
/usr/local/avamar/bin/restserver.sh --stop
/usr/local/avamar/bin/restserver.sh --start
58
Authentication
Page 59

Importing commercially signed security certificates for Apache
Apache answers requests on port 443. The Apache security certificate is stored in /etc/apache2/ssl.crt/server.crt.
Steps
1. Ensure that you are still logged in as the root user.
2. Back up the Apache security certificate by typing the following command on one line:
cp /etc/apache2/ssl.crt/server.crt /etc/apache2/ssl.crt/server.crt.bak
3. Regenerate the security certificate and keys by typing the following command on one line:
openssl req -x509 -new -newkey rsa:3072 -nodes -keyout /etc/apache2/ssl.key/server.key sha512 -out /etc/apache2/ssl.crt/server.crt -days 1825 -subj "/C=Country/ST=StateName/
L=LocalityName/O=Organization/OU=OrganizationalUnit/CN=CommonName/emailAddress=EmailContact"
where:
Table 27. Fields
Field Description
Country The two-letter ISO abbreviation for the country. The list of abbreviations is available on the ISO web site at
www.iso.org.
StateName In countries where it is applicable, the state or province where the organization is located. This entry cannot
be abbreviated.
LocalityName City where the organization is located.
Organization The exact legal name of the company. This entry cannot be abbreviated.
OrganizationalUnit Optional entry for more information about the organization, such as a department name.
CommonName FQDN of the server, or a wildcard FQDN for several servers. The wildcard character (*) must only appear
once, and only in the hostname portion of the FQDN value. Example for single server:
corp-1.example.com. Example wildcard FQDN for several servers: corp-*.example.com.
EmailContact Email address of the primary administrator of the server or servers.
Ensure that there are no spaces in the subj parameter.
4. Create the CSR by typing the following command on one line:
openssl x509 -x509toreq -in /etc/apache2/ssl.crt/server.crt -signkey /etc/apache2/ssl.key/
server.key -out /etc/apache2/apache.csr
5. Obtain the CSR from the server at /etc/apache2/apache.csr and submit it to a CA for signing.
6. Obtain a text file from the CA that contains the signed security certificate and place it on the server.
The CA may supply additional security certificates, such as an intermediate or root CA certificate, or a certificate chain. Import these
certificates before importing the signed certificate.
The following steps assume that a CA root certificate exists in /etc/apache2/ssl.crt/CA.crt and that you have overwritten
the existing certificate at /etc/apache2/ssl.crt/server.crt with the signed certificate.
7. Set the ownership and group of the security certificates by typing the following command on one line:
chown root:root /etc/apache2/ssl.crt/server.crt /etc/apache2/ssl.crt/CA.crt
8. Set the file permissions for the security certificates by typing the following command on one line:
chmod 600 /etc/apache2/ssl.crt/server.crt /etc/apache2/ssl.crt/CA.crt
9. Delete the existing security certificate and key from the Network Security Services (NSS) database by typing the following command:
certutil -F -n Server-Cert -d /etc/apache2/mod_nss.d
When prompted, type the password changeme123!.
10. Create a .p12 file containing the signed security certificate and key by typing the following command on one line:
openssl pkcs12 -export -in /etc/apache2/ssl.crt/server.crt -inkey /etc/apache2/ssl.key/
server.key -out /etc/apache2/server-cert.p12 -name "Server-Cert" -passin pass:foo -passout
pass:foo
Authentication
59
Page 60

If the CA provided additional security certificates, add a -certfile argument for each additional certificate. For example:
openssl pkcs12 -export -in /etc/apache2/ssl.crt/server.crt -certfile /etc/apache2/ssl.crt/
CA.crt -inkey /etc/apache2/ssl.key/server.key -out /etc/apache2/server-cert.p12 -name
"Server-Cert" -passin pass:foo -passout pass:foo
11. Import the .p12 file into the NSS database by typing the following command on one line:
pk12util -i /etc/apache2/server-cert.p12 -d /etc/apache2/mod_nss.d -W foo
When prompted, type the password changeme123!.
12. Restart Apache by typing the following command:
service apache2 restart
Code signing
Avamar provides signed client (RPM/DEB) and server (RPM) packages to ensure the authenticity and integrity of software components.
This digital signature ensures that the packages have not been modified or corrupted in transit and come from a trusted source.
Newer AVE images contain GPG public keys that enable the Avamar server to verify the authenticity of signed packages. Upgrades to
Avamar 7.5.1 and later and Avamar 18.1 and later also supply these public keys. Avamar clients obtain the public keys from the Avamar
server via Web Restore.
Avamar Installation Manager installs some internal components of the Avamar server from signed RPM files. The public keys allow the
Avamar to verify the authenticity of the packages and the package payloads.
The public keys also allow the Avamar clients and the Avamar Installation Manager to install signed and unsigned packages and RPMs.
Both the public keys and the signed packages can be deployed via the Avamar Client Manager (ACM).
Avamar Installation Manager and ACM retain the ability to accept unsigned packages.
Limitations
The applicability of code signing is subject to the following limitations:
• The Avamar Windows client is not signed with the GPG key because the client is already signed by a certificate.
• The Avamar Solaris client is not signed with the GPG key. Signing support for this platform is expected in a future release.
Clients and the GPG public keys
The Downloads section of the Avamar Web Restore page (DTLT) contains an entry for Public GPG keys for Avamar Client RPM/
Debian packages.
Linux and UNIX clients should download this key and the installer script:
• avpkgkey.pub
• import_avpkgkey.sh
Run the script to import the Avamar GPG public keys.
Credential security
The following sections provide information about how to secure the credentials that are used to connect Avamar to remote components.
Data Domain
Avamar uses DD Boost software, SSH, and REST-based communication to interact with the Data Domain system:
• DD Boost and SSH—Avamar connects to the Data Domain system with credentials that are secured by means of Transport Layer
Security (TLS) with a presigned certificate that belongs to Avamar. Avamar securely stores the certificate in a keystore and provides
the certificate to Data Domain for authentication.
• Rest API—Avamar connects to the Data Domain system with credentials that are secured based on HTTPS transport-level security
with a presigned certificate that belongs to Avamar.
Data Domain credentials are stored in a local file with the name dr_info in the /usr/local/Avamar/var/ directory. The local
keystore file is encrypted with a 128-bit AES key.
60
Authentication
Page 61

ESRS
Avamar uses an RSA token, which is a one-time password authentication method, to connect to the EMC Secure Remote Services
(ESRS) Gateway. Avamar does not store the username and password (token). The token is valid for only 1 minute.
VMware vCenter
Avamar stores the vCenter username and password as a value in the MCS database. The password is encrypted with AES encryption and
relies on the database's native protection.
The vCenter public key is stored in the /user/local/Avamar/lib/rmi_ssl_keystore keystore.
Dell EMC repository server
The Support Zone account credentials are encrypted with Java Cryptography Extension and saved in a local configuration file.
LDAP server
Avamar relies on the LDAP mapping system to store LDAP credentials. For more information, see the Avamar Administration Guide.
FLR UI
The FLR UI does not store credentials on the Avamar server.
KMIP server
The certificates that belong to the KMIP server are stored in the /usr/local/avamar/etc/akm folder.
Avamar stores the username and password for the KMIP server in the akm.xml configuration file. The password is encrypted with a 256bit AES key.
Authentication
61
Page 62

3
Authorization
Topics:
• About authorization
• Default roles
• Role-based access control and the AUI
• Role mapping
• External role associations
• Default authorizations
• Entitlement export
• Actions that do not require authorization
About authorization
After a user authenticates to Avamar, the concept of user authorization places limits on the actions that an authenticated user may take.
Roles define the allowable operations for each user account. In general, Avamar authorization proceeds by assigning users to one of the
default roles.
Default roles
There are three types of default roles:
• Administrator roles
• Operator roles
• User roles
Administrator roles
Administrators are responsible for maintaining the server.
You can only assign the role of administrator to user accounts at a domain level. Domain level includes the top-level (root) domain and any
other domain or subdomain. You cannot assign the administrator role to user accounts at a client level.
You can assign the administrator role to users at the top-level (root) domain or to a specific domain or subdomain.
Avamar 18.2 introduces the concept of the vCenter administrator. This role is specific to the AUI and has no counterpart in Avamar
Administrator.
Table 28. Administrator roles
Administrator type Description
Root administrators Administrators at the top-level (root) domain have full control of the system. They are sometimes referred
to as “root administrators.”
Domain administrators Administrators at domains other than root generally have access to most of the features that are described
in this guide. Administrators typically can only view or operate on objects in the domain. Any activity that
would allow a domain administrator to view data outside the domain is disallowed. Access to server features
of a global nature (for example, suspending or resuming scheduled operations or changing runtimes for
maintenance activities) is disallowed. Domain administrators:
• Cannot add or edit other subdomain administrators.
• Cannot change their assigned role.
• Can change their password.
62 Authorization
Page 63

Table 28. Administrator roles (continued)
Administrator type Description
Domain administrators do not have access to the AUI dashboard.
vCenter administrator vCenter administrators have access to the same features as domain administrators, but additionally have
access to the AUI dashboard and to event management area within the vCenter domain.
Operator roles
Operator roles are generally implemented to allow certain users limited access to certain areas of the server to perform backups and
restores, or obtain status and run reports. These roles allow greater freedom in assigning backup, restore, and reporting tasks to persons
other than administrators.
You can only assign operator roles to user accounts at the domain level. You cannot assign these roles to user accounts at the client level.
To add the user account to subdomains, you must have administrator privileges on the parent domain or above.
Users with an operator role do not have access to all administrative features. Instead, after login, they are presented with an interface that
provides access to the features that they are allowed to use.
The following table describes the four operator roles.
Table 29. Operator roles
Operator type Description
Restore only operator Restore only operators are generally only allowed to perform restores and to monitor those activities to
determine when they complete and if they completed without errors. Restore only operators at the top-level
(root) domain can perform restores for any client in the server. Restore only operators at a domain other
than root can only perform restores for clients in that domain. Restore only operators can restore backup
data and monitor activities in the assigned domain.
• By default, restore only operators cannot perform restores to a different location or restores to multiple
locations. To enable this option, you must set the restore_admin_can_direct_restores
attribute to true in the mcserver.xml file.
• By default, restore only operators cannot browse backups from the command line or the Avamar Web
Restore interface. To enable these activities for a restore only operator, add the noticketrequired
privilege by using the avmgr chgv command:avmgr chgv --acnt=location --u=name --
ud=auth \ --pv="enabled,read,mclogin,noticketrequired" where location is the
subdomain of the operator, name is the Avamar username of the user, and auth is the external
authentication system that is used to authenticate the user.
Backup only operator Backup only operators are generally only allowed to perform backups and to monitor those activities to
determine when they complete and if they completed without errors. Backup only operators at the top-level
(root) domain can perform backups for any client or group in the server. Backup only operators at domains
other than root can only perform backups for clients or groups in that domain. Backup only operators can
perform on-demand backups of a client or a group, as well as monitor activities in the assigned domain.
• By default, backup only operators cannot perform restores to a different location or restores to multiple
locations. To enable this option, you must set the restore_admin_can_direct_restores
attribute to true in the mcserver.xml file.
• By default, backup only operators cannot perform backups from the command line. To enable command
line backups for a backup only operator, add the noticketrequired privilege by using the avmgr
chgv avmgr chgv --acnt=location --u=name --ud=auth \ --
pv="enabled,read,mclogin,backup,noticketrequired"command: where location is the
subdomain of the operator, name is the Avamar username of the user, and auth is the external
authentication system that is used to authenticate the user.
Backup/restore operator Backup/restore operators are generally only allowed to perform backups or restores and to monitor those
activities to determine when they complete and if they completed without errors. As with roles that are
assigned to other domain user accounts, backup/restore operators at the top-level (root) domain can
perform backups and restores for any client or group in the server. Backup/restore operators at domains
other than root can only perform backups and restores for clients or groups in that domain. Backup/restore
operators can perform the following tasks in the assigned domain:
Authorization 63
Page 64

Table 29. Operator roles (continued)
Operator type Description
• Perform on-demand backups for a client or group.
• Perform restores.
• Monitor activities.
By default, backup/restore operators cannot browse backups from the command line or by using the
Avamar Web Restore interface, and cannot perform backups from the command line. To enable these
activities, add the noticketrequired privilege by using the avmgr chgv command: avmgr chgv --
acnt=location --u=name --ud=auth \ -pv="enabled,read,mclogin,backup,noticketrequired" where location is the subdomain of
the operator, name is the Avamar username of the user, and auth is the external authentication system that
is used to authenticate the user.
Activity operator Activity operators are generally only allowed to monitor backup and restore activities and to create certain
reports. Activity operators at the top-level (root) domain can view or create reports for backup and restore
activities in all domains and subdomains. Activity operators at domains other than root can only view or
create reports for backup and restore activities in that domain. Activity operators can perform the following
tasks in the assigned domain:
• Monitor activities.
• View the group status summary.
• View the Activity Report.
• View the Replication Report.
User roles
User roles limit the operations that are allowed for a user account to a specific client.
Users who are assigned to one of the user roles cannot log in to the Avamar Administrator, the AUI, Avamar Client Manager, or the
Avamar client web UI.
NOTE:
Avamar Administrator provides the ability to add a user account to a client. However, you cannot add a user
account to a client from the Avamar Web User Interface (AUI).
The following table describes the four user roles.
Table 30. User roles
User type Description
Back Up Only User Users assigned this role can start backups directly from the client by using the avtar command line.
Restore (Read) Only
User
Back Up/Restore User Users assigned this role can start backups and restores directly from the client by using the avtar
Restore (Read) Only/
Ignore File Permissions
Users assigned this role can start restores directly from the client by using the avtar command line or
Management Console Server (MCS) web services.
command line or MCS web services.
Similar to the Restore (Read) Only User role except that operating system file permissions are ignored during
restores. This user is allowed to restore any file that is stored for an Avamar client. This role is only available
when users are authenticated by using Avamar internal authentication. To ensure trouble-free restores,
Windows client user accounts should be assigned this role only when both of the following are true:
• Users are authenticated using Avamar internal authentication.
• Users do not require access to the Avamar client web UI.
Role-based access control and the AUI
The AUI provides role-based security for users who access the web-based interface.
Each time that a user logs in to the AUI, the security subsystem maps the user to any assigned roles and domains. Avamar uses that
information to construct a table of the administrative areas and URLs that correspond to a user's access level.
64
Authorization
Page 65

After logging in, the AUI directs the user to a default page for their role, and hides any controls and areas that do not correspond to the
user's access level. For example, a backup only operator sees the Asset Management and Activity areas in the navigation pane, but not
the server management areas.
Each time that a user goes to an area within the AUI, regardless of the method, the security subsystem checks the incoming request
against the access table and grants or denies the request accordingly. The AUI reroutes any attempts to access unauthorized areas.
The following tables indicate the user roles that can access each of the specified feature panes within the AUI.
Table 31. AUI feature pane access by administrator user role
AUI feature pane Root administrator Domain administrator vCenter administrator
Dashboard Yes No Yes
Asset Management Yes Yes
Asset Management Domain Yes Yes
Asset Management Backup Yes Yes
Asset Management Restore Yes Yes
Backup Policy Yes Yes
Advanced Policy Yes Yes
a
a
a
a
a
a
Replication Policy Yes No No
Cloud Tier Policy Yes No No
Setting Yes Yes
Proxy Management Yes Yes
System Yes Yes
Activity Yes Yes
a
a
a
a
Event Yes No Yes
Yes
Yes
Yes
Yes
Yes
Yes
Yes
Yes
Yes
Yes
a
a
a
a
a
a
a
a
a
a
a
a.
Within the specified domain
Table 32. AUI feature pane access by operator user role
AUI feature pane Backup/restore
operator
Dashboard No No No No
Asset Management Yes Yes Yes No
Asset Management
No No No No
Domain
Asset Management
Yes Yes No No
Backup
Asset Management
Yes No Yes No
Restore
Backup Policy No No No No
Advanced Policy No No No No
Replication Policy No No No No
Cloud Tier Policy No No No No
Setting No No No No
Proxy Management No No No No
Backup only operator Restore only operator Activity operator
System No No No No
Authorization 65
Page 66

Table 32. AUI feature pane access by operator user role (continued)
AUI feature pane Backup/restore
operator
Activity Yes Yes Yes Yes
Event No No No No
Backup only operator Restore only operator Activity operator
Role mapping
Administrators can assign roles at the time of account creation, or change the assigned roles at any point afterward. The Avamar
Administration Guide contains specific tasks to configure a user's roles.
External role associations
Authorization follows the same process, whether you choose to configure users via internal authentication or network authentication (for
example, LDAP and NIS). Network authentication provides no additional predetermined authorization. Instead, assign LDAP users to an
existing Avamar role through an LDAP map.
The Avamar Administration Guide provides more information about network authentication.
Default authorizations
A new Avamar user account comes without any authorization, until the administrator assigns a role to the account from the list of available
roles during the process of account creation.
However, after installation, the Avamar server contains several default user accounts with preconfigured authorizations. The Avamar
server requires many of these accounts for proper operation. Pre-loaded user accounts on page 36 provides additional information.
The Avamar Customer Support password for the Avamar Installation Manager provides limited authorization to perform more complex
operations.
Running commands with elevated privileges
The SLES OS for Avamar servers reserves many commands for the root user. However, the administrative OS user can run a limited
number of reserved commands with elevated privileges by using the sudo command.
Many of the listed commands are intended to be run from scripts and utilities, and not directly from the command line. The file /etc/
sudoers contains a full list of these commands.
Table 33. Commands authorized for
/opt/dell/srvadmin/bin/omconfig
/opt/MegaRAID/CmdTool2/CmdTool2
/sbin/arping
/sbin/chkconfig --add akm
/sbin/chkconfig --add connectemc
/sbin/chkconfig --del akm
/sbin/chkconfig snmpd off
/sbin/chkconfig snmpd on
/sbin/dumpe2fs
/sbin/ethtool bond[0-9]
/sbin/ethtool bond[0-9]*.*[0-9]
sudo
/sbin/ethtool bond[0-9][0-9]
66 Authorization
Page 67

Table 33. Commands authorized for sudo (continued)
/sbin/ethtool eth[0-9]
/sbin/service akm restart
/sbin/service akm start
/sbin/service akm status
/sbin/service akm stop
/sbin/service apache2 status
/sbin/service apache2 stop
/sbin/service axionfs restart
/sbin/service axionfs status
/sbin/service axionfs stop
/sbin/service connectemc restart
/sbin/service connectemc start
/sbin/service connectemc stop
/sbin/service rabbitmq-server restart
/sbin/service rabbitmq-server start
/sbin/service rabbitmq-server status
/sbin/service snmpd restart
/sbin/service snmpd start
/sbin/service snmpd status
/sbin/service sshd restart
/sbin/service sshd status
/sbin/service syslog restart
/sbin/service syslog start
/usr/Arcconf/arcconf
/usr/bin/atq
/usr/bin/chage -l root
/usr/bin/crontab -u admin -l
/usr/bin/crontab -u dpn -l
/usr/bin/crontab -u root -l (root)
/usr/bin/flashupdt/flashupdt -i
/usr/bin/omreport
/usr/local/avamar/bin/avsetup_snmp --testconfigured (root)
/usr/local/avamar/bin/emwebapp.sh
/usr/local/avamar/bin/mccipher encrypt --all
/usr/local/avamar/bin/mccipher --encrypt_mcs
/usr/local/avamar/bin/mccipher --encrypt_mcs
/usr/local/avamar/bin/mccipher --encrypt_mcs
Authorization 67
Page 68

Table 33. Commands authorized for sudo (continued)
/usr/local/avamar/bin/mccipher --encrypt_mcs /usr/local/avamar/lib (rootAP)
/usr/local/avamar/bin/mccipher --encrypt_mcs /usr/local/avamar/lib/mcserver.xml
/usr/local/avamar/bin/mccipher --encrypt_mcs /usr/local/avamar/var/mc/server_data/prefs
(MCUSERAP|rootAP)
/usr/local/avamar/bin/mccipher --update
/usr/local/avamar/bin/mcsnmp
/usr/local/avamar/bin/secure.dpn
/usr/local/avamar/bin/tomcatctl
/usr/sbin/dmidecode
/opt/dell/linux/supportscripts/srvadmin-services.sh
/opt/dell/srvadmin/bin/omreport
/opt/dell/srvadmin/omil/srvadmin-services.sh
/opt/dell/srvadmin/sbin/racadm getconfig -g cfgracvirtual -o cfgvirmediaattached
/opt/dell/srvadmin/sbin/srvadmin-services.sh
/opt/MegaRAID/CmdTool2/CmdTool264
/sbin/chkconfig --del connectemc
/sbin/ethtool eth[0-9][0-9]
/sbin/service apache2 restart
/sbin/service apache2 start
/sbin/service axionfs start
/sbin/service connectemc status
/sbin/service rabbitmq-server stop
/sbin/service snmpd stop
/sbin/service sshd start
/sbin/service syslog status
/usr/bin/chage -l admin
/usr/bin/ipmitool
/usr/bin/omconfig
/usr/local/avamar/bin/avagent.bin
/usr/local/avamar/bin/avsetup_connectemc.pl
/usr/local/avamar/bin/backup_upgrade_files \"\"
/usr/local/avamar/bin/clean_db.pl
/usr/local/avamar/bin/createFSLink.pl
/usr/local/avamar/bin/dpnfsctl
/usr/local/avamar/bin/getlogs
/usr/local/avamar/bin/killProcess.pl
/usr/local/avamar/bin/mccipher encrypt --all
68 Authorization
Page 69

Table 33. Commands authorized for sudo (continued)
/usr/local/avamar/bin/mccipher encrypt --all
/usr/local/avamar/bin/mccipher encrypt --all /usr/local/avamar/lib
/usr/local/avamar/bin/mccipher --encrypt_mcs
/usr/local/avamar/bin/mccipher --encrypt_mcs
/usr/local/avamar/bin/mccipher --encrypt_mcs
/usr/local/avamar/bin/mccipher --encrypt_mcs /usr/local/avamar/lib (MCUSERAP)
/usr/local/avamar/bin/mccipher --encrypt_mcs /usr/local/avamar/lib (MCUSERAP|rootAP)
/usr/local/avamar/bin/mccipher --init
/usr/local/avamar/bin/mccipher --init_mcs
/usr/local/avamar/bin/mccipher --upgrade
/usr/local/avamar/bin/mccipherHelper.pl (root)
/usr/local/avamar/bin/mcddrsnmp
/usr/local/avamar/bin/msgbrokerctl.pl --start
/usr/local/avamar/bin/msgbrokerctl.pl --stop
/usr/local/avamar/bin/rabbitCertificateGen.pl
/usr/local/avamar/lib (rootAP|MCUSERAP)
/usr/local/avamar/lib (viewuserAP)
/usr/local/avamar/lib/dpnutils/avictl
/usr/local/avamar/lib/dpnutils/connectemcctl (root)
/usr/local/avamar/lib/dpnutils/dtltctl
/usr/local/avamar/lib/dpnutils/unattended-restart-ctl
/usr/local/avamar/var/mc/server_data/prefs
/usr/local/avamar/var/mc/server_data/prefs (MCUSERAP)
/usr/local/avamar/var/mc/server_data/prefs (rootAP)
/usr/local/avamar/var/mc/server_data/prefs (rootAP|MCUSERAP)
/usr/local/avamar/var/mc/server_data/prefs (viewuserAP)
/usr/sbin/flashupdt -i
Entitlement export
An administrator can export a list of authorized users, along with their respective roles and domains, from the command prompt.
After logging in to the Avamar server, type the following command:
mccli user show
Avamar returns output similar to the following:
0,23000,CLI command completed successfully.
Name Role Domain Authenticator
------------- ------------------------ ------ --------------------------MCUser Administrator / Axion Authentication System
backuponly Back up Only User / Axion Authentication System
backuprestore Back up/Restore User / Axion Authentication System
repluser Replication User / Axion Authentication System
Authorization
69
Page 70

restoreonly Restore (Read) Only User / Axion Authentication System
root Administrator / Axion Authentication System
Actions that do not require authorization
Most actions that a user can perform on an Avamar server require some degree of authentication and authorization, including any actions
that provide access to customer data. However, for convenience, a limited number of actions do not require authorization.
Table 34. Actions that do not require authorization
Location Action Effects Notes
Avamar Web Restore (Desktop/
Laptop)
Avamar Web Restore (Desktop/
Laptop)
Avamar Web Restore (Desktop/
Laptop)
Downloads Allows a user to download
platform-specific Avamar client
plug-ins and related items.
Administrator Allows a user to download the
Avamar Administrator
application for use on the local
computer.
Help Provides description of the
functions available through
Avamar Web Restore.
An administrator must activate a
client and assign it to a policy
before the Avamar server
performs a backup of that
client. Installing the Avamar
client software does not
automatically start backups of
that client.
The Avamar Administrator
software requires authentication
and authorization to access any
system functions. The server
permits only the software
download without authorization.
70 Authorization
Page 71

Network Security
Topics:
• Network exposure
• Communication security
• Firewall settings
Network exposure
The following topics describe the exposed or required ports and protocols for communication between the Avamar server and external
components.
Terminology
This chapter uses specific terms to refer to network concepts that concern Avamar servers:
4
Source
Target Computer that receives a network transmission. The target computer receives transmitted network packets on
Inbound Direction of travel of network packets that are sent from another computer to a referenced Avamar computer.
Outbound Direction of travel of network packets that an Avamar computer sends to a destination computer. The referenced
Required ports Inbound and outbound ports that must be open to allow the Avamar server to perform its core functions. Relevant
Optional ports Inbound and outbound ports that are used by the Avamar server to provide additional functionality. Closing these
Computer that originates a network transmission. The source computer transmits network packets through a
network interface, over a network connection, and to a specific port on a target computer.
the port that the source computer specified. A service on the target computer that is listening on the specified
port processes the packets. Processing may include a response sent to the source computer or the establishment
of two-way communication with the source computer.
The referenced Avamar computer is the target and the other computer is the source. The referenced Avamar
computer receives inbound network packets on an inbound port. The inbound port is a port on the referenced
Avamar computer with a specific service for receiving and handling those network packets. The inbound port is
also known as a listening port.
Avamar computer is the source and the other computer is the target. The outbound port is the port on which the
other computer listens for the transmissions from the referenced Avamar computer.
routers, switches, and firewalls must allow the network packets to reach these required ports. Core functionality is
reduced when a process listening on a required target port cannot receive packets from a source computer.
NOTE: When an Avamar server undergoes security hardening some of the required ports are
intentionally closed. Security hardening provides an increase in security in exchange for a loss of
some functionality.
ports reduces or eliminates the additional functionality but does not prevent the Avamar server from performing
its core functions.
Utility node ports
The Avamar utility node has specific port requirements both for inbound and outbound ports.
The tables in this section list the following port requirements for the utility node:
• Required inbound ports
Ports on the utility node that must be open to network transmissions from specified source computers.
• Optional inbound ports
Network Security 71
Page 72

Ports on the utility node that can be optionally opened to network transmissions from specified source computers to enable a specific
feature.
• Required outbound ports
Ports on another computer that the utility node must be allowed to access.
Utility node required inbound ports
The following table describes the inbound ports that must be open on an Avamar utility node. For every port listed in this table, the
Avamar utility node is the destination and the source is listed in the Source computer column.
NOTE: Avamar 7.5.1 removes support for HTTP access to TCP ports 80 and 7580. Use the HTTPS ports 443 and 7543 to
access these services instead.
Table 35. Required inbound ports on the utility node
Port Protocol Service name Source computer Additional information
N/A
22 TCP SSH
69 TCP TFTP Internal switch
123 TCP/UDP NTP NTP time servers Provides clock synchronization from network
163 UDP SNMP Data Domain system Getter/setter port for SNMP objects from a
443 TCP HTTPS protocol
700 TCP/UDP Login Manager
ICMP
Types 3, 8, and
11
ICMP
over TLS/SSL
• Avamar clients
• Other Avamar servers
• Data Domain system
• Administrator computers
• Other Avamar server nodes
• Web browser clients
• Reverse proxy web server
• AvInstaller
• Avamar Downloader Service
host
• Avamar Key Manager
• Web browser clients
• Reverse proxy web server
Avamar clients periodically ping the Avamar
server to determine the best interface for
communicating with the MCS. The Avamar
server sends an ICMP response. Avamar
servers also ping associated systems, such as
replication destinations and Data Domain.
Secure shell access.
time protocol servers.
Data Domain system. Required when storing
Avamar client backups on a Data Domain
system.
Provides web browsers with HTTPS access to
Avamar services. A reverse proxy web server
can be used to limit access to this port.
703 TCP AKM service Avamar server nodes Used for key management.
1234 TCP Avamar installation
utility HTTPS
2888 TCP AVDTO Avamar Extended Retention Media
5555 TCP PostgreSQL
administrator
server
72 Network Security
Web browser clients Only open this port for installation of the
Avamar software. Only permit access from
trusted administrator computers that are used
during software installation.
NOTE: Close this port when
installation of the Avamar software is
complete. Avamar services do not
listen on port 1234.
The firewall rules open this port when you
Access Node
• Clients running Avamar Client
Manager and Data Protection
Advisor
install support for Avamar Extended Retention.
This port is open by default. Securing the
Postgres firewall port on page 158 provides
more instructions to enable selective access.
Page 73

Table 35. Required inbound ports on the utility node (continued)
Port Protocol Service name Source computer Additional information
• PostgreSQL administrator client
computers
5568 TCP PostgreSQL Avamar Extended Retention Media
Access Node
5671 TCP RabbitMQ
6667 TCP Archive Service
Event
7000 TCP Apache Tomcat Avamar Extended Retention Media
7443 TCP Apache Tomcat Avamar Extended Retention Media
7543 HTTPS/SSL Update Manager Web browser clients Web browser clients use this port to create
7544 TCP Update Manager Jetty socket clients Jetty socket clients use this port to send a
• localhost
• Other Avamar utility nodes
• Avamar Extended Retention
computers
• Backup and Recovery Manager
computers
Avamar Extended Retention Media
Access Node
Access Node
Access Node
Limit access to trusted administrator
computers.
The firewall rules open this port when you
install support for Avamar Extended Retention.
RabbitMQ is a message broker who is used to
enhance asynchronous interprocess
communication.
The firewall rules open this port when you
install support for Avamar Extended Retention.
The firewall rules open this port when you
install support for Avamar Extended Retention.
The firewall rules open this port when you
install support for Avamar Extended Retention.
HTTPS connections to Avamar Installation
Manager. Limit access to trusted administrator
computers.
shutdown signal to its Jetty web server. Limit
access to trusted administrator computers.
7778–
7781
8105 TCP Apache Tomcat Avamar client computers Used by Avamar Desktop/Laptop.
8109 TCP Apache Tomcat Avamar client computers Used by Avamar Desktop/Laptop.
8181 TCP Apache Tomcat Avamar client computers Connections from Avamar client computers
8444 TCP Apache Tomcat Web browser clients Web browser connections from Avamar
8505 TCP Apache Tomcat Utility node or single-node server Avamar Desktop/Laptop uses this port to
8580 TCP AvInstaller Web browser clients Used for connections from Avamar
9443 TCP RMI - Avamar
TCP RMI Avamar Administrator management
console
Web browser clients
Management
Console web
services
Used for connections from the Avamar
console. Limit access to trusted administrator
computers.
and from AvInstaller hosts are redirected to
this port.
Desktop/Laptop client computers are
redirected to this port.
send a shutdown command to its Apache
Tomcat server. Limit access to the utility node
or single-node server.
Downloader Service computer, and for access
to AvInstaller from other web browser clients.
19000 TCP/UDP Avamar subsystem
(also known as
GSAN)
Avamar server nodes Avamar subsystem communication.
Network Security 73
Page 74

Table 35. Required inbound ports on the utility node (continued)
Port Protocol Service name Source computer Additional information
19500 TCP/UDP Avamar subsystem Avamar server nodes Avamar subsystem communication.
20000 TCP/UDP Avamar subsystem Avamar server nodes Avamar subsystem communication.
20500 TCP/UDP Avamar subsystem Avamar server nodes Avamar subsystem communication.
25000 TCP/UDP Avamar subsystem Avamar server nodes Avamar subsystem communication.
25500 TCP/UDP Avamar subsystem Avamar server nodes Avamar subsystem communication.
26000 TCP/UDP Avamar subsystem Avamar server nodes Avamar subsystem communication.
26500 TCP/UDP Avamar subsystem Avamar server nodes Avamar subsystem communication.
27000 TCP Avamar server
27500 TCP Avamar server
28001 TCP
28002–
28011
28009 TCP avagent VMware proxy Unsecure communication with VMware proxy.
28810-28
819
29000 TCP Avamar server SSL
TCP Avamar Extended Retention Media
TCP ddrmaint localhost Internal use only for token-based
• Avamar server
CLI
• MCS
• Avagent
• Avamar client computers
• Avamar server nodes
• Avamar nodes acting as a
replicator source
• Avamar server nodes
• Avamar nodes acting as a
replicator source
• Avamar client computers
• VMware proxy
• Replication source
• Replication target
Access Node
• Avamar client computers
• Avamar server nodes
Avamar subsystem communication. This port
is blocked by default for new Avamar
installations. Open this port to allow
unencrypted backups.
Avamar subsystem communication.
• CLI commands from client computers.
• Avagent to MCS communication.
• Bi-directional communication between
avagent and MCS on the replication
source Avamar server and the replication
destination Avamar server to permit
authentication key exchange.
The firewall rules open this port when you
install support for Avamar Extended Retention.
authentication when connecting to Data
Domain; only localhost can use it.
Avamar subsystem communication.
30001 TCP MCS
30002 TCP avagent Avamar client computers Client communication over SSL.
30003 TCP MCS
30102–
30109
61617 TCP Apache ActiveMQ
TCP avagent VMware proxy Secure communication with VMware proxy.
SSL
• Avamar client computers
• VMware proxy
• Avamar server nodes
• Avamar client computers
• Avamar server nodes
Avamar Extended Retention Media
Access Node
• 2-way secure socket communication.
• Avagent to MCS communication.
• MCS communication over SSL.
MCS communication over SSL.
The firewall rules open this port when you
install support for Avamar Extended Retention.
Utility node optional inbound ports
The following table describes the recommended, but optional, inbound ports for an Avamar utility node. For every port listed in this table,
the Avamar utility node is the destination and the source is listed in the Source computer column.
74
Network Security
Page 75

Table 36. Optional inbound ports on the utility node
Port Protocol Service name Source computer Additional information
514 UDP syslog Utility node or single-node server Avamar server connects to this port to
communicate events to syslog.
8509 TCP Apache Tomcat Utility node or single-node server The Apache JServ Protocol (AJP) uses port
8509 to balance the work load for multiple
instances of Tomcat.
Utility node required outbound ports
The following table describes the outbound ports that must be accessible to network packets that are sent from an Avamar utility node.
For each row, the utility node is the source computer that must have outgoing access to the listed port on the listed destination computer.
Table 37. Required outbound ports for the utility node
Port Protocol Destination computer Additional information
N/A
7 TCP Data Domain system Required to register a Data Domain system for storing
23 TCP Internal Required for communication with internal switches and
25 TCP Avamar Customer Support Required to allow ConnectEMC to make an SMTP
53 TCP/UDP DNS Required for name resolution and DNS zone transfers.
88 Key Distribution Center (KDC) Required for access to Kerberos authentication system.
111 TCP/UDP RPC port mapper service on Data
123 TCP/UDP NTP time servers Provides synchronization of system time from network
163 UDP SNMP service on Data Domain
ICMP
Types 3, 8, and 11
• Avamar clients
• Other Avamar servers
• Data Domain system
Domain system
system
Avamar clients periodically ping the Avamar server to
determine the best interface for communicating with the
MCS. The Avamar server sends an ICMP response.
Avamar servers also ping associated systems, such as
replication destinations and Data Domain.
Avamar client backups.
for firmware upgrades.
connection with Customer Support.
VMware proxy nodes require the TCP connection to DNS.
Only required when backups are stored on a Data Domain
system. Access to RPC and NFS port mapper
functionality on a Data Domain system.
time protocol servers.
Only required when backups are stored on a Data Domain
system.
389 TCP/UDP LDAP Provides access to directory services.
443
464 TCP Key Distribution Center (KDC) Required for access to the Kerberos Change/Set
902 TCP VMware ESX server proxy service
2049 TCP/UDP NFS daemon on Data Domain system Only required when backups are stored on a Data Domain
2052 TCP/UDP NFS mountd process on Data
• vSphere API
• TCP
• VMware vCenter
• Avamar Key Manager
Domain system
password.
system.
Only required when backups are stored on a Data Domain
system. Outbound communication must be open for both
TCP and UDP protocols.
Network Security 75
Page 76

Table 37. Required outbound ports for the utility node (continued)
Port Protocol Destination computer Additional information
5671 TCP
5696 TCP KMIP-compliant key management
7443 TCP Media Access node that hosts
7444 TCP VMware vCenter For utility node configurations that also run the VMware
7543 HTTPS/SSL Update Manager Web browser clients use this port to create HTTPS
7544 TCP Update Manager Jetty socket clients use this port to send a shutdown
7543 HTTPS Update Manager Used for connections from the Avamar Downloader
• localhost
• Other Avamar utility nodes
• Avamar Extended Retention
computers
• Backup and Recovery Manager
computers
server
Avamar Extended Retention
RabbitMQ messaging. RabbitMQ is a message broker
used to enhance asynchronous interprocess
communication.
Recommended port for AKM external key management
operation.
Only required when using the Avamar Extended Retention
feature.
Backup Appliance this port is opened by an if/then clause
in the firewall rules. Otherwise, this port is not required.
Used to test vCenter credentials.
connections to Avamar Installation Manager. Limit access
to trusted administrator computers.
signal to its Jetty web server. Limit access to trusted
administrator computers.
Service computer, and for access Update Manager from
other web browser clients.
8080 TCP NetWorker server For utility node configurations that also run the VMware
Backup Appliance this port is opened by an if/then clause
in the firewall rules. Otherwise, this port is not required.
Used to register with a NetWorker server.
8580 TCP Computer running Avamar
Downloader Service
9443 TCP Managed Avamar servers Avamar Management Console web services use this
19000 TCP/UDP Avamar server nodes Avamar subsystem communication.
19500 TCP/UDP Avamar server nodes Avamar subsystem communication.
20000 TCP/UDP Avamar server nodes Avamar subsystem communication.
20500 TCP/UDP Avamar server nodes Avamar subsystem communication.
25000 TCP/UDP Avamar server nodes Avamar subsystem communication.
25500 TCP/UDP Avamar server nodes Avamar subsystem communication.
26000 TCP/UDP Avamar server nodes Avamar subsystem communication.
26500 TCP/UDP Avamar server nodes Avamar subsystem communication.
27000 TCP Avamar server nodes Avamar subsystem communication.
28001 TCP Replication source system and
replication target system
Used to make requests for package downloads from the
Avamar Downloader Service computer.
outbound port for RMI communication via a dynamically
assigned port on managed Avamar servers.
Replication requires bi-directional access between the
replication source Avamar server and the replication
destination Avamar server to permit authentication key
exchange.
28009 TCP VMware proxy MCS access to proxy logs.
76 Network Security
Page 77

Table 37. Required outbound ports for the utility node (continued)
Port Protocol Destination computer Additional information
28011 TCP Avamar Extended Retention Media
Access Node
29000 TCP Avamar server nodes Avamar subsystem communication over SSL.
30001 TCP Avamar server nodes MCS communication over SSL.
30002 TCP Avamar client computers Communication with avagent.
30003 TCP Avamar server nodes MCS communication over SSL.
30002 30009
30102 TCP VMware proxy Avagent paging port. Secure communication with
61617 TCP Media Access node that hosts
61619 TCP Computer running Backup and
TCP VMware proxy Avagent paging port. Secured communication with
Avamar Extended Retention
Recovery Manager.
The firewall rules open this port when you install support
for Avamar Extended Retention.
VMware proxy.
VMware proxy.
Only required when using the Avamar Extended Retention
feature.
Required to permit communication with Backup and
Recovery Manager.
Storage node ports
Avamar storage nodes have specific port requirements both for inbound and outbound ports.
The tables in this section list the following port requirements for storage nodes:
• Required inbound ports
Ports on each storage node that must be open to network transmissions from specified source computers.
• Required outbound ports
Ports on another computer that each storage node must be allowed to access.
Storage node required inbound ports
The following table describes the inbound ports that must be open on each Avamar storage node. For every port listed in this table, the
Avamar storage node is the destination and the source is listed in the Source computer column.
Table 38. Required inbound ports on each storage node
Port Protocol Service name Source Additional information
22 TCP SSH
123 TCP/UDP NTP
19000 TCP/UDP Avamar subsystem Avamar server nodes Avamar subsystem communication.
19500 TCP/UDP Avamar subsystem Avamar server nodes Avamar subsystem communication.
20000 TCP/UDP Avamar subsystem Avamar server nodes Avamar subsystem communication.
20500 TCP/UDP Avamar subsystem Avamar server nodes Avamar subsystem communication.
25000 TCP/UDP Avamar subsystem Avamar server nodes Avamar subsystem communication.
25500 TCP/UDP Avamar subsystem Avamar server nodes Avamar subsystem communication.
• Administrator
computers
• Other Avamar server
nodes
• NTP time servers
• Avamar utility node
Secure shell access.
Permits clock synchronization from
network time protocol servers
(exochronous) and from the utility node
(isochronous).
Network Security 77
Page 78

Table 38. Required inbound ports on each storage node (continued)
Port Protocol Service name Source Additional information
26000 TCP/UDP Avamar subsystem Avamar server nodes Avamar subsystem communication.
26500 TCP/UDP Avamar subsystem Avamar server nodes Avamar subsystem communication.
27000 TCP Avamar server
29000 TCP Avamar server SSL
30001 TCP MCS SSL Avamar server nodes MCS communication.
30003 TCP MCS SSL Avamar server nodes MCS communication.
• Avamar client
computers
• Avamar nodes acting
as a replicator source
• Avamar client
computers
• Avamar server nodes
Avamar subsystem communication. This
port is blocked by default for new
installations. Open this port to allow
unencrypted backups.
Avamar subsystem communication.
Storage node required outbound ports
The following table describes the outbound ports that must be accessible to network packets that are sent from each Avamar storage
node. For each row, the storage node is the source computer that must have outgoing access to the listed port on the listed destination
computer.
Table 39. Required outbound ports for each storage node
Port Protocol Destination Additional information
53 TCP/UDP DNS Required for name resolution and DNS zone transfers. TCP
connection to DNS is required by VMware proxy nodes.
123 TCP/UDP NTP time servers and the Avamar
utility node
Permits clock synchronization from network time protocol
servers (exochronous) and from the utility node
(isochronous).
703 TCP Utility node Permits access to the AKM service on the utility node.
19000 TCP/UDP Avamar server nodes Avamar subsystem communication.
19500 TCP/UDP Avamar server nodes Avamar subsystem communication.
20000 TCP/UDP Avamar server nodes Avamar subsystem communication.
20500 TCP/UDP Avamar server nodes Avamar subsystem communication.
25000 TCP/UDP Avamar server nodes Avamar subsystem communication.
25500 TCP/UDP Avamar server nodes Avamar subsystem communication.
26000 TCP/UDP Avamar server nodes Avamar subsystem communication.
26500 TCP/UDP Avamar server nodes Avamar subsystem communication.
27000 TCP Avamar server nodes Avamar subsystem communication.
29000 TCP Avamar server nodes Avamar subsystem communication over SSL.
30001 TCP Avamar server nodes MCS communication over SSL.
30003 TCP Avamar server nodes MCS communication over SSL.
Avamar client ports
Avamar clients have specific port requirements both for inbound and outbound ports.
The tables in this section list the following port requirements for Avamar clients:
78
Network Security
Page 79

• Required inbound ports
Ports on an Avamar client that must be open to network transmissions from specified source computers.
• Required outbound ports
Ports on another computer that an Avamar client must be allowed to access.
Avamar client required inbound ports
The following table describes the inbound ports that must be open on an Avamar client. For every port listed in this table, an Avamar client
is the destination and the source is listed in the Source computer column.
Table 40. Required inbound ports on an Avamar client
Port Protocol Service name Source Additional information
28002 TCP avagent Avamar server Provides management functionality from
Avamar Administrator.
30001 TCP MCS Avamar utility node 2-way secure socket
30002 TCP avagent Avamar utility node
Avamar client required outbound ports
The following table describes the outbound ports that must be accessible to network packets that are sent from an Avamar client. For
each row, the Avamar client is the source computer that must have outgoing access to the listed port on the listed destination computer.
NOTE:
Avamar 7.5.1 removes support for HTTP access to TCP port 80. Use the HTTPS port 443 to access these
services instead.
Table 41. Required outbound ports for an Avamar client
Port Protocol Destination Additional information
53 TCP/UDP DNS Required for name resolution and DNS zone
transfers.
111 TCP/UDP Data Domain system Required for backing up clients to Data Domain.
123 UDP NTP time servers Provides clock synchronization from network time
protocol servers.
443 TCP Avamar server HTTPS service Required to use the web browser UI of Avamar
Desktop/Laptop and the web browser UI of Avamar
Web Restore.
2049 TCP/UDP Data Domain system Required for backing up clients to Data Domain.
2052 TCP/UDP Data Domain system Required for backing up clients to Data Domain.
3008 TCP Archive tier service on Data Domain
system
8105 TCP Avamar server Used by Avamar Desktop/Laptop.
8109 TCP Avamar server Used by Avamar Desktop/Laptop.
8181 TCP Avamar server HTTP redirect port Required to use the web browser UI of Avamar
Only required when backups are stored on a Data
Domain system and archive tier is used.
Desktop/Laptop and the web browser UI of Avamar
Web Restore.
8444 TCP Avamar server HTTPS redirect port Required to use the web browser UI of Avamar
Desktop/Laptop and the web browser UI of Avamar
Web Restore.
27000 TCP Avamar server Avamar subsystem communication.
28001 TCP Avamar server CLI commands from client computers.
29000 TCP Avamar server Avamar subsystem communication.
Network Security 79
Page 80

Table 41. Required outbound ports for an Avamar client (continued)
Port Protocol Destination Additional information
30001 TCP Avamar utility node MCS
30003 TCP Avamar utility node MCS
Avamar Downloader Service host ports
An Avamar Downloader service host has specific port requirements both for inbound and outbound ports.
The tables in this section list the following port requirements for an Avamar Downloader service host:
• Required inbound port
Port on an Avamar Downloader service host that must be open to network transmissions from specified source computers.
• Required outbound ports
Ports on another computer that an Avamar Downloader service host must be allowed to access.
Avamar Downloader Service host required inbound port
The following table describes the inbound port that must be open on an Avamar Downloader Service host. For the port listed in this table,
an Avamar Downloader Service host is the destination and the source is listed in the Source computer column.
Table 42. Required inbound port on an Avamar Downloader Service host
Port Protocol Service name Source Additional information
8580 TCP Avamar Downloader Service Avamar server Avamar server connects to this port to
access the Avamar Downloader Service.
Avamar Downloader Service host required outbound ports
The following table describes the outbound ports that must be accessible to network packets that are sent from an Avamar Downloader
Service host. For each row, an Avamar Downloader Service host is the source computer that must have outgoing access to the listed port
on the listed destination computer.
NOTE:
Avamar 7.5.1 removes support for HTTP access to TCP port 80. Use the HTTPS port 443 to access these
services instead.
Table 43. Required outbound ports for an Avamar Downloader Service host
Port Protocol Destination Additional information
21 TCP Avamar FTP server Provides the Avamar Downloader Service with FTP access to
updates, security rollup packages, hotfixes, and patches.
53 TCP/UDP DNS Required for name resolution and DNS zone transfers.
123 UDP NTP time servers Provides clock synchronization from network time protocol
servers.
443 TCP Avamar server HTTPS service Provides HTTPS access to the AvInstaller service.
Ports when using a Data Domain system
An Avamar system that is deployed with a Data Domain system as a storage target has specific port requirements.
Also to the port requirements described in this section, implement the additional Data Domain system port requirements that are described
in the Knowledgebase article: "Port Requirements for Allowing Access to Data Domain System Through a Firewall." This article is available
from: https://www.dell.com/support.
80
Network Security
Page 81

Required ports when using a Data Domain system
The following table describes the general port requirements when an Avamar system is deployed with a Data Domain system as a storage
target
Table 44. Required ports when using a Data Domain system
Port Protocol Source Destination Service Additional information
7 TCP Utility node Data Domain system ECHO Required to register a Data Domain system
for storing Avamar client backups.
22 TCP Utility node Data Domain system SSH Secure shell communication with the Data
Domain system.
111 TCP/UDP Utility node Data Domain system RPC port mapper service Access to RPC and NFS port mapper
functionality on a Data Domain system.
161 UDP Data
Domain
system
163 UDP Utility node Data Domain system SNMP none
2049 TCP/UDP Utility node Data Domain system NFS daemon none
2052 TCP/UDP Utility node Data Domain system NFS mountd process Outbound communication must be open for
3008 TCP Avamar
client
3009 TCP Avamar
client
Utility node SNMP This is the getter/setter port for SNMP
objects from a Data Domain system.
both protocols: TCP and UDP.
Data Domain system Archive tier service and
backend capacity report
Data Domain system Archive tier service and
backend capacity report
Only required when archive tier is used.
Only required when archive tier is used in
the REST API.
NDMP accelerator node ports
Avamar NDMP accelerator nodes have specific port requirements for outbound ports.
The table in this section lists the following port requirements for NDMP accelerator nodes:
• Required inbound ports
Ports on an accelerator node that must be open to network transmissions from specified source computers.
• Required outbound ports
Ports on another computer that each accelerator node must be allowed to access.
NDMP accelerator node required inbound ports
The following table describes the inbound ports that must be accessible to network packets that are sent to each Avamar accelerator
node. For each row, the accelerator node is the destination and the source is listed in the Source computer column.
Table 45. Required inbound ports for each accelerator node
Port Protocol Source Additional information
7543 HTTP/SSL Web browser clients Web browser clients use this port to create HTTPS
connections to Avamar Installation Manager. Limit access
to trusted administrator computers.
28002-28202 TCP Avamar client/agent
30002-30202 TCP Avamar client/agent
Network Security 81
Page 82

NDMP accelerator node required outbound ports
The following table describes the outbound ports that must be accessible to network packets that are sent from each Avamar accelerator
node. For each row, the accelerator node is the source computer that must have outgoing access to the listed port on the listed
destination computer.
Table 46. Required outbound ports for each accelerator node
Port Protocol Destination Additional information
7 TCP Data Domain system
25 TCP Customer Support Required for SMTP connections between
ConnectEMC and Customer Support.
111 TCP/UDP Data Domain system
443 TCP Customer Support LDLS communication with Customer Support.
2049 TCP/UDP Data Domain system
2052 TCP/UDP Data Domain system
3008 TCP Data Domain system
3009 TCP Data Domain system
8080 TCP Isilon Required for Isilon platform API access.
8580 TCP Computer running Avamar
Downloader Service
9443 TCP RMI - Avamar Management Console
web services
10000 TCP NAS filer Required for NDMP control messages.
28001 TCP Avamar Administrator management
console
30001 TCP Avamar Administrator management
console
30003 TCP Avamar server nodes MCS communication over SSL.
Used to make requests for package downloads from
the Avamar Downloader Service computer.
Mounting a NAS share
Avamar 18.1 and later releases include additional operating system and firewall hardening packages for NDMP accelerator nodes. To mount
a NAS share on an NDMP accelerator node, add the NAS IP address to the firewall table. Remove the NAS from the firewall table when
you no longer need to mount the NAS share.
Steps
1. Open a command shell:
a. Log in to the NDMP accelerator node as admin.
b. Switch user to root by typing su -.
2. Add the NAS to the firewall table by typing the following commands:
iptables -I OUTPUT -p tcp -d IPv4-addr -j ACCEPT
iptables -I OUTPUT -p udp -d IPv4-addr -j ACCEPT
where IPv4-addr is a specific IPv4 address for the NAS.
3. Remove the NAS from the firewall table by typing the following commands:
iptables -D OUTPUT -p tcp -d IPv4-addr -j ACCEPT
iptables -D OUTPUT -p udp -d IPv4-addr -j ACCEPT
where IPv4-addr is a specific IPv4 address for the NAS.
82
Network Security
Page 83

Remote management interface ports
The remote management interface on Avamar utility, storage, and accelerator nodes has specific port requirements both for inbound and
outbound ports.
The remote management interface depends on the type of ADS platform:
• The Gen4T platform uses the Baseboard Management Controller (BMC) Web Console
• The Gen4S platform uses the Remote Management Module 4 (RMM4)
Gen4-based Avamar nodes have reached end-of-life. Past releases of this guide provide further information about Gen4-based Avamar
nodes.
The tables in this section list the inbound port requirements for the remote management interface on all the nodes. The ports that must be
opened to network transmissions from specified source computers are based on your network environment.
NOTE: It is recommended to isolate the management network.
Connection to the remote management interfaces depends on the type of ADS platform and is made through the relevant BMC Web
Console or RMM4 IP address. Do not use the backup interface for this purpose.
Note that the remote management console interface is only compatible with Java versions 1.7.x and 1.8 versions earlier than 1.8u161. If
Java version 1.8u161 and later is installed on the machine used to connect to the remote management console, the KVM console fails to
launch using either ping or a web browser.
NOTE: The dedicated port and shared port cannot be the same IP address. If the IP address is the same, set the IP
address of the shared port to 0.0.0.0. Also, connection of the dedicated port through a switch may require gratuitous
ARP to be turned on.
Remote management interface inbound ports
The following table describes the inbound ports that should be open on the remote management interface of all Gen4T-based Avamar
nodes. The actual ports that should be open depend on your network environment. For every port listed in this table, the remote
management interface on the node is the destination and the source is listed in the Source computer column.
Table 47. Inbound ports for the remote management interface on all Gen4T-based nodes
Port Protocol Service name Source computer Additional information
80 TCP HTTP Administrator computers HTTP access
443 TCP HTTP protocol over
TLS/SSL
2068 TCP Virtual console and media
redirection
The following table describes the inbound ports that should be open on the remote management interface of all Gen4S-based Avamar
nodes. The actual ports that should be open depend on your network environment. For every port listed in this table, the remote
management interface on the node is the destination and the source is listed in the Source computer column.
Administrator computers HTTPS access
Administrator computers Virtual console keyboard/mouse, virtual
media server, virtual media secure service,
and virtual console video
Table 48. Inbound ports for the remote management interface on all Gen4S-based nodes
Port Protocol Service name Source computer Additional information
80 TCP HTTP Administrator computers HTTP access
443 TCP HTTPS Administrator computers HTTPS access
5120 TCP CDROM media redirection Administrator computers
5123 TCP Floppy/USB media
redirection
7578 TCP Keyboard, video, mouse Administrator computers
Gen4-based Avamar nodes have reached end-of-life. Past releases of this guide provide further information about Gen4-based Avamar
nodes.
Administrator computers
Network Security
83
Page 84

NOTE:
Ensure that the local network environment allows for the creation of these connections.
If using a private intranet, configure the setup of firewall and Network Address Translation (NAT) accordingly.
Ensure that you open the ports bi-directionally at the firewall level.
Remote management interface outbound ports
The following table describes the outbound ports that should be accessible to network packets that are sent from the remote
management interface on all Avamar nodes. The actual ports that should be open depend on your network environment. By default, none
of these outbound ports are configured to be in use. You must modify the configuration to use those protocols. For each row, the node is
the source computer that must have outgoing access to the listed port on the listed destination computer.
Table 49. Outbound ports for the remote management interface on all Avamar nodes
Port Protocol Destination computer Additional information
25 TCP Administrator computers Required to make an SMTP connection with
Administrator computers.
53 TCP/UDP DNS server Required for DNS queries.
68 UDP Administrator computers Required for DHCP-assigned IP address.
69 UDP Administrator computers Required for trivial file transfers (TFTP).
162 UDP Administrator computers Required to send SNMP traps.
636 TCP/UDP LDAPS server Required to make Secure LDAP queries.
3269 TCP /UDP LDAPS server Required for LDAPS global catalog (CG).
NOTE:
Ensure that the local network environment allows for the creation of these connections.
If using a private intranet, configure the setup of firewall and Network Address Translation (NAT) accordingly.
Ensure that you open the ports bi-directionally at the firewall level.
Avamar VMware Combined Proxy ports
This section outlines the requirements for the Avamar VMware Combined Proxy.
Avamar VMware Combined Proxy inbound ports
The following table describes the inbound ports requirements for the Avamar VMware Combined Proxy.
Table 50. Required inbound ports for the Avamar VMware Combined Proxy
Port Protocol Source Additional information
443 TCP/FLR service FLR guest VM Optional, but recommended.
22 TCP / SSH TCP / SSH Avamar Administrator Diagnostic support is optional, but
recommended.
902 TCP / VMware ESX server proxy
service
5489 TCP / CIM service Avamar Avamar Deployment Used to register the proxy.
28009 TCP / Access proxy logs Avamar MCS
28102 - 28109 TCP / avagent paging port Avamar MCS Avamar 7.0 and Avamar 7.1
30102 - 30109 TCP / avagent paging port Avamar MCS Avamar 7.2
84 Network Security
Avamar Server
Page 85

Table 50. Required inbound ports for the Avamar VMware Combined Proxy (continued)
Port Protocol Source Additional information
30002 - 30009 TCP / avagent paging port Avamar Server Secured communication with the
Avamar Server Utility Node.
Avamar VMware Combined Proxy outbound ports
The following table describes the outbound ports requirements for the Avamar VMware Combined Proxy.
Table 51. Required outbound ports for the Avamar VMware Combined Proxy
Port Protocol Destination Additional information
53 UDP + TCP / DNS DNS server UDP + TCP
111 TCP / UDP Data Domain system Access to RPC and NFS port mapper functionality
on a Data Domain system
443 TCP / vSphere API ESXi hosts
443 TCP / vSphere API vCenter
902 TCP / VDDK ESXi hosts
2049 TCP/UDP Data Domain system
2052 TCP/UDP Data Domain system Outbound communication must be open for both
protocols: TCP and UDP
8543 TCP Avamar server Used for VMware snapshot operations
27000 TCP / GSAN communication Avamar server Non-secured communication
28001 TCP / Avamar MCS / avagent Avamar server
28002 - 28010 TCP / Avamar MCS / avagent Avamar server
29000 TCP / GSAN communication Avamar server Secured communication
30001 TCP / avagent to MCS
communication
30002 - 30010 TCP / Avamar MCS / avagent Avamar server
30102 - 30109 TCP / Avagent paging port Avamar server Secured communication with Avamar Server
Avamar MCS Avamar 7.2
Utility Node
Avamar vSphere Combined Proxy ports
The following table describes the ports that are required for the Avamar vSphere Combined Proxy.
Table 52. Required ports for the Avamar vSphere Combined Proxy
Port Protocol Source Destination
443 TCP / vSphere API Avamar Deployment Manager ESXi hosts
443 TCP / vSphere API Avamar MCS vCenter
7444 TCP / Test vCenter credentials Avamar MCS vCenter
Network Security 85
Page 86

Ports when using Avamar Virtual Edition
Avamar Virtual Edition (AVE) has specific Azure network security group port requirements both for inbound and outbound ports.
Inbound ports for the Azure network security group
The following tables describe the rules that should be added to an Azure network security group.
NOTE: If you want to restrict the source of traffic, set the source with IPv4 or IPv6 CIDR block, or a single IPv4 or IPv6
address.
NOTE: Avamar no longer supports HTTP access to TCP port 80. Use the HTTPS ports 443 to access these services
instead.
For all table entries:
• The Source and Destination fields are Any.
• The Source port range field is *
• The Action is Allow.
• Assign a unique priority value to each rule, starting at 100.
• Type a unique description for each rule. The value must be unique for both inbound and outbound rules.
Table 53. Inbound ports for the Azure network security group
Type Protocol Destination port range
SSH TCP 22
Custom TCP Rule TCP 161
Custom UDP Rule UDP 161
Custom TCP Rule TCP 163
Custom UDP Rule UDP 163
HTTPS TCP 443
Custom TCP Rule TCP 700
Custom TCP Rule TCP 7543
Custom TCP Rule TCP 7778 - 7781
Custom TCP Rule TCP 8543
Custom TCP Rule TCP 9090
Custom TCP Rule TCP 9443
Custom TCP Rule TCP 27000
Custom TCP Rule TCP 28001 - 28002
Custom TCP Rule TCP 28810 - 28819
Custom TCP Rule TCP 29000
Custom TCP Rule TCP 30001 - 30010
Outbound ports for the Azure network security group
If you want to restrict the source of traffic, set the source with IPv4 or IPv6 CIDR block, or a single IPv4 or IPv6
NOTE:
address.
By default, Azure has a rule AllowInternetOutBound with priority 65001 to allow all outbound internet traffic. Override this rule by adding
a rule with a priority (that is, an integer number) that is greater than all customized rules' priority, and less than 65000: source: *,
destination: *, protocol: *, action: Deny. Azure documentation contains information about creating a firewall rule.
For all table entries:
86
Network Security
Page 87

• The Source and Destination fields are Any.
• The Source port range field is *
• The Action is Allow.
• Assign a unique priority value to each rule, starting at 100.
• Type a unique description for each rule. The value must be unique for both inbound and outbound rules.
Table 54. Outbound ports for the Azure network security group
Type Protocol Destination port range
Custom TCP Rule TCP 7
SSH TCP 22
SMTP TCP 25
DNS (UDP) UDP 53
Custom TCP Rule TCP 111
Custom UDP Rule UDP 111
Custom TCP Rule TCP 161
Custom UDP Rule UDP 161
Custom TCP Rule TCP 163
Custom UDP Rule UDP 163
HTTPS TCP 443
Custom TCP Rule TCP 700
Custom TCP Rule TCP 2049
Custom UDP Rule UDP 2049
Custom TCP Rule TCP 2052
Custom UDP Rule UDP 2052
Custom TCP Rule TCP 3008
Custom TCP Rule TCP 8443
Custom TCP Rule TCP 8888
Custom TCP Rule TCP 9090
Custom TCP Rule TCP 9443
Custom TCP Rule TCP 27000
Custom TCP Rule TCP 28001-28010
Custom TCP Rule TCP 29000
Custom TCP Rule TCP 30001-30010
Communication security
The following topics provide information about securing communication between Avamar and remote systems:
External Web interfaces
Interfaces for all components (for example, Avamar Installation Manager, Avamar Administrator, MCS) are secure.
All Avamar external web interfaces are only HTTPS accessible. Automatic redirection from HTTP to HTTPS is disabled.
Consider the following limitation:
Network Security
87
Page 88

• Recent releases of Avamar enable only TLS 1.2, might impact compatibility with older Avamar clients that do not support TLS 1.2.
• Avamar web interfaces are unavailable to web browsers that do not support TLS 1.2.
• Installations of the Avamar Downloader Service on older operating systems, such as Windows 7, that do not support TLS 1.2 might
experience issues with connecting to recent releases of Avamar.
To enable TLS1.2 for Windows 7, Windows 2008 and Windows 2012, refer to the documentation on the Microsoft Support.
Network access control
Control of networking in the Avamar environment starts with awareness of several parts of the network.
Subnet and gateway assignments
Avamar client machines must be able to connect to every node in the Avamar environment directly, and each node in the environment
must be able to connect to the client machines.
Assign a default gateway to the router in the Avamar environment.
DNS requirements
The Avamar environment requires a Domain Name System (DNS) server. Within the DNS domain, assign forward mapping to the Avamar
utility node, or to the single-node Avamar server. Optionally, also assign reverse mapping to the utility node or single-node server.
For example, use the following forward mapping entry in a BIND environment:
avamar-1 A 10.0.5.5
Continuing the example, use the following optional reverse mapping for a zone serving the 5.0.10.in-addr.arpa subnet:
5 PTR avamar-1.example.com.
Remote access control
Protect all nodes and the switch in the Avamar server against unauthorized access. Use a Virtual Private Network (VPN) system when
accessing the Avamar system from a remote location.
SNMP
Avamar provides support for system monitoring and event notification through the Simple Network Management Protocol (SNMP).
Firewall settings
The Avamar firewall daemon runs on every Avamar node. The Avamar firewall daemon controls access to all inbound ports on each node
and controls transmissions sent from each node.
The Avamar firewall daemon is called avfirewall. When a change is made to a firewall rule, restart avfirewall to load the new
configuration.
The Avamar firewall daemon uses the rules in /etc/firewall.base. Use the symlink: /ect/firewall.default to access the
rules file.
The following topics describe how to configure and verify the operation of the Avamar firewall:
Controlling the firewall daemon
Stop, start, restart, and check the status of the Avamar firewall daemon.
Steps
1. Open a command shell:
a. Log in to the server as admin.
b. Switch user to root by typing the following command:
88
Network Security
Page 89

su -
c. For a multi-node server, load the rootid OpenSSH key by typing the following command:
ssh-agent bash
ssh-add /root/.ssh/rootid
2. Stop the firewall daemon by typing:
service avfirewall stop
3. Start the firewall daemon by typing:
service avfirewall start
4. Restart the firewall daemon by typing:
service avfirewall restart
5. Check the status of the firewall daemon by typing:
service avfirewall status
Editing the Firewall in Avamar
Edit the status of the Avamar firewall.
About this task
Firewall edit functionality allows the user to open and close nondependent ports for customized data transfer and to modify associated
rules. Rules and ports can be initiated, edited, and terminated through manual configuration of a designated text file, executing those
changes, and then restarting the firewall on the Avamar server.
Editing the firewall is essentially understanding the content of the config file, editing that content, and then executing those changes.
Steps
1. Log in to the utility node (or single node server) as root.
Provide the appropriate password.
2. Change the working directory to the following: /usr/local/avamar/lib/admin/security.
3. Open avfwb_custom_config.txt in a plain text editor.
See section below for config file example and how to edit the file.
4. Save and close the file.
5. Run the following command:manage-custom-rules.sh –execute-rules.
This command copies the new firewall rules to all nodes in the system and restarts the firewall.
6. Exit the command session.
Example
The firewall customization lines that you add to the avfwb_custom_config.txt file must be structured in a pipe-delimited fashion
such as the following:
Source IP | Source Port | Destination IP | Destination Port | Protocol | ICMP-type | Target | Chain | Node type
where:
Table 55. Firewall customization
Section Description
Source IP Source specification - address can be a network IP address (with /mask) or a plain IP address.
Source Port Port of origin for traffic.
Destination IP IP address of destination machine.
Destination Port Destination port or port range specification.
Protocol TCP, UDP, or ICMP.
ICMP-type If ICMP is entered for Protocol, enter the type.
Target ACCEPT, REJECT, DROP, or LOGDROP.
Network Security 89
Page 90

Table 55. Firewall customization (continued)
Section Description
Chain INPUT, OUTPUT, or LOGDROP
Node type ALL (all nodes), DATA (data nodes only), or UTILITY (only applies to the utility node).
If a field does not apply, leave the field blank.
Miscellaneous information
To delete all firewall rules, delete the rules in avfwb_custom_config.txt and run manage-custom-rules.sh --executerules again.
For diagnostic purposes, the log file is located in /var/log/custom-firewall.
To view the current state of the firewall iptable on the utility node or a single-node server, run the following command: iptables –L
(for ipv4) or ip6tables –L (for ipv6).
To view the current state of the firewall iptable on all of the nodes of a multi-node server, run the following command: mapall --all+
--user=root iptables -L.
Configuring the Avamar firewall
Use the following instructions whenever you need to open or close particular ports in the Avamar firewall, or restrict access to a particular
IP address.
Users should be familiar with the operation of iptables, including order of precedence, before creating custom firewall rules.
Opening a firewall port
If the Avamar server is a dual-stack configuration, repeat this task to create rules for both addressing systems.
Steps
1. Open a command shell:
a. Log in to the server as admin.
b. Switch user to root by typing the following command:
su -
c. For a multi-node server, load the rootid OpenSSH key by typing the following command:
ssh-agent bash
ssh-add /root/.ssh/rootid
2. Change directory by typing the following command:
cd /usr/local/avamar/lib/admin/security
3. Run the firewall rules script by typing the following command:
./edit-firewall-rules.sh
The following output appears:
Choose an Action
----------------
1) Add a custom rule
2) Remove a custom rule
3) List Current Custom Rules
4) Exit
5) Save Changes
Enter desired action:
4. Type 1 to add a custom rule and press Enter.
The following output appears:
Firewall Rule Types
-------------------
1) IPv4 Rule
90
Network Security
Page 91

2) IPv6 Rule
Enter Firewall Rule Type:
5. Type the number that corresponds to the addressing system in use and press Enter.
The following output appears:
Firewall Chains
---------------
1) OUTPUT
2) INPUT
3) LOGDROP
4) FORWARD
Select Chain:
6. Type 1 to add an output rule or 2 to add an input rule and press Enter.
The following output appears:
Protocol
--------
1) TCP
2) UDP
3) ICMP
Enter Protocol:
7. Type the number that corresponds to the required protocol and press Enter.
The following output appears:
Enter source IP (leave blank for none):
8. For outbound connections, perform the following substeps:
a. Type the IP address of this Avamar server and press Enter.
The following output appears:
Enter source port (leave blank for none):
b. Type the number of the port to open and press Enter.
The following output appears:
Enter Destination IP Address (leave blank for none):
c. Leave this field blank and press Enter.
If you want to restrict connections to a particular IP address, type the IP address instead and press Enter.
The following output appears:
Enter Destination Port (leave blank for none):
d. Leave this field blank and press Enter.
The following output appears:
Targets
-------
1) ACCEPT
2) REJECT
3) DROP
4) LOGDROP
Select Target:
9. For inbound connections, perform the following substeps:
a. Leave this field blank and press Enter.
If you want to restrict connections to a particular IP address, type the IP address instead and press Enter.
The following output appears:
Enter source port (leave blank for none):
b. Leave this field blank and press Enter.
The following output appears:
Enter Destination IP Address (leave blank for none):
c. Type the IP address of this Avamar server and press Enter.
Network Security
91
Page 92

The following output appears:
Enter Destination Port (leave blank for none):
d. Type the number of the port to open and press Enter.
The following output appears:
Targets
-------
1) ACCEPT
2) REJECT
3) DROP
4) LOGDROP
Select Target:
10. Type 1 to allow packets for the specified port and press Enter.
The following output appears:
Node Types
----------
1) ALL
2) DATA
3) UTILITY
4) ACCELERATOR
Select node type to apply rule to:
11. Type the number that corresponds to the node type and press Enter.
Unless otherwise indicated by the tables in this appendix, most ports only require the utility node.
Output similar to the following appears:
Add rule |7080|||tcp||ACCEPT|OUTPUT|UTILITY to custom rules file? (Y/N):
12. Type Y to save the new rule and press Enter.
The script writes the new rule to avfwb_custom_config.txt.
Output similar to the following appears:
Adding |7080|||tcp||ACCEPT|OUTPUT|UTILITY to pending actions...
Add another firewall rule? (Y/N):
13. If you require more rules, type Y and press Enter. Otherwise, type N and press Enter.
The following output appears:
Return to main menu? (Y/N):
14. Type N and press Enter.
The following output appears:
Save and execute rules now? (Y/N):
15. Type Y to save the new firewall rules and press Enter.
The script saves the new rules to the system firewall tables and automatically restarts the Avamar firewall, then exits.
Output similar to the following appears:
Rules have been saved to /usr/local/avamar/lib/admin/security/avfwb_custom_config.txt
|7080|||tcp||ACCEPT|OUTPUT|UTILITY will be applied
Applying /usr/sbin/iptables -A OUTPUT -p tcp --sport 7080 -j ACCEPT...
Closing a firewall port
If the Avamar server is a dual-stack configuration, repeat this task to create rules for both addressing systems.
Steps
1. Open a command shell:
a. Log in to the server as admin.
b. Switch user to root by typing the following command:
su -
92
Network Security
Page 93

c. For a multi-node server, load the rootid OpenSSH key by typing the following command:
ssh-agent bash
ssh-add /root/.ssh/rootid
2. Change directory by typing the following command:
cd /usr/local/avamar/lib/admin/security
3. Run the firewall rules script by typing the following command:
./edit-firewall-rules.sh
The following output appears:
Choose an Action
----------------
1) Add a custom rule
2) Remove a custom rule
3) List Current Custom Rules
4) Exit
5) Save Changes
Enter desired action:
4. Type 1 to add a custom rule and press Enter.
The following output appears:
Firewall Rule Types
-------------------
1) IPv4 Rule
2) IPv6 Rule
Enter Firewall Rule Type:
5. Type the number that corresponds to the addressing system in use and press Enter.
The following output appears:
Firewall Chains
---------------
1) OUTPUT
2) INPUT
3) LOGDROP
4) FORWARD
Select Chain:
6. Type 1 to add an output rule or 2 to add an input rule and press Enter.
The following output appears:
Protocol
--------
1) TCP
2) UDP
3) ICMP
Enter Protocol:
7. Type the number that corresponds to the required protocol and press Enter.
The following output appears:
Enter source IP (leave blank for none):
8. For outbound connections, perform the following substeps:
a. Leave this field blank and press Enter.
The following output appears:
Enter source port (leave blank for none):
b. Type the number of the port to close and press Enter.
The following output appears:
Enter Destination IP Address (leave blank for none):
c. Leave this field blank and press Enter.
If you want to block connections to a particular IP address, type the IP address instead and press Enter.
The following output appears:
Network Security
93
Page 94

Enter Destination Port (leave blank for none):
d. Leave this field blank and press Enter.
The following output appears:
Targets
-------
1) ACCEPT
2) REJECT
3) DROP
4) LOGDROP
Select Target:
9. For inbound connections, perform the following substeps:
a. Leave this field blank and press Enter.
If you want to block connections from a particular IP address, type the IP address instead and press Enter.
The following output appears:
Enter source port (leave blank for none):
b. Leave this field blank and press Enter.
The following output appears:
Enter Destination IP Address (leave blank for none):
c. Type the IP address of this Avamar server and press Enter.
The following output appears:
Enter Destination Port (leave blank for none):
d. Type the number of the port to close and press Enter.
The following output appears:
Targets
-------
1) ACCEPT
2) REJECT
3) DROP
4) LOGDROP
Select Target:
10. Type 2 to reject packets for the specified port, or 3 to drop packets for the specified port, and press Enter.
The following output appears:
Node Types
----------
1) ALL
2) DATA
3) UTILITY
4) ACCELERATOR
Select node type to apply rule to:
11. Type the number that corresponds to the node type and press Enter.
Unless otherwise indicated by the tables in this appendix, most ports only require the utility node.
Output similar to the following appears:
Add rule ||10.7.100.1|7080|tcp||REJECT|INPUT|UTILITY to custom rules file? (Y/N):
12. Type Y to save the new rule and press Enter.
The script writes the new rule to avfwb_custom_config.txt.
Output similar to the following appears:
Adding ||10.7.100.1|7080|tcp||REJECT|INPUT|UTILITY to pending actions...
Add another firewall rule? (Y/N):
13. If you require more rules, type Y and press Enter. Otherwise, type N and press Enter.
The following output appears:
Return to main menu? (Y/N):
94
Network Security
Page 95

14. Type N and press Enter.
The following output appears:
Save and execute rules now? (Y/N):
15. Type Y to save the new firewall rules and press Enter.
The script saves the new rules to the system firewall tables and automatically restarts the Avamar firewall, then exits.
Output similar to the following appears:
Rules have been saved to /usr/local/avamar/lib/admin/security/avfwb_custom_config.txt
||10.7.100.1|7080|tcp||REJECT|INPUT|UTILITY will be applied
Applying rule /usr/sbin/iptables -A INPUT -p tcp -d 10.7.100.1 --dport 7080 -j REJECT
Removing a custom firewall rule
Steps
1. Open a command shell:
a. Log in to the server as admin.
b. Switch user to root by typing the following command:
su -
c. For a multi-node server, load the rootid OpenSSH key by typing the following command:
ssh-agent bash
ssh-add /root/.ssh/rootid
2. Change directory by typing the following command:
cd /usr/local/avamar/lib/admin/security
3. Run the firewall rules script by typing the following command:
./edit-firewall-rules.sh
The following output appears:
Choose an Action
----------------
1) Add a custom rule
2) Remove a custom rule
3) List Current Custom Rules
4) Exit
5) Save Changes
Enter desired action:
4. Type 2 to remove custom rules and press Enter.
Output similar to the following appears:
Rules in configuration file:
1 |7080|10.7.100.105||tcp||ACCEPT|OUTPUT|UTILITY
Select line to remove (ENTER to go back):
5. Type the number of the line that corresponds to the custom rule and then press Enter.
Output similar to the following appears:
Line |7080|10.7.100.105||tcp||ACCEPT|OUTPUT|UTILITY will be flagged for removal from custom
configuration file.
The script returns to the main menu.
Choose an Action
----------------
1) Add a custom rule
2) Remove a custom rule
3) List Current Custom Rules
4) Exit
5) Save Changes
Enter desired action:
Network Security
95
Page 96

6. If you need to remove additional custom rules, repeat the previous steps. Otherwise, type 5 to save changes and press Enter.
The following output appears:
Rules have been saved to /usr/local/avamar/lib/admin/security/avfwb_custom_config.txt
Return to main menu? (Y/N):
7. Type N and press Enter.
The following output appears:
Save and execute rules now? (Y/N):
8. Type Y and press Enter.
The script removes the custom firewall rules from the system firewall tables, automatically restarts the Avamar firewall, and then exits.
The following output appears:
Rules have been saved to /usr/local/avamar/lib/admin/security/avfwb_custom_config.txt
Adding the NAS IP address to the NDMP firewall table
During an NDMP backup and restore, NAS assigns an IP address to the Avamar server for dedicated data stream transmission. If the NAS
IP address is blocked, then you must add the NAS IP address to the NDMP firewall table.
NOTE: For Avamar 18.1 and later, avfirewall version 6.0.0-2 and later supports the configuration of customized rules
for the Avamar NDMP accelerator node through the edit-firewall-rules.sh script. Before running the edit-
firewall-rules.sh script, ensure that avfwb-6.0.0-2.x86_64.rpm or later is installed on the Avamar server nodes
and NDMP accelerator nodes.
Verify the Avamar firewall version
To verify the Avamar firewall version, complete the following steps.
Steps
1. Open a command shell:
a. Log in to the server as admin.
b. Switch user to root by typing the following command:
su -
c. For a multi-node server, load the rootid OpenSSH key by typing the following command:
ssh-agent bash
ssh-add /root/.ssh/rootid
2. To verify the firewall version, run the following command:
mapall --nodes=0.s,#.accelerator.# --user=root 'rpm -q avfwb'
Output similar to the following appears:
Using /usr/local/avamar/var/probe.xml
(0.0) ssh -q -x -o GSSAPIAuthentication=no root@10.62.237.63 'rpm -q avfwb'
avfwb-6.0.0-2
(0.accelerator.0) ssh -q -x -o GSSAPIAuthentication=no root@10.62.237.68 'rpm -q avfwb'
avfwb-6.0.0-2
Add the NAS IP address to the NDMP firewall
This task opens an IP address in the NDMP firewall for the NDMP data stream transmission between the Avamar NDMP accelerator and
NAS.
Steps
1. Open a command shell:
a. Log in to the server as admin.
b. Switch user to root by typing the following command:
96
Network Security
Page 97

su -
c. For a multi-node server, load the rootid OpenSSH key by typing the following command:
ssh-agent bash
ssh-add /root/.ssh/rootid
2. Change directory by typing the following command:
cd /usr/local/avamar/lib/admin/security
3. Run the firewall rules script by typing the following command:
./edit-firewall-rules.sh
Output similar to the following appears:
Choose an Action
----------------
1) Add a custom rule
2) Remove a custom rule
3) List Current Custom Rules
4) Exit
5) Save Changes
Enter desired action:
4. Type 1 to add a custom rule and press Enter.
Output similar to the following appears:
Firewall Rule Types
-------------------
1) IPv4 Rule
2) IPv6 Rule
Enter Firewall Rule Type:
5. Type the number that corresponds to the addressing system in use and press Enter.
Output similar to the following appears:
Firewall Chains
---------------
1) OUTPUT
2) INPUT
3) LOGDROP
4) FORWARD
Select Chain:
6. Type 1 to add an output rule and press Enter.
Output similar to the following appears:
Protocol
--------
1) TCP
2) UDP
3) ICMP
Enter Protocol:
7. Type 1 to select TCP and press Enter.
Output similar to the following appears:
Enter source port (leave blank for none):
8. Leave this field blank and press Enter.
Output similar to the following appears:
Enter Destination IP Address (leave blank for none):
9. Type the IP address of the NAS NDMP data connection and press Enter.
Output similar to the following appears:
Enter Destination Port (leave blank for none):
10. Leave this field blank and press Enter.
Output similar to the following appears:
Network Security
97
Page 98

Targets
-------
1) ACCEPT
2) REJECT
3) DROP
4) LOGDROP
Select Target:
11. Type 1 to allow packets that are destined for the NAS NDMP connection and press Enter.
Output similar to the following appears:
Node Types
----------
1) ALL
2) DATA
3) UTILITY
4) ACCELERATOR
Select node type to apply rule to:
12. Type 4 to select the accelerator nodes and press Enter.
Output similar to the following appears:
Run Order
--------I) Insert (Inserts rule before default AV Firewall rules are applied)
A) Append (Standard behavior. Rule is appended, with default AV Firewall rules taking
precedent)
Select run order for this rule [A]:
13. Type 1 to select Insert and press Enter.
Output similar to the following appears:
Add rule ||192.168.1.100||tcp||ACCEPT|OUTPUT|ACCELERATOR|I to custom rules file? (Y/N):
14. Type Y to save the new rule and press Enter.
The script writes the new rule to avfwb_custom_config.txt.
Output similar to the following appears:
Adding ||192.168.1.100||tcp||ACCEPT|OUTPUT|ACCELERATOR|I to pending actions...
Add another firewall rule? (Y/N):
15. Repeat the previous steps to add another new rule for protocol UDP.
When the process is complete, output similar to the following appears:
Adding ||192.168.1.100||udp||ACCEPT|OUTPUT|ACCELERATOR|I to pending actions...
Add another firewall rule? (Y/N):
16. Type N and press Enter.
Output similar to the following appears:
Return to main menu? (Y/N):
17. Type N and press Enter.
Output similar to the following appears:
Save and execute rules now? (Y/N):
18. Type Y to save the new rules and press Enter.
The script saves the new rules to the system firewall tables, automatically restarts the Avamar firewall, and then exits.
Output similar to the following appears:
Rules have been saved to /usr/local/avamar/lib/admin/security/avfwb_custom_config.txt
||192.168.1.100||tcp||ACCEPT|OUTPUT|ACCELERATOR|I will be applied
||192.168.1.100||udp||ACCEPT|OUTPUT|ACCELERATOR|I will be applied
Applying rule /usr/sbin/iptables -A OUTPUT -p tcp -d 192.168.1.100 -j ACCEPT
Applying rule /usr/sbin/iptables -A OUTPUT -p udp -d 192.168.1.100 -j ACCEPT
98
Network Security
Page 99

5
Data Security and Integrity
Topics:
• About Data-in-flight encryption
• Data-at-rest encryption
• Data integrity
• Data erasure
About Data-in-flight encryption
Avamar can encrypt all data sent between Avamar clients and the Avamar server during transmission (data-in-flight encryption).
Encryption methodology and levels are different depending on the Avamar system version.
You specify the default encryption method to use for client/server data transfers when you create and edit groups. You also can override
the group encryption method for a specific client on the Client Properties tab of the Edit Client dialog box, for a specific backup on the
On Demand Backup Options dialog box, or for a specific restore on the Restore Options dialog box. The Avamar Administration Guide
provides details.
To enable encryption of data in transit, the Avamar server data nodes each require a unique public/private key pair and a signed X.509
certificate that is associated with the public key.
When the Avamar server is installed, a public/private key pair and a self-signed certificate are generated automatically in the /data01/
home/admin directory on each Avamar server storage node and in the /usr/local/avamar/etc directory on the utility node.
However, because self-signing is not recommended in production environments, you should generate and install a key and signed
certificate from either a commercial or private CA.
You can also configure Avamar for two-way authentication, where the client requests authentication from the Avamar server, and then
the Avamar server also requests authentication from the client. One-way, or server-to-client, authentication typically provides sufficient
security. However, in some cases, two-way authentication is required or preferred.
The following steps detail the encryption and authentication process for client/server data transfers in a server-to-client authentication
environment:
1. The Avamar client requests authentication from the Avamar server.
2. The server sends the appropriate certificate to the client. The certificate contains the public key.
3. The client verifies the server certificate and generates a random key, which is encrypted using the public key, and sends the encrypted
message to the server.
4. The server decrypts the message by using its private key and reads the key generated by the client.
5. This random key is then used by both sides to negotiate on a set of temporary symmetric keys to perform the encryption. The set of
temporary encryption keys is refreshed at a regular interval during the backup session.
NOTE: Higher cipher levels result in slower Avamar system performance.
Data-in-flight encryption
To provide enhanced security during client/server data transfers, Avamar supports two levels of data-in-flight encryption: cleartext
and high. The exact encryption technology and bit strength that is used for a client/server connection depends on a number of factors,
including the client platform and Avamar server version.
Each cipher level maps to a specific set of OpenSSL suites as shown in the following table.
Table 56. Cipher levels and associated OpenSSL suites
Avamar cipher level OpenSSL suites
cleartext
a
NULL-SHA
Data Security and Integrity 99
Page 100

Table 56. Cipher levels and associated OpenSSL suites (continued)
Avamar cipher level OpenSSL suites
medium
high ECDHE-ECDSA-AES256-GCM-SHA256:ECDHE-ECDSA-AES256-
The default Avamar cipher level is the high setting. When you use the avtar command with the --encrypt-strength=high
option or you include –encrypt-strength=high in /usr/local/avamar/var/avtar.cmd, the shared cipher is AES256-SHA.
Avamar 7.5 and later and Avamar 18.1 and later clients support TLS encryption of the data-in-flight for backups that are stored on a Data
Domain system. However, Avamar clients cannot provide encryption of the data-in-flight for backups that are stored on a Data Domain
version 5.4 or earlier system.
Encrypted traffic using the TLS 1.0 and 1.1 protocols is no longer supported. Browsers, clients, and other components that require these
protocols are not allowed to connect to the server. Only TLS 1.2 encryption is supported.
b
a.
The cleartext cipher level is not available in Avamar 7.5 and later and Avamar 18.1 and later when the session security features
are enabled. If cleartext was in place before an upgrade from a previous version of Avamar, the upgrade changes this setting to
high. The session security features are enabled if the communication security setting is anything other than Disabled/Off.
b.
The medium cipher level is not available in Avamar 7.5 and later and Avamar 18.1 and later. If medium encryption was in place
before an upgrade from a previous version of Avamar, the upgrade does not change the existing behavior. However, Avamar
Administrator displays this setting as high. If you change the cipher level to another value, you cannot select medium again.
ECDHE-ECDSA-AES128-GCM-SHA256:ECDHE-ECDSA-AES128SHA256:ECDHE-ECDSA-AES128-SHA:ECDHE-RSA-AES128GCM-SHA256:ECDHE-RSA-AES128-SHA256:AES128SHA:AECDH-AES128-SHA
SHA384:ECDHE-ECDSA-AES256-SHA:ECDHE-RSA-AES256GCM-SHA384:AES256-SHA
Closing TCP port 30002
TCP port 30002 was an internal-only exception that supported TLS 1.0 and 1.1. In Avamar 18.2, encrypted traffic using TLS 1.0 and 1.1 is
disabled for clients and components. Only TLS 1.2 encryption is supported now. To disable external access to this port, add the port to the
Avamar firewall.
Steps
1. Open a command shell:
a. Log in to the server as admin.
b. Switch user to root by typing the following command:
su -
c. For a multi-node server, load the rootid OpenSSH key by typing the following command:
ssh-agent bash
ssh-add /root/.ssh/rootid
2. Add TCP port 30002 to the Avamar firewall by typing the following command on one line:
iptables -I INPUT ! -s <SERVER> -p tcp -m tcp --dport 30002 -j REJECT
where <SERVER> is the IP address of the utility node or single-node server.
Data-in-flight encryption in Avamar versions 7.1 through
7.4
To provide enhanced security during client/server data transfers, Avamar server versions 7.1 through 7.4 supported six levels of data-inflight encryption: cleartext, insecure, low, legacy, medium, and high. The exact encryption technology and bit strength that
was used for a client/server connection depended on a number of factors, including the client platform and Avamar server version.
The Avamar Product Security Guide for these versions provides more information.
100
Data Security and Integrity
 Loading...