

Page 1
Setting Up Your Monitor
Installation de votre téléviseur | Configurar su monitor | Установка монитора | Einrichten des Monitors | Ustawianie monitora | Configuraçâo de seu monitor
A CAUTION:
Before you set up and operate your Dell™ monitor,
see the safety instructions that ship with your
monitor.
Avant d'installer et d'utiliser votre moniteur
Dell™, lisez les Instructions de sécurité
fournies avec votre moniteur.
Precaución: ВНИМАНИЕ:
Antes de instalar y utilizar su monitor Dell™,
consulte las instrucciones de seguridad que
se envían con su monitor.
Передустановкой и эксплуатацией
монитора □е1Г" ознакомьтесь с
правилами техники безопасности,
входящими в комплект поставки
монтитора.
zk
Achtung:
Bevor Sie den Dell™ Monitor einrichten und
verwenden, lesen Sie bitte die dem Monitor
beigelegten Sicherheitshinweise.
A
Ostrzezenie:
Przed ustawieniem i uruchomieniem
monitore Dell™, przeczytaj instrukcje
dotyczqce bezpieczeñstwa dostarczone
wraz z monitorem.
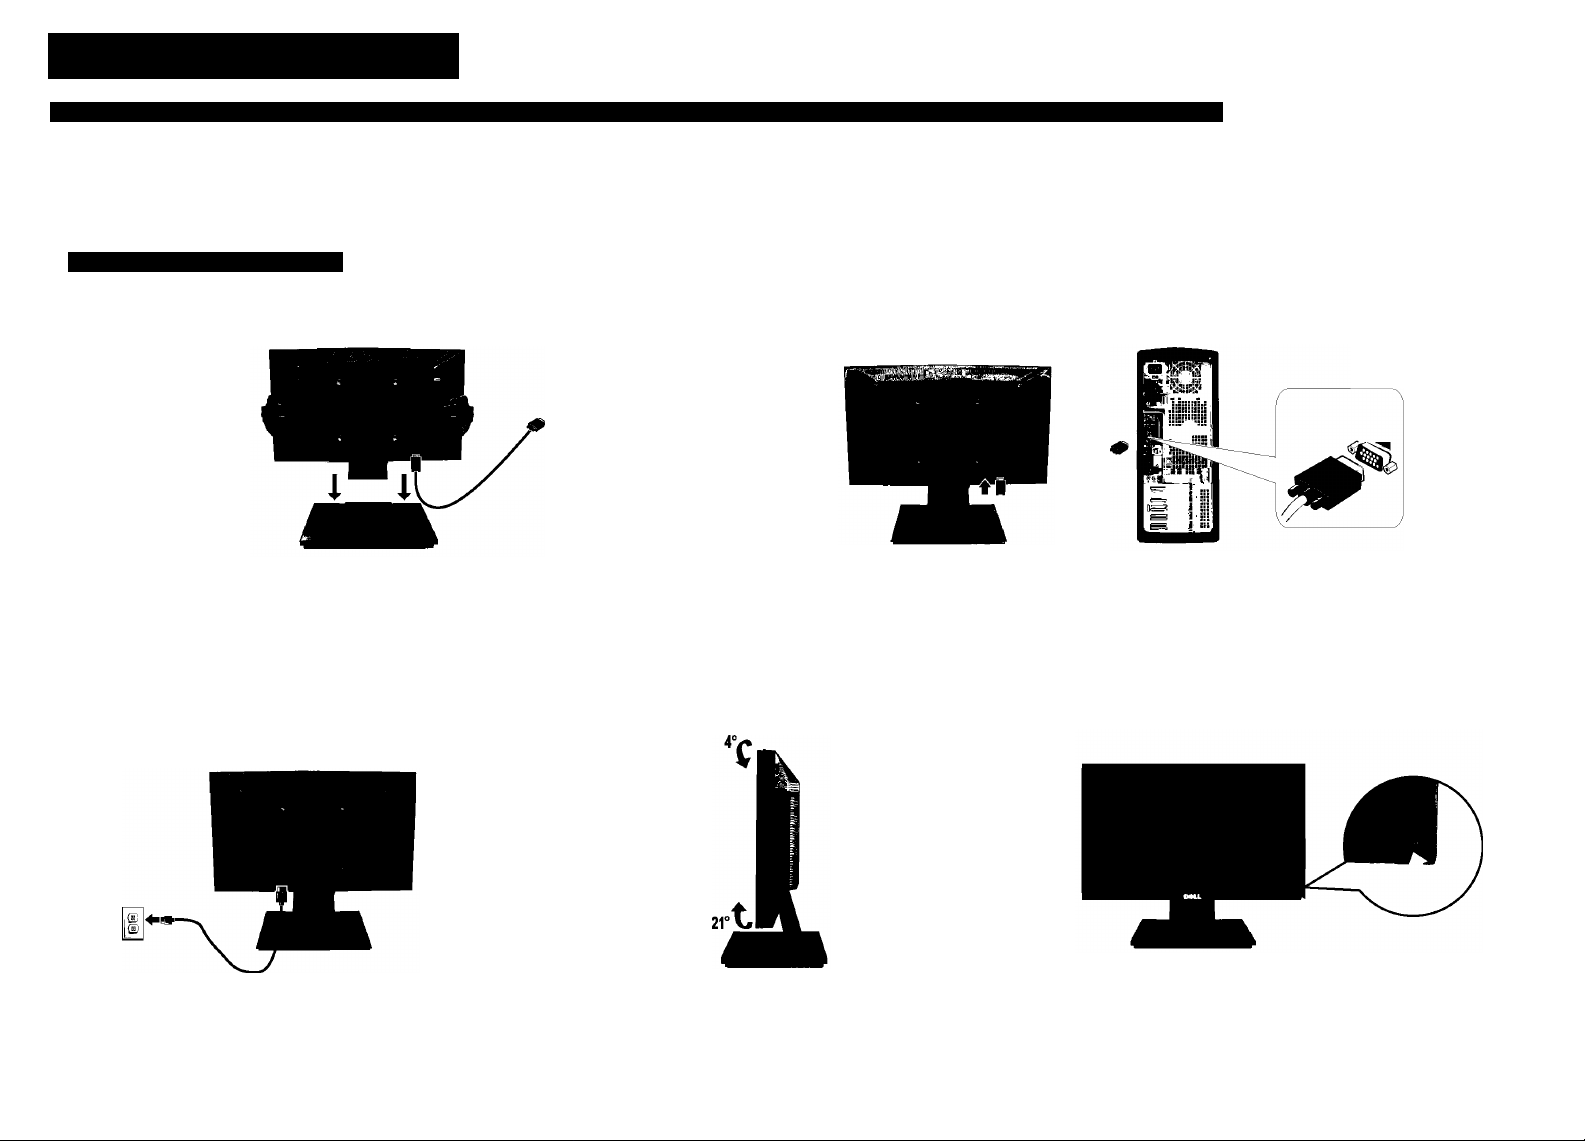
Dell™ E1609W Flat Panel Monitor
1 Slide the monitor stand onto base until it clicke into place
Faites glisser le support du moniteur sur la base, jusqu'à ce qu'il s'enclenche en place.
Deslice el soporte del monitor sobre la base hasta que encaje en su lugar.
Задвигайте стойку монитора на основание, пока она не защелкнется на месте.
Schieben Sie den Monitorständer in die Basis, bis er einrastet.
Wsun stojak monitora do podstawy dopóki nie zablokuje siq na wtasciwym miejscu
Deslize o suporte do monitor na base até que ouça um clique
3 Connect the power cable 4 Adjust the monitor 5 Press the power button
2 Connect the monitor using the blue VGA cable
Branchez le moniteur en utilisant le câble bleu VGA.
Conecte el monitor utilizando el cable VGA azul.
Подключите монитор к компьютеру синим VGA-кабелем.
Schließen Sie den Monitor über das blaue VGA-Kabel an.
Podtqcz monitor za pomocq niebieskiego kabla VGA
Conecte o monitor usando o cabo VGA azul
zkCuidado:
Antes de configurar e operar seu monitor
Dell™ consute as Instrucòes de seguran^a
enviadas com o aparelho.
VGA
Branchez le cordon d'alimentation.
Conecte el cable de alimentación.
Подключите кабель питания.
Schließen Sie die Netzkabel an.
Podtqcz kabel zasilajqcy
Conecte o cabo de alimentaçao
Ajustez le moniteur.
Ajuste el monitor.
Настроить монитор
Stellen Sie den Monitor ein.
Regolare ol monitor.
Wyregulowac monitor
Appuyez sur le bouton marche/arrét.
Presione el botón de encendido.
Нажмите кнопку питания.
Drücken Sie die Ein-/Austaste.
Nacisnij przycisk wtqcznika zasilania
Pressione o botao de alimentaqSo
Page 2
About Your Monitori A propos de votre moniteur | Acerca de su monitor | Сведения о мониторе | info zum Monitor | Informacje о monitorze | Sobre seu monitor
5
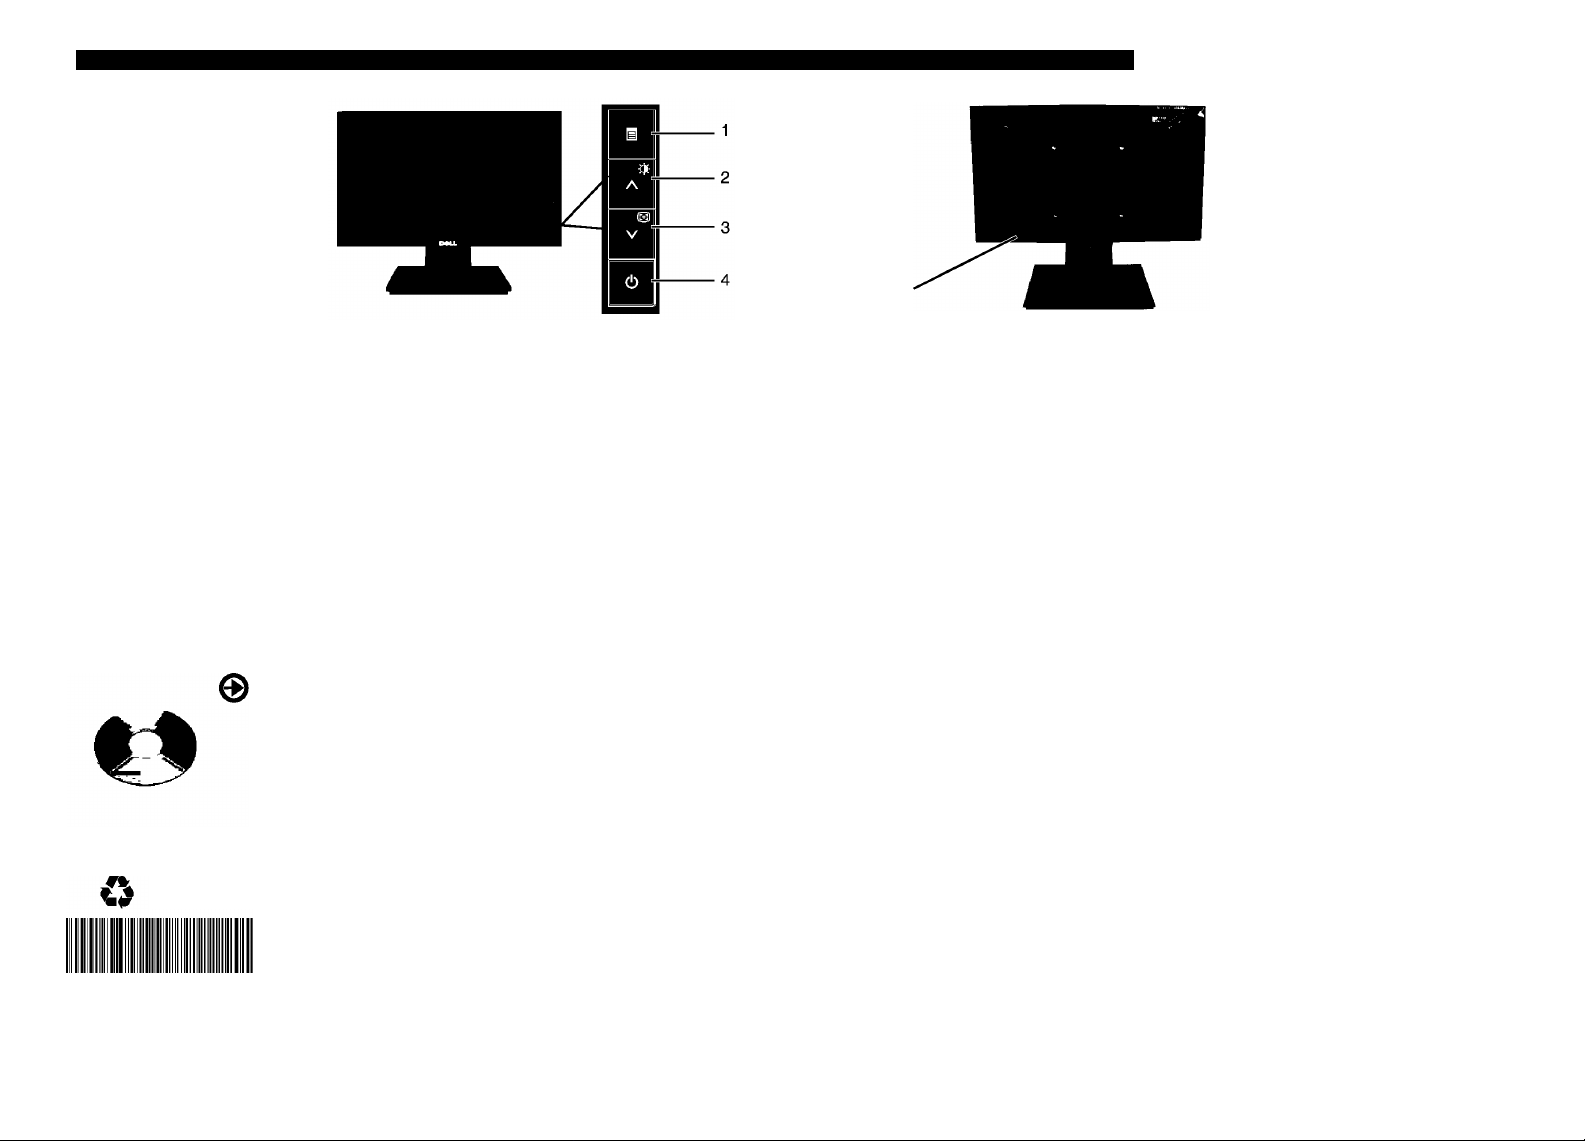
1. OSD menu button
2. Up button /Brightness and Contrast
3. Down button /Auto adjust
4. Power On/Off button (with LED indicator)
5. Security lock slot
1. OSD-Menü.
2. Aufwärtstaste/Helligkeit und Kontrast
3. Abwärtstaste/Auto-Einstellung
4. Ein-/Austaste (mit LED-Anzeige)
5. Schlitz für Sicherheitssperre
Finding Information
For more information see the
User's Guideon theDn'vers and
Documentation media.
Printed in the China
Information in this document Is subject to change without notice.
«2008 Dell Inc All rights reserved.
Q41G7800700B32
(Dell Part No.P642D)
Rechercher des informations
Pour plus d'informations, reportez-
vous au Guide de ¡'utilisateur sur le
CD Pilotes et Documentation.
tsoever without the written permissi
1. Menu OSD
2. Bouton vers le haut/Luminosité et contraste
3. Bouton vers le bas/Réglage automatique
4. Bouton marche/arrêt (avec voyant DEL)
5. Fente de verrouillage sécurité
1. Menu ekranowe OSD
2. Przycisk Do góry/Jasnosc i Kontrast
3. Przycisk W dót/Samoregulacja
4. Przycisk wt./wyt. zasilania (ze wskaznikiem diodowym)
5. Gniazdo blokady bezpieczenstwa
Búsqueda de información
Para más información, consulte el
manual del usuario en los medios
de controladores y documentación.
«2008 Dell Inc. Tous droits réservés.
Dell and the logo DELL sont des marques déposées de Dell li
Dell dénie tout Intérêt propriétaire dans les marques et les n
commerciaux autres que les siens.
«2008 Dell Inc Todos los derechos reservados.
Dellyel logotlpodeDELLsonmarcasreglstradasdeDell inc ~
Dell descarga todo su interés de propiedad sobre las marcas y pen ^
nombres de otras empresas. auaKaMk
1. Menú OSD.
2. Botón arriba / Brillo y Contraste
3. Botón abajo / Ajuste automático
4. Botón de encendido / apagado (con indicador LED)
5. Ranura de bloqueo de seguridad
1. Menu OSD
2. Botâo Acima/Brilho e contraste
3. Botâo Abaixo/Ajuste automático
4. Botâo Alimentaçâo ligada/desligada (com indicador LED)
5. Entrada de bloqueio de segurança
Получение информации
Дополнительную информацию
см. в руководстве пользователя
на диске с драйверами и
документацией.
«2008 Dell Inc. Все
•ОТИП DELL Я
Dell Inc. Dell
Weitere Informationen
Weitere Informationen finden
Sie in dem Benutzerhandbuch
auf dem Treiber- und
Dokumentationsmedium.
Dell Inc
«2008 Dell Ine Alle Rechte Vorbehalten.
Die Reproduktion In Irgendeiner Welse ohne
schriftliche Genehmigung von Dell Ine Ist
streng verboten.
Dell urtd das DELL-Logoslnd Marken der Dell inc
Dell erhebt keinerlei Eigentumsansprücheauf
andere als Ihre eigenen Marken und Namen.
1. Экранное меню
2. Кнопка «вверх», яркость и контрастность.
3. Кнопка «вниз», автоматическая настройка.
4. Кнопка включения и выключения питания
(со светодиодным индикатором).
5. Разъем защитного замка
Wyszukiwanie informacji
Dodatkowe informacje, patrz
Przewodnik uzytkownika na
noániku ze sterownikami i
dokumentacjq.
«2008Dell IncWszelkleprawazastrzetene.
Dell I logo DELLsqznakami handlowymi Dell ln
Del I zizeka siq interesdw wlasnoiciowych do
marek I nazw innych wlafcicieli.
c 2008
Encontrar informaíóes
Para obter mais infòrmagóes
consulte o guia de usuàrio nas
unidades e midia de
documentagào.
«2006 Dell Irte Todos OS direltos reservados.
A reproduçio de qualquer forma sem a
permissâo escrita da Dell Incéestritamente
D^LL
www.dell.com | support.dell.com
 Loading...