

Dell PowerEdge 840, PowerEdge 850, PowerEdge 860, PowerEdge R200, DRAC 4/P Install Manual

About Cautions
CAUTION: A CAUTION indicates a potential for property damage, personal injury, or death.
Installing the DRAC 4/P
NOTICE: Read these installation instructions before installing your DRAC 4/P expansion card.
CAUTION: Many repairs may only be done by a certified service technician. You should only perform
troubleshooting and simple repairs as authorized in your product documentation, or as directed by the
online or telephone service and support team. Damage due to servicing that is not authorized by Dell is
not covered by your warranty. Read and follow the safety instructions that came with the product.
This document provides special instructions for installing the Dell™ Remote Access Controller 4/P
(DRAC 4/P) card into a Dell PowerEdge™ system.
CAUTION: To help prevent damage to the DRAC 4/P card, ensure that the system is unplugged from its
AC power source before installing the card.
Shutdown the system and unplug it from its AC power source.
1
Your system’s
perform before opening the cover of your system, including turning off the system and
disconnecting it from its AC power source. However, the DRAC 4/P card can be damaged if it
is installed in the system that is turned off, but still attached to its AC power supply. Ensure
that the system is unplugged from its AC power supply before installing the DRAC 4/P card.
2
Open the system. See "Opening the System" in the
instructions.
3
Determine which expansion slot is most appropriate for the DRAC 4/P card.
Ideally, the DRAC 4/P card should be installed in the PCI expansion slot nearest the RAC
connector on the system board. See "System Board Connectors" in "Jumpers, Switches, and
Connectors" in the
board’s connectors.
Product Information Guide
Installation and Troubleshooting Guide
provides a sequence of safety steps that you should
Installation and Troubleshooting Guide
for an illustration of your system
for
www.dell.com | support.dell.com
4
Connect the DRAC 4/P card interface cable from the card to the system’s RAC connector on
the system board. See Figure 1.
NOTE: The interface cable and connectors are keyed and can be connected only one way.
Install the DRAC 4/P card into expansion slot:
5
a
Position the DRAC 4/P card so that the card-edge connector aligns with the system-board
card connector on the system board. See Figure 1.
September 2004
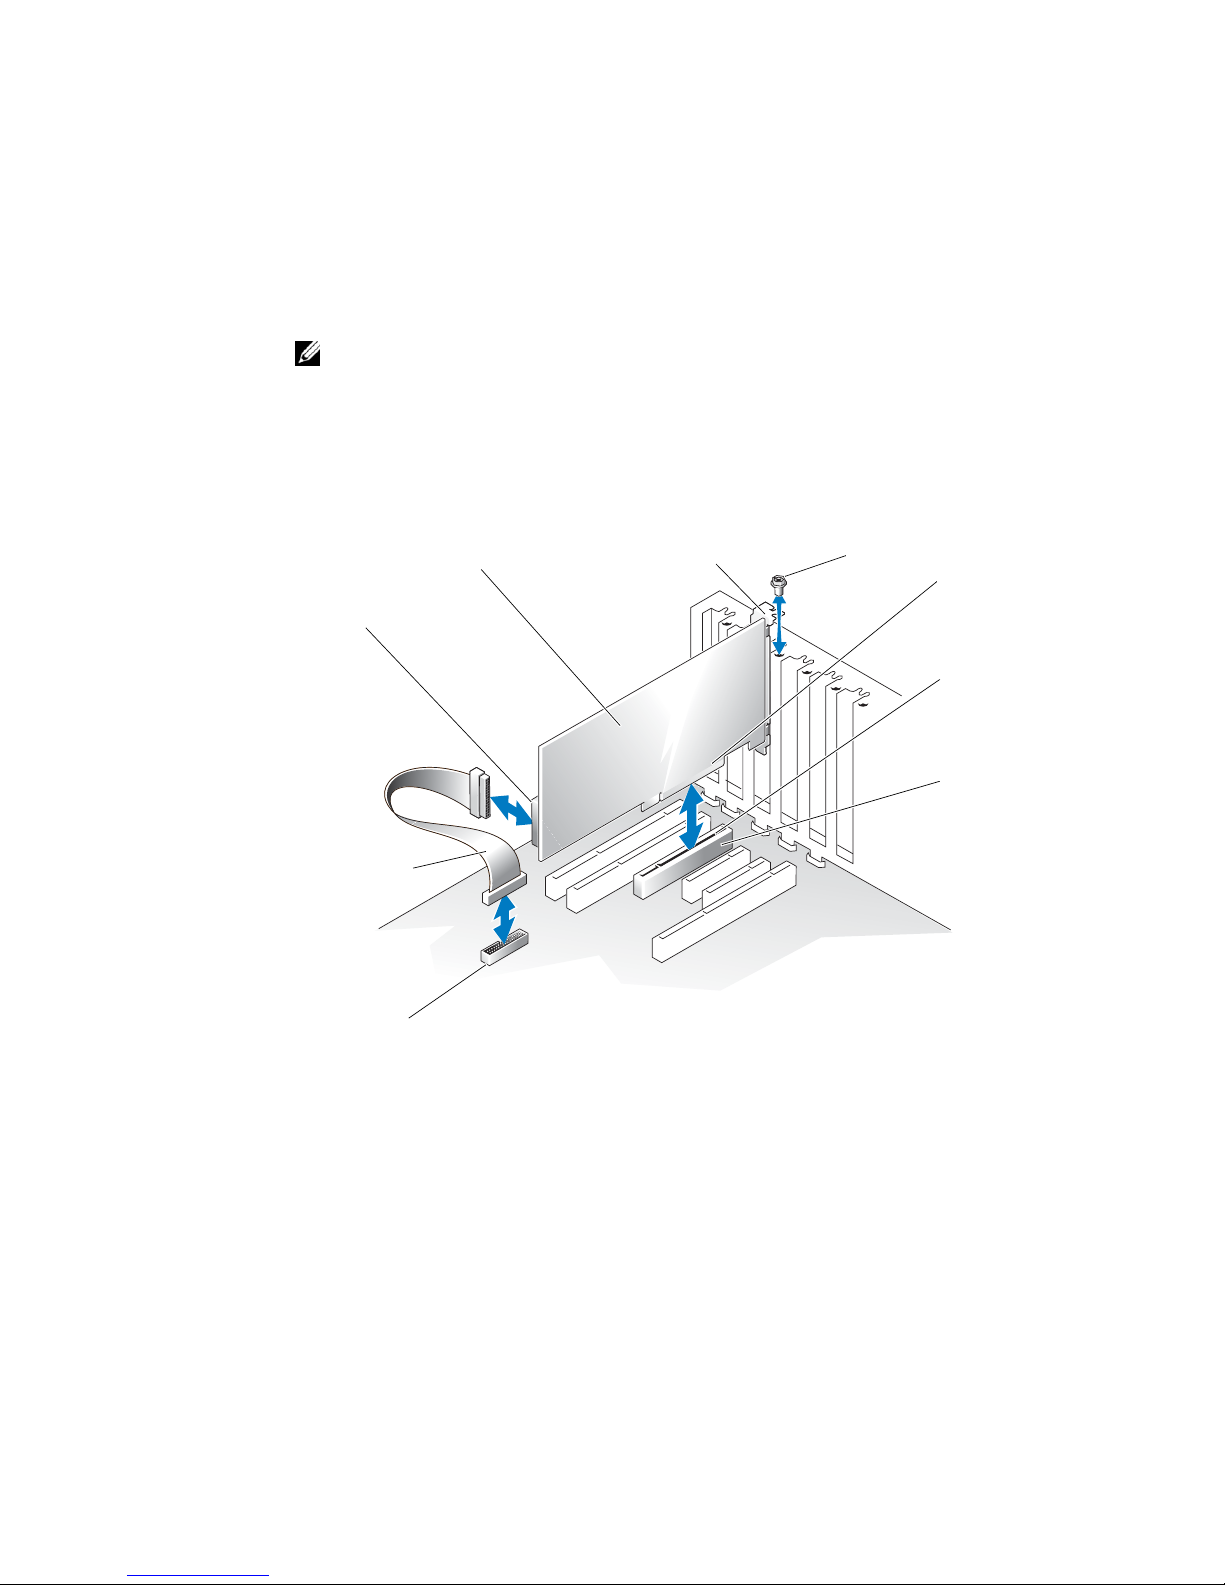
b
Insert the card-edge connector firmly into the system-board card connector until the card
is fully seated.
NOTE: Some systems use a plastic bar to secure the expansion-card bracket to the back panel
instead of a screw.
Install the screw that secures the expansion-card bracket to the back panel.
c
6
Close the system. See "Closing the System" in the
Installation and Troubleshooting Guide
instructions.
Figure 1. Installing the DRAC 4/P Card
for
www.dell.com | support.dell.com
card-interface
connector
interface cable
RAC connector
7
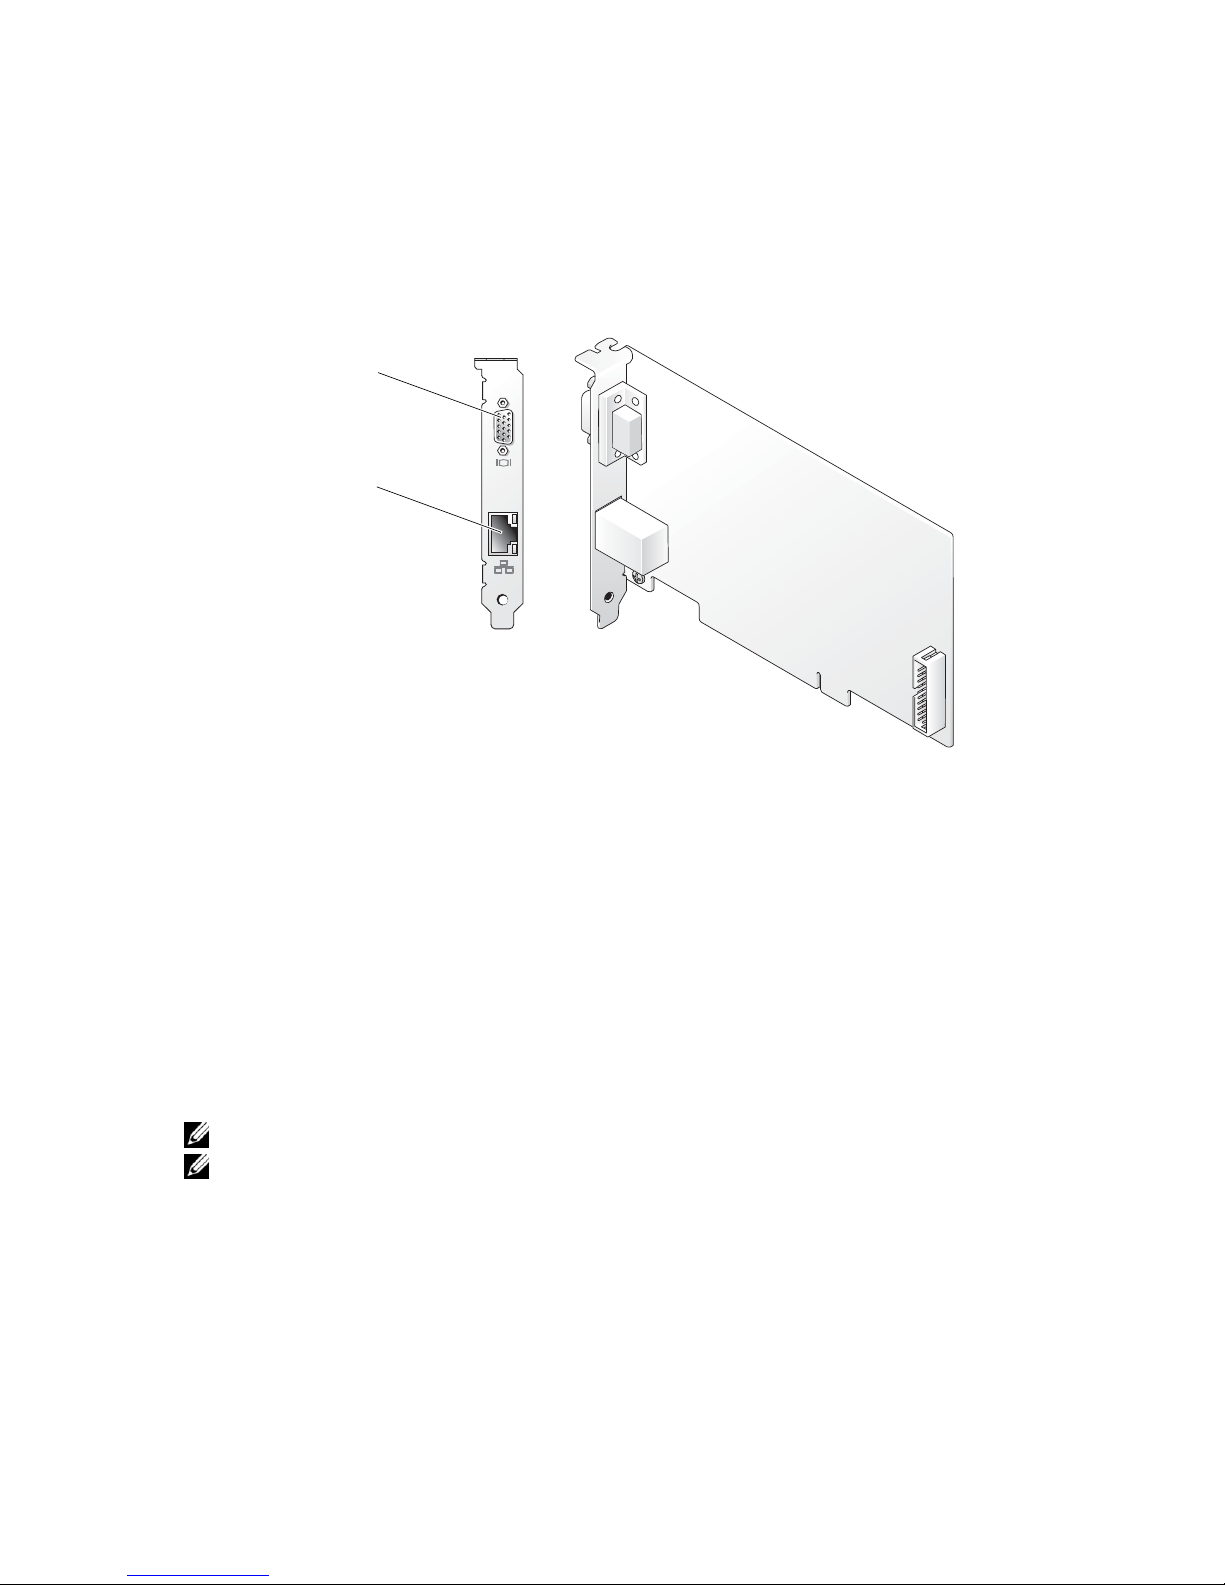
Connect the monitor cable to the card video connector on the DRAC 4/P card. See Figure 2.
The monitor cable must be connected to the card video connector on the DRAC 4/P card—
not to the system’s integrated video connector.
DRAC 4/P card
expansion-card bracket
The connectors on your system board and the actual
expansion slot that you use may vary on your system board.
screw
card-edge
connector
systemboard card
connector
expansion
slot
8
Connect the network to the card NIC connector on the DRAC 4/P card. See Figure 2.
The network cable must be connected to the card NIC connector on the DRAC 4/P card—
not to the system’s integrated NIC connector.
9
Reattach the system to its AC power source and turn on the system.
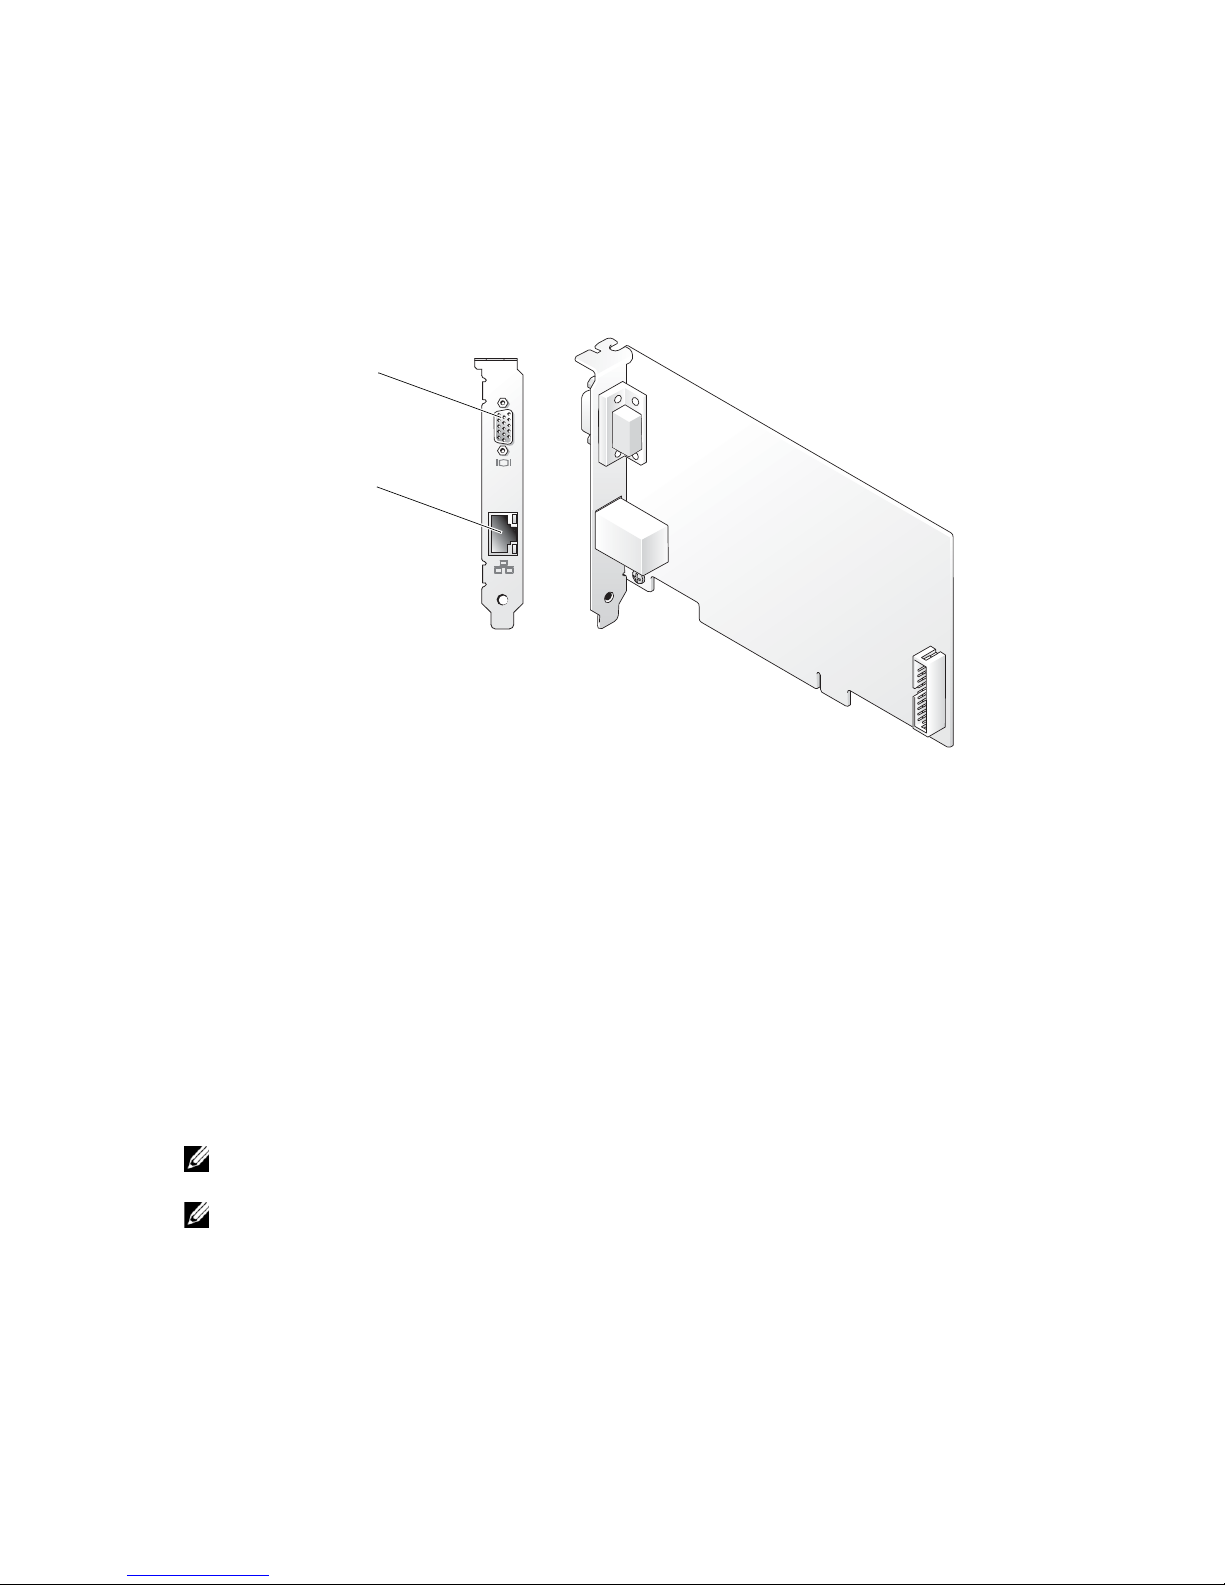
Figure 2. DRAC 4/P Video and NIC Connector Locations
card video connector
card NIC connector
10
Configure the DRAC 4/P card:
a
During boot, the DRAC 4/P <Ctrl><d> setup program option appears. Press
<Ctrl><d> and enter the DRAC 4/P setup program.
b
Configure the DRAC 4/P as explained in the
c
Exit the DRAC 4/P setup program. The system then continues its boot.
If you are running a Microsoft
®
Windows® operating system, the operating system detects
Dell Remote Access Controller 4 User’s Guide.
several new DRAC 4/P-related devices as it starts. The drivers for those devices are located in
one of the following paths under the
Server Assistant
CD:
Systems Management
group on the
Dell OpenManage
www.dell.com | support.dell.com
Dell: Remote Access Controller - DRAC 4/P (Driver) Windows 2003 DRAC4 Drivers
(Self Extracting Zip)
or
Dell: Remote Access Controller - DRAC 4/P (Driver) Windows 2000 DRAC4 Drivers
(Self Extracting Zip)
NOTE: The screen may blink several times as Windows starts and the Hardware Wizard discovers
the new DRAC 4/P display adapter.
NOTE: Novell
®
NetWare® and Red Hat® Linux operating systems use native drivers.

www.dell.com | support.dell.com
____________________
Information in this document is subject to change without notice.
© 2004 Dell Inc. All rights reserved. Printed in the U.S.A.
Reproduction in any manner whatsoever without the written permission of Dell Inc. is strictly forbidden.
Trademarks used in this text: Dell, the DELL logo, and PowerEdge are trademarks of Dell Inc.;
Microsoft and Windows are registered trademarks of Microsoft Corporation.
Other trademarks and trade names may be used in this document to refer to either the entities claiming the marks
and names or their products. Dell Inc. disclaims any proprietary interest in trademarks and trade names other than its own.

关于警告
警告: 警告表示存在可能导致财产损失、人身伤害或死亡的潜在危险。
www.dell.com | support.dell.com
安装
本说明文件提供了在
的特殊说明。
1
2
3
4
5
注: 某些系统使用塑料杆将扩充卡支架固定至背面板,而不是使用螺钉。
6
DRAC 4/P
注意: 在安装
警告:
排除和简单修理,或者根据联机或电话服务和支持小组的指导执行操作。如果是由于非
权维修而导致的损坏,则不能享受保修。请阅读并遵循随产品附带的安全说明。
警告: 为防止
关掉系统,然后断开系统的交流电源。
系统的 《产品信息指南》中提供了一系列安全步骤,在您打开机箱之前应该先执行这些
步骤,包括关掉系统和断开交流电源连接。但是,如果将
仍然与交流电源连接的系统中,会损坏卡。请确保在安装
交流电源。
打开系统外壳。有关说明,请参阅《安装与故障排除指南》中的“打开系统外壳”。
确定哪个扩充槽最适合安装
从理想上来说,
有关主板连接器的图示,请参阅 《安装与故障排除指南》的 “跳线、开关和连接器”
中的 “主板连接器”。
将
DRAC 4/P
注: 接口电缆和连接器采用锁定式设计,仅可以从一个方向连接。
将
DRAC 4/P
a
确定
请参阅图
b
将卡边缘的连接器稳固地插入主板的卡连接器,直至插卡完全就位。
c
安装将扩充卡支架固定至背面板的螺钉。
合上系统外壳。有关说明,请参阅《安装与故障排除指南》中的“合上系统外壳”。
DRAC 4/P
许多修理只能由合格的维修技术人员进行。您只能根据产品说明文件中的授权执行故障
Dell PowerEdge™
DRAC 4/P
卡的接口电缆从卡连接到主板上的
卡安装到扩充槽中:
DRAC 4/P
。
1
扩充卡之前,请先阅读以下安装说明。
系统上安装
卡损坏,应确保在安装卡之前断开系统的交流电源。
DRAC 4/P
DRAC 4/P
卡的位置,使卡边缘的连接器与主板上的主板卡连接器对准。
卡应该安装在主板上离
卡。
远程访问控制器
Dell™
RAC
RAC
4/P (DRAC 4/P)
DRAC 4/P
DRAC 4/P
连接器最近的
连接器。请参阅图 1。
卡安装在已关机但
卡之前断开系统的
PCI
扩充槽中。
Dell
授
卡
2004 年 9 月

图
安装
1.
DRAC 4/P
卡
卡接口连接器
www.dell.com | support.dell.com
接口电缆
RAC 连接器
7
将显示器电缆连接至
显示器电缆必须连接至
连接器。
DRAC 4/P 卡
扩充卡支架
您的主板上的连接器和您实际使用的扩充槽可能有所不同,
视您的主板而定。
DRAC 4/P
DRAC 4/P
卡上的卡视频连接器。请参阅图 2。
卡上的卡视频连接器,而不要连接至系统的集成视频
螺钉
卡边缘连接器
主板卡连接器
扩充槽
8
将网络连接至
DRAC 4/P
网络电缆必须连接至
接器。
9
重新接通系统的交流电源,然后开机。
卡上的卡
DRAC 4/P
连接器。请参阅图 2。
NIC
卡上的卡
连接器,而不要连接至系统的集成
NIC
NIC
连
图
2. DRAC 4/P
10
配置
a
b
c
如果您运行的是
DRAC 4/P
上
视频和
卡视频连接器
卡 NIC 连接器
DRAC 4/P
NIC
卡:
连接器位置
在引导期间,屏幕将显示
组合键,进入
根据 《
退出
DRAC 4/P
DRAC 4/P
远程访问控制器
Dell
设置程序。系统然后继续执行引导过程。
Microsoft
®
有关的新设备。这些设备的驱动程序位于
Systems Management
组下面的下列其中一个路径中:
DRAC 4/P <Ctrl><d>
设置程序。
用户指南》中的说明配置
4
Windo ws®
操作系统,操作系统在启动时将会检测到几个与
设置程序选项。按
DRAC 4/P
Dell OpenManage Server Assistant
Dell:Remote Access Controller - DRAC 4/P (Driver) Windows 2003 DRAC4 Drivers
(自解压文件)或
www.dell.com | support.dell.com
<Ctrl><d>
。
CD
Dell:Remote Access Controller - DRAC 4/P (Driver) Windows 2000 DRAC4 Drivers
(自解压文件)
注: 当 Windows 启动和硬件向导找到新的 DRAC 4/P 显示适配器时,屏幕可能会闪烁多次。
注:
Novell® NetWare® 和 Red Hat® Linux 操作系统使用自带的驱动程序。

www.dell.com | support.dell.com
____________________
本文中的信息如有更改,恕不另行通知。
© 2004 Dell Inc.
未经
Dell Inc.
本文中使用的商标:
Corporation
本文中述及的其他商标和产品名称是指拥有相应商标和名称的公司或其制造的产品。
Dell Inc.
版权所有,翻印必究。美国印制。
书面许可,不得以任何方式进行复制。
Dell、DELL
的注册商标。
对本公司的商标和产品名称之外的其他商标和产品名称不拥有任何专有权。
徽标和
PowerEdge 是 Dell Inc.
的商标;
Microsoft 和 Windows 是 Microsoft

À propos de la mention “Précaution”
PRÉCAUTION : une PRÉCAUTION indique un risque potentiel d'endommagement du matériel,
de blessure corporelle ou de mort.
Installation d'une carte DRAC 4/P
AVIS : avant de procéder à l'installation d'une carte d'extension DRAC 4/P, prenez connaissance
des instructions d'installation.
PRÉCAUTION : la plupart des réparations doivent être effectuées uniquement par un technicien
de maintenance certifié. Procédez uniquement aux dépannages et réparations indiqués dans la
documentation du produit ou recommandés par les services de support en ligne ou par téléphone.
Les dommages causés par des interventions de maintenance non autorisées par Dell ne sont pas
couverts par votre garantie. Lisez et respectez les consignes de sécurité fournies avec le produit.
Ce document fournit des instructions particulières concernant l'installation d'un contrôleur d'accès
distant DRAC 4/P (Dell™ Remote Access Controller 4/P) sur un système Dell PowerEdge™.
PRÉCAUTION : pour éviter d'endommager la carte DRAC 4/P, assurez-vous que le système est
débranché avant l'installation.
Mettez le système hors tension et débranchez-le de la prise électrique.
1
Le
Guide d'information sur le produit
doivent être suivies avant l'ouverture du capot (mise hors tension, déconnexion de la prise
électrique, etc. Si le système dans lequel vous installez la carte DRAC 4/P est hors tension,
mais branché sur le secteur, un risque d'endommagement de la carte subsiste. Vérifiez que
le système est bien débranché avant d'installer la carte.
2
Ouvrez le système. Voir la section “Ouverture du système” dans le
de dépannage
3
Déterminez le logement d'extension le plus approprié à l'installation de la carte DRAC 4/P.
Il est recommandé d'installer la carte dans le logement d'extension PCI le plus proche du
connecteur RAC de la carte système. Une illustration montrant les connecteurs de la carte
système se trouve à la section “Connecteurs de la carte système”, dans le
et de dépannage
4
Connectez le câble d'interface de la carte DRAC 4/P au connecteur RAC de la carte système.
Voir la f ig ure 1.
.
(chapitre “Cavaliers, commutateurs et connecteurs”).
du système contient les consignes de sécurité qui
Guide d'installation et
Guide d'installation
www.dell.com | support.dell.com
REMARQUE : le câble d'interface et les connecteurs sont munis d'un détrompeur pour être
connectés correctement.
Septembre 2004
 Loading...