

Page 1

™
Setting up Dell
vRanger™ on the
Dell DR Series System
Dell Engineering
April 2015
A Dell Technical White Paper
Page 2

Date
Description
April 2015
Initial release
Revisions
THIS WHITE PAPER IS FOR INFORMATIONAL PURPOSES ONLY, AND MAY CONTAIN TYPOGRAPHICAL ERRORS AND
TECHNICAL INACCURACIES. THE CONTENT IS PROVIDED AS IS, WITHOUT EXPRESS OR IMPLIED WARRANTIES OF
ANY KIND.
© 2015 Dell Inc. All rights reserved. Reproduction of this material in any manner whatsoever without the express
written permission of Dell Inc. is strictly forbidden. For more information, contact Dell.
PRODUCT WARRANTIES APPLICABLE TO THE DELL PRODUCTS DESCRIBED IN THIS DOCUMENT MAY BE FOUND
AT: http://www.dell.com/learn/us/en/19/terms-of-sale-commercial-and-public-sector
reference architectures discussed in this document may vary with differing deployment conditions, network loads, and
the like. Third party products may be included in reference architectures for the convenience of the reader. Inclusion
of such third party products does not necessarily constitute Dell’s recommendation of those products. Please consult
your Dell representative for additional information.
Trademarks used in this text:
Dell™, the Dell logo, and Dell vRanger™ are trademarks of Dell Inc. Other Dell trademarks may be used in this
document. Microsoft
®
Directory
are either trademarks or registered trademarks of Microsoft Corporation in the United States and/or other
countries. VMware
®
, Windows®, Windows Server®, Internet Explorer®, MS-DOS®, Windows Vista® and Active
®
, Virtual SMP®, vMotion®, vCenter™, vSphere®, ESX®, and ESXi™ are registered trademarks or
trademarks of VMware, Inc. in the United States or other countries.
Other trademarks and trade names may be used in this document to refer to either the entities claiming the marks
and/or names or their products and are the property of their respective owners. Dell disclaims proprietary interest in
the marks and names of others.
Performance of network
2 Setting up Dell™ vRanger™ on the
Dell DR Series System | April 2015
Page 3

Table of contents
Revisions ...................................................................................................................................................................................................... 2
Executive summary ................................................................................................................................................................................... 4
1 Installing and configuring the DR Series system ....................................................................................................................... 5
2 Configuring an NFS share for backup using vRanger ............................................................................................................ 14
3 Configuring an RDA container for backup ................................................................................................................................ 15
3.1 Create an RDS container .................................................................................................................................................... 15
3.2 Configure the Dell RDA device in vRanger .....................................................................................................................17
4 Setting up vRanger .......................................................................................................................................................................... 19
5 Viewing a history of optimized copies in the DR Series system GUI ................................................................................. 27
6 Configuring replication at the source ........................................................................................................................................ 28
6.1 Create an RDS container in the Dell DR Series system for the replication target ............................................... 28
6.2 Configure replication at the target container in vRanger .......................................................................................... 29
7 Setting up the DR Series system cleaner ................................................................................................................................... 30
8 Monitoring deduplication, compression, and performance ................................................................................................ 31
3 Setting up Dell™ vRanger™ on the
Dell DR Series System | April 2015
Page 4

Executive summary
This whitepaper provides information about how to set up the Dell DR Series system as a
backup to disk target for Dell vRanger backup software. This paper is a quick reference
guide and does not include all DR Series system deployment best practices.
For additional information, see the DR Series system documentation and other data
management application best practices whitepapers for your specific DR Series system at:
http://www.dell.com/powervaultmanuals
NOTE: The DR Series system and the vRanger build version and screen shots used for this
whitepaper may vary slightly, depending on the version of the DR Series system or
vRanger software version you are using.
4 Setting up Dell™ vRanger™ on the
Dell DR Series System | April 2015
Page 5

1 Installing and configuring the DR Series system
1. Rack and cable the DR Series system appliance, and power it on.
2. Log onto iDRAC using the default address, 192.168.0.1, with the username: root
and password: Calvin.
3. Launch the virtual console.
5 Setting up Dell™ vRanger™ on the
Dell DR Series System | April 2015
Page 6

4. When the virtual console opens, log on to the system as:
user: administrator, password: St0r@ge!
NOTE: The “0” in the password is the numeral zero.
5. Set the user-defined networking preferences as needed.
6. View the summary of preferences and confirm that the settings are correct.
6 Setting up Dell™ vRanger™ on the
Dell DR Series System | April 2015
Page 7

7. Log on to the DR Series system administrator console, using the IP address you
just provided for the DR Series system as:
user: administrator, password St0r@ge!
8. Join the DR Series system to Active Directory as described below.
NOTE: If you do not want to add the DR Series system to Active Directory, see the
Dell DR SeriesOwner’s Manual
for guest logon instructions.
a. Click System Configuration > Active Directory in the left navigation area of
the DR Series system GUI.
7 Setting up Dell™ vRanger™ on the
Dell DR Series System | April 2015
Page 8

b. Enter your Active Directory credentials and click Join Domain.
9. Select Containers on the left navigation area, and then click the Create link at the
top of the page.
8 Setting up Dell™ vRanger™ on the
Dell DR Series System | April 2015
Page 9

10. Enter a Container Name and click Next.
11. For the Storage Access Protocol, select NAS (NFS, CIFS) and click Next.
12. Select NFS and CIFS as appropriate. (vRanger supports both CIFS and NFS
protocols.)
9 Setting up Dell™ vRanger™ on the
Dell DR Series System | April 2015
Page 10

13. For NFS, set the client access credentials and click Next.
14. For CIFS, set the client access credentials and click Next.
10 Setting up Dell™ vRanger™ on the
Dell DR Series System | April 2015
Page 11
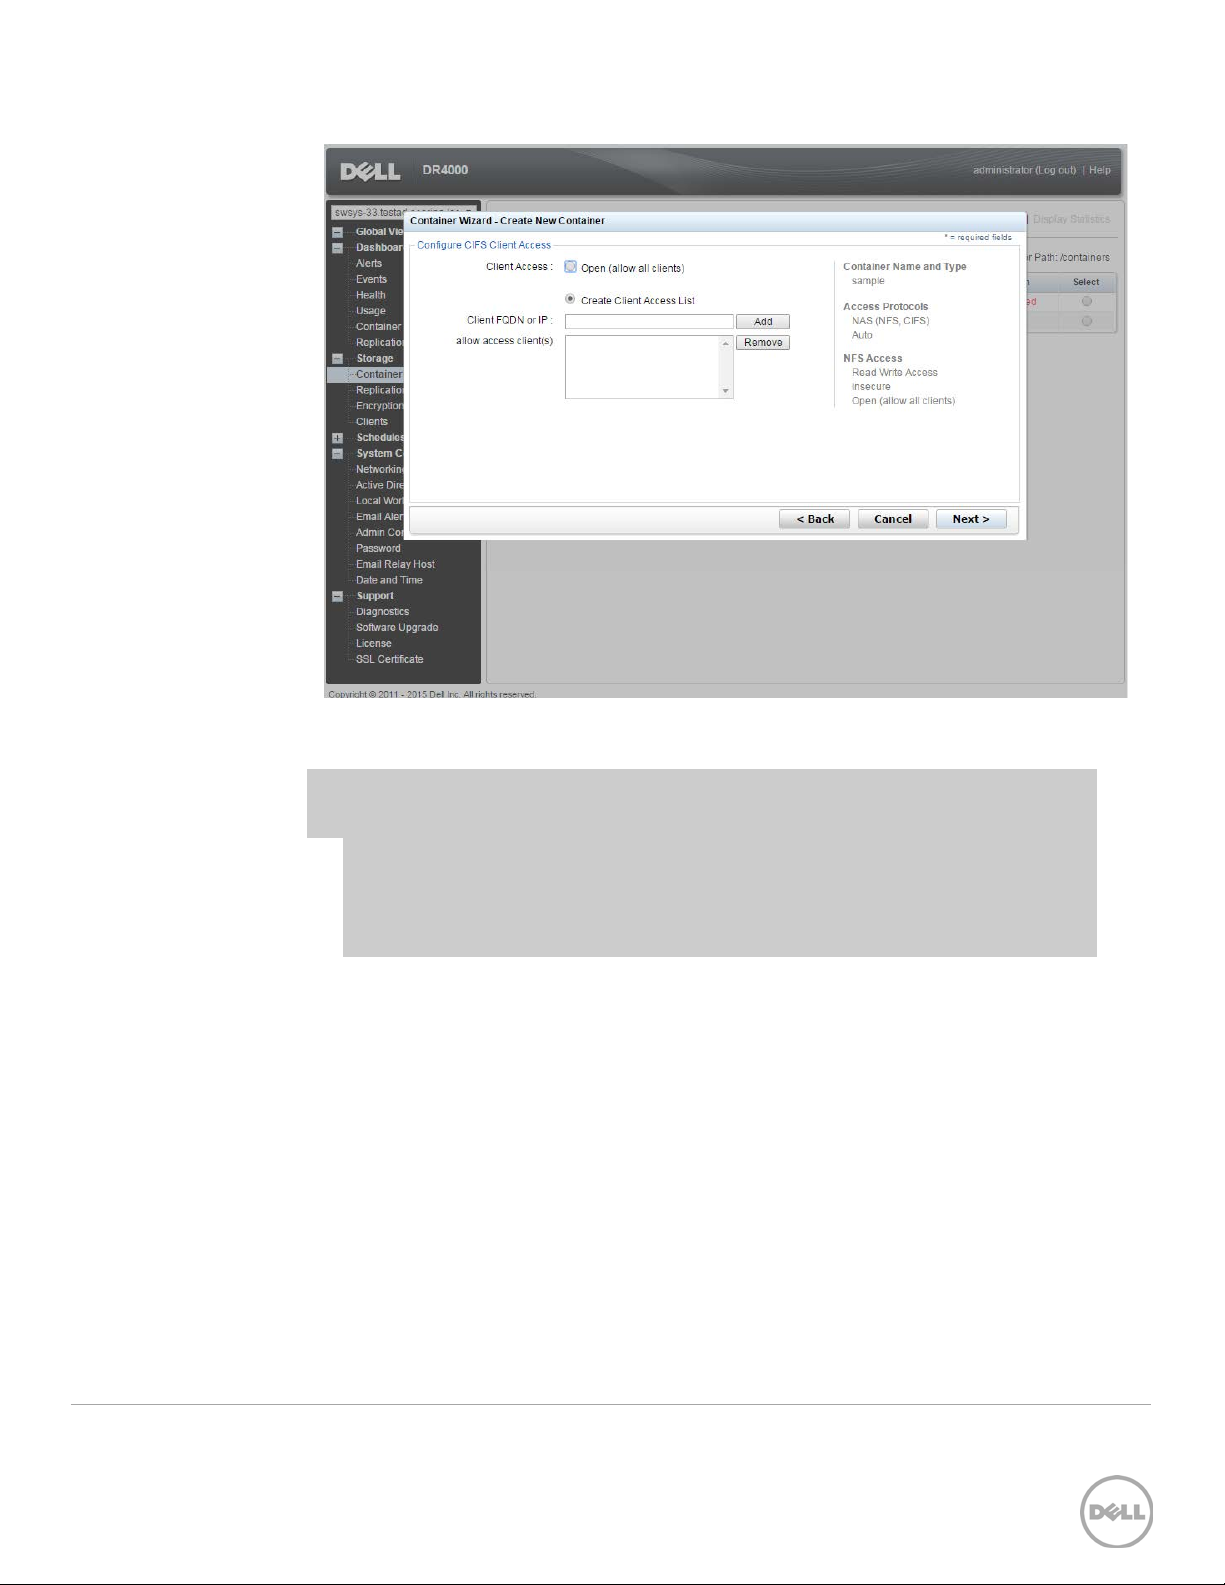
NOTE: For improved security, Dell recommends adding IP addresses for the
following components (Not all environments will have all components):
• Backup console (vRanger Server)
• ESXi hosts (as vRanger backs up these VMs)
• Backup proxies (for vSphere environments)
11 Setting up Dell™ vRanger™ on the
Dell DR Series System | April 2015
Page 12
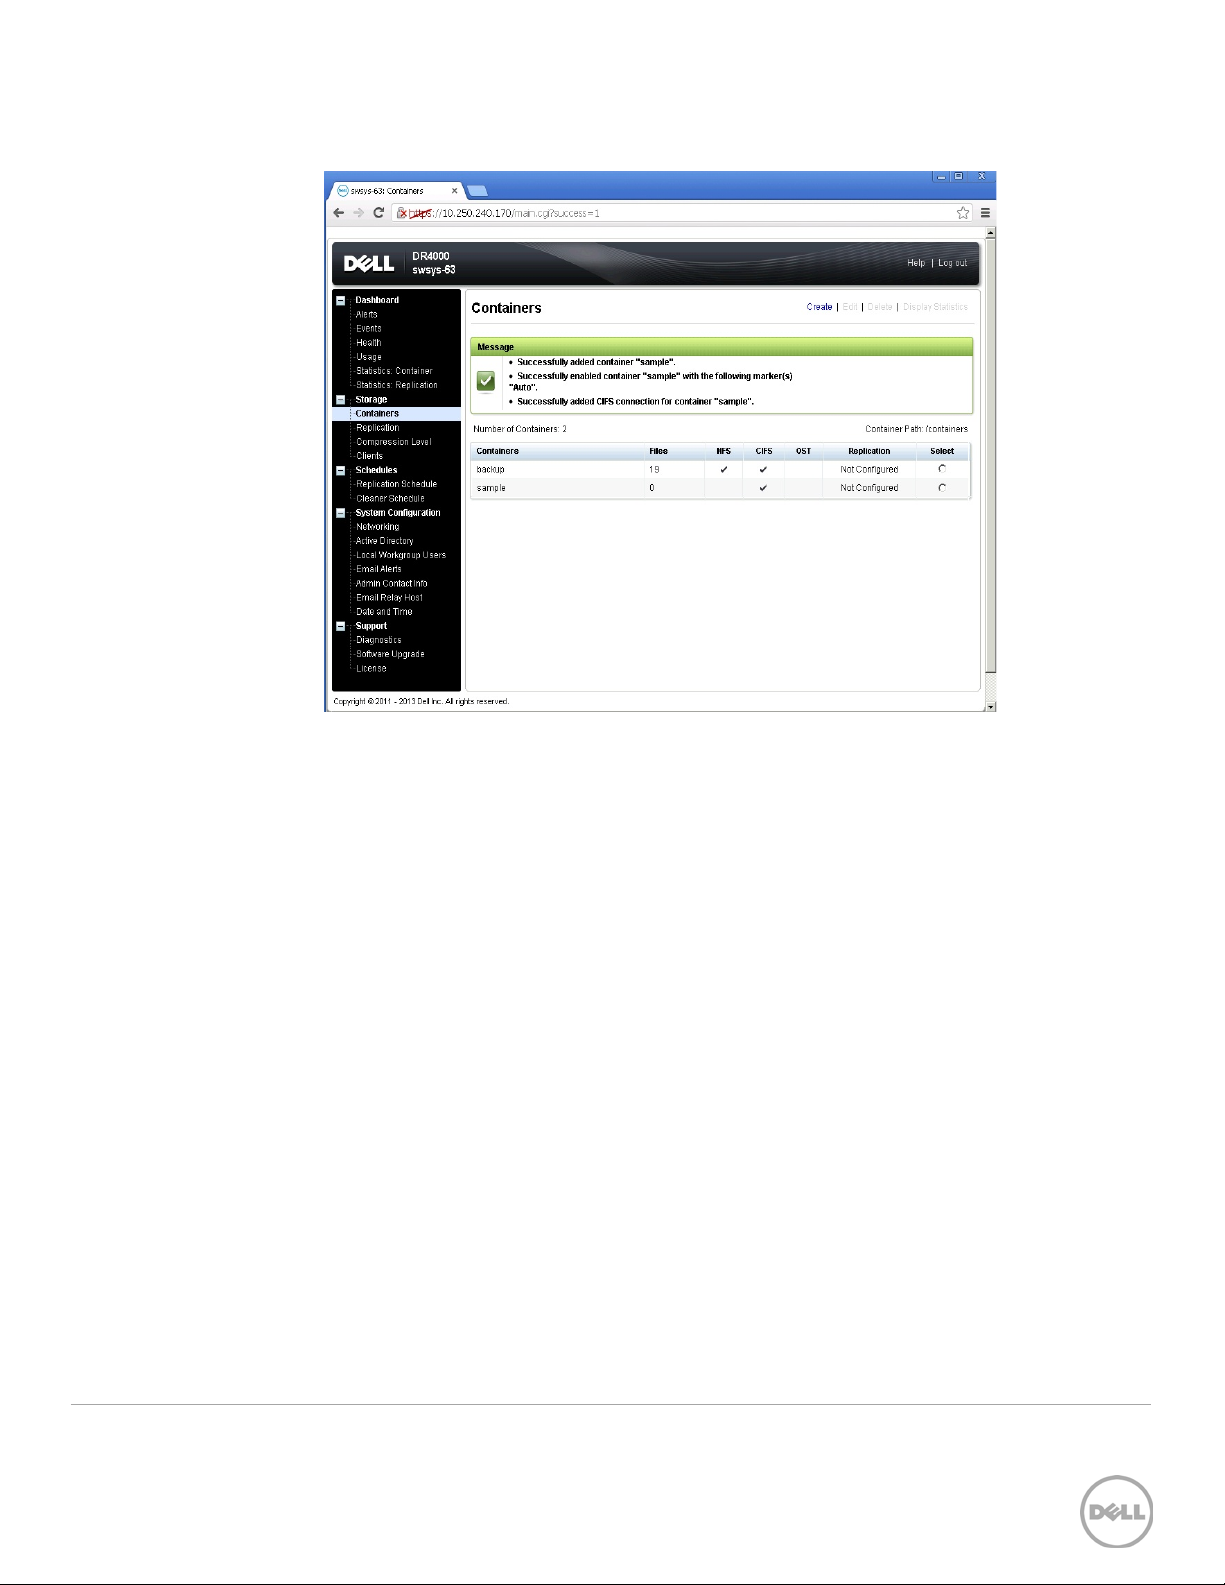
15. Click Create a New Container, and then confirm that the container was added.
12 Setting up Dell™ vRanger™ on the
Dell DR Series System | April 2015
Page 13
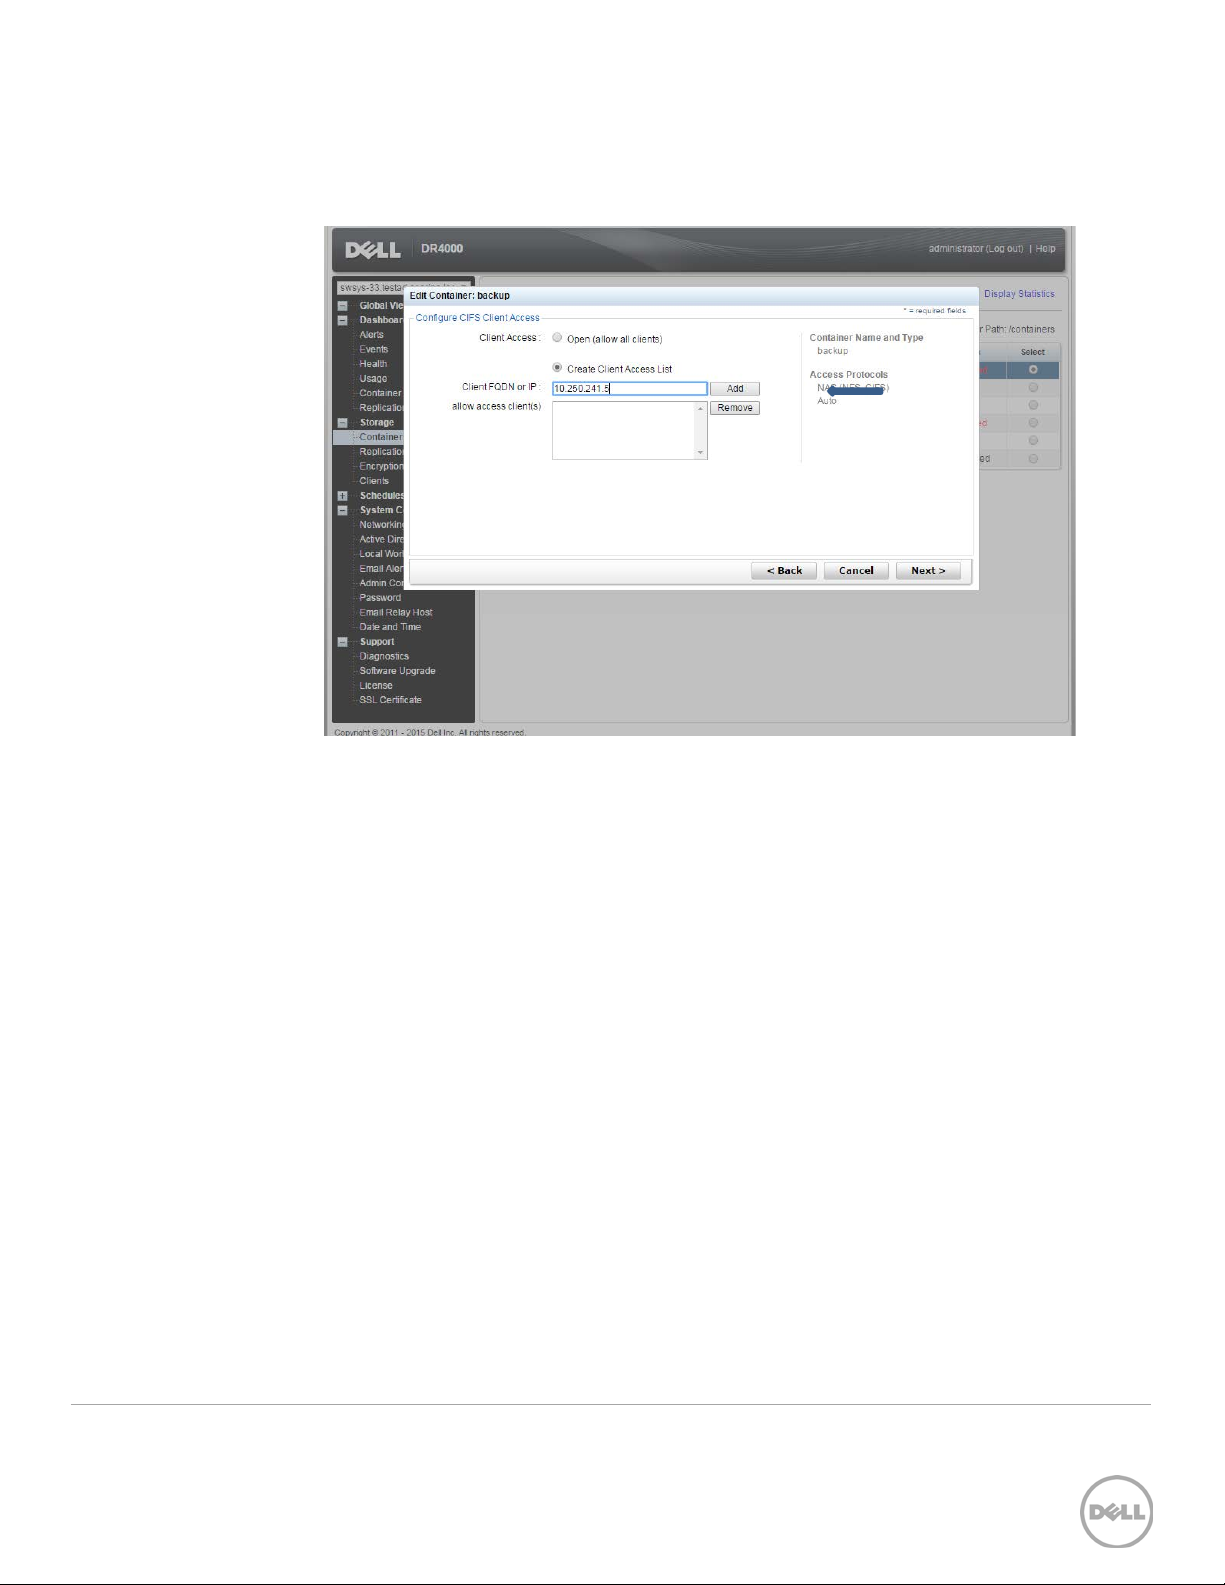
16. Select the container and then click Edit. Reconfigure client access permissions, if
required, and click Next. Make a note of the container path, which you will use
later to target the DR Series system.
17. Click Modify this container to save any changes you made, or click Cancel to exit.
13 Setting up Dell™ vRanger™ on the
Dell DR Series System | April 2015
Page 14
2 Configuring an NFS share for backup using
vRanger
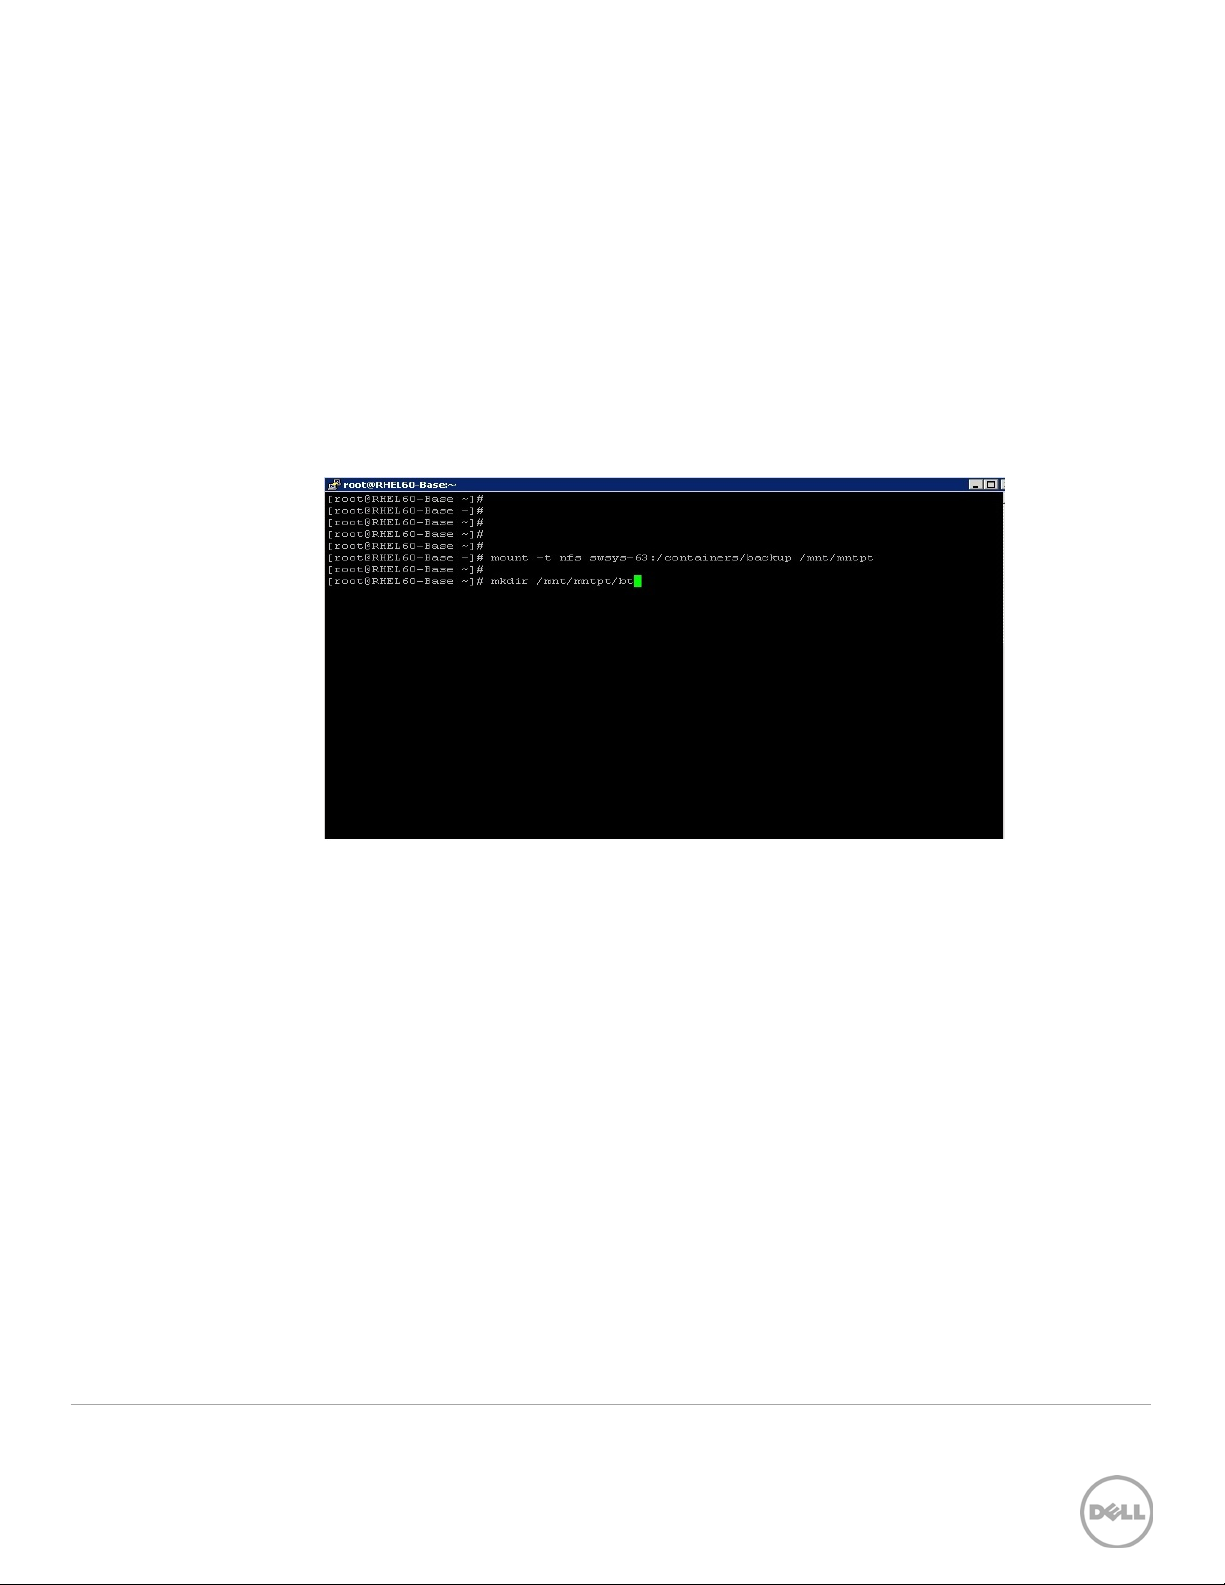
For NFS backup using vRanger, you need to create a target folder under the NFS share
directory. This folder is a subdirectory of the NFS Export directory and is the location to
which save points will be written. (This configuration is not required when adding a CIFS
share.)
1. Mount the NFS share onto any of the NFS clients available in the environment.
2. Create a directory by using the mkdir command inside the mounted directory.
14 Setting up Dell™ vRanger™ on the
Dell DR Series System | April 2015
Page 15
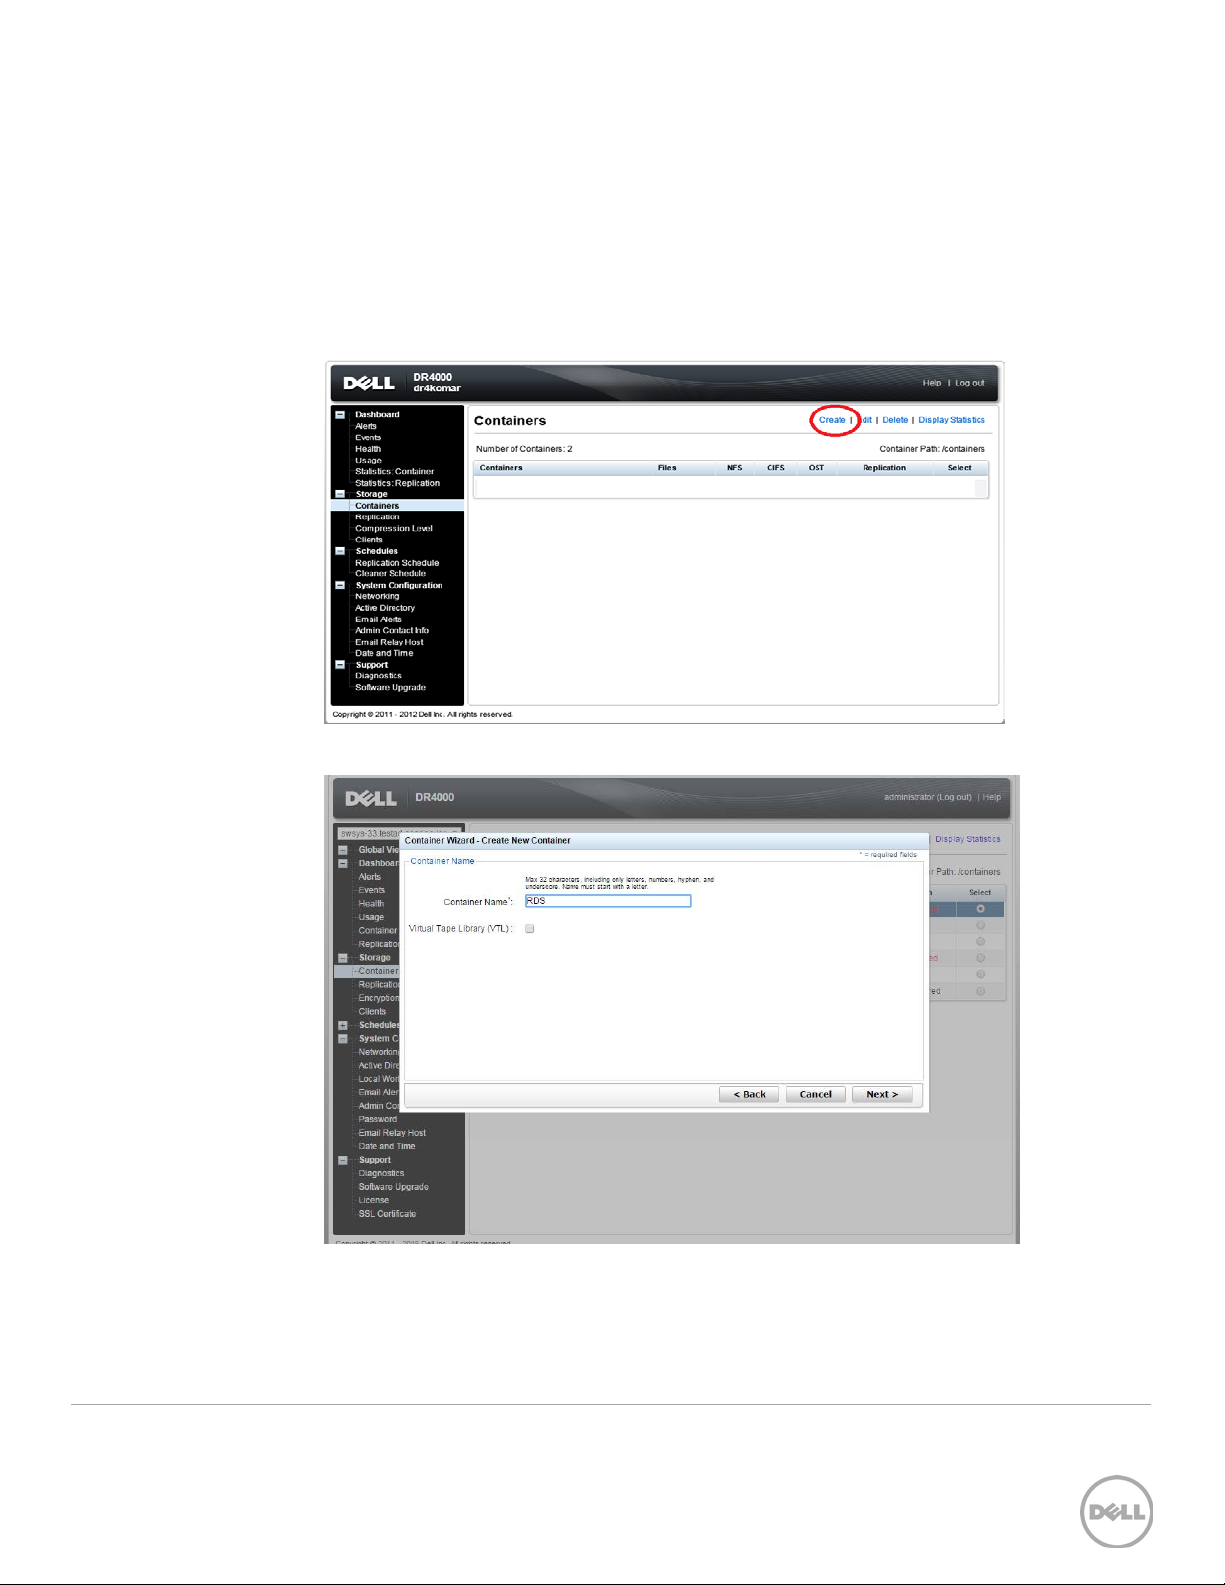
3 Configuring an RDA container for backup
3.1 Create an RDS container
1. Select Containers in the left side of the DR Series system GUI, and then click
Create.
2. Enter a container name and then click Next.
3. For the Storage Access Protocol, select Dell Rapid Data Storage (RDS).
15 Setting up Dell™ vRanger™ on the
Dell DR Series System | April 2015
Page 16
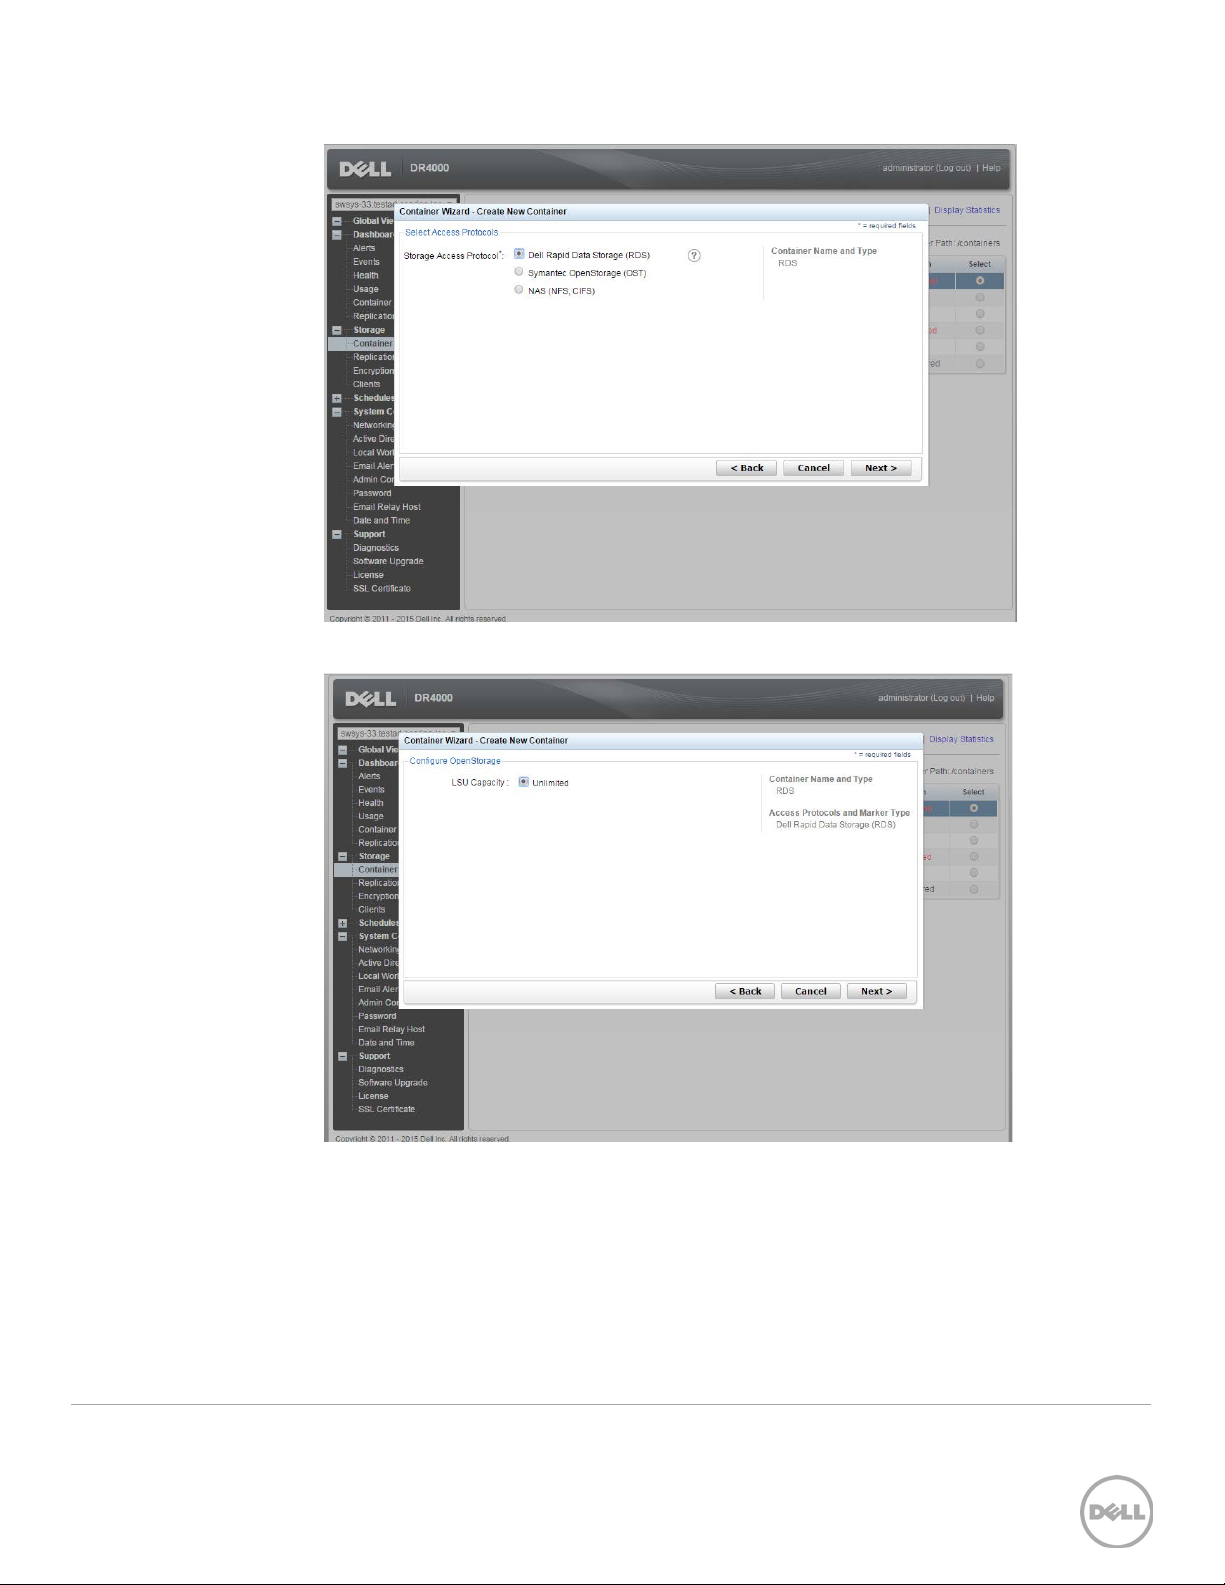
4. LSU capacity is set as Unlimited. Click Next.
5. Click Create New Container, and then confirm that the container was added.
16 Setting up Dell™ vRanger™ on the
Dell DR Series System | April 2015
Page 17
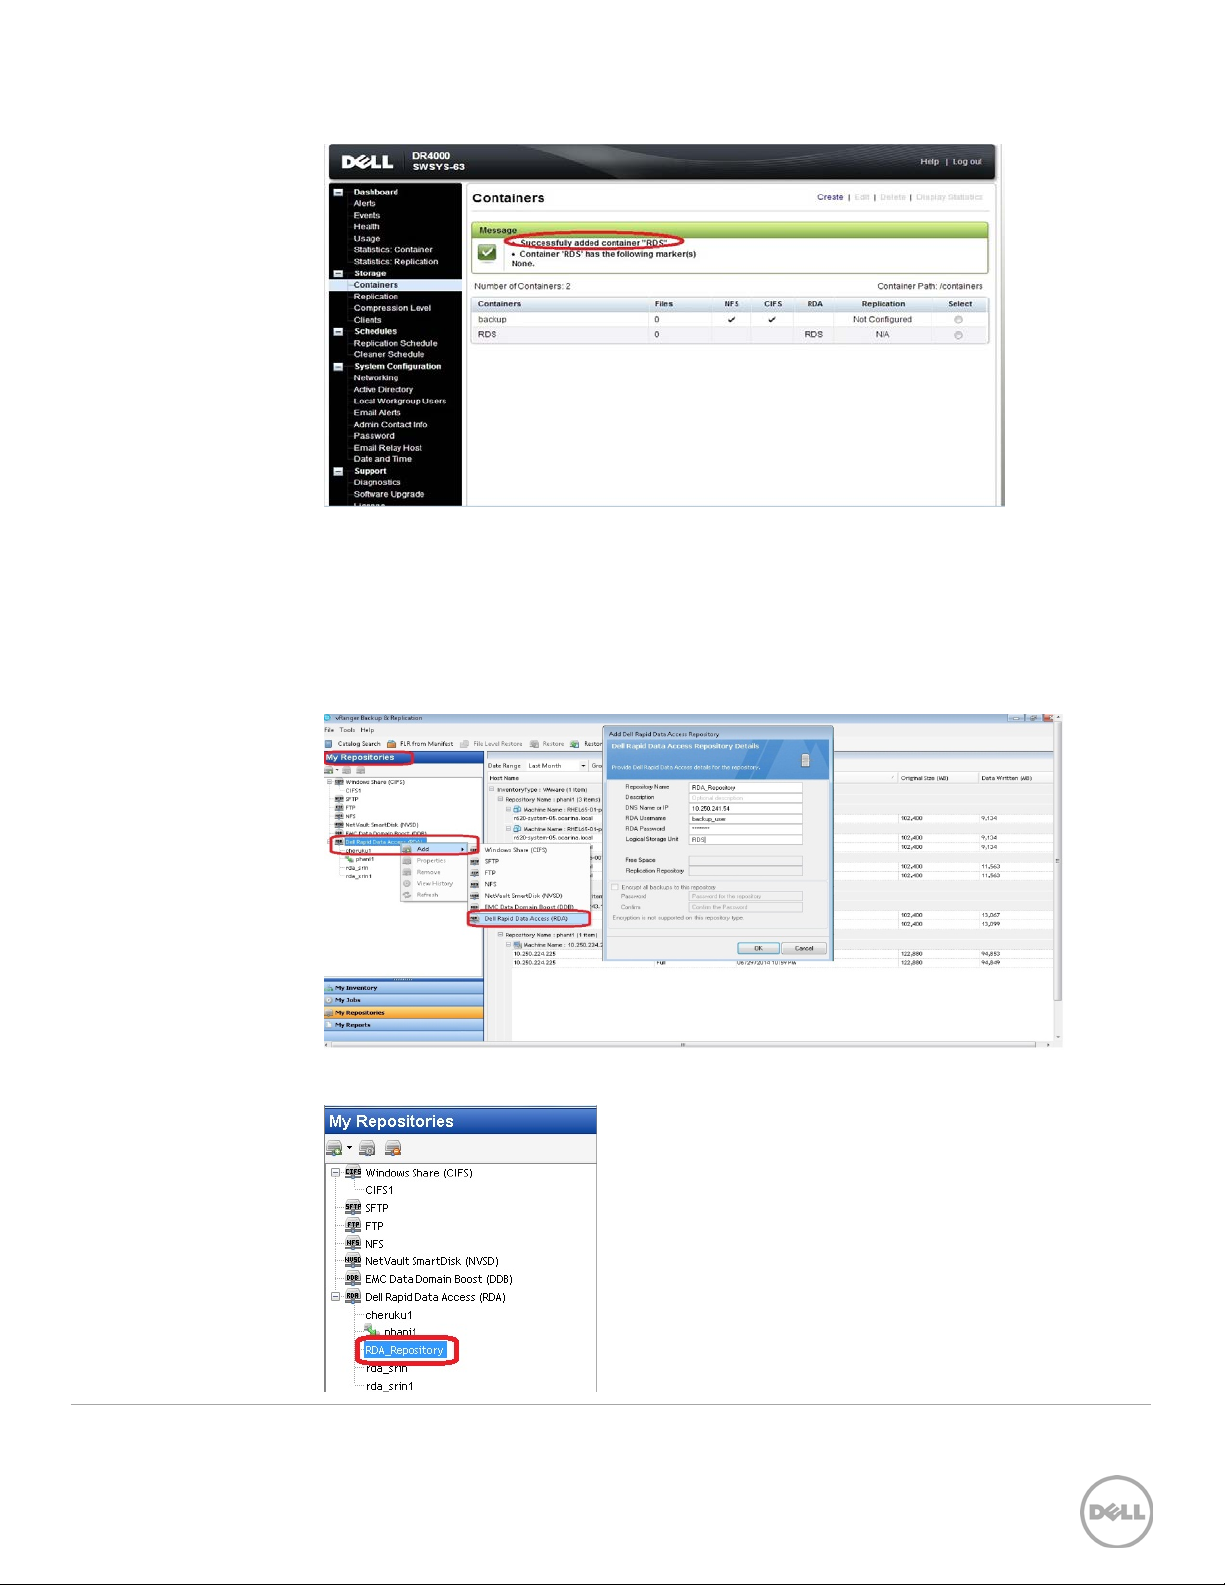
3.2 Configure the Dell RDA device in vRanger
Configure the Dell RDA device in vRanger as follows:
1. Navigate to My Repository > Dell Rapid Access (RDA).
2. Confirm that the RDA devices are added.
17 Setting up Dell™ vRanger™ on the
Dell DR Series System | April 2015
Page 18
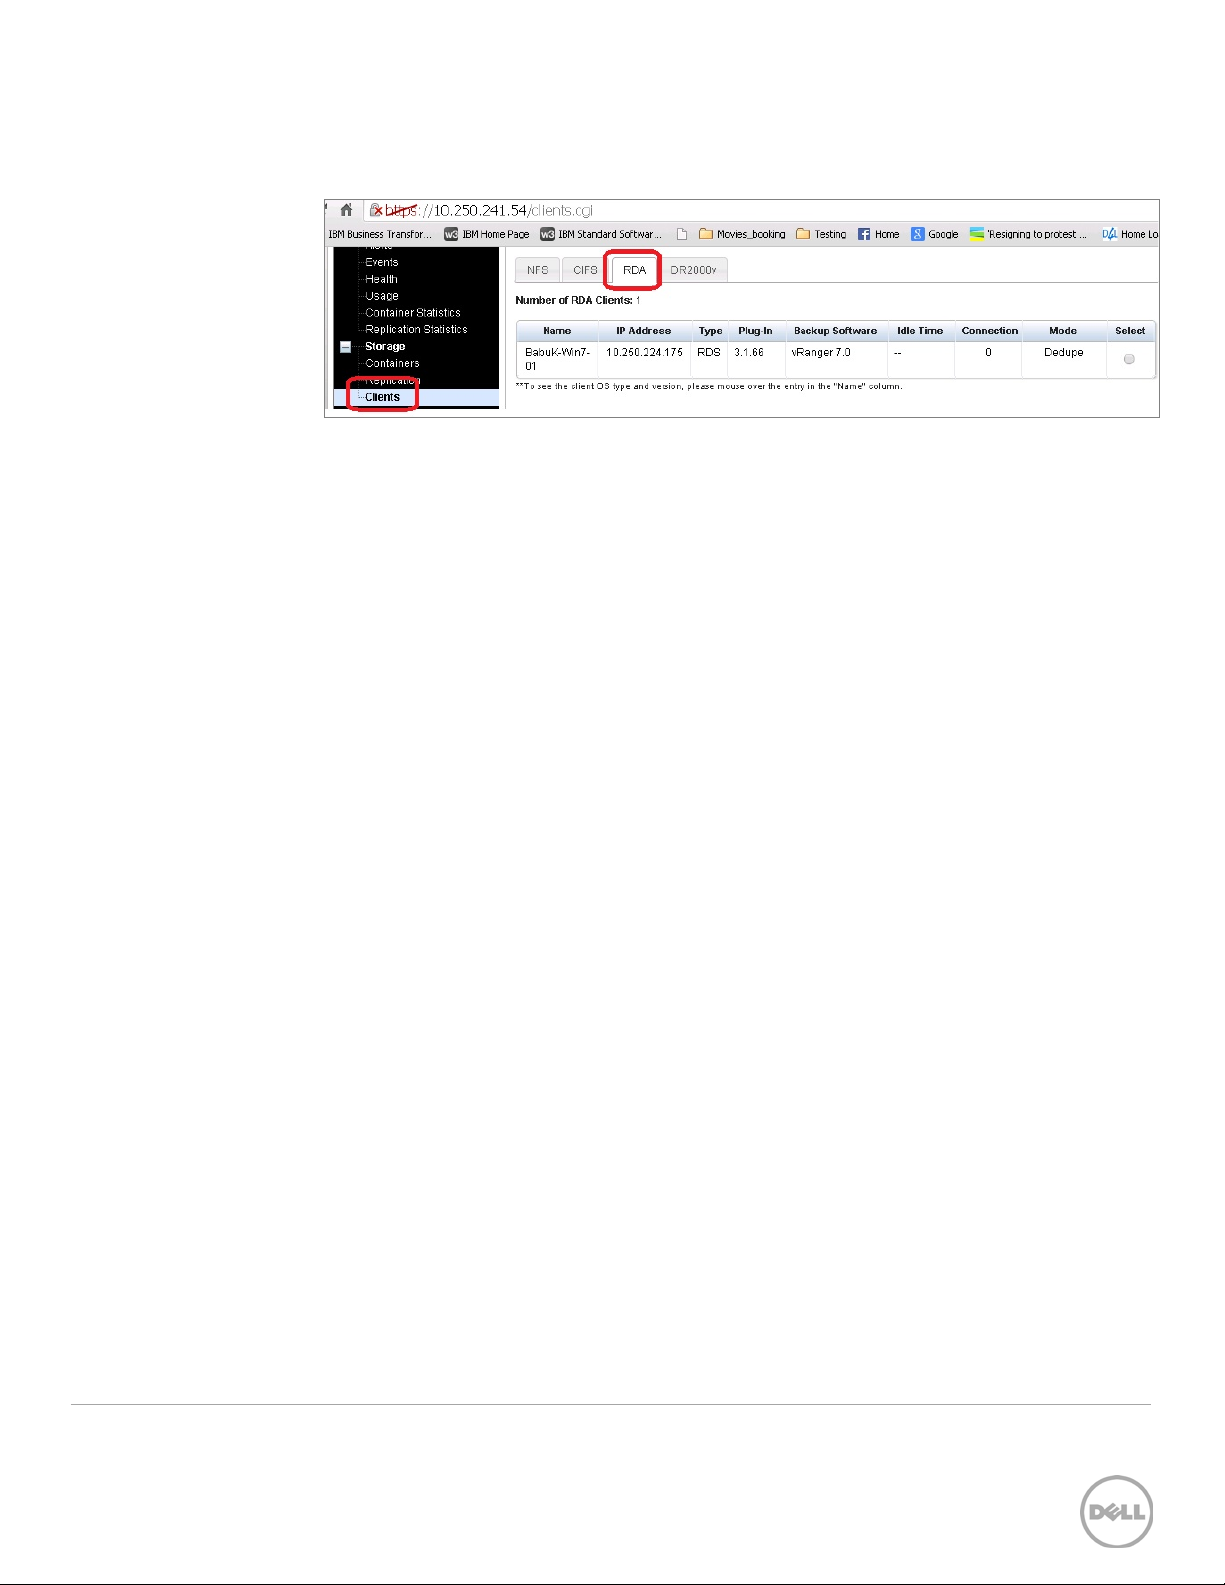
3. In the DR Series system GUI, navigate to Storage > Client and click the RDA tab to
review the configured RDA device details.
18 Setting up Dell™ vRanger™ on the
Dell DR Series System | April 2015
Page 19
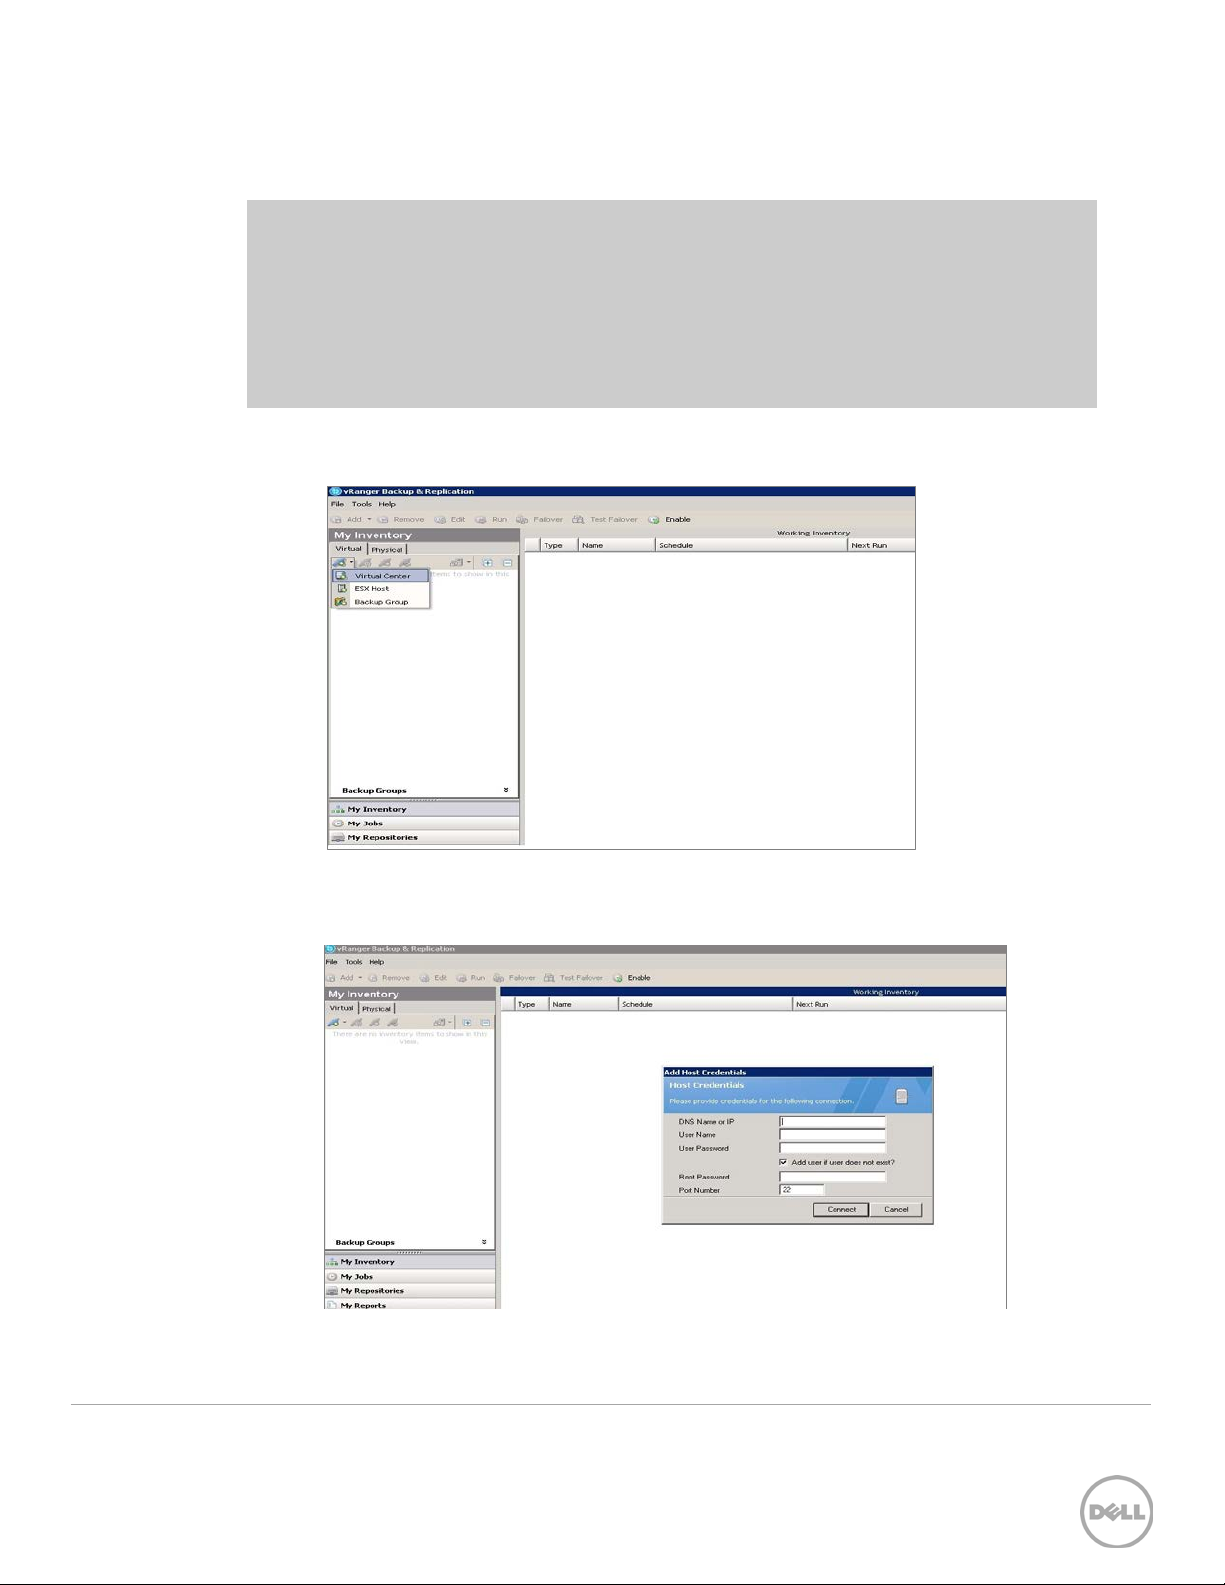
4 Setting up vRanger
NOTES:
• To maximize DR Series system vRanger storage capacity savings, Dell
recommends that you adhere exactly to the following setup settings.
• The backup formats differ completely when setup settings are changed. Hence,
all savings on vRanger installations that had settings changed in between are null
and void.
1. Open the vRanger Backup and Replication Console.
2. Go to My Inventory > Virtual > Add and add either your vCenter or ESX host.
• Adding ESX host
For ESX, you need to add the ESX host with root credentials.
19 Setting up Dell™ vRanger™ on the
Dell DR Series System | April 2015
Page 20
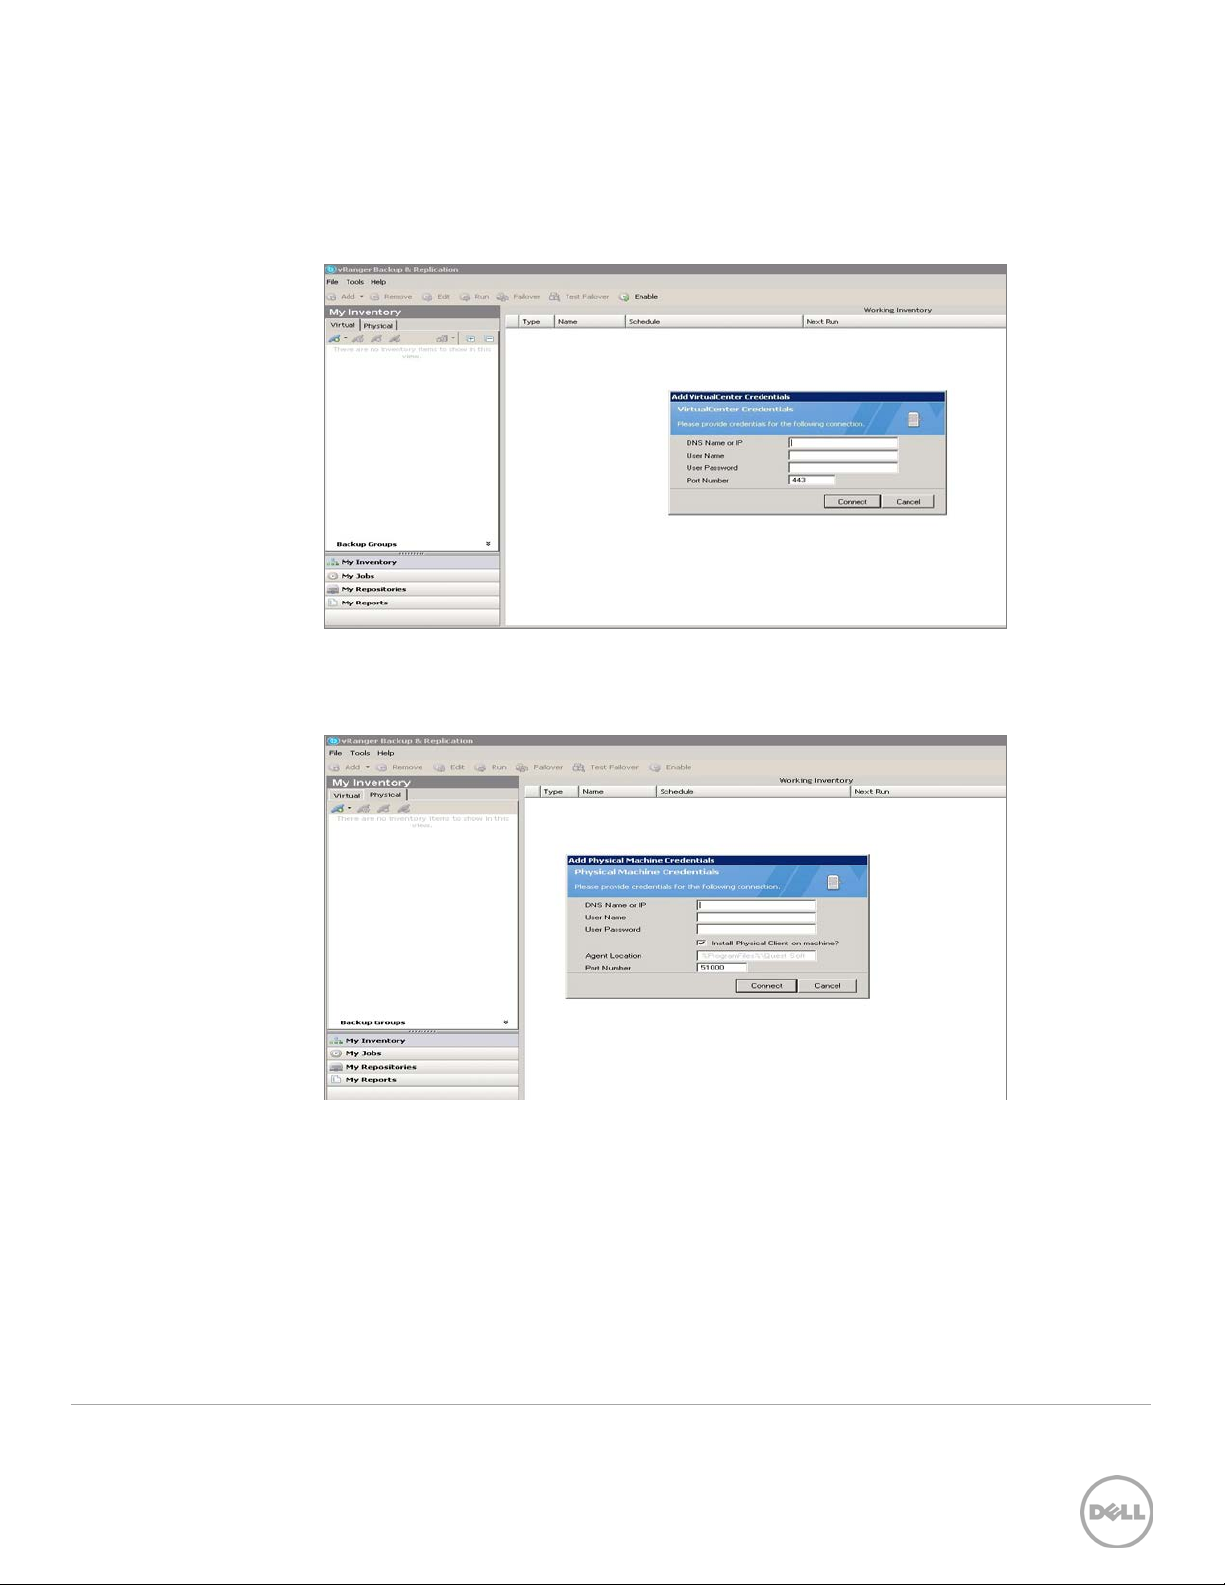
• Adding Virtual Center
When adding the vCenter host you need to provide the IP/Hostname and
the logon credentials of the Virtual Center.
3. To add the physical server, go to My Inventory > Physical > Add, and then select
the option, Install physical client on machine?. By default, the physical client is
installed on the physical machine at
C:\Program Files\Quest Software\
.
20 Setting up Dell™ vRanger™ on the
Dell DR Series System | April 2015
Page 21
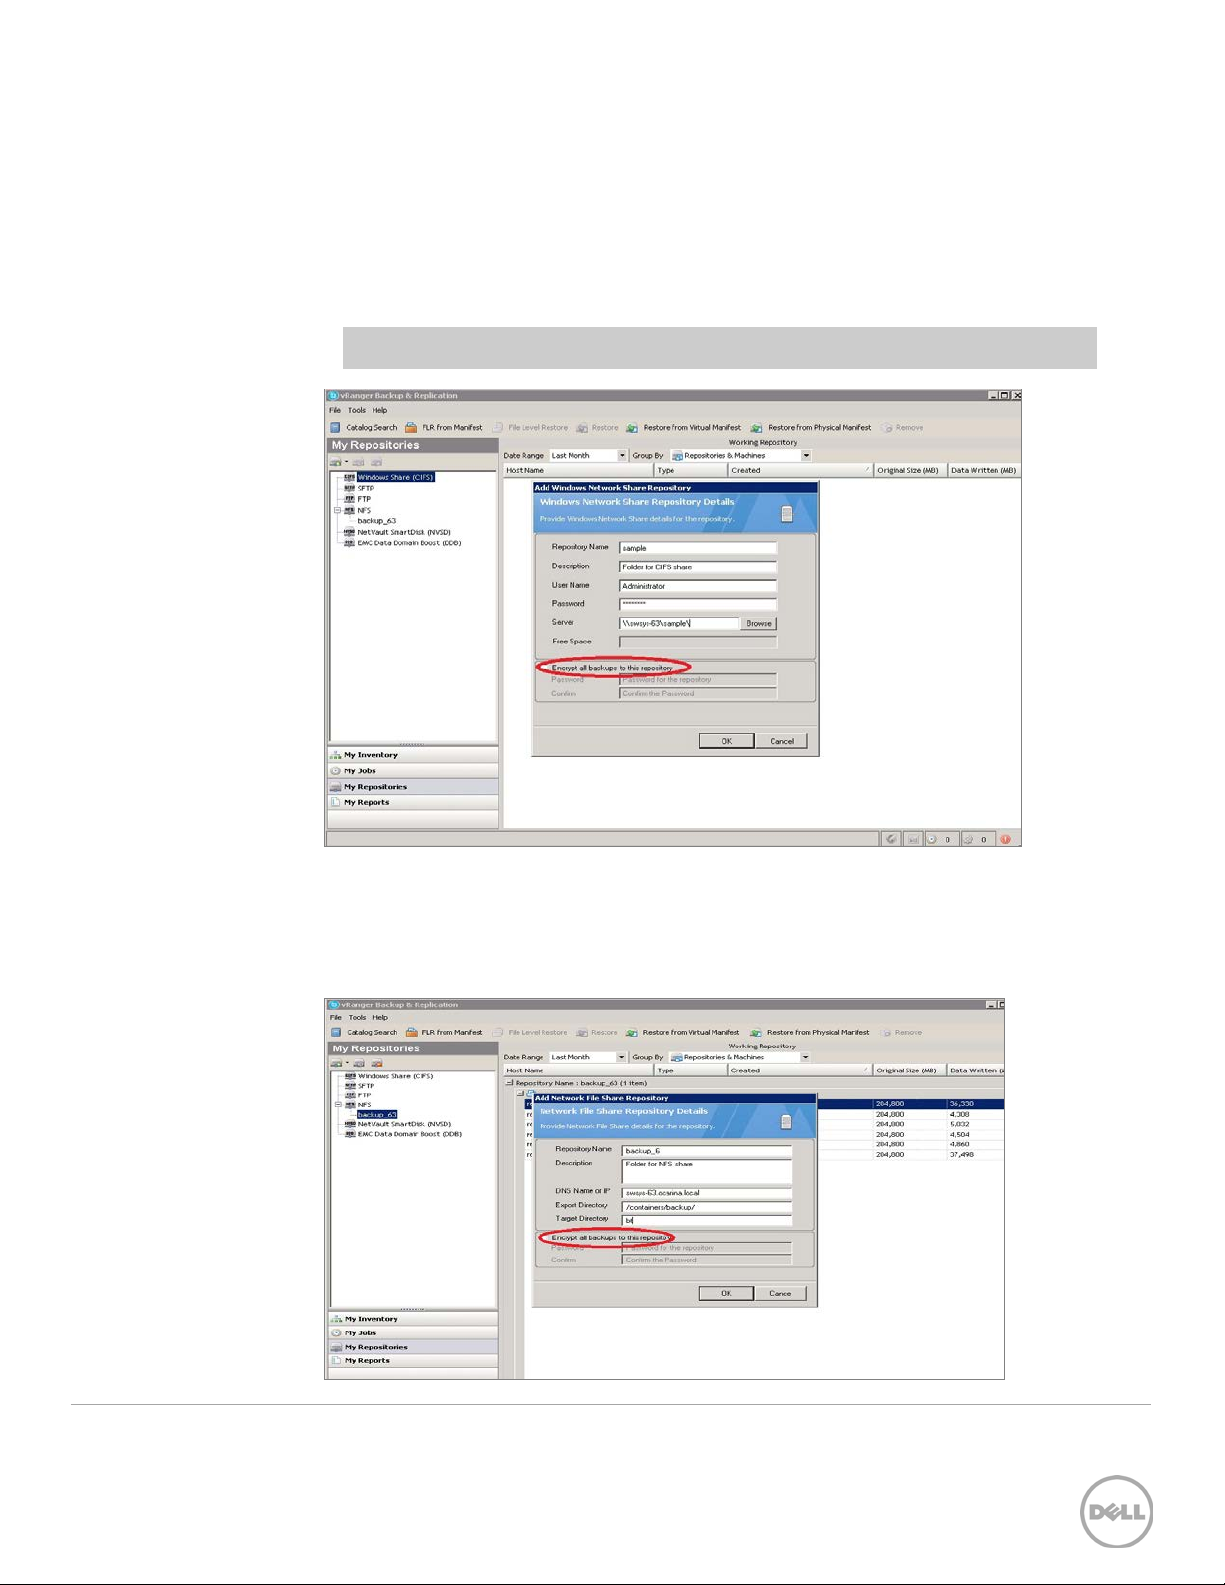
4. You need to map the CIFS/NFS share to vRanger. (vRanger supports both CIFS and
NFS protocols).
• Mapping a CIFS share
To map a CIFS share, go to My repository > Add > Windows Share (CIFS),
enter the required details, and then click OK.
Note: Dell recommends that you do not enable encryption.
• Mapping an NFS share
To map an NFS share, go to My repository > Add > NFS, enter the required
credentials, and then click OK.
21 Setting up Dell™ vRanger™ on the
Dell DR Series System | April 2015
Page 22
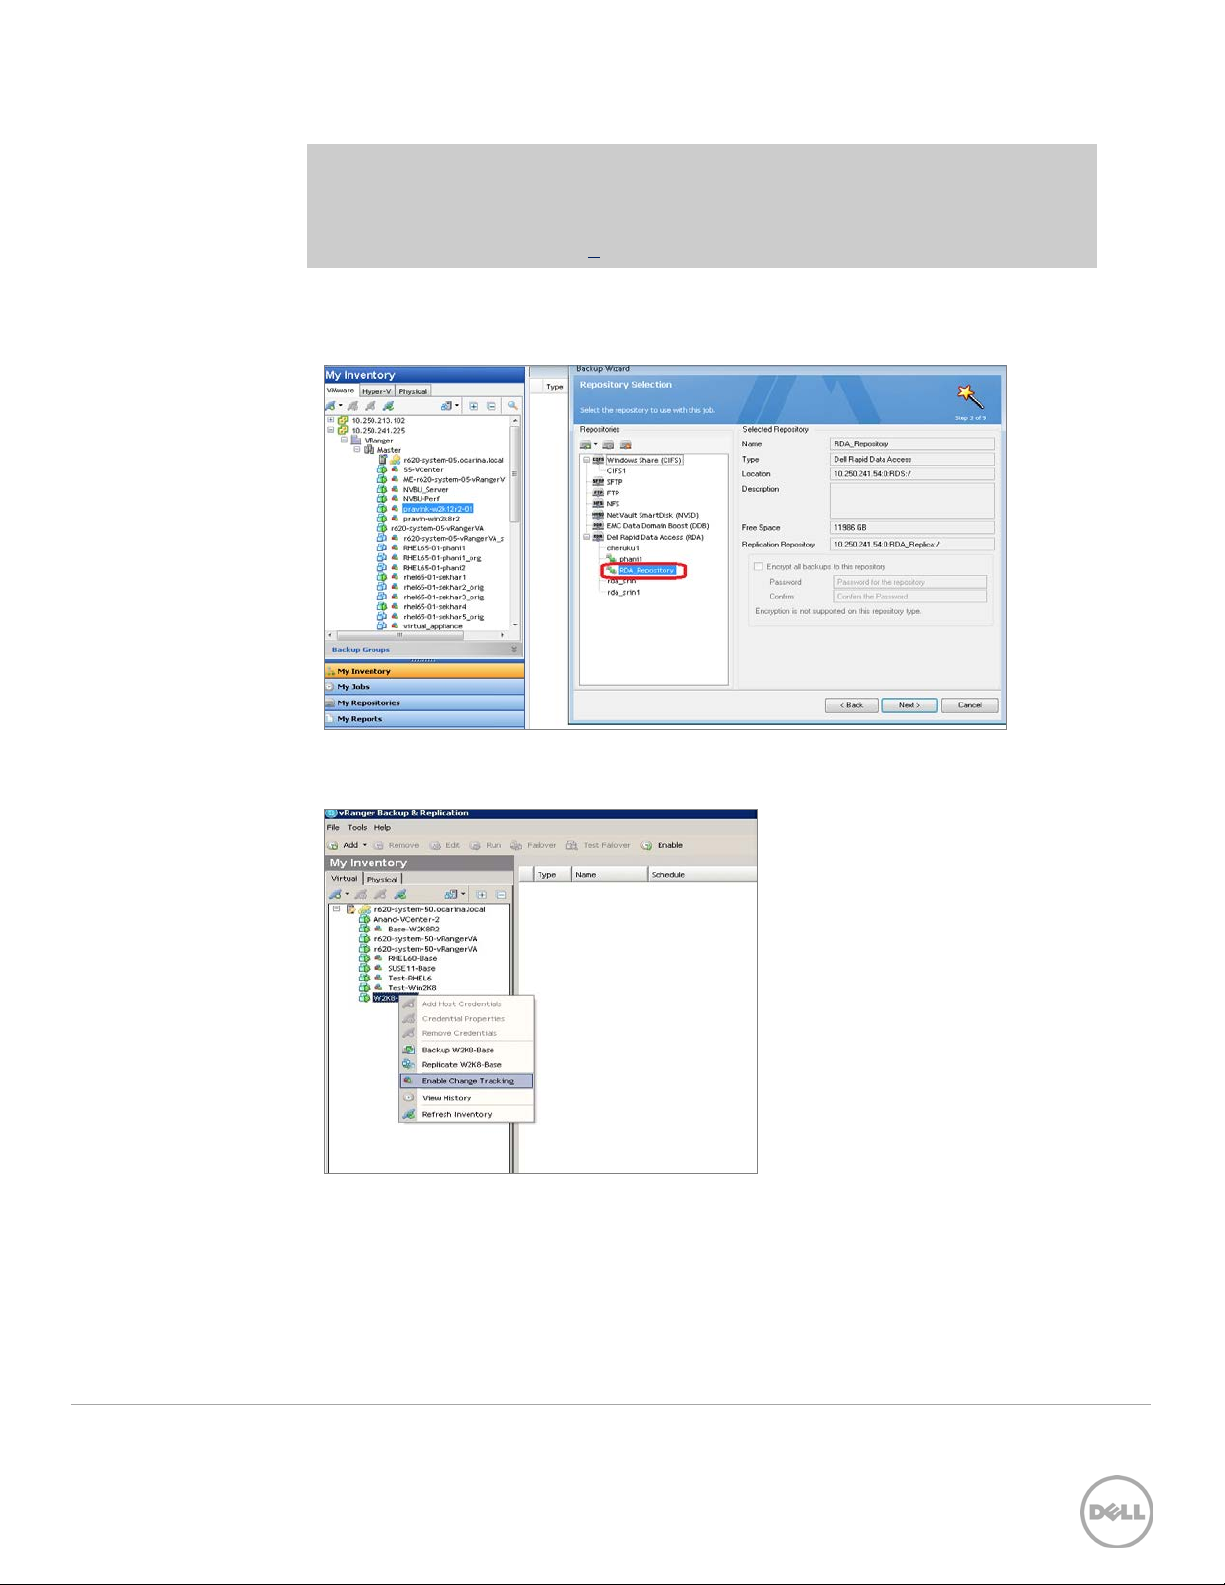
Note: Export Directory lists the export directory but not the complete share path
(that is, it does not provide IP/hostname of the DR Series system). Target Directory
lists the target directory name that was created under the share directory
[Mentioned above in section 2 ].
• For RDA, select the RDA device configured in the previous section, “
the Dell RDA device in vRanger
.”
Configure
5. Right-click and enable change tracking (Change Block Tracking) on the VM you
want to back up.
6. Select a virtual machine for backup, and right-click Backup, which opens the
backup wizard.
22 Setting up Dell™ vRanger™ on the
Dell DR Series System | April 2015
Page 23
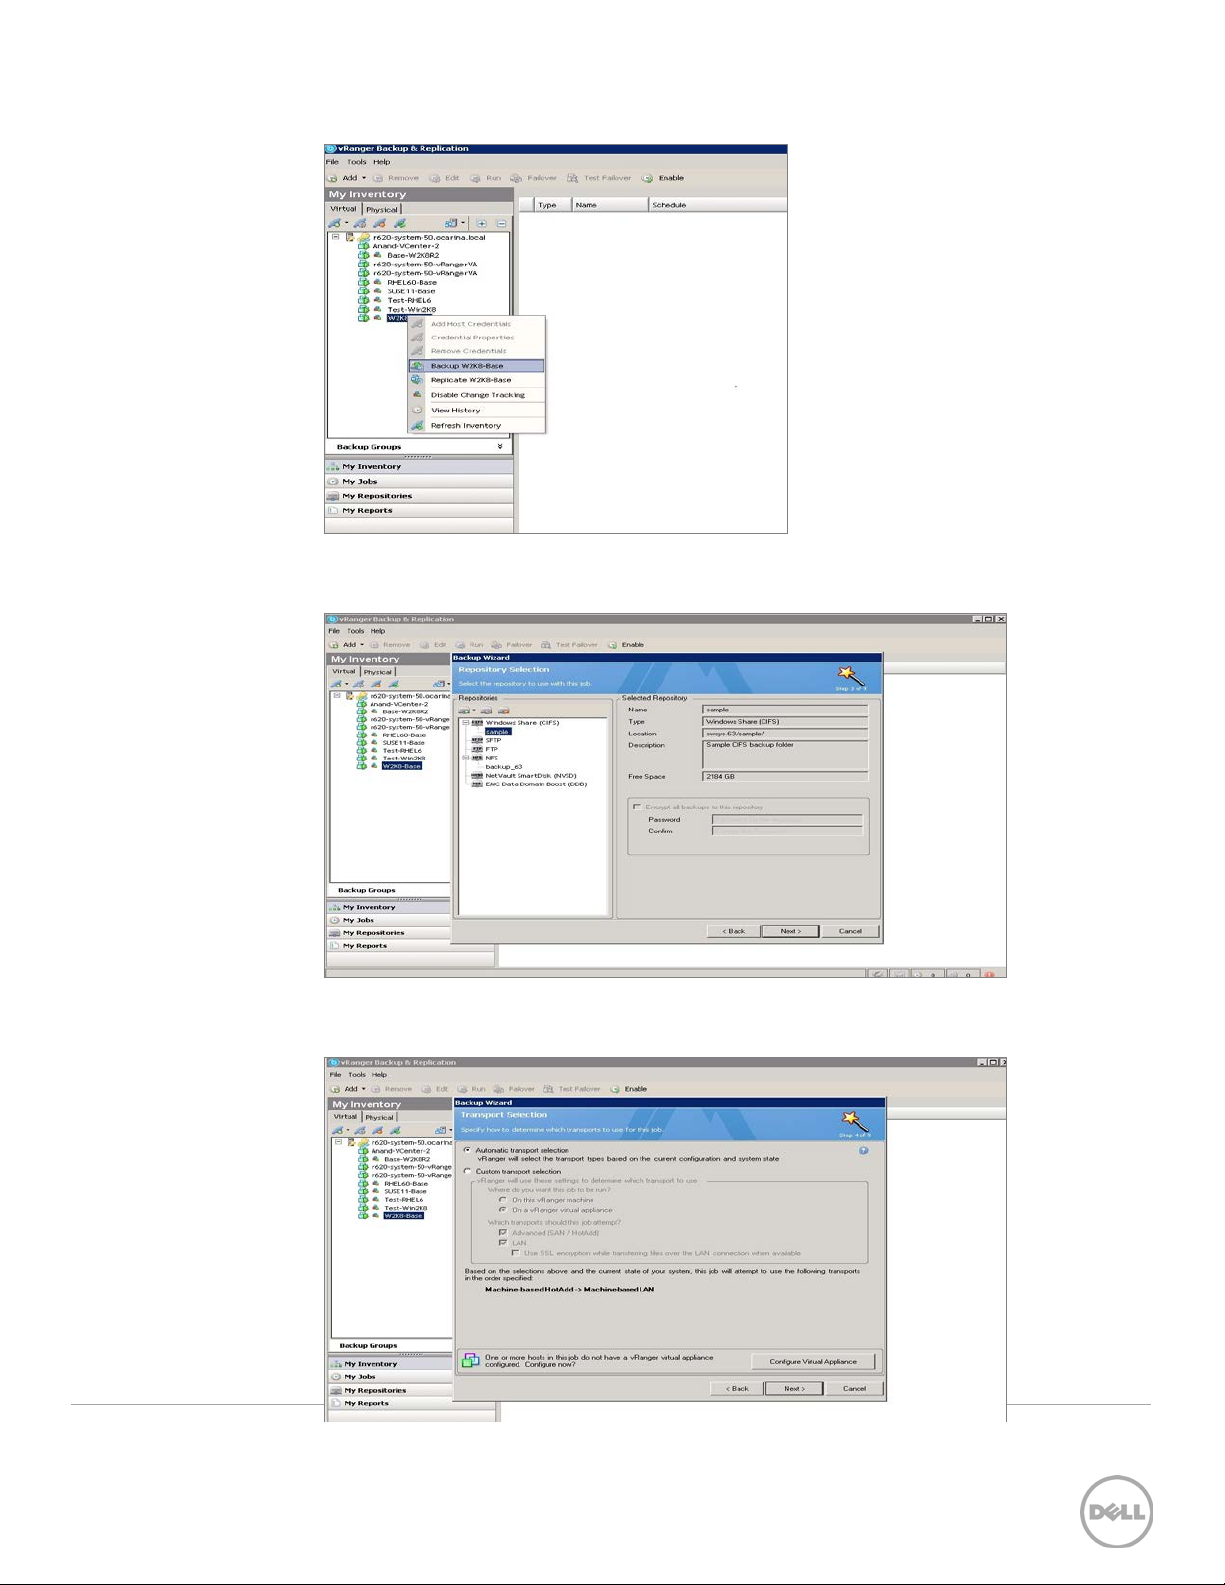
7. Select disks to back up, and then select the repository to which the VM is to be
backed up.
8. Select the appropriate Transport type according to the setup. If you are unsure,
click Automatic Transport Selection.
23 Setting up Dell™ vRanger™ on the
Dell DR Series System | April 2015
Page 24
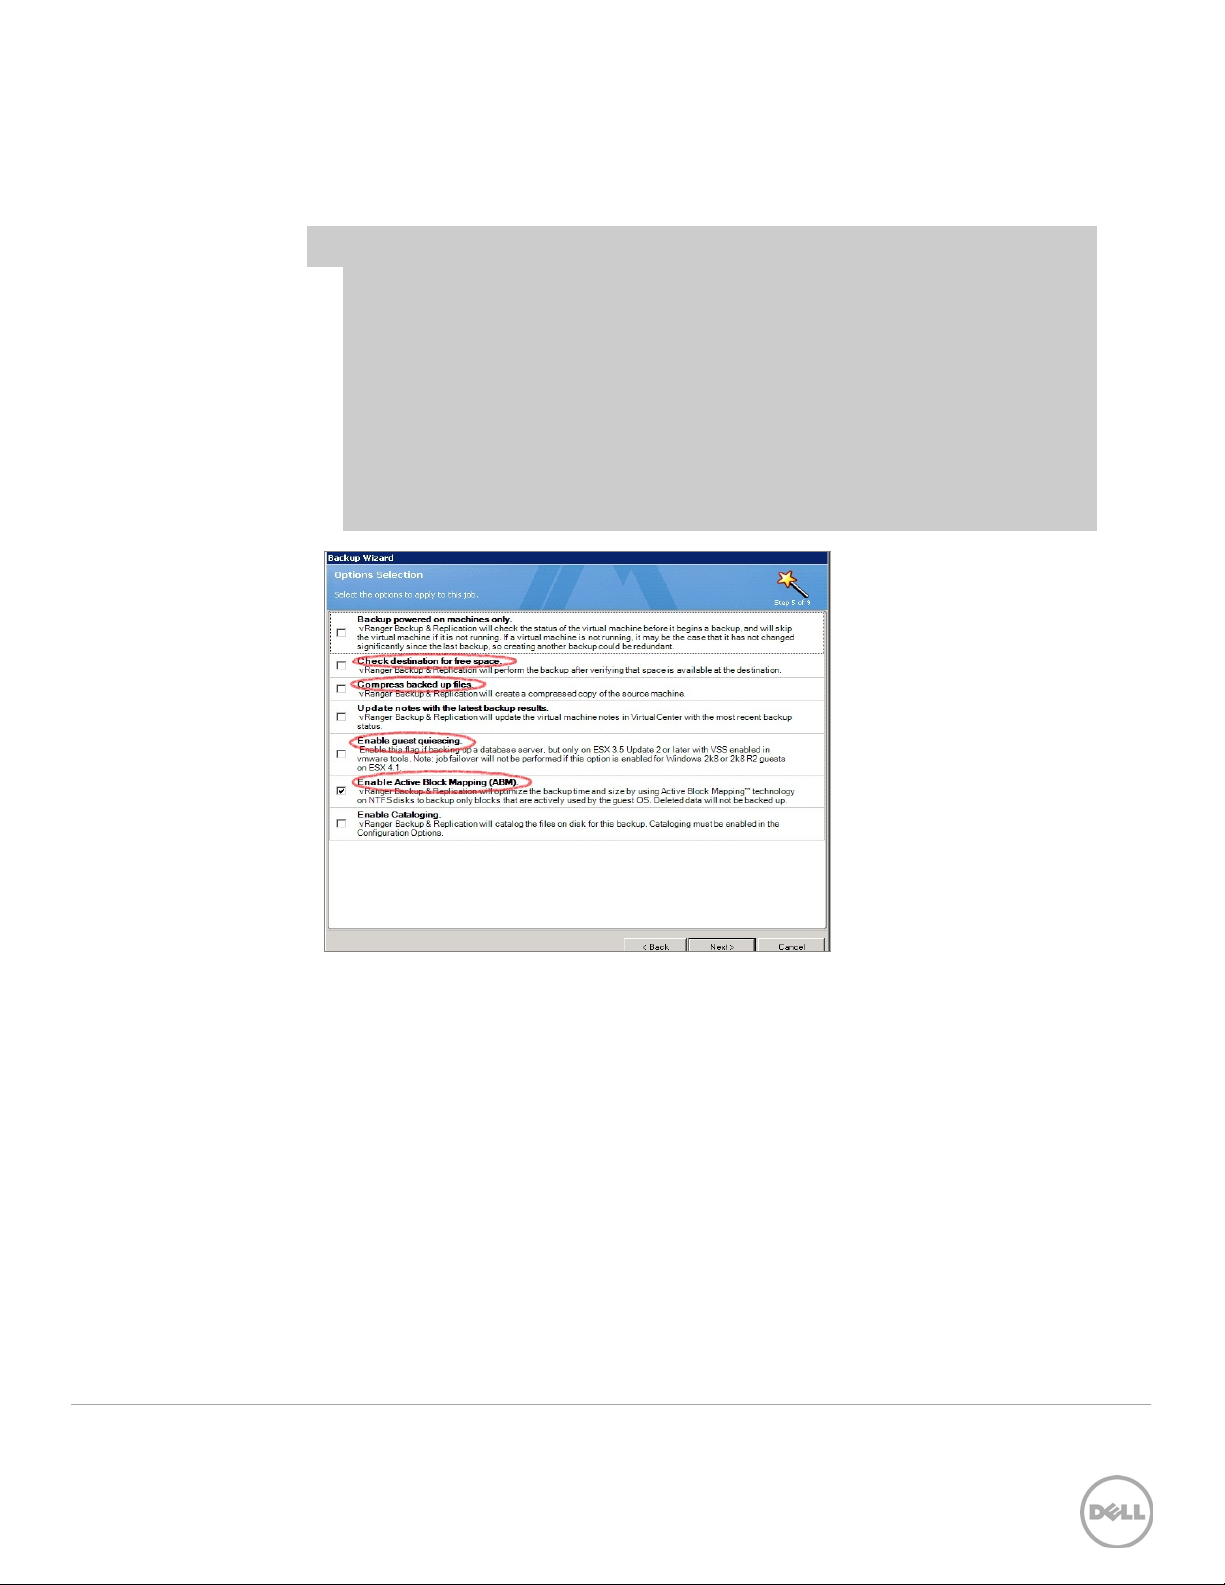
9. Select backup options for the VM.
NOTES:
• Always Disable ‘Check destination for free space’ since the DR Series
system supports deduplication and so the overall space that is occupied is
less.
• Always enable ABM (Active Block Mapping) for better overall results from
both vRanger and DR.
• vRanger recommends enabling ‘Guest quiescing’ in case of backing up a
database (Example: Exchange server).
• Disable ‘compress backed up files’ for better savings.
24 Setting up Dell™ vRanger™ on the
Dell DR Series System | April 2015
Page 25
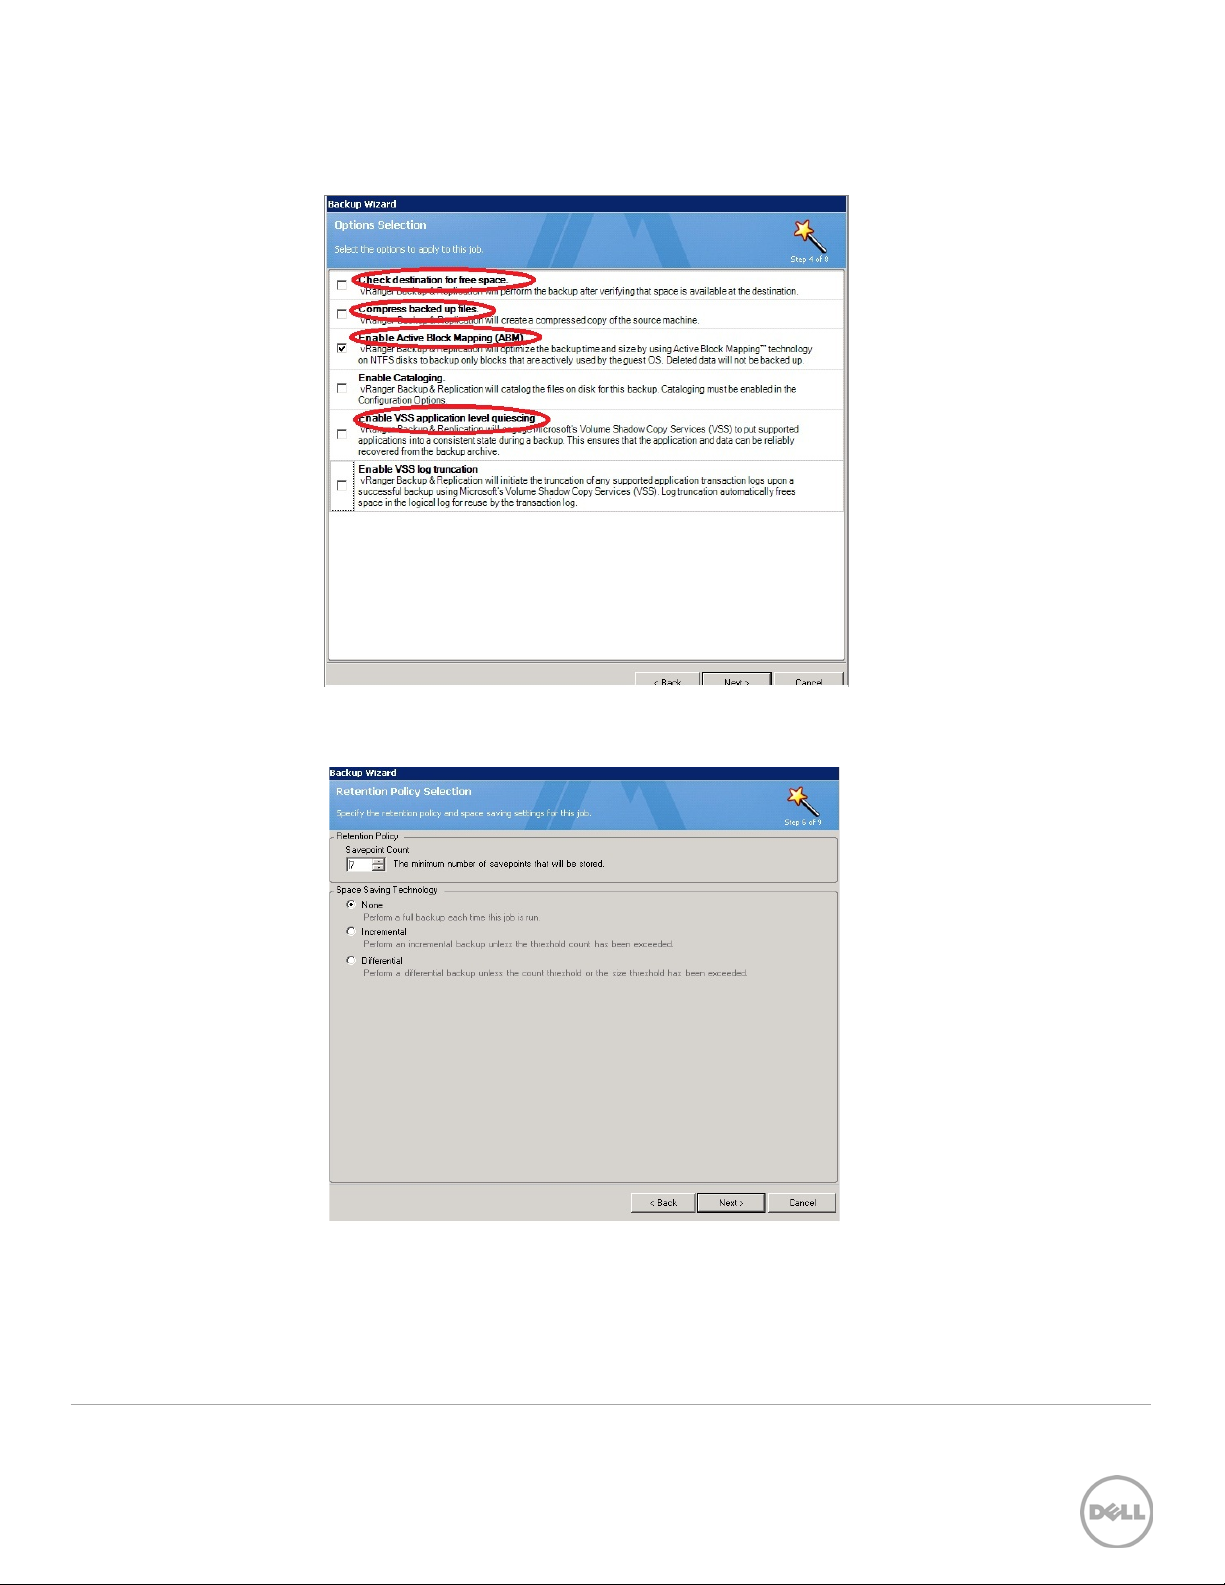
10. Select backup options for the physical machine.
11. For the Retention Policy, select the type of backup technology as either None
(which completes a Full backup), Incremental, or Differential.
25 Setting up Dell™ vRanger™ on the
Dell DR Series System | April 2015
Page 26
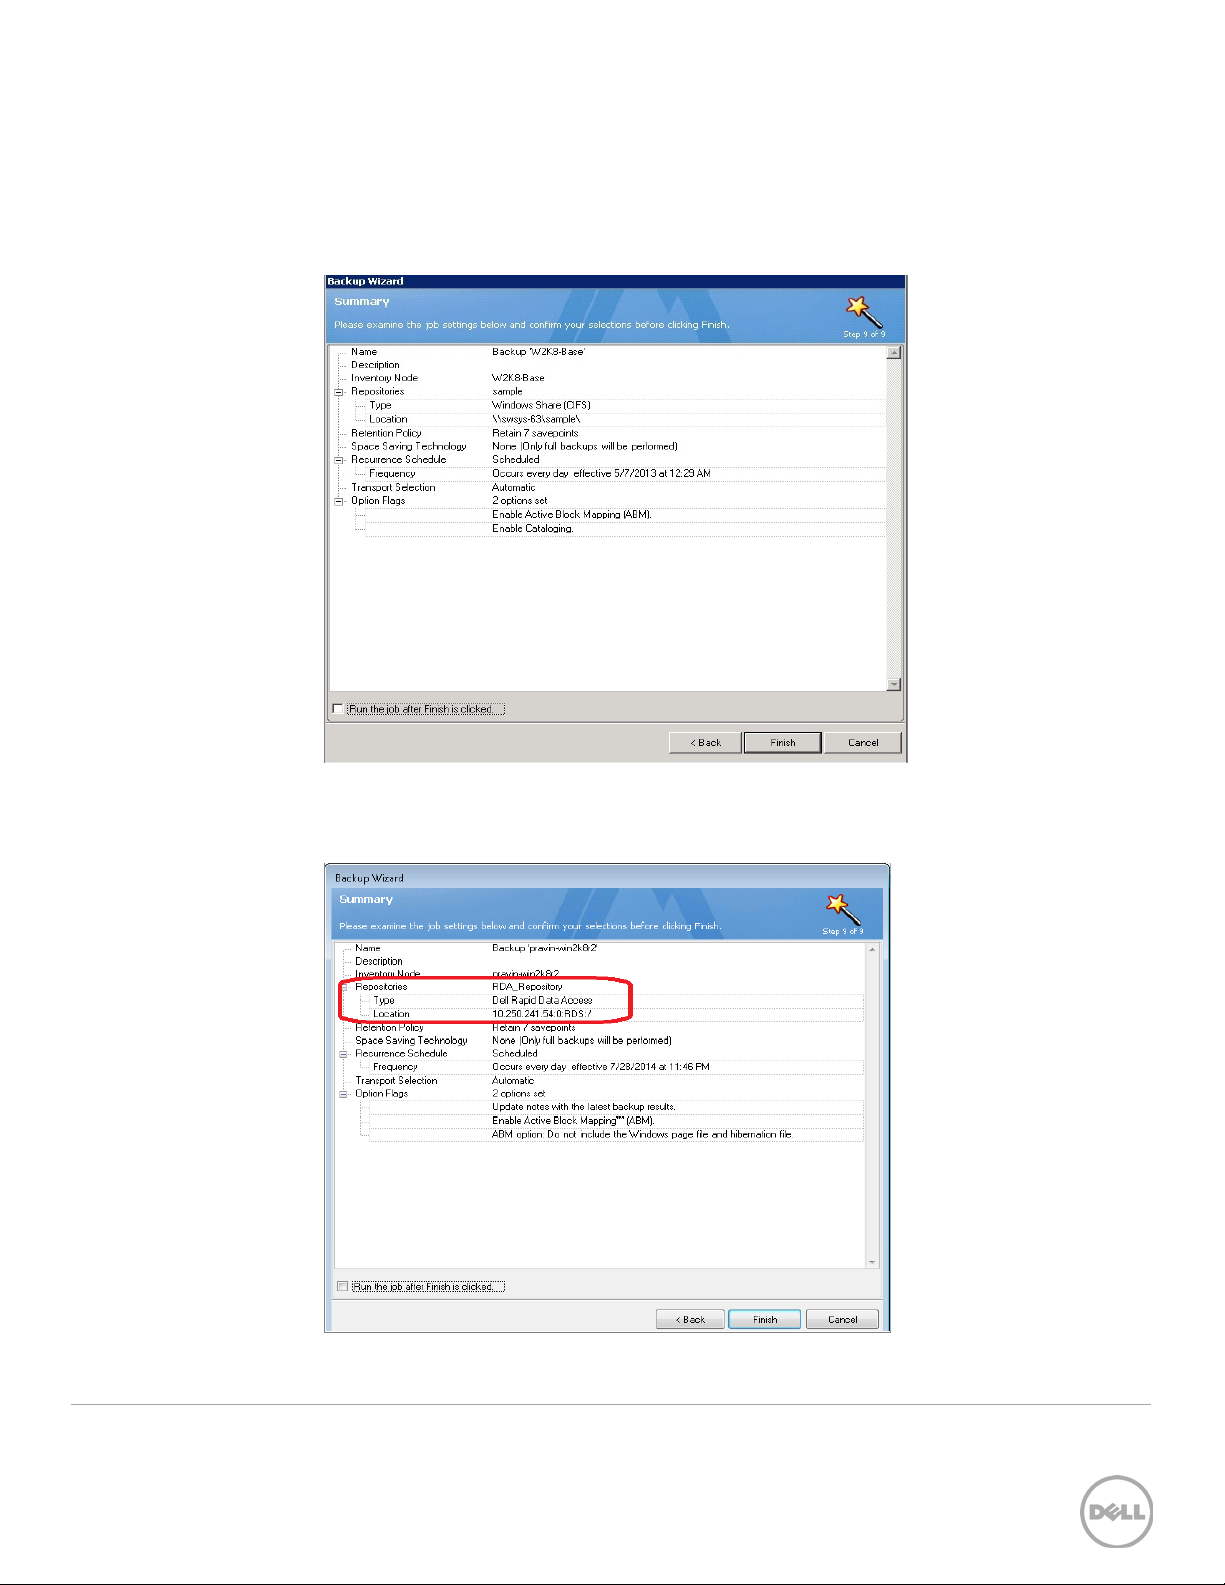
12. Schedule the backup and then provide the mail server details for sending mail.
The following example shows a backup summary page that opens when the target
is a CIFS repository.
The following example shows a backup summary page that opens when the target
is a RDA repository.
26 Setting up Dell™ vRanger™ on the
Dell DR Series System | April 2015
Page 27
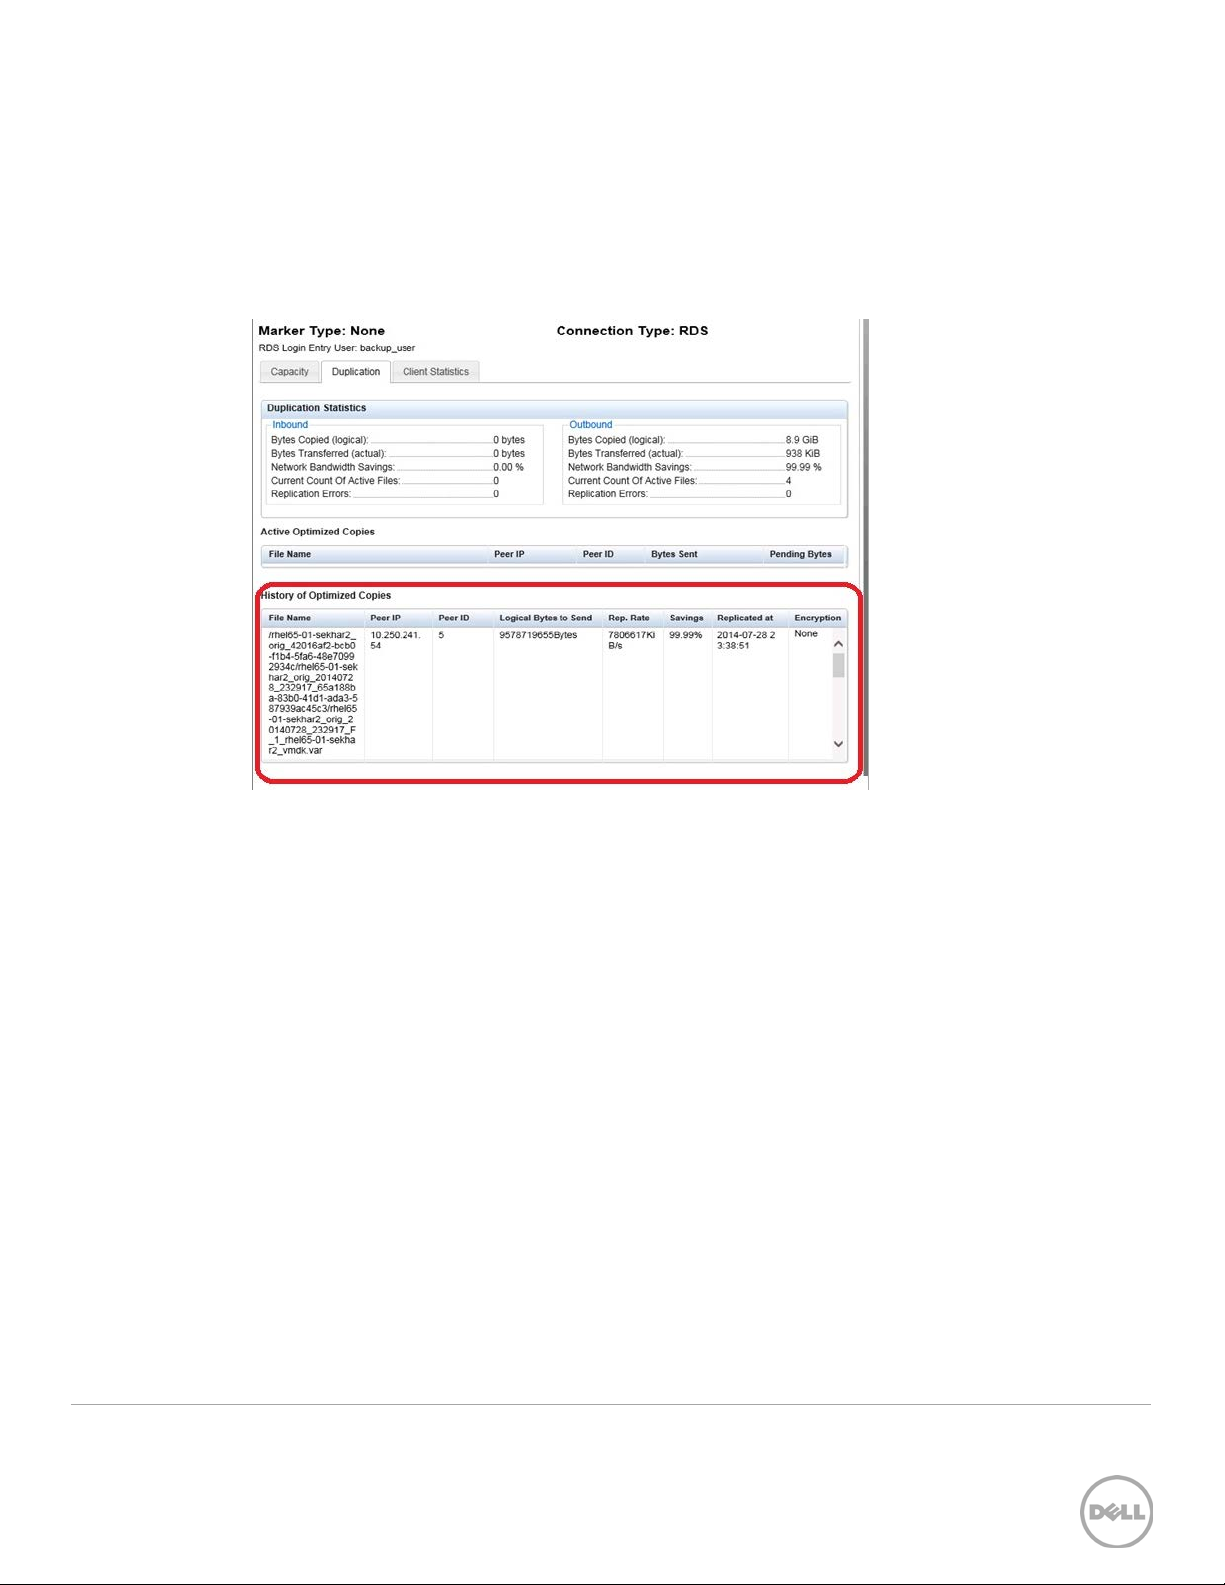
5 Viewing a history of optimized copies in the DR
Series system GUI
In the DR Series system GUI, go to the Container Statistics > Duplication tab to view a
history of optimized VM copies, as shown in the following example.
27 Setting up Dell™ vRanger™ on the
Dell DR Series System | April 2015
Page 28
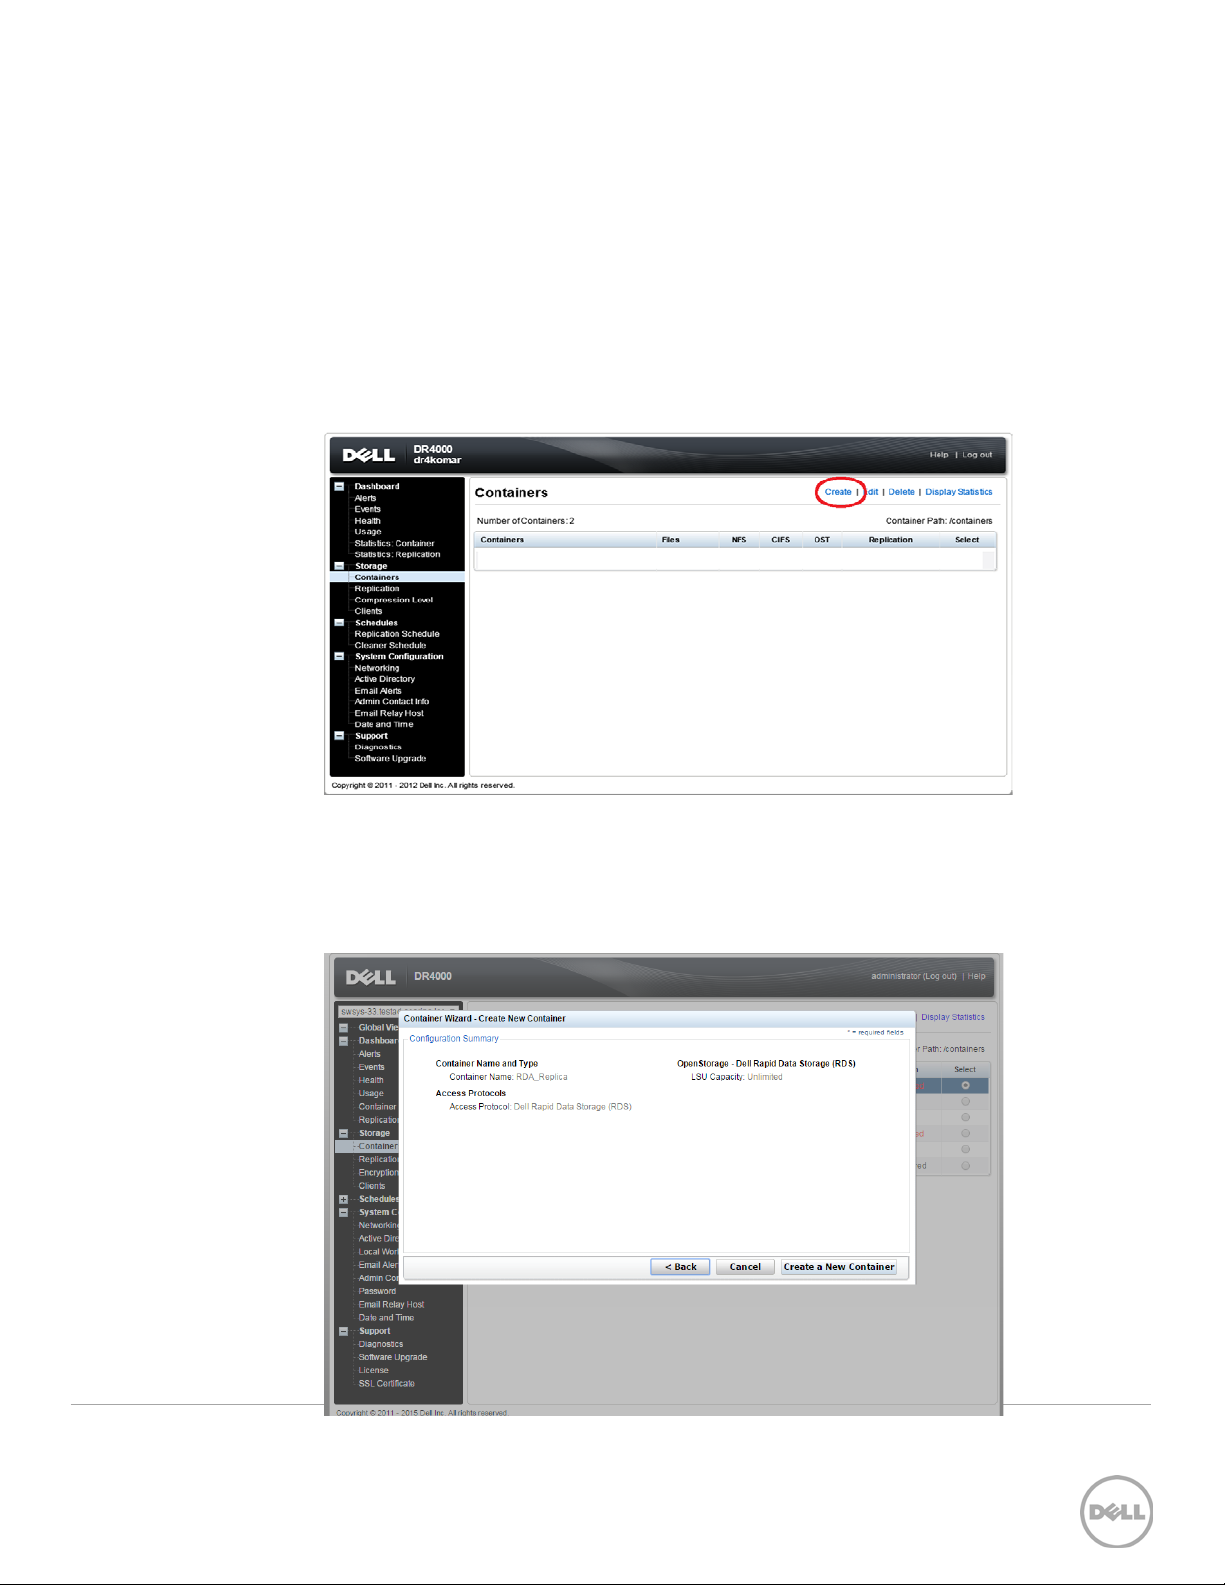
6 Configuring replication at the source
This configuration enables source-side deduplication to reduce the amount of data moved
over the network to the appliance.
6.1 Create an RDS container in the Dell DR Series system for
the replication target
1. Select Containers in the left navigation area of the DR Series system GUI, and then
click the Create link at the top of the page.
2. Enter a Container Name, and then click Next.
3. For Storage Access Protocol, select Dell Rapid Data Storage (RDS). Follow the
steps described in the previous section to create a container. Confirm the
container details and click Create a New Container.
28 Setting up Dell™ vRanger™ on the
Dell DR Series System | April 2015
Page 29
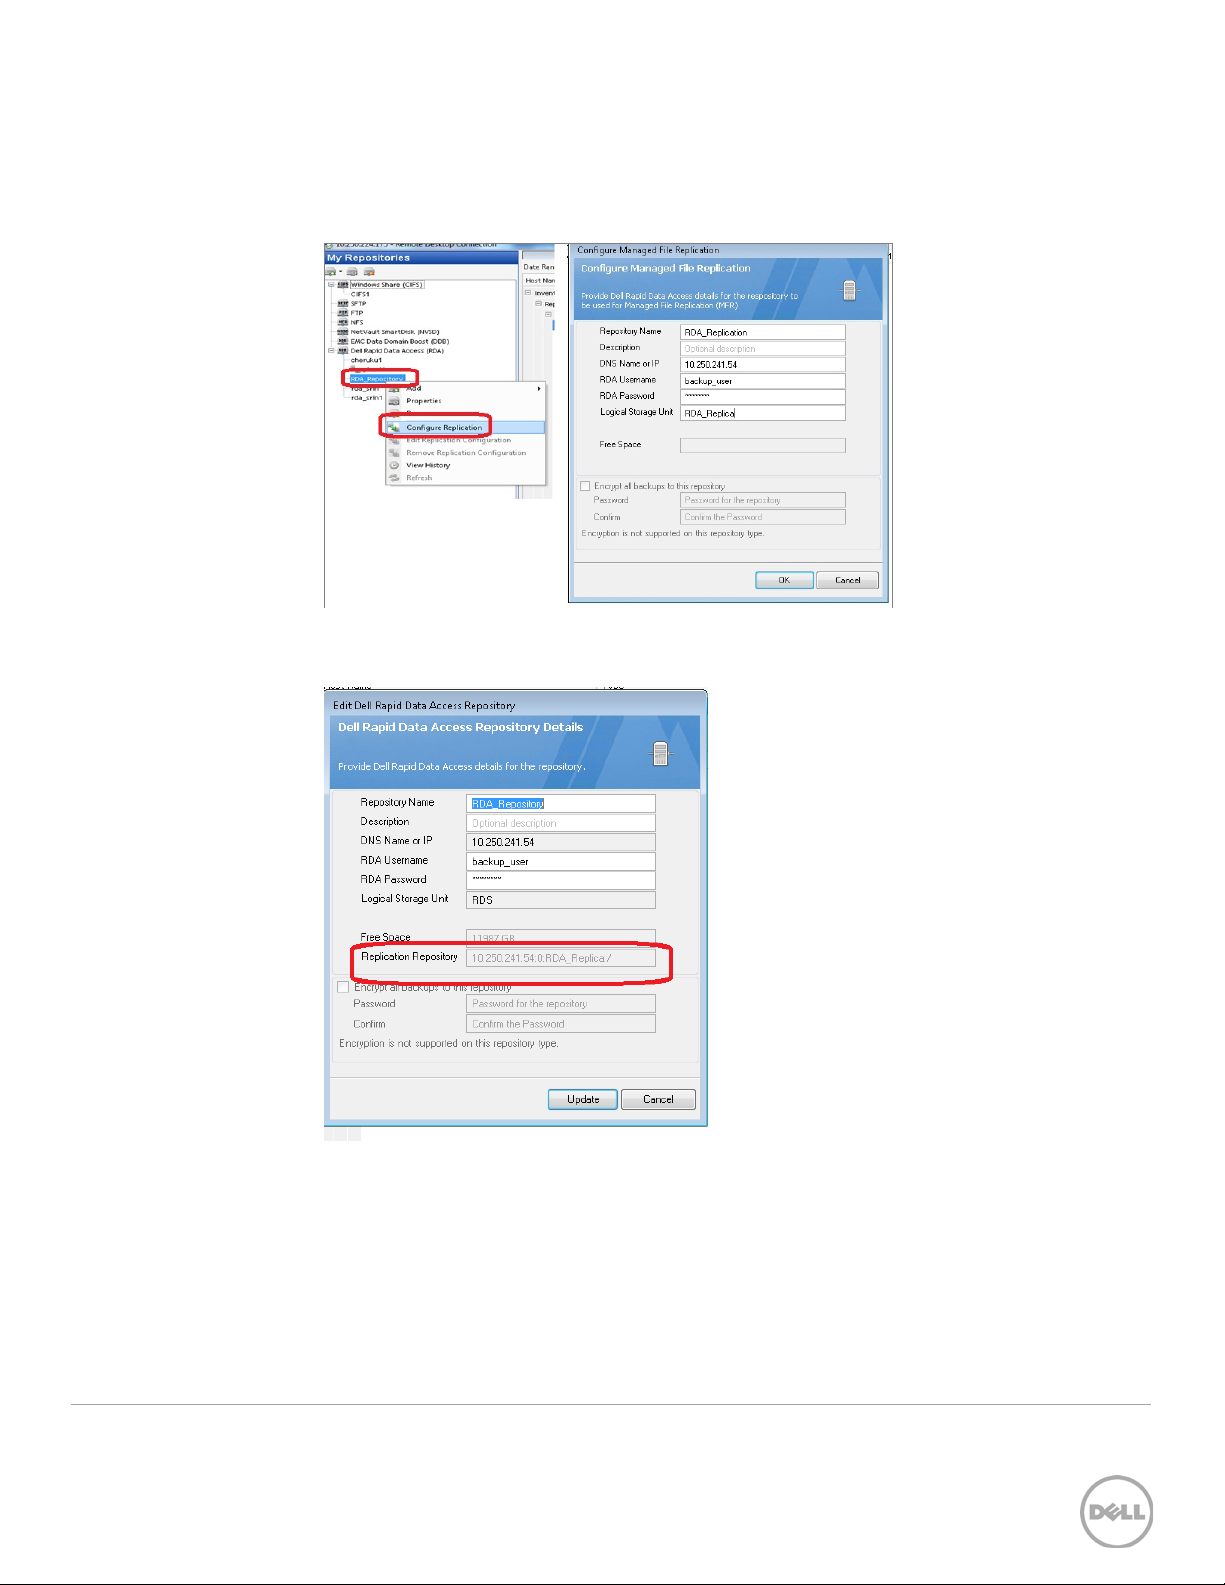
6.2 Configure replication at the target container in vRanger
1. Select the RDA device, right-click Configure Replication, and then enter the DR
Series server and target container details.
2. Confirm the replication configuration by right-clicking the RDA repository and
clicking Properties.
29 Setting up Dell™ vRanger™ on the
Dell DR Series System | April 2015
Page 30
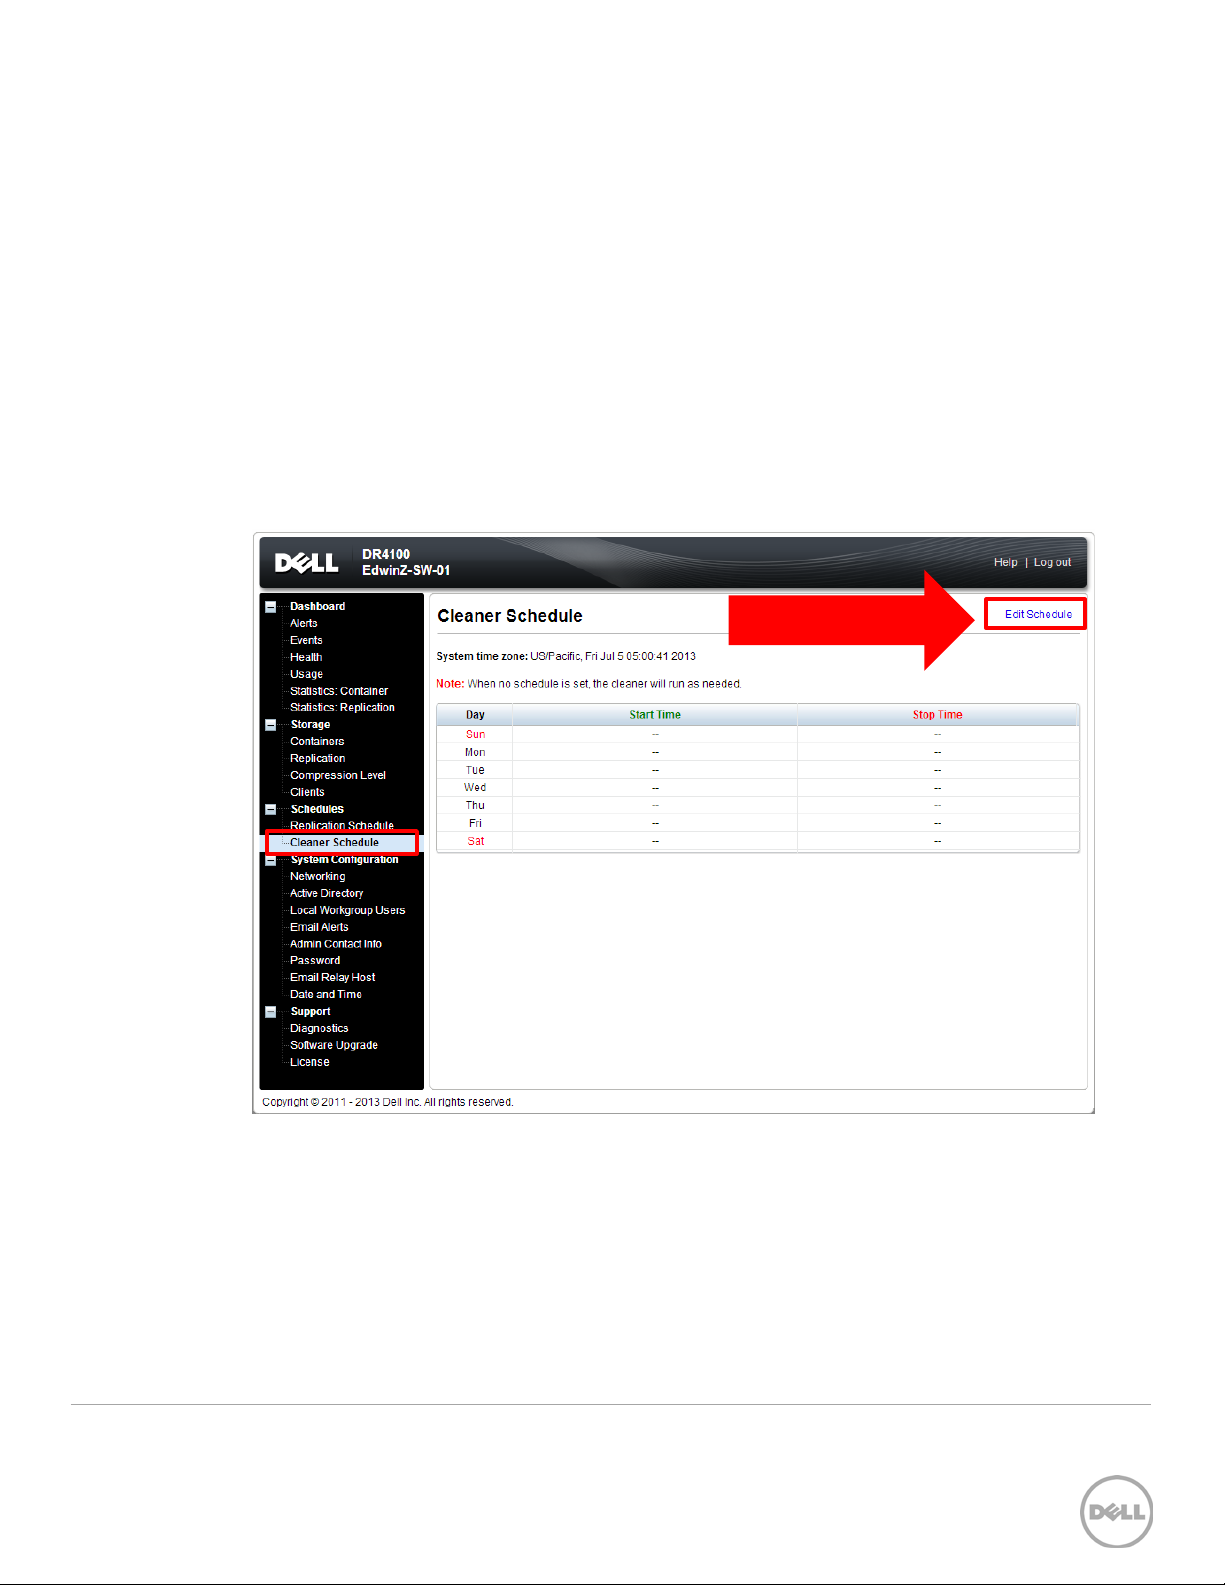
7 Setting up the DR Series system cleaner
Performing scheduled disk space reclamation operations are recommended as a method
for recovering disk space from system containers in which files were deleted as a result of
deduplication.
The system cleaner runs during idle time. If your workflow does not have a sufficient
amount of idle time on a daily basis, then you should consider scheduling the cleaner to
force it to run during a scheduled time.
If necessary, you can perform the procedure shown in the following example screenshot
to force the cleaner to run. After all of the backup jobs are set up, the DR Series system
cleaner can be scheduled. The DR Series system cleaner should run at least six hours per
week when backups are not taking place, and generally after a backup job has completed.
Schedule Cleaner
30 Setting up Dell™ vRanger™ on the
Dell DR Series System | April 2015
Page 31
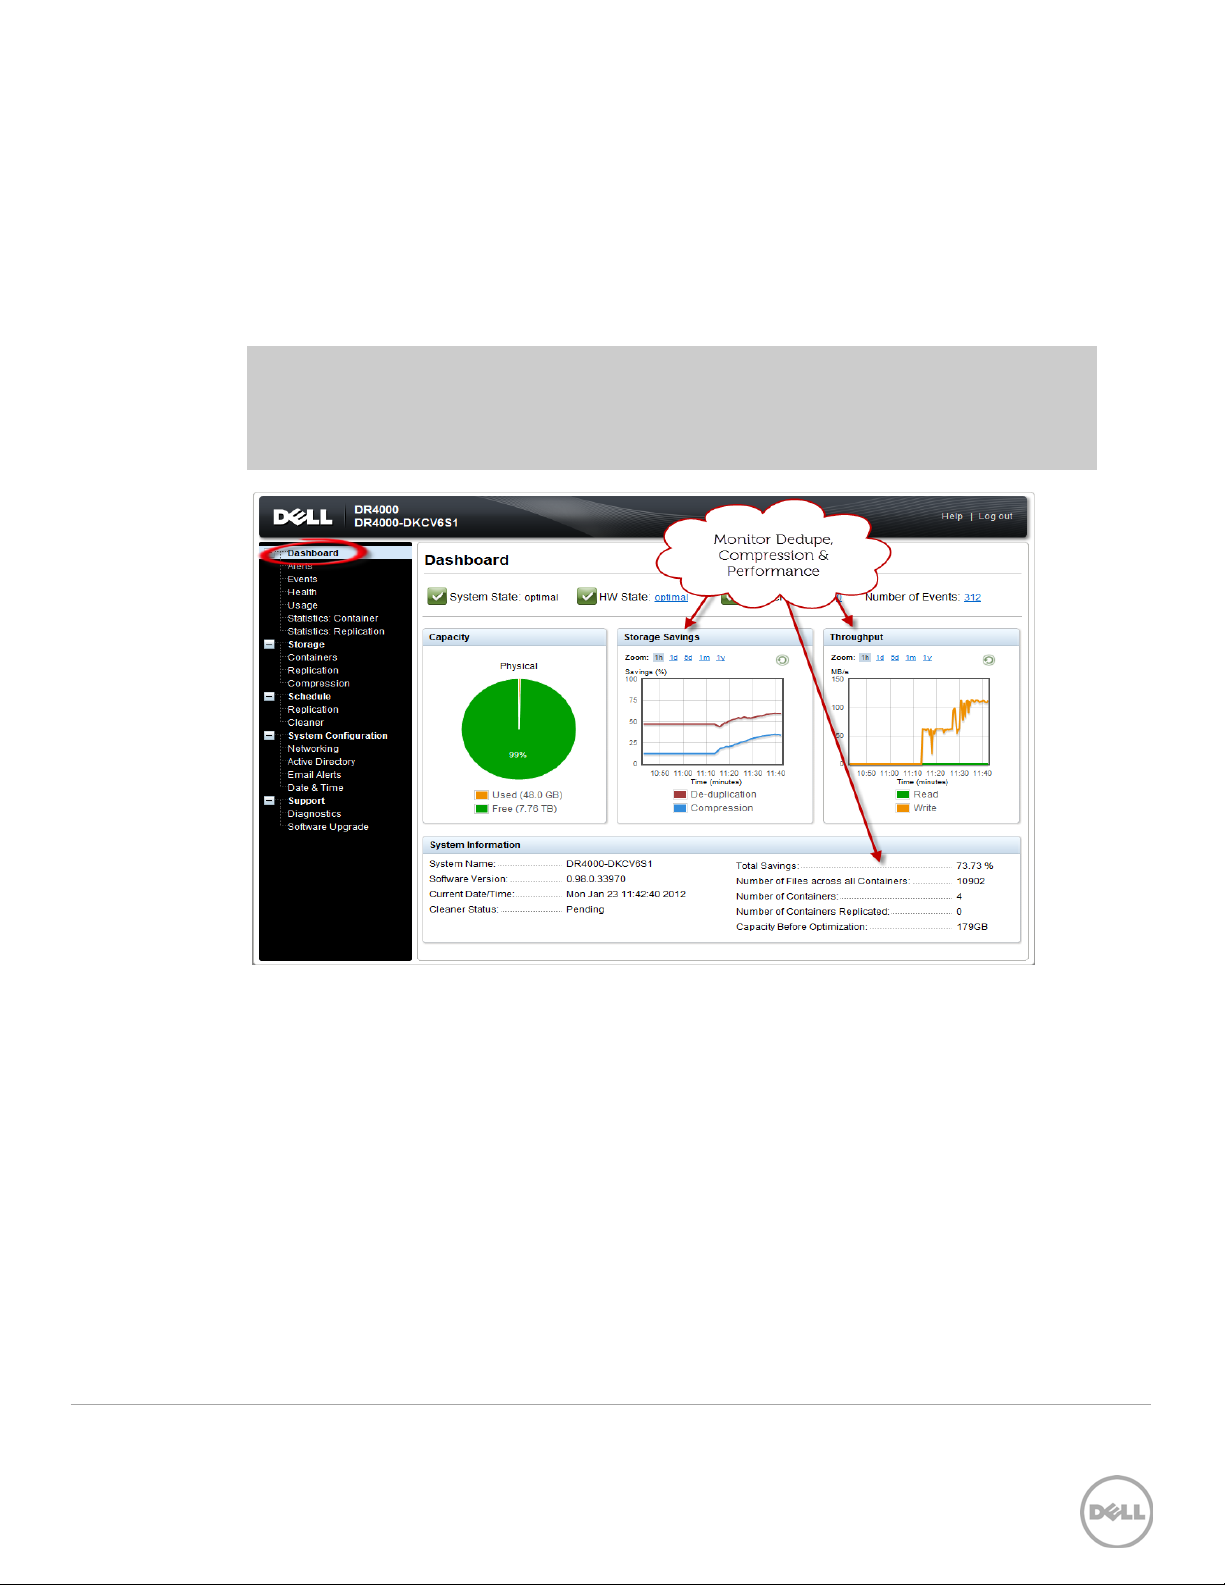
8 Monitoring deduplication, compression, and
performance
After backup jobs have run, the DR Series system tracks capacity, storage savings, and
throughput on the DR Series system dashboard. This information is valuable in
understanding the benefits of the DR Series system.
Note: Deduplication ratios increase over time. It is not uncommon to see a 2-4x
reduction (25-50% total savings) on the initial backup. As additional full backup jobs are
completed, the ratios will increase. Backup jobs with a 12-week retention will average a
15x ratio, in most cases.
31 Setting up Dell™ vRanger™ on the
Dell DR Series System | April 2015
 Loading...