

Page 1

Setting Up the Dell™ DR Series System as an
NFS or CIFS Backup Target on Oracle
Recovery Manager®
Dell Engineering
April 2015
A Dell Technical White Paper
Page 2

Date
Description
April 2015
Initial release
Revisions
THIS WHITE PAPER IS FOR INFORMATIONAL PURPOSES ONLY, AND MAY CONTAIN TYPOGRAPHICAL ERRORS AND
TECHNICAL INACCURACIES. THE CONTENT IS PROVIDED AS IS, WITHOUT EXPRESS OR IMPLIED WARRANTIES OF
ANY KIND.
© 2015 Dell Inc. All rights reserved. Reproduction of this material in any manner whatsoever without the express
written permission of Dell Inc. is strictly forbidden. For more information, contact Dell.
PRODUCT WARRANTIES APPLICABLE TO THE DELL PRODUCTS DESCRIBED IN THIS DOCUMENT MAY BE FOUND
AT: http://www.dell.com/learn/us/en/19/terms-of-sale-commercial-and-public-sector Performance of network
reference architectures discussed in this document may vary with differing deployment conditions, network loads, and
the like. Third party products may be included in reference architectures for the convenience of the reader. Inclusion
of such third party products does not necessarily constitute Dell’s recommendation of those products. Please consult
your Dell representative for additional information.
Trademarks used in this text:
Dell™, the Dell logo, and PowerVault™ are trademarks of Dell Inc. Other Dell trademarks may be used in this
document. Microsoft®, Windows®, Windows Server®, Internet Explorer®, MS-DOS®, Windows Vista® and Active
Directory® are either trademarks or registered trademarks of Microsoft Corporation in the United States and/or other
countries. Red Hat® and Red Hat® Enterprise Linux® are registered trademarks of Red Hat, Inc. in the United States
and/or other countries. Novell® and SUSE® are registered trademarks of Novell Inc. in the United States and other
countries. Oracle® is a registered trademark of Oracle Corporation and/or its affiliates. Other trademarks and trade
names may be used in this document to refer to either the entities claiming the marks and/or names or their products
and are the property of their respective owners. Dell disclaims proprietary interest in the marks and names of others.
2 Setting Up the Dell™ DR Series System as an NFS or CIFS Backup Target on Oracle Recovery Manager® |
April 2015
Page 3

Table of contents
1 Installing and configuring the DR Series system ....................................................................................................................... 5
2 Configuring a backup job on RMAN over a CIFS target ........................................................................................................ 12
2.1 Oracle settings for Windows RMAN Online Backup ................................................................................................... 12
2.2 Default RMAN backup configuration............................................................................................................................... 12
2.3 RMAN backup settings to DR Series system backup ................................................................................................... 12
2.4 RMAN backup of full database .......................................................................................................................................... 13
2.5 RMAN incremental backup of database ......................................................................................................................... 13
2.6 Backup with different options ........................................................................................................................................... 14
2.7 RMAN restore of Oracle database from DR Series system ........................................................................................ 14
2.8 RMAN restore of archive logs from DR Series system images ................................................................................. 15
3 Replicating Oracle RMAN database images ...............................................................................................................................17
3.1 RMAN restore from replication DR Series system container .....................................................................................17
4 Configuring a backup job on RMAN over an NFS target ....................................................................................................... 19
4.1 Create a storage device for NFS ....................................................................................................................................... 19
5 Creating a storage device for Rapid CIFS .................................................................................................................................. 20
5.1 About the Rapid CIFS plugin .............................................................................................................................................. 20
5.2 Configure Rapid CIFS........................................................................................................................................................... 20
6 Creating a storage device for Rapid NFS ................................................................................................................................... 21
6.1 About the Rapid NFS plugin ............................................................................................................................................... 21
6.2 Configuring Rapid NFS ........................................................................................................................................................ 21
7 General best practices for RMAN backups to the DR Series system .................................................................................. 22
8 Setting up the DR Series system cleaner ................................................................................................................................... 24
9 Monitoring deduplication, compression, and performance ................................................................................................ 25
3 Setting Up the Dell™ DR Series System as an NFS or CIFS Backup Target on Oracle Recovery Manager® |
April 2015
Page 4
Executive summary
This paper provides guideline about how to set up the Dell DR Series System as a backup to disk target for
RMAN® over CIFS/Rapid CIFS and NFS/Rapid NFS.
For additional information, see the DR Series system documentation and other data management
application best practices whitepapers for your specific DR Series system at:
http://www.dell.com/powervaultmanuals
Note: The DR Series System/RMAN build version and screenshots used for this paper may vary slightly, depending on
the version of the DR Series System/ RMAN software version used.
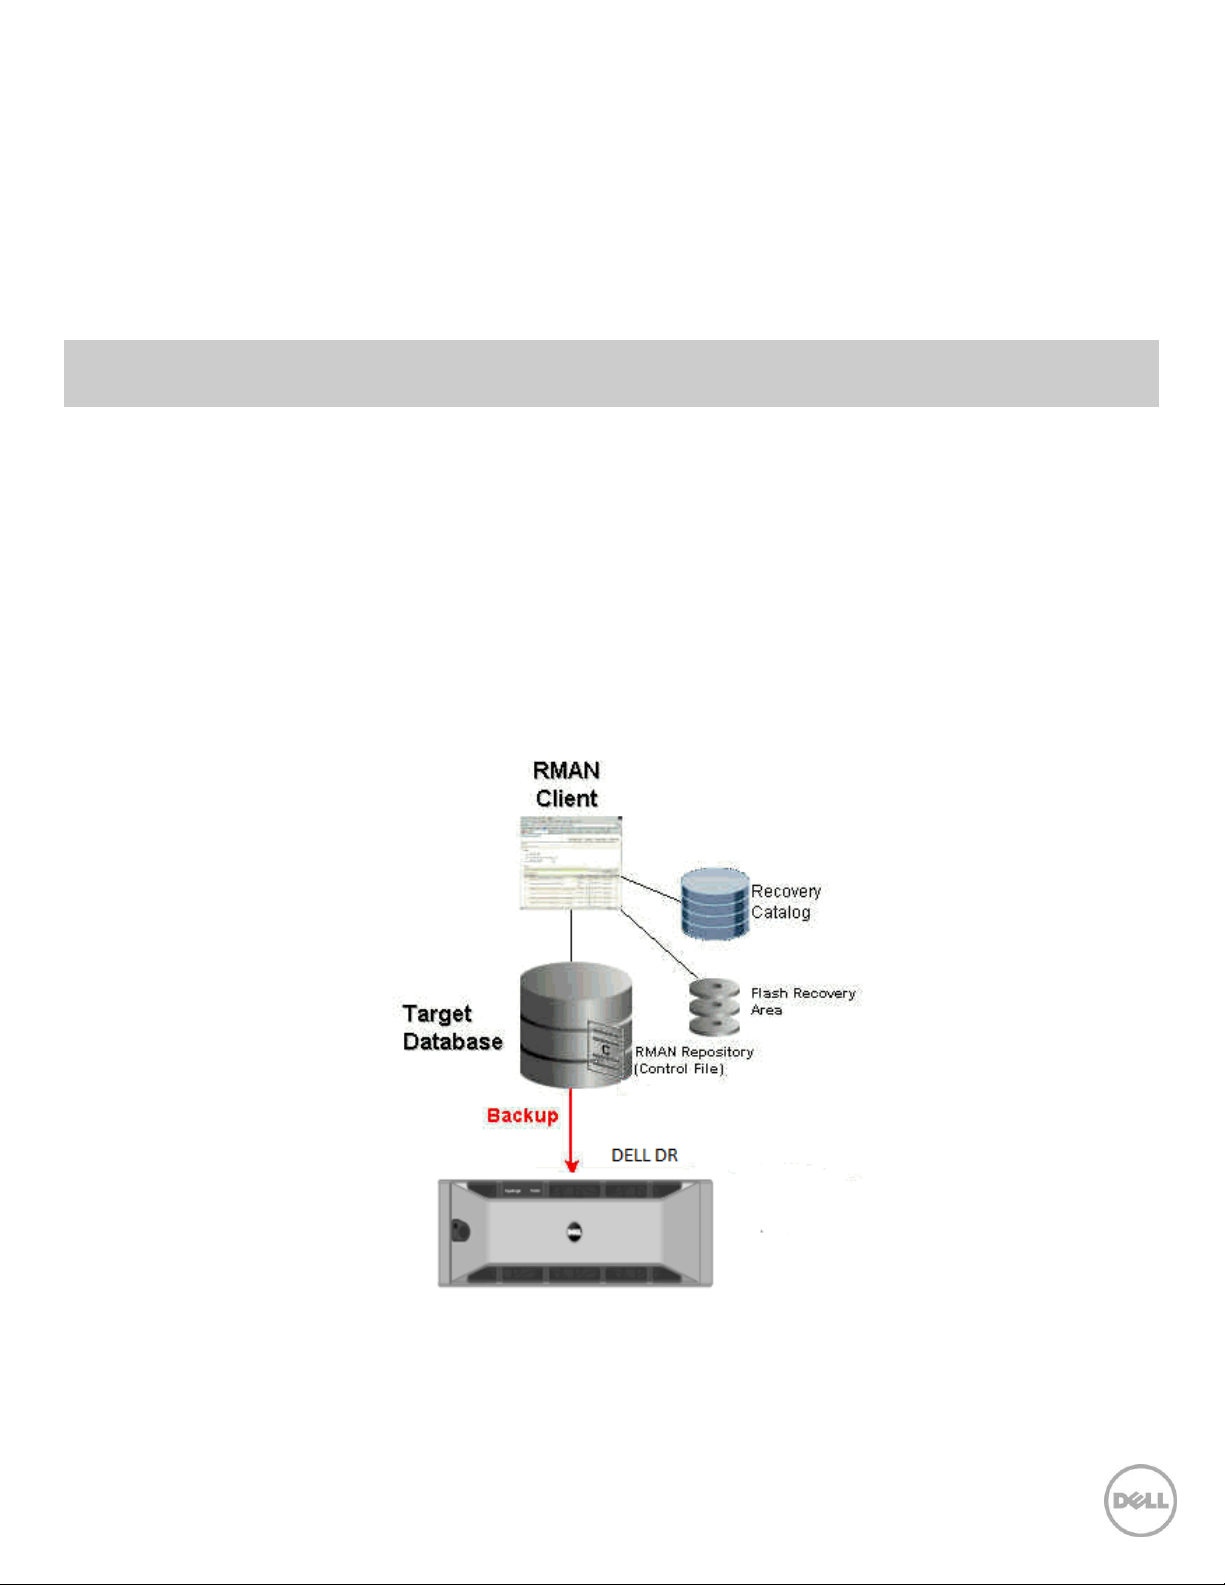
About RMAN
RMAN (Recovery Manager) is a backup and recovery manager supplied for Oracle databases by the Oracle
Corporation. Oracle Corporation recommends RMAN as its preferred method for backup and recovery
and has written command-line and graphical (via Oracle Enterprise Manager) interfaces for the product.
The following illustration shows a typical implementation of the backup infrastructure with the Dell DR
Series system. The DR Seriees system offers optimized replication of data from one system to another over
the WAN for disaster recovery.
Dell DR Series System: RMAN: Baseline Scenarios
4 Setting Up the Dell™ DR Series System as an NFS or CIFS Backup Target on Oracle Recovery Manager® |
April 2015
Page 5
1 Installing and configuring the DR Series system
1. Rack and cable the DR Series system, and power it on. Initialize the DR Series system.
In the
Dell DR Series System Administrator Guide
Connection”, “Logging in and Initializing the DR Series System and “Accessing IDRAC6/Idrac7
Using RACADM” for more information.
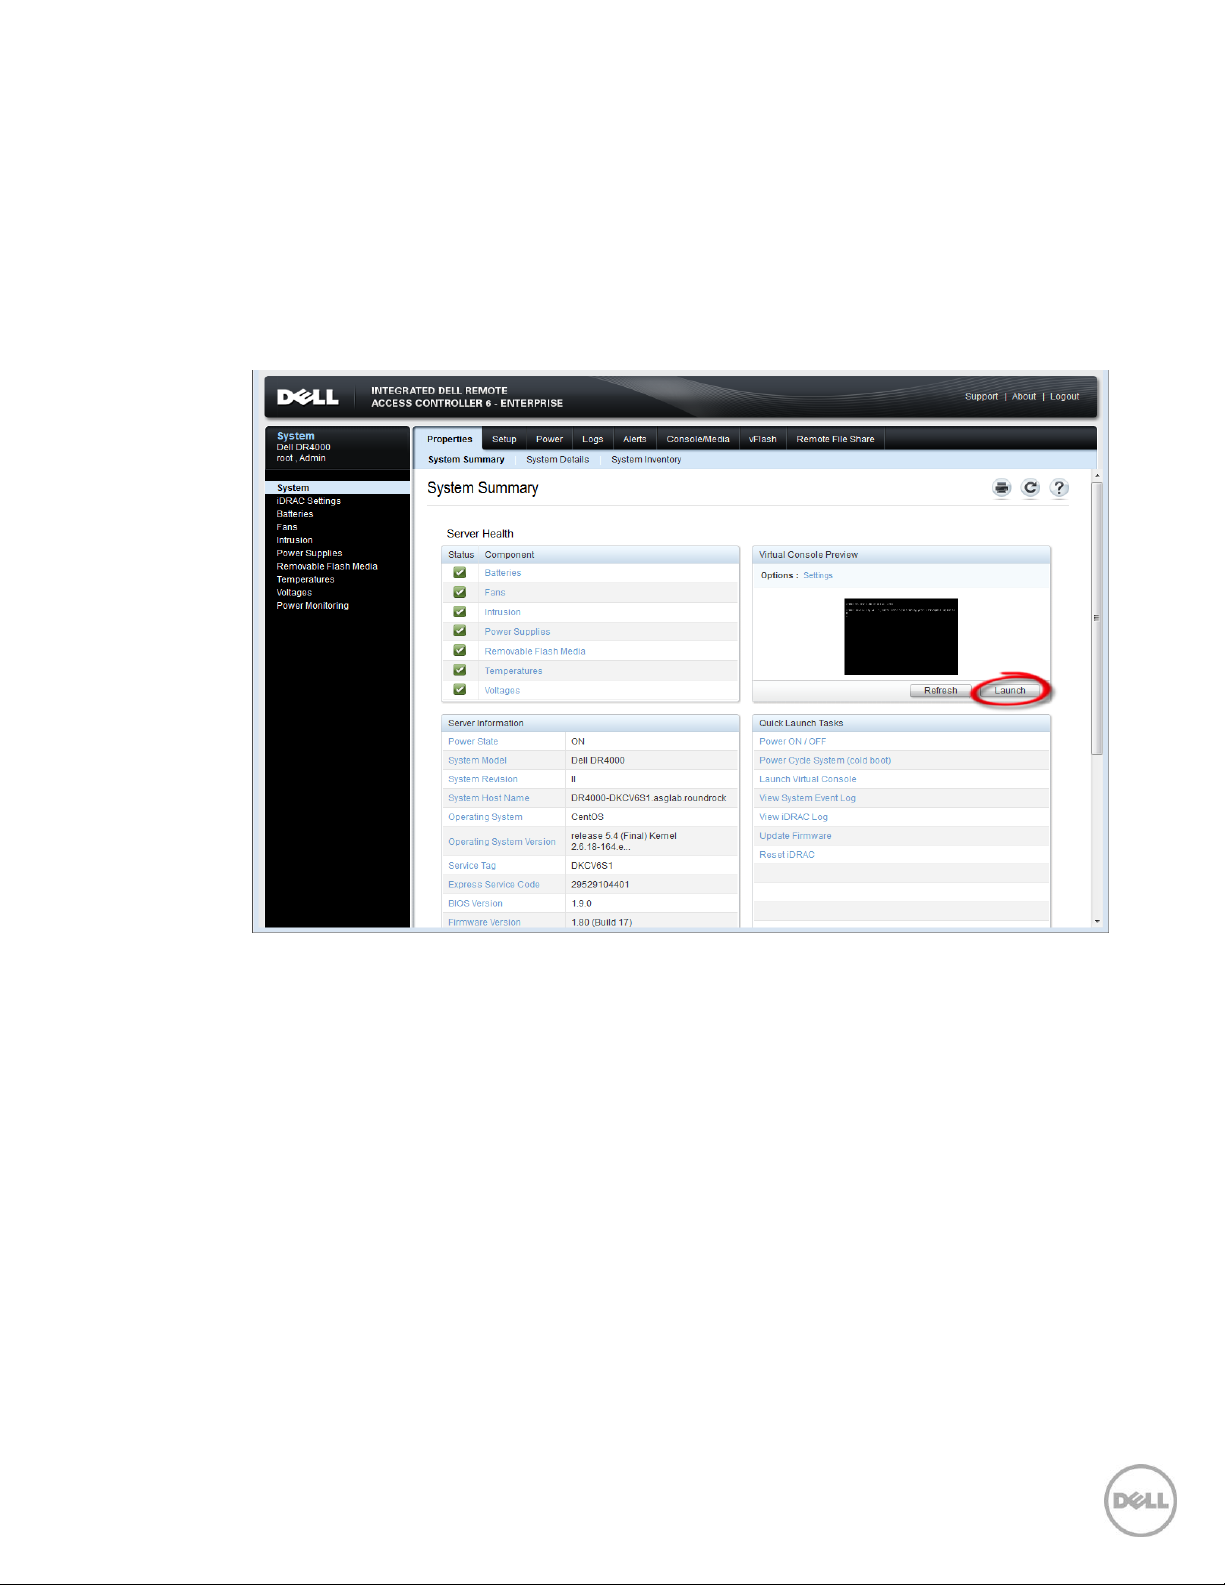
2. Log on to iDRAC using the default address 192.168.0.120, or the IP address that is assigned to the
iDRAC interface, with the user name and password: “root/calvin”.
, refer to the following topics: “iDRAC
3. Launch the virtual console.
5 Setting Up the Dell™ DR Series System as an NFS or CIFS Backup Target on Oracle Recovery Manager® |
April 2015
Page 6
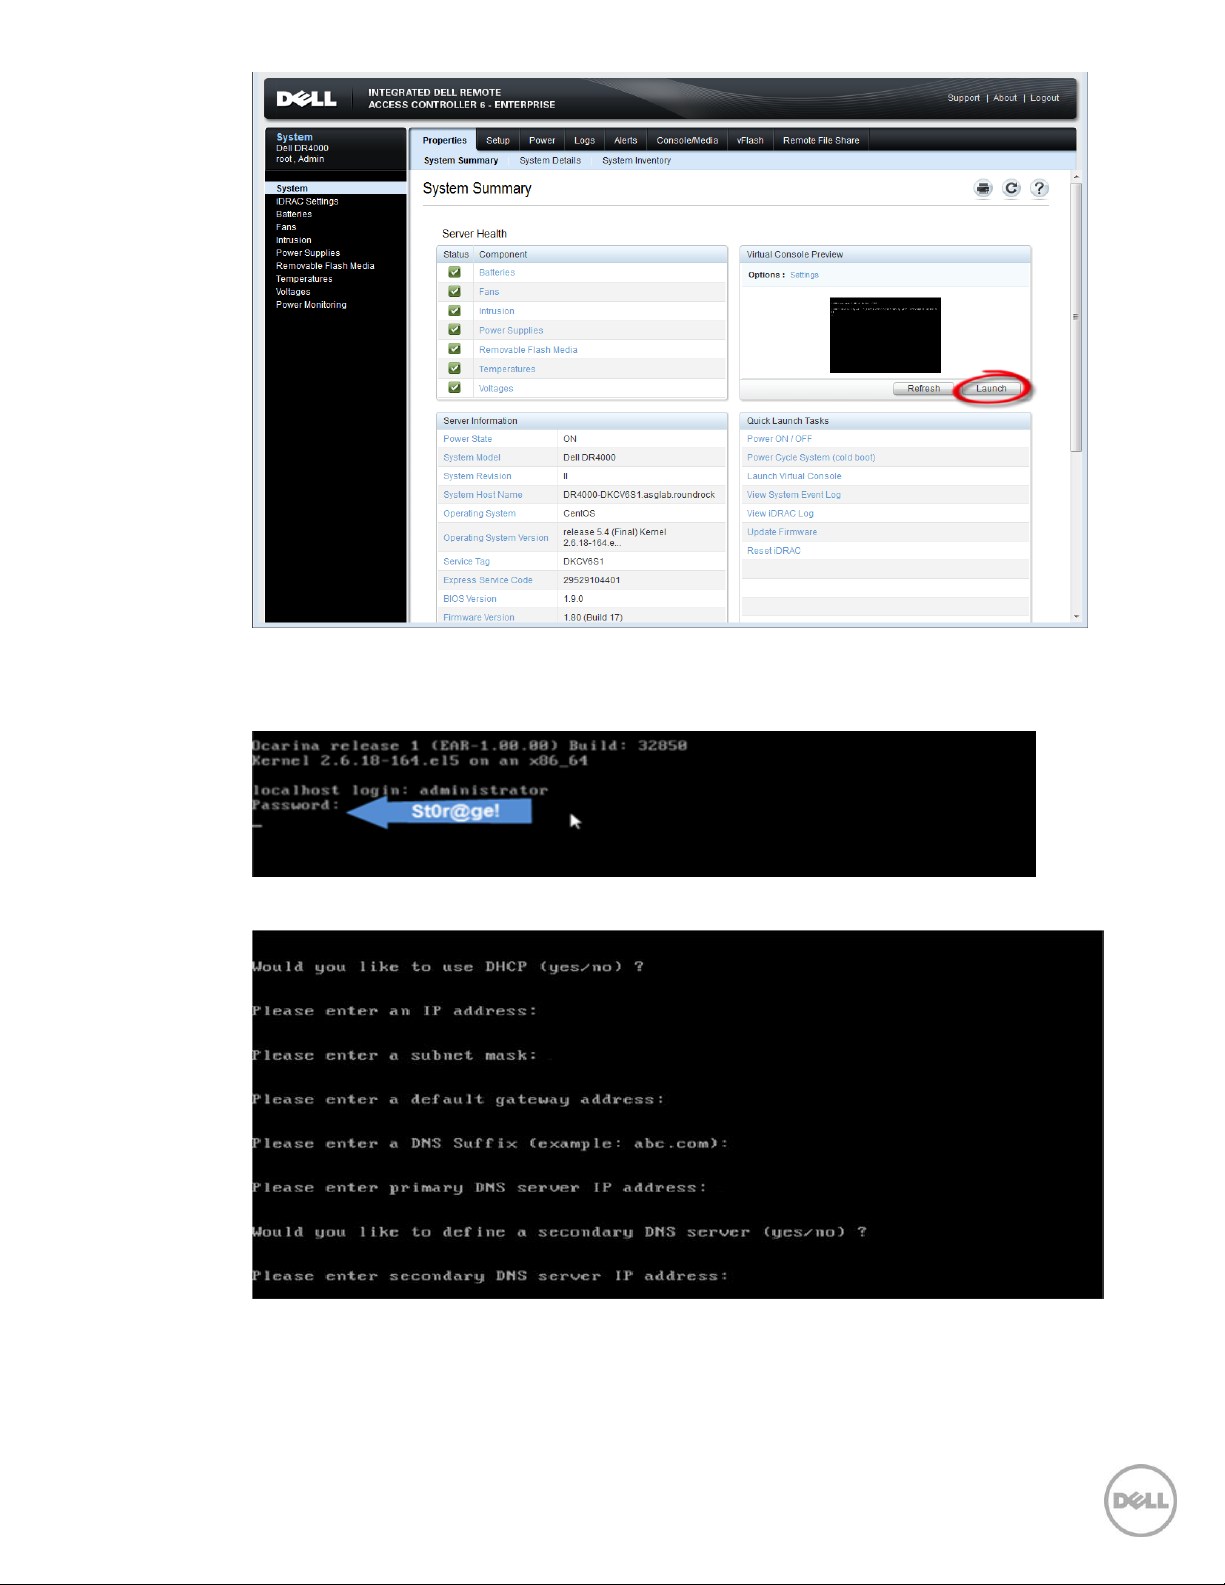
4. After the virtual console is open, log on to the system as user administrator with the password
St0r@ge! (The “0” in the password is the numeral zero).
5. Set the user-defined networking preferences.
6. View the summary of preferences and confirm that it is correct.
6 Setting Up the Dell™ DR Series System as an NFS or CIFS Backup Target on Oracle Recovery Manager® |
April 2015
Page 7

7. Log on to DR Series system administrator console using the IP address you just provided for the
DR Series system with the username administrator and password St0r@ge! (The “0” in the
password is the numeral zero.).
8. Join the DR Series system to Active Directory.
Note: If you do not want to add the DR Series system to Active Directory, please see the
System Owner’s Manual
for guest logon instructions.
a. Under System Configuration in the left navigation area, click Active Directory.
7 Setting Up the Dell™ DR Series System as an NFS or CIFS Backup Target on Oracle Recovery Manager® |
April 2015
DR Series
Page 8
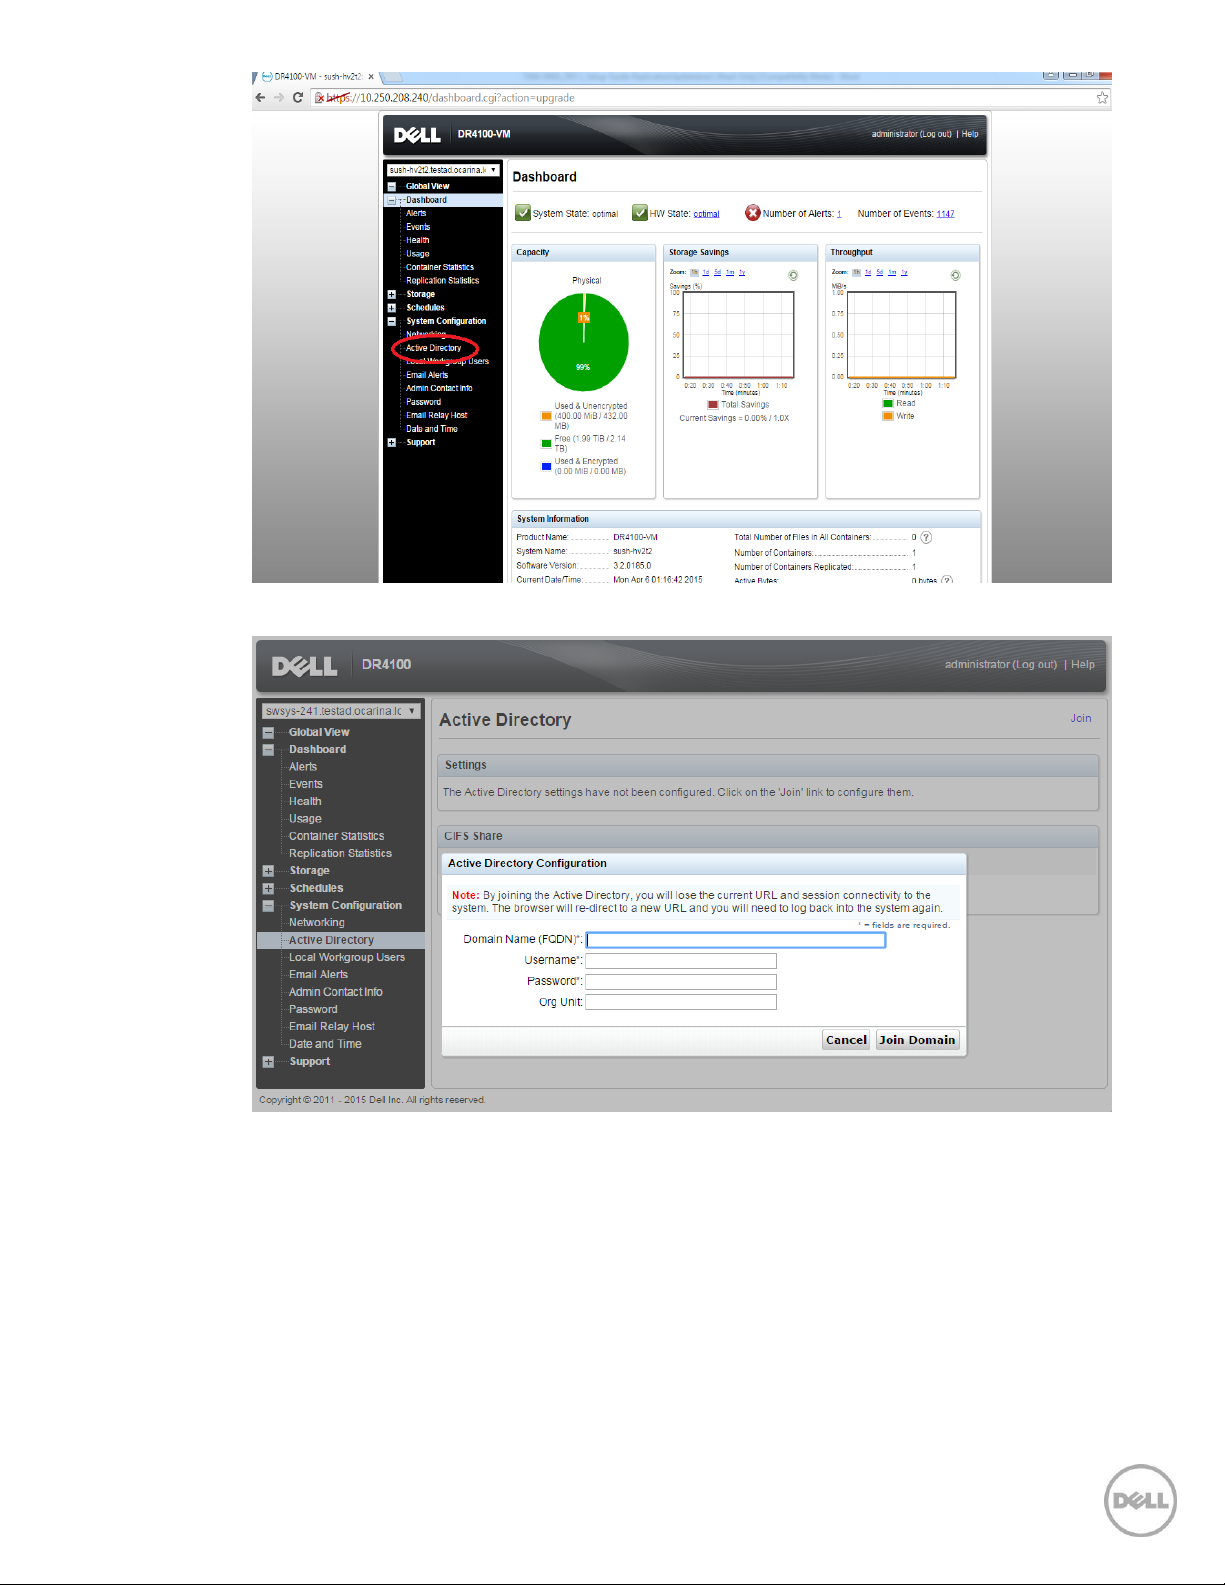
b. Enter your Active Directory credentials.
9. Create and mount the container by selecting Storage > Containers in the left navigation area, and
then clicking Create at the top of the page.
8 Setting Up the Dell™ DR Series System as an NFS or CIFS Backup Target on Oracle Recovery Manager® |
April 2015
Page 9

10. Enter a Container Name, click Next.
11. Select the NAS (NFS, CIFS) option and click Next.
12. Enable the access protocols as needed, and then click Next.
9 Setting Up the Dell™ DR Series System as an NFS or CIFS Backup Target on Oracle Recovery Manager® |
April 2015
Page 10

13. For NFS, provide the client access information and click Next.
14. For CIFS, provide the client access control information and click Next.
10 Setting Up the Dell™ DR Series System as an NFS or CIFS Backup Target on Oracle Recovery Manager® |
April 2015
Page 11

Note: For improved security, Dell recommends adding IP addresses for the Backup console (RMAN). Not all
environments will have all components.
15. Click Create a New Container, and then confirm that the container is added.
16. Select the Container that was just created and click Edit. Note the container share/export path,
which you will use later to target the DR Series system.
11 Setting Up the Dell™ DR Series System as an NFS or CIFS Backup Target on Oracle Recovery Manager® |
April 2015
Page 12

2 Configuring a backup job on RMAN over a CIFS target
2.1 Oracle settings for Windows RMAN Online Backup
There are two options for RMAN to authenticate to the DR Series system through CIFS.
DR is joined into an Active Directory Domain: Integrate RMAN Node and DR Series System with Active
Directory
Ensure the AD user has appropriate ACLs to the DR Series System Container share
DR is standalone CIFS server: Make sure this CIFS user has appropriate access permission to the DR
Series system container share. Oracle RMAN Backup Node will use this user to authenticate to DR
Series system share in Workgroup mode.
To set the password for local CIFS administrator on the DR Series system, log on to the DR
using SSH.
i. Log on with the username Administrator, and password St0r@ge!
ii. Run the following command:
authenticate --set --user administrator
Note: The CIFS administrator account is a separate account from the administrator account used to
administer the appliance. After an authentication method is chosen, set the RMAN Oracle service
account to use the CIFS administrator account.
2.2 Default RMAN backup configuration
The Default settings for RMAN are listed below with command show all.
2.3 RMAN backup settings to DR Series system backup
The RMAN backup settings changed for taking backup to Dell DR Server systems over CIFS.
1. Configure channel to use UNC path of the DR Series system container.
12 Setting Up the Dell™ DR Series System as an NFS or CIFS Backup Target on Oracle Recovery Manager® |
April 2015
Page 13

CONFIGURE CHANNEL DEVICE TYPE DISK MAXOPENFILES 1 FORMAT ‘\\<UNCPath to
the container noted above >/ora_df%t_s%s_s%p’;
2. Configure RMAN to back up the control file after each backup.
2.4 RMAN backup of full database
Backup Oracle Database using RMAN with BACKUP INCRMENTAL LEVEL 0 DATABASE FILESPERSET 1;
2.5 RMAN incremental backup of database
Incremental Backup Oracle Database using RMAN with BACKUP INCRMENTAL LEVEL 1 DATABASE
FILESPERSET 1;
13 Setting Up the Dell™ DR Series System as an NFS or CIFS Backup Target on Oracle Recovery Manager® |
April 2015
Page 14

2.6 Backup with different options
BACKUP ARCHIVELOG ALL;
BACKUP DATABASE PLUS ARCHIVELOG;
2.7 RMAN restore of Oracle database from DR Series system
The following screen shot shows the restore process of Oracle Database through RMAN from DR Series
system images.
14 Setting Up the Dell™ DR Series System as an NFS or CIFS Backup Target on Oracle Recovery Manager® |
April 2015
Page 15

2.8 RMAN restore of archive logs from DR Series system images
RMAN> RESTORE ARCHIVELOG ALL;
Starting restore at 18-JUN-14
using channel ORA_DISK_1
channel ORA_DISK_1: starting archived log restore to default destination
channel ORA_DISK_1: restoring archived log
archived log thread=1 sequence=23
channel ORA_DISK_1: restoring archived log
archived log thread=1 sequence=24
channel ORA_DISK_1: restoring archived log
archived log thread=1 sequence=25
channel ORA_DISK_1: restoring archived log
archived log thread=1 sequence=26
channel ORA_DISK_1: restoring archived log
archived log thread=1 sequence=27
channel ORA_DISK_1: restoring archived log
archived log thread=1 sequence=28
channel ORA_DISK_1: restoring archived log
archived log thread=1 sequence=29
channel ORA_DISK_1: reading from backup piece
\\10.250.242.108\ORARDCIFS\LARGE_DF850522883_S6_S1
channel ORA_DISK_1: piece
handle=\\10.250.242.108\ORARDCIFS\LARGE_DF850522883_S6_S1 tag=TAG20140618T002123
channel ORA_DISK_1: restored backup piece 1
channel ORA_DISK_1: restore complete, elapsed time: 00:00:10
channel ORA_DISK_1: starting archived log restore to default destination
channel ORA_DISK_1: restoring archived log
archived log thread=1 sequence=30
15 Setting Up the Dell™ DR Series System as an NFS or CIFS Backup Target on Oracle Recovery Manager® |
April 2015
Page 16

channel ORA_DISK_1: reading from backup piece
\\10.250.242.108\ORARDCIFS\LARGE_DF850522946_S9_S1
channel ORA_DISK_1: piece
handle=\\10.250.242.108\ORARDCIFS\LARGE_DF850522946_S9_S1 tag=TAG20140618T002226
channel ORA_DISK_1: restored backup piece 1
channel ORA_DISK_1: restore complete, elapsed time: 00:00:01
Finished restore at 18-JUN-14
RMAN>
To restore archive logs to a different location, use the following RMAN command. The default location of
the archive log restore will be where they are created.
RUN
{
SET ARCHIVELOG DESTINATION TO '/oracle/temp_restore';
RESTORE ARCHIVELOG ALL;
}
16 Setting Up the Dell™ DR Series System as an NFS or CIFS Backup Target on Oracle Recovery Manager® |
April 2015
Page 17

3 Replicating Oracle RMAN database images
First, you need to create containers on the source and target DR Series systems and then configure
replication between those source and target DR containers. Both of the DR Series systems should be on
the same version. Refer to the
configuring cascaded replication.
Dell DR Series System Administrator’s Guide
for information about
Replication of Oracle Database to target DR Series system
3.1 RMAN restore from replication DR Series system container
To restore the Oracle Database from replication container, first detach the replication on the target
container, and run the following commands to import the backup images into the RMAN Catalog.
RMAN> catalog start with '<UNC Path of the DR replication container>';
Searching for all files that match the pattern <UNC Path of the DR replication
container>
List of Files Unknown to the Database
=====================================
File Name<UNC Path of the DR replication container>\ORA_DF848183546_S112_S1
File Name: <UNC Path of the DR replication container>\ORA_DF848183663_S114_S1
File Name: <UNC Path of the DR replication container>\ORA_DF848183662_S113_S1
17 Setting Up the Dell™ DR Series System as an NFS or CIFS Backup Target on Oracle Recovery Manager® |
April 2015
Page 18

Do you really want to catalog the above files (enter YES or NO)? yes
Cataloging files...
Cataloging done
List of Cataloged Files
=======================
File Name: <UNC Path of the DR replication container>\ORA_DF848183546_S112_S1
File Name: <UNC Path of the DR replication container>\ORA_DF848183663_S114_S1
File Name: <UNC Path of the DR replication container>\ORA_DF848183662_S113_S1
18 Setting Up the Dell™ DR Series System as an NFS or CIFS Backup Target on Oracle Recovery Manager® |
April 2015
Page 19

4 Configuring a backup job on RMAN over an NFS target
4.1 Create a storage device for NFS
For NFS backup using RMAN, a target folder needs to be created as an NFS share directory. This is the
location to which backup objects will be written. (This is not required while adding CIFS share.)
1. Mount the DR Series System NFS share onto the NFS share directory which backup objects will be
written in the RMAN environment.
2. For example:
mount –t nfs <ip address of DRXXXX>:/containers/sample
/mnt/RMANtargetContainer
3. Verify the NFS share. One way is to try using the Linux command “cat /proc/mounts”. The rsize
and wsize of the connects in the command output should be 512K.
In the RMAN settings use the below command to add the NFS mount path as device.
CONFIGURE CHANNEL DEVICE TYPE DISK MAXOPENFILES 1 FORMAT '/<Mount point path
on RMAN server>/ora_df%t_s%s_s%p';
Note: Please follow the instructions in Section 3 as the backup and other settings are the same as that of
CIFS.
19 Setting Up the Dell™ DR Series System as an NFS or CIFS Backup Target on Oracle Recovery Manager® |
April 2015
Page 20

5 Creating a storage device for Rapid CIFS
5.1 About the Rapid CIFS plugin
Rapid CIFS enables write operation acceleration on clients that use CIFS file system protocols. These
accelerators allow for better coordination and integration between DR Series systems backup, restore, and
optimized duplication operations with Data Management Applications (DMAs) such as CommVault, EMC
Networker, and Tivoli Storage Manager. For a current list of supported DMAs, see the
System Interoperability Guide.
data is written to the DR Series system. All chunking and hash computations are done at the client level.
5.2 Configure Rapid CIFS
To configure Rapid CIFS on windows operating systems download and install the plugin
DellRapidCIFS-xxxxx.msi on the Oracle server.
Rapid CIFS is a Windows-certified filter driver that ensures that only unique
Dell DR Series
Refer to the
information.
Below is the output for Rapid CIFS configured backup.
RMAN> BACKUP INCREMENTAL LEVEL 1 DATABASE filesperset 1;
Starting backup at 02-JUN-14
using channel ORA_DISK_1
channel ORA_DISK_1: starting incremental level 1 datafile backup set
channel ORA_DISK_1: specifying datafile(s) in backup set
input datafile file number=00001
name=E:\APP\ADMINISTRATOR\ORADATA\BLOCK\SYSTEM01.DBF
channel ORA_DISK_1: starting piece 1 at 02-JUN-14
channel ORA_DISK_1: finished piece 1 at 02-JUN-14
piece handle=\\SWSYS-33.OCARINA.LOCAL\BACKUP\ORA_DF849163738_S17_S1
tag=TAG20140602T064858 comment=NONE
----------------Screen O/P truncated----------------------Starting Control File and SPFILE Autobackup at 02-JUN-14
piece handle=C:\APP\ADMINISTRATOR\PRODUCT\11.2.0\DBHOME_3\DATABASE\C-168923332620140602-03 comment=NONE
Finished Control File and SPFILE Autobackup at 02-JUN-14
To check the Client Side optimization:
Dell DR Series System Administrator’s Guide
for the download location and for more
C:\Program Files\Dell\Rapid CIFS>rdcifsctl.exe stats -s
Aggregate Statistics:
Total Bytes Written: 2,411,298,816
Total Bytes Sent: 1,378,067,343
Total Network Savings: 42.8496
C:\Program Files\Dell\Rapid CIFS>rdcifsctl.exe stats -s
Aggregate Statistics:
Total Bytes Written: 2,412,691,456
Total Bytes Sent: 1,379,461,495
Total Network Savings: 42.8248
20 Setting Up the Dell™ DR Series System as an NFS or CIFS Backup Target on Oracle Recovery Manager® |
April 2015
Page 21

6 Creating a storage device for Rapid NFS
6.1 About the Rapid NFS plugin
Rapid NFS enables write operation acceleration on clients that use NFS file system protocols. These
accelerators allow for better coordination and integration between DR Series systems backup, restore, and
optimized duplication operations with Data Management Applications (DMAs) such as CommVault, EMC
Networker, and Tivoli Storage Manager. For the current list of supported DMAs, see the
System Interoperability Guide.
Rapid NFS is a client file system type that ensures that only unique data is written to the DR Series system.
It uses user space components and file system in user space (FUSE) to accomplish this. Metadata
operations such as file creates and permission changes go through the standard NFS protocol, whereas
write operations go through Rapid NFS.
6.2 Configuring Rapid NFS
For Rapid NFS to configure on Linux system we need to install plugin bin file,
DellRapidNFS-xxxxx-xxxxx-x86_64.bin.The rpm after install looks like DellRapidNFS-310093.0-
52425.x86_64.
Dell DR Series
1. To mount as Rapid NFS:
mount –t rdnfs <ip address of DRXXXX>:/containers/sample
/mnt/RMANtargetContainer
2. Verify the NFS share. One way is to try using the Linux command “cat /proc/mounts”. The rsize
and wsize of the connects in the command output should be 512K.
Refer to the
information.
Dell DR Series System Administrator’s Guide
for the download location and for more
21 Setting Up the Dell™ DR Series System as an NFS or CIFS Backup Target on Oracle Recovery Manager® |
April 2015
Page 22

7 General best practices for RMAN backups to the DR Series
system
The Dell DR Series system supports RMAN backups over both CIFS and NFS protocols. With client side
optimization drivers like Rapid CIFS and Rapid NFS backups become faster and more efficient. Several
options exist with RMAN that every DBA should be aware of. These effect how RMAN behaves when
performing its backup duties. Some of the most important are outlined here because they affect how
RMAN will interact with a Dell DR Series deduplication appliance. Refer to Oracle’s documentation for
more details.
Multiplexing of data is not recommended as it adversely affects the deduplication savings. Every time data
gets multiplexed, the patterns may change, and the deduplication algorithm can fail to decipher the
duplicates. Specify FILESPERSET = 1 when backing up to a DR Series system. FILESPERSET controls how
many data files are written to a particular file within the backup set.
Backup database FILESPERSET=1
Specify MAXOPENFILES = 1 for each channel defined. This will ensure that each RMAN channel only
reads from a single file at any one time. It is recommended to keep the value at minimum.
CONFIGURE CHANNEL DEVICE TYPE DISK MAXOPENFILES 1 FORMAT '<UNCPath of the DR
container>/ora_df%t_s%s_s%p';
Turn on change block tracking by using below command.
SQL> ALTER DATABASE ENABLE BLOCK CHANGE TRACKING USING FILE '<Path on the RMAN server
Oracle Home>/oradata/rman_change_track.f';
Configure RMAN settings to backup control file and SPFILE.
Auto backup on
CONFIGURE CONTROLFILE AUTOBACKUP ON;
Keep CONFIGURE BACKUP OPTIMIZATION OFF every time for better savings.
RMAN encryption should NOT be used as the deduplication savings get affected.
A listing of the global parameters can be generated by the “show all” RMAN command:
RMAN> show all;
RMAN configuration parameters for database with db_unique_name APPLE are:
CONFIGURE RETENTION POLICY TO REDUNDANCY 1; # default
CONFIGURE BACKUP OPTIMIZATION OFF; # default
CONFIGURE DEFAULT DEVICE TYPE TO DISK; # default
CONFIGURE CONTROLFILE AUTOBACKUP ON;
CONFIGURE CONTROLFILE AUTOBACKUP FORMAT FOR DEVICE TYPE DISK TO '%F'; # default
CONFIGURE DEVICE TYPE DISK PARALLELISM 1 BACKUP TYPE TO BACKUPSET; # default
CONFIGURE DATAFILE BACKUP COPIES FOR DEVICE TYPE DISK TO 1; # default
CONFIGURE ARCHIVELOG BACKUP COPIES FOR DEVICE TYPE DISK TO 1; # default
CONFIGURE CHANNEL DEVICE TYPE DISK FORMAT '/mnt/apple_nfs/apple_%u_%s_%p';
CONFIGURE MAXSETSIZE TO UNLIMITED; # default
CONFIGURE ENCRYPTION FOR DATABASE OFF; # default
CONFIGURE ENCRYPTION ALGORITHM 'AES128'; # default
22 Setting Up the Dell™ DR Series System as an NFS or CIFS Backup Target on Oracle Recovery Manager® |
April 2015
Page 23

CONFIGURE COMPRESSION ALGORITHM 'BASIC' AS OF RELEASE 'DEFAULT' OPTIMIZE FOR
LOAD TRUE ; # default
CONFIGURE ARCHIVELOG DELETION POLICY TO NONE; # default
CONFIGURE SNAPSHOT CONTROLFILE NAME TO
'/home/orabase/product/11.2.0/db_1/dbs/snapcf_apple.f'; # default
23 Setting Up the Dell™ DR Series System as an NFS or CIFS Backup Target on Oracle Recovery Manager® |
April 2015
Page 24

8 Setting up the DR Series system cleaner
Performing scheduled disk space reclamation operations are recommended as a method for recovering
disk space from system containers in which files were deleted as a result of deduplication.
The cleaner runs during idle time. If your workflow does not have a sufficient amount of idle time on a
daily basis, then you should consider scheduling the cleaner to force it to run during a scheduled time.
If necessary, you can perform the procedure shown in the following screenshot to force the cleaner to
run. After all of the backup jobs are set up, the DR Series system cleaner can be scheduled. The DR Series
system cleaner should run at least three hours per day when backups are not taking place, and generally
after a backup job has completed.
Dell recommends scheduling the cleaner at a separate time from backup and replication jobs.
24 Setting Up the Dell™ DR Series System as an NFS or CIFS Backup Target on Oracle Recovery Manager® |
April 2015
Page 25

9 Monitoring deduplication, compression, and performance
After backup jobs have run, the DR Series system tracks capacity, storage savings, and throughput on the
DR Series system dashboard. This information is valuable in understanding the benefits of the DR Series
system.
Note: Deduplication ratios increase over time. It is not uncommon to see a 2-4x reduction (25-50% total
savings) on the initial backup. As additional full backup jobs are completed, the ratios will increase.
Backup jobs with a 12-week retention will average a 15x ratio, in most cases.
25 Setting Up the Dell™ DR Series System as an NFS or CIFS Backup Target on Oracle Recovery Manager® |
April 2015
 Loading...