

Dell Data Protection Security Tools Owner's Manual

Dell Data Protection | Security Tools
Installation Guide

© 2014 Dell Inc.
Registered trademarks and trademarks used in the DDP|E, DDP|ST, and DDP|CE suite of documents: Dell™ and the Dell logo, Dell
Precision™, OptiPlex™, ControlVault™, Latitude™, XPS
®
Duo
, Itanium®, and Xeon® are registered trademarks of Intel Corporation in the U.S. and other countries. Adobe®, Acrobat®, and
®
are registered trademarks of Adobe Systems Incorporated. Authen Tec® and Eikon® are registered trademarks of Authen Tec.
Flash
®
AMD
is a registered trademark of Advanced Micro Devices, Inc. Microsoft®, Windows®, and Windows Server®, Internet Explorer®,
MS-DOS
V
of Microsoft Corporation in the United States and/or other countries. VMware
in the United States or other countries. Box
Android™, Google™ Chrome™, Gmail™, YouTube
the United States and other countries. Apple
iCloud
®
®
, Windows Vista®, MSN®, ActiveX®, Active Directory®, Access®, ActiveSync®, BitLocker®, BitLocker To Go®, Excel®, Hyper-
, Silverlight®, Outlook®, PowerPoint®, OneDrive®, SQL Server®, and Visual C++® are either trademarks or registered trademarks
®
is a registered trademark of Box. DropboxSM is a service mark of Dropbox, Inc. Google™,
®
®
SM
, iPad®, iPhone®, iPhoto®, iTunes Music Store®, Macintosh®, Safari®, and Siri® are either servicemarks, trademarks, or
, Aperture®, App StoreSM, Apple Remote Desktop™, Apple TV®, Boot Camp™, FileVault™,
registered trademarks of Apple, Inc. in the United States and/or other countries. GO ID
of EMC Corporation. EnCase™ and Guidance Software
is a registered trademark of Entrust
®
, Inc. in the United States and other countries. InstallShield® is a registered trademark of Flexera
Software in the United States, China, European Community, Hong Kong, Japan, Taiwan, and United Kingdom. Micron
are registered trademarks of Micron Technology, Inc. in the United States and other countries. Mozilla
of Mozilla Foundation in the United States and/or other countries. iOS
the United States and certain other countries and is used under license. Oracle
®
, and KACE™ are trademarks of Dell Inc. Intel®, Pentium®, Intel Core Inside
®
is a registered trademark or trademark of VMware, Inc.
®
, and Google™ Play are either trademarks or registered trademarks of Google Inc. in
®
®
are either trademarks or registered trademarks of Guidance Software. Entrust®
®
is a trademark or registered trademark of Cisco Systems, Inc. in
®
, RSA®, and SecurID® are registered trademarks
®
®
Fire fox® is a registered trademark
and RealSSD®
and Java® are registered trademarks of Oracle and/or its
affiliates. Other names may be trademarks of their respective owners. SAMSUNG™ is a trademark of SAMSUNG in the United States
or other countries. Seagate® is a registered trademark of Seagate Technology LLC in the United States and/or other countries. Travelstar®
is a registered trademark of HGST, Inc. in the United States and other countries. UNIX
VALIDITY™ is a trademark of Validity Sensors, Inc. in the United States and other countries. VeriSign
trademarks or registered trademarks of VeriSign, Inc. or its affiliates or subsidiaries in the U.S. and other countries and licensed to Symantec
Corporation. KVM on IP
®
is a registered trademark of Video Products. Yahoo!® is a registered trademark of Yahoo! Inc.
®
is a registered trademark of The Open Group.
®
and other related marks are the
This product uses parts of the 7-Zip program. The source code can be found at www.7-zip.org. Licensing is under the GNU LGPL
license + unRAR restrictions (www.7-zip.org/license.txt).
2014-08
Protected by one or more U.S. Patents, including: Number 7665125; Number 7437752; and Number 7665118.
Information in this document is subject to change without notice.

Contents
1 Introduction . . . . . . . . . . . . . . . . . . . . . . . . . . . . . . . . . . . . . . . . . . . . . . . . . . . . 5
2 Requirements. . . . . . . . . . . . . . . . . . . . . . . . . . . . . . . . . . . . . . . . . . . . . . . . . . . 7
3 Installation and Configuration Tasks . . . . . . . . . . . . . . . . . . . . . . . . . . . . . . . 13
Overview . . . . . . . . . . . . . . . . . . . . . . . . . . . . . . . . . . . . . . . . . . . . . . . . . . . . . . . . . . . . . . . . . . . . . . . . . . . . . . . . . . . . . . . . 5
Drivers . . . . . . . . . . . . . . . . . . . . . . . . . . . . . . . . . . . . . . . . . . . . . . . . . . . . . . . . . . . . . . . . . . . . . . . . . . . . . . . . . . . . . . . . . . 7
Client Prerequisites. . . . . . . . . . . . . . . . . . . . . . . . . . . . . . . . . . . . . . . . . . . . . . . . . . . . . . . . . . . . . . . . . . . . . . . . . . . . . . . 7
Windows Operating Systems. . . . . . . . . . . . . . . . . . . . . . . . . . . . . . . . . . . . . . . . . . . . . . . . . . . . . . . . . . . . . . . . . . . . . . . 8
Hardware . . . . . . . . . . . . . . . . . . . . . . . . . . . . . . . . . . . . . . . . . . . . . . . . . . . . . . . . . . . . . . . . . . . . . . . . . . . . . . . . . . . . . . . . 8
Language Support . . . . . . . . . . . . . . . . . . . . . . . . . . . . . . . . . . . . . . . . . . . . . . . . . . . . . . . . . . . . . . . . . . . . . . . . . . . . . . . . 9
Interoperability. . . . . . . . . . . . . . . . . . . . . . . . . . . . . . . . . . . . . . . . . . . . . . . . . . . . . . . . . . . . . . . . . . . . . . . . . . . . . . . . . . 10
Install DDP|ST. . . . . . . . . . . . . . . . . . . . . . . . . . . . . . . . . . . . . . . . . . . . . . . . . . . . . . . . . . . . . . . . . . . . . . . . . . . . . . . . . . . 13
Configure DDP|ST. . . . . . . . . . . . . . . . . . . . . . . . . . . . . . . . . . . . . . . . . . . . . . . . . . . . . . . . . . . . . . . . . . . . . . . . . . . . . . . . 16
Configure Features in the Administrator Console . . . . . . . . . . . . . . . . . . . . . . . . . . . . . . . . . . . . . . . . . . . . . . . . 16
Configure Features in the Security Console . . . . . . . . . . . . . . . . . . . . . . . . . . . . . . . . . . . . . . . . . . . . . . . . . . . . . 30
4 Use the DDP|ST Authentication Applications . . . . . . . . . . . . . . . . . . . . . . . . 39
Credentials . . . . . . . . . . . . . . . . . . . . . . . . . . . . . . . . . . . . . . . . . . . . . . . . . . . . . . . . . . . . . . . . . . . . . . . . . . . . . . . . . . . . . 39
Enrollment Status. . . . . . . . . . . . . . . . . . . . . . . . . . . . . . . . . . . . . . . . . . . . . . . . . . . . . . . . . . . . . . . . . . . . . . . . . . . . 39
Backup and Restore. . . . . . . . . . . . . . . . . . . . . . . . . . . . . . . . . . . . . . . . . . . . . . . . . . . . . . . . . . . . . . . . . . . . . . . . . . . . . . 41
Back up Data . . . . . . . . . . . . . . . . . . . . . . . . . . . . . . . . . . . . . . . . . . . . . . . . . . . . . . . . . . . . . . . . . . . . . . . . . . . . . . . 42
Restore Data. . . . . . . . . . . . . . . . . . . . . . . . . . . . . . . . . . . . . . . . . . . . . . . . . . . . . . . . . . . . . . . . . . . . . . . . . . . . . . . . 44
Password Manager . . . . . . . . . . . . . . . . . . . . . . . . . . . . . . . . . . . . . . . . . . . . . . . . . . . . . . . . . . . . . . . . . . . . . . . . . . . . . . 45
Website and Application Logon Training. . . . . . . . . . . . . . . . . . . . . . . . . . . . . . . . . . . . . . . . . . . . . . . . . . . . . . . . 46
Add Logon. . . . . . . . . . . . . . . . . . . . . . . . . . . . . . . . . . . . . . . . . . . . . . . . . . . . . . . . . . . . . . . . . . . . . . . . . . . . . . . . . . 47
Icon Context Menu . . . . . . . . . . . . . . . . . . . . . . . . . . . . . . . . . . . . . . . . . . . . . . . . . . . . . . . . . . . . . . . . . . . . . . . . . . 49
Web Domain Support . . . . . . . . . . . . . . . . . . . . . . . . . . . . . . . . . . . . . . . . . . . . . . . . . . . . . . . . . . . . . . . . . . . . . . . . 50
Logging on to Trained Logon Screens . . . . . . . . . . . . . . . . . . . . . . . . . . . . . . . . . . . . . . . . . . . . . . . . . . . . . . . . . . 50
Filling in with Windows Credentials . . . . . . . . . . . . . . . . . . . . . . . . . . . . . . . . . . . . . . . . . . . . . . . . . . . . . . . . . . . . 51
Installation Guide 3

Use Old Password . . . . . . . . . . . . . . . . . . . . . . . . . . . . . . . . . . . . . . . . . . . . . . . . . . . . . . . . . . . . . . . . . . . . . . . . . . . 52
Password Change . . . . . . . . . . . . . . . . . . . . . . . . . . . . . . . . . . . . . . . . . . . . . . . . . . . . . . . . . . . .
Password Manager Page. . . . . . . . . . . . . . . . . . . . . . . . . . . . . . . . . . . . . . . . . . . . . . . . . . . . . . . . .
Settings Page . . . . . . . . . . . . . . . . . . . . . . . . . . . . . . . . . . . . . . . . . . . . . . . . . . . . . . . . . . . . . . . . . . . . . . . . . . . . . . . 56
Turning off Password Manager. . . . . . . . . . . . . . . . . . . . . . . . . . . . . . . . . . . . . . . . . . . . . . . . . . . . . .
. . . . . . . . . . . . . . . 53
. . . . . . . . . . . . 54
. . . . . . . . . . 56
5 Uninstallation Tasks . . . . . . . . . . . . . . . . . . . . . . . . . . . . . . . . . . . . . . . . . . . . 57
Uninstall DDP|ST . . . . . . . . . . . . . . . . . . . . . . . . . . . . . . . . . . . . . . . . . . . . . . . . . . . . . . . . . . . . . . . . . . . . . . . . . . . . . . . . 57
6 Recovery . . . . . . . . . . . . . . . . . . . . . . . . . . . . . . . . . . . . . . . . . . . . . . . . . . . . . 59
Self-Recovery, OS Logon . . . . . . . . . . . . . . . . . . . . . . . . . . . . . . . . . . . . . . . . . . . . . . . . . . . . . . . . . . . . . . . . . . . . . . . . . 59
Self-Recovery, PBA . . . . . . . . . . . . . . . . . . . . . . . . . . . . . . . . . . . . . . . . . . . . . . . . . . . . . . . . . . . . . . . . . . . . . . . . . . . . . . 61
Assisted Recovery, PBA . . . . . . . . . . . . . . . . . . . . . . . . . . . . . . . . . . . . . . . . . . . . . . . . . . . . . . . . . . . . . . . . . . . . . . . . . . 63
. .
Prerequisites . . . . . . . . . . . . . . . . . . . . . . . . . . . . . . . . . . . . . . . . . . . . . . . . . . . . . . . . . .
. . . . . . . . . . . . . . . . . . . 63
Glossary . . . . . . . . . . . . . . . . . . . . . . . . . . . . . . . . . . . . . . . . . . . . . . . . . . . . . . . . . . . . . . . . . 65
4 Installation Guide

Introduction
Dell Data Protection | Security Tools (DDP|ST) provides security and identity protection to Dell computer
administrators and end users. DDP|ST is pre-installed on all Dell Latitude, Optiplex, and Precision computers and on
select Dell XPS notebooks. Should you need to
support, see
www.dell.com/support > Endpoint Security Solutions
Overview
DDP|ST is an end-to-end security solution designed to provide advanced authentication support, as well as support for
self-encrypting drives.
Features are separated between two components, the Administrator Console and the Security Console. The specific
features available within each of these consoles are determined by the Operating Mode.
DDP|ST provides authentication support for Windows Passwords, Fingerprints, and Contactless Cards, as well as Self
Enrollment and One-Step Logon (
• The Administrator Console is available to users with Administrator privileges and is used to configure the software for all
users of the computer.
The Administrator Console is used to set up authentication policies, manage users, and configure advanced settings as
well as settings specific to supported credentials for Windows logon. The Administrator Console also provides the ability
to set login and recovery policies for self-encrypting drives.
• The Security Console is the centralized user interface for all end users of the computer.
The Security Console is used to set up and manage user’s credentials, view the enrollment status of their credentials,
backup and restore program data as well as Password Manager logons and credentials for Windows. The Security Console
provides a wizard-driven user interface to enable users to configure their credentials and self-recovery questions.
Single Sign-On [SSO]
reinstall
DDP|ST, follow the instructions in this guide. For additional
.
).
Continue to
Installation Guide 5
Requirements
.

6 Installation Guide

Requirements
• DDP|ST is pre-installed on all Dell Latitude, Optiplex, and Precision computers and on select Dell XPS notebooks, and
meets the following minimum requirements. Should you need to reinstall DDP|ST, ensure that your computer still
meets these requirements. See www.dell.com/support > Endpoint Security Solutions for more information.
• Windows 8.1 should not be installed on drive 1 on self-encrypting drives. This ope
supported because Windows 8.1 creates a recovery partition drive 0 which in turn, breaks Preboot Authentication.
Instead, either install Windows 8.1 on the drive configured as drive 0, or restore Windows 8.1 as an image to any of the
drives.
• Supported Opal compliant SEDs require updated Intel Rapid Storage Technology Drivers, located at
http://www.dell.com/support/drivers/us/en/19/DriverDetails/Product/latitude-e6440-laptop?driverId=1KX2H&osCode=
W764&fileId=3356216042&languageCode=en&categoryId=SA
.
rating system configuration is not
IMPORTANT:
NOTE: DDP|ST does not support UEFI Secure Boot with self-encrypting drives on Windows 8 or Windows 8.1. For more information about
Due to the nature of RAID and SEDs, SED management supports RAID only with the Intel Rapid Storage Technology Driver
configured to use a single disk. The issue with “RAID=On” with SEDs is that RAID requires access to the disk to read and
write RAID-related data at a high sector not available on a locked SED from start and cannot wait to read this data until after
the user is logged on. Change the SATA operation in the BIOS from “RAID=On” to “AHCI” to resolve the issue. If the operating
system does not have the AHCI controller drivers pre-installed, the operating system will blue screen when switched from
“RAID=On” to “AHCI.”
UEFI, see
http://en.community.dell.com/techcenter/extras/m/white_papers/20278835.aspx
.
Drivers
• Intel Rapid Storage Technology Driver
http://www.dell.com/support/drivers/us/en/19/DriverDetails/Product/latitude-e6440-laptop?driverId=1KX2H&osCode=
W764&fileId=3356216042&languageCode=en&categoryId=SA
Client Prerequisites
The installer installs these components if not already installed on the computer.
Prerequisites
• Microsoft Visual C++ 2012 Update 3 or later Redistributable Package (x86/x64)
• Microsoft .NET Framework v4.0
BEST PRACTICE: Potential installation problems can be avoided if Microsoft .NET Framework is installed on the target computer prior to
client installation.
Installation Guide 7

Windows Operating Systems
The following table details supported software.
Windows Operating Systems (32- and 64-bit)
• Microsoft Windows 7 SP0-SP1
- Enterprise
- Professional
• Microsoft Windows 8
- Enterprise
- Pro
- Windows 8 (Consumer)
• Microsoft Windows 8.1
- Enterprise Edition
- Pro Edition
Hardware
The following table details supported hardware.
Fingerprint Readers
• Validity VFS495 in Secure Mode
• Broadcom Control Vault Swipe Reader
• UPEK TCS1 FIPS 201 Secure Reader 1.6.3.379
• Authentec Eikon and Eikon To Go USB Readers
Smart Cards
NOTE: Smart cards, including contactless cards, can be used for Windows logon but not Preboot Authentication.
• PKCS #11 Smart Cards using the ActivIdentity client
NOTE: The ActivIdentity client is not pre-loaded and must be installed separately.
• CSP Cards
•Common Access Cards (CAC)
NOTE: With CACs that have more than one certificate, at logon, the user selects the correct certificate from a list.
Contactless Cards
• Contactless Cards using Contactless Card Readers built-in to specified Dell laptops
8 Installation Guide

Language Support
DDP|ST is Multilingual User Interface (MUI) compliant and supports the following languages.
NOTE:
PBA localization is not supported in Russian, Traditional Chinese, or Simplified Chinese.
Language Support
• EN - English • KO - Korean
• FR - French • ZH-CN - Chinese, Simplified
• IT - Italian • ZH-TW - Chinese, Traditional/Taiwan
• DE - German • PT-BR - Portuguese, Brazilian
• ES - Spanish • PT-PT - Portuguese, Portugal (Iberian)
• JA - Japanese • RU - Russian
Installation Guide 9
Interoperability
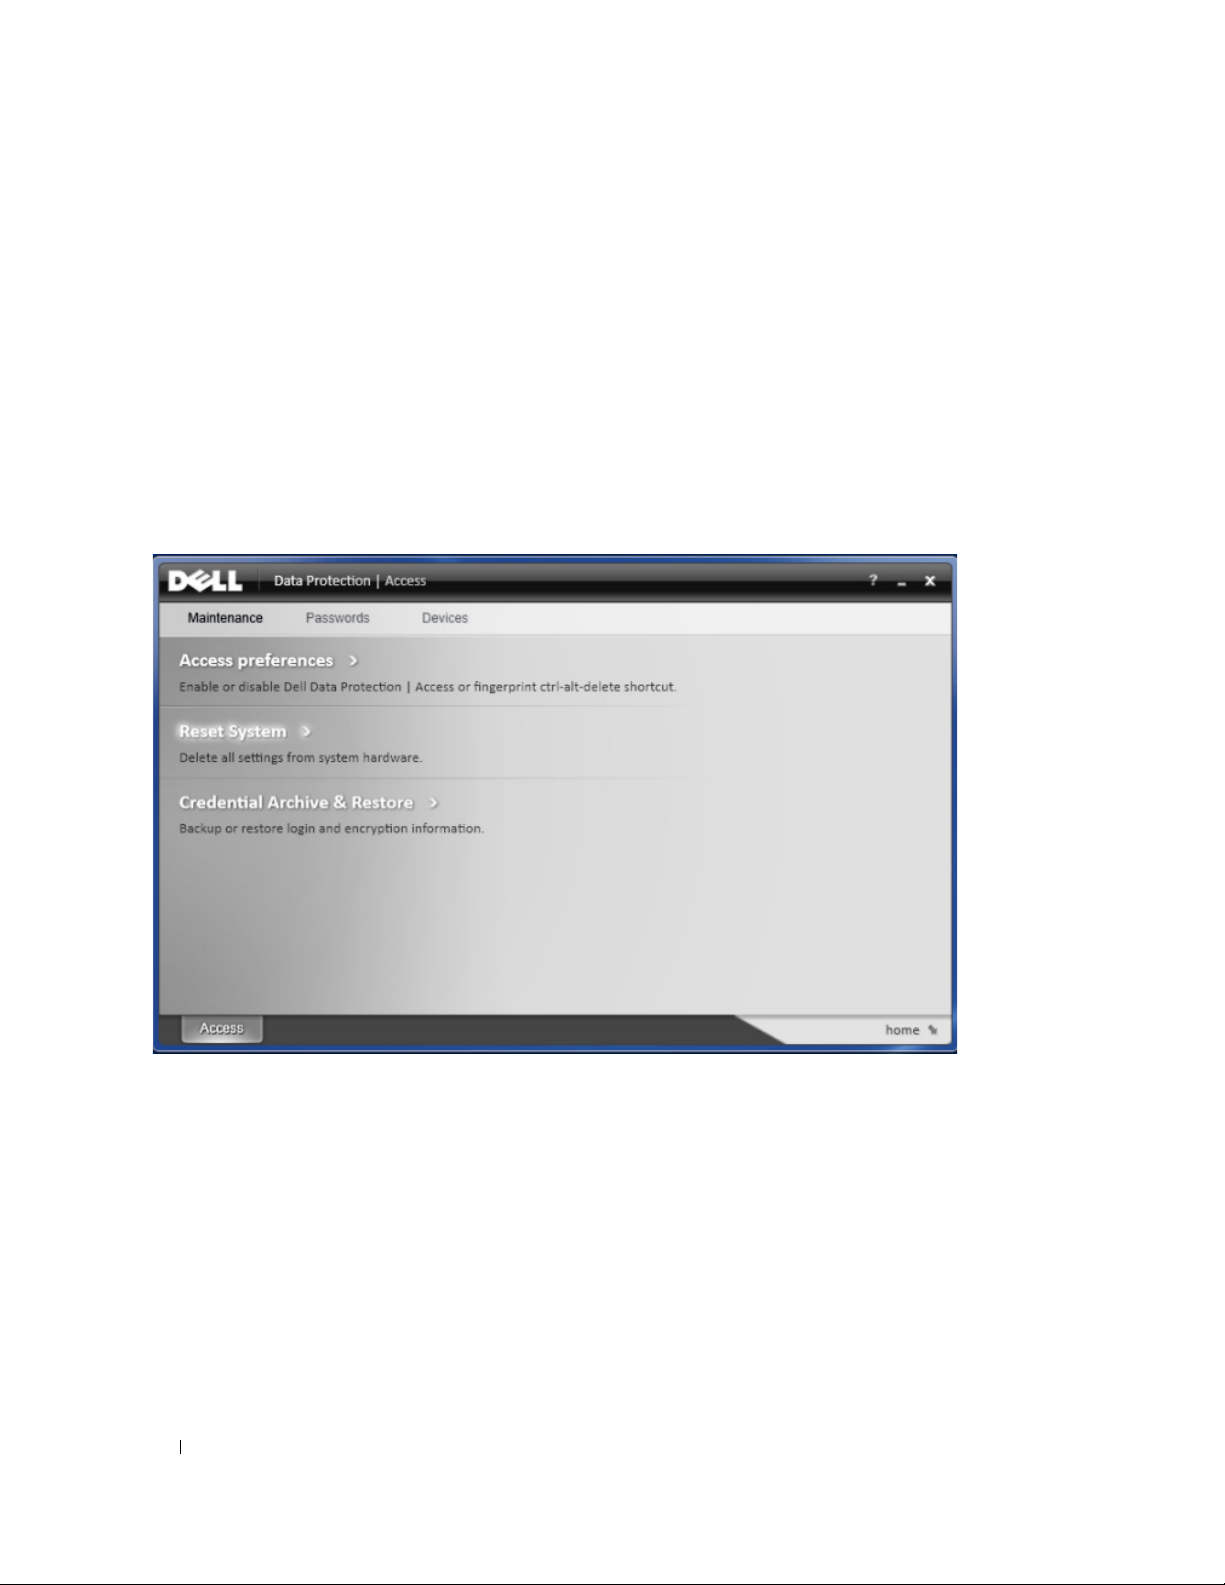
Deprovision and Uninstall Dell Data Protection | Access
If DDP|A is installed now or has been installed in the past on your computer, before installing Security Tools, you must
deprovision the DDP|A-managed hardware and then uninstall DDP|A. If DDP|A has not been used, you may simply
uninstall DDP|A and restart the installation process.
Deprovisioning DDP|A-managed hardware includes the fingerprint reader, smart card reader, BIOS passwords, TPM, and
the Self-Encrypting Drive.
NOTE:
If running DDP|E encryption products, stop or pause an encryption sweep. If running Microsoft BitLocker, suspend the encryption
policy. Once DDP|A is uninstalled and Microsoft BitLocker policy is unsuspended, initialize the TPM by following the instructions
located at
http://technet.microsoft.com/en-us/library/cc753140.aspx.
Deprovision DDP|A-Managed Hardware
1
Launch DDP|A and click the
Advanced
tab.
2
Select
Reset System
verifies the credentials, DDP|A will perform the following actions:
• Remove all provisioned credentials from Dell ControlVault (if present)
• Remove Dell ControlVault owner password (if present)
• Remove all provisioned fingerprints from integrated fingerprint reader (if present)
• Remove all BIOS passwords (BIOS System, BIOS Admin, and HDD passwords)
• Clear the Trusted Platform Module
• Remove the DDP|A Credential Provider
Once the computer is deprovisioned, DDP|A reboots the computer to restore the Windows default credential provider.
10 Installation Guide
. This will require that you enter any provisioned credentials to verify your identity. After DDP|A

Uninstall DDP|A
Once the authentication hardware is deprovisioned, uninstall DDP|A.
1
Launch DDP|A and perform a Reset System.
This will remove all DDP|A managed credentials and passwords and will clear the Trusted Platform Module (TPM).
2
Click
Uninstall
3
When the uninstall finishes, click
NOTE: Removing DDP|A will also unlock the SED and remove the Preboot Authentication.
to launch the installer.
Ye s
to restart.
Initialize the TPM
1. Follow the instructions located at
Proceed to
Installation and Configuration Tasks
http://technet.microsoft.com/en-us/library/cc753140.aspx
.
.
Installation Guide 11

12 Installation Guide
Installation and Configuration Tasks
To install DDP|ST, you must be at least a local Admin user.
Install DDP|ST
This section details installing DDP|ST on the local computer.
1
Locate installation file in the DDP|ST installation media. Copy it to the local computer.
NOTE: The installation media can be located at
2
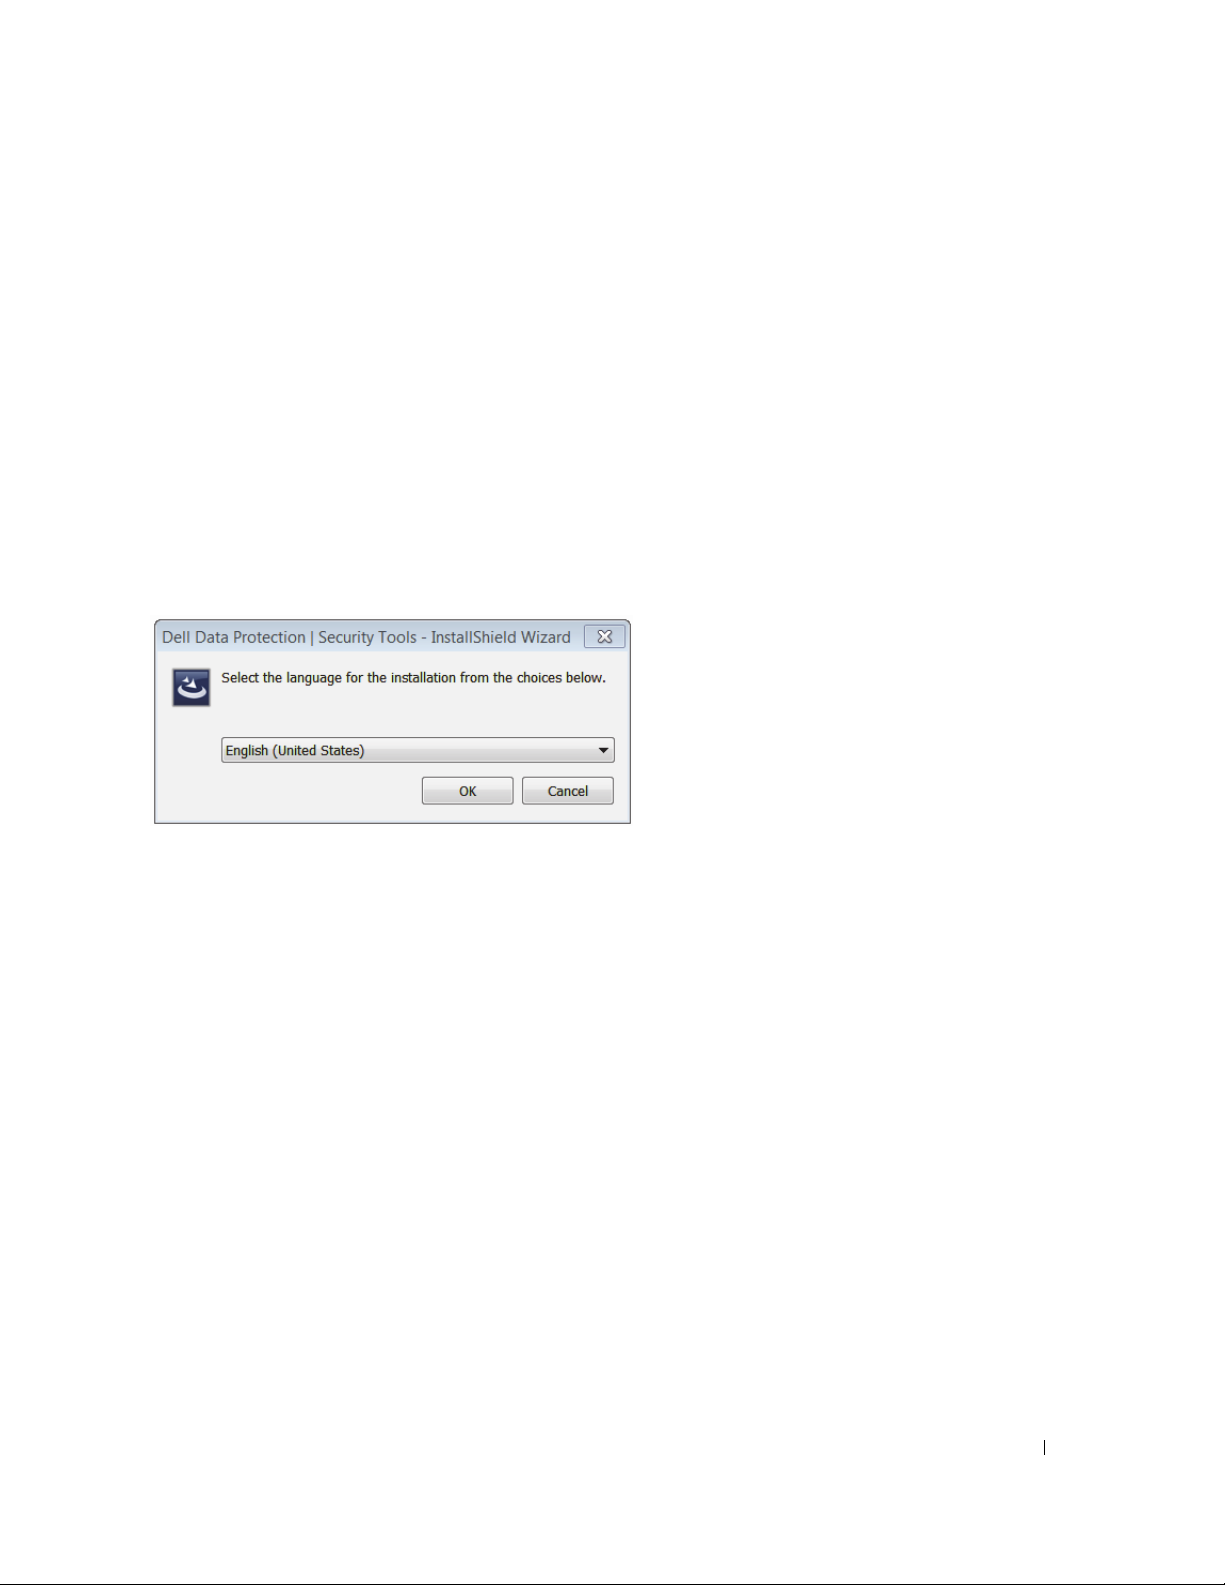
Double-click the file to launch the installer.
3
Select the appropriate language and click OK.
4
Click
Install
if prompted to install Microsoft Visual C++ Redistributable Package.
5
Click
Next
when the Welcome screen displays.
6
Read the license agreement, agree to the terms, and click
7
Click
Next
to install Security Tools in the default location of C:\Program Files\Dell\Dell Data Protection\Security Tools.
www.dell.com/support > Endpoint Security Solutions
Next
.
.
Installation Guide 13

8
Select
Next
on the Select Feature screen.
9
Depending upon your operating system, a dialog may display to indicate that Security Tools will now be managing your
authentication credentials. Click
Cancel
click
to stop the installation and retain Windows as your authentication credentials manager.
Continue
to accept Security Tools as the manager of your authentication credentials, or
14 Installation Guide

10
Click
Install
to begin the installation or click
credentials.
11
Once the installation is complete, a computer restart is required. Select
Cancel
to continue using the Microsoft Operating System to manage your
Ye s
to restart and then click
Finish
.
Installation is complete.
Installation Guide 15
Configure DDP|ST
To begin using the features of DDP|ST, they must first be configured.
Configure Features in the Administrator Console
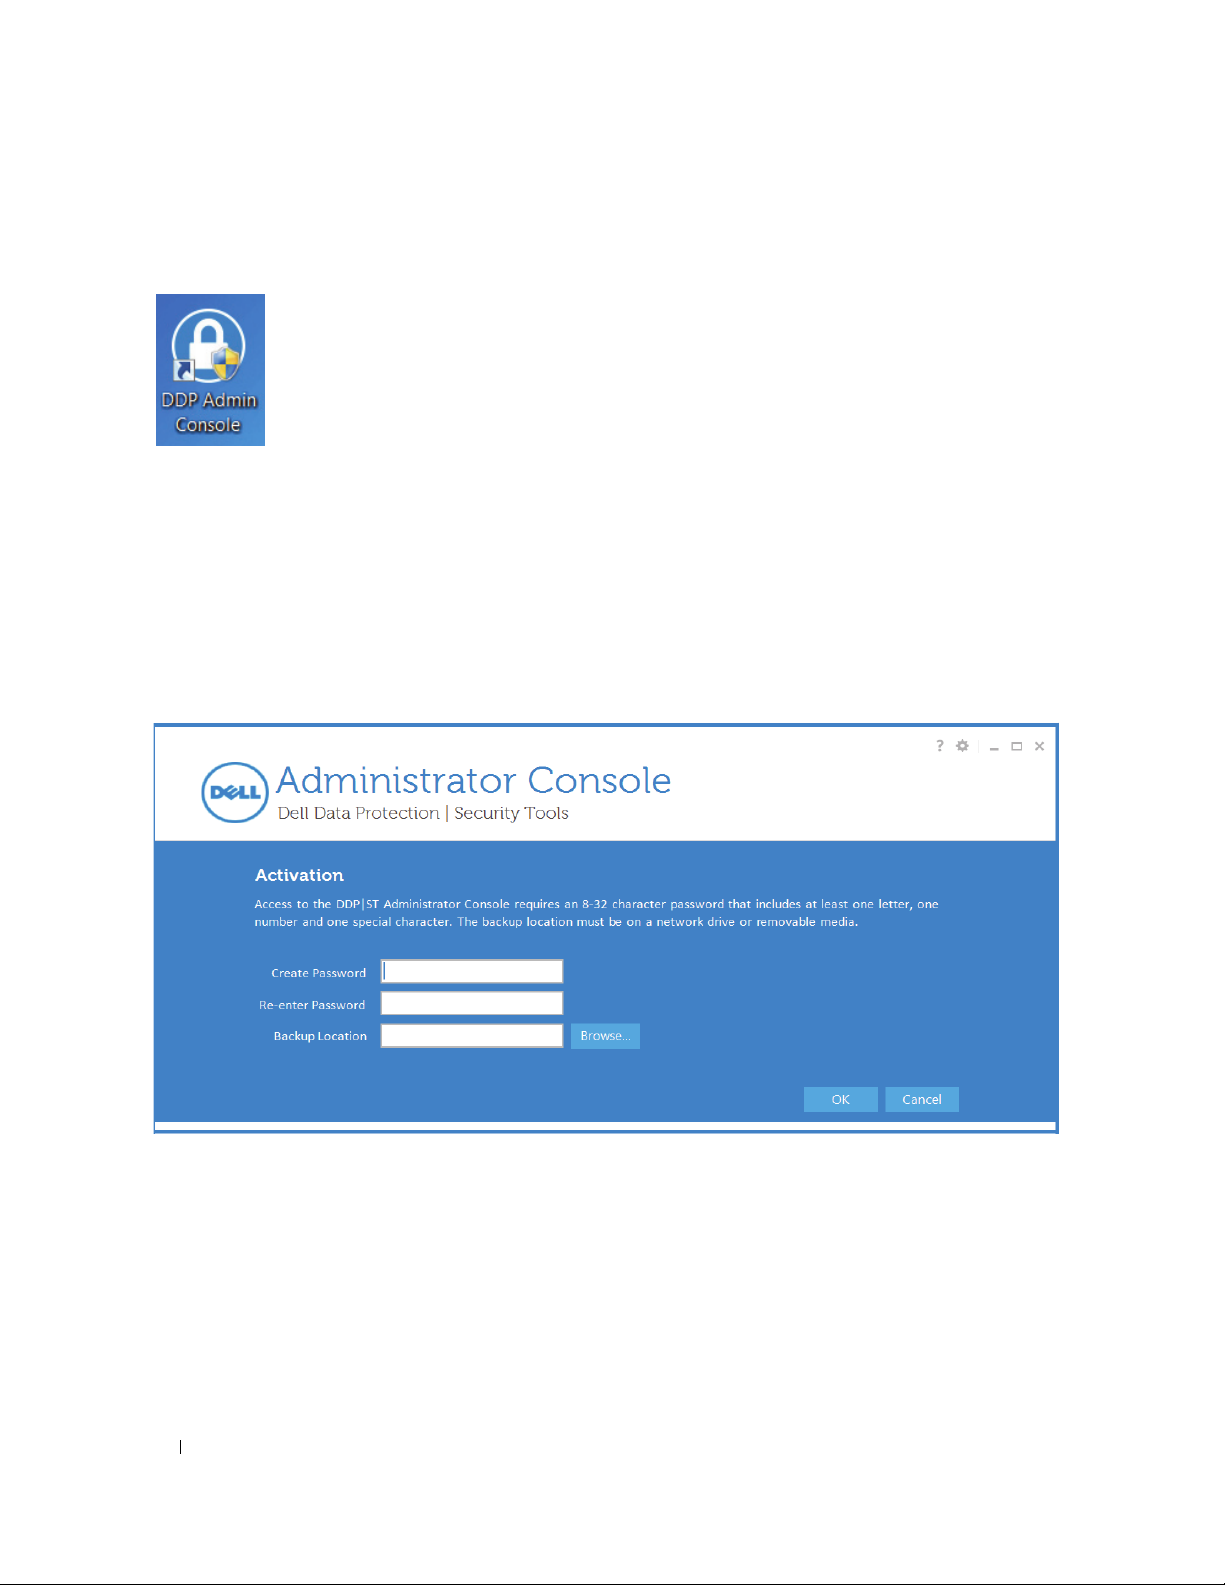
• Launch the Administrator Console from the Desktop shortcut.
NOTE: If logged in as a regular user (using a standard Windows account), the Administrator Console requires UAC elevation to launch.
• Before beginning configuration tasks, you must create a password to be used with DDP|ST. This password will be needed
any time you log on to the Administrator Console.
The password must be 8-32 characters that includes at lea
The backup location must be a network drive or on removable med
for a recovery operation. Dell Support will need access to this file to help you recover data if a recovery operation is
needed.
OK
When finished, click
.
st one letter, one number, and one special character.
ia. This file contains the recovery keys that are needed
16 Installation Guide
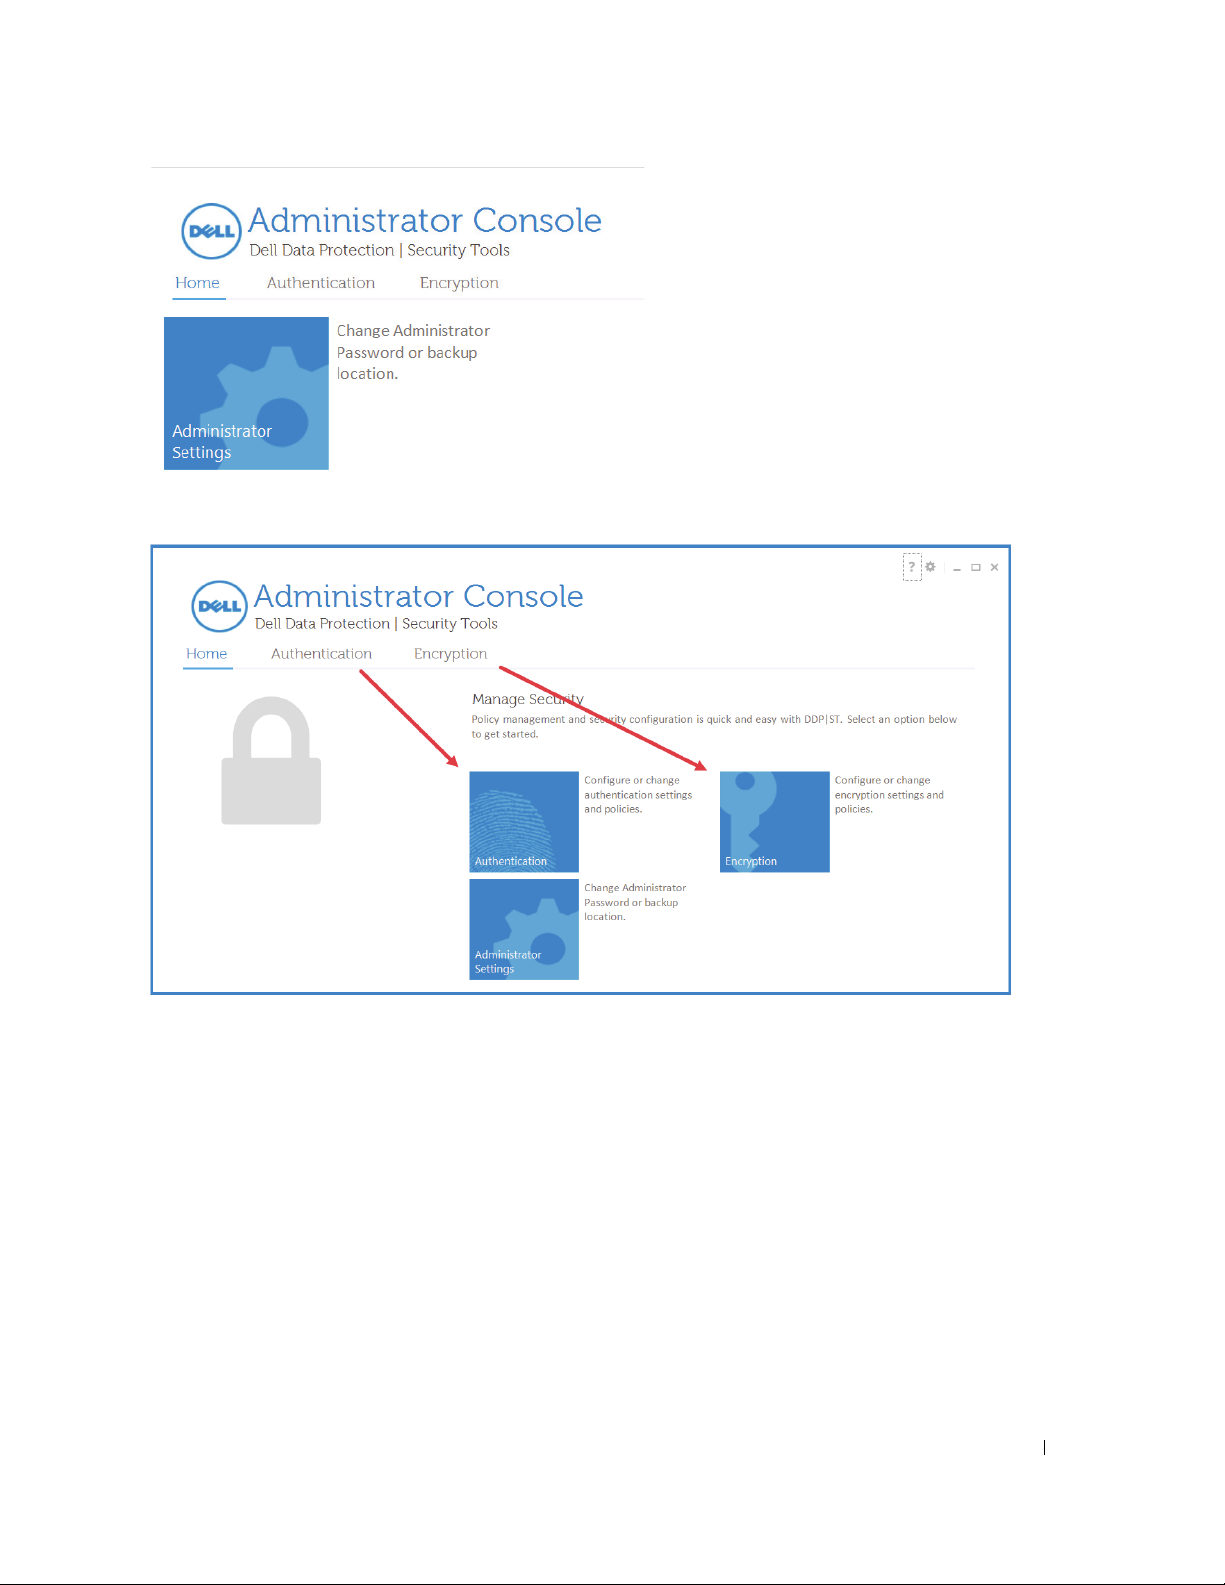
• To change your password, from the
Home
tab, click
Administrator Settings
.
• To navigate through the Administrator Console, you can either select items from the top menu “tabs” or click the “tiles”
in the body of the page. Either method takes you to the same page.
Installation Guide 17
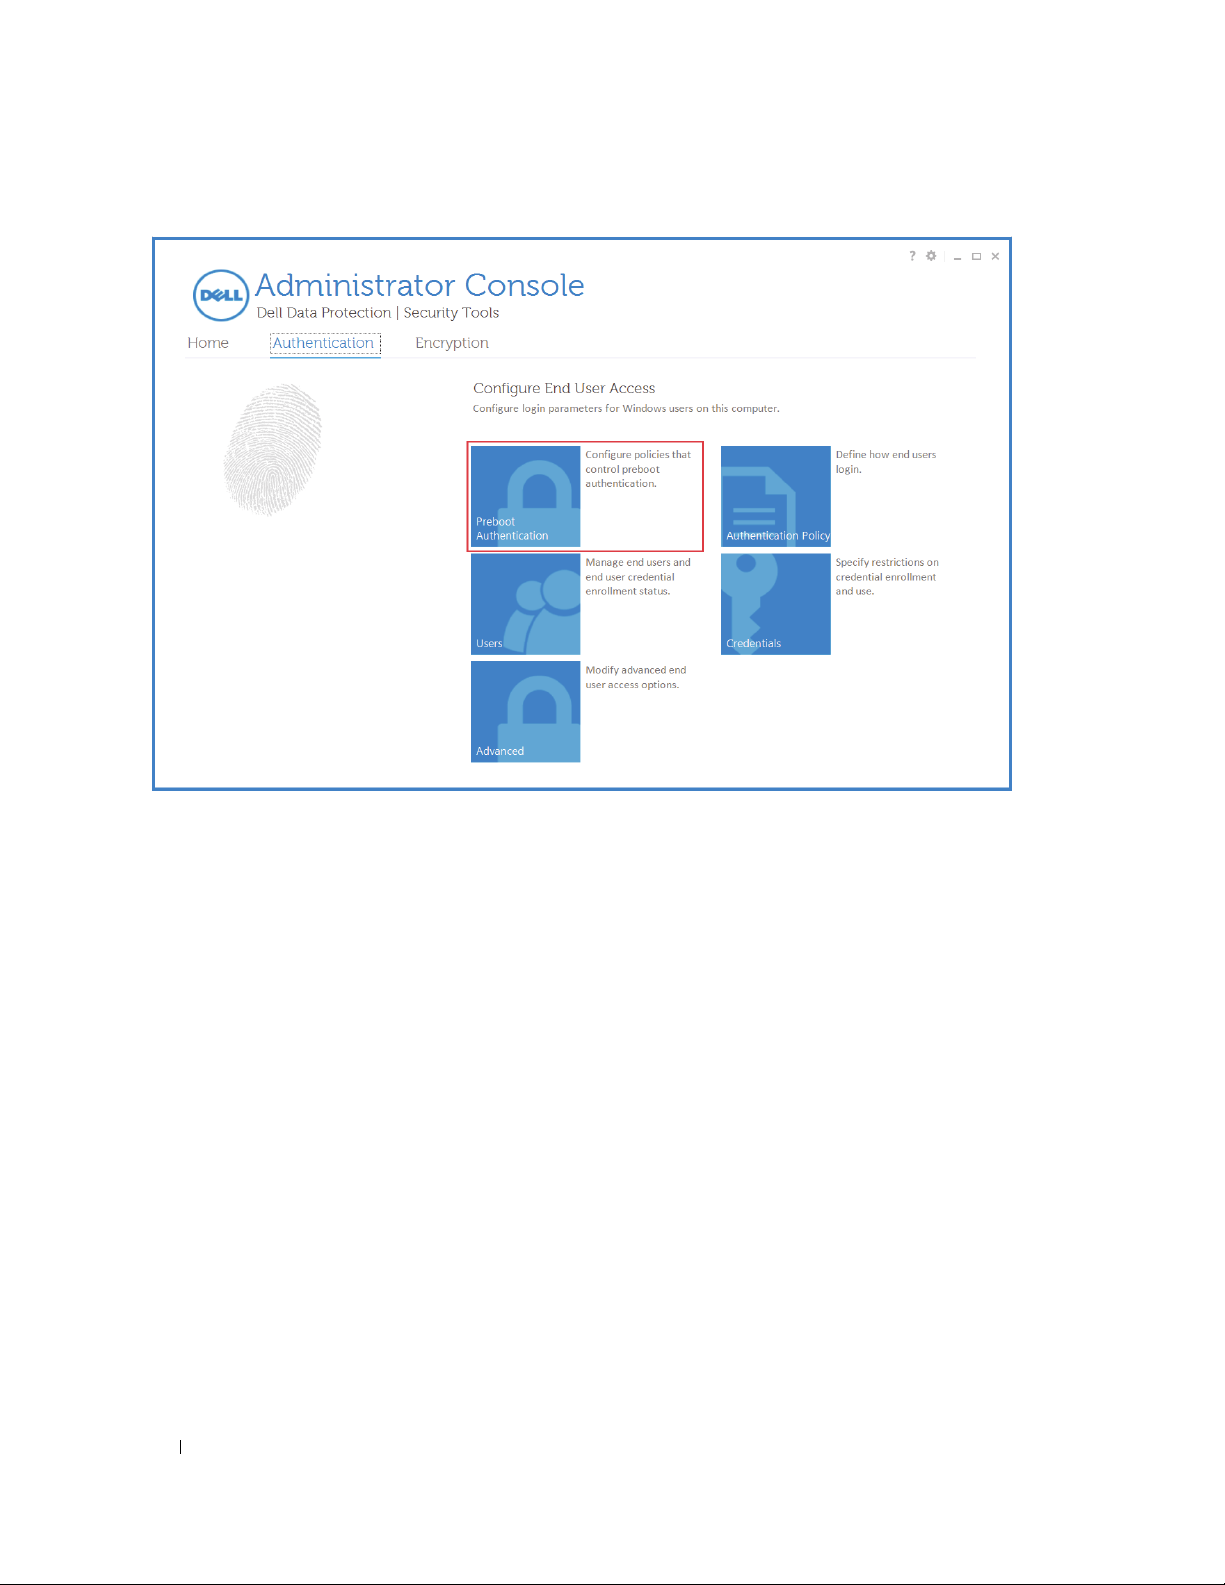
Configure Authentication for Users
1
Click the
2
Click
Authentication
tab.
Preboot Authentication
to configure Preboot Authentication.
18 Installation Guide
a
This page is visible only if a self-encrypting drive is present on the computer. Change or confirm the following values.
Logon Policies
Non-Cached User Login Attempts Allowed - How many times an unknown user can attempt to log in (a user that
has not logged in to the computer before [no credentials have been cached]).
Cached User Login Attempts Allowed - How
Question/Answer Attempts Allowed - Number
many times can a known user attempt to log in.
of times the user can attempt to enter the correct answer.
Enable Crypto Erase Password - Select to enable.
Enter the Crypto Erase Password - A word or code of up to 100 characters used
as a failsafe security mechanism.
Entering this word or code in the user name or password field during the PBA authentication
permanently
Click
. Not entering text in this field results in no crypto erase password being available in case of emergency.
Apply
when finished.
wipes the device
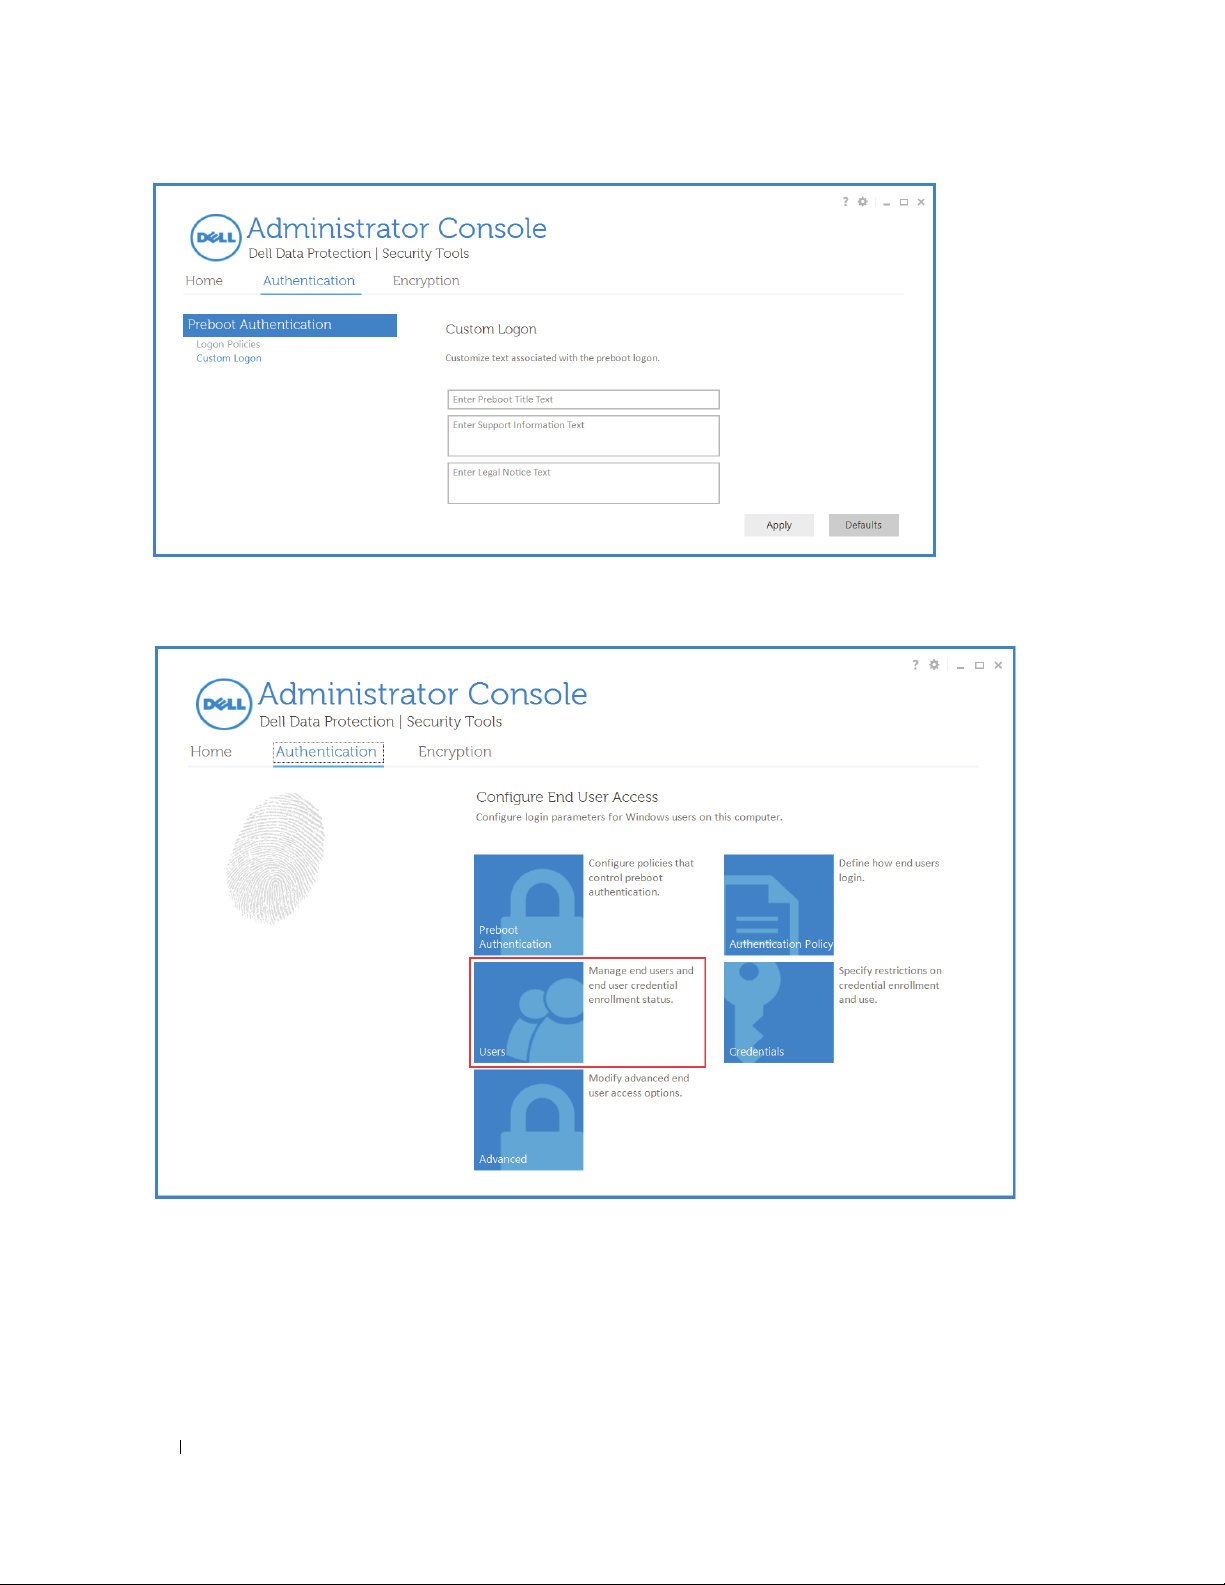
b
This page is visible only if a self-encrypting drive is present on the computer. Change or confirm the following values.
Custom Logon
Preboot Title Text - This text displays on the top of the PBA screen. Not entering text in this field results in no title
being displayed. Text does not wrap, so entering more than 17 characters may result in the text being cut off.
Support Information Text - This text displays on the PBA support information screen. Dell recommends that you
customize
the message to include specific instructions about how to contact the Help Desk or Security
Administrator. Not entering text in this field results in no support contact information being available for the user.
Text wrapping occurs at the word level, not the character level. For instance, if you have a single word that is more
than approximately 50 characters in length, it will not wrap and no scroll bar will be present, therefore the text will
be cut off.
Legal Notice Text - This text displays before being allowed to
log on to the device. For example: By clicking OK, you
agree to abide by the acceptable computer use policy. Not entering text in this field results in no text or OK/Cancel
buttons being displayed. Text wrapping occurs at the word level, not the character level. For instance, if you have a
single word that is more than approximately 50 characters in length, it will not wrap and no scroll bar will be present,
therefore the text will be cut off.
Installation Guide 19
3
Click
Click
Apply
when finished.
Users
to manage users and user status.
a
New Windows users are
Click
Add
to add an
Location. Enter the object name and click
Select a User and click
which credentials are to be enrolled for the selected user.
20 Installation Guide
automatically
existing
Windows user. When the
Enroll
to launch the Attended Enrollment Wizard. On the
added when they log on to Windows or enroll credentials.
Check Names
Select Users
. Click OK when finished.
dialog displays, select the Object Type and
Choose Credentials
page, select
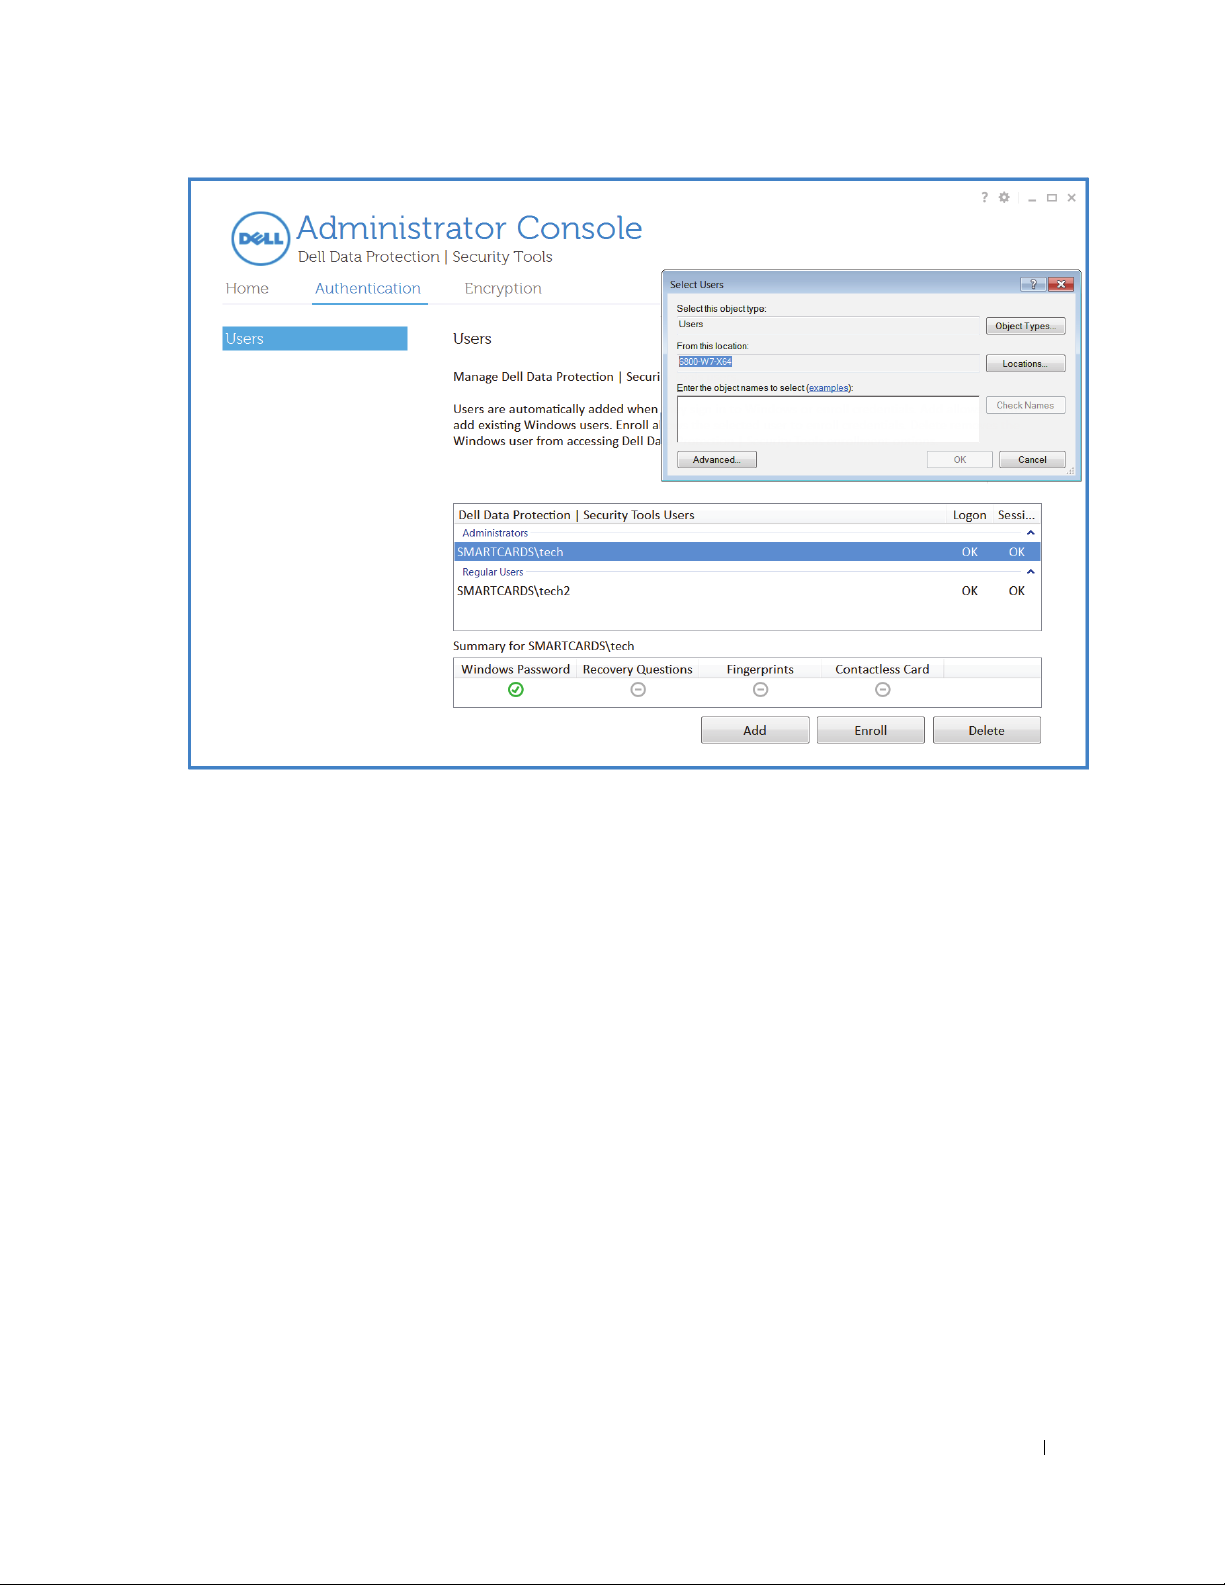
Click
Delete
to remove the Windows user from accessing the Security Console enrollment options.
Installation Guide 21
 Loading...