

Page 1

Dell™ Latitude™ D410
Quick Reference Guide
Model PP06S
www.dell.com | support.dell.com
Page 2

Notes, Notices, and Cautions
NOTE: A NOTE indicates important information that helps you make better use of your computer.
NOTICE: A NOTICE indicates either potential damage to hardware or loss of data and tells you how to avoid the
problem.
CAUTION: A CAUTION indicates a potential for property damage, personal injury, or death.
Abbreviations and Acronyms
For a complete list of abbreviations and acronyms, see the
double-click the
and Support Center
User’s Guide
, and then click
icon on your Microsoft® Windows® desktop, or click the
User and system guides
If you purchased a Dell™ n Series computer, any references in this document to Microsoft
User’s Guide
).
(depending on your operating system,
Start
button, click
®
Windows®
Help
operating systems are not applicable.
The
Drivers and Utilities
CD and
Operating System
CD are optional and may not ship with all computers.
_________________
Information in this document is subject to change without notice.
© 2004 Dell Inc. All rights reserved.
Reproduction in any manner whatsoever without the written permission of Dell Inc. is strictly forbidden.
Trademarks used in this text: Dell, the DELL logo, and Latitude are trademarks of Dell Inc.; Microsoft and Windows are registered trademarks
of Microsoft Corporation; Intel and Pentium are registered trademarks of Intel Corporation.
Other trademarks and trade names may be used in this document to refer to either the entities claiming the marks and names or their products.
Dell Inc. disclaims any proprietary interest in trademarks and trade names other than its own.
Model PP06S
November 2004 P/N D5173 Rev. A00
Page 3

Contents
Finding Information . . . . . . . . . . . . . . . . . . . . . . . . . . . . . . . . 5
Setting Up Your Computer
About Your Computer
Front View
Left View
Right View
Back View
. . . . . . . . . . . . . . . . . . . . . . . . . . . . . . . . . . 12
. . . . . . . . . . . . . . . . . . . . . . . . . . . . . . . . . . 13
. . . . . . . . . . . . . . . . . . . . . . . . . . . . . . . . . . 14
. . . . . . . . . . . . . . . . . . . . . . . . . . . . . . . . . . 14
Bottom View
Using a Battery
. . . . . . . . . . . . . . . . . . . . . . . . . . . . . . . . . . 15
Battery Performance
. . . . . . . . . . . . . . . . . . . . . . . . . . . . . 8
. . . . . . . . . . . . . . . . . . . . . . . . . . . . . . . 11
. . . . . . . . . . . . . . . . . . . . . . . . . . . . . . . . 15
. . . . . . . . . . . . . . . . . . . . . . . . . . . . 15
Checking the Battery Charge
Charging the Battery
Removing a Battery
Installing a Battery
Storing a Battery
Solving Problems
. . . . . . . . . . . . . . . . . . . . . . . . . . . . 18
. . . . . . . . . . . . . . . . . . . . . . . . . . . . . 18
. . . . . . . . . . . . . . . . . . . . . . . . . . . . . 19
. . . . . . . . . . . . . . . . . . . . . . . . . . . . . . 19
. . . . . . . . . . . . . . . . . . . . . . . . . . . . . . . . 19
Notebook System Software (NSS)
Lockups and Software Problems
Running the Dell Diagnostics
. . . . . . . . . . . . . . . . . . . . . . . . 16
. . . . . . . . . . . . . . . . . . . . . 19
. . . . . . . . . . . . . . . . . . . . . . 20
. . . . . . . . . . . . . . . . . . . . . . . . 22
Contents 3
Page 4

4 Contents
Page 5
FILE LOCATION: J:\DL\DL044399\DTP\D5173eb0.fm
Finding Information
NOTE: Some features may not be available for your computer or in certain countries.
NOTE: Additional information may ship with your computer.
What Are You Looking For? Find It Here
• A diagnostic program for my computer
• Drivers for my computer
• My computer documentation
• My device documentation
• Notebook System Software (NSS)
Drivers and Utilities CD (also known as ResourceCD)
Documentation and drivers are already installed on your
computer. You can use the CD to
Dell Diagnostics
, or access your documentation.
reinstall drivers
Readme files may be
included on your CD to
provide last-minute
updates about technical
changes to your
computer or advanced
technical-reference
material for technicians
or experienced users.
, run the
• Warranty information
• Terms and Conditions (U.S. only)
• Safety instructions
• Regulatory information
• Ergonomics information
• End User License Agreement
DELL CONFIDENTIAL – PRELIMINARY 12/8/04 – FOR PROOF ONLY
NOTE: Drivers and documentation updates can be found at
support.dell.com.
NOTE: The Drivers and Utilities CD is optional and may not
ship with your computer.
Dell™ Product Information Guide
Quick Reference Guide 5
Page 6
FILE LOCATION: J:\DL\DL044399\DTP\D5173eb0.fm
What Are You Looking For? Find It Here
• How to remove and replace parts
• Specifications
• How to configure system settings
• How to troubleshoot and solve problems
User’s Guide
Microsoft® Windows® XP Help and Support Center
1
2
The User’s Guide is also available on the
Utilities
NOTE: The Drivers and Utilities CD is optional and may not
ship with your computer.
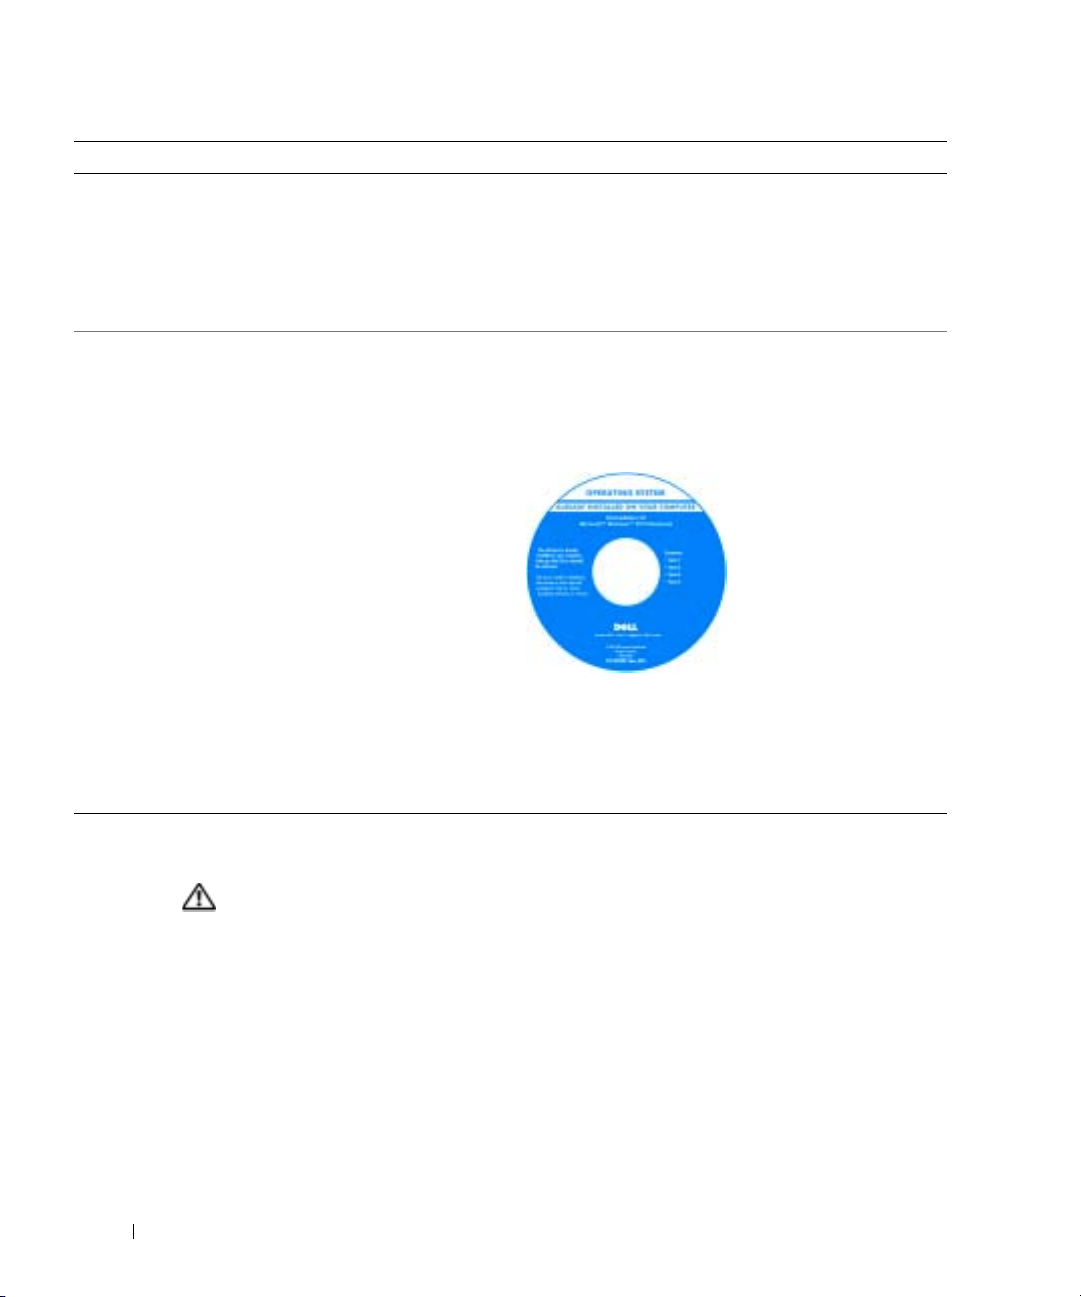
• Service Tag and Express Service Code
• Microsoft Windows License Label
www.dell.com | support.dell.com
Service Tag and Microsoft Windows License
These labels are located on
• Use the Service Tag to
• Enter the Express Service Code to direct your call when
Click the
Click
Start
button and click
User’s and system guides
Help and Support
and click
User’s guides
.
.
Drivers and
CD
.
the bottom of
your computer.
identify your
computer when you
support.dell.com
use
or contact technical
support.
contacting technical support. The Express Service Code
may not be available in certain countries.
DELL CONFIDENTIAL – PRELIMINARY 12/8/04 – FOR PROOF ONLY
6 Quick Reference Guide
Page 7

FILE LOCATION: J:\DL\DL044399\DTP\D5173eb0.fm
What Are You Looking For? Find It Here
• Solutions — Troubleshooting hints and tips, articles
from technicians, online courses, frequently asked
questions
• Community — Online discussion with other Dell
customers
• Upgrades — Upgrade information for components, such
as memory, the hard drive, and the operating system
Dell Support Website — support.dell.com
NOTE: Select your region to view the appropriate
support site.
NOTE: Corporate, government, and education customers
can also use the customized Dell Premier Support website
at premier.support.dell.com. The website may not be
available in all regions.
• Customer Care — Contact information, service call and
order status, warranty, and repair information
• Service and support — Service call status and support
history, service contract, online discussions with
technical support
• Reference — Computer documentation, details on my
computer configuration, product specifications, and
white papers
• Downloads — Certified drivers, patches, and software
updates
• Notebook System Software (NSS)— If you reinstall the
operating system for your computer, you should also
reinstall the NSS utility. NSS provides critical updates
for your operating system and support for Dell™
3.5-inch USB floppy drives, Intel
®
Pentium®M
processors, optical drives, and USB devices. NSS is
necessary for correct operation of your Dell computer.
The software automatically detects your computer and
operating system and installs the updates appropriate
for your configuration.
To download Notebook System Software:
1
Go to
support.dell.com
2
Enter your Service Tag or product model.
3
In the
Download Category
4
Select the operating system and operating system
language for your computer, and click
5
Under Select a Device, scroll to
Configuration Utilities
System Software
and click
Downloads
drop-down menu, click
Submit
System and
, and click
Dell Notebook
.
DELL CONFIDENTIAL – PRELIMINARY 12/8/04 – FOR PROOF ONLY
.
All
.
.
Quick Reference Guide 7
Page 8
FILE LOCATION: J:\DL\DL044399\DTP\D5173eb0.fm
What Are You Looking For? Find It Here
• How to use Windows XP
• Documentation for my computer
• Documentation for devices (such as a modem)
• How to reinstall my operating system
www.dell.com | support.dell.com
Windows Help and Support Center
1
2
3
4
Operating System CD
The operating system is already installed on your
computer. To reinstall your operating system, use the
Operating System CD. See "
instructions.
Click the
Type a word or phrase that describes your problem and
click the arrow icon.
Click the topic that describes your problem.
Follow the instructions on the screen.
Start
button and click
Help and Support
Reinstalling Windows XP
After you reinstall your
operating system, use the
Drivers and Utilities
to reinstall drivers for the
devices that came with
your computer.
Your operating system
product key label is
located on your
computer.
.
" for
CD
Setting Up Your Computer
CAUTION: Before you perform the following procedures, see the safety instructions in the Product
Information Guide.
1
Unpack the accessories box.
2
Set aside the contents of the accessories box, which you will need to complete your computer
setup.
The accessories box also contains user documentation and any software or additional
hardware (such as PC Cards, drives, or batteries) that you have ordered.
3
Connect the AC adapter to the AC adapter connector on the computer and to the electrical
outlet.
DELL CONFIDENTIAL – PRELIMINARY 12/8/04 – FOR PROOF ONLY
8 Quick Reference Guide
NOTE: The color of your CD varies based on the operating
system you ordered.
NOTE: The Operating System CD is optional and may not
ship with your computer.
Page 9

FILE LOCATION: J:\DL\DL044399\DTP\D5173eb0.fm
CAUTION: The AC adapter works with electrical outlets worldwide. However, power connectors and
power strips vary among countries. Using an incompatible cable or improperly connecting the cable to
the power strip or electrical outlet may cause fire or equipment damage.
NOTICE: When using the AC adapter, secure the cable so that the cable is not pulled, tangled, stepped
on, or crushed by objects such as chair legs or desk supports.
NOTICE: When you disconnect the AC adapter cable from the computer, grasp the connector, not the
cable itself, and pull firmly but gently to avoid damaging the cable. When you wrap the AC adapter cable,
ensure that you follow the angle of the connector on the AC adapter to avoid damaging the cable.
NOTE: Do not connect the computer to the docking device until the computer has been turned on and
shut down at least once.
DELL CONFIDENTIAL – PRELIMINARY 12/8/04 – FOR PROOF ONLY
Quick Reference Guide 9
Page 10
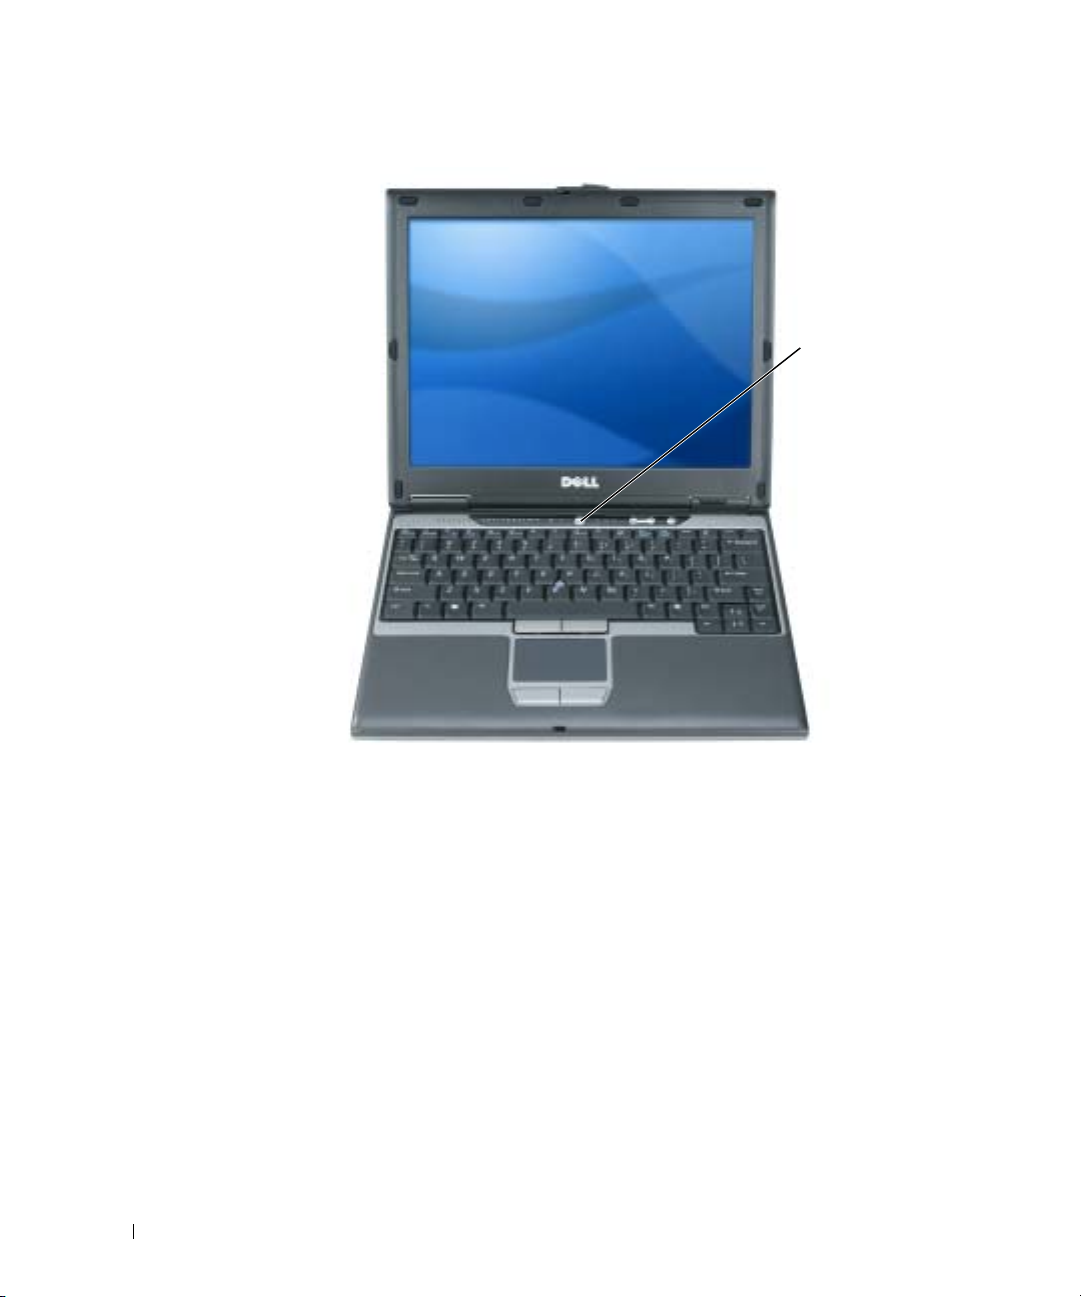
4
Open the computer display and press the power button to turn on the computer.
www.dell.com | support.dell.com
FILE LOCATION: J:\DL\DL044399\DTP\D5173eb0.fm
power button
DELL CONFIDENTIAL – PRELIMINARY 12/8/04 – FOR PROOF ONLY
10 Quick Reference Guide
Page 11

About Your Computer
FILE LOCATION: J:\DL\DL044399\DTP\D5173eb0.fm
See your online
(depending on your operating system), either double-click the
click the
following items address some of the more commonly asked questions about the computer.
•
Modem and network adapter:
10/100/1000 Ethernet network adapter on the system board. For connector locations, see
"Back View" on page 14. For more information on ports and connectors, see "About Your
Computer" in your online
Battery life and usage:
certain types of operations, such as extended wireless operation, can significantly reduce
battery life and operating time.
For more information about battery performance and usage, see "Using a Battery" on page 15.
For more information about conserving power, see your
Dell D/Bay:
•
User’s Guide
Docking devices:
•
Station, and the Dell D/Port Advanced Port Replicator.
NOTE: Docking devices may not be available in all countries.
– For information on your optional docking device, see the documentation that
– For information on obtaining optimal performance when using a docking device with this
User’s Guide
Start
button, click
For information on the Dell D/Bay and the devices it supports, see your online
.
accompanied the device.
computer, see "Solving Problems" in your online
for detailed information about your computer. To access the
Help and Support Center
The computer may include both a v.92 56K modem and a
User’s Guide
Various batteries are available for use with your computer. Performing
Your computer supports the Dell™ Media Base, the Dell D/Dock Expansion
.
, and then click
User’s Guide
User and system guides
User’s Guide
User’s Guide
User’s Guide
icon on your desktop, or
.
.
. The
DELL CONFIDENTIAL – PRELIMINARY 12/8/04 – FOR PROOF ONLY
Quick Reference Guide 11
Page 12
Front View
www.dell.com | support.dell.com
FILE LOCATION: J:\DL\DL044399\DTP\D5173eb0.fm
1
2
12
3
11
4
10
5
9
6
8
DELL CONFIDENTIAL – PRELIMINARY 12/8/04 – FOR PROOF ONLY
12 Quick Reference Guide
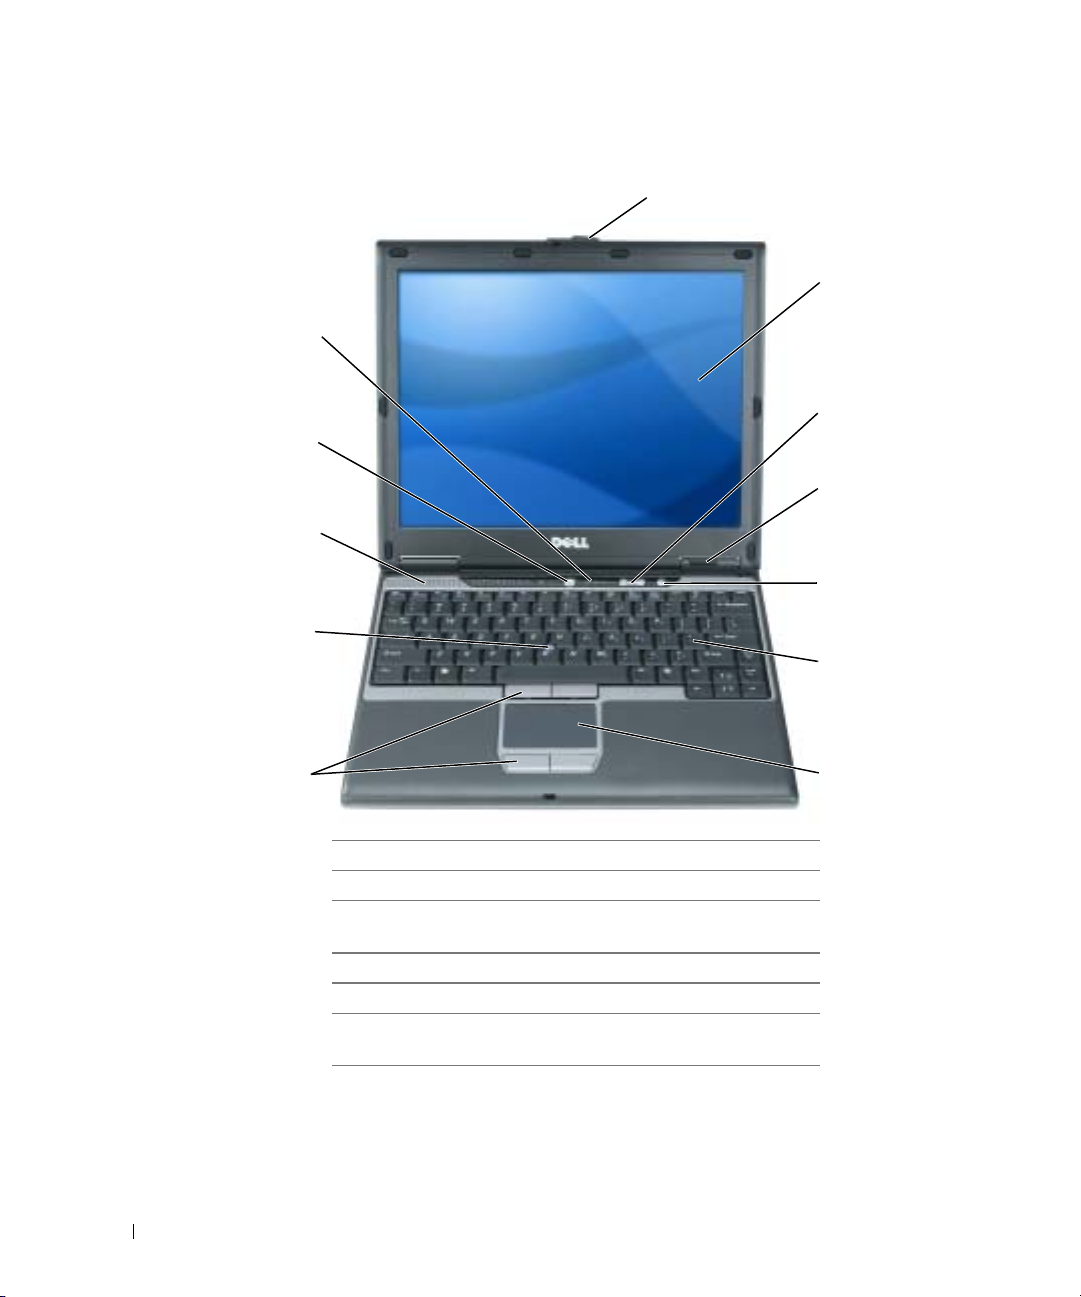
1 display latch 7 touch pad
2 display 8 track stick/touch pad buttons
3 volume control
buttons
4 device status lights 10 speaker
5 mute button 11 power button
6 keyboard 12 keyboard and wireless status
9 track stick
lights
7
Page 13
Left View
FILE LOCATION: J:\DL\DL044399\DTP\D5173eb0.fm
41
3
2
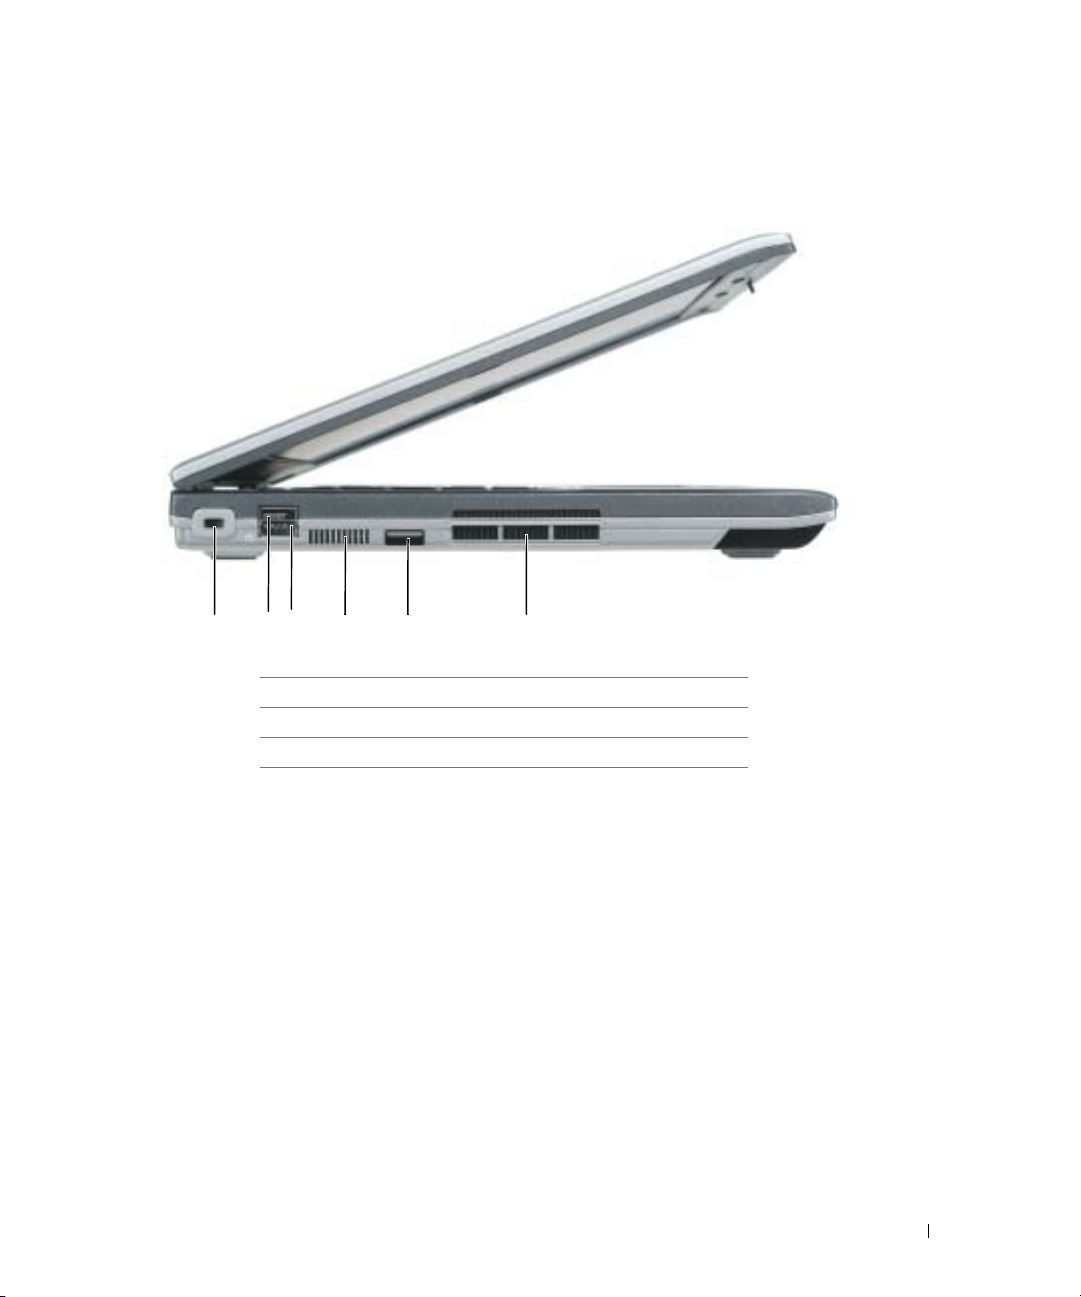
1 security cable slot 4 air vents
2
D/Bay connector
USB connector
3
56
5 infrared sensor
6 air vents
DELL CONFIDENTIAL – PRELIMINARY 12/8/04 – FOR PROOF ONLY
Quick Reference Guide 13
Page 14
Right View
www.dell.com | support.dell.com
FILE LOCATION: J:\DL\DL044399\DTP\D5173eb0.fm
1 234
Back View
CAUTION: Do not block, push objects into, or allow dust to accumulate in the air vents. Do not store
your computer in a low-airflow environment, such as a closed briefcase, while it is running. Restricting
the airflow can damage the computer or cause a fire.
NOTICE: To avoid damaging the computer, wait 5 seconds after you turn off the computer before you
disconnect an external device.
DELL CONFIDENTIAL – PRELIMINARY 12/8/04 – FOR PROOF ONLY
14 Quick Reference Guide
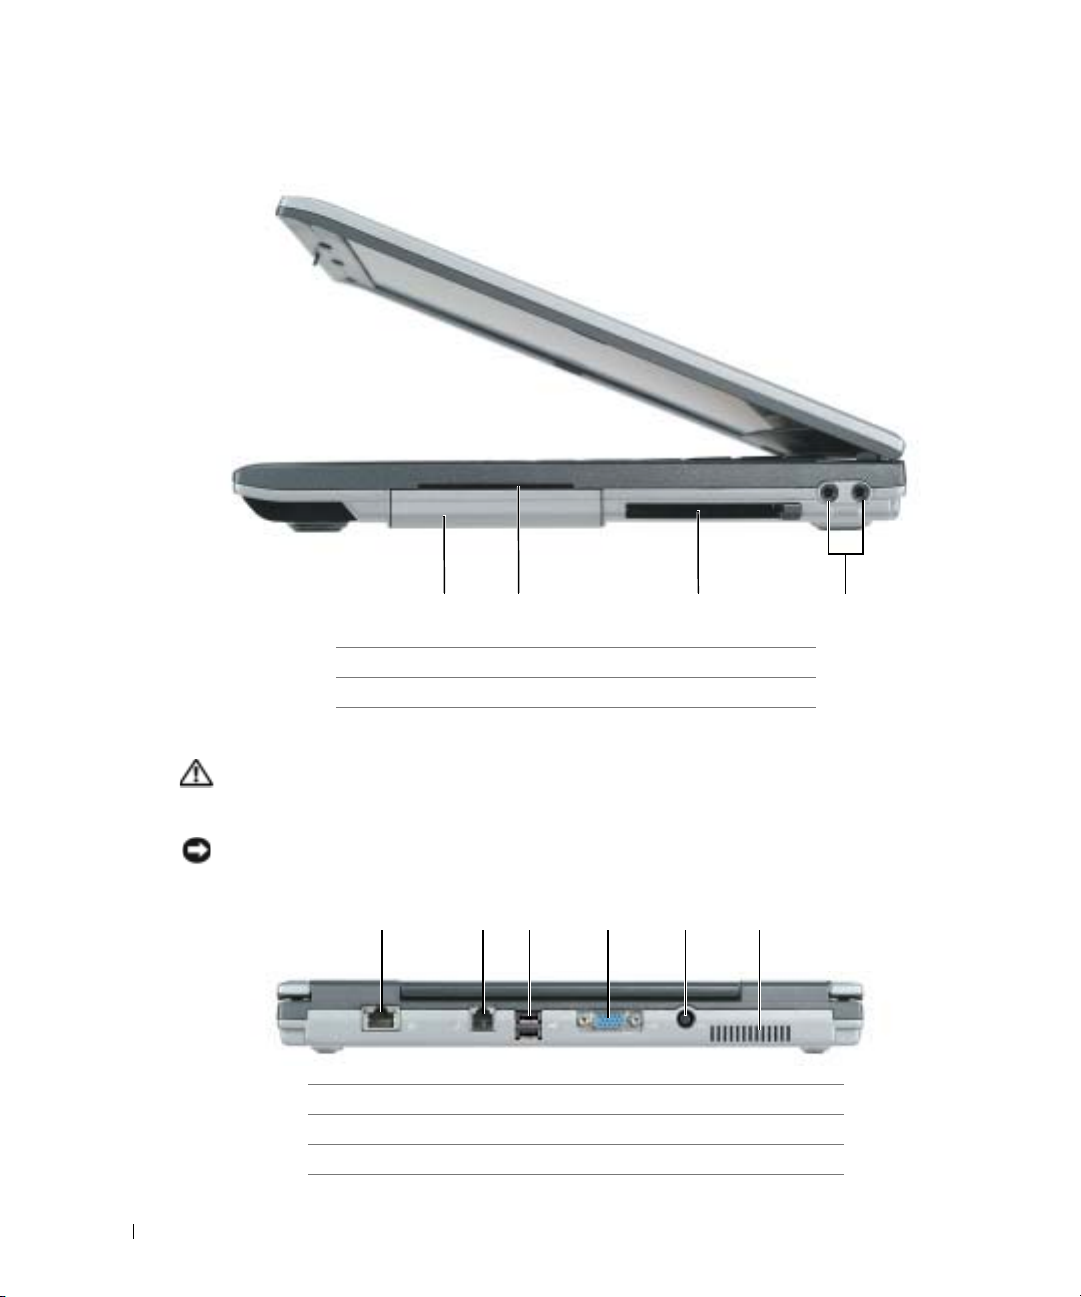
1 hard drive 3 PC Card slot
2 smart card slot 4 audio connectors (2)
123456
1 network connector (RJ-45) 4 video connector
2 modem connector (RJ-11) 5 AC adapter connector
3 USB connector (2) 6 air vents
Page 15
Bottom View
FILE LOCATION: J:\DL\DL044399\DTP\D5173eb0.fm
1
8
7
2
3 4
5
6
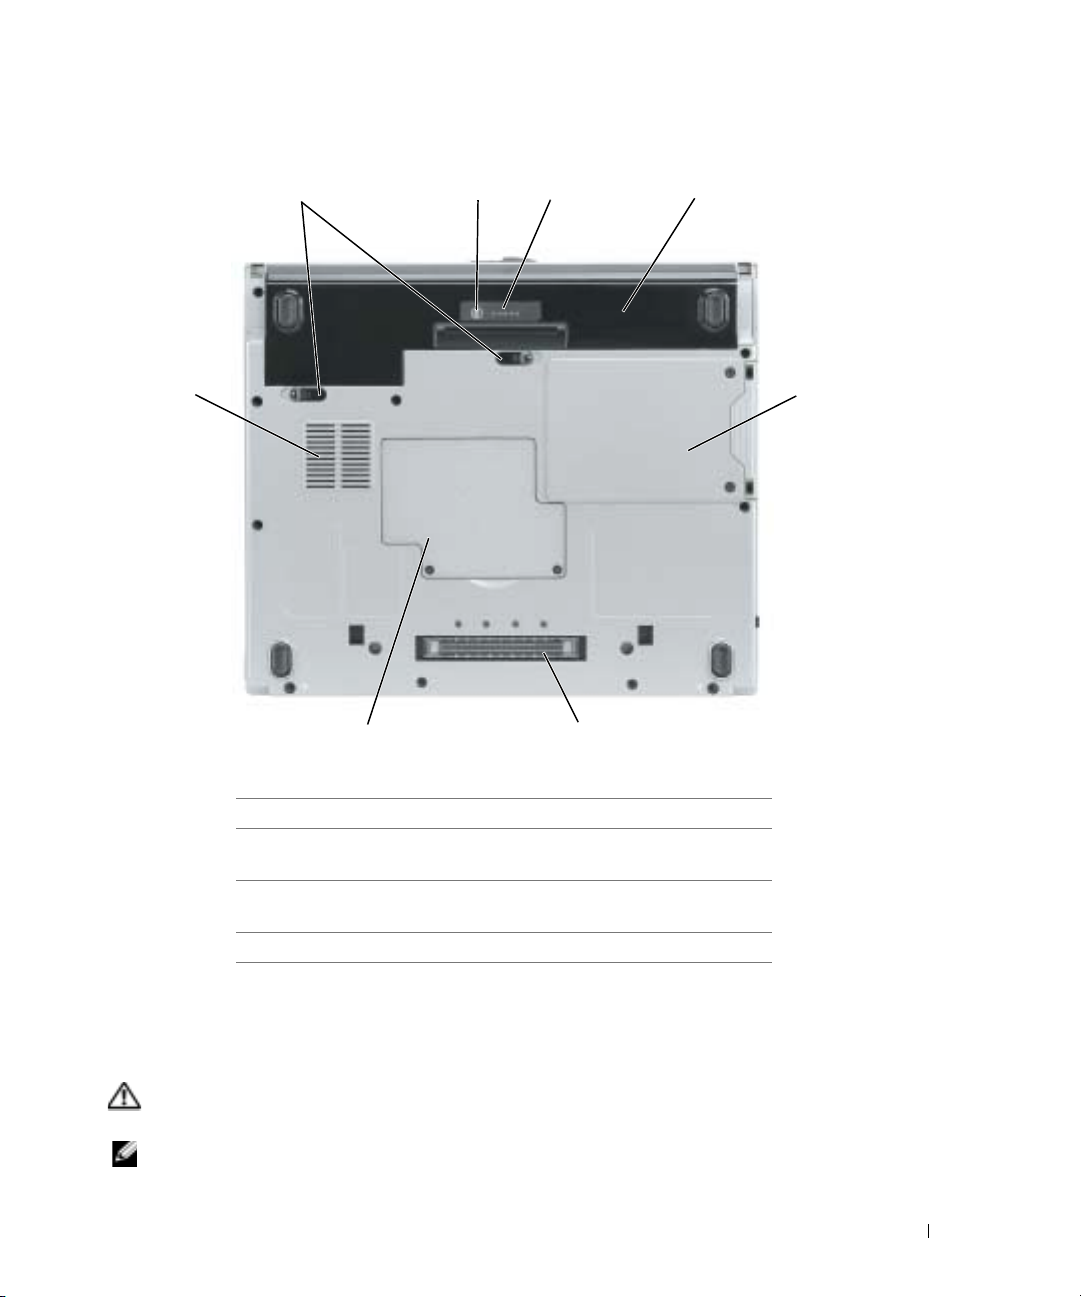
1 battery-bay latch releases (2) 5 hard drive
2 charge-gauge status button 6 Media Base docking-device
connector
3 battery charge gauge 7 memory module/coin-cell
battery cover
4 battery 8
fan air vents
Using a Battery
Battery Performance
CAUTION: Before you perform the following procedures, see the safety instructions in the Product
Information Guide.
NOTE: For more information about the Dell warranty for your computer, see the Product Information
Guide or separate paper warranty document that shipped with your computer.
DELL CONFIDENTIAL – PRELIMINARY 12/8/04 – FOR PROOF ONLY
Quick Reference Guide 15
Page 16
For optimal computer performance and to help preserve BIOS settings, operate your Dell™
computer with the battery installed at all times. Use a battery to run the computer when it is not
connected to an electrical outlet. One battery is supplied as standard equipment in the battery bay.
Battery operating time varies depending on operating conditions.
NOTE: Battery operating time (the time it can hold a charge) decreases over time. Depending on how
often the battery is used and the conditions under which it is used, you may need to purchase a new
battery during the life of your computer.
Operating time is significantly reduced when you perform operations including, but not limited to,
the following:
• Using optical drives, such as DVD or CD drives
www.dell.com | support.dell.com
• Using wireless-network communications devices, PC Cards, or USB devices
• Using high-brightness display settings, 3D screen savers, or other power-intensive programs
such as 3D games
• Running the computer in maximum performance mode
NOTE: It is recommended that you connect your computer to an electrical outlet when it is writing to a
CD or DVD.
You can check the battery charge by pressing the battery-charge status button on the battery. You
can also set power management options to alert you when the battery charge is low.
CAUTION: Using an incompatible battery may increase the risk of fire or explosion. Replace the
battery only with a compatible battery purchased from Dell. The lithium-ion battery is designed to work
with your Dell computer. Do not use a battery from other computers with your computer.
FILE LOCATION: J:\DL\DL044399\DTP\D5173eb0.fm
CAUTION: Do not dispose of batteries with household waste. When your battery no longer holds a
charge, call your local waste disposal or environmental agency for advice on disposing of a lithium-ion
battery. See "Battery Disposal" in the Product Information Guide.
CAUTION: Misuse of the battery may increase the risk of fire or chemical burn. Do not puncture,
incinerate, disassemble, or expose the battery to temperatures above 65°C (149°F). Keep the battery
away from children. Handle damaged or leaking batteries with extreme care. Damaged batteries may
leak and cause personal injury or equipment damage.
Checking the Battery Charge
The Dell QuickSet Battery Meter, the Microsoft® Windows®
the battery charge gauge and health gauge, and the low-battery warning provide information on the
battery charge.
Dell QuickSet Battery Meter
If Dell QuickSet is installed, press <Fn><F3> to display the QuickSet Battery Meter.
Battery Meter
The
in your computer.
DELL CONFIDENTIAL – PRELIMINARY 12/8/04 – FOR PROOF ONLY
16 Quick Reference Guide
Power Meter
window and icon,
window displays status, charge level, and charge completion time for the battery
Page 17
FILE LOCATION: J:\DL\DL044399\DTP\D5173eb0.fm
NOTE: You can use your optional Media Base to charge the computer battery when the Media Base is in
standalone mode, or when the computer is docked in the Media Base. The additional power from the
battery in the Media Base is available for computer usage once you dock the computer.
In addition, when your computer is connected to the Media Base or other docking device (docked),
the
Battery Meter
window includes a
Dock Battery
tab, which displays the charge level and current
status of the battery in the battery bay of the Media Base or other docking device.
The following icons appear in the
• The computer or docking device is running on battery power.
• The battery is discharging.
• The computer or docking device is connected to an electrical outlet and
running on AC power.
• The battery is charging.
• The computer or docking device is connected to an electrical outlet and
running on AC power.
• The battery is fully charged and idle.
Battery Meter
window:
For more information about QuickSet, right-click the icon in the notification area (located in
Help
the lower-right corner of the Windows desktop), and click
.
Microsoft Windows Power Meter
The Windows Power Meter indicates the remaining battery charge. To check the Power Meter,
double-click the icon in the notification area. For more information about the
tab, see your
Charge Gauge
User’s Guide
. If the computer is connected to an electrical outlet, a icon appears.
Power Meter
During the first 3 seconds after you press the status button on the battery charge gauge, the lights
on the charge gauge indicate battery charge status. Each light represents approximately 20 percent
of the total battery charge. For example, if the battery has 80 percent of its charge remaining, four
of the lights are on. If no lights appear, the battery has no charge.
Health Gauge
The battery life span is largely determined by the number of times it is charged. After hundreds of
charge and discharge cycles, batteries lose some charge capacity, or
battery health
. To check the
battery health, press and hold the status button on the battery charge gauge for at least 3 seconds.
If no lights appear, the battery is in good condition, and more than 80 percent of its original charge
capacity remains. Each light represents incremental degradation. If five lights appear, less than
60 percent of the charge capacity remains, and you should consider replacing the battery.
DELL CONFIDENTIAL – PRELIMINARY 12/8/04 – FOR PROOF ONLY
Quick Reference Guide 17
Page 18

NOTE: When you press and hold the status button on the battery charge gauge for at least 3 seconds,
the charge-level lights first light to display the current charge status. Then they switch to battery health
status where they represent incremental degradation when lit.
Low-Battery Warning
NOTICE: To avoid losing or corrupting data, save your work immediately after a low-battery warning.
Then connect the computer to an electrical outlet. If the battery runs completely out of power, hibernate
mode begins automatically.
NOTE: You can use your optional Media Base to charge the computer battery when the Media Base is in
standalone mode, or when the computer is docked in the Media Base. The additional power from the
battery in the Media Base is available for computer usage once you dock the computer.
www.dell.com | support.dell.com
A pop-up window warns you when the battery charge is approximately 90 percent depleted. For
more information about low-battery alarms, see your
A low-battery warning occurs when the battery charge is approximately 90 percent depleted. The
computer beeps once, indicating that minimal battery operating time remains. During that time,
the speaker beeps periodically. The computer enters hibernate mode when the battery charge is at a
critically low level.
Charging the Battery
NOTE: The AC adapter charges a completely discharged battery in approximately 2 hours with the
computer turned off. Charge time is longer with the computer turned on. You can leave the battery in the
computer as long as you like. The battery’s internal circuitry prevents the battery from overcharging.
When you connect the computer to an electrical outlet or install a battery while the computer is
connected to an electrical outlet, the computer checks the battery charge and temperature. If
necessary, the AC adapter then charges the battery and maintains the battery charge.
If the battery is hot from being used in your computer or being in a hot environment, the battery
may not charge when you connect the computer to an electrical outlet.
The battery is too hot to start charging if the light flashes alternately green and orange.
Disconnect the computer from the electrical outlet and allow the computer and the battery to cool
to room temperature. Then connect the computer to an electrical outlet to continue charging the
battery.
FILE LOCATION: J:\DL\DL044399\DTP\D5173eb0.fm
User’s Guide
.
Removing a Battery
CAUTION: Before performing the following procedures, disconnect the modem from the telephone
wall jack.
1
Ensure that the computer is turned off and disconnected from the electrical outlet.
2
If the computer is connected to the Media Base or other docking device (docked), undock it.
See the documentation that came with your docking device for instructions.
DELL CONFIDENTIAL – PRELIMINARY 12/8/04 – FOR PROOF ONLY
18 Quick Reference Guide
Page 19
FILE LOCATION: J:\DL\DL044399\DTP\D5173eb0.fm
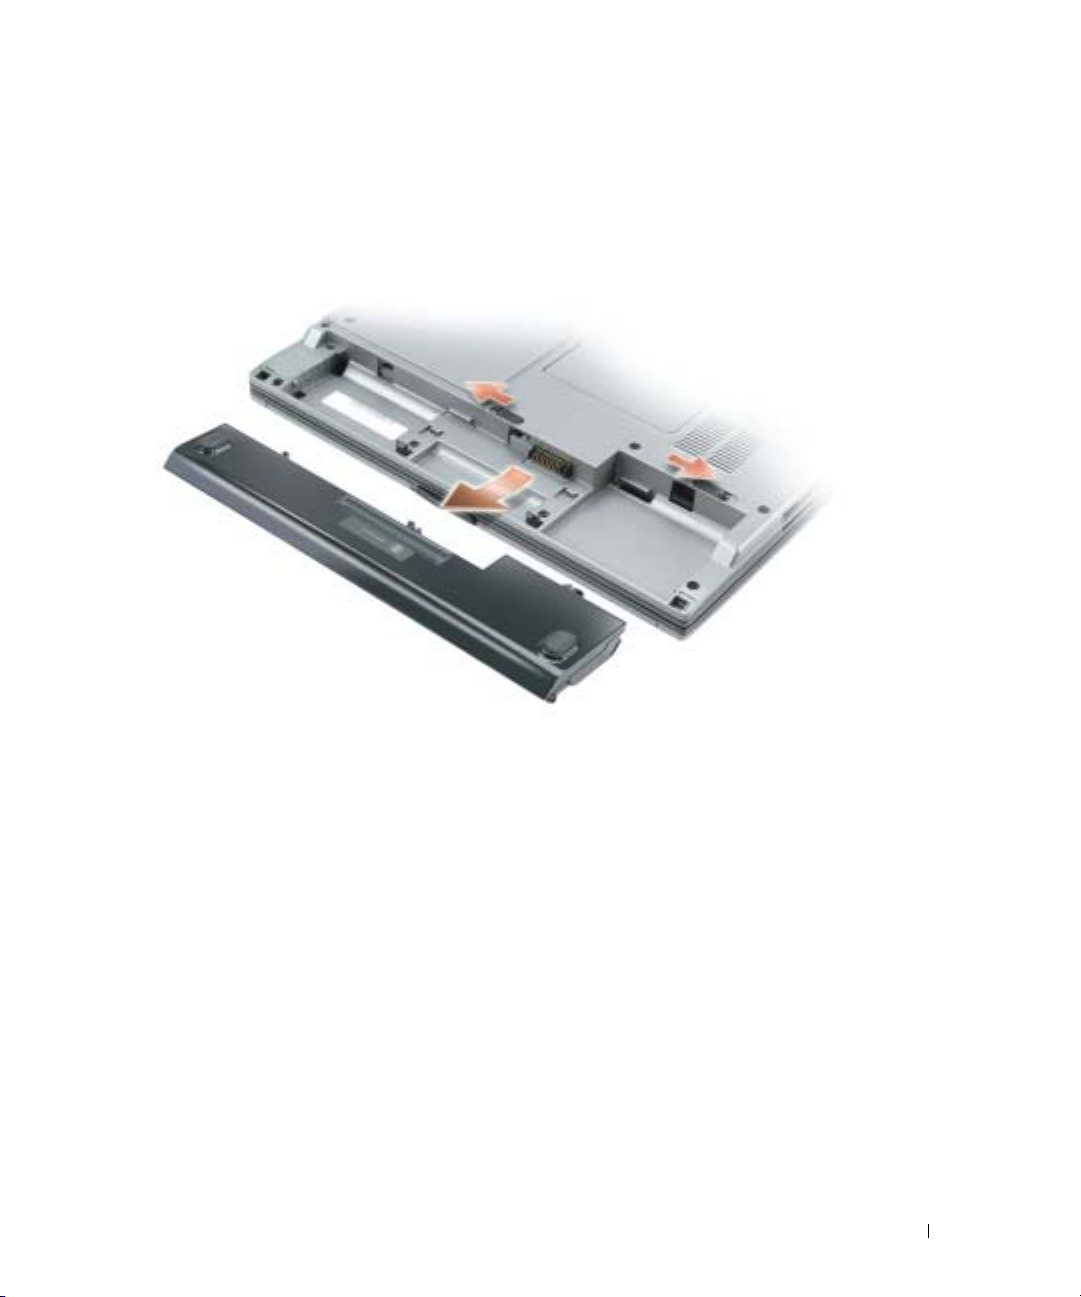
3
Slide the battery-bay latch releases on the bottom of the computer, and then remove the
battery from the bay.
Installing a Battery
Ensure that the computer is turned off. Slide the battery into the bay until the latch releases click.
Storing a Battery
Remove the battery when you store your computer for an extended period of time. A battery
discharges during prolonged storage. After a long storage period, recharge the battery fully before
you use it.
Solving Problems
Notebook System Software (NSS)
If you reinstall the operating system for your computer, you should also reinstall the NSS utility.
This utility is available on the optional
www.support.dell.com
.
DELL CONFIDENTIAL – PRELIMINARY 12/8/04 – FOR PROOF ONLY
Drivers and Utilities
CD and on the Dell Support website at
Quick Reference Guide 19
Page 20
FILE LOCATION: J:\DL\DL044399\DTP\D5173eb0.fm
To download the utility from the Dell Support website, go to the
and select your computer model from the pull-down menu. Select the
"System and Configuration Utilities," select your operating system and language, and then follow
the posted instructions.
NSS provides critical updates for your operating system and support for Dell™ 3.5-inch USB floppy
drives, Intel
®
operation of your Dell computer. The software automatically detects your computer and operating
system and installs the updates appropriate for your configuration.
NOTE: NSS is critical for the correct operation of USB devices, including the Dell D/Bay, D/Dock, D/Port,
and D/View devices.
www.dell.com | support.dell.com
Lockups and Software Problems
CAUTION: Before you perform the following procedures, see the safety instructions in the Product
Information Guide.
The computer does not start up
ENSURE THAT THE AC ADAPTER IS FIRMLY CONNECTED TO THE COMPUTER AND TO THE ELECTRICAL
OUTLET
The computer stops responding
NOTICE: You might lose data if you are unable to perform an operating system shutdown.
Downloads
section of the website
Download Category
Pentium®M processors, optical drives, and USB devices. NSS is necessary for correct
TURN THE COMPUTER OFF — If you are unable to get a response by pressing a key on your keyboard or
moving your mouse, press and hold the power button for at least 8 to 10 seconds until the computer
turns off. Then restart your computer.
A program stops responding
END THE PROGRAM —
1
Press <Ctrl><Shift><Esc> simultaneously.
2
Click
Applications
3
Click the program that is no longer responding.
4
Click
End Task
DELL CONFIDENTIAL – PRELIMINARY 12/8/04 – FOR PROOF ONLY
20 Quick Reference Guide
.
.
Page 21

FILE LOCATION: J:\DL\DL044399\DTP\D5173eb0.fm
A program crashes repeatedly
NOTE: Software usually includes installation instructions in its documentation or on a floppy or CD.
CHECK THE SOFTWARE DOCUMENTATION — If necessary, uninstall and then reinstall the program.
A program is designed for an earlier Windows operating system
IF YOU ARE USING WINDOWS XP, RUN THE PROGRAM COMPATIBILITY WIZARD — The Program
Compatibility Wizard configures a program so that it runs in an environment similar to nonWindows XP operating system environments.
1
Click the
Wizard
2
In the welcome screen, click
3
Follow the instructions on the screen.
Start
button, point to
.
All Programs→ Accessories
Next
.
, and then click
Program Compatibility
A solid blue screen appears
TURN THE COMPUTER OFF — If you are unable to get a response by pressing a key on your keyboard or
moving your mouse, press and hold the power button for at least 8 to 10 seconds until the computer
turns off. Then restart your computer.
Other software problems
CHECK THE SOFTWARE DOCUMENTATION OR CONTACT THE SOFTWARE MANUFACTURER FOR
TROUBLESHOOTING INFORMATION —
• Ensure that the program is compatible with the operating system installed on your computer.
• Ensure that your computer meets the minimum hardware requirements needed to run the software. See
the software documentation for information.
• Ensure that the program is installed and configured properly.
• Verify that the device drivers do not conflict with the program.
• If necessary, uninstall and then reinstall the program.
BACK UP YOUR FILES IMMEDIATELY
USE A VIRUS-SCANNING PROGRAM TO CHECK THE HARD DRIVE, FLOPPIES, OR CDS
SAVE AND CLOSE ANY OPEN FILES OR PROGRAMS AND SHUT DOWN YOUR COMPUTER THROUGH THE
MENU
Start
DELL CONFIDENTIAL – PRELIMINARY 12/8/04 – FOR PROOF ONLY
Quick Reference Guide 21
Page 22
SCAN THE COMPUTER FOR SPYWARE — If you are experiencing slow computer performance, you
frequently receive pop-up advertisements, or you are having problems connecting to the Internet, your
computer might be infected with spyware. Use an anti-virus program that includes anti-spyware
protection (your program may require an upgrade) to scan the computer and remove spyware. For more
information, go to support.dell.com and search for the keyword spyware.
RUN THE DELL DIAGNOSTICS — If all tests run successfully, the error condition is related to a software
problem.
Running the Dell Diagnostics
www.dell.com | support.dell.com
CAUTION: Before you perform the following procedures, see the safety instructions located in the
Product Information Guide.
When to Use the Dell Diagnostics
If you experience a problem with your computer, perform the checks in "Solving Problems" (see
your online
User’s Guide
assistance.
NOTICE: The Dell Diagnostics works only on Dell™ computers.
Start the Dell Diagnostics from either your hard drive or from the optional
(also known as the
FILE LOCATION: J:\DL\DL044399\DTP\D5173eb0.fm
) and run the Dell Diagnostics before you contact Dell for technical
Drivers and Utilities
ResourceCD
).
CD
Starting the Dell Diagnostics From Your Hard Drive
The Dell Diagnostics is located on a hidden diagnostic utility partition on your hard drive.
NOTE: If your computer cannot display a screen image, contact Dell.
1
Shut down the computer.
2
If the computer is connected to a docking device (docked), undock it. See the documentation
that came with your docking device for instructions.
3
Connect the computer to an electrical outlet.
4
Turn on the computer. When the DELL™ logo appears, press <F12> immediately.
NOTE: If you cannot see anything on your display, hold down the mute button and press the computer’s
power button to begin the Dell Diagnostics. The computer automatically runs the Pre-boot System
Assessment.
NOTE: If you see a message stating that no diagnostics utility partition has been found, run the Dell
Diagnostics from your optional Drivers and Utilities CD.
If you wait too long and the operating system logo appears, continue to wait until you see the
Microsoft
®
DELL CONFIDENTIAL – PRELIMINARY 12/8/04 – FOR PROOF ONLY
22 Quick Reference Guide
Windows® desktop. Then shut down your computer and try again.
Page 23

FILE LOCATION: J:\DL\DL044399\DTP\D5173eb0.fm
5
When the boot device list appears, highlight
Diagnostics
and press <Enter>.
The computer runs the Pre-boot System Assessment, a series of initial tests of your system
board, keyboard, hard drive, and display.
• During the assessment, answer any questions that appear.
• If a failure is detected, the computer stops and beeps. To stop the assessment and restart
the computer, press <n>; to continue to the next test, press <y>; to retest the
component that failed, press <r>.
• If failures are detected during the Pre-boot System Assessment, write down the error
code(s) and contact Dell before continuing on to the Dell Diagnostics.
If the Pre-boot System Assessment completes successfully, you receive the message
Dell Diagnostic Utility Partition. Press any key to continue
6
Press any key to start the Dell Diagnostics from the diagnostics utility partition on your hard
.
drive.
Starting the Dell Diagnostics From the Optional Drivers and Utilities CD
1
Insert the
2
Shut down and restart the computer.
Drivers and Utilities
CD.
When the DELL logo appears, press <F12> immediately.
Booting
If you wait too long and the Windows logo appears, continue to wait until you see the
Windows desktop. Then shut down your computer and try again.
NOTE: The next steps change the boot sequence for one time only. On the next start-up, the computer
boots according to the devices specified in system setup.
3
When the boot device list appears, highlight
4
Select the
5
Select the
6
Ty p e 1 to start the
7
Ty p e 2 to start the Dell Diagnostics.
8
Select
CD/DVD/CD-RW Drive
Boot from CD-ROM
ResourceCD
option from the CD boot menu.
option from the menu that appears.
menu.
Run the 32 Bit Dell Diagnostics
CD/DVD/CD-RW Drive
and press <Enter>.
from the numbered list. If multiple versions are listed,
select the version appropriate for your computer.
9
When the Dell Diagnostics
DELL CONFIDENTIAL – PRELIMINARY 12/8/04 – FOR PROOF ONLY
Main Menu
appears, select the test you want to run.
Quick Reference Guide 23
Page 24

Dell Diagnostics Main Menu
1
After the Dell Diagnostics loads and the
option you want.
Option Function
Express Test Performs a quick test of devices. This test typically takes 10 to 20 minutes
Extended Test Performs a thorough check of devices. This test typically takes 1 hour or
www.dell.com | support.dell.com
Custom Test Tests a specific device. You can customize the tests you want to run.
Symptom Tree Lists the most common symptoms encountered and allows you to select a
2
If a problem is encountered during a test, a message appears with an error code and a
description of the problem. Write down the error code and problem description and follow
the instructions on the screen.
If you cannot resolve the error condition, contact Dell.
NOTE: The Service Tag for your computer is located at the top of each test screen. If you contact Dell,
technical support will ask for your Service Tag.
3
If you run a test from the
described in the following table for more information.
FILE LOCATION: J:\DL\DL044399\DTP\D5173eb0.fm
Main Menu
and requires no interaction on your part. Run Express Test first to increase
the possibility of tracing the problem quickly.
more and requires you to answer questions periodically.
test based on the symptom of the problem you are having.
Custom Test
or
Symptom Tree
screen appears, click the button for the
option, click the applicable tab
Tab Function
Results Displays the results of the test and any error conditions encountered.
Errors Displays error conditions encountered, error codes, and the problem
Help Describes the test and may indicate requirements for running the test.
Configuration Displays your hardware configuration for the selected device.
Parameters Allows you to customize the test by changing the test settings.
DELL CONFIDENTIAL – PRELIMINARY 12/8/04 – FOR PROOF ONLY
24 Quick Reference Guide
description.
The Dell Diagnostics obtains configuration information for all devices from
system setup, memory, and various internal tests, and it displays the
information in the device list in the left pane of the screen. The device list
may not display the names of all the components installed on your
computer or all devices attached to your computer.
Page 25

FILE LOCATION: J:\DL\DL044399\DTP\D5173eb0.fm
4
When the tests are completed, if you are running the Dell Diagnostics from the
Utilities
5
When the tests are completed, close the test screen to return to the
exit the Dell Diagnostics and restart the computer, close the
CD, remove the CD.
Main Menu
Main Menu
Drivers and
screen. To
screen.
DELL CONFIDENTIAL – PRELIMINARY 12/8/04 – FOR PROOF ONLY
Quick Reference Guide 25
Page 26

www.dell.com | support.dell.com
FILE LOCATION: J:\DL\DL044399\DTP\D5173eb0.fm
DELL CONFIDENTIAL – PRELIMINARY 12/8/04 – FOR PROOF ONLY
26 Quick Reference Guide
Page 27

Index
A
about your computer
back view, 13
bottom view, 14
front view, 11
left view, 12
right view, 13
B
battery
battery life and usage, 10
charge gauge, 16
charging, 17
checking the charge, 15
health gauge, 16
installing, 18
low-battery warning, 17
performance, 14
power meter, 16
removing, 17
storing, 18
C
CD
operating system, 8
computer, 10
crashes, 19-20
slow performance, 21
stops responding, 19
D
Dell
support website, 7
Dell Premier Support
website, 5, 7
Diagnostics
Dell, 21
diagnostics
Drivers and Utilities CD, 5
documentation
device, 5
online, 7
System Information Guide, 5
User’s Guide, 6
drivers
ResourceCD, 5
Drivers and Utilities CD, 5
F
Finding Information
documentation, 5
L
labels
Microsoft Windows, 6
Service Tag, 6
M
Microsoft Windows label, 6
O
Operating System
Installation Guide, 8
operating system
CD, 8
operating system CD, 8
P
problems
blue screen, 20
computer crashes, 19-20
computer does not start up, 19
computer stops responding, 19
lockups, 19
program crashes, 20
program stops responding, 19
programs and Windows
compatibility, 20
slow computer
performance, 21
software, 19-20
solving, 18
spyware, 21
Index 27
Page 28

R
reinstalling
Drivers and Utilities, 5
ResourceCD, 5
S
safety instructions, 5
Service Tag, 6
software
problems, 20
spyware, 21
U
User’s Guide, 6
W
warranty, 5
Windows XP
Program Compatibility
Wizard, 2 0
wizards
Program Compatibility
Wizard, 2 0
28 Index
Page 29

Dell™ Latitude™ D410
Guide de référence rapide
Modèle PP06S
www.dell.com | support.dell.com
Page 30

Remarques, avis et précautions
REMARQUE : Une REMARQUE fournit des informations importantes qui vous aident à mieux utiliser votre ordinateur.
AVIS : Un AVIS vous avertit d’un risque de dommage matériel ou de perte de données et vous indique comment éviter le
problème.
PRÉCAUTION : Une PRÉCAUTION indique un risque potentiel d'endommagement du matériel, de blessure corporelle
ou de mort.
Abréviations et sigles
Pour obtenir la liste complète des abréviations et sigles, reportez-vous au
d'exploitation, double-cliquez sur l'icône
sur le bouton
Démarrer
Si vous avez acheté un ordinateur Dell™ Série n, les références du présent document concernant les systèmes
d'application Microsoft
Les CD
Drivers and Utilities
, puis sur
®
Windows® ne sont pas applicables.
Centre d'aide et de support
(Pilotes et utilitaires) et
Guide d'utilisation
Operating System
du bureau Microsoft® Windows® , ou bien cliquez
, et enfin sur
Guide d'utilisation
Guides d'utilisation du système
(selon votre système
).
(Système d’exploitation) sont en option
et peuvent ne pas être expédiés avec tous les ordinateurs.
_________________
Les informations contenues dans ce document sont sujettes à modification sans préavis.
© 2004 Dell Inc. Tous droits réservés.
La reproduction de ce document, de quelque manière que ce soit, sans l'autorisation écrite de Dell Inc. est strictement interdite.
Marques utilisées dans ce document : Dell, le logo DELL et Latitude sont des marques de Dell Inc.; Microsoft et Windows sont des marques
déposées de Microsoft Corporation ; Intel et Pentium sont des marques déposées d'Intel Corporation.
D'autres marques et noms commerciaux peuvent être utilisés dans ce document pour faire référence aux entités se réclamant de ces marques
et de ces noms ou à leurs produits. Dell Inc. rejette tout intérêt propriétaire dans les marques et les noms commerciaux autres que les siens.
Modèle PP06S
Novembre 2004 Réf. D5173 Rév. A00
Page 31

Table des matières
Recherche d'informations . . . . . . . . . . . . . . . . . . . . . . . . . . . . 33
Configuration de votre ordinateur
À propos de votre ordinateur
Vue frontale
Vue du côté gauche
Vue du côté droit
Vue arrière
Vue de dessous
. . . . . . . . . . . . . . . . . . . . . . . . . . . . . . . . . 40
. . . . . . . . . . . . . . . . . . . . . . . . . . . . . 41
. . . . . . . . . . . . . . . . . . . . . . . . . . . . . . 42
. . . . . . . . . . . . . . . . . . . . . . . . . . . . . . . . . 42
. . . . . . . . . . . . . . . . . . . . . . . . . . . . . . . 43
Utilisation d'une batterie
Performances de la batterie
Vérification de la charge de la batterie
Chargement de la batterie
Retrait de la batterie
Installation d'une batterie
Stockage d'une batterie
Résolution des problèmes
Notebook System Software (NSS)
Problèmes de blocage et problèmes logiciels
Exécution de Dell Diagnostics
. . . . . . . . . . . . . . . . . . . . . . . . 37
. . . . . . . . . . . . . . . . . . . . . . . . . . 39
. . . . . . . . . . . . . . . . . . . . . . . . . . . . 43
. . . . . . . . . . . . . . . . . . . . . . . . 43
. . . . . . . . . . . . . . . . . . . 44
. . . . . . . . . . . . . . . . . . . . . . . . . 46
. . . . . . . . . . . . . . . . . . . . . . . . . . . . 47
. . . . . . . . . . . . . . . . . . . . . . . . . 47
. . . . . . . . . . . . . . . . . . . . . . . . . . 48
. . . . . . . . . . . . . . . . . . . . . . . . . . . . 48
. . . . . . . . . . . . . . . . . . . . . 48
. . . . . . . . . . . . . . . 48
. . . . . . . . . . . . . . . . . . . . . . . 51
Index . . . . . . . . . . . . . . . . . . . . . . . . . . . . . . . . . . . . . . . . . 55
Table des matières 31
Page 32

32 Table des matières
Page 33

FILE LOCATION: J:\DL\DL044399\DTP\D5173fb0.fm
Recherche d'informations
REMARQUE : Certaines fonctionnalités peuvent ne pas être disponibles sur votre ordinateur ou dans certains
pays.
REMARQUE : Il est possible que des informations supplémentaires soient livrées avec votre ordinateur.
Que recherchez-vous ? Cherchez ici.
• Un programme de diagnostic pour mon ordinateur
• Pilotes pour mon ordinateur
• Documentation concernant mon ordinateur
• Documentation concernant mon périphérique
• Notebook System Software (NSS)
CD Drivers and Utilities (Pilotes et utilitaires) (également
appelé CD ResourceCD)
La documentation et les pilotes sont déjà installés sur
l'ordinateur. Vous pouvez utiliser le CD pour
les pilotes
documentation.
, exécuter
Dell Diagnostics
Des fichiers Lisez-moi
peuvent être inclus sur
votre CD afin de fournir
des informations sur les
modifications techniques
apportées en dernière
minute à votre système
ou des informations de
référence destinées aux
techniciens ou aux
utilisateurs expérimentés
ou accéder à votre
réinstaller
.
• Informations sur les garanties
• Termes et Conditions (États-Unis uniquement)
• Consignes de sécurité
• Informations sur les réglementations
• Informations relatives à l'ergonomie
• Contrat de licence pour utilisateur final
DELL CONFIDENTIEL – PRÉLIMINAIRE 12/8/04 – POUR AVANT-PROJET SEULEMENT
REMARQUE : Les pilotes et mises à jour de documentation
les plus récents se trouvent à l'adresse support.dell.com.
REMARQUE : Le CD Drivers and Utilities est en option et
n'est pas obligatoirement expédié avec votre ordinateur.
Guide d'information sur le produit Dell™
Guide de référence rapide 33
Page 34

FILE LOCATION: J:\DL\DL044399\DTP\D5173fb0.fm
Que recherchez-vous ? Cherchez ici.
• Comment retirer et remplacer des pièces
• Caractéristiques
• Comment configurer les paramètres du système
• Comment déterminer et résoudre des problèmes
Guide d'utilisation
Centre d'aide et de support Microsoft® Windows® XP
1
Cliquez sur le bouton
support
2
Cliquez sur
Guides d'utilisation
Le Guide d'utilisation est aussi disponible sur le CD
Drivers and Utilities
REMARQUE : Le CD Drivers and Utilities est en option et
www.dell.com | support.dell.com
• Numéro de service et code de service express
• Étiquette de licence Microsoft Windows
n'est pas obligatoirement expédié avec votre ordinateur.
Numéro de service et licence Microsoft Windows
Ces étiquettes sont situées sur
• Utilisez le numéro de
service pour identifier
votre ordinateur
lorsque vous accédez
au site Web
support.dell.com
lorsque vous contactez le service de support technique.
• Entrez le code de service express pour orienter votre
appel lorsque vous communiquez avec le service
d'assistance technique. Le code de service express n'est
pas nécessairement disponible dans tous les pays.
Démarrer
, puis sur
.
Guides d'utilisation du système
.
.
la base de
ou
Aide et
, puis sur
votre ordinateur.
DELL CONFIDENTIEL – PRÉLIMINAIRE 12/8/04 – POUR AVANT-PROJET SEULEMENT
34 Guide de référence rapide
Page 35

FILE LOCATION: J:\DL\DL044399\DTP\D5173fb0.fm
Que recherchez-vous ? Cherchez ici.
• Solutions — Astuces de dépannage, articles de techniciens,
cours en ligne, questions fréquemment posées
• Communauté — Discussion en ligne avec d'autres clients
Dell
• Mises à niveau — Informations sur les mises à niveau des
composants, comme la mémoire, le disque dur et le système
d'exploitation
• Service clientèle — Personnes-ressources, appels de service
Site Web de support de Dell — support.dell.com
REMARQUE : Sélectionnez votre région pour afficher le
site de support approprié.
REMARQUE : Les représentants des grandes entreprises,
du gouvernement et du domaine de l'éducation peuvent
également utiliser le site Web Premier Support de Dell à
l'adresse premier.support.dell.com. Ce site Web peut ne
pas être disponible dans toutes les régions.
et état des commandes, garanties et informations sur les
réparations
• Service et support — Historique de l'état des appels de
service et du support, contrat de service, discussions en ligne
avec le support technique
• Référence — Documentation de l'ordinateur, détails sur la
configuration de l'ordinateur, caractéristiques de produit et
livres blancs
• Téléchargements — Pilotes, correctifs et mises à jour
logicielles agréés
• Notebook System Software (NSS)— Si vous réinstallez le
système d'exploitation de votre ordinateur, vous devez
également réinstaller l'utilitaire NSS. NSS fournit des mises
à jour essentielles pour le système d'exploitation et la prise
en charge des lecteurs de disquette USB Dell™ de 3,5
pouces, des processeurs Intel
®
Pentium®M, des lecteurs
optiques et des périphériques USB. NSS est requis pour le
bon fonctionnement de votre ordinateur Dell. Ce logiciel
détecte automatiquement votre ordinateur et son système
d'exploitation, et installe les mises à jour appropriées à votre
configuration.
Pour télécharger NSS :
1
Allez à l'adresse
Téléchargements
2
Saisissez votre numéro de service ou le modèle de l'appareil.
3
Dans le menu déroulant
All
(Toutes).
sur
4
Sélectionnez le système d'exploitation et la langue du
support.dell.com
.
Télécharger une catégorie
et cliquez sur
, cliquez
système d'exploitation de votre ordinateur, puis cliquez sur
Soumettre
5
Sous Select a Device (Sélectionner un périphérique),
descendez jusqu'à
puis cliquez sur
.
Utilitaires Système et Configuration
Dell Notebook System Software
(Logiciel
système pour portables Dell).
DELL CONFIDENTIEL – PRÉLIMINAIRE 12/8/04 – POUR AVANT-PROJET SEULEMENT
,
Guide de référence rapide 35
Page 36

FILE LOCATION: J:\DL\DL044399\DTP\D5173fb0.fm
Que recherchez-vous ? Cherchez ici.
• Comment utiliser Windows XP
• Documentation concernant mon ordinateur
• Documentation concernant les périphériques (pour un
modem, par exemple)
Centre d'aide et de support de Windows
1
Cliquez sur le bouton
support
2
Tapez un mot ou une expression qui décrit votre
problème, puis cliquez sur l'icône en forme de flèche.
3
Cliquez sur la rubrique qui décrit votre problème.
4
Suivez les instructions qui s'affichent à l'écran.
• Comment réinstaller mon système d'exploitation
CD Operating System (système d'exploitation)
Le système d'exploitation est déjà installé sur votre
www.dell.com | support.dell.com
ordinateur. Pour réinstaller le système d'exploitation,
utilisez le CD Operating System (Système d'exploitation).
Reportez-vous à la section «
» pour obtenir des instructions.
XP
Démarrer
, puis sur
Aide et
.
Réinstallation de Windows
Après avoir réinstallé
votre système
d'exploitation, utilisez le
Drivers and Utilities
CD
pour réinstaller les pilotes
des périphériques livrés
avec votre ordinateur.
L'étiquette de la clé de
produit (Product key) de
votre système
d'exploitation se trouve
sur l'ordinateur.
DELL CONFIDENTIEL – PRÉLIMINAIRE 12/8/04 – POUR AVANT-PROJET SEULEMENT
36 Guide de référence rapide
REMARQUE : La couleur du CD varie selon le système
d'exploitation que vous avez commandé.
REMARQUE : Le CD Operating System est en option et
n'est pas obligatoirement expédié avec tous les
ordinateurs.
Page 37

FILE LOCATION: J:\DL\DL044399\DTP\D5173fb0.fm
Configuration de votre ordinateur
PRÉCAUTION : Avant de commencer toute procédure de cette section, reportez-vous aux consignes
de sécurité du Guide d´information sur le produit.
1
Déballez la boîte d'accessoires.
2
Mettez de côté le contenu de la boîte d'accessoires ; vous en aurez besoin ultérieurement pour
configurer votre ordinateur.
Cette boîte contient également la documentation utilisateur et tout autre logiciel ou matériel
supplémentaire (PC Cards, lecteurs, batteries, etc.) que vous avez commandé.
3
Reliez l'adaptateur secteur au connecteur de l'adaptateur secteur de l'ordinateur et à la prise
secteur.
PRÉCAUTION : L'adaptateur secteur fonctionne avec les tensions secteur disponibles dans le monde
entier. Cependant, les connecteurs et les rampes d'alimentation varient selon les pays. Le fait d'utiliser
un câble incompatible, ou de mal brancher le câble aux prises peut endommager l'équipement ou
causer un incendie.
AVIS : Lorsque vous utilisez l'adaptateur secteur, vérifiez que le câble n'est pas étiré, coincé ou écrasé
par des objets tels que des pieds de chaise ou de bureau, et qu'on ne peut pas marcher dessus.
AVIS : Lorsque vous déconnectez le câble de l'adaptateur secteur de l'ordinateur, saisissez le
connecteur et non le câble lui-même, puis tirez fermement mais avec précaution pour éviter
d'endommager le câble. Lorsque vous enroulez le câble de l'adaptateur secteur, vérifiez que vous suivez
l'angle du connecteur de l'adaptateur secteur afin d'éviter d'endommager le câble.
REMARQUE : Ne raccordez pas l'ordinateur à la station d'accueil tant qu'il n'a pas été mis sous tension
et arrêté au moins une fois.
DELL CONFIDENTIEL – PRÉLIMINAIRE 12/8/04 – POUR AVANT-PROJET SEULEMENT
Guide de référence rapide 37
Page 38

4
Pour mettre l'ordinateur sous tension, ouvrez le moniteur et appuyez sur le bouton
d'alimentation.
www.dell.com | support.dell.com
FILE LOCATION: J:\DL\DL044399\DTP\D5173fb0.fm
bouton d'alimentation
DELL CONFIDENTIEL – PRÉLIMINAIRE 12/8/04 – POUR AVANT-PROJET SEULEMENT
38 Guide de référence rapide
Page 39

FILE LOCATION: J:\DL\DL044399\DTP\D5173fb0.fm
À propos de votre ordinateur
Pour plus d'informations sur l'ordinateur, reportez-vous au
Guide d'utilisation
au
Guide d'utilisation
et enfin sur
plus fréquemment posées concernant l'ordinateur.
•
•
•
Guides d'utilisation du système
Carte réseau et modem :
56K et une carte réseau Ethernet 10/100/1000. Pour trouver l'emplacement des connecteurs,
reportez-vous à la section «Vue arrière» à la page 42. Pour plus d'informations sur les ports et
les connecteurs, reportez-vous à la section «À propos de votre ordinateur» du
d'utilisation
Durée de vie et utilisation de la batterie :
ordinateur. Certaines opérations, comme l'utilisation prolongée de périphériques sans fil,
peuvent réduire considérablement la durée de vie et l'autonomie de la batterie.
Pour obtenir plus d'informations sur les performances de la batterie et son utilisation,
reportez-vous à la section «Utilisation d'une batterie» à la page 43.
Pour des informations supplémentaires concernant l'économie d'énergie, reportez-vous à
Guide d'utilisation
votre
Dell D/Bay :
en charge, reportez-vous à votre
Stations d'accueil :
Expansion Station, et Dell D/Port Advanced Port Replicator.
REMARQUE : Il se peut que les stations d'accueil ne soient pas disponibles dans tous les pays.
– Pour des informations sur votre station d'accueil optionnelle, reportez-vous à la
documentation qui accompagne la station.
– Pour savoir comment obtenir des performances optimales lors de l'utilisation d'une
station d'accueil avec cet ordinateur, reportez-vous à la section «Résolutions des
problèmes» du
vous devez, selon votre système d'exploitation, soit double-cliquer sur l'icône
de votre bureau, soit sur le bouton
. Vous trouverez ci-dessous des réponses aux questions les
La carte système de l'ordinateur peut comprendre un modem v.92
en ligne.
Diverses batteries sont disponibles pour votre
.
Pour obtenir des informations sur Dell D/Bay et sur les périphériques qu'il prend
Guide d'utilisation
Votre ordinateur prend en charge Dell™ Media Base, Dell D/Dock
Guide d'utilisation
en ligne.
Guide d'utilisation
Démarrer
, puis sur
en ligne.
en ligne. Pour avoir accès
Centre d'aide et de support
Guide
,
DELL CONFIDENTIEL – PRÉLIMINAIRE 12/8/04 – POUR AVANT-PROJET SEULEMENT
Guide de référence rapide 39
Page 40

Vue frontale
www.dell.com | support.dell.com
FILE LOCATION: J:\DL\DL044399\DTP\D5173fb0.fm
1
2
12
3
11
4
10
5
9
6
8
1 loquet de l'écran 7 tablette tactile
2 écran 8 boutons de la manette/tablette tactile
3 boutons de contrôle du volume 9 manette
4 voyants d'état du périphérique 10 haut-parleur
5 bouton de mise en sourdine 11 bouton d'alimentation
6 clavier 12 clavier et voyants d'état du sans fil
DELL CONFIDENTIEL – PRÉLIMINAIRE 12/8/04 – POUR AVANT-PROJET SEULEMENT
40 Guide de référence rapide
7
Page 41

Vue du côté gauche
FILE LOCATION: J:\DL\DL044399\DTP\D5173fb0.fm
41
3
2
1 emplacement pour câble de sécurité (antivol) 4 entrées d'air
2
connecteur D/Bay
Connecteur USB
3
56
5 capteur infrarouge
6 entrées d'air
DELL CONFIDENTIEL – PRÉLIMINAIRE 12/8/04 – POUR AVANT-PROJET SEULEMENT
Guide de référence rapide 41
Page 42

Vue du côté droit
www.dell.com | support.dell.com
FILE LOCATION: J:\DL\DL044399\DTP\D5173fb0.fm
1 234
Vue arrière
PRÉCAUTION : Ne bloquez pas les entrées d'air de l'ordinateur et n'insérez pas d'objets dedans ;
évitez également toute accumulation de poussière. Ne placez pas l'ordinateur dans un environnement
peu aéré, tel qu'une mallette fermée, lorsque celui-ci fonctionne. Le manque de ventilation risquerait
de causer un incendie ou d'endommager l'ordinateur.
AVIS : Pour éviter d'endommager l'ordinateur, après l'avoir éteint, attendez 5 secondes avant de
déconnecter tout périphérique externe.
1 connecteur réseau (RJ-45) 4 connecteur vidéo
2 connecteur modem (RJ-11) 5 connecteur d'adaptateur secteur
3 connecteurs USB (2) 6 entrées d'air
DELL CONFIDENTIEL – PRÉLIMINAIRE 12/8/04 – POUR AVANT-PROJET SEULEMENT
42 Guide de référence rapide
1 unité de disque dur 3 logement de PC Card
2 logement de carte à puce 4 connecteurs audio (2)
123456
Page 43

Vue de dessous
FILE LOCATION: J:\DL\DL044399\DTP\D5173fb0.fm
1
8
7
2
3 4
5
6
1 loquets de fermeture de la baie de batterie (2) 5 unité de disque dur
2 bouton d'état de la jauge de charge 6 connecteur de station d'accueil
3 indicateur de charge de la batterie 7 cache module de mémoire/pile bouton
4 batterie 8
entrées d'air du ventilateur
Utilisation d'une batterie
Performances de la batterie
PRÉCAUTION : Avant de commencer toute procédure de cette section, reportez-vous aux consignes
de sécurité du Guide d´information sur le produit.
REMARQUE : Pour plus d'informations sur la garantie Dell relative à votre ordinateur, reportez-vous au
Guide d'information sur le produit ou au document de garantie livré avec votre ordinateur.
DELL CONFIDENTIEL – PRÉLIMINAIRE 12/8/04 – POUR AVANT-PROJET SEULEMENT
Guide de référence rapide 43
Page 44

Pour un fonctionnement optimal et afin de préserver les paramètres du BIOS, laissez la batterie
principale installée en permanence dans votre ordinateur portable Dell™. Utilisez une batterie
pour alimenter l'ordinateur lorsqu'il n'est pas branché sur une prise électrique. Votre ordinateur est
livré avec une batterie, installée dans la baie. L'autonomie de la batterie varie en fonction des
conditions de fonctionnement.
REMARQUE : L'autonomie de la batterie (la période durant laquelle la batterie reste chargée) diminue
avec le temps. Selon la fréquence d'utilisation et les conditions de fonctionnement de la batterie, il est
possible que vous deviez en acheter une autre au cours de la durée de vie de votre ordinateur.
Cette durée est considérablement réduite par l'exécution de certaines opérations, notamment, sans
que cela soit limitatif :
• Utilisation de lecteurs optiques, tels que des lecteurs de DVD et CD
www.dell.com | support.dell.com
• Utilisation de périphériques de communication sans fil, de PC Cards ou de périphériques
USB
• Utilisation de paramètres élevés d'affichage et de luminosité, d'économiseurs d'écran en 3D
ou d'autres programmes gourmands en ressources, tels que des jeux en 3D
• Utilisation de l'ordinateur en mode Performances maximales
REMARQUE : Il est recommandé de connecter l'ordinateur à une prise électrique lorsque vous gravez
un CD ou un DVD.
Vous pouvez vérifier la charge de la batterie en appuyant sur le bouton d'état de charge de la
batterie. Vous pouvez également définir des options de gestion de l'alimentation afin que
l'ordinateur vous alerte lorsque le niveau de charge de la batterie est faible.
FILE LOCATION: J:\DL\DL044399\DTP\D5173fb0.fm
PRÉCAUTION : L'utilisation d'une batterie non compatible peut accroître le risque d'incendie ou
d'explosion. Ne remplacez la batterie que par une batterie compatible achetée auprès de Dell. La
batterie au lithium-ion est conçue pour fonctionner avec votre ordinateur Dell. N'utilisez pas de
batterie provenant d'un autre ordinateur.
PRÉCAUTION : Ne jetez pas les batteries avec les ordures ménagères. Lorsque votre batterie ne tient
plus sa charge, contactez votre service municipal de traitement des déchets pour savoir comment vous
en débarrasser. Consultez la section «Mise au rebut de la batterie» du Guide d'information sur le
produit.
PRÉCAUTION : Une utilisation inadéquate de la batterie peut augmenter le risque d'incendie ou de
brûlure chimique. Prenez soin de ne pas la percer, l'incinérer, la démonter ou l'exposer à une
température supérieure à 65° C (149° F). Rangez la batterie hors de portée des enfants. Manipulez les
batteries endommagées ou percées avec d'extrêmes précautions. Les batteries endommagées peuvent
fuir et causer des dommages personnels ou matériels.
Vérification de la charge de la batterie
La jauge de batterie Dell QuickSet, la fenêtre et l'icône de la
Microsoft® Windows®, l'indicateur de charge de la batterie, la jauge d'état et l'alerte en cas de
niveau de batterie faible fournissent des informations sur le niveau de charge de la batterie.
DELL CONFIDENTIEL – PRÉLIMINAIRE 12/8/04 – POUR AVANT-PROJET SEULEMENT
44 Guide de référence rapide
jauge d'alimentation/d'énergie
Page 45

FILE LOCATION: J:\DL\DL044399\DTP\D5173fb0.fm
Jauge de batterie Dell QuickSet
Si Dell QuickSet est installé, appuyez sur <Fn><F3> pour afficher la jauge de batterie QuickSet.
La fenêtre
Jauge de batterie
affiche l'état, le niveau de charge et le temps de chargement de la
batterie de votre ordinateur.
REMARQUE : Vous pouvez utiliser votre périphérique d’accueil optionnel pour recharger la batterie de
l'ordinateur lorsque le périphérique d’accueil est en mode autonome, ou lorsque l'ordinateur y est
connecté. La charge supplémentaire de la batterie située dans le périphérique d’accueil est disponible
pour l'ordinateur une fois qu'il y est connecté.
En outre, la fenêtre
l'ordinateur est connecté au périphérique d’accueil
Jauge de batterie
comprend un onglet
ou à toute autre station d'accueil (amarré). Cet
Dock Battery
(Batterie amarrée) lorsque
onglet affiche le niveau de charge et l'état actuel de la batterie dans la baie de batterie du
périphérique ou de la station d'accueil.
Les icônes suivantes s'affichent dans la fenêtre
• L'ordinateur ou la station d'accueil fonctionne sur batterie.
• La batterie est déchargée.
• L'ordinateur ou la station d'accueil est connecté à une prise électrique et alimenté en CA.
• La batterie est en cours de charge.
Jauge de batterie
:
• L'ordinateur ou la station d'accueil est connecté à une prise électrique et alimenté en CA.
• La batterie est complètement chargée et inactive.
Pour des informations supplémentaires sur QuickSet, effectuez un clic droit sur l'icône de la
Barre d'état système (située dans le coin du bureau Windows en bas à droite), puis cliquez sur
Aide
.
Jauge d'alimentation Microsoft Windows
La jauge d'alimentation Windows indique la charge de batterie restante. Pour vérifier la jauge
d'alimentation, double-cliquez sur l' icône
supplémentaires concernant l'onglet
d'utilisation
Jauge de charge
. Si l'ordinateur est branché sur le secteur, une icône apparaît.
Jauge d'alimentation
de la Barre d'état système. Pour des informations
, reportez-vous à votre
Guide
Lorsque vous maintenez appuyé le bouton d'état de la jauge de charge de la batterie pendant au
moins trois secondes, les voyants de niveau de charge s'allument pour indiquer l'état actuel de
charge. Chaque voyant représente environ 20 pour cent de la charge totale de la batterie. S'il reste,
par exemple, 80 pour cent de la charge de la batterie, quatre des voyants sont allumés. Si aucun
voyant n'est allumé, la batterie est complètement déchargée.
DELL CONFIDENTIEL – PRÉLIMINAIRE 12/8/04 – POUR AVANT-PROJET SEULEMENT
Guide de référence rapide 45
Page 46

Jauge d'état
La durée de vie de la batterie est déterminée en grande partie par le nombre de charges qu'elle
reçoit. Après des centaines de cycles de charge et de décharge, la capacité de charge des batteries
diminue et l'
état des batteries
d'état, situé sur l'indicateur de charge de la batterie, et maintenez-le enfoncé pendant au moins 3
secondes. Si aucun voyant ne s'allume, la batterie est en bon état et elle dispose encore de plus de
80 pour cent de sa capacité de charge d'origine. Chaque voyant représente une dégradation
incrémentielle. Si cinq voyants s'allument, la batterie dispose de moins de 60 pour cent de sa
capacité de charge et vous devez envisager son remplacement.
REMARQUE : Lorsque vous maintenez appuyé le bouton d'état de l'indicateur de charge de la batterie
pendant au moins trois secondes, les voyants de niveau de charge s'allument pour indiquer l'état actuel
www.dell.com | support.dell.com
de charge. Ils indiquent ensuite l'état de dégradation de la batterie quand ils sont allumés.
Alerte de batterie faible
AVIS : Pour éviter la perte ou la corruption de vos données, enregistrez votre travail immédiatement
après avoir reçu une alerte de niveau de batterie faible. Connectez ensuite l'ordinateur à une prise
secteur. Si la batterie est complètement déchargée, l'ordinateur passe immédiatement en mode Mise en
veille prolongée.
REMARQUE : Vous pouvez utiliser votre périphérique d’accueil optionnel pour recharger la batterie de
l'ordinateur lorsque le périphérique d’accueil est en mode autonome, ou lorsque l'ordinateur y est
connecté. La charge supplémentaire de la batterie située dans le périphérique d’accueil est disponible
pour l'ordinateur une fois qu'il y est connecté.
Une fenêtre contextuelle vous avertit lorsque la batterie est déchargée à environ 90 pour cent. Pour
des informations supplémentaires concernant les alertes niveau de batterie faible, reportez-vous à
votre
Guide d'utilisation
Une alerte de batterie déchargée a lieu lorsque la batterie est déchargée à environ 90 pour cent.
L'ordinateur émet un signal sonore pour indiquer que la limite de durée minimale de
fonctionnement est atteinte. Pendant ce délai, le haut-parleur émet régulièrement des bips.
L'ordinateur passe en mode Mise en veille prolongée quand la charge de la batterie atteint un
niveau très bas.
FILE LOCATION: J:\DL\DL044399\DTP\D5173fb0.fm
se dégrade. Pour vérifier l'état de la batterie, appuyez sur le bouton
.
Chargement de la batterie
REMARQUE : L'adaptateur secteur charge une batterie complètement déchargée en 2 heures environ,
si l'ordinateur est éteint. La durée de chargement est plus longue lorsque l'ordinateur est sous tension.
Vous pouvez laisser la batterie dans l'ordinateur aussi longtemps que vous le souhaitez. Les circuits
internes de la batterie préviennent toute surcharge.
Lorsque vous branchez l'ordinateur sur une prise électrique ou installez une batterie pendant que
l'ordinateur est branché sur une prise électrique, l'ordinateur vérifie le niveau de charge et la
température de la batterie. Au besoin, l'adaptateur secteur charge alors la batterie et maintient le
niveau de charge.
DELL CONFIDENTIEL – PRÉLIMINAIRE 12/8/04 – POUR AVANT-PROJET SEULEMENT
46 Guide de référence rapide
Page 47

FILE LOCATION: J:\DL\DL044399\DTP\D5173fb0.fm
Si la batterie est chaude parce qu'elle se trouvait dans l'ordinateur ou en raison de la température
extérieure, il est probable qu'elle ne se charge pas lorsque vous branchez l'ordinateur sur une prise
électrique.
La batterie est trop chaude pour démarrer le processus de recharge si le voyant clignote
affichant alternativement les couleurs vert et orange. Débranchez l'ordinateur de la prise électrique
et laissez refroidir l'ordinateur et la batterie jusqu'à ce qu'ils atteignent la température ambiante.
Branchez alors l'ordinateur sur une prise électrique et continuez à charger la batterie.
Retrait de la batterie
PRÉCAUTION : Avant de commencer toute procédure de cette section, débranchez le modem de la
prise téléphonique murale.
1
Assurez-vous que l'ordinateur est éteint et qu'il n'est pas branché à une prise électrique.
2
Si l'ordinateur est connecté à un périphérique d’accueil ou autre station d'accueil (amarré),
déconnectez-le. Pour obtenir des instructions, reportez-vous à la documentation qui
accompagne la station d'accueil.
3
Faites glisser le loquet de fermeture de la baie de batterie situé sous l'ordinateur, puis retirez
la batterie de la baie.
Installation d'une batterie
Assurez-vous que l'ordinateur est éteint. Faites glisser la batterie dans la baie jusqu'à ce que les
loquets s'enclenchent.
DELL CONFIDENTIEL – PRÉLIMINAIRE 12/8/04 – POUR AVANT-PROJET SEULEMENT
Guide de référence rapide 47
Page 48

Stockage d'une batterie
Retirez la batterie de l'ordinateur lorsque vous rangez ce dernier pendant une période prolongée.
Sinon, la batterie finira par se décharger. Après une longue période de stockage, rechargez
complètement la batterie avant de l'utiliser.
Résolution des problèmes
Notebook System Software (NSS)
Si vous réinstallez le système d'exploitation de votre ordinateur, vous devez également réinstaller
l'utilitaire NSS. Cet utilitaire est disponible sur le CD
www.dell.com | support.dell.com
Web de support de Dell à l'adresse
Pour télécharger l'utilitaire à partir du site Web de support de Dell, allez à la section
Téléchargements
déroulant. Sélectionnez la
système d'exploitation et la langue, puis suivez les instructions qui s'affichent.
NSS fournit des mises à jour essentielles pour le système d'exploitation et la prise en charge des
lecteurs de disquette USB Dell™ de 3,5 pouces, des processeurs Intel
optiques et des périphériques USB. NSS est requis pour le bon fonctionnement de votre ordinateur
Dell. Ce logiciel détecte automatiquement votre ordinateur et son système d'exploitation, et
installe les mises à jour appropriées à votre configuration.
FILE LOCATION: J:\DL\DL044399\DTP\D5173fb0.fm
Drivers and Utilities
www.support.dell.com
.
en option et sur le site
du site Web et sélectionnez le modèle de votre ordinateur dans le menu
Catégorie de téléchargement
«Utilitaires Système et Configuration», le
®
Pentium® M, des lecteurs
REMARQUE : NSS est indispensable pour le bon fonctionnement des périphériques USB, qui
comprennent les périphériques D/Bay, D/Dock, D/Port et D/View de Dell.
Problèmes de blocage et problèmes logiciels
PRÉCAUTION : Avant de commencer toute procédure de cette section, reportez-vous aux consignes
de sécurité du Guide d´information sur le produit.
L'ordinateur ne démarre pas
ASSUREZ-VOUS QUE L' ADAPTATEUR SECTEUR EST FERMEMENT CONNECTÉ À L 'ORDINATEUR ET À LA
PRISE ÉLECTRIQUE
L'ordinateur ne répond plus
AVIS : Vous pouvez perdre des données si vous n'arrivez pas à arrêter correctement le système
d'exploitation.
ÉTEIGNEZ L'ORDINATEUR — Si vous n'obtenez aucune réponse lorsque vous appuyez sur une touche
du clavier ou lorsque vous déplacez la souris, appuyez sur le bouton d'alimentation et maintenez-le
enfoncé pendant au moins 8 à 10 secondes jusqu'à ce que l'ordinateur s'éteigne. Redémarrez
l'ordinateur.
DELL CONFIDENTIEL – PRÉLIMINAIRE 12/8/04 – POUR AVANT-PROJET SEULEMENT
48 Guide de référence rapide
Page 49

FILE LOCATION: J:\DL\DL044399\DTP\D5173fb0.fm
Un programme ne répond plus
QUITTEZ LE PROGRAMME —
1
Appuyez simultanément sur <Ctrl><Maj><Échap>.
2
Cliquez sur
3
Cliquez sur le programme qui ne répond plus.
4
Cliquez sur
Applications
Fin de tâche
.
.
Un programme se bloque fréquemment
REMARQUE : La documentation de tout logiciel, la disquette ou le CD qui l'accompagne incluent
généralement des instructions d'installation.
CONSULTEZ LA DOCUMENTATION DU LOGICIEL — Si nécessaire, désinstallez, puis réinstallez le
programme.
Un programme est conçu pour une version antérieure du système d'exploitation Windows
SI VOUS UTILISEZ WINDOWS XP, LANCEZ L'ASSISTANT COMPATIBILITÉ DES PROGRAMMES —
L'Assistant Compatibilité des programmes configure les programmes pour qu'ils fonctionnent dans un
environnement proche des environnements des systèmes d'exploitation non Windows XP.
1
Cliquez sur le bouton
Assistant Compatibilité des programmes
2
Dans l'écran d'accueil, cliquez sur
3
Suivez les instructions qui s'affichent à l'écran.
Démarrer
, pointez sur
.
Suivant
.
Tous les programmes→ Accessoires
, puis cliquez sur
Un écran bleu uni apparaît
ÉTEIGNEZ L'ORDINATEUR — Si vous n'obtenez aucune réponse lorsque vous appuyez sur une touche
du clavier ou lorsque vous déplacez la souris, appuyez sur le bouton d'alimentation et maintenez-le
enfoncé pendant au moins 8 à 10 secondes jusqu'à ce que l'ordinateur s'éteigne. Redémarrez
l'ordinateur.
DELL CONFIDENTIEL – PRÉLIMINAIRE 12/8/04 – POUR AVANT-PROJET SEULEMENT
Guide de référence rapide 49
Page 50

Autres problèmes logiciels
VÉRIFIEZ LA DOCUMENTATION DU LOGICIEL OU CONTACTEZ LE FABRICANT POUR OBTENIR DES
INFORMATIONS DE DÉPANNAGE —
• Assurez-vous que le programme est compatible avec le système d'exploitation installé sur votre
ordinateur.
• Assurez-vous que l'ordinateur est conforme aux exigences matérielles requises pour que le logiciel
fonctionne. Reportez-vous à la documentation du logiciel pour de plus amples informations.
• Assurez-vous que le programme est correctement installé et configuré.
• Assurez-vous que les pilotes de périphérique n'entrent pas en conflit avec le programme.
• Le cas échéant, supprimez, puis réinstallez le programme.
www.dell.com | support.dell.com
SAUVEGARDEZ IMMÉDIATEMENT VOS FICHIERS
UTILISEZ UN PROGRAMME DE SCRUTATION DES VIRUS POUR VÉRIFIER LE DISQUE DUR, LES
DISQUETTES OU LES CD
ENREGISTREZ LES FICHIERS OUVERTS ET QUITTEZ TOUS LES PROGRAMMES, PUIS ÉTEIGNEZ
L 'ORDINATEUR VIA LE MENU Démarrer
FILE LOCATION: J:\DL\DL044399\DTP\D5173fb0.fm
ANALYSEZ VOTRE ORDINATEUR POUR VOIR S 'IL CONTIENT DES LOGICIELS ESPIONS — Si vous
observez un ralentissement des performances de votre ordinateur, si des fenêtres publicitaires
s'affichent fréquemment sur votre écran ou si vous avez des problèmes pour vous connecter sur
Internet, votre ordinateur est peut-être infecté par un logiciel espion. Utilisez un programme anti-virus
qui inclut une protection contre les logiciels espions (une mise à niveau de votre programme sera peutêtre nécessaire) afin d'analyser votre ordinateur et de supprimer les logiciels espions. Pour plus
d'informations, allez sur le site support.dell.com et lancez une recherche avec le mot-clé espion.
EXÉCUTEZ DELL DIAGNOSTICS — Si tous les tests s'exécutent sans générer d'erreur, la condition
d'erreur est liée à un problème logiciel.
DELL CONFIDENTIEL – PRÉLIMINAIRE 12/8/04 – POUR AVANT-PROJET SEULEMENT
50 Guide de référence rapide
Page 51

FILE LOCATION: J:\DL\DL044399\DTP\D5173fb0.fm
Exécution de Dell Diagnostics
PRÉCAUTION : Avant de commencer toute procédure de cette section, reportez-vous aux consignes
de sécurité du Guide d´information sur le produit.
Quand utiliser Dell Diagnostics
Si vous rencontrez un problème avec l'ordinateur, effectuez les vérifications indiquées dans la
section «Résolution des problèmes» (reportez-vous au
Diagnostics avant de contacter Dell pour obtenir une assistance technique.
AVIS : Dell Diagnostics ne fonctionne qu'avec les ordinateurs Dell™.
Démarrez Dell Diagnostics à partir du disque dur ou du CD
Utilitaires) (également appelé CD
Démarrage de Dell Diagnostics à partir de votre disque dur
ResourceCD
Dell Diagnostics se trouve dans une partition cachée (utilitaire de diagnostics) de votre disque dur.
REMARQUE : Si aucune image ne s'affiche, contactez Dell.
1
Éteignez l'ordinateur.
2
Si l'ordinateur est connecté à une station d'accueil (amarré), déconnectez-le. Pour obtenir des
instructions, reportez-vous à la documentation qui accompagne la station d'accueil.
3
Connectez l'ordinateur à une prise électrique.
4
Allumez l'ordinateur. Lorsque le logo DELL™ apparaît, appuyez immédiatement sur <F12>.
REMARQUE : Si rien ne s'affiche, maintenez le bouton de mise en sourdine enfoncé et appuyez sur le
bouton d'alimentation de l'ordinateur pour démarrer Dell Diagnostics. L'ordinateur lance
automatiquement l'évaluation du système de préamorçage.
Guide d'utilisation
) en option.
en ligne) et exécutez Dell
Drivers and Utilities
(Pilotes et
REMARQUE : Si un message indique qu'aucune partition d'utilitaire de diagnostics n'a été détectée,
exécutez Dell Diagnostics depuis votre CD Drivers and Utilities (Pilotes et utilitaires) en option.
Si vous attendez trop longtemps et que le logo du système d'exploitation apparaît, patientez
jusqu'à ce que vous voyiez le bureau de Microsoft
®
Windows®. Ensuite, arrêtez votre
ordinateur et faites une nouvelle tentative.
5
Lorsque la liste des périphériques d'amorçage s'affiche, sélectionnez
Diagnostics
et appuyez
sur <Entrée>.
L'ordinateur lance l'évaluation de préamorçage du système avec une série de diagnostics
intégrés qui effectue un test préalable de la carte système, du clavier, du disque dur et de
l'écran.
• Répondez à toutes les questions qui s'affichent pendant l'évaluation.
• Si une défaillance de composant est détectée, l'ordinateur s'arrête et émet un signal
sonore. Pour arrêter l'évaluation et redémarrer l'ordinateur, appuyez sur <n> ; pour
passer au test suivant, appuyez sur <y> ; pour retester le composant défectueux,
appuyez sur <r>.
• Si des défaillances sont détectées lors de l'évaluation de préamorçage du système, notez
les codes d'erreur et contactez Dell avant de continuer.
DELL CONFIDENTIEL – PRÉLIMINAIRE 12/8/04 – POUR AVANT-PROJET SEULEMENT
Guide de référence rapide 51
Page 52

Si l'évaluation de préamorçage du système se déroule sans problème, vous recevez le message
Booting Dell Diagnostic Utility Partition. Press any key to continue.
(Amorçage de la partition d'utilitaires de diagnostics. Appuyez sur une touche pour
continuer.)
6
Appuyez sur une touche pour démarrer Dell Diagnostics à partir de la partition de diagnostics
du disque dur.
Démarrage de Dell Diagnostics à partir du CD Drivers and Utilities en option
1
Insérez le CD
2
Éteignez et redémarrez l'ordinateur.
Lorsque le logo DELL apparaît, appuyez immédiatement sur <F12>.
www.dell.com | support.dell.com
Si vous attendez trop longtemps et que le logo Windows apparaît, attendez encore jusqu'à ce
que le bureau Windows s'affiche. Éteignez alors votre ordinateur et faites une nouvelle
tentative.
REMARQUE : Les étapes suivantes ne modifient la séquence d'amorçage qu'une seule fois. Au
démarrage suivant, l'ordinateur démarre en fonction des périphériques définis dans le programme de
configuration du système.
3
Lorsque la liste des périphériques d'amorçage s'affiche, sélectionnez
CD/DVD/CD-RW
4
Sélectionnez l'option
5
Sélectionnez l'option
6
Ta p e z 1 pour démarrer le menu du CD
7
Saisissez 2 pour démarrer Dell Diagnostics.
8
Sélectionnez
versions sont répertoriées, sélectionnez la version appropriée à votre ordinateur.
9
Lorsque le
FILE LOCATION: J:\DL\DL044399\DTP\D5173fb0.fm
Drivers and Utilities
.
et appuyez sur <Entrée>.
Lecteur de CD/DVD/CD-RW
Amorcer à partir du CD-ROM
ResourceCD
Exécuter Dell Diagnostics 32 bits
menu principal
de Dell Diagnostics s'affiche, sélectionnez le test à effectuer.
Lecteur de
dans le menu d'amorçage du CD.
dans le menu qui s'affiche.
.
depuis la liste numérotée. Si plusieurs
Menu principal de Dell Diagnostics
1
Une fois Dell Diagnostics chargé et l'écran du
correspondant à l'option souhaitée.
Option Fonction
Express Test
(Test rapide)
Extended Test
(Test approfondi)
Custom Test
(Test personnalisé)
DELL CONFIDENTIEL – PRÉLIMINAIRE 12/8/04 – POUR AVANT-PROJET SEULEMENT
52 Guide de référence rapide
menu principal
Exécute un test rapide des périphériques. Ce test dure généralement
de 10 à 20 minutes et n'exige pas d'action de votre part. Effectuez tout
d'abord un Test rapide pour trouver le problème plus rapidement.
Exécute un test approfondi des périphériques. En règle générale, ce
test prend une heure ou plus et nécessite que vous répondiez
régulièrement à des questions.
Teste un périphérique spécifique. Vous pouvez personnaliser les tests
à exécuter.
affiché, cliquez sur le bouton
Page 53

FILE LOCATION: J:\DL\DL044399\DTP\D5173fb0.fm
Option Fonction
Symptom Tree
(Arborescence des
symptômes)
2
Si un problème survient pendant un test, un message indiquant le code d'erreur et une
Répertorie les symptômes couramment rencontrés et permet de
sélectionner un test en fonction du symptôme du problème.
description du problème s'affiche. Notez le code d'erreur et la description du problème et
suivez les instructions.
Si vous ne pouvez pas résoudre le problème, contactez Dell.
REMARQUE : Le numéro de service de votre ordinateur s'affiche dans la partie supérieure de chaque
écran de test. Lorsque vous contacterez le support technique de Dell, ce numéro de service vous sera
demandé.
3
Si vous effectuez un test à partir de l'option
symptômes
Onglet Fonction
Résultats Affiche les résultats du test et les conditions d'erreur rencontrées.
Erreurs Affiche les conditions d'erreur rencontrées, les codes d'erreur et la description du
Aide Décrit le test et peut indiquer les conditions requises pour exécuter le test.
Configuration Affiche la configuration matérielle du périphérique sélectionné.
Paramètres Vous permet de personnaliser le test en modifiant ses paramètres.
, cliquez sur l'onglet approprié décrit dans le tableau suivant pour en savoir plus.
problème.
Dell Diagnostics obtient vos informations de configuration de tous les périphériques
à partir du programme de configuration du système, de la mémoire et de divers tests
internes, et les affiche dans la liste des périphériques située dans le volet gauche de
l'écran. La liste des périphériques risque de ne pas afficher les noms de tous les
composants installés sur votre ordinateur ou de tous les périphériques reliés à celui-ci.
Test personnalisé
ou
Arborescence des
4
Une fois les tests terminés, si vous exécutez Dell Diagnostics à partir du CD
Utilities
5
Lorsque les tests sont terminés, fermez l'écran de test pour revenir à l'écran du
principal
principal
, retirez le CD.
. Pour quitter Dell Diagnostics et redémarrer l'ordinateur, fermez l'écran du
.
DELL CONFIDENTIEL – PRÉLIMINAIRE 12/8/04 – POUR AVANT-PROJET SEULEMENT
Drivers and
menu
menu
Guide de référence rapide 53
Page 54

www.dell.com | support.dell.com
FILE LOCATION: J:\DL\DL044399\DTP\D5173fb0.fm
DELL CONFIDENTIEL – PRÉLIMINAIRE 12/8/04 – POUR AVANT-PROJET SEULEMENT
54 Guide de référence rapide
Page 55

Index
A
assistants
Assistant Compatibilité des
programmes, 49
B
batterie
alerte de batterie faible, 46
chargement, 46
durée de vie et utilisation de la
batterie, 38
installation, 47
jauge d'alimentation, 45
jauge d'état, 46
jauge de charge, 45
performances, 43
retrait, 47
stockage, 48
vérification de la charge, 44
C
CD
système d'exploitation, 36
CD Drivers and Utilities, 33
CD Operating System, 36
consignes de sécurité, 33
D
Dell
site de support, 35
Diagnostics
Dell, 51
diagnostics
CD Drivers and Utilities, 33
documentation
en ligne, 35
Guide d'information sur le
système, 33
Guide d'utilisation, 34
périphérique, 33
G
garantie, 33
Guide d'utilisation, 34
L
logiciel
problèmes, 49-50
logiciel espion, 50
N
numéro de service, 34
O
ordinateur, 38
blocages, 48-49
ne répond plus, 48
performances lentes, 50
P
pilotes
CD ResourceCD, 33
problèmes
blocage d'ordinateur, 48-49
blocages, 48
blocages programme, 49
compatibilité programmes et
Windows, 49
l'ordinateur ne démarre pas, 48
l'ordinateur ne répond plus, 48
le programme ne répond
plus, 49
logiciel, 48
logiciel espion, 50
logiciels, 49-50
performances lentes de
l'ordinateur, 50
résolution, 48
écran bleu, 49
R
Recherche d'informations
documentation, 33
Index 55
Page 56

réinstallation
CD ResourceCD, 33
Pilotes et utilitaires, 33
S
Site Web Premier Support de
Dell, 35
site Web «Dell Premier
Support» (Support
Premier de Dell), 33
système d'exploitation
CD, 36
Guide d'installation, 36
W
Windows XP
Assistant Compatibilité des
programmes, 49
Z
à propos de votre ordinateur
vue arrière, 42
vue de dessous, 43
vue du côté droit, 42
vue du côté gauche, 40
vue frontale, 40
étiquette Microsoft
Windows, 34
étiquettes
Microsoft Windows, 34
numéro de service, 34
56 Index
Page 57

Dell™ Latitude™ D410
Guia de Referência Rápida
Modelo PP06S
www.dell.com | support.dell.com
Page 58

Notas, Avisos e Advertências
NOTA: NOTA indica informações importantes para utilizar melhor o computador.
AVISO: indica riscos para o hardware ou de perda de dados e como evitar o problema.
ADVERTÊNCIA: ADVERTÊNCIA indica um potencial de danos ao equipamento, de lesões corporais ou mesmo de
morte.
Abreviações e acrônimos
Para obter uma lista completa de abreviaturas e acrônimos, consulte o
operacional, clique duas vezes no ícone
Windows® ou clique no botão
system guides
Se você adquiriu o computador Dell™ série n, as referências deste documento a sistemas operacionais
Microsoft
O CD
).
®
Windows® não se aplicam.
Drivers and Utilities
Iniciar
(Drivers e utilitários) e o CD
User’s Guide
, clique em
(Guia do usuário) na área de trabalho do Microsoft
Centro de ajuda de suporte
Operating System
User’s Guide
(dependendo do seu sistema
e, em seguida, clique em
User and
(Sistema operacional) são opcionais e
®
podem não ser fornecidos com todos os computadores.
_________________
As informações deste documento estão sujeitas a alteração sem aviso prévio.
© 2004 Dell Inc. Todos os direitos reservados.
É proibida a reprodução sem permissão por escrito da Dell Inc.
Marcas comerciais usadas neste texto: Dell, o logotipo da DELL e Latitude são marcas comerciais da Dell Inc.; Microsoft e Windows são marcas
comerciais registradas da Microsoft Corporation; Intel e Pentium são marcas comerciais registradas da Intel Corporation.
Outras marcas e nomes comerciais podem ser utilizados neste documento como referência às entidades proprietárias dessas marcas e nomes
ou a seus produtos. A Dell Inc. declara que não tem interesse de propriedade sobre marcas e nomes de terceiros.
Modelo PP06S
Novembro de 2004 P/N D5173 Rev. A00
Page 59

Índice
Como obter informações. . . . . . . . . . . . . . . . . . . . . . . . . . . . . 61
Como configurar o computador
Sobre o seu computador
Vista frontal
. . . . . . . . . . . . . . . . . . . . . . . . . . . . . . . . . 68
Vista lateral esquerda
Vista lateral direita
Vista traseira
Vista inferior
Como usar a bateria
. . . . . . . . . . . . . . . . . . . . . . . . . . . . . . . . 70
. . . . . . . . . . . . . . . . . . . . . . . . . . . . . . . . 71
. . . . . . . . . . . . . . . . . . . . . . . . . . . . . . . 71
Desempenho da bateria
Como verificar a carga da bateria
Como carregar a bateria
Como remover a bateria
Como instalar a bateria
Como armazenar a bateria
Como solucionar problemas
NSS (Notebook System Software)
Problemas de travamento e de software
Como executar o Dell Diagnostics
. . . . . . . . . . . . . . . . . . . . . . . . . 64
. . . . . . . . . . . . . . . . . . . . . . . . . . . . . 67
. . . . . . . . . . . . . . . . . . . . . . . . . . . 69
. . . . . . . . . . . . . . . . . . . . . . . . . . . . . 70
. . . . . . . . . . . . . . . . . . . . . . . . . . 71
. . . . . . . . . . . . . . . . . . . . . 72
. . . . . . . . . . . . . . . . . . . . . . . . . . 74
. . . . . . . . . . . . . . . . . . . . . . . . . . 74
. . . . . . . . . . . . . . . . . . . . . . . . . . . 75
. . . . . . . . . . . . . . . . . . . . . . . . . 75
. . . . . . . . . . . . . . . . . . . . . . . . . . . 75
. . . . . . . . . . . . . . . . . . . . . 75
. . . . . . . . . . . . . . . . . . 76
. . . . . . . . . . . . . . . . . . . . . 78
Índice remissivo . . . . . . . . . . . . . . . . . . . . . . . . . . . . . . . . . 81
Índice 59
Page 60

60 Índice
Page 61

LOCAL DO ARQUIVO: J:\DL\DL044399\DTP\D5173bb0.fm
Como obter informações
NOTA: Alguns recursos talvez não estejam disponíveis para o seu computador ou não estejam disponíveis em
determinados países.
NOTA: Informações adicionais podem ser fornecidas com o seu computador.
O que você está procurando? Encontre aqui
• Um programa de diagnóstico para o computador
• Drivers para o computador
• Documentação do computador
• Documentação do dispositivo
• NSS (Notebook System Software)
CD Drivers and Utilities CD (Drivers e utilitários), também
conhecido como ResourceCD
A documentação e os drivers já estão instalados no
computador. Use o CD para
Dell Diagnostics
ou acessar sua documentação.
reinstalar drivers
Pode haver arquivos Leiame incluídos no CD, para
fornecer as atualizações
mais recentes sobre
alterações técnicas no
computador ou material
de referência técnica
avançada para técnicos ou
usuários experientes.
, executar o
• Informações sobre garantia
• Termos e condições (apenas para os EUA)
• Instruções de segurança
• Informações de normalização
• Informações de ergonomia
• Contrato de licença do usuário final
CONFIDENCIAL DA DELL – PRELIMINAR 12/8/04 – SOMENTE PARA TESTE
NOTA: As atualizações de drivers e da documentação
encontram-se no site support.dell.com.
NOTA: O CD Drivers and Utilities (Drivers e utilitários) é
opcional e pode não ser fornecido com todos os
computadores.
Guia de Informações do Produto Dell™
Guia de Referência Rápida 61
Page 62

LOCAL DO ARQUIVO: J:\DL\DL044399\DTP\D5173bb0.fm
O que você está procurando? Encontre aqui
• Como remover e substituir peças
• Especificações
• Como configurar os parâmetros do sistema
• Como localizar defeitos e solucionar problemas
Guia do usuário
Centro de ajuda e suporte do Microsoft
1
Clique no botão
2
Clique em
do sistema) e clique em
O User’s Guide (Guia do usuário) está disponível também
no CD
NOTA: O CD Drivers and Utilities (Drivers e utilitários) é
opcional e pode não ser fornecido com todos os
www.dell.com | support.dell.com
• Código de serviço expresso e etiqueta de serviço
• Etiqueta de licença do Microsoft Windows
computadores.
Etiqueta de serviço e licença do Microsoft Windows
Essas etiquetas estão localizadas na
computador.
• Use a etiqueta de
serviço para identificar
o computador quando
acessar o site
support.dell.com
inglês) ou quando
entrar em contato com o suporte técnico.
• Digite o código de serviço expresso para direcionar sua
chamada ao entrar em contato com o suporte técnico. O
código de serviço expresso pode não estar disponível em
determinados países.
Iniciar
User’s and system guides
Drivers and Utilities
(em
®
Windows® XP
e em
Ajuda e suporte
(Guias do usuário e
User’s guides
(Guias do usuário).
(Drivers e utilitários).
parte inferior do
.
CONFIDENCIAL DA DELL – PRELIMINAR 12/8/04 – SOMENTE PARA TESTE
62 Guia de Referência Rápida
Page 63

LOCAL DO ARQUIVO: J:\DL\DL044399\DTP\D5173bb0.fm
O que você está procurando? Encontre aqui
• Solutions (Soluções) — Dicas para solução de problemas,
artigos escritos por técnicos, cursos on-line, perguntas mais
freqüentes
• Community (Comunidade) — Discussões on-line com
outros clientes da Dell
• Upgrades (Atualizações) — Informações sobre atualizações
de componentes, como memórias, discos rígidos e sistemas
operacionais.
Site de suporte da Dell — support.dell.com
NOTA: Selecione sua região para ver o site de suporte
correspondente.
NOTA: Clientes corporativos, do governo e da área de
educação podem também usar o site de suporte
personalizado do Dell Premier em
premier.support.dell.com. O site pode não estar disponível
em todas as regiões.
• Customer Care (Atendimento ao cliente) — Informações
de contato, chamadas de serviço e informações sobre status
de pedidos, garantia e reparos
• Service and Support (Serviço e suporte) — Status de
chamadas de serviço e histórico de suporte, contrato de
serviços, discussões on-line com o suporte técnico
• Reference (Referência) — Documentação do computador,
detalhes sobre a configuração de meu computador,
especificações de produtos e informativo oficial
• Downloads — Atualizações de software, patches e drivers
certificados
• NSS (Notebook System Software)— Se reinstalar o sistema
operacional no seu computador, você deve reinstalar
também o utilitário NSS. Ele oferece atualizações críticas
para o sistema operacional e suporte para unidades de
disquete USB de 3,5 polegadas da Dell™, processadores
®
Pentium®M, unidades ópticas e dispositivos USB.
Intel
Esse utilitário é necessário para que o seu computador Dell
opere corretamente. O software detecta automaticamente
seu computador e sistema operacional e instala as
atualizações adequadas para a sua configuração.
Para fazer o download do NSS (Notebook System
Software):
1
Vá para o site
Downloads
2
Digite a etiqueta de serviço ou o modelo do produto.
3
No menu suspenso
download), clique em
4
Selecione o sistema operacional, bem como o idioma do
sistema operacional para o computador e clique em
support.dell.com
.
Download Category
All
(em inglês) e clique em
(Categoria de
(Todas).
Submit
(Submeter).
5
Em Select a Device (Selecionar um dispositivo), role para
System and Configuration Utilities
e de configuração) e clique em
Software
(NSS da Dell).
CONFIDENCIAL DA DELL – PRELIMINAR 12/8/04 – SOMENTE PARA TESTE
(Utilitários do sistema
Dell Notebook System
Guia de Referência Rápida 63
Page 64

LOCAL DO ARQUIVO: J:\DL\DL044399\DTP\D5173bb0.fm
O que você está procurando? Encontre aqui
• Como usar o Windows® XP
• Documentação do computador
• Documentação sobre dispositivos (como um modem)
• Como reinstalar o sistema operacional
www.dell.com | support.dell.com
Centro de ajuda e suporte do Windows
1
Clique no botão
2
Digite uma palavra ou expressão que descreva o seu
problema e clique no ícone de seta.
3
Clique no tópico que descreve o problema.
4
Siga as instruções da tela.
CD Operating System
O sistema operacional já está instalado no computador.
Para reinstalar o sistema operacional, utilize o CD
Operating System (Sistema operacional). Consulte “
reinstalar o Windows XP
Iniciar
e em
Ajuda e suporte
” para obter instruções.
Após reinstalar o sistema
operacional, use o CD
Drivers and Utilities
(Drivers e utilitários)
reinstalar drivers para os
dispositivos fornecidos
com o seu computador.
A etiqueta da chave do
produto do sistema
operacional está localizada
no computador.
.
Como
para
Como configurar o computador
ADVERTÊNCIA: Antes de executar os seguintes procedimentos, consulte as instruções de segurança
no Guia de Informações do Produto.
1
Abra a caixa de acessórios.
2
Guarde o conteúdo da caixa de acessórios, pois você necessitará deles para terminar a
configuração do computador.
A caixa de acessórios contém também a documentação do usuário, software ou hardware
adicional (como placas de PC, drivers ou baterias) que você adquiriu.
3
Conecte o adaptador CA no respectivo conector do computador e na tomada elétrica.
CONFIDENCIAL DA DELL – PRELIMINAR 12/8/04 – SOMENTE PARA TESTE
64 Guia de Referência Rápida
NOTA: A cor do CD varia de acordo com o sistema
operacional adquirido.
NOTA: O CD Operating System (Sistema operacional) é
opcional e pode não ser fornecido com o seu computador.
Page 65

LOCAL DO ARQUIVO: J:\DL\DL044399\DTP\D5173bb0.fm
ADVERTÊNCIA: O adaptador para CA funciona com todos os tipos de tomada elétrica. No entanto, os
conectores de energia e os filtros de linha variam de país para país. O uso de um cabo incompatível ou
a conexão incorreta ao filtro de linha ou à tomada elétrica poderá causar incêndio ou danos ao
equipamento.
AVISO: Ao usar o adaptador CA, proteja o cabo para que ele não embarace ou seja puxado, pisado ou
imprensado por objetos como pernas de cadeiras ou suporte de escrivaninhas.
AVISO: Ao desconectar o cabo do adaptador CA do computador, segure-o pelo conector, e não pelo fio,
e puxe-o com firmeza, mas com cuidado para não danificá-lo. Ao enrolar o cabo do adaptador CA,
verifique se você seguiu o ângulo do conector no adaptador CA para não danificar o cabo.
NOTA: Não conecte o computador ao dispositivo de acoplamento, até que o computador tenha sido
ligado e desligado pelo menos uma vez.
CONFIDENCIAL DA DELL – PRELIMINAR 12/8/04 – SOMENTE PARA TESTE
Guia de Referência Rápida 65
Page 66

4
Abra a tela e pressione o botão liga/desliga para ligar o computador.
www.dell.com | support.dell.com
LOCAL DO ARQUIVO: J:\DL\DL044399\DTP\D5173bb0.fm
botão liga/desliga
CONFIDENCIAL DA DELL – PRELIMINAR 12/8/04 – SOMENTE PARA TESTE
66 Guia de Referência Rápida
Page 67

LOCAL DO ARQUIVO: J:\DL\DL044399\DTP\D5173bb0.fm
Sobre o seu computador
Consulte o
o
Guia do usuário
usuário
seguida, clique em
respondem a algumas das perguntas mais freqüentes sobre o computador.
•
•
•
Guia do usuário
(dependendo do seu sistema operacional), clique duas vezes no ícone do
na área de trabalho ou clique no botão
User and system guides
Modem e adaptador de rede
adaptador de rede Ethernet 10/100/1000 Mbps na placa de sistema. Para obter informações
sobre localização de conectores, consulte "Vista traseira", na página 70. Para obter mais
informações sobre portas e conectores, consulte “Sobre o seu computador” no
usuário
online.
Vida útil e uso da bateria:
execução de determinados tipos de operações como, por exemplo, operações sem fio
prolongadas, pode reduzir de maneira significativa a vida útil e o tempo de operação da
bateria.
Para obter mais informações sobre o desempenho e uso da bateria, consulte "Como usar a
bateria", na página 71.
Para obter mais informações sobre como conservar energia, consulte o
Dell D/Bay:
consulte o
Dispositivos de acoplamento:
expansão Dell D/Dock e o replicador de portas avançado Dell D/Port.
NOTA: Os dispositivos de acoplamento podem não estar disponíveis em todos os países.
– Para obter informações sobre seu dispositivo de acoplamento opcional, consulte a
– Para obter informações sobre como obter um ótimo desempenho ao usar um dispositivos
Para obter informações sobre o Dell D/Bay e os dispositivos que ele suporta,
Guia do usuário
documentação que acompanha o dispositivo.
de acoplamento com este computador, consulte a seção “Como solucionar problemas” do
Guia do usuário
online para obter informações detalhadas sobre o computador. Para acessar
Iniciar
, clique em
(Guias do usuário e do sistema). Os itens a seguir
O computador pode incluir ambos: um modem v.92 56K e um
Há várias baterias disponíveis para uso em seu computador. A
online.
Seu computador suporta a Base de mídia Dell™, a estação de
online.
Centro de ajuda e suporte
Guia do
Guia do usuário
Guia do
e, em
.
CONFIDENCIAL DA DELL – PRELIMINAR 12/8/04 – SOMENTE PARA TESTE
Guia de Referência Rápida 67
Page 68

Vista frontal
www.dell.com | support.dell.com
LOCAL DO ARQUIVO: J:\DL\DL044399\DTP\D5173bb0.fm
1
2
12
3
11
4
10
5
9
6
8
1 trava da tela 7 touch pad
2 tela 8 botões do track stick e do
3 botões de controle de
4 luzes de status do
5 botão “sem áudio” 11 botão liga/desliga
6 teclado 12 luzes de status do teclado e
CONFIDENCIAL DA DELL – PRELIMINAR 12/8/04 – SOMENTE PARA TESTE
68 Guia de Referência Rápida
7
touch pad
9 track stick
volume
10 alto-falante
dispositivo
da rede sem fio
Page 69

Vista lateral esquerda
LOCAL DO ARQUIVO: J:\DL\DL044399\DTP\D5173bb0.fm
41
3
2
1 encaixe do cabo de
segurança
2
conector D/Bay
conector USB
3
56
4 aberturas de ventilação
5 sensor de infravermelho
6 aberturas de ventilação
CONFIDENCIAL DA DELL – PRELIMINAR 12/8/04 – SOMENTE PARA TESTE
Guia de Referência Rápida 69
Page 70

Vista lateral direita
www.dell.com | support.dell.com
LOCAL DO ARQUIVO: J:\DL\DL044399\DTP\D5173bb0.fm
1 234
1 disco rígido 3 slot da placa de PC
2 slot de cartão inteligente 4 conectores de áudio (2)
Vista traseira
ADVERTÊNCIA: Não bloqueie, não introduza objetos e nem permita o acúmulo de poeira nas
aberturas de ventilação. Não coloque o computador em ambientes com pouca ventilação, como em
pastas fechadas, por exemplo, enquanto ele estiver funcionando. O bloqueio do fluxo de ar pode
danificar o computador ou causar incêndio.
AVISO: Para evitar danos, aguarde cinco segundos após desligar o computador para desconectar um
dispositivo externo.
1 conector da rede (RJ-45) 4 saída de vídeo
2 conector do modem (RJ-11) 5 conector do adaptador CA
3 conector USB ( 2) 6 aberturas de ventilação
CONFIDENCIAL DA DELL – PRELIMINAR 12/8/04 – SOMENTE PARA TESTE
70 Guia de Referência Rápida
1
23 4 5 6
Page 71

Vista inferior
LOCAL DO ARQUIVO: J:\DL\DL044399\DTP\D5173bb0.fm
1
8
7
2
3 4
5
6
1 travas de liberação do
compartimento daco bateria (2)
2 botão de status do indicador de
carga
3 indicador de carga da bateria 7 tampa do módulo de memória/bateria
4 bateria 8
5 disco rígido
6 conector do dispositivo de acoplamento
para a Base de mídia
de célula tipo moeda
aberturas de ventilação
Como usar a bateria
Desempenho da bateria
ADVERTÊNCIA: Antes de executar os seguintes procedimentos, consulte as instruções de segurança
no Guia de Informações do Produto.
NOTA: Para obter mais informações sobre a garantia Dell para o seu computador, consulte o Guia de
Informações do Produto ou o documento separado de garantia fornecido com o computador.
CONFIDENCIAL DA DELL – PRELIMINAR 12/8/04 – SOMENTE PARA TESTE
Guia de Referência Rápida 71
Page 72

Para obter um ótimo desempenho do computador e ajudar a preservar as configurações do BIOS,
opere o computador Dell™ usando permanentemente a bateria. Use a bateria para operar o
computador quando ele não estiver conectado a uma tomada elétrica. Uma bateria é fornecida
como equipamento padrão no compartimento de bateria. O tempo de operação da bateria varia de
acordo com as condições operacionais.
NOTA: O tempo de operação da bateria (período em que a bateria retém a carga) diminui com o passar
do tempo. Dependendo da freqüência com que a bateria é usada e das condições sob as quais ela é
usada, pode ser que você tenha de comprar uma nova bateria durante a vida útil de seu computador.
O tempo de operação diminui consideravelmente quando você executa certas operações, incluindo,
entre outras, as seguintes:
• Usar unidades ópticas como, por exemplo, unidades de DVD ou CD
www.dell.com | support.dell.com
• Usar dispositivos de comunicação de rede sem fio, placas de PC ou dispositivos USB
• Usar configurações de alto brilho de vídeo, proteções de tela em 3D ou outros programas com
consumo elevado de energia, como jogos em 3D, por exemplo
• Operar o computador no modo de desempenho máximo.
NOTA: É recomendável conectar o computador a uma tomada elétrica durante a gravação de um CD ou
DVD.
Para verificar a carga da bateria, pressione o botão de status de carga da bateria.Você pode também
definir opções de gerenciamento de energia para alertá-lo quando a carga da bateria estiver baixa.
ADVERTÊNCIA: O uso de uma bateria incompatível pode aumentar o risco de incêndio ou explosão.
Substitua a bateria somente por uma bateria compatível adquirida na Dell. A bateria de íon de lítio foi
projetada para funcionar com o seu computador Dell. Não use baterias de outros computadores em seu
computador.
.
ADVERTÊNCIA: Não descarte baterias junto com o lixo doméstico. Quando a bateria não puder mais
armazenar carga, ligue para o órgão ambiental ou para a empresa de coleta de lixo local para obter
instruções sobre como descartar uma bateria de íons de lítio. Consulte a seção “Descarte da bateria”
no Guia de Informações do Produto.
.
ADVERTÊNCIA: O uso inadequado da bateria pode aumentar o risco de incêndio ou de queimaduras
químicas. Não perfure, não incinere, não desmonte nem exponha a bateria a temperaturas acima de
65°C. Mantenha a bateria longe de crianças. Manuseie com muito cuidado baterias danificadas ou que
estejam vazando. As baterias danificadas podem vazar e causar danos pessoais ou ao equipamento.
LOCAL DO ARQUIVO: J:\DL\DL044399\DTP\D5173bb0.fm
Como verificar a carga da bateria
O medidor de bateria do Dell QuickSet, a janela do
e o ícone , o indicador de carga e o indicador de saúde da bateria, bem como a advertência
sobre bateria com pouca carga fornecem informações sobre a carga da bateria.
Medidor de bateria do Dell QuickSet
Se o Dell QuickSet estiver instalado, pressione <Fn><F3> para mostrar o seu medidor de bateria.
A janela
para o carregamento total da bateria no computador.
72 Guia de Referência Rápida
Battery Meter
CONFIDENCIAL DA DELL – PRELIMINAR 12/8/04 – SOMENTE PARA TESTE
medidor de energia
do Microsoft® Windows®
(Medidor de bateria) mostra o status, o nível de carga e o tempo necessário
Page 73

LOCAL DO ARQUIVO: J:\DL\DL044399\DTP\D5173bb0.fm
NOTA: Use a Base de mídia opcional para carregar a bateria do computador quando a Base de mídia
estiver no modo independente (standalone) ou quando o computador estiver nela acoplado. A energia
adicional da bateria na Base de mídia estará disponível para uso do computador após você fazer o
acoplamento do computador.
Além disso, quando o computador estiver conectado à Base de mídia ou a outro dispositivo de
acoplamento (acoplado), a janela
(bateria do dispositivo de acoplamento), a qual mostra o nível de carga e o status atual da
Battery
Battery Meter
(Medidor de bateria) irá conter a guia
Dock
bateria no compartimento de bateria da Base de mídia ou de outro dispositivo de acoplamento.
Os seguintes ícones aparecem na janela
• O computador ou o dispositivo de acoplamento está usando a energia da bateria.
• A bateria está sendo descarregada.
• O computador ou o dispositivo de acoplamento está conectado a uma tomada
elétrica e está usando energia CA.
• A bateria está sendo carregada.
• O computador ou o dispositivo de acoplamento está conectado a uma tomada
elétrica e está usando energia CA.
• A bateria está totalmente carregada e inativa
Battery Meter
(Medidor de bateria):
Para obter mais informações sobre o QuickSet, clique o botão direito no ícone na área de notificação
(localizada no canto inferior direito da área de trabalho do Windows) e clique em
Help
(Ajuda).
Medidor de energia do Microsoft Windows
O medidor de energia do Windows indica a carga restante da bateria. Para checar o medidor de
energia, clique duas vezes no ícone na área de notificação. Para obter mais informações sobre a
guia do
medidor de energia
, consulte o
Guia do usuário
. Se o computador estiver conectado a uma
tomada elétrica, o ícone aparecerá.
Indicador de carga
Durante os 3 primeiros segundos após você pressionar o botão de status no indicador de carga da
bateria, as luzes no indicador de carga indicarão o status de carga da bateria. Cada luz representa
aproximadamente 20% da carga total da bateria. Por exemplo, se a bateria tiver 80% de carga
restante, quatro luzes estarão acesas. Se não houver luzes acesas, a bateria estará descarregada.
Indicador de saúde
A vida útil da bateria é grandemente determinada pelo número de vezes em que ela é carregada.
Após centenas de ciclos de carga e descarga, as baterias perdem um pouco da capacidade de carga
saúde
ou a
. Para verificar a saúde da bateria, pressione e mantenha pressionado o botão de status no
indicador de carga da bateria durante pelo menos três segundos. Se nenhuma luz acender, a bateria
está em boas condições e resta ainda mais de 80% da capacidade de carga original. Cada luz
representa uma degradação incremental. Se aparecerem cinco luzes, isto é uma indicação de que
resta menos de 60 % da capacidade de carga e você deverá começar a pensar em substituir a bateria.
CONFIDENCIAL DA DELL – PRELIMINAR 12/8/04 – SOMENTE PARA TESTE
Guia de Referência Rápida 73
Page 74

NOTA: Quando você pressiona e mantém pressionado o botão de status no indicador de carga da
bateria durante pelo menos 3 segundos, as luzes do nível de carga são primeiro acesas para mostrar o
status atual da carga. Em seguida, elas se alternam para o status de saúde da bateria, onde elas
representam a degradação por incremento quando acesas.
Aviso de bateria com pouca carga
AVISO: Para evitar perda ou danos aos dados, salve o trabalho imediatamente após uma advertência de
bateria com pouca carga. Em seguida, conecte o computador a uma tomada elétrica. Se a bateria estiver
completamente sem energia, o modo de hibernação será iniciado automaticamente.
NOTA: Use a Base de mídia opcional para carregar a bateria do computador quando a Base de mídia
estiver no modo independente (standalone) ou quando o computador estiver acoplado na Base de mídia.
www.dell.com | support.dell.com
A energia adicional da bateria na Base de mídia estará disponível para uso do computador após você
fazer o acoplamento do computador.
Uma janela pop-up avisa quando a carga da bateria estiver esgotada em aproximadamente 90%.
Para obter mais informações sobre alarmes de bateria com pouca carga, consulte o
Uma advertência de bateria com carga baixa ocorre quando a carga da bateria estiver esgotada em
aproximadamente 90 %. O computador emite um bipe uma vez, indicando que resta um tempo
mínimo de operação da bateria. Durante esse período, o alto-falante emitirá bipes periodicamente.
O computador entrará no modo de hibernação quando a carga da bateria estiver em um nível
criticamente baixo.
LOCAL DO ARQUIVO: J:\DL\DL044399\DTP\D5173bb0.fm
Guia do usuário
.
Como carregar a bateria
NOTA:
Quando você conecta o computador a uma tomada elétrica ou instala uma bateria em um
computador conectado a uma tomada elétrica, ele verifica a carga e a temperatura da bateria. Se
necessário, o adaptador para CA carrega a bateria e mantém sua carga.
Se a bateria estiver quente devido ao uso no computador ou porque a temperatura ambiente está
elevada, talvez ela não seja carregada quando o computador for conectado a uma tomada elétrica.
A bateria estará muito quente para começar a carregar se a luz piscar alternadamente entre o
verde e laranja. Desconecte o computador da tomada elétrica e deixe que a bateria e o computador
esfriem até atingirem a temperatura ambiente. Em seguida, conecte o computador à tomada
elétrica para continuar a carregar a bateria.
O adaptador CA recarrega uma bateria completamente descarregada em aproximadamente 2 horas
com o computador desligado. O tempo de carga será maior se o computador estiver ligado. Você pode
deixar a bateria no computador o tempo que desejar. O circuito interno da bateria evita a sobrecarga.
Como remover a bateria
ADVERTÊNCIA: Antes de executar os seguintes procedimentos, desconecte o modem da tomada de
telefone na parede.
1
Verifique se o computador está desligado e desconectado da tomada elétrica.
CONFIDENCIAL DA DELL – PRELIMINAR 12/8/04 – SOMENTE PARA TESTE
74 Guia de Referência Rápida
Page 75

LOCAL DO ARQUIVO: J:\DL\DL044399\DTP\D5173bb0.fm
2
Se o computador estiver conectado à Base de mídia ou a outro dispositivo de acoplamento
(acoplado), desconecte-o. Consulte a documentação fornecida com o dispositivo de
acoplamento para obter instruções.
3
Deslize para fora as travas de liberação do compartimento de bateria na parte inferior do
computador e remova a bateria do compartimento.
Como instalar a bateria
Certifique-se de que o computador esteja desligado. Empurre a bateria para dentro do
compartimento até ouvir o clique das travas de liberação.
Como armazenar a bateria
Remova a bateria quando for guardar o computador por muito tempo. As baterias descarregam
durante um período longo de armazenamento. Nesses casos, recarregue a bateria completamente
antes de usá-la novamente.
Como solucionar problemas
NSS (Notebook System Software)
Se reinstalar o sistema operacional no seu computador, você deve reinstalar também o utilitário
NSS. Esse utilitário está disponível no CD opcional
site de suporte da Dell em
CONFIDENCIAL DA DELL – PRELIMINAR 12/8/04 – SOMENTE PARA TESTE
www.support.dell.com
Drivers and Utilities
(em inglês).
(Drivers e utilitários) e no
Guia de Referência Rápida 75
Page 76

LOCAL DO ARQUIVO: J:\DL\DL044399\DTP\D5173bb0.fm
Para fazer o download do utilitário a partir do site de suporte da Dell, vá para a seção
site e selecione o modelo do seu computador no menu suspenso. Selecione “System and
Configuration Utilities,” (Utilitários do sistema e de configuração) de
(Categoria do download), selecione seu sistema operacional e o idioma e, em seguida, siga as
instruções apresentadas.
O utilitário NSS fornece atualizações críticas para o sistema operacional e suporte para unidades de
disquete USB de 3,5 polegadas da Dell™, processadores Intel
dispositivos USB. Esse utilitário é necessário para que o seu computador Dell opere corretamente.
O software detecta automaticamente seu computador e sistema operacional e instala as
atualizações adequadas para a sua configuração.
www.dell.com | support.dell.com
NOTA: Ele é essencial para a correta operação de dispositivos USB, inclusive Dell D/Bay, D/Dock,
D/Port e D/View.
Problemas de travamento e de software
ADVERTÊNCIA: Antes de executar os seguintes procedimentos, consulte as instruções de segurança
apresentadas no Guia de Informações do Produto.
O computador não inicia
VERIFIQUE SE O ADAPTADOR CA ESTÁ FIRMEMENTE CONECTADO AO COMPUTADOR E À TOMADA
ELÉTRICA
Downloads
Download Category
®
Pentium®M, unidades ópticas e
do
O computador pára de responder
AVISO: Você pode perder dados se não conseguir executar o procedimento de desligar o sistema
operacional
DESLIGUE O COMPUTADOR — Se você não conseguir obter resposta pressionando uma tecla ou
movendo o mouse, pressione e mantenha pressionado o botão liga/desliga durante, pelo menos, 8 a 10
segundos até desligar o computador. Em seguida, reinicie o computador.
Um programa pára de responder
ENCERRE O PROGRAMA —
1
Pressione <Ctrl><Shift><Esc> simultaneamente.
2
Clique em
3
Clique no programa que não está mais respondendo.
4
Clique em
CONFIDENCIAL DA DELL – PRELIMINAR 12/8/04 – SOMENTE PARA TESTE
Aplicativos
Finalizar tarefa
76 Guia de Referência Rápida
.
.
Page 77

Um programa trava repetidamente
LOCAL DO ARQUIVO: J:\DL\DL044399\DTP\D5173bb0.fm
NOTA:
As instruções de instalação do software estão geralmente na documentação ou em um disquete ou CD.
CONSULTE A DOCUMENTAÇÃO DO SOFTWARE — Se necessário, desinstale e reinstale o programa.
Programa criado para um sistema operacional Windows mais antigo
SE VOCÊ ESTIVER USANDO O WINDOWS XP, EXECUTE O ASSISTENTE DE COMPATIBILIDADE DE
PROGRAMAS — O Assistente de compatibilidade de programas configura uma programa para
funcionar em um ambiente semelhante a ambientes de sistemas operacionais não-Windows XP.
1
Clique no botão
compatibilidade de programas
2
Na tela de boas-vindas, clique em
3
Siga as instruções da tela.
Iniciar
, aponte para
.
Avançar
Todos os programas
.
→
Acessórios
e clique em
Assistente de
Exibição de uma tela inteiramente azul
DESLIGUE O COMPUTADOR — Se você não conseguir obter resposta pressionando uma tecla ou
movendo o mouse, pressione e mantenha pressionado o botão liga/desliga durante, pelo menos, 8 a 10
segundos até desligar o computador. Em seguida, reinicie o computador.
Outros problemas de software
CONSULTE A DOCUMENTAÇÃO DO SOFTWARE OU ENTRE EM CONTATO COM O FABRICANTE DO
PRODUTO PARA OBTER INFORMAÇÕES SOBRE SOLUÇÃO DE PROBLEMAS —
• Verifique se o programa é compatível com o sistema operacional instalado no computador.
• Verifique se o computador atende aos requisitos mínimos de hardware necessários para executar o
software. Consulte a documentação do software para obter informações.
• Verifique se o programa foi instalado e configurado adequadamente.
• Verifique se os drivers de dispositivo não estão em conflito com o programa.
• Se necessário, desinstale e, em seguida, reinstale o programa.
FAÇA BACKUP DE SEUS ARQUIVOS IMEDIATAMENTE
USE UM PROGRAMA ANTIVÍRUS PARA EXAMINAR O DISCO RÍGIDO, DISQUETES OU CDS
SALVE E FECHE ARQUIVOS E PROGRAMAS ABERTOS E DESLIGUE O COMPUTADOR ATRAVÉS DO MENU
Iniciar
CONFIDENCIAL DA DELL – PRELIMINAR 12/8/04 – SOMENTE PARA TESTE
Guia de Referência Rápida 77
Page 78

LOCAL DO ARQUIVO: J:\DL\DL044399\DTP\D5173bb0.fm
EXAMINE O COMPUTADOR PARA VER SE TEM ALGUM SPYWARE SENDO EXECUTADO — Se o seu
computador ficar lento, aparecerem freqüentes anúncios em janelas pop-up ou se você tiver problemas
para se conectar à Internet, o seu computador pode estar infectado com spyware (software de
espionagem). Use um programa antivírus que inclua proteção contra spyware (talvez seja necessário
fazer uma atualização) para verificar o computador e remover o spyware. Para obter mais informações,
visite o site support.dell.com (em inglês) e procure a palavra-chave spyware.
EXECUTE O DELL DIAGNOSTICS — Se todos os testes forem executados sem problema, a condição de
erro está relacionada a um problema de software.
www.dell.com | support.dell.com
Como executar o Dell Diagnostics
ADVERTÊNCIA: Antes de executar os seguintes procedimentos, consulte as instruções de segurança
descritas no Guia de Informações do Produto.
Quando usar o Dell Diagnostics
Se o computador apresentar algum problema, siga as instruções descritas na seção “Como
solucionar problemas” do
contato com a assistência técnica da Dell.
AVISO: O Dell Diagnostics só funciona em computadores Dell™.
Inicie o Dell Diagnostics a partir do disco rígido ou do CD opcional
(Drivers e utilitários), também conhecido como
Como iniciar o Dell Diagnostics a partir do disco rígido
O Dell Diagnostics está localizado em uma partição oculta do utilitário de diagnóstico no disco rígido.
NOTA: Se o computador não puder exibir uma imagem de tela, entre em contato com a Dell.
1
Desligue o computador.
2
Se o computador estiver conectado a um dispositivo de acoplamento, (acoplado), desconecte-o.
Consulte a documentação fornecida com o dispositivo de acoplamento para obter instruções.
3
Conecte o computador a uma tomada elétrica.
4
Ligue o computador. Quando o logotipo DELL™ aparecer, pressione <F12> imediatamente.
NOTA: Se você não vir nada na tela, ou seja, se ela estiver vazia, mantenha pressionado o botão “sem
áudio” e pressione o botão liga/desliga do computador para iniciar o Dell Diagnostics. O computador
executa automaticamente a avaliação de pré-inicialização do sistema.
Guia do usuário
on-line e execute o Dell Diagnostics antes de entrar em
ResourceCD
CD Drivers and Utilities
).
NOTA:
Se aparecer uma mensagem informando que não foi encontrada nenhuma partição do utilitário de
diagnóstico, execute o Dell Diagnostics a partir do CD opcional Drivers and Utilities (Drivers e utilitários).
Se você esperar tempo demais e o logotipo do sistema operacional aparecer, continue
aguardando até vir a área de trabalho do Microsoft
computador e tente novamente.
CONFIDENCIAL DA DELL – PRELIMINAR 12/8/04 – SOMENTE PARA TESTE
78 Guia de Referência Rápida
®
Windows®.Em seguida, desligue o
Page 79

LOCAL DO ARQUIVO: J:\DL\DL044399\DTP\D5173bb0.fm
5
Quando a lista de dispositivos de inicialização aparecer, realce
Diagnostics
(diagnóstico) e
pressione <Enter>.
O computador executará a avaliação de pré-inicialização do sistema, que é uma série de testes
iniciais da placa de sistema, do teclado, do disco rígido e da tela.
• Durante a avaliação, responda a todas as perguntas que aparecerem.
• Se for detectada alguma falha, o computador interromperá o processo e emitirá um bipe.
Para interromper a avaliação e reinicializar o computador, pressione <n>; para passar
para o teste seguinte, pressione <y>; para testar novamente o componente que
apresentou defeito, pressione <r>.
• Se forem detectadas falhas durante a avaliação de pré-inicialização do sistema, anote o(s)
código(s) de erro e entre em contato com a Dell antes de continuar com o Dell
Diagnostics.
Se a avaliação de pré-inicialização do sistema for bem-sucedida, você receberá a mensagem
Dell Diagnostic Utility Partition. Press any key to continue
(Inicializando partição
do utilitário de diagnóstico da Dell. Pressione qualquer tecla para continuar).
6
Pressione qualquer tecla para iniciar o Dell Diagnostics a partir da partição do utilitário de
diagnóstico no disco rígido.
Como iniciar o Dell Diagnostics a partir do CD opcional Drivers and Utilities
1
Insira o
2
Desligue e reinicialize o computador.
CD Drivers and Utilities
(Drivers e utilitários).
Quando o logotipo DELL aparecer, pressione <F12> imediatamente.
Se você esperar tempo demais e o logotipo do Windows aparecer, continue aguardando até que a área
de trabalho do Windows apareça. Em seguida, desligue o computador e tente novamente.
NOTA:
3
As etapas seguintes alteram a seqüência de inicialização apenas por uma vez. Na próxima inicialização,
o computador inicializará de acordo com os dispositivos especificados na configuração do sistema.
Quando a lista de dispositivos de inicialização aparecer, realce
Unidade de CD/DVD/CD-RW
e pressione <Enter>.
4
Selecione a opção
5
Selecione a opção
6
Digite 1 para iniciar o menu do
7
Digite 2 para iniciar o Dell Diagnostics.
8
Selecione
Run the 32 Bit Dell Diagnostics
Unidade de CD/DVD/CD-RW
Boot from CD-ROM
(Inicializar a partir do CD-ROM) no menu que aparecer.
ResourceCD
.
(Executar o Dell Diagnostics de 32 bits) na lista
no menu de inicialização do CD.
numerada. Se houver várias versões na lista, selecione a versão adequada para sua plataforma.
9
Quando
Main Menu
(Menu principal) do Dell Diagnostics aparecer, selecione o teste que
deseja executar.
Booting
Tela do menu principal do Dell Diagnostics
1
Depois que o Dell Diagnostics for carregado e a tela do
aparecer, clique no botão da opção desejada.
CONFIDENCIAL DA DELL – PRELIMINAR 12/8/04 – SOMENTE PARA TESTE
Main Menu
(Menu principal)
Guia de Referência Rápida 79
Page 80

Opção Função
Express Test (Teste
expresso)
Extended Test (Teste
completo)
Custom Test (Teste
personalizado)
Symptom Tree (Árvore
de sintomas)
www.dell.com | support.dell.com
2
Se for encontrado algum problema durante um teste, aparecerá uma mensagem mostrando o
código do erro e uma descrição do problema. Anote esse código e a descrição do problema e
siga as instruções da tela.
Se não for possível resolver a condição de erro, entre em contato com a Dell.
NOTA: A etiqueta de serviço do computador está localizada na parte superior de cada tela de teste. Se
você entrar em contato com a Dell, o suporte técnico solicitará o número da etiqueta de serviço.
3
Se você executar um teste usando a opção
Tr ee
(Árvore de sintomas), clique na guia correspondente, descrita na tabela a seguir, para
obter mais informações.
LOCAL DO ARQUIVO: J:\DL\DL044399\DTP\D5173bb0.fm
Executa um teste rápido dos dispositivos. Normalmente, esse teste leva de 10 a 20
minutos e não exige interação de sua parte. Aumente as possibilidades de detectar
o problema rapidamente executando primeiro o Express Test (Teste expresso).
Executa uma verificação completa dos dispositivos. Normalmente, esse teste leva
uma hora ou mais e exige que você responda a perguntas periodicamente.
Testa um dispositivo específico. Você pode personalizar os testes que quiser
executar.
Mostra uma lista dos sintomas mais comuns encontrados e permite selecionar um
teste com base no sintoma do problema que está ocorrendo.
Custom Test
(Teste personalizado) ou
Symptom
Guia Função
Results (Resultados) Mostra os resultados do teste e as condições de erro encontradas.
Errors (Erros)
Help (Ajuda) Descreve o teste e pode indicar os requisitos para a execução desse teste.
Configuration
(Configuração)
Parameters (Parâmetros)
4
Quando acabar os testes, se você estiver executando o Dell Diagnostics a partir do
and Utilities (Drivers e utilitários)
5
Quando acabar os testes, feche a tela de testes para retornar à tela
principal). Para sair do Dell Diagnostics e reinicializar o computador, feche a tela
(Menu principal).
CONFIDENCIAL DA DELL – PRELIMINAR 12/8/04 – SOMENTE PARA TESTE
80 Guia de Referência Rápida
Mostra as condições de erro encontradas, os códigos de erro e a descrição do problema.
Mostra a configuração de hardware do dispositivo selecionado.
O Dell Diagnostics obtém as informações sobre a configuração de todos os
dispositivos através do programa de configuração do sistema, da memória e de vários
testes internos, e mostra essas informações na lista de dispositivos no painel esquerdo
da tela. A lista de dispositivos pode não conter os nomes de todos os componentes
instalados no computador ou de todos os dispositivos conectados a ele.
Permite alterar as configurações de teste para personalizá-lo.
CD
Drivers
,
remova o CD.
Main Menu
(Menu
Main Menu
Page 81

Índice remissivo
A
assistentes
Assistente de compatibilidade
de programas, 77
B
bateria
armazenamento, 75
aviso de bateria com pouca
carga, 74
carregamento, 74
desempenho, 71
indicador de carga, 73
indicador de saúde, 73
instalação, 75
medidor de energia, 73
troca, 74
verificação da carga, 72
vida útil e uso da bateria, 66
C
CD
sistema operacional, 64
CD do sistema
operacional, 64
CD Drivers and Utilities, 61
Como obter informações
documentação, 61
computador, 66
desempenho lento, 78
pára de responder, 76
trava, 76-77
D
Dell
site de suporte, 63
Diagnostics
Dell, 78
diagnósticos
CD Drivers and Utilities, 61
documentação
dispositivo, 61
guia de informações do
sistema, 61
guia do usuário, 62
online, 63
drivers
ResourceCD, 61
E
etiqueta de serviço, 62
G
garantia, 61
guia do usuário, 62
I
instruções de segurança, 61
P
problemas
compatibilidade com o
Windows e programas, 77
computador não inicia, 76
computador pára de
responder, 76
computador trava, 76-77
desempenho lento do
computador, 78
programa pára de
responder, 76
programa trava, 77
software, 76-77
solucionar, 75
spyware, 78
tela azul, 77
travamento, 76
R
reinstalação
Drivers and Utilities, 61
ResourceCD, 61
rótulo do Microsoft
Windows, 62
rótulos
etiqueta de serviço, 62
Microsoft Windows, 62
Índice remissivo 81
Page 82

S
Sistema operacional
Guia de instalação, 64
sistema operacional
CD, 64
Site de suporte do Dell
Premier, 63
site do Dell Premier Support
na Web, 61
sobre o seu computador
vista frontal, 68
vista inferior, 71
vista lateral direita, 70
vista lateral esquerda, 68
vista traseira, 70
software
problemas, 77
spyware, 78
W
Windows XP
Assistente de compatibilidade
de programas, 77
82 Índice remissivo
Page 83

Dell™ Latitude™ D410
Guía de referencia rápida
Modelo PP06S
www.dell.com | support.dell.com
Page 84

Notas, avisos y precauciones
NOTA: Una NOTA indica información importante que le ayudar a hacer un mejor uso de la computadora.
AVISO: Un AVISO indica la posibilidad de daños al hardware o pérdida de datos y le explica cómo evitar el problema.
PRECAUCIÓN: Una PRECAUCIÓN indica un posible daño material, lesión corporal o muerte.
Abreviaturas y siglas
Para obtener una lista completa de abreviaturas y siglas, consulte la
haga doble clic en el icono de la
botón
Inicio
, en
Centro de ayuda y soporte técnico
Guía del usuario
del escritorio Microsoft® Windows® o bien haga clic en el
y, a continuación, en
Guía del usuario
(según su sistema operativo,
Guías del usuario y del sistema
).
Si ha adquirido una computadora Dell™ Serie n, todas las referencias que aparecen en este documento relativas
a los sistemas operativos de Microsoft
Drivers and Utilities
El CD
(Controladores y utilidades) y el CD del
®
Windows® no son aplicables.
sistema operativo
son opcionales y es posible
que no se entreguen con todos las computadoras.
_________________
La información contenida en este documento puede modificarse sin aviso previo.
© 2004 Dell Inc. Todos los derechos reservados.
Queda estrictamente prohibido realizar cualquier tipo de reproducción sin el consentimiento escrito de Dell Inc.
Marcas comerciales utilizadas en este texto: Dell, el logotipo de DELL y Latitude son marcas comerciales de Dell Inc.; Microsoft y Windows
son marcas comerciales registradas de Microsoft Corporation; Intel y Pentium son marcas comerciales registradas de Intel Corporation.
Este documento puede incluir otras marcas comerciales y nombres comerciales para referirse a las entidades que son propietarias de los mismos
o a sus productos. Dell Inc. renuncia a cualquier interés sobre la propiedad de marcas y nombres comerciales que no sean los suyos.
Modelo PP06S
Noviembre de 2004 N/P D5173 Rev. A00
Page 85

Contenido
Localización de información . . . . . . . . . . . . . . . . . . . . . . . . . . 87
Configuración de la computadora
Acerca de su computadora
Vista anterior
Vista izquierda
Vista derecha
Vista posterior
Vista inferior
Uso de la batería
. . . . . . . . . . . . . . . . . . . . . . . . . . . . . . . . 94
. . . . . . . . . . . . . . . . . . . . . . . . . . . . . . . 95
. . . . . . . . . . . . . . . . . . . . . . . . . . . . . . . . 96
. . . . . . . . . . . . . . . . . . . . . . . . . . . . . . . . 96
. . . . . . . . . . . . . . . . . . . . . . . . . . . . . . . . 97
. . . . . . . . . . . . . . . . . . . . . . . . . . . . . . . . . 97
Rendimiento de la batería
Comprobación de la carga de la batería
Carga de la batería
. . . . . . . . . . . . . . . . . . . . . . . . . . . . 100
Extracción de una batería
Instalación de una batería
Almacenamiento de una batería
Solución de problemas
. . . . . . . . . . . . . . . . . . . . . . . . . . . . 102
Notebook System Software (NSS)
Bloqueos y problemas con el software
Ejecución de los Dell Diagnostics
. . . . . . . . . . . . . . . . . . . . . . . . 91
. . . . . . . . . . . . . . . . . . . . . . . . . . . 93
. . . . . . . . . . . . . . . . . . . . . . . . . . 97
. . . . . . . . . . . . . . . . . . 98
. . . . . . . . . . . . . . . . . . . . . . . . 101
. . . . . . . . . . . . . . . . . . . . . . . . 102
. . . . . . . . . . . . . . . . . . . . . 102
. . . . . . . . . . . . . . . . . . . . 102
. . . . . . . . . . . . . . . . . . 102
. . . . . . . . . . . . . . . . . . . . 104
Índice . . . . . . . . . . . . . . . . . . . . . . . . . . . . . . . . . . . . . . . 109
Contenido 85
Page 86

86 Contenido
Page 87

UBICACIÓN DE ARCHIVOS: J:\DL\DL044399\DTP\D5173sb0.fm
Localización de información
NOTA: Es posible que algunas funciones no estén disponibles en su computadora o en determinados países.
NOTA: Su computadora puede incluir información adicional.
¿Qué busca? Aquí lo encontrará
• Un programa de diagnóstico para mi computadora
• Controladores para mi computadora
• La documentación de mi computadora
• La documentación de mi dispositivo
• Notebook System Software (NSS)
CD Drivers and Utilities (también conocido como
ResourceCD)
La documentación y los controladores ya están instalados
en su computadora. Puede utilizar el CD para
instalar los controladores
acceder a la documentación.
, ejecutar los
Los archivos “readme”
(léame) pueden estar
incluidos en su CD para
disponer de
actualizaciones de
última hora sobre los
cambios técnicos de la
computadora o el
material de consulta
destinado a los técnicos o
usuarios avanzados.
Dell Diagnostics
volver a
, o
• Información sobre la garantía
• Términos y condiciones (sólo en EE.UU.)
• Instrucciones de seguridad
• Información reglamentaria
• Información ergonómica
• End User License Agreement (Contrato de licencia de
usuario final)
DELL CONFIDENTIAL – PRELIMINARY 12/8/04 – FOR PROOF ONLY
NOTA: Las actualizaciones de los controladores y de la
documentación se pueden encontrar en support.dell.com.
NOTA: El CD denominado Drivers and Utilities es opcional y
es posible que no se entregue con su computadora.
Guía de información del producto Dell™
Sitio web Dell Premier Support
Guía de referencia rápida 87
Page 88

UBICACIÓN DE ARCHIVOS: J:\DL\DL044399\DTP\D5173sb0.fm
¿Qué busca? Aquí lo encontrará
• Cómo extraer y cambiar piezas
• Especificaciones
• Cómo configurar los parámetros del sistema
• Cómo detectar y solucionar problemas
Guía del usuario
Centro de ayuda y soporte técnico de Microsoft
Windows
®
1
Haga clic en el botón
soporte técnico
2
Haga clic en
del usuario
La Guía del usuario también está disponible en el
Drivers and Utilities
NOTA: El CD denominado Drivers and Utilities es opcional y
www.dell.com | support.dell.com
• Etiqueta de servicio y código de servicio rápido
• Etiqueta de licencia de Microsoft Windows
es posible que no se entregue con su computadora.
Etiqueta de servicio y licencia de Microsoft Windows
Estas etiquetas se encuentran en
computadora.
• Utilice la etiqueta de
servicio para
identificar la
computadora cuando
utilice
support.dell.com
ponga en contacto
con el servicio de
asistencia técnica.
• Escriba el código de servicio urgente para dirigir su
llamada cuando se ponga en contacto con el servicio de
asistencia técnica. Es posible que el código de servicio
urgente no esté disponible en algunos países.
XP
Inicio
y seleccione
.
Guías del usuario y del sistema
.
(Controladores y utilidades).
la parte inferior de
o se
®
Ayuda y
y en
Guías
CD
su
DELL CONFIDENTIAL – PRELIMINARY 12/8/04 – FOR PROOF ONLY
88 Guía de referencia rápida
Page 89

UBICACIÓN DE ARCHIVOS: J:\DL\DL044399\DTP\D5173sb0.fm
¿Qué busca? Aquí lo encontrará
• Soluciones — Consejos y sugerencias para la solución de
problemas, artículos de técnicos, cursos en línea y preguntas
más frecuentes
• Comunidad — Debates en línea con otros clientes de Dell
• Actualizaciones — Información de actualización para
componentes como por ejemplo la memoria, la unidad de
disco duro y el sistema operativo
• Atención al cliente — Información de contacto, llamada de
Sitio web Dell Support — support.dell.com
NOTA: Seleccione su región para ver el sitio web de
asistencia adecuado.
NOTA: Los clientes de empresas, instituciones
gubernamentales y educativas también pueden utilizar el
sitio web personalizado Dell Premier Support de
premier.support.dell.com. Es posible que este sitio web no
esté disponible en todas las regiones.
servicio y estado de los pedidos, garantía e información de
reparación
• Servicio y asistencia — Historial de asistencia y estado de las
llamadas de servicio, contrato de servicio, debates en línea
con el personal de asistencia técnica
• Referencia — Documentación de la computadora, detalles
en la configuración de mi computadora, especificaciones del
producto y documentación técnica
• Descargas — Controladores certificados, revisiones y
actualizaciones de software
• Notebook System Software (NSS) — Si vuelve a instalar el
sistema operativo de la computadora, también debe volver a
instalar la utilidad NSS. NSS proporciona actualizaciones
importantes del sistema operativo y asistencia para las
unidades de disquete de 3,5 pulgadas de Dell™,
procesadores Intel
®
Pentium®M, unidades ópticas y
dispositivos USB. NSS es necesaria para el correcto
funcionamiento de su computadora Dell. El software
detecta automáticamente su computadora y sistema
operativo e instala las actualizaciones apropiadas a su
configuración.
Para descargar Notebook System Software:
1
Vaya a
support.dell.com
y haga clic en
Downloads
(Descargas).
2
Especifique la etiqueta de servicio o el modelo del producto.
3
En el menú descendente
categoría), haga clic en
4
Seleccione el sistema operativo y el idioma del sistema
operativo de su computadora y haga clic en
Download Category
All
(Todas).
(Descargar
Submit
(Enviar).
5
En Select a Device (Seleccionar un dispositivo), desplácese
System and Configuration Utilities
hasta
sistema y de la configuración), y haga clic en
System Software
.
DELL CONFIDENTIAL – PRELIMINARY 12/8/04 – FOR PROOF ONLY
(Utilidades del
Dell Notebook
Guía de referencia rápida 89
Page 90

UBICACIÓN DE ARCHIVOS: J:\DL\DL044399\DTP\D5173sb0.fm
¿Qué busca? Aquí lo encontrará
• Cómo utilizar Windows XP
• Documentación de mi computadora
• Documentación para los dispositivos (como por ejemplo un
módem)
Centro de ayuda y soporte técnico de Windows
1
Haga clic en el botón
soporte técnico
2
Escriba una palabra o frase que describa el problema y a
continuación haga clic en el icono de flecha.
3
Haga clic en el tema que describa el problema.
4
Siga las instrucciones que aparecen en pantalla.
• Cómo volver a instalar mi sistema operativo
CD del sistema operativo
El sistema operativo ya está instalado en la computadora.
www.dell.com | support.dell.com
Para volver a instalar el sistema operativo, utilice el CD
del sistema operativo. Consulte la sección “
de Windows XP
Inicio
y seleccione
.
” para obtener instrucciones.
Si vuelve a instalar el
sistema operativo, utilice
CD Drivers and
el
Utilities
(Controladores y
utilidades) para volver a
instalar los controladores
de los dispositivos
incluidos en la
computadora en el
momento de su compra.
La clave del producto del
sistema operativo se
encuentra en la
computadora.
Ayuda y
Reinstalación
DELL CONFIDENTIAL – PRELIMINARY 12/8/04 – FOR PROOF ONLY
90 Guía de referencia rápida
NOTA: El color de su CD varía según el sistema operativo
que haya solicitado.
NOTA: El CD del sistema operativo es opcional, por lo que
es posible que no se envíe con su computadora.
Page 91

UBICACIÓN DE ARCHIVOS: J:\DL\DL044399\DTP\D5173sb0.fm
Configuración de la computadora
PRECAUCIÓN: Antes de realizar los siguientes procedimientos, consulte las instrucciones de
seguridad de la Guía de información del producto.
1
Desempaquete la caja de accesorios.
2
Saque el contenido de la caja de accesorios, que necesitará para completar la configuración de
la computadora.
La caja de accesorios también contiene la documentación del usuario y todo el software o
hardware adicional (como tarjetas PC, unidades o baterías) que ha solicitado.
3
Conecte el adaptador de CA al conector del adaptador de CA de la computadora y a la toma
de alimentación eléctrica.
PRECAUCIÓN: El adaptador de CA funciona con las tomas de alimentación eléctrica de todo el mundo.
No obstante, los conectores de alimentación y los enchufes múltiples varían de un país a otro. El uso de
un cable incompatible o la conexión incorrecta del cable al enchufe múltiple o a la toma de
alimentación eléctrica puede dañar la computadora o provocar un incendio.
AVISO: Cuando utilice el adaptador de CA, fije el cable de modo que objetos tales como las patas de la
silla o los soportes del escritorio no tiren del cable, ni se enreden en él, lo pisen o aplasten.
AVISO: Cuando desconecte el cable del adaptador de CA de la computadora, sujete el conector del
cable (no el propio cable) y tire firmemente, pero con cuidado de no dañar el cable. Cuando enrolle el
cable del adaptador de CA, asegúrese de que sigue el ángulo del conector del adaptador de CA para
evitar dañar el cable.
NOTA: No conecte la computadora al dispositivo de acoplamiento hasta que la computadora se haya
encendido y apagado como mínimo una vez.
DELL CONFIDENTIAL – PRELIMINARY 12/8/04 – FOR PROOF ONLY
Guía de referencia rápida 91
Page 92

4
Para encender la computadora, abra la pantalla y pulse el botón de alimentación.
www.dell.com | support.dell.com
UBICACIÓN DE ARCHIVOS: J:\DL\DL044399\DTP\D5173sb0.fm
Botón de
alimentación
DELL CONFIDENTIAL – PRELIMINARY 12/8/04 – FOR PROOF ONLY
92 Guía de referencia rápida
Page 93

UBICACIÓN DE ARCHIVOS: J:\DL\DL044399\DTP\D5173sb0.fm
Acerca de su computadora
Consulte la
Para acceder a la
del usuario
continuación, en
más frecuentes acerca de la computadora.
•
Guía del usuario
Guía del usuario
del escritorio, o haga clic en el botón
Guías del usuario y del sistema
Módem y adaptador de red:
adaptador de red Ethernet 10/100/1000 en la placa base. Para saber dónde se encuentran los
conectores, consulte la sección “Vista posterior” en la página 96. Para obtener más
información acerca de los puertos y conectores, consulte la sección “Acerca de su
computadora” en la
Duración de la batería y uso:
realización de determinados tipos de operaciones, como el funcionamiento inalámbrico
durante mucho tiempo, pueden reducir de manera significativa la duración de la batería y el
tiempo de funcionamiento.
Para obtener más información sobre el rendimiento y la utilización de la batería, consulte
“Uso de la batería” en la página 97.
Para obtener más información sobre la conservación de energía, consulte la
en línea para obtener información detallada acerca de la computadora.
(en función del sistema operativo), haga doble clic en el icono
Inicio
, en
Centro de ayuda y soporte técnico
. Los siguientes puntos tratan algunas de las preguntas
La computadora puede incluir un módem v.92 de 56 K y un
Guía del usuario
Se pueden utilizar diferentes baterías con la computadora. La
en línea.
Guía del usuario
Guía
y, a
.
D/Bay de Dell:
•
con él, consulte la
•
Dispositivos de acoplamiento:
estación de expansión D/Dock de Dell y el replicador de puerto avanzado D/Port de Dell.
NOTA: Es posible que los dispositivos de acoplamiento no estén disponibles en algunos países.
– Para obtener información sobre el dispositivo de acoplamiento opcional, consulte la
documentación incluida con el dispositivo.
– Para obtener información acerca de cómo obtener un rendimiento óptimo al utilizar un
dispositivo de acoplamiento con esta computadora, consulte la sección “Solución de
problemas” de la
Para obtener información sobre el D/Bay de Dell y los dispositivos compatibles
Guía del usuario
Guía del usuario
en línea.
Su computadora es compatible con la base de medios Dell™, la
en línea.
DELL CONFIDENTIAL – PRELIMINARY 12/8/04 – FOR PROOF ONLY
Guía de referencia rápida 93
Page 94

Vista anterior
www.dell.com | support.dell.com
UBICACIÓN DE ARCHIVOS: J:\DL\DL044399\DTP\D5173sb0.fm
1
2
12
3
11
4
10
5
9
6
8
1 Seguro de la pantalla 7 Superficie táctil
2 Pantalla 8 Botones de la palanca de
3 Botones de control de
4 Indicadores luminosos
5 Botón silencio 11 Botón de alimentación
6 Teclado 12 Teclado e indicadores de estado
DELL CONFIDENTIAL – PRELIMINARY 12/8/04 – FOR PROOF ONLY
94 Guía de referencia rápida
7
seguimiento y de la superficie táctil
9 Palanca de seguimiento
volumen
10 Par lant e
de estado del dispositivo
inalámbrico
Page 95

Vista izquierda
UBICACIÓN DE ARCHIVOS: J:\DL\DL044399\DTP\D5173sb0.fm
41
3
2
1 Ranura para cable de
seguridad
2
Conector D/Bay
Conector de USB
3
56
4 Rejillas de ventilación
5 Sensor de infrarrojos
6 Rejillas de ventilación
DELL CONFIDENTIAL – PRELIMINARY 12/8/04 – FOR PROOF ONLY
Guía de referencia rápida 95
Page 96

Vista derecha
www.dell.com | support.dell.com
UBICACIÓN DE ARCHIVOS: J:\DL\DL044399\DTP\D5173sb0.fm
1 234
Vista posterior
PRECAUCIÓN: No introduzca objetos ni permita que el polvo se acumule en las rejillas de ventilación
ni las bloquee. No almacene la computadora en un entorno con poca ventilación, como un maletín
cerrado, mientras esté en funcionamiento. La circulación restringida de aire podría dañar la
computadora o provocar un incendio.
AVISO: Para no dañar la computadora, espere 5 segundos después de apagarla antes de desconectar
un dispositivo externo.
1 Conector de red (RJ-45) 4 Conector de vídeo
2 Conector de módem (RJ-11) 5 Conector del adaptador de CA
3 Conectores USB (2) 6 Rejillas de ventilación
DELL CONFIDENTIAL – PRELIMINARY 12/8/04 – FOR PROOF ONLY
96 Guía de referencia rápida
1 Unidad de disco duro 3 Ranura de la tarjeta PC
2 Ranura para tarjetas Smart 4 Conectores de sonido (2)
123456
Page 97

Vista inferior
UBICACIÓN DE ARCHIVOS: J:\DL\DL044399\DTP\D5173sb0.fm
1
8
7
2
3 4
5
6
1 Pasadores de liberación del
compartimento de baterías (2)
2 Botón de estado del medidor
de carga
3 Medidor de carga de la batería 7 Cubierta del módulo de memoria/batería
4 Batería 8
5 Unidad de disco duro
6 Conector del dispositivo de
acoplamiento de la base de medios
de celda del espesor de una moneda
Rejillas de ventilación del ventilador
Uso de la batería
Rendimiento de la batería
PRECAUCIÓN: Antes de realizar los siguientes procedimientos, consulte las instrucciones de
seguridad de la Guía de información del producto.
NOTA: Para obtener más información acerca de la garantía de Dell para su computadora, consulte la
Guía de información del producto o el documento de garantía sobre papel que se envía con la
computadora.
DELL CONFIDENTIAL – PRELIMINARY 12/8/04 – FOR PROOF ONLY
Guía de referencia rápida 97
Page 98

Para lograr un rendimiento óptimo de la computadora y ayudar a conservar la configuración del
BIOS, utilice siempre la computadora Dell™ con la batería instalada. Utilice una batería para
ejecutar la computadora cuando no esté conectada a una toma de alimentación eléctrica. Se
proporciona una batería en su compartimento correspondiente como equipamiento estándar. El
tiempo de funcionamiento de la batería depende de las condiciones de funcionamiento.
NOTA: El tiempo de funcionamiento de la batería (el tiempo que puede mantener una carga) disminuye
con el tiempo. En función de la frecuencia y las condiciones de uso de la batería, es posible que deba
comprar una nueva batería durante la vida útil de la computadora.
La duración de la batería se reduce en gran medida si realiza, entre otras, las operaciones que se
indican a continuación:
• Usar unidades ópticas, como unidades de DVD y CD
www.dell.com | support.dell.com
• Usar dispositivos de comunicación para redes inalámbricas, tarjetas PC o dispositivos USB
• Usar una configuración de pantalla con mucho brillo, protectores de pantalla 3D u otros
programas que consuman mucha energía como juegos 3D
• Hacer funcionar la computadora en el modo de máximo rendimiento
NOTA: Se recomienda conectar la computadora a una toma de alimentación eléctrica mientras se
graba en un CD o DVD.
Puede comprobar la carga de la batería pulsando el botón de estado de carga de la batería situado
en la batería. También puede establecer las opciones de administración de energía para que reciba
un mensaje de alerta cuando la carga de la batería esté baja.
UBICACIÓN DE ARCHIVOS: J:\DL\DL044399\DTP\D5173sb0.fm
PRECAUCIÓN: El uso de baterías incompatibles puede aumentar el riesgo de incendio o explosión.
Sustituya la batería únicamente por baterías de Dell. La batería de iones de litio está diseñada para
funcionar con computadoras Dell. No utilice una batería de otra computadora.
PRECAUCIÓN: No deseche las baterías en la basura doméstica. Cuando la batería ya no pueda
cargarse, solicite información a una empresa local de gestión de residuos o al departamento
responsable en materia de medio ambiente sobre el modo de desechar las baterías de iones de litio.
Consulte el apartado “Cómo desechar las baterías” de la Guía de información del producto.
PRECAUCIÓN: El uso incorrecto de la batería puede aumentar el riesgo de incendio o quemadura
química. No perfore, incinere, desmonte o exponga la batería a temperaturas superiores a 65 °C (149
°F). Mantenga la batería fuera del alcance de los niños. Tenga mucho cuidado con las baterías dañadas
o que goteen. Las baterías dañadas pueden gotear y causar lesiones personales o daños en la
computadora.
Comprobación de la carga de la batería
El medidor de batería Dell QuickSet, la ventana de Microsoft® Windows®
icono , el medidor de carga de la batería y el medidor de estado, así como la advertencia de
batería baja proporcionan información sobre la carga de la batería.
DELL CONFIDENTIAL – PRELIMINARY 12/8/04 – FOR PROOF ONLY
98 Guía de referencia rápida
Medidor de energía
y el
Page 99

UBICACIÓN DE ARCHIVOS: J:\DL\DL044399\DTP\D5173sb0.fm
Medidor de batería QuickSet de Dell
Si Dell QuickSet está instalado, presione <Fn><F3> para ver el Medidor de batería Dell
QuickSet.
La ventana
Battery Meter
(Medidor de la batería) muestra el estado, el nivel y el tiempo total de
carga de la batería de la computadora.
NOTA: Puede utilizar la base de medios opcional para cargar la batería de la computadora cuando la
base de medios está en modo independiente, o cuando la computadora está acoplada a la base de
medios. Una vez acople la computadora, ésta podrá utilizar la alimentación adicional procedente de la
batería de la base de medios.
Además, cuando la computadora está conectada a la base de medios u a otro dispositivo de
acoplamiento (acoplada), la ventana
denominada
Dock Battery
(Acoplar batería), que muestra el nivel de carga y el estado actual de la
Battery Meter
(Medidor de batería) incluye una ficha
batería en el compartimento de baterías de la base de medios u otro dispositivo de acoplamiento.
Los iconos siguientes aparecen en la ventana
• La computadora o el dispositivo de acoplamiento se alimenta de la batería.
• La batería se está descargando.
• La computadora o el dispositivo de acoplamiento está conectado a una
toma de alimentación eléctrica y se alimenta de la corriente alterna.
• La batería se está cargando.
• La computadora o el dispositivo de acoplamiento está conectado a una
toma de alimentación eléctrica y se alimenta de la corriente alterna.
• La batería está completamente cargada e inactiva.
Battery Meter
(Medidor de la batería):
Para obtener más información sobre QuickSet, haga clic con el botón derecho del ratón en el icono
del área de notificación (situada en el margen inferior derecho del escritorio de Windows) y
Help
haga clic en
Medidor de energía de Microsoft Windows
(Ayuda).
El medidor de energía de Windows indica la carga que le queda a la batería. Para comprobar el
medidor de energía, haga doble clic en el icono del área de notificación. Para obtener más
información sobre la ficha
Power Meter
(Medidor de energía), consulte la
Guía del usuario
. Si la
computadora está conectada a una toma de alimentación eléctrica, aparecerá un icono .
Medidor de carga
Durante los tres primeros segundos tras pulsar el botón de estado situado en el medidor de carga de
la batería, los indicadores del medidor de carga indican el estado de carga de la batería. Cada luz
representa aproximadamente un 20 % de la carga total de la batería. Por ejemplo, si la batería tiene
aún un 80 % de carga restante, habrá cuatro luces encendidas. Si no hay ninguna luz encendida, la
batería está descargada.
DELL CONFIDENTIAL – PRELIMINARY 12/8/04 – FOR PROOF ONLY
Guía de referencia rápida 99
Page 100

Medidor de estado
La duración de la batería se ve determinada en gran medida por el número de veces que se carga.
Tras cientos de ciclos de carga y descarga, las baterías pierden parte de su capacidad de carga, o
estado
. Para comprobar el estado de la batería, mantenga pulsado el botón de estado del medidor de
carga de esa batería durante al menos 3 segundos. Si no se ilumina ningún indicador, significa que
la batería está en buenas condiciones y que mantiene más del 80 por ciento de su capacidad de
carga original. Cada luz representa una degradación gradual. Si se iluminan cinco indicadores,
significa que la batería conserva menos del 60 por ciento de su capacidad de carga, por lo que se
debería considerar su sustitución.
NOTA: Si pulsa y mantiene pulsado el botón de estado situado en el medidor de carga de la batería
durante al menos 3 segundos, los indicadores de nivel de carga se iluminan primero para mostrar el
www.dell.com | support.dell.com
estado de carga actual. A continuación pasan a mostrar el estado de consumo de la batería donde
representan la degradación en incrementos cuando está iluminado.
Advertencia de bajo nivel de carga de la batería
AVISO: Para evitar la pérdida de datos o que éstos resulten dañados, tras una advertencia de batería
baja guarde inmediatamente su trabajo. A continuación, conecte la computadora a una toma de
alimentación eléctrica. Si la batería se agota completamente, el modo de hibernación se activa
automáticamente.
NOTA: Puede utilizar la base de medios opcional para cargar la batería de la computadora cuando la
base de medios está en modo independiente, o cuando la computadora está acoplada a la base de
medios. Una vez acople la computadora, ésta podrá utilizar la alimentación adicional procedente de la
batería de la base de medios.
Cuando se ha agotado aproximadamente un 90 % de la carga, una ventana emergente se lo
advierte. Para obtener más información sobre las alarmas de bajo nivel de carga de batería, consulte
la
Guía del usuario
La advertencia de batería baja se produce cuando se ha agotado aproximadamente un 90 % de la
carga. La computadora emitirá un pitido, lo que indica que queda el tiempo mínimo de
funcionamiento de la batería. Durante ese tiempo, por el parlante se emitirán pitidos a intervalos
periódicos. La computadora entra en el modo de hibernación cuando la carga de la batería alcanza
un nivel extremadamente bajo.
UBICACIÓN DE ARCHIVOS: J:\DL\DL044399\DTP\D5173sb0.fm
.
Carga de la batería
NOTA: El adaptador de CA tarda 2 horas aproximadamente en cargar una batería totalmente
descargada con la computadora apagada. El tiempo de carga aumenta con la computadora encendida.
Puede dejar la batería en la computadora todo el tiempo que desee. Los circuitos internos de la batería
impiden que se sobrecargue.
Cuando conecte la computadora a una toma de alimentación eléctrica o instale una batería
mientras está conectada a una toma de alimentación eléctrica, ésta comprobará la carga y la
temperatura de la batería. Si es necesario, el adaptador de CA cargará la batería y mantendrá la
carga.
DELL CONFIDENTIAL – PRELIMINARY 12/8/04 – FOR PROOF ONLY
100 Guía de referencia rápida
 Loading...