

Dell bios-laptop Service Manual

Disclaimer
This information is provided as an "At Your Own Risk" procedure. I can not absolutely assure that it is
safe for any or all equipment, with any make of materials, or under any or all environmental or working
conditions. If you perform this procedure on a product belonging to you or another person, you do so
at your own risk and liability. Also you are responsible for taking any safety precautions that may be
necessary to protect yourself and the equipment you may be working on, or which may subsequently
be affected by this procedure. You are also responsible for any breach of law or contract which would
occur by your decision to undertake this procedure.
This information and procedure are not sponsored, endorsed, authorized, or condoned by; and are
probably criticized or condemned by any and all of the following: Dell; any of their affiliates; any other
manufacturer of laptops, electronic devices or equipment, screwdrivers, or paperclips.
Also; I can not be held liable for any ill effects brought about from natural responses of humor resulting
from reading of this site, or its content, regardless of the form of humorous reaction. This shall include
but not be limited to: laughing, chuckling, giggling, or snorteling.
Helpful Links:
http://support.dell.com/systemdocumentation/index.aspx?category=12,86
http://support.dell.com/systemdocumentation/index.aspx?category=12,87
http://digitaltv4free.tripod.com/dell/latitudeD35B.zip
http://digitaltv4free.tripod.com/dell/service_tag.zip
http://digitaltv4free.tripod.com/dell/bootcd.rar
http://homepage.ntlworld.com/judslat/paragon/software.html
There are a lot of people who have a dell or similar laptop that they are not able to use because of a
special password chip that can't be cleared by resetting the CMOS.
Dell will not give any help to these people without verifying that they are the original and registered
owners of these laptops. Their justification is that it is part of their security / anti-theft program, and
keeps people from stealing their laptops or accessing their data.
There are however, several reasons that this is an extremely unrealistic approach to the matter of
laptop theft.
Many legitimate possessors of a laptop may:
¾ Be original owners who neglected to register with Dell.
¾ Have lost all the paperwork pertaining to their ownership
¾ Have bought it second hand from an original owner.
¾ Received it from their employer, and changed jobs.
¾ Bought it through a commercial or government liquidation sale.
¾ Bought it off of eBay or another auction site.
Either legitimate or stolen, this would not be the fault of the possessor.
¾ Received it as a gift from a parent, spouse, friend, etc...; whom is dead, estranged,
unreachable, etc...
This password system does not prevent theft because:
¾
When stealing a laptop, either off a park bench, while slipping into an office,
breaking into a home or car; a thief will not pull out their handy 'list of laptop
models that are protected by an irremovable password", and leave the notebook there.

¾ Thieves steal according to opportunity, and even if they are aware that a laptop might be
protected by a password, they will likely steal it anyway. If they can't break the password, they
can just throw it away, as it did not cost them anything, and has no investment value to them.
It also does not increase the likelihood of catching thieves, or the return of a stolen laptop
because:
¾ Stolen laptops are often stolen along with other belongings which could likely include the
original owner's identity and/or paperwork regarding the laptop.
¾ A thief who finds that the laptop they have stolen is protected by a password will not feel
remorseful at this barrier, and seek out the legitimate owner so that they can return it.
¾ If a thief should call Dell and be unable to provide ownership information and the technician
logs their caller ID, and reports it to the authorities:
This is hardly grounds for a search warrant.
By the time any action might be taken by police; the thief will likely have given up on the
laptop and gotten rid of it, or passed it along to someone else. There will be no evidence,
and no returned laptop.
¾ If authorities confiscate a laptop which they believe is stolen:
They may or may not be aware of their ability to find the owner through Dell.
The owner may never have registered.
They may not initially be believed by Dell tech support and decide not to press the matter.
It also does not prevent the data on the laptop from being accessed because:
¾ Anyone who has the laptop in their possession can remove the hard drive in about 10
seconds, put it in another laptop or computer (or copy it to another hard drive) and access it.
¾ These laptops, to my best knowledge, come equipped with the ability to enable a Hard Drive
password. This is what hard drive passwords are for! If the hard drive password is
enabled, regardless of its circumventability, a second password will not make the data sup er
secure. If one password can be thwarted, then 2 can be as well.
So we are left with the stark realization that Dell's password security scheme is nothing more than a
selling point. Something that will cause someone to buy one of their laptops, instead of another brand,
because of a perceived safeguard - which is in reality, nothing more than ineffectual hype.
The purpose of this site is to show you how, if need arises, you can negotiate past this purportedly
intricate and nearly foolproof security measure using nothing more than the devices in this picture:
1. The laptop
2. A small screwdriver
3. A paperclip
The following pages will show you how this can be done; in a step by step breakdown, with
photographs of the actual process. At no charge to you.

Introduction
An explanation of what's going on with the laptop.
This is the prepatory section where I explain some things about the chip, CMOS, asset and service
tags, and passwords; so that you will have a good grasp of the big picture.
Hopefully it will also clear up any thing you have gotten a vague idea about on another website.
All computers have special chips inside them that store information about the computer.
Some of them are manufactured with permanent information that can not be changed (and, as a rule,
all have exactly the same information on them; thus not for passwords.) These contain information
about the computer model or are part of its functional circuitry.
Another type of chip (the kind we are interested in) is manufactured with a blank information area that
can be programmed or filled with information. These chips are commonly used to store settings and
passwords; and come in 2 basic sorts: VOLATILE and NON-VOLATILE.
VOLATILE chips use a source of electricity to help them keep their information, such as a battery.
They are less expensive and are used to store computer settings, and also passwords on most
computers. If one of these chips has a password on it, the battery can be removed and after a time
(between 2 seconds to 30 minutes, depending on the chip) the password will be erased.
NON-VOLATILE chips do not need electricity to keep their information, but are more expensive. If
there is a password on one of these chips, it can be removed from power for years and still have the
password on it. (However this does not mean that it is permanent.) Remember that the information on
Non-Volatile chips can be filled with information. This information can also be changed or erased.
If you have read this far you probably own a Dell or similar laptop with a password that is obviously
stored in a Non-Volatile chip, or are an employee of a company that makes one. These laptops have
most of their setting information stored in Volatile (inexpensive) chips, and their passwords are stored
on a tiny Non-Volatile (more expensive) chip.
The chip that Dell uses is called a 24C02 chip.
This is the Chip Type number used to refer to the chip's design in the electronics industry.
*
The 24C02 is a small, rather common surface mount
dip* chip with 8 leads (or legs), which costs
about $5. It measures 4.5 mm long x 3.5 mm wide x 2 mm tall, and stores 256 Bytes (or one quarter of
a Kilobyte) of information. It is commonly used in modems, DIMM Memory, and other electronic
devices; and in a different shape it is used in many wallet sized "smart cards." * SURFACE MOUNT
means that the chip is soldered onto the surface of the printed circuit, instead of having pins sticking
through the board. This is the most difficult type of circuitry to solder by hand.
* DIP means 'Dual Inline Package'. This means that the chip has 2 rows of leads (or legs) in straight
lines running down its sides.
That's the chip we will be dealing with, if you would like to know more about the chip, click here, or
read the "Some unnecessary information about the chip." section later on.
The laptop that was used in this demonstration is a Model 630 type PPX. Other laptops may be
different from the one shown in the full breakdown demonstration photos.

If a certain laptop does not correspond to any of these diagrams, more information might be found on
the web, or, anyone not reading for informational purposes only - could decide to simply "Wing it."
Also, the chip containing the password may be in a different location on some motherboards, but it
should be able to be found by reading the numbers on the top of the chip, although a magnifying glass
might be necessary. Take out the hdd and use a ac adapter!
Model / Series Typ Chip Clears Comments
Latitude XP ? not tested no Info
Latitude XPi Yes Yes
Latitude CP Yes not tested no Info
Latitude CPi Yes Yes You have to solder two smal wires
Latitude CPiA Yes Yes
Latitude CPx Yes Yes Picture included.
Latitude CPxJ Yes Yes
Latitude CS ? not test ed
Latitude CSx Yes Yes
The EEPROM chip 24c02 is on the backside
of the motherboard behind the PCMCIA
slots. Short circuit Pin 3 and 6 wile booting
The Chip is on the top side of motherboard,
under MMC2 processor module. You have
to solder two smal wires
The Chip is on the top side of motherboard,
under MMC2 processor module.
the 24C02 chip is located between
Neomagic chip and ram slot
the 24C02 chip is located between
Neomagic chip and ram slot
Latitude c400 Yes Yes Picture included.
Latitude c500 Yes Yes
Latitude c510 Yes Yes
Latitude c600 Yes Yes
The Chip is on the bottom side of
motherboard, under the PCMCIA card slots.
The Chip is on the bottom side of
motherboard, under the PCMCIA card slots.
The Chip is on the bottom side of
motherboard, under the PCMCIA card slots.

Latitude c610 Yes Yes Picture included.
Latitude c640 Yes Yes
Latitude c800 Yes not tested no Info
c810
Latitude
c840
Latitude L400 Yes Yes remove CMOS Battery for 5 minutes.
Latitude D400 Yes Yes
Latitude
D410 Yes
Yes
Yes Picture included.
Yes Picture included.
The Chip is on the bottom of the
motherboard just to the left of DIMM 1.
Picture included.
Latitude
Latitude
Latitude D600 24u05 Yes
Latitude D610 24u05/04 Yes Picture included.
Latitude
Latitude
D500
D505
D510
D800
D810
110L
X1
Yes
24c04
Yes
Yes
Yes
Yes Picture included.
Yes Picture included.
Yes Picture included.
Picture included.
Picture included.

Inspiron 2650 ? not tested no Info
Inspiron 510m Yes Yes
Inspiron 3200 Yes No
Inspiron 3500 24c164 Yes Picture included.
Inspiron 3800 Yes Yes
Inspiron 4000 Yes Yes
24c04 eeprom is under a piece of black
sheet under the pcmcia socket
A program called KILLCMOS.EXE is
reproted to work for this laptop.
The Chip is on the top side of motherboard,
under MMC2 processor module.
The Chip is on the bottom side of
motherboard, under the PCMCIA card slots.
Inspiron 5100 Yes Yes
Inspiron 7000 24C164 No no Info
Inspiron 7500 Yes not tested no Info
Inspiron 8000 Yes not tested The chip is under the CD-ROM
8100
Inspiron
8200
Inspiron 8500 24c04N Yes Picture included.
Inspiron 8600 Yes Yes Picture included.
Yes
Yes Picture included.
Chip is on the back side of the
motherboard, close to the DRAM slots.

Inspiron 1100 Yes Yes
1200
Inspiron
Inspiron
2200
XPS Gen2
M170
9300
Yes
24C04 Yes
Yes Picture included.
Chip is on the bottom of the board. 24c168
is near the B ram connector
The chip (C24O4N) is located on the bottem
of the laptop right next to the two DIMM
slots
Now we are informed and ready to begin. Anyone attempting this procedure should have the
implements shown in this picture, along with any others they may deem needful or useful.
They may also wish to write down the Service Tag number for later use, as it will be erased.
Laptop - Screwdriver - Paperclip
And remember, when using a screwdriver, it's "righty - tightey, lefty - loosey."

* NOTE:
There are a few things that should be addressed before you continue...
I will list them quickly here.
Some of these laptops may have an additional password called a "Hard Drive Password."
This may not even become evident until the other passwords have been cleared. This password is
stored on the hard drive, it does not mean that the laptop can not be used; it just means that the hard
drive can not be accessed.
If you are not able to find out what the Hard Drive Password is, you can simply replace it with
another Hard Drive, and then reinstall windows. (I'm assuming you choose windows; linux, solaris,
or DOS are fine too.)
Also: I do not know how to bypass, circumvent, or clear the hard drive password.
Step
One
Taking
it
apart
This is the first step in the procedure; and demonstrates how the laptop is prepared for disassembly,
and begin the actual disassembly process.
For this particular laptop, a size 0 Phillips™ screwdriver is recommended. Other model s may require a
different size or type.
*note: These photographs show the procedure being performed without any special devi ce s o r
methods used to prevent or reduce the risk of either personal injury or damage to the device; such as
safety goggles, electrostatic wrist bands.
It is not the purpose of this website to promote, assure, or condone this or any procedure as being
safe or reasonable without the use of such devices or methods. Anyone performing this or any similar
procedure is responsible for seeing to the safety needs of and resulting from such a procedure.
Furthermore, on the subject of Electrostatic Discharge (ESD,) and potential damage to computer chips
or circuitry: During the past 5 years that I have worked as a computer technician, apart from volatile
memory (SIMM / DIMM modules,) I have never needed to use ESD reducing devices, nor known any
computer device to fail due to the effects of ESD from handling or use without ESD reducing
equipment. This may, in part, be because I live in an area where the average humidity is around 70% 80%. I understand that increased humidity tends to lower ESD effects, while lower humidity tends to
increase this. Anyone deciding to perform this procedure must make their own decisions about the
importance of ESD in their environment and the need for special devices or procedures.

(Remember that SIMM / DIMM memory modules / sticks are always extremely susceptible to ESD
damage at any humidity, under any environmental conditions, and should always be handled with the
utmost care and precaution against damage.)
The first thing that needs to be done, is the removable of any batteries, floppy drives, CD-ROMs,
PCMCIA cards, or other removable / swappable components of the laptop. Also the power cord /
adapter should be disconnected. One may, or may not want to remove the RAM, depending on
personal preference.
If possible, the hard drive should be removed as well.
First the hard drive retaining screw is removed like this:
The hard drive caddy cover is pressed down (towards the bottom of the laptop,) unlocking it.
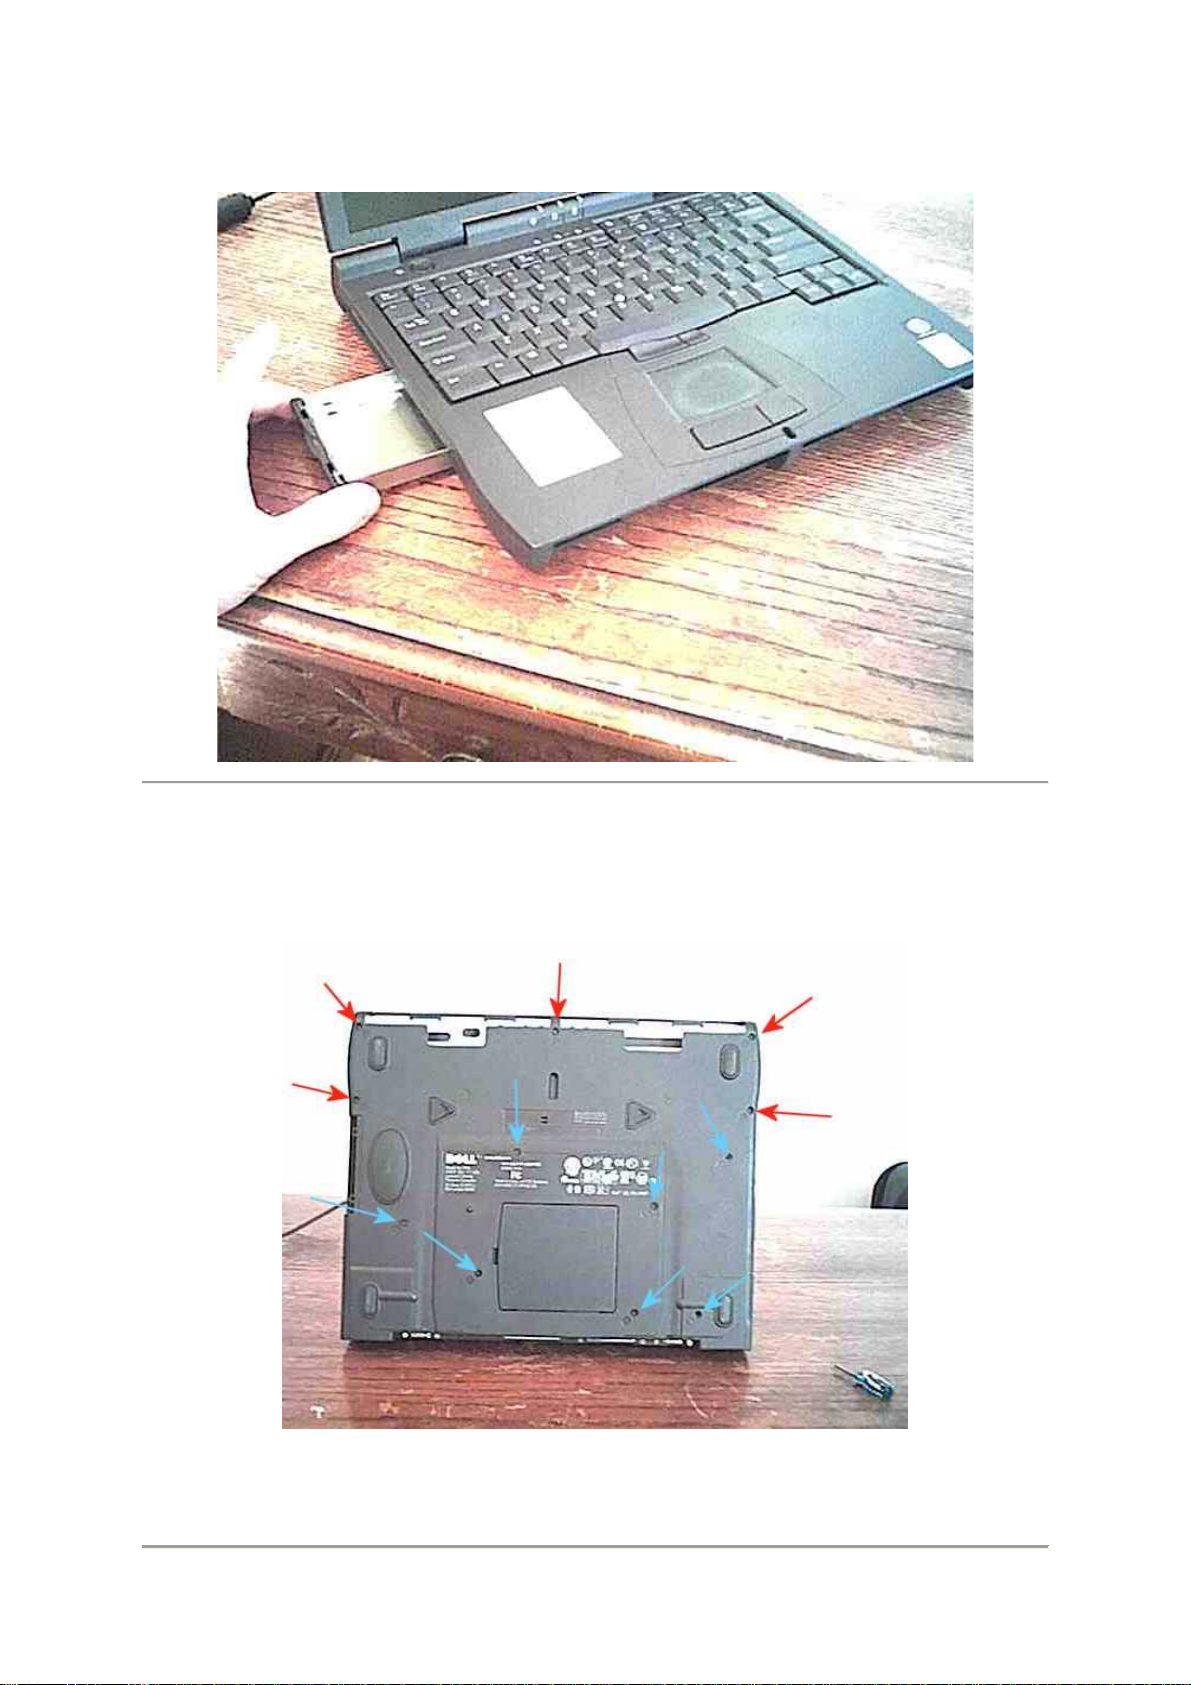
The hard drive caddy is pulled and slid outwards until it is free from the laptop assembly.
The next thing that needs to be done is the removing of the keyboard. (This particular model)
The keyboard is released from the rest of the assembly by the removal of 7 screws on the bottom of
the laptop. These are indicated here by blue arrows:
They are also indicated on the bottom of the laptop by a circle with the letter 'K' inside of it next to the
location of each screw.
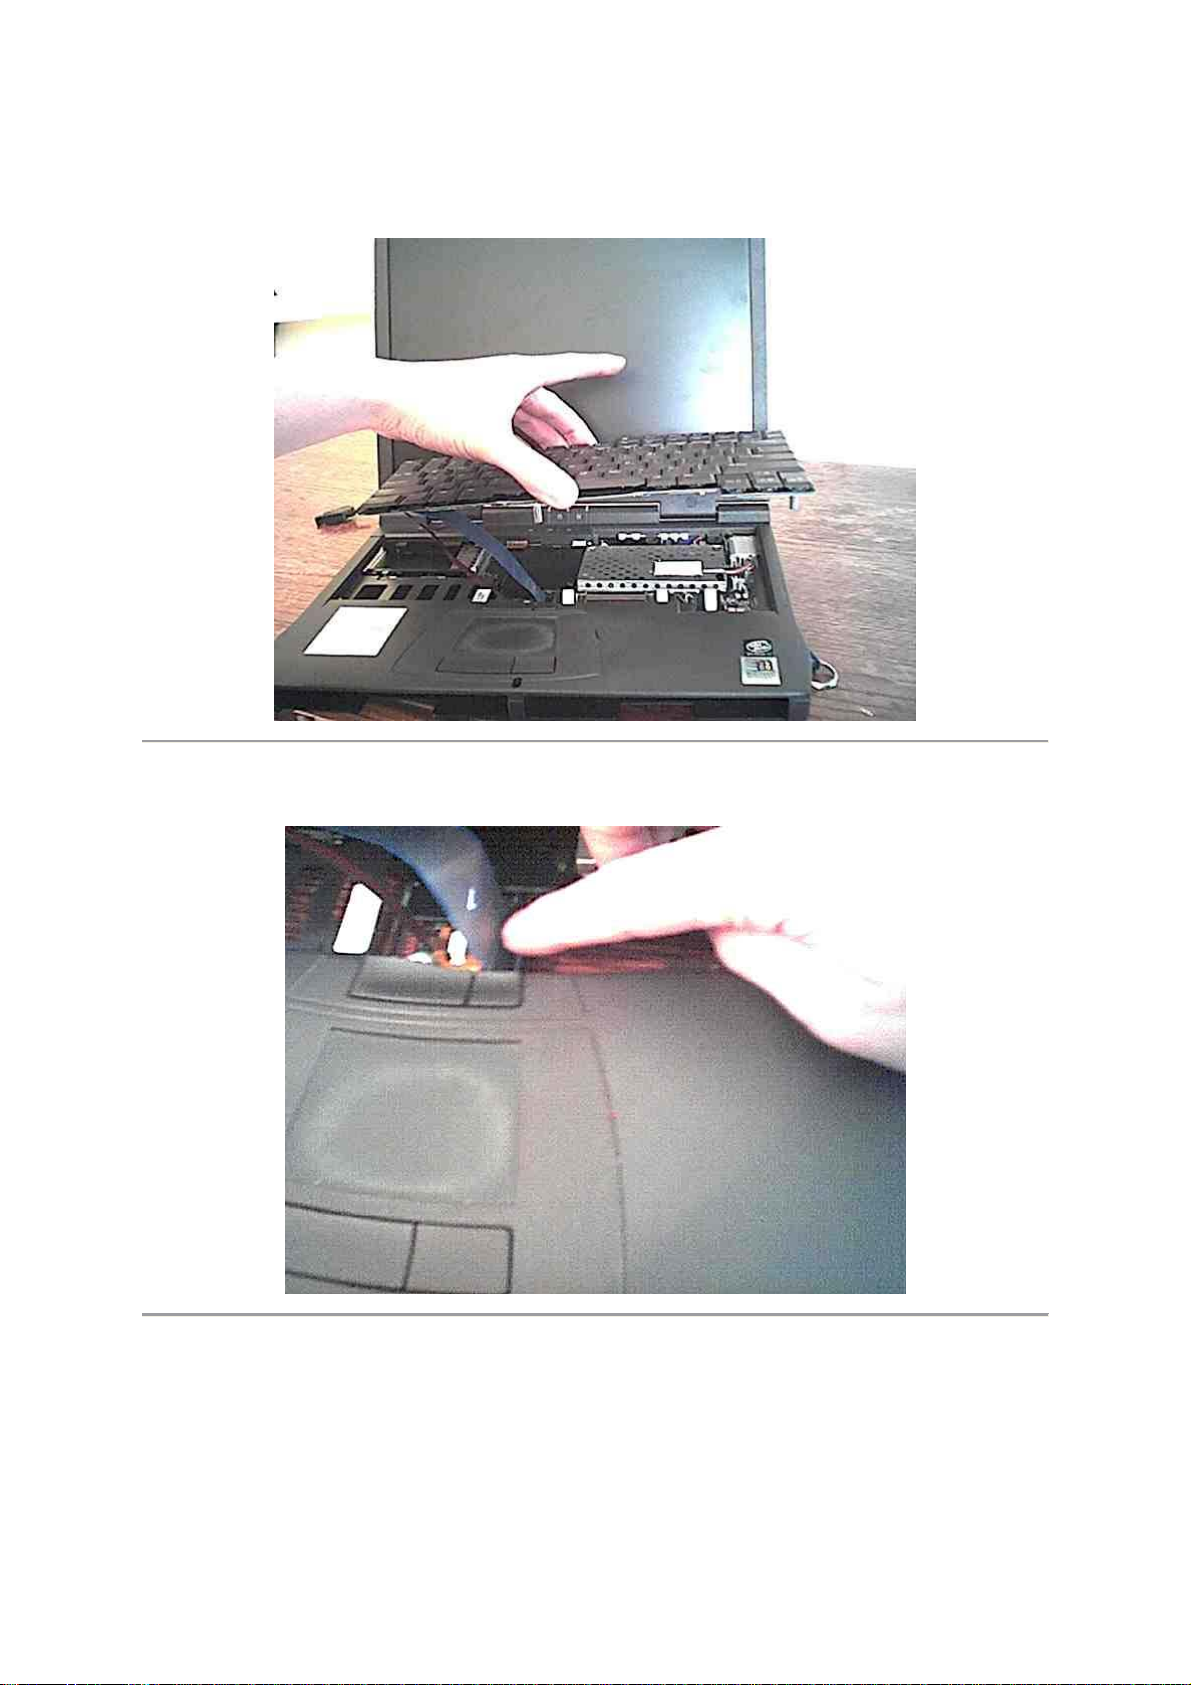
The keyboard is then lifted upwards and out of the main laptop assembly, except for 2 thin connection
cables. The keyboard can then be lain perpendicular to its original position so that these cable's
connectors can be accessed.
The larger cable pictured here can be pulled straight up, disconnecting it from the main board.
The retention clip of the smaller cable must be pressed on both sides (in the direction of the cable)
gently. It should not be forced, and when open, will still be attached to the main connector, but be
moved approximately 1 - 2 mm from its original position.

The cable can then be pulled from the connector.

Step Two
Taking it apart, continued.
The rest of the disassembly process.
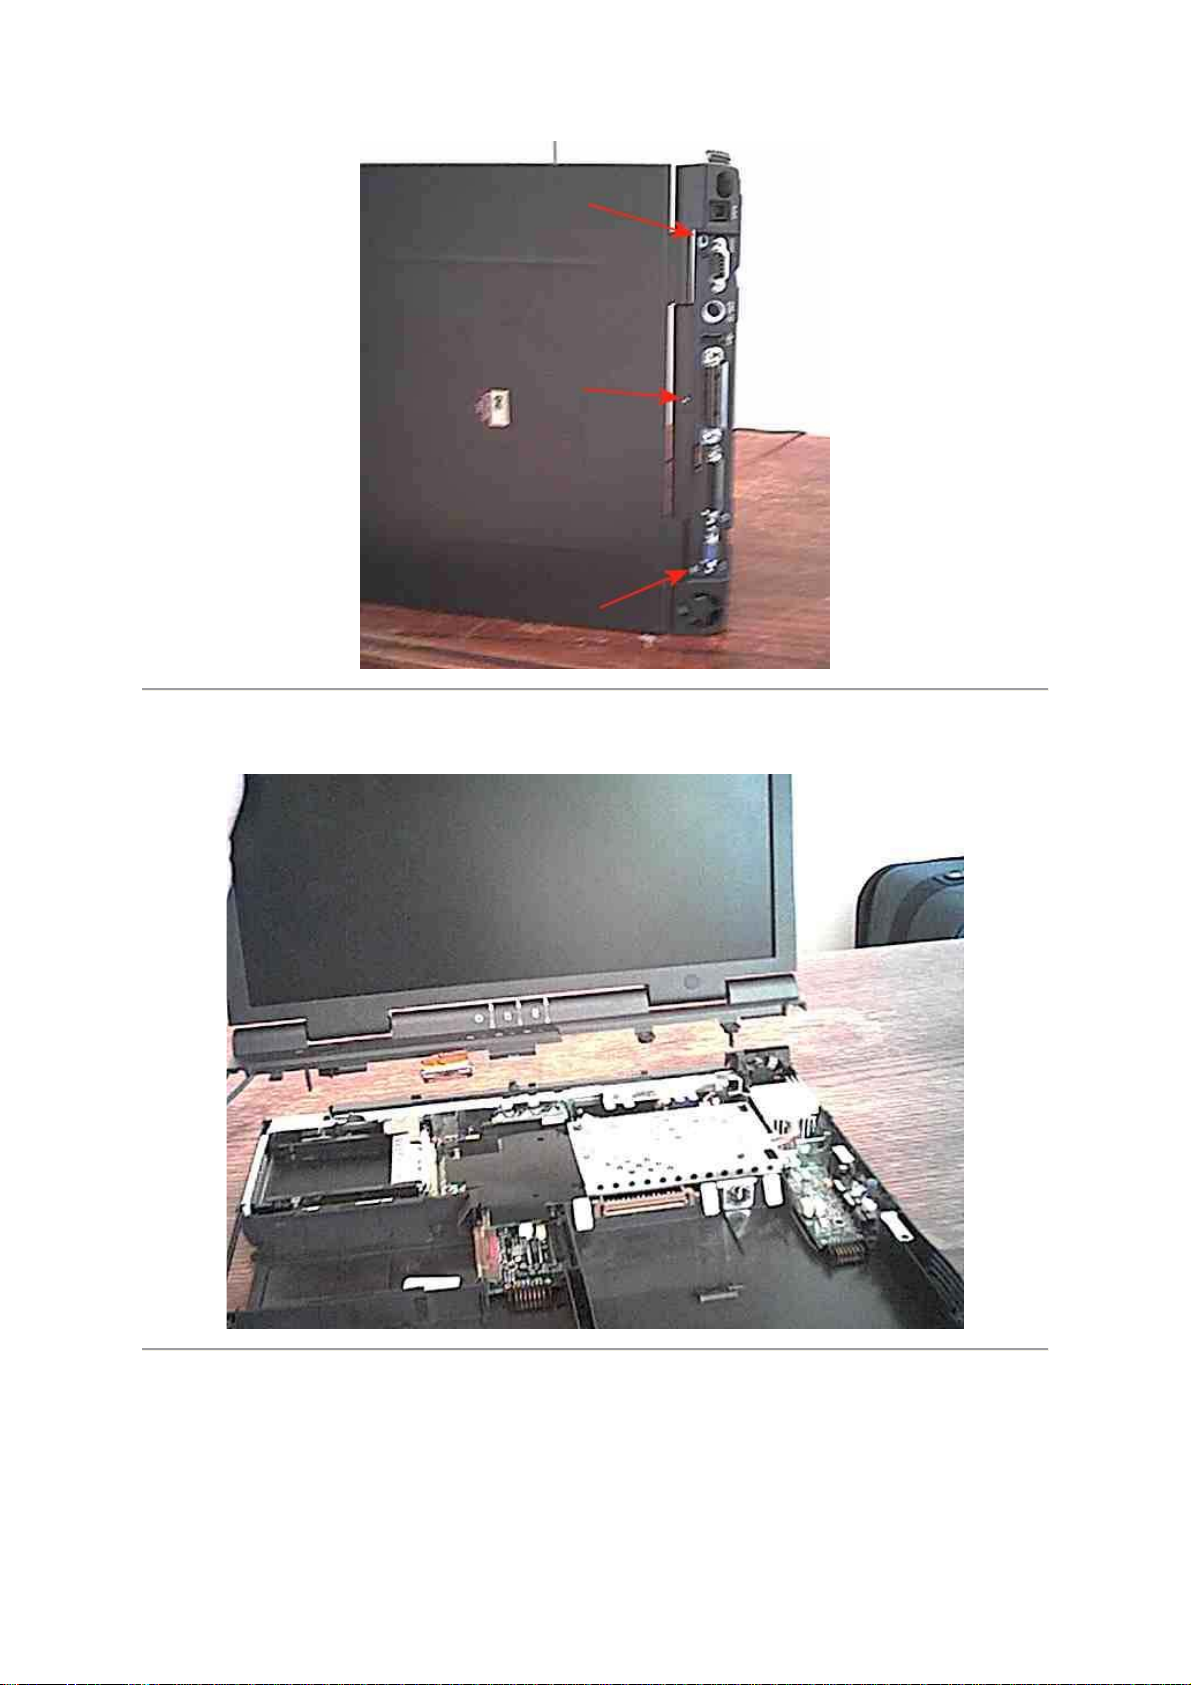
The next thing that needs to be done is removing of the palmrest. (This particular model)
The palmrest is released from the rest of the assembly by the removal of 5 screws on the bottom of
the laptop. These are indicated here by red arrows:
They are also indicated on the bottom of the laptop by a circle with the letter 'P' inside of it next to the
location of each screw.
The electronic components of the palmrest are disconnected from the main circuit by pulling this tab,
which contained one of the keyboard connectors on it, straight up away from the main circuit board.
Also, if the CMOS information needs to be cleared for any reason, it can be done by disconnecting this
connector for only a few seconds. This is because the battery is located in the palmrest just above the
right speaker (at least on this model.) And because this particular CMOS chip doesn't hold its data
very long without a battery, and is located on the main board.
I personally found this to be somewhat odd.

Now the latch pictured here must be released from its hold on the bottom of the case. I used a small
flat screwdriver to gently pry it back while easing the front of the palmrest upwards. Be careful not to
lift the palmrest up too much, as there are still 2 more hitches securing it to the rest of the case.
There are 2 latches, one on each side of the palmrest. They are towards the back of the palmrest,
near the screen. They can be unhooked from the main assembly in the manner shown in this picture,
by lifting the corner of the other section of the case up about a millimeter. After both of these are freed
the palmrest can be lifted away.

The official repair manual for this laptop stated that the display must be removed before the palmrest
can be taken off. But, as you can see, for anyone who is mechanically inclined enough to be able to
cross a country road, this is not actually necessary. (Although this procedure does require the removal
of the screen, which is next.)
The first thing that needs to be done when removing the screen is to disconnect this ribbon cable from
its connector on the motherboard by pulling it upwards. This is the only electronic connection that the
screen has with the rest of the notebook.
To release the screen from the main assembly, the 3 screws shown here by red arrows, and also by a
circle containing the letter 'D' next to each screw.
Make sure you keep track of all screws, put them in something, and keep track of which ones go
where.
After these screws are removed, the screen can be lifted straight up and away.
The motherboard is the next part to be removed. This model has 2 screws fastening the motherboard
to the case as shown in the picture. There are 2 more photos following, which show close-ups of each
screw to avoid any confusion. They are shown by red arrows in the photographs. But, unlike previous
screws, they do not have a convenient circled letter next to them.

* For this model, these are the only screws that need to be removed on the motherboard! There a re
other screws which may look as though they need to be removed, such as the ones by the processor
or fan but these should not be removed.
Remember to check the next 2 pictures first.
The screw on the right.
The screw on the left.

The motherboard is now released from the bottom of the case and the unit is placed in its normal
position on a flat surface.
Applying a steady gentle lifting force under the middle fore section of the motherboard causes it to
swing up.

And then it can be lifted straight up and away from the bottom of the unit's case.

Reorienting things just a tad.
In order to clear the password on the chip, some of the laptop must be put back together. This is
because the laptop will need to be powered on during the process. Seeing how easy it was to
disassemble, this is not a difficult task.
This page shows how this part of the procedure is done, and the next page is where the real action of
actually clearing the password takes place.
First the display screen must be put back on. This can easily be done by holding it in this manner and
setting it into its slot.
Step Three
Then it must be held in place with screws, one on each side as shown in this picture should be
sufficient to hold it.

Up to this point we have something that looks like this:
Now the palmrest is be put back on.
 Loading...